1
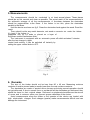
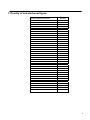
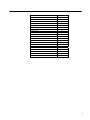
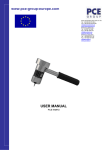
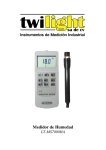
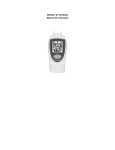
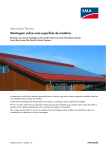
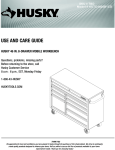
PCE Americas Inc.
711 Commerce Way
Suite 8
Jupiter
FL-33458
USA
From outside US: +1
Tel: (561) 320-9162
Fax: (561) 320-9176
[email protected]
PCE Instruments UK Ltd.
Units 12/13
Southpoint Business Park
Ensign way
Hampshire / Southampton
United Kingdom, SO31 4RF
From outside UK: +44
Tel: (0) 2380 98703 0
Fax: (0) 2380 98703 9
[email protected]
www.pce-instruments.com/english
www.pce-instruments.com
USER MANUAL
Moisture Meter
PCE-WP21
Contents:
1. Application.................................................................................................................3
2. Technical data ...........................................................................................................3
3. Description of the controls .........................................................................................3
4. Preparing the instrument ...........................................................................................4
5. Measurements...........................................................................................................5
6. Remarks ....................................................................................................................5
7. Density of selected wood types .................................................................................6
8. Calculating wood density...........................................................................................8
9. Errors ........................................................................................................................9
10. Changing the battery .................................................................................................9
2
1. Application
Wood Moisture Meter WIP-22D is designed for quick and non damaging measurement
of moisture contents in wood. The device measures the dielectric constant (SIC) of the
material. The wood is penetrated by the electromagnetic field generated by the device.
The Moisture Meter is equipped with knobs for setting the density and thickness of the
wood. It can be used to measure wood planks 10 mm to
60 mm thick and of density within the range of 0.3 to 1.1 g/cm³. The measuring range is
4% to 60% of moisture contents.
2. Technical data
Range
Max. depth of penetration
Display
Resolution
Settings range:
density
4% - 60%
60 mm
LCD, 12.7 mm
0.1
0.3 – 1.1 g/cm³
thickness
10 – 60 mm
Minimal settings’ step:
density
0.02 g/cm³
thickness
2 mm
Power
Battery life
Low power indication
Size
device
case
battery 6F22, 9V
approx. 5000 meas.
yes
165 * 80 * 33 mm
270 * 180 * 55 mm
3. Description of the controls
There are two control knobs on the front panel:
upper – to select the operating function,
OFF – power off.
DENSITY – setting the density with the lower knob.
THICKNESS – setting the thickness with the lower knob.
SETTINGS CHECK – alternately displaying the previously set density and thickness.
MEASURE – automatic calibration (approx. 4 sec.) and measurement.
lower –to set the density and thickness of the wood. This knob is active when the
upper knob is set to DENSITY or THICKNESS.
3
4. Preparing the instrument
a) Preparing the instrument without the change in settings
In this case quickly switch the upper control to SETTINGS CHECK. The LCD
will display the density and thickness set during the previous measurements (e.g. 0.56
and 42). Hold the device in the air (fig. 1), switch the upper control knob to MEASURE.
The device will calibrate automatically (the display shows - - -). The end of
calibration is indicated by the number 4.0 (the lower range limit) displayed on the LCD.
The device is ready for measurements.
Fig. 1
b)
Preparing the instrument and changing the settings
Follow these steps:
˜ set the upper control knob to DENSITY and then set the required density using the
lower control knob,
˜
set the upper control knob to THICKNESS and set the required thickness with the
lower control knob,
˜
set the upper control knob to SETTINGS CHECK. The LCD will display the density
and thickness alternately,
˜
hold the instrument in the air (fig. 1) and set the upper control knob to MEASURE. The
device will calibrate automatically (the display shows - - -).
The end of calibration is indicated by the number
4.0 (the lower range limit) displayed on the LCD. The device is ready for
measurements.
A table with the density values for the most popular wood types is on the back of the
moisture meter.
Density values for other (also exotic) wood types are in chapter 7 of the users manual.
4
5. Measurements
The measurements should be conducted in at least several places. These places
should be as flat, smooth and clean as possible. The actual result of the measurements is
the arithmetic average of all the measurements. A line drawn between the electrodes
should be perpendicular to the fibres. If the timber is too thin, place the electrodes
parallel to the fibres.
Hold the device as shown on fig 2. Press the electrodes hard against the wood. Read the
result.
There should not be any metal elements, wet wood or concrete etc under the timber.
It’s best if the timber is
supported only by it’s ends or placed on a layer of
Styrofoam several centimetres thick.
The instrument is equipped with an automatic power off which activates 5 minutes
after the last change in upper
control knob setting. It can be switched off instantly by
setting the upper control knob to OFF.
Fig. 2
6. Remarks
The size of the timber should not be less than 80 x 40 mm. Measuring moisture
contents of smaller pieces leads to results lower than the real moisture contents.
The electrodes are made of special silicon bronze and during normal operation should
not get deformed. If due to excess force or accidental fall the electrodes get deformed, they
should be bend to their original shape. Deformed or misplaced electrodes are the source
of errors and in extreme cases can prevent proper calibration of the device.
Avoid measurements when the timber or the operator of the device are loaded with
high electrostatic charges. Such charges (sparks) make measurements difficult and can
damage the instrument.
5
7. Density of selected wood types
Wood type(brand name)
Abacji
Abura
Afara white
Afrormosia
Alder, Blackalder
Alerce
Ash common
Ash japanese
Ash white
Aspen, Poplar
Balsa
Basswood, Lime
Beech
Density
(g/cm3)
0,35
0,53
0,52
0,65
0,51
0,34
0,65
0,61
0,64
0,45
0,08
0,49
0,68
Birch common
0,61
Californian Redwood
Mountain Cherry
Chestnut, Sweet
Douglas Fir, Oregon
Eberesche
Ebony Macassar
Elm
European Cherry
Spruce European
Hickory, White heart
Hornbeam common
Iroko
Larch European
Larch japanese
Lauan White
Locust black
Mahogany Broad
Mahogany Grand, Bassam
Mansonia
Maple
Maple
Maple sugar
0,39
0,54
0,55
0,47
0,73
1
0,64
0,55
0,43
0,76
0,79
0,63
0,55
0,49
0,52
0,74
0,55
0,47
0,6
0,59
0,58
0,63
Maple soft
0,47
6
Meranti dark red
Meranti White
Merbau
Niangon, Wishma
Oak, European
Oak, White
Okoume, Gaboon
Pear
Pine insignis
Pine, Weymouth
Pine, Europ. Black
Pine, Redwood
Popular Black Populus nigra
Ramin
Rubberwood
Redoak, Northern
Sapele
Silver Fir
SpruceW.H. Alaska pine,
Teak
Utile
Walnut
0,67
0,82
0,77
0,6
0,65
0,74
0,41
0,7
0,4
0,37
0,53
0,49
0,41
0,56
0,49
0,66
0,62
0,41
0,44
0,63
0,59
0,64
7
8. Calculating wood density
Calculating the density of a wood type can be necessary when the wood type is
not in the table in chapter
7 or when it is suspected that the local wood has the density considerably different from the
average for this type.
Follow these steps to calculate the density of the wood type:
a) cut a regular cube of the wood and measure it’s size with the accuracy of 1 mm
(e.g. 46 * 64 * 32) mm; calculate it’s volume (in cm3)
V=a*b*h
(e.g. 94.2 cm3)
b) weight the cube with the accuracy of 1 gram; note the result G in grams (e.g. 62g)
c) measure the approximate moisture contents with Wood
Moisture Meter WIP-22D setting:
˜ thickness –according to h,
˜ density – based on your expertise or tables
Note the result W % (e.g. 17.2%)
d)
calculate the density with the following formula:
g=
G
V
x
100
100 + W
where:
G – weight of the sample (g)
V – volume of the sample (cm3)
W – moisture contents (%)
g – density (g/cm3)
For the example values given in a, b and c the result is:
g=
62
94.2
x
100
=
100 + 17.2
0.56
e) now you can use the calculated density (e.g. 0.56) for any future measurements of this
type of timber.
8
9. Errors
If the instrument can not calibrate properly it indicates the following error:
-AIr
AIr
- generator voltage too low
- generator voltage too high
In such case power off the device, check the geometry of the electrodes, clean the
electrodes, make sure the device is dry and then start the calibration again (see chapter 4).
If the instrument still reports error contact the producer.
10. Changing the battery
The device is equipped with a power level control circuit. When the power drops
below acceptable level a sign ”LO BAT” appears on the left side of the LCD. This
indicates that the battery has expired and should be replaced with a new one.
To replace the battery unscrew the screw on the back of the instrument and carefully
remove the back panel.
Store the device in a dry place.
NOTE: "This instrument doesn’t have ATEX protection, so it should not be used in potentially explosive
atmospheres (powder, flammable gases)."
9