1
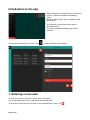
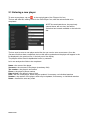
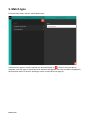
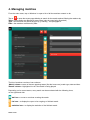
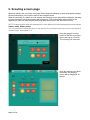
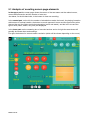
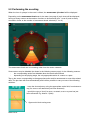
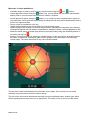
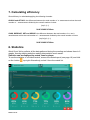
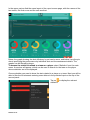
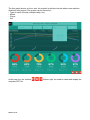
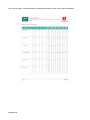
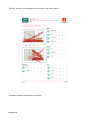
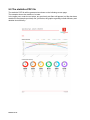
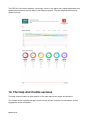
Quick Scout Volley
User manual
Contents
Introduction to the app
2
1. Entering a new team
2
1.1 Box for new team entering
2. Managing players
2.1 Entering a new player
3
4
5
3. Match type
6
4. Managing matches
7
4.1 Entering a new match
4.2 Managing the players called up for the match
5. Scouting screen page
9
10
11
5.1 Analysis of scouting screen page elements
12
5.2 Performing the scouting
13
5.3 Managing the libero
15
6. Consulting a match report
16
7. Calculating efficiency
19
8. Statistics
19
9. Exporting data
22
9.1 Match report PDF file
22
9.2 The statistics PDF file
25
10. The Help And Credits sections
PAGE 1 OF 26
26
Introduction to the app
When the app is launched the menu on the left
is open. The menu includes the following
items:
Matches, Match Type, Teams, Statistics, Help
and Credits.
The functions of the various items will be
illustrated below.
The menu disappears whenever an item is
selected.
To open the menu again, tap on the icon
, in the top left part of the display.
1. Entering a new team
To enter a new team, select the ‘Teams’ item in the menu.
The screen page with the list of the teams entered will open.
To open the second box with the fields to be completed, tap on the icon
PAGE 2 OF 26
.
1.1 Box for new team entering
Let's analyze the right-hand side box in detail.
3 text fields can be found in the upper part:
Name = the name of the team
Category = free field to enter the appropriate category or league
(e.g. women, under 14, etc.)
Year/season = the year or the season in which the team is playing - it may be entered in a single
year or double year format (e.g. 2014 or 2014/2015).
In the central part the assessment levels can be selected.
This function allows to choose the number of levels that will be used to assess the players of the
team being entered. There are 3 possible options:
5 levels = ++ + / - - 4 levels = ++ + - - 3 levels = ++ / - The button allowing to open the box where players can be entered (see chapter 2) can then be
found.
The two icons in the right bottom part allow to copy the team just entered or to delete it,
respectively.
NOTE: The title of the box is initially 'New Team'. Once the field has been completed, the 'Name'
field will be updated with the name entered and the team will automatically appear in the list
displayed in the previous box.
NOTE: The team copy feature allows to keep the same season, thus generating a proper copy, or
to move the copy to the next season. PAGE 3 OF 26
2. Managing players
Once all the fields of the ‘New Team’ box have been completed, tap on ‘Players list’ to manage the
players or enter new ones.
The team box will slide left, making room for the players list.
The ‘Teams’ box, in turn, will be minimized, but will remain available on the left side bar.
Generally speaking, when more than 2 boxes are open, the ones that were opened first ones can
be found on the left side bar. To re-open a box, tap on its title.
A box can be closed using the icon
, located top right, in the title bar.
Let’s now analyze the players list.
This box includes the names of the players, tap on the player’s name to open the detail panel;
here you can edit or permanently delete the player using the
the bottom right of the panel.
icon which can be found on
NOTE When a player is removed from the list, this does not result in the removal of his statistics,
which contributes to the team's overall statistics.
PAGE 4 OF 26
2.1 Entering a new player
To enter a new player, tap on
, in the top right part of the ‘Players List' box.
The box will slide left, making room for the ‘New Player’ box, with the various fields to be
completed.
NOTE As mentioned above, the previously
opened boxes will not close, but will be
minimized and remain available on the left side
bar.
The box used to enter a new player works like the one used to enter a new team. Once the
‘Surname’ field has been completed, the box title will be updated and the player will appear in the
list displayed in the previous box, in the left part of the display.
The players will be listed in alphabetical order, by surname.
Let’s now analyze the fields to be completed:
Name = the name of the player
Surname = the surname of the player (mandatory field)
Tax number = the player’s tax number
Phone = the player’s phone number
Date of birth = the player’s date of birth
Role = the role of the player, which may be updated, if necessary, on individual matches
Number = the number of the player, which may be updated, if necessary, on individual matches
Notes = free field to enter any notes
PAGE 5 OF 26
3. Match type
From the main menu, top left, select ‘Match type’.
In this area the types of match required can be entered (tap on
); there is only one field to
complete; once the type of match has been entered it will appear in the list and will be displayed in
the dropdown menu of the box, allowing to enter a new match (see page 6).
PAGE 6 OF 26
4. Managing matches
From the main menu, tap on 'Matches' to open a list of all the matches entered so far.
Tap on
to open the screen page allowing to search for the match required, filtering the matches by:
Team = the matches are filtered by team name (only the team being assessed)
Type = the matches are filtered by type (e.g. friendly) - see paragraph 4.
Date = the matches are filtered by date.
The list of matches consists of two columns:
‘Match’ column = name of the two opposing teams (first the home one), match type, date and time
'Result’ column = highlighted in red if the match is being played
Depending on its current status, every match can be associated with the following icons,
on the right-hand side:
ball icon = to start or continue scouting the match
list icon = to display the report of an ongoing or finished match
statistics icon = to display the statistics of the finished match
PAGE 7 OF 26
ball icon + list icon = in the matches being assessed, it allows to resume scouting or display the
report completed so far
list icon + statistics icon = in the matches already finished, it allows to display the final report and
the statistics generated.
NOTE When the Matches box is opened, the next match is displayed first.
If the box of an ongoing match is opened, a note will be displayed in the top part, describing the
match status as ‘currently being assessed’, as shown in the following screen page.
PAGE 8 OF 26
4.1 Entering a new match
In the ‘Matches’ box, tap on
to enter a new match.
The relevant box with the fields to be completed will open. The box works just like the ones
described above to enter a new player and a new team.
Let’s now analyze the various fields in detail:
Team to be analyzed = this field allows to enter the name of the team suggesting it from those
already entered and saved, thanks to the autocomplete function (mandatory field)
Opponents = free field, enter opposition team name (mandatory field)
At home = if enabled (green icon), the match will be considered as a home match and the name of
the team to be analyzed first will be displayed in the list
Type = select from a list of saved types (see paragraph 3)
Date and Time = date and time of the match
Location = free field, enter location where the match is played
Set number = select the number of sets to be played
PAGE 9 OF 26
Actions to be evaluated = this function allows to disable the actions not to be assessed during
the match – serve and pass are always and mandatorily enabled
Summoned list = see next paragraph 4.2
Observer = name of the person making the assessment
Notes = free field to enter any notes about the match
Exclude from stats = if enabled, this function allows not to include the assessment into statistics.
By default this function is disabled.
4.2 Managing the players called up for the match
Tap on ‘List of called up players’, in the bottom part of
the box, to manage the players taking part in the match.
A new box will open, allowing to:
⁃ call up (or not) every player for the match
⁃ modify the role and number of a player for that match
⁃ select the first 13 players (tap on ‘Call up all’, top right)
who have already been assigned a role and a shirt
number
NOTE To be called up, a player must have been assigned a role and a shirt number.
PAGE 10 OF 26
5. Scouting screen page
We have reached the very heart of the app. All the elements allowing to easily and rapidly manage
all the assessments of the various actions are analyzed below.
When the scouting of a match is to be started, the following screen page will be displayed, allowing
to enter the team’s line-up and specify ball possession. This screen page will be shown at the
beginning of each set (with ball possession already determined in the sets after the first).
NOTE The libero and the setter are represented in colors different from those representing the other players:
Libero: white, Setter: yellow.
It is not possible to include the libero in the starting line up because he/she must be connected to
another player, see chapter 5.3.
Drag the players from the
bench to the field to position
them; then tap on 'Confirm’.
The scouting can now start.
Once the settings have been
confirmed, the scouting
screen will be displayed, as
follows:
PAGE 11 OF 26
5.1 Analysis of scouting screen page elements
In the upper part the screen page shows the names of the two teams and the related scores,
current ball possession and the number of sets won.
Just below, on the left-hand side, is the button for time-out recording.
In the central part, on the left, the number of substitutions made, the bench, the playing formation
with buttons for manual rotation, the button to record opponent’s errors and the opponent's points
(beyond the net),the field to track shot trajectories (serve and attack), and the icons to trace the
type of shot (serve, attack, set, pass) are displayed.
In the lower part are the streaming box of recorded actions and on its right the area where will
possibly be shown alerts and warnings.
Far right, the buttons for set and match conclusion (which will be shown depending on the score).
PAGE 12 OF 26
5.2 Performing the scouting
When the icon of a player in the court is clicked, the assessment 'pie chart' will be displayed.
Depending on the assessment levels set for the team (see page 3) a pie chart will be displayed,
having as many sectors as the number of actions to be assessed (min. 1 max. 6) and as many
concentric circles as the number of assessment levels selected (5, 4 or 3).
The assessment levels are in increasing order from the center outwards.
Some sectors may be disabled (as shown in the following screen page), for the following reasons:
⁃
the corresponding action was disabled when the match was entered
⁃
depending on the playing stage, the only appropriate action is a serve or a pass
Tap on the sector corresponding to the appropriate action and its assessment to record the related
data. The pie chart will close automatically and it will be possible to carry out one of the following
activities:
- trace the shot trajectory using the appropriate active field, from bottom to
top (if a serve or an attack has just been assessed)
- specify the type of shot (if a serve, an attack, a set or a pass has just
been assessed. E.g. Attack – Spike)
Opponent’s block tracing area.
PAGE 13 OF 26
Moreover, it is also possible to:
- manually assign (or take) a point to (from) the two teams using the
and
buttons
- record opponent’s errors using the
button (e.g. a serve below the net) which automatically
adds a point to your own team and performs a rotation if required
- record opponent's points using the
-
button ( e.g. a spike so hard to defend that no player of
your own team can be give the responsibility for letting the ball drop) which automatically adds a
point to the opponent team
record a time out (maximum 2 per set)
change ball possessions (tap on the ball icon near the team name)
replace a player with another one from the bench (after 6 substitutions in the same set a warning
message will appear and the number of substitutions, beside the bench, will be highlighted in red)
delete the latest action recorded (from all those previously listed) using the streaming button, in
the lower part (tap on
)
- perform a new assessment by clicking on another player; in this case the pie chart will suggest
the action to assess by showing the other ones in a lighter color (as shown in the following
screen page). The other actions will in any case remain enabled
The pie chart rotates automatically when the team serves again, but it can also be corrected
manually using the buttons under the team’s line-up.
The end of the set must be determined manually using the dedicated button, bottom right, which
will be displayed as soon as the score is appropriate. The same is true for the end of the match.
PAGE 14 OF 26
5.3 Managing the libero
The libero, as previously shown, is represented with inverted colors compared to the other players;
it is not possible to include him/her in the starting line up because he/she must be connected to
another player.
To connect the libero to a player in the line up you only need to drag him/her from the bench onto
the player.
This way the libero will be placed in the line up only when his/her connected player rotates to the
second line. To render this connection, on each of the two connected players will be shown the
number of the other.
In the following image we can see the 2 connected to the libero 45 who will replace him/her when
the 2 will rotate to the second line.
When the libero is in the bench you can:
- connect him/her to another player on the court dragging him/her
- if he/she is connected to another player, you can perform a substitution, as long as the player is
in the second line
- disconnect them with a double tap
When the libero is playing you can:
- drag the 2 from the bench back to the line up, so the connection will be removed
- double tap the player in the line up (45 in this case) so the connection will be removed
- drag another player onto the libero, for instance the 7: the libero will be now connected to the 7
All these actions will be shown in the streaming box on the bottom and thus they can be canceled. PAGE 15 OF 26
6. Consulting a match report
The report screen page can be accessed in three different ways:
- From the match list (see page 7), by clicking on the icon
- During the scouting, by tapping on the icon
- Automatically, at the end of each match
, top right
The report screen page includes the names of the teams in the upper part and the result,
specifying the sets, in the central part.
Immediately below are the 2 summarizing tables including the match data, intermediate scores and
final scores.
In this example:
first two sets won, third set lost, last two sets not played.
PAGE 16 OF 26
Even lower is a box featuring 4 different tables, which can be displayed individually by clicking on
the left and right-hand side red arrows, and which display, respectively:
1. The assessment of players, divided into
shots and specifying their efficiency (see page
18); this line can be exploded (tap on
) and
the assessment of each shot can be displayed.
The table can be filtered by set.
2. The attack efficiency report, depending on
the setter and his/her position. This table can
be filtered by player, position and set.
The graph can be filtered further by: player that
attacked, attack start and destination court area
(calculated depending on the trajectory), and
type of attack.
3. The types of shot and trajectory reports (for
serves and attacks), which also can be filtered
by assessment, type of shot, player, and set.
PAGE 17 OF 26
4. The match report, with a detail of the
shots, which can be filtered by set.
The column of one's own team includes a list
of the shots that have resulted in a point for
the team being analyzed. The opponent team
column, conversely, includes a list of the shots
that have resulted in a point for the opponent
team. The number of the player, the action
icon, and its assessment are displayed for
each shot.
The buttons
, bottom right, are used to display, print, and share the PDF file of
the complete report (see chapter 9).
In the IOS version you can find only the
missing two.
button which includes the same functionalities as the
From the report screen page it is possible to go back to the scouting screen pages – by tapping on
the
button, top right (if the match is still ongoing) – or move on to the match statistics – by
tapping on the
PAGE 18 OF 26
button (if the match has ended).
7. Calculating efficiency
Shot efficiency is calculated applying the following formulas:
BLOCK and ATTACK: the difference between the total number of ++ assessments minus the total
number of -- assessments divided by the overall number of shots.
(++) - (- -)
_____________
Total number of shots
PASS, DEFENCE, SET and SERVE: the difference between the total number of ++ and +
assessments minus the total number of -- assessments divided by the overall number of shots.
(++) + (+) - (- -)
______________
Total number of shots
8. Statistics
Quick Scout Volley collects all the data gathered during the scouting and shows them in 2
graphs, thereby making statistics reading interpretation much easier.
Statistics can be displayed by match, team or player.
To see the statistics of a finished match, access the related report (see page 16) and click
on the button
PAGE 19 OF 26
, top right. Alternatively, select it from the match list.
In the upper part we find the same layout of the report screen page, with the names of the
two teams, the final score and the sets won/lost.
Below, the graph showing the shot efficiency by set can be seen, and below it are the pie
charts specifying the performance by individual shot and the assessment details. The
graphs can be filtered by player.
To access the statistics related to a team or a player select 'Statistics' from the main
menu. A new box will appear, which can be used to search for the team or the player
whose statistics are to be displayed.
Choose whether you want to show the stats related to a player or a team. Next you will be
able to filter the list elements entering some letters in the provided input on the top of the
second panel.
Tap on
to display the relevant
statistics.
PAGE 20 OF 26
The first graph shows, on the x axis, the months in the time interval when some matches
(finished) were played. The graphs can be filtered by:
⁃ Type of match (friendly, championship, etc.)
⁃ Match
⁃ Player
- Set
In this case too, the buttons
complete PDF file. PAGE 21 OF 26
, bottom right, are used to create and display the
9. Exporting data
Report and statistics data are exported into PDF files showing the graphs and tables, which can be
printed or shared.
9.1 Match report PDF file
The first part includes the match report table. The entire match information will be printed.
PAGE 22 OF 26
In the second part, a table with player assessments will be shown, with all lines exploded.
PAGE 23 OF 26
The third, and last, part includes the assessment of all match actions.
The attack efficiency table will not be printed.
PAGE 24 OF 26
9.2 The statistics PDF file
The statistics PDF file will be generated as shown on the following screen page.
The example shows the statistics of a team.
In the upper part, under the red stripe, any previously set filters will appear (no filter has been
enabled in the example provided) and, just below, the graphs regarding overall efficiency and
detailed shot efficiency.
PAGE 25 OF 26
The PDF file of the match statistics, conversely, shows, in the upper part, match-related data, any
enabled filters between the red stripes, and efficiency graphs. The first graph will obviously be
divided into sets.
10. The Help And Credits sections
The Help section includes a ‘quick tutorial’ on the main app screen pages and functions.
The Credits section specifies the app current version and the contacts of its developers for any
suggestions and/or complaints.
PAGE 26 OF 26