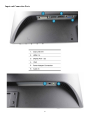
1
USER MANUAL NX-‐VUE 24A NX-‐VUE 24B 1 Table of Contents Important Information Getting Started Input and Connection Ports Monitor & Stand Adjustment Enabling AMD FreeSync Technology Monitor Button Operations - Legends and Functions Button Functions and Features for On Screen Display (OSD) Main Menu On Screen Display (OSD) PICTURE Sub-Menu Brightness Adjustment Contrast Adjustment Gamma Adjustment Dynamic Contrast Ratio Adjustment (DCR) On Screen Display (OSD) COLOR Sub-Menu Color Temperature Preset Color Temperatures User Define (Red, Green, Blue Adjustment for Color Calibration) On Screen Display (OSD) - OSD Settings Sub-Menu Horizontal and Vertical Adjustment Transparency Time Out On Screen Display (OSD) - Setup Sub-Menu Language Input Display Size Reset Volume Audio Input OD (Over Drive) Warranty Information Electronics Recycling and Proper Electronics Disposal Nixeus Technology, Inc - Contact Information 2 3 5 6 7-9 10 - 14 15 16 17 17 18 19 20 21 21 22 23 - 27 28 28 - 29 30 31 32 33 34 35 36 37 38 39 40 - 41 42 43 Important Information Important Note: Thank-you for your purchase! Please make sure your computer hardware and graphics card supports the Nixeus Vue 24" Monitor. Some devices and connections may not be able to support the full 1920x1080 resolution at 144Hz refresh rates. Avoid using 3rd party cable adapters/convertors to connect the NX-VUE24 to HDMI, VGA, and DVI output devices - we cannot guarantee they will be compatible with the NX-VUE24. Only use cables that are direct connections and not "convertors". If you are not sure, please contact your computer hardware’s manufacturer. Please read this manual before using NX-VUE24 with your computer. It contains important information regarding the use and care of computer monitors. Safety and Maintenance: 1) Do not expose the monitor to direct sunlight. Keep the monitor away from a stove or any other heat source. 2) Remove or secure any objects that may fall into the monitor’s vents. Do not obstruct or block the cooling vents of the monitor. 3) Don’t jam the vents on the enclosure. 4) When setting up the monitor for use, please ensure the power plug and socket are easy to insert and extract. 5) When disconnecting the power cord or DC power line for the monitor, please wait for 6 seconds before reconnecting the power cord or DC power line wires for normal operation. 6) Please use only approved power line and power adapters provided by Nixeus. If any power connections are missing, please contact Nixeus for a replacement. Using un-authorized power connectors may damage your monitor and void your warranty. 7) During operation, please do not throw objects and take care to avoid collision with the monitor. Do not overclock or modify the monitor’s decoder board. Please do not apply excessive force to the LCD panel or drop the monitor. Warranty does not cover physical damages, over-clocking, and modifications to the monitor. 8) When monitor is not in use for a long period of time, please disconnect the power plug. 9) When using slightly wet cloth or LCD cleaners to clean the monitor, please disconnect the power adapter. Do not use organic solvent, alcohol, house hold glass cleaners or ammonia liquid to clean the monitor - these may damage the display panel. 10) Do not store or use monitor in hot, direct sunlight, or in a cold environment. To avoid electrical shock and to prevent monitor damage; do not use the monitor in dusty, rain, wet, and humid conditions. If monitor gets wet, please wipe clean with soft dry cloth as soon as possible. If foreign objects or liquids get into the monitor, please disconnect power adapter immediately. For service please contact Nixeus Technical support for service and repair at [email protected] 11) To ensure long life and best performance of the monitor, please use the monitor in these safe and optimum conditions: Temperature = 0-40 degrees Celsius (32°-95° Fahrenheit), Humidity = 20-80% RH 3 Avoiding Image Persistence, Incidental Image or After Image: 1) When the monitor is on and unattended, please use a moving screen saver. If there is a static (non moving image) on the screen, please refresh regularly or start an application to start using the screen. 2) Long time continuous display of static images may case a “brand” on the screen; this is also called “image persistence” or “incidental image” or “after image.” “Brand,” “incidental image” or “after image” is a common phenomenon of LCD Panel Technology. In most cases, after turning off the power supply for a certain amount of time the “brand,” “incidental image” or “after image” will gradually disappear. Also by displaying a pure white image for the entire screen for the same duration that you had the static image that caused the image persistence may remove the image persistence. Please contact Nixeus if you need assistance in removing image persistence. CAUTION: Serious “brand,” “incidental image” or “after image” will not disappear and cannot be repaired. This type of damage is not covered by warranty. Please take good care of your monitor to prevent serious “brand,” “incidental image” or “after image.” Larger display panels may have some glow around the edges or corners. This is known as back light bleed and Glow - this is normal due to the display LED technology that allows more light and higher brightness to produce more vibrant colors and brighter pictures. If your monitor needs replacement parts, warranty service, and repairs please do not attempt to do it yourself! Doing so may void the warranty. Please contact [email protected] for warranty support. For more information please visit www.nixeus.com 4 Getting Started Box Contents: • Nixeus Vue 24” 1920x1080 FreeSync™ 144Hz Gaming Monitor (NX-VUE24) • Stand Base x 1 (with 4 screws) • Stand Shaft x 1 (with 4 screws) • Black DisplayPort to DisplayPort Cable x 1 • Power Adapter & Power Cable x 1 • NX-VUE24 Quick Start Guide • 3.5mm AUX Audio Cable Installing Base Stand: (Tools needed – Philips Screw Driver) Please refer to quick start guide for installation of Stand Base and Stand Shaft. 5 Input and Connection Ports 6 The included DisplayPort to DisplayPort cable is for connecting the NX-VUE24 for DisplayPort output devices/hardware. For Audio/Sound: With a DisplayPort connection, you can transmit audio from your computer to the NXVUE24A/B monitor by adjusting your operating system's audio playback settings. If you are using a DVI or VGA connection, you will need to use the included 3.5mm AUX cable and configure your operating system's audio playback settings. NOTE: Do not use cable/adpater converters to connect the NX-VUE24 to HDMI, DVI, or VGA output hardware/devices. We cannot guarantee these adapters will work with the NX-VUE24. To enable AMD FreeSync™ Technology - a direct DisplayPort only cable connection to your computer is required. NX-VUE24 Power Cable and Power Supply Switch: Only use the power cable included with the NX-VUE24. Using any other un-authorized power adapters may damage your monitor and void your warranty. Connect the power cable to internal power supply on the back of the monitor. NX-VUE24A - Monitor Swivel Left/Right: Make sure the NX-VUE24 is on a stable level surface. Holding the base shaft with your hand, carefully twist the monitor shaft left or right to desired orientation. 7 NX-VUE24A - Monitor Tilting Foward/Back: Use both hands, hold the top and bottom or right and left to tilt the monitor forward or backward by up to 15°. NX-VUE24A - Monitor Tilting Height Adjustment: Use both hands, press down the locking button, the slide the monitor up and down the stand shaft for your desired height by up to 4 inches. Release button to lock in the desired height. 8 NX-VUE24A - Monitor Pivot to 90° Portrait Mode: Using both hands, first raise the monitor to the highest point. Next pivot the monitor clock wise into portrait mode. NOTE: All Above Monitor and Stand Adjustments is for the NX-VUE24A model with a full feature premium stand. The NX-VUE24B model only includes a base stand with tilt feature. 9 To enable AMD FreeSync™ Technology: 1) First, you must have an AMD Radeon or AMD APU that is compatible with AMD FreeSync™ technology. Below is a list of AMD hardware that is compatible with FreeSync™. AMD Hardware Compatible With FreeSync AMD Radeon R9 200 Series Graphics Card Radeon R7 260x Radeon R9 285 Radeon R9 290 Radeon R9 290x Radeon R9 295x2 AMD Radeon R9 300 Series Graphics Card Radeon R7 360 Radeon R9 380 Radeon R9 390 Radeon R9 390x Radeon Fury Radeon Fury X Radeon Fury Nano AMD APU AMD A10-7870K AMD A10-7850K AMD A10-7700K AMD A6-7400K "AMD APU Requires AMD Mother Board with DisplayPort output" For an updated list of AMD hardware that is compatible with AMD FreeSync™ technology, please visit: http://www.amd.com/en-us/innovations/software-technologies/technologies-gaming/freesync 10 2) Second, you must install or have already installed an AMD Catalyst graphics drivers that have AMD FreeSync™ technology (at minimum AMD Catalyst 15.7 Graphics Driver). For updated FreeSync™ enabled AMD graphics drivers, please visit: http://support.amd.com/en-us/download 3) Third, connect the NX-VUE24 monitor to your AMD FreeSync™ enabled hardware using the included DisplayPort cable. Turn on your computer and power on the NX-VUE24 by pressing the [ ON/OFF button. ] POWER 4) When your computer boots to the desktop, you should see a pop up notification prompting you to enable AMD FreeSync™ with your new NX-VUE24 FreeSync™ monitor by accessing the AMD Catalyst Control Center. NOTE: If you do not see the above pop-up notification. You can still enable FreeSync™ by going directly to the AMD Catalyst Control Center. 11 5) In the AMD Catalyst Control Center menu, click on the "My Digital Flat-Panels" section the left side then select the "Properties (Digital Flat-Panel) sub-menu. You should see the "Properties (Digital Flat-Panel)" pictured below: 12 6) In the AMD Catalyst Control Center menu in the "Properties (Digital Flat-Panels)" sub-menu, click and check on the box "Enable" in the AMD FreeSync™ technology (or DP Adaptive-Sync) section. For reference, see picture below: 13 7) Make sure you see the check mark in the box "Enable" in the AMD FreeSync™ technology (or DP Adaptive-Sync) section. Last, click on "Apply" to enable AMD FreeSync™ technology. For reference, see picture below: NOTE: Once you enable FreeSync™ in the AMD Catalyst Control Center you do not have to go through this process again (unless you want to disable FreeSync™). If you disconnect the NX-VUE24 via DisplayPort cable from the computer, you may have to go through this process again to enable FreeSync™. The Adaptive-Sync (FreeSync) range is 30Hz to 144Hz. If you need additional assistance, please contact us toll free at 888-9834128 or e-mail [email protected] 14 1) Monitor Button Operations - Legends and Functions Button Functions when not navigating in the On Screen Display (OSD) Main Menu [ ] Button #1 - Shows Main Menu On Screen Display (OSD)/ or EXIT from Main Menu Press and Hold to OSD LOCKED, Press and Hold to OSD UNLOCKED [ ] Down Button - Adjust LOW BLUE RAY (Blue Light Mode) from STRONGEST, STRONG, MEDIAN, WEAKEST or OFF. NOTE: LOW BLUE RAY feature limits the monitor's blue color output to minimize eye strain, eye fatigue, and safer viewing of the monitor during long usage, work or gaming sessions. [ ] Up Button- No Function (May vary in different models or regions) [ ] Button #2 - Video Source Input selection - DisplayPort, DVI, HDMI, or VGA Note: Please wait 3 seconds before video appears for selected Video Source Input [ ] POWER ON/OFF 15 Button Functions and Features for On Screen Display (OSD) Main Menu [ ] Shows Main Menu On Screen Display (OSD)/ Exit Sub-Menu or Exit Selection/Back NOTE: Pressing [ MENU for OSD. ] more than once or multiple times will exit out of Sub-menu and/or exit MAIN [ ] Navigate or Move Down/ Adjust Down [ ] Navigate or Move Up/ Adjust Up [ ] Confirm feature or OSD Menu Selection/OK 16 2) On Screen Display (OSD) PICTURE SUB-MENU PICTURE (Sub-Menu) - BRIGHTNESS a) To bring up the OSD Main Menu, press [ ] b) Make sure the PICTURE sub-menu is highlighted in red (see picture) and press [ Highlight BRIGHTNESS and press [ ] to enter into BRIGHTNESS adjustment. c) Press [ ] to make brightness lower or press (Default BRIGHTNESS is at 80). [ ] to make brightness higher d) Once you adjust the BRIGHTNESS settings to your desired level, press [ PICTURE sub-menu. 17 ] to confirm selection. ] once to confirm and exit to the PICTURE (Sub-Menu) - CONTRAST The CONTRAST Feature allows you to set your preferred static contrast ratio of the luminance of the brightness color (white) to that of the darkest color (black). a) In the PICTURE sub-menu, use the arrow buttons [ confirm selection. b) Press[ ] to make CONTRAST lower or press (Default CONTRAST is at 50). ] or [ ] to highlight CONTRAST and press [ ] to [ ] to make CONTRAST higher c) Once you adjust the CONTRAST settings to your desired level, press [ PICTURE sub-menu. 18 ] once to confirm and exit to the PICTURE (Sub-Menu) - GAMMA NOTE: With GAMMA settings on OFF, the GAMMA is default at 2.6. With GAMMA settings ON the setting is 2.2. (For accurate color production or critical color work, we recommend setting GAMMA to ON to enable Gamma 2.2 and to set Brightness at 50 first as a starting point before beginning to adjust the Color Temperature, Brightness and Contrast settings using a Colorimeter.) a) In the PICTURE sub-menu, use the arrow buttons [ press [ b) Press[ ] or [ ] to navigate and to highlight GAMMA. Next ] to confirm selection. ] or [ ] navigate to select GAMMA for OFF or ON.(Default GAMMA is at OFF). c) Once you adjust the GAMMA settings to either OFF or ON, press [ PICTURE sub-menu. 19 ] once to confirm and exit to the PICTURE (Sub-Menu) - DYNAMIC CONTRAST RATIO (DCR) The DCR (DYNAMIC CONTRAST RATIO) feature allows you to display a dark image or dark scene by increasing the contrast ratio dynamically. Enabling this feature may affect the accuracy of picture color or be over exposed (we recommend leaving this feature off). a) In the PICTURE sub-menu, use the arrow buttons [ ] or [ ] to navigate and to highlight DCR. Next press [ ] to confirm selection. b) Press[ ] or [ ] navigate to select DCR for OFF or ON.(Default DCR is at OFF). c) Once you adjust the DCR settings to either OFF or ON, press [ sub-menu. 20 ] once to confirm and exit to the PICTURE 3) On Screen Display (OSD) COLOR SUB-MENU COLOR (Sub-Menu) - COLOR TEMPERATURE The NX-VUE24 has four preset color temperatures for your professional use, general use and gaming needs 5400K, 6500K, 9300K and sRGB. a) To bring up the OSD Main Menu, press [ b) Use the arrow buttons [ selection. ] ] or [ ] to navigate to the "COLOR" sub-menu and press [ ] to confirm c) Make sure the "COLOR" sub-menu is highlighted in red (see picture) and press [ Highlight "COLOR TEMPERATURE" and press [ ] to enter into " COLOR TEMPERATURE " adjustment. 21 ] to confirm selection. COLOR TEMPERATURE (Sub-Menu) - PRESET Color Temperature NOTE: Default preset color temperature is 6500K. We recommend using 6500K or sRGB for best preset color reproduction. a) In the COLOR TEMPERATURE sub-menu, use the arrow buttons [ the desired preset color temperature to use for your environment. b) Next press [ ] or [ ] to navigate and to highlight ] to select and confirm selection. c) Press [ ] once to confirm selection and exit to the COLOR sub-menu. To completely exit out of the On Screen Display press [ ] again. 22 COLOR TEMPERATURE (Sub-Menu) - USER DEFINE (Color Calibration) NOTE: Only Custom Calibrate the Monitor's Color Temperature if you have a Colorimeter. The NX-VUE24 has a premium feature to allow you to custom calibrate the color temperature and color settings for RED, GREEN, and BLUE without the assistance or need of your computer's operating system or graphics card. This feature allows you to create more accurate colors for content creation, print work, photography and graphic design. We recommend only to use this feature with colorimeter hardware. To enable this feature and make it active for the video/picture of the monitor, you have to enable and activate USER DEFINE in the COLOR TEMPEARTE category of the COLOR Sub-Menu. a) To bring up the OSD Main Menu, press [ b) Use the arrow buttons [ selection. ] ] or [ ] to navigate to the COLOR sub-menu and press [ ] to confirm c) Make sure the COLOR sub-menu is highlighted in red (see picture) and press [ Highlight COLOR TEMPERATURE and press [ ] to enter into COLOR TEMPERATURE adjustment. 23 ] to confirm selection. COLOR (Sub-Menu) - USER DEFINE a) In the COLOR TEMPERATURE sub-menu, use the arrow buttons [ USER DEFINE. ] or [ ] to navigate and to highlight b) Press [ ] once to confirm selection and exit to the COLOR sub-menu. The RED, GREEN, and BLUE are now selectable for custom configuration. NOTE: USER DEFINE needs to always be highlighted and selected in COLOR TEMPERATURE if you need to custom calibrate colors for professional work. If USER DEFINE is not selected - the RED, GREEN, and BLUE will be grayed out and not selectable for configuration. Also if USER DEFINE is not selected or active the custom settings will not be represented on the monitor and picture/video. 24 a) To adjust the RED setting, highlight RED and press[ b) Use the arrow buttons [ ] ] or [ ] to adjust between 0 to 100 for the RED temperature settings. c) Once you set your desired RED settings, press [ ] to confirm selection and exit to COLOR sub-menu to adjust the next color settings. 25 a) To adjust the GREEN setting, Use the arrow buttons [ press[ ] or [ ] to navigate and highlight GREEN and ]. b) Use the arrow buttons [ ] or [ ] to adjust between 0 to 100 for the GREEN temperature settings. c) Once you set your desired GREEN settings, press [ ] to confirm selection and exit to COLOR sub-menu to adjust the next color settings. 26 a) To adjust the BLUE setting, Use the arrow buttons [ press[ ] or [ ] to navigate and highlight GREEN and ]. b) Use the arrow buttons [ ] or [ ] to adjust between 0 to 100 for the GREEN temperature settings. c) Once you set your desired GREEN settings, press [ ] to confirm selection and exit to COLOR sub-menu to continue to adjust the next color settings. d) Once you are finished adjust and calibrating the color settings - Press [ ] once to confirm selection and exit to the COLOR sub-menu. To completely exit out of the On Screen Display press [ ] again. NOTE: When using a colorimeter to calibrate the monitor, you may need to exit and enter each RGB (Red, Green, Blue) color multiple times to adjust the color temperature settings to reach the desired results. Your computer's color output will have slight variations of color reproduction and image quality depending on graphics card used and video output port used. We recommend using a DisplayPort connection for the best and most consistent color performance. 27 4) On Screen Display (OSD) - OSD Settings Sub-Menu OSD SETTINGS (Sub-Menu) - HORIZONTAL The HORIZONTAL feature allows you to set the OSD MENU (On Screen Display Menu) to either the left or right of your monitor. a) To bring up the OSD Main Menu, press [ OSD SETTINGS sub-menu and press [ ]. Nextuse the arrow buttons [ ] or [ ] to navigate to the ] to confirm selection. b) Make sure the HORIZONTAL selection is highlighted in red (see picture) and press [ selection. ] to confirm c) Use the arrow buttons [ ] or [ ] to adjust between 0 to 100 for the HORIZONTAL placement of the OSD MENU towards the right or left of the display. Press [ ] once to confirm selection and exit to the OSD SETTINGS sub-menu to begin the next adjustment or to completely exit out of the On Screen Display press[ ] again. 28 OSD SETTINGS (Sub-Menu) - VERTICAL The VERTICAL feature allows you to set the OSD MENU (On Screen Display Menu) to either towards the top or bottom of your monitor. a) Make sure the VERTICAL selection is highlighted in red (see picture) and press [ ] to confirm selection. b) Use the arrow buttons [ ] or [ ] to adjust between 0 to 100 for the VERTICAL placement of the OSD MENU towards the TOP or BOTTOM of the display. c) Press [ ] once to confirm selection and exit to the OSD SETTINGS sub-menu to begin the next adjustment or to completely exit out of the On Screen Display press [ ] again. 29 OSD SETTINGS (Sub-Menu) - TRANSPARENCY The TRANSPARENCY feature allows you to make the OSD Menu more solid or transparent. a) To bring up the OSD Main Menu, press [ OSD SETTINGS sub-menu and press [ b) Use the arrow buttons [ ]. Nextuse the arrow buttons [ ] or [ ] to navigate to the ] to confirm selection. ] or [ ] to navigate to TRANSPARENCY. Make sure selection is highlighted (see picture) and press [ ] to confirm selection. c) Use the arrow buttons [ ] or [ ] to adjust between 0 to 4 for the TRANSPARENCY of the OSD MENU. Press [ ] once to confirm preferred settings and exit to the OSD SETTINGS sub menu to begin the next adjustment or to completely exit out of the On Screen Display press [ ] again. 30 OSD SETTINGS (Sub-Menu) - TIME OUT The TIME OUT feature allows you to set how long or how short the OSD Menu remains on screen. If you want the OSD Menu to immediately to go away you can always press [ a) To bring up the OSD Main Menu, press [ OSD SETTINGS sub-menu and press [ b) Use the arrow buttons [ picture) and press [ ]. ]. Nextuse the arrow buttons [ ] or [ ] to navigate to the ] to confirm selection. ] or [ ] to navigate to OSD TIMEOUT. Make sure selection is highlighted (see ] to confirm selection. c) The default OSD duration is 15 seconds. Use the arrow buttons [ ] or [ ] to adjust between 5 seconds to 60 seconds for the TIMEOUT or Duration of the OSD MENU. Press [ ] once to confirm preferred settings and exit to the OSD SETTINGS sub-menu to begin the next adjustment or to completely exit out of the On Screen Display press [ ] again. 31 4) ON SCREEN DISPLAY - SETUP SUB-MENU SETUP SUB-MENU a) To bring up the OSD Main Menu, press [ SETUP sub-menu and press [ ]. Nextuse the arrow buttons [ ] or [ ] to navigate to the ] to confirm selection to enter and access the SETUP sub-menu. In the SETUP sub menu you have the options of configuring the OSD Language, selecting the INPUT for video/picture, Display Size, RESET, VOLUME, AUDIO INPUT, and OD (Over Drive). 32 SETUP - LANGUAGE a) Use the arrow buttons [ picture) and press [ ] or [ ] to navigate to LANGUAGE. Make sure selection is highlighted (see ] to confirm selection. b) Use the arrow buttons [ ] or [ ] to navigate to the preferred "LANGUAGE. Make sure selection is highlighted (see picture) and press [ ] to confirm selection. ENGLISH is the default LANGUAGE. Available LANGUAGES include French, Italian, Spanish, Dutch, and Portuguese. c) Press [ ] once to confirm preferred settings and exit to the SETUP sub-menu to begin the next adjustment or to completely exit out of the On Screen Display by pressing [ ] again. 33 SETPUP - INPUT a) Use the arrow buttons [ and press [ ] or [ ] to navigate to INPUT. Make sure selection is highlighted (see picture) ] to confirm selection. b) Use the arrow buttons [ ] or [ ] to navigate to the preferred INPUT. Make sure selection is highlighted (see picture) and press [ ] to confirm selection. The default "INPUT" is the input being used to transmit current the current video on your monitor. Available INPUTS include VGA, DVI, and DP (DisplayPort). c) Press [ ] once to confirm preferred settings and exit to the SETUP sub-menu to begin the next adjustment or to completely exit out of the On Screen Display by pressing [ ] again. The INPUT setup allows you to switch between different video inputs if you have more than one device sharing or using the monitor. If you are only using one computer or device - the best connection type to use for maximum performance is DP (DisplayPort) for FreeSync Technology and/or PC Gaming. 34 SETUP - DISPLAY SIZE The DISPLAY SIZE setup allows you to switch between FULL SCREEN and a 4:3 Aspect Ratio (640 x 480 resolution). We recommend to not adjust the DISPLAY SIZE and to leave it at the default setting of FULL SCREEN. a) Use the arrow buttons [ (see picture) and press [ ] or [ ] to navigate to "DISPLAY SIZE." Make sure selection is highlighted ] to confirm selection. b) Use the arrow buttons [ ] or [ ] to navigate to the preferred "DISPLAY SIZE." Make sure selection is highlighted (see picture) and press [ ] to confirm selection. The default "FULL SCREEN" is the current and default display size of your monitor. Available DISPLAY SIZE settings include FULL SCREEN and a 4:3 Aspect Ration. c) Press [ ] once to confirm preferred settings and exit to the SETUP sub-menu to begin the next adjustment or to completely exit out of the On Screen Display by pressing [ ] again. 35 SETUP - RESET The RESET feature in the SETUP sub-menu will allow you to reset all On Screen Display (OSD) configurations or changes you have made - back to the monitors default settings. a) In the SETUP sub-menu, use the arrow buttons [ highlighted (see picture) and press [ ] or [ ] to navigate to RESET. Make sure selection is ] to confirm selection. b) Use the arrow buttons [ ] or [ ] to navigate to the preferred either the NO or YES to reset all changes made to the OSD configurations to default. Make sure selection is highlighted (see picture) and press [ ] to confirm selection. c) Press [ ] once to confirm preferred settings and exit to the SETUP sub-menu to begin the next adjustment or to completely exit out of the On Screen Display by pressing [ ] again. 36 SETUP - VOLUME The VOLUME feature in the SETUP sub-menu configures the audio volume for the monitors internal speakers. To use the monitor's internal speaker, you must use either an HDMI connection or DisplayPort connection both connection types can transmit audio to the monitor. When using a DVI connection, you must use the included 3.5mm AUX audio cable to connect to the 3.5mm audio input of the monitor (DVI does not transmit audio to the monitor by itself). Make sure the audio playback is configured properly in your computer's operating system. Also -see SETUP - AUDIO INPUT on the next page for type of connection used for the monitor's speaker feature. a) In the SETUP sub-menu, use the arrow buttons [ is highlighted (see picture) and press [ b) Use the arrow buttons [ ] or [ ] to navigate to VOLUME. Make sure selection ] to confirm selection. ] or [ ] to configured to the preferred speaker volume output from "0" to "100." c) Press [ ] once to confirm preferred settings and exit to the SETUP sub-menu to begin the next adjustment or to completely exit out of the On Screen Display by pressing [ ] again. 37 SETUP - AUDIO INPUT The NX-VUE24 allows you to choose your preferred audio input for the monitor's internal speakers. These are the recommended OSD setting for AUDIO input depends on the connection you are using: DIGITAL = when using a DisplayPort or HDMI connection. ANALOG = when using the 3.5mm AUX audio cable with a DVI or VGA connection a) In the SETUP sub-menu, use the arrow buttons [ selection is highlighted (see picture) and press [ ] or [ ] to navigate to AUDIO INPUT. Make sure ] to confirm selection. b) Use the arrow buttons [ ] or [ ] to navigate to the preferred either the DIGITAL or ANALOG for your audio input preference and type. Make sure selection is highlighted (see picture) and press [ ] to confirm selection. c) Press [ ] once to confirm preferred settings and exit to the SETUP sub-menu to begin the next adjustment or to completely exit out of the On Screen Display by pressing [ ] again. 38 SETUP - OD (OVER DRIVE) The OD (Over Drive) feature is designed to improve the NX-VUE24's response time and eliminate or minimize ghosting for PC gaming. By default, the OD setting is on MEDIAN. Depending on the type of PC Game, you may have to adjust the OD according to your preference. a) In the SETUP sub-menu, use the arrow buttons [ highlighted (see picture) and press [ ] or [ ] to navigate to OD. Make sure selection is ] to confirm selection. b) Use the arrow buttons [ ] or [ ] to navigate to either the OFF, MEDIA, or STRONG for your Over Drive preference and performance. Make sure selection is highlighted (see picture) and press [ ] to confirm selection. c) Press [ ] once to confirm preferred settings and exit to the SETUP sub-menu to begin the next adjustment or to completely exit out of the On Screen Display by pressing [ ] again. NOTE: When using AMD FreeSync technology, the recommended OD setting is MEDIAN or Strong. If you need additional assistance, please contact Nixeus toll free at 888-983-4128 or e-mail [email protected] 39 Nixeus Technology, Inc. (“Nixeus”) provides this Limited Warranty: • Only to the person or entity that originally purchased the product from Nixeus or its authorized reseller or distributor, and • Only for products purchased and delivered within the United States, the District of Columbia, U.S. Possessions or Protectorates, U.S. Military Installations, or addresses with an APO or FPO, and Canada. Three Year Limited Warranty for NX-‐VUE24A and NX-‐VUE24B: Nixeus warrants this product will be free from material defects in workmanship and materials under normal use from the original date of purchase. • Product (excluding power supplies): Three (3) years • Power supplies: Three (3) years • Spare parts and spare kits: Ninety (90) days • Larger monitor panels may have some glow around the edges or corners. This is known as back light bleed and panel Glow - this is normal due to the LED technology that allows more light and higher brightness to produce more vibrant colors and brighter pictures. • Having up to 3 Bright or 3 Dark Pixel anomalies is considered normal and the monitor is not defective. Warranty serviced monitors and RMA replacement parts may still consist of these allowed pixel anomalies. Monitor is defective if it contains MORE than the above stated allowed pixel anomalies. Under this Limited Warranty will be, at Nixeus’s option, to either repair or replace the defective Product during the Warranty Period at no charge to the original owner excluding shipping and handling fees. The replacement product needs not to be new nor have identical make, model or part. Nixeus may replace the defective Product or any part thereof with any factory reconditioned product that Nixeus determines is equivalent in all material respects to the defective Product. Replacement or repaired Product will be warranted for the remainder of the original Warranty Period or ninety (90) days, whichever is longer. Non-‐Applicability of Limited Warranty: Limited Warranty of Nixeus’s products will not be applied to and does not cover any refurbished/reconditioned product and any product purchased through clearance or liquidation sale or other sales in which Nixeus, the sellers, or the liquidators expressly disclaim their warranty obligation, whereas the product is being sold “As-Is” without any warranty. RMA (Return Merchandise Authorization) Request: The customer shall return the product with proof of purchase to Nixeus for RMA processing. In case the return policy period has expired from the retailer or distributors and the product is within warranty, the customer shall submit a RMA to Nixeus as described below: • Customer (End User) must submit a RMA request with the product as part of the claim with a written detai description of the Product issue allowing Nixues to confirm the same, along with proof of purchase of the product (dated receipt). • The customer must first contact technical support from Nixeus Technical Support at [email protected], 40 who will attempt to assist and remedy the customer in resolving their issues and concern with the product. If the product is considered defective or malfunctioning, the Customer (End User) must obtain a Return Material Authorization (“RMA”) number by completing the RMA form and entering the assigned RMA Number assigned by [email protected]. • After an RMA number is assigned, the defective/malfunctioning product must be packaged securely in the original or other suitable shipping package to ensure that it will not be damaged in transit to Nixeus Technology, Inc. The RMA number must be visibly and clearly marked on the outside of the package. Do not include any manuals or accessories in the shipping package, Nixeus will only replace/repair the defective/malfunctioning product and will not ship back any accessories. • The Customer (End User) is responsible for all incoming shipping charges to Nixeus. RMA replacements need be fully insured by the customer expense and shipped to Nixeus Technology, Inc., 4801 Little John Street, Suite E, Baldwin Park, CA 91706. Nixeus will not be held responsible for lost packages shipped during transit to Nixeus’s Office. Nixeus will ship back the repaired or replacement package any common carrier selected by Nixeus. Return shipping fees shall be paid by Nixeus, if a United States address is used, otherwise the product will be shipped to you using freight collect. Expedited shipment methods are available at Customers (End Users) expense upon request. We “Nixeus” reserve the right to deny and reject any returned products if guidelines/instructions and request are not met, return shipment will be charged to the Customers “End Users” at their expense. What Is Not Covered Under Limited Warranty: The Limited Warranty provided by Nixeus does not cover the following: Improper or incorrectly performed service maintenance or repairs voids this Limited Warranty. Products that Nixeus’ judge to have been subjected to abuse, accident, alteration, modification, tampering, negligence, misuse, faulty installation, repair or service in any way that is not contemplated in the documentation for the product, or if the model or serial number has been altered, tampered with, defaced or removed, product failures due to power outages, and cosmetic damage, and does not limit damage that are caused by shipment, due to act of God. Any hardware, firmware or other products or services provided by anyone other than Nixeus. Limitation of Liability: N IXEUS IS N O T LIABLE UN D ER AN Y CO N TRACT, N EG LIG EN CE, STRICT LIABILITY O R O TH ER LEG AL O R EQ UITABLE TH EO RY FO R ANY LO SS O F USE O F TH E PRO D UCT, INCO NVENIENCE O R D AM AG ES O F ANY CH ARACTER, W H ETH ER D IRECT, SPECIAL, INCID ENTAL O R CO NSEQ UENTIAL (INCLUD ING , BUT NO T LIM ITED TO , D AM AG ES FO R LO SS O F G O O D W ILL, LO SS O F REVENUE O R PRO FIT, W O RK STO PPAG E, CO M PUTER FAILURE O R M ALFUNCTIO N, FAILURE O F O TH ER EQ UIPM ENT O R CO M PUTER PRO G RAM S TO W H ICH NIXES’S PRO D UCT IS CO NNECTED W ITH , LO SS O F INFO RM ATIO N O R D ATA CO NTAINED IN, STO RED O N, O R INTEG RATED W ITH AN Y PRO D UCT RETURN ED TO N IXEUS FO R W ARRAN TY SERVICE) RESULTIN G FRO M TH E USE O F TH E PRO D UCT, RELATIN G TO W ARRAN TY SERVICE, O R ARISIN G O UT O F 41 AN Y BREACH O F TH IS LIM ITED W ARRAN TY, EVEN IF N IXEUS H AS BEEN AD VISED OF TH E PO SSIBILITY O F SUCH D AM AG ES TO TH E M AXIM UM EXTEN T PERM ITTED BY LAW ,. TH E SO LE REM ED Y FO R A BREACH O F TH E FO REG O ING LIM ITED W ARRAN TY IS REPAIR, O R REPLACEM ENT O F TH E D EFECTIVE O R NO NCO NFO RM ING PRO D UCT. TH E M AXIM UM LIABILITY O F N IXEUS UN D ER TH IS W ARRAN TY IS LIM ITED TO TH E PURCH ASE PRICE O F TH E PR O D UCT CO VERED BY TH E W ARRANTY. TH E FO REG O IN G EXPRESS W RITTEN W ARRANTIES AND REM ED IES ARE EXCLUSIVE AND ARE IN LIEU OF AN Y O TH ER W ARRAN TIES O R REM ED IES, EXPRESS, IM PLIED O R STATUTO RY. Governing Law: This Limited Warranty shall be governed by the laws of the State of California. Some states do not allow exclusion or limitation of incidental or consequential damages, or limitations on how long an implied warranty lasts, so the foregoing limitations and exclusions may not apply. This Limited Warranty provides specific legal rights and you may also have other rights which vary from state to state. Electronics Recycling and Proper Electronics Disposal Nixeus Technology, Inc is committed to a greener environment by encouraging all our Nixeus customers to recycle our covered electronic devices (CEDs) and accessories. It is illegal to throw away your electronic devices in regular garbage and landfills. Electronic devices need to be recycled or properly disposed of to avoid unnecessary harm to our community and environment. By donating, properly disposing and recycling your unwanted electronic products, we can work together to conserve our natural resources, reduce greenhouse gas emissions, and avoid air/water pollution. From EPA.gov Website: For example: • Recycling one million laptops saves the energy equivalent to the electricity used by more than 3,500 US homes in a year. • For every million cell phones we recycle, 35 thousand pounds of copper, 772 pounds of silver, 75 pounds of gold, and 33 pounds of palladium can be recovered. Before Donating or Recycling Your Used Electronics • For your computer or laptop, consider upgrading the hardware or software instead of buying a brand new product. • Delete all personal information from your electronics • Remove any batteries from your electronics; they may need to be recycled separately Recycle with Nixeus Technology, Inc Nixeus Customers in California: Please visit http://www.erecycle.org for more information. Mail-Back Program for Nixeus Customers in Virginia, Texas, Rhode Island, Oklahoma, New Jersey, New York, Maryland, Minnesota, Missouri, Michigan, Indiana, Illinois: Nixeus Customers can recycle or send back their end of life or unwanted Nixeus electronic devices with us anytime. There are no fees or charges for this service. Simply contact us at [email protected] or call us at 888-983-4128. This free electronics recycling/collection mail back program is limited to only Nixeus branded products and is subject to product verification and approval. Once approved, we will provide you with a prepaid UPS return shipping label to ship back your Nixeus electronic device or to ship to a designated recycling/collection facility. 42 NOTE: This mail-back program service does not apply to any entities that operate or are involved in wholesale, distribution, and retail sales of consumer electronics. Nixeus Technology accepts all our products for recycling/collection from large businesses and large entities – but may charge a fee for recycling and collection. All unwanted and end of life Nixeus products mailed back will become the sole property of Nixeus Technology, Inc. For More Information Regarding Electronics Collection and Local Recycling Programs in your State EPA.gov: You can also use the EPA’s search function to find local drop off locations for your unwanted electronics, electronics donations, and to recycle your end of life electronics. 1-800-Recycling: Sign up to receive Recycling News, to find Recycling Locations and Events local to your area. Earth911.com: This website has good information for recycling solutions for your electronic devices. Also includes a search engine to find local E-Cycling solutions for LCD Computer Monitors that you can use to drop off your unwanted electronic devices. To access Earth911.com’s Recycling Location Search Engine go to search.earth911.com Recycle4Earth: By entering your Zip Code on the home page of Recycle4Earth.com, you can find an electronics recycling or electronics collection center near you. If you have any questions or need additional assistance regarding Donation, Collection or Recycling your end of life Nixeus products please e-mail us at [email protected]. Nixeus Technology, Inc 4801 Little John Street, Suite E Baldwin Park, CA 91706 Toll Free: 888-983-4128 Phone: 626-869-5154 Fax: 626-381-9585 Tech Support & Warranty Service: [email protected] Web Site: www.nixeus.com 43