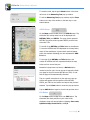
1
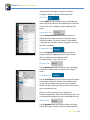
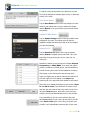
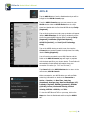
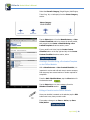
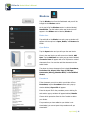
FltPlan Go Android
FltPlan Go Android User’s Manual
SIGNING IN .......................................................................................................................................... 6
AIRPORTS ........................................................................................................................................... 7
History Button .............................................................................................................................................................. 7
Favorites Button .......................................................................................................................................................... 7
Search/Browse Airports Button ................................................................................................................................. 8
Nearby Me Button ....................................................................................................................................................... 8
Binder Button ............................................................................................................................................................... 8
Navigating the Airport Icon ........................................................................................................................................ 8
Airport Diagram Button............................................................................................................................................... 9
Airport Diagram Picture .............................................................................................................................................. 9
Nearby Airports ............................................................................................................................................................ 9
Open A/FD .................................................................................................................................................................... 9
Navigating the Airports Tabs ...................................................................................................................................... 9
FBOs Tab .................................................................................................................................................................... 10
Information Tab ....................................................................................................................................................... 10
Frequencies Tab ....................................................................................................................................................... 10
Runways Tab ............................................................................................................................................................ 10
Procedures Tab ........................................................................................................................................................ 10
Weather Tab ............................................................................................................................................................. 10
NOTAMs Tab ............................................................................................................................................................. 11
Remarks Tab ............................................................................................................................................................ 11
MAPS ................................................................................................................................................. 12
Options Button ......................................................................................................................................................... 13
GPS Position ............................................................................................................................................................. 13
Change Ship Size and Color ................................................................................................................................... 13
Zoom & Orientation .................................................................................................................................................. 13
Map Display/Rendering ........................................................................................................................................... 14
Overlay Transparency ............................................................................................................................................... 14
Zoom Options Button ............................................................................................................................................... 15
My Routes Button .................................................................................................................................................... 12
Measuring Tool .......................................................................................................................................................... 15
Sign In Button ........................................................................................................................................................... 12
Basemaps Button .................................................................................................................................................... 14
Overlays Button ......................................................................................................................................................... 15
Edit Button ................................................................................................................................................................ 16
Save Route Button ................................................................................................................................................... 17
Update On Map Button ........................................................................................................................................... 17
April 2015 | 2
FltPlan Go Android User’s Manual
Search For Fix ........................................................................................................................................................... 17
P/P Button ................................................................................................................................................................ 18
Auto-Center Button .................................................................................................................................................. 18
NAVLOGS ........................................................................................................................................... 19
Refresh Current Button ........................................................................................................................................... 19
NavLogs/WX Button ................................................................................................................................................ 19
Sign In Button ........................................................................................................................................................... 20
Zoom In/Zoom Out Arrows ..................................................................................................................................... 20
CHECKLISTS ..................................................................................................................................... 21
Getting Started Creating a Checklist on the FltPlan.com Website ................................................................... 22
Creating a Checklist Using a Pre-Loaded Template on the FltPlan Website ................................................... 23
Editing a Checklist on the FltPlan Website ........................................................................................................... 23
Creating a Custom Checklist on the FltPlan Website ......................................................................................... 24
Copying/Sharing a Checklist from the FltPlan.com Website ........................................................................... 24
A Checklist for NXXX on the FltPlan Go App......................................................................................................... 25
Reset All Button ........................................................................................................................................................ 25
Previous Button ........................................................................................................................................................ 25
Next Button ............................................................................................................................................................... 25
Done Button ............................................................................................................................................................... 25
Skip Button ................................................................................................................................................................ 26
Reset List Button ...................................................................................................................................................... 26
BINDERS ............................................................................................................................................ 27
Binder Icon ................................................................................................................................................................. 27
Open Button ............................................................................................................................................................... 27
Procedures ................................................................................................................................................................. 27
Procedure List ........................................................................................................................................................... 28
Airport Info. Page ...................................................................................................................................................... 28
A/FD Page ................................................................................................................................................................ 28
Document .................................................................................................................................................................. 29
NavLog ........................................................................................................................................................................ 29
Weather Brief ............................................................................................................................................................ 30
ScratchPad Sketch ................................................................................................................................................... 30
Delete Button ........................................................................................................................................................... 30
Rename Binder Button ............................................................................................................................................ 30
WEATHER ......................................................................................................................................... 31
Refresh ....................................................................................................................................................................... 31
April 2015 | 3
FltPlan Go Android User’s Manual
Tap to Get WX Button .............................................................................................................................................. 31
Location Text Box ...................................................................................................................................................... 31
Enroute Departure and Arrival Airports ................................................................................................................ 32
Recently Viewed Weather ....................................................................................................................................... 32
Zoom In/Zoom Out Arrows .................................................................................................................................... 32
TRACKING .......................................................................................................................................... 33
Refresh Button ......................................................................................................................................................... 33
My Aircraft Button .................................................................................................................................................... 33
Aviation Type ............................................................................................................................................................. 33
Flight Status .............................................................................................................................................................. 34
Switching Aircraft...................................................................................................................................................... 34
TOOLS ................................................................................................................................................. 35
Runway Wind Calculator ........................................................................................................................................ 35
Runway Wind Calculator w/Airport ....................................................................................................................... 36
Weight & Balance .................................................................................................................................................... 36
Fuel Conversion ........................................................................................................................................................ 37
Custom Fuel ............................................................................................................................................................... 38
Temperature Conversion ......................................................................................................................................... 38
Density Altitude Calculator ...................................................................................................................................... 38
Altitude/Elevation/Airport ID .................................................................................................................................. 39
Current Altimeter Setting ........................................................................................................................................ 39
Pressure Altitude (press to edit) ............................................................................................................................ 39
Outside Air Temperature ......................................................................................................................................... 39
Density Altitude ......................................................................................................................................................... 40
SCRATCHPAD .................................................................................................................................... 41
Note: The ScratchPad Feature Will Be Available in an Upcoming Update ...................................................... 41
My Doodles Button ................................................................................................................................................... 41
New Doodle Button ................................................................................................................................................... 41
Draw Doodle .............................................................................................................................................................. 41
Select Size Button ..................................................................................................................................................... 41
Text Doodle ................................................................................................................................................................ 42
DOWNLOADS .................................................................................................................................... 43
Queue ......................................................................................................................................................................... 43
Cancel All Button ..................................................................................................................................................... 43
Clear Finished Button .............................................................................................................................................. 43
Retry Failed Button .................................................................................................................................................. 44
April 2015 | 4
FltPlan Go Android User’s Manual
Downloaded Files Button ........................................................................................................................................ 44
Failed Downloads Button ........................................................................................................................................ 44
Available Downloads Button ................................................................................................................................... 45
Storage Location Button ......................................................................................................................................... 45
SETTINGS ........................................................................................................................................... 46
Device ......................................................................................................................................................................... 46
Moving-Map Mode (GPS) ......................................................................................................................................... 46
Information Database .............................................................................................................................................. 46
About .......................................................................................................................................................................... 47
April 2015 | 5
FltPlan Go Android User’s Manual
Signing In
The FltPlan Go app for Android will default to the Airports
section when initially opened.
To sign into your FltPlan account from within the app, tap on
the FltPlan.com icon in the upper left corner of the
Dashboard, then tap the Sign In button in the upper right
corner of the FltPlan.com page.
A pop-up window will appear labeled, Sign In. Enter your
username and password and then tap Sign In at the
bottom of the pop-up window.
If you do not already have a FltPlan.com account, tap the
blue link labeled, Become a Registered User.
If you forgot your username or password, tap the blue link
labeled, Forgot Username/Password.
To sign out of your FltPlan.com account, tap the Sign Out
button on the bottom of the Sign In window.
To exit this pop-up window, tap the Cancel button on the
bottom of the window or the back key on your Android
device.
April 2015 | 6
FltPlan Go Android User’s Manual
Airports
Tap the Airports icon from the Dashboard and you will be
brought to the Airports section.
The header of the Airports section contains five buttons,
History, Favorites, Search/Browse Airports, Nearby
Me, and Add to Binders buttons.
History Button
The first button within the Airports section is the History
button. Tap the History button and a pop-up window will
appear labeled, Recently Viewed Airports. On this pop-up
window you will see a list of your most recently viewed
airports.
By selecting any of the airports listed on this pop-up box,
you will be brought to the corresponding airports’ page
containing information on FBOs, Frequencies, Runways, etc.
To switch between recently viewed airports pages, tap the
History button again and the Recently Viewed Airports
pop-up window will reappear where you can tap on another
airport.
Favorites Button
The second button within the Airports section is the
Favorites button. Tap the Favorites button and a pop-up
window will appear labeled, Favored Airports. On this popup window you will see a list of your favored airports.
By selecting any of the airports listed in this pop-up window,
you will be brought to the corresponding airports’ page
containing information on FBOs, Frequencies, Runways, etc.
To add an airport to your Favorites list, tap the Add to
Favorites button on the Favored Airports pop-up
window. Whichever airport you are currently viewing on the
Airports section will then be added to the list of favored
airports.
April 2015 | 7
FltPlan Go Android User’s Manual
To switch between favored airports, tap the Favorites
button again and the Favored Airports pop-up window will
reappear where you can tap on another airport.
Search/Browse Airports Button
The third button within the Airports section is the
Search/Browse Airports button. Tap this button and a
pop-up window will appear labeled, Search/Browse
Airports. On this pop-up window you will see a search
airports bar and a list of all the states.
Tap in the search airports bar to manually type in the airport
you are searching for.
Beneath the search airports bar you will see a list you can
scroll through of all the states, provinces, and countries we
have airport information for. Tap on the state you are
searching in and all of the available airports in the
FltPlan.com database for that state will appear.
To exit this pop-up window, tap the Close button on the
bottom of the window or the back key on your Android
device.
Nearby Me Button
The fourth button within the Airports section is the Nearby
Me button. Tap this button and a pop-up window will
appear labeled, 10 Closest Airports. On this window you
will see a list of the ten closest airports to your current
location.
Tap on any of the listed airports and you will be brought to
the corresponding airports’ page containing information on
FBOs, Frequencies, Runways, etc.
Binder Button
To be made available on a future update.
Navigating the Airport Icon
After you have selected your desired airport, the airport
information will be displayed.
April 2015 | 8
FltPlan Go Android User’s Manual
The selected airport’s basic information will be displayed on
the top of the page, including the city and state it’s located
in, the longest runway, time zone, AOE, and coordinates.
To the right of this information are three buttons, an
Airport Diagram button, Nearby Airports button, and an
Open A/FD button.
Airport Diagram Button
Tap the Airport Diagram button and you will be redirected
to airport diagram as displayed in the latest AFD. To leave
this page, tap the back key on your Android device.
Airport Diagram Picture
In the upper left corner of the Airports section there is an
edited airport diagram that displays FBO locations in relation
to the runways. Tap the picture and a pop-up window
labeled Airport Diagram will appear.
To exit this pop-up window, tap the Close button on the
bottom of the window or the back key on your Android
device.
Nearby Airports
Tap the Nearby Airports button located beneath the
Airport Diagram button and a pop-up window will appear
displaying the closest airports in relation to your position.
To exit this pop-up window, tap the Close button on the
bottom of the window or the back key on your Android
device.
Open A/FD
Tap the Open A/FD button located beneath the Nearby
Airports button and you will be redirected to the selected
airports’ section in the A/FD. To go back to the Airports
section of the app, tap the back key on your Android device.
Navigating the Airports Tabs
Located on the left side of the Airports section is a list of
tabs that contain features associated with the airport,
April 2015 | 9
FltPlan Go Android User’s Manual
including FBOs, Information, Frequencies, Runways,
Procedures, Weather, NOTAMs, and Remarks tabs.
FBOs Tab
Tap the FBOs tab and the Airports section will display the
various FBO pages offered at the selected airport. Swipe the
screen to the left to navigate through the different FBO
pages.
Information Tab
Tap the Information tab and the Airports section will
display basic information concerning the selected airport,
including the Name, City, State, Elevation, Fuel available,
Longest Runway, Variation, Latitude, Longitude, Time zone,
and A.O.E. availability.
Frequencies Tab
Tap the Frequencies tab and the Airports section will
display the different frequencies for the various services
offered, including Clearance Delivery, ATIS
(Arrival/Departure), Tower, Ground, etc.
Runways Tab
Tap the Runways tab and the Airports section will display
the different runways and their lengths on the selected
airport.
Procedures Tab
Tap the Procedures tab and the Airports section will display
the procedures offered. If offered for the selected airport,
you will see the takeoff minimums, alternate minimums,
LAHSO, Hot Spot, and Airport Diagram sections that you can
tap to download and view.
Scroll up on the procedures to see, if offered, the
Instrument Approaches, STARs, and DP/SID Departures. Tap
on the particular procedure you want to download and view.
Weather Tab
Tap the Weather tab and the Airports section will display
the METAR Reports, Terminal Forecasts, Nearby Departure
April 2015 | 10
FltPlan Go Android User’s Manual
Airport METARs, and PIREPs. Scroll up and down to view all
of the available weather reports.
NOTAMs Tab
Tap the NOTAMs tab and the NOTAMs and FDC NOTAMs
will be displayed for the selected airport. Scroll up and down
to view all of the available NOTAMs.
Remarks Tab
Tap the Remarks tab and any remarks that have been
published for the selected airport will populate. Scroll up and
down to view all of the available remarks.
April 2015 | 11
FltPlan Go Android User’s Manual
Maps
Tap the Maps icon from the Dashboard and you will be
brought to the Maps section.
The header on the Maps section contains several buttons,
including My Routes, Sign In, Options, Basemaps,
Overlays, Zoom To, Measure Tool, ADS-B, and Edit
buttons.
My Routes Button
The next button within the Maps section toolbar is the My
Routes button. Tap this button and a pop-up window will
appear with routes that are stored in your FltPlan.com
account, and the option to create a new route. Scroll up on
the screen to view all saved routes.
Tap any of the stored routes listed in the My Routes popup window and the route will populate on the designated
map, along with the route points beneath the Edit section.
To create a new route, tap the Create new route button
from the My Routes pop-up window and the Edit section
will expand to a blank text box. In this blank text box you
can type in a route or search for airports, intersections, and
VORs/NDBs along your route of flight too.
To delete a route from the My Routes pop-up window, tap
and hold on the route you wish to delete and a pop-up
window labeled, Notice will appear asking if you want to
delete this route, then tap the Yes button.
To refresh your saved routes, tap the Refresh routes button
in the lower right corner of the My Routes pop-up window.
Sign In Button
The next button on the Maps section toolbar is the Sign In
button. Tap this button and a pop-up window will appear
where you can sign into your FltPlan.com account.
Enter your username and password, and then tap Sign In
at the bottom of the pop-up window.
April 2015 | 12
FltPlan Go Android User’s Manual
If you do not already have a FltPlan.com account, tap the
blue link labeled, Become a Registered User.
If you forgot your username or password, tap the blue link
labeled, Forgot Username/Password.
To sign out of your FltPlan.com account, tap the Sign Out
button on the bottom of the Sign In window.
To exit this pop-up window, tap the Cancel button on the
bottom of the window or the back key on your Android
device.
Options Button
The first button within the Maps section is the Options
button. Tap this button and a pop-up window will appear
with checkable options for different features offered for
maps, including GPS Position, Zoom & Orientation,
Breadcrumbs, Map Display/Rendering, and Overlay
Transparency.
GPS Position
The first section within the Options button is the GPS
Position section. In this section there are several options
you can choose to check off, including Toggle GPS service,
Selective GPS service, Auto-center position, Display ship
position, and Change ship size and color.
Change Ship Size and Color
Tap the Change Ship Size and Color button and a pop-up
window labeled Aircraft Icon will appear. In this Aircraft
Icon window you will see different sizes and colors of
airplanes to choose from that will display your aircraft on the
maps.
Zoom & Orientation
The next section within the Options button is the Zoom &
Orientation section. In this section there are several
options you can choose to check off, including North-up,
Track-up, Track-forward, and Disable zoom restriction.
April 2015 | 13
FltPlan Go Android User’s Manual
Breadcrumbs
The next section within the Options button is the
Breadcrumbs section. In this section there are several
options, including Toggle breadcrumbs, Clear/remove
breadcrumbs, Save breadcrumb file, and Load breadcrumb
file.
Map Display/Rendering
The next section within the Options button is the Map
Display/Rendering section. In this section there is the
option to select Downloaded Maps Only. Check off this
option to render the map to use downloaded files.
Overlay Transparency
The next section within the Options button is the Overlay
Transparency section. Tap the Toggle overlay
transparencies button beneath this section to change the
transparency of each map overlay.
To exit the Options pop-up window, tap the Close button
on the bottom of the window or the back key on your
Android device.
Basemaps Button
On the Maps section toolbar there is a Basemaps button.
Tap on this button and a pop-up window labeled Basemaps
will appear with all of the options of maps you can display,
including Sectionals (U.S.), Sectionals (Canada), World
Aeronautical charts, Victor Airways (U.S.), Victor Airways
(Canada), Victor Airways (Caribbean), Jet Enroute (U.S.), Jet
Enroute (Canada), Jet Enroute (Caribbean), Satellite
Imagery, Streets, Shaded Relief, and Topographic maps.
Tap on the desired basemap and the Maps section will
display the route you are viewing within the selected
basemap.
To exit the Basemaps pop-up window, tap the Close button
on the bottom of the window or the back key on your
Android device.
April 2015 | 14
FltPlan Go Android User’s Manual
Overlays Button
On the Maps section toolbar there is an Overlays button.
Tap on this button and a pop-up window labeled Overlays
will appear with all of the available overlays you can choose
to display on your map. These overlays include Terminal
Area Charts, Helicopter Charts, Airport Locations, State
Borders, Country Borders, Airspace & TFRs, NRS Grid Fixes,
CAP Grid, IFR Victor Airways, IFR Jet Airways, and Baron WX
– IR Satellite, Visible Satellite, Surface Analysis, Echo Tops,
Radar (Canada), and Radar.
On the Overlays pop-up window there is a Settings button
in the bottom center of the window.
Zoom Options Button
The next button within the Maps section toolbar is the
Zoom Options button. Tap this button and a pop-up
window will appear with different zoom options along your
route. These options include Zoom to Present Position, Zoom
to Departure Airport, Zoom to Arrival Airport, and Zoom to
Full Route.
Tap any of these buttons to have the map view zoomed into
your desired positon. After tapping the button for your
desired position, the Zoom Options button will disappear
and you will be brought to your desired position on the map.
Measuring Tool
The next button on the Maps section toolbar is the
Measurement Tool. Tap on this button and a small pop-up
window will appear in the bottom of the Maps screen
labeled, Measuring tool.
To use the Measurement Tool, tap the first point on the
map you would like to calculate the distance from, and then
tap the next point. An orange line will appear between your
first tapped points to each addition point, with the distance
in nautical miles labeled on the orange line.
In the Measuring Tool pop-up window you will see the
calculated total of nautical miles based on the points tapped
on the map.
April 2015 | 15
FltPlan Go Android User’s Manual
To reset this total, tap the green Reset button in the lower
left corner of the Measuring Tool pop-up window.
To exit the Measuring Tool pop-up window, tap the Close
button on the top of the window or the back key on your
Android device.
ADS-B Button
On the Maps section toolbar there is an ADS-B button. Tap
this button and a drop-down box will be displayed with
METARs, TAFs, and SPECIs. The green circles represent
METARs, the yellow circles represent SPECIs, and the blue
circles are TAFs.
To the left of the METARs and TAFs labels are checkboxes.
To have the METARs and TAFs displayed on the map below,
check off the checkboxes. A green check mark will appear
within the checkbox indicating you have activated the ADSB feature.
To the right of the METARs and TAFs labels are the
number of METARs and TAFs represented within the map
below and how current they are.
Beneath this drop-down box there is a Refresh button
located on the far right. You can choose to manually refresh
your page for the most current METARs and TAFs, or wait
and the page will be automatically refreshed.
Tap on a specific colored circle on the map and a pop-up
window will appear with the specifics of the METARs,
SPECIs, and TAFs for the location and airport that you have
selected. Tap the Close button to close this pop-up window.
Tap the ADS-B button again to close this drop-down menu.
Edit Button
On the Maps section toolbar there is an Edit button. Tap
this button and each point/fix on your route will be
displayed, along with several buttons including, Save route,
Update on Map, Search for fix, and P/P.
April 2015 | 16
FltPlan Go Android User’s Manual
To edit the route, tap anywhere in the white box in which
the route is displayed to manually type in fixes, or delete any
portion of the route.
Save Route Button
Tap the Save Route button to save any changes you have
made to your edited route. A pop-up window will appear
labeled, Notice, to let you know the route has been saved
successfully.
Update On Map Button
Tap the Update On Map button to show your edited route
displayed on the map. The original route will then be
updated to display the edited route with all of the changes
you have incorporated.
Search For Fix
Tap the Search For Fix button and a pop-up window
labeled, Search will appear with a search bar. Tap in the
search bar and type which point of your route you are
looking for.
Beneath the search bar are the options to display Airports,
Intersections, or VORs/NDBs. If you want your search
results to include any of these options, tap the checkbox to
the left of each option and it will be included in the search.
After typing in your desired point and choosing which
options to display, tap the search button and a small box in
the lower right corner will appear on the Maps page
containing all of the points and fixes related to your search.
Above the list of related points/fixes are two options, Zoomto and Add to route. If you would like to choose a point
and have the map zoom to that point, tap the circle to the
left of the Zoom-to option. Now when you choose your
point/fix, the map will automatically zoom to this point/fix.
If you would like to choose a point and have this point
automatically added to your route, tap the circle to the left
of the Add to route option. Now, when you choose your
point/fix, it will automatically become a part of your route.
April 2015 | 17
FltPlan Go Android User’s Manual
To exit this pop-up window, tap the Close button on the
bottom of the window or the back key on your Android
device.
P/P Button
Tap the P/P button to have your present position latitude
and longitude entered into your route. Tap within the route
where you would like to place the P/P and then tap the P/P
button and the latitude and longitude will be entered into
this space.
Auto-Center Button
Located in the lower right portion of the map display screen
is the Auto-Center icon. Tap on this icon and it will
automatically center the view of your aircraft on the map.
April 2015 | 18
FltPlan Go Android User’s Manual
NavLogs
Tap the NavLogs icon from the Dashboard and you will be
brought to the NavLogs section.
The header of the NavLogs section contains three buttons,
the Refresh Current, NavLogs/WX, and the Sign In
buttons.
Refresh Current Button
The first button on the header is the Refresh Current
button. Tap this button to refresh the current NavLog for the
flight you are viewing.
NavLogs/WX Button
The next button on the header is the NavLogs/WX button.
Tap on this button a pop-up window will appear labeled,
NavLogs/WX. This pop-up window contains NavLogs for
routes that are currently in your FltPlan.com account.
If you have downloaded the NavLog for a particular route, a
green check mark will appear to the right of that route
description, along with how long ago that NavLog had been
downloaded.
To display a downloaded NavLog, tap on the route
description, in the NavLogs/WX pop-up window, and the
downloaded NavLog will appear in the NavLog section.
If you have not downloaded the NavLog for a particular
route, a Download button will appear to the right of that
route description, along with a notice labeled, not
downloaded.
To download a NavLog, tap the Download button to the
right of route description.
If the NavLog is for a current route, there will be a Refresh
button in place of the Download button, so that you can
continuously refresh your downloaded NavLog.
April 2015 | 19
FltPlan Go Android User’s Manual
To delete a NavLog, tap and hold down on the route
description of the NavLog you wish to delete and a pop-up
window labeled, Delete File will appear asking if you want
to delete saved NavLog, and then tap the Delete button.
To exit this pop-up window, tap the Cancel button on the
bottom of the window or the back key on your Android
device.
Sign In Button
The next button on the NavLogs section toolbar is the Sign
In button. Tap this button and a pop-up window will
appear where you can sign into your FltPlan.com account.
Enter your username and password and then tap Sign In at
the bottom of the pop-up window.
If you do not already have a FltPlan.com account, tap the
blue link labeled, Become a Registered User.
If you forgot your username or password, tap the blue link
labeled, Forgot Username/Password.
To sign out of your FltPlan.com account, tap the Sign Out
button on the bottom of the Sign In window.
To exit this pop-up window, tap the Cancel button on the
bottom of the window or the back key on your Android
device.
Zoom In/Zoom Out Arrows
Tap the NavLog page itself and to the bottom right of the
screen you will see two small, grey magnifying glass icons,
representing Zoom In and Zoom Out. Note that this is on
the NavLog screen itself and not contained in a pop-up
window.
Tap the Zoom In icon and you can zoom into a particular
spot on your NavLog. Tap the Zoom Out icon and you can
zoom further out on a particular spot.
As a note, you can also double tap on the screen to zoom in
and out of the NavLog, and use the Zoom In and Zoom
Out icons for a more precise zooming.
April 2015 | 20
FltPlan Go Android User’s Manual
ADS-B
Tap the ADS-B button from the Dashboard and you will be
brought to the ADS-B Console page.
From the ADS-B Console page you can connect to your
ADS-B devices. Next to ADS-B Device there is a dropdown box labeled with the first listed ADS-B device, Clarity
(Sagetech).
Tap on this drop-down box and a pop-up window will appear
labeled, ADS-B Devices. On this pop-up window there are
the four supported ADS-B devices listed, including Clarity
(Sagetech), Pathfinder (Flight Data System),
XGPS170 (Dual AV), and iLevil (Levil Technology
Corp).
Tap on the ADS-B device you wish to use, then tap the
Connect button located beneath the drop-down box initially
labeled Clarity (Sagetech).
You will now be connected to your ADS-B device and the
fields on the ADS-B Console page will begin to populate
with the data specific to your chosen device. These fields will
automatically contain default information when your
connection is inactive (i.e. “0 ft” and “0 Knots”).
Tap Cancel within the ADS-B Devices box to return to the
main screen, ADS-B Console.
When connected to your ADS-B device you will see fields
containing information on whether the Connection is
Active or Inactive, the Run-Time, Last ping
(heartbeat), Average ping, Received messages, UTC,
Latitude, Longitude, Altitude (geometric), Altitude
(@29.92), Course, Horizontal Velocity, Vertical
Velocity, METARs + SPECIs, and TAFs.
To view the METARs and TAFs on your map, click on the
Maps icon from the Dashboard and then tap the ADS-B
tab.
April 2015 | 21
FltPlan Go Android User’s Manual
Checklists
Tap the Checklists icon from the Dashboard and you will
be brought to the Checklists section.
At the top of the Checklists section you will see a header
that says, Checklists for account (your username).
Beneath this header will be all the checklists that you have
created within your FltPlan.com account displayed.
If you have already created a checklist for an aircraft, the
aircraft N number is listed below a green circle with a white
check mark inside of it. Tap the desired aircraft to view to
that particular checklist.
If you do not have a checklist for your aircraft, you must
first create your checklist on the FltPlan.com website. You
can also do so by clicking the FltPlan.com icon located on
the Dashboard or by going to www.fltplan.com.
Getting Started Creating a Checklist on the
FltPlan.com Website
To create or edit a checklist, tap the FltPlan.com icon
located on the Dashboard. From here, FltPlan.com is as it
appears on the website.
Note: You can only create or edit a checklist from the
FltPlan.com icon, or on the www.fltplan.com website itself.
From the FltPlan.com icon (the first icon on the
Dashboard) look on the Main Menu, then tap the Tools
button on the left side of the page.
Tap the Checklist link.
Tap the Add button to create a new list for the desired
aircraft.
April 2015 | 22
FltPlan Go Android User’s Manual
Select the Aircraft Category (Single Engine, Multi Engine,
Turbo Prop, Jet, or Helicopter) from the Select Category
section.
Tap the Select button from the Manufacturers, or User
Created Checklists section to choose the aircraft model,
and proceed to the Create a Checklist Using a PreLoaded Template directions section, below.
If your model is not listed, tap the Create Custom
Checklist button on the top right and skip to the Create
Custom Checklist directions section, below.
Creating a Checklist Using a Pre-Loaded Template
on the FltPlan Website
With a Manufacturers or User Created Checklist, it is
important to review and edit each step to ensure accuracy.
Each step may have several actions or checks required for
completion.
From the Main Checklist Menu, tap the View button for
the desired aircraft.
Tap the Select button to view a category from the
Standard Checklist section.
Editing a Checklist on the FltPlan Website
Once your checklist is created on the website, tap the Edit
button next to any item you wish to edit.
If you make a change to an Item or Action, tap Save
Item/Action.
April 2015 | 23
FltPlan Go Android User’s Manual
Tap the Sort Checklist button to change the order in which
the item or actions are listed.
Tap Save Checklist Sort to save changes.
To add a new item, tap the Add New Item button. Press
the Save Item/Action button after you have added a new
item.
After adding a new Item/Action, it will appear at the
bottom of the list. Use the Sort Checklist button to change
the location of the new item within the list.
Creating a Custom Checklist on the FltPlan Website
From the Main Checklist Menu, tap the Add button and
select the aircraft category from the Select Category
section. Tap the Create Custom Checklist button located
on the top right.
Choose View to begin creating your checklist.
Create a New Category by selecting the Add New button
in the Standard Checklist section.
Enter the category name and tap the Save Category
button.
Tap the Add New Item button to add steps to a category.
Enter the item or action in the Item/Action section and
press the Save Item/Action button.
Continue adding additional steps on the Display Checklist
page.
Tap the Main Menu button located on the top right of the
screen.
Copying/Sharing a Checklist from the FltPlan.com
Website
A checklist can be copied from one aircraft to another within
your FltPlan account, or it can be copied from someone
else's FltPlan checklist.
To copy a checklist from someone else, you will need their
username and the tail number of the aircraft to copy.
April 2015 | 24
FltPlan Go Android User’s Manual
From the Main Checklist Menu, select the tail number and
tap the Add button.
Enter the username and tail number in the Copy Profile
From Other User section. Tap the Copy Profile button.
A Checklist for NXXX on the FltPlan Go App
From the Checklist icon on the Dashboard, look under the
label, Checklists for account NXXX (your username will
appear after account).
Tap the desired aircraft checklist and the page containing
the selected checklist will be displayed.
At the top of this section you will see the name for the
checklist you are viewing, a Reset All button with the N
number of the aircraft this checklist pertains to, a Previous
button, a Next button, a Done button, a Skip button, and
a Reset List button.
Reset All Button
The Reset All button in the top left corner of your checklist
is used to reset all of your checklists. When checklists are
reset, all of the items will be marked as unchecked.
To reset all of your checklists, tap the button and a pop-up
window labeled, Notice will appear asking if you want to
reset all checklists for the selected N number, tap the Yes
button.
Previous Button
Tap the Previous button to return to the previous page,
which contains the checklists for all of the different aircraft
in your account.
Next Button
Tap the Next button to advance to the next checklist you
entered for your selected N number.
Done Button
Tap the Done button to indicate that you have checked that
item and it is checked off the list.
April 2015 | 25
FltPlan Go Android User’s Manual
Skip Button
Tap the Skip button to skip over checking off a particular
item, which will mark the unchecked item yellow.
After you have finished checking off or skipping all of the
items for a particular checklist, you will get a pop-up window
labeled, Notice stating that the checklist has skipped an
item, and if would you like to be redirected to that skipped
item.
Tap the Yes button and the checklist will begin at the item
you skipped over.
If you do not wish to return to your skipped items on your
checklist, tap Cancel, and you will be able to tap the Next
button to move to the next checklist entered for that N
number.
Reset List Button
Tap the Reset List button to set the checklist back to
having all items unchecked.
To leave a checklist, or to switch to a different set of
checklists for another aircraft, tap the back key on your
Android device.
April 2015 | 26
FltPlan Go Android User’s Manual
Binders
Tap the Binders icon from the Dashboard and you will be
brought to the Binders section.
At the top left of the Binders section is a button labeled,
New Binder. Tap this button and a new binder icon will
appear in the Binders section labeled, Binder #.
Binder Icon
Tap and hold on the Binder icon and a pop-up window will
appear with the options to Open, Delete, and Rename the
binder.
Open Button
Tap the Open button and you will open the new binder.
Once in the new binder you will see an icon labeled, Add
New. Tap the Add New icon and a pop-up window labeled,
Choose an item will appear with a list of places to retrieve
documents from. You can then add the documents to the
select binder.
The places to choose documents from include Procedures,
Procedure List, Airport Info. Page, A/FD Page,
Documents, NavLog, Weather Brief, and ScratchPad
Sketch.
Procedures
If the document you wish to add to your binder is from
Procedures, tap the Procedure button and a pop-up
window labeled, Airport ID will appear.
Enter the airport ID for the procedure you are looking for
and another pop-up window will appear labeled, Results.
Choose which procedure from the list of results to add to
your binder.
If a procedure you have added to your binder is not
downloaded, you cannot open this procedure until you
download it.
April 2015 | 27
FltPlan Go Android User’s Manual
In this case, go to the Downloads icon
located on the Dashboard.
Once in the Downloads section, find the
files you need to download in order to have the procedure
you wish to add to your binder, and tap on the file to begin
the download.
You will see that the file you have selected will appear
beneath the Queue in the Downloads section, and a blue
bar will indicate the download progress of the file.
After the file has finished downloading, you can go back into
your binder and view your stored document. Tap the back
key on your Android device to return to the selected binder.
Procedure List
The Procedure List feature will be available in a future
update of the app.
Airport Info. Page
If you wish to create a shortcut to a particular airport
information page within a binder, tap the Airport Info.
Page item on the, Choose an item pop-up window.
The Airport ID pop-up window will then appear where you
can search the desired airport ID. After searching, an icon
will be created called Airport Info. Page with the airport
ID listed beneath it.
Tap this icon and the airport page for the selected ID will
open in the Airports section.
To return to your binder, tap the Binders icon from the
Dashboard and tap your desired binder.
A/FD Page
If you wish to add an A/FD Page to a particular binder, tap
the A/FD Page item on the Choose an Item pop-up
window.
The Airport ID pop-up window will then appear where you
can search the desired A/FD. After searching, an icon will be
created with the airport ID and A/FD listed beneath it.
April 2015 | 28
FltPlan Go Android User’s Manual
If an A/FD you have added to your binder is not
downloaded, you cannot open this A/FD until you download
it. In this case, go to the Downloads icon located on the
Dashboard.
Once in the Downloads section, find the files you need to
download in order to have the A/FD you wish to add to your
binder, and tap on the file to begin the download.
You will see that the file you have selected will appear
beneath the Queue in the Downloads section, and a blue
bar will indicate the download progress of the file.
After your file has finished downloading, you can go back
into your binder and view your stored document.
Tap this icon and the A/FD for the selected airport ID will
open.
Tap the back key on your Android device to return to the
selected binder.
Document
The Document feature will be available in a future update
of the app.
NavLog
If you wish to add a particular NavLogs/WX to your
binder, tap the NavLog item from the Choose an Item
pop-up window.
The NavLogs/WX pop-up window will appear where you
can choose from your downloaded NavLogs.
Tap on your desired NavLog and it will create an icon within
your binder labeled NavLog with your departure and arrival
airport IDs listed beneath.
Tap this icon and the NavLog for the selected trip will open
in the NavLogs section.
To return to your binder, tap the Binders icon from the
Dashboard and tap your desired binder.
April 2015 | 29
FltPlan Go Android User’s Manual
Weather Brief
The Weather Brief feature will be available in a future
update of the app.
ScratchPad Sketch
The ScratchPad Sketch feature will be available in a future
update of the app.
Delete Button
To delete a binder, tap and hold on the binder icon you wish
to delete.
A pop-up window will appear labeled with your binder’s
name. Tap the Delete button and a pop-up window labeled
Notice will appear asking if you want to delete this binder.
Tap the Delete button to delete that binder, or the Cancel
button to cancel deleting the selected binder.
Rename Binder Button
To rename a binder, tap and hold on the binder icon you
wish to rename.
A pop-up window will appear labeled with your binder’s
name. Tap the Rename button and a pop-up window
labeled, Rename will appear with a text box with the
current name of your binder.
Tap within this text box and delete the old name of your
binder, then type in the desired new name of your binder.
Tap the OK button and your binder will be renamed.
April 2015 | 30
FltPlan Go Android User’s Manual
Weather
Tap the Weather icon from the Dashboard and you will be
brought to the Weather section.
The header on the Weather section has two buttons,
Refresh and Tap to Get WX.
Refresh
The Refresh button is located in the upper left corner of the
Weather page. Tap the Refresh button and the weather
reports will be refreshed to represent the most current
weather.
Tap to Get WX Button
The Tap to Get WX Button is located in the middle of the
Weather page. Tap the Tap to Get WX Button and a
pop-up window will appear labeled, Weather.
There are several different sections to the Weather pop-up
window.
There are text windows to enter the Location (Airport
ID), and to enter the Enroute Departure and Arrival
airports, and a list of the airport IDs you have searched
weather for before.
Location Text Box
To begin, type the airport ID in the Location text box.
The Weather page will then display the METAR Reports,
TAFs, Terminal Forecasts, Notams, FDC Notams, and PIREPs
for your searched airport. Beneath the weather reports is a
list of nearby airports.
At the bottom of the Weather page you will see a map with
a red designator indicating where your airport lies.
April 2015 | 31
FltPlan Go Android User’s Manual
Enroute Departure and Arrival Airports
If you would like to see the weather at your departure and
arrival airports in addition to the Enroute weather, type in
your departure and arrival airports in the enroute text boxes.
The Weather page will then display the METAR Reports,
TAFs, Terminal Forecasts, Notams, FDC Notams, and PIREPs
for your departure, arrival, and enroute weather.
Recently Viewed Weather
Beneath the Location and Enroute text boxes is a list of all
the airport ID’s and enroute weather you have recently
searched for.
Tap any of these airport ID’s and the weather page will
show the most up-to-date weather information for the
selected airport ID.
Zoom In/Zoom Out Arrows
Tap the NavLog page itself and to the bottom right of the
screen you will see two small, grey magnifying glass icons,
representing Zoom In and Zoom Out. Note that this is on
the NavLog screen itself and not contained in a pop-up
window.
Tap the Zoom In icon and you can zoom into a particular
spot on your NavLog. Tap the Zoom Out icon and you can
zoom further out on a particular spot on the NavLog.
As a note, you can also double tap on the screen to zoom in
and out of the NavLog, and use the Zoom In and Zoom
Out icons for a more precise zooming.
April 2015 | 32
FltPlan Go Android User’s Manual
Tracking
Tap the Tracking icon from the Dashboard and you will be
brought to the Tracking section. At the top of the
Tracking section there is a header with a Refresh button
and a My Aircraft button.
Refresh Button
The first button on the Tracking header is the Refresh
button. Tap this button and the Tracking page will refresh.
My Aircraft Button
The second button on the Tracking header is the My
Aircraft button.
Tap the My Aircraft button and a pop-up window will
appear labeled, Tracking.
If you already have an aircraft set up for tracking through
the website, you can type in your N number in the white text
box labeled, Tail number. Then, tap the Track button at
the bottom of the Tracking pop-up window.
If your searched aircraft is currently flying, you will see
information regarding the flights where your aircraft has
been tracked.
This information includes Flight Number, Departure Airport,
Arrival Airport, Estimated Arrival Time, Time to Arrival,
Status, Altitude, Ground Speed (KTS), and Equipment.
On FltPlan.com you can view two different types of flight,
either Avaiation Type or Flight Status interchangeably.
There are two drop-down boxes titled, Aviation Type and
Flight Status.
Aviation Type
Tap the Aviation Type button and a drop-down box will
appear with two choices of Aviation Type to choose from,
either Commercial (COM) or General Aviation (GA).
April 2015 | 33
FltPlan Go Android User’s Manual
Flight Status
Tap the Flight Status button and a drop-down box will
appear with the different flight statuses available including
Scheduled (SCHED), Proposed (PROP), In Air (INAIR),
Landed (LAND), Unknown (UNK), Delayed (DELAY), and
Cancelled (CANCL).
Switching Aircraft
To switch from tracking one aircraft to tracking another, tap
the My Aircraft button again.
Type in a different tail number, and then tap the Track
button in the lower right corner of the Tracking pop-up
window.
April 2015 | 34
FltPlan Go Android User’s Manual
Tools
Tap the Tools icon from the Dashboard and a pop-up
window labeled, Choose a Tool/Calculator will appear in
the center of the screen.
The Choose a Tool/Calculator pop-up window has
several tools and calculators to choose from, including
Runway Wind Calculator, Runway Wind Calculator
w/Airport, Weight & Balance, Fuel Conversion,
Temperature Conversion, and Density Altitude
Calculator.
Runway Wind Calculator
Tap the Runway Wind Calculator and the calculator will
appear full screen.
There are several components you can enter into the
Runway Wind Calculator including the Runway Number,
Wind From, Wind Speed (knots), and the Gusting to (knots).
Next to each component is a box that indicates the amount
entered for that component. This white box is between a
minus sign button and a plus sign button. Tap either button
to decrease or increase the shown amount to fit your flight
planning needs.
To enter these numbers, tap and hold the blue circles on the
lines beneath each component. Then slide the blue circle to
the left or right to increase or decrease the amount to fit
your flight planning needs.
At the top of the Runway Wind Calculator there is a
Head Wind calculator and an X Wind calculator that
will calculate your head wind and x wind components based
on the other components of the calculator.
At the bottom of the Runway Wind Calculator there is a
picture of the runway indicating north, south, east, or west
with a blue arrow pointing to the calculated path of where
your runway wind is coming from.
April 2015 | 35
FltPlan Go Android User’s Manual
Runway Wind Calculator w/Airport
The next button on the Tools pop-up window labeled,
Choose a Tool/Calculator is the Runway Wind
Calculator w/Airport. Tap this button and another pop-up
window labeled Airport ID will appear where you can enter
the airport ID of the runway you are going to use.
In addition to the Runway Wind Calculator components
listed above, you can choose your runway number from the
actual runways listed at the airport you entered.
After selecting which runway you are going to be using,
adjust for the Wind From, Wind Speed (knots), and Gusting
to (knots).
At the top of the Runway Wind Calculator, there is a
Head Wind/Tail Wind calculator and an X Wind
calculator that will calculate your head wind and x wind
components based on the other components of the
calculator.
At the bottom of the Runway Wind Calculator there is a
picture of the runway indicating north, south, east, or west
with a blue arrow pointing to the calculated path of where
your runway wind is coming from.
This picture will also indicate the position of the runway
numbers of the actual airport that you entered in relation to
the North, South, East, or West headings.
Weight & Balance
The next button on the Tools pop-up window labeled,
Choose a Tool/Calculator is the Weight & Balance tool.
Tap this button and the Weight & Balance section will
appear.
If you have already entered weight and balance for an
aircraft through the FltPlan.com website before, there will be
an airplane icon with your aircraft N-number listed below.
Tap the airplane icon of the N-number you wish to view and
you will be taken to the weight and balance information
page for the selected aircraft.
April 2015 | 36
FltPlan Go Android User’s Manual
On the Weight & Balance information page for your
selected aircraft, you will see the already entered Basic
Empty Weight along with text boxes where you can enter
the weights of passengers and baggage according to which
type of aircraft you have selected.
You can also enter the Fuel Units in either pounds or
gallons, the Fuel Tank Weights (depending on the aircraft
and how many fuel tanks there are), the Fuel Burn, and
the predetermined Max. Takeoff Weight.
After entering in the weight for passengers, baggage, and
fuel/fuel burn, tap the green Calculate button at the
bottom of this section and the Under Gross Weight and
Zero Fuel Weight will be calculated in accordance to the
specifics of the tabulated trip.
Beneath the green Calculate button you will see the legend
to the weight and balance envelope at the top of the page.
The Calculate button indicates what each color represents,
including the C.G. Takeoff, C.G. Landing, C.G. Fuel Burn,
C.G. Zero Fuel Weight, Envelope, Maximum Ramp Weight,
Maximum Landing Weight, and Maximum Fuel Weight.
Beneath this legend is an aircraft diagram.
The legend for this diagram is located directly below and
shows which colored numbers represent seats, baggage,
and fuel tanks.
To switch from the weight and balance from one aircraft to
another, tap the back button on your Android device, and
you will be taken back to the main Weight & Balance
page.
Fuel Conversion
The next button on the Tools pop-up window labeled,
Choose a Tool/Calculator is the Fuel Conversion tool.
Tap this button and the Fuel Type pop-up window will
appear where you choose which fuel type you would like to
enter, AVGAS 6.0 lb/gal, JET A1 6.7 lb/gal, or CUSTOM.
After you have chosen fuel, you will be redirected to the
Fuel Conversion page which allows you to enter all of your
April 2015 | 37
FltPlan Go Android User’s Manual
fuel amounts in different quantities (either pounds, gallons,
kilograms, or liters) and calculate the cost of the fuel per
pound, gallon, kilogram, or liter.
Beneath the calculator is a Conversion Table which gives
you an idea of how each quantity relates to each other. For
example, 1 lb. is approximately 0.453592 kg, etc.
Custom Fuel
If you chose the CUSTOM option from the Fuel Type pop-up
window, a Custom Fuel Type pop-up window will appear
where you can enter either pounds per gallon or kilograms
per liter.
Temperature Conversion
The next button on the Tools pop-up window labeled,
Choose a Tool/Calculator is the Temperature
Conversion tool.
Tap this button and the Temperature Conversion page
will appear.
Tap within the text box for either Fahrenheit (F˚) or Celsius
(C˚) to calculate the conversion.
Beneath the calculator is a Conversion Table that gives
you a formula for calculating either Fahrenheit or Celsius.
Density Altitude Calculator
The next button on the Tools pop-up window labeled,
Choose a Tool/Calculator is the Density Altitude
Calculator.
Tap this button and the Density Altitude Calculator page
will appear.
There are four key elements that go into calculating the
density altitude, including the Altitude/Elevation, Current
Altimeter Setting, Pressure Altitude, and Outside Air
Temperature.
April 2015 | 38
FltPlan Go Android User’s Manual
Altitude/Elevation/Airport ID
When entering the altitude for the given airport, you can
enter the known altitude, the elevation of the airport, or the
Airport ID of the given airport and the elevation will be
imported.
You can either choose to express this number in feet or
meters by tapping the ft button or m button to the right of
the text box beneath the Altitude/Elevation/Airport ID
heading.
Current Altimeter Setting
Beneath the Current Altimeter Setting heading you can
type in this setting by tapping in the text box below.
Beneath this text box there is a checkbox labeled, Use
standard pressure. If you would always like to have 29.92
inHg as the current altimeter setting, then tap the box and a
green check will appear.
To the right of the text box you can choose to express the
altimeter setting in either inHg or mbar. Tap the inHg or
mbar to choose to express your altimeter setting in that
measurement.
Pressure Altitude (press to edit)
Beneath the Pressure Altitude (press to edit) heading
you can type in the pressure altitude by tapping in the text
box below.
To the right of the white text box you can choose to display
the pressure altitude in either feet or meters. Tap the ft to
display in feet or m to choose to display your pressure
altitude in meters.
Outside Air Temperature
Beneath the Outside Air Temperature heading you can
type in the temperature by tapping in the text box below.
To the right of the text box you can choose to express the
temperature in either degrees Fahrenheit or Celsius. Tap the
˚F or the ˚C button to choose.
April 2015 | 39
FltPlan Go Android User’s Manual
Beneath the text box it says ISA (+0) and ISA @0ft 15.0 ˚C
as a reminder of the International Standard
Atmosphere in relation to the outside air temperature.
These measurements of ISA will change according to the
data you input to the above sections.
Density Altitude
Beneath the Density Altitude you will see the calculated
density altitude based on the information you provided in
the above sections.
To the right of the text box you can choose to express the
altitude in either feet or meters. Tap ft to express in feet and
tap m to express your density altitude in meters.
April 2015 | 40
FltPlan Go Android User’s Manual
ScratchPad
Note: The ScratchPad Feature Will Be Available in
an Upcoming Update
Tap the ScratchPad icon from the Dashboard and the
ScratchPad page will appear.
The ScratchPad page is comprised of a single button
labeled, My Doodles.
My Doodles Button
Tap the My Doodles button and a pop-up window will
appear labeled, My Doodles.
New Doodle Button
From the My Doodles pop-up window you can create a
new doodle by tapping the New Doodle button. The My
Doodles pop-up window also lists all of the doodles you
have recently created.
Tap the New Doodle button and a pop-up window labeled,
Draw or Text will appear. To create a doodle where you
draw with your finger, tap the Draw button. To create a
doodle that is comprised of text, tap the Text button.
After choosing what type of doodle you want, a pop-up
window labeled, Add new Doodle will appear with a white
text box. Type in the name of your doodle in the text box,
then tap the Add button in the lower right corner.
Draw Doodle
If you chose to create a Draw Doodle, a blank screen will
appear where you can use your finger to draw. On the
header you will see two buttons, the Select Size button and
the My Doodles button, which will appear with the name of
your doodle in the center of the header.
Select Size Button
Tap the Select Size button and a pop-up window labeled,
Brush Size will appear with different brush sizes you can
choose to draw your doodle in.
April 2015 | 41
FltPlan Go Android User’s Manual
Beneath the blank screen is a series of colors to choose
from. Tap the color of the brush you would like to use.
Beneath the series of colors are three buttons, Save, Erase,
and Clear.
Tap the Save button to save the changes made to your
doodle.
Tap the Erase button to erase your doodle little by little.
Tap the Clear button to completely clear your doodle.
Text Doodle
If you chose to create a Text Doodle, a blank screen will
appear where you can tap and then type.
Beneath the blank screen are two buttons, the Save button
and the Clear button.
Tap the Save button to save the changes made to your
doodle.
Tap the Clear button to completely clear your doodle.
April 2015 | 42
FltPlan Go Android User’s Manual
Downloads
Tap the Downloads icon from the Dashboard and the
Downloads page will appear.
The Downloads page is comprised of a scrolling box that is
broken up into sections including U.S. Sectionals, Canadian
Sectionals (VNC), World Aeronautical Charts, IFR High
(U.S.), IFR High/Low (Pacific Ocean), IFR Low (U.S.), IFR
Low (Canada), Civil Air Patrol (CAP Grid), Terminal Area
Charts, VFR Terminal Area Charts, Helicopter Charts,
Approach Charts (U.S.), Approach Charts (Canada),
Airport/Facility Directory, and the Canadian Flight
Supplement.
Tap on the section that you want to download and you will
see the download start in the section to the right called the
Queue.
Queue
The Queue is where all of your downloads that are in
progress will appear once you begin the downloading
process. The Queue allows for you to have multiple files
downloading simultaneously.
Failed downloads will also appear in the Queue and you
can restart the download from this section as well.
If you would like to cancel any download while it is in
progress, tap the small X in the upper right corner of the
file’s window.
At the bottom of the Queue there are several buttons
including, Cancel All, Clear Finished, and Retry Failed.
Cancel All Button
Tap the Cancel All button, and any files that are in the
process of downloading will cancel and stop downloading.
Clear Finished Button
Tap the Clear Finished button, and the list of finished
downloads will be cleared from the Queue. This button does
not clear the files, just the Queue itself.
April 2015 | 43
FltPlan Go Android User’s Manual
Retry Failed Button
Tap the Retry Failed button, and any files that have failed
to download will be refreshed and the downloading process
will begin again.
The Downloads section has several buttons along the
header, including Downloaded Files, Failed Downloads,
Available Downloads, and Storage Location.
Downloaded Files Button
Tap the Downloaded Files button and the Downloaded
Files section will appear. In this section you will see there
are Procedures, Maps, and Airport/Facility Directory
lists.
Each of these lists show gray or colored boxes that
represent the available areas that you can download
procedures, maps, and A/FDs for.
The header of the Downloaded Files section shows a
legend that shows what the colors of the boxes mean.
If green, the files are downloaded and current, if red, the
files are expired, if blue, the files are intended for the future,
and if green with a blue line encompassing the box, both
files are downloaded for the current and the future.
Beneath the Procedures, Maps, and Airport / Facility
Directory sections there are two buttons, Update expired
and Download future.
Depending on the section you are under, and the status of
your files, you can update your expired files or download
future files right from the Downloaded Files section.
Failed Downloads Button
Tap the Failed Downloads button, and a pop-up window
labeled, Failed Downloads will appear with a list of all the
files you have tried to download and have failed. If this
window is blank, you do not have any failed downloads.
April 2015 | 44
FltPlan Go Android User’s Manual
Available Downloads Button
Tap the Available Downloads button, and a pop-up
window labeled, Available Downloads will appear with a
list of all the available files to download.
Storage Location Button
Tap the Storage Location button, and a pop-up window
labeled Storage Location will appear with two options.
Tap the circle to the right to choose to use the storage
folder or to use external storage, then tap OK in the lower
right corner of the Storage Location pop-up window.
April 2015 | 45
FltPlan Go Android User’s Manual
Settings
Tap the Settings icon from the Dashboard and a pop-up
window labeled, Settings will appear in the center of the
screen.
The Settings pop-up window has several different sections
including, Device, Moving-Map Mode (GPS),
Information Database, and About.
Device
Beneath the Device section you can choose the setting
Keep screen on, which prevents the device screen from
turning off if untouched after a period of time. Check off the
check box to the right to keep the screen on.
Beneath the Device section you can also choose to Adjust
screen brightness. Tap this section and a pop-up window will
appear labeled, Screen brightness, where you can tap and
drag a blue circle on a blue bar to either increase or
decrease the brightness of your device’s screen.
Beneath this blue bar you can put a check in the checkbox
labeled, Use system default, to set this brightness as the
default for your device.
Moving-Map Mode (GPS)
Beneath the Moving-Map Mode (GPS) section you can
choose to Toggle GPS Service, which will enable/disable
the app’s GPS service. Check off the checkbox to the right to
have toggle ON.
Beneath the Moving-Map Mode (GPS) section you can
choose to use Selective GPS Service, which will only use
GPS when the App is visible and open.
Information Database
Beneath the Information Database section, tap Check
for update and the app will check for any available
database updates.
April 2015 | 46
FltPlan Go Android User’s Manual
About
Beneath the About section, there are the Open source
licenses and the App build version. Tap Open source
licenses and a pop-up window labeled Open source
licenses will appear with our Terms and Conditions of
Use, Reproduction, and Distribution of the FltPlan Go
app.
April 2015 | 47
FltPlan Go Android User’s Manual
A/FD, 8, 27, 44
Create New Route, 13
About Section, 46
Creating a Checklist, 20, 21, 22
Action, 21
Current Altimeter, 37, 38
Add New, 25
Custom Fuel, 37
Add New Doodle, 40
Delete Button, 28
Add New Item, 21, 22
Delete NavLog, 18
Add to Favorites, 6
Density Altitude, 39
Add to Route, 16
Density Altitude Calculator, 37
Aircraft Category, 20
Device, 45
Airport Diagram, 8
Display Airports, 16
Airport Diagram Button, 8
Display Checklist, 22
Airport ID, 38
Display Intersections, 16
Airport Information, 9, 26
Display NDBs, 16
Airports, 6, 26
Display VORs, 16
Altitude, 37, 38
Distribution of FltPlan Go app, 46
App Build Version, 46
Document, 27
Auto-Center, 17
Done Button, 23
Available Downloads Button, 44
Download, 18
Aviation Type, 32
Download Future, 44
Basemaps, 14
Downloaded Files, 43
Basic Empty Weight, 35
Downloads, 26, 27, 42
Become a Registered User, 5, 14, 19
Downloads Page, 42
Binder Button, 7
Draw, 40
Binders, 25, 28
Draw Doodle, 40
Breadcrumbs, 12
Edit Route, 13, 15
Browse Airports, 7
Editing a Checklist, 21
Brush Size, 41
Elevation, 37, 38
Calculate, 36
Enroute Weather, 30
Cancel All Button, 43
Erase, 41
Change Ship Color, 11
Failed Downloads, 42
Change Ship Size, 11
Failed Downloads Button, 44
Check for Update, 46
Favored Airports, 6
Checklists, 19
Favorites Button, 6
Checklists for Account, 19, 23
FBOs, 9
Clear, 41
Flight Status, 32
Clear Finished Button, 43
Forgot Password, 5, 14, 19
Color, 41
Forgot Username, 5, 14, 19
COM, 32
Frequencies, 9
Commercial, 32
Fuel Burn, 35
Conversion Table, 36, 37
Fuel Conversion, 36
Copy a Checklist, 22
Fuel Tank Weights, 35
Copy Profile, 23
Fuel Type, 36
April 2015 | 48
FltPlan Go Android User’s Manual
Fuel Units, 35
Pressure Altitude, 37, 38
GA, 32
Previous Button, 23
General Aviation, 32
Procedures, 9, 25, 44
GPS, 46
Procedures List, 26
GPS Position, 11
Queue, 26, 42, 43
Head Wind Calculator, 34
Recently Viewe Weather, 30
History Button, 6
Recently Viewed Airports, 6
Information Database, 46
Refresh, 18, 29
International Standard Atmosphere, 39
Refresh Button, 31
Item, 21
Refresh Current, 17
Location Weather, 30
Refresh Routes, 13
Main Checklist Menu, 21, 22
Remarks, 10
Manufacturers Checklists, 21
Rename, 28
Map Display, 12
Reproduction, 46
Map Options, 11
Reset, 23, 24
Map Rendering, 12
Results, 25
Maps, 11, 44
Retry Failed Button, 43
Max Takeoff Weight, 35
Runway Wind Calculator, 33, 34, 35
Measuring Tool, 13
Runways, 9
Moving Map Mode, 46
Save, 41
My Aircraft, 32
Save Action, 21
My Aircraft Button, 31
Save Category, 22
My Doodles, 40
Save Checklist, 21
My Doodles Button, 40
Save Item, 21
My Routes, 13
Save Routes, 15
NavLog, 17, 27, 30
Saved Routes, 13
NavLogs/WX, 17, 27
Scratchpad, 40
Nearby Airports, 8
Scratchpad Sketch, 28
Nearby Me Button, 7
Screen Brightness, 45
New Binder, 25
Search Airports, 7
New Category, 22
Search For Fix, 16
New Doodle Button, 40
Select Category, 20
Next Button, 23
Select Size Button, 41
North Up, 12
Settings, 45
Notams, 10
Share a Checklist, 22
Notice, 23, 24, 28
Signing In, 5, 14, 17, 18
Open Button, 25
Signing Out, 5
Open Source Licenses, 46
Skip Button, 24
Outside Air Temperature, 37, 38
Sort Checklist, 21
Overlay Transparency, 12
Standard Checklist, 21, 22
Overlays, 15
Storage Location, 44
P/P, 17
Switching Aircraft, 32
Press to Edit, 38
Tail Number, 31
April 2015 | 49
FltPlan Go Android User’s Manual
Tail Wind Calculator, 34
Use System Default, 46
Tap to Get WX Button, 29
User Created Checklists, 21
Temperature Conversion, 37
Weather, 9, 29, 30
Terms and Conditions of Use, 46
Weather Brief, 28
Text, 40
Weight & Balance, 35, 36
Text Doodle, 41
X Wind Calculator, 34
Toggle GPS Service, 46
Zero Fuel Weight, 36
Tools, 20, 33, 34
Zoom & Orientaion, 11
Track Button, 32
Zoom In, 19, 30
Track Forward, 12
Zoom Options, 12
Track Up, 12
Zoom Out, 19, 30
Tracking, 31
Zoom To, 16
Under Gross Weight, 36
Zoom to Arrival, 12
Update Expired, 44
Zoom to Full Route, 12
Update On Map, 16
Zoom to Present, 12
Use Standard Pressure, 38
April 2015 | 50