1
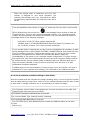
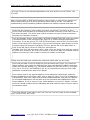
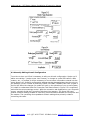
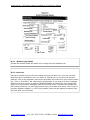
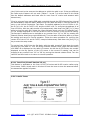
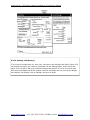
radios.net.au : SCS Pactor Modem Installation & Instruction Manual
9 TROUBLE- SHOOTING - WHAT TO DO WHEN THINGS DONE
WORK
From time to time things do not go as expected when setting up or running Airmail. The
two most common problems result from the modem and the computer not talking to each
other, or transmitting off frequency. These two "show-stopping" problems can be resolved
with the application of a little logic and patience.
9.1 Troubleshooting - Start Here
Debugging communications problems with your e-mail system is a two-step process:
Get the computer and modem talking to each other. The computer will not be able to set
1 the
modem in the Pactor mode if the modem and computer aren't speaking to one another.
Get the modem and radio, or if you are controlling the radio directly from the computer,
get the computer and radio talking to each other. Computerized frequency control
2
depends upon
modem/computer and radio talking to each other.
9.1.1 Getting the Computer and Modem Talking to Each Other
If the modem and computer aren't talking to each other nothing else will work. Problems in
this area are almost always caused by one or a combination of these three things:
1
The modem model selected does not match the modem model connected to the
computer.
2
The Com Port number selected does not match the Com Port number assigned by
Windows.
3 The Baud Rate selected is incorrect.
Setting up the communications link between the modem and the computer requires telling
Airmail the modem model you're using, to what Com port the modem is connected, and
how fast the computer and the modem should talk to each other (baud rate). Here's how:
With your modem and radio powered on, Airmail running, and the Message Screen on your
monitor, go to the toolbar and select TOOLS, OPTIONS, CONNECTION TAB. Select the
modem model from the pulldown menu shown in Figure 5-1. Airmail will automatically set
the baud rate to the appropriate communication speed for the modem model selected. If
you find it necessary to change the baud rate from the default rate (not recommended),
select a different baud rate from the pulldown menu.
www.radios.net.au
t. 61 (0)7 4125-7700 f. 03-8640-0419 e. [email protected]
radios.net.au : SCS Pactor Modem Installation & Instruction Manual
Determining which Com Port is available for communication with the modem is a
frequent source of trouble when first setting up a system. Most laptop computers have
at the most one serial port, and that serial port is assigned a Com Port number by the
computer (usually Com 1).
www.radios.net.au
t. 61 (0)7 4125-7700 f. 03-8640-0419 e. [email protected]
radios.net.au : SCS Pactor Modem Installation & Instruction Manual
There are several ways to determine the Com Port
number is assigned to your serial connector, but
probably the quickest way is by trial-and-error. While
not particularly sophisticated, this method is fast, and it
works:
From the dropdown menu shown in Figure 5-2, select the first Com Port in the list click
APPLY,OK,and then click on the icon
in the Message Screen toolbar to start the
Terminal Screen. If you're lucky and have guessed correctly, your computer and the
modem will communicate, the modem will initialize, and your computer will display a
1 message similar to the following message:
2010/05/16 12:08 PTC-IIPro modem initialized OK
<Modem serial*. 01000008CD8E220DxProfessional [Pactor-3] firmware ver:
4.0, no Pactor-3 license, 20 P3 trial-connects remaining>
If your modem doesn't respond and you don't see the initialization OK message, go back
to the Message Screen, select TOOLS, OPTIONS, CONNECTION tab. and choose the next
Com Port number on the list. Continue the process until you find a Com Port number
that works. This approach only takes a few minutes and doesn't require an
understanding of com ports or your computer system configuration. If you go through
the entire list of Com Port numbers and still aren't having any success, double-check to
2
be certain that the correct modem model is selected, and try a different baud rate. If
they are correctly selected, it may be time to solicit help from a friend, or to seek
professional computer assistance.
Probable cause of non communication is that you have a com port conflict, com port is
switched off in your computer bios settings, your USB card is not installed correctly.
9.1.2 Get the Modem and Radio talking to Each Other.
Once the modem and the computer are happily chatting away, it's time to get the modem
and the radio talking to each other. Failure for the modem/computer and the radio to talk
to each other is usually caused by one or a combination of, these six things:
1
The Frequency Control Cable is connected to an incorrect connector on the radio (this
happens quite often with the lcom M-802).
2 The Radio Connection method chosen is incorrect.
3 An incorrect Radio Type (brand & model) is selected.
4 The selected Radio Baud Rate is incorrect.
The CIV-ADDR (hex} radio address does not match the address setting in the radio
5 (Icom
radios only).
www.radios.net.au
t. 61 (0)7 4125-7700 f. 03-8640-0419 e. [email protected]
radios.net.au : SCS Pactor Modem Installation & Instruction Manual
The RS-232 box is not checked (Applicable to the Icom M-802 or the M-700Pro.710/
6 710RT)
When using an 8083 or 8086 serial frequency control cable, in order for the modem and
radio to talk to each other all five of the above items must be correct. The steps for
troubleshooting communications problems between the modem/computer and radio are:
Verify that the frequency control cable is properly connected. If you have an Icom
M-802. make sure the cable is connected to the Remote connector on the radio, and not
1
the Audio connector. The M-802 uses a DB-9 connector on both of these connections,
and they are frequently confused.
From the Message Screen, select TOOLS, OPTIONS, CONNECTION TAB. and in the Radio
Connection section of the connection tab (Figure 5-3) choose the appropriate Radio
Connection. If you are using a PTC-II/II Pro/IIusb modem, place a dot in the third radio
button, Direct using PTC-ll control port. If you are controlling the radio directly from the
computer using the computer's serial/RS-232 port, place a dot in the radio button in
front of the last choice, Direct via COM port: and select an
2
available Com from the drop-down menu. Note: Only one device at a time can connect
to a Com Port; therefore, the Com Port number to which the radio is connected must be
different from the Com Port number to which the modem is connected.
3 Make sure the Radio type matches the make and model radio you are using.
Verify that the data in the CIV ADDR(hex) field and baud rate (Figure 5-4) match the
radio's settings. Icom radios are different from other manufacturers radios in that each
model has a unique address, e.g., the default address for the Icom M-802 is 08 (Figure
5-4). the M-710 is 01; the706MKIIG is 58, etc (a comprehensive listing of Icom radio
addresses is located at the back of this Guide).
Icom owners need to pay special attention to the addressing requirement, and enter
4 either the address to which their radio is set or enter 00 (zero, zero). The 00 address is
interpreted by most Icom radios as a general broadcast address, and they will respond
to commands addressed to 00 the same as if the commands were addressed to their
unique address. If you're unsure of your radios address, try using 00. Section 11 at the
end of this Guide contains the hex addresses and baud rates for many of Icom's marine
and amateur radios.
5
Tune First. Place a check mark in the Tune First box if you are using an Icom branded
(AT-120/130/140, etc.) tuner.
www.radios.net.au
t. 61 (0)7 4125-7700 f. 03-8640-0419 e. [email protected]
radios.net.au : SCS Pactor Modem Installation & Instruction Manual
9.2 Manually Editing Airmail Configuration
From time to time you'll find it necessary to edit your Airmail configuration. Maybe you'll
add a new callsign (maybe a new ham license), or change to a new SSB radio or radio
modem, etc., or perhaps it will be necessary to correct some information entered into the
setup wizard, etc. Airmail's configuration settings can be changed at any time by going to
the Message Screen Toolbar by selecting TOOLS, OPTIONS, CONNECTION TAB. To gain a
feel for the effect the changes you make will have on the operation of your e-mail system,
it's helpful to understand how the Connection Tab Sheet shown in Figure 5-5 is organized,
and what the various settings control. With the connection tab displayed on your computer
screen, mentally divide the Connection Tab sheet into quarters. The upper left-hand
quarter contains settings related to controlling communications between the computer and
the modem. The remaining three quadrants contain settings that primarily relate to
controlling the radio.
www.radios.net.au
t. 61 (0)7 4125-7700 f. 03-8640-0419 e. [email protected]
radios.net.au : SCS Pactor Modem Installation & Instruction Manual
9.2.1 Modem Type/Model
Choose the modem brand and model you're using from the dropdown list.
9.2.2 Com Port
Choose an unused com port for the modem from the pull down list. If you do not know
what Com port is available to use, one tactic for finding out is to use the trial-and-test
method; click on the dropdown menu arrow and select the lowest com port number shown,
e.g., Com 1, click APPLY, OK. Start the Terminal screen. If you receive an error message,
close the Terminal screen, go back to TOOLS/OPTIONS, and select the next sequentially
higher com port number, and again start the Terminal screen. Continue the process until
the modem initializes. You have now found a Com port number that works. Hint: If you're
using an Edgeport adaptor, or a PTC-IIusb modem, start with the highest numbered Com
Port and work your way down
www.radios.net.au
t. 61 (0)7 4125-7700 f. 03-8640-0419 e. [email protected]
radios.net.au : SCS Pactor Modem Installation & Instruction Manual
9.2.3 Baud Rate
Airmail will enter the appropriate default baud rate for the modem chosen. You can choose
a different baud rate if you desire, however, slower baud rates might cause "stair stepping"
when receiving WEFAX with the GetFAX program.
9.2.4 Show Links Messages
Checking this box permits monitoring communication between the modem and the
computer, a useful troubleshooting tool. Uncheck this box after the e-mail system is
working properly. The computer now knows the modem model connected to it, the com
port number to which the modem is connected, and the baud rate at which the modem
communicates. Next you must tell the modem about the radio.
9.2.5 Radio Connection
This is where you enable computerized frequency
control of your radio. If the modem selected in Figure
5.6 has the ability to interface to the frequency control
port on your radio (PTC-II/IIPro/IIusb), all four choices
will be active, otherwise only None or Direct via COM
port), will be available.
1) None
Selecting none deactivates computer
control.
www.radios.net.au
t. 61 (0)7 4125-7700 f. 03-8640-0419 e. [email protected]
radios.net.au : SCS Pactor Modem Installation & Instruction Manual
2) Via
PTC-II
Do not use. When checked the modem
generates
the
frequency
control
commands instead of Airmail. You
want Airmail to generate the control
commands.
3) Direct
using
PTC-II
Control
Port
Use this selection if you're using a PTC-Ilusb, PTC-IIPro, or PTC-II to
control your radios transmit/receive frequencies.
4) Direct
via Com
Port
Use this choice to control your radio if you're using a PTC-IIe, PTC-IIex,
or other modem that does not have frequency control capabilities, and
your radio is connected to a RS-232/Serial port on your computer.
9.2.6 Radio Model/Type
This drop-down menu lists popular marine radios by model number. Choose the
manufacturer and model of radio that is connected to your Pactor modem.
9.2.7 Baud
Baud is the data rate between the modem and the radios control port. Set the baud rate for
NEMA compliant radios, e.g., Icom M-700 series, Icom M-802, Furuno 1503, to 4800. For
other radio models refer to your Operator/User manual to determine the proper data rate,
or Section 11, Tables 7-1a and 7.1b.
9.2.8 RS-232
Check this box if you are using a PTC-II/IIPro/ or PTC-IIusb modem and your radios
computer control port is RS-232 compatible (Icom M-700 series, M-802, Sea-235, some
Kenwood and Yaesu transceivers, etc.
9.2.9 Dial Offset:
Leave this entry set to "00" unless there are proven inaccuracies in the dial setting of the
radio.
9.2.10 Remote ID/CIV ADDR (hex) - Icom Radio Address
Enter the address of the Icom radio connected to the modem. If you don't know the address
of your radio, try entering 00 (zero zero), the general broadcast address to which most
Icom SSB and ham radios respond. Note: Multiple Icom radios can be controlled by a
single control line; therefore, each Icom radio has a user setable address. For radios being
controlled through the radio's CIV Port, the address entered in the Remote ID/CIV ADDR
www.radios.net.au
t. 61 (0)7 4125-7700 f. 03-8640-0419 e. [email protected]
radios.net.au : SCS Pactor Modem Installation & Instruction Manual
(hex) field must be the same as the address to which the radio is set. If they are different
the radio control feature will not work (Tables 7. la and 7.1b at the back of this Guide
lists the default addresses and baud rate for most Icom HF marine and amateur radio
transceivers).
If you're using an Icom marine SSB radio controlled through the SSB's Remote Port, Airmail
will automatically read the radio's address from the radio and enter it into the Remote ID
entry on the Airmail Connection Tab Sheet. The default address for the M-700Pro is 02,
the M-710 is 01, the M-710RT is 03, and the M-802 is 08. To verify/set the address of an
Icom M700Pro, with the radio turned off simultaneously hold down the [ENT] & [1] keys
while turning the radio ON. Rotate the Group Selector Knob until the LCD displays remid. The number displayed on the top portion of the LCD screen is the current ID setting.
The Remote ID address can be changed to any number from "00" to "99" by rotating the
Channel Selector Knob (large right-hand knob). Turn the radio off and then back on to save
the setting and return to normal operation. Follow the same procedure for verifying the
remote ID of the M-710 and M-710RT, except simultaneously hold down the [func] & [1]
key to enter the setup mode.
To put the Icom M-802 into the Set Mode, with the radio turned off hold down the mode
key and turn the radio on. Turn the Group Channel Selector knob (large left-hand knob)
until REMT-lD is displayed on the radio LCD screen. As with the M-700 series, the number
displayed on the top portion of the LCD screen is the current ID setting, and can be
changed to any number from "00" to "99" by turning the channel selector knob. Turn the
radio off and then back on to return to normal operation.
9.2.11 Tune First (Airmail Version 3.3.xx)
This feature is applicable to the Icom M-700/710 series and M-802 marine radios using
Icom tuners. Place a check mark in this box to force the tuner to tune the antenna before
the transmitter applies full power.
9.2.12 Audio Tones
www.radios.net.au
t. 61 (0)7 4125-7700 f. 03-8640-0419 e. [email protected]
radios.net.au : SCS Pactor Modem Installation & Instruction Manual
The audio tones section shown in Figure 5-7 is located
in the lower left-hand section of the Connection Tab.
Verify that the center frequency is set to 1500, and
USB (Upper Sideband) is selected. The Amplitudes
setting should be
adjusted to produce the proper
output from your radio, somewhere around 100 watts
for marine radios, and 50 - 60 watts for ham radios. A
beginning setting at or below FSK-250/PSK-330 for the
Icom M-802 and FSK-130/PSK-170 for the M-700Pro/
710 is recommended. The process of properly adjusting
the transmit power of your transceiver is discussed in
detail elsewhere in this Guide.
9.2.13 Modes Screen: (Applicable to Icom M-700,710,710RT, & M-802)
Hidden from plain view, you access this screen from the Message Index Screen by clicking
on TOOLS, OPTIONS, ADVANCED SETTINGS. Shown in Figure 5-8, this window lets you
bring the mode labels used in Airmail into agreement with the mode labels used in your
Icom radio. Huh? What's that mean? Fortunately for us these labels seldom need changing
and the changes are primarily applicable to the M-710 series of Icom radios. Here's the
problem and how this screen solves it. Some versions of the same Icom radio model, e.g.,
M-710, label the Upper Sideband mode as USB, and others label it J3E. Some M710's label
Amplitude Modulation (like the AM radio we're all familiar with), AM, and others label it H3E,
etc. Think of this as a language dialect. In order for Airmail to control the radio correctly,
it needs to know which dialect of the M-710 language to speak. Should Airmail call Upper
Sideband USB or J3E when sending the command to switch to Upper Sideband mode? When,
if ever, will you have to use this window? Unless Airmail is unable to set your Icom M-710
series radio into the Upper Sideband or AM modes, probably never, but now you know the
purpose for this screen and why it exists.
To see what labels your M-710 uses for the various communication modes, power on your
M-710 and step through the modes by pressing the mode button on your radio.
www.radios.net.au
t. 61 (0)7 4125-7700 f. 03-8640-0419 e. [email protected]
radios.net.au : SCS Pactor Modem Installation & Instruction Manual
9.2.14 Settings Tab Sheet(s)
If you haven't already done so, enter your call sign on the Settings Tab Sheet (Figure 5-9).
You should also enter your Lat/Lon coordinates on the Settings Tab if these entries are
blank. Click on APPLY, OK when finished making these entries. If you're running Airmail
with both the SailMail and WL2K network versions combined into one, Airmail will display
two Settings Tab Sheets; one for SailMail, and one for WL2K.
www.radios.net.au
t. 61 (0)7 4125-7700 f. 03-8640-0419 e. [email protected]
radios.net.au : SCS Pactor Modem Installation & Instruction Manual
9.2.15 Verifying Your Configuration - Does it Work?
With your radio and modem turned on and Airmail running, switch to the Terminal Screen
by clicking on the
icon located on the Message Screen Toolbar. The Pactor-II
modem should switch to the Pactor Mode and the Terminal Screen will display in red text a
message similar to:
< Modem serial*: 01000008CD65F788 > < Professional [Pactor-3]firmware ver: 3.9
installed, no Pactor-3 license, 20 P3 trial-connects remaining > if no P-III License
is installed, or 2009/03/18 19:56:59 PTC-II modem initialized OK < Professional
[Pactor-3] firmware ver: 3.9, P-3 license OK > if a P-III License is installed.
If the modem does not switch to the Pactor-II mode and/or an error is shown on the
Terminal Screen, go back and check the modem and radio settings. Most problems are
caused by com port conflicts (one or more hardware devices assigned to the same Com
Port), incorrect Com Port assignment (the modem is connected to a Com Port different from
that which is assigned in Airmail), and incorrect data baud rates. If you've checked the
Show Links Messages box, remember to uncheck it once the system is working correctly.
www.radios.net.au
t. 61 (0)7 4125-7700 f. 03-8640-0419 e. [email protected]