1
TT-10236A easyMail
User Manual
SAILOR®
by Thrane & Thrane
TT-10236A easyMail User Manual
Copyright© Thrane & Thrane A/S
ALL RIGHTS RESERVED
2006, Thrane & Thrane A/S
Information in this document is subject to change without notice and does not represent a
commitment on the part of Thrane & Thrane A/S.
Document number:
TT 99-122283
Revision: B
1
TT-10236A easyMail
User Manual
SAFETY SUMMARY
The following general safety precautions must be observed during all phases of operation, service
and repair of this equipment. Failure to comply with these precautions or with specific warnings
elsewhere in this manual violates safety standards of design, manufacture and intended use of the
equipment
Thrane & Thrane A/S assume no liability for the customer’s failure to comply with these
requirements.
MICROWAVE RADIATION HAZARDS
During transmission this unit radiates microwaves from the antenna. This radiation may be
hazardous to humans if they are exposed to it directly at short distances from the antenna. During
transmission, make sure that nobody is closer than the recommended minimum safety distance of 1
ft. (0.3 meter).
KEEP AWAY FROM LIVE CIRCUITS
Operating personnel must not remove equipment covers. Only qualified maintenance personnel
must make component replacement and internal adjustment. Under certain conditions, dangerous
voltages may exist even with the power cable removed. To avoid injuries, always disconnect power
and discharge circuits before touching them.
SAFETY AT SEA
Use the easyTrack transceiver in connection with a display device (e.g. a personal computer with
EasyMail or a Message Terminal) to increase safety at sea. Without a display terminal you will be
unable to display meteorological, navigational and SAR messages, distress alert relays as well as
commercial messages.
2
TT-10236A easyMail
User Manual
LIST OF CONTENTS:
1
SCOPE AND PURPOSE ........................................................................... 6
1.1
1.2
2
INSTALLING EASYMAIL ......................................................................... 8
2.1
2.2
2.3
2.4
2.5
2.6
3
RELATED DOCUMENTS ..............................................................................................................6
ABBREVIATIONS AND TERMS .......................................................................................................6
ABOUT EASYMAIL ....................................................................................................................8
BEFORE YOU INSTALL ................................................................................................................8
EASYMAIL INSTALLATION ...........................................................................................................8
RUNNING EASYMAIL FOR THE FIRST TIME .....................................................................................13
EASYMAIL BASIC SETUP ............................................................................................................13
GETTING NEW VERSIONS OF EASYMAIL ......................................................................................15
USING EASYMAIL ...............................................................................16
3.1
EASYMAIL MAIN WINDOW ........................................................................................................16
3.1.1
Hot list ........................................................................................................................17
3.2
SENDING AND RECEIVING MESSAGES .........................................................................................18
3.2.1
Prepare for sending messages ....................................................................................18
3.2.2
Sending a message......................................................................................................19
3.2.3
Examples of different message types ..........................................................................23
3.2.4
Default messages.........................................................................................................27
3.2.5
Sending messages to easyTrack ..................................................................................28
3.3
AUTO TEXT ............................................................................................................................28
3.4
EGC RECEPTION....................................................................................................................29
3.5
POSITION REPORTING ..............................................................................................................30
3.6
DNID LIST ............................................................................................................................31
3.7
ENID LIST ............................................................................................................................32
3.8
TRANSCEIVER INFORMATION ....................................................................................................32
3.8.1
Transceiver status........................................................................................................32
3.8.2
GPS status....................................................................................................................33
3.8.3
View / Manually update position .................................................................................34
3.9
PASSWORD PROTECTION ..........................................................................................................35
3.9.1
Setting a Transmit password ........................................................................................35
3.9.2
Setting a Config password ...........................................................................................35
3.9.3
Removing a password.................................................................................................36
3.10
TERMINAL MODE .................................................................................................................36
3.11
LAND EARTH STATIONS ........................................................................................................37
3.12
E-MAIL SERVICE PROVIDERS .................................................................................................39
3.13
SET LOCAL TIME..................................................................................................................40
3.14
DISTRESS FUNCTIONALITY .....................................................................................................41
3.14.1 Distress Alert Setup .....................................................................................................41
3.14.2 Reset Alarm .................................................................................................................43
3.14.3 Latest Distress information...........................................................................................43
3.14.4 Distress Test Mode ......................................................................................................44
3.14.5 Distress Message.........................................................................................................45
3
TT-10236A easyMail
4
User Manual
GETTING FURTHER INFORMATION ..........................................................48
LIST OF FIGURES:
Figure 1 easyMail with no connection to easyTrack..........................................................................13
Figure 2 easyMail connected to easyTrack, good satellite signal and GPS fix. .................................13
Figure 3 Example of Mobile number ................................................................................................14
Figure 4 The login menu ..................................................................................................................14
Figure 5 Example when logged in to East Atlantic............................................................................14
Figure 6 Choose your Service Provider............................................................................................15
Figure 7 Land Earth Stations (LESs) of your Inmarsat Service Provider.............................................15
Figure 8 The easyMail main window ................................................................................................16
Figure 9 Logging in to an Ocean region ...........................................................................................18
Figure 10 Choose your Service Provider..........................................................................................19
Figure 11 Land Earth Stations (LESs) of your Inmarsat Service Provider ...........................................19
Figure 12 The Address Book ............................................................................................................20
Figure 13 The Address Card ............................................................................................................20
Figure 14 An address is added to the 'To' field .................................................................................22
Figure 15 The sending window ........................................................................................................23
Figure 16 Example of adding a telex address...................................................................................24
Figure 17 Example of adding a fax address......................................................................................24
Figure 18 Example of adding an Inm-C mobile address...................................................................25
Figure 19 Example of adding a PSTN modem address .....................................................................25
Figure 20 Example of adding a Special Access Code 28 address .....................................................26
Figure 21 Example of adding a DNID address..................................................................................26
Figure 22 Example of adding an X.25 address .................................................................................27
Figure 23 Default message menu .....................................................................................................27
Figure 24 Set default message dialog...............................................................................................28
Figure 25 The auto text possibilities .................................................................................................29
Figure 26 The EGC Setup window ....................................................................................................30
Figure 27 easyMail Position reporting set-up ................................................................................... 31
Figure 28 The DNID List ...................................................................................................................32
Figure 29 The ENID List....................................................................................................................32
Figure 30 The Transceiver Status window ........................................................................................33
Figure 31 The GPS Status window.....................................................................................................34
Figure 32 Position window ...............................................................................................................34
Figure 33 Creating a transmit password...........................................................................................35
Figure 34 Creating a config password..............................................................................................36
Figure 35 The Terminal mode ..........................................................................................................37
Figure 36 Land Earth Stations ...........................................................................................................38
Figure 37 Changing a LES name.......................................................................................................39
Figure 38 E-mail Service Providers ..................................................................................................40
Figure 39 Set local time ....................................................................................................................41
Figure 40 Distress info window ........................................................................................................41
Figure 41 Distress Alert Setup ..........................................................................................................42
Figure 42 Latest distress information window................................................................................... 43
Figure 43 Distress Test Mode ...........................................................................................................45
4
TT-10236A easyMail
User Manual
Figure 44 Distress Message Editor info 1..........................................................................................46
Figure 45 Distress Message Editor info 2..........................................................................................46
Figure 46 The Distress Message Editor ............................................................................................47
Figure 47 A Distress Message entry in the Outbox ...........................................................................48
LIST OF TABLES:
Table 1 Related documents ................................................................................................................6
Table 2 Abbreviations and terms .......................................................................................................7
Table 3 Status of latest Distress Alert................................................................................................44
Table 4 Status of latest distress test ..................................................................................................44
5
TT-10236A easyMail
User Manual
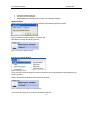
1 SCOPE AND PURPOSE
The purpose of this document is to describe the system in which the easyTrack Mobile Earth Station
(MES) is used and how the easyTrack MES is operated. The information found in the manual is only
an overall briefing. For detailed description read the documents listed in section 1.1 Related
Documents. For access to these manuals please contact the local distributor.
1.1
RELATED DOCUMENTS
Looking for
Please read
Detailed description of the installation of the
easyTrack MES.
Detailed description of the use of the
easyTrack MES.
Detailed description of RS232 interface to the
easyTrack MES.
Detailed description of the Land Earth Station
PSDN interface
Detailed description of the Land Earth Station
Internet interface
Something not described in any of the above
listed documents
[1] TT98-121787, TT-3026D/M/S Installation Manual
[2] TT98-121798, TT-3026DMS User Manual
[3] TT 98-116080, TT-3026 Software Interface
Reference Manual
[4] TT 99-103879, PSDN User Interface Manual
[5] TT 99-110036, Internet Gateway User Manual
[6] On www.thrane.com how to contact the local
Thrane & Thrane distributor for further assistance.
Table 1 Related documents
1.2
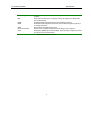
ABBREVIATIONS AND TERMS
AA
Capsat Manager
DNID
EGC
Geostationary
GPS
Inmarsat-C mobile
ISP
ISN
LES
Login
Member number
MES
MRCC
NCS
Ocean region
OS
Accounting Authority.
Thrane & Thrane fleet tracking program.
Data Network ID (for tracking purpose).
Enhanced Group Call.
Geostationary satellites are positioned 36000 Km above the earth. At this
height they rotate around the earth at the same speed as the earth rotates
around its axis, so in effect remaining stationary above a point on the earth.
Global Positioning System.
The easyTrack satellite communication modem.
Inmarsat Service Provider. Company offering the service. Most likely also a
PSA and AA.
Inmarsat Serial Number.
Land Earth Station.
Registration of easyTrack MES in the Inmarsat-C system.
Used to distinguish easyTrack MES’s with same DNID from another.
Mobile Earth Station – the name of the transceiver in Inmarsat-C.
Maritime Rescue Coordination Centre
Network Coordination Station.
Coverage of one of four geostationary Inmarsat satellites.
Operating System.
6
TT-10236A easyMail
Position report
PSA
PSDN
PSTN
SARF
Store and forward
Telex
User Manual
Compact information transmitted from easyTrack that includes the GPS
position.
Point of Service Activation. Company making the registration. Most likely
also an ISP and AA.
Public Switched Data Network such as the X25 data network.
Public Switched Telephone Network is the land based telephone system or
an analogue modem.
Service Activation Registration Form.
LES receives complete mails before forwarding it to the recipient.
TELeprinter EXchange is a standardized, internationally recognized, means
of real time text communications.
Table 2 Abbreviations and terms
7
TT-10236A easyMail
User Manual
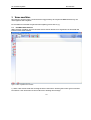
2 INSTALLING EASYMAIL
2.1
ABOUT
EASYMAIL
EasyMail is a PC program, which can be used to control Thrane & Thrane and Sailor Inmarsat-C
transceivers.
With easyMail you can easily send and receive e-mail, SMS, fax and telex messages, set up position
reporting, receive EGC messages and many other things.
2.2
BEFORE YOU INSTALL
Before installation of easyMail make sure that your PC fulfils the following requirements:
Operating system: Windows 98SE, 2000 or XP
Free hard drive space: 10MByte minimum, 50MByte recommended.
2.3
EASYMAIL INSTALLATION
Follow these steps to install easyMail:
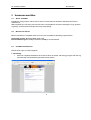
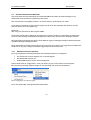
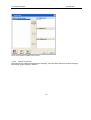
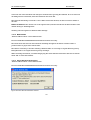
1. CD startup
• Insert the easyMail installation CD in the CD drive of the PC. The setup program will start up
automatically and the following window will be shown.
8
TT-10236A easyMail
User Manual
If the program does not start automatically, run start.htm from your CD drive.
2. Starting the installation
• Click ‘Install easyMail’.
3. Start up window
•
Click ‘Next’.
4. Welcome screen
•
Click ‘Next’.
9
TT-10236A easyMail
User Manual
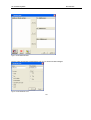
5. Disclaimer window
•
•
•
Read the disclaimer
Click the button ‘ I accept the terms in the license agreement’
Click ‘Next’
6. Customer information
•
•
Type user name and organisation
Click ‘Next’.
7. Destination folder
10
TT-10236A easyMail
•
•
User Manual
Choose destination folder (Default and recommended folder is C:\Program Files\easyMail)
Click ‘Next’.
8. Ready to install
•
Click ‘Install’ to begin installing easyMail.
9. Install completed
11
TT-10236A easyMail
•
User Manual
Click ‘Finish’ to complete the installation procedure.
10. Starting easyMail
• easyMail can be started in one of two ways:
1. Click the easyMail icon
on the desktop.
2. Start easyMail from StartÆProgramsÆThrane & ThraneÆeasyMail
The easyMail main window below will be shown.
12
TT-10236A easyMail
2.4
User Manual
RUNNING EASYMAIL FOR THE FIRST TIME
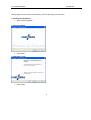
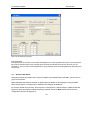
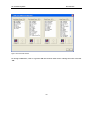
When starting easyMail, for a moment the Connections and Mobile status field look like this:
Figure 1 easyMail with no connection to easyTrack
After a few seconds, the fields should change to this:
Figure 2 easyMail connected to easyTrack, good satellite signal and GPS fix.
If the fields look like Figure 21, please go on to 5.5 easyMail basic setup.
If the fields look like Figure 20, The PC has not connected to easyTrack. This usually is because the
COM port in the PC is already open by another application, or because the COM port or baud rate
set in easyMail is wrong. Close the other application or go to OptionsÆConfigurationÆCOM
Settings… and choose the correct port and baud rate (default 4800).
Below is an explanation of the Connections field.
GPS
Green: GPS ok. Red: GPS error or no antenna connection.
Ant. Signal
This bar has 5 steps from all green to all red, depending on the quality of the satellite signal. Green:
good signal quality. Red: no signal.
PC connect
Green: easyMail has connected to easyTrack. Red: No connection between easyMail and easyTrack
Please go on to the easyMail basic setup section, for a quick guide to getting easyTrack and
easyMail configured and ready to use.
2.5
EASYMAIL BASIC SETUP
When starting easyMail for the first time, a few things need to be configured:
13
TT-10236A easyMail
•
•
•
User Manual
Configure Mobile number.
Log in to an Ocean Region.
Default LES and E-mail Service Provider for sending messages.
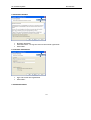
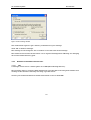
Mobile number
Click OptionsÆConfigurationÆMobile number. The following dialog is shown:
Type the Mobile number (9 digits) and click ‘Ok’.
The Mobile number should be updated:
Figure 3 Example of Mobile number
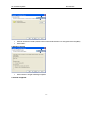
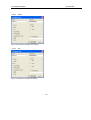
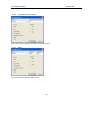
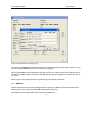
Log in to an Ocean Region
Figure 4 The login menu
Go to the menu OptionsÆLogin and choose between the 4 Ocean Regions depending on your
current position.
After a short while the Mobile status field has changed:
Figure 5 Example when logged in to East Atlantic
You have now logged in to the Inmarsat satellite network.
14
TT-10236A easyMail
User Manual
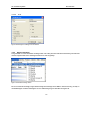
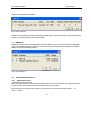
Default LES and E-mail Service Provider for sending messages.
To set up easyMail for sending messages, the following needs to be configured.
Click OptionsÆSet Default ISP…
Figure 6 Choose your Service Provider
Choose your Inmarsat Service Provider on the list.
Click ‘OptionsÆSet Default LES…’
Figure 7 Land Earth Stations (LESs) of your Inmarsat Service Provider
Choose the Land Earth Stations of your Inmarsat Service Provider for each Ocean Region.
You are now ready to send and receive messages.
2.6
GETTING NEW VERSIONS OF EASYMAIL
easyMail is a free program and can be downloaded on the Thrane & Thrane website on the following
address:
http://www.tt.dk/easymail
15
TT-10236A easyMail
User Manual
3 USING EASYMAIL
This chapter explains some overall functions supported by the easyTrack MES and how they are
used together with easyMail.
For installation of TT-3026 easyTrack and easyMail, please refer to [1].
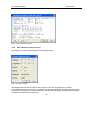
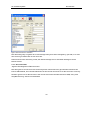
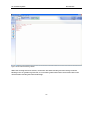
3.1 EASYMAIL MAIN WINDOW
When starting easyMail, the main window will be shown. Below is an explanation of the fields and
buttons on the main window.
Figure 8 The easyMail main window
1) ‘Send’. This button sends the message written in the Editor. Clicking the button opens a window
from where a few selections can be made before sending the message.
16
TT-10236A easyMail
User Manual
2) ‘Contacts’. Clicking this button opens the Contacts / Address book.
3) ‘Mobile number’. This field shows the mobile number. Click to enter/change the mobile number.
4) ‘Mobile Status Field’. This bar shows thee current status of the transceiver. Click in this field to
show the Transceiver Status Window.
5) ‘PC Connect’. Green: easyMail has connected to easyTrack. Red: No connection between
easyMail and easyTrack
6) ‘Ant Signal’. This bar has 5 steps from all green to all red, depending on the quality of the satellite
signal. Green: good signal quality. Red: no signal. Click in this field to show Transceiver status.
7) ‘GPS’. Green: GPS is ok. Red: GPS error or no antenna connection. Click to show GPS status
window.
8) ‘To’. Insert an address in the ‘To’ field.
9) ‘Cc’. Insert an address in the ‘Cc’ field. This feature might not be supported by all ISPs.
10) ‘Subject’. A message subject can be typed in this field.
11) ‘Editor’. This shows the Editor.
12) ‘Distress Message Editor’. TT-3026D only. This opens the Distress Message Editor.
13) ‘Inbox’. This opens the Inbox where all incoming messages are stored.
14) ‘Outbox’. This opens the Outbox where all outgoing and sent messages are stored.
15) ‘EGC’. This opens the EGC log where all EGCs are stored.
16) ‘UTC time’. This field shows the current UTC time.
17) ‘Info bar’. This field shows the last info received. Click in this field to open the info log, showing
the last 500 info messages from the transceiver.
3.1.1 HOT LIST
[1.13]
For easier navigation in easyMail, a list of all clicked menus and buttons are shown when pressing
the F12 key. The list is showed with the most used items on top. When clicking the list items, the
belonging button or menu item is opened.
17
TT-10236A easyMail
User Manual
3.2 SENDING AND RECEIVING MESSAGES
One of the main features offered by the easyTrack MES is the ability to send messages to any
destination in the world from anywhere in the world.
The main window of easyMail contains a To: field a Subject: field and the text editor.
In the Subject: field write an appropriate subject for the mail. The message that needs to be sent
must be written in the text editor e.g.:
Hello John,
This is my first mail from the T&T easyTrack MES.
It should be noted that the billing in the Inmarsat C system is based on consumption and therefore
the cost of the message transmission will depend on how many characters the message contains.
The following sections describe how to send different types of messages using the Thrane & Thrane
easyMail message handling software.
Some details like bit format and specific services and access codes are not supported on all ISPs and
an ISP can at any time change the number supported formats and services.
3.2.1 PREPARE FOR SENDING MESSAGES
To set up easyMail for sending messages, the following needs to be configured.
•
•
•
The transceiver must be logged in to an Ocean Region.
The default ISP must be set.
Default LESs must be set for all Ocean Regions.
If the mobile status is “Logged Out”, then you need to log in to one of the 4 Ocean Regions.
This is done by clicking ‘OptionsÆLoginÆ’ and choosing one of the Ocean Regions.
Figure 9 Logging in to an Ocean region
To set the default ISP, click OptionsÆSet Default ISP…
18
TT-10236A easyMail
User Manual
Figure 10 Choose your Service Provider
Choose your Inmarsat Service Provider on the list.
To set the default Land Earth Stations, click OptionsÆSet Default LES…
Figure 11 Land Earth Stations (LESs) of your Inmarsat Service Provider
Choose the Land Earth Stations of your Inmarsat Service Provider for each Ocean Region.
You are now ready to send and receive messages.
3.2.2
SENDING A MESSAGE
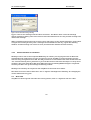
3.2.2.1 CREATE AN ADDRESS IN THE ADDRESS BOOK
A message needs to be sent to a contact in the Address Book. To create a contact, click ‘Contacts’ on
the main window. This will open the Address Book.
19
TT-10236A easyMail
User Manual
Figure 12 The Address Book
Type a name and choose a destination type, e.g. e-mail as in this example.
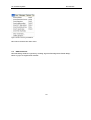
Figure 13 The Address Card
20
TT-10236A easyMail
User Manual
Type the e-mail address in the address field.
The Format options are used to change the size of the data being sent over satellite connection. This
can make the message cheaper to send. 7 bit is cheaper to send than 8 bit, and 5 bit is cheaper than
7 bit.
There are 3 options:
Choosing 5 bit, the message is sent as ITA-2 Packed Baudot. With this format, the text will be
converted to and sent with lower case letters.
Choosing 7 bit, the message is sent as Int. Alphabet no.5, odd parity.
Choosing 8 bit, the message is sent as 8-bit data. No data will be converted. Speceial characters in a
text could still be slightly different from the original, depending on the character set used when
typing the message and the character set used when reading the received message.
Example of conversion:
Original text:
The quick brown fox jumps over the lazy dog0123456789.,:;!"#¤%&/()=?`^'*¨@£$€{[]}|~_-<>\
Text received when sent in 5-bit format:
the quick brown fox jumps over the lazy dog0123456789.,::.'#?%+/()=?'''.?@?$?(())/---()/
Text received when sent in 7-bit format:
The quick brown fox jumps over the lazy dog0123456789.,:;!"#$%&/()=?`^'*(@#${[]}|~_-<>\
Text received when sent in 8-bit format:
The quick brown fox jumps over the lazy dog0123456789.,:;!"#ñ%&/()=?`^'*¿@ú$Ç{[]}|~_-<>\
Click ‘OK’ to save the address.
21
TT-10236A easyMail
User Manual
Figure 14 An address is added to the 'To' field
3.2.2.2 SENDING THE MESSAGE
After selecting an address and writing the message, click the ‘Send’ button to send the message.
This brings up the ‘Sending’ window.
22
TT-10236A easyMail
User Manual
Figure 15 The sending window
Use confirmation request to get a delivery confirmation of your message.
Click ‘OK’ to send the message.
The message is now being sent. Go to ‘Outbox’ to view the status of the message.
The Outbox is saved on the PC hard drive. Go to ‘OptionsÆConfigurationÆRouting’ for changing
the current Outbox directory path.
3.2.3
EXAMPLES OF DIFFERENT MESSAGE TYPES
3.2.3.1 SMS
A message can be sent to a mobile phone as an SMS (Short Message Service).
This is usually done by creating a SAC address with a specific SAC code. The phone number and
message is then written in the body text using a specific format.
Contact your Land Earth Station for further information on how to send SMS.
23
TT-10236A easyMail
3.2.3.2
User Manual
TELEX
Figure 16 Example of adding a telex address
3.2.3.3
FAX
Figure 17 Example of adding a fax address
24
TT-10236A easyMail
3.2.3.4
User Manual
INM-C MOBILE
Figure 18 Example of adding an Inm-C mobile address
3.2.3.5
PSTN MODEM
Figure 19 Example of adding a PSTN modem address
25
TT-10236A easyMail
3.2.3.6
User Manual
SPECIAL ACCESS CODE (SAC)
Figure 20 Example of adding a Special Access Code 28 address
3.2.3.7
DNID
Figure 21 Example of adding a DNID address
26
TT-10236A easyMail
3.2.3.8
User Manual
X.25
Figure 22 Example of adding an X.25 address
3.2.4 DEFAULT MESSAGES
It is possible to create 8 default messages that can easily be sent with the function keys F1-F8. This
can be helpful if the same message needs to be sent regularly.
Figure 23 Default message menu
To save a default message, begin with writing the message in the Editor. Press an F key (F1-F8) or
click Messages->Default messages->F1-F8. This brings up the window in Figure 24.
27
TT-10236A easyMail
User Manual
Figure 24 Set default message dialog
Type a name for the message and click ’Save and close’. The Button ‘Save’ saves the message
without closing the dialog. The ‘Clear’ button clears the link between an F key and the message and
deletes the message.
When a default message has been saved it’s name will appear in the ‘Default messages’ menu. Refer
to Figure 23. Pressing an F key after a message has been linked to that key, opens the ‘Sending
window’ and the message are read to be sent (if a destination address has been chosen).
3.2.5
SENDING MESSAGES TO EASYTRACK
Messages can be sent to the easyTrack MES using an ordinary e-mail program such as Microsoft
Outlook Express or Netscape. In order to send an e-mail to the MES a e-mail forwarding account
must be set up and paid for at the ISP. The ISP provides an e-mail-address that must be filled into the
"To:" field and usually also a password or pin code that must be filled into the subject or body of the
message, this varies from ISP to ISP. Some ISPs also supports sending SMS messages to easyTrack.
Contact your ISP to set up the message forwarding account.
Messages received by the easyTrack and easyMail can be found in the Inbox.
The Inbox is saved on the PC hard drive. Go to ‘OptionsÆConfigurationÆRouting’ for changing the
current Inbox directory path.
3.3 AUTO TEXT
easyMail can insert specific texts like the current position, time or a signature into the editor.
28
TT-10236A easyMail
User Manual
Figure 25 The auto text possibilities
This can be found in the ‘Edit’ menu.
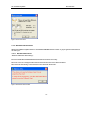
3.4 EGC RECEPTION
The EGC Setup window is opened by clicking ‘OptionsÆConfigurationÆEGC Setup’.
Refer to [2] for an explanation of EGCs.
29
TT-10236A easyMail
User Manual
Figure 26 The EGC Setup window
Fixed positions:
Fixed positions are used to receive EGC messages sent to other positions than your current position.
This can be beneficial if you for example want to know the weather forecast for the area you are
heading to. You can enter several positions on your planned route to keep updated on the next parts
of your trip.
3.5
POSITION REPORTING
Using the position reporting feature requires a DNID to be downloaded in the MES – please refer to
[2] for more details.
When the DNID and member number is downloaded the DNID can be displayed using easyMail.
Select menu Options->Configuration->DNID that will display the DNID list.
To actually enable the reporting, select Options->Configuration->Position Report->DNID PU Position
Reporting. This will display the Reporting Setup window. Press the New button and the interval
configuration window is displayed.
30
TT-10236A easyMail
User Manual
Figure 27 easyMail Position reporting set-up
Now select the LES,DNID and Member Number pair downloaded by the LES, set the interval to, e.g.,
2 hours. Press the OK button to start the automatic reporting.
The easyTrack MES is now configured to send its position at a regular interval to the LES that stores
the data in the DNID mailbox. From here the LES will typically be configured to forward the reports
by e-mail.
Refer to [2] for more information about position reports and how to use them.
3.6
DNID LIST
Before easyTrack can be used for polling and data reporting, a DNID must exist in the transceiver.
Refer to [2] for more information on DNIDs and position reporting.
The DNIDs stored in easyTrack can be viewed in the DNID List,
31
TT-10236A easyMail
User Manual
‘Options->ConfigurationÆDNIDs’.
Figure 28 The DNID List
DNIDs can be enabled or disabled. Disabling a DNID makes easyTrack unable to send data/position
reports or receive polls from this specific DNID.
3.7 ENID LIST
ENIDs are used to receive FleetNET EGC messages. Refer to [2] for more information on FleetNET.
A list of the ENIDs existing in easyTrack can be viewed clicking ‘OptionsÆConfigurationÆENIDs.
ENIDs can be enabled and disabled.
Figure 29 The ENID List
3.8
TRANSCEIVER INFORMATION
3.8.1 TRANSCEIVER STATUS
‘OptionsÆTransceiver Status’.
The Transceiver Status provides technical information on the current state of the easyTrack satellite
communication. The Transceiver Status is updated every 10 seconds.
The information contained in the window can be printed or saved by clicking the ‘Print…’ or
‘Save…’ button.
32
TT-10236A easyMail
User Manual
Figure 30 The Transceiver Status window
3.8.2 GPS STATUS
‘OptionsÆGPS Status’.
The GPS status provides detailed information on the current state of the GPS reception. The GPS
Status is updated every 10 seconds.
The information contained in the window can be printed or saved by clicking the ‘Print…’ or
‘Save…’ button.
33
TT-10236A easyMail
User Manual
Figure 31 The GPS Status window
3.8.3
VIEW / MANUALLY UPDATE POSITION
Choosing the ‘Position’ menu brings up the following dialog:
Figure 32 Position window
This dialog shows the latest position from easyTrack. The data is updated every minute.
If the GPS should fail, you can enter a position manually from this dialog. Clicking ‘OK’ will update
the position. If the position is updated manually and the GPS is working, the GPS will immediately
overwrite the manually stored position.
34
TT-10236A easyMail
User Manual
3.9 PASSWORD PROTECTION
easyMail allows sending of messages and changing the configuration to be password protected.
3.9.1 SETTING A TRANSMIT PASSWORD
Setting a transmit password, easyMail will ask for the password when the user clicks the ‘Send’
button. Only when the right password is entered, the ‘sending dialog’ will be shown and the
message can be sent. Transmission of Distress Messages will not be password protected, so when
trying to send a Distress Message, the password check will not be performed.
Figure 33 Creating a transmit password
3.9.2 SETTING A CONFIG PASSWORD
When a config password has been set, the user trying to enter the configuration menu
(OptionsÆConfiguration) of easyMail must enter the correct password, or the configuration cannot
be changed. Land earth station setup, local time settings and COM settings are not password
protected.
35
TT-10236A easyMail
User Manual
Figure 34 Creating a config password
3.9.3 REMOVING A PASSWORD
The transmit and config passwords can be removed by typing the old password and without
entering a new one in the two other fields of the Password window. Save by clicking ‘OK’.
3.10 TERMINAL MODE
‘OptionsÆConfigurationÆTerminal Mode’.
The Terminal Mode is for advanced use, and is used to communicate with easyTrack via a textual
command interface.
36
TT-10236A easyMail
User Manual
Figure 35 The Terminal mode
Note that in Terminal Mode the normal communication with the transceiver is disabled, so no
information will be updated in easyMail, and no EGCs or messages will be received in the period of
the Terminal Mode session.
3.11 LAND EARTH STATIONS
‘OptionsÆConfigurationÆLand Earth Stations’.
In this window the available Land Earth Stations can be viewed, and the names of the Land Earth
Stations can be changed.
37
TT-10236A easyMail
User Manual
Figure 36 Land Earth Stations
To change a LES name, click on a specific LES and click the ‘Edit’ button. Change the name and click
‘OK’.
38
TT-10236A easyMail
User Manual
Figure 37 Changing a LES name
To restore the LESes to the default values, click the ‘Default’ button for the Ocean Region.
3.12 E-MAIL SERVICE PROVIDERS
‘OptionsÆConfigurationÆE-mail Service Providers’.
Here you can view the settings of the ISPs e-mail settings.
39
TT-10236A easyMail
User Manual
Figure 38 E-mail Service Providers
Use this dialog only to update the e-mail settings if they have been changed by your ISP, or to add
new service providers that are not in the list.
If the list have been altered by a fault, the default settings can be reloaded clicking the ‘Load
Default’ button.
3.13 SET LOCAL TIME
‘OptionsÆConfigurationÆSet local time’.
Use this option to set the local time in the easyTrack. The transceiver gets the UTC time from the
built in GPS module, but it needs information of the current time zone to set the local time correctly.
Another option is to set the PC time to the current local time calculated from the GPS, every time
easyMail starts up. This is recommended.
40
TT-10236A easyMail
User Manual
Figure 39 Set local time
3.14 DISTRESS FUNCTIONALITY
With a TT-3026D easyMail offers a non-SOLAS GMDSS solution. Refer to [2] for general information
on this topic.
3.14.1 DISTRESS ALERT SETUP
‘DistressÆDistress Alert Setup’.
Feature of SOLAS and NON-SOLAS with Distress transceivers only.
Here the user can configure what information will be sent with a Distress Alert.
The Distress Alert Setup is also known as the Distress Generator.
Figure 40 Distress info window
41
TT-10236A easyMail
User Manual
Figure 41 Distress Alert Setup
Land Earth Stations: For TT-3026D, Land Earth Stations can be configured for all 4 Ocean Regions.
This is the LES where the mobile will send the Distress Alert through when initiated from the alarm
panel.
Position: There are two possibilities with the position included in the Distress Alert. Either the
automatically updated GPS position can be included, this will usually be the option to choose, or a
position can be entered manually. When marking ‘Always use latest position from GPS’, it will be
the GPS position that is used when sending a Distress Alert. If unmarking this option, the position
fields will be enabled, and this entered position will be used in the Distress Alert.
Note: This window cannot be used to check if it is the GPS position or a manual position that will be
used in the Distress Alert. It can only show the position that would be included if the Distress Alert
42
TT-10236A easyMail
User Manual
were sent now. The checkbox will always be marked when opening this window. So to be sure that
the GPS position is included, mark the checkbox and click ‘OK’.
The Distress Alert Setup is valid for 1 hour. When it becomes invalid, an info box will be shown to
the user.
Nature of distress: The chosen one of the options listed, will be included in the Distress Alert. The
default setting is “Undesignated”.
Clicking ‘OK’ will update the Distress Alert Settings.
3.14.2 RESET ALARM
‘DistressÆReset alarm / Latest distress info’.
Feature of SOLAS and NON-SOLAS with Distress transceivers only.
This menu item will reset the alarm buttons including the light in the button and the buzzer if
present. Refer to [2] for more information.
This will be necessary to do after sending a Distress Alert or receiving an urgent/distress priority
SafetyNet EGC or an urgent/distress priority message.
When resetting the buttons, a window displaying the latest distress information will also be shown.
Click ‘OK’ to close this window.
3.14.3 LATEST DISTRESS INFORMATION
‘DistressÆReset alarm / Latest distress info’.
Feature of SOLAS and NON-SOLAS with Distress transceivers only.
Figure 42 Latest distress information window
43
TT-10236A easyMail
User Manual
This window shows the status of the latest Distress Alert that was sent. This menu item also resets the
alarm buttons. Refer to 3.14.2 for more information on resetting the alarm buttons. The latest Distress
Alert status field can contain three different status texts. These are explained below in Table 3
Status of latest
Distress Alert
“none”
“rejected”
“received by MRCC”
Description of status
A Distress Alert has not previously been sent.
This will usually be the case.
The last Distress Alert was not received by
MRCC.
The last Distress Alert was received by MRCC
(Maritime Rescue Coordination Centre”
Table 3 Status of latest Distress Alert
The status of the latest distress test (Link/PVT test) is also shown. This status field can contain three
different status texts, explained below in Table 4.
Status of latest
Distress Alert
“none”
“rejected”
“successful”
Description of status
A Link test has not previously been executed.
You can start a Link test from ‘OptionsÆLink
test’
The last Link test was not completed
successfully.
The last Link test was completed successfully.
Table 4 Status of latest distress test
3.14.4 DISTRESS TEST MODE
‘DistressÆDistress Test Mode’.
Feature of SOLAS and NON-SOLAS with Distress transceivers only.
When selecting this menu item, the easyTrack is set into Distress Test Mode. In itself this does not
test anything, but it gives the user the possibility to safely test the alarm buttons without any Distress
Alerts being sent. Refer to [2] for information about the alarm button installation.
Note also that the Link test is another important part of the regular, recommended test. That part will
test that the link to the satellite is fully operational.
IMPORTANT: DO NEVER TEST THIS INSTLLATION BY SENDING AN ALERT ON-AIR. Any Distress
Alerts coming through the Inmarsat-C network will be taken seriously by the receiving authorities.
44
TT-10236A easyMail
User Manual
The Distress Test mode will allow the user to operate the distress button without any alerts are
actually being sent.
The windows shown in Figure 43 will be shown while Distress Test Mode is active.
Figure 43 Distress Test Mode
In Distress Test Mode the alarm panel can be pressed without any alerts being sent.
The recommended test procedure is this:
Action
Light in the button
Buzzer (if installed)
Press the alert button
Flashing
Beeping
Hold the button for at
On with an off-period
Off
least 5 seconds
every 15 seconds.
Press the CLEAR button
Off
On
Off
Off
(if installed)
Release the CLEAR
button (if installed)
If this test passes the installation is correct.
3.14.5 DISTRESS MESSAGE
Feature of SOLAS and NON-SOLAS with Distress transceivers only.
A Distress Message or Distress priority message is used in addition to Distress alert when time
permits during the distress situation and it is NOT used instead of Distress alerting. When the
Distress Alert is confirmed, a more detailed distress priority message can be sent giving more
information about the distress situation, e.g. number people on board, situation with the vessel,
assistance required, etc. The main requirements here is to send the message via the same LES
as distress alert and the message will also be delivered to the same MRCC (Maritime Rescue
Coordination Centre).
45
TT-10236A easyMail
User Manual
Inmarsat-C Distress priority message is also used to cancel Inmarsat-C false Distress Alerts whereby
the ship's operator is aware of a false alert and send distress priority message via the same LES
asking to cancel his alert. In this case both false alert and subsequent distress priority message will
be delivered to the same MRCC who will know immediately (or almost) that the alert is false. It is
an IMO recommended procedure how to cancel false alerts via Inmarsat C.
Refer to [2] for more information on the use of Distress Messages.
To send a Distress Message, click the Distress Message Editor button.
The two information windows below are shown before entering the Distress Message Editor.
Figure 44 Distress Message Editor info 1
Figure 45 Distress Message Editor info 2
When entering the Distress Message Editor, two lines of auto text is immediately inserted, latest
position and mobile number.
A Distress Message is always sent directly to an MRCC and this address cannot be changed. It is not
possible to add other addresses to this message either.
46
TT-10236A easyMail
User Manual
Figure 46 The Distress Message Editor
When the message has been written, click ‘Send’ like when sending normal message. Distress
Messages are not password protected, so if a transmit password has been entered this will not be
checked when sending the Distress Message.
47
TT-10236A easyMail
User Manual
Figure 47 A Distress Message entry in the Outbox
4 GETTING FURTHER INFORMATION
If this User/Operator manual did not answer your question or you like to read more please refer to
section 1.1 Related Documents that includes a list of other Thrane & Thrane documents that might be
of interest.
48