1
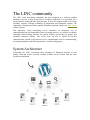
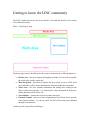
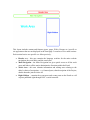
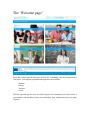
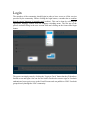
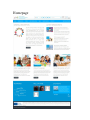
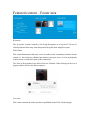
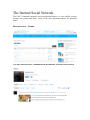
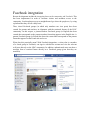
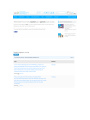
LINC Community -User Guide Dimitris Koutsaftikis 3/7/2015 Contents The LINC community ......................................................................................................... 3 System Architecture ........................................................................................................ 3 Getting to know the LINC community ............................................................................... 5 The ‘Welcome page’ ....................................................................................................... 7 Login ............................................................................................................................... 8 Homepage........................................................................................................................ 9 Featured content – Footer area ...................................................................................... 10 The Internal Social Network ......................................................................................... 11 Facebook integration ..................................................................................................... 12 Adding content to the community ................................................................................. 14 Posts versus Pages ..................................................................................................... 14 Adding a new post ..................................................................................................... 14 Associating ‘categories’ and ‘tags’ with a post ......................................................... 14 Adding a post/page content ....................................................................................... 15 Categories .................................................................................................................. 15 Adding images and other media .................................................................................... 16 Inserting an image ..................................................................................................... 16 Users .............................................................................................................................. 17 Editing personal profile ............................................................................................. 18 References ..................................................................................................................... 19 The LINC community The LINC social networking community has been designed as a software solution destined to provide a range of services to an online community. It is accessible via a simple Internet connection and a basic browser. It does also support mobile access from anywhere, anytime, offering availability of information and community support. The community is implemented on the popular WordPress platform which is an Open Source software system. This innovative social networking service introduces an alternative way of communication that will bring added value to existing practices. It is tailored to enhance knowledge about learning activities for parents, learners, and teachers in primary and secondary education schools. This service does not aim to replace face-to-face communication; instead it tries and serves as a complementary tool for communicating, accessing information, and following learners’ activities and progress. System Architecture Technically, the LINC Community takes advantage of Wordpress network of sites feature. With this feature activated, multiple websites can be created from the same WordPress installation. Given that the LINC community targets parents and teachers that do not necessarily speak fluent English the interface is available in the national languages represented in the consortium through project partners, namely Greek, Swedish, French, and Czech. This is possible through the Wordpress multisite feature that enables the co-existence of 5 different websites (one for each national language including English). More precisely, the LINC community is organized in the following way: English Website - http://community.linc-project.eu/ This is the main (landing) site of the community that has localized content in English; this site aggregates all social networking activities through the Project and hosts sitewide information. French Website - http://fr.community.linc-project.eu/ This site has localized content in French and hosts information and resources for learners, teachers, parents or other interested parties that are native speakers of French or know French. Czech Website - http://cs.community.linc-project.eu/ This site has localized content in Czech and hosts information and resources for learners, teachers, parents or other interested parties that are native speakers of Czech or know Czech. Swedish Website - http://sv.community.linc-project.eu/ This site has localized content in Swedish and hosts information and resources for learners, teachers, parents or other interested parties that are native speakers of Swedish or know Swedish. Greek Website - http://gr.community.linc-project.eu/ This site has localized content in Greek and hosts information and resources for learners, teachers, parents or other interested parties that are native speakers of Greek or know Greek. The content published in each website may differ but the basic rules of uniformity are followed resulting in a common template/theme. Getting to know the LINC community The LINC Community has an easy-to-use interface. The main user interface (UI) consists of two different layouts: Home – Front Page Layout The home page layout is divided up into five main sections that serve different purposes: Header area – this area contains the language switcher, for site-wide navigation, the social links, and the search area Main Navigation - this Main Navigation bar gives quick access to all the work areas and links to all the major administrative functions within the community. Work Area – this area contains information and editing areas relating to the editor’s choice of navigation – e.g. featured posts, short description of the project, details about the joint activities, etc… News Sidebar – contains the recent news and events posts Featured Content – this area works complementary to the Work Area to provide extra featured content – e.g. the tag cloud, the hall of fame and posts published through social networks Content specific Layout (Posts and Pages) This layout includes content and features (posts, pages, Wikis, Forums etc.) specific to site appearance that are not displayed in the front page. It consists of five main sections. Each section has its own specific use. More precisely: Header area – this area contains the language switcher for the entire website navigation, the social links, and the search area Main Navigation - the Main Navigation bar gives quick access to all the work areas and links to all the major administrative functions within the Portal Work Area – this area contains information and editing areas relating to the editor’s choice of navigation – e.g. featured posts, short description of the Project, details about the joint activities etc Right Sidebar – contains the recent news and events posts on the Portal as well as posts published right through LINC’s social networks The ‘Welcome page’ When the visitors enter the first page of the LINC Community, they are introduced to a ‘tile layout’. Four options (represented through tiles) are available: Students Parents Teachers Guests The tiles represent specific roles. In order to login to the community you need to select a representative role and then to enter your credentials. Non- authenticated users can enter as guests. Login The members of the community should login in order to have access to all the services provided by the community. Before clicking the login button, a member has to confirm that the correct language is currently used (website). This can be done by selecting the appropriate language context from the language switching menu. The last step of the process includes filling in the user account form and clicking on the form-related login button. The guests can simply enter by clicking the “Login as Guest” button but they’ll then have limited access and rights. One can also use his/her Facebook account to sign in. Facebook authenticated users gain access to the Portal Forums and can publish to LINC Facebook groups directly through the LINC community. Homepage Featured content – Footer area Keywords The ‘keywords’ section is actually a list of tags that appears as a 'tag cloud'. The size of each tag indicates how many times that particular tag has been assigned to posts. Hall of fame This section demonstrates the most ‘active’ members of the community, based on custom criteria (i.e. the total posts published per member, total post views, level of participation in discussions, average time spent on the community). The icons of the members in the hall of fame are clickable. When clicking on the icon a pop-up window (like the one below) appears: Live posts This section contains the wall posts that are published on the LINC Facebook page. The Internal Social Network The LINC Community integrates social-networking features (i.e. user profiles, activity streams, user groups and more). Some of the most important features are presented below: Discussion Area - Forums User likes and Posts likes, Communication Mechanisms, Focused Social Network Facebook integration Recent developments include the integration between the community and Facebook. This has been implemented in order to facilitate visitors and members access to the community. Our thought process was straightforward: go where the people are, by using a platform that they use on a daily basis. Thus, closed Facebook groups (in which only members can view posts) have been created for parents and teachers, in alignment with the restricted forums of the LINC community. In this respect, a parents-teachers Facebook group (in English) has been created that corresponds to the parents-teachers forum that appears in the English site. A parents Facebook group (in French) has been also created that corresponds to the parents forum that appears on the French site and so on. What does this practically mean? With Facebook integration, a visitor who is a member of a closed group in Facebook, can sign in with his/her account and view the relevant wall posts directly on the LINC community. In addition, authenticated users can share a message from a restricted forum directly on a Facebook group (given that they are members). Adding content to the community The members of the community can add content to the community by creating posts or pages. The process of making posts or creating pages does not differ much. The main difference is that a post can be associated with categories and tags whereas pages cannot. What’s the difference between categories and tags? Tags are ad-hoc keywords that identify important information in the post (names, subjects, etc…) that may or may not appear often in other posts; Categories are pre-determined sections. Let us think of the website as a book; the categories could be the table of contents and the tags could be the terms in the index. Posts versus Pages LINC Community has been built around two basic concepts: posts and pages. The posts are typically blog entries. A series of articles, listed usually in a reverse-chronological order. The pages allow the creation of static content (i.e. content that does not change or changes infrequently). An ‘About us’ page is an example of a page on a typical website. In most cases the content in the ‘About us’ page doesn’t change very frequently. Adding a new post To add a new Post from the Front End, the user needs to select the ‘Add Post’ link from the Manage menu that is on the Main navigation menu. Publishing from the Front End Associating ‘categories’ and ‘tags’ with a post Associating a post with one or more categories and tags is really essential. As it has been mentioned above, the categories are pre-determined sections and the tags are ad-hoc keywords that identify important information in the Post (names, subjects, etc). As a matter of fact the use of categories and tags has a tremendous impact on the platform’s overall usability. The association can be done either from the Frond End or the Back End, filling out the corresponding fields. Adding a post/page content At the top of the editor there are two tabs, Visual and Text ( ). These switch the editor view between the Visual Editor and the Text editor. The ‘Text view’ enables the author to view the HTML code underpinning the content. The editor used to enter content into a page or post is easy to use and does not differ from a regular word processor. It includes toolbar buttons that allow to ‘bold’ or ‘italicize’ text, to enter in headings or bullet points and more. One can even use basic keyboard shortcuts used in other text editors. For example: Shift+Enter inserts a line break, Ctrl+C/Cmd+C = copy, Ctrl+X/Cmd+X = cut, Ctrl+Z/Cmd+Z = undo, Ctrl+Y/Cmd+Y = redo, Ctrl+A/Cmd+A = select all, etc. (use the Ctrl key on a PC or the Command key on a Mac). The Toolbar Toggle button ( which gives extra functionality. ) will show or hide a second line of formatting buttons Categories The categories can be used to define sections of the website and group related posts. The default category is called ‘Uncategorized’. Unlike posts, the pages cannot be associated with categories. Categories can be added whilst navigating through the Front End. From the ‘Manage menu’ select the ‘Edit categories’ link to add or edit categories. Adding Categories in the Front End Overall, adding Categories option will simply add them to the list of available Categories (displayed when publishing a Post). When clicking on the Categories menu option the user will be given access to a list of Categories that have already been added along with some blank fields that allow to add a new Category. The user adds a new Category by filling in the blank fields and then clicking the ‘Add New Category’ button. Important terms: Name – The name of the category. Parent – Categories, unlike tags, can optionally have a hierarchy. One might have a ‘Car’ category and under that, children categories for Ford, General Motors and Toyota. To create a subcategory, one has to choose another category from the Parent dropdown menu. Edit button – Allows to edit the Category properties such as Name, Slug, Parent and Description. Adding images and other media Adding images and other media files such as videos, documents or PDFs is not a complex process. The Media Library is the place where images, files and media are uploaded and stored. Once they have been uploaded into the Media Library the user can simply insert them into a page or post. In the case of files such as Word Documents or PDFs, there is also the option of creating links to those files- the links can then be forwarded to interested individuals or used within a post or page. Inserting an image In order to insert an image into a page/post, the user has to click the ‘Add Media’ button ( ) and then simply drag the image(s) from wherever they are on his/her computer, into the browser window. Then, the file is automatically being uploaded. Alternatively, the user can click the ‘Select Files’ button and then select the file(s) to be uploaded, using the dialog window that appears. The user can also simply drag the file straight into the Visual Editor. Once the image has been uploaded, the Media Library is displayed. The Media Library contains all the previously uploaded images. The images/files that have just been uploaded will be automatically ‘selected’ to ease the insertion into a page or a post. Selected images appear with a ‘tick’ icon on the top right corner of the image. Users This section lists all the subscribed users of the LINC community. The users based on the role that they have been addressed can have or have not access to specific content or facilities. The website administrator is the most powerful user and can create and manage user accounts. The user roles can be grouped in three different sets, all set by the website administrator: Wordpress specific roles Community related roles Forum specific roles Wordpress specific roles Administrator – Somebody who has access to all the administration features Editor – Somebody who can publish and manage posts and pages as well as manage other users' posts, etc. Author – Somebody who can publish and manage their own posts Contributor – Somebody who can write and manage their posts but not publish them Subscriber – Somebody who can only manage their profile Community related roles Community related roles mostly serve as aliases to the corresponding Wordpress roles. There might be a slight difference between the default Wordpress and the Community’s custom roles only to enhance the overall user experience and secure the proper access to resources. Staff – Somebody who has access to all the administration features, especially the ones that are Community oriented. Wikis, Forums, etc. Teacher – Somebody who can publish and manage posts and pages as well as manage other users' (parents and teacher) posts, etc. Parent – Somebody who can publish and manage their own posts Student – Somebody who can write and manage their posts but not publish them Forum specific roles Keymaster – Can create, edit and delete other users’ forums, topics and replies. Can manage Tags, and moderate a forum with the moderation tools. Has access to global forum settings, tools, and importer. Moderator – Can create and edit forums. Can create, edit and delete other users’ topics and replies. Can manage Tags, and moderate a forum with the moderation tools. Participant – Can create and edit their own topics and replies. Spectator – Can only read topics and replies. Blocked – All capabilities are explicitly blocked. Editing personal profile To edit the personal profile details, the user simply has to click on the user name, located in the top header area and then to click on the ‘Edit Profile’ link that appears beneath the user name when visiting the User Profile page. References Easy WP Guide V2.7 for WordPress 3.9 by Anthony Hortin (easywpguide.com) Official Wordpress User Manual This project has been funded with support from the European Commission. This communication reflects the views only of the author, and the Commission cannot be held responsible for any use which may be made of the information contained therein.