1
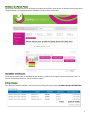
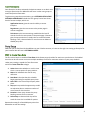
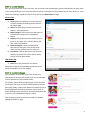
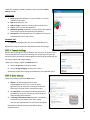
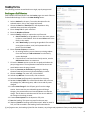
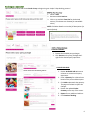
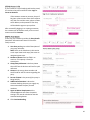
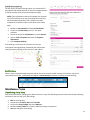
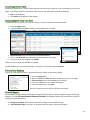
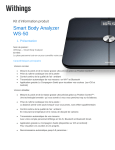
Welcome to
A COMPLETE GUIDE FOR PARTY MANAGEMENT
Navigating iPartyPro’s Features ......................... 1
Miscellaneous Topics ....................................... 11
Parties Page ............................................................... 1
Transferring Party Dates ..........................................11
Parties Settings .......................................................... 1
Cancelling a Booked Party ........................................12
Parties on the Parent Portal ...................................... 2
Disabling Specific Party Time Slots ...........................12
Activation and Access ........................................ 2
Printing Party Bookings ............................................12
Billing Changes ........................................................... 2
Financial Reports ......................................................12
User Permissions ....................................................... 3
Party Setup ....................................................... 3
STEP 1: Create Time Slots .......................................... 3
STEP 2: Create Stations .............................................. 4
STEP 3: Create Packages ............................................ 4
STEP 4: Create Add-ons (Optional) ............................ 5
STEP 5: Financial Settings .......................................... 6
STEP 6: Other Settings ............................................... 6
Enabling Parties in the Parent Portal .................. 7
Viewing and Searching for Parties: ..................... 7
From the Parties Page ................................................ 7
From the Parent Portal .............................................. 7
Booking Parties ................................................. 8
Booking as a Staff Member ........................................ 8
Booking as a Customer .............................................. 9
Notifications ............................................................ 11
Miscellaneous Topics ....................................... 11
Transferring Party Dates .......................................... 11
Cancelling a Booked Party ....................................... 12
Disabling Specific Party Time Slots .......................... 12
Printing Party Bookings............................................ 12
Financial Reports ..................................................... 12
Navigating iPartyPro’s Features
There are three major components of the iPartyPro module; the parties page, the parties section of settings, and the
parent portal. Each of these sections of the add-on module have a unique purpose.
Parties Page
Once the party module has been activated, the parties page button will appear in the navigation bar! This is where staff
members will view and book parties. Before parties appear here, the party settings need to be edited.
Parties Settings
The settings for parties are located under a new section at Settings>Parties. Completing these settings is an essential
step in order to create available party bookings and custom party options. We will look closer at each of these settings
later in the guide. Below is a brief description of each setting.
Time Slots define available party times for each party station.
Stations are unique party spaces available
for booking at the facility.
Packages describe the party experience the
customer is purchasing. Each is assigned a
flat rate fee. Available packages can vary by
station.
Add-ons are optional items that are
attached to packages to up-sell the party
experience. Available items not included in
the basic package price such as a special
appearance, pizza, cake, party favors etc.
can be sold through this feature. Each addon has a designated price and an optional
maximum quantity limit.
TIP: With the menu expanded, drag and drop the listed options under stations, packages and add-ons into the
order you wish to see them listed on the portal!
Financial dictates how party income is tracked within the iClassPro software and displayed on financial reports. Like
classes or camps, the parties feature must be associated with a Program and a Charge Category for recording fees to
enable online booking.
Other is where a party specific waiver or acknowledgement text can be entered for online booking and the booking
confirmation email can be customized and set to BCC as a notification to party staff.
1
Parties on the Parent Portal
Parties have a dedicated section of the Parent Portal with special filters. Once parties are enabled in the Parent Portal,
all parties that are not already booked or disabled will show online as seen below.
Activation and Access
The iPartyPro module costs an additional fee per location in addition to the regular iClassPro subscription rate. To
activate and purchase iPartyPro, contact iClassPro support.
Billing Changes
Once iPartyPro has been enabled, it will be listed in the billing info section under SETTINGS>BILLING INFORMATION.
2
User Permissions
Once iPartyPro has been activated, the business owner or an admin user
must give permissions for additional staff users in other user groups to
access the parties information.
To give a user group these permissions, go to SETTINGS>SETUP>STAFF
SETTINGS>USER GROUPS and edit the user group. Parties have three
levels of access to adjust, which are:
Application Access- gives the user the ability to access
iPartyPro.
Page Access- gives the user access to the parties page in
account navigation.
Task Access- split into two settings, establishes the level of
control the user has over parties in the parties page. Choose to
give the user permission to simply view or to edit and create
bookings. Then, choose whether or not the user can delete or
disable party slots.
Party Setup
Now that you are familiar with the additions to your iClassPro account, it’s time to dive right into setting up iPartyPro for
your business! We will start in SETTINGS>PARTIES.
STEP 1: Create Time Slots
The first critical step is to establish Time Slots which dictate party schedules for stations at your business. Each added
time slot can be set to occur on one or multiple weekdays to allow for maximum variation in your party schedule.
Under party settings, expand the Time Slots menu
and click on New Time Slot to begin.
1. Active determines whether or not this time
slot is a current option for party stations.
2. Name this individual time slot for easy
reference.
3. Start Date is the date that this schedule
begins populating for available party times.
4. Start Time is the time of day the party takes
place.
5. Stop options provide the opportunity to add
an expiration date or maximum number of
occurrences for this time slot.
6. Duration is how many minutes the party
booking reserves for the customer.
7. Select Days to choose which days of the
week this time slot is available for parties.
Repeat these steps for all available party time slots.
Remember to save the settings
3
STEP 2: Create Stations
After you have created all of your time slots, you must now create available party spaces called Stations to attach them
to for creating bookings. If you only have one party space, create a generic party station such as “Party Room” or “Gym.”
Under party settings, expand the Stations menu and click on New Station to begin.
DETAILS TAB:
1. Active determines whether or not the station is
currently available for booking online and from
the parties page.
2. Name the space being created. This name will
display in the parent portal.
3. Station Image is where a picture of the space (or
a promotional image) can be uploaded for
display.
4. Capacity defines the maximum number of party
goers for the space. This is not the same as the
max number of attendees.
5. Short Description is used to display a brief
description of the space in the Parent Portal
when scanning available stations and times.
6. Description is the full descriptive text that staff
members and customers will be able to see by
clicking a link for More Details.
TIME SLOTS TAB:
7. Select time slots available for this station.
Repeat these steps for all available party stations at the
facility. Remember to save the settings!
STEP 3: Create Packages
Party packages communicate each of the unique party
experiences the business has to offer. One or more packages
must be attached to each available station.
For example, a Basic Booking might simply reserve the space
for the party, but does not require additional labor from your
party staff ($100). A Super Party Experience includes access to
special equipment and a party supervisor ($175). Lastly, a
Deluxe Package reserves the space, the special equipment and
supervisor, plus a keepsake package for ($250).
Each of these experiences would be created as a separate
package (example on right).
4
Under party settings, expand the Stations menu and click on
New Package to begin.
DETAILS TAB:
1. Active determines whether or not this package is
currently available for stations.
2. Name the package. Staff members and customers
will see this descriptive title when booking a party.
3. Package Image is a great place to display a picture of
an example party or items included in the package.
4. Price is the base cost of the package, including all of
the items in the package description and a set
number of guests.
5. Deposit Only Price is the price this package will
charge if only a deposit amount is immediately
required to book a party online. If left blank, parties
will always use the full price for online booking. If a
deposit price is included, customers will have the
option to pay the deposit or pay in full. To remove the
pay in full option, uncheck Allow ‘Pay in Full’.
6. Number of Guests Included is the maximum number
of guests included in the base price of the package.
7. Price per Additional Guest allows the customer to
enter additional guest reservations for an added cost
per guest, up to the capacity of the station.
8. Tax Rate is a taxable amount to be applied to the
total party package cost (including additional guests).
9. Description is a text area used to describe what this
party package includes and to provide some sales
oriented verbiage.
STATIONS TAB:
10. Select the stations to be linked to this package.
Repeat these steps for all available party packages.
Remember to save the settings!
STEP 4: Create Add-ons (Optional)
Add-ons are useful for businesses that allow
customers to customize their party experience
with the purchase of optional items on top of
the pre-packaged party experience.
Add-ons are extra items offered at a price per
quantity. These are attached to party packages
where they are available for purchase.
These can be used for virtually any kind of item,
such as an appearance by your mascot, party
favors, a pizza, or even balloons!
5
Under party settings, expand the Add-ons menu and click on New
Add-on to begin.
DETAILS TAB:
1. Active determines whether or not this add-on is currently
available for purchase.
2. Name the item(s) for sale.
3. Add-on Image is ideal for including a picture of the item.
4. Price is the cost of the described item.
5. Maximum Quantity establishes an upper limit to the quantity
of the add-on can be purchased per party booking.
6. Description is text displayed next to the Add-on in the portal
to describe the item in more detail.
PACKAGES TAB:
7. Select the package(s) this item is an available add-on for.
Repeat these steps for all add-ons. Remember to save the settings!
STEP 5: Financial Settings
Because party bookings are not enrollments, the way you track parties from a
financial perspective is critical for evaluating sales at the end of the year. All
parties and party accessories sold through the parties booking module will use
the same program and charge category.
Under party settings, expand the Financial menu.
1. Select a Program to track party income.
2. Select a Charge Category to track party income.
Remember to save these settings at the bottom of this expanded menu!
STEP 6: Other Settings
Under party settings expand the Other menu.
1. Waiver is an area designated for custom
acknowledgement text. This is not a full policy
agreement, but all customers must agree to this text
before they can book online. (See example right.)
2. The Lead Time restricts how immediately parties can
be booked in the portal. A setting of 2 days would not
allow bookings within 48 hours.
3. A Booking Confirmation Email template is provided to
customize the confirmation email sent to party
contacts. BCC staff members for real time notifications!
A list of
available email
variables can be
found under the
quick help icon!
Remember to save the settings at the bottom of this
expanded menu!
6
Enabling Parties in the Parent Portal
To activate the “Book a Party!” option on the Parent Portal, under SETTINGS>PARENT PORTAL>GENERAL check:
Viewing and Searching for Parties:
Now it’s time to see the rewards of your hard work! Parties can be viewed by staff members from the Parties Page and
by customers via the special Parties section of your Parent Portal.
From the Parties Page
Navigate to the Parties page. From here, you can see all of the bookings created by your party stations and time slots.
Try using the filters on the left to see availability by station, time, date or day of the week. Once you book a party, you
can search for the party name in the Search Parties field!
From the Parent Portal
One of the many perks of the new iPartyPro module is that the new party module moves the entire party booking
experience into a single 5-step booking process through the parent portal! Availability is Step 1!
To begin, customers will click on Book a
Party in the parent portal navigation.
1. Choose a Date. Dates that have
available party slots appear in the
dropdown menu.
2. Browse Stations. All time slots for
the date and station are shown but
only available slots are clickable
buttons in full color.
3. To view the full description of the
station, customers will click on
More Details to the right of the
station name.
7
Booking Parties
Party booking has been streamlined into a single, step by step process!
Booking as a Staff Member
Staff members will book parties from the Parties page. Use search filters to
find available bookings or click on the New Booking button.
1. Select a Station for the party. To see the description for the
selected station, click on the orange help button.
2. Choose the Date and Time Slot from the dropdowns. Only
available dates and times will populate.
3. Enter a Party Title for quick reference.
4. Enter the Number of Guests.
5. Attach a Family. A family is required to track financials.
a. Search Families by the guardian’s first or last name, phone
number or email address. Click the word Select next to the
family in the results.
b. Add a New Family, by entering the guardian’s first and last
name, phone number, email, and a password for the
portal. Then click Save.
6. Enter a Person of Honor or Honoree.
a. On existing families, you can choose an existing student
from that family to +Add as Honoree from the family
section displayed.
b. If the Honoree is not listed in the Family section, use the
Add Honoree button to create one.
7. Fill out the Contact section to note who to speak with about the
party arrangements. The confirmation email will be sent to this
email address once the party is saved.
8. Enter any Customer or Staff Notes regarding the booking.
Customer notes will print on the form and display in emails.
9. Choose a Package. For more info, click on Details.
10. Include any Add-ons. For more info, click on Details.
11. Select the Hosts (staff members) responsible for this party.
12. Review the Party Totals! This section breaks down the price into
the package fee, additional guests, add-on items and any taxes
charged.
13. Create a New Charge for the full party price from the Ledger
section. Parties uses the pre-selected Program and Charge
Category, the pretax amount and a tax dropdown to create the
charge. The tax does not calculate until the line item is added to
the charge or the charge is saved.
14. Create a New Payment for the deposit or full price.
15. Save the booking! This opens a prompt for the next step.
16. (Optional) Send the booking confirmation email. When an email is
sent, it will be recorded in the Booking Confirmation details.
If you forget to save, the booking info will be lost. However, any charges and payments will stay on the family’s ledger.
8
Booking as a Customer
Open the Parent Portal and choose Book a Party to begin using our simple 5-Step booking process!
STEP 1: Pick Your Day
1. Select a Date.
2. Review available Stations.
3. Click on an available Time Slot for the desired
station. (The buttons are dimmed for unavailable
times.)
NOTE: Click More Details to view the full description of a
station (below).
STEP 2: Pick a Package
CHOOSE PACKAGE:
1. Browse the available party packages.
2. Click Choose on the party package that’s
right for the desired party experience.
CHOOSE ADD-ONS:
1. Review Available Add-on items to
enhance or customize the party
experience.
2. Enter a Quantity for a desired item
based on the price and description.
3. Click Add underneath that quantity.
The page will reload to reflect the
changes.
4. Review the updated Order
Summary at the top of the screen.
5. Repeat for any additional add-ons.
6. Click Continue Booking.
9
STEP 3: Personal Info
If your customer is not already signed into the portal,
this is where they will be asked to either Login or
Create an Account.
If the customer creates an account, they will
be given a short account form which requires
only their first and last name, phone number,
email address, and a password. Then they
will be asked to agree to your policies.
After successfully logging in or creating an account,
the customer will be asked to verify it’s the correct
account and click Continue.
STEP 4: Party Details
In this step, the customer provides the Party Details.
Some basic information will Auto-Fill from their
family account.
1. Your Party so Far gives a brief description of
your party selections.
NOTE: Click on the linked text in this section
or the steps listed at the top of the screen to
navigate to past steps.
2. Number of Guests must be filled in to
continue. The capacity is listed for
convenience.
3. Group/Party Nickname is the Party Name
that staff from the business will use for quick
reference.
4. Contact is the name, phone number and
email listed for staff to contact regarding the
party.
5. Person of Honor is the person(s) the party is
being held for.
6. Additional Information is where the
customer booking the party can supply any
extra notes about the party for staff
members.
7. Agree to Waiver Requirement is the
acknowledgement text from the parties
settings. This must be checked to view the
continue booking button.
8. Click Continue Booking.
10
STEP 5: Review and Pay
The last step in the party booking process is to review the full
party details and submit payment for either the deposit amount
or the full amount of the party fees (example on right).
NOTE: If any information needs to be changed, the customer
can click on the step at the top of the page where that info
was collected during booking. The customer must then
complete all consecutive steps to come back to the review
page.
1. Review the Party Details and the Price Calculation.
2. If you have a Promo Code, enter it in the space
provided.
3. Choose to pay for the Full Amount or just the Deposit.
4. Select a Form of Payment and enter the Payment
Information.
5. Click Complete Booking.
If the booking is successful, the customer will receive a
confirmation message (below), followed by the confirmation
email (from party settings) at the contact’s email address.
Notifications
When a party is booked through the parent portal, the emails listed in the BCC settings will receive a copy of the
confirmation email. Also, a notification will appear in Online Activity for both the payment and the booking!
Miscellaneous Topics
Transferring Party Dates
With the parties feature, changing party dates and times is easy! The following steps will remove the old party booking
and create a new one with your new settings.
1.
2.
3.
4.
5.
Edit the existing party.
Choose the new Station, Date and Time Slot.
Confirm the Party Package choice and Add-ons.
Review the Party Totals for necessary additional charges or payments.
Save the changes to the booking
11
Cancelling a Booked Party
Cancelling a booked party is simple! These steps will not remove any charges or issue any refunds from the family
ledger. It will simply delete the information from the party slot and make it available for booking.
1. Edit the existing party.
2. Click Delete at the bottom of the window.
Disabling Specific Party Time Slots
To disable specific party time slots, such as holidays or closures, follow the instructions below.
1. Go to the Parties page.
2. Adjust the filters and view to display all desired parties on one page.
3. Check the boxes next to the parties that should be disabled.
4. Click on the Quick Edit icon (lightning bolt) at the bottom of the page.
5. In the new quick edit window, click Disable.
These slots will no longer be available for booking.
To view disabled slots from the parties page, set the filter on the parties page to In-Active.
Printing Party Bookings
To print the information for one or more booked parties, follow the instructions below.
1.
2.
3.
4.
5.
Go to the Parties page.
Adjust the filters and view quantity to display the parties on one page.
Check the boxes next to the booking(s) to be printed.
Click on the Print icon at the bottom of the page.
From the new window, click print.
This form is great to keep on file for staff at the front desk!
Financial Reports
Parties booked through iPartyPro will display on regular iClassPro financial reports using the Program and Charge
Category set under SETTINGS>PARTIES>FINANCIAL SETTINGS. The following reports will be particularly useful for
tracking charges and payments.
1. Category List Report- details family information, charges, taxes and balance due.
2. Program Deposit Split- a summary of the total amount of money collected by program.
12