1
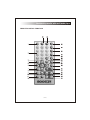
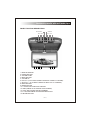
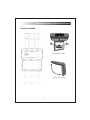
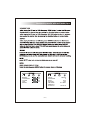
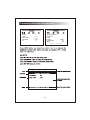
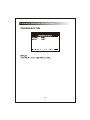
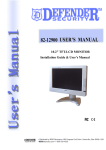
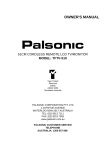
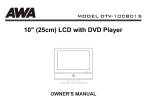
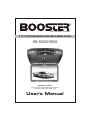
THE PERFECT SOUND
9" TFT LCD COLOR MONITOR WITH MULTI-MEDIA PLAYER
BM-9055TVUSB
BM-9055TVUSB
9" TFT LCD MONITOR/TV
PLAY
STOP
MODE
WARNING! HAZARD!
DO NOT OPERATE THIS UNIT UNLESS VEHICLE
IS PARKED IN SAFE AND LEGAL AREA.
User's Manual
Roofmounting monitor with multi-media player
GENERAL INFORMATION. . . . . . . . . . . . . . . . . . . . . . . . . . . . . . . . . 1-2
REMOTE CONTROL . . . . . . . . . . . . . . . . . . . . . . . . . . . . . . . . . . . . . 3-4
PANEL FUNCTION . . . . . . . . . . . . . . . . . . . . . . . . . . . . . . . . . . . . . . . . 5
WIRING DIAGRAM . . . . . . . . . . . . . . . . . . . . . . . . . . . . . . . . . . . . . . . . 6
PRODUCT INSTALLED . . . . . . . . . . . . . . . . . . . . . . . . . . . . . . . . . . . . . 7
BASIC OPERATION . . . . . . . . . . . . . . . . . . . . . . . . . . . . . . . . . . . . . 8-12
TROUBLE SHOOTING . . . . . . . . . . . . . . . . . . . . . . . . . . . . . . . . . . . . 13
TECHNICAL SPECIFICATIONS . . . . . . . . . . . . . . . . . . . . . . . . . . . . . 14
ACCESSORIES. . . . . . . . . . . . . . . . . . . . . . . . . . . . . . . . . . . . . . . . . . 14
Roofmounting monitor with multi-media player
1
Roofmounting monitor with multi-media player
Pull
Push
2
Roofmounting monitor with multi-media player
REMOTE CONTROL FUNCTION
3
Roofmounting monitor with multi-media player
1. POWER button: Press the POWER key to turn the power ON/OFF.
2. NUMBER button: In the SD/USB mode by pressing these button you can
directly select the program; In the TV mode, you can directly select the TV channel.
3. UPWARD button: In SD/USB mode, press it to select the menu or program.
4. SETUP button
5. ENTER button
6. LEFTWARD button: Press it to leftward select the menu or program.
7. AUTO button: In the TV mode, press AUTO button, it will automatic search channel.
8. DOWNWARD button: In DVD/SD/USB mode, press it to select down the menu
or program.
9. SLEEP button: Time set.
10. MENU button: OSD Menu.
11. P.P button: Image mode.
12. SYS button: TV color system switch.
13/15. VOLUME button: Press the button to increase or decrease the volume.
14/16. CHANNEL button: In TV mode, press the button to search upwards or
downwards the TV channel.
17. PLAY button: Press once, it plays or pause.
18. STOP button: Press STOP for memory stop, press STOP twice to stop playing.
19. WIDE button: 16:9/4:3 display switch.
20. RIGHTWARD button: Press it to rightward select the menu or program.
21/22. PREVIOUS/NEXT button.
23/24. FAST BACKWARD/FAST FORWARD button.
25. REPEAT button: In the playing mode, press it to perform the repeated playing.
26. RETURN button.
27. HOME: In the SD or USB mode, press it to return the top-level menu.
28. SD/USB button: In the SD/USB media mode, press to switch SD or USB.
29. MUTE button: Press the key to turn on and of the volume output.
30. MODE button: Video switch.
4
Roofmounting monitor with multi-media player
PANEL FUNCTION DESCRIPTION
SD Card Slot
USB Port
16 15 14 13
12 11 10 9
BM-9055TVUSB
9" TFT LCD MONITOR/TV
PLAY
1 2
3 4
5
STOP
MODE
6 7 8
1. REMOTE WINDOW
2. POWER BUTTON
3. VOLUME DOWN
4. MENU BUTTON
5. VOLUME UP
6. PLAY/CH- ( IN TV MODE ,PRESS TO SELECT DOWN TV CHANNEL)
7. STOP/CH+ ( IN TV MODE ,PRESS TO SELECT UP TV CHANNEL)
8. MODE BUTTON
9. ENTER BUTTON
10,11. RIGHT/LEFT DIRECTION CURSOR
12. OPEN (PRESS TO FLIP DOWN YOUR SCREEN)
13. LIGHT SWITCH AND TIME ADJUSTMENT
14,15. UP/DOWN MENU OR PROGRAM SELECTION
16. RETURN BUTTON
5
Roofmounting monitor with multi-media player
key: LIGHT SWITCH / TIME ADJUSTMENT
A. Light switch
During initialization mode; Press
shortly to switch on/off light.
B. Time adjustment
During any mode, Press
3 seconds to enter time adjustment mode.
The HOUR is twinkling, Press
shortly to adjust the correct number
Press
3 seconds to finish hour adjustment and adjust MINUTE.
The MINUTE is twinkling, Press
shortly to adjust the correct number.
Press
3 seconds again to finish time adjustment.
Note: This machine is suitable to some types of the car not all types.
Wiring Diagram
YELLOW RCA (V OUT)
WHITE RCA (AUDIO OUT)
RED RCA (AUDIO OUT)
AV INPUT:
WHITE RCA (L AUDIO IN)
RED RCA ( R AUDIO IN)
YELLOW RCA (VIDEO 1 IN)
YELLOW RCA ( VIDEO 2 IN)
POWER:
RED WIRE (+12V SWITCHED)
BLACK WIRE (-12V GROUND)
BM-9055TVUSB
9" TFT LCD MONITOR/TV
DOME LAMPS:
BLUE: GROUND
YELLOW WIRE: + DOOR SWITCH
RED WIRE: CONSTANT +12V
PLAY
STOP
MODE
* FOR BETTER UNDERSTANDING ALL WIRES ARE PROPERLY TAGED.
6
Roofmounting monitor with multi-media player
Product installed
Left-right 360° Rotating
Up-down 105° Flipping
7
Roofmounting monitor with multi-media player
Features:
1. The display unit has buit-in TV tuner.
2. Built-in USB 2.0 host and SD card reader.
3. Built-in wireless FM audio transmitter
4. Built-in IR audio transmitter
5. AV input channel
Basic operation
8
Roofmounting monitor with multi-media player
BRIGHT
CONTRAST
COLOR
TINT
RESET
50
50
50
50
INPUT
ROTATION
BLUE
SCALER
FM SEND
ENGLISH
S-ROLOC
9
MEDIA
4
OFF
16:9
87.7 MHz
NTSC M
Roofmounting monitor with multi-media player
SLEEP
TIME
OFF TIME
ON TIME
IR
0
AUTO SEARCH
SEARCH
FINE
BAND
VHFH
17
PROGRAM
ON
SKIP
FREQ 271.25 MHz
A
10
Roofmounting monitor with multi-media player
11
Roofmounting monitor with multi-media player
12
Roofmounting monitor with multi-media player
TV SETUP
Press MODE button to select TV.
Press MENU button and select "S-ROLOC" item, select TV color system
and audio system by pressing CH-/CH+, VOL-/VOL+ to adjust them.
Press MENU button and select "AUTO SEARCH" item. it will automatic
search channel.
The cable TV program can be watched after it finish search.
Press CH-/CH+ to select TV channel.
Press VOL-/+ to adjust volume.
Voice mode choice: D/K B/G I M N.
Color mode choice: PAL NTSC SECAM PAL/M PAL/N.
TROUBLE SHOOTING
NO SOUND OR BAD SOUND EFFECT
Please check if cables are connected properly.
Please check audio shift setup.
Please adjust the receiving frequency to harmonized with the transmitting
frequency.
NO PICTURE
Check if cables are connected properly.
Video input is no t yet set up correctly.
The monitor is ON OR OFF.
POOR PICTURE
The color is not properly adjusted, please operate the remote controller to
adjust it.
The disc is scratched spotted.
THE REMOTE CONTROL DOES NOT WORK PROPERLY
There is an obstacle in the path of the remote control and unit.
Remove the obstacle, check if remote control point to receiver or not.
The batteries in the remote control are exhausted. Replace the batteries
with new ones.
NOTE: please contact with the dealer or approved service center help if the
troubles can't be solved by the methods offered.
13
Roofmounting monitor with multi-media player
9 inch (16:9)
768xRGBx234
14