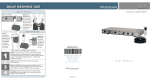
1
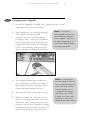
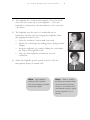
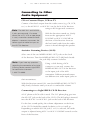
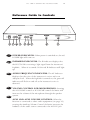
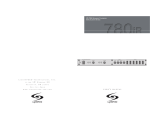
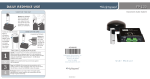
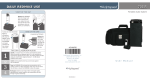
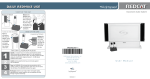
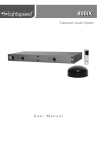
LES 700 IR Series
L i s t e n i n g E n h a n c e m e n t S y s t e m tm
for Classroom Amplification
User Manual
L i g h t S P E E D Te c h n o l o g i e s , I n c .
Table of Contents
Several studies validated by the U.S.
Department of Education and the
Educational Audiology Association verify
that poor classroom acoustics, high ambient
noise, and temporary mild hearing loss among
children place many students academically at
risk.
The Infrared (IR) Classroom Amplification
provided by the LES 700 increases both the volume
and clarity of your voice, and evenly distributes it
so that no matter where students are seated, they
have equal opportunity to understand what is
being said.
The following pages provide:
Charging Your LightMic
Operating Your LightMic
Positioning An Optional Microphone
Connecting to Other Audio Equipment
Tips on Using Classroom Amplification
Reference Guide to Controls
Trouble Shooting
Transmitter & Battery Care
Pages
3
4
7
8
9
11
14
15
Now we hope you will enjoy using what many principals,
teachers and students are calling, “One of the most
effective teaching aids introduced in the decade.”
2
L E S 7 0 0 I R O P E R AT I N G I N S T R U C T I O N S
Operating Instructions
Step 1
Power for Your Receiver
1
Check that:
• Both front panel microphone volume controls
(A VOLUME and B VOLUME) are set to minimum
by turning knobs fully counter-clockwise.
• The Receiver must be connected to a power source:
Use the enclosed power supply to plug into a power
cord or a standard wall electrical outlet, and
connect the other end to the DC POWER jack
on the back panel.
• The speakers are connected as described in the
Speaker Installation Instructions packed with the
speakers.
2
Note
Turn ON the power switch located on the left side of the
front panel of the Receiver. The red POWER light on the
switch lights up.
Refer to the
Reference Guide on page
13 to identify the name
and location of each
component of your system.
Familiarizing yourself with
these pages may be helpful
if you are unfamiliar with
electronic equipment.
L E S 7 0 0 I R O P E R AT I N G I N S T R U C T I O N S
Step 2
3
Charging Your LightMic
1
Ensure the LightMic is turned OFF. (On/off switch is on the
side panel.) Receiver can be left on.
2
Your LightMic has its internal rechargeable batteries already installed.
Connect one end of the Transmitter
Charging Cable to one of the CHARGE
jacks on the back panel of the Receiver.
Connect the other end of the Charging
Cable to the charging jack on the side
of the LightMic as shown in the illustration.
3
The triangle-shaped light on the front
of the LightMic (see illustration above)
glows green when the charging cable is
connected and working correctly.
4
The batteries fully charge in 8-12 hours.
5
When in normal use, it is best to leave
batteries charging until used, since they
slowly lose their charge when not in use.
However, do not leave batteries charging
continuously for more than 10 days as it
significantly shortens your battery life.
Note The internal
rechargeable batteries are
not completely charged
when shipped. They must
be fully charged for 8 or
more hours before regular
classroom operation.
Note If the batteries
are not going to be used
for an extended period of
time (Christmas, spring,
summer break, etc.) it
is important to charge
the battery for at least
8 hours, and then store
LightMic in a dry, mild
temperature environment.
4
L E S 7 0 0 I R O P E R AT I N G I N S T R U C T I O N S
6
Once the batteries are charged, remove the Charger Cable
from the LightMic.
7
NiMH batteries usually maintain their charge for a full
day of normal classroom use. Always switch the LightMic
Transmitter OFF when not in use (lunch hour, quiet times,
etc.).
8
When the LightMic requires new batteries, turn it over
and place your thumb on the ribbed section of the battery cover. Remove the battery cover by firmly sliding the
cover down until it “snaps” out. Insert the new batteries
(paying attention to the + and - as indicated inside the
case). To close, slide the battery cover back toward the
top of the LightMic and snap it into the locked position.
Step 3
Operating Your LightMic
1
On the side of the LightMic is a Channel A/B slide switch.
Slide the switch to the “A” position. (If you purchase a
second LightMic for simultaneous use in this room, set
one LightMic channel switch to the “A” position and the
second LightMic switch in the “B” position.)
2
Slide the on/off switch on the side of the LightMic
Transmitter to ON, and the triangle-shaped light on the
front glows red.
3
Your LES-700 IR system has two separate receivers, Channel
A & B, to allow for use of two LightMic Transmitters in the
same room at the same time. Ensure the Receiver is receiving your LightMic Transmitter signal:
• The IR indicator light left of the A VOLUME will glow
red on your Receiver if you chose Channel “A” on your
LightMic Transmitter.
• The IR indicator light left of the B VOLUME will glow
red if Channel “B” is chosen.
• If you are simultaneously operating two LightMics, one
set on “A” and one set on “B,” both Receiver IR lights
“A” and “B” will glow red.
L E S 7 0 0 I R O P E R AT I N G I N S T R U C T I O N S
4
The LightMic has a built-in Microphone. (Note the small
circle of foam at the top of your LightMic.) Once the
LightMic is switched on, the microphone is also activated
– no wires!
5
The LightMic may be used as a hand-held mic or
hands-free lavaliere style by hanging the LightMic from
the supplied Lavaliere Cord.
• Place the Lavaliere Cord around your neck.
• Adjust the cord length by sliding plastic spring-loaded
adapter.
• Hang the LightMic by securely sliding the cord under
the clip on the LightMic back.
• The top of the LightMic should rest on your
collarbone.
6
When the LightMic power switch is slid to OFF, the
microphone power is turned OFF.
Note
High collared
clothing may interfere
with the outgoing infrared
transmitter signal.
Note
5
There is a delay
of about one-second from
the time the Transmitter
switch is turned ON until
the Receiver sends a signal
to the Amplifier. This is
normal.
6
Step 4
L E S 7 0 0 I R O P E R AT I N G I N S T R U C T I O N S
Adjusting LightMic Volume
LightMic volume is determined by a setting on the Receiver.
Note
1
Make sure the Receiver is switched ON.
2
Ensure the LightMic is switched ON with the triangle on
the front of the LightMic glowing red. One of the red
IR indicators on the front panel of the Receiver will also
glow, indicating that it is receiving the LightMic transmitter signal and is ready for use.
3
Speak at a normal voice volume and the green AF indicator
on the Receiver front panel should flash, or flutter, on and
off as voice volume increases and decreases. While speaking
at a conversational voice level, slowly turn the A volume
control knob clockwise (if your LightMic is set on Channel
A) to increase the loudness of the speakers until the sound
level is adequate for the room.
Feedback or
“squealing” may occur if
the volume is set too high.
Reducing the loudness
of the speakers with the
volume control usually
eliminates feedback.
L E S 7 0 0 I R O P E R AT I N G I N S T R U C T I O N S
Step 5
7
Positioning An *Optional* Microphone
If you would prefer to use a different microphone, it can
be plugged into the LightMic converting it to function only
as a Transmitter.
1
2
3
The LightMic has an 1/8” microphone jack on its side near
the charging jack.
Insert the plug end of the microphone wire into the jack,
pressing firmly.
After the microphone is connected to the LightMic,
position the microphone as described below:
Noise-canceling Headset Microphone: The headset
microphone is placed from behind the head over both ears.
(Like putting a pair of glasses on backwards.) The flexible
microphone arm is then adjusted to follow along your jaw
line with the microphone element at the end positioned
about 3/4” from the chin as shown. The flat side (with screwhead) should be facing away from your mouth.
Lavaliere Microphone: The lavaliere microphone should be
hung around the neck as illustrated, resting on your collarbone. The neck cord is adjusted by squeezing the two long
ends together and then sliding the adjuster up or down the
cord.
Flexible Collar Microphone: The flexible collar microphone
is wrapped around the neck with the microphone element
positioned 3-4 inches from the mouth, as shown.
8
L E S 7 0 0 I R O P E R AT I N G I N S T R U C T I O N S
Connecting to Other
Audio Equipment
CD or Cassette Player, VCR or TV
Connect a line-level output from the audio source (e.g. CD, VCR,
etc.) to the AUX IN 1 or AUX IN 2 on the back of the Receiver
using an RCA-type male connector.
Note The AUX IN 1 and AUX IN
2 jacks are monaural. If a stereo
source like a CD, VCR or tape player
is used, a common stereo-to-mono
adapter is necessary to convert the
stereo signal to mono for input to
the LES 700 Receiver.
With the Receiver turned on, slowly
increase the appropriate AUX 1
VOLUME or AUX 2 VOLUME on
the front of the Receiver. Increase
the level until audio from the audio
source is heard through the speaker.
Assistive Listening Devices (ALD)
Select one of the two MIXED AUDIO OUT jacks on the back
of the Receiver. Turn the MIXED AUDIO OUT ADJ knob beside
the jack fully counter-clockwise.
Note If you have any questions
regarding the connection of assistive
listening devices contact LightSPEED
for technical assistance at
1-800-732-8999.
Using a cable having a RCA
connector at one end, connect the
MIXED AUDIO OUT of the Receiver
to the input jack of the ALD
transmitter. Different manufacturers
use different size audio input jacks on
their transmitters.
With the Receiver turned ON, turn the MIXED AUDIO OUTPUT
ADJ slowly clockwise until you reach a comfortable volume.
Connecting to a LightSPEED CX-50 Receiver
A 1/4” phone-to-RCA cable is used. The 1/4” phone plug goes into
the AF OUT jack on the back of the CX-50. The RCA plug is inserted
into the AUX IN 1 or AUX IN 2 jack on the back of the Receiver.
For the best sound quality, the volume adjustment on the front
of the CX-50 should be turned clockwise as far as it will go.
Depending on which AUX IN jack (1 or 2) is selected, the audio
output is adjusted using AUX 1 or AUX 2 VOLUME controls on the
front of the Receiver.
L E S 7 0 0 I R O P E R AT I N G I N S T R U C T I O N S
9
Tips on Using Classroom
Amplification
These helpful suggestions are provided to maximize the successful
use of your new Classroom Amplification system.
•
Involve your students in this new process right from the
beginning. When setting the volume, ask the students, “What is
the correct volume?” (Each level will seem “louder” for them than
you.) Ask, “When should we use the hand-held microphone?”
Some teachers introduce the system by passing the hand-held
microphone around the room for each student to say hello.
•
Adjust the Lavaliere Cord to position the LightMic Transmitter to
rest on your collarbone.
•
With the Lavaliere and Flexible Collar Microphone, position
the microphone so that it is 4-5 inches from your mouth. This
allows a good signal to be picked up, yet is far enough from
the mouth to minimize extraneous noises generated during
speech. Keep the foam cover on the microphone to help
reduce additional noise.
•
Speak in a natural voice. Normal conversational speech level
should provide an adequate speech signal. It is not necessary
to increase the intensity of your voice because the IR system is
providing adequate amplification (approximately 5-10 dB)
above your normal voice level.
•
Avoid wearing jewelry that may rub or bump against the
LightMic and produce unwanted noise.
•
Avoid wearing high collared clothing that may interfere with the
infrared Transmitter signal.
•
Find a safe, secure place away from excessive heat, cold or
dampness for overnight storage of the LightMic.
•
If using an optional microphone, do not wrap the mic cord
around the LightMic. This damages the cord and jacks and is
not covered under warranty.
•
Use the on/off control on the LightMic to mute the system when
needed (such as during private conversations with a student,
parent, or other classroom visitor).
•
Turn the LightMic Transmitter(s) OFF whenever leaving the
classroom.
10
L E S 7 0 0 I R O P E R AT I N G I N S T R U C T I O N S
•
Recharge batteries each night. Operating time (actual
usage) for the LightMic when using the rechargeable
batteries should be more than adequate for a typical school
day. Your rechargeable batteries should last for a normal
school year if properly cared for.
•
Do not recharge disposable batteries as they can
overheat and expand, creating a significant hazard
and damaging the LightMic. (This type of damage is
not covered under warranty.)
•
Try to avoid dropping the LightMic.
•
Treat cords (particularly near the attachments),
microphones, and batteries gently. These are usually
the items that tend to malfunction first from misuse.
•
Avoid blowing into the microphone when testing it.
Instead, rub fingers over the top of the LightMic, or snap
fingers near the microphone. Or conduct a consonant test
by saying “ah, bah, s, sh, th”, etc. These consonant sounds
represent some of the softer frequency ranges of speech and
if they can be heard and distinguished, your equipment is
working effectively.
•
The Receiver has two auxiliary sound source input jacks
that may be used to amplify additional complimentary
audio from a VCR, CD-ROM, computer, cassette tape
player, etc., with a simple connecting cable (not included).
For any difficulty or question not addressed here,
please contact LightSPEED’s Service Department at
1-800-732-8999, 7:00am - 5:00pm PST.
L E S 7 0 0 I R O P E R AT I N G I N S T R U C T I O N S
11
Reference Guide to Controls
1
POWER INDICATOR: When power is switched on, the red
POWER light will come on.
2 & 5 INFRARED INDICATOR: The IR indicator displays that
the LES 700 IR is receiving a light signal from the instructor’s
LightMic. When it is turned ON the red IR Indicator will light
up.
3 & 6 AUDIO FREQUENCY INDICATOR: The AF Indicator
displays that the voice of the instructor is active and at an
adequate level. When the LightMic is turned on, the green AF
indicator will flash on and off as the instructor’s voice is
detected.
4 & 7 VOLUME CONTROL FOR MICROPHONES: Rotating
8&9
the A VOLUME control or B VOLUME control clockwise will
increase the volume of the microphone through the speaker
system.
AUX1 AND AUX2 VOLUME CONTROL: When the
Receiver is connected to other audio equipment (see page 10),
rotating the Auxiliary Volume Control clockwise increases the
loudness of the audio source connected to the AUX IN jack
12
10 - 13
14 & 17
15 & 16
L E S 7 0 0 I R O P E R AT I N G I N S T R U C T I O N S
(located on the back panel).
SPEAKER OUTPUT CONNECTORS: These red and black
pairs of connectors are used to attach molded wire from the
loudspeaker system to the Receiver. Each pair has its own on/off
switch (see 20) underneath.
MIXED AUDIO OUTPUT LEVEL ADJUST: Clockwise
rotation increases the level of the audio signal of the Mixed Audio
Output jack.
MIXED AUDIO OUTPUT JACK: Sends to an external source
18 & 19
20
the same audio information supplied to the speaker system. This
output could be used for recording purposes, or for an assistive
listening device such as LightSPEED’s LES 360 FM Personal
Listening System.
AUX IN 1 AND AUX IN 2 INPUT JACKS: Used to connect
an external audio source (e.g., background music from a CD) to mix
with your voice from the LightMic. AUX1 level is adjusted by using
the AUX1 VOLUME on the front; AUX2 is adjusted by AUX2
VOLUME on the front.
SPEAKER OUTPUT SWITCHES: Turns ON or OFF the
red and black speaker connector pair above it. This is used for
“zoning” multiple speakers within the classroom. (See your
Speaker Installation information.)
L E S 7 0 0 I R O P E R AT I N G I N S T R U C T I O N S
21
13
DC POWER CONNECTOR: The Receiver requires a 24-volt,
2.5 Amp DC power supply. The center conductor is positive (+)
polarity.
Caution: Power supplies from different manufacturers have various
output voltages, current ratings, and polarity. Connecting the wrong
type of power supply can result in damage to the LES 700. (This
would not be covered under warranty.)
22
TRANSMITTER CHARGING JACKS: One end of the
Charging Cable is connected to this jack when charging the
batteries in the LightMic. The other end of the Charging Cable is
connected to the CHARGING jack on the side of the LightMic.
(See page 3.)
23
SPEAKER FILTERS: Factory preset for optimum performance.
If you have questions about these filters or their settings, please call
LightSPEED or see your speaker installation instructions.
24
EQ ADJUSTERS: Factory set for a normal classroom environment,
these three knobs function similarly to the “bass” and “treble” on your
home stereo. A combination of adjustments will help clarify voice
tones for better student hearing and comprehension, and can also
assist with the removal of “squeal” or feedback.
25
MIC/LINE: This switch sets the signal output level to micro
phone or line level for the 1/4” phone AF Out jack (see 26).
26
AF OUT: If you wish to use a different amplifier (for example, to
connect two classrooms) and use the LES 700 as an IR receiver only,
this output is used to connect the LES 700 to that other amplifier,
and send through the pre-amplifier signal.
27
AF BALANCE OUT: Providing a similar function as the AF OUT,
this XLR output sends a balanced microphone level pre-amplifier signal.
28
SENSOR INPUTS: The cable from your IR sensor is connected
to any of these six plugs. Though most rooms are adequately served
with one IR sensor, the six plugs provide opportunity for up to six
IR sensors to be used in a classroom if necessary due to room size or
dimensions.
14
L E S 7 0 0 I R O P E R AT I N G I N S T R U C T I O N S
Trouble Shooting Guide
Please go through this checklist before calling LightSPEED
Technologies Service Department.
Battery Check
Note
Most problems
associated with listening
enhancement systems are
directly related to low
battery power. Check
batteries first.
• Confirm batteries are charged each
night. With proper charging,
batteries should last about one
school year.
• LightMics are charged using a cable
from the back of the Receiver.
Make sure plugs are secured, and
in the proper jacks.
•
Confirm the green charging light located on the front of the
LightMic is on while charging.
•
Be sure the LightMic is turned OFF while charging.
Hearing Static or Buzzing
•
Test LightMic with fully charged batteries. Regular alkaline
batteries may be used for testing purposes.
•
If using two LightMics, check that they are not set to the
same channel. If so, select a different channel for one of the
LightMics.
•
If you have access to another mic, try it in your LightMic.
•
Test the LightMic using its built-in microphone. Remove
any other optional microphone. If it works properly, the
problem is with your optional microphone which may
need repair.
•
Keep Receiver at least 6 ft. away from computers.
Low Volume
•
Check volume level on Receiver and adjust as necessary.
L E S 7 0 0 I R O P E R AT I N G I N S T R U C T I O N S
15
Sound Fades In and Out (Drop Out)
•
Confirm IR Sensor is securely attached and visible from
all areas of the room where the LightMic is operating.
•
Test LightMic with fully charged batteries. You can use any
known, good quality batteries for testing.
No Sound From Speaker
•
Confirm the LightMic and Receiver are turned on and
have matching channels. Check both A VOLUME and
B VOLUME to ensure they are set correctly.
•
Confirm Power Supply is the correct type, is connected
securely in the wall outlet and into the back of the Receiver.
•
Turn on Receiver; confirm that the POWER light located on
the front panel switch is on.
•
Turn on LightMic and confirm red IR light, located on the
front panel of the Receiver, lights. When speaking into the
LightMic, the green AF light should flash/flutter with your
voice volume.
•
Confirm batteries in the LightMic are good: the red
indicator light should glow steadily.
•
Check to confirm speaker wires are in the correct wire
terminals on the back of the Receiver and confirm that
the speaker switch for that speaker output is in the ON
position. Black (or black stripe) to black terminal; white
or gray wire to adjacent red terminal.
•
Confirm IR Sensor cable plugs are secure in jacks.
Transmitter Maintenance & Care
•
Cleaning the battery contacts will help ensure that your
system gives you years of reliable service. We recommend
using “deoxidizer” or contact cleaner every 2 or 3 months.
16
L E S 7 0 0 I R O P E R AT I N G I N S T R U C T I O N S
Battery Maintenance & Care
•
Battery should fit snugly against the contact points inside
the battery compartment.
•
Batteries are to be charged each night and over the
weekends. They should not be left charging over the
summer or during Christmas and Spring Breaks. Prior
to extended breaks, systems should be fully charged and
batteries removed from the LightMic. After extended
breaks, reinstall batteries and recharge before use.
If you have gone through this checklist and are still
having problems, write down the serial numbers of your
system. Call LightSPEED Service Department at
1-800-732-8999
7:00am – 5:00pm PST
Warranty
Five Year Limited Warranty to Original Purchaser
The LightSPEED 700-series Classroom Amplification Systems are guaranteed against malfunction due to defects in materials and workmanship for a period of five years from purchase. Microphones (other than
the LT-70 LightMic) and batteries are guaranteed for one year. The
product will be repaired or replaced at LightSPEED’s option during the
warranty period. Warranty does not extend to finish, appearance, or
malfunctions due to abuse or misuse. Repairs performed by any other
than LightSPEED will void this guarantee. Our Service Department
(800.732.8999, 7:00am–5:00pm PST) will handle all your repair/
replacement needs.
1-800-732-8999
May 2003