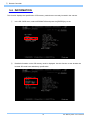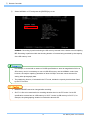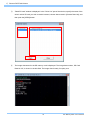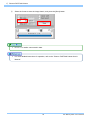
1
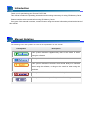
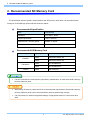
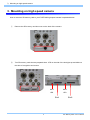
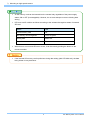
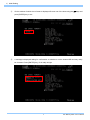
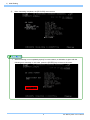
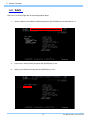
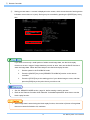
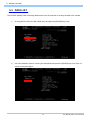
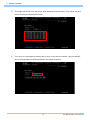
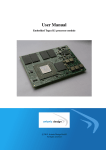
SD Memor y Card The copyright of this manual is held by Photron Limited. Product specifications and manual contents can change without advanced notification. This manual was created taking every possible measure to ensure the accuracy of its contents. However, if you find a section which is unclear, a mistake, or an omission, please contact Photron Limited using the contact information provided at the end of the manual. Photron Limited bears no responsibility for the results of using the product or from following the instructions in this manual. Company names and product names listed in this manual are trademarks of their respective companies. Introduction Thank you for purchasing your Photron FASTCAM. This manual contains the operating instructions and warnings necessary for using SD Memory Cards. Please read the entire manual before using SD Memory Cards. If any part of this manual is unclear, contact Photron using the contact information printed at the back of this manual. Manual Notation The following icons and symbols are used in the explanations in this manual. Icon/Symbol Description This symbol indicates supplementary items to be aware of when using the software. This symbol indicates the location of a reference. This symbol indicates instructions that should always be followed when using the software, or things to be careful of when using the software. This symbol indicates content that should always be read. This symbol indicates a space for you to use for making notes. About this manual The contents of this book are structured as follows: Introduction The outline of this book is shown. 1. Notes Special notes and cautions for using this manual are given. 2. Recommended SD Memory Card Products and models currently recommended by Photron are presented. 3. Mounting on high speed camera How to mount an SD memory card onto high speed camera is explained. 4. Initial Setting Initial setting required to be made before saving image data from high speed camera is explained. 5. Remote controller Operation and setting up by means of the remote controller are explained 6. Photron FASTCAM Viewer (PFV) Image data viewing and storing operations using PFV are explained. 7. Reference How to send a question or how to make reference when in trouble is explained. Table of contents 1. Notes ................................................................................................................................... 1 2. Recommended SD Memory Card ..................................................................................... 2 3. Mounting on high speed camera ...................................................................................... 3 4. Initial Setting ....................................................................................................................... 6 5. Remote Controller .............................................................................................................. 9 5.1. SD CARDmenu ............................................................................................................ 9 5.2. SAVE .......................................................................................................................... 10 5.3. DATA LIST .................................................................................................................. 13 5.4. INFORMATION ........................................................................................................... 15 5.5. FORMAT ..................................................................................................................... 16 5.6. MEMORY MODE ........................................................................................................ 16 6. Photron FASTCAM Viewer .............................................................................................. 18 7. Contacting Photron .......................................................................................................... 21 1.Notes 1. Notes This book describes how to perform storing of image data into an SD memory card, and viewing of stored data, using the FASTCAM series model camera that has a built-in SD memory card interface. The setting method varies greatly by the environment, especially the OS and the network adaptor in the PC. Use this manual as an example for checking the flow of setting arrangement. The setting method of PFV is also included in explanation in this manual. To use the PFV, PFV software must be installed in advance. If an SD memory card which is less than recommended specification is used, the transfer rate may fall remarkably or may fail in storing image data. When using this book, also refer to the hardware manuals of the FASTCAM camera, the SD memory card and your PC. 1 SD MemoryCard User’s Manual 2.Recommended SD Memory Card 2. Recommended SD Memory Card The specification and the specific model names of the SD memory cards which can be used for data storage in FASTCAM high speed camera are shown below: Recommended Specification Item Specification Standard SD, SDHC, SDXC Speed specification UHS-1 SDR104 Manufacturer’s nominal speed 90MB/s or higher Recommended manufacturer SanDisk, Panasonic, Toshiba Recommended SD Memory Card Manufacturer Capacity Model 64GB SDSDXPA-064G-J35 32GB SDSDXPA-032G-J35 64GB RP-SDUB64GJK 32GB RP-SDAB32GJK 32GB SD-GU032G1 SanDisk Panasonic Toshiba • If an SD card with low nominal speed, specified by manufacturer, is used, the transfer rate may become extremely slow. • When using SD memory cards other than a recommended manufacturer, the transfer rate may become extremely slow even if the manufacture nominal speed is high enough. • If an SD memory is used for image data storage of high speed camera, it cannot save other data. 2 SD MemoryCard User’s Manual 3.Mounting on high speed camera 3. Mounting on high speed camera How to mount an SD memory card to your FASTCAM high speed camera is explained below. ① Remove the SD memory card slot cover on the back of the camera. ② Two SD memory card slots are prepared there. LED on the side of the slot lights up and blinks at the time of recognition and access. Slot1 Slot2 LED LED Slot1 3 Slot2 SD MemoryCard User’s Manual 3.Mounting on high speed camera ③ Insert SD memory cards into the slots on the camera back until you hear a click sound. ④ If an inserted SD card is correctly recognized, LED corresponding to the slot turns on green. 4 SD MemoryCard User’s Manual 3.Mounting on high speed camera • An SD memory card can be inserted into the camera body regardless of the power supply status, ON or OFF (hot-swappable). However, do not even attempt to remove it during data writing. • LED turns on/off or blinks as follows according to the existence/recognition status of inserted SD card. • Status LED No SD memory card Off SD memory card recognized Turns on green Writing data Blinks red Error found Turns on red When an error occurs and LED turns on red, it can be reset by pushing the button on the remote controller. • If the inserted SD memory card is pulled out during data writing (with LED blink red), the data being written in may be broken. 5 SD MemoryCard User’s Manual 4.Initial Setting 4. Initial Setting When using an SD memory card, it is necessary to format it first. The high speed camera body and remote controller are used for formatting. ① Connect the remote controller to the high speed camera. If your remote controller is a model without an LCD monitor, a video monitor should be connected to it. ② Switch on the camera. ③ Operate the remote controller while looking at the monitor screen. Press [MENU] key, followed by [OTHERS], [SD CARD], [FORMAT], then press [ENTER] key to set. 6 SD MemoryCard User’s Manual 4.Initial Setting ④ Choice window of which slot to format is displayed.Choose one of the slots using the △▽keys and press [ENTER] key to set. ⑤ A message is displayed asking for confirmation on whether or not the inserted SD card may really be formatted. Press [ENTER] key, if it is really all right. 7 SD MemoryCard User’s Manual 4.Initial Setting ⑥ • When formatting completes, the [SD CARD] menu returns. When formatting is not completed properly for some reason, an indication is given with the following error message. In this case, press the [ENTER] key to return to the menu. 8 SD MemoryCard User’s Manual 5.Remote Controller 5. Remote Controller Here, how to carry out data storage and setup using the remote controller is explained. 5.1. SD CARD menu ① ② Press [MENU] key on the remote controller to open the menu. In the menu, go to [OTHERS] => [SD CARD] then press the [ENTER] key. The [SD CARD] menu will appear as shown below. 9 SD MemoryCard User’s Manual 5.Remote Controller 5.2. SAVE Here is how to store image data of the photographed object. ① Set the camera in PLAYBACK mode and open the [SD CARD] menu as described in 5.1. ② In the menu, select [SAVE] and press the [ENTER] key to set. ③ Select your desired slot and press the [ENTER] key to set. 10 SD MemoryCard User’s Manual 5.Remote Controller ④ Storing process starts. A counter is displayed on the screen, which shows the end of storing as the indication comes down to 0 (zero). Storing may be cancelled by pressing the [ENTER] key at any time. If you wish to store only a small portion of whole stored image data, use the block-replay function to set out a range of image data that you wish to store, then use the SAVE function to store the image data. Follow the below steps to use the block-replay function: 1. Set the system in the PLAYBACK mode. 2. Press the [ON/OFF] key in the [SEGMENT PLAYBACK] section on the remote controller. 3. Press the [START] key at the starting point of your desired range to store, and then press the [END] key at the point where you wish to end. • See 5.6. MEMORY MODE section, page 16, before starting a storing process. • Refer to the “Remote Controller User’s Manual” for detailed explanation about how to use the block replay function. • When image data is stored using the block-replay function, the number of pieces of image data that can be stored is limited to 32, maximum. 11 SD MemoryCard User’s Manual 5.Remote Controller • In order to prevent data disappearance, a write-protected setup is recommended. 12 SD MemoryCard User’s Manual 5.Remote Controller 5.3. DATA LIST This function displays a list of all image data stored in the SD card that is currently inserted in the camera. ① Choose [DATA LIST] in the SD CARD menu and press the [ENTER] key to set. ② In the slot selection window, choose your desired slot and press the [ENTER] key to set. Slot 1 is chosen in the below figure. 13 SD MemoryCard User’s Manual 5.Remote Controller ③ The image data saved in the SD card in Slot1 are listed as shown below. Year, month, day and time of shooting are displayed in the list. ④ You can go to a next page by pressing the [◀ ▶] key on the remote controller. Up to 32 different pieces of image data are stored and listed in four pages, maximum. 14 SD MemoryCard User’s Manual 5.Remote Controller 5.4. INFORMATION This function displays the specification of SD memory cards that are currently inserted in the camera. ① In the SD CARD menu, select INFORMATION and press the [ENTER] key to set. ② Detailed information on the SD memory cards is displayed. Use this function to see whether the inserted SD cards have satisfactory specification. 15 SD MemoryCard User’s Manual 5.Remote Controller 5.5. FORMAT This function formats, or initializes, SD memory cards that are inserted in the camera. • For detailed discussion of operation, see “4.Initial Setting” on page 6. 5.6. MEMORY MODE This function sets whether the recordable duration of the camera is matched up to the storage capacity of an SD memory card being used. Because of certain technical restriction of the specification of SD memory card, the maximum capacity that can be available for actual storage of image data is limited to about 14 GB with an SD memory card with 16 GB specification, for example. Since all image data cannot be saved in this SD memory card when it is used together with a camera of 16 GB specification, overflow of image data will cause an error. In this case, however, if "FIT" mode is used, the photography duration of the camera will be automatically restricted to 14 GB, and, as a result, shooting and storing of image data can be performed smoothly. ① In the SD CARD menu, select MEMORY MODE and press the [ENTER] key to set. 16 SD MemoryCard User’s Manual 5.Remote Controller ② Select NORMAL or FIT and press the [ENTER] key to set. NORMAL: Recording is performed using the SD memory inserted in the camera to its full capacity. FIT: Recording is performed with the shooting duration of camera being restricted by the capacity of the SD memory card. • For example, to record with a camera of 32-GB specification to store its image data in full in an SD memory card, it is necessary to use a 64 GB SD memory card in NORMAL mode. Note, however, the surplus capacity (remainder of about 32 GB) in that case cannot be used for storing other photography data. • The partitioning function, if activated in the FIT mode, divides the capacity that has been fitted by the FIT function. • MEMORY MODE cannot be changed after recording. • SLOT 1 is first to be restricted in its recording duration when in the FIT mode. If a 16 GB specification camera has an 8 GB memory in SLOT 1 and a 32 GB memory in SLOT 2, for example, the photographing duration is restricted to about 6 GB. 17 SD MemoryCard User’s Manual 6.Photron FASTCAM Viewer 6. Photron FASTCAM Viewer This section discusses how to replay and manipulate the image data stored in an SD memory card using the PFV Photron FASTCAM Viewer. ① Connect an SD memory card containing image data to your PC via a memory card reader (sold separately). Camera need not be connected to your PC. • When an SD memory card is connected to your PC, a message “Formatting is needed” is displayed. But, NEVER format the card. The above message always comes up because the SD card contains image data in a unique format. ② Start up PFV. Click on the File tab, and then press the [SD card] button. Camera need not be connected to your PC. 18 SD MemoryCard User’s Manual 6.Photron FASTCAM Viewer ③ "Read SD card" window is displayed. In the "Drive List" part of the window, specify the name of the drive in which SD card you wish to read is inserted, choose data to read in [Camera Data List], and then push the [OPEN] button. ④ The image data stored in the SD memory card is displayed. The image data number, SD Card Data No. XX, is shown in the title field. The image data is ready for replay now. 19 SD MemoryCard User’s Manual 6.Photron FASTCAM Viewer ⑤ Select the format to save the image data in, and press the [Store] button. • PFV 3.3.7 or earlier cannot read in data. • For more detailed instructions for operation, refer to the “Photron FASTCAM Viewer User’s Manual”. 20 SD MemoryCard User’s Manual 7. Contacting Photron 7. Contacting Photron For inquires related to PFV, contact Photron at the contact information listed below. Additionally, the following items will be verified when inquiring, so please prepare them in advance. Items Verified Concrete Example Contact Information Company, school or organization name, customer contact name, contact phone number, Contact e-mail. Product Name The Photron FASTCAM Viewer version number and the high-speed camera name, SD Memory Card name. For the version number, check the version information. Condition of the system and what is known about it. Contact Information PHOTRON USA, INC. In Americas and Antipodes 9520 Padgett Street, Suite 110 San Diego, CA 92126-4426, USA Phone : 800-585-2129 or 858-684-3555 Fax : 858-684-3558 E-mail : [email protected] www.photron.com PHOTRON EUROPE LIMITED In Europe, Africa and India The Barn, Bottom Road, West Wycombe, Buckinghamshire, HP14 4BS, U.K. Phone : +44(0) 1494 48 1011 Fax : +44(0) 1494 48 7011 E-mail : [email protected] www.photron.com PHOTRON LIMITED In other areas 21F, Jimbocho Mitsui Bldg., 1-105 Kanda Jimbocho, Chiyoda-Ku, Tokyo 101-0051 Phone : +81 3 3518 6271 Fax : +81 3 3518 6279 E-mail : [email protected] www.photron.co.jp 21 SD MemoryCard User’s Manual SD Memor y Card User’s Manual Revision 1.01E Publication Date June. 2015 Publisher PHOTRON LIMITED 21F, Jimbocho Mitsui Bldg., 1-105 Kanda Jimbocho, Chiyoda-Ku, Tokyo 101-0051 © 201 3.P H O TR ON LI MI TE D , Al l r ights res er ved . P rin ted in Ja pan. No. E150608U