1
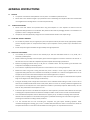
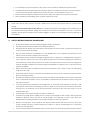
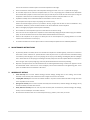
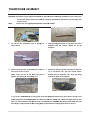
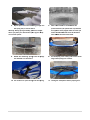
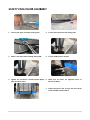
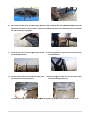
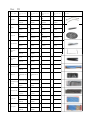
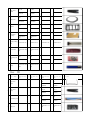
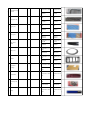
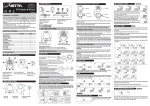
SkkyDa anceer Trramp polin ne The content in this docum ment is subjectt to change without notice.. © Coppyright SkyDaancer™ Alll rights reservved. GENERAL INSTRUCTIONS 1.1 PURPOSE The product is intended for home/domestic use only and is not suitable for professional uses. Please refer to the maximum weight as per specification sheet. Overloading the trampoline above the recommended user weight will cause damage which is not covered by the warranty 1.2 DANGER FOR CHILDREN Please ensure that children are supervised when using the trampoline. It is also important to make sure that all appropriate safety precautions are undertaken. Also please be aware that the packaging material is not suitable for use by children. There is a danger of suffocation. Trampolines over 51cm (20inches) in height are not recommended for children under 6 years of age. 1.3 ATTENTION– PRODUCT DAMAGES Do not alter the product. Only use original spare parts and repairs should only be carried out by appropriately qualified persons. Improper repairs can compromise the safety of your trampoline. Use this product only as described in this manual. Protect the product against the effects of high humidity and high temperatures. 1.4 ADVICE FOR THE ASSEMBLY The assembly of the product must be done carefully by at least two able‐bodied adults. If in any doubt, ask a technically qualified person. Before commencing assembly of the trampoline, please read thoroughly the instructions contained in this manual – it will save time and ensure that the completed trampoline complies with the design specifications. Remove all packaging materials and lay out all parts on a suitable surface. This will provide a good overview of all components and simplify the assembly process. Cross check the unpacked parts with the parts list to ensure that there are no missing components. Beware that when using tools or doing technical work, there is always a risk of injury so please make sure that appropriate safety precautions are undertaken and assembly is undertaken in a careful and thoughtful manner. As an example do not let tools lie around the workspace that could be tripped over or stood on. Dispose or place in storage packaging material in a way that cannot cause any danger. As noted above Foils and plastic bags can be dangerous for children (danger of suffocation)! During the assembly process comply with all instructions in the Installation Guide making sure that no short cuts are taken. Once assembled double check that all screws, bolts, washers and nuts are correctly installed and tightened and that all joints are correctly fixed. The correct placement of washers is particularly important. Without them, nuts and bolts can easy unwind when the trampoline is in use. A clearance space of at least 7.3m above the trampoline is most important In particular careful attention must be paid to keeping the trampoline well clear of electrical and telephone cables as well as trees and other overhead obstacles. Once assembled the trampoline must be checked that it is properly set up. In addition to keeping clear of overhead obstacles it must be placed on a flat and firm footing and it is preferable that the legs are anchored to the ground to prevent ground movement or lifting in windy conditions. It is also essential that the area surrounding the trampoline has good impact absorbing capacities. Either recommended playground matting, grass, sand or a suitable alternative material. Under no circumstances should the trampoline be located in an area where the immediate surrounding area is an unprotected hard surface. Do not attempt to set up the trampoline in rainy, windy or stormy conditions, especially during thunderstorms. The metal frame of the trampoline will conduct electricity. Please ensure that it does not come into contact or placed in close contact with any form of electrical circuit during construction. The same applies once it is in use. Make sure that the trampoline is located well clear of other objects and is kept in a safe and secure environment. When assembling or disassembling, please use gloves to protect your hands. WARNING‐ When IN USE 1. Please ensure that the safety enclosure net zipper is 100% closed and that all three entrance hooks are connected before jumping. 2. Users must not intentionally jump into the safety net; it is designed to stop persons from falling from the trampoline but not for intentional rebounding. Intentional jumping into the safety net may cause the trampoline to top over, or could cause damage to the net. Abuse of the safety net is considered negligent use which is not covered by the warranty, please refer to the disclaimer. 3. SAFETY INSTRUCTIONS FOR TRAMPOLINES All users of the trampoline must be supervised regardless of age and experience. The safety instructions of the trampoline should always be adhered to. Somersaults must be avoided. Incorrect landings on the trampoline can lead to injuries, in particular to the back, neck or head. Injuries could include paralysis Only one person should use the trampoline at a time. Multiple users on the trampoline will increase the risk of collision and can also result in damage to the net and clips. The trampoline must be examined for damaged and general wear on a regular basis – preferably before each time it is used. In particular check for rips in the nets and broken clips which can be caused by exceeding user conditions or from normal wear and tear. Also check the nuts and bolts in the frame as these can loosen over time and tighten as necessary. Damaged or defective parts should be replaced immediately and trampoline must not be used until such repairs are completed. Neither cloths with hooks nor jewellery should be worn by trampoline users in order to avoid such items getting caught in the net or clips. As previously stated in the set up instructions the trampoline must only be set up on flat ground and stable surface. Also avoid any slippery surfaces. Strong wind can blow the trampoline away. If such winds are forecasted the trampoline must be moved to a protected place, or alternatively dismantled. If this is not practicable or possible fasten the trampoline securely to the ground with ropes and anchors. Try to avoid the moving the trampoline once assembled as it can bend when moved. Should it be necessary to shift the trampoline, please consider the following: at least four people must be evenly spaced around the frame to lift it off the ground. The trampoline must be carried horizontally. If the frame is bent during this process it must be corrected before reuse. If used at night ensure that the trampoline is located in a well‐lit area. Trampoline are jumping devices, enabling the user to jump to unusual heights as well as make a wide range of body movements. Hitting the frame, cover pads or incorrect landing on the trampoline can lead to injury. Users must therefore limit their jumping movements to their physical capacity to control such movements. Operators and Supervisors of the trampoline must make themselves familiar with the user manual. This manual contains assembly instructions, selected precautionary measures as well as recommendations for servicing and maintenance of the trampoline. It is also the responsibility of the trampoline owners to ensure that all users are correctly supervised and informed and also ensure that there is sufficient space around the trampoline for safe usage. Users and observers must keep clear of the trampolines moving parts when it is in use – in particular the springs. Do not allow anyone to be under the trampoline when it is in use. The jumping mat is flexible and the downwards force created when jumped on could cause serious injury to both the person under the mat and the person using the trampoline. In like manner do not allow any objects to be placed under the trampoline when it is in use Implement all safety rules and be familiar with the information in the user manual. The trampoline must only be used, if the jumping mat is clean and dry. Surfaces can become slippery in wet or icy conditions. Also lips, tongues and wet skin can stick to metalwork in very cold weather. Therefore, in these conditions children must not be allowed to use the trampoline. Worn or damaged jumping mats should replace immediately. Do not allow use of the trampoline by persons under influence of alcohol or drugs. Ensure all users of the trampoline are competent in the fundamental jumping techniques before trying more difficult jumps. For more information refer to the section titled Fundamental Bounce Techniques. Climb on the trampoline. Do not jump on it directly. Do not use the trampoline as a jumping platform on to other surface as this could result in serious injury. For further information or exercise options refer to a trained trampoline professional or creditable publication. 4. MAINTENANCE INSTRUCTIONS As previously stated in the safety section it is vital that the trampoline is checked regularly, at least once a month and more often if under sustained use. Special attention should be paid to the nut, bolt and washer assemblies making sure that they are firmly tight. The net and jumping mat for any rips and chaffing, the fiberglass poles for breakages and or disconnections and the springs for breakages. All faulty components must be replaced before the trampoline is fit for use again. Also any sharp edges (e.g. bolt ends) should be filed down if found to be protruding. SkyDancer Trampoline frames are manufactured from zinc‐coated galvanized tubing. If surface rust appears it should be removed with either a wire brush or coarse sandpaper, and the area treated with a cold galvanizing paint. These paints are available from most hardware or DIY stores. 5. WARRRANTY DETAILS Frame warranty does not cover weather damage, external damage, damage due to over loading, and all other mentions of non‐warranty cover. Small surface rust no larger than 2cm are not covered. Jumping Mat warranty does not cover the metal D shackles or any wear and tear. Small holes with no larger than 2cm in the Jump Mat are not covered. Spring Cover warranty does not cover any faults caused by lack of maintenance, weather damage, UV damage, misuse, incorrect assembly or normal wear and tear. Safety Enclosure warranty does not cover any faults caused by lack of maintenance, weather damage, UV damage, misuse, incorrect assembly or normal wear and tear. All accessories and bonus items are not covered by warranty. E.g. ladders, anchor kits, rain covers TRAM MPOLINEE ASSEM MBLY Refer to PAR RTS LIST for id dentification n of parts. WARNING: TTwo adults in n good physical conditionn are require ed for the folllowing assem mbly .For you ur safety, you u should weaar proper shoes and clotthing. Failure e to follow these t instrucctions and warnings w mayy result in injjury. NOTE: Picture mayy vary slightlyy with differeent trampolin ne models 1. Lay outt all the traampoline parts in groupps, as 2. Attach the le A eg extensionss to a leg basse and secure e shown aabove. together t with the screews. Repeat for all legg supports. s 3. Simply cconnect the tw wo Top Rails ttogether. Screews in 4. the top rails to the T section. Notes: make sure all of the holes h need tto be aligned.. That will maake assembliing easy. Attach the a A ll leg support rts assembled d in. This will be a two‐person job, aand the seccond person n should s hold the oppositte side, while you bringg both ends off the circle toogether. 5. Lay o out the JUMP PING MAT on the ground inside the co ompleted frame. Once doone attach a spring to anyy D‐Ring llocated on th he JUMPING MAT. You w will notice tha at the SPRING G has a diffeerent length hook at each h end. It iis most impo ortant that sh horter hook is attached tto the JUMPIING MAT D‐RRing. Also ma ake sure thatt the D‐Ring is neatly positioned w with its long eedge located inside the D‐Ring fabric ssleeve as sho own. 6. Rep peat process for the rema aining springss. Use the spring tool, as shown above. Warning: Du uring spring a assembly, ple ease be carefful where you p place your ha ands other pa arts of your bbody as connecto or points. 7. 7 Next con nnect MAT too the FRAME at the quartersections (the points half w way between the oppo osite ends). A Again make sure that you match ea ach D‐RING w with each slot between each SPR RING that hass been fitted. 8. Attaach the remaaining springgs until all spprings are attached ontto the frame. 9. 9 Put the sspring cover safety pads on the outerr edge so tthe springs aare covered. 10. Thee all the cover pad’s stringgs onto the sppring. 11. Testing the Trampolinne before jum mping it on. SAFETTY ENCLLOSUREE ASSEM MBLY 1. Connectt the upper aand lower netting poles. 2. Put the Pole sleeve onto tthe netting p poles 3. Above is the status aafter finishing sliding cufffs 4. Put the plasttic part on alll poles. 5. Tighten the connecction screwss between uupper 6. Make sure all screws are tightene ed nicely to o poles an nd lower pole es ensure the sa e afety. 7. Repeat the former step, and you willl have the all poles attache ed as photo aabove. 8. Now staart the fiber glass rod an nd netting ennclosure partt. Assemble the two FIBRREGLASS RO ODS using the e galvanizzed connecto ors as shown above. In th e process be e careful not tto over stretcch the elasticc cord linkingg the rodss resulting in n a breakage. 9. Leave th he last one to o insert the p part which iss used 10. Connecting t C the two partss of rods and d make them m for the b basketball ho oop a complete c a ircle. 11. Put the safety enclo osure net ontto the upper poles 12. After putting A g the whole nnet onto the e upper holess and fastten the net o on plastic parts. we finish inst w talling safetyy net. 13. Slid de the D ringg attached the e JUMPING M MAT through the slit locatted in the seaam of the saffety net. BASKEETBALL HOOP SET ASSSEMBLLY 1. Place th he correspond ding bolts (the e M812mm xx 2) on the ba ack plate, tigh htening the boolts and wash her to firm thee support pole e. 2. Place th he hoop hold der (metal plate) p and sccrew the bolts M630mm x 3, with nnuts M6 x 3, into correspo onding holes on the front p plate 3. Attach the basketb ball hoop on nto the hooop 4. Placce one of the e springs in tthe middle of o the holder, Screw the bolt b M575mm m x 1 in, witth nut M5 x 1. plates as photo a above. 5. Screw tthe bolt M8100mm into the mettal 6. Put the other spring onto tthe bolt M8 8, and scre plate. ew the nut M8 in. 7. You nea arly finish… 8. Placce the netting g and Velcro it onto the h hoop. Finisshed! SkyDancer Trampoline Parts List 10 9 8 7 11 6 12 13 3 5 4 3 2 1 14 15 16 17 18 19 20 Box #1 No. Parts name 1 2 3 4 5 6 7 Top Rail Spring Jump mat Leg extension Leg base U shape Pole sleeve Large Basketball pole Parts Code and size for 8ft P-OTP03A1-08TR Parts Code Qty and size for 10ft 6 Ф42*1.5 1470mm Ф42*1.5 1710mm P-OTP03A1-08SP P-OTP03A1-10SP P-OTP03A1-12SP P-OTP03A1-14SP 48 64 72 141mm 141mm 177mm 177mm P-OTP03A1-08JM P-OTP03A1-10JM P-OTP03A1-12JM P-OTP03A1-14JM 1 1 1 D2100mm D2800mm D3300mm D3940mm P-OTP03A1-08LE P-OTP03A1-10LE P-OTP03A1-12LE P-OTP03A1-14LE 6 Ф38*1.2 442mm Ф38*1.2 442mm P-OTP03A1-08LB P-OTP03A1-10LB 3 Ф38*1.2 1657mm Ф38*1.2 1608mm P-OTP03A1-08PS-LG P-OTP03A1-10PS-LG 1 1730mm 1730mm P-OTP03A1-08BP P-OTP03A1-10BP 2 8 Ф38*1.5 570mm 4 1 2 Ф38*1.5 1020mm Ф38*1.5 1020mm P-OTP03A1-081 SN P-OTP03A1-101 SN 9 P-OTP03A1-BH Basketball hoop 1 bracket Ф38*1.5 505mm 12 Lower pole 8 P-OTP03A1-14TR Ф38*1.5 1232mm Safety net 11 Upper pole 8 P-OTP03A1-12TR Parts Code Qty and size for 14ft Ф38*1.5 1307mm 8 10 Fiberglass rod P-OTP03A1-10TR Parts Code Qty and size for 12ft P-OTP03A1-08FR 2 P-OTP03A1-BH 1 Ф38*1.5 505mm P-OTP03A1-10FR Ф9 (5 joints) Ф9 (6 joints) P-OTP03A1-08UP P-OTP03A1-10UP 5 Ф25*1.2 1090mm Ф25*1.2 1090mm P-OTP03A1-08LP P-OTP03A1-10LP Ф25*1.2 1090mm 5 Ф25*1.2 1090mm 2 7 7 8 Ф38*1.5 570mm Qty Picture 8 88 1 8 P-OTP03A1-08PS-SM Pole sleeve 13 Small 14 Safety mat 15 Ladder 5 1730mm 1730mm P-OTP03A1-08SM P-OTP03A1-10SM 1 D2440mm D3050mm P-OTP03A1-08LD P-OTP03A1-10LD 1 2217mm 16 17 18 Bastketball 19 Assembly tool bag 20 Pump Box 6 7 8 Leg base U shape Pole sleeve Large Basketball pole Safety net 1 1 760*530*70 mm 760*530*70 mm P-OTP03A1-TL 1 P-OTP03A1-TL 1 P-OTP03A1-BP1 BL P-OTP03A1-BP1 BL P-OTP03A1-08TB P-OTP03A1-10TB 1 P-OTP03A1-TL 1 P-OTP03A1-TL 1 1 210*100mm 210*100mm P-OTP03A1-BP1 PM P-OTP03A1-BP1 PM #2 No. Parts name 5 1 P-OTP03A1-BP 1 Spring loading tool 7 2217mm P-OTP03A1-BP Basketball package P-OTP03A1-10PS-SM Parts Code and size for 8ft Parts Code Qty and size for 10ft Parts Code Qty and size for 12ft P-OTP03A1-12LB Parts Code Qty and size for 14ft 4 P-OTP03A1-14LB Ф38*1.5 1840mm Ф38*1.5 2074mm P-OTP03A1-12PS-LG P-OTP03A1-14PS-LG 1 1880mm 1880mm P-OTP03A1-12BP P-OTP03A1-14BP 2 Qty Picture 4 1 2 Ф38*1.5 1159mm Ф38*1.5 1159mm P-OTP03A1-121 SN P-OTP03A1-141 SN 9 Basketball hoop bracket 10 Fiberglass rod 11 Upper pole 12 Lower pole Pole sleeve 13 Small 14 Safety mat 15 Ladder P-OTP03A1-BH P-OTP03A1-BH 1 Ф38*1.5 505mm P-OTP03A1-12FR P-OTP03A1-14FR 2 Ф9 (8 joints) Ф9 (9 joints) P-OTP03A1-12UP P-OTP03A1-14UP 7 Ф25*1.2 1229mm Ф25*1.2 1229mm P-OTP03A1-12LP P-OTP03A1-14LP 7 Ф25*1.2 1229mm Ф25*1.2 1229mm P-OTP03A1-12PS-SM P-OTP03A1-14PS-SM 7 1880mm 1880mm P-OTP03A1-12SM P-OTP03A1-13SM 1 D3660mm D4270mm P-OTP03A1-12LD P-OTP03A1-14LD 1 2437mm 16 Basketball package 18 Bastketball 19 Assembly tool bag 20 Pump 1 Ф38*1.5 505mm 2 7 7 7 1 1 2437mm P-OTP03A1-BP P-OTP03A1-BP 1 1 760*530*70 mm 760*530*70 mm P-OTP03A1-BP1 BL P-OTP03A1-BP1 BL P-OTP03A1-12TB P-OTP03A1-14TB 1 1 210*100mm 210*100mm P-OTP03A1-BP1 PM P-OTP03A1-BP1 PM Assembly tool bag Parts name Parts Code and size for 8ft Parts Code Qty and size for 10ft Parts Code Qty and size for 12ft Parts Code Qty and size for 14ft Screw M6*35 P-OTP03A1SW-M6-35 5 P-OTP03A1SW-M6-35 7 P-OTP03A1SW-M6-35 7 P-OTP03A1SW-M6-35 7 Screw M6*75 P-OTP03A1SW-M6-75 10 P-OTP03A1SW-M6-75 14 P-OTP03A1SW-M6-75 14 P-OTP03A1SW-M6-75 14 Screw M6*88 P-OTP03A1SW-M6-88 2 P-OTP03A1SW-M6-88 2 P-OTP03A1SW-M6-88 2 P-OTP03A1SW-M6-88 2 Nuts P-OTP03A1-NT 18 P-OTP03A1-NT 23 P-OTP03A1-NT 23 P-OTP03A1-NT 23 Spanner P-OTP03A1-SR 1 P-OTP03A1-SR 1 P-OTP03A1-SR 1 P-OTP03A1-SR 1 Screwdriver P-OTP03A1-SD 1 P-OTP03A1-SD 1 P-OTP03A1-SD 1 P-OTP03A1-SD 1 Spacer P-OTP03A1-SC 12 P-OTP03A1-SC 16 P-OTP03A1-SC 16 P-OTP03A1-SC 16 M6 plastic caps P-OTP03A1-PC13 M6 P-OTP03A1-PC16 M6 P-OTP03A1-PC16 M6 P-OTP03A1-PC16 M6 Qty Picture Basketball Package Parts name Parts Code Qty picture P-OTP03A1-BP1 BB Net bag P-OTP03A1-BP-NB 1 Hoop P-OTP03A1-BP1 HP Metal plate P-OTP03A1-BP-MP 1 Basketball hardware bag P-OTP03A1-BP1 HB Parts name Parts Code Qty picture Parts name Parts Code Basketball board Qty picture basketball hardware bag Qty picture Parts name Parts Code Screw M8*100 P-OTP03A1-BP1 SW-M8-1H Nuts M8 P-OTP03A1-BP-NT1 M8 Screw M8*12 P-OTP03A1-BP2 SW-M8-12 Nuts M6 P-OTP03A1-BP-NT3 M6 ScrewM6*30 P-OTP03A1-BP3 SW-M6-30 Nuts M5 P-OTP03A1-BP-NT1 M5 ScrewM5*75 P-OTP03A1-BP1 SW-M5-75 Washer M8 P-OTP03A1-BP-WS3 M8 Springs L P-OTP03A1-BP1 SP-LO Washer M6 P-OTP03A1-BP-WS6 M6 Springs S P-OTP03A1-BP1 SP-SH