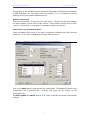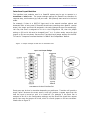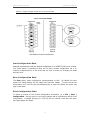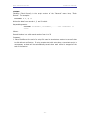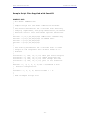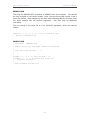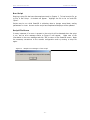
1
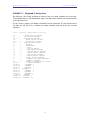
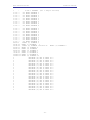
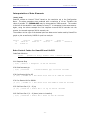
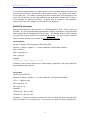
THE SMART CUMULATIVE RECORDER™
FOR WINDOWS
SOF-726 User’s Manual
DOC-035
Rev. 1.2
Copyright © 2007
All Rights Reserved
MED Associates, Inc.
P.O. Box 319
St. Albans, Vermont 05478
www.med-associates.com
Trademarks: SmartCR™, SoftCR™, MED-PC™, MED Associates, Inc
MED ASSOCIATES INC.
SMARTCR MANUAL
- ii -
MED ASSOCIATES INC.
SMARTCR MANUAL
TABLE OF CONTENTS
Chapter 1 ...............................................................................................1
Getting Started.................................................................................................. 1
General Computer Environment ........................................................................ 1
Backing Up the Software .................................................................................. 1
SmartCR Installation ....................................................................................... 1
Using SmartCR with MED-PC............................................................................. 2
Using SmartCR with other control systems ......................................................... 2
Chapter 2 ...............................................................................................3
Set-up and Configuration .................................................................................... 3
Introduction ................................................................................................... 3
Configuration for SmartCR ............................................................................... 3
General Information ........................................................................................ 4
Data Path ................................................................................................... 4
Number of Records ...................................................................................... 4
System Resolution........................................................................................ 5
Pen Reset Mode ........................................................................................... 5
Display Refresh Rate .................................................................................... 5
Data Format ................................................................................................ 5
Data Segregation ......................................................................................... 5
Data Prefix.................................................................................................. 6
Long Filenames Enabled................................................................................ 6
Print the time not in 00:00:00 in data file ........................................................ 6
Auto Config Ports............................................................................................ 6
Port Type: .................................................................................................. 6
Starting Port Number.................................................................................... 6
Number of Event Pens .................................................................................. 7
Remote Start (Y/N) and Remote Reset ............................................................ 7
Interface Input Modules................................................................................... 8
Load Configuration Data .................................................................................. 9
Save Configuration Data .................................................................................. 9
Print Configuration Data .................................................................................. 9
EXIT ........................................................................................................... 10
- iii -
MED ASSOCIATES INC.
SMARTCR MANUAL
Chapter 3 .............................................................................................11
Running SmartCR............................................................................................. 11
Introduction ................................................................................................. 11
The SmartCR Main Menu ................................................................................ 11
File Main Menu Selection................................................................................ 12
Configuration ............................................................................................ 12
Run Script ................................................................................................. 12
Color Setup ............................................................................................... 12
Print......................................................................................................... 12
Record Main Menu ........................................................................................ 13
Edit/Status/Maintenance ............................................................................. 13
Y-Scale Height ........................................................................................... 13
X-Scale Width:........................................................................................... 13
Auto Plot Options ....................................................................................... 14
Auto Plot Interval....................................................................................... 14
Y-Scale Height ........................................................................................... 14
Pen Reset Up/Down ................................................................................... 14
Auto Dump Options .................................................................................... 14
Start ........................................................................................................ 14
Stop ......................................................................................................... 15
Flush ........................................................................................................ 15
Reset ....................................................................................................... 15
Right-Click options ........................................................................................ 16
Edit Windows ............................................................................................ 16
Pens 5-9 ................................................................................................... 16
Freeze Window .......................................................................................... 16
Unfreeze Window ....................................................................................... 17
Attach Record............................................................................................ 17
Print View ................................................................................................. 17
Other options ............................................................................................... 18
Exit .......................................................................................................... 18
- iv -
MED ASSOCIATES INC.
SMARTCR MANUAL
Chapter 4 .............................................................................................19
SmartCR Script Files ......................................................................................... 19
Introduction ................................................................................................. 19
Syntax......................................................................................................... 19
Keywords and Arguments ............................................................................... 20
RecInfo .................................................................................................... 20
ScaleInfo .................................................................................................. 21
MonInfo.................................................................................................... 21
StartRec ................................................................................................... 22
StopRec .................................................................................................... 22
FlushRec ................................................................................................... 23
Sample Script Files Supplied with SmartCR ....................................................... 24
Run Script.................................................................................................... 26
Script File Errors ........................................................................................... 26
Appendix A ...........................................................................................27
Data Formats and File Segregation ..................................................................... 27
Introduction ................................................................................................. 27
Choosing a Data Format ................................................................................ 27
FORMAT 1 - Annotated .................................................................................. 27
Sample Printout Format 1: .......................................................................... 28
FORMAT 2 – Stripped .................................................................................... 29
FORMAT 3 – Stripped C Array Only .................................................................. 31
FORMAT 4 – Stripped with Variable Identification .............................................. 32
Interpretation of Data Elements ...................................................................... 34
"Clock" Ticks ............................................................................................. 34
Data Control Codes for SmartCR and SoftCR ..................................................... 34
SMARTCR Filenames ...................................................................................... 35
File Per Subject ......................................................................................... 35
File per Day .............................................................................................. 35
File per Animal per Day............................................................................... 36
Drive and/or Path for Dumping Data ................................................................ 36
Data Prefix for Filenames ............................................................................... 36
- v -
MED ASSOCIATES INC.
SMARTCR MANUAL
- vi -
MED ASSOCIATES INC.
SMARTCR MANUAL
CHAPTER 1
Getting Started
General Computer Environment
•
•
•
•
•
•
200 MHz or faster computer with at least one free PCI slot
Windows 98, 2000, or XP
128 MB of RAM (64MB of RAM if running Windows 98)
200+ Megabytes of free disk space
CD-ROM drive
Mouse
Backing Up the Software
It is strongly encouraged that a backup of all data files be made before proceeding.
Refer to the Windows manual for assistance if necessary.
SmartCR Installation
If a complete system with computer has been purchased from MED Associates, Inc.,
SmartCR software will already be installed. Proceed to Chapter 2 to configure SmartCR
to the interface hardware.
A password is required to complete the installation of this software. Please take a
moment to fill out the registration form that was supplied and return it to MED
Associates, Inc. to obtain the password.
Please insert the SmartCR CD into the CD-ROM driver. Installation should start
automatically. Otherwise, open Windows Explorer, open the CD drive containing the
SmartCR disk and click on the file called autorun.exe. Follow the instructions for
installing the DIG-704 PCI card. After the driver for the DIG-704 card is installed, open
CD drive SmartCR again, and click on autorun.exe file to access the main menu.
Proceed with the installation of SmartCR software this time.
- 1 -
MED ASSOCIATES INC.
SMARTCR MANUAL
Using SmartCR with MED-PC
An easy way to connect a MED-PC behavioral control package with a SmartCR interface
is to have a SmartCtrl card in the first interface cabinet connected to the connection
panel of the first chamber.
In the same cabinet there should be the decoder card connected to the 28 Volt DC
power supply cabinet.
Insert DIG-726 SuperPort Output card in the first interface cabinet, and connect it to the
DIG-712F SuperPort Input card in the second interface cabinet.
The Decoder card in the second interface cabinet should be also connected to the 28
Volt DC power supply cabinet.
Connect DIG-704 PCI card in the computer running Med-PC software to the Decoder card
in the first interface cabinet.
Connect DIG-704 PCI card in the computer running SmartCR software to the Decoder
card in the second interface cabinet.
Using SmartCR with other control systems
Connections to the SmartCR interface are made via input modules designed for switch
closures, typically using DIG-710, DIG-711, DIG-712, or DIG-713 modules. The DIG-711
and DIG-712 are optically isolated and can be conveniently connected to most 28V DC
systems. The DIG-710 and DIG-713 can be connected to 5V DC (or TTL) systems.
- 2 -
MED ASSOCIATES INC.
SMARTCR MANUAL
CHAPTER 2
Set-up and Configuration
Introduction
The Smart Cumulative Recorder (SmartCR) software package contains two executable
programs, SmartCR and MED Test. MED Test is a hardware test utility used to test Med
Associates hardware. SmartCR software enables a computer to produce real-time
cumulative records and graphical displays of the data. A maximum of 32 records may be
configured with up to 32 view windows
In addition to providing a real time display, SmartCR saves all cumulative records to disk
files for post-hoc screen displays or graphical printouts using the Soft Cumulative
Recorder software (MED Associates, Inc. Cat. No. SOF-721). The numerical response
(event) time values may also be extracted for statistical analysis.
Configuration for SmartCR
Before SmartCR can run, it is necessary to configure the Smart Cumulative Recorder for
the hardware. When the SmartCR icon on the desktop is clicked on for the first time the
following message will appear:
C:\Program Files\SmartCR\SmartCR.CFG not found defaults will be used. Use the
configuration form to create/change the configuration information and then save the
configuration.
By default the configuration file is named SMARTCR.CFG, however, any legal file name
may be chosen as long as it uses the .CFG extension. Multiple configurations are
provided to increase the flexibility and convenience of the SmartCR system.
- 3 -
MED ASSOCIATES INC.
SMARTCR MANUAL
General Information
Select File, then Configuration to begin record set-up. Figure 1 shows the window that
will appear once these two options are selected.
Figure 1 – Configuration Menu
Data Path
The default path for saving data is as follows:
C:\Program Files\SmartCR\
The default path can be changed by clicking the Browse button and then selecting the
desired path. Please keep in mind that if the path is changed, it is important to
remember where to look for the data once the SmartCR session is done.
Number of Records
Enter the total number of cumulative records to be recorded.
- 4 -
MED ASSOCIATES INC.
SMARTCR MANUAL
System Resolution
Enter the system resolution in milliseconds. This determines how often the inputs are
read. Typical values are 100ms or 10ms.
Pen Reset Mode
Entering pen down will cause a solid vertical line to be drawn when the pen resets from
the top of the record. Entering pen up allows the pen to reset without a vertical line.
The default setting is pen down during reset.
Display Refresh Rate
Determines how often the displays are updated in seconds.
Data Format
Enter the format for data saving. The Smart Cumulative Recorder will save data in four
formats that correspond to the MED-PC Version 4 formats. These formats are as
follows:
1.
Annotated: The annotated is the most user friendly. All variables and arrays
are clearly labeled including header information.
2.
Stripped: The stripped file is clean of all labels and can be easily loaded into a
spreadsheet, however, locating a specific value is dependent on its position in
the file so that knowledge of the data format is required. See Appendix A for
detailed information.
3.
Stripped, C array only:
variables and one array
4.
Stripped with variable Id: This format provides the same information as Format
2 Stripped, with the added feature of maintaining alphabetical order of variables
and arrays and identifying the number of elements assigned to each variable.
This format produces a data set with no simple
Please refer to the latest Med-PC IV manual for more information on Data File Formats.
It is recommended that annotated files be saved to begin with until the format and
contents of data files created by SmartCR are clearly understood.
Data Segregation
The Smart Cumulative Recorder segregates data in the same way that MED-PC does
based on "subject", "experiment", and "group" identification numbers, and/or the date of
data collection. These are entered from the Record | Edit/Status/Maintenance
screen (see Chapter 3). The choices are:
1. File Per Subject/Group/Experiment
2. File Per Day
3. File Per Animal Per Day
See Appendix A for detailed information and examples of data format and data
segregation methods.
- 5 -
MED ASSOCIATES INC.
SMARTCR MANUAL
Data Prefix
Each format above begins with an arbitrary first character. By default, SmartCR sets this
character to the exclamation point "!" because other MED Associates, Inc. programs
such as SoftCR use this same default.
Long Filenames Enabled
Leave this option checked to allow long file names.
Print the time not in 00:00:00 in data file
If this option is checked, it will create a C array with elements in the following format.
Example:
6071.11
where 6071 is a time value and 11 is the SmartCR component. For more information
please refer to the Interpretation of Data Elements article in Appendix A of this manual.
Auto Config Ports
SmartCR has a built in "auto configuration" option. This selection overrides ALL manual
port/bit assignments and assigns consecutive port/bit numbers to all boxes (Records).
Figure 2 - Auto Configuration Data Entry Form
Port Type:
Select Standard Port input modules or a SuperPort depending on the input modules
installed in the your interface cabinets. If a combination of modules are used it will be
necessary to configure the ports manually.
Starting Port Number
Enter the port number of the first input module. By convention the first standard
module should be set for port 780 and the first Super-Port for port 789.
The
- 6 -
MED ASSOCIATES INC.
SMARTCR MANUAL
configuration of the hardware may be verified on data sheets provided with the interface
if MED Associates, Inc. has factory wired the system. If it is necessary to change
settings, refer to the Interface Modules Manual.
Number of Event Pens
Enter the total number of event pens for each record. The Auto Config option assigns
the same number of event pens to each record. If the number of event pens for each
record is not the same, it is necessary to manually configure the records.
Remote Start (Y/N) and Remote Reset
Check the Remote Start option if an input is assigned to remotely start and stop data
collection, or if an input is assigned to remotely reset the record.
Figure 3 - Configuration Record window with set record configuration
Click on the Save button to save the current configuration. The default file name for the
configuration file is SmartCR.CFG.
However, any name can be chosen for the
configuration file.
Use Add, Update and Delete buttons at any time to change the Record Configuration
settings.
- 7 -
MED ASSOCIATES INC.
SMARTCR MANUAL
Interface Input Modules
The interface input modules used in a SmartCR system may be set to operate in a
transition or level mode. The proper settings required for SmartCR are transition for
response step, reinforcement pip, and pen reset. Box (Record) start must be in the level
mode.
For example, if there is a DIG-712 Input card in the second interface cabinet and
Automatic Start is being used (if SmartCR should start recording when Med-PC session
starts), the output port must be assigned in the code (change the mpc file accordingly).
Let’s say that Start is assigned to bit #4 in the Configuration file, then the jumper
setting on JP4 on bit #4 must be changed from T to L. In other words, move the third
jumper on JP4 one row down. See more on Transition/Level jumper settings for the DIG712 card in “Computer Interface Modules for IBM-PC and Compatibles” Manual.
Figure - 4 Jumper settings on DIG-712 for automatic start
Event pens may be level or transition depending on preference. Transition will provide a
single "spike" whenever the event occurs, Level will produce a square wave from the
time the input is turned on until it is turned off. For example, if the Event Pen is
assigned to bit #8 in the Configuration settings, and the Event Pen should be a square
wave, then move the jumper on bit #8, which is a fourth jumper on JP4 one row down.
Please refer to Figure 5.
- 8 -
MED ASSOCIATES INC.
SMARTCR MANUAL
Figure 5 - Jumper settings on DIG-712 for Level Event Pen
Load Configuration Data
SmartCR automatically loads the default configuration file, SMARTCR.CFG when invoked.
The “Load” button is provided to allow you to load a custom configuration file or to
reload a configuration file in the event that you wish to erase any changes you made
and start over.
Save Configuration Data
The Save button saves configuration entries/changes to disk. By default the save
screen will always display the file name that has been loaded. To save the current
configuration to a new file use the backspace key to erase the default file name, and
type a new name.
Print Configuration Data
To obtain a printout of the current configuration information, go to File | Print |
Configuration. Use this option to verify any changes and as a permanent record of the
configuration. A sample printout of a .CFG file for two records, each with two event
pens may appear as follows:
- 9 -
MED ASSOCIATES INC.
SMARTCR MANUAL
==================================
Smart Cumulative Record Configuration Data
==================================
General Configuration Information
Number of (Records) Boxes: 2
System Resolution: 10
Pen Reset Mode: Down
Data Format: 1
Data Segregation: Subject
Data Prefix: !
Data Path: C:\Program Files\SMARTCR\
Use Long Filenames: Yes
Print the time not 00:00:00 in data files: Yes
Record Configuration Information
Record # 1
Type:
Trace:
Port:
==================================
Response:
2
789, 0,1
Reinforcement:
1
789, 0, 2
Start:
1
789, 0,4
Event Pen:
1
789, 0, 8
==================================
Record # 2
Type:
Trace:
Port:
==================================
Response:
1
789, 0,16
Reinforcement:
1
789, 0, 32
Start:
1
789, 0, 64
Event Pen:
1
789, 0, 128
==================================
EXIT
When finished with configuration settings, select Exit button from the Configuration
Menu window.
- 10 -
MED ASSOCIATES INC.
SMARTCR MANUAL
CHAPTER 3
Running SmartCR
Introduction
The Smart Cumulative Recorder will record up to 32 separate cumulative records with up
to 10 event pens for each. From 1 to 32 records may be displayed simultaneously on
the screen.
The SmartCR Main Menu
Click on SmartCR icon on the desktop to load the SmartCR software. If the icon is not
on the desktop, go to Start Æ Programs Æ SmartCR.
File is used to setup the Configuration, Run Script, setup Colors for traces and event
pen (Color Setup); Print is for printing your Configuration or Record Data.
Record provides five different options. Edit/Maintenance/Setup option is to look at the
configuration settings using the “Event” tab. “Setup” tab is used to enter individual
record information, including subject, experiment and group identification numbers; to
enter any additional comments; to monitor the status of any specified record; and to
manually start or stop a specified record, flush data, or activate a pen reset. Start option
is for manually starting the record(s). Stop option is for manual stopping of the
record(s). Flush is to flush data in all or selected records. Reset option activates a pen
reset.
Options is used to set subject as record indicator, to select scroll options, and pick the
options of showing window on record start or displaying record access window (will show
which records are currently being run when this option is selected during the session).
Window is used to set the x- and y-axis of the record, manipulate the window
parameters, and the ability to freeze a display for closer examination without data loss
( Edit/Status ). Other options for different setup for windows are available through Scroll,
Tile, Minimize All or Remote All options.
Help/About provides the version number of the SmartCR program.
The remainder of this chapter will detail the aspects of SmartCR. When reading this
chapter, keep in mind the relationship between records and views. Each record defines
a collection of data gathered in real time and a data file. It may also represent a unique
"box" or test chamber although it is common to have more than one record for a single
"box". A view represents a display of a record. Multiple views can be displayed
simultaneously, and multiple views of a single record can also be displayed.
- 11 -
MED ASSOCIATES INC.
SMARTCR MANUAL
File Main Menu Selection
There are five submenu items associated with the "File" main menu heading.
Configuration
When SmartCR is first run the default configuration file SMARTCR.CFG is automatically
loaded. Configuration files can be loaded or modified by entering the configuration
screen.
Run Script
Selections and entries made in SmartCR are not saved from session to session. However
it is possible to create scripts. Scripts are small, user defined macros or batch files that
define the various parameters SmartCR uses to create cumulative records. The Run
Script selection allows the user to execute a script.
Scripts are the preferred method of setting up an experiment. They may be prepared
using any ASCII editor or word processor. Some sample scripts have been provided with
the distribution CD. All script files must have the extension .SCR. See Chapter 4 for
details on creating script files.
Color Setup
This option allows the user to set and change colors for traces, events, background and
printing background.
Print
This allows the user to print the configuration data, which is discussed in detail in
Chapter 2.
It can also print the current record. Go to FileÆ Print Æ Record.
- 12 -
MED ASSOCIATES INC.
SMARTCR MANUAL
Record Main Menu
Edit/Status/Maintenance
Once this option is selected, Figure 6 will appear.
Figure 6 - Edit/Status/Maintenance main window
Selection of Setup tab allows the user to name the subject, experiment, and group.
Duration time of each record should be entered here. The values for X Scale Width and
Y Scale Height can also be entered. AutoPlot and Auto Dump options can also be
checked here.
Record data may also be entered via a script file. See Chapter 4 for details.
Y-Scale Height
This value determines the number of responses required to reach the top of the record.
This value can be any number between 10 and 1000. Edit this value as desired.
X-Scale Width:
This value determines the elapsed time displayed on the monitor at any given time. For
example if a value of 10 minutes is entered, SmartCR will plot to the monitor display for
10 minutes with a grid mark every minute. After collecting data for 10 minute, the
display updates to minutes 1 - 11, after 11 minutes the display updates to 2 - 12
minutes, etc. This value can be any number between 0.1 and 20.
- 13 -
MED ASSOCIATES INC.
SMARTCR MANUAL
Auto Plot Options
Enabling Auto Plot allows SmartCR to send the cumulative record to a printer. This is
the only method available to produce a hard copy of the graphical record while SmartCR
is running. Select it by placing a check mark next to “Enabled”.
Auto Plot Interval
The value entered here determines the time slice for cumulative records printed via the
auto plot option and is independent of the X-Axis on the screen display.
Y-Scale Height
The entry defines the Y-Scale Height for the auto plot only. This value determines the
number of responses required to reach the top of the record. This value can be any
number between 10 and 1000. Edit this value as desired.
Pen Reset Up/Down
This entry defines the pen reset mode for the auto plot only. The pen reset mode for
the display screen is determined by the general configuration settings. Unlike the screen
display in which all records must use the same pen reset mode, this entry allows you to
customize each auto plot individually.
Choose "Up" if no vertical line is desired at reset, or "down" to have a vertical line
drawn at reset. Reset will occur when the response count equals the value entered for
the Y-Axis and each time it equals a whole multiple, e.g., 2x, 3x, 4x, etc.
Auto Dump Options
The "Auto Dump Options" menu will allow SmartCR to dump (save) the cumulative
records to disk at the end of a session. This is particularly useful when also using the
remote start/stop feature. The alternative approach is to automatically "flush" data at
the end of the experiment.
Start
The Start submenu item may be selected to manually start recording data for one or
more records.
The monitor will display a “Select Record(s) to Start” window where one or more records
to start can be selected. Each record selected will be highlighted. When the records that
should be started have been selected, select “Ok” to begin collecting data. Complete the
record configuration in Edit/Status/Maintenance before actually starting a record.
Records may also be started from a script file (see Chapter 4).
Records started in this manner will continue to run for an amount if time as specified in
“Duration” field in Edit/Status/Maintenance window under “Setup” tab or until manually
stopped.
- 14 -
MED ASSOCIATES INC.
SMARTCR MANUAL
Stop
To terminate recording data before the duration interval has expired, select “Stop” from
the “Records” menu. Once the record is stopped, its data is NOT lost, and may be saved
by using the “Flush” submenu item under Record.
Flush
Data accumulated by the Smart Cumulative Recorder may be flushed (written) to disk at
any time. If the record is active (collecting data) when data are flushed to the disk, the
"C" array (containing all IRT values, event mark codes, reinforcement pip codes, etc.) is
cleared, however, all other data (start date and time, identification numbers, total
responses and reinforcements, elapsed time, etc.) are retained. Subsequent flushes will
be appended to the same data file assuming that ID information affecting the file name
has not changed.
To flush data, select "Flush" from the "Records" menu and highlight the records to flush
as appropriate. Click OK to activate the flush.
Reset
The "Reset" submenu item may be used to generate a pen reset on one or more records.
After selecting "Reset " from the "Records" menu, highlight with the records to reset as
appropriate. Click OK to activate the reset.
- 15 -
MED ASSOCIATES INC.
SMARTCR MANUAL
Right-Click options
Right clicking anywhere on the SmartCR screen will bring up a menu of nine selections.
Freeze Window and Print View options are only available when the record is running in
real time.
Edit Windows
This option displays Figure 7, in which the view windows parameters are displayed and
can be modified, such as state, visibility, freeze/unfreeze, X Axis width and Y Axis
height.
Figure 7 – Window List
Pens 5-9
Displays pens 5-9 on the bottom of the screen. Only five of the ten pens can be
displayed at a time, and this option allows the user to switch between pens 0-4 and pens
5-9.
Freeze Window
The "Freeze window" submenu item permits freezing any currently displayed cumulative
record (screen display only). When selected, the record will freeze. Please refer to
Figure 8. The frozen record may be left displayed as long as needed. SmartCR
continues to collect all data while the record is frozen on the screen.
- 16 -
MED ASSOCIATES INC.
SMARTCR MANUAL
Figure 8 - The Freeze Window option
Unfreeze Window
Right-click anywhere on SmartCR screen to get a menu on the screen like the one shown
in Figure 8. This time the option Unfreeze Window will be available if the record is still in
frozen mode. Click on this option. If there are many records frozen, then right-click on
each of them to select the “Unfreeze Window” option.
Attach Record
Attaches a record to this view window.
displayed in the current view window.
This allows the user to change the record
Print View
This option prints out the current view of a record.
- 17 -
MED ASSOCIATES INC.
SMARTCR MANUAL
Other options
Other options available when right-clicking on the SmartCR screen include a Record
menu with seven submenu options (Record Edit/Status, Add Window, Close All Windows,
Start/Stop, Flush + Continue, Reset, Exit), Edit Window, Maximize, Restore, Change
Scale, Pens 5-9, Freeze Window, Attach Record, Print View, Exit.
These options are self-explanatory and allow the user to change the record parameters
in real time.
Exit
Select Exit from the main menu to exit SmartCR when SmartCR session is finished. The
program will check for any data that has not been saved. If unsure if the data has been
saved, click No, and then save the data by selecting Record Æ Flush. Then, select File
Æ Exit again.
Figure -9 Exit Screen
- 18 -
MED ASSOCIATES INC.
SMARTCR MANUAL
CHAPTER 4
SmartCR Script Files
Introduction
All of the set-up procedures described in Chapter 3 may be easily and quickly
accomplished by means of a macro or batch file, which in the Smart Cumulative Recorder
is called a Script file. Script files or scripts contain Keyword commands such as
"RecInfo" or "MonInfo" to define the parameters of SmartCR.
Use any editor or word processor that is capable of creating standard ASCII files (Please
note that many word processors create document files which are not standard ASCII by
default, many will however save a document in standard ASCII format as an option). If
unsure which program to use, use Notepad. To run Notepad, go to the Windows Start
menu, and select run. Then type “notepad.exe”, and click Ok.
Syntax
The script files use the follow syntax:
KEYWORD = arg1,arg2,...,argN
;Comment (Optional)
Where:
KEYWORD - is a script keyword listed below.
arg - arguments to the keyword.
The "=" (equal sign) is used to separate the keyword from it's arguments. The ","
(comma) is used to separate multiple arguments for the keyword where required. The
“;" (semicolon) begins a comment. The script parser is case insensitive (one exception
is the Pen Reset Mode indicator which must be an upper case "D" or "U"), and does not
care about spaces so long as the entire command fits on one line.
Lines beginning with a semicolon define additional comments.
- 19 -
MED ASSOCIATES INC.
SMARTCR MANUAL
Keywords and Arguments
Keywords may be placed in the script file in any order, except StartRec which should be
placed at the end. All arguments must be placed at the end. All arguments must be
present even if inactive. The individual keywords follow with arguments and comments.
RecInfo
RecInfo (Record Information) is the script version of the "Records" menu item," Enter
Record Data". For example:
RecInfo = 1,S17,1,3,60,Y,N,N :
Enter record #1 data, subject-S17, Experiment-1, Group-3, Duration 60
Plot turned on, Auto Dump turned off, Remote Start turned off.
minutes,
Auto
Keyword Arguments:
RecInfo RecNumber, Subject, Experiment, Group, Duration,
Auto Plot (Y/N), Auto Dump (Y/N), Remote Start (Y/N):
Where:
1.
Record Number is a valid record number from 1 to 32
2.
Subject is a 3-character alpha/numeric string
3.
Experiment is a 3-character alpha/numeric string
4.
Group is a 3-character alpha/numeric string
5.
Duration is an integer from 1 to 32767
6.
Auto Plot is Y or N
7.
Auto Dump is Y or N
8.
Remote Start is Y or N
9.
: Comments
1. All data must be provided even if not active.
even if Remote Start is turned on.
For example, enter a duration value
2. Enter "0" for Subject, Experiment, or Group if no other label applies. Keep in mind,
however, that the "0" may be used in naming the data file, e.g. 0E0.0 is a legal file
under the file saving by subject, experiment and group option.
- 20 -
MED ASSOCIATES INC.
SMARTCR MANUAL
ScaleInfo
ScaleInfo (Scaling Information) is the script version of the "View" menu item, "Scaling
Parameters". For example:
ScaleInfo = 1,100,20,D,10 :
Enter scaling parameters for record #1, Y-axis height-100 responses, X-axis-20 minutes,
pen reset mode is down, auto plot width (X-axis) is 10 minutes.
Keyword Arguments:
ScaleInfo RecNumber,
Width
Height,
Width,
Reset
Mode,
Plot
Where:
1.
Record Number is a valid record number from 1 to 32
2.
Height is an integer from 10 to 10000 (responses on the Y-Axis)
3.
Width is an integer from 1 to 20 (time in minutes on the display X-Axis)
4.
Reset Mode is a capital U (UP) or a capital D (DOWN) for auto plot
5.
Plot Width is an integer from 1 to 100 (time in minutes on the auto plot X-Axis)
6.
Comments:
a. All data must be provided even if not active. For example, enter a Plot Width if Auto
Plot is turned off.
b. Height sets the Y-axis for both the screen display and the Auto Plot when activated.
The minimum value, which may be entered, is 10.
c. Plot Width sets the X-axis for the auto plot only. It is independent of the setting for
the screen display.
MonInfo
MonInfo (Monitor Information) is the script version of two "View" menu items, "Zoom
Level" and "Record Selection". For example:
MonInfo = 1, 4, 1, 2, 3, 4
Enter monitor information for monitor #1, Zoom Level-4 with record #1 displayed in
View #1, rec.#2 displayed in View #2, etc.
MonInfo = 1, 4, 1, 3, 4, 6
Enter monitor information for monitor #1, Zoom Level-4 with record #1 displayed in
View #1, record #3 displayed in View #2, record #4 displayed in View #3, and record
#6 displayed in View #4.
- 21 -
MED ASSOCIATES INC.
SMARTCR MANUAL
Keyword Arguments:
MonInfo MonNbr,
ViewNbr
(Zoom
RecNbr,.....RecNbr of last View
Level),
RecNbr,
Where:
1.
Monitor Number is a valid monitor number from 1 to 8
2.
View Number is 1, 2, 4, 8, or 16
3.
Record Number is a valid record number from 1 to 32
4.
(Records may be assigned in any order desired.)
StartRec
StartRec (Start Record) is the script version of the "Record" menu item, "Start".
example:
For
StartRec = 1, 2, 3
Starts records 1, 2, and 3.
Keyword Arguments:
StartRec RecNumber,
Start
RecNumber,......Last
RecNumber
to
Where:
Record Number is a valid record number from 1 to 32
Comments:
1. StartRec should be placed as the last keyword in a script file used to initialize and run
a SmartCR session.
StopRec
StopRec (Stop Record) is the script version of the "Record" menu item, "Stop". For
example:
StopRec = 1, 2, 3 ; Stops records 1, 2, and 3.
Keyword Arguments:
StopRec RecNumber,
Stop
RecNumber,......Last
RecNumber
to
Where:
Record Number is a valid record number from 1 to 32
Comments:
1. Place StopRec before FlushRec in order to assure data integrity within a single data
file.
- 22 -
MED ASSOCIATES INC.
SMARTCR MANUAL
FlushRec
FlushRec (Flush Record) is the script version of the "Records" menu item, "Flush
Record". For example:
FlushRec = 1, 2, 3
Writes the data from records 1, 2, and 3 to disk.
Keyword Arguments:
FlushRec RecNumber, RecNumber,......Last RecNumber to
Flush
Where:
Record Number is a valid record number from 1 to 32
Comment:
1. Place FlushRec at the end of a script file used to terminate a session to save all data
to disk without verification. If using remote start with auto dump, a terminate script is
unnecessary as data will be automatically saved when each record is stopped at the
end of the session.
- 23 -
MED ASSOCIATES INC.
SMARTCR MANUAL
Sample Script Files Supplied with SmartCR
SAMPLE1.SCR
; File Name: SAMPLE1.SCR
;
; Sample Script for the Smart Cumulative Recorder
;
; Set Record Information for 4 records with arbitrary
; subject, experiment, and group identifiers, 60 minute
; duration and all auto and remote options turned off.
;
RecInfo = 1,C1,1,G5,60,N,N,N ; Additional comments may
RecInfo = 2,C2,1,G5,60,N,N,N ; be added here.
RecInfo = 3,C3,1,G5,60,N,N,N
RecInfo = 4,C4,1,G5,60,N,N,N
;
;
; Set Scaling Parameters for 4 records with a Y-Axis
; height of 100 responses and a X-Axis width of 15
; minutes.
;
ScaleInfo = 1, 100, 15, D, 10 ; Note pen reset and plot
ScaleInfo = 2, 100, 15, D, 10 ; width have been set
ScaleInfo = 3, 100, 15, D, 10 ; even though the auto
ScaleInfo = 4, 100, 15, D, 10 ; plot is not turned on.
;
MonInfo = 1, 4, 1, 2, 3, 4 ; Set a standard 4 view
; monitor configuration.
;
StartRec = 1, 2, 3, 4 ; Start records 1 - 4.
;
;
; End of Sample Script File
- 24 -
MED ASSOCIATES INC.
SMARTCR MANUAL
SAMPLE2.SCR
The script file SAMPLE2.SCR is identical to SAMPLE1 with one exception. The records
are now arranged on the screen records 1 and 2 across the top and records 3 and 4
across the bottom. Such changes can be made while collecting data by running a script
file, which contains only the MonInfo arguments.
See "Run Scrip for additional
information.
The only change in the script file is in the "MonInfo" arguments, which now read as
follows:
;MonInfo = 1, 4, 1, 3, 4, 2 ; Set a custom 4 view
;
monitor configuration.
SAMPLE3.SCR
; File Name: SAMPLE3.SCR
;
; Sample Script for The Smart Cumulative Recorder
;
; Stop and Flush Records 1 - 4
;
;
StopRec = 1, 2, 3, 4 ; Stop records 1 -4.
FlushRec = 1, 2, 3, 4 ; Saves Data Files for
;
records 1 through 4.
;
; End of Sample Script File
- 25 -
MED ASSOCIATES INC.
SMARTCR MANUAL
Run Script
Running a script file has been discussed previously in Chapter 3. To load a script file, go
to File Æ Run Script. A window will appear. Highlight the file to be run and click
“Open”.
Scripts may be run while SmartCR is collecting data to change record data, scaling
parameters or views. As soon as the script has completed all displays will be updated.
Script File Errors
In many instances, if an error is present in the script it will be detected when the script
is run, and an error message similar to Figure 10 will appear.
Make note of the
information in the error message and click "OK" to return to the SmartCR screen. Make
the necessary corrections to the records’ configuration and try running a script file
again.
Figure 10 - Sample Error Message in "Run Script"
- 26 -
MED ASSOCIATES INC.
SMARTCR MANUAL
APPENDIX A
Data Formats and File Segregation
Introduction
This section is designed to provide a basic background on the various data formats, and
describe how file segregation works.
Choosing a Data Format
Four data formats that correspond to the MED-PC Version 4 formats are available with
the Smart Cumulative Recorder.
1.
Annotated
2.
Stripped
3.
Stripped, C array only
4.
Stripped with variable Id
The annotated is the most user friendly.
including header information.
All variables and arrays are clearly labeled
Please refer to the latest Med-PC IV manual for more information on Data File Formats.
It is recommended that annotated files be saved to begin with until the format and
contents of data files created by SmartCR are clearly understood.
FORMAT 1 - Annotated
The SmartCR "annotated" file format creates a human-readable output file. The output
file contains alphabetic characters and may contain data from multiple sessions,
depending upon the file naming conventions used to generate the data. Annotated data
files always begin with the name of the data file on line one. Two lines are then skipped
and header information begins. In the event that more than one data set is in the data
file, two lines are skipped following the last data element in each data set, and the "start
date" forms the first line for each data set. The file designation line is not repeated. The
comments will appear on the very last line.
- 27 -
MED ASSOCIATES INC.
SMARTCR MANUAL
Sample Printout Format 1:
File: !_Subject_FR_Training_Experiment_1.Group_1
Start Date: 05/2//2003
End Date: 05/22/2003
Subject: FR_Training
Experiment: 1
Group: 1
Start Time: 13:24:30
End Time: 14:25:57
Source code: SMARTCR
DATE RECORD STARTED
DATE RECORD STOPPED
SUBJECT, EXPER., & GROUP NO.'S
TIME RECORD STARTED
TIME RECORD STOPPED
PROGRAM CREATING THE DATA FILE
TOTAL "CLOCK" TICKS
D: 359908.000
E: 0.000
G: 0.000
H: 0.000
ALL SIMPLE VARIABLES
I: 0.000
J: 0.000
IN ALPHABETICAL ORDER.
K: 0.000
L: 0.000
M: 0.000
NOTE: ONLY 3 SIMPLE VARIABLES AND ONE
N: 0.000
O: 0.000
ARRAY ARE USED BY SMARTCR, HOWEVER,
P: 0.000
A FULL DATA FORMAT IS USED SO THAT
FILES PRODUCED BY MED-PC AND BY
Q: 0.000
R: 0.000
SMARTCR APPEAR IDENTICAL TO THE SOFTCR
SOFTWARE, OR ANY OTHER SOFTWARE WHICH
S: 0.000
T: 0.000
MAY BE DEVELOPED IN THE FUTURE.
U: 0.000
V: 0.000
W: 0.000
X: 0.000
Y: 0.000
Z: 0.000
ARRAYS A,B and C FOLLOW
A:
0:
0.000
5:
0.000
TOTAL RESPONSES
2.000
0.000
0.000
0.000
0.000
0.000
0.000
0.000
B:
0:
2.000
5:
0.000
TOTAL REINFORCERS
0.000
0.000
0.000
0.000
0.000
0.000
0.000
0.000
C:
0:
9636.11
5:
66125.50
10:
359994.31
\White mouse
20091.50
66126.60
20092.60
75047.50
- 28 -
63334.20
75048.60
63336.11
359994.30
MED ASSOCIATES INC.
SMARTCR MANUAL
FORMAT 2 – Stripped
The SmartCR "stripped" file format is devoid of all labels except for the file name on the
first line. As with the annotated format, two blank lines separate the file name from the
first data element, which is the month the record was started. Determining the
"meaning" of the column of numbers that followings is totally dependent upon
understanding the file format.
The example, which follows, contains the information
identical to that of the annotated file shown previously. Multiple data sets within the
same data file are separated by two blank lines, as in the annotated format.
File: FR_Training NAME APPEARS ONLY ON 1ST LINE OF FILE
BLANK LINES ALWAYS APPEAR
BEFORE "START DATE"
05 MONTH RECORD STARTED
22 DAY RECORD STARTED
2003 YEAR RECORD STARTED
05 MONTH RECORD STOPPED
22 DAY RECORD STOPPED
2003 YEAR RECORD STOPPED
1 SUBJECT
1 EXPERIMENT
1 GROUP
1 RECORD NUMBER
13 HOUR (24-HOUR FORMAT) RECORD STARTED
24 MINUTE RECORD STARTED
30 SECOND RECORD STARTED
14 HOUR RECORD STOPPED
25 MINUTE RECORD STOPPED
57 SECOND RECORD STOPPED
23 NUMBER OF SIMPLE VARIABLES
3 NUMBER OF ARRAYS
10 NUMBER OF ELEMENTS IN A ARRAY
10 NUMBER OF ELEMENTS IN B ARRAY
11 NUMBER OF ELEMENTS IN C ARRAY
359908.000 VALUE VARIABLE D (TOTAL "CLOCK" TICKS)
0 VALUE VARIABLE E (NOT USED)
0 VALUE VARIABLE F (NOT USED)
0*
0*
0*
0*
0*
0*
0*
0*
0*
0*
0*
0*
0*
0*
0*
0*
0*
0*
0*
0 23 RD SIMPLE VARIABLE (Z)
- 29 -
MED ASSOCIATES INC.
9636.11
20091.50
20092.60
63336.11
66125.50
66126.60
75047.50
75048.60
359994.30
359994.31
SMARTCR MANUAL
ARRAY (C) ELEMENT 0
ARRAY (C) ELEMENT
1
ARRAY (C) ELEMENT " 2”63334.20
ARRAY (C) ELEMENT 4
ARRAY (C) ELEMENT 5
ARRAY (C) ELEMENT 6
ARRAY (C) ELEMENT 7
ARRAY (C) ELEMENT 8
ARRAY (C) ELEMENT 9
ARRAY (C) ELEMENT 10
ARRAY (C) ELEMENT 3
Comments:
1.
This format is consistent for all Format 2 files.
2.
The number of elements listed in the C array equals the total number of
responses, reinforcements, plus event pen codes and pen reset codes.
3.
The file name is only listed once -- on line 1 of the file, even if there are
multiple sessions in the file.
4.
Each session's data is always preceded by exactly two blank lines; the first
session's data is separated from the filename by two lines. If a second session
appeared in this file, it would be separated from the preceding session by two
blank lines.
- 30 -
MED ASSOCIATES INC.
SMARTCR MANUAL
FORMAT 3 – Stripped C Array Only
By definition, this format produces a data set with no simple variables and one array.
The example below is self-explanatory. Again, the data were created in the same manner
as the previous files.
If the C array is empty, the header information will be presented. The last three lines of
the data set will be 0,1,0 to indicate no simple variables and one array with no data
elements.
File: !_Subject_1_Experiment_14.Group_1
05
-- MONTH RECORD STARTED
30
-DAY RECORD STARTED
2003 -YEAR RECORD STARTED
05
-MONTH RECORD STOPPED
30
-DAY RECORD STOPPED
2003
-YEAR RECORD STOPPED
1
-SUBJECT
14
-EXPERIMENT
1
-GROUP
1
-RECORD NUMBER
12
-HOUR RECORD STARTED
4
-MINUTE RECORD STARTED
14
-SECOND RECORD STARTED
12
-HOUR RECORD STOPPED
6
-MINUTE RECORD STOPPED
51
-SECOND RECORD STARTED
0
-NUMBER OF SIMPLE VARIABLES
1
-NUMBER OF ARRAYS
11
-NUMBER OF ELEMENTS IN C ARRAY
9636.11
-- C ARRAY ELEMENT 0
20091.50
--ELEMENT 1
20092.60
–ELEMENT 2
63334.20
–ELEMENT 3
63336.11 –ELEMENT 4
66125.50
–ELEMENT 5
66126.60
–ELEMENT 6
75047.50
–ELEMENT 7
75048.60
–ELEMENT 8
359994.30 –ELEMENT 9
359994.31 -ELEMENT 10
- 31 -
MED ASSOCIATES INC.
SMARTCR MANUAL
FORMAT 4 – Stripped with Variable Identification
This format provides the same information as Format 2 Stripped, with the added
features of maintaining alphabetical order of variables and arrays and identifying the
number of elements assigned to each variable. Therefore, simple variables are always
associated with one element, while array may contain from 1 to 10,000 elements. Like
simple stripped format, it is not necessary to have access to the .MPC code that
produced the data set in order to match variable letters to data elements.
The data in the sample were created in the same manner as the previous files.
File: !_Subject_1_Experiment_14.Group_1
05
-- MONTH RECORD STARTED
30
-DAY RECORD STARTED
2003 -YEAR RECORD STARTED
05
-MONTH RECORD STOPPED
30
-DAY RECORD STOPPED
2003
-YEAR RECORD STOPPED
1
-SUBJECT
14
-EXPERIMENT
1
-GROUP
1
-RECORD NUMBER
12
-HOUR RECORD STARTED
4
-MINUTE RECORD STARTED
14
-SECOND RECORD STARTED
12
-HOUR RECORD STOPPED
6
-MINUTE RECORD STOPPED
51
-SECOND RECORD STARTED
23
-NUMBER OF SIMPLE VARIABLES
3
-NUMBER OF ARRAYS
0.3
-0.3 IS A “MARKER NUMBER” ONLY (Data analysis programs may
use this value to
identify the start of variable
identification. )
10
-ARRAY “A” HAS 10 ELEMENTS
10
-ARRAY “B” HAS 10 ELEMENTS
11
-ARRAY “C” HAS 11 ELEMENTS
1
D HAS 1 ELEMENT (was a simple variable)
1
E HAS 1 ELEMENT (was a simple variable)
1
F HAS 1 ELEMENT (was a simple variable)
1
G HAS 1 ELEMENT (was a simple variable)
1
H HAS 1 ELEMENT (was a simple variable)
1
I HAS 1 ELEMENT (was a simple variable)
1
J HAS 1 ELEMENT (was a simple variable)
1
K HAS 1 ELEMENT (was a simple variable)
1
L HAS 1 ELEMENT (was a simple variable)
1
M HAS 1 ELEMENT (was a simple variable)
1
N HAS 1 ELEMENT (was a simple variable)
1
O HAS 1 ELEMENT (was a simple variable)
1
P HAS 1 ELEMENT (was a simple variable)
1
Q HAS 1 ELEMENT (was a simple variable)
1
R HAS 1 ELEMENT (was a simple variable)
1
S HAS 1 ELEMENT (was a simple variable)
1
T HAS 1 ELEMENT (was a simple variable)
1
U HAS 1 ELEMENT (was a simple variable)
1
V HAS 1 ELEMENT (was a simple variable)
1
W HAS 1 ELEMENT (was a simple variable)
1
X HAS 1 ELEMENT (was a simple variable)
1
Y HAS 1 ELEMENT (was a simple variable)
- 32 -
MED ASSOCIATES INC.
1
0.000
5.000
0.000
0.000
0.000
0.000
0.000
0.000
0.000
0.000
-----------
5.000 -0.000 -0.000 -0.000 -0.000 -0.000 -0.000 -0.000 -0.000 -0.000 -9636.11
20091.50
20092.60
63336.11
66125.50
66126.60
75047.50
75048.60
359994.30
359994.31
0
0
0
0
0
0
0
0
0
0
0
0
0
0
0
0
0
0
0
0
0
0
0
“A”
“A”
“A”
“A”
“A”
“A”
“A”
“A”
“A”
“A”
SMARTCR MANUAL
Z HAS 1 ELEMENT (was a simple variable)
ARRAY ELEMENT 0
ARRAY ELEMENT 1
ARRAY ELEMENT 2
ARRAY ELEMENT 3
ARRAY ELEMENT 4
ARRAY ELEMENT 5
ARRAY ELEMENT 6
ARRAY ELEMENT 7
ARRAY ELEMENT 8
ARRAY ELEMENT 9
“B” ARRAY ELEMENT 0
“B” ARRAY ELEMENT 1
“B” ARRAY ELEMENT 2
“B” ARRAY ELEMENT 3
“B” ARRAY ELEMENT 4
“B” ARRAY ELEMENT 5
“B” ARRAY ELEMENT 6
“B” ARRAY ELEMENT 7
“B” ARRAY ELEMENT 8
“B” ARRAY ELEMENT 9
ARRAY (C) ELEMENT 0
ARRAY (C) ELEMENT
1
ARRAY (C) ELEMENT " 2”63334.20
ARRAY (C) ELEMENT 4
ARRAY (C) ELEMENT 5
ARRAY (C) ELEMENT 6
ARRAY (C) ELEMENT 7
ARRAY (C) ELEMENT 8
ARRAY (C) ELEMENT 9
ARRAY (C) ELEMENT 10
VARIABLE (D) HAS A VALUE
VARIABLE (E) HAS A VALUE
VARIABLE (F) HAS A VALUE
VARIABLE (G) HAS A VALUE
VARIABLE (H) HAS A VALUE
VARIABLE (I) HAS A VALUE
VARIABLE (J) HAS A VALUE
VARIABLE (K) HAS A VALUE
VARIABLE (L) HAS A VALUE
VARIABLE (M) HAS A VALUE
VARIABLE (N) HAS A VALUE
VARIABLE (O) HAS A VALUE
VARIABLE (P) HAS A VALUE
VARIABLE (Q) HAS A VALUE
VARIABLE (R) HAS A VALUE
VARIABLE (S) HAS A VALUE
VARIABLE (T) HAS A VALUE
VARIABLE (U) HAS A VALUE
VARIABLE (V) HAS A VALUE
VARIABLE (W) HAS A VALUE
VARIABLE (X) HAS A VALUE
VARIABLE (Y) HAS A VALUE
VARIABLE (Z) HAS A VALUE
- 33 -
ARRAY (C) ELEMENT 3
0F
0F
0F
0F
0F
0F
0F
0F
0F
0F
0F
0F
0F
0F
0F
0F
0F
0F
0F
0F
0F
0F
0F
0
0
0
0
0
0
0
0
0
0
0
0
0
0
0
0
0
0
0
0
0
0
0
MED ASSOCIATES INC.
SMARTCR MANUAL
Interpretation of Data Elements
"Clock" Ticks
SmartCR utilizes an internal "Clock" based on the resolution set in the Configuration
Menu. The above examples were produced with a resolution of 10 ms. Therefore the
value of variable "D" (359908.000) may be interpreted as 3599 seconds. The number
to the left of the decimal in each element of array "C" is interpreted in the same manner.
Again, using the above example the first response occurred 96.36 seconds into the
session, the second response 200.91 seconds, etc.
The numbers to the right of the decimal point are data control codes used by SmartCR to
graph or plot as well as by SoftCR for post hoc analysis.
9636.11
20091.50
5:
66125.50
10:
359994.31
20092.60
66126.60
63334.20
75047.50
63336.11
75048.60
359994.30
Data Control Codes for SmartCR and SoftCR
Code Code Definition
Format
[Element in Array] Element Value = Element Definition
0.11 Response Step
[ C(0) ] 9636.11 = Response
0.20 Reinforcement pip
[ C(4) ] 63334.20
at 96.36 seconds
= Reinforcement pip at 633.34 seconds
0.30 Pen Reset with Pen UP
[C (10) ] 359994.30 = Pen Reset with Pen UP at 3599.94 seconds
0.31 Pen Reset with Pen DOWN
[C (11) ] 359994.31 = Pen Reset with Pen DOWN at 3599.94 seconds
0.5Y Set Event Pen Y (0 – 9) up
[C (2) ] 20091.50 = Event Pen 1 is up at 200.91 seconds
0. 6Y Set Event Pen Y (0 – 9) down (return to baseline)
[ C(3) ] 20092.60 = Event Pen 1 down at 200.92 seconds
- 34 -
MED ASSOCIATES INC.
SMARTCR MANUAL
In the above examples event pen codes appear 1 clock tick apart because the input line
controlling the event pen was placed in the transition mode. This appears as a "spike"
on the event line. To produce a square wave with a width equal to the duration of the
event, set the data line on the input module for the level mode. Please refer to Figure 5
as an example for setting the jumper. It would then be normal to find responses,
reinforcement pips, etc. between the .5Y and .6Y time elements.
SMARTCR Filenames
Among the configuration options there is a "Data Segregation" field. Three options are
provided. The first cumulates data segregated by subject, experiment, and group labels
and is called Files per Subj/Grp/Exp Files per Day . The second writes all data collected
on a given day to a single file and is known as File per Day. The third writes to separate
files per animal, per day and is known as File per Animal per Day.
File Per Subject
Format: A_Subject_SSS_Experiment_EEE.Group_GGG
Where: A = Arbitrary (default = !, or user-selected in Configuration Window)
SSS = subject #
EEE = experiment #
GGG = group #
Example:
!_Subject_2_Experiment_15.Group_1
Comments: Each session data with the same subject, experiment, and group codes will
be appended to the same file.
File per Day
Format: AYYYY-MM-DD
Where: A = Arbitrary (default = 1, or user-selected in Configuration Window )
YYYY = 4 digits of year
MM = Month 01..12
DD = Day 01..31
Examples:
!2003-06-09 – June 9, 2003
!2003-05-29 – May 29, 2003
Comments: These files typically contain more than one data set, assuming that more
than one animal is run on a given day. They are not as long as the file per subject files
- 35 -
MED ASSOCIATES INC.
SMARTCR MANUAL
File per Animal per Day
Format: AYYYY-M-DD_SShTTm.SubjectNNN
Where: A = Arbitrary (default = !, or user-selected in Configuration Window)
YYYY = Four digits of year
M = Month
1 = Jan.....
9 = Sept.
A = Oct.
B = Nov.
C = Dec.
DD = Day 01..31
SS- Hour in Military Time
TT- Minute value
SubjectNNN- Subject Number
Examples:
!2003-6-09_09h33m.Subject2= File collected on June 9, 2003. Data
collection started at 9:33 am for Subject 2
!2003-6-06_15h14m.Subject5=file collected on
collection started at 3:14 pm for Subject5.
June
6,
2003.
Data
Drive and/or Path for Dumping Data
When setting up your configuration parameters, select any valid drive and path for
saving data, although designating a subdirectory just for data is recommended.
Click on the “Browse” button next to the Data Path field in Configuration and a window
will come up prompting the user to select a folder to save the data in. It is user’s
responsibility to create the appropriate directory\folder on their system for saving the
data.
Data Prefix for Filenames
Each format above begins with an arbitrary first character. By default, Configuration
sets this character to the exclamation point "!" because other MED Associates, Inc.
programs such as SOFTCR use this same default. This character may be changed on the
Configuration form by changing the character in Data Prefix field to from ! to anything
else.
- 36 -