1
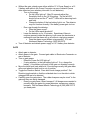
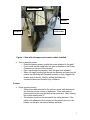
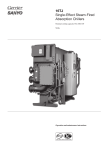
Northwest Marine Technology, Inc. R-Series Detector and Gate Seasonal Checklist Prior to using your detector and gate please check and test the following items: DETECTOR Are the detector and gate (if you are using one) clean? If possible use warm soapy water and rinse well. If scales and slime have hardened to the detector, you may have to wet the surfaces and let them soak for awhile before cleaning. o Check inside the tunnel, around the knobs. o Wash the plastic knob protector with a soft sponge. o Do the knobs on the front of the detector rotate easily? If not, wash around them with warm soapy water and brush off any corrosion. Are there any punctures through the enclosure? o Check both sides and the top and bottom. o If you find a puncture, you must return the unit to Northwest Marine Technology for repair. Please call (360) 468-3375. Is the desiccant exhausted? o If the desiccant is pink, change it. Fresh desiccant is blue. o See User’s Manual for instructions and source of desiccant material. Are the two desiccant cartridge hoses attached correctly? o Ensure that the yellow plugs on the desiccant cartridge have been removed so that air can freely circulate through the desiccant. o One hose should be attached between the desiccant cartridge and the hose barb on the back of the detector. o Another 8” hose should be attached to the other end of the desiccant cartridge. One end of this hose is left open to the atmosphere. 1 Without the gate, attach power either with the 15 V Power Supply or a 12 V battery and cable to the Power Connector on rear of detector (some older detectors have a battery tube with 2 c-cell batteries). o Turn on the power. Do the LEDs light up? After 30 seconds adjust the Sensitivity Knob to the 10:30 position. The far left LED should be on and the 2nd and 3rd LEDs will be bouncing back and forth. Charge the battery if the low battery light is on. The detector may not function correctly if the battery power gets too low. o Run a tag through the detector. Does the alarm sound? Do the LEDs reach threshold? o Leave the detector on for 10 minutes. Sometimes if there is moisture present inside the detector it will cause the electronics to malfunction and the alarm will go off without a tag being present. Does the alarm sound without a tag present? If so call Northwest Marine Technology (360) 468-3375. Turn off detector and detach power supply or 12 V battery from detector. GATE Attach gate to detector. Attach power to the gate. Connect gate cable to Electronics Connector on rear of detector. Turn on gate power o Does the Power On LED light up? o If using a battery, is the low battery light on? If so, charge the battery. A low battery will result in the gate not diverting correctly. Move the latch hook back and forth. If functioning correctly the gate alarm will sound when the latch hook is out of position. Toggle the Direction Switch. Does latch hook change position? Set Direction toggle switch so that the unlatched door is on the side to which untagged fish are to be diverted. Carefully open the gate doors. The rubber bumpers may be stuck” to the gate and they are easily damaged. o Does your gate have 4 intact bumpers? All bumpers are needed to correctly align the gates for proper diversion; replace any missing bumpers. Call Northwest Marine Technology at (360) 468-3375 if you need parts. 2 Counter cables Bumper Bumpers Bumper on inside of bar Figure 1 Gate with 4 bumpers and counter cables installed Turn on detector power o Does the detector power up with the power attached to the gate? o If not, check that the cable from the gate is attached to the Power Connector on the rear of the detector. o Run a tag through the detector, does the gate latch release? o When you begin running fish through the detector and gate you will need to set the Delay and Duration correctly so that a tagged fish diverts when it should. Start by setting the Delay fully counterclockwise and Duration fully clockwise. Counter Check counter function o Without the cable attached to the counter, press each button and see that the counter counts up and down. Clear each side by pressing both buttons on that side at the same time. After clearing the counter should read “0”. o The counter should not be stored with the cable attached. If the cable is left attached to the counter and the probes are not in the holders on the gate, the internal battery will drain. 3 o Attach the cable to the back of the counter. Place the cable sensor probes into the holders on the gate. Secure with the Counter Keeper Springs or elastic bands if the springs are missing. o Manually open and close each door on the gate. Do counts register on the counter displays? If the counts are displaying on the wrong display, switch the sensor probes to opposite sides. Quad Counter Check that each counter functions. Attach cables from switch box to counters. Attach foot switch and cable to gate and detector. Check that foot switch works, changing between counters. Check that counts are going to the correct display of each counter. For further instructions refer to the User’s Manual or call Northwest Marine Technology (360) 468-3375. 4