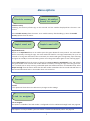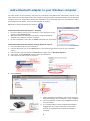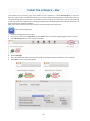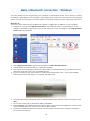
1
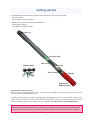
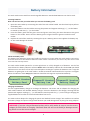
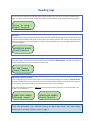
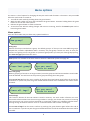
Stick Reader
SDL 400S
USER MANUAL
for
Windows & Mac
Links to mobile apps, printers and weighers.
Version 01.09.2015
1
Copyright © 2015 Shearwell Data Ltd
Table of Contents
Ge ng started - Page 3
Ba ery informa on - Page 4
Reading tags - Page 5
Menu op ons - Page 6
Add a Bluetooth adapter to a Windows PC - Page 8
Install s ck reader so ware: Windows - Page 9
Install s ck reader so ware: Mac - Page 10
Bluetooth connec on: Windows - Page 11
Bluetooth connec on: Mac - Page 14
Open SDL Connect: Windows - Page 16
Open SDL Connect: Mac - Page 17
Op ons for downloading: Windows - Page 18
Download tag numbers: Windows - Page 20
Op ons for downloading: Mac - Page 21
Download tag numbers: Mac - Page 23
Configure the s ck reader: Windows - Page 24
Configure the s ck reader: Mac - Page 24
Link to a mobile printer - Page 26
Configure print op ons: Windows - Page 28
Configure print op ons: Mac - Page 29
Print op ons on the s ck reader - Page 30
EID Formats - Page 31
Working with tag files: Windows - Page 32
Working with tag files: Mac - Page 34
Trouble-shoo ng - Page 36
Appendix I: Android phone - StockMove Express- Page 37
Appendix II: Link to a EziWeigh7 - Page 39
Appendix III: Link to a ID3000 weigher - Page 42
Contact us - Page 45
2
Getting started
The SDL400S s ck reader comes complete with everything you need to get started.
- SDL s ck reader
- Shearwell SDL Connect so ware
- Ba ery pack and four rechargeable AA ba eries
- Mains ba ery charger
- Car adapter for ba ery charger
Light ring
Shearwell label
LCD screen
Ba ery pack
Blue light
Green bu on
Handle
End cap for
ba ery access
Turn the s ck reader on and off
Press and release the green bu on once. The LCD screen will light up and display the start-up screen
(version number and the ba ery level).
Turn off the s ck reader by pressing and holding the green bu on for at least two seconds un l the LCD
screen shuts off. If the s ck reader is le idle for five minutes it will turn itself off to conserve ba ery
power. Shutdown me can be changed on the computer with SDL Connect > S ck Configura on
Warning: The Shearwell label above the display should NOT be removed! The serial number, product
codes and Bluetooth address are printed on the back. Removal of the label will void any warranty.
3
Battery information
The s ck reader comes with four AA rechargeable ba eries. Standard AA ba eries can also be used.
Inser ng ba eries
Note: You will not lose your data when you remove the ba ery pack.
1. Open the s ck reader by unscrewing the end of the red or blue handle. Use the white loop to pull out
the ba ery pack.
2. Insert the ba eries into the holder ensuring the posi ve and nega ve markings (+ / -) on the ba eries match up with the (+ / -) on the holder.
3. Insert the ba ery pack with the green arrow and green circle facing the same direc on as the green
bu on on the reader. Ensure that the ba ery pack is aligned with the grooves inside the s ck
reader.
4. Replace the end of the reader by screwing the cap on. Warning: Do not over-Ɵghten the baƩery cap
as this could damage the thread.
Check the ba ery level
The ba ery level indicator shows very briefly on the start-up screen when the s ck reader is turned on.
To check the level of the ba eries when the s ck reader is turned on, first turn it off, then turn it back
on to see the start-up screen.
The s ck reader should operate for at least eight hours on a fully charged set of ba eries. For the first
several hours the ba ery indicator will show Good. When the ba ery indicator first shows Low you should
s ll have one or two hours of use le , but should plan to recharge or replace the ba eries soon. A sign the
ba eries are ge ng low is the s ck reader is unable to maintain a Bluetooth link to a printer or weigher.
When the indicator shows Empty the ba eries should be recharged or replaced immediately.
Shearwell Version
Battery Good
Shearwell Version
Battery Low
Shearwell Version
Battery Empty
Charging the ba eries
Use the supplied ba ery charger to recharge the ba eries. The mains and car adapter for charging the
s ck reader ba eries are labelled “Ba ery Charger”. Place the ba eries in the charger, ensuring that the
posi ve and nega ve markings (+ / -) on the ba eries match up with the (+ / -) on the charger. Charging the
supplied ba eries from flat to full should take about four hours.
The mains and car adapter for charging the printer are labelled “Printer Charger”. Be careful not to confuse
the ba ery charger and printer charger leads because you could damage them by using the wrong adapter!
WARNING: If you are using a Bluetooth printer with a sƟck reader be sure to use the correct
adapter for each when re-charging. Shearwell Data Ltd. will not be liable for damage caused
by failure to use the correct charger.
4
Reading tags
Turn on the s ck reader. Press and release the green bu on once. You don’t need to hold the bu on
down. The s ck reader will begin to scan for an EID. For informa on on Rapid Read mode see page 7.
Press to read...
Grp=A Count=0
EID found
If an EID is within range the light ring at the end of the s ck reader will flash green and a short ‘beep’ will
be heard. The EID number will show on the LCD screen and be stored in the memory. The group count
will be increased by one. The s ck reader is ready to scan for another EID - press the green bu on once to
start scanning again.
UK0123456 08863
Grp=A Count=1
EID not found
If the s ck reader scans but no EID is found the screen will display No EID found. The light ring will glow
red and a different long ‘beep’ will signal a failed read.
No EID found
Grp=A Count=0
EID already stored in memory
If the same EID tag is read more than once, the screen will briefly display the message Already saved.
The light ring will flash red and a short beep will indicate that this number is already stored in memory
for this group. The second ‘read’ is not stored and the count is not increased.
If the same EID tag is scanned in a different group the s ck reader will treat it as a new number and
record it as an EID found.
UK0123456 08863
Already saved...
UK0123456 08863
Grp=B Count=3
Note: This informaƟon is for individual reading, not Rapid Read mode. Learn about Rapid
Read mode in the Menu OpƟon secƟon on page 7.
5
Menu options
The menu is a list of op ons for changing the way the s ck reader func ons. The menu is only accessible
when the s ck reader is turned on.
1. Turn off the s ck reader by holding down the green bu on.
2. With the s ck reader off, press and hold down the green bu on. Con nue holding down the green
bu on to view all the menu op ons.
3. Release the green bu on to make a selec on.
4. To exit the menu without making changes and return to scanning, wait for the Cancel op on and release the green bu on.
Menu op ons
Your own s ck reader may not have every op on listed here.
New group?
New group
Animals are always recorded into a group. The default group is “A” but you can create different groups
beyond that, named in alphabe cal order. However, only one group is ac ve at a me, so once you
create a new group you can not go back to a previous group unless you erase your latest group by using
the Erase last grp op on from the menu.
Print op ons are available if the s ck reader is linked to a Bluetooth printer. See page 18.
Erase last group?
Are you sure?
Press to erase
Erase last group
When a grouping of animals is no longer wanted, erase the group and all the EID numbers stored inside
it will be deleted. This will result in the previous group becoming the ac ve group.
Select Erase last grp from the menu. Confirm by pushing the green bu on again before the end of the
countdown. If you do not push the green bu on before the end of the countdown the ac on will be
canceled.
Erase all tags?
Are you sure?
Press to erase
Erase all tags
This function deletes all the EID numbers stored in memory. The stick reader software can store
thousands of EID numbers but the more tag numbers in storage, the slower the process of scanning
and saving each tag. Once you have exported or printed tag numbers it’s advisable to delete them.
Erasing all tags also allows animals to be re-scanned and their EID number saved again.
Select Erase all tags from the menu. Confirm by pushing the green button again before the end of
the countdown. If you do not push the green bu on before the end of the countdown the ac on will be
canceled.
6
Menu options
Disable memory?
Memory disabled
Press to read...
Disable memory
Disabling the memory allows tags to be scanned and the number displayed but the EID is not
stored.
Select Disable memory from the menu. To re-enable memory a er disabling it, select the Enable
memory op on from the menu.
Rapid read on?
Rapid read off?
Rapid Read mode
When set to Rapid Read there is no need to press the green bu on for every animal - the s ck reader
will be constantly scanning for tags. The s ck reader will look for new tags con nuously for up to 12
seconds. If no tags are detected in that 12 seconds, the s ck reader gives a long beep, stops scanning
and goes on standby to conserve ba ery power. Press the green bu on again to start scanning again.
Select Rapid read on from the menu to change from Press to Read to Rapid Read. Press and release
the green bu on once and the s ck reader will be constantly scanning for tags. Press the green button a second me to stop scanning. To disable rapid read mode and return to individual read, select
Rapid read off from the menu. Note that the s ck reader remembers the last mode selected when it
was turned off and will start in that mode when next turned on.
Cancel?
Cancel
This op on will close the menu without any changes to the se ngs.
Link to weigher?
Link to weigher
This op on is available if the s ck reader is configured to link to a Bluetooth weigh head. See page 28.
Print opƟons are only available if the sƟck reader is linked to a Bluetooth printer. See page 26.
7
Add a Bluetooth adapter to your Windows computer
The s ck reader can be wirelessly connected to a computer using Bluetooth. EID numbers stored on the
s ck reader can then be imported into the computer, using the special so ware provided. If your Windows
computer does not already have Bluetooth capabili es then Shearwell Data Ltd. recommends a Bluetooth adapter from Belkin. These can be supplied on request.
Bluetooth is o en indicated by this symbol.
Install Belkin Mini Bluetooth adaptor - Autoplay
1. Insert the Belkin CD into your computer. If the Autoplay screen
appears select Autorun.exe.
2. When the Belkin installa on screen opens, plug the Bluetooth
adapter into a USB port on your computer.
3. On the installa on screen click on Install and follow the instruc ons.
Install Belkin Mini Bluetooth adaptor through Windows Explorer
1. Insert the Belkin CD into your computer.
2. Find the Windows icon or the Start bu on in the bo om right-hand corner of your computer
screen.
3. Le -click with your mouse on the Start bu on. Right-click on Windows Explorer.
4. On the le , under Computer, find the CD in the DVD drive.
5. Le -click on the CD to view its contents.
6. Select Autorun.
7. When the Belkin installa on screen opens, plug the
Bluetooth adapter into a USB port on your computer.
8. On the installa on screen click on Install and follow
the instruc ons.
9. It’s recommended to leave the Bluetooth adapter
plugged into the USB port because a connec on
must be re-established every me the adapter is
removed.
8
Install the software - Windows
The software program for connecting your stick reader to your computer is called SDL Connect. Install
this software on your computer from the CD website before you start scanning tags. The so ware
allows you to transfer informa on between the s ck reader and your PC. Being able to connect your s ck
reader to your PC is useful even if you are only planning to link your s ck to a mobile printer. Changing
configura ons and keeping the date and me correct are all done through the computer so ware.
We recommend all other programs on your computer be closed before you start the installa on process.
1. Insert the SDL Connect so ware CD into your computer. The AutoPlay window should open. Click on
Install SDLConnect. If the Autoplay window does not open automa cally, open the CD with Windows
Explorer (see page 8) to view the files and select SDLConnectSetup.exe
2. Select the language you prefer for the installa on process. This will NOT change the language in the
SDL Connect program - only the language used for the setup procedure.
3. On the Select Des na on screen - leave as is, click on Next.
4. On the Ready to Install screen, click on Install.
5. Click Finish to exit the setup program.
6. An SDL Connect icon is now on your computer desktop as a link to open the program.
You can also download SDL Connect from the Shearwell website:
- www.shearwell.co.uk
1. Click on the Support tab
2. Click on S ck Reader Downloads
3. Click on Download So ware.
9
Install the software - Mac
The software for connecting your stick reader to your computer is called SDL Connect. It works on
Mac OS X 10.9 or later. The so ware allows you to transfer informa on between the s ck reader and your
computer. Being able to connect your s ck reader to your computer is useful even if you are only planning
to link your s ck to a mobile printer. Changing configura ons and keeping the date and me correct are all
done through the computer so ware.
Note: Your sƟck reader must be fully charged to make a Bluetooth connecƟon.
Install from the App Store
1. Click on the App Store icon to open.
2. In the search box type in Shearwell. Hit the <Enter> key or click the magnifying glass icon to search.
3. Find SDL Connect in the search results. Click Get.
4. Click Install App.
5. Enter your Apple ID and password if prompted. The program will be installed on your computer.
6. Click Open to start using the program.
10
Make a Bluetooth connection - Windows
The s ck reader must be recognized by your computer as a Bluetooth device. This is done by a variety
of methods, depending on your computer’s opera ng system. Follow the instruc ons for the opera ng
system you will be using. Note: Your sƟck reader must be fully charged to make a Bluetooth connecƟon.
Windows XP
Turn on the s ck reader. Ensure the Bluetooth adapter is plugged into a USB port on your computer.
1. Navigate to a screen called My Bluetooth Places. You can follow a link on your desktop or on the
toolbar on the bo om, right-hand corner of your computer screen. You might also find My Bluetooth
Places under My Computer.
2. Open My Bluetooth Places, then choose the op on to Add a Bluetooth Device.
3. The Bluetooth Setup Wizard will run - follow the prompts.
4. Your PC will start searching for Bluetooth signals. When it’s finished scanning, the Bluetooth Device
Selec on screen will show a list of available devices.
5. Look on the back of your s ck reader for a label with its Bluetooth name - it will start SDL400S,
followed by another four digits. For example: SDL400S 1234
6. Find your s ck reader’s Bluetooth name on the Bluetooth Device Selec on screen and select it. Click
Next.
7. On the next screen type in the passkey 1111. Click Finish.
8. Select Connect on the Bluetooth Device Control. Make a note of the Serial (COM) port number which
will be required when you connect to the s ck reader so ware.
9. A shortcut to the Bluetooth Device Control is automa cally created on your computer desktop for
easy access in the future.
11
Make a Bluetooth connection - Windows
Windows 7, Windows 8 and Windows 10
1. Turn on the s ck reader.
2. In the Control Panel open Devices and Printers. Select Add a Device. Or click the Bluetooth icon on
the bo om right-hand corner of your computer screen and select Add a Device.
3. Your PC will start searching for Bluetooth signals. When it’s finished scanning, the window will show
a list of available devices.
4. Look on the back of your s ck reader for a
label with its Bluetooth name - it will start
SDL440S, followed by another four digits.
For example: SDL400S 1234
12
Make a Bluetooth connection - Windows
5. Find your s ck reader’s Bluetooth name on the screen and select it. Click Next.
6. On the next screen type in the pairing code 1111. Click Next.
7. Allow me for Windows to install the so ware drivers.
8. When the s ck reader has been successfully installed click on the link to Devices and Printers, or
right click with your mouse on the SDL400 icon. Look on the Services tab. Make a note of the Serial
(COM) port number which will be required when you connect to the s ck reader so ware.
13
Make a Bluetooth connection - Mac
1. Turn on the s ck reader.
2. Open SDL Connect on your computer.
3. Click on Choose Reader.
4. Look on the back of your s ck reader for a label with its Bluetooth name - it will start SDL440S,
followed by another four digits. For example: SDL440S 1234
5. Click on your s ck reader’s Bluetooth name on the screen. Click Select.
14
Make a Bluetooth connection - Mac
1. If you are asked for a passcode type in 1111. Click Pair.
2. The s ck reader connec on will show on the SDL Connect screen.
15
Open SDL Connect - Windows
1. Switch on the s ck reader and check the ba ery level is good. Establish the Bluetooth link with the
computer before you open SDL Connect.
2. If you forgot to record your COM port number earlier, go to Control Panel>Devices and Printers. Find
your s ck reader’s Bluetooth name on the list. Right-click with your mouse on the s ck reader’s
name. Le click your mouse on Proper es. Look on the tab called Services to see the COM port
number. Write it down!
3. Double-click the SDL Connect icon on your computer desktop to start. The so ware
will open.
4. Click on the COM port dropdown list on the right side of the screen. Select the COM port number
you recorded earlier. When a successful connec on is made the bu ons that were greyed out will
become ac ve. The s ck reader so ware has now been successfully installed and you will not need
to enter your COM port number again.
16
Open SDL Connect - Mac
1. Switch on the s ck reader and check the ba ery level is good.
2. Click on the SDL Connect icon if there is a shortcut on your desktop.
3. If there is no desktop shortcut, open Finder, click on Applica ons and select SDL Connect.
4. If your s ck reader is not connected, highlight it and click Select.
17
Options for downloading - Windows
EID numbers stored on the s ck reader can be downloaded into your computer using the supplied so ware.
Before you start, click on Show Tag Read Op ons to set your preferences. Click Hide Tag Read Op ons to
close the op on screen.
Tag read op ons
When reading tags from the sƟck...
- Sort them into order means arranging the numbers from lowest to highest tag number.
- Include group labels means show the group (Ex. Group A, Group B, Group C, etc.).
- Include the me the tag was scanned means show the date and me each tag was scanned.
18
Options for downloading - Windows
Tags to save
- All tags from s ck means show all the groups and all the tags.
- Selected tags from s ck means you can select a specific group and then select which tag numbers in
that group.
Load tags in:
- Notepad means a text file that can also be saved as a CSV (comma separated values) file that is easily
imported into a spreadsheet or a database applica on.
- Excel means as a spreadsheet in Microso Excel. Note: The program detects whether Excel is installed
on your computer. If it is not installed then Notepad is the default.
- Windows Clipboard means the selected tag numbers are copied and ready to paste into a holding
register or animal movement document, such as for the NLMD-LT or the Animal Repor ng and Movement Service (ARAMS). Numbers on the clipboard can be pasted into any Windows program.
MS Excel format
Notepad format
Windows clipboard
p
format
0826024422015281,
0826024422019012,
0826024422019027,
0826024422019077,
0826024422030386,
Total for group A: 5
A,
A,
A,
A,
A,
21/02/2014 9:26:45 AM
21/02/2014 9:26:45 AM
21/02/2014 9:26:43 AM
21/02/2014 9:26:45 AM
21/02/2014 9:26:44 AM
Total: 5
19
Download tag numbers - Windows
Download EID numbers
1. Turn on the s ck reader and ensure it has a Bluetooth link to your computer.
2. Click on the SDL Connect shortcut icon on your desktop. The so ware will open and the blue light on
the s ck reader will flash as they connect.
3. Select op ons for downloading by clicking on the Show Tag Read Op ons bu on.
4. Click Read Tags from S ck.
5. If viewing the numbers in an Excel or Notepad format you can save the data. Go to File > Save As,
name the file and select a loca on.
Erase tag numbers from the s ck reader
Downloading tags into the computer does not remove the numbers from the s ck reader’s memory. To
erase tags, you can click on the Erase Tags bu on, and then click Yes to confirm. You can also erase tags on
the s ck reader itself - select Erase Tags as a menu op on when you turn on the s ck reader.
20
Options for downloading - Mac
EID numbers stored on the s ck reader can be downloaded into your computer using SDL Connect. Before
you start click on Tag Read Op ons to set your preferences.
Tag read op ons
When reading tags from the sƟck...
- Sort them into order means arranging the numbers from lowest to highest tag number.
- Include group labels means show the group (Ex. Group A, Group B, Group C, etc.).
- Include the me the tag was scanned means show the date and me each tag was scanned.
Tags to save
- All tags from s ck means show all the groups and all the tags.
- Selected tags from s ck means you can select a specific group, open the group, and then select
individual tag numbers in that group.
21
Options for downloading - Mac
Load tags in:
- TextEdit means a text file that can also be saved as a CSV (comma separated values) file that is easily
imported into a spreadsheet or a database applica on.
- Numbers means as a spreadsheet in iWorks. Note: The program detects whether Numbers is installed
on your computer. If it is not installed then TextEdit is the default.
- Clipboard means the selected tag numbers are copied and ready to paste into a holding register or
animal movement document. Numbers on the clipboard can be pasted into another program.
TextEdit format
Numbers format
Clipboard format - paste into other programs
22
Download tags numbers - Mac
Download EID numbers
1. Turn on the s ck reader and ensure it has a Bluetooth link to your computer.
2. Click on the SDL Connect shortcut icon on your desktop to open the so ware.
3. Select op ons for downloading by clicking on the Tag Read Op ons bu on.
4. Click Read Tags from S ck.
5. If viewing the numbers in a TextEdit or Numbers format you can save the data. Go to File > Save As,
name the file and select a loca on.
Erase tag numbers from the s ck reader
Downloading tags into the computer does not remove the numbers from the s ck reader’s memory. To
erase tags, you can click on the Erase Tags bu on, and then click Yes to confirm. You can also erase tags on
the s ck reader itself - select Erase Tags as a menu op on when you turn on the s ck reader.
23
Configure the stick reader - Windows
To save your changes click on Save Configura on. To cancel and exit click on Quit.
Firmware Version
This is the current so ware version number on
the s ck reader.
Serial Number
This is the s ck reader’s serial number. This is
also printed on the Shearwell label on the back
of the s ck reader.
Scan me (seconds) from 1 to 10
This is the length of me the s ck reader will search for an EID tag before giving a failed read signal. Type
in a scan me from 1 to 10 seconds. The default me is 4 seconds.
Shutdown Time (minutes) from 1 to 10
This is the length of me the s ck reader will be inac ve before it shuts off automa cally. Type in a shutdown me from 1 to 10 minutes. The default me is 5 minutes.
EID Display Format
This is how EID numbers are shown on the s ck reader’s display screen. This also controls how EID
numbers will appear in print-outs. Tag Lookup is the format when a tag (bucket) file is loaded. For more
informa on see page 22 - Tag File Op ons and page 26 - EID Op ons.
EID Output Format
This is the format for information the stick reader sends to any connected Bluetooth device, such as
a printer or weigh head. Instructions for linking those devices will indicate what format they require.
Tag Lookup is the format when a tag (bucket) file is loaded. For more information see page 22 - Tag
File Options and page 26 - EID Options.
Save Readings to S ck Memory
This is the same as Disable Memory on the s ck reader menu. Select No to disable the memory; select Yes
to enable the memory.
Language
Select a language for the display. The computer must also have the Control Panel > Region and Language
op ons set to the same language.
Con nuous Read Mode
This is the same as the Rapid Read op on on the s ck reader’s menu. The s ck reader will scan con nuously
for EID tags without the user pushing the green bu on for each animal. If no tags are found, the s ck reader
will stop scanning a er 12 seconds. Press to Read means the s ck reader scans for a tag only when the
green bu on is pushed; when a tag is read the green bu on must be pushed again to scan for another tag.
Con nuous Read Timeout (seconds) 1 to 30
This is the length of me the s ck reader will scan for tags in Con nuous Read mode. If no tags are detected in this me then the s ck reader will give a long beep and stop scanning. The default me is 12 seconds.
Type in a scan me from 1 to 30 seconds.
For printer op ons see page 26 - Link to a Mobile Printer.
24
Configure the stick reader - Mac
Details
Firmware Version
This is the current so ware version number on the
s ck reader.
Serial Number
This is the s ck reader’s serial number. This is also
printed on the Shearwell label on the back of the s ck
reader.
Language
This will set the language on the s ck reader screen.
Se ngs
Scan me (seconds) from 1 to 10
This is the length of me the s ck reader will search
for an EID tag before giving a failed read signal. Type
in a scan me from 1 to 10 seconds. The default me
is 4 seconds.
Shutdown Time (minutes) from 1 to 10
This is the length of me the s ck reader will be
inac ve before it shuts off automa cally. Type in
a shutdown me from 1 to 10 minutes. The default
me is 5 minutes.
EID Display Format
This is how EID numbers are shown on the s ck reader’s display screen. This also controls how EID
numbers will appear in print-outs. Tag Lookup is the format when a tag (bucket) file is loaded. For more
informa on see page 22 - Tag File Op ons and page 26 - EID Op ons.
EID Output Format
This is the format for information the stick reader sends to any connected Bluetooth device, such as
a printer or weigh head. Instructions for linking those devices will indicate what format they require.
Tag Lookup is the format when a tag (bucket) file is loaded. For more information see page 20 - Tag
File Options and or EID Options in the Windows manual.
Save Readings to S ck Memory
This is the same as Disable Memory on the s ck reader menu. Select No to disable the memory; select Yes
to enable the memory.
Con nuous Read Mode
This is the same as the Rapid Read op on on the s ck reader’s menu. The s ck reader will scan con nuously
for EID tags without the user pushing the green bu on for each animal. If no tags are found, the s ck reader
will stop scanning a er 12 seconds.
Con nuous Read Timeout (seconds) 1 to 30
This is the length of me the s ck reader will scan for tags in Con nuous Read mode. If no tags are detected in this me then the s ck reader will give a long beep and stop scanning. The default me is 12 seconds.
Type in a scan me from 1 to 30 seconds.
25
Link to a mobile printer
The s ck reader is fully compa ble with a thermal Bluetooth printer. The mobile printer recommended
and supplied by Shearwell is an Able Systems AP1300BT.
Cover
Release catch for cover
Power bu on
Indicator light
Printer on and off
Press the power bu on once to turn the printer on. The printer turns itself off automa cally if it has not
been used for a few minutes. You can turn the printer off manually by opening the cover and double-clicking
the power bu on.
Ba ery charging
The ba ery can be recharged using either the mains charger or the car charger supplied. Charging the
printer ba ery from flat to full should take about three hours.
Indicator light
Steady green = Normal opera on
Long green, short red = Ba ery is low
Short green, long orange = Ba ery charging
Blinking red = Error
WARNING: Use the correct adapter for charging the printer. Do not confuse the sƟck reader baƩery
chargers with the printer chargers. The mains and car charger for the printer are labelled Printer
Charger.
Paper roll installa on
To insert a new roll of paper, slide the catch down and away from the paper slot.
The cover for the paper container will release and open. Remove the
old paper core and insert a new roll of paper.
26
Link to a mobile printer
Printer and s ck reader combina on
When a stick reader and printer are purchased as a bundle they will
come from Shearwell with the Bluetooth link already established.
A label on the underside of the printer confirms your s ck reader is
linked. Print op ons will not be displayed on your s ck reader’s menu
if it is not linked to a printer.
New connec ons
To establish a new printer link, or if you wish to link an exis ng printer
to an alterna ve s ck reader, you must have already completed the earlier steps for installing Bluetooth and the s ck reader so ware on your
computer. (See pages 8 to 12.) Once the s ck reader is linked to the so ware on the computer a new connec on to the printer is made through
the Configure S ck screen on the PC.
1.
2.
3.
4.
Turn on the s ck reader.
Open the SDL Connect so ware. Click on Configure S ck.
For a Windows computer, scroll down to find the Printer Type field. Select AP1300BT.
For a Mac computer, click Configure s ck > Peripherals
5. Turn on the printer by pressing the power bu on. The indicator light will glow green.
6. Press and release the power bu on twice, in quick succession. This will cause the printer to print out
a test strip.
7. On the test strip, find the MAC Address. This 12 character code is the printer’s Bluetooth ID.
8. On the Configure S ck screen on the computer find the field Printer Bluetooth ID and type in the
MAC Address from the test strip.
9. Click Save Configura on. The blue light on the s ck reader will flash as the two connect.
27
Configure printer options - Windows
The Configure S ck window on your Windows computer so ware includes many of the same op ons as
the menu on the s ck reader. To save your changes click on Save Configura on. To cancel and exit click on
Quit.
Label Prin ng Allowed
The Print label menu op on is only available on the s ck reader when the Configure S ck op on is set to
Yes.
Label prin ng is a specialized func on so the default is set to No.
Label Printer On
If Label Prin ng is allowed, then the actual label prin ng func on can be turned on or off by selec ng Yes
or No. This op on ac vates the Bluetooth printer a er each animal is scanned - a label of each EID number
is printed a er each tag is read.
Print in Order
EID numbers will be printed in numerical order.
Please note: Prin ng will be slower when this is selected.
Please note: Print Order does not work if the EID display op on is set to Tag Lookup.
28
Configure printer options - Mac
The Configure S ck window on your Mac computer so ware includes many of the same op ons as the
menu on the s ck reader. To save your changes click on Save. To cancel and exit click on Cancel.
Peripherals
Printer Type
The default se ng is AP1300BT. This is the mobile Bluetooth printer supplied by Shearwell.
Label Printer Allowed
Label prin ng is a specialized func on so the default se ng is un cked.
Label Printer On
If Label Prin ng is allowed, then the actual label prin ng func on can be turned on or off by selec ng Yes
or No. This op on ac vates the Bluetooth printer a er each animal is scanned - a label of each EID number
is printed a er each tag is read.
Print in Order
EID numbers can be printed in numerical order or in the order the tags were read.
Note: Prin ng will be slower when Print in order is selected.
Note: Print in order does not work if the EID display op on is set to Tag Lookup.
Printer Bluetooth ID
This is the MAC address of the Bluetooth printer you want to link to your s ck reader. See page 27 for how
to find your printer’s Mac address.
29
Print options on the stick reader
A s ck reader linked to a mobile printer will display print op ons on the s ck menu. The format of the EID
numbers depends on the se ngs you choose on the Configure S ck program on the computer.
1. Turn on the printer and make sure there is sufficient paper loaded.
2. Turn on the s ck reader by pressing and holding the green bu on to see all the menu op ons.
3. Release the bu on to make a selec on from the menu.
Print order on?
Print order on
EID numbers are printed in numerical order. To change back to print EID numbers in the order they
were read select Print order off.
Print group?
Print Group
This prints all the EID numbers in the current group.
Print all groups?
Print all groups
This prints all the EID numbers divided into groups.
No print out will be produced if Group A = 0 animals.
Print barcodes?
Print barcode
EIDs are shown as both numbers and barcodes.
Print label?
Print labels
This op on is only available when the s ck reader is configured Label Prin ng Allowed. A er each
animal is scanned the printer prints the EID number and the matching barcode. If the EID Format is set
to Tag Lookup then that number will appear underneath the barcode.
30
EID Tag Formats
Defini ons
WYSIWYG Tags
- “What You See Is What You Get”. A ‘WYSIWYG’ tag has an electronic number (EID) that is the same as
the number printed on the outside of the tag.
- UK sheep born a er Jan 1, 2010 must have an official WYSIWYG tag.
- “Slaughter tags” are also WYSIWYG, although only the flock mark is visible on the outside.
Non-WYSIWYG Tags
- A tag with an electronic number (EID) that is different than the number printed on the outside of the
tag.
- A tag file is for non-WYSIWYG tags - a cross-reference between the EID inside the tag and the number
printed on the outside.
S ck reader EID format op ons
Some countries and equipment manufacturers require EID numbers to be transmi ed in a specific format.
The SDL400S s ck reader is able to transmit EID numbers in various formats. Changes to the EID format are
made through the Configure S ck func on on the computer so ware.
UK WYSIWYG (Sheep)
- Displays UK, followed by a space and the 7-digit flock number, followed by a space and the 5-digit individual animal number.
- The s ck reader set to UK WYSIWYG will display non-UK tags in decimal format.
Decimal
Displays the full 16-digit EID number
Tag Lookup
- Used with a tag file for non-WYSIWYG tags.
- The EID number programmed into the tag microchip is cross referenced to another number that will be
displayed when the tag is scanned.
ISO Decimal
- The EID number is shown, minus the first 0 of the country code and with a space between the country
code and the remaining 12 digits.
Full ISO
- The screen will alternate between the 15-digit EID number and six addi onal digits that are the retag
counter, the species iden fier and three reserved digits.
Hexadecimal
- All the informa on on the microchip are displayed in hexadecimal on screen , including the retag
counter, species iden fier and the three reserved digits.
31
Working with tag files - Windows
•
•
•
•
A ‘WYSIWYG’ tag has an electronic number (EID) that is the same as the number printed on the outside of the tag.
A ‘non-WYSIWYG’ tag has an electronic number (EID) that is different than the number printed on
the outside of the tag.
A tag file is for non-WYSIWYG tags - a cross-reference between the EID inside the tag and the number
printed on the outside.
A tag file loaded into the s ck reader so ware allows the s ck reader to display the outside number
instead of the internal EID number. Your tag manufacturer will supply this file for you when you purchase non-WYSIWYG tags. Learn more about EID and tag formats on page 22 - EID Op ons
To load a tag file onto your s ck reader:
1. Turn on the s ck reader.
2. Open SDL Connect on your computer desktop.
Click on Configure S ck.
3. Change EID Display Format to Tag Lookup.
4. Change EID Output Format to Tag Lookup.
5. Click Save Configura on and Quit.
Note: The sƟck reader will sƟll read and print WYSIWYG tag numbers even when it is configured
for a tag file and the format is set to Tag Lookup.
6.
7.
8.
9.
The tag file provided by your tag supplier must be saved on your computer.
Click on the Tag File Op ons bu on.
Select Set up Tag File.
Select Get Tags from File on PC. Find the tag file from your tag manufacturer - accepted tag formats are
Shearwell, Allflex and FarmPlan. For all others please check with Shearwell Support.
10. If you do not have a tag file you can make your own text file in Notepad. Call Shearwell Support for
more informa on.
32
Working with tag files - Windows
Select tags to send to the s ck reader
1. The tag file will open with two columns of informa on. The eartag column shows the name/number
that will be displayed when the tag is scanned by the s ck reader.
2. The Send to S ck column displays a green ck and (New) besides each name/number. (New) means
the number has not previously been sent to the s ck reader.
3. If you wish to send the en re list of tags to the s ck reader click Save & Exit.
4. Click on the Send Tag File to S ck bu on. A confirma on screen will display the number of tags exported.
5. To send only selected tags to the s ck reader highlight the tags you want on the grid. To select mul ple
tags hold down the control key, or hold down the shi key while selec ng the first and last number in
a series.
6. Click on Select Tags to Send to S ck. Tags that have been sent will now have only a green ck beside.
All tags will remain on the grid for selec on next me the program is opened.
7. Tags that are NOT to be sent to the s ck can be highlighted on the grid. Click on Deselect Tags from the
List. A red cross will be visible beside the number when it is deselected.
8. Delete tags that you will never want to send to the s ck reader to reduce the size of the tag file. Highlight the unwanted tags on the grid and click on Delete Selected Tags from the List. If you change your
mind you must import the tag file again to restore those numbers to the grid.
33
Working with tag files - Mac
•
•
•
•
A ‘WYSIWYG’ tag has an electronic number (EID) that is the same as the number printed on the outside of the tag.
A ‘non-WYSIWYG’ tag has an electronic number (EID) that is different than the number printed on
the outside of the tag.
A tag file is for non-WYSIWYG tags - a cross-reference between the EID inside the tag and the number
printed on the outside.
A tag file loaded into the s ck reader so ware allows the s ck reader to display the outside number
instead of the internal EID number. Your tag manufacturer will supply this file for you when you
purchase non-WYSIWYG tags. Learn more about EID and tag formats in EID Op ons in the Windows
manual.
To load a tag file onto your s ck reader:
- Turn on the s ck reader.
Open SDL Connect on your computer desktop.
- Click on Configure S ck.
- Change EID Display Format to Tag Lookup.
- Change EID Output Format to Tag Lookup.
- Click Save.
The tag file provided by your tag supplier must be saved on your computer.
- Click on the Tag File Op ons bu on.
- Select Set up Tag File.
- Select Get Tags from File.
- Find the tag file from your tag manufacturer - accepted tag formats are Shearwell, Allflex and FarmPlan. For all others please check with Shearwell Support.
- Select the tag file. Click Open. All the tag numbers in that tag file will be displayed.
34
Working with tag files - Mac
Select the tags you want to send to the s ck reader.
1. To send all the tags:
- Highlight the first tag on the list, hold down the shi key and highlight the last tag on the list.
- Click Select Tags to Send to S ck - a ck will appear beside each selected tag.
- Click Save.
- Click Send Tag File to S ck. The blue light on the s ck reader will flash blue.
2. To send only selected tags to the s ck reader highlight the tags you want on the grid. To select mulple tags hold down the command (Apple) key, or hold down the shi key while clicking the first and
last number in a series.
- Click Select Tags to Send to S ck - a ck will appear beside each selected tag.
- Click Save.
- Click Send Tag File to S ck. The blue light on the s ck reader will flash blue.
3. To remove a tag file click on Erase Tag File from S ck. This will remove ALL tag files so be sure that
none of the tags will ever need to be read again (i.e. animals are dead or sold).
35
Trouble-shooting
Error messages on the computer
1. No Bluetooth signal
- Check the Bluetooth adapter is plugged into a USB port (Windows).
- Look at the Bluetooth icon on your desktop or taskbar - is there a red or blue
symbol? The Bluetooth adapter might be disabled.
2. No Bluetooth signal
- check the s ck reader is turned on and the ba ery level is good.
3. Losing Bluetooth connec on between the s ck and the computer
- Ba ery level in the s ck reader is ge ng low - insert fresh ba eries or stop and recharge.
4. Wrong date and me
- Date and me are automa cally sent to the s ck reader from the computer so ware when the s ck
connects. A s ck reader that isn’t used very frequently will run down the back-up ba ery that runs
the internal clock. To correct the date and me connect the s ck reader and SDL Connect before you
intend to use it.
If all else fails - remove the sƟck reader from your Bluetooth Devices and re-pair it.
36
Appendix I - Link to StockMove Express for Android
Note: The red-handled SDL400S s ck reader will only link to an Android phone.
Phone Requirements
Stock Move Express for Android requires a smart phone or tablet running Google's Android opera ng
system. The phone or tablet must have Bluetooth and will need Internet access via mobile data or WiFi.
Download StockMove Express
1. Touch the Google Play Store icon on the home page on your mobile phone or tablet. New users to
the Play Store may be required to set up a Google account.
2. In the search box at the top, search for ‘shearwell stock move’
3. Select StockMove Express in the search result, then press Install.
Register with NLMD-LT
You must have an NLMD account to use StockMove Express.
1. Open StockMove Express. Register as a new user or log in if you already have an account.
2. You can also register online at www.nlmd-lt.co.uk
3. Remember your user name and password - you will need them to log into StockMove
Express
Connect to your s ck reader
1. Turn on your s ck reader.
2. Open StockMove Express. Touch either the cow or the sheep icon.
3.
4.
5.
6.
7.
8.
Touch Statutory.
Select an event to record - Movement or Tag Applica on or Death.
Touch Add Animals.
Touch Connect in the top le corner of the screen.
Touch Scan for Devices to find the Bluetooth signal from your s ck reader.
Touch your s ck reader Bluetooth number (ex. SDL400-XXXX). See page 10 of this
manual for help finding the Bluetooth number.
9. Type in passcode 1111. Touch OK. You are ready to scan tags.
37
Appendix I - Link to StockMove Express for Android
Use the StockMove Express Help Guide
Touch the help icon at the top right-hand
corner of any page to open a help screen.
Use the online help on NLMD-LT
Go to www.nlmd-lt.co.uk
Click on Ge ng Started
38
Appendix II - Link to a weigher - EziWeigh7
The SDL400S s ck reader can be linked to a weigher that has Bluetooth. Devices with Bluetooth will have
the Bluetooth symbol on the front.
Bluetooth symbol
Power bu on
Arrow to scroll up
Escape bu on
Enter bu on
Arrow to scroll down
The first step to link your s ck reader to an EziWeigh7 is to find the Bluetooth ID of the weigher.
1. Push the power bu on to turn on the weigher.
2. Push the Menu bu on.
3. Use the bo om arrow to scroll down through the func ons to Setups...
4. Push Enter. Use the bo om arrow to scroll down through the func ons to BT Address
5. Write down the BT address on a piece of paper, leaving out the colons. The example in the photo
above would be BT Address 00A0963D2FA3.
6. Press the Escape bu on twice to exit.
39
Appendix II - Link to a weigher - EziWeigh7
The second step to link your s ck reader to an EziWeigh7 weigher is to change the configura on on your
s ck reader.
1. Make sure the Bluetooth adapter is plugged into a USB port on your computer (Windows).
2. Turn on the s ck reader.
3. Click on the SDL Connect icon on your computer desktop. The blue light on the s ck reader should
flash as the Bluetooth connec on is made.
4. Click on Configure S ck.
5. For a Windows computer, scroll down to find the Weigher Bluetooth ID field. Type in the Bluetooth ID
number for your weigher.
6. Click Save Configura on and Quit.
7. On a Mac computer, click on Peripherals.
8. Type in the Bluetooth ID number for your weigher in the Weigher Bluetooth ID field.
9. Click Save.
40
Appendix II - Link to a weigher - EziWeigh7
»
»
»
»
Turn off your s ck reader.
Turn the s ck reader back on, pressing and holding the green bu on to view the menu op ons.
Release the bu on at Link to weigher? The blue light on the s ck reader will glow when the Bluetooth
connec on is made.
The s ck reader and weigher are now linked - when a tag is scanned by the s ck reader the EID number
will be sent to the weigher and be displayed on the screen.
EID tag number
41
Appendix III - Link to a weigher - ID3000
The SDL400S s ck reader can be linked to a weigher that has Bluetooth. Devices with Bluetooth will have
the Bluetooth logo on the front. Weighers like the Tru-Test ID3000 purchased from Shearwell will have a
label on the back with the Bluetooth informa on.
The first step to link a s ck reader to an ID3000 weigher is to change the configura on on the weigher.
1. Press the power bu on to turn on the weigher.
2. Press the Setup bu on. The Weighing Screen Setup opens.
Bluetooth symbol
42
Appendix III - Link to a weigher - ID3000
3. On the weighing setup screen, use the up and down arrows to move around the screen. “RHS” means
right-hand side; “LHS” means le -hand side.
4. Use the arrows to select EID. Press the Enter bu on and use the arrows to select the ck mark. Press
the Enter bu on to make the selec on.
5. Press the ESC bu on to exit the setup screen. The EID field should now be visible on the front screen.
43
Appendix III - Link to a weigher - ID3000
The second step to link your s ck reader to an ID3000 weigher is to change the configura on on your
s ck reader.
1. Make sure the Bluetooth adapter is plugged into a USB port on your computer (Windows).
2. Turn on the s ck reader.
3. Click on the SDL Connect icon on your computer desktop. The blue light on the s ck reader should
flash as the Bluetooth connec on is made.
4. Click on Configure S ck.
5. For a Windows computer, scroll down to find the Weigher Bluetooth ID field. Type in the Bluetooth ID
number for your weigher.
6. Click Save Configura on and Quit.
7. On a Mac computer, click on Peripherals.
8. Type in the Bluetooth ID number for your weigher in the Weigher Bluetooth ID field.
9. Click Save.
»
»
»
»
Turn off your s ck reader.
Turn the s ck reader back on, pressing and holding the green bu on to view the menu op ons.
Release the bu on at Link to weigher? The blue light on the s ck reader should flash as the Bluetooth
connec on is made.
The s ck reader and weigher are now linked - when a tag is scanned by the s ck reader the EID number
will be sent to the weigher and be displayed on the screen.
44
Contact us
For technical support telephone:
You can email technical support at:
For general enquiries telephone:
Fax:
Alterna vely visit our website at:
+44 (0) 1643 841814
[email protected]
+44 (0) 1643 842100
+44 (0) 1643 841628
www.shearwell.co.uk
Lines are open from Monday to Friday between 8am - 5pm GMT.
Cer fica on
FCC ID: YVSSDL400S
The SDL400S complies with parts15.207 and 15.209 of the FCC rules CFR47:2009. OperaƟon is subject to
the following two condiƟons: (1) this device may not cause interference, and (2) this device must accept any
interference, including interference that may cause undesired operaƟon of the device.
The SDL400S operates at a frequency of 134.2KHz and complies with part 15C emission requirements.
These limits are designed to provide reasonable protecƟon against harmful interference when the equipment is operated in a commercial environment. This equipment generates, uses and can radiate radio frequency energy, and if not installed and used in accordance with the instrucƟon manual, may cause harmful
interference in which case the user will be required to correct the interference at his own expense.
IC: 8856A-SDL400S
The SDL400S also complies with Industry Canada RSS-210 issue 7. This SDL400S complies with Industry
Canada licence-exempt RSS standard (s).
N29666
45