1
© 2012 Tru-Test Limited
All product names and brand names in this document are trademarks or registered trademarks of their respective holders.
No part of this publication may be photocopied, reproduced, stored in a retrieval system, or transmitted in any form or by any means, electronic,
mechanical, photocopying, recording or otherwise without the prior written permission of Tru-Test Limited. Product specifications may change
without prior notice.
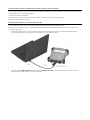
For more information on other quality Tru-Test Group brands and products, visit www.tru-test.com.
Tru-Test Limited
25 Carbine Road
Mt Wellington
Auckland 1060
New Zealand
Postal address:
P O Box 51078
Pakuranga
Manukau 2140
New Zealand
Issue 1 06/2012
The Bluetooth® word mark and logos are registered trademarks owned by Bluetooth SIG, Inc. Any use by Tru-Test Limited is under licence
Windows is a registered trademark of Microsoft Corporation in the United States and other countries
Contents
Getting started ............................................................................................................................................1
Overview of the EziWeigh7 ................................................................................................................................................................................... 1
Parts of the indicator ............................................................................................................................................................................................. 1
Charging the internal battery................................................................................................................................................................................. 2
Installing the indicator........................................................................................................................................................................................... 3
The indicator interface........................................................................................................................................................................................... 4
Using the indicator ......................................................................................................................................6
Weighing animals without entering IDs ................................................................................................................................................................. 6
Weighing animals and entering IDs at the same time ............................................................................................................................................. 7
Weighing animals and drafting (sorting) them by weight ....................................................................................................................................... 8
Inducting animals by recording animal IDs without weighing ................................................................................................................................. 9
Connecting the indicator to other devices ................................................................................................10
Connecting the indicator to an EID Stick Reader via a Bluetooth® wireless connection......................................................................................... 10
Connecting the indicator to load bars using load bar cables or load bar adaptors ................................................................................................. 11
Connecting the indicator to a PC using the USB cable .......................................................................................................................................... 11
Connecting the indicator to an XRP Panel Reader using a serial communication cable .......................................................................................... 12
Connecting the indicator to a non-Tru-Test brand EID Reader using a DB9 serial cable ......................................................................................... 12
Connecting the indicator to an EID Stick Reader using the Stick Reader-Serial cable ............................................................................................. 12
Viewing statistics .......................................................................................................................................13
Managing session records .........................................................................................................................14
Deleting data ...................................................................................................................................................................................................... 14
Transferring information between the indicator and the PC .....................................................................15
Installing EziLink ................................................................................................................................................................................................. 15
Using EziLink ...................................................................................................................................................................................................... 15
Transferring a list of animal IDs to the indicator ................................................................................................................................................... 15
Transferring recorded data from the indicator to a PC .......................................................................................................................................... 16
Deleting all data on the indicator using EziLink .................................................................................................................................................... 17
Setups ........................................................................................................................................................18
Updating the software ...............................................................................................................................22
Checking for software updates ............................................................................................................................................................................ 22
Setting EziWeigh to automatically update the software ........................................................................................................................................ 22
Manually updating the software .......................................................................................................................................................................... 22
Troubleshooting/FAQ .................................................................................................................................23
General issues..................................................................................................................................................................................................... 23
Issues with weighing ........................................................................................................................................................................................... 23
Issues with connecting ........................................................................................................................................................................................ 24
Caring for the indicator .............................................................................................................................25
Service and warranty information .............................................................................................................25
Compliance ................................................................................................................................................25
FCC notice .......................................................................................................................................................................................................... 25
FCC warning ....................................................................................................................................................................................................... 25
Industry Canada notice ....................................................................................................................................................................................... 25
Specifications.............................................................................................................................................25
Menus ........................................................................................................................................................26
i
ii
Getting started
Overview of the EziWeigh7
The EziWeigh7 indicator offers seamless integration with EID readers for the efficient collection of information. Bluetooth® wireless connectivity
between the indicator and a Tru-Test EID Stick Reader allows for roaming up to 100 m away.
The performance of individual animals can be monitored, enabling informed decisions to be made.
Features of the EziWeigh7:
Records information by VID or EID tags.
Displays an animal’s daily weight gain since last weighing session.
A ‘comments’ field allows treatments or traits to be entered during weighing.
Bluetooth® wireless connectivity with Tru-Test EID Stick Reader.
Speeds up weight drafting (sorting) by displaying direction for up to three weight ranges.
VID/EID pairs can be pre-loaded onto the indicator. This enables the indicator to automatically show the VID once an EID is scanned.
Statistics from current and previous weighing sessions can be displayed.
Extra-rugged case design with large LCD display.
Easy USB connectivity with PC for transferring data.
Auto Zero for cancelling build up of dirt on the weighing platform.
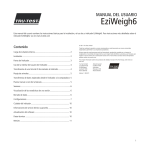
Parts of the indicator
1
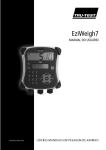
Charging the internal battery
Note: Before using the indicator, ensure that the internal battery is fully charged.
Note: The battery indicator may not be entirely accurate when the indicator is being used in very cold conditions (below 5 ºC / 40 ºF).
2
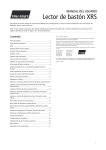
Installing the indicator
Note: Mount the indicator and secure the cables so they cannot be damaged by stock.
1
2
3
Install load bars under the platform on a firm, level surface (see Load Bar User Manual).
Mount the indicator bracket onto a flat surface (timber rails, concrete) or pipe-work.
Remove the dust caps on the load bar connectors. Connect the load bar cables to the indicator.
The indicator automatically calibrates with Tru-Test load bars.
4
5
If required, connect the indicator to the mains power using the USB cable and the power adaptor.
If using an XRP Reader to scan EID tags, connect the indicator to the XRP Reader (for summary instructions see Connecting the indicator to
other devices on page 10, or for full details see the XRP Reader’s User Manual).
If using an EID Stick Reader to scan EID tags, set the indicator up to communicate with the EID Stick Stick Reader using Bluetooth® wireless
connectivity (for summary instructions see Connecting the indicator to other devices on page 10, or for full details see the EID Stick Reader’s
User Manual).
Tip: Connect the dust caps together to keep out dirt and moisture. Dust caps should remain in place at all times when the indicator is not in use.
3
The indicator interface
The data screen
During weighing, the data screen displays relevant information:
Menu button
Press
to view the menu items. The top level of menus includes:
Statistics
View statistics for the current session, or for previously recorded sessions.
Clear last record
Delete the last record in the current session.
Sessions
Start a new session, view statistics for the current session or for previously recorded sessions, delete a session or delete all
sessions.
Setups
Change the indicator settings and enable extra features.
Using the keypad to nagivate through the menus
Press
Press
to go deeper into a sub-menu or to select an option.
or
to scroll through a list of options.
Press
to escape out of a sub-menu back to the next tier up.
Using the keypad to enter data
Use the alpha numeric keypad to enter text or numbers.
Press
to toggle between alphabet characters and numbers.
Press
to type a decimal point or full-stop.
With alphabet characters set, press
once to type a colon (:) or twice to type a hyphen (-).
With alphabet characters set, press
to type a space.
Stable light
The red stable light illuminates when the weight is stable. A weight cannot be recorded until the stable light is illuminated.
Record key
Press
to record an animal’s weight.
Note: Pressing
is not necessary if the indicator is set to record weights automatically See Automatic Recording on page 20.
Manual zero key
By default, the scale automatically zeroes itself when a load is removed from the weighing platform or when the indicator first powers up.
Occasionally, you may need to use the manual zero to force the scale to return to zero.
To zero the scale manually:
Press
.
The scale displays zero.
Note: To disable Auto Zero, see Auto Zero on page 20.
Entering a comment
A comment about an animal (e.g. a condition score) may be entered during the weighing session. The comment will be saved as part of the session
data.
To enter a comment:
1
4
After entering the animal’s ID number(s), press
.
2
Enter a comment using the alpha numeric keypad.
Viewing weight gain
During weighing, weight gain per day will displayed if a weight has previously been recorded for the same animal and the record is still on the
indicator. Weight gain is displayed on the Data screen when the weight is stable and the ID has been entered. Weight gain is not saved as part of
the session data.
5
Using the indicator
Here are four examples of common ways to use the indicator:
Weighing animals without entering IDs
You may want to weigh your animals without recording their IDs or any information about particular animals. This could be useful if you want to
view or download statistics about a group of animals quickly.
To weigh animals:
1
2
3
4
5
Create a new session (Press
,
,
then
). See
Managing session records on page 14 for more information about
creating sessions.
Move the animal onto the platform.
Wait for the stable light to illuminate.
Press
.
When the animal moves off the platform, the indicator
automatically returns to zero.
Repeat steps 2-4 for all animals.
Tips:
Ensure that the animal is fully on the platform before pressing
.
Ensure that the underside of the platform or crate is kept clear of dirt
and stones.
To speed up weighing, you can set the indicator to record weights
automatically, eliminating the need to press
. See Automatic
Recording on page 20.
During or after weighing, you can view statistics for the weighing session. Statistics available include:
Count of records
Average weight
Total of all weights
Minimum and maximum weight.
To view statistics, press
,
,
,
,
and
. See Viewing statistics on page 13 for more information.
After the weighing session is complete, you can transfer the recorded session data to a PC for analysis or to share with others. You need to have
EziLink™ installed on your PC first. For installation instructions, see Installing EziLink on page 15.
To transfer recorded data to a PC:
1
Connect the indicator to the PC using the USB cable.
2
Launch EziLink then click
and save the file.
See Transferring information between the indicator and the PC on page 15 for more information about transferring data.
6
Weighing animals and entering IDs at the same time
You can weigh animals and record IDs and other information about particular animals.
To weigh animals:
1
2
3
Create a new session (Press
,
,
then
). See Managing
session records on page 14 for more information about creating sessions.
Move the animal onto the platform.
Enter the animal’s VID using the alpha numeric keypad, or scan the animal’s
EID tag using an EID reader.
Notes:
-
Entering the animal’s ID is optional.
Entering a comment about an animal is optional.
The animal’s VID or EID may be entered before the
animal steps onto the platform.
When inducting new animals, both the VID and EID can
be entered.
Weight gain will be displayed if a weight has previously
been recorded for the animal and the record is still on
the indicator. See Viewing weight gain on page 5.
Tips:
4
Press
and enter a comment about the animal using the alpha numeric
keypad, if desired.
-
5
6
7
Wait for the stable light to illuminate.
Press
.
When the animal moves off the platform, the indicator automatically returns
to zero.
Repeat steps 2-6 for all animals.
-
-
Ensure that the animal is fully on the platform before
pressing
.
Ensure that the underside of the platform or crate is kept
clear of dirt and stones.
To speed up weighing, you can set the indicator to
record weights automatically, eliminating the need to
press
. See Automatic Recording on page 20.
When inducting new animals, VIDs can be set to
automatically increment. This means you don’t need to
enter the VID, the number or letter will increment by one
each time you record a weight. See Auto Increment VIDs
on page 19.
You can pre-load a cross reference file containing EIDs
and corresponding VIDs using EziLinkTM, supplied with
the indicator. If a cross reference file has been preloaded, the animal’s VID will appear when an EID tag is
scanned. See Transferring information between the
indicator and the PC on page 15 for more information
about transferring data.
You can set the indicator to automatically apply a prefix
to the VIDs as you enter them. See Prefix VIDs on page
19.
During or after weighing, you can view statistics for the weighing session. Statistics available include:
Count of records
Average weight
Total of all weights
Minimum and maximum weight.
To view statistics, press
,
,
,
,
and
. See Viewing statistics on page 13 for more information.
After the weighing session is complete, you can transfer the recorded session data to a PC for analysis or to share with others. You need to have
EziLink installed on your PC first. For installation instructions, see Installing EziLink on page 15.
To transfer recorded data to a PC:
1
Connect the indicator to the PC using the USB cable.
2
Launch EziLink then click
and save the file.
See Transferring information between the indicator and the PC on page 15 for more information about transferring data.
7
Weighing animals and drafting (sorting) them by weight
You can weigh animals and draft (sort) them according to their weights. The weight ranges can be customised. During weighing, the indicator
displays a direction arrow depending on the weight range in which the animal belongs. If Drafting (Sorting) is enabled, the session statistics also
show a count for each draft (sort) range. For more information about setting up drafting (sorting) including draft (sort) ranges, see Drafting
(Sorting) on page 18.
To draft (sort) animals by weight:
1
2
3
4
5
6
7
Enable Drafting (Sorting) (Press
,
repeatedly to display Setups, then
,
, and
).
Set the draft (sort) range lower limit (Press
to display Low Limit, type a value for the low limit range, press
Set the draft (sort) range upper limit (Press
to display High Limit, type a value for the high limit range, press
Set the draft (sort) direction for the lower range (Press
to display Low Direction, press
repeatedly).
Set the draft (sort) direction for the middle range (Press
to display Mid Direction, press
repeatedly).
Set the draft (sort) direction for the upper range (Press
to display High Direction, press
repeatedly).
Weigh animals as described above, entering animal IDs during weighing, if desired.
).
).
During or after weighing, you can view statistics for the weighing session. Statistics available include:
Count of records
Average weight
Total of all weights
Minimum and maximum weight.
Count of animals in low, medium and high ranges.
To view statistics, press
,
,
,
,
and
. See Viewing statistics on page 13 for more information.
After the weighing session is complete, you can transfer the recorded session data to a PC for further processing. You need to have EziLink
installed on your PC first. For installation instructions, see Installing EziLink on page 15.
To transfer recorded data to a PC:
1
Connect the indicator to the PC using the USB cable.
2
Launch EziLink then click
and save the file.
See Transferring information between the indicator and the PC on page 15 for more information about transferring data.
Note: The draft (sort) direction is recorded in the session data.
8
Inducting animals by recording animal IDs without weighing
You can apply animal EID tags as you weigh, entering the VIDs as you go. You must disconnect the load bars from the indicator so that the
indicator does not wait for a stable weight. This will allow you to press
as soon as you have entered the ID or IDs. The EID, VID or both may be
entered for each animal record. The
button must be pressed for each animal.
To record animal IDs without weighing:
1
Disconnect load bar connectors.
2
Create a new session (Press
,
,
then
). See
Managing session records on page 14 for more information about
creating sessions.
Enter the animal’s VID using the alpha numeric keypad and scan
the animal’s EID tag using an EID reader.
3
Notes: Entering a comment about an animal is optional.
Tips:
4
Press
and enter a comment about the animal using the
alpha numeric keypad, if desired.
5
6
Press
.
Repeat steps 3-5 for each new animal record.
When inducting new animals, VIDs can be set to automatically
increment. This means you don’t need to enter the VID, the
number or letter will increment by one each time you record a
weight. See Auto Increment VIDs on page 19.
You can set the indicator to automatically apply a prefix to the
VIDs as you enter them. See Prefix VIDs on page 19.
9
Connecting the indicator to other devices
The EziWeigh7 indicator can be used in various weighing configurations. It may be connected to:
Tru-Test EID Stick Reader or other brand stick reader for reading EID tags using a Bluetooth® wireless connection
Tru-Test Load Bars or other brand load bars for weighing
A PC for transferring animal IDs from the PC to the indicator or transferring recorded data from the indicator to the PC.
Tru-Test XRP Panel Reader or other brand panel reader for reading EID tags
A summary of information is provided for connection to Tru-Test products only. For comprehensive installation instructions, see the device’s own
user manual. If you have trouble connecting the indicator to a device, see Troubleshooting/FAQ on page 23.
Connecting the indicator to an EID Stick Reader via a Bluetooth® wireless connection
To establish a Bluetooth wireless connection between the indicator and a Tru-Test EID Stick Reader or other Bluetooth enabled EID reader, you
need to ‘pair’ the two devices. The following instructions are specifically for pairing a Tru-Test EID Stick Reader. If your Bluetooth enabled EID
reader is not a Tru-Test EID Stick Reader, refer to the pairing instructions that came with your reader.
Note:
-
Before pairing the two devices, ensure that the stick reader has BLUETOOTH® set to Auto (BT AUTO displayed on the LCD). If not, press and
hold both the Read button and the Scroll button to enter the stick reader’s settings. Press the scroll button repeatedly to scroll through the
options. When BLUETOOTH® is selected, press the Read button repeatedly until BLUETOOTH® (AUTO) is displayed.
When connecting the two devices, the indicator must always be turned on before the stick reader.
To pair the indicator with the stick reader:
1
Ensure the stick reader and the indicator are well within range of each other and that the stick reader is turned off.
2
3
4
Press
to turn on the indicator.
Press the Read button to turn on the stick reader.
A rotating circle displays on the stick reader’s LCD indicating that it is searching for Bluetooth devices.
After approximately one minute, the pairing is complete and a connection is established.
A lightning bolt appears on the stick reader’s LCD (see below), the blue LED illuminates and a small arrow appears in the top right-hand
corner of the indicator’s Weight screen to show that the wireless connection is active (see Bluetooth® Wireless Connection Status shown on
Parts of the indicator on page 1).
Now that pairing is complete, subsequent connections should be virtually instant.
Troubleshooting
If the stick reader automatically connects to another Bluetooth enabled device instead of the indicator, turn off the other device and start the
pairing procedure again.
Pairing may fail if there are too many Bluetooth enabled devices in the vicinity. Once the stick reader has found 10 devices, it stops searching
for others.
If your Bluetooth enabled EID reader is not a Tru-Test EID Stick Reader, your reader must be capable of being the Bluetooth master device.
The adaptor is a slave device only.
Testing the connection
1
Ensure the stick reader and the indicator are well within range of each other and that the stick reader is turned off.
2
3
Press
to turn on the indicator.
Press the Read button to turn on the stick reader.
After a few seconds, a lightning bolt appears on the stick reader’s LCD and a small arrow appears in the top right-hand corner of the stick
reader’s LCD to show that the wireless connection is active.
Scan an EID tag with the stick reader (Press and release the Read button while passing near an EID tag).
The EID tag number should appear on the indicator’s Data screen.
4
10
Connecting the indicator to load bars using load bar cables or load bar adaptors
You can connect the indicator to Tru-Test load bars using the cables provided with the load bars. The indicator can also connect to other brands of
load bars either directly or using load bar adaptors.
To connect the indicator to the load bars:
Plug the ends of the load bar cables into the indicator’s load bar connectors and the other ends into the load bars.
Ensure that all cable connections are secure.
Connecting the indicator to a PC using the USB cable
You can connect the indicator to the EID Stick Reader using the USB cable, provided with the EziWeigh7 indicator.
Before connecting the indicator to the PC, install the EziLink software provided with the EziWeigh7 indicator. For installation instructions, see
Installing EziLink on page 15.
1
Connect the Indicator to the PC, using the USB cable. Attach the Power/Communication end to the indicator’s Power/Communication
Connector and tighten the screw collar firmly. Insert the USB end into a free USB port on the PC.
2
On the PC desktop, double-click on the shortcut for EziLink to launch the application.
The indicator displays USB connected and EziLink displays EziWeigh7 Connected in the bottom left-hand corner of the window. This
indicates that the indicator and PC are successfully connected.
11
Connecting the indicator to an XRP Panel Reader using a serial communication cable
You can connect the indicator to an XRP Panel Reader using the serial communication cable provided with the XRP panel reader or sold as an
accessory (Tru-Test part number 818310).
Plug the end of the serial communication cable into the indicator’s power/communication connector and the other end into the XRP Panel Reader’s
COM port.
Ensure that all cable connections are secure.
Note: See the XRP Panel Reader’s User Manual for installation instructions.
Connecting the indicator to a non-Tru-Test brand EID Reader using a DB9 serial cable
You can connect the indicator to a non-Tru-Test brand of EID Reader using a DB9 serial cable which is sold as an accessory (Tru-Test part number
818324).
Plug the end of the DB9 serial cable into the indicator’s power/communication connector and the other end into the EID Reader.
Ensure that all cable connections are secure.
Connecting the indicator to an EID Stick Reader using the Stick Reader-Serial cable
You can connect the indicator to the EID Stick Reader using the Stick Reader-Serial cable which is sold as an accessory (Tru-Test part number
819630).
Plug the end of the Stick Reader-Serial cable into the indicator’s power/communication connector and the other end into the EID Reader.
Ensure that all cable connections are secure.
12
Viewing statistics
Statistics can be viewed for the current session or for previously recorded sessions.
To view statistics for the current session:
1
2
3
Press
then
to display Statistics.
Press
.
Use the arrows to scroll through the statistics for the current session.
To view statistics for previously recorded sessions:
1
2
3
4
5
Press
,
,
to display Sessions. Press
then
to display Statistics.
Press
.
Use the arrows to scroll through the list of sessions.
Select a session and press
.
Use the arrows to scroll through the statistics for the selected session.
Statistics available:
Count
Number of records in the session
Average
Average weight recorded in the session.
Note: Records with no weights are ignored in the average calculation.
Total
Total of all weights recorded in the session.
Min
Minimum weight recorded in the session
Max
Maximum weight recorded in the session
Low Count
Count of animals in Low range, (only available if drafting/sorting is enabled).
Medium
Count
Count of animals in Medium range, (only available if drafting/sorting is enabled).
High Count
Count of animals in High range, (only available if drafting/sorting is enabled).
Note: Draft (Sort) statistics can only be viewed for the current session.
13
Managing session records
Data is recorded on the indicator in sessions. It is advisable to begin a new session each time you weigh. The indicator can store up to 100
sessions.
To manage session data, go to the sessions menu (Press
,
,
to display Sessions. Press
).
Start New
The session name is automatically created using the date the session was started. When you transfer sessions to a PC, EziLink will
apply a sequence number to each file name (e.g. session 1 being the oldest session). This is so that you can easily identify a
session if there was more than one session created in a single day.
To start a new session:
Press
.
A message Started is displayed.
Statistics
Statistics can be viewed for a particular session. For more information, see Viewing statistics on page 13.
To view statistics for a particular file:
1
Press
.
2
Press
.
3
Use the arrows to scroll through the list of sessions.
4
Select a session and press
.
5
Use the arrows to scroll through the statistics for the selected session.
Clear oldest
session
To clear the oldest session recorded on the indicator:
1
Press
,
to display Clear Oldest Session.
2
Press
.
Note: ID information remains in the indicator.
Clear ALL
sessions
To clear all sessions recorded on the indicator:
1
Press
,
,
to display Clear Oldest Session.
2
Press
.
Note: ID information remains in the indicator.
Clear ALL
Sessions &
VID-EID
Links
This option deletes all data recorded on the indicator (including ID information). The same process can be done from within
EziLink. See Deleting all data on the indicator using EziLink on page 17.
Deleting data
If you make a mistake during the weighing session and you want to quickly delete the last record in the session, there is no need to go into the
sessions menu, you can simply clear the last record.
To delete the last record in the session:
1
2
3
14
Press
Press
Press
.
to display Clear Last Record.
.
Transferring information between the indicator and the PC
Information may be transferred between the indicator and the PC using the EziLink software application, supplied with the indicator. EziLink can
only be installed on computers running Windows XP or later.
Installing EziLink
Note: Do not connect the indicator to the PC until you have installed EziLink.
1
2
3
4
Turn on the PC, login if necessary then wait for the desktop to appear.
Close any open programs.
Insert the EziLink CD.
Follow the on-screen instructions to install the software and device driver.
5
To launch EziLink, click on the desktop icon
or go to the Start menu.
Using EziLink
To use EziLink:
1
2
3
Connect the indicator to the PC and launch the application. See Connecting the indicator to a PC using the USB cable on page 11.
Wait for the indicator to connect to the PC (this may take up to 1 minute).
Click one of the menu options to upload IDs, download sessions or delete sessions.
Transferring a list of animal IDs to the indicator
A file containing EIDs and corresponding VIDs (visible tag numbers) can be exported to the indicator prior to a weighing session, using EziLinkTM. If
a cross-reference file has been pre-loaded, the animals’ VID will appear on the Data Screen when a tag is scanned. The EID displayed in small
numerals directly above.
15
Up to 15,000 EID/VID pairs may be exported to the indicator. The cross-reference file must be formatted as follows:
File must be in .csv or .xls format. .txt files are also acceptable as long as the fields are separated by a comma (essentially a .csv file).
The file must contain only two columns of data – one column for VIDs and one for EIDs.
VIDs can be in the first column and EIDs in the second column, or the other way around.
A header row is optional.
The file should only contain letters and digits. It must not contain any of the following characters [ ] ( ) { }, ; ` ~ ^ \ #.
If the VID is 16 characters or more, only the digits after the last letter from the right hand end will be used. For example, if the VID in crossreference file is 12345678XBX00047, it will be exported as 00047. This allows the use of tag bucket files.
Here are two possible formats for the cross-reference file:
No header row = VIDs in first column, EIDs in second column or the other way around
Header row = EIDs in first column, VIDs in second column or the other way around
Caution! Do not connect the indicator to the PC until you have installed the EziLink software. EziLink includes the driver required by the indicator. If
you have already connected the indicator without installing EziLink, disconnect the indicator and cancel the Windows wizard if this has begun.
To transfer a cross-reference file from a PC to the indicator:
1
Connect the indicator to the PC and launch EziLink. See Connecting the indicator to a PC using the USB cable on page 11.
2
On the EziLink window, click
.
3
Browse to find the .csv (comma separated values) file containing the VID, EID. Select the .csv file and click Open.
A dialogue box confirms that the IDs have been successfully downloaded.
4
Disconnect the USB cable.
Note:
-
If the cross-reference file is not in .csv format, in step 3 when browsing, click on the drop-down arrow in the Files of Type field and select All
Files. This will allow you to select another file format such as .xls.
The indicator must be disconnected from the PC before it can be used.
Transferring recorded data from the indicator to a PC
Records may be transferred from the indicator to a PC using EziLink. Another application such as MS Excel can then be used for viewing and
manipulating recorded data. Instructions for installing EziLink are supplied with the software CD.
Caution! Do not connect the indicator to the PC until you have installed the EziLink software. EziLink includes the driver required by the indicator. If
you have already connected the indicator without installing EziLink, disconnect the indicator and cancel the Windows wizard if this has begun.
To transfer records from the indicator to a PC:
1
Connect the indicator to the PC and launch EziLink. See Connecting the indicator to a PC using the USB cable on page 11.
EziLink displays all the sessions recorded on the indicator in the main window.
2
Select a particular session and click
-orSelect File/Import all sessions from EziWeigh7.
The Save… dialogue box is displayed.
3
16
Type a file name, select a location on your computer and click Save.
Deleting all data on the indicator using EziLink
You can delete all EID-VID pairs and all session data on the indicator using EziLink.
To delete all EID-VID pairs and all session data on the indicator:
1
2
Connect the indicator to the PC and launch EziLink. See Connecting the indicator to a PC using the USB cable on page 11.
On the EziLink window, click .
A warning dialogue is displayed.
3
4
Click Continue.
A dialogue confirms that all data has been deleted.
Tip: The same process can be done from within the indicator. See Managing session records on page 14.
17
Setups
The indicator can be customised to suit the weighing application or environmental conditions. The settings are accessed through the Setups menu.
To access the Setups menu, press
, then press
repeatedly to display Setups.
Press
to go deeper into a sub-menu or to select an option.
Press
to escape out of a sub-menu back to the next tier up.
Drafting (Sorting)
Drafting (Sorting) allows you to sort animals into two or three groups according to their weights. During weighing, the indicator displays the
weight range the animal belongs in and displays a drafting (sorting) direction to show you which way to draft (sort) animals,
There are two draft (sort) limit settings: a low limit and a high limit. The draft (sort) limits are the ‘splitting points’ for the groups:
For two-way drafting (sorting), enter a weight for one of the draft (sort) limits (leaving the other set to zero). For example, to draft (sort) animals
below 300 kg into one pen and animals above 300 kg into another, set the low limit to 0 kg and set the high limit to 300 kg:
For three-way drafting (sorting), enter a weight for both the low limit and high limit. For example, to draft (sort) animals into three pens 0-250 kg,
250-300 kg and 300+, set the Low limit to 250 kg and the High limit to 300 kg:
18
Explanation
Options
Drafting (Off)*
[Sorting (Off) – USA only]
Enable this option to sort animals into groups according to their weights.
Drafting (With ID)
Sorting (With ID) – USA only
Enable this option to sort animals into groups according to their weights.
Drafting (With no ID)
Sorting (With no ID) – USA only
Type a value for the low limit range using the alpha-numeric keypad.
Low Limit
Type a value for the high limit range using the alpha-numeric keypad.
High Limit
This is the direction that you want animals in the low range to go.
Low Direction
This is the direction that you want animals in the mid range to go.
Mid Direction
This is the direction that you want animals in the high range to go.
High Direction
This option is only available if Drafting (With ID) [Sorting (With No ID)] has been enabled and is only
relevant when the indicator is being used with an Auto Drafter (currently not supported). The animals
will automatically be released after a period of time, even if an ID has not been entered. The timeout
period can be set in the Timeout for no-EID field.
Release If No EID (On)
This option is only available if Drafting (With ID) [Sorting (With No ID)] has been enabled and is only
relevant when the indicator is being used with an Auto Drafter (currently not supported). The animals
will not be released if an ID has not been entered.
Release If No EID (Off)
This option is only available if Release If No EID is set to (On).
Type in a value for the timeout period for entering an ID. If an ID has not been entered within this
period of time, the animal will be automatically released.
Timeout For No-EID
Prefix VIDs
Explanation
Options
You can set the indicator to automatically apply prefixes to the VID as you enter them. This saves time
typing. For example, if all of the VIDs are in the format AU476329 where 329 is the individual
animal’s number, you could set up a prefix of AU476. During weighing, when you type the individual
animal’s number 329, the indicator automatically adds the prefix AU476.
To enter a prefix, enable Prefix then type in a value for Prefix using the alpha-numeric keypad.
Note: Any combination of numbers, letters and spaces can be used for a prefix. The colon, dash and
decimal point may also be used.
Prefix (Off)*
Prefix (On)
Auto Increment VIDs
Explanation
Options
To save time when tagging and weighing animals, you can set the VID field to automatically
increment for each new animal. This means you don’t have to enter the VID, the number (or letter)
will increment by one each time you record a weight. For example, if you have a box of ear tags that
are sorted in order, you can set up the indicator to automatically apply the next number in sequence
as you weigh and tag each animal. When weighing, the auto incremented VID number appears on the
indicator as soon as the animal steps onto the weighing platform.
Auto Inc VID (Off)*
Auto Inc VID (On)*
Repeat comment
Explanation
Options
If you enter a comment about an animal and you want to repeat it for all animals in the session, you
can enable Repeat. After you enter the comment, it will automatically repeat for all subsequent
animals unless you over-ride it by entering a different comment. For example, you may want to enter
a comment that you are administering a treatment to all animals.
Repeat (Off)*
Repeat (On)
19
Resolution
Explanation
Options
You can specify the minimum weighing resolution.
You may want to change the minimum resolution, for example, if you are weighing very heavy loads
and you are not too concerned with accuracy. By setting the resolution to 5 kg, the indicator will
weigh to the nearest 5 kg and arrive at a weight more quickly. If you are weighing light loads, for
example small animals, you may require accurate measurements. By setting the resolution to 0.1 kg,
the indicator will weigh to the nearest tenth of a kilogram, although it may take longer for the scale
to stabilise.
The resolution options depend on the type of load bars being used with the indicator.
Resolution 0.1
Resolution 0.2
Resolution 0.5*
Resolution 1
Resolution 2
Resolution 5
Backlight
Explanation
Options
The backlight is set to Off by default, however you can set it to Low or High to suit poor lighting
conditions. Use of the backlight will affect battery consumption – the run-time will double if the
backlight is set to Low instead of High.
Backlight (Off)*
Backlight (Low)
Backlight (High)
Automatic Recording
Explanation
Options
Automatic (auto) recording can be used in order to speed up weighing as there is no need to press
to complete the record. When Auto Record is on, the animal weight is recorded as soon as an ID
is entered and the stable light indicator illuminates. If Auto Record is used with an EID reader,
recording becomes a completely hands-free operation. Auto recording should only be used where
there is limited likelihood of external influences affecting the weight reading.
When Auto record (With ID) is enabled, the indicator will wait for an ID to be entered before
recording.
When Auto record (With No ID) is enabled, the indicator will not wait for an ID to be entered before
recording.
Auto record (Off)*
Auto record (With ID)
Auto record (With No ID)
Date and Time
Explanation
Options
The indicator’s internal date and time affects the stamp applied to each session. The date format used
is yyyy/mm/dd. The time format is hh:mm.
To change the date and time, type in the date and time using the alpha numeric keypad.
Date (yyyy-mm-dd)
Time (hh:mm)
Auto Zero
Explanation
Options
By default, the scale automatically zeroes when a load is removed from the weighing platform or
when the indicator first powers up. You may want to disable auto-zeroing, for example:
if you are weighing a number of items together and it might take a while to load the items on
the scale (e.g. weighing wool bales). In this case, the indicator may turn off after a period of
inactivity and when powered up again, you would want the indicator to display the weight of
the load – not zero.
if you are weighing small weights on the platform.
Auto Zero (On)*
With auto zero disabled, you can use
key on page 4.
20
to manually zero the scale when required. See Manual zero
Auto Zero (Off)*
Auto Power Down
Explanation
Options
When Auto Power Down is enabled, the indicator turns itself off after 15 minutes of inactivity in order
to conserve the internal battery.
Auto Power Down (On)*
Auto Power Down (Off)
Record IDs Immediately
Explanation
Options
When Record IDs Immediately is enabled, the indicator will not wait for the stable light to illuminate
or the
button to be pressed before recording. An animal record is created as soon as an ID is
entered or scanned. This feature is useful, for example, when recording animals as they are loaded
onto a truck. In this case, you would allow animals to file past, scan their EIDs or type in their VIDs.
Using this method, you can record the EID or VID, but not both. When Record IDs Immediately is
enabled, you cannot enter a comment.
This option is not suitable for inducting animals. See Weighing animals and entering IDs at the same
time on page 9.
Record IDs Immediately (Off)*
Record IDs Immediately (On)
Damp System
Explanation
Options
Damping is the length of time it takes in order for the indicator to settle on a weight. The damping system selected will depend on what you are
weighing (cattle, sheep, produce, feed etc).
Ideal damping system for weighing cattle
Superdamp III Cattle
Ideal damping system for weighing sheep
Superdamp III Sheep
You can specify the weighing time
Fixed weighing time
The average weight for a specific number of seconds is continuously displayed. Used for non-moving
weights such as produce and feed. You can specify the weighing time.
Averaging
Specify the weighing time if Damp System set to Fixed Weighing Time or Averaging.
Weigh Time (0.1 s – 10 s)
Note: The Weigh Time option is only available if Fixed Weighing Time or Averaging has been selected
as the Damp System setting.
Language
Explanation
Options
The indicator display can be set to English, Spanish, French, German, Portuguese, Chinese or
Japanese.
English
Idioma (Español) = Spanish
Langue (Français) = French
Sprache (Deutsch) = German
Lingua (Português) = Portuguese
Language (简体中文) = Chinese
Language (日本) = Japanese
Bluetooth® Address
The indicator’s Bluetooth address is displayed. This field is read-only.
Software Version
You may need to view the software version for troubleshooting purposes.
21
Updating the software
In order to update the indicator’s software, you need to have EziLink installed on your PC first. For installation instructions, see Installing EziLink on
page 15.
Checking for software updates
1
2
Connect the indicator to the PC and launch EziLink. See Connecting the indicator to a PC using the USB cable on page 11.
In the Help menu, select Check for Updates.
A dialogue box will appear advising whether an update is available. Follow the onscreen instructions to complete the update.
Note: The indicator must be disconnected from the PC before it can be used.
Setting EziWeigh to automatically update the software
You can set up EziWeigh to automatically search for and install software updates each time you connect the indicator to the PC and run EziWeigh.
To set up EziWeigh to automatically update software:
1
Launch EziLink.
2
3
Click
.
In the Updates tab, under Check for Updates, select Automatically.
Manually updating the software
You can download an update file from the Tru-Test website and install it manually. The update file resides within the Tru-Test website
www.tru-test.com
1
2
3
4
5
Download the update file onto your PC. The file format is pew7_vX_XX.bin, where X_XX is the software version.
Connect the indicator to the PC and launch EziLink. See Connecting the indicator to a PC using the USB cable on page 11.
Click Tools/Update firmware in EziWeigh7.
Browse to find the .bin (binary) file containing the software update. Select the .bin file and click Open.
A dialogue box confirms that the software has been updated.
Disconnect the USB cable.
Note: The indicator must be disconnected from the PC before it can be used.
22
Troubleshooting/FAQ
General issues
Problem
Possible cause and solution
Indicator does not switch on.
Indicator switches on but does not stay on.
Check that the indicator is charged (examine the Battery Indicator on the Weight screen, see
Parts of the indicator on page 1).
Battery does not charge
Check all connections between the indicator and the power adaptor or PC.
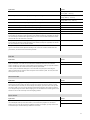
Issues with weighing
Problem
Possible cause and solution
Reading does not return to zero between
animals
Check for binding. If you use chains to prevent crate movement, they must remain slack while the
animal is being weighed.
Ensure that the platform or crate does not touch any other part of the race or concrete pad. This
could be caused by movement of the load bars or a build up of dung, dirt, or stones.
Ensure that the load bar feet are sitting evenly on the pad and the ground is level. There should
be no stones or dung under the rubber feet. All four load bar feet should be firmly in contact
with the ground.
Check pinning / anchoring. Misaligned bolt holes put a residual load on the load bars. It may be
necessary to enlarge the mounting holes in the platform or crate to improve the alignment.
Ensure that the animal does not touch unweighed sides or gates of the enclosure. Even touching
a vertical surface affects the weight reading.
Difference in readings at each end of the
platform.
Readings less than expected
Reading unstable
Zeroing takes a long time
Overload
Underload
bAd.c, ER 05 or Bad code displayed
Check for moisture in the load cell connectors in either the indicator or load bars.
Moisture can be removed from the plugs or caps using methylated spirits, ethyl alcohol or a
suitable electrical contact cleaner. Stronger solvents must not be used as they react with the
plastic.
Check the cable for damage. If the cable is damaged, return it for service.
Otherwise, the problem could be caused by moisture in the load bars or indicator. If available,
check the indicator with another set of load bars.
Try each load bar separately to see if the problem is with one bar.
If moisture is the possible cause of failure, return the indicator for service.
The connected load bar/cell may not be automatically supported by the indicator and may require
calibration. Contact your local representative for details.
23
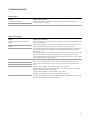
Issues with connecting
Problem
Possible cause and solution
I can’t seem to establish a Bluetooth®
wireless connection between the indicator and
a Tru-Test EID Stick Reader.
Turn on the indicator first, then the stick reader.
The stick reader has connected to another Bluetooth enabled device instead of the indicator.
Turn off the other device and start the pairing procedure again.
The stick reader hasn’t been set to connect via Bluetooth automatically. The stick reader’s
LCD should read BT AUTO. Change the stick reader settings to connect via Bluetooth
automatically (see the EID Stick Reader User Manual for details).
Check that the devices are in close proximity.
Pairing may fail if there are too many Bluetooth enabled devices in the vicinity. Once the
stick reader has found 10 devices, it stops searching. Manually pair the devices (see the EID
Stick Reader User Manual for details).
I can’t seem to establish a Bluetooth wireless
connection between the indicator and another
device.
I need to enter the indicator’s Bluetooth MAC
address to pair with my device
The indicator’s Bluetooth MAC address is displayed in the Setups menu. See Bluetooth® Address
on page 21.
The serial connection between the indicator
and an EID reader is not working
Check cable connections are secure.Tighten, if required.
Check connections at both ends for corrosion or moisture.
If the connected device is not a Tru-Test EID Reader, refer to the EID reader’s own user
manual for further information.
The USB connection between the indicator
and PC is not working
Check cable connections are secure. Tighten, if required.
Try inserting the USB end into another port on your computer.
Disconnect the USB cable, turn the indicator off then on.
Re-install the EziLink software application and the USB drivers.
24
Check the pairing instructions supplied with your device.
Your Bluetooth enabled device must be capable of being the Bluetooth master device. The
indicator is a slave device only.
Caring for the indicator
Do not leave the indicator or load bars in water. Store the indicator in a cool, dry place.
By default, the indicator turns itself off after 15 minutes of inactivity in order to conserve the battery.
Wipe the indicator using a damp cloth, warm water and soap. Other cleaners may damage the case.
Service and warranty information
For service and warranty information, see www.tru-test.com.
Compliance
FCC notice
This device complies with part 15 of the FCC Rules. Operation is subject to the following two conditions: (1) This device may not cause harmful
interference, and (2) this device must accept any interference received, including interference that may cause undesired operation.
This equipment has been tested and found to comply with the limits for a Class B digital device, pursuant to part 15 of the FCC Rules. These limits
are designed to provide reasonable protection against harmful interference in a residential installation.
This equipment generates, uses and can radiate radio frequency energy and, if not installed and used in accordance with the instructions, may
cause harmful interference to radio communications. However, there is no guarantee that interference will not occur in a particular installation. If
this equipment does cause harmful interference to radio or television reception, which can be determined by turning the equipment off and on, the
user is encouraged to try to correct the interference by one or more of the following measures:
Reorient or relocate the receiving antenna.
Increase the separation between the equipment and receiver.
Connect the equipment into an outlet on a circuit different from that to which the receiver is connected.
Consult the dealer or an experienced radio/ TV technician for help.
FCC warning
Note: Users are cautioned that changes or modifications not expressly approved by the party responsible for compliance could void the user's
authority to operate the equipment.
Industry Canada notice
This Class B digital apparatus complies with Canadian ICES-003 (Cet appareil numérique de la classe B est conforme à la norme NMB-003 du
Canada).
This device complies with Industry Canada licence-exempt RSS standard(s). Operation is subject to the following two conditions:
(1) this device may not cause interference, and
(2) this device must accept any interference, including interference that may cause undesired operation of the device.
Tru-Test Limited hereby declares that the EziWeigh7 indicator is in compliance with the essential requirements and other relevant provisions
of Directive 1999/5/EC. The declaration of conformity may be consulted at http://www.tru-test.com/weighing/pdfs/EC_DoC_EW7.pdf.
Specifications
Accuracy
±1 % or 2 resolutions (whichever is greater) with Tru-Test load bars connected.
Power supply
5 V DC (power adaptor).
Operating temperature
-10 to +40 °C (+14 to +104 °F).
Storage temperature
-20 to +35 °C (-4 to +95 °F).
Internal battery run time
Up to 20 hours with 2 load bars connected.
Environmental
IP67 (immersion in up to 1 m (3’) of water).
25
Menus
KEY
Statistics...
Count
Average
Press
to go deeper into a sub-menu
or to select an option (move left to right
on this tree).
Press
to go escape out of a submenu (move right to left on this tree).
Press
or
to scroll through a list
of options
(move up and down on this tree).
… indicates a sub-menu
Total
Min
Max
Low count (only if drafting is
enabled)
Medium count (only if
drafting is enabled)
High count (only if drafting is
enabled)
Other sessions
Clear last record...
Other session 1,
listed by date,
followed by Count
Average
Other session 2 etc
Total
Cleared
Min
Max
Sessions...
Start new
Started
Statistics...
Current session,
listed by date,
followed by Count
Average
Other session 1 etc
Total
Min
Max
Setups...
26
Clear oldest session
Cleared
Clear ALL sessions
Cleared
Clear all sessions
& VID-EID links
Cleared
(see page 2)
Setups...
Draft…
(Sort - USA only)
Drafting (Off)*
Drafting (With ID)
(Sorting (Off) - USA only)
(Sorting (With ID) - USA only)
Low Limit (x)
[type in value for Low Limit]
High Limit (x)
[type in value for High Limit]
Low Direction (<)
[enter draft direction]
Mid Direction (Λ)
[enter draft direction]
High Direction (>)
[enter draft direction]
Release If No EID (Off)*
Release If No EID (On)
Drafting (With No ID)
(Sorting (With No ID) - USA only)
Notes:
(only if Drafting With ID is set to On)
Timeout For No-EID
(only if Release If No EID is set to On)
VID Prefix...
[type in value for Timeout]
Prefix (Off)*
Prefix (On)
Prefix (x)
[type in value for Prefix]
Auto Inc VID (Off)*
Auto Inc VID (On)
Repeat (Off)*
Repeat (On)
Backlight (Off)*
Backlight (Low)
Backlight (High)
Resolution (0.1)
Resolution (0.2)
Resolution (0.5)*
Auto record (Off)*
Auto record (With ID)
Auto record
(With No ID)
Date (yyyy-mm-dd)
[type in value for Date]
Time (hh:mm)
[type in value for Time]
Auto Zero (On)*
Auto Zero (Off)
Auto Power Down (On)*
Auto Power Down (Off)
Record IDs Immediately
(Off)*
Record IDs Immediately (On)
Damp System (Superdamp III
(Cattle))*
Damp System (Superdamp III
(Sheep))
Damp System
(Fixed weighing time)
Damp System
(Averaging)
Weigh Time (0.3 s)
Weigh Time (0.5 s)**
Langue (Français)
Weigh Time (0.1 s)
(only if Damp System is set to Fixed
Weighing Time or Averaging)
Weigh Units (lb)*
(USA only)
Weight Units (kg)
(USA only)
Language (English)*
Idioma (Español)
Default settings are marked *
For default settings marked ** (Damp System Settings):
0.5 s is default when Damp System is set to Fixed Weighing Time.
1 s is default when Damp System is set to Averaging.
Resolution (1)
Resolution (2)
Resolution (5)
Weigh Time (1 s)**
Weigh Time (1.5 s)
Weigh Time (2 s)
Weigh Time
(2.5 s, 3 s, 4 s, 5 s, 7s or
10 s)
Sprache (Deutsch)
Lingua (Português)
Language (简体中文)
Language (日本)
BT Address
SW Version (0.01)
27
Index
Auto Increment VIDs, 19
Menu button, 4
Auto Power Down, 21
Parts of the indicator, 1
Auto Zero, 20
Prefix VIDs, 19
Automatic recording, 20
Record IDs Immediately, 21
Backlight, 20
Record key, 4
Battery charging, 2
Repeat comment, 19
Bluetooth® address, 21
Resolution, 20
Bucket file. See Transferring a list of animal IDs to the indicator
Servicing, 25
Caring for the indicator, 25
Session records, managing, 14
Charging the indicator. See Battery charging
Sessions, deleting, 14
Comment, entering a, 4
Sessions, starting a new session, 14
Compliance, 25
Software version, 21
Connecting the indicator to other devices, 10
Sorting example, 8
Damp System, 21
Sorting, setting up, 18
Data screen, 4
Specifications, 25
Date and Time setting, 20
Stable light, 4
Deleting all data on the indicator, 14
Statistics, viewing, 13
Deleting all data on the indicator using EziLink, 17
Transferring a list of animal IDs to the indicator, 15
Deleting the last record, 14
Transferring recorded data from the indicator to a PC, 16
Drafting example, 8
Troubleshooting, 23
Drafting, setting up, 18
Updating the software, 22
EziLink, installing, 15
User interface, 4
EziLink, using, 15
Warranty, 25
Frequently asked questions, 23
Weighing animals and drafting (sorting) them by weight, 8
Inducting animals by recording animal IDs without weighing, 9
Weighing animals and entering IDs at the same time, 7
Installing the indicator, 3
Weighing animals without entering IDs, 6
Keypad, 4
Weight gain, viewing, 5
Language, 21
Zero key, 4
Maintenance. See Caring for the indicator
Zeroing the scale manually, 4
Map of the menus, 26
28