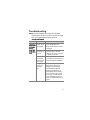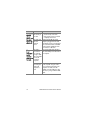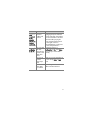
1
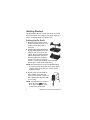
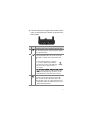
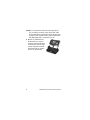
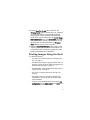
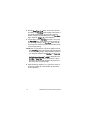
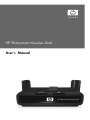
HP Photosmart M-series dock
User's Manual
HP Photosmart
M-series dock
User’s Manual
3
Legal Notices
© Copyright 2004 Hewlett-Packard Development Company, L.P.
The information contained herein is subject to change without notice.
The only warranties for HP products and services are set forth in the
express warranty statements accompanying such products and
services. Nothing herein should be construed as constituting an
additional warranty. HP shall not be liable for technical or editorial
errors or omissions contained herein.
SD logo is a trademark of its proprietor.
Printed in China
4
HP Photosmart M-series dock User’s Manual
Table of Contents
Getting Started . . . . . . . . . . . . . . . . . . . . . . . . . . . . 6
Setting Up the Dock . . . . . . . . . . . . . . . . . . . . . . 6
Dock Lights and Buttons . . . . . . . . . . . . . . . . . . . 9
Transferring Images to a Computer Using the Dock . . 10
Printing Images Using the Dock . . . . . . . . . . . . . . . . 11
Displaying Images on a TV Using the Dock . . . . . . . 13
Technical Support . . . . . . . . . . . . . . . . . . . . . . . . . 14
Troubleshooting . . . . . . . . . . . . . . . . . . . . . . . . . . . 15
Purchasing Camera Accessories . . . . . . . . . . . . . . . 18
5
Getting Started
The HP Photosmart M-series camera dock allows you to easily
download images to your computer, print images directly to a
printer, and display images on a television (TV).
Setting Up the Dock
1 Attach the dock insert that came in
the box with either your dock or your
camera to the top of the dock as
shown here.
2 Insert the rechargeable Nickel Metal
Hydride (NiMH) batteries that came
in the box with your dock into your
camera. The dock will recharge these
batteries whenever the camera is in
the dock (regardless of whether the
camera is on or off). As long as the
camera is in the dock, the batteries will be recharged
periodically to compensate for self-discharge.
NOTE The first time that you use the rechargeable batteries,
be sure that you fully charge them in the camera before
using the camera. It may take up to 15 hours to fully
charge the batteries.
3 Plug the power cord into the HP AC
power adapter. If more than one
power cord is in the box, use the cord
that is appropriate for electrical outlets
in your country.
NOTE The dock does not work without
power. Be sure to ONLY use the
HP AC power adapter and power
cord that came with the dock.
6
HP Photosmart M-series dock User’s Manual
4 Connect the HP AC power adapter and the USB and audio/
video (TV) cables to the back of the dock as explained in the
following table.
3
2
1
# Icon Description
1
Connect the HP AC power adapter to the back of the
dock, and plug the power cord for the power adapter
into an electrical outlet.
2
Connect the dock to your computer or printer using
the appropriate USB cable. You cannot connect the
dock to both a computer and a printer at the same
time.
z To connect the dock either to a computer,
or to a printer displaying the PictBridge
logo (see logo on right), use the USB cable
that came in the box with your dock or
your camera.
z For HP Photosmart M305, M307, and M407 cameras
only: To connect the dock to an HP printer that does
not display the Pictbridge logo (see above), use the
USB cable that came in the box with your camera.
3
Connect the dock to a TV using the audio/video cable
that came in the box with your dock. Connect the
yellow connector on the audio/video cable to the
video input jack on your TV, and the red connector on
the audio/video cable to the audio input jack on your
TV. (See the following NOTE.)
7
NOTE If you cannot locate video and audio input jacks on
your TV to fit the connectors on the audio/video cable,
you should be able to use the video and audio input jacks
on either a video cassette recorder (VCR) or digital video
disk (DVD) player that is connected to your TV.
5 Remove any cables that may
be attached to your camera.
Insert the camera into the dock
as shown here. The back of the
camera must point toward the
front of the dock. The camera
will turn on automatically.
8
HP Photosmart M-series dock User’s Manual
Dock Lights and Buttons
1
2
3
#
Name
Description
1
Power
light
Shows the power/battery charging status. If this
light is:
z On—The camera is in the dock, the dock has
power, and the camera batteries are fully charged
(or are not rechargeable).
z Blinking—The camera is in the dock, and the dock
is charging the camera batteries.
z Off—The dock has no power or there is no camera
in the dock.
2
Activates the connection to the computer or the
printer, depending on which of those devices is
Save/Print connected to the dock. If the light above this
button button is:
z On—The dock is connected to the computer or
printer.
z Blinking—There is an active connection between
the camera and the computer or printer.
z Off—The dock is not connected to the computer or
printer.
9
#
Name
3
TV button
Description
Activates the TV connection. If the light above this
button is:
z On—The dock is connected to the TV.
z Blinking—An audio/video signal is being sent to
the TV.
z Off—The dock is not connected to the TV.
Transferring Images to a
Computer Using the Dock
1 Confirm the following:
• The dock insert is attached to the top of the dock. (See
step 1 on page 6.)
• The HP AC power adapter is plugged into the dock, and
the power cord for the power adapter is plugged into an
electrical outlet. (See step 4 on page 7.)
• The USB cable is connected between the dock and your
computer. (See step 4 on page 7.)
• The camera is inserted into the dock. (See step 5 on
page 8.)
• The HP Image Zone software is installed on your
computer. (See your camera User’s Manual.)
• If you are using a Macintosh computer, the camera’s USB
Configuration is set to Disk Drive in the Setup menu. (See
your camera User’s Manual.)
10
HP Photosmart M-series dock User’s Manual
2 Press the Save/Print
button on the dock. The
HP Image Transfer software will launch on your computer. If
you have set the software to automatically transfer the
images from the camera, the images will automatically
transfer to the computer. Otherwise, in the Transfer Images
from Camera/Card screen, click Start Transfer. The images
are transferred to the computer, and then if there are any
still images that were previously selected for HP Instant
Share destinations, those actions are started.
3 When the Image Action Summary screen appears on the
computer, your images have been saved and shared. You
can leave the camera in the dock to recharge the camera
batteries (if the batteries are rechargeable).
Printing Images Using the Dock
1 Confirm the following:
• The dock insert is attached to the top of the dock. (See
step 1 on page 6.)
• The HP AC power adapter is plugged into the dock, and
the power cord for the power adapter is plugged into an
electrical outlet. (See step 4 on page 7.)
• The USB cable is connected between the dock and your
printer. (See step 4 on page 7.)
• The camera is inserted into the dock. (See step 5 on
page 8.)
• The printer is turned on, and paper is loaded in the
printer. Refer to your printer user’s manual for printer
setup information.
• If you are using a PictBridge printer, the camera’s USB
Configuration is set to Digital Camera in the Setup menu.
(See your camera User’s Manual.)
11
2 Press the Save/Print
button on the dock to start the
print dialog. The Print Setup menu displays on the camera. If
you already selected images to print in the camera, the
number of images selected will be shown in the Print Setup
menu. Otherwise, Images: ALL will be displayed.
3 If all the settings in the Print Setup menu look correct, press
the Menu/OK button on the camera to begin printing. Or
you can change settings in the Print Setup menu using the
arrow keys on the camera, then follow the instructions on the
screen to begin printing.
NOTE There is a print preview in the lower right-hand corner
of the Print Setup screen showing the page layout that will
be used for printing images. This print preview updates as
you change the settings for the Print Size and Paper Size.
For PictBridge printers only: If default is displayed for the
Print Size or Paper Size, then no print preview is shown.
The printer will automatically determine the page layout
that will be used for printing images.
4 When the printing completes, you can leave the camera in
the dock to recharge the camera batteries (if the batteries
are rechargeable).
12
HP Photosmart M-series dock User’s Manual
Displaying Images on a TV
Using the Dock
1 Confirm the following:
• The dock insert is attached to the top of the dock. (See
step 1 on page 6.)
• The HP AC power adapter is plugged into the dock, and
the power cord for the power adapter is plugged into an
electrical outlet. (See step 4 on page 7.)
• The audio/video cable is connected either between the
dock and your TV, or between the dock and a VCR or
DVD player that is connected to your TV. (See step 4 on
page 7.)
• The camera is inserted into the dock. (See step 5 on
page 8.)
2 Your camera is set by default to send an NTSC video signal
to a TV. The NTSC format is used primarily in North
America and Japan. The other format, PAL, is used primarily
in Europe. If your region accepts only a PAL video signal,
you must change the camera’s TV Configuration to PAL in
the Setup menu. (See your camera User’s Manual.)
3 Your camera will be the source for the TV signal (just like a
VCR, DVD, or a camcorder), so you must set the TV to take
video input from an external video source (your camera)
instead of from the antenna or cable TV. Refer to the TV
user’s manual for directions on how to do this.
13
4 Press the TV
button on the dock. The first image in the
camera is displayed on the TV. Press the Playback
button
on the camera to start an automatic slideshow of all the
images in the camera, playing any attached audio clip or
video clip, and then changing to the next image. Or you
can use the
buttons on the camera to manually
navigate through a slideshow of the images in the camera.
NOTE The Image Display on the camera turns off when the
camera is connected to a TV. However, you can still use
the camera’s Playback Menu and HP Instant Share Menu,
because the menus will display on the TV screen.
5 To end the slideshow, press the TV
button again. You
can leave the camera in the dock to recharge the camera
batteries (if the batteries are rechargeable).
Technical Support
Please refer to your camera User's Manual for support
procedures and contact information.
HP online service and support is your easy, fast, and direct web
resource for product assistance, diagnostics, and driver
downloads. It is your one-stop source for all service and
support needs. Get award-winning assistance, 24x7 at:
www.hp.com/support
14
HP Photosmart M-series dock User’s Manual
Troubleshooting
NOTE For more information about solutions to problems
mentioned here, as well as any other issues that you might
have, see the HP Customer Support website at:
www.hp.com/support
Problem
Possible cause
The camera
batteries will
not charge,
and the
power light
on the dock
is on.
Batteries in the Install rechargeable NiMH
camera are not batteries. PhotoLithium and
rechargeable. ordinary alkaline batteries cannot
be recharged.
The camera is
not securely in
the dock.
Solution
z Make sure the dock insert is
placed securely on the dock.
z Make sure the camera is inserted
completely into the dock.
The camera
Make sure the camera has been
has not been
left in the dock for at least 15 hours
left in the dock to charge the batteries completely.
long enough.
Battery voltage
is too low for
charging to
start.
The camera will not attempt to
charge batteries that may be
damaged or over-discharged.
Remove the batteries from the
camera and charge them in an
external battery charger, then try
them in the camera again. If this
does not work, it is likely that one
or more of the batteries are bad.
Purchase new NiMH batteries and
try again.
15
Problem
Possible cause
Solution
The camera
batteries
will not
charge, and
the power
light on the
dock is off.
The camera is
not securely in
the dock.
z Make sure the dock insert is
The dock does
not have
electrical
power.
Confirm that the HP AC power
adapter is plugged into the dock,
and that the power cord is plugged
into an electrical outlet. Check that
the dock power light blinks when
the camera is in the dock.
The camera
is not
recognized
by the
computer
when it is in
the dock.
The dock is
Connect the USB cable directly to
connected to
one of the USB ports on the back of
the computer
the computer.
through a USB
hub or the USB
port on the
front of the
computer.
The USB cable
connecting the
dock to the
computer is
bad.
16
placed securely on the dock.
z Make sure the camera is inserted
completely into the dock.
Try connecting the camera directly
to the computer using the cable
that is connecting the dock to the
computer. If it works, then the
problem is not the cable. If it does
not work, try using a different USB
cable.
HP Photosmart M-series dock User’s Manual
Problem
Possible cause
Solution
The camera
is not
recognized
by the
computer
when it is in
the dock
(continued).
There is a
functional
problem with
the dock.
Run the dock functionality test by
unplugging the power cord from
the back of the dock, then holding
down the two buttons on the front
of the dock while you plug the
power cord back into the dock. If
the dock lights come on in
5 seconds (blinking or solid), then
the dock is fully functional.
Images will
not display
on the TV.
The TV accepts
PAL video
format, but the
camera is set to
NTSC video
format.
Change the camera’s TV
Configuration to PAL in the Setup
menu. (See your camera User’s
Manual.)
The TV is not
set to the
correct input
mode.
Check your TV user’s manual to set
the TV to accept video or input
mode.
Audio and
video cables
are switched.
Try switching the audio and video
cables on the back of the TV.
17
Purchasing Camera Accessories
For information about purchasing accessories, go to:
z
www.hp.com/go/myhpcamera (US)
z
www.hp.ca/myhpcamera (Canada)
z
www.hp.com (all other countries)
To purchase accessories, visit your local retailer or order
online at:
z
www.hpshopping.com (US)
z
www.hpshopping.ca (Canada)
z
www.hp.com/eur/hpoptions (Europe)
z
www.hp.com/apac/homeandoffice (Asia Pacific)
Some available accessories are as follows:
z
HP Photosmart M-series quick recharge kit—L1815A (Not
available in Latin America.)
z
HP Photosmart 3.3V AC power adapter—C8912B (Not
available in Latin America)
z
HP Photosmart SD Memory cards (North America only)
• HP Photosmart 64 MB SD memory card—C8896A
• HP Photosmart 128 MB SD memory card—C8897A
• HP Photosmart 256 MB SD memory card—L1813A
• HP Photosmart 512 MB SD memory card—L1814A
z
HP Photosmart M-series leather case—L1816A
z
www.casesonline.com—Go to www.casesonline.com to
design your own custom case to fit your HP Photosmart
M-series camera. Choose the style, material, and color for
your camera case.
18
HP Photosmart M-series dock User’s Manual