1
Introduction
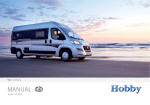
Dear Motor Home Owners,
We would like to congratulate you on the purchase of your new HOBBY motor home and
hope that you will always enjoy traveling with it.
Please read this manual carefully, even if you have been driving a motor home for a longer
period of time. It will help you to avoid operating errors and damage to the vehicle and its
equipment. Correct handling of all technical details will increase your driving comfort and
maintain the value of your motor home.
We wish you and your companions many enjoyable trips and hope you always have a safe
journey.
Your
HOBBY Motor Home Plant
Ing. Harald Striewski GmbH
00-1
Introduction
Chapter 1: Introduction
Chapter: Wheels, Tyres, Brakes
1.1
General information................................................ 01-1
4.1
Wheels.................................................................... 04-1
1.2
Before taking your first drive................................... 01-1
4.2
Tyres........................................................................ 04-1
1.3
Designations in the operating instructions.............. 01-2
4.3
Inflation pressure..................................................... 04-2
4.4
Tread depth............................................................. 04-2
4.5
Wheel rims.............................................................. 04-3
4.6
Snow chains............................................................ 04-3
4.7
Spare tyre................................................................ 04-3
4.8
Tyre repair kit........................................................... 04-4
4.9
Changing the tyre.................................................... 04-7
4.10
Brakes..................................................................... 04-7
Chapter 2: Safety
2.1
General information................................................. 02-1
2.2
Fire protection......................................................... 02-1
2.3
Road safety............................................................. 02-2
2.4
What to observe before taking your first drive........ 02-2
2.5
Before and while driving......................................... 02-3
2.6
Notes for your journey............................................ 02-5
2.7
Tools on board........................................................ 02-9
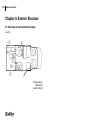
Chapter 5: Exterior Structure
2.8
Emergency equipment............................................ 02-9
5.1
Overview of tank and service flaps......................... 05-1
2.9
Maximum speeds.................................................. 02-11
5.2
Ventilation................................................................ 05-2
2.10
When you stop driving.......................................... 02-14
5.3
Opening and closing doors and flaps..................... 05-4
5.4
Exterior mirror......................................................... 05-8
5.5
Condensation in headlight systems........................ 05-8
Chapter 3: Chassis
3.1
Chassis................................................................... 03-1
3.2
Loading................................................................... 03-1
3.3
Leveling supports.................................................... 03-7
6.1
Safety instructions.................................................. 06-1
3.4
Entrance steps........................................................ 03-8
6.2
HOBBY on-board control panel.............................. 06-1
3.5
Externally mounted constructions.......................... 03-9
6.3
Electric power supply.............................................. 06-6
6.4
Function of the power generating unit.................... 06-7
Chapter 6: Electrical Installations
Introduction
6.5
Caravan battery..................................................... 06-10
Chapter 9: Gas
6.6
Fuse protection of the electric system.................. 06-11
9.1
General safety rules for using LPG fittings............. 09-1
6.7
Interior circuit diagrams........................................ 06-13
9.2
Gas supply.............................................................. 09-3
6.8
Subsequently installed devices............................. 06-29
9.3
Heating.................................................................... 09-5
9.4
Refrigerator............................................................. 09-7
9.5
Gas cooker.............................................................. 09-7
Chapter 7: Interior of the Caravan
7.1
Opening and closing doors and flaps..................... 07-1
7.2
Windows................................................................. 07-2
Chapter 10: Accessories
10.1
7.3
Caravan skylight...................................................... 07-4
7.4
Remi-Star sunroof and blind................................... 07-5
7.5
Skylight in washroom............................................ 07-10
7.6
Dimming system for driver's cabin....................... 07-10
7.7
Seating chests and setting up beds..................... 07-12
7.8
Overview of seating arrangements....................... 07-13
7.9
Overview of day and night positions..................... 07-13
7.10
Seats in the caravan............................................. 07-14
Chapter 12: Sanitation and Environmental Protection
7.11
Seatbelts in the caravan....................................... 07-14
12.1
Traveling in the environment................................... 12-1
7.12
Seats in the driver's cabin..................................... 07-15
12.2
Returning the vehicle.............................................. 12-3
Towbar coupling...................................................... 10-1
Chapter 11: Maintenance and Care
11.1
Maintenance........................................................... 11-1
11.2
Airing....................................................................... 11-1
11.3
Care......................................................................... 11-2
11.4
Operating in winter.................................................. 11-4
Chapter 8: Water
Chapter 13: Technical Data............................................. 13-1
8.1
Water supply........................................................... 08-1
13.1
Weights acc. to 92/21/EWG, 2007 season............. 13-1
8.2
Flushing toilet . ....................................................... 08-4
13.2
Inflation pressure of tyres....................................... 13-2
Hot water supply..................................................... 08-9
Index .................................................................................. I-1
8.3
Appendix.............................................................................A-1
00-2
01-1
Introduction
Chapter 1: Introduction
Our motor homes are continuously being further developed
and for this reason we must reserve the right to make changes
to the equipment, shape and technology. Certain kinds of
accessories are also described in this user manual that are
not part of the standard scope of delivery. For this reason, no
claims may be asserted against HOBBY based on the contents of this user manual. Those accessories that are available at
the time of going to print are described here. They have been
applied on a par for all floor plans. Please note that it was
not possible to describe all of the individual variations here. If
you have any special questions concerning accessories or the
technology of the vehicle, your dealer will be happy to answer
them.
1.1 General information
Your HOBBY motor home has been built in accordance with
the latest technology and approved safety regulations. Despite
all precautionary measures, however, it is possible that passengers may be hurt or the motor home damaged if the safety instructions in this user manual and the warning stickers
placed throughout the motor home are not observed. Please
use the motor home only when it is technically in top condition.
Any defects that affect the safety of passengers or the motor
home should be remedied immediately by trained personnel.
The brake system and the gas system should only be checked
and repaired by an authorised workshop.
Please ensure that all of the deadlines for checking equipment
and inspections are met.
1.2 Before taking your first drive
Please do not consider this manual to be just a means of reference, but familiarize yourself thoroughly with it before taking
your first drive.
Fill out the guarantee cards in the different manuals for the installed equipment and fittings and send them to the manufacturers.
This will ensure guarantee claims for any of the equipment.
In accordance with guarantee conditions, HOBBY's dealer
will give you a 5-year guarantee on the consistency of the
motor home. Your dealer will give you a guarantee booklet,
“5 Years‘ Guarantee on Consistency“ when you pick up
your vehicle.
Note: If a consistency test has not been carried out, you will
forfeit any claims for a 5-year guarantee on consistency.
Introduction
Please note the following before operating the vehicle:
• Check the tyre pressure.
Please refer to the section on tyre pressure.
• Load the vehicle correctly. Keep to the technically permissible overall mass.
Please refer to the section on loading.
• Load the batteries fully before each journey
Please refer to the section on the starter and accommodation
batteries.
• If the temperature outside is below 0° C, heat the vehicle
before filling up the water system.
Please refer to the section on water supply/filling the fresh
water tank.
• Tighten the wheel nuts after having driven the first
50 km.
• Switch off all fitted devices that operate on gas before
filling the petrol tank.
• Tightly strap gas bottles in the gas bottle box during
transportation.
• When camping in winter, heat the vehicle at night if there
is danger of frost.
Please refer to the section on operating in winter/heating.
• Keep compulsory ventilation clear.
Please refer to the section on windows/roof fan/airing.
• When the vehicle is not in use, empty the entire water
system and leave the water faucets open in a neutral
position. This prevents the water system from being
damaged by frost.
Please refer to the section on emptying the water system.
1.3 Designations in the operating
instructions
This manual explains the motor home in the following manner:
Texts and illustrations
Texts that refer to illustrations are found directly below the
illustrations.
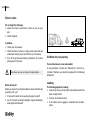
Details in illustrations (here: entrance) have been given item
numbers (1).
1
Lists
Lists are given in the form of key words and shown as bullet
points using “-“.
01-2
01-3
Introduction
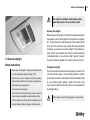
Handling instructions
Handling instructions are also given in the form of key words
beginning with the symbol “•“.
Notes
Notes point out important details that ensure your motor
home and its fittings will function perfectly. Please remember that there may be some differences in description to the
various kinds of equipment that can be supplied.
Warnings
Warnings make you aware of dangers that may lead to
material being damaged or even people being hurt if they
are not observed.
Environmental Tips
Environmental tips give you possibilities for lessening the
impact on the environment.
Introduction
Safety
02-1 Safety
Chapter 2: Safety
2.2 Fire protection
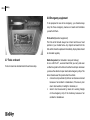
2.1 General information
Precautions against fire
• Never leave children alone in the vehicle.
• Keep inflammable materials away from all heating and cooking devices.
• Any changes to the electric system, gas system or built-in
devices may only be carried out by an authorised workshop.
• Install a fire extinguisher next to the main entrance.
• Familiarise yourself with the instructions on the fire extinguisher.
• Store a fire blanket near the cooker.
• Do not block any escape routes.
• Familiarise yourself with all safety measures set up on the
property.
• Ensure that there is sufficient ventilation. Never cover builtin compulsory ventilation (skylights with compulsory ventilation or roof fan). Keep compulsory ventilation free of snow
and leaves - danger of suffocation!
• Note the headroom of the entrance door and the driver's
door.
• Operating and user instructions for built-in equipment (refrigerator, heating, cooker, etc.) as well as for the basic vehicle
must be observed at all times.
• If accessories or optional equipment is to be installed, this
may change the measurements, weight and road performance of the motor home. Some accessories must be registred and entered in the vehicle's papers.
• Use only tyres and rims that have been approved for your
motor home. Please refer to the vehicle's registration papers
for information on tyre and rim sizes.
• Always use the parking brake whenever you park the motor
home.
Fighting fire
• Immediately evacuate all passengers.
• Shut the valves of the gas bottles.
• Turn off the electric supply.
• Sound the alarm and call the fire department.
• Only fight the fire yourself if you can do so without risk.
Safety
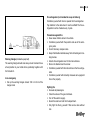
2.3 Road safety
• Before driving, check that the signal and light equipment,
steering and brakes all function properly.
• If the vehicle has been standing for a longer period of time
(approx. 10 months) have an authorised workshop check
the brake system and the gas system.
• Completely open and fasten the dimming system on the
front and side windows.
• Passengers may not stay in the alcoves while driving.
• In winter, the roof must be cleared of snow and ice before
driving.
• Regularly check the tire pressure before driving. False tire
pressure can cause excessive wear, damage to the tires or
even lead to a burst tire.
• Children's seats may only be mounted on seats that have a
three-point seat belt installed by the factory.
• Turn the reversible seats in the direction of travel and lock
them. The seats may not be turned while driving.
2.4 What to observe before taking your first drive
Vehicle registration
Every vehicle that drives on public roads must be registered. This also applies to your new motor home. Apply for registration
at your local Driver and Vehicle Licensing Agency.
You must show the following when applying for registration:
-
registration document, Part II
-
insurance coverage
-
proof of personal identity or confirmation of registra-
tion by a local authority
-
if applicable, power of attorney to register the
vehicle.
General inspection
In accordance with Section 29 of the German Road Traffic
Licensing Regulations, your motor home must undergo a general inspection every two years during the first 72 months, after
which a general inspection must be carried out every year. This
general inspection can be carried out by the German Technical
Surveyance Association (TÜV), the German Motor Vehicle Surveyance Association (DEKRA) or an officially approved expert.
02-2
02-3
Safety
For each general inspection you must show the following:
-
registration document, Part I
-
valid gas test certificate for gas installation. The initial certificate will be given to you together with the registration document.
Any changes made to the vehicle that underlie German
Road Traffic Licensing Regulations must be officially
authorised!
If you have any further questions or difficulties, your authorised Hobby dealer will always be available to assist you!
2.5 Before and while driving
As the owner / driver of the vehicle, you are responsible for the
state of the vehicle. Please observe the following points:
Exterior
Check the exterior of the vehicle and carry out the following
preparations before driving:
Preparing the vehicle
• If the leveling supports have been extended, retract them.
• Close all of the windows in the motor home as well as the
skylights in the roof.
• Close and secure the entrances to the caravan and the
service flaps.
Safety
• Close the tap for the sewage tank.
• Close all taps and quick-action stop valves for gas devices. The only exception is for heaters that are to be used while
driving.
• If necessary, remove any electric cables from the exterior
socket.
• If necessary, retract the TV antenna as for as possible.
• If necessary, secure any loads on the roof, ensuring that they
will not slide.
• The same applies for bicycles.
• Turn off the light in the tent in front of the motor home.
Interior
Some preparations must also be carried out inside the mobile
home.
Preparing the interior
• Sort loose objects and stow them in the compartments.
• Place heavy objects in the lower compartments.
• If necessary, switch refrigerator to 12 V operation.
• Ensure that no liquids, including those in the refrigerator, will
leak.
• Secure gas bottles.
• Brace the safety device for the table.
• Firmly close doors (including refrigerator door), drawers and
flaps.
• Heavy and/or voluminous objects (e.g. TV, radio) must be
secured before driving.
• Completely open and secure the optional cockpit dimming
system.
Do not overload the vehicle! It is imperative that you note the
permissible axle loads, the technically permissible overall
mass as well as the permissible height, width and length
of the mobile home.
Place a note with all important measures and weights in a
visible place in both the caravan and the driver‘s cabin.
02-4
02-5 Safety
Driver‘s cabin
Do not forget the following:
• Adjust the interior and exterior mirrors as well as your
seat.
• Check the lights.
In addition:
• Check your tire pressure.
• Check all liquids, such as oil, cooling water, brake fluid and
windscreen cleaning liquid, and fill them up if necessary.
• Turn off all gas devices (heating, refrigerator, etc.) before putting petrol in the tank.
Note: Never use your cell phone at the petrol station.
Before driving off
Before you drive off you should be able to answer the following
questions with “yes“:
• Is there a first-aid kit and a warning triangle on board?
• Are all the lights working (headlights, dipped headlights,
brake lights and blinkers)?
2.6 Notes for your journey
Your mobile home is not an automobile!
In many situations, it reacts very differently to a “normal“ automobile. Therefore, you should be prepared for the following
differences:
Loading
The following applies for loading:
• Load evenly. Heavy or bulky objects should be placed in the
lower compartments!
• Tie down roof loads securely!
• In the interior, store luggage in cupboards and compartments.
Safety 02-6
• Secure all doors and flaps.
• After you have finished loading, check the overall weight on
a public scales.
Do not exceed axle loads and permissible overall weight.
Roof load (50 kg maximum)
The height of the mobile home may vary from one journey to
the next due to different roof loads.
The following applies for roof loads:
• Add the measurement of the roof load to the height of the
mobile home.
• Place a note visibly in the driver's cab giving the overall
height. This saves having to calculate the height when driving
under bridges and through tunnels.
Braking
The following applies for braking:
• Note the longer length of the brake path, especially on wet
roads.
• When driving downhill, select a gear that is not higher than
when driving uphill.
Shunting
Your mobile home is far larger than an automobile.
The following applies for shunting:
• Even if the exterior mirrors have been set correctly, there is
an extremely large blind angle.
• Use assistance from other persons to park in places where
you have a difficult view.
Passenger safety
The following applies while driving:
• Only those seats may be used by passengers that are equipped with a safety belt.
• While driving, passengers may note stay in the alcove or the
beds.
• Passengers must remain in their seats with their seat belt
on!
• Do not open the door latch!
• No extra passengers may remain in the vehicle!
02-7
Safety
Driving
Driving in reverse
Take a trial drive before leaving on your first large journey in
order to familiarize yourself with the mobile home. Remember
to practise driving backwards.
The following applies for driving in reverse:
• Use the assistance of a person outside the vehicle when
driving in reverse.
The following applies for driving:
• Do not underestimate the length of the mobile home.
• Be careful when driving into inner courtyards and through
entrance gates.
• The mobile home may start to swing from side to side in
cross-winds, on wet or icy roads.
• Adjust your speed to road and traffic conditions.
• Long descents with a slight gradient can become dangerous. Adjust your speed from the very beginning to allow you to
speed up if necessary without endangering other automobiles.
• As a general rule, never drive faster downhill than uphill.
• The mobile home may be caught up in a slipstream when
overtaking or being overtaken by lorries with trailers or buses.
This effect is counteracted by lightly counter-steering.
Driving through curves
Due to its height, a mobile home begins to sway more quickly
than an automobile.
The following applies for driving through curves:
• Never drive too quickly into a curve!
Driving economically
The motor of your mobile home has not been designed to drive
constantly under a full load.
The following applies when driving:
• Do not keep your foot down on the gas!
• The final 20 km/h before reaching top speed require up to
50 % more fuel!
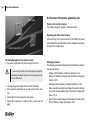
Getting petrol
A number of devices that use an open flame have been built
into your mobile home.
Safety
The following applies when getting petrol:
• Turn off all gas devices (heating, refrigerator, etc.)!
• Turn off all cell phones!
• Never get anything other than diesel fuel.
• Never mistakenly fill the fresh water tank with fuel.
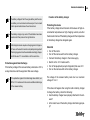
Saving energy in winter
It is very easy to save energy inside your mobile home. This
applies especially to heating in winter.
The following applies for saving energy:
• Meter the exact use of ventilation in the vehicle and the
heating valve.
• Install winter mats on the inner sides of the driver‘s cabin
and the windscreen (not included in scope of delivery).
• Install an insulation mat between the driver‘s cabin and the
caravan (not included in scope of delivery).
• Use aluminium-coated window mats and window blinds.
These offer protection against both the cold and the heat.
• Open the door as little and as briefly as possible.
• When camping in winter, it is possible to put up a small tent
in front of the vehicle as protection against the cold.
02-8
02-9
Safety
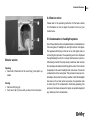
2.8 Emergency equipment
To be prepared in case of an emergency, you should always
carry the three emergency devices on board and familiarize
yourself with them.
First-aid kit (standard equipment)
The first-aid kit should always be at hand and have a fixed
position in your mobile home. Any objects removed from the
first-aid kit should be replaced immediately. Expiry dates should
be checked regularly.
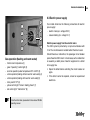
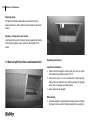
2.7 Tools on board
Tools on board are located inside the entrance step.
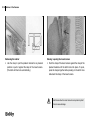
Reflective jacket (not included in scope of delivery)
In acc. with EN 471, we recommend that you carry and wear
a reflective jacket with white retro-reflective stripes whenever
you leave the vehicle on open roads and emergency strips. The
driver should wear this jacket when the vehicle
• comes to a stop outside city limits on an obscure rural road
because of an accident or breakdown, if the view is poor
due to bad weather, in twilight or darkness, or
• when it must be secured by means of a warning triangle
on the emergency strip of the motorway because of an
accident or breakdown.
Safety
Fire extinguisher (not included in scope of delivery)
Familiarize yourself with how to operate the fire extinguisher.
Pay attention to the date when it must be refilled! The fire extinguisher must be checked every 2 years.
100 m
Warning triangle (standard equipment)
The warning triangle should also always be at hand and have
a fixed position in your mobile home, preferably together with
the first-aid kit.
In an emergency
• Set up the warning triangle at least 100 m in front of the
danger zone!
Precautions against fire
• Never leave children alone in the vehicle.
• Familiarize yourself with the position and use of the emergency exits.
• Do not block any escape routes.
• Keep inflammable materials away from all heating and cooking devices.
• Install a fire extinguisher next to the main entrance.
• Store a fire blanket near the cooker.
• Familiarize yourself with the instructions on the fire extinguisher.
• Familiarize yourself with all safety measures set up against
fire on the property.
Fighting fire
• Evacuate all passengers.
• Close the valves of the gas containers.
• Turn off the electric supply.
• Sound the alarm and call the fire department.
• Only fight the fire by yourself if this can be done without
risk.
02-10
02-11 Safety
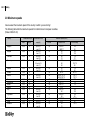
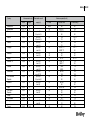
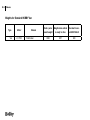
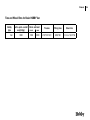
2.9 Maximum speeds
Never exceed the maximum speed of the country in which you are driving!
The following table lists the maximum speeds for mobile homes in European countries.
(Status: 2000-01-03)
Country Measurements (m)
width length
Permissible overall weight (t)
in cities
Belgium
2,50
12
up to 7,5
50
over 7,5 Bulgaria
2,60
11
up to 7,5
50
over 7,5 Denmark
2,55
12
up to 3,5
50
over 3,5 Germany
2,55
12
up to 3,5
50
3,5 up to 7,5 over 7,5 Estonia
2,50
12
up to 3,5
50
over 3,5 Finland
2,60
12 50
France
2,50
12
up to 3,5
50
over 3,5 Greece
2,50
12 50
Great Britain
2,55
12 48
Ireland
2,50
12 48
Iceland
2,55
12 50
Italy
2,55
12
up to 3,5
50
over 3,5 Yugoslavia
2,50
12
up to 3,5
60
over 3,5 Croatia
2,55
12 50
Latvia
2,50
12
up to 7,5
50
Lithuania
2,50
12
up to 3,5
50
over 3,5 Maximum speed (km/h)
outside cities
on motorways
90/120 *1
60/90 *1
90
70
80
70
100
80
60
90
70
80 *15
90 *3/110 *1;3
80 *3/100 *1;3
110/120 *1
96/112 *1
96/112 *1
90 *4
90/110 *1
80
80/100 *1
80
80/100 *1
90 *2
90
70
120
90
120
100
110
70
130 *2
100 *19
80
110
90
80 *15
130 *3
110 *3
120
112
112
130
100
100
80
130 *18
90
110 *9
Safety
Country Measurements (m)
width length
Permissible overall weight (t)
in cities
Macedonia
2,50
12 50/60
Netherlands
2,55 *14
12 50
Norway
2,55
12,4
up to 3,5
50
3,5 up to 7,5 Austria
2,55
12
up to 3,5
50
3,5 up to 7,5 Poland
2,50
12
up to 2,5
60
over 2,5 Portugal
2,55
12
up to 3,5
50
over 3,5 Romania
2,50
12
up to 3,5
50
over 3,5
40
Russia
2,50
12 50
Sweden*16
2,60
24
up to 3,5
50
over 3,5 Sweden
2,60
24
up to 3,5
50
over 3,5 Switzerland
2,55
12
up to 3,5
50
over 3,5*12 The Slovakian
2,50
12
up to 3,5
60
Republic 3,5 up to 6,0 Slovenia
2,55
12
up to 3,5
50
over 3,5 Spain
2,55
12 50
The Czech
2,50
12
up to 3,5
50
Republic over 3,5 Turkey
2,50
10 50
The Ukraine
2,50
12 60
Hungary
2,50
12
up to 3,5
50
over 3,5 Cyprus
2,50
16,5 50
Maximum speed (km/h)
outside cities
on motorways
80
80/100 *1
80/90 *1
80
100
70
90
70
90/100 *17
80/90 *17
90
60
90 *10
70/90 *17
80/90 *1
70/90
80/90
80/100
100
90
80
80/100
80
80/90/100
90
80
80
90
80/100
70
80
80
120
90
80
130 *8
80
130
70
120 *7
90
90
60
90 *10
110
90
110
90
120
100
130
80
100
80
100
130
80
130
110
120
80
100
02-12
02-13
Safety
*1:
*2:
*3:
*4:
*5:
*6:
*7:
*8:
*9:
*10.
*11:
*12:
*13:
*14:
*15:
*16:
*17:
*19:
On expressways.
Recommended speed 130 km/h.
Reduce speed by 10 km/h on wet roads and by 20 km/h on motorways.
On gravel roads: 80 km/h.
On roads with more than one lane in both directions.
On motorways.
A driver who has not held his licence for more than one year may not drive faster than 90 km/h.
Corresponding stickers (available in the offices of the ACP) must be applied visibly to the rear
of the vehicle.
From 10 p.m. to 5 a.m.: 110 km/h on all motorways with the exception of the A1 (Salzburg-Vienna)
and the A2 (Salzburg-Villach).
Up to 1100 ccm: 70 km/h, up to 1800 ccm: 80 km/h, over 1800 ccm: 90 km/h.
70km/h if the driver has held his licence for less than 2 years.
In accordance with Section 57 a of the German Road Traffic Licensing Regulations, vehicles with a
maximum overall weight of more than 7.5 t require a tachograph. However, it is in dispute whether this
is also applicable for motor homes that are privately used.
A heavy vehicle fee must be paid on all roads for all vehicles with a maximum overall weight of more than 3.5 t.
The experience of the past few years has shown that objections are no longer raised with regard to
extra-wide or extra-long German vehicles.
2.55 m on all main roads; 2.20 m on all roads marked “B“.
Motor homes that were first registered from 1995 onwards with an empty weight of 1,875 kg as well as those
first registered from 1981 onwards with an empty weight oof 1,800 kg may drive a maximum of 100 km/h.
A closed sewage system is often mandatory on Swedish camping grounds.
In accordance with the signs.
12th exception to the German traffic regulations for the German Road Traffic Regulations dated 2005-03-18.
Note traffic regulations nos. 253, 273 and 277 in accordance with Section 41 of the German Road Traffic Regulations.
Also note Sections 3, 7 and 18 of the German Road Traffic Regulations.
Safety
2.10 When you stop driving
Selecting a parking space
The following applies for selecting a parking space:
• Select a parking space that is as level as possible.
• If possible, pick your spot in daylight.
Switching electric consumption:
The following applies when switching electric consumption:
• Switch the refrigerator from 12 V to gas or 230 V. Otherwise,
if the motor is not on, the 12 V electrical supply will automatically turn itself off after a few minutes.
Securing the vehicle
Water system
The following applies when securing the vehicle:
• Put the vehicle in gear.
• Pull on the handbrake.
• If necessary, extend extra vehicle supports.
• If necessary, use blocks (not in scope of delivery).
Empty the entire water system if the vehicle is not heated when
there is danger of frost. Leave the water faucets as well as all
drain valves open to prevent damage from frost.
Water that has been left to stand in the fresh water tank or
water pipes quickly becomes undrinkable. Therefore, always
flush the water pipes thoroughly with several litres of fresh water before using them.
If the temperature is below 0°, only pull the handbrake on
lightly and ensure that the vehicle is in gear to prevent the
handbrake from freezing!
When turning the driver‘ seat, ensure that you do not accidently disengage the handbrake.
02-14
Chassis
03-1
Chassis
Chapter 3: Chassis
3.1 Chassis
The chassis includes parts of the frame and the axles. No
technical changes may be made, as otherwise the general type
approval will expire!
Technical changes may only be carried out after being
released by the manufacturer.
For further information, please refer to the enclosed operating instructions for the basic vehicle.
3.2 Loading
The maximum axle loads as well as the technically permissible overall mass entered in the vehicle‘s documents may
not be exceeded.
Weights of mobile homes in accordance with 92/21/EWG
Please refer to the definition of masses for mobile homes!
Definition of Masses for Mobile Homes (2007)
Throughout Europe, EU Guideline 92/21/EWG is applicable for
calculating the masses (weights) and resulting loads for mobile
homes. The terms and basis used for calculations are explained below.
1. Technically permissible overall mass
The figure for the technically permissible overall mass is based on information given by the Hobby Mobile Home Plant in
cooperation with the manufacturer of the base vehicle. This
mass was determined in extensive calculations and tests and,
for safety reasons, it may not be exceeded under any circumstances.
2. Mass when the vehicle is ready to start
The mass when the vehicle is ready to start corresponds to the
mass of the empty vehicle including lubricants, tools, spare
tyre (and/or repair kit), petrol (100 %), booster battery, all of the
standard equipment mounted by the factory as well as 75 kg
for the driver, plus basic equipment (gas, water, electric).
3. Basic Equipment
The basic equipment includes all of the equipment and liquids
that are necessary to ensure safe and proper use of the vehicle.
This includes the weights of:
Chassis 03-2
4. Loading
Loading corresponds to the difference between the "technically
permissible overall mass" and the "mass when the vehicle is ready to start". This value must take into consideration the masses
for passengers (conventional load: 75 kg x no. of seats, driver
excepted), additional equipment and personal belongings.
Van
a) Supply of liquefied petroleum gas
No. of 11 kg gas bottles
2
No. of 5 kg bottles
Weight of an 11 kg aluminium bottle
-
Weight of a 5 kg steel bottle
in the mobile home have been taken into consideration, e.g.
-
Weight of 11 kg gas inflation (90 %)
9.9
Weight of 5 kg gas inflation (90 %)
-
Total:
Check to ensure that the masses of all objects transported
5.5
passengers, additional equipment, basic equipment and
personal belongings such as clothes, food, pets, bicycles,
surfboards, other sport equipment, etc.).
31
b) Liquids
200 l fresh water tank (90 %)
-
104 l fresh water tank (90 %)
-
100 l fresh water tank (90 %)
90
Under no circumstances may the technically permissible
total load be exceeded when the mobile home has been
loaded.
Total basic equipment:
121
The mass when the vehicle is ready to start includes an additional value for liquids and gas, etc. (see basic equipment). Part
of this additional value can also be used for additional loads if,
for example, you would like to travel with empty water tanks or
without gas bottles.
03-3
Chassis
Weights for Standard HOBBY Van
Type
Van
Motor
2,0 TDCi
Chassis
Flachboden
Techn. perm. Weight when vehicle
overall weight
is ready to drive
3500
2817
Overload in acc.
with EN 1646-2
683
Chassis
Tires and Wheel Rims for Basic HOBBY Van
Hobby
type
Van
Techn. perm. overall
weight (kg)
3500
Perm. axle load
front
rear
1665
2250
Tire size
Fitting tires
Steel rims
215/75 R 16 C
5/65/160
5 1/2 J x 16, ET 56
03-4
03-5
Chassis
Chassis Data, HOBBY Van
Hobby
type
Van
Type of caravan
Basic vehicle
Alternative
motorization
Chassis
Techn. perm.
overall weight
(kg)
Teilintegriert
Ford Transit FT 350
2,0 TDCi
Flachboden
3500
Perm. axle load
front
rear
1750
2250
Trailing load Trailing load Max. total hauempty
full
lage weight
750
1000
4500
Tire size
Rims
215/75 R 16 C 5 1/2 J x 16, ET 56
Chassis
Weight of accessories for Van
Object
Weight (kg)
Additional exterior storage flap
1.0
Air-conditioning B 1901 (Dometic) (230 V)
31.0
Air-condition B 2000 (Dometic) (230 V)
34.0
Air-conditioning Truma Frostair 1700
26.3
Air-conditioning via vehicle engine
20.0
Alarm system
1.0
Bicycle carrier for 2 bicycles
7.2
Bicycle carrier for 3 bicycles
8.3
Carpet
6.0 - 11.0
Car radio with navigation system and CD player
3.0
Cassette radio with 2 loudspeakers
1.7
CD radio
1.6
Central hoovering system (Dometic)
5.4
Dashboard made of precious root timber
0.5
Duomatic L-Plus / Duo Comfort
2.0
DVD Navigation system with return passage video system 6.1
Exhauster hood
1.0
Gel battery Exide Gel G 80
27.0
Insulation mats for cockpit
0.5
Light for tent in front of mobile home (Dometic)
0.2
Loudspeakers (additional) in caravan
1.7
Microwave oven
15.0
Motorisation 2.0 TDCi instead of 2.0 TDE (FORD)
10.0
Navigation system Travel Pilot E1
2.0
Oven
16.0
Parking distance control system with optical warning
2.0
Radio, preparation for
Remifront cockpit shade (plissé)
Return passage video system with flat screen
Satellite antenna, fully assembled (incl. 3 kg mast)
Skylight, elec. 600 x 600 REMistar
Solar system with 2 modules, each 50 W
Solar system with 2 modules, each 75 W / 85 W
Sun awning Omnistor, 300 x 250 cm
Sun awning Omnistor, 350 x 250 cm
TELECO digital satellit antenna w/ autom. search system
Towbar coupling, rigid
WAECO cruise control for FORD
Water purification filter (Dometic)
FORD Flex Package: Air-conditioning system
Exterior mirror, electric
Window opener, electric
Wheel covers
Audio system 2000
1.3
3.0
2.0
9.8
10.8
16.0
18.0
21.0
25.0
24.0
15.5
1.5
3.0
20.0
1.0
6.0
6.0
5.0
03-6
03-7
Chassis
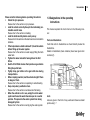
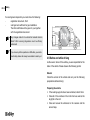
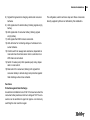
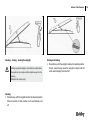
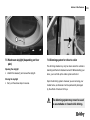
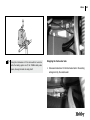
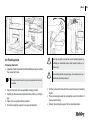
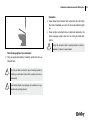
Retracting leveling supports
• Use crank to release leveing supports.
• Retract leveling supports.
• To lock leveling supports, press fork (1).
1
2
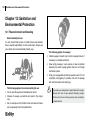
3.3 Leveling supports
Leveling supports, standard design
The leveling supports are located at the rear of your mobile
home.
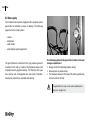
Swinging out the leveling supports
• To swing out the leveling supports, press fork (1) and pull
towards hinge.
• Swing out leveling supports.
• If necessary, secure leveling supports from caving in.
• Place leveling support upon base (2).
• Use the crank to even out the leveling supports until the
vehicle is in a level position.
Chassis
1
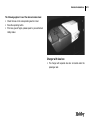
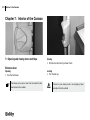
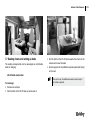
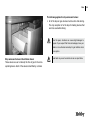
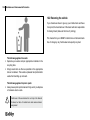
3.4 Entrance step
Your mobile home (Van model) has an electric entrance step
(1).
Use the switch on the inside, next to the entrance door to
activate it.
Do not step on the entrance step until it has been completely extended!
Mind the different heights of the steps and ensure that the
ground in front of the entrance is firm and level.
The entrance step is automatically retracted when the
motor starts.
03-8
03-9
Chassis
3.5 Externally mounted constructions
Registering accessories in the vehicle's documents
• Have your HOBBY dealer mount your externally mounted constructions.
• Drive your mobile home to the Technical Surveyance Association (TÜV).
• The TÜV will survey your externally mounted constructions
and draw up an appropriate expertise.
• Take the expertise and the registration documents, Parts I
and II, to the Driver and Vehicle Licensing Agency. They will
copy the changes into the vehicle's documents.
Do not forget that towbar couplings, motorcycle carriers,
leveling devices and/or additional spring blades must be
registered.
Please note that mounting additional equipment reduces
the load your mobile home can carry.
Chassis
Wheels, tires, brakes
04-1
Wheels, tires, brakes
Chapter 4: Wheels, tires, brakes
Driving to protect your tires
4.1 Wheels
• Avoid braking sharply and racing starts.
• Avoid long drives on poor roads.
• Never drive an overloaded vehicle.
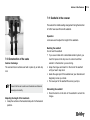
On your first drive with your mobile home, please check that your
tire bolts are still securely tightened after having driven 50 km
and, if necessary, tighten them with a torque of 160 Nm for 15"
wheel rims (steel and light metal) and 180 Nm for 16" wheel
rims (steel and light metal). After this, the tire bolts should be
checked regularly that they are securely tightened.
Tubeless tires have been mounted on your HOBBY mobile
home. Under no circumstances may tubes be inserted in
these tires!
4.2 Tires
Use only tires that have been entered in the vehicle's documents.
Other tire sizes may only be used if they have been permitted
by the manufacturer of the basic vehicle.
Wheels, tires, brakes
If the pressure is too low, this may cause overheating of the
tire, possibly resulting in severe damage to the tire.
For the correct inflation pressure, please refer to the table in
the chapter on “Technical Data“ or the operating instructions
for the basic vehicle.
1
2
3
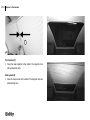
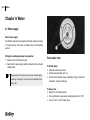
4.4 Tread depth
Replace your tires as soon as the tread depth is only 1.6 mm.
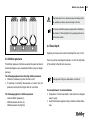
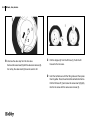
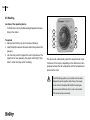
4.3 Inflation pressure
The inflation pressure of all tires as well as the spare tire should
be checked approx. every 4 weeks and before you go on longer
journeys.
The following applies when checking inflation pressure:
• Check the pressure only when the tire is cold.
• If checking or correcting the pressure of a warm tire, the
pressure must be 0.3 bar higher than for a cold tire.
The following applies for inflation pressure:
- correct inflation pressure (1).
- inflation pressure too low (2).
- inflation pressure too high (3).
Tires may not be exchanged crosswise, i.e. from the right side
of the vehicle to the left and vice versa.
Tires age even if they are used seldom or not at all.
Tire manufacturers‘ recommendations
• Irrespective of their tread depth, tires should be changed
every 6 years.
• Avoid hard impacts against curbs, potholes or other obstacles.
04-2
04-3 Wheels, tires, brakes
4.5 Wheel rims
Use only those wheel rims listed in the vehicle‘s documents. Please observe the following points, should you wish to use
other wheel rims.
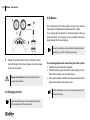
4.6 Snow chains
Use snow chains only on the front axle.
Never drive faster than 50 km/h.
The following applies when using other wheel rims:
- Size,
- construction,
- injection depth and
- carrying power must be sufficient for the permissible total
weight.
- The cone of the fastening screw must correspond to the
construction of the wheel rim.
Adaptations are only permitted if these have been released by
the manufacturer.
For explicit information, please refer to the General Type
Approval ("Allgemeinen Betriebserlaubnis", ABE).
Aluminium wheel rims must be tested separately for each type
of vehicle. The screws used on aluminium rims may not be
used for steel rims. When using aluminium rims, tires may not
be changed from the front to the back or vice versa.
Do not use snow chains on snow-free roads.
Ornamental hub caps must be removed before putting on
snow chains.
4.6.1 Models with front-wheel drive
If you wish to use snow chains, the wheels on the front axle
must use tires size 195/75 R 16 C (M+S) on steel rims 5.5 J x
16 H2, ET 50. You may leave the tires size 215/75 R 16 C on
the rear axle. This tire mix is covered by Ford's basic approval
and, therefore, does not require extra permission. Tires size 195/75 R 16 C (M+S) must be inflated to the maximum
admissible pressure of 4.8 bar. Snow chains may only be used
with steel rims and only on the front axle.
4.7 Spare tire
A spare tire is not included in the scope of delivery.
Wheels, tires, brakes
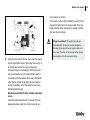
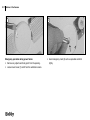
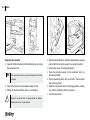
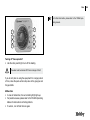
4.8 Repair kit
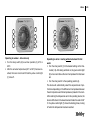
A Shake the bottle. Open the fill hose (1) on the bottle (foil
seal is thereby punctured).
Do not use the tire repair kit if the tire was damaged as a
result of driving without air. Small cuts, especially in the tire
tread, can be resealed using the tire repair kit. Do not remove
foreign objects (such as screws or nails) from the tire. The tire
repair kit can be used as long as the outside temperature is
approx. -30° C or higher.
04-4
04-5
Wheels, tires, brakes
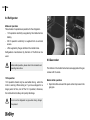
B Unscrew the valve cap from the tire valve. Remove the valve insert (2) with the valvecore remover (3). Do not lay the valve insert (2) down in sand or dirt.
C Pull the stopper (4) from the fill hose (1). Push the fill
hose onto the tire valve.
D Hold the bottle down with the filling tube and then press
them together. Press the entire bottle contents into the tire.
Pull the fill hose off (1) and screw the valve insert (2) tightly
into the tire valve with the valve-core remover (3).
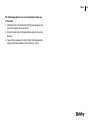
Wheels, tires, brakes
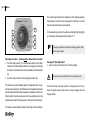
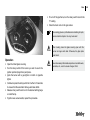
may not drive any further.
If the minimum value is still indicated (8), correct the tire
pressure according to the tire pressure table in the gas
bottle container. Drive carefully to the nearest mechanic
and have the tire replaced.
Danger of accidents! If the required tire pressure is
still unattainable, the tire is too severely damaged. In
this case, the tire repair kit can no longer provide an ef-
fective seal. Therefore, do not drive any further. Notify a
E Open the air hose (5) on the tire valve. Insert the plug (6)
into the cigar lighter socket. Then pump the tires (Fig. 7).
do not operate the electric air pump longer than
8 minutes! Danger of overheating! If sufficient air pres-
sure is unattainable, drive 10 meters (either forward or
in reverse) so that the sealant can be evenly distributed
within the tire. Repeat the pumping process. Resume
driving immediately, so that the sealant can be evenly distributed within the tire.
Maximum speed: 80 km/h. Drive carefully, especially in
curves.
Check tire pressure after driving 10 minutes. If the tire
pressure has fallen under this minimum value (8), you
service station or the 24-hour service hotline.
04-6
04-7 Wheels, tires, brakes
4.10 Brakes
The components in the brake system are part of the General
Type Approval (“Allgemeinen Betriebserlaubnis“, ABE).
If you change the components in the brake system, the type
approval expires. Any changes are only possible if they have
been released by the manufacturer.
In your own interests, you should have the brakes checked
regularly by your Fiat or Peugeot repair shop.
F Adhere the provided sticker to the combination instrument within sight of the driver. Dispose of used tire repair
kit at a service station.
Danger of accidents! Have the tires replaced at the
nearest service station.
4.9 Changing the tire
Further information is given in the operating instructions
of the manufacturer of the basic vehicle.
The following applies when maintaining the brake system:
• Check the level of brake fluid regularly.
• Check the brake system and brake hoses regularly for leakage. Martens often gnaw at rubber hoses.
• Use only those brake oils that have the same features as the
oils that are already in the brake circuit.
Further information is given in the operating instructions
for the Ford Transit.
Wheels, tires, brakes
Exterior Structure
05-1
Exterior Structure
Chapter 5: Exterior Structure
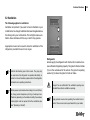
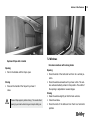
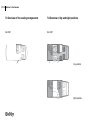
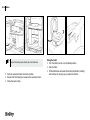
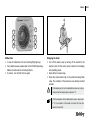
5.1 Overview of tank and service flaps
Van 2007
Storage flap (1)
Toilet flap (2)
Gas box flap (3)
Exterior Structure
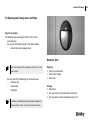
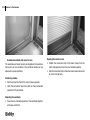
5.2 Ventilation
The following applies for ventilation:
Ventilation is important if you want to feel comfortable in your
mobile home. No-draught ventilation has been integrated above
the driving unit in your mobile home. The roof lights ensure ventilation. Never interfere with the way in which they operate.
2
1
Appropriate covers can be used to close the ventilation of the
refrigerator, provided it does not run on gas.
Note the information given on the covers. They may only
be used when the refrigerator is operated electrically in
Refrigerator
Grates supply the refrigerator with fresh air from outside to ensure sufficient refrigerating capacity. The grate for fresh air intake
(1) is on the outside wall of the vehicle. The grate for expelling
used air (2) is above the grate for fresh air intake.
winter. For more information, please refer to the refrigerator
manufacturer‘s operating instructions.
Watery vapour is produced while cooking, from wet clothes,
Danger! You can suffocate if the ventilation openings are
blocked! Never block ventilation openings.
etc. Every person transpires up to 35 g of water per hour.
Therefore, depending on the relative humidity, the windows
and skylight s must be opened for further ventilation (see
also “Operating in Winter“).
Apply special covers when operating the mobile home in
winter. These covers can be purchased from your dealer.
05-2
05-3
Exterior Structure
1
3
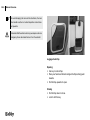
We recommend that you remove the ventilation grate if the
outside temperature is very high. This allows more air to
permeate to the refrigerator, intensifying refrigeration.
Removing the ventilation grate
• Turn the screw (3) as far to the left as it will go.
• Carefully pull out the ventilation grate, starting on the left.
• Then remove the ventilation grate.
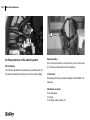
Heating
The heating system is supplied with fresh air from outside (1).
This ventilation flap also permits exhaust air from the system
to escape.
Danger! You can suffocate if the ventilation openings are
blocked!
Never block ventilation openings.
Exterior Structure
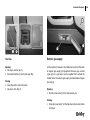
5.3 Opening and closing doors and flaps
Keys to the vehicle
The following keys are supplied with the motor home:
- one master key
- two keys for the following locks on the basic vehicle:
-
driver‘s door and passenger door
Entrance door
Note the manufacturer‘s operating instructions for the
basic vehicle.
-
two keys that fit the following locks on the structure:
-
entrance door
-
service flaps
-
toilet flaps
In addition, a self-adhesive aluminium plate is supplied, engraved with the number of the key for the basic vehicle.
Opening
• Use key to unlock door.
• Pull on door handle.
• Open door.
Closing
• Close door.
• Turn key until you hear the bolt lock into place.
• Turn key back to verticle position and pull it out.
05-4
05-5
Exterior Structure
To avoid damaging the lock and the doorframe, the inner
door handle must be in a horizontal position and not slanted upwards.
Remember that the entrance door is your escape route in an
emergency. Never barricade the door from the outside!
Luggage trunk flap
Opening
• Use key to unlock flap.
• Place your hand over the lock and give the flap a strong push
inwards.
• Pull the flap upwards to open.
Closing
• Pull the flap down to close.
• Lock it with the key.
Exterior Structure
2
1
3
1
2
Toilet flap
Exterior gas supply
Opening
• Use key to unlock flap (1).
• Press both buttons (1 and 2) and open flap.
At the customer‘s request, the mobile home can be fitted with
an exterior gas supply (3). Equipment that uses gas, such as
a gas grill or a gas lamp, can be supplied from outside the
mobile home. The exterior gas supply is located below the gas
box flap (2).
Closing
• Press flap until it locks into place.
• Use key to lock flap (1).
Opening
• Pull the cover plate (1) of the flap towards you.
Closing
• Press the cover plate (1) of the flap shut until you hear it lock
into place.
05-6
05-7
Exterior Structure
2
1
1
2
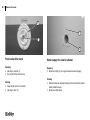
Fresh water filler neck
Water supply for exterior shower
Opening
• Use key to unlock (1).
• Turn lid (2) firmly and remove.
Opening
• Slide cover flap (1) up to gain access to water supply.
Closing
• Insert lid (2) and turn it closed.
• Use key to lock (1).
Closing
• Remove hose for exterior shower from branch neck (2) and
insert protective cap.
• Slide cover flap down.
Exterior Structure
5.4 Exterior mirror
1
2
Exterior socket
Opening
• Take hold of the bottom of the cover flap (1) and pull it upwards.
Closing
• Remove CEE plug (2).
• Push cover flap (1) down until you hear it lock into place.
Please refer to the operating instruction for the basic vehicle
for information on how to adjust the exterior mirrors of your
mobile home.
5.5 Condensation in headlight systems
One of the problems often complained about is condensation on
tthe outer glass of headlights or rear lights mde of clear glass.
This appears after driving in the rain or on cold nights, and is a
normal physical process. The expanding warm air is displaced
through headlight vents from a lamp that has been turned on.
After being turned off, the lamp slowly cools down and moist air
from outside permeates inside through the vents. This moisture
evaporates in the warm headlight and cools down to become
condensation on the outer glass. This process is known as condensation. After a short drive in dry weather or after the headlight
has been on for a brief period a process of evaporation sets
in which drys off the condensation. Technically speaking, this
process is harmless, because the lamps are protected against
any influences from condensation.
05-8
Electrical Installations
06-1 Electrical Installations
Chapter 6: Electrical Installations
6.1 Safety instructions
The following must be observed:
• Do not remove the signs on electrical components giving
safety instructions or danger warnings.
• Do not use the installation compartments for the caravan
battery, on-board control panel, battery charger and 230 V
connector box as additional storage room.
• Smoking and open fire are forbidden when checking electrical equipment.
• Only authorised and experienced workshops may carry out
electrical repairs.
• Inexpert handling of the vehicle‘s electrical system may
endanger your own life as well as that of others.
• Use only weatherproof, 3-wired extension cable and shockproof plug or CEE plug and coupler when hooking up to an
external 230 V network.
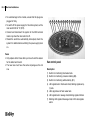
6.2 HOBBY on-board control panel
The electric power supply is provided via the HOBBY on-board
control panel in connection with an automatic battery charger.
Main elements of the electric system
• "PC-100HB and PC-100HB T" CONTROL PANEL controls the electric power consumers,
• 12V DISTRIBUTON MODULE "DS-300HB" main relay, battery parallel relay (12V - 70A), refrigerator
relay, pump relay, charging facility B1, safety fuses.
• BATTERY LOADING DEVICE loads the battery in buffer operation.
• PROBE WITH ROD measures contents of fresh water tank, 4-state visualisation
• PROBE WITH SCREWS "SSP" LED display shows when sewage tank is full
• CONSUMER BATTERY "B2" supplies all consumers
• VEHICLE BATTERY "B1"
• GENERATOR loads both the vehicle and consumer batteries at the same
time
• 230V MAIN SWITCH supplies and protects the 230V consumers
• 50A FUSES VEHICLE/ and CONSUMER BATTERIES
Electrical Installations
Advice and instructions
Important!
• Any changes to the electrical installation may only be carried
out by a professional electrician.
• Disconnect the battery and switch off the 230V mains before
carrying out any maintenance work.
Batteries
• Please observe the battery manufacturer's operating instructions.
• The acid in the battery is poisonous and corrosive. Avoid
contact with eyes and skin.
• If the battery is completely empty, it must be recharged for
a minimum of 10 hours. If the battery has been empty for at
least 8 weeks, it may be damaged.
• Check the amount of liquid in the batteries (acid batteries)
regularly; gel batteries require no maintenance, but must
continuously be recharged.
• Check the level of the battery fluid regularly (lead storage
battery).
• Check that the clamps are still on properly and remove any
layers of oxide.
• Unclamp the minus pole if the battery is not being used for
a longer period of time (more than 1-2 months).
• Should the consumer battery be removed, isolate the plus
pole (to prevent short circuits when turning on the motor).
• If you are stopping in one place for a very long time, unclamp the battery or recharge it regularly.
Battery charger
• Install the battery charger in a dry and well-aired room.
• This device may only be mounted by a professional.
• In case of misuse, the guarantee and the manufacturer's
liability will no longer apply.
• Do not carry out any maintenance work as along as the 230V
mains is still connected.
• Never plug up the ventilation on the lid; ensure that there is
sufficient ventilation.
• Turn off the switch before disconnecting the battery charger
from the 230V mains.
Tank probes
• To avoid incrustations, especially in the sewage tank, never
let the water in the tanks stand for too long.
230V main switch
• Before removing the lid, check that the plug for the electric
mains has been unplugged.
06-2
06-3
Electrical Installations
• To avoid damage to the module, ensure that the plugs are
plugged in firmly.
• To switch off the power supply for the entire system, set the
main switch 230 to "0" (OFF).
• Connect and disconnect the system to the 230V external
mains only when the main switch is off.
• Should the switch be automatically interrupted, check the
system for defects before switching the power supply back
on.
Fuses
• Only replace defect fuses after you have found the reason
for the defect and fixed it.
• The new fuse must have the same amperage as the old
one.
1
2
3
4
5
6
7
8
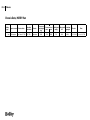
9 10 11 12 13 14 15
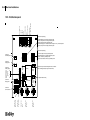
Van control panel
Description
1) Button for monitoring fresh water tank.
2) Button for monitoring consumer battery (B2).
3) Button for monitoring vehicle battery (B1).
4) LED signals test in fresh water tank; blinking signals empty tank.
5) LEDs signal level of fresh water tank.
6) LED signals test in sewage tank; blinking signals full tank.
7) Blinking LED signals full sewage tank; LED 6 also signals
alarm.
Electrical Installations
8) Signals that generator is charging vehicle and consumer
batteries.
9) LED signals test of vehicle battery; blinking signals empty
battery.
10) LED signals test of consumer battery; blinking signals
empty battery.
11) LED signals that 230V mains is connected.
12) LED voltmeter for monitoring voltage of vehicle and consumer batteries.
13) Control switch for sewage tank resistance; dependent on
main switch and functions when motor is switched on or
230V mains is connected.
14) Switch for water pump that operates pump relay; dependent on main switch.
15) Main switch for consumers; blinking LED signals that
consumer battery is almost empty and protection against
total discharge will soon be activated.
Functions
Protection against total discharge
An electronic installation turns off all 12V consumers when the
consumer battery reaches a minimum voltage of 10V. The consumers can be switched on again for approx. one minute by
switching the main switch on again.
The refrigerator, electric entrance step and those consumers
directly supplied by B2 are not affected by this installation.
06-4
Electrical Installations
D+/External lighting
Refrigerator
Gas consumers
Aux.
Entrance step
Pump
Light A
Light B
Heating/Boiler
12 V - Distribution panel
Reserved for 9-pole plug
1/9 Heating/Boiler via main switch protected by fuse1
2/9, 5/9, 4/9 Light B via main relay protected by fuse2
3/9 Pump switched by relay protected by fuse4
6/9 External lighting / D+ increased automatic change-over via +, protected by fuse9
7/9, 8/9, 9/9 Light A via main relay protected by fuse3
Reserved for 6-pole plug
Connection
fresh water probe
1/6 Entrance step continuous, protected by fuse5
2/6, 3/6 Refrigerator D+ controlled, protected by fuse8
4/6 Aux. continuous, protected by fuse6
5/6, 6/6 Gas consumers continuous, protected by fuse7
FWT
Connection
sewage probe
KS2
KS1
AWT
Connection
battery charger
Charger
Display
Refrigerator relay
Parallel
connection relay
D+/Ext.
lighting
relay
Connection
earth consumers
battery I
Connection
battery II
Connection
earth
Connection
D+ generator
Connection
Earth
pump switch
B2 permanently connected to refrigerator when connections
KS1 and KS2 bypassed (no longer controlled via D+)
D+ signal switched via relay
D+
Connection
display panel
Main relay
Pump
Pump
relay
1/8 free
2/8 LED green
3/8 LED red
4/8 12V mains
5/8 + charge
6/8 Plus charge
7/8 Earth
8/8 Earth
Connection
06-5
Electrical Installations
6.3 Electric power supply
3
1
6
2
7
8
4
5
Gas operation (heating and warm water)
-
-
-
-
-
-
-
-
Dial for room temperature (1)
green “operating“ control light (2)
summer operation (water temperature 40°C or 60°C (3)
winter operation (heating without need for warm water) (4)
winter operation (heating with need for warm water) (5)
rotary switch “off“ (6)
yellow control light: “boiler in heating phase“ (7)
red control light: “malfunction“ (8)
For further information, please refer to the enclosed TRUMA
operating manual.
Your mobile home has the following connections for electric
power supply:
- electric mains (a.c. voltage 230 V)
- caravan battery (d.c. voltage 12 V)
Electric power supply from the electric mains
The 230 V system is protected by a 2-pole circuit breaker with
16 A. The circuit breaker is located behind the driver‘s seat.
Should there be a malfunction, the passenger circuit breaker
opens the entire 230 V circuit. In most cases, such a malfunction
is caused by a defect piece of electric equipment or a defect
in its supply line.
• Repair the defect before switching the circuit breaker on
again.
• If the defect cannot be repaired, consult an experienced
electrician.
06-6
06-7
Electrical Installations
Fresh water
6.4 Function of the power generating unit
Position of the battery charger
The battery charger is located in the driver's seat.
Electric mains 230 V
The following applies for the electric mains:
• the power supply lead may not be longer than 25 m.
If you are using a cable drum without protection against
overheating, the electric cable must be completely unwound
from the cable drum.
• Use only plugs and cables that meet CEE standards.
• First, make the connection to the main socket of the vehicle.
• Then insert the other plug in the live socket.
• Follow this sequence in reverse when you pull out the
plug.
Operating with 230 V electric mains
After switching on the master switch on the HOBBY on-board
control panel, the caravan battery will be charged by the battery
charger in the mobile home.
Charging procedure
The charging procedure is dependent on the battery voltage of
the caravan battery:
- Charge until the battery voltage has reached 14.4 V.
- Switch off the battery charger until the battery voltage has
sunk to 13.8 V.
- Recharge when the battery voltage sinks below 13.8 V.
- Make a parallel connection and charge the engine battery as
well as the caravan battery when the battery voltage sinks
below 13.5 V.
– Separate the engine battery and the caravan battery when
the joint battery voltage sinks below 12.5 V.
Electrical Installations
The battery voltage of both the engine battery and the caravan battery can be checked continuously on the on-board
control panel located above the entrance door.
The battery charger only works if the batteries have been
inserted with their poles in the right direction.
A discharged caravan requires a charging period of approx.
12 hours on the electric mains to completely recharge itself.
This charging period must be extended accordingly if equipment that uses 12 V is switched on at the same time.
Protection against total discharge
If the battery voltage of the caravan battery sinks below 10.5 V,
a relay shuts down all the equipment that uses voltage.
If the protection against total discharge takes effect, turn
off the 12 V master switch to avoid an additional discharge
of the caravan battery.
Function of the battery charger
Protecting the device
If the battery charger should become hot because of high environmental temperatures or high charging currents, a built-in
thermal switch turns off the battery charger until the temperature
in the battery charger has dropped again.
Checklist
• Turn off the motor.
• Turn off the mains switch on the battery charger.
• Connect the battery charger to the mains supply.
• Switch on the 12 V master switch.
• Turn off all equipment (except refrigerator) that uses 12 V.
• Turn on the mains switch on the battery charger.
The voltage of the caravan battery must rise to a maximum
voltage of 14.4 V.
If this does not happen after using the built-in battery charger
to charge the battery, check the following:
• Has the battery charger been properly attached to the network?
• Is the mains fuse of the battery charger functioning properly?
06-8
06-9
Electrical Installations
• Is the battery voltage of the battery charger above 1 volt?
• Have the poles of the caravan battery been attached properly?
• Is the connection between the battery charger and the onboard control panel functioning properly?
Operation when the motor is running
As soon as the motor is running, a relay connects the starter
battery and the caravan battery in parallel. The D+ signal sits
close to the dynamo. Therefore, the dynamo charges both
batteries. If the D+ signal no longer sits close to the dynamo,
the two batteries will be separated from each other again. In
this way, the starter battery cannot be discharged by equipment
in the caravan.
The 12 V supply for the refrigerator only functions when you
are driving. If the motor has stopped, the 12 V operation of the
refrigerator is automatically turned off again.
To charge a discharged caravan battery optimally while
driving, disconnect the 12 V operation of the refrigerator and
The voltage of the caravan battery must rise if
- the engine speed is above the idling speed,
- the vehicle‘s battery is not completely discharged.
If this does not happen after using the dynamo to charge the
battery, check the following:
• Is the fuse in the supply line to the vehicle‘s battery functioning properly near the vehicle‘s battery?
• Have the poles of the caravan battery been attached properly
to the battery charger?
• Is the fuse in the supply line to the “D+“ signal functioning
properly near the vehicle‘s battery?
• Is the “D+“ signal sitting close to the battery charger?
There must be a voltage of 12 V here when the motor is
running.
• Is the connection between the battery charger and the onboard control panel functioning properly?
turn off as much equipment as possible that uses 12 V.
Checklist
• Turn off the motor.
• Switch on the 12 V master switch.
• Turn off all equipment that uses 12 V.
• Start the motor.
Operation by means of a 12 V caravan battery
All of the equipment is automatically supplied from the caravan
battery if the mobile home is standing still without a 230 V mains
supply and with its engine turned off. The 12 V master switch
must be switched on.
Electrical Installations
The caravan battery should only be allowed to discharge to
Changing the battery
a voltage of 11 V. At this point, you should ensure that it is
recharged from the dynamo or from public supply.
6.5 Caravan battery
Location
- Under the driver's seat, in the double bottom or in a separate
compartment that is externally accessible, depending on the
floor plan.
Features
- The battery does not require maintenance. It does not need
to be refilled with water.
- The battery is closed off and cannot leak.
- The battery is cycle-proof, making it especially suitable
for the supply of the board network. Several discharging/
charging operations are possible.
Use only the same kind of batteries when exchanging the
battery (same capacity and voltage, cycle-proof, maintenance-free and leakproof).
•
•
•
•
•
•
•
Please do not smoke when changing the battery.
Disconnect the connection to the 230 V network.
First, disconnect the minus (-) connector.
Then disconnect the plus (+) connector.
Remove the battery.
Insert the new battery.
Use the reverse sequence to connect the new battery.
The solution of electrolytes contained in the battery is poisonous and corrosive! Protect your eyes and face whenever
handling the battery.
If your skin or eyes come into contact with this solution,
wash immediately with lots of clear water.
Keep open flames or equipment that gives off sparks away
from the battery. Danger! Explosive!
06-10
06-11
Electrical Installations
1
1
6.6 Fuse protection of the electric system
Starter battery
The main fuse protection is carried out by a 40 A safety fuse (1).
The fuse is located under the hood next to the starter battery.
Caravan battery
The main fuse protection is carried out by a 30 A safety fuse
(1). The fuse is located right next to the battery.
12 V circuits
These are protected by overload releases on the HOBBY control panel.
Information on fuses
15 A: refrigerator
10 A: light
10 A: pump, boiler, heating, TV
Electrical Installations
The following applies if one of the devices breaks down:
• Check the fuse on the corresponding electric circuit.
• Press the operating button.
• If the fuse goes off again, please speak to your authorised
Hobby dealer.
Charger with fuse box
• The charger with separate fuse box is located under the
passenger seat.
06-12
06-13
Electrical Installations
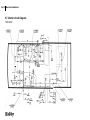
6.7 Interior circuit diagram
T500 GFSC
Electrical Installations
T500 GFSC
06-14
06-15
Electrical Installations
6.8 Subsequently installed devices
Subsequently installed electronic devices that can be used while
driving (e.g. mobile phones, wireless equipment, radios, cameras for driving in reverse, navigation equipment, or others) must
meet all of the requirements for electromagnetic compatibility.
Such equipment must have been approved in accordance with
EU Guideline 72/245/EWG as it appears in version 95/54/EG,
because otherwise it may cause interference with the electronic
systems already installed in the mobile home.
A CE mark is mandatory for devices that have been subsequently installed and which cannot be used while driving.
Electrical Installations
Interior of the Caravan
07-1
Interior of the Caravan
Chapter 7: Interior of the Caravan
1
2
7.1 Opening and closing doors and flaps
Entrance door
Opening
• Turn the bolt down.
Closing
• Pull the door shut until you hear it lock.
Locking
• Turn the bolt up.
This allows you to open a door from the inside that has
This door is your escape route in an emergency. Never
been locked on the outside.
barricade it from the outside!
Interior of the Caravan
Cupboard flaps with a handle
7.2 Windows
Knockout windows with locking hooks
Opening
• Pull on the handle until the flap is open.
Closing
• Press on the handle of the flap until you hear it
close.
Close all flaps properly before driving. This avoids them
opening by accident while driving and objects falling out.
Opening
• Press the knob of the bolts and turn them to a vertical position.
• Press the window outwards until you hear a click. The window will automatically remain in this position. The width of
the opening is adjustable in several stages.
Closing
• Raise the window slightly so that the hook unlocks.
• Close the window.
• Press the knob of the bolts and turn them to a horizontal
position.
07-2
07-3
Interior of the Caravan
Combined sunshade and insect screen
The sunshade and insect screen are integrated in the window
frame and can be combined. The combined shade can be
adjusted in several positions.
Combining shades
• Pull the connection flap of the insect screen upwards.
• Latch the connection flap to the catch on the one-handed
operation of the sunshade.
Adjusting the sunshade
• Press the one-handed operation of the sunshade together
at the jaw and hold it.
Opening the insect screen
• Unlatch the connection flap of the insect screen from the
catch and separate it from the one-handed operation.
• Use the connection flap to draw the insect screen down and
do not let it snap back.
Interior of the Caravan 07-4
The vents for ventilation must always remain
open! Never shut or cover up these vents!
7.3 Caravan skylight
Safety instructions
- Never open the skylight in strong winds/rain/hail, etc.
or if the temperature outside is below -20°C!
- Remove snow, ice or excessive dirt before opening.
Ensure there is sufficient room before opening the skylight under trees, in garages, etc.
- Do not stand on the skylight.
Opening the skylight
Before opening the skylight, check that the outside area above
the skylight is clear. The skylight can be opened to an angle of
60°. To eject the crank, push the ejector in the direction of the
arrow. Turn the crank to its user position. By turning the crank
clockwise, you can now open the skylight to the desired position. If there is an obstacle, the crank's overload protection
immediately kicks in; you will hear a slight "grating" sound in
the crank. Close the skylight if it is raining or there is a storm.
Closing the skylight
Turn the crank anti-clockwise until the skylight is closed. Then
turn the crank and press it into its resting position. If there is
an obstacle, the crank's overload protection immediately kicks
in; you will hear a slight "grating" sound in the crank. In this
case, give the crank one more turn until it can be pressed into
its resting position.
- Close and bolt the skylight before driving. Open the
insect screen and pleated material (resting position).
- If the sunlight is very strong, pull the sunshade only 3/4
closed, otherwise there is a danger of heat build-up.
Before driving, ensure that the skylight is securely bolted.
07-5 Interior of the Caravan
Dimming plissé
The plissé is infinitely adjustable: pull the handle to the
desired position or until it locks into the handle of the insect
screen.
Opening / closing the insect screen
Use the handle to push the insect screen against the handle
of the dimming plissé until it locks into the handle of the
plissé.
7.4 Sunroof with Remi-Star combination blind
Operating instructions
Important information
• Never open the skylight in strong wind, rain, hail, etc. and if
the outside temperature is below 20° C!
• Remove any snow, ice or excessive dirt before opening.
Ensure there is sufficient room before opening the skylight
unter trees, in garages or similar places.
• Never stand on the skylight.
While driving
• Close the skylight completely before driving and lock it. Open
the insect screen and the folding material (home position).
Interior of the Caravan
Opening - closing - locking the skylight
Before you open the skylight, check that it is unobstructed.
Keep parts of your body and other objects away from the
opening.
Attention! Can cause injury!
Opening
• Press the key until the skylight reaches the desired position.
When it reaches its final position it will automatically turn
off.
Closing and locking
• Press the key until the skylight reaches the desired position. To lock, press the key when the skylight is closed until the
motor automatically turns itself off.
07-6
07-7
Interior of the Caravan
1
Emergency operation during power failure
• Remove any objects and body parts from the opening.
• Loosen round cover (1) and lift out the ventilation screen.
2
• Insert emergency crank (2) as far as possible and hold
tightly.
Interior of the Caravan
3
• Use the push-button to unlatch the mechanism (3/A).
• Hold the push-button and, at the same time, turn the crank
(3/B) to move the skylight.
After reaching the desired position of the skylight, pull the button and, at the same time, lightly turn the crank back and forth until the mechanism locks.
Attention! Skylight can snap shut suddenly while being
unlocked (3/A). Always hold the crank firmly as long as the
gears are unlocked.
Interior lighting
• Press the toggle switch on/off for interior lighting.
07-8
07-9
Interior of the Caravan
Darkening the interior
• Use the clasp to pull the pleated material to any desired
position or push it against the clasp of the insect screen.
(The latch will then lock automatically.)
Closing / opening the insect screen
• Push the clasp of the insect screen against the clasp of the
pleated material until the latch locks into place. To open,
press the clasps together while pressing on the latch. Now
slide back the clasp of the insect screen.
Note! Never allow the insect screen to snap back by itself.
This can cause damage.
Interior of the Caravan
1
2
7.5 Washroom skylight (depending on floor plan)
Opening the skylight
• Unlatch the release (1) and secure the skylight.
Closing the skylight
• Carry out the above steps in reverse.
7.6 Dimming system for driver's cabin
The dimming shades may only be drawn when the vehicle is
standing and the motor has been turned off. Before starting your
drive, you must fold up the entire system and lock it.
Open the dimming system whenever you are not using your
mobile home, as otherwise it will be permanently damaged
by the effects of heat and UV rays.
The dimming system may never be used
as a sunshade or closed while driving.
07-10
07-11 Interior of the Caravan
1
Front system (1)
• Press the clasp together in the middle. The magnetic lock
will automatically lock.
Side system (2)
• Draw the clasp across to the rabbet. The magnetic lock will
automatically lock.
Interior of the Caravan
7.7 Seating chests and setting up beds
The seating arrangements can be rearranged as comfortable
beds for sleeping.
• Pull the latch on the lift-off table towards the interior of the
caravan and lower the table.
• Attach supports to the additional wooden panel and hang it
on the wall.
Lift-off table construction
When not in use, the additional wooden panel is kept in
To rearrange
• Remove all cushions.
• Pull the latch on the lift-off table up and loosen it.
the clothes cupboard.
07-12
07-13
Interior of the Caravan
7.8 Overview of the seating arrangements
7.9 Overview of day and night positions
Van 2007
Van 2007
Day position
Night position
Interior of the Caravan
7.11 Seatbelts in the caravan
The seats in the middle seating arrangement facing the direction
of traffic have been fitted with seatbelts.
Operation
Locks are used to adjust the height of the seatbelts.
Buckling the seatbelt
Do not twist the seatbelt.
7.10 Construction of the seats
Cushion fastenings
The seat and back cushions are held in place by an anti-slip
mat.
Ensure that the seat cushions and backrests are fastened
securely and correctly.
Adjusting the height of the headrests
• Grasp the cushion on the headrest and push it to the desired
position.
•
If you use a model with a retractable restraint system, you
must first press on the top cover to unlock it and then
extend it in the direction you are driving.
• Grasp the tongue and insert it in the lock of the seatbelt
until you hear it snap shut.
• Guide the upper part of the seatbelt over your shoulder and
diagonally across your chest.
• The lower part of the seatbelt fits across your hips.
Unbuckling the seatbelt
• Press the button on the lock of the seatbelt to unlock the
tongue.
07-14
07-15
Interior of the Caravan
7.12 Seats in the driver‘s cabin
Please refer to the operating instructions of the basic
vehicle for information on operating these.
Interior of the Caravan
Water
08-1
Water
Chapter 8: Water
8.1 Water supply
Warm water supply
The kitchen and toilet are supplied with fresh water by means
of a water pump. The pump is located close to the heating
system.
Putting the submerged pump into operation
• Switch on the 12V master switch.
• Switch on the water supply switch, located on the on-board
control panel.
Always ensure that the fresh water tank is filled before
switching on the pump. The pump can be destroyed if the
tank is dry!
1
Fresh water tank
To fill with water
• Close all outlets and valves.
• Unlock and open filler neck (1).
• Fill tank with drinking water, preferably using a hose (not
included in scope of delivery).
To draw water
• Switch on 12V master switch.
• Turn switches for water pump, heating and boiler to “ON“.
• Turn on “hot“ or “cold“ water taps.
Water
During the cold season or if the main switch is turned on
while the heating system is off, the TRUMA safety valve
opens, allowing the boiler to empty itself.
Emptying the fresh water tank
• Valves are located next to the fresh water tank in the seating
arrangement by the outside wall.
08-2
08-3
Water
The following applies for obtaining good water from the
tank:
• Only fill the tank with drinking water. When filling, pay attention to the sticker with the “Fresh Water“ symbol.
• Always boil water before using it.
• Lock the tank.
• Empty the water tank after every journey and before letting
your mobile home stand for a longer period of time.
• Clean the water tank thoroughly with water.
run off at a sewage disposal place.
• After the sewage has run off completely, push the slide back
into place.
Only empty your sewage tank in special places for sewage
disposal, but never in open spaces! Generally, sewage
stations are found in motorway service areas, campsites
or petrol stations.
Water in closed containers, such as a tank, quickly becomes
full of bacteria. If you enjoy drinking plain water, you should
add a disinfectant or store mineral water.
Never allow antifreezer or other chemicals to get into the
water circuit. This can be poisonous! When operating in winter, ensure that the fresh water tank is sufficiently heated.
Sewage tank
Emptying the sewage tank
• The support for emptying the sewage tank is located underneath the mobile home. Pull the slide and let the sewage
Water
8.2 Flushing toilet
Preparing the toilet
• Open the Thetford door and pull the holding bar up to remove
the excrement tank.
The excrement tank can only be removed when the bolt
You may be able to avoid the use of sanitary liquids by
installing an activated carbon filter system (sold as an
accessory)!
Use sanitary liquids very sparingly. An overdose is no guarantee of preventing odours!
is closed.
• Pull out the tank as far as possible, keeping it level.
• Slightly tip the excrement tank and then pull it out completely.
• Place it in an upright vertical position.
• Turn the emptying support to an upward position.
• Fill the excrement tank with the correct amount of sanitary
liquid.
• Then add enough water to completely cover the bottom of
the excrement tank.
• Return the emptying support to its original position.
08-4
08-5
Water
Never fill sanitary liquid directly into the toilet bowl.
• Push the excrement tank back into position.
• Ensure that the holding bar secures the excrement tank.
• Close the service flap.
Using the toilet
• Turn the toilet bowl to a comfortable position.
• Use the toilet.
• Fill the toilet bowl with water. Press the flush button. Flushing
will continue for as long as you press the button.
Water
C200 S Cassette
• Open the bolt by turning the bolt lever counter-clockwise.
• Flush the toilet by pressing the flush button.
• After flushing, close the bolt.
08-6
08-7
Water
Emptying the cassette
• Open the Thetford door and pull the holding bar up to remove
the excrement tank.
The excrement tank can only be removed when the bolt
is closed.
• Pull out the tank as far as possible, keeping it level.
• Slightly tip the tank and then pull it out completely.
Empty the excrement tank in special places for sanitary
disposal, but never in open spaces!
• Take the excrement tank to a sanitary disposal place, making
sure to hold the emptying support in an upright position.
• Remove the cap on the emptying support.
• Place the emptying support on the excrement tank in a
downward position.
• Press the aerating button with your thumb. The excrement
tank will empty itself.
• Return the excrement tank to its storage position, pushing
it in until the holding bar locks it into place.
• Lock the service flap.
Water
The following applies for an environmentally-friendly use
of the toilet:
• Fill the tank only with toilet solutions that have been approved
and do not pollute the environment!
• Empty the toilet only into the appropriate outlets or at service
stations!
• Never empty sewage into a drain! Drain channels generally
bypass clarification plants and end directly in a river.
08-8
08-9
Water
8.3 Hot water supply
Water heater
Your mobile home is equipped with a liquid gas heating system
with an integrated boiler. The boiler holds 14 liters of water.
The operating device for the water heater is integrated in the
panel for the heating system.
The following applies for the water heater:
• Empty the water if there is danger of frost!
• If the water heater has been unused for a longer period of
time, rinse it out (open the mixing tap)!
Only allow experts to carry out repairs!
Any changes to the boiler lead to breakdowns and the type
approval for the device will be terminated!
Filling the water heater (initial operation or after emptying)
• Turn on the water pump by turning on the switch for the
electric circuit for the water pump, located on the display
and operating panel.
• Open all of the hot water taps.
• Only shut the taps when the boiler is full, the displaced air
has escaped and water is flowing from the hot water taps.
For further information, please refer to the TRUMA operating manual.
Water 08-10
1
3
1
3
7
6
7
6
8
4
8
4
2
5
2
5
Operating in summer - hot water only
• Turn the rotary switch (6) to summer operation (3), 40°C or
60°C.
• After the set water temperature (40°C or 60°C) has been reached, the burner turns itself off and the yellow control light
(7) turns off.
Operating in winter - heating without a demand for hot
water
• Turn the rotary switch (1) to the desired setting on the thermostat (1-9). After being switched on, the green control light
(2) turns on and shows the room temperature that has been
set.
• Turn the rotary switch to the operating position (4).
The device will automatically select the required level of performance depending on the difference in temperature between
the set temperature and the temperature at present in the room.
After reaching the temperature set on the operating device, the
burner shifts down to the lowest level and heats the water to 60°
C. the yellow control light (7) shows the heating phase, turning
off when the temperature has been reached.
08-11 Water
The water temperature then depends on the heating capacity
that has been set and the time required to heat the room until
the set temperature has been reached.
1
3
7
6
8
4
2
5
In this operating position, the yellow control light (6) only lights
up if the water temperature drops below 5° C.
It is always possible to operate the heating system, either
with or without water.
Operating in winter - heating with a demand for hot water
• Turn the rotary switch (1) to the desired setting on the thermostat (1-9). After being switched on, the green control light
(2) turns on and shows the room temperature that has been
set.
• Turn the rotary switch to the operating position (5).
The device will automatically select the required level of performance depending on the difference in temperature between
the set temperature and the temperature at present in the room.
After reaching the temperature set on the operating device, the
heating turns itself off (irrespective of the water temperature).
The water is automatically heated if the boiler has been filled.
Turning off “Gas Operation“
• Use the rotary switch (6) to turn off the heating.
The water must be emptied if there is danger of frost!
If the device has not been used for a longer period of time,
close the quick-action stop valve in the gas supply line and
the gas bottle.
Water
1
3
7
6
8
4
2
5
Malfunction
• In case of malfunction, the red control light (8) lights up.
• For possible causes, please refer to the TRUMA Operating
Manual for instructions on finding defects.
• To unlock, turn off and then on again.
Emptying the boiler
• Turn off the water pump by turning off the switch for the
electric circuit for the water pump, located on the display
and operating panel.
• Open all the hot water taps.
• Press the control button (6) on the electrical safety/drain
valve. The contents of the boiler are now directly emptied
outside.
If the heating is not on, the safety/drain valve can only be
closed when the temperature is above 8° C.
If the temperature of the safety/drain valve is lower than
2° C, the contents of the boiler can drain off when the
device is turned off.
08-12
Gas
09-1 Gas
Chapter 9: Gas
• Air the rooms.
• Clear the danger zone.
9.1 General safety rules for the use of LPG fittings
• Inform your surroundings (groundsman) and, if neces-
Checking the gas fittings
• Before initial operation, have the LPG fittings checked by an
expert.
• The gas fittings must be checked every 2 years by an LPG
expert. This must be confirmed on the certificate (conform
with Form G 607 from the German Association of Gas and
Water Experts).
• The regulator and waste gas pipes must also be checked.
• We recommend that you replace the safety regulator at least
every 6 years.
• The connecting hose should also be checked regularly for
damage. Replace it immediately if you find tears, porous
spots or similar damage.
• The operator is responsible for having checks carried out.
after they have been checked by an expert.
If you suspect that gas is leaking, take the following measures immediately:
• Shut the stop valve on the gas bottle.
• Ignition sources such as open fire or smoking are
strictly forbidden.
sary, the fire department.
The gas fittings may only be taken into operation again Built-in objects and changes
• Only an expert may build in objects and make any changes
to the gas fittings.
• Devices with different connecting screws may not be operated.
Storing objects
• Gas bottles must always stand upright.
• Cupboards for gas bottles must be sealed up from the living
quarters.
• Cupboards for gas bottles must have a vent of at least
100 cm2 in or directly above the floor.
Gas
Regulators and valves
• Pressure governors must have a fixed pressure of 30 mbar.
The regulations in EN 12864, Appendix D, apply accordingly.
The pressure governors must have a minimum flow rate of
1.2hx/h.
• Carefully attach the high-pressure hose on the bottle by hand
(note: left-handed thread). Do not use spanners, pincers
or similar tools.
• If the temperature is below 5 ºC, use the de-frosting facility
(ice-ex) for regulators.
The operating pressure for gas is 30 mbar.
Operating the cooker
• When operating the cooker, the skylight or the window must be open.
• The operating levers of gas devices that must be pressed
to ignite when turned on, must spring back by themselves
after being pressed.
Waste gas
• The waste gas pipe must be attached firmly and impenetrably
to the heating and the chimney. It may not be damaged in
any way.
• Waste gas must be passed out without obstruction and
fresh air must be passed in without obstruction. For this
reason, there may be no snow walls or skirts directly next
to the vehicle. The intake openings on the underbody of the
vehicle must be kept clear and clean.
Before initial operation
• Keep all vents clear.
• Remove any snow from chimney.
• Clear aspirating holes for combustion air underneath the
vehicle of dirt and/or snow. Otherwise, the waste air might have a CO content that is higher than allowed.
• The safety vents must not be closed.
• Never use portable cookers or heating devices, except
electric heating devices, but not radiant heaters, because
they can cause a fire or suffocation.
Cookers or other devices that use air from indoors for
combustion may never be used to heat the vehicle. If this
is ignored it could cause mortal danger, due to the lack of
oxygen and the possible development of odorless carbon
Read the manufacturers‘ operating manuals thoroughly
monoxide.
and carefully!
09-2
09-3 Gas
9.2 Gas supply
Your mobile home has been equipped with a propane system
(gas bottle not included in scope of delivery). The following
equipment runs on this system:
- cooker,
- refrigerator,
- water heater,
- and possibly, special equipment.
The gas bottles are connected to the gas pressure governor
mounted on the wall by means of high-pressure hoses with
integrated security against breaking. It is fitted out with a gas
flow monitor and an integrated test connection. Therefore,
heating may explicitly be operated while driving.
The following applies for the gas bottle container in the rear
storage compartment:
• Always control the fastenings before driving.
• Securely lash any loose straps.
• The maximum pressure in the hose of the safety regulator may
not be more than 30 mbar.
The gas bottle room may not be used as additional storage room. Danger! Fire!
Gas 09-4
The following applies for stop valves and valves:
• All of the taps on gas devices must be shut while driving.
The only exception is for the taps for heating devices that
are to be used while driving.
Over the years, vibrations can cause slight leakages to
appear. If you suspect that there are leakages, have your
dealer or an authorised workshop for gas facilities check
your system.
Stop valves and valves in the kitchen drawer
These valves are use to interrupt the flow of gas to the corresponding device. Each of the valves is identified by a sticker.
Leak tests may never be carried out near an open flame.
09-5
Gas
9.3 Heating
Location of the operating device
- In the kitchen or by the middle seating arrangement, depending on the model.
To operate
• Remove the chimney cap (not in scope of delivery).
• Open the bottle valve and the quick-action stop valve in the
gas pipe.
• Use the rotary switch to adjust the room temperature. The
equipment is now operating. The green control light “Operation“ under the rotary switch is shining.
1
3
7
6
8
4
2
5
The device will automatically select the required level of performance for the burner, depending on the difference in temperature between the set temperature and the temperature at
present in the room.
The LPG heating system in your mobile home has been
designed to permit operation while driving. The requirements of the EU Guideline 2001/56/EG for heating devices have been fulfilled so that, in case of an accident,
LPG cannot escape involuntarily.
Gas
For further information, please refer to the TRUMA operating manual.
1
3
7
6
8
4
2
5
Turning off “Gas operation“
• Use the rotary switch (6) to turn off the heating.
The water must be drained off if there is danger of frost!
If you do not plan on using the equipment for a longer period
of time, close the quick-action stop valve in the gas pipe and
the gas bottle.
Malfunction
• In case of malfunction, the red control light (8) lights up.
• For possible causes, please refer to the TRUMA Operating
Manual for instructions on finding defects.
• To unlock, turn off and then on again.
09-6
09-7 Gas
9.4 Refrigerator
Modes of operation
Three modes of operation are possible for the refrigerator.
- 12 V operation: electricity is supplied by the mobile home‘s
battery.
- 230 V operation: electricity is supplied from an external
source.
- LPG: supplied by the gas bottles in the mobile home.
Refrigerators manufactured by Dometic or Thetford can be
used.
9.5 Gas cooker
Before initial operation, please refer to the manufacturer‘s
operating instructions.
12 V operation
12 V operation should only be used while driving, when the
motor is running. When resting or if you have stopped for a
longer period of time, turn off the 12 V operation; otherwise,
the mobile home‘s battery will quickly discharge.
Do not run the refrigerator on gas while driving. Danger
of explosion!
The kitchen in the mobile home has been equipped with a gas
cooker with 3 burners.
Before initial operation
• Open the bottle valve and the quick-action stop valve in the
gas pipe.
Gas 09-8
• To turn off the gas flame, turn the rotary switch back to the
“0“ setting.
• Close the main cock on the gas cooker.
Use cooking gloves or potholders when handling hot pots,
pans and similar objects. You may be burned!
After cooking, leave the glass covering open until the
burner no longer emits heat. Otherwise, the glass plate
could burst.
Operation
• Open the tinted glass covering.
• Turn the rotary switch of the burner you wish to use to the
ignition position (large flame) and press.
• Ignite the burner with a gas lighter or match or cigarette
lighter.
• Continue to press the rotary switch for a further 5-10 seconds
to ensure that the automatic flame guard takes effect.
• Release rotary switch and turn to the desired setting (large
or small flame).
• If ignition was unsuccessful, repeat the procedure.
Never store easily inflammable objects such as dishtowels,
serviettes, etc., near the cooker. Danger of fire!
Accessories
10-1 Accessories
Chapter 10: Accessories
Only the most important accessories are described in this
chapter.
Please note the manufacturers‘ detailed operating instructions,
installation instructions and circuit diagrams for the accessories.
10.1 Towbar coupling
The following applies for the towbar coupling:
• If a towbar coupling has been subsequently mounted, it
must be entered in the vehicle's documents by the Technical
Surveyance Association (TÜV). The necessary documents
are enclosed with the towbar coupling.
• Note the permitted load of 2,250 kg for the rear axle.
• Note the permitted braked trailing load of 1,000 kg. (No extra
load possible.)
• Permitted drawbar load: 75 kg.
Entry in the vehicle's documents
• Have your HOBBY dealer mount external constructions. He
will also handle all the formalities for you.
• If this is not the case, drive your mobil home together with
the necessary expertise for the external construction to
the TÜV, where the external construction will be inspected
and a corresponding expertise issued for registration in the
vehicle's documents.
• Present the expertise to the Driver and Vehicle Licensing
Agency, where the amendments will be entered in the vehicle
documents.
In addition, note the manufacturer‘s operating instructions.
Accessories
Maintenance and Care
11-1
Maintenance and Care
Chapter 11: Maintenance and Care
The operator of the vehicle is responsible for having maintenance carried out on schedule.
11.1 Maintenance
Replace the safety regulator for gas at least every 6
Maintenance intervals
years!
There are stipulated maintenance intervals for the mobile home
and its equipment.
For safety reasons, spare parts for equipment must conform
with the manufacturer‘s instructions and must be installed
by him or a duly authorised representative.
Also note the maintenance intervals for the basic Ford
vehicle.
The following applies for maintenance intervals:
• Have the first maintenance carried out by a HOBBY dealer
12 months after the vehicle was first registered.
• All further maintenance should be carried out once a year
by a HOBBY dealer.
• The maintenance of the basic vehicle as well as all built-in
equipment should be carried out at the intervals given in
each operating manual.
11.2 Airing
For a comfortable climate inside the caravan, there must be
sufficient ventilation. This also avoids corrosive damage due
to condensation.
Condensation is caused by
- insufficient volume inside the caravan
- breathing and perspiration of the passengers
- bringing in damp clothing
- operating a gas cooker
The gas fittings must be checked every 2 years by an expert
for liquid gas and confirmed on the certificate in accordance
Ensure that there is a sufficient exchange of air to avoid
with DGVW G 607.
damages due to the build-up of condensation!
Maintenance and Care 11-2
11.3 Care
Cleaning the exterior
The vehicle should not be washed more often than necessary.
The following applies when waxing the surfaces:
• The varnished surfaces should be treated occasionally with
wax. Note the application instructions given by the wax
manufacturers. We recommend products made by VALMA,
turtle, Flash or System.
Wash the vehicle only in places provided for this purpose.
Using cleaning materials sparingly. Aggressive cleansers,
such as wheel rim cleaners, damage the environment.
The following applies when cleaning the exterior:
• Rinse the vehicle with a weak jet of water.
• Wash the vehicle with a soft sponge and a commercial
shampoo solution. Rinse the sponge often.
• Then rinse with a generous amount of water.
• Dry the vehicle with a suede cloth.
• After washing the vehicle, leave it standing outside to dry
off completely.
The following applies when polishing the surfaces:
• In exceptional cases, use polish to refinish weathered
varnished surfaces. We recommend solvent-free polishing
paste.
Use polish only in special cases and as seldom as possible,
because polish removes the top layer of varnish. Frequent
polishing causes extreme wear.
The following applies for tar and resin stains:
• Tar and resin stains as well as other organic stains can be
removed with petroleum ether or spirits.
Do not use aggressive solutions such as products contai-
Dry the headlights and sockets thoroughly, as water collects
there easily.
ning ester or ketone.
11-3
Maintenance and Care
The following applies for damages:
• Repair damages immediately to avoid further damages due
to corrosion. Ask your HOBBY dealer for assistance.
Windows and doors
The following applies for their care:
• Rub the rubber joints around doors and windows lightly with
talcum powder.
• Clean acrylic glass panes only with a clean, wet sponge
and a soft cloth. Cleaning with a dry cloth may scratch the
panes.
Do not use strong and aggressive solutions that contain
softeners or solvents!
You will find talcum powder in auto accessory shops.
Cleaning the interior
The following applies for cushions, upholstery and curtains:
• Clean cushions with a soft brush or hoover.
• Have very dirty upholstery and curtains dry-cleaned. Do not
wash them yourself!
• If necessary, wash them carefully using the foam from mildaction detergent.
The following applies for carpeted floors:
• Clean with a hoover or brush.
• If necessary, treat with carpet shampoo or a shampooing
machine.
The following applies for furniture surfaces:
• Clean the surface of wooden furniture with a damp cloth or
sponge.
• Rub dry with a dust-free cloth.
• Use mild furniture polish.
Never use strong-action cleansers or intenvise furniture
polish, because this could scratch the surface!
The following applies for the toilet:
• Clean with a neutral liquid cleanser and a cloth that does
not scratch.
Never use strong-action cleansers in the toilet!
Maintenance and Care
Accessories
11.4 Operating in winter
The following applies for their care:
• Clean plastic parts (e.g. fenders, skirts) with water of up to
60° C and mild household cleansers.
• Clean greasy or oily surfaces with spirits.
• If necessary, lubricate door hinges and leveling supports.
• Clean fresh water pipes, the fresh water and sewage tanks
once a year.
Preparations
Do not use strong-action cleansers, because these could
scratch the surface!
Remove all spray cans containing cleansing and care solutions from the vehicle after you have finished! Otherwise
they may explode if the temperature exceeds 50° C!
The following applies for preparations:
• Check vehicle for damage to varnish or rust. If necessary,
repair damage.
• Ensure that water cannot get into the compulsory ventilation
in the floor or the heating.
• Protect the metal parts of the underbody against rust with
a wax preservative.
• Use a suitable material to preserve the exterior varnished
surfaces.
Operating in winter
During operation in winter, condensation is caused when using
the vehicle in low temperatures. Sufficient ventilation is extremely important to ensure that the quality of the air inside the
vehicle is good and to avoid damages to the vehicle caused
by condensation.
11-4
11-5
Maintenance and Care
The following applies for ventilation:
• When heating the vehicle, turn up the heating to the highest
position and open the cupboards in the ceiling, curtains as
well as blinds. This ensures optimal ventilation.
• Only turn on the heating when the circulation fan is on.
• Air all cushions in the morning; air the storage compartments
and dry damp spots.
At the end of the winter season
The following applies for the care of the vehicle:
• Thoroughly wash the underbody and the motor. This removes
corrosive thawing agents (salts, alkali).
Wash the vehicle only in places provided for this
purpose.
If, despite this, condensation should build up somewhere,
simply wipe it away.
Using cleaning materials sparingly. Aggressive cleansers,
such as wheel rim cleaners, damage the environment.
Frost protection
Winterizing your vehicle
If the interior is sufficiently heated, the fresh water tank, water
pipes and water heater should not freeze.
The following applies for the sewage tank:
• In very low temperatures, add antifreezer or common salt to
the sewage.
• Store sewage outside the vehicle.
• Leave the drain cock of the sewage tank open.
In general:
• Only leave your mobile home in a closed space if it is dry
and easy to air. Otherwise, it is better to leave your mobile
home in the open.
The following applies for the interior fittings:
• Empty the refrigerator and clean it. Leave the refrigerator
door open.
Maintenance and Care 11-6
• Leave storage compartments and cupboards open to air.
• Place cushions and mattresses in such a way that they will
not come into contact with condensation.
• If necessary, heat the mobile home to avoid mildew due to
condensation.
• Place 3 kg of common salt in a bowl to keep the interior of
the vehicle dry. The salt will soak up any moisture. Change
it regularly.
• Disconnect batteries; ideally, remove them and check once
a month if they are still charged, otherwise charge them.
• Turn off the 12 V master switch.
The following applies for the exterior of the caravan and
the basic vehicle:
• Use a suitable material to preserve exterior varnished surfaces.
• Protect the metal parts of the underbody against rust with
a wax preservative.
• To care for the wheels, jack up the vehicle or move it from
one spot to another every two months.
• Use a tarpaulin, leaving space between it and the vehicle to
ensure sufficient airing.
• Leave the compulsory ventilation open.
• Air your mobile home thoroughly every three to four
weeks.
• Check the antifreezer in the cooling circuit, refilling if necessary.
The following applies for containers:
• Empty the fresh water tank with a pump or waste valve and
clean it.
• Empty and clean the sewage tank.
• Empty and clean the WC tank.
• Completely empty the water heater by switching the fresh
water pump on the on-board control centre to “off“ and
opening all faucets.
• Ensure that water cannot get into the compulsory ventilation
in the floor or the heating.
Also note the information and operating instructions given
by the manufacturers of the built-in equipment.
Sanitation and Environmental Protection
12-1 Sanitation and Environmental Protection
Chapter 12: Sanitation and
Environmental Protection
12.1 The environment and traveling
Environmentally fair use
It is only natural that owners of mobile homes and caravans
have a special responsibility for the environment. Always use
your vehicle in an environmentally friendly way.
The following applies for sewage:
• Collect sewage on board only in built-in sewage tanks or, if
necessary, in suitable containers!
• Never empty sewage in open spaces or down manholes!
Generally, the public sewage system does not run through
clarification plants.
• Empty your sewage tank as often as possible, even if it is not
completely full (hygiene). If possible, rinse out the sewage
tank with fresh water after emptying.
The following applies for environmentally fair use:
• Do not spoil the peace and cleanliness of nature.
• Dispose of sewage, excrements and wast in the proper
way.
• Set an example so that mobile home and caravan drivers
are not generally held to be pollutionists.
Only empty your sewage tank in special places for sewage
disposal, but never in open spaces! Generally, sewage
stations are found in motorway service areas, campsites
or petrol stations.
Sanitation and Environmental Protection 12-2
Sanitation
• Never allow the excrement tank to become too full. Empty
the tank immediately as soon as the level indicator lights
up.
• Never empty excrements down manholes! Generally, the
public sewage system does not run through clarification
plants.
Empty the excrement tank in special places for sanitary
disposal, but never in open spaces!
The following applies for excrements:
• Only use approved sanitary cleansing products in the excrement tank.
You may be able to avoid the use of sanitary liquids by
installing an activated carbon filter system (sold as an
accessory)!
Use sanitary liquids very sparingly. An overdose is no guarantee of preventing odours!
12-3 Sanitation and Environmental Protection
12.2 Returning the vehicle
If you should ever have to give up your mobile home and have
it recycled, the manufacturer of the basic vehicle is responsible
for taking it back (status at the time of printing).
This means that your HOBBY mobile home will be taken back
free of charge by any Ford dealer and expertly recycled.
The following applies for waste:
• Separate your waste and put appropriate materials in the
recycling bins.
• Empty waste bins as often as possible in the appropriate
bins or containers. This avoids unpleasant and problematic
waste from building up on board.
The following applies for picnic spots:
• Always leave picnic spots clean and tidy, even if you dispose
of someone else‘s waste.
Careful use of the environment is not only in the interest
of nature, but also of mobile home and caravan drivers
everywhere!
Sanitation and Environmental Protection
Technical Data
13-1
Technical Data
Chapter 13: Technical Data
13.1 Weights according to 92/21/EWG, 2007 season
Model
Series
Weight of basic vehicle
Driver
Diesel
(kg)
Basic
equipment
Mass when vehicle
is ready to start
Techn. perm.
overall weigh
T 500 GFSC
Van (A)
2553
75
68
121
2817
3500
Overload
weight
No. of
seats
Conventional
loading
Overload
weight
Length of
vehicle
Personal
equipment
Remaining
overload weight
683
4
225
458
6,1
101
357
These figures refer to the standard vehicle without extra equipment. Deviations of up to 5 % are possible.
Technical Data 13-2
13.2 Inflation pressures
Tires
tire pressure (bar)
Basis
Michelin XC Camping
215/75 R 16 C
front: 3.5 rear: 5.5
FORD
other tire manufacturers*
185/75 R 16 C
front: 4.7 rear: 3.5
FORD
215/75 R 16 C
front: 3.5 rear: 4.75
FORD
* These inflation pressures are only valid for standard tires by
alternative manufacturers. In principle, we try to equip all vehicles with “Michelin Camping“ tires. In times of high demand,
however, Michelin is unable to fulfil all demands. In this case,
alternative brands are mounted, e.g. Pirelli.
Index
I-1
Index
Index
A
Accessories
care of 11-4
Airing 11-1
B
Battery charger
location 06-7
Beds, rearranging
lift-off table construction 07-12
Brakes 02-6, 04-7
Breakdown of devices 06-8
C
Caravan battery 06-10
changing the battery 06-10
features 06-9
location 06-9
Care 11-2
of windows and doors 11-3
of furniture surfaces 11-3
of cushions and upholstery,
curtains 11-3
of carpeted floor 11-3
of toilet 11-3
of accessories 11-4
Changing a tire 04-7
Charging procedure 06-7
with running motor 06-9
protecting the device 06-8
protection against total discharge 06-8
Chassis 03-1
Checking the gas supply 9-1
Circuit diagram
interior 06-13
Compulsory ventilation 05-2
Condensation 05-8/11-1
Cupboard doors
with push-button knob 07-2
D
Day and night position
overview 07-14
Dimming system 07-10
Doors and flaps
interior 07-1
Doors
opening and closing 05-4
Driving 02-7
curves 02-7
protecting your tires 04-1
in reverse 02-7
Driving in reverse 02-6
Driving through curves 02-6
E
Economic driving 02-7
Electric power supply 06-6
Electric power supply unit 06-7
Electric system
fuses 06-7
Electrical installations
safety instructions 06-1
Emergency equipment 02-9
fire extinguisher 02-10
first-aid kit 02-9
warning triangle 02-10
Entrance door 05-5/07-1
Entrance step 03-8
Environment 12-1
waste 12-3
sewage 12-1
sanitation 12-2
excrements 12-2
picnic spots 12-3
Environmental protection 12-1
Exterior gas supply 05-7
Exterior mirror 05-8
Exterior shower
water supply 05-7
Cleaning the exterior 11-2
polishing 11-3
waxing 11-2
Exterior socket 05-8
Externally mounted constructions 03-9
F
Fire extinguisher 02-10
First-aid kit 02-7
Flaps
opening and closing 05-5
Flushing toilet 08-4
Fresh water filler neck 05-7
Fresh water tank 08-1
to empty 08-2
to get water 08-1
to fill with water 08-1
Furniture surfaces
care of 11-2
Fuse protection of elec. system
12 V circuits 06-11
information on fuses 06-11
starter battery 06-11
G
Gas 09-1
Gas bottle container 09-3
Gas cooker 09-7
to operate 09-8
putting into operation 09-8
Gas supply 09-3
General inspection 02-2
H
Headrests
adjusting the height 07-14
Heating
to turn off 09-6
to operate 09-5
location of operating device 09-5
malfunction 09-6
Hot water supply
function 08-9
I
Inflation pressure 04-2
Inflation pressure values 13-2
Index
K
Keys to the vehicle 05-5
Knockout windows 07-2
L
Levelling supports 03-7
Loading 02-5/03-1
LPG fittings
waste gas 09-2
quick-action stop valves
and valves 09-4
location 09-4
built-in objects
and changes 09-1
checking 09-1
regulators and valves 09-2
Luggage trunk flap 05-5
M
Mains supply 06-3
Maintenance intervals 11-1
Maintenance
brake system 04-7
Maximum speeds 02-11
O
On-board control panel 06-1
Operating in winter 11-4
sewage tank 11-5
ventilation 11-5
frost protection 11-5
preparations 11-4
Operating the cooker 09-2
P
Petrol 02-7
Preparing the vehicle 02-2
Protection against total discharge
06-4
R
Repair kit 04-4
Refrigerator 09-7
230 V operation 09-7
to operate 09-7
modes of operation 09-7
gas operation 09-7
ventilation 05-3
locking the door 09-7
operating in winter 05-3
Registration 02-2
Regulator 09-2
Resin stains 11-3
Returning the vehicle 12-3
Roof load 02-6
S
Saving energy 02-8
Seatbelts
in caravan 07-14
Seating arrangements
overview 07-13
Seats
in caravan 07-14
Securing the vehicle 02-14
Selecting a parking space 02-14
Service flaps 05-1
Sewage tank 08-3
to empty 08-3
Shunting 02-6
Skylights 07-4
in washroom 07-10
Snow chains 04-3
Sunroof
with combined blind 07-5
Sunshade 07-3
combined with blinds 07-3
to adjust 07-3
Switching electric consumption
02-14
T
Tank flaps 05-1
Tar stains 11-3
Technical data sheet 13-1
Toilet flap 05-6
Toilet
care of 11-3
Toilet
use of 08-5
C 200 S cassette 08-6
emptying cassette 08-7
Towbar coupling 10-1
Tread depth 04-2
Tires 04-1
V
Valves 09-2
W
Warning triangle 02-8
Waste gas 09-2
Water boiler 08-9
to empty 08-12
to fill 08-9
operating in summer 08-10
malfunction 08-12
Water supply for exterior shower 05-7
Water system 02-14
Weight of accessories 03-6
Wheel rims 04-3
Winterizing your vehicle 11-5
exterior of caravan and basic vehicle 11-6
containers 11-6
interior fittings 11-5
I-2
Appendix
A-1
Appendix
Calculating masses for HOBBY mobile homes
The following table enables you to calculate the mass of your own mobile home on the basis of the mass data given in this manual.
This calculation must always result in a positive remaining load in order to fulfil current legal requirements.
To determine your remaining load, simply subtract the "mass when the vehicle is ready to start", the "conventional load", all "additional
equipment" as well as your "personal luggage" from the "technically permissible overall mass". Simply enter the date for your personal
mobile home in the table on the next page. If you have any questions or if anything is unclear, your HOBBY dealer will be pleased
to assist you.
Your
HOBBY Motor Home Plant
Ing. Harald Striewski GmbH
Appendix
Model:
Technically permissible overall mass:
Mass when the vehicle is ready to start (incl. gas, water, electricity, driver and fuel):
-
Conventional load (no. of seats [excl. driver] x 75 kg:
-
Additional equipment:
1.)
-
2.)
-
3.)
-
4.)
-
5.)
-
6.)
-
7.)
-
8.)
-
9.)
-
10.)
-
11.)
-
12.)
-
13.)
-
14.)
-
15.)
-
Personal luggage = (10 x N) + (10 x L):
N - Total number of seats (incl. driver)
L - Length of vehicle in meters
Remaining load:
Under no circumstances may the technically permissible overall mass of
the mobile home be exceeded!
A-2