1
Introduction to OPC
Tutorial
Introduction to OPC
Tutorial
This manual is a product of Matrikon Inc.
Matrikon Inc.
Suite 1800, 10405 Jasper Avenue
Edmonton, AB T5J 3N4
Canada
Phone: 780.448.1010
Fax: 780.448.9191
www.matrikonopc.com
Document Revision History:
Date
Document
Version
Description
Author
2002-10-31
1.0
Initial document.
LE
2002-11-08
2.0
Proposal creation.
LE
2010-11-06
3.0
Converted to standard template and updated
information.
BJH, WD,
LB
MatrikonOPC – Introduction to OPC Tutorial
2
SOFTWARE VERSION
Version:
N/A
DOCUMENT VERSION
Version:
3.0
COPYRIGHT INFORMATION
© Copyright 2010, Matrikon Inc. All rights reserved. No part of this document may be reproduced, stored in a
retrieval system, translated, or transmitted in any form or by any means, electronic, mechanical, photocopying, recording,
or otherwise, without prior written permission of Matrikon Inc.
CONFIDENTIAL
The information contained herein is confidential and proprietary to Matrikon Inc. It may not be disclosed or transferred,
directly or indirectly, to any third party without the explicit written permission of Matrikon Inc.
LIMITATIONS
Matrikon has made its best effort to prepare this manual. Matrikon makes no representation or warranties of
any kind with regard to the completeness or accuracy of the contents herein and accepts no liability of any kind
including without limitation warranties of merchantable quality, satisfactory quality, merchantability and
fitness for a particular purpose on those arising by law, statute, usage of trade, course of dealing or otherwise.
Matrikon shall not be liable for any losses or damages of any kind caused or alleged to be caused directly or
indirectly from this manual.
LICENSE AGREEMENT
This document and the software described in this document are supplied under a license agreement and may only be used
in accordance with the terms of that agreement. Matrikon reserves the right to make any improvements and/or changes to
product specifications at any time without notice.
TRADEMARK INFORMATION
The following are either trademarks or registered trademarks of their respective organizations:
Matrikon and MatrikonOPC are trademarks or registered trademarks of Matrikon Inc.
OTHER
MatrikonOPC™ is a division of Matrikon™ Inc.
MatrikonOPC – Introduction to OPC Tutorial
3
Table of Contents
Introduction ..................................................................................................................... 6
MatrikonOPC Tools General Overview ................................................................................... 6
Downloading and Installing MatrikonOPC Tools ...................................................................... 7
Tutorial Overview .............................................................................................................. 7
Configure the Data Source ............................................................................................... 9
Creating Sample Data in Microsoft Excel ............................................................................... 9
Configure the OPC Server ............................................................................................... 10
Using an OPC Client (MatrikonOPC Explorer) ................................................................. 14
Establishing Connection Between OPC Explorer and OPC Server for DDE ................................ 14
Adding Data Points in MatrikonOPC Explorer ....................................................................... 16
Testing the Connection Between MatrikonOPC Explorer and Microsoft Excel ............................ 19
OPC Writing in MatrikonOPC Explorer .............................................................................. 19
OPC Reading in MatrikonOPC Explorer ............................................................................. 21
Exchanging Data Between TWO OPC Servers ................................................................. 22
Configure OPC Client (MatrikonOPC Data Manager) Connection Group .................................... 22
Add OPC Data Points ........................................................................................................ 24
Testing the OPC Connection .............................................................................................. 30
Modifying the Values in MatrikonOPC Data Manager .......................................................... 30
Modify Values in Microsoft Excel ..................................................................................... 31
Modifying Values in the MatrikonOPC Server for Simulation and Testing .............................. 32
Troubleshooting ............................................................................................................. 35
Problems and Solutions .................................................................................................... 35
Questions and Answers .................................................................................................... 41
Licensing ........................................................................................................................ 42
Contacting Support .......................................................................................................... 42
Table of Appendices
Appendix A Distributed COM (DCOM) .......................................................................... 44
DCOM Configuration Utility ............................................................................................... 44
Default Properties ............................................................................................................ 44
Security Permissions ........................................................................................................ 45
Server Identity ................................................................................................................ 49
Default Protocols ............................................................................................................. 49
Remote Program ID ......................................................................................................... 50
Table of Figures
Figure
Figure
Figure
Figure
Figure
Figure
Figure
Figure
Figure
1
2
3
4
5
6
7
8
9
-
OPC Architecture .............................................................................................. 6
Microsoft Excel Sample Data ............................................................................ 9
MatrikonOPC Server for DDE Configuration Screen ........................................ 10
New Alias Group ............................................................................................. 11
Insert New Alias Window ............................................................................... 12
Insert New Alias - Settings ............................................................................ 12
New Aliases.................................................................................................... 13
MatrikonOPC Explorer .................................................................................... 15
Icon - Server Connected ................................................................................. 15
MatrikonOPC – Introduction to OPC Tutorial
4
Figure
Figure
Figure
Figure
Figure
Figure
Figure
Figure
Figure
Figure
Figure
Figure
Figure
Figure
Figure
Figure
Figure
Figure
Figure
Figure
Figure
Figure
Figure
Figure
Figure
Figure
Figure
Figure
Figure
Figure
Figure
Figure
Figure
Figure
10
11
12
13
14
15
16
17
18
19
20
21
22
23
24
25
26
27
28
29
30
31
32
33
34
35
36
37
38
39
40
41
42
43
-
Server Status ...............................................................................................
Add Tags Button ...........................................................................................
MatrikonOPC Explorer Browsing Window .....................................................
Configured Tags ...........................................................................................
Validated Data Point ....................................................................................
Microsoft Excel Data Points - OPC Explorer ..................................................
Write Values Function ..................................................................................
Write Values Window ...................................................................................
OPC Write to Excel .......................................................................................
Value Change Confirmation ..........................................................................
MatrikonOPC Data Manager Configuration Window ......................................
Add Data Manager Group Window ................................................................
Configured OPC Data Manager Group ...........................................................
Simulated Data Points in MatrikonOPC Server for Simulation and Testing ...
Configured Data Points in MatrikonOPC Server for DDE Address Space ........
Add Shared Point Window ............................................................................
Completed Shared Point Configuration .........................................................
Add Shared Point Window (Options Tab) .....................................................
Active OPC Data Manager Configuration.......................................................
Write Value Window .....................................................................................
Verified Value Change in Microsoft Excel ......................................................
Verified Value Change in MatrikonOPC Server for Simulation and Testing ...
Changed Excel Value ....................................................................................
Value Change in MatrikonOPC Data Manager ...............................................
Verified Value Change in MatrikonOPC Server for Simulation and Testing ...
Write Values Window ...................................................................................
Changed Value in MatrikonOPC Server for Simulation and Testing ...............
Verified Value Change in Excel .....................................................................
Registry Editor .............................................................................................
Program ID Branch ......................................................................................
Distributed COM Configuration Properties Window ......................................
Distributed COM Configuration Security Tab ................................................
Registry Value Permissions Window ............................................................
Add Users and Groups Window ....................................................................
16
16
17
18
18
19
19
20
20
21
23
24
24
25
26
27
28
29
29
30
31
31
32
32
32
33
33
34
36
37
46
47
48
48
Table of Tables
Table 1 - MatrikonOPC Support Regional Contact Information ....................................... 43
Table 2 - After-Hours Support ........................................................................................ 43
MatrikonOPC – Introduction to OPC Tutorial
5
Introduction
MatrikonOPC™ is the world’s leading provider of open data connectivity products for industrial
applications – from the plant floor to the enterprise. MatrikonOPC is committed to the success of
every customer. To deliver on this promise, MatrikonOPC provides secure and reliable software,
expert live support, and extensive OPC training services around the world. Through its Global
Partner Network, MatrikonOPC also builds strong, working relationships with third-party vendors
and local system integrators to maximize the value delivered to end-customers. With offices in
North America, Europe, Asia-Pacific, and the Middle East, MatrikonOPC provides local service on a
global scale.
This document is designed as a guide to use the following MatrikonOPC tools (all of which must be
installed on the local computer):
MatrikonOPC Server for DDE
MatrikonOPC Explorer
MatrikonOPC Server for Simulation and Testing
MatrikonOPC Data Manager
Those applications listed above are all available for download for evaluation purposes. For more
information, refer to Downloading and Installing MatrikonOPC Tools.
Note: To complete this tutorial, Microsoft Excel must also be installed on the local computer.
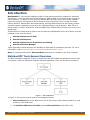
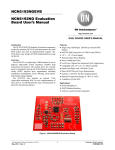
MatrikonOPC Tools General Overview
The OPC Architecture diagram (Figure 1) depicts how the OPC software applications connect with
one another. Each box denotes a separate software application. Each line denotes a connection.
Figure 1 - OPC Architecture
In Figure 1, the process control system is arranged as follows:
1. Microsoft Excel acts as the data source. All of the process control data is read from, and
written to, Microsoft Excel.
2. The MatrikonOPC Server for DDE connects Microsoft Excel to the OPC client.
MatrikonOPC – Introduction to OPC Tutorial
6
3. MatrikonOPC Explorer acts as the data sink. It reads data and commands, and writes
data back to Microsoft Excel.
4. The MatrikonOPC Server for Simulation and Testing simulates a connection to a
sample device or sample application. It transfers simulated data that is read by
MatrikonOPC Explorer.
5. MatrikonOPC Data Manager has OPC client functionality that connects the two OPC
servers. Sample tag values are shared between the MatrikonOPC Server for Simulation
and Testing and the MatrikonOPC Server for DDE.
Downloading and Installing MatrikonOPC Tools
All of the MatrikonOPC software used in this tutorial are available as free evaluation versions that
can be downloaded from the following locations:
MatrikonOPC Explorer:
http://matrikonopc.com/products/opc-desktop-tools/opc-explorer.aspx
MatrikonOPC Server for DDE:
http://www.matrikonopc.com/opc-drivers/168/base-driver-details.aspx
MatrikonOPC Server for Simulation and Testing:
http://matrikonopc.com/products/opc-drivers/opc-simulation-server.aspx
MatrikonOPC Data Manager:
http://www.matrikonopc.com/products/opc-data-management/opc-data-manager.aspx
To install each software package, download and run each executable. Follow the instructions that
accompany each installation.
Notes:
The MatrikonOPC Server for DDE and MatrikonOPC Data Manager are meant to be
used in this tutorial for demonstration purposes only and come with a free 30-day fullyfunctional demo license. After the demonstration period has expired, the software ceases to
operate until a registered version is installed.
The MatrikonOPC Explorer and MatrikonOPC Server for Simulation and Testing are
fully-functional OPC testing tools and no licensing is required for these applications.
Tutorial Overview
The exercises in this tutorial describe the function of each MatrikonOPC application while providing
guidance through the process of configuring the MatrikonOPC Server for DDE. Working through
this tutorial provides the necessary knowledge to help troubleshoot OPC software implementations
by highlighting where problems may occur when connecting any OPC software applications.
The MatrikonOPC Server for DDE is configured using the following steps:
1. Use Microsoft Excel to create sample data. Refer to Configure the Data Source for more
information.
2. Configure the connection between the DDE server (using MatrikonOPC Server for DDE)
and Microsoft Excel. Refer to Configure the OPC Server for more information.
3. Configure MatrikonOPC Explorer to read and write values to and from Microsoft Excel
using the MatrikonOPC Server for DDE. Refer to Using an OPC Client (MatrikonOPC
Explorer) for more information.
MatrikonOPC – Introduction to OPC Tutorial
7
4. Connect MatrikonOPC Explorer to the MatrikonOPC Server for Simulation and
Testing. Then connect the two OPC servers using MatrikonOPC Data Manager. Refer to
Exchanging Data Between Two OPC Servers for more information.
MatrikonOPC – Introduction to OPC Tutorial
8
Configure the Data Source
OPC Technology provides the means to access data contained within a data sources using OPC
server functionality. For an OPC server to access data, the data source itself must be available for
connection and must contain valid data to access. This tutorial shows how to establish an OPC
connection with a data source (in this case, Microsoft Excel), using MatrikonOPC tools.
Creating Sample Data in Microsoft Excel
The first step is to ensure that the data source is running and has data. This is done by creating
some sample data in various cells in Microsoft Excel and save the data in a workbook file.
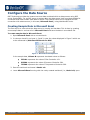
To create sample data in Microsoft Excel:
1. Open Microsoft Excel with a new workbook.
2. In columns A and B, and rows 1, 2 and 3, enter the values displayed in Figure 2 which are
to be referenced by MatrikonOPC Server for DDE.
Figure 2 - Microsoft Excel Sample Data
In the sample data, Column B represents simulated values as follows:
FIC101 represents the value of Flow Controller 101.
PIC204 represents the value of Pressure Controller 204.
TIC306 represents the value of Temperature Controller 306.
3. Save the workbook and name it Book1.xls.
4. Leave Microsoft Excel running with the newly-created workbook (i.e., Book1.xls) open.
MatrikonOPC – Introduction to OPC Tutorial
9
Configure the OPC Server
With completion of the Configure the Data Source section, a data source has been established
(i.e., Microsoft Excel) and contains valid data points. The MatrikonOPC Server for DDE can be
used to establish a connection to the sample data in Book1.xls.
The MatrikonOPC Server for DDE is used to establish a connection to Microsoft Excel (which
uses the DDE protocol to provide data access functionalities to other applications), and provide OPC
access to Microsoft Excel data to any OPC client (MatrikonOPC Explorer in this tutorial). It
provides key functionality such as read and write access to all valid DDE server items, and DDE
server connection status. The MatrikonOPC Server for DDE can be used by any OPC-compliant
application such as an HMI or Process Historian, to connect to DDE servers such as Microsoft
Excel, Matlab, the Six Sigma statistical package MiniTab, and others.
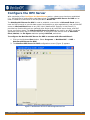
To configure the MatrikonOPC Server for DDE to connect with Microsoft Excel:
1. Click on the Windows Start button. Select Programs -> MatrikonOPC -> DDE ->
MatrikonOPC Server for DDE.
2. The MatrikonOPC Server for DDE configuration screen (Figure 3) appears.
Figure 3 - MatrikonOPC Server for DDE Configuration Screen
MatrikonOPC – Introduction to OPC Tutorial
10
3. In the Current configuration pane (on the left side of the screen), select Alias
Configuration.
Note: When Alias Configuration is selected, the Contents pane on the right side of the
screen appears and initially shows that no aliases have been created.
4. From the Edit menu, select Insert Alias Group.
Or,
Right-click your mouse on Alias Configuration and select Insert Alias Group from the
displayed menu.
5. An alias group folder called New Alias 1 appears beneath the Alias Configuration item.
The contents of the new alias group (currently blank) are shown in the Contents pane
(Figure 4).
Figure 4 - New Alias Group
6. In the Current configuration pane, select the new alias group, New Alias 1.
7. From the Edit menu, select Insert New Alias.
Or,
MatrikonOPC – Introduction to OPC Tutorial
11
Right-click your mouse in the Contents pane and select Insert Alias Group from the
displayed menu.
8. The Insert New Alias window (Figure 5) appears.
Note: The Insert New Alias window allows the OPC server to reference specific values in
the Microsoft Excel file with the MatrikonOPC Server for DDE.
Figure 5 - Insert New Alias Window
9. For each tag value listed in Book1.xls, insert a new alias as follows:
a. Name: Tag name (e.g., FIC101).
b. Item Path: The Excel cell reference. For example, enter
excel|[book1.xls]sheet1!r1c2 for FIC101’s value. In Microsoft Excel, the pipe
(|) is used to separate the file name.
Note: The Item Path syntax is formatted according Microsoft Excel
requirements, not MatrikonOPC requirements. Therefore, data
access syntax may be different for other DDE applications. Make sure
you have spelled the file name and item path correctly.
10. Leave the rest of the fields as is (i.e., the default settings) as shown in Figure 6.
Figure 6 - Insert New Alias - Settings
11. Click on the Save button to save the new alias.
Or,
Click on the Save & Create new button to enter another alias.
MatrikonOPC – Introduction to OPC Tutorial
12
12. Enter the remaining aliases:
a. Name: PIC204
Item Name: excel|[book1.xls]sheet1!r2c2
b. Name: TIC306
Item Name: excel|[book1.xls]sheet1!r3c2
13. The Configuration screen should now appear as shown in Figure 7.
Figure 7 - New Aliases
14. The MatrikonOPC Server for DDE is now configured properly and connected to Microsoft
Excel. This means that any OPC client (e.g., MatrikonOPC Explorer) can connect with the
configured sample data in Book1.xls using the interface provided by the DDE server.
MatrikonOPC – Introduction to OPC Tutorial
13
Using an OPC Client (MatrikonOPC Explorer)
Once the MatrikonOPC Server for DDE has been configured, the connection between Microsoft
Excel and the MatrikonOPC Server for DDE can be utilized by an OPC client to access Excel
data. The next step is to configure MatrikonOPC Explorer to read and write values to and from
Microsoft Excel through a connection to the MatrikonOPC Server for DDE.
This section shows how to use MatrikonOPC Explorer to interface with the MatrikonOPC Server
for DDE to access data from a DDE server (Microsoft Excel).
Configuration steps include:
Opening MatrikonOPC Explorer and connecting to the MatrikonOPC Server for DDE.
Refer to Establishing Connection Between OPC Explorer and OPC Server for DDE for
more information.
Adding data points to be read from the connection to the MatrikonOPC Server for DDE
that originate from Microsoft Excel. Refer to Adding Data Points in OPC Explorer for
more information.
Monitoring the connection and current values of the Microsoft Excel data points within OPC
Explorer. This includes writing to the configured data points in Microsoft Excel by changing
the tag value in OPC Explorer and seeing the change appear in the Excel workbook,
Book1.xls. Refer to Testing the Connection Between OPC Explorer and Microsoft
Excel for more information.
Establishing Connection Between OPC Explorer and OPC Server
for DDE
To configure MatrikonOPC Explorer:
1. Click on the Windows Start button. Select Programs -> MatrikonOPC -> Explorer ->
MatrikonOPC Explorer.
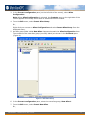
2. The MatrikonOPC Explorer configuration screen appears (Figure 8). Listed in the
navigation pane on the left side of the screen, are the names of the OPC servers installed on
the local computer.
Note: The MatrikonOPC Server for DDE (previously installed in this tutorial) should appear
on this list (Matrikon.OPC.DDE.1). If it does not, contact MatrikonOPC Support.
MatrikonOPC – Introduction to OPC Tutorial
14
Figure 8 - MatrikonOPC Explorer
3. Right-click your mouse on Matrikon.OPC.DDE.1 and select Connect from the displayed
menu.
Or,
Click on the Connect button in the OPC Server Connection Options screen section.
4. Connection to the OPC server can be verified by:
The presence of the blue MatrikonOPC icon next to the server name in the navigation
pane (Figure 9).
Figure 9 - Icon - Server Connected
In the Server Status screen section, Yes appears next to the Connected field
(Figure 10).
MatrikonOPC – Introduction to OPC Tutorial
15
Figure 10 - Server Status
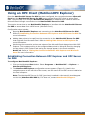
Adding Data Points in MatrikonOPC Explorer
To add data points in MatrikonOPC Explorer:
1. In the OPC Server Connection Options screen section, click on the Add Tags button
(Figure 11).
Figure 11 - Add Tags Button
MatrikonOPC – Introduction to OPC Tutorial
16
2. The OPC Explorer browsing window appears (Figure 12). The browsing window is specific
to the OPC server currently selected and connected.
Figure 12 - MatrikonOPC Explorer Browsing Window
3. In the Available Items screen section, double-click your mouse on the Configured
Aliases folder to open it display the New Alias 1 folder.
4. Click on the New Alias 1 folder. The Microsoft Excel tags, for which aliases had been
created earlier in this tutorial, now appear in the Available Tags screen section.
5. Double-click your mouse on the FIC101 tag.
6. The tag name appears in the Item ID field (Figure 13).
Note: If the selected data point does not already appear in the Tags to be added screen
section, click on the right-pointing arrow button to the left of this section.
MatrikonOPC – Introduction to OPC Tutorial
17
Figure 13 - Configured Tags
7. The data tag appears in the Tags to be added screen section, and displays a blue question
mark.
8. Select the data tag, and from the File menu select the Validate Tags option.
Or,
Click on the Validate Items
icon.
9. If the OPC Server for DDE can access the tag from Microsoft Excel, the blue question
mark changes to a green checkmark (Figure 14).
Figure 14 - Validated Data Point
MatrikonOPC – Introduction to OPC Tutorial
18
Note: If OPC Explorer cannot read the tag from Microsoft Excel, the blue question mark
changes to a red X. If this happens, make sure the correct Item Path was entered when
the alias was created in the Configure the OPC Server section of this tutorial.
10. Repeat steps 5 through 8 for the remaining tags.
11. From the File menu, select Close.
Or,
Click on the Close
button.
12. The browse window is closed and OPC Explorer is updated.
13. OPC Explorer now shows the tags as Active, and displays the sample values originally
entered in the Microsoft Excel worksheet (Figure 15).
Figure 15 - Microsoft Excel Data Points - OPC Explorer
Testing the Connection Between MatrikonOPC Explorer and
Microsoft Excel
There are two tests shown in this tutorial:
1. Issuing an OPC Write in MatrikonOPC Explorer and witnessing the change in values in
Microsoft Excel.
2. Changing values in Microsoft Excel and witnessing the values of the same points change
within MatrikonOPC Explorer.
OPC Writing in MatrikonOPC Explorer
This example (i.e., test) shows than an OPC client can write to a configured data point.
1. In OPC Explorer, right-click your mouse on the FIC101 tag.
2. Select Write Values (Figure 16) from the displayed menu.
Figure 16 - Write Values Function
3. The Write Values window (Figure 17) appears.
MatrikonOPC – Introduction to OPC Tutorial
19
Figure 17 - Write Values Window
4. With the current value highlighted in the New Value field, change it from 1550 to 1600.
Click OK.
5. The value displayed in OPC Explorer and in the Microsoft Excel workbook (Book1.xls), is
now 1600 (Figure 18).
Figure 18 - OPC Write to Excel
MatrikonOPC – Introduction to OPC Tutorial
20
OPC Reading in MatrikonOPC Explorer
This example shows how an OPC client receives an update when a value in the data source is
changed.
1. In the Book1.xls spreadsheet, change the value for FIC101 back to 1550 from 1600.
2. In OPC Explorer, view the data point screen and confirm that the value for FIC101 has
been changed back to 1550 (Figure 19).
Figure 19 - Value Change Confirmation
MatrikonOPC – Introduction to OPC Tutorial
21
Exchanging Data Between TWO OPC Servers
The connection between Microsoft Excel and the MatrikonOPC Server for DDE is configured
and tested. The next step is to establish the exchange of data between the MatrikonOPC Server
for Simulation and Testing and the OPC Server for DDE.
To establish OPC communication, OPC client functionality is required to broker the connection. In
this case, for communication to occur between two OPC servers, an OPC-enabled application is
required that has OPC client functionality to establish a read from one OPC server and create a
corresponding write to the other OPC server. MatrikonOPC Data Manager can enable the exchange
of OPC data between two OPC servers.
Note: There is no configuration required for the MatrikonOPC
Server for Simulation and Testing because it simulates a
connection to a virtual data source. The OPC server generates a
variety of data types and data points that behave in a specific manner.
This section includes information on the:
Configuration of MatrikonOPC Data Manager to establish connectivity between the
OPC Server for DDE and the OPC Server for Simulation and Testing.
Testing of established connectivity to ensure that data (which is read and written, to
and from, the two OPC servers using OPC Data Manager) appears in Microsoft
Excel.
Configure OPC Client (MatrikonOPC Data Manager) Connection
Group
To establish a connection to the OPC servers, MatrikonOPC Data Manager requires that an OPC
Group be created to dictate certain characteristics of the OPC communication (e.g., Update Rate).
To configure an OPC Data Manager Group:
1. Click on the Windows Start button. Select Programs -> MatrikonOPC -> Data Manager
-> MatrikonOPC Data Manager.
2. OPC Data Manager starts and the following software icon
(bottom right side of your screen)
appears in the system tray
Note: It may take a few seconds for OPC Data Manager to load and for the icon to appear.
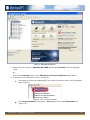
3. Right-click your mouse on the icon and select Configure from the displayed menu.
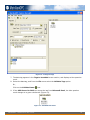
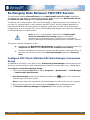
4. The MatrikonOPC Data Manager Configuration screen (Figure 20) appears.
MatrikonOPC – Introduction to OPC Tutorial
22
Figure 20 - MatrikonOPC Data Manager Configuration Window
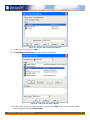
5. In the Data Manager Groups screen section (lower left hand side of the screen), rightclick your mouse and select Add Group from the displayed menu.
6. The Add Data Manager Group window (Figure 21) appears.
MatrikonOPC – Introduction to OPC Tutorial
23
Figure 21 - Add Data Manager Group Window
7. In the Group Name field, type group1 and click OK.
8. The Add Data Manager Group window closes. You are returned to the MatrikonOPC
Data Manager Configuration screen where the newly-created group1 now appears listed
in the Data Manager Groups screen section (Figure 22).
Figure 22 - Configured OPC Data Manager Group
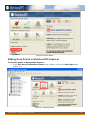
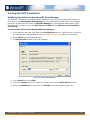
Add OPC Data Points
Using the shared connection between the MatrikonOPC Server for Simulation and Testing, and
the MatrikonOPC OPC Server for DDE, the MatrikonOPC Data Manager can now define points
within each system that will be communicating with each other.
MatrikonOPC – Introduction to OPC Tutorial
24
OPC Data Manager presents you with two views (top left and right panes) that represent the
source and destination OPC server connections to which data points will be exchanged.
To add shared OPC data points:
1. Using the upper right pane of the OPC Data Manager Configuration screen, click on
Matrikon.OPC.Simulation.1 to start the connection to the MatrikonOPC Server for
Simulation and Testing.
2. The connection to the OPC Server for Simulation should be established and OPC Data
Manager should now be able to browse the OPC server for data points. The Simulation
Items folder appears nested within the address space of the OPC Server for Simulation.
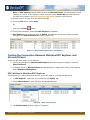
3. Select and expand the Simulation Items folder, followed by the Bucket Brigade folder
which displays numerous tags (Figure 23).
Figure 23 - Simulated Data Points in MatrikonOPC Server for Simulation and Testing
4. In the upper left pane of the OPC Data Manager Configuration window, click on
Matrikon.OPC.DDE.1 to establish a connection to the OPC Server for DDE.
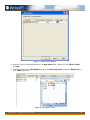
5. Select and expand the Configured Aliases folder. The data points of interest are already
configured as aliases (created in Configure the OPC Server) and are found in the New
Alias 1 folder (Figure 24).
MatrikonOPC – Introduction to OPC Tutorial
25
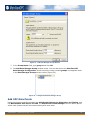
Figure 24 - Configured Data Points in MatrikonOPC Server for DDE Address Space
6. Drag and drop the FIC101 tag into the Bucket Brigade folder on the right side of the
screen.
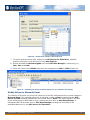
7. The Add Shared Point window (Figure 25) appears.
MatrikonOPC – Introduction to OPC Tutorial
26
Figure 25 - Add Shared Point Window
8. In the Input OPC Server screen section, the name of the source server (e.g.,
Localhost\Matrikon.OPC.DDE.1) is displayed in the Server Name field.
9. In the Output OPC Server screen section, the name of the destination server (e.g.,
Localhost\Matrikon.OPC.Simulation.1) is displayed in the Server Name field.
10. In the OPC Item field in the Output OPC Server screen section, type the name of a data
point that allows both read and write access (e.g., Bucket Brigade.Int1) as shown and
highlighted in Figure 26.
MatrikonOPC – Introduction to OPC Tutorial
27
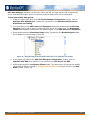
Figure 26 - Completed Shared Point Configuration
11. Click on the Options tab.
12. In the Direction screen section, select the Bidirectional option (Figure 27).
Note: When the shared point configuration is set to Bidirectional, data values are allowed
to be written and read from both source and destination OPC servers.
MatrikonOPC – Introduction to OPC Tutorial
28
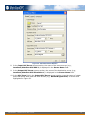
Figure 27 - Add Shared Point Window (Options Tab)
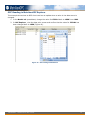
13. Click on the OK button to save the settings and finish adding the shared point. The Add
Shared Point window is closed and you are returned to the OPC Data Manager
Configuration screen. The tag values are displayed in the lower right side pane (Figure
28).
Note: The tag values are now shared between the FIC101 data point in the MatrikonOPC
Server for DDE and the Bucket Brigade.Int1 data point in the MatrikonOPC Server for
Simulation and Testing.
Figure 28 - Active OPC Data Manager Configuration
MatrikonOPC – Introduction to OPC Tutorial
29
Testing the OPC Connection
Modifying the Values in MatrikonOPC Data Manager
The intention of this test is to understand the behaviour of the OPC architecture when issuing an
OPC Write in the MatrikonOPC Data Manager for the created shared data points. The expected
behaviour of issuing an OPC Write in OPC Data Manager on a bidirectional shared point is that
the value will be written to both the OPC Server for DDE and the OPC Server for Simulation
and Testing.
To test the OPC Write in the MatrikonOPC Data Manager:
1. In the pane on the lower right side of the Configuration screen, right-click your mouse on
the shared point (that was added in the Add OPC Data Points section of this tutorial).
2. Select Write from the displayed menu.
3. The Write Value window (Figure 29) appears.
Figure 29 - Write Value Window
4. In the Value field, type 1550.
5. Click on the Apply button to commit the change and close the Write Value window.
6. Review the Book1.xls file to confirm the FIC101 value has changed (Figure 30).
MatrikonOPC – Introduction to OPC Tutorial
30
Figure 30 - Verified Value Change in Microsoft Excel
7. To ensure that the values were written to the OPC Server for Simulation, establish
another connection to the OPC server using OPC Explorer.
8. Browse and add the Bucket Brigade items that OPC Data Manager is referencing (i.e.,
Int1, Int2, and Int4).
9. Verify the value of the FIC101 data point has changed from 1600 to 1550 (Figure 31).
Figure 31 - Verified Value Change in MatrikonOPC Server for Simulation and Testing
Modify Values in Microsoft Excel
The intention of this test is to verify the behaviour of the OPC architecture when a value changes in
Microsoft Excel. The expected behaviour of changing a value in Excel would be that the OPC
Server for DDE would be updated with the current value in Excel. This value change in the OPC
server would cause an OPC Read to occur, sending the new value to OPC Data Manager. A
subsequent OPC Write would occur in OPC Data Manager, sending the new value to the
associated data point in the OPC Server for Simulation.
MatrikonOPC – Introduction to OPC Tutorial
31
To test the value change in Microsoft Excel:
1. In the Microsoft Excel Book1.xls file, change the value for FIC101 to 2000 (Figure 32).
Figure 32 - Changed Excel Value
2. View the OPC Data Manager Configuration window and confirm that the FIC101 shared
data point value has changed to 2000 (Figure 33).
Figure 33 - Value Change in MatrikonOPC Data Manager
3. To ensure the values were written to the OPC Server for Simulation, establish another
connection to the OPC server using OPC Explorer. Browse and add the Bucket Brigade
items that OPC Data Manager is referencing (e.g., Int1, Int2, and Int4).
4. Verify the value of the FIC101 data point has changed to 2000 (Figure 34).
Figure 34 - Verified Value Change in MatrikonOPC Server for Simulation and Testing
Modifying Values in the MatrikonOPC Server for Simulation and Testing
The intention of this test is to verify the behaviour of the OPC architecture when a value changes in
the OPC Server for Simulation and Testing. The expected behaviour of changing a value in the
OPC Server for Simulation would be that an OPC Read would occur sending the new value to
OPC Data Manager. A subsequent OPC Write would occur in OPC Data Manager sending the
new value to the associated data point in the OPC Server for DDE and eventually Microsoft
Excel.
To test the value change in MatrikonOPC Server for Simulation and Testing:
1. In OPC Explorer, right-click your mouse on the top tag (Bucket Brigade.Int1) and select
Write Values from the displayed menu.
2. The Write Values window (Figure 35) appears.
MatrikonOPC – Introduction to OPC Tutorial
32
Figure 35 - Write Values Window
3. Select the current tag value in the New Value field.
4. Change the tag value to 2513 and click on the OK button.
Note: This operation issues an OPC Write to the OPC Server for Simulation from OPC
Explorer. By viewing OPC Explorer after the write and witnessing the value for that item
change to 2513, this confirms that the value was successfully changed in the OPC server.
Figure 36 - Changed Value in MatrikonOPC Server for Simulation and Testing
5. View the OPC Data Manager Configuration screen and check the FIC101/Bucket
Brigade.Int1 shared data point value. The value of the shared point is displayed as 2513.
6. In Microsoft Excel, verify the value for FIC101 changed to 2513 (Figure 37).
MatrikonOPC – Introduction to OPC Tutorial
33
Figure 37 - Verified Value Change in Excel
MatrikonOPC – Introduction to OPC Tutorial
34
Troubleshooting
This section is intended to assist you by providing licensing information and MatrikonOPC
Support contact information. Also addressed here are some of the most common problems
encountered, and questions asked, while using this OPC server. Please check the following
Problems/Solutions and Questions/Answers sections before contacting the MatrikonOPC
Support team.
Problems and Solutions
“aprxdist” error on install
Problem:
What is this “aprxdist” error on install?
Solution:
For our installations to work correctly, the install must be able to access the
C:\WINDOWS\system32 directory to add, use, and remove the file called
aprxdist.exe and add the file opcenum.exe.
Generally, we will see this error on Windows 2003 SP1 system where this is not
possible. To resolve the issue, download these files, and place them in
C:\WINDOWS\system32, and rerun the install.
Logged in as Administrator to run install
Problem:
Why do I need to be logged in as an Administrator to run the install?
Solution:
For MatrikonOPC software to install correctly, you must be logged in as a user with
access to the registry. If you are not an Administrator on the system, the installation
will not be able to register the software correctly.
PSTCFG error
Problem:
After my OPC server died, I tried to access the Configuration screen and now I am
experiencing access violations and PSTCFG errors.
Solution:
If your OPC server process stops and you leave the PSTCFG running, when you
attempt to access the Configuration screen to do anything to your configuration
items (add, change, delete, and so on), you will experience access violations. You will
need to kill the configuration and restart the server.
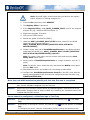
Server stops updating client with item values after two hours
Problem:
The server stops updating the client with item values after two hours.
Solution:
The server may be licensed with a hardware key and the hardware key may not be
properly detected, or the software license has expired.
Alternatively, try running the MatrikonOPC Licensing utility from the shortcut menu.
Click on the Check Licenses button to see the status of all MatrikonOPC product
licenses.
Check that the correct HASP hardware key is securely fastened to the parallel port. If it
is, run the HINSTALL program that is located in the Program Files\Common
Files\MatrikonOPC\Common directory.
MatrikonOPC – Introduction to OPC Tutorial
35
Server stops updating client with item values after 30 days
Problem:
The server stops updating the client with item values after 30 days.
Solution:
The evaluation period for the license has expired. Please contact MatrikonOPC
Support.
Server shuts down after five minutes when no clients connected
Problem:
The server automatically shuts down after five minutes when there are no clients
connected.
Solution:
This is standard behaviour for COM servers. However, this behaviour can be overridden
as shown in the following example:
Note: Microsoft highly recommends that you back up the registry
before editing it or making changes to it.
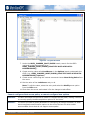
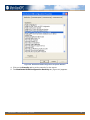
1. From the Run command, enter REGEDIT.
2. The Registry Editor (Figure 38) is launched.
3. In the Registry Editor, under HKEY_CLASSES_ROOT, look for the required
program ID (e.g., Matrikon.OPC.Simulation.1).
Figure 38 - Registry Editor
4. Expand the program ID branch.
5. Click on the CLSID branch.
MatrikonOPC – Introduction to OPC Tutorial
36
6. Record the global universal ID (GUID).
Figure 39 - Program ID Branch
7. Under the HKEY_CLASSES_ROOT\CLSID branch, search for the GUID
retrieved in the previous step (e.g.,
HKEY_CLASSES_ROOT\CLSID\{024C7FFC-9CC3-476f-867ABC3CAD79F4FE}).
8. Create a string value called LockServer in the Options branch underneath the
GUID (e.g., HKEY_CLASSES_ROOT\CLSID\{024C7FFC-9CC3-476f-867ABC3CAD79F4FE}\Options).
9. Create a new value using the context menu and choose New String Value from
the menu.
10. Set the value of the LockServer entry to 1.
Note: To edit the value, select the entry and select the Modify menu option
from the Edit menu.
11. Shut down the server and restart it for the change to take effect.
Cannot configure client access paths, so cannot configure item options
Problem:
The OPC client does not provide a means to configure access paths, making it difficult
to correctly specify the data acquisition options for the items.
Solution:
The server provides a global parameter for configuring an escape character, to allow
users to append communication options to the end of an item ID which would
accommodate clients that do not support access paths.
MatrikonOPC – Introduction to OPC Tutorial
37
Perform the following steps as shown (with example) below:
Note: Microsoft highly recommends that you back up the registry
before editing it or making changes to it.
1. From the Run command, enter REGEDIT.
2. The Registry Editor is launched.
3. In the Registry Editor, under HKEY_CLASSES_ROOT, look for the required
program ID (e.g., Matrikon.OPC.Simulation.1).
4. Expand the program ID branch.
5. Click on the CLSID branch.
6. Record the global universal ID (GUID).
7. Under the HKEY_CLASSES_ROOT\CLSID branch, search for the GUID
retrieved in the previous step (e.g.,
HKEY_CLASSES_ROOT\CLSID\{024C7FFC-9CC3-476f-867ABC3CAD79F4FE}).
8. Create a string value called ItemIDEscapeCharacter in the Options branch
underneath the GUID (e.g., HKEY_CLASSES_ROOT\CLSID\{024C7FFC9CC3-476f-867A-BC3CAD79F4FE}\Options).
Note: To create a new value, use the context menu and select the New
String Value menu option.
9. Set the value of ItemIDEscapeCharacter to a single character, such as “|”
(pipe).
Note: To edit the value, select the entry and select the Modify menu option
from the Edit menu.
10. Shut down the server and restart it for the change to take effect.
11. Configure the ItemIDEscapeCharacter Item ID in the OPC client with the
access path appended to the end with the configured escape character (e.g.,
ITEMID|ACCESSPATH).
More than one HASP attached to parallel port, but only first one is recognized
Problem:
There is more than one HASP hardware key from Matrikon attached to the parallel
port, but the software recognizes only the first one.
Solution:
HASP keys from the same vendor cannot be chained together. Send an email to the
MatrikonOPC Support team to obtain a HASP key containing the combined codes of all
installed MatrikonOPC servers.
Server cannot be configured; no Matrikon logo in Tool Tray
Problem:
The server cannot be configured because there is no Matrikon logo
Tray.
Solution:
If the server is running as a service, the Matrikon logo
Tray.
in the Tool
does not appear in the Tool
To configure the server, start the configuration utility by using the shortcut to the
MatrikonOPC – Introduction to OPC Tutorial
38
OPC server in the Windows Start menu (this shortcut starts the Configuration utility
as well as the OPC server).
Note: If the server configuration utility generates an “access denied”
error on launch, the DCOM permissions have not been configured
properly.
OPC client unable to create or read items under configured object (device)
Problem:
The OPC client is unable to create or read items under a configured object (device).
Solution:
Check the object configuration (for more information, refer to the Server Configuration
section in the applicable product’s User’s Manual that accompanies the software).
Ensure the Enabled checkbox is selected.
Server does not retain settings
Problem:
The server does not retain its previous settings and needs to be reconfigured each
time it starts up.
Solution:
In the Configuration window, choose Options from the View menu. Under the
General tab, ensure that the Load configuration on start-up checkbox is selected
and that the correct file name appears in the edit box (for more information, refer to
the General Options section in the applicable product’s User’s Manual that accompanies
the software).
Server cannot save configuration in XML format
Problem:
The OPC server cannot save the configuration in XML format.
Solution:
Microsoft Internet Explorer 4.01 (or later) must be installed to use the XML format.
Server does not show up in the list of locally available program IDs in OPC client
application
Problem:
The server does not show up in a list of locally available program IDs in the OPC client
application.
Solution:
Make sure that a user with local administrative rights installs the OPC server so that it
can create the necessary entries in the registry.
Ensure OPCEnum is registered as a service, DCOM permissions are configured
properly, and the OPCEnum service is running.
Also, especially for older OPC clients that do not use the OPC server browser, make
sure the client is running as a user that has read access to the registry.
Server does not show up as remote program in OPC client application
Problem:
The OPC server does not show up in a list of remotely available program IDs in my
OPC client application.
Solution:
Follow the steps found in Appendix A – Distributed COM (DCOM) to copy the
program ID from the server machine to the client machine.
MatrikonOPC – Introduction to OPC Tutorial
39
Access denied or time-out error when connecting to remove server via DCOM
Problem:
Access Denied error message appears, or time out occurs when trying to connect to
a remote OPC server via DCOM.
Solution:
Ensure that the access and launch permissions for the OPC server are set correctly on
the server machine. For more information, refer to Appendix A – Distributed COM
(DCOM).
Server does not start up or client cannot connect
Problem:
A client tries to connect to the server and fails, or the server does not start up.
Solution:
Ensure that the access and launch permissions for the OPC server are set correctly.
For more information, refer to Appendix A – Distributed COM (DCOM).
About screen and Configuration window do not show up
Problem:
The About screen and Configuration window do not show up when a remotely
connecting client or a client that runs as a service (such as the Aspen Technologies
CIMIO OPC Manager) tries to launch the OPC server.
Solution:
Either set the identity for the OPC server to the interactive user, or consider running
the server as a service. For more information, refer to Appendix A – Distributed
COM (DCOM).
DA 2.05 asynchronous I/O does not work
Problem:
After installing an older OPC server, DA 2.05 asynchronous I/O no longer works.
Solution:
The old installation program installed and registered its own (older) version of the OPC
proxy/stub DLL.
Reinstall the standard OPC proxy/stub DLLs, using an up-to-date installation program
or re-register them using the REGSVR32 command-line utility (for more information,
refer to the OPC Compliance - Installation section in the applicable product’s User’s
Manual that accompanies the software).
Server is using a large portion of CPU resources
Problem:
Server is using 99% of CPU resources.
Solution:
Check the server’s Time Granularity settings in the server’s Advanced Options (for
more information, refer to the Advanced Options section in the applicable product’s
User’s Manual that accompanies the software. Ensure the granularity is not set to 0. It
is recommended that you not set the value lower than 100.
Trouble communicating through a network
Problem:
Experiencing problems communicating to the product’s device through a network.
Solution:
Make sure users can ping the device. Use the Start -> Run with command CMD to
bring up a command window and type:
Ping ipaddress ( e.g., C:\temp>ping 127.0.0.1
Pinging 127.0.0.1 with 32 bytes of data:
Reply from 127.0.0.1: bytes=32 time<10ms TTL=128
MatrikonOPC – Introduction to OPC Tutorial
40
Reply from 127.0.0.1: bytes=32 time<10ms TTL=128
Reply from 127.0.0.1: bytes=32 time<10ms TTL=128
Reply from 127.0.0.1: bytes=32 time<10ms TTL=128
Ping statistics for 127.0.0.1:
Packets: Sent = 4, Received = 4, Lost = 0 (0% loss),
Approximate round trip times in milli-seconds:
Minimum = 0ms, Maximum =
0ms, Average =
0ms)
Where ipaddress is the IP address of the user’s <System X> device. If it says “no
response”, then there are likely network issues between user’s computer and the
product.
Note: Refer to the DCOM Manual to further diagnose any DCOM issues.
Events are not being generated
Problem:
Aliases have been configured to generate events, but a subscribed A&E client is not
receiving events as expected.
Solution:
It is possible to disable event generation at the Alias Group level. Make sure that all of
the Alias Groups are set to have events enabled.
Questions and Answers
How do I remove the server as a service?
Problem:
How do I remove the server as a service?
Solution:
Re-register the OPC server executable using the /REGSERVER command-line switch.
Does the server need to be started manually when installed as a service?
Problem:
Does the server need to be started manually when it is installed as a service?
Solution:
No, the first OPC client that tries to connect will start the OPC server.
How can I get OPC data into other applications?
Problem:
How can I get OPC data into Microsoft Excel, Microsoft Word, or another application
with support for Visual Basic, VBA, or VB Script?
Solution:
Use the MatrikonOPC Automation Component to create a Visual Basic script that
connects to a server, creates groups and items, and receives data change updates.
Contact Support for examples of how to do this in Excel, Visual Basic, or an HTML
document.
How can I access individual bits from an integer item?
Problem:
How can I access individual bits from an integer item?
Solution:
In order to do this, users will have to apply a mask to the value, which will null all of
the bits in the integer value except the one that users want to keep.
For example, if the user wanted to isolate the third bit, they would have to apply a
mask that is in binary which will only have the third bit present. In binary, this is the
MatrikonOPC – Introduction to OPC Tutorial
41
number 4 (0100).
To apply the mask, users must use the AND operator, which will leave a 1, if and only
if, both the bits in that position are 1.
0110 1100
+ 0000 0100
= 0000 0100
Data bit we want to access
In decimal notation, this would be expressed as 108 AND 4 = 4.
To do this in an OPC server, users would configure an alias to use the IF operator.
With the example above, where the user wishes to access the third bit in the integer,
the statement would appear as:
IF (INPUT AND 4 = 4, 1, 0)
Therefore, if the bit in position 3 is a 1, since 1 AND 1 =1, the IF statement would be
true and would return a 1. If the bit in position is 0, 0 AND 1 = 0, the IF statement
would return a false value, which is a 0.
Search the MatrikonOPC Support Knowledge Base at www.opcsupport.com to find the answers
to other commonly-asked connectivity questions.
Licensing
Most MatrikonOPC products require that some form of licensing criteria be met for it to function
correctly.
Depending on the MatrikonOPC server, it supports either software licensing only or, both software
and hardware licensing. Refer to the necessary licensing information available in the Licensing
Procedures document which accompanies the MatrikonOPC server software and User’s Manual.
Note: Alias Events needs to be licensed separately, and by default, is delivered with only a 30-day
demo. To purchase a full Alias Events license, please contact your MatrikonOPC Account Manager.
Contacting Support
The MatrikonOPC Customer Services department (www.opcsupport.com) is available 24 hours a
day, seven days a week.
Contact MatrikonOPC Support using the information below, or send an email
([email protected]).
For Monday to Friday daytime support requests, contact MatrikonOPC Support using the regional
phone numbers provided in Table 1.
Region
North America
UTC/GMT -7 hours (MST)
Europe /Africa *
UTC/GMT +1 hours (CET)
Australia/Asia *
MatrikonOPC – Introduction to OPC Tutorial
Office Hours
8:00 am-5:00 pm
9:00 am-5:00 pm
9:00 am-5:00 pm
Contact Information
+1-877-OPC-4-ALL
+49-221-969-77-0
(Request OPC Support)
+61-2-4908-2198
42
Region
Office Hours
UTC/GMT +10 hours (AEST)
Contact Information
(Request OPC Support)
* Toll-free regional numbers coming soon!
Table 1 - MatrikonOPC Support Regional Contact Information
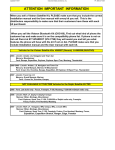
For after-hours support in all regions, please use either of the following numbers. There is no
extra charge from MatrikonOPC for calling their after-hours support numbers.
Region
All
Contact Information
+1-780-231-9480
+1-780-264-6714
Table 2 - After-Hours Support
MatrikonOPC – Introduction to OPC Tutorial
43
Appendix A
Distributed COM (DCOM)
DCOM is an object protocol that enables COM components (such as OPC clients and servers) to
communicate directly with each other across a network. A certain amount of configuration is
required on the system where the OPC server is installed to allow remote clients to connect to it
over the network.
Readers should be familiar with DCOM and with Windows 2000 security features and security
administration. Information regarding Distributed COM and various links to related sites, white
papers, specifications, and so on, can be found at
http://www.microsoft.com/com/default.mspx.
Notes:
The following steps are suggestions only. Ask your Windows
Network Administrator for more information about the settings
that you should use, especially between different domains.
The steps provided in this appendix apply to Windows NT
operating systems only. For information on how to configure
DCOM settings for newer Windows operating systems, please
refer to the MatrikonOPC Online Support page on DCOM
Settings.
DCOM Configuration Utility
Start the DCOM configuration utility either from the server configuration utility or from the
command-line (DCOMCNFG). Answer, yes to any message boxes that appear (allowing the utility to
assign application ID entries to those servers that do not already have them).
The main window for DCOMCNFG allows the user to either configure default settings for all COM
servers or else to configure settings for a specific server chosen from the list. The former will affect
all servers configured to use the default settings. The latter will affect the selected server only.
Note: DCOM settings are stored in the registry and loaded by COM
(and OPC) servers at start-up. Therefore, server processes must be
shut down and re-started for these changes to take effect.
Default Properties
The Default Properties tab contains settings that affect all DCOM communication on the machine.
First of all, ensure that the Enable Distributed COM on this computer is selected in
so that the machine is available to others via DCOM.
Select the Enable COM Internet Services on this computer to allow DCOM access to
the machine from the Internet (check with your administrator).
In general, the other settings do not need to be changed.
The Authentication Level specifies when COM should authenticate the identity of calling clients
(each call, each packet, etc).
Normally, it should be set to Connect, indicating that COM should authenticate clients
when they first connect to a server. If it is set to None, then COM performs no
authentication and ignores any access permission settings.
MatrikonOPC – Introduction to OPC Tutorial
44
The Impersonation Level specifies whether servers can ascertain the identity of calling clients
and whether they can then perform operations on the client's behalf (as if the server is the client).
Normally, it should be set to Identify, allowing the server to identify the calling client to
see if it is allowed access to a certain resource but not to actually access any of these
resources as the client.
Select the Provide additional security for reference tracking to make even the
reference counting on COM objects secure. This setting is not generally required.
Security Permissions
The most important DCOM settings for an OPC server are the security permissions. There are two
ways for you to set these:
1. Change the specific settings for the server (recommended).
2. Change the default settings (not recommended) and make sure that the OPC server will use
these.
Either way, be certain that the access and launch permissions are correct for the server.
Setting Security Permissions
To set the security permissions for an OPC Server:
1. Open the DCOM configuration utility.
2. Select the OPC server, and then click Properties.
3. The Distributed COM Configuration Properties window (Figure 40) appears.
MatrikonOPC – Introduction to OPC Tutorial
45
Figure 40 - Distributed COM Configuration Properties Window
4. Click on the Security tab to set the security for the server.
5. The Distributed COM Configuration Security tab (Figure 41) appears.
MatrikonOPC – Introduction to OPC Tutorial
46
Figure 41 - Distributed COM Configuration Security Tab
Notes:
The Access Permissions contain an Access Control List of principals that are
allowed to interact with objects supplied by a server.
The Launch Permissions contain an Access Control List of principals that are
allowed to start up a server process or service.
6. Include the names of users or user groups from trusted domains that you wish to be able to
use the OPC server on this machine. Include the Everyone group to allow access to all
users on a particular domain.
7. To set the Access permissions, click Use custom access permissions and then click Edit.
8. The Registry Value Permissions window (Figure 42) appears.
MatrikonOPC – Introduction to OPC Tutorial
47
Figure 42 - Registry Value Permissions Window
9. To add users to the list click Add.
10. The Add Users and Groups window (Figure 43) appears.
Figure 43 - Add Users and Groups Window
11. To add a user to the list, select the user, and then click Add. If the user you wish to add
does not appear then click Show Users.
MatrikonOPC – Introduction to OPC Tutorial
48
12. When you are done adding users, click OK to close the Add Users and Groups window.
You can then choose to Allow Access or Deny Access for each user.
Notes:
The procedure to set the launch permissions is similar to the above, but instead of
choosing Allow Access for a user you would choose Allow Launch.
The Configuration Permissions contain an Access Control List of principals that are
allowed to modify the configuration information for a server. In other words, it
indicates who is allowed to alter the registry entries for installed servers as well as
who is able to access the registry for the purposes of installing new servers. It is
usually simpler to install and configure servers as a user with local administrative
rights.
13. To connect to an OPC server from outside of the domain, create a local user account on
both the server and the client machine with identical username and password. Then, add
the local user on the OPC server to the DCOM permissions. Use the local account on the
client machine to connect to the OPC server.
Server Identity
The Identity tab for a selected COM (or OPC) server specifies the user account that should be
used when COM starts up the process. The available settings are different for servers that run as
local executables as opposed to those that run as NT services.
Note: It is strongly recommended that OPC servers should be
installed to run as NT services if they are going to be accessed by
remote clients via DCOM. This ensures that the server can always be
accessed even if no one is presently logged on to the machine, and
only one server process ever starts up. It also adds a greater degree
of security in terms of who is able to shut down the server process.
Servers that run as local executables have the option of running as the launching user (the calling
client–this is the default), the interactive user (the one currently logged onto the machine), or a
specified user. It is usually best to use the interactive user or a specified user. Otherwise, remote
clients might start up multiple separate server processes that are not accessible to others.
Servers that run as NT services should generally run as the local System account. Alternatively,
the server can be set to run as a specified user, although this is usually done from the Service
Control Manager applet rather than DCOMCNFG. Access and Launch permissions are particularly
important when installing a server to run as an NT service.
Default Protocols
The Default Protocols tab specifies the communication protocols available to DCOM. The order
that protocols appear in the list indicates the priority in which they will be used (the topmost
having the highest priority).
The more protocols that appear in the list, the better the chances of connecting to an OPC server
on an unknown remote machine (such as at an OPC Interoperability Workshop). However, it may
also take longer for DCOM to time out if a server machine is not present since it has to try each
protocol in turn.
For most situations, it is best to remove all unused protocols from the list and only include those
that are necessary for your network. For example, on a TCP/IP network, one would include the
Connection-oriented TCP/IP protocol. Contact your IT personnel for more information about
your network.
MatrikonOPC – Introduction to OPC Tutorial
49
Note: Evidence indicates that there are problems with the datagramoriented protocols (such as UDP/IP) that can cause memory leaks in
DCOM. Therefore, it is strongly recommended that these protocols be
removed from the list of default protocols. Datagram-oriented
protocols are not supported under Windows 2000 at all (although the
DCOM configuration utility still allows you to configure them).
Remote Program ID
Before the OPC Server Browser became available, OPC client applications had to search the
registry to generate a list of available OPC servers. Therefore, some older OPC clients need to have
a program ID in the local registry in order to connect to a particular OPC server.
The simplest solution is to install the OPC server software on the client machine even if it is not
used. Alternatively, use the following steps to copy a program ID to the client machine.
Note: This method may not work for every OPC client. Please check the client documentation for
more information.
WARNING: Any changes made to the registry must be made with
extreme caution!
1. Back up your registry.
2. On the server machine, run REGEDIT as a user that has access rights to the local registry.
3. Expand the HKEY_CLASSES_ROOT key.
4. Find the program ID(s) for the desired OPC server(s).
Note: In the case of MatrikonOPC servers, the ID has the form Matrikon.OPC.Device. If you
quickly type the first few letters then REGEDIT should jump to the location of that key.
Some servers may have both a version-specific as well as a version-independent program
ID. In this case both IDs should be copied to the client machine.
5. For each program ID, select the key and choose Export Registry File from the Registry
menu. Enter a file name, and then click Save. Be careful not to overwrite other export files
that you are creating.
6. Copy the exported REG files to the client machine.
7. Merge the REG files into the registry of the client machine.
Note: This should simply be a matter of double clicking on the file from the desktop of the
client machine. Alternatively, run REGEDIT on the client machine and choose Import
Registry File from the Registry menu, selecting each file in turn. This must be done as a
user who has write access to the local registry.
8. Use REGEDIT to check that the program IDs have in fact, been copied.
9. Delete the REG files since they are no longer needed.
MatrikonOPC – Introduction to OPC Tutorial
50