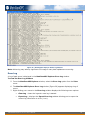
1
MatrikonOPC Explorer
User's Manual
MatrikonOPC Explorer
User's Manual
This manual is a product of Matrikon Inc.
Matrikon Inc.
Suite 1800, 10405 Jasper Avenue
Edmonton, AB T5J 3N4
Canada
Phone: +1.780.448.1010
Fax: +1.780.448.9191
www.matrikonopc.com
Document Revision History:
Date
Document
Version
Description
Author
2004-03-17
1.0
Migrated to new template.
TNN
2005-01-07
1.1
Updated Copyright information.
EJM
2008-01-24
1.2
Added new functionality.
MWH
2008-02-05
2.0
Migrated to new template, general edit.
LB
2008-02-26
3.0
New install package documented in Installation
and Un-Installation sections.
LB
2008-03-06
3.1
Screenshots updated and new functionality
added.
MWH
2008-04-07
3.2
Main window screenshot and description updates.
LB
2008-07-21
3.3
New functionality and screenshot updates.
MWH
4.0
Screenshots and information updated/added in
the Configuration section to reflect new Explorer
(v4.0.0.0) and MatrikonOPC Security Gateway
functionality.
LB
2008-10-06
MatrikonOPC Explorer v5.0.0.0 User’s Manual
2
2009-08-21
5.0
MatrikonOPC Explorer v5.0.0.0 User’s Manual
Updated References, Document Terminology, and
Contacting Support sections. Added Limitations
section. Removed DEP settings note in Installation
section. Updated Starting MatrikonOPC Explorer
section. Setup Complete screenshot replaced.
Added Tables 23 and 24. Security and Offline
Mode appendixes, and references to them, were
removed. Un-Installation section updated. Added
A&E functionality which involved the following:
replaced MatrikonOPC Explorer screenshots
(Figures 7 and 8), updated Table 6 MatrikonOPC
Explorer Window Commands, updated Table 8
Server Menu Commands, updated Adding OPC
Groups section, updated Changing OPC Groups
section, added Subscription Options and Adding
Subscriptions sections, updated Data Display
section, updated Advise Log section, added Error
Log section, added Exporting Groups, Items, and
Alarms section.
LB, MM
3
SOFTWARE VERSION
Version:
5.0.0.0
DOCUMENT VERSION
Version:
5.0
COPYRIGHT INFORMATION
© Copyright 1997 - 2009, Matrikon Inc. All rights reserved. No part of this document may be reproduced, stored in
a retrieval system, translated, or transmitted in any form or by any means, electronic, mechanical, photocopying, recording,
or otherwise, without prior written permission of Matrikon Inc.
CONFIDENTIAL
The information contained herein is confidential and proprietary to Matrikon Inc. It may not be disclosed or transferred,
directly or indirectly, to any third party without the explicit written permission of Matrikon Inc.
LIMITATIONS
Matrikon has made its best effort to prepare this manual. Matrikon makes no representation or warranties of
any kind with regard to the completeness or accuracy of the contents herein and accepts no liability of any kind
including without limitation warranties of merchantable quality, satisfactory quality, merchantability and
fitness for a particular purpose on those arising by law, statute, usage of trade, course of dealing or otherwise.
Matrikon shall not be liable for any losses or damages of any kind caused or alleged to be caused directly or
indirectly from this manual.
LICENSE AGREEMENT
This document and the software described in this document are supplied under a license agreement and may only be used
in accordance with the terms of that agreement. Matrikon reserves the right to make any improvements and/or changes to
product specifications at any time without notice.
TRADEMARK INFORMATION
The following are either trademarks or registered trademarks of their respective organizations:
Matrikon and MatrikonOPC are trademarks or registered trademarks of Matrikon Inc.
OTHER
MatrikonOPC™ is a division of Matrikon™ Inc.
MatrikonOPC Explorer v5.0.0.0 User’s Manual
4
Table of Contents
Introduction ..................................................................................................................... 9
Who Should Use This Manual ............................................................................................ 9
Overview of Manual ......................................................................................................... 9
References ................................................................................................................... 10
Document Terminology .................................................................................................. 10
Getting Started............................................................................................................... 11
System Requirements.................................................................................................... 11
Software Requirements ............................................................................................... 11
Hardware Requirements .............................................................................................. 11
Installation................................................................................................................... 11
Installed Files ............................................................................................................... 18
Licensing ..................................................................................................................... 18
Contacting Support ....................................................................................................... 19
Configuration ................................................................................................................. 20
Starting MatrikonOPC Explorer ........................................................................................ 20
MatrikonOPC Explorer Window ........................................................................................ 20
File Menu .................................................................................................................. 24
Server Menu .............................................................................................................. 24
Group Menu............................................................................................................... 25
Item Menu ................................................................................................................ 26
View Menu ................................................................................................................ 26
Help Menu ................................................................................................................. 26
Toolbar Options.......................................................................................................... 26
Viewing Available OPC Servers ........................................................................................ 27
Connecting to an OPC Server .......................................................................................... 28
Adding OPC Groups ....................................................................................................... 29
Changing OPC Groups.................................................................................................... 30
Adding Subscriptions ..................................................................................................... 30
Subscription Settings Tab ............................................................................................ 31
Filtering Tab .............................................................................................................. 32
Subscription Options...................................................................................................... 34
Adding OPC Items ......................................................................................................... 36
File Menu .................................................................................................................. 38
Edit Menu.................................................................................................................. 38
View Menu ................................................................................................................ 38
Browse Menu ............................................................................................................. 39
Toolbar Options.......................................................................................................... 39
Item ID..................................................................................................................... 42
Access Path ............................................................................................................... 43
Browsing the Server Address Space .............................................................................. 43
Requested Data Type .................................................................................................. 44
Active State............................................................................................................... 44
Validate the OPC Items ............................................................................................... 44
Read Real-Time Values .................................................................................................. 44
Update Rate .............................................................................................................. 45
Active State............................................................................................................... 45
Time Bias .................................................................................................................. 45
Dead-Band ................................................................................................................ 46
I/O Method................................................................................................................ 46
Data Display .............................................................................................................. 46
MatrikonOPC Explorer v5.0.0.0 User’s Manual
5
Group Info ................................................................................................................ 47
Subscription Info ........................................................................................................ 48
Advise Log ................................................................................................................ 48
Error Log................................................................................................................... 49
Write Control Values ................................................................................................... 50
Options Window ............................................................................................................ 52
General Options ......................................................................................................... 52
Data Transfer Options ................................................................................................. 54
Data Display Options .................................................................................................. 55
COM Options ............................................................................................................. 56
Miscellaneous Options ................................................................................................. 58
Exporting Groups, Items, and Alarms............................................................................... 59
Exporting Groups ....................................................................................................... 59
Exporting Items ......................................................................................................... 59
Exporting Alarms........................................................................................................ 60
Saving a Session........................................................................................................... 60
Reloading a Session....................................................................................................... 60
Clearing a Session......................................................................................................... 60
Limitations ..................................................................................................................... 61
Troubleshooting ............................................................................................................. 62
Problems and Solutions.................................................................................................. 62
Un-Installation ............................................................................................................... 66
Table of Appendices
Appendix A
Distributed COM (DCOM) ........................................................................ 71
DCOM Configuration Utility ............................................................................................. 71
Default Properties ......................................................................................................... 71
Security Permissions...................................................................................................... 72
Server Identity ............................................................................................................. 76
Default Protocols........................................................................................................... 76
Remote Program ID....................................................................................................... 77
Appendix B
Standard Data Types............................................................................... 78
Appendix C
OPC Quality Flags ................................................................................... 79
Quality BitField ............................................................................................................. 79
Substatus BitField ......................................................................................................... 79
Limit BitField ................................................................................................................ 81
Table of Figures
Figure
Figure
Figure
Figure
Figure
Figure
Figure
1
2
3
4
5
6
7
-
InstallAware Wizard Verification Window ......................................................
License Agreement Screen .............................................................................
Destination Folder Screen ..............................................................................
Start Menu Screen..........................................................................................
Installing MatrikonOPC Explorer Screen.........................................................
MatrikonOPC Explorer Setup Complete Screen ...............................................
MatrikonOPC Explorer (Prior to Server Connection).......................................
MatrikonOPC Explorer v5.0.0.0 User’s Manual
12
13
14
15
16
17
21
6
Figure
Figure
Figure
Figure
Figure
Figure
Figure
Figure
Figure
Figure
Figure
Figure
Figure
Figure
Figure
Figure
Figure
Figure
Figure
Figure
Figure
Figure
Figure
Figure
Figure
Figure
Figure
Figure
Figure
Figure
Figure
Figure
Figure
Figure
Figure
Figure
Figure
8 - MatrikonOPC Explorer (with Connected Server).............................................
9 - Supported OPC Interfaces ..............................................................................
10 - MatrikonOPC Explorer Toolbar .....................................................................
11 - Server List....................................................................................................
12 - Connecting to an OPC Server Window (Other Network Computers) .............
13 - Add Group Window ......................................................................................
14 - Add Subscription Window (Subscription Settings Tab) ................................
15 - Add Subscription Window (Filtering Tab).....................................................
16 - New Subscription .........................................................................................
17 - Export Tags Window ....................................................................................
18 - Subscription Properties Window ..................................................................
19 - Tag Studio ....................................................................................................
20 - View Tag Generator Button ..........................................................................
21 - Tag Generator Window.................................................................................
22 - Browse Access Paths Button ........................................................................
23 - Group Properties Window ............................................................................
24 - Data Display.................................................................................................
25 - MatrikonOPC Explorer Advise Log Window...................................................
26 - MatrikonOPC Explorer Error Log Window .....................................................
27 - Write Values Window (Multiple Value Tab) ..................................................
28 - Write Values Window (Signal Generator Tab) ..............................................
29 - General Options Tab.....................................................................................
30 - Data Transfer Options Tab ...........................................................................
31 - Data Display Options Tab .............................................................................
32 - COM Options Tab ..........................................................................................
33 - Miscellaneous Options Tab ...........................................................................
34 - Callback Group .............................................................................................
35 - Component Services Window .......................................................................
36 - Add or Remove Programs.............................................................................
37 - Welcome to MatrikonOPC Explorer Maintenance Screen ..............................
38 - Ready to Uninstall Screen ............................................................................
39 - Uninstalling MatrikonOPC Explorer Screen ...................................................
40 - MatrikonOPC Explorer Setup Complete Screen .............................................
41 - Distributed COM Configuration Properties Window ......................................
42 - Distributed COM Configuration Security Tab ................................................
43 - Registry Value Permissions Window ............................................................
44 - Add Users and Groups Window ....................................................................
22
23
27
27
29
30
31
32
34
35
36
37
42
42
43
45
47
49
50
50
51
53
54
56
57
58
62
63
66
67
68
69
70
73
74
75
75
Table of Tables
Table
Table
Table
Table
Table
Table
Table
Table
Table
Table
Table
1 - Terms and Definitions......................................................................................
2 - Files Installed in "Explorer" Folder..................................................................
3 - Files Installed in "Common" Folder .................................................................
4 - MatrikonOPC Support Regional Contact Information .......................................
5 - After-Hours Support ........................................................................................
6 - MatrikonOPC Explorer Window Commands......................................................
7 - File Menu Commands.......................................................................................
8 - Server Menu Commands ..................................................................................
9 - Group Menu Commands ...................................................................................
10 - Item Menu Commands...................................................................................
11 - View Menu Commands...................................................................................
MatrikonOPC Explorer v5.0.0.0 User’s Manual
10
18
18
19
19
24
24
25
25
26
26
7
Table
Table
Table
Table
Table
Table
Table
Table
Table
Table
Table
Table
Table
Table
Table
Table
Table
Table
Table
Table
Table
Table
Table
Table
12
13
14
15
16
17
18
19
20
21
22
23
24
25
26
27
28
29
30
31
32
33
34
35
-
Help Menu Commands ...................................................................................
MatrikonOPC Explorer Window Toolbar Options ............................................
Add Subscription Window (Subscription Settings Tab) Components .............
Add Subscription Window (Filtering Tab) Components..................................
Tag Studio Commands ...................................................................................
File Menu Commands (Tag Studio) ................................................................
Edit Menu Commands (Tag Studio)................................................................
View Menu Commands (Tag Studio) ..............................................................
Browse Menu Commands (Tag Studio) ..........................................................
Tag Studio Toolbar Options ...........................................................................
Tag Studio Components .................................................................................
Group Info Display Information.....................................................................
Subscription Info Display Information...........................................................
General Options Tab Fields ............................................................................
Data Transfer Options Tab Fields...................................................................
Data Display Options Tab Fields ....................................................................
COM Options Tab Fields .................................................................................
Miscellaneous Options Tab Fields ..................................................................
Standard Data Types .....................................................................................
Quality BitField Values...................................................................................
Substatus – BAD Quality................................................................................
Substatus – UNCERTAIN Quality....................................................................
Substatus – GOOD Quality .............................................................................
Limit BitField Values ......................................................................................
MatrikonOPC Explorer v5.0.0.0 User’s Manual
26
27
32
33
37
38
38
38
39
39
40
47
48
53
55
56
58
59
78
79
80
81
81
81
8
Introduction
MatrikonOPC™ Explorer is a general-purpose OPC client. It is included with all MatrikonOPC servers
to ensure that users always have a reliable means with which to test the capabilities of the
software.
Who Should Use This Manual
This manual is intended for use by all users of MatrikonOPC Explorer. This manual explains how to
install and configure the application, and how to perform common tasks.
Overview of Manual
This document uses icons to highlight valuable information. Remember these icons and what they
mean, as they will assist you throughout the manual.
This symbol denotes important information that must be
acknowledged. Failure to do so may result in the software not
functioning properly.
BOLD
Font displayed in this color and style indicates a hyperlink to the
applicable/associated information within this document, or if
applicable, any external sources.
The User’s Manual has been designed as such so that you can click on references in the document
to jump to that referenced point without having to scroll through several pages (in some cases).
For example, if you were to see the sentence “Refer to Figure 1 for more information”, pressing the
CTRL key and clicking your mouse on the text “Figure 1” will automatically take you to the location
of Figure 1 within the document.
This manual consists of several sections and is structured as follows:
•
Introduction – this introductory chapter.
•
Getting Started – provides instructions for installing the application, and how to contact
MatrikonOPC’s Support team.
•
Configuration – shows how to start and configure the application, and describes each
component in detail, including windows/screens, panels, tabs, and menu commands.
•
Limitations – provides information on specific performance and operational limitations of
the software.
•
Troubleshooting – provides solutions for common problems that may be encountered, and
answers to frequently asked questions.
•
Un-installation – provides instructions on un-installing software.
•
Appendices:
o
A - DCOM
o
B – Standard Data Types
o
C – OPC Quality Flags
MatrikonOPC Explorer v5.0.0.0 User’s Manual
9
References
This document references information found within the following documents/sites:
•
www.opcfoundation.org
•
www.matrikonopc.com
•
www.opcsupport.com
•
OPC Data Access Custom Interface Standard v1.0a
•
OPC Data Access Custom Interface Standard v2.05a
•
OPC Security v1.0
•
OPC Alarms and Event Interface Standard v1.0
Document Terminology
The following terms used interchangeably throughout this document:
•
screen and window
•
MatrikonOPC Explorer and OPC Explorer
Table 1 provides a list of definitions for terms used throughout this document.
Term/Abbreviation
Description
A&E
OPC Alarms and Events. Provides access to process alarm and event data.
COM
Component Object Model. A method for organizing software, specifying
how to build components that can be dynamically interchanged.
DA
OPC Data Access. Provides access to real-time process data.
DCOM
Distributed Component Object Model. An extension of COM that allows
communication between COM components over a network.
DDE
Dynamic Data Exchange. Allows the transfer of data between two running
applications.
HDA
OPC Historical Data Access.
HMI
Human Machine Interface. Device that allows interaction between the user
and machine. Typically used in process control applications.
Matrikon
Matrikon Inc.
MatrikonOPC
Matrikon’s brand name for its OPC servers and clients.
OPC
A communication standard. Refer to www.opcfoundation.org for more
information.
PLC
Programmable Logic Controller.
Table 1 - Terms and Definitions
MatrikonOPC Explorer v5.0.0.0 User’s Manual
10
Getting Started
This chapter contains important information about installing the application and how to contact
Matrikon’s Support team.
The System Requirements section shows how to avoid future problems by ensuring that the
system meets the minimum software and hardware requirements. Detailed step-by-step
instructions in the Installation section walks you through the installation process and lists the files
that are installed during this process.
Refer to the Licensing section in this document for information on licensing this application and
any associated server. If any problems are encountered during installation or licensing, refer to the
Contacting Support section for information about how to contact the MatrikonOPC Support team
for assistance.
System Requirements
The software has minimum Software and Hardware system requirements. These requirements
must be met for the software to function properly.
Software Requirements
The server requires the following software:
•
Microsoft Windows XP Service Pack 1, or
•
Microsoft Windows 2000 Service Pack 2
•
Internet Explorer 4.01 Service Pack 1 (or better)
Note: It is recommended that the most current service packs are
installed.
Hardware Requirements
The server requires the following hardware:
•
Intel® Pentium® 4 Processor
•
512 MB RAM
•
40 GB 7200 RPM hard drive
Installation
Note: Usually, MatrikonOPC Explorer is automatically installed along with your server. However,
there may be instances where you need to install MatrikonOPC Explorer by itself. If that is the
case, use the steps outlined in the procedure that follows.
Once the system requirements have been met, you are ready to install the software.
To install the software:
1. Insert the MatrikonOPC Explorer CD into the CD drive.
2. If the MatrikonOPC Welcome screen does not automatically appear, double-click the
MatrikonOPCExplorer.exe file. The InstallAware Wizard verifies its contents (Figure 1)
and then the License Agreement screen (Figure 2) appears.
MatrikonOPC Explorer v5.0.0.0 User’s Manual
11
Notes:
•
The Version number located in the lower left corner indicates the version number of
the software that is being installed. The text “X.X.X.X” will be replaced with the
specific product version.
•
From the License Agreement screen, you have the option of selecting the I reject
the license agreement option. Selecting the I reject the license agreement
option button disables the Next button so your options are to cancel the install by
clicking on the Cancel button, or select the I accept the license agreement option
button enabling you to proceed through the install.
Figure 1 - InstallAware Wizard Verification Window
MatrikonOPC Explorer v5.0.0.0 User’s Manual
12
Figure 2 - License Agreement Screen
3. Read the Software License Agreement, using the scroll bar to view the entire message.
4. Select the I accept the license agreement option button.
5. Click on the Next button. The Destination Folder screen (Figure 3) appears.
Note: From this point onward, the Back button is available allowing you to return to the
previous screen or screens.
MatrikonOPC Explorer v5.0.0.0 User’s Manual
13
Figure 3 - Destination Folder Screen
6. Select the folder in which to install MatrikonOPC Explorer, or accept the default location
displayed in the Folder path field.
7. On the Destination Folder screen select or clear the checkbox associated with the
installation of any or all of the following:
•
MatrikonOPC NewsReader
•
MatrikonOPC Tunneller (30-day demonstration version)
•
MatrikonOPC Analyzer (selected by default)
•
MatrikonOPC Simulation Server (selected by default)
Note: As part of the installation process, the MatrikonOPC Analyzer
tool is installed and used to detect the system settings that affect the
use of this software. No information is communicated back to
Matrikon. Information is stored on this system only for future use by
MatrikonOPC Support to assist with troubleshooting, if required.
8. Click on the Next button. The Start Menu screen (Figure 4) appears.
MatrikonOPC Explorer v5.0.0.0 User’s Manual
14
Figure 4 - Start Menu Screen
9. Select the required Start Menu group and then specify whether you want shortcuts created
only for yourself, or for all users, by selecting the applicable option button.
10. Click on the INSTALL button. The Installing MatrikonOPC Explorer screen (Figure 5)
appears, installation begins and the server files are copied to the computer.
Note: Prior to starting the installation, you have the option of clicking on the Back button
to change any of the installation information. Click on the Cancel button if you wish to stop
or cancel the installation.
MatrikonOPC Explorer v5.0.0.0 User’s Manual
15
Figure 5 - Installing MatrikonOPC Explorer Screen
11. When the installation has finished, the MatrikonOPC Explorer Setup Complete screen
(Figure 6) appears stating that MatrikonOPC Explorer has been successfully installed.
MatrikonOPC Explorer v5.0.0.0 User’s Manual
16
Figure 6 - MatrikonOPC Explorer Setup Complete Screen
12. At this point, you have the option launching any or all of the following by selecting the
appropriate checkbox or checkboxes:
•
MatrikonOPC Explorer
•
Release Notes
•
User’s Manual
•
Quick Start Guide
13. Click on the Finish button to complete the installation and exit the Wizard.
14. The necessary files are copied to the target computer, the software components are
registered, and shortcut icons are created in the Start menu.
Note: At this point, it is recommended that you verify the DCOM
settings for your installed servers. Reference to the DCOM
configuration can be found in the DCOM Manual. This configuration
varies for different operating systems.
MatrikonOPC Explorer v5.0.0.0 User’s Manual
17
Installed Files
The installation program copies all necessary files to the target computer and creates shortcut
icons in the Start menu.
The files listed in Table 2 are installed by default, in the following location:
C:\Program Files\Matrikon\OPC\ Explorer
File Name
Description
eximg.dll
Component of MatrikonOPC Explorer.
Explorer.wmv
Instructional video demonstrating how to configure MatrikonOPC
Explorer.
Explorer EULA.pdf
End-User License Agreement in PDF format.
MatrikonOPC Server for
Explorer Quick Start
Guide.pdf
Procedural document providing instructions to get you up and
running on MatrikonOPC Explorer as quickly as possible.
MatrikonOPC Server for
Explorer Release Notes.pdf
Release Notes for this product.
MatrikonOPC Server for
Explorer User Manual.pdf
This document.
OPCExplorer.exe
Product executable.
Project Info.log
Build information specific to the current version of the server.
Table 2 - Files Installed in "Explorer" Folder
The files listed in Table 3 are installed by default, in the following location:
C:\Program Files\Common Files\MatrikonOPC\Common
File Name
Description
OPCAuto.dll
MatrikonOPC Automation Component – enables developers to access
OPC data from client applications developed using automation tools
such as Visual Basic, VBA, and VB Script.
OPCDAAuto.dll
MatrikonOPC Automation Component – enables developers to access
OPC data from client applications developed using automation tools
such as Visual Basic, VBA, and VB Script.
opchda_ps.dll
The proxy-stub file that allows OPC clients to make remote
connections to an OPC HDA server.
OPCHDAAUTO.dll
MatrikonOPC HDA Automation Component – enables developers to
access OPC HDA data from client applications developed using
automation tools such as Visual Basic, VBA, and VB Script.
Table 3 - Files Installed in "Common" Folder
Licensing
Most MatrikonOPC products require some form of licensing criteria be met to ensure that it
functions successfully. For information about the licensing of the MatrikonOPC server that
accompanies this MatrikonOPC Explorer, please refer to the Licensing section of the server-specific
User’s Manual.
MatrikonOPC Explorer v5.0.0.0 User’s Manual
18
Contacting Support
The MatrikonOPC Customer Services department (www.opcsupport.com) is available 24 hours a
day, seven days a week.
Contact MatrikonOPC Support using the information below, or send an email
([email protected]).
For Monday to Friday daytime support requests, contact MatrikonOPC Support using the regional
phone numbers provided in Table 4.
Region
Office Hours
North America
8:00am-5:00pm
UTC/GMT -7 hours (MST)
Europe /Africa *
9:00am-5:00pm
UTC/GMT +1 hours (CET)
Middle East *
9:00am-5:00pm
UTC/GMT +3 hours
Australia/Asia *
9:00am-5:00pm
UTC/GMT +10 hours (AEST)
Contact Information
+1-877-OPC-4-ALL
+49-221-969-77-0
(Request OPC Support)
+973-174-65363
+61-2-4908-2198
(Request OPC Support)
* Toll-free regional numbers coming soon!
Table 4 - MatrikonOPC Support Regional Contact Information
For after-hours support in all regions, please use either of the following numbers. There is no
extra charge from MatrikonOPC for calling their after-hours support numbers.
Region
Contact Information
+1-780-231-9480
All
+1-780-264-6714
Table 5 - After-Hours Support
MatrikonOPC Explorer v5.0.0.0 User’s Manual
19
Configuration
Minimal configuration of MatrikonOPC Explorer is required for the application to function properly,
but users can customize its behaviour as required. This chapter shows users how to start and
configure the application and describes each component in detail, including the windows, panels,
and menu commands.
The Starting MatrikonOPC Explorer section of this manual shows users how to start the
application, and describes the MatrikonOPC Explorer window and Options window in detail.
The Configuration section describes in detail how to connect to servers and how to add groups
and items.
Starting MatrikonOPC Explorer
To launch MatrikonOPC Explorer, you have the following options:
To launch MatrikonOPC Explorer from the Start menu:
1. Click on the Windows Start button.
2. Select Programs -> MatrikonOPC -> Explorer -> MatrikonOPC Explorer.
3. The MatrikonOPC Explorer window (Figure 8) is displayed.
To launch MatrikonOPC Explorer from a MatrikonOPC server Configuration screen:
1. From the toolbar on the main Configuration screen of the required server, click on the
View OPC Tags for this Server icon (
).
2. The MatrikonOPC Explorer’s Tag Studio window (Figure 8) is displayed.
To launch MatrikonOPC Explorer using command-line:
Note: You have the option of passing a configuration file to MatrikonOPC Explorer as a commandline argument. This launches OPC Explorer with a path to the XML file and automatically loads the
file. In the following procedure, you would replace C:\Program
Files\Matrikon\OPC\Explorer\test.xml with the configuration file path of your choice.
1. Use the Start -> Run with command CMD to bring up a command window.
2. Type the following: CD C:\Program Files\Matrikon\OPC\Explorer.
3. Press Enter.
4. Type the following: opcexplorer.exe
C:\Program Files\Matrikon\OPC\Explorer\test.xml.
5. Press Enter.
6. MatrikonOPC Explorer is launched with the configuration file (in this example, test.xml)
automatically loaded.
MatrikonOPC Explorer Window
The information provided in this section describes the MatrikonOPC Explorer window, functions,
and menus.
MatrikonOPC Explorer v5.0.0.0 User’s Manual
20
Figure 7 shows the MatrikonOPC Explorer window prior to selecting and connecting to a server.
Figure 8 displays the MatrikonOPC Explorer window once a server has been selected in the left
navigation pane, and you have connected to that selected server.
Figure 7 - MatrikonOPC Explorer (Prior to Server Connection)
MatrikonOPC Explorer v5.0.0.0 User’s Manual
21
Figure 8 - MatrikonOPC Explorer (with Connected Server)
Table 6 describes the commands in the MatrikonOPC Explorer window.
Command
Description
Main Menu
Provides access to the File, Server, Group, Item, View, and Help menus.
Main Toolbar
Provides shortcut buttons for commands in the Main Menu. Refer to Table
13 for descriptions of these buttons.
Navigation Pane
Displays a tree of configuration objects currently defined in the server.
Select an object to display its current settings in the right-hand panel.
Contents
Displays the contents associated with the item selected in the navigation
pane on the left side of this screen. The column headings (an example of
which can be seen in Figure 24 and are displayed once you have added a
group and items to that group) can be used to sort the listed items. Click on
the heading of your choice to sort in ascending or descending order, as
required. Once you click on a particular heading, a blue triangle appears
) and will change direction when you click on the
(
column heading.
When you initially access the main Explorer window, the Contents pane
(i.e., the pane on the right side of the screen) displays the OPC Server
Connection Options and MatrikonOPC Configuration Options which are
greyed out, and empty Server Status, Server Info, and Group Info
MatrikonOPC Explorer v5.0.0.0 User’s Manual
22
Command
Description
screen sections.
Once you have selected and connected to a server, the following screen
sections are also displayed in the Contents pane: Supported OPC
Interfaces, OPC Security. The Server Status and Server Info screen
sections now also contain server information. The Group Info screen
section is populated once a group is created and selected.
OPC Server Connection
Options
Until a ProgID is selected in the navigation pane, these option buttons are
greyed out. Once you select a ProgID, the Connect button is enabled. Upon
selecting the Connect button, the label then changes to read Disconnect
and following buttons are enabled.
•
Connect/Disconnect – connects/disconnects to/from the selected
server.
•
Add Tags – displays the Add Group window (Figure 13).
•
Add Alarms – displays the Add Subscription window (Figure 14).
Once a ProgID has been selected, the OPC Server, OPC Security (if
Security is supported by the selected server) and the Licensing buttons are
all enabled allowing you to configure the necessary options (i.e., server,
security, licensing).
MatrikonOPC
Configuration Options
Server Status
Supported OPC
Interfaces
•
OPC Server – displays the Configuration screen for the selected
server. Refer to the Server Configuration section in the User’s Manual
installed with the selected server.
•
OPC Security – if enabled, displays an Enter server password
window. Use the password set during installation of the selected
server. Entering the required password allows you to access the
MatrikonOPC Tag Security Configuration Utility screen.
•
Licensing – displays the MTK Software Authorization screen
allowing you to license the selected server. For more information,
refer to the Licensing Procedures document installed with the selected
server. This option is greyed out if the selected server does not
require licensing (e.g., Simulation Server).
This screen section is not displayed until a server is selected and connected
to. The connected server status information is displayed: Prog ID of the
selected server, whether the selected server is connect, server status,
number of groups added to the server, total number of items within all
groups, current time, and the last update time.
This screen section is not displayed until a server is selected and connected
to. Supported OPC interfaces are displayed: DA, HDA, A&E, Security. If
the selected server does not support one or more of the interfaces, in the
Supported OPC Interfaces screen section, the name of that particular
interface appears greyed out with a red X across it (Figure 9).
Figure 9 - Supported OPC Interfaces
MatrikonOPC Explorer v5.0.0.0 User’s Manual
23
Command
OPC Security
Description
This screen section is not displayed until a server is selected and connected
to. OPC Security Check is displayed. This screen section confirms whether
OPC Security is implemented or not.
The OPC Security screen section also contains a link to MatrikonOPC
Security Gateway information available on the MatrikonOPC website.
Server Info
Displays statistics on the server currently selected in the navigation pane:
Server, Connected, State, Groups, Total Items, Current Local Time,
Update Local Time.
MatrikonOPC Ads/Tips
Displays ads for MatrikonOPC and a variety of MatrikonOPC Explorer tips.
Displays statistics on the group currently selected in the navigation pane:
Group, Connected (Async I/O), Active, Items, Current Update Rate,
Percent Deadband, Data Change Rate.
Group
Info/Subscription Info
Note: In situations where a subscription has been added to a connected
server, and that subscription has been selected in the navigation pane, this
screen section is then labelled as Subscription Info. In that case, the
following statistics are then displayed: Subscription, Active, Alarms,
Current Buffer Time, Severity Maximum, Severity Minimum, Max
Buffer Size, Event Types.
Table 6 - MatrikonOPC Explorer Window Commands
The following sections describe the menus available from the MatrikonOPC Explorer window, and
what they are used for.
File Menu
Table 7 describes the File menu commands.
Command
Description
New Session
Clears the current session and starts a new one.
Open
Displays the Open Session window allowing you to locate and open a saved
session as an XML file.
Save
Saves the current configuration to an XML file. Displays the Save Session
window to prompt for a new file name if the configuration is new and has not
been saved before.
Save As
Saves the current configuration to an XML file. Displays the Save Session
window to prompt for a new file name.
Exit
Closes the current session.
Table 7 - File Menu Commands
Server Menu
Table 8 describes the Server menu commands.
Command
Description
Connect
Connects to the selected server.
Disconnect
Disconnects from the selected server.
MatrikonOPC Explorer v5.0.0.0 User’s Manual
24
Command
Description
Add Group
Displays the Add Group window which allows you to define the settings for
a new group.
Add Subscription
Displays the Add Subscription window which allows you to define the
settings for a new subscription.
Export Groups
Saves an export of all of the currently configured groups in this OPC server.
Displays the Export Tags window allowing you to define a new file name
(.csv) to identify the export of configured groups. For more information,
refer to Exporting Groups, Items, and Alarms.
Logon
If enabled, select this option to display the OPC Security (Private) window
where you can enter your logon settings. If the OPC server you are
connected to supports the OPC security interface, then this option is
available and you can specify a User ID and Password to log onto the OPC
server with.
Logoff
If the OPC server you are connected to supports the OPC security interface,
then you can log out from your current username and password that was
used in the Logon option. This option is enabled only once you have logged
on.
Add/Connect Server
Displays the Connecting to an OPC Server window which allows you to
manually add another server, and/or connect to another server.
Properties
Displays the Server Properties window which allows you to access general
properties associated with the selected server (e.g., Prog ID, vendor,
registry settings), server status, as well as required and optional interfaces.
Table 8 - Server Menu Commands
Group Menu
Table 9 describes the Group menu commands.
Command
Description
Activate/Deactivate
Activates or deactivates the selected group, as required. If the group is
active, the Deactivate menu option is available. If the group is inactive, the
Activate menu option is available.
Use Async I/O
Specify whether or not Asynchronous I/O is to be used by the selected
group.
Device Read
Specify whether or not to force a Device Read.
Add Items
Displays the Tag Studio allowing you to add items to the selected group.
Export Items
Saves an export of all of the currently configured items in the selected
group. Displays the Export Tags window allowing you to define a new file
name to identify the export of configured items. For more information, refer
to Exporting Groups, Items, and Alarms.
Delete
Enables you to delete the selected group.
Properties
Displays the Group Properties window where you can update general
properties and view the associated required and optional interfaces.
Table 9 - Group Menu Commands
MatrikonOPC Explorer v5.0.0.0 User’s Manual
25
Item Menu
Table 10 describes the Group menu commands.
Command
Description
Write Values
Displays the Write Values window which allows you to write values to the
selected item or items.
Activate/Deactivate
Activates or deactivates the selected item or items. If the item is active, the
Deactivate menu option is available. If the item is inactive, the Activate
menu option is available.
Delete
Enables you to delete the selected item or items.
Export Items
Saves an export of all of the currently selected items. Displays the Export
Tags window for a new file name. For more information, refer to Exporting
Groups, Items, and Alarms.
Properties
Displays the Item Properties window where you can update general
properties and detailed item properties.
Table 10 - Item Menu Commands
View Menu
Table 11 describes the View menu commands.
Command
Description
Advise Log
Displays the MatrikonOPC Explorer Advise Log window.
Error Log
Displays the MatrikonOPC Explorer Error Log window.
Update Speed
Allows you to specify the refresh rate for the value display in OPC Explorer:
High, Normal, Low.
Refresh
Refreshes the displayed OPC Explorer and any updates made.
Options
Displays the Options window used to change MatrikonOPC server options:
General, Data Transfer, Data Display, COM, and Miscellaneous.
Table 11 - View Menu Commands
Help Menu
Table 12 describes the Help menu commands.
Command
Description
MatrikonOPC on the Web
Opens a link to the MatrikonOPC web site.
About
Displays the Welcome screen, which includes information about the
product version.
Table 12 - Help Menu Commands
Toolbar Options
Figure 10 displays the MatrikonOPC Explorer toolbar. Each toolbar option is described in Table
13.
MatrikonOPC Explorer v5.0.0.0 User’s Manual
26
Figure 10 - MatrikonOPC Explorer Toolbar
Option
Description
Connect to remote OPC
Server
Use this button to display the Connecting to an OPC Server
window.
Connect to/Disconnect from
OPC Server
Select this button to disconnect from (
selected server.
Properties
Use this button to display the Server Properties window.
OPC Server Refresh
Select this button to refresh the selected server.
Add Group
Use this button to display the Add Group window allowing you to
create groups and add them to the selected server.
Group Properties
Use this button to display the Group Properties window.
Delete Group
Select this button to delete selected groups.
Activate/Deactivate Group
Select this button to activate or deactivate selected groups, as
required.
Use/Stop using Asynch I/O
Select this button to use or stop using Asynch I/O, as required.
Force Demand Read
Select this button force a Demand Read for the selected group.
Add OPC Items
Use this button to display the Tag Studio allowing you to add tags.
OPC item properties
Use this button to display the Item Properties window.
Delete OPC items
Select this button to delete selected items.
Activate/Deactivate item(s)
Select this button to activate or deactivate selected items, as
required.
Write to selected OPC items
Use this button to display the Write Values window allowing you to
define a new value for the selected item or items.
), or connect to (
), the
Table 13 - MatrikonOPC Explorer Window Toolbar Options
Viewing Available OPC Servers
MatrikonOPC Explorer is an OPC client application. It connects to OPC server applications and
displays real-time values as they are received. When OPC Explorer starts up, it searches the
registry on the local computer and generates a list of program IDs for available OPC servers. It
displays this list in a browser view in the left-hand pane (Figure 11) of the OPC Explorer.
Figure 11 - Server List
MatrikonOPC Explorer v5.0.0.0 User’s Manual
27
Every OPC server has a unique program ID. This is a human-readable text string that is converted
to a globally-unique identification number which COM then uses to identify the server. Each server
may have a version-specific program ID (with a number appended to the end of the string), a
version-independent program ID (no number), or both. All MatrikonOPC servers have both types,
but only the version-dependent program ID shows up in the list.
If an error occurs during the communication session between OPC Explorer and an OPC server, a
message appears explaining as much. Click on the Details button to get a more descriptive
explanation of the error. Clear the Disconnect Server checkbox to ignore the error and continue
without disconnecting from the server. Select the Error Log option from the View menu to display
a log of past errors in the MatrikonOPC Explorer Error Log window. For more information, refer
to Error Log.
Connecting to an OPC Server
To connect to an OPC server:
1. From the main MatrikonOPC Explorer window, in the browser view (i.e., navigation pane),
select a program ID.
2. In the OPC Server Connections Options screen section in the Contents pane, click on
the Connect button, or
From the toolbar, select the Connect to selected OPC Server icon (
), or
Right-click your mouse on the required ProgID in the navigation pane, and select Connect
from the displayed menu, or
From the Server menu, select the Connect option.
Notes:
•
The browser pane allows users to choose OPC servers on the Local or Networked
machines. Another option for remote connections is the Other Network Computers
option. Right-clicking your mouse on this item and selecting Add/Connect Server
displays the Connecting to an OPC Server window (Figure 12) which allows you to
manually enter a host name/IP address and OPC Server Prog ID.
•
COM will attempt to launch the OPC server if it is not currently running when the first
client attempts to connect to it. If the server runs as a local executable, then COM
will run it. If the server runs as an NT service, then COM will start it up.
•
Similarly, when the last client application disconnects from an OPC server, the server
will shut down. MatrikonOPC servers wait for one minute before shutting down to
avoid unnecessary processing when client applications connect and disconnect
frequently.
MatrikonOPC Explorer v5.0.0.0 User’s Manual
28
Figure 12 - Connecting to an OPC Server Window (Other Network Computers)
Adding OPC Groups
Note: To add a group or groups to a connected server (for assistance, see Connecting to an OPC
Server), follows the steps outlined in the procedure below.
To add an OPC group:
1. From MatrikonOPC Explorer, in the browser view (i.e., navigation pane), select the
connected server to which you want to add an OPC group.
2. From the toolbar, click on the Add Group button (
), or
Right-click your mouse on the required server and select the Add Group option from the
displayed menu, or
From the Server menu, select the Add Group option.
Note: You also have the option of adding a group by first clicking on the Add Tags button
in the OPC Server Connections Options screen section of the Matrikon Explorer
window. The Tag Studio then appears allowing you to add items as required (for more
information, refer to Adding OPC Items). Once you close the Tag Studio, a new group is
automatically created for you.
3. The Add Group window (Figure 13) appears.
MatrikonOPC Explorer v5.0.0.0 User’s Manual
29
Figure 13 - Add Group Window
4. Enter a name for the group. If the Group Name field is left blank, the OPC server will
assign a unique name for the group.
5. Change the other settings as desired.
6. Click on the OK button.
7. The Tag Studio (Figure 19) appears allowing you to add OPC items to your new group
(refer to Adding OPC Items).
8. After adding items to the group, click on the OK button.
9. The newly-created group and associated items now appear in the navigation pane under the
selected server.
Changing OPC Groups
To change an OPC group:
1. Select the group for which you want to change settings, and from the Group menu either:
Select the Properties menu option, or
From the toolbar, click on the Group Properties button (
), or
Right-click your mouse on the group you wish to change, and select Properties from the
displayed menu.
2. The Group Properties window appears.
3. Change the settings as required. Refer to Read Real-Time Values for further explanation
of what these settings do.
4. Click on the Apply button to submit the changes.
5. Click on the OK button to close the Group Properties window and return to Matrikon
Explorer.
Adding Subscriptions
A subscription is added to a connected server and is used to categorize alarms for that server.
The Add Subscription window consists of two tabs:
•
Subscription Settings
•
Filtering
MatrikonOPC Explorer v5.0.0.0 User’s Manual
30
Subscription Settings Tab
The Subscription Settings tab (Figure 14) is where the subscription’s name, update rate, and
size are defined. This tab is where you specify whether the subscription is enabled or disabled.
Table 14 describes the tab components.
Figure 14 - Add Subscription Window (Subscription Settings Tab)
Option
Subscription Name
Enable
Description
Allows you to enter a name for the subscription. If this field is left
blank, the OPC server assigns a unique name for the subscription.
Use this checkbox to enable (i.e., checkbox is selected) or disable
(i.e., checkbox is cleared) the subscription.
By default, the checkbox is selected.
Update Rate
Allows you to enter or select a value that defines the rate (in
milliseconds) at which the subscription is to be updated.
Default = 1000.
Max Size
Allows you to enter or select a value that specifies the maximum
size allowed for the current subscription. A value of 0 indicates an
unlimited size.
Default = 0.
OK
Cancel
Select this button to save any changes made and close the window.
Note: This information stays consistent across all tabs.
Select this button to close the window without saving any changes
made.
MatrikonOPC Explorer v5.0.0.0 User’s Manual
31
Option
Description
Note: This information stays consistent across all tabs.
Table 14 - Add Subscription Window (Subscription Settings Tab) Components
Filtering Tab
The Filtering tab (Figure 15) filters the subscription alarms by event type, severity, and
categories. Table 15 describes the tab components.
Figure 15 - Add Subscription Window (Filtering Tab)
Option
Events
Description
Allows you to specify what types of events are to be included (i.e.,
checkbox is selected) in the subscription: Simple, Conditional,
and/or Tracking.
By default, all checkboxes are selected.
High Severity
Allows you to enter or select a value defining the highest severity
allowed for an event within a range of 1 (lowest priority) through
and including 1000 (highest priority).
Default = 1000.
Low Severity
Allows you to enter or select a value defining the lowest severity
allowed for an event within a range of 1 (lowest priority) through
and including 1000 (highest priority).
Default = 1.
Categories
In this screen section, the Available pane lists all of the possible
MatrikonOPC Explorer v5.0.0.0 User’s Manual
32
Option
Description
different alarms supported by the server. The available alarms
depend on the server to which you are connected. If an alarm is not
enabled, it is not listed in the Enabled pane.
Select this button to save any changes made and close the window.
OK
Note: This information stays consistent across all tabs.
Select this button to close the window without saving any changes
made.
Cancel
Note: This information stays consistent across all tabs.
Table 15 - Add Subscription Window (Filtering Tab) Components
To add a subscription:
1. From the MatrikonOPC Explorer window, in the browser view (i.e., navigation pane),
select the connected OPC server to which you want to add a subscription.
2. From the Server menu, select the Add Subscription option, or
Right-click your mouse on the server to which you want to add a subscription, and select
the Add Subscription option from the displayed menu, or
Click on the Add Alarms icon in the OPC Server Connection Options screen section.
3. The Add Subscription window (Figure 14) appears.
4. With the Subscription Settings tab selected, enter a name for the subscription. If the
Subscription Name field is left blank, the OPC server will assign a unique name for the
subscription.
5. Make changes as required.
6. Select the Filtering tab (Figure 15) and make any other required changes.
7. Click OK.
8. The Add Subscription window closes and you are returned to the MatrikonOPC Explorer
where the newly-created subscription is now displayed in the navigation pane (Figure 16).
Note: Once a subscription has been created, the properties can only be viewed and cannot be
changed.
MatrikonOPC Explorer v5.0.0.0 User’s Manual
33
Figure 16 - New Subscription
Subscription Options
Right-clicking your mouse on a subscription in the navigation pane (as an example, refer to Figure
16), the following options are available:
Clear Alarms – clears all alarms associated with the selected subscription.
Export Alarms – displays the Export Tags window (Figure 17) allowing you to save the
information from the selected alarm or alarms to a .csv file. For more information, refer to
Exporting Groups, Items, and Alarms.
MatrikonOPC Explorer v5.0.0.0 User’s Manual
34
Figure 17 - Export Tags Window
Delete Subscription – allows you to delete a subscription.
Properties – displays the Subscription Properties window (Figure 18) which is display only. This
window allows you to view the settings applied to the selected subscription.
Note: Once a subscription has been created, the properties can only be viewed and cannot be
changed.
MatrikonOPC Explorer v5.0.0.0 User’s Manual
35
Figure 18 - Subscription Properties Window
Adding OPC Items
An OPC group serves as a logical collection of data items. The Tag Studio (Figure 19) is a utility
for creating, validating, and adding OPC items.
MatrikonOPC Explorer v5.0.0.0 User’s Manual
36
Figure 19 - Tag Studio
Table 16 describes the commands in the Tag Studio.
Command
Description
Main Menu
Provides access to the File, Edit, View and Browse menus.
Main Toolbar
Provides shortcut buttons for commands in the Main Menu. Refer to Table
21 for descriptions of these buttons.
Tag Entry
This panel allows you to specify and edit those tags to be added to a group.
Tags to be added
This panel lists the tags to be added to a group, and displays properties for a
selected item.
Table 16 - Tag Studio Commands
MatrikonOPC Explorer v5.0.0.0 User’s Manual
37
File Menu
Table 17 describes the File menu commands.
Command
Description
Validate Tags
Select this menu option to validate the selected items.
Close
Select this menu option to close the Tag Studio and return to
MatrikonOPC Explorer.
Update and return
Select this menu option to update and close the Tag Studio and return to
MatrikonOPC Explorer.
Table 17 - File Menu Commands (Tag Studio)
Edit Menu
Table 18 describes the Edit menu commands.
Command
Description
Clear Tag List
Select this menu option to clear all tags from the Tags to be added screen
section.
Select All
Select this menu option to select all tags listed in the Tags to be added
screen section.
Remove Tag
Select this menu option to delete all selected items in the Tags to be added
screen section.
Table 18 - Edit Menu Commands (Tag Studio)
View Menu
Table 19 describes the View menu commands.
Command
Description
Status Bar
Select this menu option (i.e., checkmark appears next to option) to display a
status bar at the bottom of the screen
Server Browser
Select this menu option (i.e., checkmark appears next to option) to display
the server browser in the Tag Entry screen section.
Item Info
Select this menu option (i.e., checkmark appears next to option) to display
the Item Information screen section (below the Tags to be added
section).
Large Icons
Select this menu option (i.e., bullet point appears next to option) and the
items listed in the Tags to be added screen section are displayed as large
icons.
Small Icons
Select this menu option (i.e., bullet point appears next to option) and the
items listed in the Tags to be added screen section are displayed as small
icons.
List
Select this menu option (i.e., bullet point appears next to option) and the
items listed in the Tags to be added screen section are displayed in a list
format.
Table 19 - View Menu Commands (Tag Studio)
MatrikonOPC Explorer v5.0.0.0 User’s Manual
38
Browse Menu
Table 20 describes the Browse menu commands.
Command
Description
Refresh
Select this menu option to refresh the Tag Studio.
Flat Browse
Select this menu option (i.e., checkmark appears next to option) to enable
flat browsing for available tags.
Hierarchical Browse
Select this menu option (i.e., checkmark appears next to option) to enable
hierarchical browsing for available tags.
Table 20 - Browse Menu Commands (Tag Studio)
Toolbar Options
Each Tag Studio toolbar option is described in Table 21.
Option
Description
Select this button to close the item browser and add the selected items.
Select this button to edit the selected item.
Select this button to delete selected items.
Select this button to validate the selected items.
Select this button to show or hide the browse tree, as required.
Select this button to refresh the browse tree. This button is available only when the
server browser is displayed.
Select this button to change the view of item list. Items are either listed or appear as
icons.
Table 21 - Tag Studio Toolbar Options
Table 22 describes the Tag Studio components.
Command
Description
Item ID
Allows you to enter the required item ID.
Data Type
Allows you to select the required data type from the drop-down list. If this
field is left empty, the default data type will be used.
Create Active
Select this checkbox if you want the tag to be created in an active state.
Add tag to list
Select this button to add the tag definition to the tag list (i.e., Tags to be
added section). Tags in the tag list will be added to the selected group once
the OK button is selected.
Access Path
Allows you to enter (or select by using the Browse Access Paths button)
the tag’s access path. Access paths are optional and may not be used by
some servers.
Browse Access Paths
Use this button to display the Browse Access Paths window. If access
MatrikonOPC Explorer v5.0.0.0 User’s Manual
39
Command
Description
paths are available for the item (not the case for all servers), they are listed
for selection in this window. Select a path in this window, click on the OK
button. The window closes and the selected access path is displayed in the
Access Path field.
Filter
Allows you to enter a filter string to apply to the server.
Data Type Filter
Allows you to select the data type, which is to be used to filter available
tags, from the drop-down list. If this field is left empty, the default data type
will be used.
Write Access
Select this checkbox to browse only writeable items.
Read Access
Select this checkbox to browse only readable items.
Branches
Select this checkbox to apply the filter to the branches.
Items
Select this checkbox to apply the filter to the items.
Available Items in
Server [Server Name]
Allows you to select and expand a grouping to view the items it contains.
Available Tags
Lists the tags associated with the selected item in the Available Items
screen section. Allows you to edit item IDs and add one or more tags to the
tag list.
Tags to be added
List of those tags selected for addition to the current group. Select a tag to
view its properties in the Item Information screen section (i.e., section
below Tags to be added). You can double-click on a tag to edit it, if
required. Right-clicking your mouse on a tag displays a menu allowing you
to write values to the tag, deactivate it, delete it, or view its properties.
Item Information
Lists the properties associated with the tag selected in the Tags to be
added screen section.
Table 22 - Tag Studio Components
You can use either of the following methods to add OPC items to a group:
To add an OPC item using the Item ID field:
1. From the MatrikonOPC Explorer window, in the browser view (i.e., navigation pane),
select the OPC group to which you want to add an item or items.
2. From the Group menu, select the Add Items option, or
From the toolbar, click on the Add OPC Items button (
), or
Right-click your mouse on the group to which you want to add an item, and select the Add
Items option from the displayed menu, or
Double-click your mouse on the group to which you want to add an item.
3. The Tag Studio (Figure 19) appears.
4. From the Tag Studio, in the Item ID field, enter an item ID.
5. Click on the Add tag to list (i.e., right-pointing arrow) button. The item then appears in
the Tags to be added list.
6. Double-click on the item to edit its settings in the Tag Entry panel, or
MatrikonOPC Explorer v5.0.0.0 User’s Manual
40
Right-click your mouse on the item and select Edit from the displayed menu.
Note: The appearance of the Add tag to list button changes to include this graphic
above the arrow on the button.
7. Make changes as required.
8. From the File menu, select the Update and Return menu option to add the created items
to the OPC group and return to the MatrikonOPC Explorer.
To add an OPC item from the Available Items screen section:
1. From the MatrikonOPC Explorer window, in the browser view (i.e., navigation pane),
select the OPC group to which you want to add an item or items.
2. From the Group menu, select the Add Items option, or
From the toolbar, click on the Add OPC Items button (
), or
Right-click your mouse on the group to which you want to add an item, and select the Add
Items option from the displayed menu, or
Double-click your mouse on the group to which you want to add an item.
3. The Tag Studio (Figure 19) appears.
4. From the Tag Studio, in the Available Items screen section, select and expand either the
[Server Name] Items or Configured Aliases nodes.
5. Browse to the desired item or items.
6. Right-click your mouse on the required item and select Add to Tag List from the displayed
menu, or
Double-click your mouse on the required tag to move it to the Tags to be added screen
section, or
To add all of the tags listed in the Available Tags screen section, right-click your mouse
anywhere in that screen section and select Add All Items to Tag List from the displayed
menu.
7. Double-click on the item to edit its settings in the Tag Entry panel, or
Right-click your mouse on the item and select Edit from the displayed menu.
Note: The appearance of the Add tag to list button changes to include this graphic
above the arrow on the button.
8. Make changes as required.
9. From the File menu, select the Update and Return menu option to add the created items
to the OPC group and return to the MatrikonOPC Explorer.
The following sub-sections describe the MatrikonOPC Explorer components and functions in more
detail:
•
Item ID
•
Access Path
•
Browsing the Server Address Space
•
Requested Data Type
MatrikonOPC Explorer v5.0.0.0 User’s Manual
41
•
Active State
•
Validate the OPC Items
Item ID
All OPC items must be identified by an item ID. This identifier is a server-specific string of
characters that uniquely identifies a source of data to an OPC server. More than one OPC item may
refer to the same item ID at the same time.
Note: Items or devices given names containing a period, comma, or hash mark, will not be
available in MatrikonOPC Explorer.
On the Tag Studio, enter the item ID in the Item ID field. Click on the View tag generator
button (outlined in red in Figure 20) adjacent to the Item ID field. The Tag Generator window
Figure 21 appears.
The Tag Generator is a utility used to create large numbers of tags that follow a known pattern.
Figure 20 - View Tag Generator Button
Figure 21 - Tag Generator Window
Some examples of item IDs might be:
•
PLC1.4:0001
MatrikonOPC Explorer v5.0.0.0 User’s Manual
42
•
North:FIC101/CV
•
\\ARCSVR:DBTAG001
Refer to your OPC server’s documentation for information about the specific syntax of the item IDs.
Access Path
Some OPC servers may allow clients to specify an access path in addition to an item ID. An access
path may suggest to the server how it should get the data for a particular item. For example, it
might specify the method of communication to use for accessing the data (i.e., radio, satellite, or
modem).
Servers are under no obligation to use the access path, although they will return errors if the
access path is invalid. From the Tag Studio, click on the Browse Access Paths button (outlined
in red in Figure 22) to the right of the Access Path field to browse the access paths that are
available for the selected item ID (if the server supports this feature). MatrikonOPC servers do not
use access paths. Leave the Access Path field blank if it is not used.
Figure 22 - Browse Access Paths Button
Browsing the Server Address Space
Browsing is supported by some OPC servers as a means of isolating users from the exact syntax of
its item IDs. Browsing allows users of OPC clients to view the “contents” of a server to find a
particular tag and resolve it into a valid item ID. It is not primarily intended for auto-generating
OPC items. If the OPC server supports browsing, then a tree view and list view appear in Tag
Studio.
The browsing method can be changed form hierarchical to flat by clicking on the Tag Studio’s
Browse menu which gives you the option of selecting Flat Browse or Hierarchical Browse.
When using flat browsing, all items are displayed in the Available Tags window.
When using hierarchical browsing, the tree view displays “branches” in the address space, while
the list view displays the “leaves” that are available under the selected branch. Each leaf either
represents an actual item or else it may provide a hint indicative of available items. For example, if
there are thousands of numbered items under a branch, the server might simply provide a single
leaf representing the range of numeric addresses available.
While browsing, you may apply a number of filter criteria to search for a particular type of item.
The syntax of the filter is vendor-specific, but the algorithm recommended by the OPC Foundation
follows the same pattern as the Visual Basic “Like” function with respect to item names. For
example, A* filters out any item names that do not begin with the letter A. This filter may also
apply to branches.
Items may also be filtered by data type and access rights. Choosing a type other than
Empty/Default causes the browser to display only those items with the same canonical data type
as that selected. Access rights are non-exclusive. For example, selecting write access and deselecting read access will display only items that can be written to, regardless of their read
accessibility. Selecting both should filter nothing out.
Double-click on a leaf and Tag Studio will place the fully-qualified item ID for that item in the
Item ID field. If the item ID is a hint, then change it to a “real” item, following the pattern
provided by the hint. Alternatively, right-click on the item and choose Add to Tag List to add the
item using the previous item’s settings. Selecting Add All Items to Tag List adds every item
under the branch.
MatrikonOPC Explorer v5.0.0.0 User’s Manual
43
Requested Data Type
All OPC items have a native (canonical) data type. That is to say, there is a default format to the
data that the server supplies for an item. When creating OPC items, client applications can specify
a requested data type for each item. The OPC server will attempt to convert any data from the
item to this format, if possible. If the requested and canonical data types are incompatible, the
server will fail to validate the item when it is added.
Active State
Like groups, OPC items may be active or inactive. Refer to Read Real-Time Values for more
information about this setting.
Validate the OPC Items
OPC items can be validated using any of the following options:
•
From the Tag Studio, select Validate Tags from the File menu, or
•
From the toolbar, click on the Validate Items button (
•
Right-click your mouse in the Tags to be added screen section and select Validate Tags
from the displayed menu.
), or
Tag Studio will then query the OPC server to determine whether the items are correct. A small
red X that appears next to an item indicates that it did not validate properly. A green checkmark
indicates that the item is valid. A blue question mark indicates that the item has not yet been
validated.
Read Real-Time Values
Once items are added to an OPC group, MatrikonOPC Explorer continually updates the display for
that group with real-time data. The data values appear in the list view on the right-hand side of the
OPC Explorer window. Each item is listed along with its item ID, access path, active state, value,
quality and timestamp.
When there are a number of groups created on an OPC server, use the group list view to navigate
between different groups as well as to view the items in those groups.
MatrikonOPC Explorer v5.0.0.0 User’s Manual
44
Figure 23 - Group Properties Window
Update Rate
The OPC server tries to keep MatrikonOPC Explorer informed with values for an OPC group at the
requested update rate for that group. If the requested update rate is too fast for the server to
handle, then it will return a revised update rate that it will use instead. Internally, the server tries
to keep the data items at least as “fresh” as indicated by the update rate. However, the server will
send values to the client no faster than the update rate to avoid overwhelming it.
Active State
OPC servers only update values for active items in active groups. When an individual item is set
inactive, the server stops sending updates for the item. When a group is set inactive, the server
stops sending values for any items in that group. Client applications (such as HMI applications) can
help to reduce the processing load on an OPC server by deactivating groups and items that are not
currently needed.
Choose the Activate or Deactivate option from the Group or Item menus at any time to change
the active state of an OPC group or individual OPC items.
Time Bias
Some OPC client applications may use the OPC server time bias setting as a storage area for time
zone information. This information might be used to display server timestamps in a time zone other
than UTC or the local time zone. MatrikonOPC Explorer does not use this information, but allows
the user to write the information to the server as a test.
MatrikonOPC Explorer v5.0.0.0 User’s Manual
45
Dead-Band
Some OPC servers support dead-band for updates from analog data sources. The dead-band value
is a percentage of full-scale deflection and so the high and low limits for the item must be known
ahead of time. Dead-band affects only updates between an OPC client and a server. It has no
effect on communication between an OPC server and its respective device or devices.
I/O Method
MatrikonOPC Explorer allows the user to specify the method of communication to use with a group.
Synchronous I/O is generally reserved for testing and special operations. OPC Explorer also allows
the user to choose between the 1.0a or 2.0 style of asynchronous I/O. The normal recommended
setting is Auto-Detect I/O, which attempts to use 2.0 first, and then 1.0a if that fails, and finally
Synchronous I/O if the previous two fail.
Data Display
Although the OPC server may supply data changes to MatrikonOPC Explorer at the update rate of
the group, a global setting specifies the refresh rate for the display in OPC Explorer. Choose the
Update Speed option from the View menu and select one of the available options: High,
Normal, Low.
In the item display, the Value field shows the real-time value for the item. The Quality field
indicates whether or not this value is valid, and why (refer to Appendix C - OPC Quality Flags
for more information). The Timestamp field indicates how “fresh” the value is (the time that it was
received from the data source).
The Server and Group/Subscription Info panels at the bottom of the window display status
information about the selected server and group or subscription.
MatrikonOPC Explorer v5.0.0.0 User’s Manual
46
Figure 24 - Data Display
Group Info
Table 23 describes the information displayed in the Group Info panel.
Item
Description
Group
Displays the selected group’s name.
Connected (Async I/O)
States whether the selected group is using asynchronous reads (i.e., Yes)
and to which OPC specification it conforms.
Active
Shows whether the selected group is active (Yes/No).
Items
Shows the number of items in the selected group.
Current Update Rate
Displays the current update rate of the selected group.
Percent Deadband
Displays the percent deadband specified in your group’s properties. This
parameter is required by the OPC DA specification.
Data Change Rate
Measures the throughput rate of the OPC server,by storing the last 10
updates from the OPC server and averaging them over time.
Table 23 - Group Info Display Information
MatrikonOPC Explorer v5.0.0.0 User’s Manual
47
Subscription Info
Table 24 describes the information displayed in the Subscription Info panel.
Item
Description
Subscription
Displays the selected subscription’s name.
Active
Shows whether the selected group is active (Yes/No).
Alarms
The number of alarms currently displayed. The maximum number of alarms
that can be displayed per subscription is 1000.
Current Buffer Time
The update rate specified on your subscription. All alarms that are reported
within this time frame are reported.
Severity Maximum
All alarms within the range the maximum and minimum severity are
reported to the subscription.
Severity Minimum
All alarms between the maximum and minimum severity are reported to the
subscription.
Max Buffer Size
The number of alarms that can be reported in a single update.
Event Types
Event types that are currently subscribed to. This can include Simple,
Conditional, and/or Tracking event types.
Table 24 - Subscription Info Display Information
Note: For additional information please, refer to the OPC AE 1.0 and DA 2.05A specifications.
Advise Log
The Advise Log option displays a log of ongoing I/O transactions.
To view the Advise Log window:
1. From the MatrikonOPC Explorer window, select the required group.
2. From the View menu, select the Advise Log option.
3. The MatrikonOPC Explorer Advise Log window (Figure 25) appears displaying the
transactions log.
Note: The Advise Log window can be re-sized as needed, allowing you to view all log text.
4. Right-clicking your mouse in the Advise Log window displays the following menu options:
•
Clear Log - clears the log and a new log is started.
•
Stay On Top - keeps the log window above all other windows in the desktop.
•
Follow Last Entry - keeps the most recent entry visible at all times.
•
Export Log – displays the Export Advise Log window allowing you to export the
current log information to a file (*.log).
MatrikonOPC Explorer v5.0.0.0 User’s Manual
48
Figure 25 - MatrikonOPC Explorer Advise Log Window
Note: Advise log may take up significant CPU usage if many data updates are occurring.
Error Log
A log of past errors is displayed in the MatrikonOPC Explorer Error Log window.
To view the Error Log window:
5. From the MatrikonOPC Explorer window, select the Error Log option from the View
menu.
6. The MatrikonOPC Explorer Error Log window (Figure 26) appears displaying a log of
errors.
7. Right-clicking your mouse in the Error Log window displays the following menu options:
•
Clear Log - clears the log and a new log is started.
•
Export Log – displays the Export Error Log window allowing you to export the
current log information to a file (*.csv).
MatrikonOPC Explorer v5.0.0.0 User’s Manual
49
Figure 26 - MatrikonOPC Explorer Error Log Window
Write Control Values
MatrikonOPC Explorer allows you to write control values to items in an OPC group.
To write a control value:
1. Select the desired item or items in the list view of the Contents pane.
2. Select the Write Values option from the Item menu, or
From the toolbar, click on the Write to selected OPC items button (
), or
Right-click your mouse on the required item and select Write Values from the displayed
menu, or
Double-click your mouse on the required item.
3. The Write Values window (Figure 27) is displayed with the Multiple Value tab selected.
Figure 27 - Write Values Window (Multiple Value Tab)
MatrikonOPC Explorer v5.0.0.0 User’s Manual
50
4. In the New Value column, enter the control values to be written to the item.
5. In the Data Type column, if required, select the necessary data type from the drop-down
list for each item.
6. Select the Apply button to perform the write.
7. Select the OK button to close the Write Values window.
Note: Control values may be written to items regardless of whether they or the group they are in,
are active or inactive. If the items and the group containing the items are both active, the written
control value should appear when the next update occurs. Also, some OPC servers may contain
read-only items. Values written to these items will be discarded.
MatrikonOPC Explorer also contains a Signal Generator to write ramping control values to the
OPC items.
To write a ramping control value:
1. From the Write Values window, select the Signal Generator tab (Figure 28).
2. Enter the high and low limits, and the increment factor for the ramp wave.
3. In the Frequency field, enter the time period in milliseconds and click on the Start button.
4. Select the Stop button or close the Write Values window to finish writing the ramp wave.
Figure 28 - Write Values Window (Signal Generator Tab)
MatrikonOPC Explorer v5.0.0.0 User’s Manual
51
Options Window
The Options window is used to change certain aspects of OPC Explorer’s behaviour. This window
consists of five tabs:
•
General
•
Data Transfer
•
Data Display
•
COM
•
Miscellaneous
The Defaults button on the Options window can be used to restore the original settings.
Use the Errors checkboxes on the Miscellaneous tab to specify whether the error window should
be displayed when COM or OPC errors occur, or when errors occur for individual items. The sanity
check option (also on the Miscellaneous tab) ensures that the OPC server keeps track of lists of
groups and items properly. At present, session files may only be stored as text files, so the binary
format is unavailable.
General Options
This tab allows you to view and edit the way OPC Explorer saves and loads its files, and OPC server
and item browsing options.
To view the General options:
1. On the MatrikonOPC Explorer window, from the View menu, select the Options menu
item.
2. The Options window appears.
3. From the Options window, select the General tab (Figure 29).
MatrikonOPC Explorer v5.0.0.0 User’s Manual
52
Figure 29 - General Options Tab
Table 25 describes the fields available on the General tab.
Field
Description
Save current configuration
on shutdown
Automatically saves the current configuration to the specified file
before shutting down, if selected.
Backup: X copies
Automatically keeps up to the specified number (i.e., X) of backup
copies of the configuration file when saving the configuration.
Load configuration on setup
Automatically loads a configuration from the specified file when
starting up, if selected.
Displays the full path of an existing file for load and save operations.
Filename
Click on the ellipsis button (
select an existing file name.
OPC Server Browsing
Allows you choose a method by which to browse for OPC servers.
OPC Item Browsing
Allows you to enable or disable the auto-browsing of OPC server
items upon group creation. You can also specify hierarchical or flat
browsing.
) to display the Open window used to
Table 25 - General Options Tab Fields
MatrikonOPC Explorer v5.0.0.0 User’s Manual
53
Data Transfer Options
The Data Transfer tab allows you to:
•
Select the data source used by MatrikonOPC Explorer.
•
Customize the way Asynchronous I/O is performed.
•
Customize the way values are written.
To view the Data Transfer options:
1. On the MatrikonOPC Explorer window, from the View menu, select the Options menu
item.
2. The Options window appears.
3. From the Options window, select the Data Transfer tab (Figure 30).
Figure 30 - Data Transfer Options Tab
Table 26 describes the fields available on the Data Transfer tab.
Field
Demand Reads
Description
Use this section of the Data Transfer tab to specify the data source that OPC
Explorer should use when requesting demand updates from the OPC server.
MatrikonOPC Explorer v5.0.0.0 User’s Manual
54
Field
Description
The Cache option should be selected for normal operation. Only select the
Device option for special testing operations. Device reads yield a serious
performance penalty and can prevent OPC servers from functioning properly if
they are used too often.
Refreshes
The OPC data of the currently selected group can be updated on a periodic
basis to ensure that the data is current. The refresh rate option controls how
fast the data will be requested from the end OPC server. The Cache option
should be selected for normal operation. Only select the Device option for
special testing operations. Device reads yield a serious performance penalty
and can prevent OPC servers from functioning properly if they are used too
often.
Writes
Select the Respect access rights when writing values checkbox to avoid
including read-only items in the Write Values window. Otherwise, OPC
Explorer will allow users to write values to any items.
Table 26 - Data Transfer Options Tab Fields
Data Display Options
The Data Display tab allows users to view and edit the way value quality and value timestamps
are shown.
To view the Data Display options:
1. On the MatrikonOPC Explorer window, from the View menu, select the Options menu
item.
2. The Options window appears.
3. From the Options window, select the Data Display tab (Figure 31).
MatrikonOPC Explorer v5.0.0.0 User’s Manual
55
Figure 31 - Data Display Options Tab
Table 27 describes the fields available on the Data Display tab.
Field
Description
Quality
Select the Display value qualities as text checkbox to show a text description
of the item quality in the Quality field. If the checkbox is cleared, OPC Explorer
will display a numeric value. You may want to have the checkbox cleared if the
quality value contains vendor-specific information in the upper byte.
Time & Date
Select either the Display timestamps using local time zone option or the
Display timestamps using group time bias depending on whether you want
timestamps displayed in local time or UTC.
Table 27 - Data Display Options Tab Fields
COM Options
The COM tab allows you to view and edit class context flags to be used when OPC Explorer
attempts to connect to an OPC server.
MatrikonOPC Explorer v5.0.0.0 User’s Manual
56
IMPORTANT: Do NOT clear any of the checkboxes in the Server
Context section of the COM tab unless absolutely necessary.
Changing these settings may prevent MatrikonOPC Explorer from
properly connecting to your server.
To view the COM options:
1. On the MatrikonOPC Explorer window, from the View menu, select the Options menu
item.
2. The Options window appears.
3. From the Options window, select the COM tab (Figure 32).
Figure 32 - COM Options Tab
Table 28 describes the fields available on the COM options tab.
Field
Server Context
Description
Allows for the selection of context MatrikonOPC Explorer requests when creating
server instances.
WARNING: Do not clear any of these checkboxes unless
absolutely necessary.
MatrikonOPC Explorer v5.0.0.0 User’s Manual
57
Field
OPCEnum Timeout
Description
Allows you to specify the amount of time (in seconds) that the MatrikonOPC
Explorer will wait before cancelling a remote call.
Table 28 - COM Options Tab Fields
Miscellaneous Options
The Miscellaneous tab allows you to view and edit the following features:
•
Browsing network machines on start-up
•
Sanity checking
•
Error reporting customization
•
Auto-adding groups and items
To view the Miscellaneous options:
1. On the MatrikonOPC Explorer window, from the View menu, select the Options menu
item.
2. The Options window appears.
3. From the Options window, select the Miscellaneous tab (Figure 33).
Figure 33 - Miscellaneous Options Tab
MatrikonOPC Explorer v5.0.0.0 User’s Manual
58
Table 28 describes the fields available on the Miscellaneous options tab.
Field
Description
Startup
Browsing
Select the Disable Network Browsing On Startup checkbox to disable the
browsing of neighbouring network machines upon start-up.
Sanity
Allows you to control strict sanity checking by selecting the Confirm list
synchronization with the server checkbox.
Errors
Allows you to customize the way in which COM/OPC and/or item errors are
reported. Select the checkboxes to display the required errors.
Auto Items
Select the Auto Add OPC items checkbox to automatically add items when you
add a group.
Table 29 - Miscellaneous Options Tab Fields
Exporting Groups, Items, and Alarms
MatrikonOPC Explorer allows you the ability to export group, item, and alarm information to files
for use at a later time. Each of the following procedures results in the Export Tags window (Figure
17) appearing, where you can save the information in a .csv file to the location of your choice.
Exporting Groups
To export a group:
1. From the MatrikonOPC Explorer window, with the required server connected, select the
Export Groups option from the Server menu.
Exporting Items
There are various locations from which to export items.
To export items:
1. From the MatrikonOPC Explorer window, right-click your mouse on a connected server in
navigation pane.
2. Select Export Items from displayed menu.
Or,
1. From the MatrikonOPC Explorer window, right-click your mouse on a group in the
navigation pane.
2. Select Export Items from displayed menu.
Or,
1. From the MatrikonOPC Explorer window, select a group in the navigation pane.
2. Select Export Items from Group menu.
Or,
1. From the MatrikonOPC Explorer window, once an item or items have been added to a
group, right-click on an item in the Contents pane.
2. Select Export Items from the displayed menu.
Or,
MatrikonOPC Explorer v5.0.0.0 User’s Manual
59
1. From the MatrikonOPC Explorer window, right-click your mouse on a connected server in
the navigation pane.
2. Select Export Items from displayed menu.
Exporting Alarms
To export alarms:
1. From the MatrikonOPC Explorer window, right-click your mouse on a subscription in the
navigation pane.
2. Select Export Alarms from the displayed menu.
Or,
1. From the MatrikonOPC Explorer window, once an alarm or alarms have been added to a
subscription, right-click on an alarm in the Contents pane.
2. Select Export from the displayed menu.
Saving a Session
The current session configuration, including all server connections, groups, and items, can be
saved to an XML file.
To save a session:
1. From the File menu, select either the Save or Save As menu option.
2. The Save Session window appears.
3. Enter a file name if saving the file for the first time.
4. Click Save.
Reloading a Session
To reload a session:
1. From the File menu, select the Open menu option.
2. The Open Session window appears.
3. Navigate to the location of the required XML file.
4. Select the required file.
5. Click Open.
6. The selected session is loaded.
Clearing a Session
To clear a session:
1. From the File menu, select the New Session menu option.
2. A message is displayed asking if you want to save the session.
3. Click No.
4. The session is cleared.
MatrikonOPC Explorer v5.0.0.0 User’s Manual
60
Limitations
MatrikonOPC Explorer has the following limitation:
1. Supported specifications – only the following are supported: OPC DA 1.0a, OPC DA
2.05a, OPC A&E 1.0.
2. Advise Log – opening the Advise log while there are many updates for OPC items causes
CPU usage to increase dramatically.
Refer to the MatrikonOPC Explorer Release Notes for known issues.
MatrikonOPC Explorer v5.0.0.0 User’s Manual
61
Troubleshooting
The following section addresses some of the most common problems encountered, and questions
asked, while using this OPC server. Please check the following Problems/Solutions section before
contacting the MatrikonOPC Support team.
Problems and Solutions
Asynch I/O not adding properly
Problem:
When I add an OPC Group using Asynch I/O it does not add properly. However, a
Synchronous group works.
Solution:
This error is caused by a failure of the OPC client (OPC Explorer in this case) to
validate the OPC server when establishing a callback group.
Figure 34 - Callback Group
To resolve this issue:
1. Navigate to the DCOM Configuration window: Start -> Run and then enter
dcomcnfg in the Run window. Click on the OK button.
2. The Component Services window appears. Select and expand the following
nodes: Component Services -> Computers -> My Computer.
3. Select DCOM Config from the expanded My Computer node.
MatrikonOPC Explorer v5.0.0.0 User’s Manual
62
Figure 35 - Component Services Window
4. Once you are in the DCOM configuration window, right-click on My Computer
and select Properties.
5. From the My Computer Properties window, select the Default Properties
tab. Make sure that Connect is selected in the Default Authentication Level
field.
6. Select the COM Security tab. Make sure the essential groups of Everyone,
Interactive, Network, and System are present for both Access
Permissions, and Launch and Activation Permissions.
7. Once you have made the changes, restart your OPC server and OPC Explorer
and see if you can now make the connection.
Cannot see desired OPC server in MatrikonOPC Explorer
Problem:
Solution:
I cannot see the OPC server I want, in OPC Explorer.
MatrikonOPC Explorer depends on OPCEnum for a list of available OPC servers on the
destination machine. OPC Explorer can also be configured to manually scrape the
registry for OPC servers.
To use registry browsing:
1. From the MatrikonOPC Explorer window, select the Options menu option
from the File menu.
2. The Options window is displayed.
3. With the General tab selected, select the Registry option in the OPC Server
Browsing screen section.
4. Click on the OK button to commit the change.
MatrikonOPC Explorer v5.0.0.0 User’s Manual
63
Notes:
•
Alternatively, to connect using OPCEnum, the component for OPCEnum
will need to be correctly configured for access. This can be done in the
Component Services control panel by following the detailed instructions
provided via the links below. After completing the configuration changes,
OPC Enum service will need to be re-started in the Services control
panel.
o
Windows 2000 DCOM Configuration
o
Windows XP DCOM Configuration
“Item definition does not conform to the servers’ syntax” error message
Problem:
Solution:
When trying to validate a tag after it has been added to the Tags to be added list in
the Tag Studio, the following error message is displayed: “Error: Item definition does
not conform to the servers’ syntax”.
In general, the reason for this is because the information in the tag is not correct.
However, the tags’ syntax is technically correct. That is, the colons and periods and so
on, are in the right places, but the names are incorrect or misspelled.
“Item definition does not exist in the address space” error message
Problem:
Solution:
The following error message is displayed: “Error: Item definition does exist in the
address space”.
In general, the reason for this error is because the information in the tag is correct, but
the colons and periods are in the wrong spots, or you are not pointing the tag to the
correct place. This would be an example of not referencing all the device links on some
servers.
“0x80070005 Access is denied” error message
Problem:
Solution:
The following error message is displayed: “0x80070005 Access is denied”.
This error message is associated with COM and DCOM. The error likely indicates that
your OPC client cannot access the OPC server due to COM or DCOM security settings.
To changes these, you will have to access the DCOMCNFG tool and allow this
communication. This is true for both a user account and the system account.
To resolve this issue:
1. Navigate to the DCOM Configuration window: Start -> Run and then enter
dcomcnfg in the Run window. Click on the OK button.
2. The Component Services window appears. Select and expand the following
nodes: Component Services -> Computers -> My Computer. Select the
DCOM Config folder.
3. Browse to your OPC server, right-click on it and select Properties.
4. From the Properties window, select the General tab. Make sure that Connect
is selected in the Authentication Level field.
MatrikonOPC Explorer v5.0.0.0 User’s Manual
64
5. Select the Security tab. Under Launch and Activation Permissions, select
the Customize option button and then click on the Edit button.
6. Make sure you have allowed permissions to Everyone, Interactive, Network,
and System. Click OK.
7. Under Access Permissions, select the Customize option button and click on
the Edit button.
8. Make sure you have allowed permissions to Everyone, Interactive, Network,
and System. Click OK.
Search the MatrikonOPC Support Knowledge Base at www.opcsupport.com to find the answers
to other commonly-asked MatrikonOPC Explorer questions.
MatrikonOPC Explorer v5.0.0.0 User’s Manual
65
Un-Installation
To successfully un-install MatrikonOPC Explorer, using the Add or Remove Programs from the
Microsoft Windows Control Panel is recommended.
To un-install MatrikonOPC Explorer:
1. Click on the Start button and highlight the Control Panel item.
2. From the displayed menu, select Add or Remove Programs.
3. The Add or Remove Programs window is displayed.
4. Scroll through the list of currently installed programs and updates to find and select
MatrikonOPC Explorer.
Figure 36 - Add or Remove Programs
5. Click on the Remove button associated with the MatrikonOPC Explorer program to initiate
the un-install process.
Note: You will need to close any open applications of Matrikon OPC Explorer.
6. The MatrikonOPC Explorer – InstallAware Wizard appears and the Welcome to
MatrikonOPC Explorer Maintenance screen (Figure 37) is displayed.
MatrikonOPC Explorer v5.0.0.0 User’s Manual
66
Figure 37 - Welcome to MatrikonOPC Explorer Maintenance Screen
7. Select the Remove option button to uninstall MatrikonOPC Explorer entirely.
8. Click on the Next button. The Ready to Uninstall screen (Figure 38) is displayed.
MatrikonOPC Explorer v5.0.0.0 User’s Manual
67
Figure 38 - Ready to Uninstall Screen
9. Click on the Next button.
10. The Uninstalling MatrikonOPC Explorer screen (Figure 39) appears and the un-install
takes place.
MatrikonOPC Explorer v5.0.0.0 User’s Manual
68
Figure 39 - Uninstalling MatrikonOPC Explorer Screen
11. When the un-install has finished, the Matrikon Explorer Setup Complete screen (Figure
40) appears stating that MatrikonOPC Explorer was successfully un-installed.
MatrikonOPC Explorer v5.0.0.0 User’s Manual
69
Figure 40 - MatrikonOPC Explorer Setup Complete Screen
12. Click on the Finish button to complete the un-install and exit the Wizard.
13. The program no longer appears listed in the Add or Remove Programs window.
MatrikonOPC Explorer v5.0.0.0 User’s Manual
70
Appendix A
Distributed COM (DCOM)
DCOM is an object protocol that enables COM components (such as OPC clients and servers) to
communicate directly with each other across a network. A certain amount of configuration is
required on the system where the OPC server is installed to allow remote clients to connect to it
over the network.
Readers should be familiar with DCOM and with Windows 2000 security features and security
administration. Information regarding Distributed COM and various links to related sites, white
papers, specs, etc, can be found at http://www.microsoft.com/com/default.mspx.
Notes:
•
The following steps are suggestions only. Ask your Windows
Network Administrator for more information about the settings
that you should use, especially between different domains.
•
The steps provided in this appendix apply to Windows NT
operating systems only. For information on how to configure
DCOM settings for newer Windows operating systems, please
refer to the MatrikonOPC Online Support page on DCOM
Settings.
DCOM Configuration Utility
Start the DCOM configuration utility either from the server configuration utility or from the
command-line (DCOMCNFG). Answer, yes to any message boxes that appear (allowing the utility to
assign application ID entries to those servers that don't already have them).
The main window for DCOMCNFG allows the user to either configure default settings for all COM
servers or else to configure settings for a specific server chosen from the list. The former will affect
all servers configured to use the default settings. The latter will affect the selected server only.
DCOM settings are stored in the registry and loaded by COM (and
OPC) servers at start-up. Therefore, server processes must be shut
down and re-started for these changes to take effect.
Default Properties
The Default Properties tab contains settings that affect all DCOM communication on the machine.
•
First of all, ensure that the Enable Distributed COM on this computer is selected in
so that the machine is available to others via DCOM.
•
Select the Enable COM Internet Services on this computer to allow DCOM access to
the machine from the Internet (check with your administrator).
•
In general, the other settings do not need to be changed.
The Authentication Level specifies when COM should authenticate the identity of calling clients
(each call, each packet, etc).
•
Normally, it should be set to Connect, indicating that COM should authenticate clients
when they first connect to a server. If it is set to None, then COM performs no
authentication and ignores any access permission settings.
MatrikonOPC Explorer v5.0.0.0 User’s Manual
71
The Impersonation Level specifies whether servers can ascertain the identity of calling clients
and whether they can then perform operations on the client's behalf (as if the server is the client).
•
Normally, it should be set to Identify, allowing the server to identify the calling client to
see if it is allowed access to a certain resource but not to actually access any of these
resources as the client.
•
Select the Provide additional security for reference tracking to make even the
reference counting on COM objects secure. This setting is not generally required.
Security Permissions
The most important DCOM settings for an OPC server are the security permissions. There are two
ways for you to set these:
1. Change the specific settings for the server (recommended).
2. Change the default settings (not recommended) and make sure that the OPC server will use
these.
Either way, be certain that the access and launch permissions are correct for the server.
Setting Security Permissions
To set the security permissions for an OPC Server:
1. Open the DCOM configuration utility.
2. Select the OPC server, and then click Properties.
3. The Distributed COM Configuration Properties window (Figure 41) appears.
MatrikonOPC Explorer v5.0.0.0 User’s Manual
72
Figure 41 - Distributed COM Configuration Properties Window
4. Click on the Security tab to set the security for the server.
5. The Distributed COM Configuration Security tab (Figure 42) appears.
MatrikonOPC Explorer v5.0.0.0 User’s Manual
73
Figure 42 - Distributed COM Configuration Security Tab
Notes:
•
The Access Permissions contain an Access Control List of principals that are
allowed to interact with objects supplied by a server.
•
The Launch Permissions contain an Access Control List of principals that are
allowed to start up a server process or service.
6. Include the names of users or user groups from trusted domains that you wish to be able to
use the OPC server on this machine. Include the Everyone group to allow access to all
users on a particular domain.
7. To set the Access permissions, click Use custom access permissions and then click Edit.
8. The Registry Value Permissions window (Figure 43) appears.
MatrikonOPC Explorer v5.0.0.0 User’s Manual
74
Figure 43 - Registry Value Permissions Window
9. To add users to the list click Add.
10. The Add Users and Groups window (Figure 44) appears.
Figure 44 - Add Users and Groups Window
11. To add a user to the list, select the user, and then click Add. If the user you wish to add
does not appear then click Show Users.
MatrikonOPC Explorer v5.0.0.0 User’s Manual
75
12. When you are done adding users, click OK to close the Add Users and Groups window.
You can then choose to Allow Access or Deny Access for each user.
Notes:
•
The procedure to set the launch permissions is similar to the above, but instead of
choosing Allow Access for a user you would choose Allow Launch.
•
The Configuration Permissions contain an Access Control List of principals that are
allowed to modify the configuration information for a server. In other words, it
indicates who is allowed to alter the registry entries for installed servers as well as
who is able to access the registry for the purposes of installing new servers. It is
usually simpler to install and configure servers as a user with local administrative
rights.
13. To connect to an OPC server from outside of the domain, create a local user account on
both the server and the client machine with identical username and password. Then, add
the local user on the OPC server to the DCOM permissions. Use the local account on the
client machine to connect to the OPC server.
Server Identity
The Identity tab for a selected COM (or OPC) server specifies the user account that should be
used when COM starts up the process. The available settings are different for servers that run as
local executables as opposed to those that run as NT services.
It is strongly recommended that OPC servers should be installed to
run as NT services if they are going to be accessed by remote clients
via DCOM. This ensures that the server can always be accessed even
if no one is presently logged on to the machine, and only one server
process ever starts up. It also adds a greater degree of security in
terms of who is able to shut down the server process.
Servers that run as local executables have the option of running as the launching user (the calling
client–this is the default), the interactive user (the one currently logged onto the machine), or a
specified user. It is usually best to use the interactive user or a specified user. Otherwise, remote
clients might start up multiple separate server processes that are not accessible to others.
Servers that run as NT services should generally run as the local System account. Alternatively,
the server can be set to run as a specified user, although this is usually done from the Service
Control Manager applet rather than DCOMCNFG. Access and Launch permissions are particularly
important when installing a server to run as an NT service.
Default Protocols
The Default Protocols tab specifies the communication protocols available to DCOM. The order
that protocols appear in the list indicates the priority in which they will be used (the topmost
having the highest priority).
The more protocols that appear in the list, the better the chances of connecting to an OPC server
on an unknown remote machine (such as at an OPC Interoperability Workshop). However, it may
also take longer for DCOM to time out if a server machine is not present since it has to try each
protocol in turn.
For most situations, it is best to remove all unused protocols from the list and only include those
that are necessary for your network. For example, on a TCP/IP network, one would include the
Connection-oriented TCP/IP protocol. Contact your IT personnel for more information about
your network.
MatrikonOPC Explorer v5.0.0.0 User’s Manual
76
Evidence indicates that there are problems with the datagramoriented protocols (such as UDP/IP) that can cause memory leaks in
DCOM. Therefore, it is strongly recommended that these protocols be
removed from the list of default protocols. Datagram-oriented
protocols are not supported under Windows 2000 at all (although the
DCOM configuration utility still allows you to configure them).
Remote Program ID
Before the OPC Server Browser became available, OPC client applications had to search the
registry to generate a list of available OPC servers. Therefore, some older OPC clients need to have
a program ID in the local registry in order to connect to a particular OPC server.
The simplest solution is to install the OPC server software on the client machine even if it is not
used. Alternatively, use the following steps to copy a program ID to the client machine.
Note: This method may not work for every OPC client. Please check the client documentation for
more information.
WARNING: Any changes made to the registry must be made with
extreme caution!
1. Back up your registry.
2. On the server machine, run REGEDIT as a user that has access rights to the local registry.
3. Expand the HKEY_CLASSES_ROOT key.
4. Find the program ID(s) for the desired OPC server(s).
Note: In the case of Matrikon OPC Servers, the ID has the form Matrikon.OPC.Device. If
you quickly type the first few letters then REGEDIT should jump to the location of that key.
Some servers may have both a version-specific as well as a version-independent program
ID. In this case both IDs should be copied to the client machine.
5. For each program ID, select the key and choose Export Registry File from the Registry
menu. Enter a file name, and then click Save. Be careful not to overwrite other export files
that you are creating.
6. Copy the exported REG files to the client machine.
7. Merge the REG files into the registry of the client machine.
Note: This should simply be a matter of double clicking on the file from the desktop of the
client machine. Alternatively, run REGEDIT on the client machine and choose Import
Registry File from the Registry menu, selecting each file in turn. This must be done as a
user who has write access to the local registry.
8. Use REGEDIT to check that the program IDs have in fact, been copied.
9. Delete the REG files since they are no longer needed.
MatrikonOPC Explorer v5.0.0.0 User’s Manual
77
Appendix B
Standard Data Types
The Standard data types and their descriptions are listed in Table 30.
Hex
Dec
Data Type
Description
0000
0
VT_EMPTY
Default/Empty (nothing)
0002
2
VT_I2
2-byte signed integer
0003
3
VT_I4
4-byte signed integer
0004
4
VT_R4
4-byte (single-precision) real
0005
5
VT_R8
8-byte (double-precision) real
0006
6
VT_CY
Currency
0007
7
VT_DATE
Date
0008
8
VT_BSTR
Text (UNICODE)
000A
10
VT_ERROR
Error code
000B
11
VT_BOOL
Boolean (TRUE = -1, FALSE = 0)
0011
16
VT_I1
1-byte signed integer
0012
17
VT_UI1
1-byte unsigned integer
0013
18
VT_UI2
2-byte unsigned integer
0014
19
VT_UI4
4-byte unsigned integer
2002
8194
VT_ARRAY | VT_I2
Array of 2-byte signed integers
2003
8195
VT_ARRAY | VT_I4
Array of 4-byte signed integer
2004
8196
VT_ARRAY | VT_R4
Array of 4-byte (single-precision) real
2005
8197
VT_ARRAY | VT_R8
Array of 8-byte (double-precision) real
2006
8198
VT_ARRAY | VT_CY
Array of currency values
2007
8199
VT_ARRAY | VT_DATE
Array of dates
2008
8200
VT_ARRAY | VT_BSTR
Array of text values
200A
8202
VT_ARRAY | VT_ERROR
Array of error codes
200B
8203
VT_ARRAY | VT_BOOL
Array of Boolean values
2011
8208
VT_ARRAY | VT_I1
Array of 1-byte signed integers
2012
8209
VT_ARRAY | VT_UI1
Array of 1-byte unsigned integers
2013
8210
VT_ARRAY | VT_UI2
Array of 2-byte unsigned integers
2014
8211
VT_ARRAY | VT_UI4
Array of 4-byte unsigned integers
Table 30 - Standard Data Types
MatrikonOPC Explorer v5.0.0.0 User’s Manual
78
Appendix C
OPC Quality Flags
Note: The following information is taken from the OPC Data Access Custom Interface Specification
v2.05 document.
These flags represent the quality state for an item’s data value. The low eight bits of the Quality
flags are currently defined in the form of three-bit fields: Quality, Substatus, and Limit status.
The eight Quality bits are arranged as follows: QQSSSSLL.
The high eight bits are available for vendor-specific use. If these bits are used, the standard OPC
Quality bits must still be set as accurately as possible to indicate what assumptions the client can
make about the returned data. In addition, it is the responsibility of any client interpreting vendorspecific quality information to make sure that the server providing it uses the same “rules” as the
client.
Details of the OPC standard Quality bits are as follows.
Quality BitField
QQ
Bit Value
0
00SSSSLL
1
01SSSSLL
2
3
Definition
Description
Bad
Value is not useful for reasons indicated by the Substatus.
Uncertain
The quality of the value is uncertain for reasons indicated by
the Substatus.
10SSSSLL
N/A
Not used by OPC.
11SSSSLL
Good
The quality of the value is Good.
Table 31 - Quality BitField Values
A server that supports no quality information must return 3 (Good). It is also acceptable for a
server to simply return BAD or GOOD (0x00 or 0xC0) and to always return 0 for Substatus and
Limit.
It is recommended that clients minimally check the Quality Bit field of all results (even if they do
not check the Substatus or Limit fields).
Even when a BAD value is indicated, the contents of the Value field must still be a well-defined
VARIANT even though it does not contain an accurate value. This is to simplify error handling in
client applications. For example, clients are always expected to call VariantClear() on the results of
a Synchronous Read. Similarly, the IAdviseSink needs to be able to interpret and “unpack” the
Value and Data included in the stream even if that data is BAD.
If the server has no known value to return then some reasonable default should be returned such
as a NULL string or 0 numeric value.
Substatus BitField
The layout of this field depends on the value of the Quality field.
Substatus for BAD Quality
SSSS
0
Bit Value
000000LL
Definition
Non-specific
MatrikonOPC Explorer v5.0.0.0 User’s Manual
Description
The value is bad, but no specific reason is known.
79
SSSS
1
Bit Value
000001LL
2
000010LL
3
000011LL
4
000100LL
5
000101LL
6
000110LL
7
000111LL
8-15
Definition
Description
Configuration Error
There is some server-specific problem with the
configuration. For example, the item in question has
been deleted from the configuration.
Not Connected
The input is required to be logically connected to
something, but is not. This quality may reflect that no
value is available at this time reasons such as the value
may have not been provided by the data source.
Device Failure
A device failure has been detected.
Sensor Failure
A sensor failure had been detected (the Limit field can
provide additional diagnostic information in some
situations).
Last Known Value
Communications have failed. However, the last known
value is available. Note that the “age” of the value may
be determined from the TIMESTAMPin the
OPCITEMSTATE.
Comm Failure
Communications have failed. There is no last known
value available
Out of Service
The block is off scan or otherwise locked. This quality is
also used when the active state of the item or the group
containing the item is Inactive.
N/A
Not used by OPC.
Table 32 - Substatus – BAD Quality
Servers which do not support Substatus should return 0. Note that an “old” value may be returned
with the Quality set to BAD (0) and the Substatus set to 5. This is for consistency with the
Fieldbus Specification. This is the only case in which a client may assume that a BAD value is still
usable by the application.
Substatus for UNCERTAIN Quality
SSSS
0
1
2-3
Bit Value
010000LL
Definition
Description
Non-specific
There is no specific reason why the value is uncertain.
Last Usable Value
Whatever was writing this value has stopped doing so.
The returned value should be regarded as “stale”. Note
that this differs from a BAD value with Substatus 5
(Last Known Value). That status is associated
specifically with a detectable communications error on a
“fetched” value. This error is associated with the failure
of some external source to “put” something into the
value within an acceptable period of time. Note that the
age of the value can be determined from the
TIMESTAMP in OPCITEMSTATE.
N/A
Not used by OPC.
010001LL
MatrikonOPC Explorer v5.0.0.0 User’s Manual
80
SSSS
4
Bit Value
Definition
Description
Sensor Not
Accurate
Either the value has “pegged” at one of the sensor
limits (in which case the limit field should be set to 1 or
2) or the sensor is otherwise known to be out of
calibration via some form of internal diagnostics (in
which case the Limit field should be 0).
Engineering Units
Exceeded
The returned value is outside the limits defined for this
parameter. Note that in this case (per the Fieldbus
Specification) the Limit field indicates which limit has
been exceeded but does NOT necessarily imply that the
value cannot move farther out of range.
Sub-Normal
The value is derived from multiple sources and has less
than the required number of good sources.
N/A
Not used by OPC.
010100LL
5
010101LL
6
010110LL
7-15
Table 33 - Substatus – UNCERTAIN Quality
Servers which do not support Substatus should return 0.
Substatus for GOOD Quality
SSSS
0
Bit Value
110000LL
1-5
6
110110LL
7-15
Definition
Description
Non-specific
The value is good. There are no special conditions.
N/A
Not used by OPC.
Local Override
The value has been overridden. Typically, this means the
input has been disconnected and a manually-entered
value has been “forced”.
N/A
Not used by OPC.
Table 34 - Substatus – GOOD Quality
Servers which do not support Substatus should return 0.
Limit BitField
The Limit field is valid regardless of the Quality and Substatus. In some cases, such as Sensor
Failure, it can provide useful diagnostic information.
LL
Bit Value
Definition
Description
0
QQSSSS00
Not Limited
The value is free to move up or down.
1
QQSSSS01
Low Limited
The value has “pegged” at some lower limit.
2
QQSSSS10
High Limited
The value has “pegged” at some high limit.
3
QQSSSS11
Constant
The value is a constant and cannot move.
Table 35 - Limit BitField Values
Servers which do not support Limit should return 0.
Symbolic equates are defined for values and masks for these BitFields in the QUALITY section of
the OPC header files.
MatrikonOPC Explorer v5.0.0.0 User’s Manual
81