1
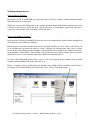
easyDnc - Remo Version 2.2
March 2005
For Windows 95/98/ME/XP/W2000 and W2003Server
This document is not a complete user manual in its
own right.
You should refer to the current easyDncXP user
manual which explains installation, setup and cable
diagrams which are the same for all versions of
easyDnc.
This document only shows the differences between
easyDncXP and this new product, easyDnc-Remo.
A new browser-like manual covering all versions is
currently in development but in the meantime you
should attach this document as an ‘addendum’ to the
current easyDncXP user manual which you can
download in full from the website at: easydnc.com
User Manual Supplemental – easyDnc – ‘MultiTasking and Remo options’
1
What’s Remo ?
easyDnc – Remo is a new version of easyDncXP with ‘remote call-up’ and multi-tasking
capability.
MultiTasking
The ability to communicate with more than one CNC at the same time. Previous versions of
easyDncXP effectively limited file transfer to just one CNC at a time. True, a user could
switch quickly between machines but during a long drip feed job to one machine the program
was pretty much locked up until the job was finished or cancelled. This new Multitasking
capability allows the user to start a file transfer to one CNC and instantly switch to another
and start additional independent send/receive tasks. - Up to 14 fully independent ‘threads’ of
execution can run parallel to each other.
Remote call-up
Allows CNC operators to initiate data transfer, in either direction, using the CNC console.
The multitasking capability allows up to 14 CNC operators to send and receive data without
disturbing each other and the ‘Remo’ capability allows them to do it without leaving their
CNC workstations, IE the transfer is controlled fully from the CNC console meaning the
computer can be located or secured some distance away from the CNC work place without
having CNC operators running or shouting across the shop
Because the original version of easyDncXP was designed as a simple, easy to use ‘single
tasking’ DNC system quite a bit of thought has gone in to this new version so that we could
add the new features without losing our simple to use ‘easyDnc’ user interface. We think
we’ve done a good job but we still had to modify a couple of items on the display changing
the way some controls, (menus, buttons and indicators) operate.
The purpose of this document is to describe the new controls and explain any changes to the
old ones.
As well as this ‘remo’ version, we’ve also released a version of easyDncXP which includes
remo’s multitasking capability but without the remote call-up feature. If you’re using that
version of easyDncXP then this document also applies with the exception of the chapters
specifically related to Remo’s remote call-up capability.
User Manual Supplemental – easyDnc – ‘MultiTasking and Remo options’
2
Installation
The installation of all versions of easyDnc is explained in full in the current easyDncXP
user manual which you can download from the easyDnc website at: easydnc.com
If you’re already using easyDncXP then you only need to install a small upgrade file. Once
installed remo automatically imports easyDncXP’s CNC configuration database so will
already contains all your current CNC communications settings. The remo setup window
contains a few more options which are explained in this supplement
If you’ve never used any version of easyDnc then follow the setup and configuration
instructions in the easyDncXP user manual referring to this supplement for differences
between the two versions.
When you start the new remo version of easyDnc you will see the remo product ‘logo’ in
the top left corner.
User Manual Supplemental – easyDnc – ‘MultiTasking and Remo options’
3
When transferring data to a CNC with any version of easyDnc you always see a progress indicator.
easyDncXP always shows the large progress indicator across the bottom of the window and because
easyDncXP doesn’t allow you to switch to a different machine while a transfer is in progress there was
no requirement for any additional indicators.
However, the new multitasking capability means you ‘can’ now switch to another machine and start
more tasks if required. In the picture below you can see the first machine shows a small percentage
indicator to the top right corner of the machine icon indicating that the job on that machine is 33%
complete.
The second icon shows 61% and, because this icon has a border we know that it’s the ‘current’
machine. The rest of the display, Com port settings CNC data window and large progress indicator
across the bottom of the window always relate to the current machine. (The machine that you
clicked/highlighted with the mouse.
Now look closely at the 1st machine icon. In the lower right corner of the icon you can see a small red
symbol.
New versions of easyDnc have a number of small symbols which appear around the CNC icon. In this
case the symbol tells us something about one machine while we’re busy with another.
The following page shows these symbol and explains their meaning.
User Manual Supplemental – easyDnc – ‘MultiTasking and Remo options’
4
CNC Status indicators
The percentage indicator shows that a file transfer TO a cnc is in progress.
The indicator showing how much of the transfer is complete.
This is not an error indicator. It merely shows that data transfer is under way
but has been halted (probably temporarily) under CNC control. It is usual for
this indicator to flash rapidly as data is fed, block wise, into the control.
During drip feeding it may appear for long periods whenever the cnc holds
up the data transfer allowing the machining process catch up.
This symbol is meant to show an arrow pointing into a folder. It indicates
that the software is receiving data from the machine which is being saved to
the machine’s default data folder.
During data reception this indicator will appear and flash around once per
second. When the transfer is complete the symbol disappears again.
The computer’s RS232 port allocated to this machine may have a problem.
The port may be missing, invalid or simply busy. It doesn’t always indicate
an error. In many cases it simply means that the port has been allocated by
the user to another task/machine.
If you click this machine icon the symbol may disappear indicating that the
port was allocated to another machine but was ‘taken back’ when you clicked
the machine icon (The symbol would then of course appear against the
machine which gave up the port) If when you click the machine icon the
symbol does not disappear then the other machine may be in the middle of a
transfer (You can’t take the RS232 port from a task in progress) but might
also indicate that the port does not exist at all or that it’s in use by some other
windows program.
Although this version of easyDnc is capable of multitasking to a number of CNCs at the
same time it stands to reason that if you wish to send/receive data to more than one CNC
at the same time then you’re going to need more than one com port in your computer.
In all the above cases you can click the relevant CNC icon to display, incoming/outgoing
file name, sample of CNC data, progress indicator and RS232 port settings/status.
User Manual Supplemental – easyDnc – ‘MultiTasking and Remo options’
5
Starting remo processes
Send data to cnc machines.
In previous version of easyDncXP you could send data to a CNC but couldn’t switch to another machine
while the transfer was in progress.
With remo you can start sending data to one machine and then simply click another machine icon to start
a transfer to that one too. To do this there’s no special setup or ‘remo enable’ option that you need to
select. Just select another CNC icon and use it like any other.
Receive data from cnc machines.
In the previous version of easyDncXP all data was received straight into the editor window meaning data
could only be received from one machine.
Remo can also receive data into the editor window if required. However, a new ‘remo’ mode allows you
to set easyDnc into a special mode where it’s always ‘listening’ for incoming data. Once you’ve selected
this mode any data coming from the machine is automatically saved straight to the computers disk drive
in the machine’s default folder. (The easyDnc setup window has a new folders option where you declare
which folder to use for each machine where data should be read from/saved to)
Of course the multitasking feature allows you to set the remo option on one machine icon and then
switch to another machine and do the same and so on.
Remo’s ‘listening’ mode is enabled from the machine menu (Right click the machine icon). If you’ve
previously used easyDncXP then you’ll notice this ‘remo’ item is a new menu option.
User Manual Supplemental – easyDnc – ‘MultiTasking and Remo options’
6
On the previous page you saw the remo option in the machine menu.
In the diagram below you can see that two machine icons have been switched to remo mode
while a third is busy sending data to the machine.
The two remo icons are listening for incoming data. If either of those machines started sending
data back to the computer it would wake up the relevant remo process which would scan the
incoming file looking for the file name and the incoming data would be saved to that machine’s
default folder without disturbing any other machine or process.
Note:
If you’re using the new MultiTasking version of easyDncXP then the red [Remo] label shown by
the machine icon would read [Ready] instead.
Remember, there’s two new versions, one with just the Multitasking capability and then there’s
‘remo’ which has MultiTasking AND the added ‘remo’ remote control feature.
What’s this ‘remo remote control ?’
User Manual Supplemental – easyDnc – ‘MultiTasking and Remo options’
7
Remo remote control.
In some circumstances the CNC machine may be located a distance away from the computer or
maybe you’ve got a number of machines connected to a central computer. In either case the last thing
you want is to need you or your machine operators running or shouting between the cnc control and
the remote computer.
Unfortunately, CNC machines are not very clever. If they were based on a smart operating system
then you’d be able to use the CNC console to browse through a remote server’s files, select the one
you want and download it into CNC memory. In most cases though the CNC control just doesn’t
have any networking capability so can’t do anything like that.
One thing most CNCs can do though is send and receive files. They can’t request files from remote
servers but they can send files to remote servers. So, imagine if we created a small file on the CNC
and wrote our request into that file and sent that file to the server. As long as the server, in this case
‘remo’, was expecting such a file it would be able to open the file, read the request, and complete
whatever action was contained within. The good news is remo has been programmed to expect such
simple file requests from pretty much any CNC as long as the CNC is capable of punching CNC
program/data.
In this example we’ll use a machine like a Fanuc because there’s lots of other makes and models of
CNC which adhere to the same ISO data standards. At the end of the example we’ll cover a couple of
alternatives so you can adjust this method to suit other machines.
In the CNC control create a small program which isn’t used by the machine. We call this program
‘The Runner’ (because we send it, just like a runner, back to the computer with our message) Lets use
program number 9999 as our runner (O9999) (you can of course use any program number you want,
O0001, or anything else) In our example we’ll imagine that we want the remote computer to send
program 1234 into the machine. On a Fanuc we’d create a small ‘runner’ program like this:%
O9999
P1234
M30
%
And that’s it. In fact, the M30 isn’t required at all. We just put it there to make this look more like a
CNC program
In that example we used program 9999 as our runner and in the second line we type ‘P1234’. Our
message says “Send Program 1234”.
You don’t need to re-type this every time. Once you’ve created it once you can leave it on the cnc
control and simply edit that second line each time you want to use it.
User Manual Supplemental – easyDnc – ‘MultiTasking and Remo options’
8
When you’ve created your runner you simply punch it out/send it to the computer and then quickly
switch the CNC in to data input mode.
When easyDnc – remo receives the runner it opens the incoming file, sees that second line ‘P1234’ and
knows that the machine is waiting for program number 1234.
easyDnc reads the requested file from the machine’s default folder, loads it up and sends it back to the
CNC.
easyDnc’s setup page has been updated to add a couple of new options as shown in the diagram below
File Delay
Once the CNC has sent the runner back to
the computer you need to quickly set the
CNC into data input or receive mode because
easyDnc may send the requested file before
you’re ready. File delay tells easyDnc to wait
this number of seconds giving you plenty of
time to prepare the CNC for data input.
REQST Tag
easyDnc is waiting for incoming data. This would usually result in an incoming file being saved to the
computer’s disk drive in the default folder. In this case though we want easyDnc to recognise the data
as our runner and read the file’s contents. This REQST tag option tells easyDnc how to recognise the
runner. (IE the runner program’s name or number or some unique comment text contained inside the
runner program)
In our example we entered ‘9999’ as the tag because that’s the number/name of the program we
decided to use as the runner.
However, you may not wish to restrict yourself to a particular program so if you’re prepared to write an
extra line of text into your runner you could enter some text such as ‘SEND’ or ‘REQST’ as the
REQST tag. So, if you entered the word ‘SEND’ into the REQST tag box then your runner program
could look like this:%
O9876
(SEND)
P1234
%
(Previously we used 9999 but can now use any program we want)
(The tag we use so easyDnc recognises this file as the runner)
(The actual program number we’re requesting)
(Our runner now says “SEND Program 1234)
Now all you need to do is punch the runner (punch O9876) and switch the control into input mode and
stand back while easyDnc does the rest.
User Manual Supplemental – easyDnc – ‘MultiTasking and Remo options’
9
IMPORTANT
The original version of easyDncXP introduced a new easy automatic setup capability called
‘Port scan’ where easyDncXP would scan incoming CNC data adjust itself to match the
CNC’s communications settings meaning that, in many case, the user didn’t need to worry
about cnc communications settings such as data rate, databits parity etc.
As well as the communications settings easyDncXP also scanned all computer com ports
looking to see which com port was actually being used.
Because of the new multitasking capability easyDnc can no longer assume ports are unused so
can no longer scan all available com ports.
All new version now require the user to open the setup window and manually select the com
port before running Port Scan. Most users know which com port they’re using anyway so
we’re sure this isn’t going to be a problem.
This supplement to the easyDnc user manual is by no means complete but we do hope that it’s
enough for you to start using easyDnc remo or the MultiTasking update for easyDncXP.
A new browser-like user manual describing all versions is being developed and should be
released early to mid April 2005
In the meantime, if you need assistance then please log in to our support forum where you can
post questions. You can also send email direct to us here at support @ easydnc.com
Once these new versions are released we expect them to go through a number of rapid updates
as some of our more dedicated users give us feedback and suggestions so please call back to
the updates page to make sure you’re using the latest version.
Thanks for using easyDnc
The easyDnc team.
www . easydnc.com
support @ easydnc .com
User Manual Supplemental – easyDnc – ‘MultiTasking and Remo options’
10