1
CB2 Framework User Manual
Lev Himmelfarb
June, 2004
ii
This book is a User Guide for CB2 Framework. It introduces CB2, explains its basics and more advanced
features, contains recommendations, rationales, description of a simple web-application development process.
Recommended for all developers who plan or is already using CB2.
c 2004 Lev Himmelfarb
Copyright °
Permission is granted to make and distribute verbatim copies of this entire document without royalty provided the copyright
notice and this permission notice are preserved.
Contents
1 Introduction
1.1 What Is CB2? . . . . . . . . . . .
1.2 Why Was CB2 Created? . . . . .
1.3 Architecture . . . . . . . . . . . .
1.3.1 Application Context . . .
1.3.2 Business Level . . . . . .
1.3.3 Presentation Level . . . .
1.3.4 Application Components .
.
.
.
.
.
.
.
.
.
.
.
.
.
.
.
.
.
.
.
.
.
.
.
.
.
.
.
.
.
.
.
.
.
.
.
.
.
.
.
.
.
.
.
.
.
.
.
.
.
.
.
.
.
.
.
.
.
.
.
.
.
.
.
.
.
.
.
.
.
.
.
.
.
.
.
.
.
.
.
.
.
.
.
.
.
.
.
.
.
.
.
.
.
.
.
.
.
.
.
.
.
.
.
.
.
.
.
.
.
.
.
.
.
.
.
.
.
.
.
.
.
.
.
.
.
.
.
.
.
.
.
.
.
.
.
.
.
.
.
.
.
.
.
.
.
.
.
1
1
1
2
2
4
6
9
2 Developing a Web-application
2.1 The DAO Basics . . . . . . . . . . . . . . . . . .
2.1.1 Data Models . . . . . . . . . . . . . . . .
2.1.2 Fetching Data with the DAO . . . . . . .
2.1.3 Updating Data with the DAO . . . . . . .
2.1.4 Inserting Data with the DAO . . . . . . .
2.1.5 Deleting Data with the DAO . . . . . . .
2.1.6 Calling Custom Update Statements . . .
2.1.7 Fetching Data into a DM Hierarchy . . .
2.1.8 Using Column Set Macros . . . . . . . . .
2.1.9 Dynamic SQL with Conditions . . . . . .
2.2 Configuring Database Connection . . . . . . . . .
2.3 The Business Level . . . . . . . . . . . . . . . . .
2.3.1 BLO Life-cycle . . . . . . . . . . . . . . .
2.3.2 Accessing Other Subsystems from a BLO
2.3.3 Business Methods . . . . . . . . . . . . .
2.3.4 Error Handling . . . . . . . . . . . . . . .
2.3.5 BLO Deployment and Usage . . . . . . .
2.3.6 BLO Initialization Parameters . . . . . .
2.3.7 About Transaction Management . . . . .
2.4 The Presentation Level . . . . . . . . . . . . . . .
2.4.1 Setup . . . . . . . . . . . . . . . . . . . .
2.4.2 Defining Pages and Components . . . . .
2.4.3 Using Presentation Elements . . . . . . .
2.4.4 Global Presentation Elements . . . . . . .
.
.
.
.
.
.
.
.
.
.
.
.
.
.
.
.
.
.
.
.
.
.
.
.
.
.
.
.
.
.
.
.
.
.
.
.
.
.
.
.
.
.
.
.
.
.
.
.
.
.
.
.
.
.
.
.
.
.
.
.
.
.
.
.
.
.
.
.
.
.
.
.
.
.
.
.
.
.
.
.
.
.
.
.
.
.
.
.
.
.
.
.
.
.
.
.
.
.
.
.
.
.
.
.
.
.
.
.
.
.
.
.
.
.
.
.
.
.
.
.
.
.
.
.
.
.
.
.
.
.
.
.
.
.
.
.
.
.
.
.
.
.
.
.
.
.
.
.
.
.
.
.
.
.
.
.
.
.
.
.
.
.
.
.
.
.
.
.
.
.
.
.
.
.
.
.
.
.
.
.
.
.
.
.
.
.
.
.
.
.
.
.
.
.
.
.
.
.
.
.
.
.
.
.
.
.
.
.
.
.
.
.
.
.
.
.
.
.
.
.
.
.
.
.
.
.
.
.
.
.
.
.
.
.
.
.
.
.
.
.
.
.
.
.
.
.
.
.
.
.
.
.
.
.
.
.
.
.
.
.
.
.
.
.
.
.
.
.
.
.
.
.
.
.
.
.
.
.
.
.
.
.
.
.
.
.
.
.
.
.
.
.
.
.
.
.
.
.
.
.
.
.
.
.
.
.
.
.
.
.
.
.
.
.
.
.
.
.
.
.
.
.
.
.
.
.
.
.
.
.
.
.
.
.
.
.
.
.
.
.
.
.
.
.
.
.
.
.
.
.
.
.
.
.
.
.
.
.
.
.
.
.
.
.
.
.
.
.
.
.
.
.
.
.
.
.
.
.
.
.
.
.
.
.
.
.
.
.
.
.
.
.
.
.
.
.
.
.
.
.
.
.
.
.
.
.
.
.
.
.
.
.
.
.
.
.
.
.
.
.
.
.
.
.
.
.
.
.
.
.
.
.
.
.
.
.
.
.
.
.
.
.
.
.
.
.
.
.
.
.
.
.
.
.
.
.
.
.
.
.
.
.
.
.
.
.
.
.
.
.
.
.
.
.
.
.
.
.
.
.
11
11
12
15
21
23
25
26
27
33
35
37
39
39
41
41
44
48
49
50
50
51
52
58
63
.
.
.
.
.
.
.
.
.
.
.
.
.
.
.
.
.
.
.
.
.
.
.
.
.
.
.
.
.
.
.
.
.
.
.
iii
.
.
.
.
.
.
.
.
.
.
.
.
.
.
.
.
.
.
.
.
.
iv
CONTENTS
2.4.5
2.4.6
Input Parameters . . . . . . . . . . . . . . . . . . . . . . . . . . . . . . . . . .
Using Form Beans as Presentation Elements Input . . . . . . . . . . . . . . .
3 Advanced Features
3.1 Application Context . .
3.2 The DAO . . . . . . . .
3.3 The Presentation Level .
3.4 Utilities . . . . . . . . .
.
.
.
.
.
.
.
.
.
.
.
.
.
.
.
.
.
.
.
.
.
.
.
.
.
.
.
.
.
.
.
.
.
.
.
.
.
.
.
.
.
.
.
.
.
.
.
.
.
.
.
.
.
.
.
.
.
.
.
.
.
.
.
.
.
.
.
.
.
.
.
.
.
.
.
.
.
.
.
.
.
.
.
.
.
.
.
.
.
.
.
.
.
.
.
.
.
.
.
.
.
.
.
.
.
.
.
.
.
.
.
.
.
.
.
.
.
.
.
.
.
.
.
.
.
.
.
.
.
.
.
.
.
.
.
.
64
67
71
71
71
71
71
Chapter 1
Introduction
1.1
What Is CB2?
CB2 is a Java library intended to provide developers with a comprehensive software infrastructure
for creating Java applications. The most usual case of CB2 usage is building a data-driven webapplication and, although CB2 can be useful for developing the whole range of applications, exactly
this case will be taken as the basis in this manual.
CB2 is not only a class library, it is also a framework, meaning that it gives you a complete
skeleton for your application, it defines its architecture leaving places where you “plug in” modules
that implement the application logic. In a sense, CB2 is an alternative to such heavy-weight technologies as EJB covering virtually all their practically useful functionality, while being much more
light-weight.
1.2
Why Was CB2 Created?
CB2 fills in the gap between such a basic framework as Apache Struts and such complete and
heavy-weight tools as various implementations of Sun Microsystems’ J2EE, and particularly EJB
containers, which usually provide developers not only with EJB, but also with the whole range of
important and useful services like logging, messaging and so on. While J2EE application servers give
you, as a developer, almost everything you might need leaving you, in theory, only to implement the
application logic (or at least it is claimed so), they are not free of some quite important disadvantages.
We will list some of them below:
• The vast majority of web-applications do not require all the power of a complete J2EE application server implementation. In fact, only a little part of the application server’s capabilities
is used in many web-applications, while it is still very complex and expensive technology.
• The concepts and interfaces are rather complex and require a team of experienced, expensive
developers to be used properly. It is very easy for an inexperienced developer to misinterpret
some concept and start using it in a wrong way leading to confusing and inefficient application
code, which is difficult to understand and fix. Usually, it is preferred that the developers have
a special training in order to use J2EE effectively.
1
2
CHAPTER 1. INTRODUCTION
• An EJB container is not just a software library, it is a big application, which usually includes
its own implementation of HTTP server and other more or less independent server subsystems,
so it is a complex infrastructure requiring maintenance staff well familiar with this particular
application server implementation. This makes switching your application environment to
something else more difficult.
• Most of implementations are commercial and are rather expensive.
CB2 itself (to be exact, its Servlet-based presentation level, which we will discuss later; the CB2’s
core is completely independent and can be used in applications based on different technologies, not
only Servlet/JSP based web-applications) is based on Apache Struts and extends it adding all the
necessary services to make a complete framework, similar to what J2EE application servers offer.
The main point is that CB2 is made very practical, it does not sacrifice practical usefulness and
efficiency to cover all possible and impossible cases defining far too generalized interfaces and introducing unnecessary levels, while still providing possibility of plugging very custom implementations
in almost any part of its architecture when it is needed. The interfaces CB2 defines for different software components are much simplier than what J2EE offers and leaves less possibility for
misunderstanding and inappropriate usage during the development process even for inexperienced
developers. CB2 library is usually embedded into the web-application, which can be deployed under
any Servlet container implementation making your software more mobile.
1.3
Architecture
As mentioned above, CB2 dictates your application’s structure. It defines several types of software
components that you implement extending provided by the library abstract classes or implementing
interfaces and then plug into the defined architecture. The architecture defines two distinctive levels:
the business level (or BL) and the presentation level (or PL). The framework for the BL is the CB2’s
core and different kinds of PLs, implemented using different technologies, can be used with the BL.
However, in this manual we will consider a PL implemented as a Servlet, and our application will
be in fact a web-application designed to be run under a Servlet container. This is the most common
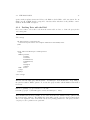
case of CB2 usage and at the same time it allows to illustrate the most of CB2’s capabilities. A
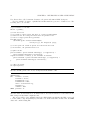
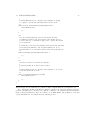
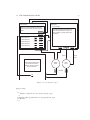
diagram showing the topmost architectural components of the framework is shown on Figure 1.1,
where you can see three major modules dividing the whole application onto three levels of internal
functionality. Let’s give a brief description of those modules’ purpose before going deeper into each
of them.
1.3.1
Application Context
The application context provides all subsystems of the application with the most basic low-level
services. There is always only one instance of application context per application and the instance
is made available to all types of application components so they can access its services at any time.
The services application context provides include:
• Logging – different parts of the application can get a logger from the application context.
CB2 uses Apache Commons Logging as a generalized interface for the underlying log kit
implementation and therefore supports all the implementations that the Commons library
1.3. ARCHITECTURE
3
struts-config.xml
pages-config.xml
Presentation Level (PL)
(based on Apache Struts)
blo-config.xml
Business Level (BL)
Request
Database (DB)
Response
Application Context
cb2app.properties
The CB2's core
Figure 1.1: High-level CB2 framework architecture.
does. The special stress is made on supporting Apache Log4J and JDK 1.4 logging because of
popularity of these two log kit implementations.
• Application properties – application context provides centralized interface for accessing (reading) CB2 standard and application custom properties. Simple name/value pairs, that is the
properties, are stored in the application context configuration file called ‘cb2app.properties’,
which is in the standard java.util.Properties format extended with a special synthax allowing conditions and macros. The set of properties can also be extended by values stored
in a database. There is a number of standard properties used by the application context to
configure and tune its operation. Also, any number of easily accessible custom application
properties can be added.
• Database connection – application context maintains a set of data sources, or just one data
source if the application works with one database. The data sources are usually database
connection pools. Application context can be configured to use data sources provided by
another subsystem through JNDI (by the servlet container for example) or it can create the
datasources on its own. In fact, this service of application context is rarely used directly by the
user application code, as we will see further CB2 provides powerful mechanisms for working
with databases so the application code don’t have to manage connections at all.
4
CHAPTER 1. INTRODUCTION
• Transaction management – central interface for managing transactions. The application context can manage transactions in two modes: using Java Transaction API while being just a
mere wrapper around javax.transaction.UserTransaction interface, or using its own implementation of transaction context, which is much more light-weight than the JTA providing
simplicity and sometimes better performace. Also, the internal implementation does not require JTA implementation for automatic transaction management. It has though some limitations such as it does not support distributed transactions and only database operations are
included into the transaction context. In general, it is recommended to use the internal implementation (for its simplicity) when the application does not require any advanced features of
the JTA.
• Broadcast messaging (BCM) – a light-weight alternative to JMS the CB2 BCM is a basic
mechanism for building simple clusters. It allows to connect a group of application instances
into a community giving ability to one instance to send messages to all members of the cluster.
Different imlpementations of BCM can be used employing different communication mechanisms
each having its unique characteristics while the interface provided by the application context
stays standard.
1.3.2
Business Level
The main application logic is implemented in components of the business level module. At the very
top of it is the BL Manager singleton. As in the case of application context there is only one instance
of BL Manager per application. The logic itself is implemented in components called Business Level
Objects, or BLOs. Each BLO represents a specific aspect of the business logic or a business entity.
Dividing the whole business logic onto seprate areas represented by BLOs also allows reusing the
BLOs in other applications.
Since BL Manager supports the concept of user sessions, BLOs exist in the context of a user
session. The user sessions are represented by BLO Containers, which contain BLO instances. When
a new user session is requested a dedicated instance of BLO Container is assigned to it and the
container is populated with dedicated instances of BLOs, therefore, a BLO can have an internal
state which will be in the scope of the user session. To access a BLO the code gets reference to the
BLO Container instance associated with the user session from the BL Manager and then looks up
the BLO in the container by the BLO’s name. When BL Manager returns a BLO Container to the
requester it locks it and no other requester can get the BLO Container for this session until the one
which has it at the moment releases it. Because of this locking mechanism and because one request
in one session is usually processed by a single thread there is no need to worry about synchronization
in the BLO implementations.
There is also a special type of BLOs that are shared by all sessions thus existing not in a user
session scope but in the application scope. This kind of BLOs is called shared BLOs. Shared BLOs
“live” in s special shared BLO Container, which is not associated with any particular user session.
One instance of shared BLO Container is created at the BL Manager initialization, which usually
happens at the application startup, and is populated with instances of shared BLOs. Since the
shared BLO Container is never locked by the BL Manager it allows concurrent access to shared
BLOs by mutliple threads, so shared BLOs have to be developped having this fact in mind taking
care of synchronizing access to their internal states.
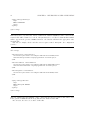
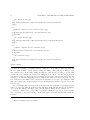
Note, that in general it is transparent to the client code requesting access to a BLO whether the
1.3. ARCHITECTURE
5
blo-config.xml
(and external
dao-config files)
DB
struts-config.xml
pages-config.xml
(and external
pages-config files)
BL Manager
Shared BLO Container
DAO
BLO
Presentation Level (PL)
(based on Apache Struts)
Request
BLO Container
Response
BLO
DM
sessions
cb2app.properties
Application Context
(logging, application properties, database connections, transaction management,
broadcast messeging)
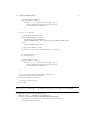
Figure 1.2: The business level.
BLO is shared or not – if a BLO Container can not find a requested BLO among the ones it contains
it tries to find and return a shared BLO then.
The BL Manager creates an instance of Database Access Object (DAO) for each data source
available in the application context. The DAO is a utility class providing BLOs with a powerful
database access API built on top of JDBC. Although BLOs can get a database connection from the
application context and use standard JDBC interface to perfom operations, DAO provides a set of
very powerful macro methods so in the most cases the whole construction of opening connection,
6
CHAPTER 1. INTRODUCTION
preparing and executing a statement, processing the result and closing the connection can be replaced
with a single DAO method call.
The DAO represents data stored in the database as Data Model objects, or DMs. A DM is an
object of a very simple class containing all public member variables and representing the application
data in the form as it is stored in database tables. In the simpliest case a DM corresponds to a
database table and has a member variable of the appropriate type for each column in the table thus
being able to hold data of a single row. It is very convenient to use DMs to pass data not only
between BLOs and the DAO but also between the BLOs themselves, as well as between the BLOs
and the presentation level, which converts the data from the DM form, that is the database form,
to the form suitable for presenting it in the user interface.
The main configuration file for the business level is ‘blo-config.xml’, which defines BLOs and
configuration for the DAOs including texts of SQL queries. It can also refer to a set of external
DAO configuration files which is useful in large projects.
1.3.3
Presentation Level
As mentioned above, different implementations of presentation level (PL) controlling the application
user interface (UI) logic can be used with the CB2 core. The library includes a PL implementation
for Servlet-based web-applications and exactly this presentation level framework is discussed in this
manual. It is based (and includes it) on Apache Struts and extends the basic set of Struts’ concepts
such as actions and form beans with new ones such as pages, components and presentation elements.
The central point of the web-application is still the Struts’ Action Servlet and the CB2 PL framework
is set up as a plug-in, which installs its own Request Processor where all the extensions start. Note
also that CB2 PL completely replaces such Struts’ extentions as Tiles, which is also made as a
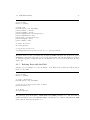
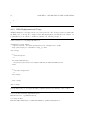
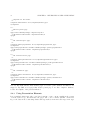
plug-in, and cannot be used with it at the same time. The CB2 PL architecture diagram is shown
on Figure 1.3.
The important difference is that CB2 introduces pages. URLs are mapped not only to actions,
as in Struts, but also to pages. Basically, CB2 slightly modifies the standard Struts action ⇒ jsp
workflow and assumes that there are two kinds of requests: those that result in a page displayed in
the browser, and those that are “pageless” performing some action in a response to the request and
sending a redirect back to the browser and then the browser automatically makes the next request.
In the first case data to be displayed can be read from the business level. In the second case, which
is usually some form submition, data is modified in the business level and then a redirect to a page
is sent in the response. For example, the application may have two URLs: ‘/customerInfo’, which
is mapped to a page containing an HTML form with a customer information to be filled in, and
‘/saveCustomerInfo’, which is mapped to an action that receives the form data, calls the BLO to
save the data to the database, and finally sends a redirect to ‘/customerInfo’ to display the form
again. Note, that in this case the action sends a redirect, not forward, so when refresh is clicked in
the browser it does not submit the form and save the customer information again, but instead just
redisplays the form. Of course, that is a very simple example, but it illustrates the idea. Figure 1.4
shows it graphically.
Pages are composed of components that are individual JSP files that include one another. A
page starts with a template component, which may include other components using <cb2:insert>
JSP tag. The included components can also include other components. Any dynamic content of
the components is controlled with the help of presentation elements. On one hand, presentation
elements (PEs) are Java beans put by the framework to the request or session scope and thus can
1.3. ARCHITECTURE
Request
7
Struts Action Servlet
struts-config.xml
pages-config.xml
Page
Response
with the
page
content
JSP Component
Presentation
Element (PE)
Business Level
(BL)
CB2 Request
Processor
(extends Struts’
request processor)
CB2 Plug-In
Action
Form
Bean
Database (DB)
Struts Module
Redirect
response
Forward
cb2app.properties
Application Context
(logging, application properties, database connections, transaction management, broadcast
messeging)
Figure 1.3: Struts-based presentation level.
be used by all Struts JSP tags in the component’s JSP, including <bean:xxx > and <logic:xxx > tags.
On the other hand, PEs are “smart” beans, they “know” how to populate their internal properties.
8
CHAPTER 1. INTRODUCTION
Customer Info Page
Business Level
HTML Form
read customer info to
prepopulate the form
/customerInfo
Submit
/saveCustomerInfo
Save
Customer Info
Action
save customer
info
redirect to /saveCustomerInfo
Figure 1.4: A page and a pageless action.
When a page is called all presentation elements on all components composing the page are invoked
for initialization. During this phase presentation elements can access the business level and read
all the data necessary to populate their bean properties. On the next step the control is passed to
the page’s template component’s JSP to render the page. The template component then includes
other components if necessary using the <cb2:insert> tag and the JSPs read data from presentation
elements’ properties using, for example, Struts tags.
Note also, that the object behind a Struts <html:form> can be both a presentation element and
an ActionForm bean. It plays the role of a presentation element when a page with the form is
displayed and, being a presentation element, gets a chance to prepopulate the form’s fields. Later
in the workflow, it plays the role of an ActionForm bean when the submitted data passed to the
appropriate Action in the same object’s fields. Clearly, it could be two separate classes, but in the
most cases it is more convenient to have a single class extending Struts’ ActionForm abstract class
and implementing CB2’s PresentationElement interface.
Two top-level configuration files define the presentation level operation. Pages, JSP components,
presentation elements and URL to page mappings are defined in ‘pages-config.xml’. Pageless
actions, action form beans and the rest of Struts-specific configuration (including the CB2 PL Plugin set up) is defined in ‘struts-config.xml’ file.
1.3. ARCHITECTURE
1.3.4
9
Application Components
From the overview above follows that there is a number of different types of software components
that have to be implemented during the application development. At this point we are ready to list
all the component types, see Table 1.1.
Component
Data Model (DM)
Extends/Implements
com.boylesoftware.cb2.
DataModel
Business Logic
Object (BLO)
com.boylesoftware.cb2.
BLObject
Action
com.boylesoftware.cb2.
presentation.servlet.
CB2Action
Presentation
Element (PE)
com.boylesoftware.cb2.
presentation.servlet.
PresentationElement
org.apache.struts.
action.ActionForm
Action Form
User Interface
Component JSP
n/a
Purpose
Represents data as it is stored in the
database, used for passing data between
components and modules.
Implements a piece of application’s business logic, provides application-specific
API to the presentation level.
Processes HTTP requests usually making
calls to the business level and submitting
changes to the data. Mapped to a URL
in ‘struts-config.xml’ configuration file.
Controls dynamic content of a UI component, represents data in the form suitable
for the UI (as opposed to a DM).
A Java bean used by Struts to pass an
HTML form data to an action processing
the form’s submission.
A top-level (template) or an includable
piece of JSP code representing a certain
part of a user interface page.
Table 1.1: Software component types.
Those listed in the Table 1.1 are the most widely used component types. There are also others,
used more rarely, in special situations, which we will discuss later.
10
CHAPTER 1. INTRODUCTION
Chapter 2
Developing a Web-application
In this chapter we shall develop a simple web-application starting from scratch. Going along, basics of various CB2 service subsystems, as well as recommended development approaches will be
demonstrated and explained.
The application we are developing is a simple address book storing information about people in
a relational database and allowing listing, searching, adding, deleting and updating records.
It is best to start with installing a CB2 development environment and get acquainted with its
structure. The environment includes a number of default configuration files. We are going to talk a
lot about them below, so it is good to have them within reach. The complete source of the example
address book application with in-code comments can be downloaded from the CB2 Framework
project web-site.
Our application will communicate with the database through the DAO, and it is important for us
to explain the DAO operation basics first so we feel comfortable later when we discuss the business
level implementation.
2.1
The DAO Basics
The DAO provides methods for the four basic database operations: fetch, update, insert and delete.
It operates on DMs and a single DM, in the most simple case, holds data of one row in a table or
a result set. The bodies of SQL queries are read from an XML configuration file, or a set of files.
Fetch methods take the query name, query parameters, additional optional arguments for the result
sorting and pagination, and return an array of DMs corresponding to the result set rows. The DM
class is associated with a particular query in the configuration file. Although queries for database
updates can be configured in the configuration file in the same manner, the top-level update, insert
and delete methods can build SQL queries automatically basing on the DM metadata. And update
takes a populated DM object, builds an UPDATE SQL query and executes it. An insert does the same,
but builds an INSERT query and can automatically handle new record id generation in a databasespecific manner and set the corresponding field with the id (or multiple ids) value in the DM before
returning from the method call. A delete generates a DELETE SQL query and takes values of id fields
from the specified DM to identify database records to delete. In all cases the association between
DM fields and database table columns is based on the field names. Basically, the DM class field
11
12
CHAPTER 2. DEVELOPING A WEB-APPLICATION
name should be the same as the corresponding column’s name or, possibly, the column’s label if it
is a SELECT query and its result set. Of course, the type of the field should be compatible as well.
Person
Address
personId NUMERIC(6) PK
lastName VARCHAR(50) NOT NULL
firstName VARCHAR(50) NULL
homeAddressId NUMERIC(6) FK NULL
workAddressId NUMERIC(6) FK NULL
email VARCHAR(30) NULL
wantsSpam BIT NOT NULL
comments TEXT NULL
addressId NUMERIC(6) PK
street1 VARCHAR(50) NULL
street2 VARCHAR(50) NULL
city VARCHAR(50) NULL
state CHAR(2) NULL
zip CHAR(5) NULL
Phone
personId NUMERIC(6) FK NOT NULL
type CHAR(3) NOT NULL
phone CHAR(10) NOT NULL
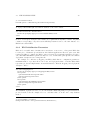
Figure 2.1: Address book database diagram.
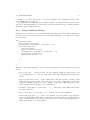
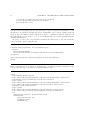
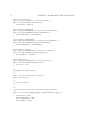
Let’s assume we are provided with the schema shown on Figure 2.1. Three tables allow us to
have a record in Person for each contact in our address book. A record in Person can optionally
have a home address record and a work address record in the Address table. Also, a record in Person
can have zero or more telephone numbers associated with it and stored in the Phone table. The
type column in the Phone table indicates the phone number type and takes, for example, this list of
values: ‘HOM’ for home number, ‘WRK’ for work number, ‘MOB’ for mobile phone number, ‘FAX’ for
fax and ‘PAG’ for pager. The phone column holds only phone number’s digits, that is number (212)
123-4567 will be stored as 2121234567.
2.1.1
Data Models
When we start a new project, first step we do implementing the business level and given that the
database schema is defined, we create a DM class for each database table directly mapping the
table’s columns to the class fields – one field for each column. A DM is a very simple class derived
from com.boylesoftware.cb2.DataModel abstract parent and has no methods, only public member
variables with the same names as the corresponding columns and respective types. Note, that a
primitive type can be used only if the corresponding column is not nullable. Otherwise, a standard
Java wrapper class must be used, so the field can be set to null if the column in the database
contains SQL NULL. If a primitive type is used for a nullable field the most likely result will be that
sooner or later you get a NullPointerException originating in the depths of Java refelection toolkit.
Also, stylistically it is a good practice to use primitive types for not nullable fields and reference
2.1. THE DAO BASICS
13
type for nullable ones, because it shows which fields in the DM are nullable and which not without
consulting the database table description.
At this point we are ready to create three DM classes for our three database tables. It is
recommended to call DM classes with the same names as corresponding tables and add suffix “DM”.
For Person table we have got:
package com.boylesoftware.cb2.examples.addressbook;
import com.boylesoftware.cb2.DataModel;
public class AddressDM
extends DataModel {
public
public
public
public
public
public
int addressId;
String street1;
String street2;
String city;
String state;
String zip;
}
For Address table:
package com.boylesoftware.cb2.examples.addressbook;
import com.boylesoftware.cb2.DataModel;
public class AddressDM
extends DataModel {
public
public
public
public
public
public
int addressId;
String street1;
String street2;
String city;
String state;
String zip;
}
For Phone table:
package com.boylesoftware.cb2.examples.addressbook;
import com.boylesoftware.cb2.DataModel;
public class PhoneDM
14
CHAPTER 2. DEVELOPING A WEB-APPLICATION
extends DataModel {
public int personId;
public String type; // not nullable
public String phone; // not nullable
}
Now, in the DAO configuration section of the ‘blo-config.xml’ file we have to create a descriptor
for each DM and associate it with a database table:
<?xml version="1.0" encoding="ISO-8859-1"?>
<!DOCTYPE blo-config PUBLIC
"-//Boyle Software, Inc.//DTD CB2 Business Level Configuration 1.0//EN"
"http://www.cb2project.com/dtd/blo-config_1_0.dtd">
<blo-config>
<!-- BLO descriptors. We shall fill in this section later.
-->
<!-- The DAO configuration.
-->
<dao-config>
<dm name="person" table="Person">
<class>com.boylesoftware.cb2.examples.addressbook.PersonDM</class>
</dm>
<dm name="address" table="Address">
<class>com.boylesoftware.cb2.examples.addressbook.AddressDM</class>
</dm>
<dm name="phone" table="Phone">
<class>com.boylesoftware.cb2.examples.addressbook.PhoneDM</class>
</dm>
</dao-config>
</blo-config>
Note, that it is not necessary to associate all DMs with tables. There may be DMs used only in
complex selects with joined tables or simple selects fetching only a subset of all columns and such
DMs are not directly associated with any particular table, they merely represent data in a certain
result set. However, it a DM to be used with those DAO methods that automatically construct SQL
2.1. THE DAO BASICS
15
queries, such as updates, inserts and deletes, the DAO needs the DM to table association. In our
simple case all our DMs directly correspond to database tables and therefore they all have ‘table’
attribute in their XML descriptors.
2.1.2
Fetching Data with the DAO
Now, if we want to select all records from the Person table we have to define the query in the
‘blo-config.xml’:
...
<dao-config>
<dm name="person" table="Person">
<class>com.boylesoftware.cb2.examples.addressbook.PersonDM</class>
</dm>
...
<query name="listAllPeople" usedm="person">
<sql>
SELECT personId,
lastName,
firstName,
homeAddressId,
workAddressId,
email,
wantsSpam,
comments
FROM
Person
</sql>
</query>
</dao-config>
...
This associates the SQL query with then name ‘listAllPeople’ and tells that the corresponding to
the querie’s result set DM is ‘person’. To execute the query we make call the DAO’s fetch method
from Java:
DAO dao = getDAO(); // get reference to the DAO
PersonDM [] people = (PersonDM [])dao.fetch("listAllPeople", null);
This call will return an array of DMs, one for each row in the table, with the fields populated with
the data from the database. The DMs in the array will be in the order the query returned them.
The second argument of the fetch method is used for passing parameters to the query, but since
our query needs no parameters we pass null.
16
CHAPTER 2. DEVELOPING A WEB-APPLICATION
Some optional parameters can be passed to the fetch method. For example, if we want the result
set to be ordered by person last name we can make the following call:
PersonDM [] people =
(PersonDM [])dao.fetch("listAllPeople",
null,
new String [] { "lastName" },
DAO.ORDER_ASC);
The DAO then will automatically modify the text of the query and will append an ORDER BY clause
to it. Ordering by multiple columns can be requested as well:
PersonDM [] people =
(PersonDM [])dao.fetch("listAllPeople",
null,
new String [] { "lastName", "firstName" },
DAO.ORDER_ASC);
A clause ‘ORDER BY lastName ASC, firstName ASC’ will be appended to the query before calling the
database.
Another supplementary feature is the result set pagination. A certain segment, or page, of the
whole result set can be requested. For example, we need to display the second page of a long list of
people on the screen while one page consists of 20 records. The following call then can be made:
PersonDM [] people =
(PersonDM [])dao.fetch("listAllPeople",
null,
1, // page number starting from zero
20, // page size
null);
The resulting array then will contain at most 20 records starting from the 20th in the result set.
The null passed as the fifth argument can be replaced with an instance of com.boylesoftware.cb2
.FetchResultDescriptor, which will be filled by the method with additional information about the
whole result set. For example, if we also need to know how many records are in the whole result set,
not only the requested page, we can make this call:
FetchResultDescriptor frd = new FetchResultDescriptor();
PersonDM [] people =
(PersonDM [])dao.fetch("listAllPeople",
null,
1, // page number starting from zero
20, // page size
frd);
int numberOfPages = (frd.getRowsTotal() - 1)/20 + 1;
2.1. THE DAO BASICS
17
Queries can also be parametrized. For example, we need our query not just list all people in the
table, but do a search by last name. Then the query transforms to:
...
<query name="searchPeopleByLastName" usedm="person">
<sql>
SELECT personId,
lastName,
firstName,
homeAddressId,
workAddressId,
email,
wantsSpam,
comments
FROM
Person
WHERE lastName LIKE ?
</sql>
</query>
...
And we can call it, for example, like this:
PersonDM [] people =
(PersonDM [])dao.fetch("searchPeopleByLastName",
new Object [] {
"%" + searchFor + "%"
});
If we would like to search a substring in both last and first name, then the query will be:
...
<query name="searchPeopleByLastName" usedm="person">
<sql>
SELECT personId,
lastName,
firstName,
homeAddressId,
workAddressId,
email,
wantsSpam,
comments
FROM
Person
WHERE lastName LIKE ?
OR firstName LIKE ?
</sql>
18
CHAPTER 2. DEVELOPING A WEB-APPLICATION
</query>
...
And the call:
PersonDM [] people =
(PersonDM [])dao.fetch("searchPeopleByLastName",
new Object [] {
"%" + searchFor + "%",
"%" + searchFor + "%"
});
We can add any number of parameters. For example, we would like to search by person’s name and
his state:
...
<query name="searchPeopleByLastName" usedm="person">
<sql>
SELECT personId,
lastName,
firstName,
homeAddressId,
workAddressId,
email,
wantsSpam,
comments
FROM
Person
LEFT OUTER JOIN Address AS HomeAddress
ON HomeAddress.addressId = Person.homeAddressId
LEFT OUTER JOIN Address AS WorkAddress
ON WorkAddress.addressId = Person.workAddressId
WHERE (
lastName LIKE ?
OR firstName LIKE ?
)
AND (
HomeAddress.state = ?
OR WorkAddress.state = ?
)
</sql>
</query>
...
And the call:
2.1. THE DAO BASICS
19
PersonDM [] people =
(PersonDM [])dao.fetch("searchPeopleByLastName",
new Object [] {
"%" + nameSubstring + "%",
"%" + nameSubstring + "%",
state,
state
});
A query parameter in the input array can be an array itself, in which case if a double-question
mark is placed in the corresponding position in the query text it will be expanded to a sequence of
comma separated single question marks according to the number of elements in the sub-array. It is
particularly useful with SQL IN conditions. For example:
...
<query name="searchPeopleByLastName" usedm="person">
<sql>
SELECT personId,
lastName,
firstName,
homeAddressId,
workAddressId,
email,
wantsSpam,
comments
FROM
Person
LEFT OUTER JOIN Address AS HomeAddress
ON HomeAddress.addressId = Person.homeAddressId
LEFT OUTER JOIN Address AS WorkAddress
ON WorkAddress.addressId = Person.workAddressId
WHERE (
lastName LIKE ?
OR firstName LIKE ?
)
AND (
HomeAddress.state IN (??)
OR WorkAddress.state IN (??)
)
</sql>
</query>
...
Then, if we are looking for people only in New York’s tri-state area, we could make the following
call:
PersonDM [] people =
20
CHAPTER 2. DEVELOPING A WEB-APPLICATION
(PersonDM [])dao.fetch("searchPeopleByLastName",
new Object [] {
"%" + nameSubstring +
"%" + nameSubstring +
new Object [] { "NY",
new Object [] { "NY",
});
"%",
"%",
"NJ", "CT" },
"NJ", "CT" },
Both IN conditions then will be expanded from ‘IN (??)’ to ‘IN (?, ?, ?)’ before the parameters
are set.
As we can see, the parameters are passed to queries basing on their position in the input array
and the position of the corresponding question mark in the querie’s text. This is a very simple
and efficient approach, however it has some disadvantages. First, Java code depends on the SQL
query structure and if the position of a parameter changes after modification of a query the Java
code making calls to it has to be reviewed as well. Second, as in the example above, if the same
parameter is used multiple times in a query it has to be passed to the fetch method as multiple
elements of the input array.
There is an alternative way to pass parameters to a query – one, which uses named parameters.
We can modify the search query above and use special named parameter placeholders instead of
simple question marks:
...
<query name="searchPeopleByLastName" usedm="person">
<sql>
SELECT personId,
lastName,
firstName,
homeAddressId,
workAddressId,
email,
wantsSpam,
comments
FROM
Person
LEFT OUTER JOIN Address AS HomeAddress
ON HomeAddress.addressId = Person.homeAddressId
LEFT OUTER JOIN Address AS WorkAddress
ON WorkAddress.addressId = Person.workAddressId
WHERE (
lastName LIKE {? name}
OR firstName LIKE {? name}
)
AND (
HomeAddress.state IN ({?? states})
OR WorkAddress.state IN ({?? states})
)
</sql>
</query>
2.1. THE DAO BASICS
21
...
The fetch call then uses a map to pass parameters instead of an array:
Map params = new HashMap(2);
params.put("name", "%" + nameSubstring + "%");
params.put("states", new Object [] { "NY", "NJ", "CT" });
PersonDM [] people =
(PersonDM [])dao.fetchWithNamedParams("searchPeopleByLastName",
params);
2.1.3
Updating Data with the DAO
As mentioned above, the DAO can construct an UPDATE SQL statement automatically given a DM
by simply including all the DM fields into the statement, so there is no need to define the query
in the DAO configuration. However, to be able to generate an appropriate WHERE clause to select
the record we want to update, the DAO needs to distinguish between record identifying and regular
data fields in the DM. Then, all id fields will be included into the UPADTE’s WHERE clause and all other
fields will be included into the SET clause. The DM’s descriptor in the DAO configuration XML file
identities which fields are id fields. In our case the three DM descriptors in the ‘blo-config.xml’
file become this:
...
<dao-config>
<dm name="person" table="Person">
<class>com.boylesoftware.cb2.examples.addressbook.PersonDM</class>
<idfield name="personId"/>
</dm>
<dm name="address" table="Address">
<class>com.boylesoftware.cb2.examples.addressbook.AddressDM</class>
<idfield name="addressId"/>
</dm>
<dm name="phone" table="Phone">
<class>com.boylesoftware.cb2.examples.addressbook.PhoneDM</class>
</dm>
...
</dao-config>
...
22
CHAPTER 2. DEVELOPING A WEB-APPLICATION
Note that we have added <idfield> elements to the person and address DMs descriptors.
Now, for example, we want to capitalize last and first name in a person record with id ‘12’. The
following Java code does that:
// get reference to the DAO
DAO dao = getDAO();
// fetch the record
// (we assume it always exists and there is a query fetchPersonById
// defined in the blo-config.xml which takes one parameter and
// selects a single person DM by personId)
PersonDM person =
((PersonDM [])dao.fetch("fetchPersonById",
new Object [] { new Integer(12) }))[0];
// at this point all fields in person are filled with data from
// the database, the personId field is 12
// update the DM
person.lastName = person.lastName.substring(0, 1).toUpperCase() +
person.lastName.substring(1).toLowerCase();
if(person.firstName != null) { // the firstName is nullable!
person.firstName = person.firstName.substring(0, 1).toUpperCase() +
person.firstName.substring(1).toLowerCase();
}
// commit the change
dao.update(person);
The last call will generate and execute an SQL statement similar to this:
UPDATE Person
SET
lastName = ’Tilsen’,
firstName = ’Moses’,
homeAddressId = 100,
workAddressId = NULL,
email = ’[email protected]’,
wantsSpam = 0,
comments = NULL
WHERE personId = 12
The table name and information about which fields are id fields and which are not is taken from the
DM descriptor in the DAO configuration file.
Also, it is possible to have multiple id fields in a DM, which is useful when the DM corresponds
to a table with a compound primary key. In such a case all id fields will be included into the WHERE
clause and combined using AND.
2.1. THE DAO BASICS
2.1.4
23
Inserting Data with the DAO
Inserting data is very similar to updating described above with one important difference – id fields
values should be generated for the new record. For each id field the DAO should be provided with
a special SELECT query that returns the id field’s new value. Different databases implement the
mechanism of new id generation differently, but in the most cases the implementation falls into one
of the following two categories:
1. The id column in the table has a special type and when an insert happens the database
automatically generates next value and sets it into to the record’s field. After the insert has
been performed the generated id value can be read from a special variable. Examples of
RDBMSs implementing this approach can be Sybase ASE and Microsoft SQL Server.
2. Next value for the id column is read from a special source by a separate SELECT query and
then this value is used in the INSERT statement along with the values for all other fields. An
example is Oracle, which has special database objects called sequences serving, particularly,
the purpose of generating values for id fields.
The query, which returns the new id values, can be associated with a DM’s id field with ‘srcquery’
attribute of the <idfield> element in the DM’s descriptor. This attribute names the query defined
using a <query> element somewhere in the DAO configuration. The way the query should be called
is defined by the <idfield>’s ‘srcorder’ attribute, which can take one of the two values: ‘pre’ or
‘post’. If it is ‘pre’, which is the default, the srcquery will be called before the main insert is
performed (the second category in the list above). If it is ‘post’ the query will be called after (the
first category).
For example, if we had a Microsoft SQL Server database and the personId column in the Person
table, as well as addressId in Address, were IDENTITY columns, our DAO configuration could look
like this:
...
<dao-config>
<dm name="person" table="Person">
<class>com.boylesoftware.cb2.examples.addressbook.PersonDM</class>
<idfield name="personId" srcquery="getIdentity" srcorder="post"/>
</dm>
<dm name="address" table="Address">
<class>com.boylesoftware.cb2.examples.addressbook.AddressDM</class>
<idfield name="addressId" srcquery="getIdentity" srcorder="post"/>
</dm>
<dm name="phone" table="Phone">
<class>com.boylesoftware.cb2.examples.addressbook.PhoneDM</class>
</dm>
...
24
CHAPTER 2. DEVELOPING A WEB-APPLICATION
<query name="getIdentity">
<sql>
SELECT @@IDENTITY
</sql>
</query>
</dao-config>
...
Immediately after every insert into Person or Address the ‘SELECT @@IDENTITY’ will be called and the
returned value will be assumed to be the id of the just inserted record. The id column itself meanwhile
will not appear in the generated INSERT statement – the database will insert the appropriate value
automatically.
If it was, for example, Oracle and there was a sequence named ‘EntityIds’, the configuration
would be:
...
<dao-config>
<dm name="person" table="Person">
<class>com.boylesoftware.cb2.examples.addressbook.PersonDM</class>
<idfield name="personId" srcquery="getNextId" srcorder="pre"/>
</dm>
<dm name="address" table="Address">
<class>com.boylesoftware.cb2.examples.addressbook.AddressDM</class>
<idfield name="addressId" srcquery="getNextId" srcorder="pre"/>
</dm>
<dm name="phone" table="Phone">
<class>com.boylesoftware.cb2.examples.addressbook.PhoneDM</class>
</dm>
...
<query name="getNextId">
<sql>
SELECT EntityIds.NEXTVAL
</sql>
</query>
</dao-config>
...
This way ‘SELECT EntityIds.NEXTVAL’ will be called first and then the returned value will be used
in the generated INSERT statement along with all other fields from the DM.
In both cases, the Java code would look like this:
2.1. THE DAO BASICS
25
// get the DAO
DAO dao = getDAO();
// build a DM
PersonDM person = new PersonDM();
person.lastName = "Tilsen";
person.firstName = "Moses";
person.homeAddressId = new Integer(100);
person.workAddressId = null;
person.email = "[email protected]";
person.wantsSpam = false;
person.comments = null;
// insert the record
dao.insert(person);
// log the new record’s id
log.debug("Inserted new person record, id = " + person.personId);
The insert method, beside generating and executing an INSERT statement, also updates the passed
DM instance and sets the id fields, so we leave the personId untouched in the sample above where
we build and populate a DM and then we can find the new record’s id set in the field after the
insert call.
2.1.5
Deleting Data with the DAO
Deleting a record is simple: we create an instance of the DM, set the id fields and call the delete
method on the DAO:
// get the DAO
DAO dao = getDAO();
// create a DM instance
PersonDM person = new PersonDM();
// set the id of the record we want to delete
person.personId = 12;
// do delete
dao.delete(person);
The generated query then will be ‘DELETE FROM Person WHERE personId = 12’. All other than id
fields in the DM are ignored. If a DM has multiple id fields they are combined using AND in the WHERE
clause, just the same way the update does.
26
CHAPTER 2. DEVELOPING A WEB-APPLICATION
2.1.6
Calling Custom Update Statements
In a more advanced case we may not be satisfied with simple SQL statements the DAO is able to
generate and the DAO allows us to define and execute any SQL text. For example, in the DAO
configuration:
...
<dao-config>
...
<query name="turnoverActivityHistory">
<sql><![CDATA[
DECLARE @startDate DATETIME
SELECT @startDate = ?
INSERT
SELECT
FROM
WHERE
INTO ActivityHistory
*
Activity
closingDate >= @startDate
IF @@ROWCOUNT > 0 BEGIN
UPDATE Activity
SET
lastTurnoverDate = GETDATE()
WHERE closingDate >= @startDate
END
]]></sql>
</query>
...
</dao-config>
...
Can be executed like this:
DAO dao = getDAO();
dao.update("turnoverActivityHistory",
new Object [] { new java.sql.Date() });
SQL text of statements can also be passed to the DAO directly from Java without defining them
in the DAO configuration file. There are lots of other features in the DAO as well, see Javadocgenerated API reference and the DTD files for complete details.
2.1. THE DAO BASICS
2.1.7
27
Fetching Data into a DM Hierarchy
As we established the DAO’s fetch methods return arrays of DMs. But what if in the earlier example
of selecting people records we wanted to fetch information about people along with their addresses
using one single SELECT? It is possible using nested DMs.
The first step is we add a nested address DMs to the person DM:
public class PersonDM
extends DataModel {
// table columns
public
public
public
public
public
public
public
public
int personId;
String lastName; // not nullable
String firstName;
Integer homeAddressId;
Integer workAddressId;
String email;
boolean wantsSpam;
String comments;
// nested DMs
public AddressDM homeAddress;
public AddressDM workAddress;
}
Now, in our SELECT statement we can join Person table with Address table and include data from the
Address table into the result set. The result set though has to be structured in a special fashion to
allow the DAO to parse it and put values from the columns to the appopriate fields in the top-level
and nested DMs. In the case of one to zero-or-one relationship, which is the case in the example we
are discussing, the following rule should be applied to the result set structure: columns belonging
to one nested DM are groupped together in a sequence in the result set and the whole group is
preceded by a column having the number of following nested DM columns as its value and as its
label – the nested DM field’s name in the parent DM. The query fetching person details by a person
id will look like the following:
<query name="fetchPersonById" usedm="person">
<sql>
SELECT -- person details fields from Person table
personId,
lastName,
firstName,
homeAddressId,
workAddressId,
email,
wantsSpam,
28
FROM
WHERE
</sql>
</query>
CHAPTER 2. DEVELOPING A WEB-APPLICATION
comments,
-- home address nested DM
5 AS homeAddress, -- means: the following 5 fields
-- belong to the nested DM
-- in field named homeAddress
HomeAddress.street1,
HomeAddress.street2,
HomeAddress.city,
HomeAddress.state,
HomeAddress.zip,
-- work address nested DM
5 AS workAddress,
WorkAddress.street1,
WorkAddress.street2,
WorkAddress.city,
WorkAddress.state,
WorkAddress.zip
Person
LEFT OUTER JOIN Address AS HomeAddress
ON HomeAddress.addressId = Person.homeAddressId
LEFT OUTER JOIN Address AS WorkAddress
ON WorkAddress.addressId = Person.workAddressId
personId = ?
Note a very important feature of the query above – it does not select addressId from HomeAddress
and WorkAddress. The reason is that the tables (in fact it is the same table but joined twice) are
joined using an outer join and therefore may return nulls in the columns. At the same time the
addressId field in AddressDM has primitive type int, so if it was included in the result column list
and there was no home or work address for a record (homeAddressId or workAddressId is NULL) we
would get an exception when the DAO tried to set the field in the nested DM. Fortunately (usually),
we’ve got the ids in the top level DM in the homeAddressId and workAddressId fields and they are
nullable. Another conclusion is that a nested DM field is never set to null even if it is joined using
an outer join and there is no respective record in the joined table. Instead, all the fields included
in the result set will be set to null and some other mechanism should be employed to determine
if a record is present or not (in our case address id fields in the parent PersonDM can be checked
for null). What implies from the query above also is that if a column is not included in the result
column list respective DM field will stay untouched and it is not any kind of error, except maybe
stylistical, to have unused fields in DMs. This way a single DM class can be potentially used with
different queries fetching this or that set or subset of the DM’s fields, although we recommend to
have a hierarchy of DM classes that extend one another each adding more fields and use different
DM classes for different result sets.
One nested DM can include another nested DM. For example, suppose we have another table
called State that has two columns: state with a two-letter state code, and fullName which holds the
state’s full name. Now, we want to select a person record with home address and the full name of
the state in the home address. First, we define a DM class for the State table:
2.1. THE DAO BASICS
package com.boylesoftware.cb2.examples.addressbook;
import com.boylesoftware.cb2.DataModel;
public class StateDM
extends DataModel {
public String state;
// not nullable
public String fullName; // not nullable
}
Next, we add a nested DM to the AddressDM:
public class AddressDM
extends DataModel {
public
public
public
public
public
public
int addressId;
String street1;
String street2;
String city;
String state;
String zip;
public StateDM stateInfo;
}
And now we are ready to write a SELECT for two nested DMs:
SELECT -- person details fields from Person table
personId,
lastName,
firstName,
homeAddressId,
workAddressId,
email,
wantsSpam,
comments,
-- home address nested DM
8 AS homeAddress, -- we include 5 fields for the
-- address and 3 fields for the
-- state info (2 data fields and
-- the header column)
Address.street1,
Address.street2,
Address.city,
29
30
FROM
CHAPTER 2. DEVELOPING A WEB-APPLICATION
Address.state,
Address.zip,
-- state info nested DM
2 AS stateInfo,
State.state,
State.fullName
Person
LEFT OUTER JOIN Address
ON Address.addressId = Person.homeAddressId
LEFT OUTER JOIN State
ON State.state = Address.state
This was the technique for one to zero-or-one relationship (or one to one, which is the same but no
nulls). With phone numbers we have got a different situation, it is one to zero-or-more relationship.
In this case we need an array of nested DMs instead of a single nested DM:
public class PersonDM
extends DataModel {
// table columns
public
public
public
public
public
public
public
public
int personId;
String lastName; // not nullable
String firstName;
Integer homeAddressId;
Integer workAddressId;
String email;
boolean wantsSpam;
String comments;
// nested DMs
public AddressDM homeAddress;
public AddressDM workAddress;
public PhoneDM [] phones;
}
For nested DM arrays the result set should be structured differently. First of all, only one nested
array can be fetched on one nesting level at once and the columns belonging to the nested array
should all be groupped at the very end of the result column list. The header column, instead of the
number of nested DM fields contains a value, which identifies the parent record and the result set
should be ordered so rows containing data for the same array immediately follow each other – as
long as the value of the header column stays the same for subsequent rows the data from the rows is
added to the same array of DMs; as soon as the header column changes a new parent DM is created
and a new nested array of DMs is started. For example:
2.1. THE DAO BASICS
31
SELECT -- person details fields from Person table
Person.personId,
lastName,
firstName,
homeAddressId,
workAddressId,
email,
wantsSpam,
comments,
-- nested array of DMs
Person.personId AS phones, -- personId identifies the
-- parent DM and the nested DMs
-- array field is called phones.
Phone.personId,
-- second time for the DM field
Phone.type,
Phone.phone
FROM
Person
LEFT OUTER JOIN Phone
ON Phone.personId = Person.personId
ORDER BY Person.personId -- phones for one person immediately
-- follow each other
Note the ORDER BY clause, which makes phones for the same person follow each other in the result
set making possible for the DAO to group them all together and put into one nested array.
We can safely include Phone.personId to the result column list even though there is an outer
join – an empty array will be assigned to the phones field of the PersonDM for people who does not
have any phone numbers, so the DAO will never try to set a null to the id field of primitive type.
This situation, possible with outer joins, is identified by checking the first column in the nested DM
column list in the first row of data for a new parent DM for NULL – if it is NULL it is assumed that
there are no records in the nested array and processing of the next parent DM starts from the next
row. It implies that the first column of the nested DM column list should be better not nullable. In
our case it is Phone.personId, which suites perfectly for the purpose. Note also, that nested arrays
are never set by the DAO to null, but empty arrays are possible.
Let’s have a look at the following result set:
personId | lastName | ... | phones | personId | type | phone
----------+----------+-----+--------+----------+------+-----------100
| Tilsen
| ... | 100
| 100
| HOM | 1112223333
100
| Tilsen
| ... | 100
| 100
| WRK | 1113334444
100
| Tilsen
| ... | 100
| 100
| MOB | 2224445566
101
| Pilat
| ... | 101
| NULL
| NULL | NULL
102
| Praetor | ... | 102
| 102
| WRK | 1113332277
----------+----------+-----+--------+----------+------+-----------Total: 5 rows
The DAO’s fetch method will return an array of 3 person DMs. The first one will have 3 phone DMs
in its phones nested array, the second will have an empty array, and the thrid will have a one-element
array.
32
CHAPTER 2. DEVELOPING A WEB-APPLICATION
Although it is impossible to have two nested arrays on one level selected at once, DMs in a nested
array can have nested arrays too. The result set then is structured so the deeper a nested array is,
the closer to the end of the result column list its columns are. It is also necessary to order the result
set by mutliple columns in such a case. A DM, of course, can still have multiple nested array fields,
but the DAO is able to fetch data only for one of them using a single SELECT statement.
Single nested DMs and nested arrays of DMs can be mixed in one result set. For example, a
query selecting all the information about people from our database would look like the following:
SELECT -- person details fields from Person table
personId,
lastName,
firstName,
homeAddressId,
workAddressId,
email,
wantsSpam,
comments,
-- home address nested DM
5 AS homeAddress,
HomeAddress.street1,
HomeAddress.street2,
HomeAddress.city,
HomeAddress.state,
HomeAddress.zip,
-- work address nested DM
5 AS workAddress,
WorkAddress.street1,
WorkAddress.street2,
WorkAddress.city,
WorkAddress.state,
WorkAddress.zip,
-- nested array of phone DMs
Person.personId AS phones,
Phone.type,
Phone.phone
FROM
Person
LEFT OUTER JOIN Address AS HomeAddress
ON HomeAddress.addressId = Person.homeAddressId
LEFT OUTER JOIN Address AS WorkAddress
ON WorkAddress.addressId = Person.workAddressId
LEFT OUTER JOIN Phone
ON Phone.personId = Person.personId
ORDER BY Person.personId
Very important notice is that when we use nested arrays of DMs we cannot use the DAO’s result
set pagination feature. Various number of result set rows correspond to DMs in the top-level array
built by the fetch method and it makes impossible for the DAO to scroll to the row corresponding
2.1. THE DAO BASICS
33
to the first record of the requested page, because the row number can be anything depending on the
data of DMs in the previous pages.
The DMs with nested DMs and arrays of DMs can still be used with the DAO’s updates, inserts
and deletes. The thing is that those methods ignore array fields and fields of type extending DataModel
when they construct SQL statements.
2.1.8
Using Column Set Macros
It happens very often when we need to list all DM fields in a SELECT query in the DAO configuration
file. There is an extended syntax, which can do it automatically helping to create simple and complex
select field lists:
{dm
[from <table name>]
[prefix <column alias prefix>]
[excluding|only (<field name> [, <field name> ...])]
[{<nested DM field name>
[from <table name>]
[prefix <column alias prefix>]
[excluding|only (<field name> [, <field name> ...])]
[by <parent DM id field name>]
[{<nested DM field name> ...}
...
]
}
...
]
}
This macro expands automatically to a list of select fields, which can be tuned using various optional
clauses:
• from <table name> – overrides the table associated with the DM in the DM descriptor and
forces the DM fields to be selected from the named table. Especially useful when using table
aliases.
• prefix <column alias prefix> – prefix column aliases, that map result set columns to DM
fields, with the specified prefix. The prefix is ignored by the column name to field name
mapping mechanism, but it allows to have columns corresponding to DM fields with the same
name by adding different prefixes to the column aliases.
• excluding (<field name> [, <field name> ...]) – excludes the named DM fields from the
select list completely.
• only (<field name> [, <field name> ...]) – includes only the named DM fields.
• {<nested DM field name> ...} – render select field list for a nested DM corresponding the
named parent DM field. This clause automatically determines if the nested DM field is an
array or a single DM and generates the appropriate header column. Using this syntax nested
DM clauses can have more nested DMs too.
34
CHAPTER 2. DEVELOPING A WEB-APPLICATION
• by <parent DM id field name> – in the case of a nested array of DMs, this clause specifies
name of the field in the parent DM, which identifies parent records and will be used in the
header column. By default, the first id field of the parent DM is used.
For example, the last query in the previous section could be rewritten:
<query name="fetchPersonById" usedm="person">
<sql>
SELECT {dm
{homeAddress}
{workAddress}
{phones}
}
FROM
Person
LEFT OUTER JOIN Address AS HomeAddress
ON HomeAddress.addressId = Person.homeAddressId
LEFT OUTER JOIN Address AS WorkAddress
ON WorkAddress.addressId = Person.workAddressId
LEFT OUTER JOIN Phone
ON Phone.personId = Person.personId
ORDER BY Person.personId
</sql>
</query>
Looks simple, isn’t it? But in reality, and in our particular case, it would not be correct if we did
so. The problems are: homeAddress and workAddress nested DMs will include addressId field and,
as we established earlier, we cannot do it. Secondly, since table named ‘Address’ is associated with
the DM corresponding to the homeAddress and workAddress nested DM fields, exactly that table
will be used to select the fields, while there is no Address table in our FROM clause – it is aliased to
‘HomeAddress’ and ‘WorkAddress’.
For the first problem there are four alternative solutions:
1. We can write select lists ourselves and simply skip the addressId fields (as we did earlier). In
this case the extended syntax does not help us and we are still listing DM fields in two places
– the DM class and the select list, which is not very nice.
2. We can change the type of addressId in the AddressDM from int to Integer, which is stylistically
not nice at all, because it implies that the addressId field is nullable while it is not.
3. We can define two DM classes: one without the addressId field and another extending it and
adding the addressId field (to be used with updates, inserts and deletes).
4. Use excluding clause.
The second problem, with the table name aliases, can be simply solved by using from clause.
This way, our query becomes this:
2.1. THE DAO BASICS
35
<query name="fetchPersonById" usedm="person">
<sql>
SELECT {dm
{homeAddress FROM HomeAddress EXCLUDING(addressId)}
{workAddress FROM WorkAddress EXCLUDING(addressId)}
{phones}
}
FROM
Person
LEFT OUTER JOIN Address AS HomeAddress
ON HomeAddress.addressId = Person.homeAddressId
LEFT OUTER JOIN Address AS WorkAddress
ON WorkAddress.addressId = Person.workAddressId
LEFT OUTER JOIN Phone
ON Phone.personId = Person.personId
ORDER BY Person.personId
</sql>
</query>
Now this will work just fine.
2.1.9
Dynamic SQL with Conditions
The last still undiscussed DAO feature we will need in our sample application allows to use dynamically constructed SQL queries while having the query parts still in the DAO configuration file.
Different parts of a complex SQL query can be specially tagged and then conditionally included or
excluded from the final SQL query text. The set of conditions is specified from the Java code at the
time of making a DAO call.
Suppose we would like to be able to search people in the database by last name, first name, city
and state, or any combination of these properties. Having a separate SQL query with a different
WHERE clause for each combination is impractical. One solution is to have a complex WHERE clause
that checks if this or that condition should be included into the final filter by analyzing a special
parameter, say a set of bits one for each condition present:
SELECT {dm}
FROM
Person
LEFT OUTER JOIN Address AS HomeAddress
ON HomeAddress.addressId = Person.homeAddressId
LEFT OUTER JOIN Address AS WorkAddress
ON WorkAddress.addressId = Person.workAddressId
WHERE ({? searchBy} & 1 = 0 OR lastName LIKE {? lastName})
AND ({? searchBy} & 2 = 0 OR firstName LIKE {? firstName})
AND ({? searchBy} & 4 = 0 OR
HomeAddress.city LIKE {? city} OR WorkAddress.city LIKE {? city})
AND ({? searchBy} & 8 = 0 OR
HomeAddress.state = {? state} OR WorkAddress.state = {? state})
36
CHAPTER 2. DEVELOPING A WEB-APPLICATION
Then, passing searchBy parameter with different bits set we can turn on or off this or that condition.
The problem with this approach is that first, it makes the query overly complicated, and second,
not every database engine is able to optimize the query execution properly and a query with such a
complex WHERE clause will be slow.
Another approach is to simply build the query text in Java programmatically and then execute
it with the DAO’s executeFetch or executeUpdate methods. The obvious disadvantage is spreading
the SQL code over different places in the application source.
The DAO’s extended syntax provides a better solution. We can tag different parts of the WHERE
clause, called conditions, with different names in the SQL query definition and then specify a set of
condition names we would like to include to the final query text right where we call the DAO. A
condition has the following synthax:
{cond (<condition name>) <chunk of SQL text>}
In our case the search query will look like this:
SELECT {dm}
FROM
Person
LEFT OUTER JOIN Address AS HomeAddress
ON HomeAddress.addressId = Person.homeAddressId
LEFT OUTER JOIN Address AS WorkAddress
ON WorkAddress.addressId = Person.workAddressId
WHERE 1 = 1 -- to make SQL synthax valid when no conditions are included
{cond (lastName)
AND lastName LIKE {? lastName}}
{cond (firstName)
AND firstName LIKE {? firstName}}
{cond (city)
AND (HomeAddress.city LIKE {? city}
OR WorkAddress.city LIKE {? city})}
{cond (state)
AND (HomeAddress.state = {? state}
OR WorkAddress.state = {? state})}
The the Java code calling this query could be:
// get the DAO
DAO dao = getDAO();
// build the conditions set and the parameters map
Set conds = new HashSet();
Map params = new HashMap();
if(lastName != null) {
conds.add("lastName");
params.put("lastName", lastName);
2.2. CONFIGURING DATABASE CONNECTION
37
}
if(firstName != null) {
conds.add("firstName");
params.put("firstName", firstName);
}
if(city != null) {
conds.add("city");
params.put("city", city);
}
if(state != null) {
conds.add("state");
params.put("state", state);
}
// do fetch
PersonDM [] res =
(PersonDM [])dao.fetchWithNamedParams("searchPeople",
conds,
params);
Or, in our particular case, we can do it without a dedicated conds set:
PersonDM [] res =
(PersonDM [])dao.fetchWithNamedParams("searchPeople",
params.keySet(),
params);
2.2
Configuring Database Connection
The DAO itself does not manage database connections, nor does it control database transactions.
Instead, the application context provides it with the connection, and, regarding the transactions, all
the DAO calls are supposed to be executed in a transactional context (or its absence) created and
maintained elsewhere. How transactions work in CB2 we shall discuss later, while at this point we
will see how to configure the application context so it maintains a pool, or multiple pools of database
connections available to all other subsystems including the DAO.
The application context configuration file is called ‘cb2app.properties’. In fact, this file contains
a free set of application properties, just some of them have special meaning and are interpreted by
the application context when it is being configured, for example, at the application startup (the
application context can be reconfigured during the application operation at any time). The application context is able to maintain connections to multiple databases, each database is represented by
a separate javax.sql.DataSource object and each data source object can be configured individually
through the application context properties. Each data source is given a name. Data source names
are free-form, except there is one special name “default” corresponding to the default data source.
All over the API if a method leads to requesting a database connection from the application context
38
CHAPTER 2. DEVELOPING A WEB-APPLICATION
it is possible to specify the name of the data source, with which the caller would like to work. If no
name is specified the “default” is assumed making it easy for applications that work with a single
data source.
There are two ways to configure a data source. The data source can be configured and created
somewhere outside CB2, for example in the servlet container, and then made available through
JNDI. All that the application context needs in this case is the name of the data source object, under which it can be found in the initial JNDI context. The name is provided with the
‘com.boylesoftware.cb2.dataSource.data source name .jndiPath’ application property. For example, we can have the following line in ‘cb2app.properties’ file:
com.boylesoftware.cb2.dataSource.default.jndiPath=java:comp/env/jdbc/myDataSource
Then the getDAO() method, used so frequently in the Java code samples above (in fact, we
meant the BLObject’s getDAO method, which is going to be clear a little bit later), will return reference to a DAO connected to the default data source, which is the data source available under
‘java:comp/env/jdbc/myDataSource’ name in the JNDI.
If we had multiple data sources and needed a DAO connected to another database we would
have something like this in the ‘cb2app.properties’:
com.boylesoftware.cb2.dataSource.otherDatabase.jndiPath=java:comp/env/jdbc/otherDS
And we would call the getDAO with a parameter specifying the data source name:
DAO dao = getDAO("otherDatabase");
In fact getDAO() just calls getDAO("default") inside.
Note that CB2 creates a dedicated instance of DAO for each data source. Also, each individual
DAO has its own <dao-config> section marked with the corresponding data source name in the BL
configuration file.
The other way of configuring a data source allows us to develop applications in environments
where JNDI is not available. In this case the application context creates and configures the data
source object(s) on its own. Below is a fragment of ‘cb2app.properties’ file configuring the default
data source as an Apache Commons Database Connection Pool (DBCP) connected to a PostgreSQL
database:
com.boylesoftware.cb2.dataSource.default.class=org.apache.commons.dbcp.BasicDataSource
com.boylesoftware.cb2.dataSource.default.property.driverClassName=org.postgresql.Driver
com.boylesoftware.cb2.dataSource.default.property.url=jdbc:postgresql://mydbhost/mydatabase
com.boylesoftware.cb2.dataSource.default.property.username=mydbuser
com.boylesoftware.cb2.dataSource.default.property.password=mypassword
com.boylesoftware.cb2.dataSource.default.property.maxWait=-1
com.boylesoftware.cb2.dataSource.default.property.maxActive=10
com.boylesoftware.cb2.dataSource.default.property.maxIdle=0
2.3. THE BUSINESS LEVEL
39
The application context then creates an instance of org.apache.commons.dbcp.BasicDataSource and
sets all ‘property’ properties on it as on a Java bean thus configuring it.
2.3
The Business Level
The buisness logic of the application is implemented in the BLOs. For our simple address book
application we are going to need just one BLO, but usually many BLOs are created during application
development, each covering its own piece of the business logic. Quite often BLOs are not that isolated
and depend on each other calling each other’s service, communicating. BLO implementations extend
com.boylesoftware.cb2.BLObject abstract class and are provided with an internal service interface
– a number of protected methods supposed to be called from the BLO’s user-defined methods to
access such subsystems as, say, application context or the DAO. Also, there is a number of callback
methods invoked by the framework during the BLO’s life-cycle. Beside those, a BLO implements
custom business methods providing its clients with an API.
We recommend to call BLO classes with noun expressions naming a business entity or service
and suffix the name with “BLO”. Our only BLO class will be AddressBookBLO for the address book
business entity:
package com.boylesoftware.cb2.examples.addressbook;
import com.boylesoftware.cb2.BLObject;
/**
* BLO that represents the address book business entity.
*/
public class AddressBookBLO
extends BLObject {
//...
}
Now we shall discuss various aspects of a BLO implementation. Note, that a complete source
code of AddressBookBLO can be downloaded along with the source code of the Address Book sample
application.
2.3.1
BLO Life-cycle
The business level has a notion of user sessions. In a web-application the framework automatically
keeps the list of BL user sessions synchronized with the servlet container’s sessions, that is whenever
a new HTTP session is created by the servlet engine a corresponding user session is created in the
business level, and whenever an HTTP session dies the corresponding BL user session is destroyed.
Although every HTTP session has a corresponding user session in the BL and the process of maintaining the two types of sessions synchronized is completely automatic, technically they are not the
same – HTTP session is represented by a javax.servlet.http.HttpSession object, is maintained by
40
CHAPTER 2. DEVELOPING A WEB-APPLICATION
the servlet engine and is considered a purely presentation level entity, while a BL user session is
represented by a com.boylesoftware.cb2.BLOContainer object and is maintained by the BLManager.
When a new session is registered in the BL manager it creates a new instance (or takes an idle
instance from the pool) of BLO container to represent the session. Then, the BLO container is
populated with new instances of all BLOs that are defined in the BL configuration file (again, a
new instance of a BLO is created or an idle instance is grabbed from the pool). Therefore, each
individual user session has its own instance of a BLO container and a set of its own instances of all
BLOs. Each BLO then is notified by calling its init method giving it a chance to initialize itself.
The initialization of the BLOs is performed in the order defined in the BL configuration file, so one
BLO can call service of another’s in its init method if the other one is initialized first. This ends
the session initialization phase and from this point the BLOs can be looked up in the BLO container
by their deployment names and their business methods can be invoked.
When the session is being destroyed all the BLOs in the corresponding BLO container are notified
by calling their destroy methods. After that the BLO container itself is destroyed and removed from
the BL manager. In fact, instances of BLOs and BLO containers can be reused, meaning that instead
of destoying them the BL manager can decide to cache the unused instances in a pool.
A BLO can be marked as “shared” in its descriptor in the BL configuration file. In this case
it does not participate in the process described above. The meaning of a shared BLO is that its
instance is shared by all user sessions instead of each session having its own instance of the BLO. All
shared BLOs are instantiated and initialized by calling their init methods once at the application
startup. Only one instance of each shared BLO exists within the application and is shared by all
user sessions. The shared BLOs’ init methods are very good place for any application initialization
code. The BLOs’ destroy methods are called when the whole application goes down.
If a BLO logically does not have any user session specific state it is a good candidate to be a
shared BLO. Making it shared will make the application more efficient and less memory consuming.
Shared BLOs are also often used for keeping application-wide caches of rarely changed data. For
example, we could have a shared BLO that fetches the list of all US states from the database in
its init method and stores the list in an internal member variable. Later, different parts of our
application could read the list from the BLO without going to the database for it.
Note also, that because of the shared nature of shared BLOs when multiple user sessions share
the same instance it is important for developers to pay attention to possible concurrent access
synchronization issues. It is especially important in a web-application when multiple concurrent
requests served by different threads are being processed at the same time and they all access the
single instance of the shared BLO.
At the same time, the concurrent access issues in the case of regular, session-scope BLOs almost
completely do not exist. The reason is that to access a BLO the client code first gets the corresponding to the session BLO container from the BL manager and then looks up the required BLO
in it. When the BL manager returns a BLO container to the client it locks it and if any other thread
requests the BLO container for the same session the BL manager will make it wait until the BLO
container is released by the first thread and the first thread releases it after it made all the BLO
calls it needed. In the most cases the client code does not have to do anything about the process of
locking and unlocking BLO containers, it happens automatically behind the scenes and the client
code is provided with a reference to the BLO container where it can look up and call BLOs. The
mechanism of BLO container locking makes any concurrent access synchronization in regular BLO
implementations almost completely unnecessary.
2.3. THE BUSINESS LEVEL
2.3.2
41
Accessing Other Subsystems from a BLO
BLOs can communicate with each other and with other CB2 subsystems. The BLObject abstract
class contains a number of protected methods and member variables intended for the internal BLO
usage. Table 2.1 lists the major elements of this internal service interface. These methods and
variables can be accessed from the BLO’s business and life-cycle methods.
Method or Variable
Usage
Returns reference to the application context giving access to
all its services.
Returns reference to the BLO container, which contains this
BLO. The BLO container then can be used to look up other
BLOs in the same session or shared BLOs and call their
service. When called from a shared BLO returns reference
to the special shared BLO container, which is maintained by
the BL manager and contains all shared BLO instances.
Gets access to the DAO to call the database.
getApplicationContext()
getBLOContainer()
getDAO()
getDAO("dataSourceName ")
setRollbackOnly()
isRollbackOnly()
Allows to set (and check if already set) the current transactional context to the “rollback only” mode. In this mode regardless of what happens after the setRollbackOnly call the
current transaction will be rolled back when it is finished.
The same can be performed directly on the application context, so these are just convenience methods. See more on
transaction handling below.
This member variable is the logger to be used in the BLO’s
methods to log application-specific messages.
log
Table 2.1: BLO internal service interface.
2.3.3
Business Methods
A BLO implements a set of custom public methods that represent its business API. Since we know
what operations our sample web-application will need to perform on the address book we can define
the AddressBookBLO’s interface:
public class AddressBookBLO
extends BLObject {
/**
* Searches the database for person records matching a certain
* condition.
*
* @param lastNameSubstr substring of a person’s last name. null
* if last name should not participate in the filter.
* @param firstNameSubstr substring of a person’s first name or
42
CHAPTER 2. DEVELOPING A WEB-APPLICATION
* null.
* @param citySubstr substring of the city name in a person’s
* home or business address or null.
* @param state two-letter US state code in a person’s home or
* business address or null.
*
* @return array of descriptors of records matching the
* condition or an empty array.
*
* @throws BLException if a database error happens.
*/
public PersonShortDM [] searchPeople(String lastNameSubstr,
String firstNameSubstr,
String citySubstr,
String state)
throws BLException {
//...
}
/**
* Gets a person record details by the person id.
*
* @param personId id of the record requested.
*
* @return completely filled person DM with home and work
* addresses and all phone numbers.
*
* @throws BLException if a database error happens or no
* record with the specified id exists.
*/
public PersonDM getPersonDetails(int personId)
throws BLException {
//...
}
/**
* Creates new or updates existing person record basing in the
* information provided in the specified DM. If personId in the
* DM is equal or less than zero a new record is created,
* otherwise an existing record with that id is updated.
*
* @param person a DM with the new data including home and work
* address and phone numbers nested DMs.
*
* @return true if the operation was successful, false if there
* the operation cannot be performed, for example, beacuse
* another record with the same first and last names exist.
* Check getLastErrors() if the method returns false.
2.3. THE BUSINESS LEVEL
43
*
* @throws BLException if a database error happens or trying
* to update a record with personId which does not exist.
*/
public boolean savePersonDetails(PersonDM person)
throws BLException {
//...
}
/**
* If the savePersonDetails call was successful the BLO
* remembers the DM for the saved person. This method gets it.
* Can be used for a confirmation page after a person successful
* save operation.
*
* @return DM of the last successfully saved person with personId,
* home and work addresses, and all phone numbers set in it.
* Returns null if no successful operation has been performed yet.
*/
public PersonDM getLastSavedPersonDetails() {
//...
}
/**
* Deletes a person record from the database.
*
* @param personId id of the record to delete.
*
* @throws BLException if a database error happens or no record
* with the specified id exist.
*/
public void deletePerson(int personId)
throws BLException {
//...
}
}
This should provide us with all we need when we will be implementing the presentation level.
Note, that methods that work with the database can throw an exception, namely com.boylesoftware.cb2.BLException. And also note, that the comment to the savePersonDetails mentions a
method called getLastErrors. These are related to how BLOs handle various kinds of errors and
exceptional situations. Let’s discuss it in the following section.
44
CHAPTER 2. DEVELOPING A WEB-APPLICATION
2.3.4
Error Handling
In CB2 we distinguish two major kinds of errors: unexpected from the business logic point of view
technical problems that should not happen during normal application operation, and errors that
can normally happen during the workflow due to, for example, incorrect user input. The first kind
usually results in a special error screen displayed to users, the error description logged, the current
transaction rolled back, a notification emailed or paged to the operator and all those kinds of serious
consequences. The second kind usually results just in a message displayed to the user asking to
correct the causes why his request cannot be accepted by the application and try again. An example
of the first kind of error could be an unexpected SQLException originating in the JDBC driver telling
that the database became unavailable for this or that reason in response to a DAO call. Clearly, this
kind of exceptional situation does not fit into the normal, supposed business logic workflow and can
be considered an application failure. At the same time, when a new person record cannot be created
because the user specified first and last name of an already existing record it cannot be considered
to be any sort of application failure and illustrates the second type or error being, in fact, a normal
business situation, upon which the application should explain to the user why the request cannot
be accepted and suggest to correct the data.
CB2 encourages usage of different ways of reporting and processing the two different types of
errors. Encourages, but does not insist, of course. It is recommended to report unexpected application failures orignating in the business level by throwing a com.boylesoftware.cb2.BLException or
a custom application specific exception derived from the BLException. Almost every DAO method
throws a BLException in case any database problems so there is usually no need to catch and rethrow
any exceptions in business methods of BLOs. A BLException can also be created and thrown from a
business method of a BLO in response to unexpectedly invalid call. For example, getPersonDetails
method in the AddressBookBLO assumes that existance of the record corresponding to the specified
id is checked elsewhere before the method is called and thus it throws an exception if no record has
the specified personId:
public PersonDM getPersonDetails(int personId)
throws BLException {
PersonDM [] res = (PersonDM [])this.getDAO().
fetch("fetchPersonById",
new Object [] { new Integer(personId) });
// check if the select returned a record
if(res.length < 1)
throw new BLException("Person with id [" + personId +
"] does not exist.");
return res[0];
}
The errors that are not application failures can be reported by the business methods without throwing any exceptions. For example, a method can return a special value used to indicate that the
call was unsuccessful. In addition to returning a special value the method optionally uses pro-
2.3. THE BUSINESS LEVEL
45
tected BLObject method called setErrors to store in the BLO’s special internal member variable a
com.boylesoftware.cb2.BLErrors object containing information about what excactly has happened.
The caller analyzes the returned value after the business method call and if it indicates that there
were problems it calls getLastErrors public method on the BLO, which returns the BLErrors object
set inside of the last called business method to see what was the error or errors. The getLastErrors
method automatically clears the BLO’s internal variable that holds BLErrors so if called immediately once again getLastErrors will return no errors until another business method sets new BLErrors
object.
Our AddressBookBLO has a method called savePersonDetails, which does not allow setting first
and last name for a record if another record already has the same. It is perfectly normal though if
a user tries to submit such a request, so throwing an exception and displaying a special application
failure page in response is not appropriate. Instead, the savePersonDetails method returns false
indicating that the request was not fulfilled and sets BLErrors with the particular error code:
...
/**
* Error code indicating that a person with the same
* first and last name already exists.
*/
public static final int ERROR_NAME_EXISTS = 1;
...
/**
* DM of the last successfully saved person. Set by savePersonDetails,
* used by getLastSavedPersonDetails.
*/
private PersonDM lastSavedPerson;
...
public boolean savePersonDetails(PersonDM person)
throws BLException {
// get the DAO
DAO dao = this.getDAO();
// create personId wrapper, we will need it multiple times later
Integer personId = new Integer(person.personId);
// check if a record with the same first and last names
// but different personId exists
Set conds = new HashSet(1);
Map params = new HashMap(3);
// include first name check if specified
if(person.firstName != null) {
conds.add("firstName");
46
CHAPTER 2. DEVELOPING A WEB-APPLICATION
params.put("firstName", person.firstName);
}
params.put("lastName", person.lastName);
// if it’s a new record then personId is invalid and no record
// exists with the same personId
params.put("personId", personId);
// this query selects personIds (into PersonDM for example) of records
// with the specified names and different from the specified personIds
if(dao.fetch("checkIfSameNameAndDiffIdExists",
conds,
params).length > 0) {
BLErrors errors = new BLErrors(1);
errors.addError(ERROR_NAME_EXISTS);
this.setErrors(errors);
return false;
}
// see if we are creating a new record or updating an existing one
if(person.personId > 0) { // update
// fetch existing record (will throw BLException if person
// does not exist)
PersonDM oldPerson = this.getPersonDetails(person.personId);
// delete existing phone numbers
dao.update("deletePhonesByPersonId",
new Object [] { personId });
// update home address
if((person.homeAddress != null) && (oldPerson.homeAddress != null)) {
person.homeAddress.addressId = oldPerson.homeAddress.addressId;
dao.update(person.homeAddress);
person.homeAddressId = oldPerson.homeAddressId;
} else if((person.homeAddress != null) && (oldPerson.homeAddress == null)) {
dao.insert(person.homeAddress);
person.homeAddressId = new Integer(person.homeAddress.addressId);
} else if((person.homeAddress == null) && (oldPerson.homeAddress != null)) {
dao.delete(oldPerson.homeAddress);
person.homeAddressId = null;
} else {
person.homeAddressId = null;
}
// update work address
// (here goes code same as for home address, we skip it)
...
// update person record
dao.update(person);
2.3. THE BUSINESS LEVEL
// reinsert phone numbers
if(person.phones != null) {
for(int i = 0; i < person.phones.length; i++) {
person.phones[i].personId = person.personId;
dao.insert(person.phones[i]);
}
}
} else { // create new
// insert home address record
if(person.homeAddress != null) {
dao.insert(person.homeAddress);
person.homeAddressId = new Integer(person.homeAddress.addressId);
} else
person.homeAddressId = null;
// insert work address record
// (here goes code same as for home address, we skip it)
...
// insert person record
dao.insert(person);
// insert phone records
if(person.phones != null) {
for(int i = 0; i < person.phones.length; i++) {
person.phones[i].personId = person.personId;
dao.insert(person.phones[i]);
}
}
}
// save the last saved DM in the member variable for
// getLastSavedPersonDetails method
this.lastSavedPerson = person;
// all done, report success
return true;
}
In the client code, which can be a presentation level’s action, we call the method like this:
if(!addressBook.savePersonDetails(person)) {
BLErrors errors = addressBook.getLastErrors();
if(errors.containsError(AddressBookBLO.ERROR_NAME_EXISTS)) {
// do whatever we need to do to send the user a message and
// redisplay the input form
47
48
CHAPTER 2. DEVELOPING A WEB-APPLICATION
...
}
}
2.3.5
BLO Deployment and Usage
All BLOs must have a descriptor in the ‘blo-config.xml’ file. The descriptor defines by what name
the BLO can be looked up in a container, what class implements it, and whether it is a shared or a
regular BLO. For our address book BLO we will have the following descriptor:
<?xml version="1.0" encoding="ISO-8859-1"?>
<!DOCTYPE blo-config PUBLIC
"-//Boyle Software, Inc.//DTD CB2 Business Level Configuration 1.0//EN"
"http://www.cb2project.com/dtd/blo-config_1_0.dtd">
<blo-config>
<!-- BLO descriptors.
-->
<blo name="addressBook">
<class>com.boylesoftware.cb2.examples.addressbook.AddressBookBLO</class>
</blo>
<!-- The DAO configuration.
-->
<dao-config>
...
</dao-config>
</blo-config>
Now the BLO can be looked up in the BLO container and its service interface can be called:
// get the BLO container (discussed later)
BLOContainer bloc = getBLOContainer();
// lookup the BLO
AddressBookBLO addressBook = (AddressBookBLO)bloc.getBLO("addressBook");
2.3. THE BUSINESS LEVEL
49
// call business method
PersonDM person = addressBook.getPersonDetails(personId);
To deploy a shared BLO just add ‘shared’ attribute to the <blo> element:
<blo name="listsCache" shared="true">
<class>com.mycompany.myproject.ListsCacheSharedBLO</class>
</blo>
It can be looked up in exactly the same manner as a regular BLO in any BLO container. Any BLO
container corresponding to any user session will always return reference to the same instance of a
BLO if it is a shared BLO.
2.3.6
BLO Initialization Parameters
BLO can be a reusable unit. Sometimes it is convenient to create a more or less generic BLO class
for some piece of business logic and then use it in different applications. However, quite often, this
requires an ability to configure the BLO to tune it for usage in a particular application. It can be
done with BLO initialization parameters that are a set of name-value pairs specified in a BLO’s
deployment descriptor in ‘blo-config.xml’ file.
For example, we could have a shopping cart BLO, which has two configuration parameters:
maximum number of products allowed in a cart, and deployment name of another BLO which
represents a product and implements some standard interface. Then the shopping cart’s deployment
descriptor could be:
<blo name="shoppingCart">
<class>com.mycompany.myproject.ShoppingCartBLO</class>
<init-param>
<param-name>maxProducts</param-name>
<param-value>12</param-value>
</init-param>
<init-param>
<param-name>productBLOName</param-name>
<param-value>product</param-value>
</init-param>
</blo>
The initialization parameters can be accessed from within a BLO using BLObject’s getInitParameter
protected method. For the example above we could have this code in the init or any business
method:
// get max number of products
String maxProductsS = this.getInitParameter("maxProducts");
50
CHAPTER 2. DEVELOPING A WEB-APPLICATION
this.maxProducts = (maxProductsS != null ?
Integer.parseInt(maxProductsS) :
10);
...
// lookup the product BLO
ProductBLO product = (ProductBLO)this.getBLOContainer().
getBLO(this.getInitParameter("productBLOName"));
2.3.7
About Transaction Management
Although we are going to discuss transaction management in detail later in this manual, it is time
to make couple of remarks on this issue now. In CB2 the idea is that business level does not manage
transaction boundaries. Of course, in advanced cases when application needs it, transactions can be
managed at any level where application context is available, however, in the most common case it is
assumed that the code, which calls the business level, controls when transactions start, when finish
and whether to call the BL in any transaction at all. In a web-application such a client code calling
the BL is the presentation level, that is actions, presentation elements and other components of the
servlet-based PL.
The justification for this approach is that the client code may want to call multiple BLOs multiple
times to achieve the action’s goal and make it within one transaction. Only the caller “sees” the
“big picture”, while the BLOs execute just pieces of the whole action. The client code then is the
most appropriate place to control transaction boundaries. Nevertheless, in a BLO’s business method
setRollbackOnly can be called to mark current transaction, if there is any, for rollback only. The
method can be called when the BLO encounters an error which it does not want to report throwing
a BLException but still any changes made to the database in the same transaction before the call
and those will be made after should be ignored and the transaction should be rolled back. For
optimization purposes a “smart” client can analyze the current transaction context if it is marked
for rollback only after the BLO call and immediately abort the action without making any further
calls to the BL.
In CB2 there is a notion of transaction context, which is an object representing current state
of a transaction. Transaction contexts are automatically created by the application context and
are bound to the JVM threads so there is no need to pass them around as method arguments –
anywhere in the application where application context is available it is possible to get the current
thread’s transaction context. Isolated, not bound to any threads transaction contexts also can be
created and used, but this feature is not used widely.
In the case of servlet-based presentation level transactions are managed automatically, we will
see how later in this manual, so it is very rare case when developers should worry about calling
transaction management methods of the application context directly from the application code.
2.4
The Presentation Level
In terms of our address book web-application, by this point we have got our business level implementation in the form of SQL queries defined in the DAO configuration and our AddressBookBLO
2.4. THE PRESENTATION LEVEL
51
with its service interface. Now we are ready to build our application’s user interface, that is the
presentation level implementation.
The discussion below assumes that the reader is familiar with Apache Struts framework.
2.4.1
Setup
The CB2 PL is based on Struts and requries Struts to be set up for the application. The CB2 itself is
set up as a Struts plug-in, which installs its own implementations of the request processor replacing
the default ones. To configure our application to use CB2 PL we first map all requests to the Struts
action servlet in the web-application deployment descriptor, that is the ‘web.xml’ file:
...
<web-app>
...
<!-- Define Struts action servlet.
-->
<servlet>
<servlet-name>action</servlet-name>
<display-name>Struts Action Servlet</display-name>
<servlet-class>org.apache.struts.action.ActionServlet</servlet-class>
<load-on-startup>1</load-on-startup>
</servlet>
...
<!-- Map requests to the Struts action servlet.
-->
<servlet-mapping>
<servlet-name>action</servlet-name>
<url-pattern>*.cb2</url-pattern>
</servlet-mapping>
...
</web-app>
All requests to URLs ending in ‘.cb2’ will be forwarded to the action servlet, and then, through the
request processor of a corresponding Struts module (in the example above there is only one, default
module is defined with configuration in ‘/WEB-INF/struts-config.xml’), to an appropriate page or
action. In CB2, the same way as in Struts, it is recommended that all the requests go this way,
through the action servlet, and no direct requests to JSPs are ever made.
Now, in the Struts configuration file for every Struts module, with which we would like to use
CB2 (that is for all the modules usually, or for the only one), we set up the CB2 plug-in. In
52
CHAPTER 2. DEVELOPING A WEB-APPLICATION
‘struts-config.xml’:
...
<struts-config>
...
<plug-in className="com.boylesoftware.cb2.presentation.servlet.CB2PlugIn">
</plug-in>
</struts-config>
When the application starts, the plug-in installs com.boylesoftware.cb2.presentation.servlet
.CB2RequestProcessor as the request processor for the module. The plug-in has a number of configuration parameters that can be set using <set-property> subelements in the <plug-in> element. See
CB2PlugIn documentation for all available options.
2.4.2
Defining Pages and Components
The application will have three pages: one allowing listing and searching people, one with person
details used for creating new profiles, updating existing ones and just seeing all the details for a
person, and finally one confirmatin page displayed after successful modification of data such as
updating, creating and deleting profiles. See the user interface diagram with all the components on
Figure 2.2.
Every page in the UI has a defining descriptor in the pages-config.xml file. A page descriptor defines the page’s unique name, to what URL the page is mapped, and from what components it is composed. Components, which are basically JSP files, also have descriptors in the ‘pages-config.xml’.
Every component JSP file has a component descriptor, which associates a unique component name
with the JSP file. A component can play one of two major roles: it can be a template component, one
which defines the page layout and is the top-level peice of JSP which may include other components
that play the second role, the role of an includable component. Every page ultimately has one template component and it is defined in the page’s descriptor. In the template component’s JSP other
components are included using <cb2:insert> tag which takes a component reference name, which
the page descriptor defines the mapping between used on the page component reference names and
real components defined in the ‘pages-config.xml’ file.
In our simple web-application there is no need in includable components – we’ve got three
completely different pages each with its own layout and therefore we need just three corresponding
template components, that is JSPs, defining both the layouts and contents. The ‘pages-config.xml’
then looks like this:
<?xml version="1.0" encoding="ISO-8859-1"?>
<!DOCTYPE pages-config
PUBLIC "-//Boyle Software, Inc.//DTD CB2 Pages Configuration 1.0//EN"
"http://www.cb2project.com/dtd/pages-config_1_0.dtd">
2.4. THE PRESENTATION LEVEL
53
submit
Search People
Edit Person
Search form with input fields by which we
can search (first name, last name, city and
state).
Search
Add New
Search Result 1
Edit
Delete
Search Result 2
Edit
Delete
Search Result 3
Edit
Delete
Search Result 4
Edit
Delete
Search Result 5
Edit
Delete
Error message
Form with information about the person,
home and work addresses and up to 5
phone numbers by phone number type
drop-downs.
Delete
Confirmation
Save
submit
Confirmation text telling that
the record was saved or
deleted, names the person
first and last name.
Delete
Action
Save
Action
redirects
Ok
Figure 2.2: User interface pages.
<pages-config>
<!-- Template component for the "Search People" page.
-->
<component name="peopleSearch" src="/peopleSearch.jsp">
</component>
<!--
Cancel
cannot
save
54
CHAPTER 2. DEVELOPING A WEB-APPLICATION
- The "Search People" page.
-->
<page name="peopleSearch" template="peopleSearch" path="/peopleSearch">
</page>
<!-- Template component for the "Person Details" page.
-->
<component name="personDetails" src="/personDetails.jsp">
</component>
<!-- The "Person Details" page.
-->
<page name="personDetails" template="personDetails" path="/personDetails">
</page>
<!-- Template component for the confirmation page.
-->
<component name="confirmation" src="/confirmation.jsp">
</component>
<!-- The confirmation page.
-->
<page name="confirmation" template="confirmation" path="/confirmation">
</page>
</pages-config>
Note that ‘src’ attribute of component element, defining the corresponding to this component JSP
file, and ‘path’ attribute of page element, defining the URL to which this page is mapped, both
these attributes use context-relative URLs. In addition to that, it is not necessary to specify URL
extention in ‘path’ attributes if extention-based mapping is used in the ‘web.xml’ web-application
deployment descriptor to map requests to the Struts Action Servlet, just the same way as it is not
necessary to do that when mapping actions to URLs in the standard ‘struts-config.xml’ file. In
fact, behind the scenes CB2 creates a Struts action mapping for every page associating the URL
with com.boylesoftware.cb2.presentation.servlet.ShowPageAction, which is a special action that
loads the page.
Now, let’s imagine that all our pages follow the same basic layout and have, for example a header
at the top of the page with the application title and other visual elements such as a clock, number
of records in the database and maybe some other information. This is shown on Figure 2.3.
Each page consists of three components: one template defining the page layout, and two includable components for the header and the content. Our ‘pages-config.xml’ file then will contain the
following:
<!-- Template component with page layout.
2.4. THE PRESENTATION LEVEL
55
Page Layout
Header
Content
Figure 2.3: Page layout.
-->
<component name="layout" src="/templates/layout.jsp">
</component>
<!-- Component for the header.
-->
<component name="header" src="/components/header.jsp">
</component>
<!-- Content component for the "Search People" page.
-->
<component name="peopleSearch" src="/components/peopleSearch.jsp">
</component>
<!-- The "Search People" page.
-->
<page name="peopleSearch" template="layout" path="/peopleSearch">
<componentref name="header" component="header"/>
<componentref name="content" component="peopleSearch"/>
</page>
<!-- Content component for the "Person Details" page.
-->
<component name="personDetails" src="/components/personDetails.jsp">
</component>
56
CHAPTER 2. DEVELOPING A WEB-APPLICATION
<!-- The "Person Details" page.
-->
<page name="personDetails" template="layout" path="/personDetails">
<componentref name="header" component="header"/>
<componentref name="content" component="personDetails"/>
</page>
<!-- Content component for the confirmation page.
-->
<component name="confirmation" src="/components/confirmation.jsp">
</component>
<!-- The confirmation page.
-->
<page name="confirmation" template="layout" path="/confirmation">
<componentref name="header" component="header"/>
<componentref name="content" component="confirmation"/>
</page>
And then the ‘layout.jsp’ will include <cb2:insert> tags:
<%@taglib uri="/WEB-INF/struts-html.tld" prefix="html"%>
<%@taglib uri="/WEB-INF/cb2.tld" prefix="cb2"%>
<html:html>
<head>
<title>Address Book</title>
</head>
<body>
<!-- HEADER -->
<div>
<cb2:insert name="header"/>
</div>
<!-- CONTENT -->
<div>
<cb2:insert name="content"/>
</div>
</body>
</html:html>
2.4. THE PRESENTATION LEVEL
57
In place of <cb2:insert> tags content of the corresponding components will be inserted. But what if
we also would like to have different page titles on each page? Having separate components and JSP
files containing just one single line for the title does not seem very attractive, although it would work.
Instead, pages, along with component references, can have attributes, which are simple name-value
pairs – a <cb2:insert> tag referring to an attribute will be replaced with the attribute’s value. For
example, in the ‘pages-config.xml’ file:
...
<page name="personDetails" template="layout" path="/personDetails">
<attribute name="title" value="Person Details"/>
<componentref name="header" component="header"/>
<componentref name="content" component="personDetails"/>
</page>
...
And in the ‘layout.jsp’:
...
<head>
<title>Address Book - <cb2:insert name="title"/></title>
</head>
...
Which, in the case of person details page, will be rendered into:
...
<head>
<title>Address Book - Person Details</title>
</head>
...
Let’s notice, that our three pages all have something in common: they are based on the same
template component and they all include the same header component. What we can do is define
one “abstract” page and make our three “concrete” pages “extend” it, which will make our pages
definitions better structured:
<!-- Template component with page layout.
-->
<component name="layout" src="/templates/layout.jsp">
</component>
<!--
58
CHAPTER 2. DEVELOPING A WEB-APPLICATION
- Component for the header.
-->
<component name="header" src="/components/header.jsp">
</component>
<!-- Abstract parent page.
-->
<page name="commonLayoutPage" template="layout">
<componentref name="header" component="header"/>
</page>
<!-- The "Search People" page.
-->
<component name="peopleSearch" src="/components/peopleSearch.jsp">
</component>
<page name="peopleSearch" extends="commonLayoutPage" path="/peopleSearch">
<componentref name="content" component="peopleSearch"/>
</page>
<!-- The "Person Details" page.
-->
<component name="personDetails" src="/components/personDetails.jsp">
</component>
<page name="personDetails" extends="commonLayoutPage" path="/personDetails">
<componentref name="content" component="personDetails"/>
</page>
<!-- The confirmation page.
-->
<component name="confirmation" src="/components/confirmation.jsp">
</component>
<page name="confirmation" extends="commonLayoutPage" path="/confirmation">
<componentref name="content" component="confirmation"/>
</page>
Note two important features: first, abstract pages do not have ‘path’ attribute and thus are not
mapped to any URL, second, pages that extend a parent page do not have ‘template’ attribute,
because the template of the parent is inherited.
2.4.3
Using Presentation Elements
It is a standard Struts approach to put Java beans into a page context, usually in the request
or in the session scope, and then have the page’s JSP code to form its dynamic content basing on the data in the beans using Struts JSP tags such as <bean:xxx > and <logic:xxx > tags.
2.4. THE PRESENTATION LEVEL
59
In Struts we usually have an action invoked first during a request processing and only then the
action forwards to a page. This way the action is the place where beans for the pages are created, populated and put to this or that scope. In CB2, along with the regular Struts actions,
we have got pages that are directly mapped to URLs and there is no user-defined action called
before passing control to the page. So, how do beans get into page context then? In CB2 those
Java beans, called Presentation Elements (PElements or PEs), actually populate themselves. Before control is passed to a page’s template component JSP, all presentation elements used in all
components that comprise the page are instantiated and their init method is called giving them a
chance to populate themselves so the component JSPs later can read the data from them using JSP
tags. Presentation elements used in a component are declared in the component’s descriptor in the
‘pages-config.xml’ file. Among other parameters every presentation element descriptor associates
a name, which can be used to access the element from the component’s JSP, with a Java class
implementing com.boylesoftware.cb2.presentation.servlet.PresentationElement interface.
For example, let’s consider our “Search People” page. We have got an area on it, which displays
search results and, as a piece of dynamic content, it will need a presentation element. This presentation element will actually perform the search in the business level and then populate its internal
property with the search result. That internal property, which is going to be an array, will be read
later from the component’s JSP and rendered into a list of records found.
An important issue is how the presentation element gets search parameters. As we can see on
our UI diagram the form with the search parameters is located on the same page and it submits
its input to the same “Search People” page as well. Therefore, when the presentation element is
called for initialization the form’s input will be available as the request parameters, so the most
straightforward way is just to read them from the request in the presentation element. Another
issue is that in the presentation element we need to distinguish if the page is being displayed as
a result of the search form submission, and then perform the search, or it was requested directly
and no search should be performed resulting in an empty search reasult list displayed. We do it by
adding a hidden field into the form and by cheking its presence in the request we can tell if the form
was indeed submitted or not.
Let’s see how the form can be defined in the component’s JSP, that is ‘peopleSearch.jsp’ file:
...
<form action=’<html:rewrite page="/peopleSearch.cb2"/>’>
<input type="hidden" name="doSearch" value="true"/>
<table>
<tr> <td>Last Name</td> <td><input type="text" name="lastNameSubstr"/></td>
<tr> <td>First Name</td> <td><input type="text" name="firstNameSubstr"/></td>
<tr> <td>City</td>
<td><input type="text" name="citySubstr"/></td>
<tr> <td>State</td>
<td><input type="text" name="state"/></td>
</table>
</form>
...
</tr>
</tr>
</tr>
</tr>
The presentation element then can be implemented like this (note, that we recommend to call
presentation element classes with noun expressions suffixed by “PE”):
60
CHAPTER 2. DEVELOPING A WEB-APPLICATION
package com.boylesoftware.cb2.examples.addressbook;
import javax.servlet.http.HttpServletRequest;
import com.boylesoftware.cb2.BLException;
import com.boylesoftware.cb2.presentation.servlet.PresentationElement;
import com.boylesoftware.cb2.presentation.servlet.ActionContext;
public class PeopleSearchResultPE
implements PresentationElement {
//
// bean properties accessed from the component JSP
//
/**
* Represents one record in the search result list.
*/
public static class ResultElement {
private final int personId;
public int getPersonId() { return this.personId; }
private final String name;
public String getName() { return this.name; }
public ResultElement(int personId, String name) {
this.personId = personId;
this.name = name;
}
}
/**
* The search result. If it is null it means no search was performed.
*/
private ResultElement [] searchResult;
public ResultElement [] getSearchResult() { return this.searchResult; }
public boolean getWasSearchPerformed() { return (this.searchResult != null); }
public boolean getNoResults() { return (this.searchResult.length == 0); }
//
// presentation element interface
//
/**
* Initialize the presentation element before using it on a page.
*
* @param actionCtx current action context, an object used to access other
* subsystems including the business level.
2.4. THE PRESENTATION LEVEL
*
* @throws BLException if an error in the BL happens.
*/
public void init(ActionContext actionCtx)
throws BLException {
// get the request object
HttpServletRequest request = actionCtx.getRequest();
// check if search was requested (the form was submitted)
if("true".equals(request.getParameter("doSearch"))) {
// get search parameters
String lastNameSubstr = request.getParameter("lastNameSubstr");
if(lastNameSubstr != null)
if((lastNameSubstr = lastNameSubstr.trim()).length() == 0)
lastNameSubstr = null;
String firstNameSubstr = request.getParameter("firstNameSubstr");
if(firstNameSubstr != null)
if((firstNameSubstr = firstNameSubstr.trim()).length() == 0)
firstNameSubstr = null;
String citySubstr = request.getParameter("citySubstr");
if(citySubstr != null)
if((citySubstr = citySubstr.trim()).length() == 0)
citySubstr = null;
String state = request.getParameter("state");
if(state != null)
if((state = state.trim()).length() == 0)
state = null;
// do search
PersonShortDM [] people = ((AddressBookBLO)actionCtx.getBLO("addressBook")).
searchPeople(lastNameSubstr, firstNameSubstr, citySubstr, state);
// put the result into searchResult property
this.searchResult = new ResultElement[people.length];
for(int i = 0; i < people.length; i++) {
this.searchResult[i] =
new ResultElement(people[i].personId,
people[i].lastName + ", " + people[i].firstName);
}
}
}
/**
* Reset all internal properties to the default state. Called before the
* init method.
*/
public void reset() {
61
62
CHAPTER 2. DEVELOPING A WEB-APPLICATION
// by default we assume that the form was not submitted
// (see getWasSearchPerformed and init methods)
this.searchResult = null;
}
}
Note the actionCtx argument passed to the init method. Action context provides interface to other
subsystems to presentation elements and actions. Particularly, action context contains an already
prepared and locked BLO container, which can be used to communicate with the business level.
The getBLO method we use in the code above is actually the same as actionCtx.getBLOContainer()
.getBLO("addressBook").
In order to be able to use our presentation element in the JSP we have to associate it with the
component in the ‘pages-config.xml’ file:
...
<component name="peopleSearch" src="/peopleSearch.jsp">
<pelement
name="peopleSearchResult"
class="com.boylesoftware.cb2.examples.addressbook.PeopleSearchResultPE"/>
</component>
<page name="peopleSearch" template="peopleSearch" path="/peopleSearch">
</page>
...
In the ‘peopleSearch.jsp’ we can use now Struts tags to access the presentation element as a Java
bean stored in the page context under ‘peopleSearchResult’ name:
...
<table>
<caption>Search Result</caption>
<logic:equals name="peopleSearchResult" property="wasSearchPerformed" value="true">
<tr><td>Search people by submitting the form above.</td></tr>
</logic:equals>
<logic:equals name="peopleSearchResult" property="wasSearchPerformed" value="false">
<logic:equals name="peopleSearchResult" property="noResults" value="true">
<tr><td>No records found.</td></tr>
</logic:equals>
<logic:equals name="peopleSearchResult" property="noResults" value="false">
<logic:iterate id="rec" name="peopleSearchResult" property="searchResult">
<tr>
<td><bean:write name="rec" property="name"/></td>
<td><html:link
page="/personDetails.cb2"
paramId="personId"
paramName="rec"
2.4. THE PRESENTATION LEVEL
63
paramProperty="personId">[edit]</html:link></td>
<td><html:link
page="/deletePerson.cb2"
paramId="personId"
paramName="rec"
paramProperty="personId">[delete]</html:link></td>
</tr>
</logic:iterate>
</logic:equals>
</logic:equals>
</table>
...
2.4.4
Global Presentation Elements
A situation is possible when the same presentation element is used in multiple components. One
way to handle it is to include a <pelement> element referring to the same class to all the components
that use it. Another way is to define a global presentation element and declare all the components
that need it as depending on it. A global presentation element is different from a local, that
is component-scope presentation element in a number of ways. First, it is not associated with any
particular component, it is defined in the global scope, it has a name, which is unique among all global
presentation elements. Another feature of a global presentation element is that it can “depend” on
other global presentation elements. This means that other global presentation elements will be
created and initialized too whenever this one is used. To define a global presentation element use
<global-pelement> element, to use it with a component use <depends> element within the component
descriptor:
...
<global-pelement name="gpelement1" class="my.company.GPElementPE">
</global-pelement>
...
<component name="component1" src="myComponent.jsp">
<depends on="gpelement1"/>
</component>
...
The global presentation element can be used from the component’s JSP just in the same way as a
local presentation element, in this example using name ‘gpelement1’.
To build a dependency chain, or even a tree of global presentation elements use <depends> elements
within <global-pelement> elements:
64
CHAPTER 2. DEVELOPING A WEB-APPLICATION
...
<global-pelement name="gpelement1" class="my.company.GPElementPE">
</global-pelement>
<global-pelement name="gpelement2" class="my.company.GPElement2PE">
<depends on="gpelement1"/>
</global-pelement>
<global-pelement name="gpelement3" class="my.company.GPElement3PE">
</global-pelement>
<global-pelement name="gpelement4" class="my.company.GPElement4PE">
<depends on="gpelement2"/>
<depends on="gpelement3"/>
</global-pelement>
...
<component name="component1" src="myComponent.jsp">
<depends on="gpelement4"/>
</component>
...
If gathering all presentation elements for a page the system finds duplicates it eliminates them,
therefore there is a guarantee that each used on a page presentation element will be initialized only
once. Also, the system initializes the presentation elements in the correct dependency order. In the
example above, whenever the ‘component1’ component is used on a page all four global presentation
elements will be created, made available from the component JSP and initialized in the following
order: ‘gpelement1’, ‘gpelement2’, ‘gpelement3’, ‘gpelement4’. If the component had also local
presentation elements they would be initialized after the global presentation elements. The defined
order of presentation elements initialization allows, when multiple presentation elements are used
in a component, to pass data between the elements through, for example, request attributes, or
presentation element input parameters discussed right below.
2.4.5
Input Parameters
Let’s go back to our search result presentation element implementation for a moment now and see
how we can improve it. Presentation elements can have input parameters that are automatically set
into the bean as bean properties before the init method call. CB2 can look for input parameters
in various sources, such as request attributes or parameters, session attributes and so on. Also,
it can perform some simple validation and transformation reducing the number of checks in the
presentation element implmentation. In the case of PeopleSearchResultPE we read form input from
the request parameters and the code could be simplified if we used input paramters for that. First,
let’s add bean properties corresponding to the input parameters:
2.4. THE PRESENTATION LEVEL
65
public class PeopleSearchResultPE
implements PresentationElement {
...
//
// input parameters
//
private boolean doSearch;
public void setDoSearch(boolean doSearch) {
this.doSearch = doSearch;
}
private String lastNameSubstr;
public void setLastNameSubstr(String lastNameSubstr) {
this.lastNameSubstr = lastNameSubstr;
}
private String firstNameSubstr;
public void setLastNameSubstr(String firstNameSubstr) {
this.firstNameSubstr = firstNameSubstr;
}
private String citySubstr;
public void setLastNameSubstr(String citySubstr) {
this.citySubstr = citySubstr;
}
private String state;
public void setLastNameSubstr(String state) {
this.state = state;
}
...
}
In the presentation element descriptor in the ‘pages-config.xml’ file we have to describe the input
parameters:
...
<component name="peopleSearch" src="/peopleSearch.jsp">
<pelement
name="peopleSearchResult"
class="com.boylesoftware.cb2.examples.addressbook.PeopleSearchResultPE">
<param name="doSearch"/>
<param name="lastNameSubstr"/>
<param name="firstNameSubstr"/>
<param name="citySubstr"/>
<param name="state"/>
</pelement>
</component>
66
CHAPTER 2. DEVELOPING A WEB-APPLICATION
...
Now, in the init method we can just read the properties, because they will be automatically set
from the request before the init call:
public void init(ActionContext actionCtx)
throws BLException {
// check if search was requested (the form was submitted)
if(this.doSearch) {
// do search
PersonShortDM [] people = ((AddressBookBLO)actionCtx.getBLO("addressBook")).
searchPeople(this.lastNameSubstr,
this.firstNameSubstr,
this.citySubstr,
this.state);
// put the result into searchResult property
this.searchResult = new ResultElement[people.length];
for(int i = 0; i < people.length; i++) {
this.searchResult[i] =
new ResultElement(people[i].personId,
people[i].lastName + ", " + people[i].firstName);
}
}
}
Parameters validation can be customized using ‘required’ and ‘emptystring’ attributes of <param>
element in the presentation element deascriptor. From where the parameter’s value is taken is
configured by the ‘from’ attribute. See the DTD for ‘pages-config.xml’ for all available options.
Note that by default, which is our case since we did not specify any of the mentioned attributes,
parameter values are taken from the request (request parameters checked first, and then request
attributes), they are optional, that is if a parameter is not present in the request no attempt to set it
in the presentation element will be taken, and if a parameter’s value is an empty or blank (consisting
of only whitespace characters) string a null will be set into the corresponding presentation element
property.
Since our input parameters are optional it is important to set their default values in the reset
method, because if they are not present in the request, that is the form was not submitted, and the
presentation element instance is reused old values may be left in the fields and break our logic. It is
especially conserns the ‘doSearch’ parameter, while others can be cleared just to make it look nicer:
public void reset() {
// reset PE properties
2.4. THE PRESENTATION LEVEL
67
this.searchResult = null;
// reset input parameters
this.doSearch = false; // don’t do search if the form was not submitted
this.lastNameSubstr = null;
this.firstNameSubstr = null;
this.citySubstr = null;
this.state = null;
}
The main purpose of the reset method is to set default values to all optional input parameters,
because, as mentioned above, if an optional parameter is not present the setter will not be called at
all.
2.4.6
Using Form Beans as Presentation Elements Input
There is another way to pass the form data to the presentation element as well – to use Struts
ActionForm bean. It is possible to associate a form bean with a presentation element, just the same
way as it is possible to do for an action in standard Struts. In Struts we tell that an action expects a
form bean at its input by specifying ‘name’ attribute to the action mapping in ‘struts-config.xml’
file and this attribute names the form bean defined by a <form-bean> element in the same Struts
configuration. To tell that a presentation element expects a form bean in the action context we
use ‘inputForm’ attribute with the corresponding <pelement> (or <global-pelement>) element. The
‘inputForm’ attribute names a form bean reference defined with a <formbeanref> element, which in
turn referes to a Struts form bean.
For forms, that should be prepopulated before being displayed on a page, it is often convenient to
define one single class that extends Struts’ ActionForm and implements PresentationElement interface
at the same time. It allows to have a single set of form fields in one class rather than in two.
In our example we could have this presentation element representing the search form:
package com.boylesoftware.cb2.examples.addressbook;
import javax.servlet.http.HttpServletRequest;
import
import
import
import
org.apache.struts.action.ActionForm;
org.apache.struts.action.ActionMapping;
com.boylesoftware.cb2.presentation.servlet.PresentationElement;
com.boylesoftware.cb2.presentation.servlet.ActionContext;
public class PeopleSearchFormPE
extends ActionForm
implements PresentationElement {
//
// form fields
//
68
CHAPTER 2. DEVELOPING A WEB-APPLICATION
private boolean doSearch;
public boolean getDoSearch() { return this.doSearch; }
public void setDoSearch(boolean doSearch) {
this.doSearch = doSearch;
}
private String lastNameSubstr;
public String getLastNameSubstr() { return this.lastNameSubstr; }
public void setLastNameSubstr(String lastNameSubstr) {
this.lastNameSubstr = lastNameSubstr;
}
private String firstNameSubstr;
public String getLastNameSubstr() { return this.firstNameSubstr; }
public void setLastNameSubstr(String firstNameSubstr) {
this.firstNameSubstr = firstNameSubstr;
}
private String citySubstr;
public String getLastNameSubstr() { return this.citySubstr; }
public void setLastNameSubstr(String citySubstr) {
this.citySubstr = citySubstr;
}
private String state;
public String getLastNameSubstr() { return this.state; }
public void setLastNameSubstr(String state) {
this.state = state;
}
//
// presentation element interface
//
public void init(ActionContext actionCtx) {}
public void reset() {}
//
// action form methods
//
/**
* Reset fields before setting them from the request parameters.
*/
public void reset(ActionMapping mapping, HttpServletRequest request) {
this.doSearch = false;
this.lastNameSubstr = null;
this.firstNameSubstr = null;
this.citySubstr = null;
2.4. THE PRESENTATION LEVEL
69
this.state = null;
}
}
The two reset methods, despite having the same name, actually belong to different subsystems and
play different non-overlapping roles. The one without arguments belongs to the PresentationElement
interface and is called by the framework before calling the init method. Its main purpose is to reset
values of optional input parameters. The second reset method belongs to the ActionForm class and
is called by Struts before setting form fields from the request and then passing the instance to an
action (or another presentation element via the action context). The purpose of this method is to
set default values to the form fields. It is very important to understand that extending ActionForm
and at the same time implementing PresentationElement interface makes the object to play two
different roles at different times.
Now, when we have the class, we should create a form bean reference for this form and add
‘inputForm’ attribute to our search result presentation element descriptor:
...
<formbeanref
name="peopleSearchForm"
class="com.boylesoftware.cb2.examples.addressbook.PeopleSearchFormPE"/>
<component name="peopleSearch" src="/peopleSearch.jsp">
<depends on="peopleSearchForm"/>
<pelement
name="peopleSearchResult"
class="com.boylesoftware.cb2.examples.addressbook.PeopleSearchResultPE"
inputForm="peopleSearchForm"/>
</component>
...
In the search result presentation element class we can have the following init method implementation
(and we do not need any input parameters anymore, of course):
public void init(ActionContext actionCtx)
throws BLException {
// get the form
PeopleSearchFormPE form = (PeopleSearchFormPE)actionCtx.getForm();
// check if search was requested (the form was submitted)
if(form.getDoSearch()) {
// do search
PersonShortDM [] people = ((AddressBookBLO)actionCtx.getBLO("addressBook")).
searchPeople(form.getLastNameSubstr(),
form.getFirstNameSubstr(),
70
CHAPTER 2. DEVELOPING A WEB-APPLICATION
form.getCitySubstr(),
form.getState());
// put the result into searchResult property
this.searchResult = new ResultElement[people.length];
for(int i = 0; i < people.length; i++) {
this.searchResult[i] =
new ResultElement(people[i].personId,
people[i].lastName + ", " + people[i].firstName);
}
}
}
TO BE FINISHED...
Chapter 3
Advanced Features
The CB2 contains tons of little features serving many practical tasks. Let’s discuss them going from
subsystem to subsystem.
3.1
Application Context
TO BE WRITTEN...
3.2
The DAO
TO BE WRITTEN...
3.3
The Presentation Level
TO BE WRITTEN...
3.4
Utilities
TO BE WRITTEN...
71
72
CHAPTER 3. ADVANCED FEATURES
List of Figures
1.1
1.2
1.3
1.4
High-level CB2 framework architecture.
The business level. . . . . . . . . . . . .
Struts-based presentation level. . . . . .
A page and a pageless action. . . . . . .
.
.
.
.
.
.
.
.
3
5
7
8
2.1
2.2
2.3
Address book database diagram. . . . . . . . . . . . . . . . . . . . . . . . . . . . . .
User interface pages. . . . . . . . . . . . . . . . . . . . . . . . . . . . . . . . . . . . .
Page layout. . . . . . . . . . . . . . . . . . . . . . . . . . . . . . . . . . . . . . . . . .
12
53
55
73
.
.
.
.
.
.
.
.
.
.
.
.
.
.
.
.
.
.
.
.
.
.
.
.
.
.
.
.
.
.
.
.
.
.
.
.
.
.
.
.
.
.
.
.
.
.
.
.
.
.
.
.
.
.
.
.
.
.
.
.
.
.
.
.
.
.
.
.
.
.
.
.
.
.
.
.
.
.
.
.
.
.
.
.
.
.
.
.
.
.
.
.
Index
Action Context, 62
Application Context, 2
properties, 37
application properties, 3
update, 21, 26
database connectivity, 3, 37
dynamic SQL queries, 35
error handling, 44
BL Manager, 4
BLO Container, 4, 40
locking, 40
blo.config.xml, 6
Broadcast Messaging (BCM), 4
Business Level (BL), 4, 39
user session, 39
Business Level Object (BLO), 4, 39
deployment descriptor, 48
initialization parameters, 49
shared, 4, 40, 49
logging, 2
nested DMs, 27
Pages, 6, 52
descriptor, 52
mapping to URLs, 54
pages-config.xml, 8, 52
Presentation Element (PE), 6, 58
global PEs, 63
input parameters, 64
Presentation Level (PL), 6
cb2app.properties, 37
Components, 6, 52
descriptor, 52
dynamic content, 58
shared BLO, 4, 40, 49
template component, 6
transaction management, 4, 50
Data Model (DM), 6, 12
descriptor, 14
id fields, 21
multiple id fields, 22
Database Access Object (DAO), 5, 11
array query parameters, 19
conditions, 36
delete, 25
extended syntax, 33
fetch, 15, 27
insert, 23
named query parameters, 20
ordering result set, 16
query parameters, 17
result set pagination, 16, 32
74