1
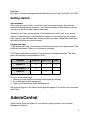
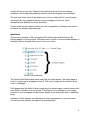
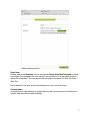
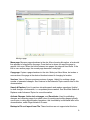
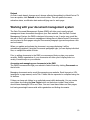
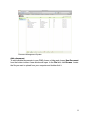
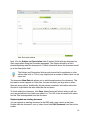
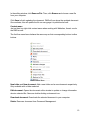
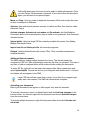
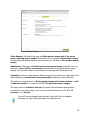
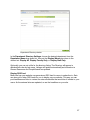
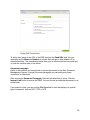
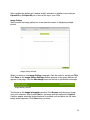
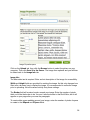
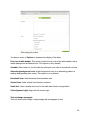
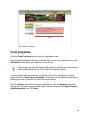
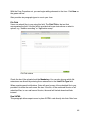
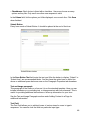
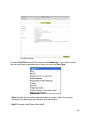
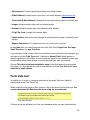
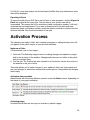
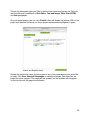
Gato Content Management System
User Documentation
Version 7.1
8/13/12
Table of Contents
Introduction!
1
What is Gato?!
1
Who should use this manual?!
1
Conventions!
1
Getting help!
1
Getting started!
2
AdminCentral!
2
Websites!
3
Inheritance!
4
Working with your website structure!
5
Creating a web page!
5
Page name!
5
Page title!
5
Templates!
6
Context menu!
7
Refresh!
Working with your document management system!
10
10
Accessing and managing your documents in the DMS!
10
Add a document!
11
Replace/update an existing document!
12
Context menu!
13
Adding multiple documents!
14
i
!
Activating your documents!
14
Removing files from DMS!
15
File size limits!
15
Editing pages!
15
Top buttons!
16
Page properties!
16
Banner images !
18
Adding and removing banners!
20
Editing and deleting banners!
21
Parent organization and site info!
21
Side navigation blocks!
Disabling side navigation!
22
23
Page footer!
23
Adding content to a page!
23
Application Porthole!
25
Calendar Events!
26
Department Directory!
26
Display RSS Feed!
27
Document paragraph!
28
Download paragraph!
30
FAQ Hierarchy!
30
Image Gallery!
31
Raw XHTML!
33
Rich Editor!
33
ii
!
Site Map!
37
Streaming Media paragraph!
38
Sub-Pages!
39
Table paragraph!
39
Text and Image paragraph!
40
Twitter paragraph!
42
Forms!
43
Creating forms !
43
Form properties !
44
Adding form elements!
45
File Field!
46
Raw XHTML!
46
Selection!
47
Submit Button!
48
Text and Image paragraph!
48
Text Field!
48
Form data tool!
50
Viewing more submissions!
51
Downloading attachments!
51
Deleting submissions and fields!
51
Viewing only new submissions!
51
Exporting to Excel!
52
Activation Process!
Instances of Gato!
52
52
iii
!
Activation status symbols!
52
Activating pages!
52
Deactivating and deleting pages!
53
Advanced topics!
53
Versioning and backups!
53
Limitations to versioning!
54
Site-wide search and replace!
55
iv
!
Introduction
What is Gato?
Gato is an easy to use content management system that allows anyone, regardless of
technical expertise, to create and manage web sites. No knowledge of specific web
technologies is required.
Who should use this manual?
The intended audience of this user manual is content authors, or editors. Editors are
responsible for the creation and maintenance of content on a web site.
Conventions
Icons
This warning icon denotes something that should be paid extra attention.
The tip icon alerts you to time-saving techniques and Gato best practices.
Instruction Text
Button, menu item, tab and column headings that you’ll see within Gato will appear in
bold.
Some instructions call for a right-click. If you’re on a Mac using a one-button mouse or
trackpad, you can hold the Control key and then click to produce the same result. You
may also be able to enable right-clicking or a two finger tap on your mouse or trackpad.
Contact ITAC for assistance.
Getting help
For general help, information on training or workshops, to request additional site
access, to have a new site created, and to report bugs or technical problems, contact
ETC Support.
Email
[email protected] anytime. Emails will be responded to within twenty-four hours at
maximum, normally much sooner.
Phone
245-5566 Monday through Friday, 8:00 AM to 5:00 PM. After working hours you can
leave a voicemail.
1
!
Live Chat
http://gato.its.txstate.edu/support/livechat Monday through Friday, 8:00 AM to 5:00 PM.
Getting started
Gato accounts
Before you can log into Gato, you will first need to have an account. Accounts are
assigned following training sessions. If you haven’t yet been to Gato training, you can
sign up for a session at http://signup.txstate.edu/
At training, you’ll also request access to the website you need to edit. If you require
access to additional sites, or weren’t able to request one at training, you can contact
Gato support at [email protected]. Please include your name, Texas State NetID and
the name of the site you need to access.
Logging into Gato
To get started with Gato, you will need an Internet connection and a web browser. Gato
is entirely web-based; There is no software to download.
ETC Support has tested a number of browsers across multiple platforms. This table
shows the browsers recommended for Gato:
Browser
Windows
Mac OS X
Linux
Firefox 3 +
X
X
X
Internet Explorer 7 +
X
Safari 4 +
X
To log in, follow these steps:
1. Launch your web browser and ensure that pages are loading.
2. Go to http://gato-edit.its.txstate.edu/
3. Type in your Texas State NetID and password.
Once you’re logged in, the AdminCentral page will appear. This will be your home base
within Gato.
AdminCentral
AdminCentral gives you access to your website’s page tree and your Document
Management System.
2
!
AdminCentral
Content is organized into two tabs: Website and Documents. Most of your time will
likely be spent in the Website tab.
Websites
The Website tab allows you to build and manage the structure of your website,
including site navigation. It represents the hierarchical structure of pages in your
website (corresponding to the hierarchical structure of the website navigation). Changes
to your site’s structure are made in AdminCentral.
You can open your website’s structure and see all of its pages by clicking on the +/- in
front of the site name. If you have access to more than one than one website, you will
see each site as a separate entry.
Each page, along with its properties, is shown in a separate line. Clicking on a page
highlights it in a blue-grey bar and makes it the active page. Any command carried out
from a menu item or button will affect the active page.
You can enter a name and a title for each page, see the activation status, the template
type, the last modification date and the user ID of the last person to modify the page.
As mentioned above, the structure of your site directly translates to how users will
navigate. The top level page (Level 1) is the homepage. This is the first page most
3
!
visitors will see on your site. Pages on the level below (Level 2) act as category
headings. Level 2 pages automatically create a top level navigation item by default.
The next level down (Level 3) are where most of your content will live. Level 3 pages
are listed in the top navigation menus. As you add pages at this level, they’ll
automatically be added to the menu by default.
Further levels can be created to refine your site’s organization. Creating a new level is
as simple as creating a new web page.
Inheritance
The two core concepts of Gato are parent/child relationships and inheritance. By
building pages in a tree structure, Gato takes care of much of more mundane aspects of
building a uniform site and allows you to focus on content.
Parent/Child Relationship
The Parent/Child Relationship works much like you would expect. Your home page at
Level 1 is the parent of all pages at Level 2. The Level 2 pages are the children of the
Level 1 homepage.
Child pages have the ability to inherit properties from parent pages, much a human child
may inherit an heirloom from her parent. This allows you, for example, to set rotating
banners on your homepage and have them display on all child pages with no additional
setup.
A number of Gato features use inheritance to make management of your site easier.
You will see these features throughout the documentation.
4
!
Working with your website structure
Creating a web page
To create a new web page, click on the page you would like your new page to appear
below. Then, click the New Page button at the bottom of AdminCentral. The new page
will appear as “untitled.”
Before the page can be used, you will need to edit both the Name and Title for the new
page.
Page name
The Page Name appears as part of the URL of this web page. For example, the address
of a page named “home” on the university’s main web site would be http://
www.txstate.edu/home.html.
To edit the Page Name, double-click on the text next to the page icon and enter a new
name.
For the page name, you may only use characters a-z, A-Z, 0-9, the underscore (_) and
dash (-). You may not use spaces or special characters such as commas or
apostrophes. Page names must be unique on each level.
To save the new Page Name (and any other change made in AdminCentral), press the
Enter key or click outside the text field. To discard a change, press the Escape key.
As a general rule, it is best to name pages using one lowercase word, such as
“students” or “undergrad.” This produces a shorter, neater URL that is easer for users to
type, more attractive on printed materials and easier to communicate over the
telephone.
Spaces are not allowed in Gato page names and are automatically replaced with
dashes. Special characters are also not allowed in Gato page names and are also
automatically replaced with dashes. For example, a page named “Rules&Regulations”
will become “Rules-Regulations.” To avoid this, name the page “rules-and-regulations”
or “rulesandregulations” instead.
Page title
The Page Title appears on the page itself and in navigation elements such as
breadcrumbs or top-navigation menus. It will also appear as the default bookmark name
when a user bookmarks the page.
To enter the Title, double-click the existing Page Title and enter what you wish to
appear in your website’s navigation. The Title may consist of any number of words,
using upper and lowercase characters. Spaces and special characters are allowed as
well.
5
!
Templates
Gato offers three templates for your content:
• Texas State Standard Template for normal pages
• Redirect for pages that should immediately redirect elsewhere
• Texas State Mail Template for email form pages
Pages default to the Texas State Standard Template, so you will only need to change
the template to create a redirect or an email form.
Redirect
The Redirect template immediately sends the user to the page set in the Properties
panel. Double-click the page entry in the Template column, choose Redirect, then
double-click the page icon to open it for editing.
Redirect page
Click the Properties button in the upper right-hand corner. Enter the address of the
page in the Destination field. If the destination is a page on the same site, click the
Internal Link button and browse to the page you need.
6
!
Redirect page properties
Email form
Double-click in the Template column and choose Texas State Mail Template for email
form pages. This template lets your users fill out information on a web page and then
submit the information. You can retrieve the information via email and from the Form
Data Tool.
See Creating Forms later in this documentation for more on email forms.
Context menu
In AdminCentral, right-clicking on a page will bring up a context menu, providing more
options than the bottom toolbar displays.
7
!
Context Menu
Open page: Opens the page for editing. Same as double-clicking the page icon or
clicking Open Page in the bottom toolbar.
New page: Creates a new page with the name “untitled” below the active page. Same
as clicking New Page in the bottom toolbar.
Delete page: Marks a page for deletion. Web pages are not deleted until the change is
activated. See Page Activation Process later in this documentation for more information.
8
!
Moving a page
Move page: Moves a page elsewhere in the site. After choosing this option, a horizontal
line appears to help position the page. Once the line is where you want the page to
appear, click once. When the line is between two pages, the page will land there. If the
line is over another page, the moved page becomes a sub-page.
Copy page: Copies a page elsewhere in the site. Works just like a Move, but makes a
new version of the page at the desired location instead of changing its location.
Versions: View or Recover previous versions of pages. Helpful for undoing a large
number of unwanted changes. See Versions in the Advanced Topics section later in this
documentation.
Search & Replace: A tool to perform site-wide search and replace operations. Helpful
for bulk changes of information, i.e. an updated phone number. See Site-Wide Search &
Replace under Advanced Topics for more information.
Activate Changes, Active incl sub pages, and De-activate: Used for publishing
changes and removing pages from public view. As creating and editing pages typically
occurs prior to doing any activation operations, this functionality is discussed later in the
documentation, under Page Activation Process.
Backup to File and Import from File: These functions are not supported at this time.
9
!
Refresh
As Gato is web-based, changes aren’t always reflected immediately in AdminCentral. To
force an update, click Refresh in the bottom toolbar. This will update the name,
activation status, modification date and modifying user for each page.
Working with your document management system
The Gato Document Management System (DMS) will allow you to easily upload,
manage and share documents throughout your Gato website. Like the Gato Content
Management System, the DMS is designed to be easy to use. It works very much like
the rest of Gato, with document management taking place in AdminCentral. Documents
can be placed in Gato pages using the Documents paragraph type and anywhere a link
can be created.
When you update and activate the document, any page displaying it will be
automatically updated. Using the Documents paragraph type, you can display individual
files, or multiple files within a folder.
Prior to adding documents to the DMS, we recommend that you plan your system
carefully. Skillful organization of your documents will allow you to display them in a
variety of useful ways on your website.
Accessing and managing your documents in the DMS
The DMS is accessed through your website’s AdminCentral by clicking Documents on
the left side.
Managing documents works much like managing your website. Each item gets a URL
(analogous to page names) and a Title. Folders can be expanded or collapsed using the
+/- buttons.
Folders can have sub-folders in an unlimited parent-child relationship. You can create
new folders by clicking the New Folder button on the bottom toolbar. New folders
should have meaningful URLs and Titles. You won’t see these folders on Gato pages,
but having meaningful names aids with organization and finding documents.
10
!
Document Management System
Add a document
To add individual documents to your DMS choose a folder and choose New Document
from the bottom toolbar. A new window will open. In the File field, click Browse. Locate
the file you want to upload from your computer and double-click it.
11
!
New Document window
Next, fill in the Subject and Description fields if desired. Both fields are displayed on
Gato pages when using the Document paragraph. The Subject should be a short
phrase explaining what the document is. Further information about the document would
go in the Description field.
The Subject and Description fields are also beneficial for explaining to other
editors what a file is. This is very helpful when a number of editors work on the
same site.
The document Meta Data tab allows you to add information about the document. This
information doesn’t appear on Gato sites, but can add clarity on large sites or when
there are many editors. Additionally, this tab shows some basic information about the
file after it is uploaded, like who added the file and when.
To finish adding the document, click Save. AdminCentral will refresh and you will see
your new document in the folder you added it to. The URL is the document’s file name
and the Title is extrapolated from the file name.
Replace/update an existing document
You can replace an existing document in the DMS with a new version at any time.
Double-click the document’s icon or select it and click Edit Document from the bottom
toolbar.
12
!
In the editing window, click Remove File. Then, click Browse and choose a new file
from your computer.
Click Save to finish updating the document. DMS will now show the updated document.
Once activate, this will update the file on every page it is published as well.
Context menu
Just as there’s a right-click context menu when working with Websites, there’s one for
the DMS as well.
The first five menu items behave the same way as their corresponding bottom toolbar
buttons.
DMS Context Menu
New folder and New document: Add a new folder and a new document respectively.
Only available with a folder selected.
Edit document: Opens the document editor window to update or change information
about a selected file. Same as double-clicking a document icon.
Download document: Downloads the selected document to your computer.
Delete: Removes document from Document Management.
13
!
Unlike with web pages, there are no extra steps to deleting documents. Once
you click Delete, the document is removed. If you need to host the document
again, you will need to be upload it again.
Move and Copy: Used to reorder or duplicate documents. Both work exactly the same
as their counterparts in Websites.
Versions: View and restore previous versions of folders and files. See Versions under
Advanced Topics.
Activate changes, Activate incl. sub nodes and De-activate: Just like Websites,
Documents have to be activated before they’re visible on the public site. See Document
Activation below.
Upload zipfile: Upload a single ZIP file containing multiple documents. See Adding
Multiple Documents below.
Import from file and Backup to file: Not currently supported
Refresh: Updates AdminCentral with current URLs, Titles, activation statuses and
modification dates
Adding multiple documents
The DMS supports adding multiple documents at once. The files will need to be
contained in a ZIP file. Gato automatically unzips the file after it’s uploaded. The order of
any files or folders contained within will be preserved after adding the documents.
To add a ZIP file, right-click on the folder the unzipped files will be contained in and
select Upload zipfile. Choose the file from your computer and double-click it. Your files
and folders will now appear in the DMS.
Larger ZIP files will take some time to unzip. If your files do not appear right
away, wait a few minutes. The DMS will refresh when complete.
Activating your documents
Before your documents can appear on Gato pages, they must be activated.
To activate a document, select it in AdminCentral and click Activate changes on the
bottom toolbar. You can also right-click the document and choose Activate changes
from the context menu.
To activate multiple documents, right-click the parent folder and select Activate incl.
sub nodes.
14
!
Before any documents will appear, the top-level folder must be activated as
well.
To hide a document from Gato pages, you can deactivate it. Select the document and
choose De-activate from the bottom toolbar, or right-click the document and choose
De-activate.
Removing files from DMS
If a file is no longer needed, you can delete it from DMS. Select the file and click Delete
on the bottom toolbar, or right-click the document and choose Delete. The file is
instantly removed.
File size limits
While there is no restriction on page sizes in Gato, we recommend keeping individual
files under 50 MB. Files over this size will often time-out when users attempt to
download them and may not even upload correctly.
If you have files over 50 MB that you need to display on your website please email
[email protected] for assistance.
Editing pages
After creating and naming your page, and optionally adding documents for it to the
DMS, you can now edit it.
To edit a page, double-click on the page’s icon. You can also select the page and click
Open page on the bottom toolbar, or right-click the page and select Open page from
the context menu.
The page will then open in a new tab for editing.
Page open for editing
15
!
Top buttons
At the top of the page editing window, there is a green bar with four buttons on it:
Top Buttons
• Preview: Hides the green edit bars from the page. Clicking the one button it leaves
behind returns you to the editor.
• AdminCentral: Refreshes the AdminCentral tab and makes the page you’re editing
the active page there
• Javascript: Use this button to insert an inheritable block of JavaScript code.
This feature is for advanced users only. You run the risk of damaging your
page. ETC Support is unable to provide any assistance with JavaScript.
• Styles: Here you can enter CSS code, inherited by child pages, to alter how your
page is displayed.
Like JavaScript, this feature is for advanced users only, is used at your own
risk, and is not supported by ETC Support.
•Properties: Displays general page properties which can be edited
Page properties
Click the Properties button in the upper right-hand corner to modify the Page
Properties. These are organized into three tabs: General, Meta and Advanced.
16
!
Page Properties window
General tab
Main Title: Displays the page Title which can be changed here. Also contains a
checkbox for Do not show this page in the navigation. Selecting this will hide the
page from all navigation menus, blocks and site maps. Users will need the URL of the
page to reach it.
Hide Sidebar: Check the box in this section to turn off the left navigation sidebar on the
page, allowing more space for content.
Update Reminder: Sets the duration between reminders about stale content. These
reminders go to the site manager as part of the nightly LinkChecker report. The options
are: Inherit From Parent Page, Don’t Send Reminders, A Year, Six Months, Three
Months, One Month, One Week.
Unless you have a specific page that needs to be updated frequently, you will
want to leave the reminder option set to Inherit From Parent Page. This way
all pages follow the site homepage’s setting and the manager receives
consistent reminders.
17
!
Meta tab
This tab allows you to enter a site description and some keywords. These fields are
optional and can improve how your site appears in some search engines.
Advanced tab
Enable RSS Feed: Check this box to have Gato automatically generate an RSS feed
that visitors can use to subscribe to site updates.
Password Protect Page: Choose an option here to limit page access to the selected
group. The options are Faculty, Staff, Student and Any NetID. The first three groups
are based on membership to the Faculty, Staff and Student mailing lists.
Google Analytics: Google Analytics is a free service you can sign up for to gather
statistics on how your website is used and accessed. Google will track information
including the number of visits, what pages are being looked at, what search terms are
used to arrive at your page, where visitors are coming from and more. For more on
Google Analytics and to sign up for a free account, visit http://www.google.com/
analytics.
Once you have your account, Google will provide you with a unique Domain ID. Place
that ID into the Website Domain ID field and Google will start tracking your site.
Google will also provide some JavaScript to add to your page. You can ignore
this, as Gato already has this code as part of the template.
For complete details on setting up Google Analytics, see the Gato website: http://
gato.its.txstate.edu/support/statistics.
Banner images
Gato allows you to add banner images to your page. Banners are optional, but they can
add a bit of flair.
To start with banners, click the Banner Settings button located towards the top of the
editing page. The Banner Settings window will open.
18
!
Banner Settings window
Show Banners: By default, the page will Show banner images only if the parent
page is showing banner images. Should you set your page to Show banner images,
all child pages will display banners as well unless you set them to Do not show banner
images.
Inheritance: Child pages will Inherit banners from parent pages by default. You can
set them to Do not inherit any banners to prevent them from showing these same
images. You will still be able to show banners on the page with either option set.
Animation: Gato can rotate between banner images if more than one is uploaded. This
option defaults to Use animation from parent page, allowing for easy uniformity.
The options for animation are to Rotate banner images with a fade transition or with
a slide left transition. You can also tell Gato Do not rotate banner images.
The pop-up box for Animation Interval only works when animation settings aren’t
inherited from the parent page. You can set to rotate the banners at 10, 15 or 30
seconds; or at 1 minute.
You won’t see the image rotation while in Gato edit. Once the page is
activated, you can see the animation on the public site.
19
!
Adding and removing banners
Once banners are enabled for a page, either by inheritance or explicitly, you will want to
add some images to serve as banners. These images should be 550 x 160 pixels. Use
a photo editing application such as Photoshop to achieve this resolution.
You can find a set of pre-formatted banner images on the Gato web site: http://
gato.its.txstate.edu/gallery/banners.
To add a banner, click the green Add New Banner Image button in the banner area.
You’ll be presented with a dialog to add an image.
Banner Image window
Images can be uploaded directly in this window, or pulled from the DMS. Click Browse
to choose an image file from your computer. Double-Click the desired file. For files in
the DMS, click Internal link and navigate to the file in your DMS folders.
Once a file is selected, provide Alt Text for it. Type in the text you want to be displayed
when images are disabled or heard when your page is read by a screen reader. This is
necessary to make your site accessible for visually impaired users.
You can also add an Image Title/Caption. This will be displayed when users hover their
mouse over the image. If the field is blank, nothing will appear on mouse-over.
20
!
If the image should act as a link, you can type an external link into the Link field. To link
to another page on the site, such as the homepage, use the Internal Link button here.
Lastly, you can elect for the image to be inherited by child pages or only appear on the
page. Only child pages set to inherit banner images will have these images appear.
When editing those pages, the image will be part of a blue bar, rather than a standard
green edit bar. You will see a link back to the parent page (Jump to Original).
You can upload as many banners as you’d like using this process.
Editing and deleting banners
After uploading an image, you'll see a new dark green edit bar above the Add New
Banner Image button. It contains an Edit button, a button with the file name and a
Delete button.
Clicking Edit brings up the same window you used to add the banner image. Here you
can change the file in use, update the alt text, title and link, or change the image's
appearance on child pages.
Clicking the button with the file name displays that image as the banner in Gato-edit.
This is very useful when multiple banner images are in use for that page.
The Delete button removes the banner from the page and all child pages. Gato will
confirm the deletion first.
Parent organization and site info
When using banners, two additional information areas become available: Parent
Organization and Site Info.
Click on Edit Parent Organization on the left side of the banner area to add the Name
of your site's parent organization and the URL to their web page.
On the right side of the banner area, click on Edit Site Info to add additional text about
your organization.
It is suggested to include some contact information here, such as the location
and telephone number.
Websites can only have one Parent Organization and one Site Info section.
They can be edited from any page displaying banners, and the text will appear
on all pages displaying banners.
21
!
Side navigation blocks
Side navigation blocks can aid users in getting around your site. Gato has powerful
tools to automatically build links for sub pages, or you can manually create links.
Click on New Navigation Block on the left side of your page.
Navigation Block window
The parameters presented here determine the type of links in your navigation block and
how they’re displayed.
Navigation Type
• Manual is for any link. You can link to other internal pages, or to external pages.
• Automatic (Single-level) makes links to every subpage directly below the current
page.
• Automatic (Two-level) makes links to every direct subpage and their subpages
below the current page
Appear on subpages?
• This page only will display the links only on this page
• This page and all subpages will display the links on the current page and all pages
below the current page
22
!
Sidebar Positioning
• Sort to Top will make the block appear on the top half of the side navigation when
other blocks are present on the page
• Sort to Bottom will make the block appear on the bottom half of the side navigation
when other blocks are present on the page
Block Title
The title for the group of links.
Disabling side navigation
The side navigation can be disabled in the Page Properties. Next to Hide Sidebar
check Do Not Display Navigation Sidebar. This will remove the side navigation and
the content area will span the entire width of the page.
Page footer
The last piece of the non-content area of your page is the Footer. This text will appear at
the bottom of every page in the site.
A website only has one Footer that appears on all pages. It can be edited on
any page of the site. It doesn’t follow standard inheritance rules like other
page areas do. For example, if you change the Footer on a level 2 page, the
changes will appear on your level 1 page, all other level 2 pages and all other
pages within the site.
To edit your Footer, click the green Edit Footer button towards the bottom of the page.
Any text can be entered here; Including contact information is suggested.
Adding content to a page
The content area of a page is the most important portion. What your users came to see
will be found in this area. Here you can add text, links, images, downloadable files and
even video.
The building blocks of your web page are called Paragraphs. Gato includes a number of
Paragraphs to help you accomplish different tasks.
In the page-editing window, click the New Paragraph button. It will appear in one of the
green edit bars, below any existing content. Gato will present you with a menu of
Paragraphs to choose from.
23
!
Create New Paragraph window
Every paragraph type has a Paragraph Properties tab.
Paragraph Properties tab
24
!
Here, you can choose to have a Line drawn above your paragraph and set how many
blank lines (Spacer) appear below the paragraph: Two (default), one or none.
Application Porthole
Use the Application Porthole paragraph to embed the content of another webpage
within your Gato website. This gives the external content the Gato look and feel, and
keeps users on your page.
When selecting Application Porthole, Gato asks for a Title to display over the
application and the URL of the application being embedded. Optionally, you can also
set a Height in pixels.
Application Porthole window
25
!
Calendar Events
Calendar Events window
The Calendar Events paragraph allows you to automatically add university events to
your website from the University Events Calendar located at http://events.txstate.edu.
To add a list of events, create a new paragraph and select Calendar Events. Give your
events listing a Title. Next, choose a Calendar to display on on your website.
Metacalendars are calendars containing all events occurring under a parent
organization and all of its sub-departments and programs. Then, enter the number of
Days going forward to display. Lastly, choose between Expanded and Collapsed List.
Department Directory
The Department Directory paragraph allows you to quickly and easily create a list of
contact information for a department based on the information in PeopleSearch.
26
!
Department Directory window
In the Department Directory Settings, choose the desired department from the
Department Name drop down list, then set the Display Whom drop down to the
desired set: Display All, Display Faculty Only, or Display Staff Only.
Optionally, you can set a title for the directory listing. The Directory will appear in
alphabetical order by last name. Listings will update automatically as information in
Human Resources and PeopleSearch are updated.
Display RSS Feed
Much like how your website can generate an RSS feed for users to subscribe to, Gato
can also pull in other RSS feeds for you to display on your website. This way you can
post headlines and links to content on external websites that would be of interest to your
users. As the external sites are updated, so are the headlines on your site.
27
!
Display RSS Feed window
To add a feed, paste in the URL of the RSS feed into the Feed URL field. You can
optionally set the Maximum Number of articles Gato will pull in (the default is 0 for
unlimited articles). The checkboxes below allow you to hide the article source and text,
or show the creation date of the article.
Document paragraph
Earlier in this manual you learned how to upload documents to the Gato Document
Management System. Using a Document paragraph you can easily post these
documents for download.
After choosing a Document Paragraph, Gato will ask what files to show. Click the
Internal Link button to browse the DMS. You can choose an individual document or an
entire folder.
If you select a folder, you can use the File Type field to limit the display to a specific
type of document, such as DOC, PDF or XLS.
28
!
Document Paragraph window
Download Paragraph window
29
!
Download paragraph
Gato also allows you to quickly upload files directly to a page using the Download
Paragraph. Here you can choose a file from your computer with the Browse button.
Optionally, you can use the Linked Text field to enter what should appear as the link to
the file. Leaving this blank will display the filename on the page.
Similar to the document paragraph, Gato will add an icon for the file and display the file
type and size with the link.
FAQ Hierarchy
The FAQ Hierarchy paragraph allows you to show pairs of questions and answers using
a “window shade” effect. The question is displayed and when clicked, the answer is
revealed as if pulled down on a window shade. You can organize your questions in
groups, or just use show a series of questions.
FAQ Hierarchy window
In the FAQ tree field, you can manage the organization of your questions. You can Add
Group, Add Faq or Delete the item at that level. You can move items by clicking them
and dragging them to the level you want them at. This tree display works much like
AdminCentral.
Depending on the item you have selected, the fields below change. When a question is
selected, you can update the Question text and enter an Answer using the rich editor.
With a group selected, you can set the Title.
30
!
Gato handles the display and “window shade” animation in addition to providing an
Expand All or Collapse All pair of links at the top of your FAQs.
Image Gallery
Gato provides an image gallery tool as an attractive means of displaying multiple
photos.
Image Gallery window
When you create a new Image Gallery paragraph, Gato first asks for an optional Title.
Click Save on the Image Gallery Settings window and now a new green edit bar will
appear on the page. Click the New Image button on this bar to upload the first image.
Image Gallery edit bar
This brings up the Image Information window. Click Browse and choose an image
from your computer. Enter the Alt Text for the image and optionally add a Caption.
Captions appear when the image thumbnail is moused over and below the full sized
image when expanded. Click Save when you finish.
31
!
Image Information window
A thumbnail of the selected image is now displayed on the web page. When users click
the thumbnail, the image will expand. At full size, users can click through a slide show of
all the images. Gato even offers the user an option to display a full screen slideshow,
provided the web browser has Adobe Flash Player installed and active.
Each file in the Image Gallery paragraph has its own edit bar. You can Edit the file to
change the image, the alt text or the caption. The Move button allows you to reorder the
images by dragging them to the position you’d like. Adjust Thumbnail brings up a
thumbnail editor (see below) and Delete removes the image from the gallery.
Uploading multiple images
You can add images individually, or add a group of images as a ZIP file. Click the
Upload Zipped Images button, then Browse to find the file on your computer. Gato will
use all PNG, JPG and GIF images found in the ZIP file in your photo gallery. Click Save
and all the images will be added to the Gallery. You will need to click the Edit button for
each image to add alt text and optionally captions.
Adjusting thumbnails
You can change the displayed thumbnail for each image by clicking the Adjust
Thumbnail button on the edit bar for that image. When the editor comes up, click and
drag around the area of the image you want to display. The thumbnail must be square.
Click Save to update the thumbnail display.
32
!
Be sure to resize your images before adding them to an image gallery. Modern
digital cameras take very large photos designed for printing. They are too
large and take too long to download when placed in Gato as-is.
Raw XHTML
This paragraph allows expert users to place XHTML code directly into their Gato page.
This paragraph type is for expert users only and is used at your own risk. ETC
Support cannot assist with XHTML.
Rich Editor
The most flexible paragraph choice, the Rich Editor is likely where you will spend most
of your time within Gato. It offers a “What You See Is What You Get” editing interface
similar to those found in Microsoft Word, Apple Pages and modern e-mail clients.
Image Gallery Settings window
Rich Editor window
In addition to formatted text, the Rich Editor allows you to insert images and tables.
Advanced users can upload Adobe Flash objects and embed them within the
paragraph.
33
!
Toolbar icons
Rich Editor toolbar icons
Styles
Styles are preset formats for the text, such as titles, strike-out and super/sub-script.
Highlight text and choose a style from the drop-down list box to format it. As the Gato
template changes over time, any text using one of these preset styles will change with
it. To remove a style, highlight the formatted text and choose the same style.
Templates
The Rich Editor comes with a handful of templates to ease placement of images and
links around your text. Clicking the Templates button brings up the template options.
You can have Gato replace everything in the paragraph with the new template, or have
it add the template at the insertion point. You can then edit the boilerplate text in the
template and change the links and images as described below.
Links
You can add or remove links. To add a link, highlight the text you want to be linked and
click the Add Link button. You may also change a link by highlighting the linked text and
clicking the same button. To remove a link, highlight part of the link and click the
Remove Link button. When a link is removed using the tool, the entire linked area will
be removed even if it was only partially selected.
To create an external link, type the web address into the URL field. Make sure the
Protocol is set correctly: http:// for most websites, or whichever protocol is correct.
To create an internal link, click the Browse Server button and choose the page you
want to link to. You cannot use this to link to a page in another Gato website.
To create an email link, change the Link Type to E-Mail. This will open the viewer's
default mail client to compose a message. It is recommended for the link text to be the
actual e-mail address for users who are not using a default mail client. Enter the E-Mail
Address and optionally, a Message Subject and Message Body.
34
!
Anchors
If you have a lot of information in your paragraph, you can create anchors to help users
move around more quickly. Use the Anchor button to drop an anchor anywhere in the
paragraph and provide an Anchor Name. You can then create a link to the anchor from
elsewhere in the paragraph. Set the link type to Link to anchor in the text, then choose
the anchor name from the By name list.
Typically, anchors are used to help users return to the top of a long paragraph. Place
the anchor at the top, then create the link at the bottom. Anchors are also useful for
navigating long lists. Place anchors within the list, then create links at the top so users
can jump to the section they need.
Tables
To insert a table, click the Insert/Edit Table icon. A Table Properties menu will pop up
where you can set the following: the number of Rows and Columns; the table
Alignment, Width and Height; the Border size; Cell padding and Cell spacing; set
Headers and add an optional Caption and Summary.
The Width can be set as a number of pixels or as a percent of the page width. You can
set the Height in pixels as well. Browsers will follow table width strictly; Table height is
not always strictly obeyed.
The Caption appears above the table, but the summary is not currently displayed
anywhere.
The Alignment option in the table properties is the location of the table on the page, not
the alignment of the contents inside of the table.
When you right-click the table in the editing menu, you will see additional options, such
as inserting and removing cells. To delete a table, right-click on it and choose Delete
Table.
Cell Spacing is the area in between cells,
while cell padding is extra space within
the cells in between the cell wall and what
is inside of the cell as shown in the
illustration to the right.
Adding an image
To insert images, click the Insert/Edit Image button. You may type the address of an
image hosted elsewhere in the URL field, click Browse Server to choose an image
from DMS or upload an image.
35
!
Image Properties pane
Click on the Upload tab, then click the Browse button to select the picture on your
computer. Then click Send it to the Server. The image then uploads and you will then
be taken back to the Image Info tab.
Image Info
The alternative text is required. Enter a short description of the image for accessibility.
Width and Height fields are provided for resizing the image. As this only changes how
Gato tells a browser how to display the image, it is recommended to resize the image
prior to uploading. Not all browsers strictly obey these settings.
The Border field will create a border around your image. Enter the number of pixels
thick you’d like the border to be. You won’t see the border in the Rich Editor, but it will
appear on your page after you save the paragraph.
To create white space padding around your image, enter the number of pixels of space
to create in the HSpace and VSpace fields.
36
!
The Align drop-down list box gives you a number of choices for where your image
rests. The text will wrap around the image as displayed in the Preview.
You can edit this information at any time by selecting the image in the Rich Editor and
clicking the Insert/Edit Image button.
Making an image a link
There are two ways to make an image a link. The first is to click on the Link tab in the
Image Properties. You may enter an external URL or click Browse Server to create an
internal link. The other way to make an image a link is to save the image, highlight it and
then click the Insert/Edit Link button.
Site Map
Site Map window
The Site Map paragraph creates an additional way for users to navigate your website: a
hierarchical list of pages. You can choose the level at which your map starts (typically
level 1 for your homepage) in the Start Level field and how many levels deep your want
your map to display in the End Level field.
You can optionally create a Title for your Site Map. Additionally, you can display the
map as a flat, alphabetical list of pages by checking the Alphabetical box.
37
!
If you’d like to keep a page out of the site map, you can choose the Do not
show this page in navigation checkbox on that page’s Properties.
Streaming Media paragraph
You may embed video or audio into a Gato page from the Instructional Technologies
Support Streaming Media Server, YouTube or Vimeo. To host content on the Streaming
Media server, you must first have an account. For instructions on getting an account
and uploading content, visit http://www.its.txstate.edu/services/streaming-mediaservices.html
Streaming Media Paragraph window
To add videos from YouTube or Vimeo, copy the direct URL to the video (the one in your
browser address bar when viewing the video, not the embed URL) and paste it into the
Video URL field. To get the Width and Height of a YouTube video, click the Share
button on the video’s page, then the Embed button. For Vimeo, click the video’s Share
button.
To add Streaming Media Server content, use the direct URL to the file you need as the
Video URL : http://stream.its.txstate.edu/users/NetID/moviename.mov. The NetID is
your actual NetID and moviename.mov is the actual movie file name.
Group accounts should use the assigned group name instead of the NetID: http://
stream.its.txstate.edu/users/gato/mymovie.mov
38
!
Use the actual Width and Height of the file as uploaded. Alternatively, you can enter a
standard width of 320 and height of 240.
The Advanced tab reveals the option to upload a Splash Image that will display before
the video plays. A screen capture from the video usually serves this well. You also have
the options to Autoplay and to show the playback Controller.
Sub-Pages
The Sub-Pages paragraph displays the pages immediately below this one in your
navigation hierarchy. Choose how may Levels below the current page you wish to
display. By default, Sub-Pages paragraphs go one level deep. All level 2 pages have
this paragraph going one level deep by default.
Sub-pages window
Table paragraph
The Table paragraph takes data copied from a spreadsheet and displays it in an
attractive table. To start, create your table data in Excel or another spreadsheet
application. Build in any desired header rows. Then copy the data and paste it into the
Table data field.
39
!
Table paragraph window
You have a series of Options to enhance the display of the data:
First row is table header: This option formats the top row as the table header, with a
darker background and heavier font. This option is on by default.
Sortable: Allows users to sort the data by setting the sort order in a particular column.
Alternating background color: Adds background color in an alternating pattern to
making distinguishing data easier. This option is on by default.
Horizontal lines: Adds horizontal lines between rows
Vertical lines: Adds vertical lines between columns
Small font: Uses a smaller font size for the table data, ideal for large tables
Cells alignment right: Aligns all cell content right
Text and Image paragraph
This tool allows you to align a single image with a paragraph of text.
40
!
Text tab
Enter a Title and your paragraph text into the Text field.
Image tab
41
!
To add the image, click the Image tab. Click Browse to choose an image from your
computer, or click Internal Link to choose an image from the DMS.
To resize the image, add the Width in pixels. Gato will preserve the aspect ratio.
Add the required Alt Text to ensure accessibility. You can set the Alignment of the
image to the right or to the left of the text. Optionally, you can add an Image Caption.
Twitter paragraph
Gato can pull in content, referred to as tweets, from the social networking site Twitter.
By default, the Twitter paragraph will float to the right of other content when placed
above it in the editor.
Twitter paragraph window
You can provide an optional Title, which can help differentiate the content from the
paragraph it is next to.
The Search Query field uses Twitter’s standards for searching. Click the link under the
field to find more search options, or use the default from: syntax to pull in all tweets from
42
!
a particular username. For example, to pull in all tweets from the official Texas State
University Twitter account, use from:txst.
Enter the number of tweets to display in the Count field, which defaults to two. If you’d
rather the Twitter paragraph left align like all other paragraphs, you can set the
Alignment to Left.
The Twitter paragraph sits seamlessly next to the paragraph below it. The edit bars are
merged with buttons for each paragraph.
Edit bar with a Twitter paragraph
Forms
Gato offers web forms to allow your users to submit information to your group. You can
receive the information via email and in the Form Data Tool.
Creating forms
First create a new page, give it a name and title, then double-click in the Template
column and choose Texas State Mail Template for email form pages.
When a user submits a form, they will arrive at a new page that confirms that they
submitted the form. It is best practice to create this page prior to creating the form.
Create a sub-page of the form using the Texas State Standard Template, name and title
it, then open it for editing. Add a paragraph that confirms that the form was submitted.
Typically, this is referred to as a “thank you page” as the text thanks the submitter.
With this complete, return to AdminCentral and open the form for editing.
43
!
Form open for editing
Form properties
Click the Form Properties button in the top right-hand corner.
Enter the email addresses that you would like Gato to send form submissions to in the
Send Mail To field. Enter each address on its own line.
These emails are optional. Anyone with access to edit the form can view and
export submitted data in the Form Data Tool discussed below.
If you would like the form submitter to receive a copy of their submission via email,
check the box for Send Copy to Submitter. This requires a few additional steps when
building your form, outlined in the Text Field section below.
Fill in the Subject field with the desired email subject. Click the Browse button and
choose the confirmation page created earlier. This will complete the Page to Display
After Submission field. Click Save.
44
!
Form Properties window
Adding form elements
Form paragraphs
45
!
With the Form Properties set, you can begin adding elements to the form. Click New on
the green edit bar.
Gato provides six paragraph types to use in your form.
File Field
Users can submit files to you using this field. The Field Title is the text that
accompanies the field. Use this field to provide brief some instructions on what to
upload, e.g. “Audition recording” or “Application essay.”
File Field window
Check the box if the upload should be Mandatory. You can also choose which file
extensions are allowed by entering those extensions in the Limit File Type field.
When receiving email notifications, Gato will send a copy of the submitted file to you,
provided it is under the mail server file size. If the file, or the combined file size of all
submitted files, is over mail server file size, the email will include download links
instead.
Raw XHTML
This paragraph allows expert users to place XHTML code directly into their Gato form.
46
!
This paragraph type is for expert users only and is used at your own risk. ETC
Support cannot assist with XHTML.
Selection
The Selection paragraph should be used to collect information from a pre-defined set of
choices. Three types of input are offered: Radio Buttons, Select Box and
Checkboxes.
Selection window
Enter a Field Title, typically the category users will choose from, e.g. “College” or
“Program.” Check the box in the Mandatory field if this selection is required.
In the Input Type field, choose which selection option you would like to display. Each
works best in different situations:
• Radio Buttons: Shows a button for each choice. Only one can be selected at a time.
Useful for when a user must choose one option from a handful of choices.
• Select Box: Shows a drop down list of the choices. The user can select one option.
Best in situations where you need to show more options than you have room for radio
buttons.
47
!
• Checkboxes: Each choice is listed with a checkbox. Users can choose as many
options as they like. Only use if more than one response is valid.
In the Values field, list the options you’d like displayed, one on each line. Click Save
when finished.
Submit Button
Every form needs a Submit Button. It should be placed at the end of the form.
Submit Button window
In the Save Button Text field, enter the text you’d like the button to display. “Submit” or
“Submit form” are recommended labels. You also have the option here to add a line
above or additional space below as seen on the Paragraph Properties tab elsewhere.
Text and Image paragraph
This paragraph is the same on a form as it is on the standard template. Here you can
include introductory or concluding text, or intersperse text with form elements. This is
useful for providing additional instructions or follow-up information for your form.
See the Text and Image Paragraph section under Adding Content to a Page for
additional information.
Text Field
The Text Field allows you to add text boxes of various sizes for users to type in
responses. You can also lock the field to a particular input type.
48
!
Text Field window
Provide a Field Title and set if the field should be Mandatory. If you’d like to ensure
that the user enters a particular type of data, you can set a Data Type:
Data Types
• Date: Provides the user with a calendar button to choose a date. You can also
optionally set a date range that the input must fall between.
• Net ID: Accepts a valid Texas State NetID
49
!
• Alphanumeric: Prevents special characters from being entered
• E-Mail Address: Accepts input in the form of an email address: [email protected]
• Texas State E-Mail Address: Validates that the email address ends in @txstate.edu
• Integer: Accepts numeric input with no decimal points
• Decimal: Accepts numeric input with decimal points allowed
• 5-Digit Zip Code: Accepts five numeric digits
• Phone number (with area code): Accepts a ten digit phone number, formatted in any
fashion
• Regular Expression: For advanced users only; Use at your own risk
In the Lines field, you can choose the size of the Text Field: Single Line Text Input,
Small Text Area, or Large Text Area.
If you elected to have a copy of the form submission sent via email to the submitter, you
will need to use the Field Type area. It defaults to Normal Field, which applies no
special significance to the input. You must mark the fields for the submitter’s name and
email address using these options to ensure the email gets sent successfully.
Choose This field is the form submitter's name for the field where the user enters
their name. For the field with the user’s email address, choose This field is the form
submitter's email address.
Form data tool
In addition to, or in lieu of, receiving submissions via email, Gato also holds all
submissions in the Form Data Tool.
When editing the form page in Gato, there is a link in the box at the top that says You
can also download the data from this form using the form data tool.
Form Data Tool link
Clicking on the link will take you to the form database where you can view individual
50
!
submissions or download them all as an Excel (XLS) file. This XLS file can be opened
by spreadsheet programs like Excel and Open Office Calc.
The URL provided by the form data tool link is only valid for 10 minutes and cannot be
bookmarked. You will need to click on the link again directly from the form page to
access it in the future. Anyone with access to view the form page on Gato edit can click
on the link to view submission information.
The columns are each of the fields you defined in the form, while the rows are individual
submissions.
Form Data Tool
Viewing more submissions
If you have many submissions, there will be Prev Page and Next Page links to view
more results. This ensures that the data loads quickly, no matter how many submissions
you receive.
Downloading attachments
If you included a file field on your form, you will need to download the attachments from
the form data tool. Any attachments will be URLs in blue text with underline as seen
below. Click on the link to download the attachment.
Deleting submissions and fields
To delete submissions from testing, spam, or other reasons there is a delete button
located to the left of each entry.
As time goes by you may find that the fields of your form changes. If at least 4
submissions have been made with a blank field, a delete button for that column will
appear. Click the delete button to remove the field from all of the submissions. If you
have not already done so, this does not remove the field from your Gato page.
A deleted column can be restored by submitting a form with the specified field filled in. If
the field was deleted from the page, create a new field with the exact same name. Then
submit the form with the specified field filled in.
Viewing only new submissions
To see only the newest submissions from when you last checked, enter the confirmation
number of the last submission you received into the field labeled Oldest confirmation
number to include. If the last submission you received had a confirmation number of
51
!
03-150-031, enter that number into the field and click Go. Now only submissions since
then will be displayed.
Exporting to Excel
To export the data into an XLS file to use in Excel or other programs, click the Export to
Excel link located at the lower right. Only the data in your current view will be
downloaded. This means that if you entered an oldest confirmation number, it will only
download the new submissions. If you want to download all of the data and have
entered an oldest confirmation number, erase the oldest confirmation number from the
field and click Go. Now it will download all of the data.
Activation Process
The changes you make in Gato, be it creating new pages or editing existing ones, will
not appear on the public version of your site until activated.
Instances of Gato
A Gato website runs on two stages:
1. Gato-edit: The Authoring stage is used for making changes and updates to pages
and to the structure of the website. Change made here are not visible to the public
until you activate them.
2. The live site: The Public state, also referred to as Production, serves the content of
the website to the your visitors.
This setup allows you to make changes to your website in Gato-edit, then review and
test your changes or have them reviewed by another person, then publish the changes
when ready.
Activation status symbols
AdminCentral will show three different symbols under the Status column, depending on
the status of your page’s activation.
Activation States
Activating pages
In AdminCentral there are two ways to activate or publish a page:
52
!
1. Select the page by clicking it once and choosing the Activate changes button
located at the bottom of the screen.
2. Right-click the page and choose Activate changes from the menu.
To activate an entire tree of pages and sub pages, right-click the top level page and
choose Activate incl. sub pages. This may take several minutes to complete,
depending on the size of your website.
Deactivating and deleting pages
If you want to take a page or pages down from the public (live) instance, there are two
ways to do this in AdminCentral.
1. Select the page by clicking it once and choosing De-activate at the bottom of the
screen.
2. Right-click the page and choose De-activate.
After successfully deactivating, this page and all of its sub pages will be deactivated.
To delete the page all together, right-click the page and click Delete page. To prevent
accidental deletions, you must then click Activate changes to complete the deletion.
You can recover a page that you deleted but haven’t activated using Versions.
Advanced topics
Versioning and backups
Versioning allows multiple copies of the same page to be saved as changes are made.
Versions are automatically created nightly if changes have been made to a page.
To access the versions of a page, right-click the page in AdminCentral and select
Versions. A list of versions with the page name, date, and user who created the page
will be shown.
53
!
Versions
To view a version of the page highlight the version by clicking on it. Click the Show
button at the bottom. You will be able to view all versions of the page since the feature
was implemented December 8, 2009.
To restore a previous version of a page, highlight the version by clicking on it. Click the
Restore button at the bottom. The existing version of the page in AdminCentral will be
replaced by the restored version.
Limitations to versioning
• This only works to restore previous versions of an existing page.If a page is deleted,
all of its versions will be deleted with it. You will need to contact [email protected] or
512.245.5566 to have a backup of the page restored from the nightly backups.
• Any versions of a page created prior to December 8, 2009 will not be available
through versioning. For backups of pages before this date, you will need to contact
[email protected] or 512.245.5566.
• The availability of pages older than 3 months is not guaranteed.
• Backups pulled directly, not through versioning, will replace any contents of the
existing page and this cannot be undone. • If a page, a section, or an entire website is deleted contact [email protected] or
512.245.5566 to have it restored.
54
!
Site-wide search and replace
Site-wide Search and Replace allows you to replace words or phrases on an individual
page, section or the entire website. To perform a search and replace, right-click the
page or top-level page of the section you want to work with and choose Search &
Replace from the context menu. For the entire website, you would right-click the
homepage.
Search and Replace
A dialog box will pop up with options for the search and replace. First, enter the word or
phrase you wish to Search For and the word or phrase you intend to Replace With.
To Include sub-pages, mark the Yes radio button; to search and replace on only the
selected page, mark No.
In the Match whole words field, you can choose to match only whole words, or to
include partial words as well. For example, if you search for “over” to replace it with
“under,” matching partial words would change “overalls” to “underalls.”
Gato offers Smart case detection here. You can choose to preserve capitalization rules
for acronyms and the first words of sentences, or make the search case sensitive. With
preservation, the above search would replace “Over the student center” with “Under the
student center,” even though “over” and “under” are lowercase.
55
!
Choose the paragraph types you’d like to perform the search and replace on. Gato will
search within any combination of Rich Editor, Text and Image, Table, Raw XHTML
and Link paragraphs.
Once all the parameters are set, click Find All. Gato will display the internal URLs of the
pages with matches and show you the proposed replacements highlighted in green.
Search and Replace results
Review the results and check the boxes next to any of the replacements you would like
to make. Click Save Selected Paragraphs to make the changes. Gato then lists the
pages that were changed. The pages will be updated, but the updates will not appear
on the live site until the pages are activated.
56
!