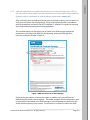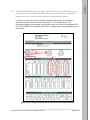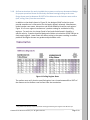
1
CONSORTIUM FOR ADVANCED RESIDENTIAL BUILDINGS Guidelines for Complying with BPI’s Technical Standards for the Air Conditioning and Heat Pump Professional Version NV.1.02 Adapted for Clark County, NV October 1, 2010 Prepared by Steven Winter Associates, Inc For the Consortium for Advanced Residential Buildings (CARB) Steven Winter Associates, Inc 50 Washington Street Norwalk, CT 06854 Tel: (203) 857‐0200 / Fax: (203) 852‐0741 Contact: Lois B. Arena © 2010 Steven Winter Associates, Inc. All rights reserved. Page i Foreword This guide provides information on how to comply with BPI’s Technical Standards for the Air Conditioning and Heat Pump Professional and is intended to compliment the Field Checklist provided in the Appendix. It is intended for both HVAC technicians and Third Party Verifiers. This guide follows the same numbering and order of BPI’s standard as does the Field Checklist. One form should be used for each HVAC system in the home. Where different, requirements of the “Home Performance Specifications for Warm Climates” (HPS) take precedence over the BPI requirements. These changes from HHPPSS BPI have been noted in the manual with the following symbol: Information contained herein applies to residential buildings 3 stories or less in height. Sample forms, equipment lists and checklists are located in the Appendix and are also available in electronic format This work was originally compiled for the Clark County Community Resources Management Division in Las Vegas, NV. Examples and some requirements have been geared toward that climate. Written by: Lois B. Arena Steven Winter Associates, Inc. 50 Washington Street Norwalk, CT 06854 P: (203) 857‐0200 F: (203) 852‐0741 Disclaimer This report was prepared as a result of work sponsored by the Building America program from the U.S. Department of Energy (DOE). It does not necessarily represent the views of the DOE, or its employees. The DOE and its employees make no warranty, expressed or implied, and assume no legal liability for the information in this report; nor does any party represent that the use of this information will not infringe upon privately owned rights. This report has not been approved or disapproved by the DOE nor has the DOE passed upon the accuracy or adequacy of the information in this report. © 2010 Steven Winter Associates, Inc. All rights reserved. Page ii TABLE OF CONTENTS 1 HEALTH & SAFETY .......................................................................................... 1‐1 1.1 Personal ............................................................................................................... 1‐1 1.2 Occupant .............................................................................................................. 1‐2 1.3 Electrical ............................................................................................................... 1‐3 1.4 Refrigerant ........................................................................................................... 1‐5 2 INSTALLATION ............................................................................................... 2‐1 2.1 Design ................................................................................................................... 2‐1 2.2 Airflow ................................................................................................................ 2‐22 2.3 Duct Systems ...................................................................................................... 2‐29 2.4 Refrigerant ......................................................................................................... 2‐36 2.5 Controls .............................................................................................................. 2‐43 2.6 Commissioning ................................................................................................... 2‐44 3 COMMISSIONING ........................................................................................... 3‐1 3.1 Airflow .................................................................................................................. 3‐1 3.2 Commissioning ..................................................................................................... 3‐3 4 SERVICE & REPAIR .......................................................................................... 4‐1 4.1 Duct Systems ........................................................................................................ 4‐1 4.2 Refrigerant ........................................................................................................... 4‐2 4.3 Airflow .................................................................................................................. 4‐3 5 DIAGNOSTIC TESTS ........................................................................................ 5‐1 5.1 Electrical ............................................................................................................... 5‐1 5.2 Airflow .................................................................................................................. 5‐2 5.3 Duct Systems ........................................................................................................ 5‐2 5.4 Refrigerant ........................................................................................................... 5‐2 REFERENCES APPENDIX A. ......................................................................................... FIELD CHECKLIST APPENDIX B. ................................................................... AUDITOR’S EQUIPMENT LIST APPENDIX C. ......................................................................... ACCA BRIEFING ON MJ8™ APPENDIX D. ..................... REGISTER FLOW & ROOM‐TO‐ROOM PRESSURE FORM © 2010 Steven Winter Associates, Inc. All rights reserved. Page iii Table of Figures Figure 1 Manual J Whole House Load Calculation – Report from Right‐Suite®Universal2‐3 Figure 2 Component Construction Summary for Manual J Calculations ........................ 2‐4 Figure 3 AHRI Certificate of Product Ratings ................................................................... 2‐6 Figure 4 AHRI Database ‐ Search Page ............................................................................. 2‐8 Figure 5 AHRI Database – Search Results ........................................................................ 2‐9 Figure 6 AHRI Database – Heat Pump Selection ............................................................ 2‐10 Figure 7 Climate Zones for LBL’s Air Leakage Factors .................................................... 2‐13 Figure 8 Manual J Room by Room Load Calculations .................................................... 2‐17 Figure 9 Sample Duct Design ......................................................................................... 2‐18 Figure 10 Duct Design Details Based on Room by Room Load Calculations ................. 2‐19 Figure 11 Ceiling Register Data ...................................................................................... 2‐20 Figure 12 Examples of Unsuitable Filter Slots ................................................................ 2‐30 Figure 13 Tips for Sealing Flex Duct .............................................................................. 2‐32 Figure 14 Sealing Duct Boots & Connections ................................................................. 2‐34 Figure 15 Capillary Tube Metering Device ..................................................................... 2‐37 Figure 16 TXV Metering Device ..................................................................................... 2‐37 Figure 17 Pressure/Temperature Chart for R‐410A and R‐22 Refrigerants. ................. 2‐41 © 2010 Steven Winter Associates, Inc. All rights reserved. Page iv Table of Tables Table 1 Tightness Categories Reproduced from Manual J, 8th Edition .......................... 2‐12 Table 2 LBL’s Factors for Climate Zones, # of Stories and Shielding ............................. 2‐13 © 2010 Steven Winter Associates, Inc. All rights reserved. Page v Introduction There are an increasing number of township, city, county, state, and national mandates on new construction and renovations to ensure energy efficiency. Many of those mandates include requirements to meet standards developed by the Building Performance Institute, Inc. (BPI) and to have third‐party verifiers, like those certified by BPI and the Residential Energy Services Network (RESNET), to confirm compliance with those mandates. These mandates are well intentioned, but many of the codes and standards are lacking comprehensive guidelines and explanations on how to actually comply with their requirements. This field guide is intended to explain how HVAC contractors can actually achieve compliance with the Building Performance Institute, Inc.’s (BPI) “Technical Standards for the Air Conditioning and Heat Pump Professional”. This BPI standard is intended to provide quality criteria which must be met by HVAC contractors when installing space cooling systems in new and existing homes. In addition, this field guide provides guidelines to third‐party verifiers on confirming that HVAC contractors work is in compliance with the standard. The “Technical Standards for the Air Conditioning and Heat Pump Professional” is available from BPI at no cost and can be downloaded from: http://www.bpi.org/standards_approved.aspx. © 2010 Steven Winter Associates, Inc. All rights reserved. 1 Health & Safety Items listed in the Health & Safety section of the BPI technical standards must be followed by the HVAC technician and the Third Party Verifier. Health & Safety 1.1 Personal 1.1.1 All technicians performing diagnostic tests, inspections, or installations, must have access to all necessary personal safety equipment required by OSHA. The following is a partial list of the kinds of protective equipment that technicians should have available to them when working on the job: A fitted cartridge‐type NIOSH‐certified respirator with appropriate cartridge suitable for the purpose intended Dust masks (to be used for quick inspections, or in situations where a respirator cannot be used) Safety glasses Work gloves Coveralls (disposable coveralls are best and should be discarded after each job) Kneepads 1.1.2 Safety glasses and gloves must be worn when handling refrigerant or when brazing. Only EPA‐Approved Section 608 certified technicians may service small residential air conditioning or heat pump equipment. 1.1.3 Technicians must be trained in proper use and applications of all personal safety devices and must adhere to OSHA regulations when on the job site. The contact information for NV is as follows: State of Nevada Department of Business and Industry Division of Industrial Relations Occupational Safety and Health Administration 1300 N. Green Valley Parkway, Suite 200 Henderson, NV 89074 702 486 9064 Contact your local OSHA office for training and certification programs near you: http://www.osha.gov/index.html. © 2010 Steven Winter Associates, Inc. All rights reserved. Page 1‐1 1.2 Occupant 1.2.1 The building occupants must be informed of the likelihood of airborne contaminants (asbestos, fiberglass, mold, etc.) in the home during and after inspection and improvement of airflow to the AC or heating system. Health & Safety Some government programs require that homes are vacant during renovations. If occupants will be present, provide the appropriate notifications. © 2010 Steven Winter Associates, Inc. All rights reserved. Page 1‐2 1.3 Electrical 1.3.1 Electrical power must be shut off before working on mechanical equipment. Anyone servicing the equipment should shut all equipment (condensing unit and air handler unit) off at the main breaker panel as well as by using the local disconnect switches. Health & Safety During the blower door and duct blaster tests, the technician and/or auditor should shut the power off at the electrical panel, at the air handler and/or turn the system off at the thermostat to prevent the system from turning on during these tests. Turn the power back on before performing airflow tests. The system will need to be operational during the air flow test across the coil. NOTE: When turning off mechanical equipment, it is a good idea to leave your car keys by the breaker so you don’t forget to turn the equipment back on. 1.3.2 Electrical wiring for HP/AC units must be in compliance with relevant codes. Improper connections, wire sizing and other problems identified must be corrected prior to proceeding to system diagnostics or repairs. The HVAC technician is responsible for verifying that the wiring is compliant with the manufacturer’s specifications and local codes. The auditor or third party verifier should confirm that this item is checked off on the Field Checklist. The technician should measure main components individually for voltage and amperage. For example, blower motors, compressors and control transformers have nameplate ratings and they should all be tested individually to make sure they are operating within the manufacturer’s specified range. According to the ACCA’s “Technicians Guide for Quality Installations”, the following practices should be observed for electrical verifications: “For electrical heating devices, the voltage and amperage should be tested with all the elements on. Electrical supply, main line sizes and disconnect ratings must be within ranges specified by the manufacturer. Low (control voltage) readings should be taken with a meter at the terminals on the low voltage side of the control transformer or at the control’s terminal connection. High (line voltage) readings need to be checked at the main power equipment terminal or at the unit disconnect. If the equipment is three‐phase, the voltage for all three line combinations must be read. Motor amperage readings must be taken on high speed if the system has variable speeds. © 2010 Steven Winter Associates, Inc. All rights reserved. Page 1‐3 Frequency drive amperage readings need to be checked at 60 HZ and should equal the frequency drive’s digital read out within the accuracy of the test meter. Equipment voltages and amperages should be checked to ensure that they are within design limits of percentages specified by the manufacturer. Field voltage readings can be divided by name plate values and multiplied by 100 to determine percent of design. The final percentage must be within the original equipment manufacturers recommended range (usually +/‐ 10%)”. Health & Safety The auditor should verify that the equipment operates in both cooling and heating mode and verify that the technician has checked this off on the Field Checklist. © 2010 Steven Winter Associates, Inc. All rights reserved. Page 1‐4 1.4 Refrigerant 1.4.1 Refrigerant must be handled and stored in compliance with EPA Section 608 standards at all times, including charging, recovery, reclamation, storage, and transportation. Health & Safety Only EPA certified technicians should be handling the refrigerant. Regulations have been issued under Section 608 of the Clean Air Act to minimize refrigerant emissions by maximizing the recovery and recycling of such substances during the service, repair, or disposal of refrigeration and air‐conditioning equipment (i.e., appliances). Information for technicians concerning proper handling is located at: http://www.epa.gov/Ozone/title6/608/608fact.html. 1.4.2 Only EPA certified technicians may install or service small residential (smaller than 5 ton capacity) central air conditioning or heat pump equipment. The technician’s certification should be provided for the job file. Confirm that it has been provided. Information for technicians including certification programs is located at: http://www.epa.gov/Ozone/title6/608/technicians/index.html. © 2010 Steven Winter Associates, Inc. All rights reserved. Page 1‐5 2 Installation Installation 2.1 Design 2.1.1 Sizing for new and replacement central air conditioning and heat pump systems must be based on heating/cooling load calculations for the building using a recognized calculation method. Residential systems should be sized in accordance with the most current version of ACCA Manual J (version 8 is the most current at the time of this publication) or the ASHRAE 2009 Handbook of Fundamentals1. There are several acceptable software packages, spreadsheets and calculation forms available. A few acceptable tools include (but are not limited to): Wrightsoft’s Right‐Suite: http://www.wrightsoft.com Elite Software’s RHVAC: http://www.elitesoft.com/web/hvacr/elite_rhvacw_info.html Nitek Software’s Load Wizard: http://www.niteksoftware.com/web2008/product2008.html Adtek Software’s AccuLoad: http://www.adteksoft.com/ Following are examples of software that do NOT meet the requirements: HVAC Computer Systems’ HVAC Calc 4.0 (7th edition of ACCA’s Manual J) Trane’s Trace 700 (commercial sizing tool) Carrier’s HAP (commercial sizing tool) Elite Software’s CHVAC (commercial sizing tool) Thomas & Associates’ HEATLOSS version 3.2 (7th edition of ACCA’s Manual J) Commercial load calculation tools are not acceptable. There are major discrepancies between residential and commercial load calculations with relation to: (1) Ventilation Rates, (2) Infiltration Rates, (3) Lighting, and (4) Other latent and sensible internal gains. Whichever tool is used, verify that it is based on the most current version of Manual J. The sample reports used in this manual were generated using Right‐Suite® Universal from WrightSoft®. 1 The 99% heating and the 1% cooling design temperatures may be different in Table 1 of Manual J, 8th Edition and the 2009 ASHRAE Handbook of Fundamentals. Manual J, 8th edition uses data from the 2001 ASHRAE Handbook of Fundamentals. Either is acceptable. © 2010 Steven Winter Associates, Inc. All rights reserved. Page 2‐1 The individual responsible for performing the Manual J calculations, whether it is the technician, designer or auditor, must provide a copy of the load calculation worksheets or software printout for the job file. Before verifying that the system has been properly sized, the auditor/verifier will want to review several items in the HVAC designer’s report including: Design indoor temperatures for both heating (70F) and cooling (75F); Design outdoor temperatures for both heating and cooling (30F & 106F respectively for Las Vegas, NV2); Infiltration rate assumed; Ventilation rate assumed; The edition of Manual J used, if applicable; The orientation of the home; Building component R‐values, U‐values and areas; Duct losses; # of people, appliances, or other internal gains Zones The total heating and cooling loads. The sample reports in Figure 1 and Figure 2 provide examples of where to find these items on the reports. This information won’t be in the same location for all software or spreadsheets, but all of the information must be verified. The auditor should verify a few areas to check the designer’s calculations. Conditioned square footage and window area by façade have the largest impact and are always good to verify. If these appear correct, move on. If not, perform a more thorough review of the building component R‐values and areas. NOTE: A briefing from the ACCA titled “Are You Using MJ8™ Correctly? Is included in the Appendix and can also be found here: http://www.h5energy.com/AreYouUsingManualJ8Correctly.pdf. The sizing method used, the design loads and whether or not a copy of the load calculations has been provided should be indicated on the Field Checklist. Installation 2 From Manual J, 8th Edition, Table 1A. © 2010 Steven Winter Associates, Inc. All rights reserved. Page 2‐2 Installation Figure 1 Manual J Whole House Load Calculation – Report from Right‐Suite®Universal © 2010 Steven Winter Associates, Inc. All rights reserved. Page 2‐3 Installation Figure 2 Component Construction Summary for Manual J Calculations © 2010 Steven Winter Associates, Inc. All rights reserved. Page 2‐4 Example: From Figure 1 and Figure 2, determine: a) the total cooling design load, b) the minimum required air flow c) if the design temperatures were chosen correctly d) the orientation of the home e) the u‐value of the windows f) the wall construction and insulation value Answers: a) 23,399 Btuh b) 1220 cfm c) Yes, these are the correct design temperatures for Las Vegas, NV according to ACCA Manual J, Table 1. . d) Northwest e) 0.32 f) 2x4 frame wall with R‐13 cavity insulation © 2010 Steven Winter Associates, Inc. All rights reserved. Page 2‐5 Installation 2.1.2 New and replacement air conditioning systems must be sized no larger than 115% (or the next nearest size available from the manufacturer) of total load at design conditions. (Systems must be sized based on load calculations referenced in Section 2.1) Installation After confirming that the load calculations were performed properly, the next step is to verify that the system was sized properly. Sizing should be performed in accordance with the procedures outlined in the ACCA’s Manual S. Manual S is a guide for selecting and sizing residential heating and cooling equipment. The installed capacity of the system can be found in the OEM (original equipment manufacturer) catalog or the AHRI (Air‐Conditioning, Heating and Refrigeration Institute) certificate as show in Figure 3. Figure 3 AHRI Certificate of Product Ratings Simply noting the capacity of either the indoor or outdoor coil is not sufficient for determining the overall system capacity. The model numbers of both components must be recorded and looked up in the OEM catalog or the AHRI database to determine the actual installed capacity of the system. The technician is required to submit the AHRI © 2010 Steven Winter Associates, Inc. All rights reserved. Page 2‐6 certificate for the new system for the job file. The database can be accessed at: http://www.ahridirectory.org/ahridirectory/pages/home.aspx. Note that the AHRI certificate lists the model numbers for the indoor and outdoor coils, the capacity and the efficiency. The auditor can then verify that the model numbers on the certificate match those on the equipment installed in the field. To determine if the installed capacity complies with the BPI sizing requirements, divide the installed capacity by the design load. Example Based on the loads in Figure 1 and the AHRI certification in Figure 3, determine if this system complies with the requirement of 2.1.2. Answer Design load: 23,399 Btuh Installed capacity: 32,400 Btuh as shown on the AHRI certificate % of design load: 32,400 ÷ 23,399 x 100 = 138%. Air conditioning systems are not supposed to be more than 115% of the total design load, BUT . . . if the next available size for the manufacturer was the unit displayed in the AHRI certificate below, then this system would be in compliance with BPI’s sizing requirement. Some manufacturers do not have ½ ton increments, especially where very high efficiencies are concerned. Example: Determine the next available size of the cooling system from the previous example. Answer: 1. Go to the AHRI database. 2. Click on Air Conditioners and Air Conditioning Coils 3. Select the manufacturer of the outdoor coil (see Figure 4) 4. To help narrow down the search, enter the SEER of the installed system as the minimum SEER, the Outdoor unit trade/Brand name if you have it, the next ½ size up from the design load. Helpful Hint: When using the AHRI Directory in general, do not input too much information into the search directory, such as the complete model numbers, as this will typically result in no results. If you input the model number, only input the beginning portion. Installation © 2010 Steven Winter Associates, Inc. All rights reserved. Page 2‐7 Note that 1 ton is equal to 12,000 Btuh and ½ ton is equal to 6,000 Btuh. The smallest increments are usually ½ ton. In this case, the next available size would be 30,000 Btuh (or very close to that) if the manufacturer offered ½ ton increments. Installation Figure 4 AHRI Database ‐ Search Page 5. Select search. 6. Click on the Capacity heading in the search results to sort from smallest to largest (see Figure 5). 7. If a 30, 000 Btuh unit shows up, the installed system does not comply with this requirement. The installer should have installed a smaller unit. © 2010 Steven Winter Associates, Inc. All rights reserved. Page 2‐8 Installation Figure 5 AHRI Database – Search Results Required documentation: AHRI certificate or OEM performance data http://www.ahridirectory.org/ahridirectory/pages/home.aspx. © 2010 Steven Winter Associates, Inc. All rights reserved. Page 2‐9 2.1.3 New and replacement heat pump systems must be sized no larger than 125% (or next nearest size available from the manufacturer) of total load at design conditions. (Systems must be sized based on load calculations referenced in Section 2.1.) Installation See previous example. Choose Heat Pumps & Heat Pump Coils on the main menu for the AHRI database and proceed as above. Figure 6 AHRI Database – Heat Pump Selection For heat pumps, use the design cooling load when calculating the % of the design load, not the heating load. © 2010 Steven Winter Associates, Inc. All rights reserved. Page 2‐10 2.1.4 When installing new systems or replacing the air‐handler and/or the compressor unit for existing systems, the indoor evaporator coil must be correctly matched to the outdoor coil for the system according to the manufacturer’s specifications or ARI standards. Installation The size of the indoor and outdoor coils are typically contained within the model numbers, but the installed capacity of the system takes into account the size of each individual part. For instance, just because the indoor coil is rated at 36 kBtuh doesn’t mean the system will supply that amount of cooling if the outdoor coil is not the same size. Often, in areas with low humidity, the indoor coil will be slightly larger than the outdoor (usually not by more than ½ ton) to provide higher sensible capacity. If the capacity of the indoor coil is different from that of the outdoor coil, It is required that new systems are correctly matched and the proper documentation has been provided to confirm the capacity of the system. Acceptable documentation may come from the manufacturer’s literature or the AHRI website. The following link will take you to the AHRI website where you can confirm the capacity and the efficiency for the installed components: http://www.ahridirectory.org/ahridirectory/pages/home.aspx. Example: Look at the following model numbers and determine the size. a) b) c) d) e) f) 13ACD‐018‐230* 13ACD‐024‐230* 24ABB342(A,W)**31 CAP**4824A 2TTX4048B1 C(A,C,D,E)48D4X+TDR Answer: The capacity of the coils is divisible by 6. Look for numbers in the model number that are evenly divisible by 6. a) 18 kBtuh ÷ 12 kBtuh/ton = 1.5 tons b) 24 kBtuh ÷ 12 kBtuh/ton = 2.0 tons c) 42 kBtuh ÷ 12 kBtuh/ton = 3.5 tons d) 48 kBtuh ÷ 12 kBtuh/ton = 4.0 tons e) 48 kBtuh ÷ 12 kBtuh/ton = 4.0 tons f) 48 kBtuh ÷ 12 kBtuh/ton = 4.0 tons © 2010 Steven Winter Associates, Inc. All rights reserved. Page 2‐11 2.1.5 Blower door test results are recommended to determine air leakage rates input into load calculations. Blower door ACH conversion: ACH = CFM50 ÷ N (use lowest N‐factor for the region). If using Manual J version 8, enter CFM50. Note: The above equation is incorrect. It should read ACHn = ACH50 ÷ N. ACH50 = CFM50 x 60 ÷ Volume Installation Before recommending HVAC upgrades for a home, a full energy audit should be conducted to determine the existing conditions of the home and any recommended shell improvements that will affect the size of the new air conditioning or heat pump system. This audit should include a blower door test. The results of that test (or the projected air tightness after improvements have been made) should be used in the Manual J calculation for sizing the new equipment. Some Manual J software programs will use a CFM50 which is measured directly with the blower door, and some use a qualitative description such as “tight”, “semi‐tight”, etc. in accordance with the ACCA Manual J procedures. Verify that the value either looks reasonable or corresponds to the auditor’s test results. Table 1 (reproduced from the ACCA’s Manual J, 8th edition) shows the ACHn (natural air change rate) associated with each of the qualitative descriptors. Table 1 Tightness Categories Reproduced from Manual J, 8th Edition Default Air Change Values for Three or Four Exposures (from Manual J, 8th Edition) Tight Semi‐Tight Average Semi‐Loose Loose Infiltration CFM for One Fireplace Air Changes per Hour (Heating) Construction 900 or Less 0.21 0.41 0.61 0.95 1.26 Floor Area of Heated Space (SqFt) 901 to 1500 1501 to 2000 2001 to 3000 0.16 0.14 0.11 0.31 0.26 0.22 0.45 0.38 0.32 0.7 0.59 0.49 0.94 0.8 0.66 3000 or more 0.1 0.19 0.28 0.43 0.58 0 13 20 27 33 For one additional fireplace, add 7 cfm to the a bove fireplace values. Lfor two or more additional fireplaces, add 10 cfm (total) to the above. Air Changes per Hour (Cooling) Construction Tight Semi‐Tight Average Semi‐Loose Loose 900 or Less 0.11 0.22 0.32 0.5 0.67 Floor Area of Heated Space (SqFt) 901 to 1500 1501 to 2000 2001 to 3000 0.08 0.07 0.06 0.16 0.14 0.11 0.23 0.2 0.16 0.36 0.31 0.25 0.49 0.42 0.34 © 2010 Steven Winter Associates, Inc. All rights reserved. 3000 or more 0.05 0.1 0.15 0.23 0.3 Fireplace Infiltration None Page 2‐12 To verify that the designer used the correct descriptor for the design load calculations the ACHn will have to be calculated from the CFM50 number. To do this, multiply the CFM50 by 60 minutes/hour and then divide by the volume of the home and then by the n‐factor. This factor was developed by Lawrence Berkeley Laboratory (LBL) and is based on the climate zone, number of stories and wind exposure. Installation Figure 7 Climate Zones for LBL’s Air Leakage Factors3 Table 2 LBL’s Factors for Climate Zones, # of Stories and Shielding4 Zones 1 2 3 4 # of Stories 14‐17 17‐20 20‐23 23‐26 1 1.5 2 2.5 3 Shielding 1 0.89 0.81 0.76 0.72 Well Normal Exposed 1.2 1 0.9 The n‐factor used in the ACHn calculations is the factor for the applicable climate zone, # of stories and shielding all multiplied together. Refer to your equipments manual for specific procedures for conducting a blower door test. 3 Sherman, M. "Estimation of Infiltration for Leakage and Climate Indicators," in Energy and Buildings, 10, 1987. 4 Sherman, M. "Estimation of Infiltration for Leakage and Climate Indicators," in Energy and Buildings, 10, 1987. © 2010 Steven Winter Associates, Inc. All rights reserved. Page 2‐13 Installation Example: The HVAC designer for an existing, 2 story home in Las Vegas, NV chose “average” for the air tightness level when calculating the size of the new equipment. The blower door number from the initial audit was 1,500 cfm50. No recommendations to air tightness were made. The size is 2,000 ft2, and the volume is 16,000 ft3. The home is located in a typical Las Vegas neighborhood. The lots are approximately 1/5 of an acre. Did the designer choose the correct air tightness level for the calculation? Answer: Step 1. Calculate the ACHn a) Determine the Zone factor: Las Vegas is Zone 3. From Table 2, the zone factor is 20 (choose the lower limit) b) Determine the height factor: This is a 2 story home, the height factor is 0.81. c) Determine the shielding factor: This is a typical neighborhood, the shielding factor is 1. d) Calculate the n‐factor: 20 x 0.81 x 1 = 16.2 e) Calculate the ACHn: 1500 CFM50 x 60 m/hr (16,000 x 16.2) = 0.35 Step 2. Determine the tightness level from Table 1 f) At 0.35 ACHn, the tightness level for “heating” (as the house was placed in winter conditions for blower door testing) would be closet to “average”. So yes, the designer chose the correct level. © 2010 Steven Winter Associates, Inc. All rights reserved. Page 2‐14 2.1.6 New ducted distribution systems must be designed to provide +/‐ 15% of room airflow requirements to satisfy calculated Btu loads for each room being conditioned. Installation For this step, room by room load calculations are needed in conjunction with a duct design using the ACCA’s Manual D or equivalent. For a forced air system that supplies both the heating and cooling, the room load calculations should produce a cfm number for both heating and cooling for each room. According to Manual D guidelines, the higher of the two should be used on the duct design unless seasonal balancing is pragmatically unacceptable, in which case, design air flow values may equal the average of the heating and cooling cfm. The HVAC designer should note which method was used. The designer is required to design a system that will meet these room loads within +/‐15%. As can be seen in room by room load calculations in Figure 8, for each room load, a corresponding cfm is calculated to satisfy that load. Compare the cfm numbers from the room by room load calculations to the designer’s cfm numbers on the duct design. These numbers should be within +/‐ 15% of each other. The HVAC designer is required to provide the room by room calculations as well as the duct design for new systems. When designing a new duct system, the designer should always try to keep the ducts out of unconditioned spaces like attics. If this is not possible, duct runs should be kept as short as possible and buried under the attic insulation. Care should also be taken not to throw air directly onto the occupants. Locate the registers at one end of the room and throw the air across the ceiling toward the opposite wall using registers designed for the throw required. Example: Using Figure 8 and Figure 9, determine if the cfm on the duct layout drawing for the Living Room and the Den are with +/‐ 15% of design cfm. Answer: A) Living Room Design Flow from Figure 8: 286 cfm (use heating because it is bigger) Living Room Flow on Duct Design (Figure 9): 264 cfm (1 – 264÷286) x 100 = 7.7% ‐ yes, meets requirements B) Den Design Flow from Figure 8: 156 cfm (use heating because it is bigger) Den Flow on Duct Design (Figure 9): 122 cfm © 2010 Steven Winter Associates, Inc. All rights reserved. Page 2‐15 (1‐122÷156) x 100 = 21.8% ‐ no, does not meet the requirement. The designer should be designing to meet the higher of the heating or cooling loads or an average of both. The value shown on Figure 9 for the Den is neither. Installation This calculation should be done for each room. There is a Register Flow & Room‐to‐ Room Pressure Form in the appendix for recording design and measured air flows. It can be used to verify compliance with this item and 3.1.1. © 2010 Steven Winter Associates, Inc. All rights reserved. Page 2‐16 Installation Figure 8 Manual J Room by Room Load Calculations © 2010 Steven Winter Associates, Inc. All rights reserved. Page 2‐17 Installation Figure 9 Sample Duct Design © 2010 Steven Winter Associates, Inc. All rights reserved. Page 2‐18 2.1.7 New ducted distribution system designs shall be based on the available external static pressure from the air handler, the pressure drop of external devices, the equivalent length of the runs, as well as the size, type and configuration of the ducts. Installation In addition to the room by room calculations and the duct layout, the designer is required to provide all the information specified in 2.1.7 as listed above. The distribution design should provide a system that results in a friction rate between 0.06 and 0.18 in/100ft2 to be compliant. Figure 10 is a sample report properly displaying this information. Figure 10 Duct Design Details Based on Room by Room Load Calculations © 2010 Steven Winter Associates, Inc. All rights reserved. Page 2‐19 Installation 2.1.8 Airflow terminations for newly installed duct systems must have a documented design for proper spread and throw to effectively distribute heating/cooling to the room. Design throw must be between 80‐120% of the distance to the furthest room surface (wall, ceiling, floor) from the termination. In addition to the details shown in Figure 10, the designer/HVAC technician must provide manufacturer’s information for the supply registers selected. Manufacturer, model number room name, dimensions and throw should be listed for each register. Figure 11 is from a register manufacturer’s product catalog for residential ceiling registers. For each size, the throw (listed in feet) and cfm delivered is listed for a specific velocity. Systems should be designed to deliver air velocities of 500‐700 fpm at each supply register. Lower flows will reduce mixing in the space resulting in comfort problems and higher throws may produce objectionable noise. Figure 11 Ceiling Register Data5 The auditor must verify that the specified register has a throw between 80 to 120% of the distance to the furthest room surface from the termination. 5 http://www.hartandcooley.com/tools/submittal‐drawings/residential‐grilles‐registers‐and‐diffusers.aspx © 2010 Steven Winter Associates, Inc. All rights reserved. Page 2‐20 Installation Example: If a 1 way, 10 x 10 ceiling register is selected for the Den in the previous example (see Figure 8), does it meet the requirement of item 2.1.8? The dimensions of the Den are 13’ wide by 12’ deep by 9’ tall. Answer: a) Den design flow rate: 156 cfm b) Velocity of that supply trunk: 655 fpm (see st3 in Figure 10). c) Maximum flow rate of the 1 way diffuser in Figure 11 at 600 fpm: 155 cfm with 10’ throw. d) Farthest surface (opposite wall) is no more than 13’ feet away from the register. You can assume that the register is set off the closest wall by at least 1 foot, bringing the distance from the register the farthest surface down to 12’. e) % Distance to the Farthest Surface: 10÷12 x 100 = 83%. Yes, this register meets the requirement. © 2010 Steven Winter Associates, Inc. All rights reserved. Page 2‐21 Installation 2.2 Airflow 2.2.1 For all new duct systems: Measured heat pump airflow must be between 375‐450 cfm/ton or within manufacturer’s specifications when measured over a dry coil (heating mode). Measured air conditioner airflow must be at least 350 cfm/ton unless the manufacturer specifies a lower airflow for the local design condition, when measured over a wet coil after a minimum of 15 minutes of run time. Often in arid climates with very little latent load like Las Vegas, the airflow of the cooling system is increased above the limits listed above to provide higher sensible capacity. NOTE: The Clark County Community Resources Division in Las Vegas, NV is requiring design airflows between 440 to 500 cfm/ton for new installs with new ducts or major ductwork modifications. For a “Clean & Tune” only, see Section 4.3.1. It is important to understand that balancing flows at each register will affect the total system airflow because dampers are usually used to divert air to and form different rooms. Once total system airflow is determined, balancing should be attempted. Airflow should be re‐measured if significant adjustments were made during balancing. Another important indicator of adequate airflow is the total external static pressure (TESP) of the system. All the components of a forced air system – the ducts, filters, registers and coils ‐ create resistance which can be measured in either inches of water column (IWC) or pascals: the higher the TESP, the lower the airflow through the system. Higher TESP’s can lead to shorter fan life and increased energy use. If manufacturer’s tables are available, the TESP can be used to estimate airflow. Maximum recommended static pressures are usually around 0.5 IWC for standard air handlers. HPS HPS TIP: IF the TESP is too high, measure the total square footage of return grill area for each system. To achieve recommended TESP’s of no more than 0.5 IWC, the total return grill area should measure at least 2 ft2/ton. This will also help minimize noise. Static pressure measurements can also help determine where there are restrictions in the system. For instance, high static pressures on the supply but not on the return would indicate that the system is restricted on the supply side. Focus should be placed on correcting problems in the supply ductwork which may include removing kinks, installing larger ducts or more supply registers where needed. © 2010 Steven Winter Associates, Inc. All rights reserved. Page 2‐22 TIP: According to ACCA, filters with a minimum of a MERV 6 rating should be used when upgrading, but you should never increase the static pressure allowed for the filter. To accomplish this, you may need to increase the dimension of the filter and the filter cabinet or filter grill. Installation NOTE: Measuring TESP is a requirement of the Clark County Community Resources Management Division in Las Vegas, NV, NOT BPI or HPS. Following are the steps necessary to fill in the Field Checklist for this item. A. Determine Cooling System Tons To determine the tonnage of the cooling system: 1. Refer to the AHRI certificate or the OEM data for the system installed. 2. Take the capacity and divide by 12,000 Btu/ton to determine the tons of the system. B. Test Total System Airflow There is more than one method for determining the airflow of the system. For consistency, it is recommended that one of the following two methods is used by the auditor. Pressure Matching Method The fan from duct leakage testing equipment may be used to test for system airflow. This test is done with the registers unsealed, so it should be done prior to setting up for the duct leakage test. Refer to the user’s manual of the particular duct leakage testing equipment being used for a complete set of instructions on conducting this test. The basic steps are summarized below: 1. Turn off the air handler. 2. Open a window or door between the building and outside to prevent pressure changes during the test. 3. Make sure all supply and return registers are open and not taped. Filter should be in place 4. Insert a static pressure probe into the supply plenum or in a main supply trunk line a few feet away from the supply plenum. Make sure the probe is pointing into the air stream. 5. Connect the probe to one end of a piece of tubing and the other end of the tubing to the pressure gauge (see equipment manual for detailed instructions). 6. Turn the thermostat to the AC fan setting (or on high). Typically, electronic thermostats are equipped with a 15‐minute staging timer. This timer prevents © 2010 Steven Winter Associates, Inc. All rights reserved. Page 2‐23 the 2‐stage system from operating at high‐stage until unit has been operating in low‐stage for 15 minutes unless there is at least a ±5°F difference between room temperature and thermostat set point. To force high‐stage (after a minimum of 2 minutes in low‐stage), adjust the set point at least ±5°F below room temperature. This might vary depending on the brand and thermostat, so to ensure the system runs on high for the test, set the thermostat as low as possible and wait 15 minutes. 7. Once the system is running at high speed, measure the pressure in the supply. 8. Turn the system off at the thermostat and the emergency switch. 9. Seal off the return side of the system as close to the blower compartment as you can. This is usually done from inside the blower compartment or at the filter slot. The more completely you are able to isolate the air‐ handler and supply side of the system, the more accurate your test will be. 10. Once the return has been sealed off, install the duct leakage testing equipment fan on the air handler cabinet. 11. Turn the air handler on high again. 12. Monitor the pressure in the supply duct and turn on the duct leakage testing equipment fan until the normal operating pressure has been reached. 13. Record the airflow. This is the total system airflow. Installation Flow Grid Test A quicker and easier method for testing system airflow is using a flow grid. The flow grid is installed in the filter slot of the existing system and uses a pressure manometer to measure system operating pressure and flows. The basic steps are as follows: 1. Turn off the air handler. 2. Open a window or door between the building and outside to prevent pressure changes during the test. 3. Make sure all supply and return registers are open and not taped. Filter should be in place 4. Insert a static pressure probe into the supply plenum or in a main supply trunk line a few feet away from the supply plenum. Make sure the probe is pointing into the air stream. 5. Connect the probe to one end of a piece of tubing and the other end of the tubing to the pressure gauge (see equipment manual for detailed instructions). 6. Turn the thermostat to the AC fan setting (or on high). Typically, electronic thermostats are equipped with a 15‐minute staging timer. This timer prevents the 2‐stage system from operating at high‐stage until unit has been operating in low‐stage for 15 minutes unless there is at least a ±5°F difference between room © 2010 Steven Winter Associates, Inc. All rights reserved. Page 2‐24 temperature and thermostat set point. To force high‐stage (after a minimum of 2 minutes in low‐stage), adjust the set point at least ±5°F below room ambient. This might vary depending on the brand and thermostat, so to ensure the system runs on high for the test, set the thermostat as low as possible and wait 15 minutes. 7. Once the system is running at high speed, measure the pressure in the supply. 8. Turn the system off at the thermostat and the emergency switch. 9. Remove the filter and insert the flow grid into the filter slot using the correct flange attachments to ensure complete coverage of the return airflow path. 10. Connect the pressure taps from the flow grid to the pressure gauge. 11. Turn the air handler on high again. 12. Record the airflow. Installation Consult the flow grid’s operating instructions for detailed instructions on how to properly hook up the equipment and use the gauges. The above two airflow test methods are the most common methods used by energy auditors. There are other approved test methods for measuring airflow. These are more likely to be used by HVAC technicians and include: Pressure drop across the coil: HVAC equipment manufacturers have developed pressure drop data for their equipment. Static pressure (SP) drop across the coil is converted to CFM of air through the use of charts or graphs in the OEM installation/startup instructions. Equipment manufacturer’s directions for the placement of measuring probes must be followed. The proper table must be used depending on whether the test is performed over a wet or dry coil. Oil‐filled or digital manometers can be used. Traverse using an anemometer: Traversing involves taking readings over a predetermined grid pattern and using those readings to calculate airflow through the duct at that location. The average airflow velocity across a representative cross section of duct is measured in feet per minute (FPM) and then multiplied by the area in square feet to obtain the final volume in cubic feet per minute (CFM). For more detailed information on how to perform a traverse, see the ACCA’s “Technician’s Guide for Quality Installations” and/or your equipment’s user’s manual. Temperature rise method: This is a common test performed by HVAC technicians to verify airflow. This test can only be used for heating equipment including electric, gas or oil furnaces. This cannot be performed in cooling mode. C. Determine Airflow/Installed Ton (cfm/ton) 1. Measure the airflow of the system as described above. © 2010 Steven Winter Associates, Inc. All rights reserved. Page 2‐25 2. Divide the total airflow by the tonnage calculated in Step A. This will yield cfm/ton. Installation D. Evaluate Total External Static Pressure 1. For split systems with a furnace, drill a hole just above the air handler cabinet and just before the evaporator coil. Be very careful not to drill into the coil. 2. For heat pumps and packaged units, drill a hole in the supply plenum just after the air handler cabinet. 3. Drill a hole in the return plenum between the filter and the air handler. 4. Connect one end of the tubing to the upper tap of the manometer on the A side and the other end to a pressure tap. 5. Make sure the manometer is set up to read pressures. 6. Set the air handler to operate at maximum speed (see B.6 above). 7. Insert the pressure tap into the hole on the supply side (see steps 1 & 2 above) and record the static pressure. (if reading is in Pascals, you can convert to IWC by dividing by 249.1) 8. Record static pressure on return side (should be negative). 9. Eliminate the negative sign from the return reading and add the numbers together. This is the total external static pressure. 10. How does this number compare to the manufacturer’s recommendation? If necessary, reduce the TESP by adjusting the blower speed, making changes to ductwork, cleaning system components, etc. © 2010 Steven Winter Associates, Inc. All rights reserved. Page 2‐26 2.2.2 For new systems (when not installing new ductwork): Air conditioner or heat pump airflow must be within the design parameters of the manufacturer’s specifications with a minimum of 325 CFM/Ton before proceeding with refrigerant charge corrections based on the results of the appropriate charging tests. Installation See previous section for calculation and airflow testing methods. Airflow testing and corrections and room airflow balancing should be conducted before refrigerant charge is tested. NOTE: The Clark County Community Resources Division in Las Vegas, NV is requiring design airflows of at least 440 cfm/ton for new installs without duct modifications. For a “Clean & Tune” only, see Section 4.3.1. Example: The contractor measured the airflow of the system at 1,000 cfm using a flow plate. The cooling system capacity is 36,000 Btuh. Does the airflow meet the requirements in 2.2.2? Answer: Airflow/ton: 1,000 cfm ÷ (36,000 Btuh ÷ 12,000 Btuh/ton) = 333 cfm/ton – The system meets BPI’s requirements listed in 2.2.2, but does not meet the requirements of 440 cfm/ton of the Clark County Community Resources Division. TIP: Any adjustments to the airflow will result in the need to retest the charge, so it is best to try and bring the flows to the levels specified in 2.2.1 before testing the charge. © 2010 Steven Winter Associates, Inc. All rights reserved. Page 2‐27 2.2.3 For new systems (when not installing new ductwork): The contractor must attempt to bring the airflow within the ranges set in 2.2.1 by opening registers, opening dampers, changing blower speed, replacing filters, and removing obvious easily repaired kinks in flex duct systems. If the above repairs do not bring the unit into compliance, the contractor shall inform the customer that duct system revisions are necessary. Installation The contractor should provide written documentation of steps taken to bring the airflows into compliance and make recommendations for repairs if those airflows were not achieved. © 2010 Steven Winter Associates, Inc. All rights reserved. Page 2‐28 2.3 Duct Systems 2.3.1 New ducted distribution systems must provide for adequate return air pathways to minimize pressure imbalances in the conditioned space. Room to room pressure differences may not exceed 3 Pascals. Installation Room to Room Pressure Measurements 1. Turn on the air handler to high ‐ cooling usually (see item 2.2.1 for information on how to force the system to run on high) 2. Close all interior doors 3. Connect tubing to Channel A Input tap and leave the bottom Reference tap open. 4. Set the gauge to measure pressures on both Channel A and B. 5. While standing in the center of the house or hallway, place the hose from the gauge under each door and record the pressure difference from each room with respect to the main body of the house (note the presence of a negative/positive sign) 6. Rooms should not be pressurized or depressurized by more than 3 Pa. Pay particular attention to rooms which contain combustion equipment – gas fired water heaters, gas stoves & fireplaces, etc. If larger differentials are noted, the contractor or auditor should make recommendations to bring the home into compliance. Typically, in a home without return ducts in every room, the bedrooms will be pressurized when the doors are closed, especially if the doors are not undercut and there are no jump ducts. If the bedrooms are pressurized compared to the central zone, some possible fixes include the installation of transfer grills, jump ducts and additional return registers. © 2010 Steven Winter Associates, Inc. All rights reserved. Page 2‐29 Installation 2.3.2 Filter slots must be tightly covered and the cover must be easily removed for cleaning and/or replacement. Below are some examples of unacceptable filter slots. The best option is to have a factory‐built filter compartment. Figure 12 Examples of Unsuitable Filter Slots © 2010 Steven Winter Associates, Inc. All rights reserved. Page 2‐30 2.3.3 New ducted distribution systems must have sheet metal and flexible ductwork both mechanically fastened and sealed at all connections. Sealing shall use duct mastic or similar product designed for sealing ducts. Duct tape is not an allowable duct sealing material. UL standard (UL 181, UL 181A, or UL 181B) duct tape may be used only at the plenum connection to the air handler cabinet. Installation Duct Sealing Techniques Appropriate duct sealing materials are limited to products the have earned the Underwriter’s Laboratory label for duct closure systems. These are: UL‐181A: Closure Systems for Use with Rigid Ducts UL‐181B: Closure Systems for Use with Flexible Air Ducts and Air Connectors Labeled products consist of mastic, butyl tape, and some pressure‐sensitive tapes. Mastic and butyl tape are the only products that are recommended for duct sealing in existing homes (in spite of what UL has labeled). This is due the fact that the UL procedure for pressure‐sensitive tapes requires mechanical fasteners (i.e. metal clamps), which are virtually never used in the field, and that the UL procedure assumes the duct surface is clean prior to installation. If duct surfaces are cleaned (using denatured alcohol or similar solvent), pressure‐sensitive tapes may be effective sealants, but the UL testing procedure does not adequately address this. Butyl Tape Butyl tapes are an attractive option for duct sealing because they are more pliable than most standard metal tapes, they are relatively easy to install, and they leave a neater, more finished appearance than mastic. On the downside, butyl tape is expensive and may be subject to melting if the ducts become very hot. Mastic Duct mastic is a material similar to joint compound. It is sold in caulk tubes and buckets and may be applied using a paintbrush or other applicator. When storing mastic, it is best to keep it from freezing even if the manufacturer’s instructions indicate that freezing will not damage the product. Most mastics are water soluble prior to curing but are waterproof once cured. Mastic may be used to seal holes and cracks up to approximately ¼” in size. Holes larger than ¼” require additional support. Mesh tape (the type used by drywall installers) may be used as a bed for the mastic when larger holes are sealed. © 2010 Steven Winter Associates, Inc. All rights reserved. Page 2‐31 Installation Sealing Applications and Techniques: The following are some applications that will require repair work beyond simply applying a coat of mastic. 1. Flexible duct connectors to trunk lines. These connectors are typically secured to the main trunk line by means of “finger joints”. Finger joints are just tabbed collars that are inserted into the hole in the trunk line and the tabs are folded over to hold the collar in place. This makes for a very leaky connection. To seal around a round collar with finger joints, mesh tape is needed to hold the mastic in place. Cut a piece of mesh tape long enough to wrap 1‐1/2 times around the diameter of the collar. Fold the mesh tape in half several times, then cut a slit from the exposed long edge of the tape, about halfway through the width of the tape. Unfold the tape and wrap it around the collar with the cut tabs against the flat surface of the trunk duct. This will provide a surface for mastic to stick to on both the collar and the trunk at the same time. Figure 13 Tips for Sealing Flex Duct6 2. Under cabinet kickplates. Commonly found in kitchens, a duct is run up through the subfloor before the cabinets are installed, then a register is cut into the cabinet kickplate. The idea is that the air from the duct is supposed to travel under the cabinet and out through the register. More often, the air travels under the cabinet and never makes it out the register. In this case, the duct sealer will have to access under the cabinet and make sure that the air has an 6 Technology Fact Sheet: “Air Distribution System Installation And Sealing”. March 2003. DOE/GO102003‐0783 © 2010 Steven Winter Associates, Inc. All rights reserved. Page 2‐32 enclosed space to travel through. This may mean sealing the perimeter of the space under the cabinet, sealing the floor openings from the basement below, or even building a duct to connect the floor opening to the register. Installation 3. Panned joist bays. A common practice to save money on installation is to use a basement ceiling joist bay in place of a fully ducted return duct. This is typically done by installing sheet metal “panning” over the bottom of the joists and connecting the joist bay to the duct system on one end and a floor register on the other end. While not a recommended practice, it is relatively easy to seal this type of return. Mastic may be applied to the joint between the panning and the joist, with or without mesh tape, depending on the size of the gaps. It is usually not necessary to seal the joist to the sub‐floor unless it is clearly not sealed tight. When sealing panned joist bays, make sure to check the end of the “duct” run to be sure an end cap has been installed and is well‐sealed. This is an often overlooked detail in this type of system. 4. Platform returns. Upflow air handlers are sometimes installed sitting on top of a plywood box, which is used as the return‐side plenum. This is also a money‐saving technique contractors use to avoid the added cost of a fully ducted sheet metal return. These are called “platform” returns. It is not uncommon to find that the box only has 4 sides and the cement of the basement floor is serving as the bottom of the plenum. In this case, the joint between the plywood and the floor will need to be sealed with plenty of mastic and mesh tape. In addition, all of the corners of the box and the connection between the box and the air handler all need to be sealed. Sealing may be done either from inside or outside the box, depending on what is more accessible. 5. Building cavities. Sometimes, entire building cavities (wall cavities, plumbing chases, or other interstitial spaces) may be being used as part of the ducts. Again, this is typically done on the return side of the system to save money in construction. These situations are particularly problematic because the duct system may be drawing air that is extremely hot or cold, and because the return may be drawing dust and other pollutants into the system. A combination strategy of air sealing, duct sealing, and possibly the installation of a duct where there is none may be required. These situations should be evaluated on a case by case basis to determine the best approach. They are more © 2010 Steven Winter Associates, Inc. All rights reserved. Page 2‐33 expensive to repair but then again, they are very large leaks that may have very high energy penalties associated with them. Installation 6. Register boots. Whether registers are located in ceilings, walls, or floors, they are rarely installed so that the space between the metal duct and the building envelope (drywall, subfloor, etc.) is air tight. This gap can easily be sealed by removing the register grill and using mastic in a caulk tube. When the grill is removed, the technician should also reach inside the boot to seal the joint between the boot and the take‐off duct. Figure 14 Sealing Duct Boots & Connections7 TIP: When sealing register boots make sure to wait until the mastic is dry before re-installing the register grilles. If you don’t, the grills will be glued shut! 7 Technology Fact Sheet: “Air Distribution System Installation And Sealing”. March 2003. DOE/GO102003‐0783 © 2010 Steven Winter Associates, Inc. All rights reserved. Page 2‐34 Installation 7. Air Handler Cabinets and Refrigerant Lines. Seal around refrigerant lines, condensate drains or any other penetrations coming out of the air handler cabinet or plenums. The air handler cabinet itself can be a major source of leakage during the duct leakage test. Make sure filter slots are well sealed. Seal all seams in the air handler cabinet and connections between the cabinet and the return and supply plenums. © 2010 Steven Winter Associates, Inc. All rights reserved. Page 2‐35 Installation 2.4 Refrigerant 2.4.1 The orifice size must match the system: Fixed orifice metering devices must match the outdoor unit (when replacing or installing new systems) Piston‐type metering devices: If the indoor coil has a different sized piston than the one on the outdoor unit, the indoor coil piston must be replaced with the correct size. When the installation is complete, attach the label that comes with the correct piston to the indoor coil. Capillary tube equipped systems must have matched indoor and outdoor coils. TXV metering device: must be properly sized to match the outdoor unit. In a cooling system, the refrigerant leaves the condenser as a liquid and is pumped to the air conditioner metering device. The metering device meters the refrigerant only allowing a certain quantity to get past it. The metering device creates a pressure drop of the liquid refrigerant which causes the refrigerant to drop in temperature. The refrigerant is now cold and ready to enter the air conditioner evaporator coil. TXV's (thermostatic expansion valves) will meter the refrigerant based on a calculated quantity of refrigerant needed to satisfy demand. For fixed metering devices such as bullet orifices, pistons, and capillary tubes, the same quantity of refrigerant is metered no matter the demand. This is the reason why TXV metering devices are used in air conditioner systems rated for higher efficiency8. Fixed metering devices are typical on older systems that use R‐22 refrigerant which is being phased out of use and is not used in new systems today. Older systems can be serviced and charged with R‐22, but if either the outdoor or indoor coil of a system needs replacing, both components will have to be replaced so that the new R‐410A refrigerant can be used. Identifying Metering Devices Fixed (Bullet) Orifice: Only a technician will be able to locate and inspect this metering valve. Again, these systems are associated with R‐22 refrigerant, therefore if a new system is being installed, this type of metering device would most likely not be used. Piston: There will be two piston metering valves on a system if it is a heat pump. Cooling only systems will have only one piston metering valve. The size of the piston orifice should be located on the nameplate on the equipment and will be listed in millimeters (mm). Capillary Tube: If you have access to the evaporator coil, you can identify a capillary tube as you will see numerous small diameter (0.02‐0.09 inches) copper tubes running from a single distributor (connected to the liquid line) to the 8 http://highperformancehvac.com/how‐air‐conditioners‐work#how_air_conditioners_work_metering_device © 2010 Steven Winter Associates, Inc. All rights reserved. Page 2‐36 Installation various branches of the evaporator coil. If the technicians notes that the system has a capillary tube metering device, the indoor and outdoor coils must be matched either according to manufacturer’s data, AHRI or matched coil capacities. Figure 15 Capillary Tube Metering Device TXV: The most widely used metering devices are thermostatic expansion valves (TXV) followed by piston metering devices and capillary tubes. Most TXV’s are external field mounted, so look for a bulb and capillary tube on the suction (large) line that feeds back to a valve in the liquid (small) line. The part number can be found on the TXV and the size can then be determined from the manufacturer’s literature. Compare the capacity of the TXV to the capacity of the outdoor coil. Figure 16 TXV Metering Device9 9 http://dnr.louisiana.gov/sec/execdiv/techasmt/ecep/hvac/h/h.htm © 2010 Steven Winter Associates, Inc. All rights reserved. Page 2‐37 2.4.2 Refrigerant lines and indoor coil must be purged with inert gas during brazing to prevent oxidation. Installation This item is the responsibility of the certified HVAC technician. The auditor should verify that the technician has checked this off on the Field Checklist. © 2010 Steven Winter Associates, Inc. All rights reserved. Page 2‐38 2.4.3 New systems must be evacuated to 500 microns or less. Isolate the system from the vacuum pump and let it sit. The micron gauge should not rise more than 300 microns (or the manufacturer’s specified limit, whichever is less) in 5 minutes above the initial vacuum level. Installation This procedure removes moisture from the system and ensures that there are no leaks. This item is the responsibility of the certified HVAC technician. The auditor should verify that the technician has checked this off on the Field Checklist. © 2010 Steven Winter Associates, Inc. All rights reserved. Page 2‐39 2.4.4 Proper charge must be verified using the superheat or sub‐cooling method. When weather conditions do not allow for proper AC testing (super‐heat or sub‐cooling), the charge may be “weighed in”. The charge must be calculated according to the manufacturer’s specifications. Installation Checking refrigerant charge is the responsibility of the HVAC technician. The auditor should verify that the information was completed for this section on the Field Checklist. Verify that the correct test was performed based on the type of metering valve present. See section 2.4.1 for information on how to identify metering devices. IMPORTANT NOTES ON CHECKING REFRIGERANT CHARGE: BEFORE charge can be tested, airflow across the coil MUST meet the manufacturer’s specifications. All airflow testing and adjustment MUST be conducted before testing the refrigerant charge. These tests CANNOT be performed on a heat pump in heat mode. The outside air temperature SHOULD be above 60F Superheat Test This test is performed at the suction line (at the condenser) on units with fixed orifice, piston or capillary tube metering devices. For an accurate superheat test, the following conditions should be met: 1. The technician must have tools that can measure dry bulb outdoor temperature, entering condenser coil temperature and wet bulb temperature of the return air at the air handler. 2. The test must be conducted with the system under a full load. 3. An accurate temperature measurement must be taken on the suction line near the service port. The pipe must be cleaned before taking the measurement. 4. The suction line pressure is measured at the compressor service port. 5. Using the suction line pressure, look up the saturation temperature from the manufacturer’s Pressure/Temperature chart. Figure 17 can be used for R‐410A and R‐22 if manufacturer literature is not available. 6. Superheat is the difference between the measured suction line temperature reading obtained in Step 3 immediately above, and the temperature obtained in the previous step. Determine if the superheat is within ±5F of the equipment manufacturer’s required superheat value for the condition. NOTE: If the superheat is higher than the manufacturer’s specified range, refrigerant should be added. If the superheat is lower than the specified range, refrigerant will have to be removed. The test should be repeated after 15 minutes of adding or removing refrigerant. © 2010 Steven Winter Associates, Inc. All rights reserved. Page 2‐40 Installation Figure 17 Pressure/Temperature Chart for R‐410A and R‐22 Refrigerants. Subcool This test is done at the condenser outlet on the systems equipped with a thermostatic expansion valve (TXV). The degrees F subcooling is equal to the condensing saturation temperature converted from the pressure reading minus the measured liquid line temperature. The following procedure is should be used for accurate results: © 2010 Steven Winter Associates, Inc. All rights reserved. Page 2‐41 1. An accurate temperature measurement must be taken on the liquid line as close to the connection at the condenser as possible. The pipe must be cleaned before taking the measurement. 2. The liquid pressure should be converted using a vapor saturation temperature chart. 3. Subcooling is the difference between the measured temperature readings in the liquid line and the temperature obtained by the pressure conversion. Determine if the subcooling is within 3F of the equipment manufacturer’s optimal number. Installation NOTE: If the subcooling is lower than the manufacturer’s specified range, refrigerant should be added. If the subcooling is higher than the specified range, refrigerant will have to be removed. The test should be repeated after 15 minutes of adding or removing refrigerant. © 2010 Steven Winter Associates, Inc. All rights reserved. Page 2‐42 2.5 Controls 2.5.1 Heat pump controls shall stage the compressor based heating first, followed by one or more stages of back‐up heating. The first stage of heating shall not include electric resistance heating. Installation This is the responsibility of the HVAC technician. The technician should verify that the first stage of heating does not include electric resistance heating by creating a call for heat and using an electric meter to verify that the resistance heater does not activate in the first stage. The auditor should verify that the information was completed on the Field Checklist. 2.5.2 If the rated SEER or HSPF for the unit is dependent on a particular option (Thermostatic Expansion Valve and/or Time Delay Relay) that option must be installed. Visual verification of TXV’s can be performed by the auditor. See section 2.4.1 for information on how to identify metering devices. To determine if a Time Delay Relay was installed, the auditor can turn down the thermostat below the room temperature to force the cooling system on. Once the system is running, turn the thermostat back up again to a setting higher than the actual room temperature. If the air handler fan runs for a minute or two after this is done, a time delay relay has been installed. © 2010 Steven Winter Associates, Inc. All rights reserved. Page 2‐43 2.6 Commissioning 2.6.1 Newly installed AC and heat pump systems must be run through a heating and/or cooling cycle as noted in 2.2.1, 2.2.2, 2.2.3, 2.3.1, 2.4.4, 2.5.1, and 3.1.1 to verify proper performance of airflow, charge, controls, room pressures, and delivery of heating/cooling to the living space. These parameters can be verified singly or in groups. Installation See the applicable sections for more information on how to comply with those requirements. © 2010 Steven Winter Associates, Inc. All rights reserved. Page 2‐44 3 Commissioning 3.1 Airflow 3.1.1 New ducted distribution systems require register airflows to be measured and verified. The system shall deliver +/‐ 20% of design airflows for each conditioned room. Deviations from design criteria greater than 20% must be corrected. Commissioning The designed air flow requirements should be input into the Airflow & Room‐to‐Room Pressure Form (see Appendix) before arriving on site. The airflow at each register must be measured and recorded. Compliance is met if the tested airflow is within +/‐20% of the design airflow. To minimize potential “whistling” sounds, it is recommended to adjust inline dampers, if available, rather than the supply registers dampers. The HVAC QI specification requires that balancing be done with all doors closed to ensure there is supply and return airflow at those times. Flow Hood Make sure your equipment is rated for the full range of flows you will encounter. Flow Hood manufacturer’s directions must be followed. For example a temperature probe may need to be installed, or a conversion table may need to be used for accurate readings when the supply air is heated. Anemometer When performing a traverse with an anemometer, the auditor/technician needs to consider: Some corrections will need to be made to the final answer if the temperature is below 60°F or above 80°F. (see appendix) Several types of meters can be used. For fast and accurate results, select a meter that reads in feet per minute and corrects for altitude and horizontal positioning. This calculation should be done for each room. There is a Register Flow & Room‐to‐ Room Pressure Form in the appendix for recording design and measured air flows. It can be used to verify compliance with this item and 2.1.6. © 2010 Steven Winter Associates, Inc. All rights reserved. Page 3‐1 Example: Airflows for the home at 555 Sample Street were measured at each register and recorded on the Register Flow & Room‐to‐Room Pressure Form (see below). Is this system in compliance with item 3.1.1 of BPI’s technical standard? Commissioning Register Flow Summary Sheet Project Address: HVAC Company: Technician: Auditor: 555 Sample Street ABC Plumbing & Heating Pat Smith Carol Jones System Install Date: Audit Date: 6/1/2010 6/10/2010 Tool Used: XXX Airflow Device Model Number: zzz‐xxx 1 Room/Grill Number Design Load CFM Living Room 286 Dining 261 Den 156 Kitchen 148 Hall 112 Closet 2 0 2 Duct Design CFM 280 250 150 150 100 0 3 % of Design Measured CFM ‐2% 320 ‐4% 220 ‐4% 175 1% 115 ‐12% 100 0% 0 4 % of Design Answer: For each room, calculate the % deviation from the design flow by dividing the measured air flow by the design airflow, subtracting that number from 1 and multiplying the result by 100: 1 – (Measured Airflow/Design Airflow) x 100 = % of design The results for each room are located in the table below in the far right column. Register Flow Summary Sheet Project Address: HVAC Company: Technician: Auditor: 555 Sample Street ABC Plumbing & Heating Pat Smith Carol Jones System Install Date: Audit Date: 6/1/2010 6/10/2010 Tool Used: XXX Airflow Device Model Number: zzz‐xxx 1 Room/Grill Number Design Load CFM Living Room 286 Dining 261 Den 156 Kitchen 148 Hall 112 Closet 2 0 2 Duct Design CFM 280 250 150 150 100 0 3 % of Design Measured CFM ‐2% 320 ‐4% 220 ‐4% 175 1% 115 ‐12% 100 0% 0 4 % of Design ‐12% 16% ‐12% 22% 11% 0% The airflow in the Kitchen is not within 20% of the design flow. Therefore, the home is not in compliance. © 2010 Steven Winter Associates, Inc. All rights reserved. Page 3‐2 3.2 Commissioning 3.2.1 3.2.2 Duct tightness for newly installed duct systems must meet or exceed the requirements set forth in the EPA standards for Energy Star Ducts. The sum of supply and return leakage measured at 25 Pascals of pressure shall be no more than 10% of the measured system airflow. (Example: With a measured 1,200 CFM system airflow, the total duct leakage may not exceed 120 CFM25.) Commissioning NOTE: If a local program has stricter requirements than those listed above, the stricter values shall apply. Clark County has adopted the Home Performance Specifications for Warm Climates which require duct leakage levels of no more than 6% of the total airflow or a reduction of 40% of the original value. This procedure describes how to measure duct leakage to outside using a combination of air leakage and duct leakage testing equipment. For specific instructions regarding proper use of this equipment, it is recommended that technicians refer to the manufacturer’s users manuals. Before beginning to set up for testing, a visual inspection of the system should be completed to make sure there are no reasons that the test should not be run. Duct Leakage to Outside Testing Procedure: 1. Configure the house for an air leakage test (see section 2.1.5 for information on conducting a blower door test) 2. It may also be helpful to choose a door in close proximity to the furnace/AC air handler as you may find yourself running between the two fans to adjust pressures during the test. 3. If a pressurization test is being used, and the blower door is only being used to maintain a 25 Pascal house pressure during the duct leakage test, the fan may be installed facing out and the reverse switch may be used to blow air into the house. This is somewhat easier than working with the fan turned around and facing into the house. 4. Determine if the air handler is inside or outside the conditioned space. a. If the air handler is “outside”, make sure the door between the zone and the living space is securely shut. b. If the air handler is “inside”, make sure any doors between the zone and the living space is open. 5. Remove the system air filter. In most cases, this will be in a filter slot near the air handler on the return side. Some central‐return systems may have filters mounted in the register grill. Some filters are located inside the air handler cabinet. (If the filter is dirty, remind the homeowner to clean or replace it.) 6. Set up the duct leakage testing equipment a. Select an appropriate location. © 2010 Steven Winter Associates, Inc. All rights reserved. Page 3‐3 i. The air handler cabinet may be the most convenient location and will ensure limited restrictions to the testing equipment airflow. ii. If the duct leakage testing equipment cannot be set up on the air handler, a return register may be used. This works best for central‐ return systems. If they system has multiple returns, choose the register closest to the air handler. b. Select a testing configuration: pressurization or depressurization i. Pressurization testing is easier to set up and is usually preferable. ii. If depressurization is chosen, make sure to follow the manufacturer’s instructions for proper setup including use of the flow conditioner and hose connections. c. Set up the pressure hoses i. Drill a ¼” hole in a supply duct near the air handler and install a static pressure probe pointing into the direction of the airflow. Ideally, duct pressure measurements should be taken in a location free of turbulence from connectors, elbows, etc. Look for a straight run of duct approximately 12” downstream of the plenum for best results. If this is not possible, pressures may be taken in the plenum. ii. Connect the supply hose to the input tap of Channel A of the manometer. If the supply pressure measurement is being taken from a space “outside” the conditioned area, an additional hose must be run to the conditioned space and attached to the Channel A reference tap on the manometer. If the supply pressure measurement is being taken from “inside” the conditioned area, leave the reference tap open. iii. Set up a third hose connecting the duct leakage testing equipment fan to the input tap of Channel B of the manometer. Leave the Channel B reference tap open. 7. Seal all supply and return registers. Use masking tape or duct mask and completely seal all registers in the duct system. 8. Open unconditioned zones to outside as much as possible. If the air handler is located outside the conditioned space, try to open the zone to outside as much as possible (open attic vents, basement windows, bulkhead doors, etc.). 9. Using the blower door, pressurize the house to 25 Pascals10 with reference to (WRT) outside. Always turn the fan up slowly to avoid sudden changes in pressure. Leave the blower door fan running. a. It may not be possible to reach 25 Pascals of pressure in very leaky or very large houses. If this is the case, use the highest test pressure possible and adjust the final duct leakage cfm to 25 Pascals by using the chart provided by the duct leakage testing equipment manufacturer. Commissioning 10 From this point forward, the procedure assumes a pressurization test is being done. Refer to the user’s manual for complete instructions for conducting a depressurization test. © 2010 Steven Winter Associates, Inc. All rights reserved. Page 3‐4 TIP: If cold ashes are present in a fireplace, cover them with wet newspaper and use some logs or fireplace tools to weigh it down while running the blower door. SAFETY ISSUE: NEVER run a blower door in a house with a wood fire burning. Even a few hot embers can reignite when subject to air 10. Using the duct leakage testing equipment fan, pressurize the duct system until the pressure in the supply duct is 0 WRT the conditioned space. If the ducts are not very leaky to outside, it may be necessary to use a low flow ring. If a fan pressure of less than 10 Pascals is needed to bring the supply duct pressure to zero, then add a low flow ring. Once that pressure is stable, it is a good idea to double check that the blower door is still at 25 Pascals. When you are sure both pressures are stable, take the duct leakage testing equipment pressure and flow readings. 11. Record the house pressure, testing equipment fan pressure and ring configuration. 12. Record the testing equipment airflow. This is your duct leakage to outside. 13. Disassemble the equipment. 14. Return the home to its original condition. © 2010 Steven Winter Associates, Inc. All rights reserved. Commissioning Page 3‐5 4 Service & Repair Several items in this section are similar or identical to items already covered. Where that is the case, the applicable section has been referenced. Service & Repair 4.1 Duct Systems 4.1.1 Sheet metal and flexible ductwork shall be mechanically fastened and sealed at all connections. Sealing shall use duct mastic or similar product designed for sealing ducts. Duct tape is not an allowable duct sealing material. UL standard (UL 181, UL 181A, or UL 181B) duct tape may be used only at the plenum connection to the air handler cabinet. See section 2.3.3 for more information. 4.1.2 Filter slots must be tightly covered and the cover must be easily removed for cleaning and/or replacement. See section 2.3.2 for more information © 2010 Steven Winter Associates, Inc. All rights reserved. Page 4‐1 4.2 Refrigerant 4.2.1 Refrigerant charge may not be added to a system with leaks. If refrigerant was previously added and unit has undercharge, the system must be tested for leaks following established protocols for leak detection. Leaks must be repaired or the client must be informed that the system cannot be charged. Service & Repair Leaks can be detected in a couple of different ways. First, a fluorescent die can be injected into the refrigerant, and with the help of a special infrared camera, leaks can be easily detected. Second, electronic leak detection meters can be used similar to that used to find gas leaks. These meters are not very affective on R‐410A refrigerant. Leak detection is the responsibility of the HVAC technician. The auditor should verify that the proper information was input on the Field Checklist. 4.2.2 Refrigerant charge corrections must be verified using the appropriate charge measurement method (superheat or sub‐cooling) Air conditioner or heat pump airflow must be within the design parameters of the manufacturer’s specifications with a minimum of 325 CFM/Ton before proceeding with refrigerant charge corrections based on the results of the appropriate charging tests. If airflow adjustments are made the refrigerant charge test must be rerun. See section 2.4.1 & 2.4.4 for information on how to determine which tests should be used. For new system installs, with or without duct modifications, airflows should be a minimum of 440 cfm/ton before proceeding with refrigerant charge corrections. For a Clean & Tune, refer to the minimum requirements listed in section 4.3.1 before proceeding with refrigerant charge corrections. © 2010 Steven Winter Associates, Inc. All rights reserved. Page 4‐2 4.3 Airflow 4.3.1 System airflow must be measured and Measured heat pump airflow should be between 375‐450 CFM/Ton, or within manufacturer’s specifications when measured over a dry coil (i.e. tested in heating mode.) Measured air conditioner airflow should be at least 350 CFM/Ton unless the manufacturer specifies a lower airflow for the local design condition, when measured over a wet coil (i.e. tested in cooling mode after a minimum of 15 minutes of run time.) See section 2.2.1 for more information on determining system airflow. 4.3.2 For existing systems: The contractor must attempt to bring the airflow within the ranges set in 4.3.1 by opening registers, opening dampers, changing blower speed, replacing filters, and removing obvious easily repaired kinks in flex duct systems. If the above repairs do not bring the unit into compliance, the contractor shall inform the customer that indoor coil cleaning or duct system revisions are necessary. Service & Repair See section 2.2.3 for more information.. 4.3.3 If repairs are made that effect airflow, the system airflow shall be measured before and after repairs are completed. See section 2.2.1 for directions on measuring airflow. © 2010 Steven Winter Associates, Inc. All rights reserved. Page 4‐3 5 Diagnostic Tests Several items in this section are similar or identical to items already covered. Where that is the case, the applicable section has been referenced. 5.1 Electrical 5.1.1 Existing wiring systems must be inspected for safe installation and compliance with applicable codes. This inspection should include, but is not limited to: Checking for obvious loose connections Visual inspection of contacts to verify good condition (no pitting, etc.) Properly sized wire gauge as required by the circuit amp draw See item 1.3.2 for more detail on which electrical components should be inspected and tested. 5.1.2 Voltage drop across contacts and relays may not occur. If a voltage drop is measured, the source must be located and corrected. Checking voltage drop is the responsibility of the HVAC technician. The auditor should verify that the proper information was input on the Field Checklist. © 2010 Steven Winter Associates, Inc. All rights reserved. Page 5‐1 5.2 Airflow 5.2.1 System airflow may be measured using a metered and calibrated pressurization device, a metered and calibrated flow plate, or a flow capture hood designed for the flow range anticipated. See section 2.2.1 for information on measuring airflow. 5.3 Duct Systems 5.3.1 Pre‐ and Post‐installation duct leakage shall be measured any time that duct sealing is part of the work‐scope to verify the success of the installation. See section 3.2.2 for information on determining duct leakage. 5.3.2 When quantifying duct leakage, a measurement system that includes a metered and calibrated duct pressurization device shall be used. See section 3.2.2 for information on determining duct leakage. 5.4 Refrigerant 5.4.1 Refrigerant charge may be measured using the following methods: Use sub‐cooling method for TXV equipped systems Use superheat method for non‐TXV equipped systems (Alternative manufacturer‐specific procedures may be allowable. Submit alternative procedures to BPI for review and approval.) If airflow is changed, the refrigerant charge must be retested. See section 2.4.1 and 2.4.4 for procedures for measuring refrigerant charge. © 2010 Steven Winter Associates, Inc. All rights reserved. Page 5‐2 References Air Conditioning Contractors of America (ACCA), Plumbing‐Heating‐Cooling‐Contractors‐ National Association Educational Foundation, Refrigeration Service Engineers Society. 2009. “HVACR 101”. Delmar CENGAGE Learning. Clifton Park, NY. Air Conditioning Contractors of America (ACCA), Plumbing‐Heating‐Cooling‐Contractors‐ National Association Educational Foundation, Refrigeration Service Engineers Society. 2009. “HVACR 201”. Delmar CENGAGE Learning. Clifton Park, NY. Air Conditioning Contractors of America (ACCA), Plumbing‐Heating‐Cooling‐Contractors‐ National Association Educational Foundation, Refrigeration Service Engineers Society. 2009. “HVACR 301”. Delmar CENGAGE Learning. Clifton Park, NY. Air Conditioning Contractors of America (ACCA). 2007. “ACCA Standard 5: HVAC Quality Installation Specification”. ACCA, Arlington, VA. Air Conditioning Contractors of America (ACCA). 2008. “Technicians Guide for Quality Installations”. ACCA, Arlington, VA. Air Conditioning Contractors of America (ACCA). 2009. “ACCA Standard 9: HVAC Quality Installation Verification Protocols”. ACCA, Arlington, VA. Air Conditioning Contractors of America (ACCA). 2009. “Manual D, Residential Duct Systems”. Third Edition, V. 1.00. ACCA, Arlington, VA. Building Performance Institute, Inc (BPI). 2003. “Technical Standards for the Air Conditioning and Heat Pump Professional”. BPI. Malta, NY. Consortium for Advanced Residential Buildings (CARB), Steven Winter Associates, Inc. 2010 “Designing Forced‐Air HVAC Systems”. http://www.carb‐swa.com/index.html. Consortium for Advanced Residential Buildings (CARB), Steven Winter Associates, Inc. 2010 “Why Right‐Size?”. http://www.carb‐swa.com/index.html. Krigger, J., Dorsi, C. 2006. “Saturn Mechanical Systems Field Guide”. Saturn Resource Management, Inc. Helena, MT. Krigger, J., Dorsi, C. 2008. “Home Performance Specifications for Warm Climates”. Saturn Resource Management, Inc. Helena, MT. Rutkowksi, H. PE. 2004. “Manual S, Residential Equipment Selection”. Air Conditioning Contractors of America (ACCA), Arlington, VA. Rutkowksi, H. PE. 2006. “Manual J, Residential Load Calculations”. Eighth Edition, V. 2.00. Air Conditioning Contractors of America (ACCA), Arlington, VA. © 2010 Steven Winter Associates, Inc. All rights reserved. Appendix A. Field Checklist Field Checklist BPI Technical standards for the Air Conditioning and Heat Pump Professional (modified for compliance with "Home Performance Specifications for Warm Climates") New System Installs + New Ducts (or changes to existing duct size and/or configuration) (does NOT apply to simply lowering and burying ducts) For more information on testing procedures documentation refer to the "BPI Technical Standards for the Air Conditioning and Heat Pump Professional" ACCA Standard 5 "HVAC Quality Installations specification" and the " Technicians Guide for Quality Installations" from ACCA PROJECT INFORMATION Project Address Technician Auditor HVAC Company System Install Date Audit Date 1. HEALTH AND SAFETY VERIFIED BY 1.1.1 All technicians performing diagnostic tests, inspections, or installations have access to all necessary personal safety equipment required by OSHA. 1.1.2 Safety glasses and gloves are worn when handling refrigerant or when brazing. 1.1.3 Technicians are trained in proper use and applications of all personal safety devices and adhere to OSHA regulations when on the job site 1.2.1 Building occupants are informed of the likelihood of airborne contaminants (asbestos,fiberglass, mold, etc.) in the home during and after inspection and improvement of airflow to the AC or heating system. 1.3.1 Electrical power is shut off before working on mechanical equipment 1.3.2 Electrical wiring for HP/AC units is in compliance with relevant codes. Improper connections, wire sizing and other problems identified are corrected prior to proceeding to system diagnostics or repairs. 1.4.1 Refrigerant is handled and stored in compliance with EPA Section 608 standards at all times, including charging, recovery, reclamation,storage, and transportation requirements. 1.4.2 Only EPA certified technicians install or service small residential(smaller than 5 ton capacity) central air conditioning or heat pump equipment. 2. INSTALLATION 2.1.1 Sizing method used: ACCA's Manual J Copy of load calculations attached? Cooling design load 2.1.2 Other Yes No Btuh Size of air conditioning system: Condenser Manufacturer & Model # Condenser Serial # Evaporator Manufacturer & Model # Evaporator Serial # Installed Capacity Btuh Installed capacity ÷ design cooling load (from 2.1.1) X 100 Answer on previous line is less than or equal to 115% % Yes No (if yes, system complies ) If No, what is next nearest size from manufacturer Next nearest size from man. is equal to installed capacity Btuh Yes No (if yes, system complies ) 2.1.3 (if no, go to next line) (if no, system is not in compliance) If heat pump: Installed cooling capacity Btu Installed capacity ÷ design cooling load (from 2.1.1) X 100 Answer on previous line is less than or equal to 125% % Yes No (if yes, system complies ) If No, what is next nearest size from manufacturer Next nearest size from man. is equal to installed capacity (if no, go to next line) Btuh Yes (if yes, system complies ) © 2010 Steven Winter Associates, Inc. All rights reserved. No (if no, system is not in compliance) 2.1.4 Indoor evaporator coil matched to outdoor coil 2.1.5 Blower door test performed? AHRI Certificate Manufacturer Data Yes No CFM @ 50 Pascals: 2.1.6 2.1.7 2.1.8 Room by room load calculations performed? ACCA's Manual J Other Duct design performed? ACCA's Manual J Other "Regsiter Flows & Room to Room Pressure" form completed & attached Yes No Ducts designed to provide +/- 15% of room airflow requirements Yes No Duct design based on: available static pressure from air handler equivalent length of runs pressure drop of external devices type and configuration of ducts Airflow terminations spread and throw documentation provided. Yes No surface from the termination (attach Register Flow form) Yes No Duct layout plan, blueprint or other documentation attached: Yes No Design throw is between 80-120% of the distance to the furthest 2.2.1 Airflow requirements: Installed capacity = [(from 2.1.2 above) ÷ 12,000] 0.0 tons Total system airflow test: Duct Blaster Total system airflow: cfm Total flow ÷ installed capacity (tons) cfm/ton Flow Plate Other Yes No Yes No Heat pump airflow is between 440-500 cfm/ton or within manufacturer's specs over a dry coil if No, explain A/C airflow is at least 440 cfm/ton or within manufacturer's specs over a wet coil after 15 min. if No, explain Total External Static Pressure (TESP): Equipment Type: Split A/c FALSE Manufacturer's recommendation for TESP Heat Pump FALSE Packaged/Rooftop Unit FALSE IWC Tested static pressure (on high stage and at full fan flow rate): a. Return just before air handler unit (Filters in place) IWC o F IWC o F IWC o F b. Just after air handler unit and just before evaporator coil (not needed if packaged rooftop) c. Supply plenum TESP = (Return Static Pressure + Supply Static Pressure) if split A/C w/ furnace: TESP = a + b IWC if Heat Pump or Packaged unit: TESP = a + c IWC TESP at or under manufacturer's recommended limit? 2.3.1 Yes No Room to room pressure differences are less than or equal to 3 Pa Yes No Pressures have been recorded on the attached Register Flow & Room to Room Pressure form. Yes No 2.3.2 Filter slots are tightly covered Yes No 2.3.3 Ducts sealed at all connections with mastic and mesh tape Yes No 2.4.1 The orifice size must match the system: • Fixed orifice metering devices match the outdoor unit Yes No • Piston-type metering devices: Same size piston for indoor coil and Yes No or N/A outdoor coil. Indoor coil label attached on installation. or • Capillary tube equipped systems has matched indoor and outdoor coils. Yes No or • TXV metering devices properly sized to match the outdoor unit Yes No 2.4.2 Refrigerant lines and indoor coil purged with inert gas during brazing. Yes No 2.4.3 New systems evacuated to 500 microns or less. Yes No Isolate the system from the vacuum pump and let it sit.The micron gauge should not rise more than 300 microns (or the manufacturer’s specified limit,whichever is less) in 5minutes above the initial vacuum level. © 2010 Steven Winter Associates, Inc. All rights reserved. 2.4.4 Charge verification Refrigerant line size (diameter) inches Refrigerant line size matches manufacturer's spec Yes o F 2.4.4.b Indoor wet bulb temperature at return o F 2.4.4.c Outdoor dry bulb temperature at condenser in shade o F 2.4.4.d Refrigerant type 2.4.4.e TXV installed ? Yes Subcool No Test In Test Out 2.4.4.f Manufacturers recommended TXV subcool target o 2.4.4.g Liquid line pressure psi psi 2.4.4.h Condensor saturation temperature (using 2.4.4.g) o F o F 2.4.4.i Liquid line temperature o F o F 2.4.4.j Subcool =[(2.4.4.h) - (2.4.4.i)] o F o F 2.4.4.k Subcool deviation=[(2.4.4.j) - (2.4.4.f)] o F o F o F Subcool Achieved (+/- 3 ⁰F)? o F Yes Superheat 2.5.1 No Indoor dry bulb temperature at return 2.4.4.a F No ` 2.4.4.l Manufacturers recommended superheat goal (based on 2.4.4.c & 2.4.4.b) o 2.4.4.m Suction line pressure psi psi 2.4.4.n Evaporator saturation temperature (using 2.4.4.m) o F o F 2.4.4.o Suction line temperature o F o F 2.4.4.p Superheat =[(2.4.4.n) - (2.4.4.0)] o F o F 2.4.4.q Superheat deviation =[(2.4.4.p) - (2.4.4.l)] o F o F F Superheat Achieved (+/- 5⁰F)? Yes No First stage of heating does not include electric resistance heat. Yes No (Activate stage 1 and verify that unit is heating and electric resistance elements are not operating) 2.5.2 TXV or Time Delay Relay installed if included in SEER or HSPF 2.6.1 System has been run through a heating or cooling cycle to verify performance as specified in Sections 2.2.1, Yes 2.3.1, 2.4.4, 2.5.1 and 3.1.1. No Yes No 3. COMMISSIONING 3.1.1 Airflows at registers deliver +/- 20% of design airflows for each conditioned room Yes No Airflows have been recorded on the attached Register Flow & Room to Room Pressure form. Yes No If room by room balancing has changed, 3.2.2 Recheck fan flow cfm Recheck static pressure IWC Duct leakage to outside testing performed pre & post sealing Yes Before sealing No After sealing Duct leakage to the outside at 25 pascals: cfm Total system airflow: (from 2.2.1) cfm cfm Duct leakage ÷ system airflow x 100 = % % Yes No Duct leakage is less than 6% of total system airflow cfm Yes No HVAC Technician: Name: Sign: Date Auditor: Name: Sign: Date © 2010 Steven Winter Associates, Inc. All rights reserved. Appendix B. Auditor’s Equipment List Tools Compass Multi‐bit screwdriver Nut driver set Utility knife Tape measure – 30’ Cordless drill w/charger & 2 batteries Drill bit set Testing Equipment Blower Door Duct Blaster Extra manometer & hoses Balometer Gas leak detection meter Carbon monoxide detector Infrared camera (optional) Personal Protection Dust masks – std. white mask Safety glasses Small first‐aid kit Full‐length mesh suits Cloth gloves Cloth booties Sleeve extensions Cleaning Supplies Trash bags – 13 gal. Dust pan & brush Swiffer‐type sweeper Sweeper refills – dry type Miscellaneous Flashlight Extension cord – 25’ 3‐prong outlet adapters Ladder First aid kit Testing Supplies Duct mask Metal tape ‐ UL Masking tape – 2” wide Duct tape Smoke puffers © 2010 Steven Winter Associates, Inc. All rights reserved. Appendix C. ACCA Briefing on MJ8™ © 2010 Steven Winter Associates, Inc. All rights reserved. © 2010 Steven Winter Associates, Inc. All rights reserved. © 2010 Steven Winter Associates, Inc. All rights reserved. © 2010 Steven Winter Associates, Inc. All rights reserved. Appendix D. Register Flow & Room‐to‐Room Pressure Form Register Flow & Room‐to‐Room Pressure Form Project Address: HVAC Company: Technician: Auditor: Tool Used: System Install/Tune‐Up Date: Audit/Test Date: Model Number: 1 Room/Grill Number Design Load CFM 2 Duct Design CFM % of Design 3 Measured CFM % of Design 4 Measured CFM Room‐Room Pressure (Pa) 1 CFM from Room by Room Loa d Ca l cul a ti ons 2 CFM from Duct De s i gn % of CFM from Room by Room Loa dy Ca l cul a ti ons (Duct De s i gn CFM/De s i gn Loa d CFM x 100) 4 % of CFM from Room by Room Loa d Ca l cul a ti ons (Me a s ure d CFM/De s i gn Loa d CFM x 100) 3 © 2010 Steven Winter Associates, Inc. All rights reserved.