1
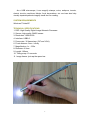
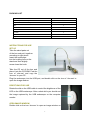
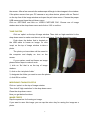
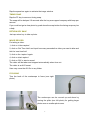
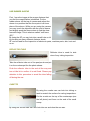
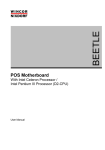
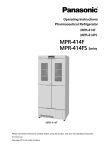
Handheld USB Digital Endoscope/Microscope
eheV2-USBplus
USER’S MANUAL
INTRODUCTION
FUNCTIONS AND APPLICATIONS
The USB Digital Endoscope/Microscope is a new electronic product for the
micro observations. It is a tubular imaging system consisting of an optical lens,
an image sensor, an illumination mechanism, and an image transfer control
circuit connected to a computer. You can display the images captured by the
Endoscope/Microscope on the computer screen, store them on the computer,
print them, or send them over the Internet.
As a USB microscope, it can magnify stamps, coins, antiques, insects,
electric circuits, machines, fabrics, food, decorations, etc. and can also help
visually impaired patients magnify small text for reading.
SYSTEM REQUIREMENTS
Windows 7/Vista/XP
TECHNICAL SPECIFICATIONS
1. DSP: High Quality Digital Image Monarch Processor.
2. Sensor: high-quality CMOS sensor
3. Resolution: 1600X1200
4. Interface: USB2.0.
5. Frame rate: 30 frames/sec (CIF and VGA).
6. Focal distance: 5mm - infinity
7. Magnification: 1x – 200x
8. Diameter: 8.2mm
9. Length: 160mm
10. Timing snap: 10 seconds
11. Image freeze: just rap the space bar
2
PACKING LIST
ITEM
QTY.
Endoscope/ Microscope
1
Adjustable Aluminum Alloy Stand
1
CD
1
Reflector Tube
1
Rubber Sleeve
1
Curette
1
Small Plastic Sleeve
1
Big Plastic Sleeve
1
Size Scale: centimeters
INSTRUCTIONS FOR USE
SET UP
Take the stand parts out
of the box and put it together
according to right photo.
Insert the endoscope
into the holding hole on the
stand and then slightly
screw down the knob.
Take the CD out of the box and
place it into the CD-ROM. Find the
icon of „ehe.exe‟ and copy the
„ehe.exe‟ to your PC.
Plug the endoscope into the USB port, and double click on the icon of „ehe.exe‟ to
open the image window.
DIRECTIONS FOR USE
Rotate the dial on the USB cable to control the brightness of the
LED on the USB endoscope. After a short while you should see
the image captured by the USB endoscope on the computer
monitor.
OPEN IMAGE WINDOW
Double click on the icon „ehe.exe‟ to open an image window on
3
the screen. After a few seconds the endoscope will begin to take images in the window.
If the picture comes from your PC camera or any other device, please click on „Device‟
on the top line of the image window and open the pull down menu. Choose the proper
USB camera and close the pull down menu.
Click on „OPTIONS‟ and click on „VIDEO CAPTURE PIN‟. Choose one of image
window size in the drop-down menu and click on „OK‟ to confirm.
TAKE PHOTOS
Click on „option‟ on the top of image window. Then click on „high resolution‟ in the
drop-down menu to make sure there is a tick mark here. Close the drop-down menu.
Push down the button that is located on
the USB cable to freeze an image. Or click
„snap‟ on the top of image window to take a
photo.
The photo you have taken will be saved in
the computer and display an icon on the
screen.
If your system could not freeze an image
please follow steps to make it work:
1, click on „file‟ that is on the top of image
window.
2, click on the „set photo folder‟
3, designate the folder you want to save the photos
4, click OK to confirm
MORE WAYS TAKING PHOTOS
Click on „option‟ on the top of image window.
Then tick off „high resolution‟ in the drop-down menu.
Close the drop-down menu.
Now you get below functions:
IMAGE FREEZ
Rap the space bar for freezing an image.
If you want to save this image you can rap the return key for saving the image as a
photo.
4
Rap the space bar again to activate the image window.
TIMING SNAP
Rap the F5 key to arouse a timing snap.
The snap will be delayed 10 seconds after the key was rapped company with beep per
second.
If you could not get a clear photo by push down the snap button the timing snap may be
a help.
RETURN KEY SNAP
Just rap return key to take a photo.
MOVIE RECORD
For taking a video:
1, click on „video capture‟
2, click on „Set Time Limit‟ and input how many seconds the video you want to take and
tick the „use time limit‟
3, click on the „capture‟ again
4, click on „start capture‟
5, click on „OK‟ to start a record
The video will be taken and stopped automatically when time out.
The video is an AVI format.
User may move the AVI file to any folder.
FOCUSING
Turn the knob of the endoscope to focus (see right
photo).
The endoscope can be moved up and down by
turning the pillar (see left photo) for getting larger
photo area or smaller photo area.
5
USE RUBBER SLEEVE
First , focus the image at the proper distance that
you feel the magnification is satisfied. Put the
rubber sleeve on the top of camera and adjust the
sleeve to a position that the focus point is at inner
place of the sleeve. While you are using the camera
you may touch the objective with the end of sleeve
and slightly push the sleeve down to find the clear
focused image. This is what we called “soft focus
(SF)”.
By using the SF you can look into a small hole or slit
by focusing on many different distance levels.
SF can be used for the inspection of electronic parts, machine parts, skin, hair and
so on.
REFLECTOR TUBE
Reflector tube is used for side
view of any tubing inspection.
Take the reflector tube out of the peel pouch and put
it on the endoscope like the photo shows.
Push the reflector tube to the end all the way and
turn a little bit to confirm it is well fixed. Please pay
attention to this procedure to avoid the tube falling
off during the use.
CURETTE
By using the curette user can look into tubing or
tank to scratch the surface for rusting inspections.
Put the curette on the top of the endoscope (see
the left photo) and focus on the end of the small
scoop.
By using the curette user can also look into ear and clear the ear wax.
6
The operation should be very careful and soft to avoid any injuries.
Do not use the curette if the ear is suffering any ear disease.
OTOSCOPE
The endoscope can be used as an Otoscope. By using the endoscope user can
look into ear and check the eardrum.
User needs to clean the ear canal with a cotton swab before checking the ear. The
ear wax would smear the lens and cause the image fuzzy.
While looking at the ear drum user should move the endoscope in the ear
slightly back and forth to get the best focused image.
Before and after using the endoscope user should clean the head of endoscope by
using an alcohol cotton swab.
7