1
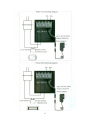
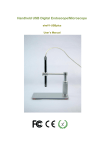
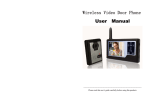
2.4 GHz Digital Wireless Video
Intercom
•
•
Thank you for purchasing the Estate Swing Wireless Video Door Phone
System.
Please read the user manual carefully before using the system.
1
Contents
1. Introduction………………………………………………………………………...............................3
2. Features…………………………………………………………………………………………………...3
3. Packing List………………………………………………………………………………………………3
4. Outdoor Camera………………………………………………………………………………………..4
5. Indoor Monitor………………………………………………………………………………………….4
6. Installation Instructions…………………………………………………………………………….5
7. Operation Instructions………………………………………………………………………………7
8. Working Environment……………………………………………………………………………….9
9. Notices……………………………………………………………………………………………………...9
10. Failure Diagnosis……………………………………………………………………………………….9
2
1. Introduction
The Estate Swing Door Phone can be used in apartments, villas, hotels,
offices, public buildings, etc. The camera is easy to install and the monitor can
be used anywhere within the wireless signal. The monitor can be mounted to
a wall or cabinet, placed on a table, or become handheld.
2. Features
(a) 2.4GHz digital frequency
(b) Transmission distance of 300 meters
(c) Clear night vision
(d) Rain shield for outdoor camera capabilities
(e) 3.5 inch TFT Monitor
(f) Hands free intercom
(g) 16 chord melody alerts with adjustable volume
(h) Date appears on monitor
(i) Indoor monitors saves up to 100 pictures (additional memory for 500
pictures)
(j) Adjustable brightness and volume
(k) Mini-USB charging interface
(l) Replaceable/Rechargeable Lithium Battery
(m) One outdoor camera = up to 4 indoor monitors
3. Packing List
1. Outdoor camera
2. Indoor monitor
3. Power adapter for camera
Input: 100-240V 50/60Hz
4. Power adapter for monitor
Input: 100-240V 50/60Hz
5. Lithium battery
6. 4 screws & stoppers
3
4. Outdoor Camera
5. Indoor Monitor
4
6. Installation Instructions
The outdoor camera should be mounted in a location free of direct sunlight
or rain. The recommended installation height is 1.5m – 1.7m for best monitoring
range. If there are obstacles between the installation position and the indoor
monitor and signal could be weakened. Check the signal before fully mounting your
camera and monitor to get the best results.
If wiring is required to be installed in the wall it should be rapped in
electrical tape to further protect it and to avoid a wiring malfunction.
(1) Remove the screw on bottom of the system and mount the shield box.
(2) For gate openers place the unlock wire in the Common and Open terminals.
For other applications requiring always closed place the unlock wire in the
Common and Closed terminals.
A. Unlock Time of 1 Sec – Switch one is up, and Switch two & three down.
B. Unlock Time of 4 Sec – Switch two is up, and one & three are down.
C. Unlock Time of 8 Sec – Switch three is up, and one & two is down.
5
6
(3) Embed the outdoor camera to the shield box using the screws, connect
adapter to power cord. Power indicator is red.
Note: Before installing the outdoor camera be sure to unplug the power supply.
7.
Operation Instructions
Note: Outdoor camera and indoor monitor must be further than 6 meters apart to avoid a whistling
interference sound.
A. Settings
(1) Date and Time
When the indoor monitor is not in intercom mode press the Keys button for 3
seconds and “T” symbol will appear left of the battery symbol. Users can set the date
(year/month/day) and the current time (hour/min): 24 hr time format.
(2) Melody & Volume
When indoor monitor is in No-Intercom Mode pre > button to select one of
the 16 melodies, press < to adjust the volume level 1-2.
(3) Adjust Talk Volume
While in intercom mode, press < or > to adjust the talk volume level 0-7.
(4) Brightness
While in intercom mode with a picture showing from outdoor camera press
∨∧ to adjust the brightness levels of 0-7.
B. Operation
(1) Indoor Monitor On/Off
Turn On: Turn power switch to “On”, Led 1 light display should display red
and melody will play.
Turn Off: Turn power switch to “Off”, Led 1 light display should be off.
Communication max alerts at level 6, and signal for max battery alerts at level 4.
7
(2) Talk/Unlock
The visitor will press the “Call” button on the outdoor camera and all indoor
monitors will sound and display an image of the visitor.
A. Press the phone key on one of the indoor monitors to speak to the visitor
before unlocking. Note: Other indoor monitors can see the image but not hear sound of
the visitor. If you want to allow other monitors to talk press the phone key to close the
current talk session on one monitor and then press the phone key on the desired monitor.
B. While in intercom mode press the key button to release the door lock.
When the door is unlocked and unlock image will display in the top of the
screen. Press the monitor button to turn off the monitor or wait 30
seconds for it to enter standby mode.
C. If you do not want the visitor to enter after seeing the video either do no
operation or press the monitor key to end the call.
(3) Monitor
If there is no calling from the outdoor camera and your monitor is in standby
mode you can press the monitor button once to wake up the monitor and another to
enter monitor mode. Users can maintain monitor mode for as long as they like.
With a monitor with multiple cameras the user can press the monitor button
and each time the button is pressed you can switch from up to 4 cameras. While
monitoring the last camera image press the monitor key to quit and close the screen.
(4) Charge
First time charging requires more than 5 hours to activate the lithium
battery. After the first charge the monitor only requires 3 hours of charging with up
to 100 hours of standby time. Led display 2 will turn red when charging, turn green
when battery is full, and the battery display will change from green to red when the
battery power is low.
C. Picture
(1) Take Picture
When indoor monitor is displaying the outdoor camera press the
“Camera” button to take a picture. If user is not home all indoor monitors save a
picture of the outdoor camera after 10 seconds of no operation.
(2) Browse Picture
Press “Up” or “Down” button to view the stores pictures under no
intercom mode. Then press the camera button to quit or wait 10 seconds to quit
viewing mode.
(3) Delete Pictures
First turn off the indoor monitor and press the monitor button and the
camera button together while turning the monitor back on. This will display text
“Delete All Photos”, “Please Wait”, “No Photos”, “Please Power Off”.
8
8. Working Environment
Working Temperature: 5°F - 105°C
Working Humidity: Less than or Equal to 85%
9. Notices
1. Be sure not to cover the microphone or speakers when installing.
2. Only uses the specified electric source power supply adapter, or one with
same voltage and electric current. Use of a unspecified power source may
result in damage to the circuit and will void any warranty.
3. Do not attempt to service this product yourself as opening the product may
expose you to dangerous voltages. Opening the product up for self-service
will also void any warranty.
4. Please review the users manual before you begin installation on your
Estate Swing Door Phone and strictly follow the user manual while installing
10. Troubleshooting
Malfunction
Product fails to turn on
Solution
-Is the “On/Off” switched to “On”?
-Is the Lithium Battery charged? (Initial 5 Hour
Charge)
Product fails to charge
Product in intercom mode
and no voice
Image is flashing and
making noise on my
monitor
No signal on my indoor
monitor
-Is the plug and the Mini USB connected
correctly?
-Check the talk volume adjustment
-The indoor monitor is near an induction
cooker, microwave, or other magnetic waves.
-Is the cameras power supply connected
-Are the two devices within 60 meters of each
other.
Warranty: Estate Swing warranties this product for the period of one year to be
free from manufacturer defect. Please visit www.estateswing.com for more details
and contact for warranty purposes.
9