Transcript
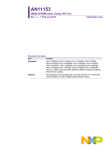
D. View Video Stream from Remote / Internet...........................
There are two methods to Viewing the Video Stream from Remote.
Method A: Using iMage Server.
iMage Server is a free service designed to remotely view video without
the need to set up DDNS or Port Forwarding.
!
iMage Server function works only with Windows Explorer and with ActiveX.
Step 1: Enable the feature in your server.
Goto Advanced Settings --> iMage Server. Select Yes to enable
and assign a Community ID. Click Apply.
!
By default, the Community ID is pre-assigned. User can also decide to assign a
different number. Changing the Community ID here, will result in iMage account that
is previously registered to loose access. User must key in the correct Community ID
to view.
Step 2: Goto your Router & configure Port Forwarding / Virtual Server.
Two types of port must be forwarded. TCP and UDP as follows:
a. (LAN IP) TCP port 80 --> (WAN IP) TCP port 80
b. (LAN IP) UDP port 9001 --> (WAN IP) UDP port 9001
!
For complete details on port forwarding see User Manual’s Appendix A
Once port forwarding is done, you are also able to remotely view
images from your PDA / PC that does not support ActiveX / Java.
To do so:
1. Make sure Method B (Step 1 & 2) are done.
2. Open a browser and enter http://x.x.x.x/pda.cgi (where x.x.x.x. is
either the domain name / WAN IP).
E. Watch & Manage Multiple IP Cameras...................................
Step 2: Goto iMage Server to register a new account.
Make sure you have internet connection. Logon to
http://www.iCV99.net --> click Register.
1. Insert the Utility CD into the CD-ROM drive and install iMultiView.
Run iMultiView after installation finish.
2. Enter the CD Key shown on the Utility CD when prompted. CD Key
is required if software is reinstalled.
3. Click Enumerate to automatically search for similiar IP Cams in LAN.
4. Click Add Device to add the IP address.
5. Double click on the eye to see the video.
F. Reset IP Camera User Account..............................................
To register, you will need;
a. the Community ID set above, and
b. Information shown on product label (located underneath the unit).
Serial Number
Master Login
S/N:3927000000 Model: IP-390e
MAC: 00-03-EA-11-99-1Z
ID: admin PWD: 1A2B3C4D
II IIIII II IIIIII I III III IIIII II I I IIIIII II I
Master Password
Once registered;
a. Use your new iMage User ID and Password to Sign In
b. Click Add / Remove Unit
c. Enter the Serial Number and Community ID of units to monitor.
d. Return to main list page and click the eye icon to view video stream!
!
NOTE:
If no image is shown, click “Help” in iMage Server to see how to do UDP port
forwarding.
iMage Server is a free but not a guaranteed service. Some routers or programs may
block the UDP video stream. In which case, UDP port forwarding is necessary. If this
method of viewing is not supported, then consider Method B.
Method B: Using DDNS and setting Port Forwarding.
This method allows user to remotely view video and access the Web
User Interface.
The Master Login and Master Password is unique to each unit. It is
located on the label at the back of the unit. Use it to reset lost or
forgotten account password.
1. Goto a PC that is in the same LAN as your IP Camera.
2. RUN Internet Explorer and type in http://x.x.x.x/password.cgi (where
x.x.x.x is the IP Camera’s LAN IP, check this using iCAMView Utility)
3. Enter; ID = admin and Password = ******** (see product label)
NOTE:
The password is case sensitive. This method can also be used to reveal password set
to the iCAMView Utility program.
G. Hardware Reset to Factory Default.........................................
1. Unplug the power and LAN cable,
2. While holding down the pin-hole reset button, replug the power.
You'll notice the both the LAN light blinks 3x then goes off.
3. While still keeping the pin-hole button held down, wait for about
45 seconds. This cause the system to delete, reset and reboot.
4. The LAN lights will blink once, signalling the reset.
The unit should now be reset to factory default and will reboot.
Connect the LAN cable and it will seach for the DHCP IP.
Step 1: Register a Domain Name
Each unit is preassigned a unique Domain Name. To activate it,
a. Goto Basic Settings --> Networks --> Dynamic DNS
b. Choose Enable Free Domain Name --> Yes
Page 3
Page 4