1
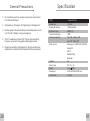
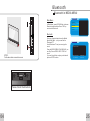
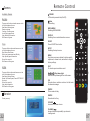
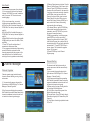
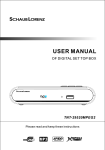
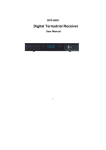
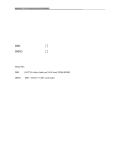
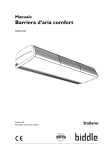
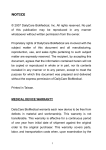
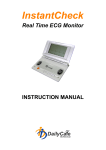
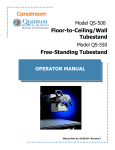
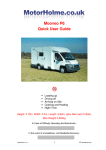
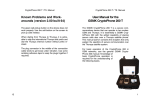
Water
Proof
TV
www.techvision.co.uk
TVIF1900
User Manual
Index
Specification ......................................................01
Installation Instructions.................................02-04
Accessory
1. Waterproof remote control
2. Wall plugs x 8 and Screws x 8
3. User manual
Speaker Installation Guide...................................05
Cabling.............................................................06
4. Adaptor
5. Extention Cable
6. Ceiling Speakers
Remote Control.............................................07-09
MENU Adjust Settings......................................10-11
DVB-T function.............................................12-23
FM Radio Player..................................................24
Bluetooth..........................................................25
Cable Schematic.................................................26
Trouble Shooting................................................27
General Precautions............................................28
Accessory ..........................................................29
29
Specification
General Precautions
1. Do not add any parts or use any accessories not provided
from the manufacturer.
2. Temperature. (Storage 0~50, Operating 0~60) degrees C.
3. Please replace the remote battery immediately when it runs
out. The life of battery is one year.(approx)
4. The TV is waterproof rated IP67. This is fully waterproof,
however, we would not suggest submerging in water.
ITEM
Specification
Screen size
18.5 inch
Display Resolution
1366(H)x768(V)
Brightness(Typ.)
400(cd/m2)
Contrast Ratio(Typ.)
1000
Viewing Angle(Typ.)
Top=80
Bottom=80
Left=80
Right=80
Video source
5. Clean the unit with a soft damp cloth. Do not use abrasive
substances or materials that could scratch the glass panel.
Video input x1(NTSC/PAL/SECAM)
Analog TV
DVB-T
FM Radio Play
Buletooth
28
Speaker
5w
Power input
DC 12V__5A
Weight
5.2kg 100g
Dimension
475(L)x397(H)x44(D) mm
Certification
CE Ip67
01
Installation Instructions
Trouble Shooting
Check that all cables are securely fastened, that you have connected
to an aerial feed or chosen AV source and that the unit is switched on.
General Problem
No Signal
TV switches off
STEP 1
Cut a hole in the wall in order to house the back of the units
and drill fixing notes.
I cannot tune into
all channels
Suggestion & Improvement
When first switched on this warning will display.
Only when you have tuned the TV in will the TV
work.
The TV will automatically switch off if there is no
source connected and it receives no instructions
from the operator.
eg; If watching a video, press play on the video
shortly after turning on the TV or it will switch off.
This is not a fault of the TV. For all reception
problems a qualified aerial installer should be
consulted.
Ensure that the video signal cable is correctly
connected to monitor and source.
No Video Display
The system supports three input signals. Check
the Monitor display is in the right input signal.
Check input sources (e.g. VCR, etc.) function
normally.
STEP 2
Plug the screw holes and feed the required leads to the back
of the unit.
02
No Audio Output
1. Ensure that the video signal cable is correctly
connected to Monitor and source.
2. Check the audio signal is connected with
“Audio in” switch correctly.
3. Check audio control is MUTE OFF.
Right-Left-AudioOutput Error
Check if the audio signal cable is correctly
connected to the Right-audio-In and Left-audioIn.
27
Cable Schematic
VIDEO
4.5m
Power extension
Speaker cable
4m
DC-jack
Speaker
STEP 3
Connect up the leads from the back of the unit.
TO P
3.5m
AC-Adaptor
26
HDMI CABLE
TV CABLE
AUDIO OUT
AV
POWER CABLE
SPEAKER OUT
50cm
TO P
STEP 4
Apply a bead of silicone to the back of the unit and
screw the unit into place.
03
Bluetooth
Bluetooth in MEDIA MENU
Main Menu
Main Menu
Digital TV
In Main Menu, press UP/DOWN key to choose
Bluetooth option and then Press ”OK” key
once to enter Bluetooth.
TO P
FM Radio Player
Bluetooth
Games
Version
Bluetooth
STEP 5
Fix the decorative screw hole covers
Open your bluetooth option from the Mobile
phone/ Mp3/ Mp4..., and you can find the
“Bathroom TV”.
Line th Bathroom TV and you can enjoy the
music.
Press the RED/ GREEN/ YELLOW/ BLUE, you
can Play/ Pause/ PREV/ NEXT/ STOP the
music.
If you can’t stop Music, maybe your buletooth
option no STOP function.
Bluetooth
Buletooth Init OK!
RED: Play/Pause
YELLOW: NEXT
GREEN: PREV
BLUE: STOP
TOP
Please check the direction
04
25
FM Radio Player
Speaker Installation Guide
FM Radio Player in MEDIA MENU
Main Menu
In Main Menu, press UP/DOWN key to choose
FM Radio Player option and then Press ”OK”
key once to enter FM Radio Player.
Main Menu
Digital TV
FM Radio Player
Bluetooth
Games
Version
FM Radio Player
When into the FM Radio Player. the system
will Auto Scan, and you can press “RED” to
auto scan again.
Press channel UP/DOWN to choose channel.
FM Radio Player
(1) Cut out a recess for the speaker of
144x115mm.
(2) Check cables are correctly
connected.
(3) Feed Cables from TV.
(4) Push back wire clips and slide
speaker into place.
FM Init Success!
RED: Auto Scan
(5) Finished.
24
05
Electronic programs guide(EPG)
Cabling
Please note: All electrical installation should be carried out by a fully
qualified Electrician and all fire and safety regulations should be obeyed.
(1) You can press key “EPG” on the remote
control to enter into the EPG page to know
more about the programs to be played. As
shown in the figure below:
1
3
2
5
4
The TV requires a 13amp socket
outlet connected to a 240V mains
supply via a readily accessible
isolation switch mounted in close
proximity to the unit. Both the
socket and pull switch must
conform to the latest safety
specification and be protected via
and RCCD device or similar. This
socket must be fitted in a dry area
away from any moisture.
Mains plug
240V mains supply
Mains socket
Isolation
pull switch
The cabling and adaptor plug
supplied with this TV must not be
cut, shortened, lengthened, etc.
as this could potentially damage
the unit.
TV Aerial:
Take a 75Ω feed from your present television aerial or distribution
system and connect this to the COAX connection at the back of the
unit. The signal level fed to the set must be at least 60dB/1millivolt
or the picture may be noisy. A TV Distribution Amplifier may be
required if you are in an area of weak signal or if other televisions
are already being fed from the same aerial. If in doubt, consult a
qualified aerial technician.
Cleaning:
Enter into EPG menu default enter Daily Mode,
menu under this mode contain 7 parts, As
shown in the figure above:
[1].Tab 1 shows the Title.
[2].Tab 2 shows time and date list.
[3].Tab 3 shows particular date list.
[4].Tab 4 shows program list, press
“UP/DOWN” to switch between programs.
[5].Tab 5 shows the time range and program
information, press “F.R & F.F” circularly to
choose to browse the time range and program
information on basis of days of every week.
[6].Tab 6 shows the detailed program
information in Tab 5.
[7].Tab 7 shows hint information for keys,
corresponding to the four colors on the remote
controller: replace with colors RED, GREEN,
YELLOW, BLUE.
[8].Press “LEFT/RIGHT” to switch between Tab
4 and Tab 5.
(2)Press “GREEN” key to enter into Weekly
Mode to display the programs and program
information in different time ranges of the
current program list within one week.
[1].Press F.R & F.F key to switch between
Sunday ---Saturday in Tab 3.
[2].Press UP/DOWN key to move upward and
downward to switch between the different
programs in Tab 5.
[3].Press LEFT/RIGHT key to choose to view
the program information in different time
ranges in Tab 6.
(3)When the cursor stops on Tab 5 in Figure 3.6
Tab 6 in Figure 3.7, press the “YELLOW” key to
choose the detailed information corresponding
to the current program.
(4)When the cursor stops in Tab 5 of Figure 3.6
and Tab 6 of Figure 3.7, press the “BLUE” key
to enter Wakeup Timer menu to book programs
Press “EXIT” to exit from EPG.
6
7
1
3
2
4
5
6
7
8
To clean the front screen use only a soft damp cloth. Under no
circumstances are abrasive cleaners to be used. Failure to
observe this warning will invalidate your guarantee.
06
23
Games
Available Games
Remote Control
POWER
LCD monitor power button (On/Off).
Box Man
Mute
Mute setting.
There are six function selection menus on the
left of the interface for user:
New Game: Restart game.
Reset: reset map.
Continue: Continue game.
Level: Display game level.
Help: offer help information.
Exit Game: exit game.
DISPLAY
Switching the current information sources.
Tetris
SLEEP
Power ON/OFF time button.
There are five function selection menu on the
left of the interface for user:
Start Game: Start Game.
Setting: set game speed and difficulty
Help: provide game information.
Score List: score list.
Exit Game: exit the game.
Hit Rat
There are five function selection menu on the
left of the interface for user:
New Game: Restart Game.
Speed: Set Game Speed, Press LEFT/RIGHT
key to set.
Score List: score list;
Help: help information.
Exit Game: exit the game.
Version
Factory use only.
MEDIA MENU
Switching MEDIA MENU.
INPUT
Switching the input source.
MENU
Used to access menu options for picture quality
adjustment, channel scan, and return to original
factory settings.
EXIT
To return to previous status or exit.
lift/up/down/right
move the left/up/down/right item in the menu.
OK
Select an item or confirms a choice. List will enter
the channel manager.
PMODE
Picture mode hot key.
SMODE
Sound mode hot key.
VOLUME
Increase / decrease volume.
22
CHANNEL
change channels sequentially up or down in
viewing mode.
07
Wakeup Timer
EPG
Electronic Program Guide(DTV only).
LANG(language)
Select the screen OSD language.
TV/RADIO
Switches between TV and RADIO ((DTV only).
SIZE
Select the 4:3 or 16:9.
Number Keys(0~9)
For direct entry of channel number or input of
alphanumeric characters System Information.
RETURN
Goes back to the previously viewed channel.
INFO
Displays information on viewed channel (DTV only).
FAV
Select the favorite or all TV channels(DTV only).
FAV+
change channels sequentially up in viewing
mode(DTV only).
FAVchange channels sequentially down in viewing
mode(DTV only).
RED/GREEN/YELLOW/BLUE
MEDIA mode Special.
If you want to set channel playing at certain
time or giving some hint information such as
Birthday. You can set via Wakeup Timer menu,
as shown in Figure 4.32
In Wakeup Timer menu, you can set Timer No:
set Wakeup event number, the system can
support at most 8 events, Timer Mode: set time
mode, Wakeup Mode: set wakeup mode,
Wakeup Messag: set wakeup message,
Wakeup Channel: set wakeup channel name ,
Wakeup Date: set wakeup date, On Time: set
wakeup time, Duration: set duration.
Parental Lock
You can revise system Password, you can via
menu ( MENU>Digital TV>Configuration >
Parental Lock) to enter Parental Lock menu.
(1)Press the 0-9 number key on the remote
controller to input old Password, the system
defaults Password as“0000“ .
(2)If the password is input correctly, the cursor
can move onto Input New Password option,
press0-9 number key on the remote controller
to input new 4-digit Password;
(3)The cursor move Confirm New Password
option, press 0-9 number key press on the
remote controller to input new 4-digit
Password; if it is confirmed the new password
is different from the new Password input, the
system will hint to input new password again,
until they are consistent. After the password is
set successfully, the system will hint the
success and save the setting, and the new
password will come into effect.
Software Upgrade
For factory use only.
08
21
System Setup
Replace battery
System Setup menu can provide convenient
system setup, you can via menu ( MENU>Digital TV->Configuration -> System Setup)
enter System Setup menu
EQ setting
To set output sound effect, can be set as Standard,
Classic, Rock, Jazz, POP
Surround
To set stage effect, can be set as OFF, Concert,
Church, Passive, Live
Area
To set scanning area and, choose area to
download preset channel settings, Germany/
England/ Italy/ France/ Spain/
Holland/Taiwan/China/Norway/Sweden/Finlan
d supported, depending on different version.
Time
Via menu (MENU>Digital TV>Configuration>
Time)
You can set Timer Mode in Time page: Timer
Mode: set time mode, Date: set date, Time: set
time, GMT Offset: set GMT Offset, Summer
Time: set summer time.
In Time menu, there are two time modes, one is
Auto setting: revise via setting GMT
Offset,Summer Time options;the other is
Manual setting: revise via setting Date,Time
options. When the cursor moves onto Timer
Mode option, Press LEFT/RIGHT key to
choose time mode.
1. Open the battery cap
Turn around the battery cap to the open mark, and take the battery out
from the base (See figure 1)
2. Replace battery
Ensure the anode (Positive) and cathode (Negative) be put in the correct
side. Note: Do not lose the waterproof rubber seal.
3. Close the battery cap
Turn around the battery cap to the close mark (See figure 3)
Dimension
Weight
20
175 (L) ×52 (W)×10(H)
70g ±5g
09
TV
MENU Adjust Settings
TV setup provides convenient TV input mode,
you can via menu ( MENU->Digital TV>Configuration -> TV) enter TV set
"
Press MENU to enter the setup modes. Press "
button to move it to the position. press OK key to confirm.
p ress EXIT to go
PICTURE
Picture mode can be set as
Standard / Vivid / Soft / Optimal /
user.
USER mode can be set the
Brightness / Contrast / Saturation /
Sharpness.
COLOR TEMP: can be set the
Standard / Warm / Cool / User.
MAIN MENU
PICTURE
SOUND
BRIGHTNESS
50
CONTRAST
50
SATURATION
50
SHARPNESS
5
HUE
50
FUNCTION
TV
USER
PICTURE MODE
COLOR TEMP
STANDARD
MOVE
SOUND
Sound mode can be set as Standard
/ Music / Movie / Speech / User.
User mode can be set the bass /
treble / balance.
AVL: on / off.
EQ: 100 / 300 / 1K / 3K / 8K.
Surround: on / off.
Display Mode
TV mode can change the mode of the ouput
video, you can adjust TV mode, can be set as
Auto, PAL, NTSC.
ADJUST
MENU
Brightness
If the brightness is not proper during watching,
you can adjust the current brightness to be a
proper one, can be set as: 0%, 10%, 20%,
30%, 40%, 50%, 60%, 70%, 80%, 90%
or100.
SOUND
USER
SOUND MODE
BASS
50
TREBLE
50
0
BALANCE
AVL
FUNCTION
Contrast
You can set system contrast via Contrast
option, can be set as: 0%, 10%, 20%, 30%,
40%, 50%, 60%, 70%, 80%, 90% or 100.
OFF
HUE
Adjust the system hue, can be set as: -6, -5, -4,
-3, - 2, -1, 0, 1, 2, 3, 4, 5 or 6.
EQ
TV
Video Output
Video Output mode can change the mode of
video output, you can adjust TV mode, can be
set as CVBS, RGB, P-YUV, P-RGB, S-Video
EXIT
MAIN MENU
PICTURE
Aspect Ratio
Video output mode can change the mode of
video ouput, you can adjust TV mode, can be
set as 16: 9 / 4: 3.
ON
SURROUND
MOVE
ADJUST
MENU
EXIT
Saturation
Adjust system saturation, can be set as: 0-12.
MAIN MENU
SOUND\EQ
PICTURE
100
300
1K
100
100
100
3K
8K
100
100
SOUND
FUNCTION
TV
MOVE
10
ADJUST
MENU
BACK
19
(4)To delete all Carriers and delete all TV and
Radio channel, press UP/DOWN key to move
the cursor to ALL Carriers option, Press OK
key, then the system will hint with “Delete all
Carriers?”dialogue box, press LEFT/RIGHT
key to choose”Yes” or “No”, press OK key to
confirm .
Configuration
SETUP
Language: select your language.
OSD Duration: Set the OSD
disappear time.
Aspect Ratio: select 16:9 / 4:3 / full
display formats.
TT Language: select your TT
language.
Reset: reset the picture parameters
of screen.
MAIN MENU
PICTURE
ENGLISH
LANGUAGE
OSD DURATION
SOUND
10 SECONDS
ASPECT RATIO
FULL
TT LANGUAGE
WEST
FUNCTION
RESET
TV
MOVE
ADJUST
MENU
EXIT
MENU
EXIT
OSD
Configuration provides individualized system
setup function, you can configure the system
according to your own hobby and demand. You
can enter Configuration menu via the
menu(MENU>Digita TV>Configuration)
(1)OSD Language option: The system has the
user interface supporting a couple of
languages, you can set language via OSD
Language option:
[a] Move the cursor onto OSD Language option
, Press RIGHT key to enter OSD Language
List.
[2] Press LEFT/DOWN key choose language;
[3] Press OK key to confirm system interface
language selection, then the setting is
effective, and then the interface language
turns into the currently chosen language, the
cursor can move onto OSD Language option on
the left.
(2)1st Audio Language option: Press RIGHT
key to enter the currently supported Audio
Language list, in the Audio Language list,
press UP/DOWN key to choose language,
press OK key to confirm.
(3)2nd Audio Language option: Press RIGHT
key to enter the currently supported Audio
Language list, in the Audio Language list,
press UP/DOWN key to choose language,
press OK key to confirm.
(4)Press OK key to confirm the editing action
in OSD menu, the system will hint with “Update
succeeds” and then return to the previous
menu .
TV
MAIN MENU
For Analogue TV & SKY
PICTURE
Channel: select the channel.
AREA: select your area.
Auto Search: Auto-search the TV
channels. Right cursor button search
TV channels.
Manual SEARCH: manual-search the
TV channels.
Fine Tune: Press the ◄ ► buttons
adjust the frequency.
Color system: Select the PAL/
SECAM/ AUTO.
Sound system: Select the DK/ BG /
L/ AUTO.
SKIP: If selected, skip
the selected channel number when
use CH+/CH- select channel. Select
ON means skip; select OFF means no
skip.
CHANNEL
001
AREA
SOUND
ENGLAND
AUTO SEARCH
MANU. SEARCH
FUNCTION
TV
615.25 MHz
FINE TUNE
COLOR SYSTEM
PAL
SOUND SYSTEM
DK
MOVE
ADJUST
MAIN MENU
TV \ AUTO SEARCH
PICTURE
CHANNEL 001
SOUND
FUNCTION
(XXX.XX MHz)
10%
CANCEL
TV
MENU
18
BACK
11
DVB-T function
Main MENU(MEDIA MENU)
Main Menu
In Main Menu, press UP/DOWN key to choose
Digital TV option and then Press ”OK” key
once to enter Digital TV menu.
(3)Press the red key ZOOM of the remote
controller to enter Add Channel menu.
Under Add Channel menu, there are 6
parameters for adding one channel as follows:
[1] Area Name: For Area Name, press the
RIGHT key of the remote controller to enter the
Area Name list on the right, then press
UP/DOWN key to choose area name, press OK
key to confirm.
[2] Carrier: Press LEFT/RIGHT key to choose.
[3] Channel Name: Press LEFT/RIGHT key to
enter Rename Channel page.
[4] Audio PID, Video PID, PCR PID, Press 0-9
number key to revise values;
[5] Press OK key to confirm the adding, the
system will hint with “Update succeeds” and
return to Edit Channel menu;
(6).Press EXIT key to return to Edit Channel
page.
4.Press the yellow 3D key of the remote
controller to enter Rename Channel menu.
The operation for this menu is as that of for
Add Channel page.
Press the button, into the Main Menu
Delete All
Installation
Installation
There are three kinds of Installation mode as
follow:
(1)Area Search: searching programs by scan
aera.
(2)Manual Search
(3)Auto Search
You can enter into parameter “installation
page” via input password digitals(default
password is “0000”), As shown in the figure
below:
12
If you do not like one or some channels, you
can delete it/them in Channel Organizer
menu, but, if you do not like all TV or Radio,
you can enter Delete All menu to choose to
delete all TV, RADIO, Carriers.
(1)Under Channel Manager menu, press
UP/DOWN key to choose Delete All option,
press OK key again, then the system will hint
with the dialogue box of inputting password
which is defaulted as “0000”, input the proper
password via the 0-9 number key of the
remote controller, then enter Delete All menu.
(2)To delete all TV channels, press UP/DOWN
key to move the cursor to ALL TV Channels
option, press OK key, then the system will hint
with ”Delete all TV Channels?”dialogue box.
Press LEFT/RIGHT key to choose “Yes” or
“No”, press OK key to confirm ,
(3)To delete all RADIO channel, press
UP/DOWN key move the cursor to ALL Radio
Channels option,press OK key, then the
system will hint with ”Delete all Radio
Channels?”dialogue box , press LEFT/RIGHT
key to choose “Yes” or “No”,press OK key to
confirm.
17
(4)Press UP/DOWN key choose Type , Press
LEFT/RIGHT key to set Sorting Parameters.
(5)After sorting is set, to realize channel
sorting, press OK key, then the system will hint
with the dialogue box“Are you sure?”
To choose “Yes”to confirm, you can see the
programs in the program list; to to choose
“No”to cancel, you can return to Channel
Sorting page;
(6)Press RETURN key to exit Channel Sorting
page.
Channel Grouping
Group channels according to Movies, Sport,
Music, Kids, Fashion etc.
(1)You can enter the page As shown in the
figure via “MENU>Digita TV> Channel
Manager> Channel Grouping”:
(2)It will pop up and dialogue box prompting
that“Channel not available”when there are no
programs in database to enter into, and it will
not enter into channel grouping page.
(3)Press UP/DOWN key to choose the line
where the channel to be grouped is in, then
press the number keys 1-8 on the remote
controller to set different channel grouping.
(4)After channel is edited, when EXIT key is
pressed to exit the menu, if actual channel
editing action exists, the system will carry out
channel grouping renewal, with the hint
of“Update succeeds”
Edit Channel
Have such operations as Add, Delte and
Rename to channels.
(1)You can enter the page as shown in the
figure below via “MENU->Digita TV-> Channel
Manager -> Edit Channel”:
(2)It will pop up and dialogue box prompting
that “No Carriers” when there are no programs
in database to enter into, and it will not enter
into ADD-Edit Channel page.
16
Channel Search
Area search is a kind of intelligent and
convenient mode of programs searching,
which covers programs of all frenquent points
of target countries or regions. As shown in the
figure below:
(1)You can move the cursor to “area search”
via press “UP/DOWN” key under “installation
menu”,then press “enter” to enter into area
searching page.
(2) After entering into area search page,
system will scan all programs one by one
under frequency points of current countries or
regions selected automatically.
(3)During scanning, press “EXIT” key to stop
and exit scanning.
(4)If any program is detected and the scanning
process is finished, system will exit the
scanning page and save the program, at the
same time return to the “installation menu” and
to play them in vpp window automatically.
Manual Search
(1)You can move the cursor to “area search”
via press “UP/DOWN” key under “installation
menu”,then press “OK” to enter into area
searching page.
(2)Prior manual scan, you need to configure
relevant parameters including:
[a] Freq(KHz): the default frequency is
474000KHz,you can input relevant digital to
modify it.;
[b]BandWidth: the default value of bandwidth
is 64MHz. while you can set it to
6MHz,7MHz,8MHz.
(3)Press “OK” key after configuration of
parameters to start manual scan.
(4)If any program is detected and the scanning
process is finished, system will exit the
scanning page and save the program, at the
same time return to the “installation menu” and
to play them in vpp window automatically.
13
Auto Search
You can search the programs of any channel.
(1)You can move the cursor to “area search”
via press “UP/DOWN” key under “installation
menu”,then press “OK” to enter into area
searching page.
(2)Prior to auto searching, you need to
configure relevant parameters including:
[a] Start Freq (KHz): the default frequency is
474000 KHz. You can input relevant digitals to
modify it;
[b] End Freq (KHz): the default frequency is
474000 KHz. You can input relevant digitals to
modify it;
[c] Band Width: the default value of bandwidth
is 64MHz.while you can set it to 6MHz, 7MHz,
and 8MHz.
3. Press “OK” key after configuration of
parameters to start manual scan.
4. If any program is detected and the scanning
process is finished, system will exit the
scanning page and save the program, at the
same time return to the “installation menu”
and to play them in vpp window automatically.
Channel Manager
Channel Organizer
Channel organizer page includes favorite
channels, channel deleting, moving, locking
and rename.
(1) You can enter the page as shown in the
figure below via “MENU>Digital TV> Channel
Manager> Channel Organizer”
(2)It will pop up and dialogue box prompting
that“Channel not available”when there are no
channels in database to enter into, and it will
not enter into channel organizer page.
14
(3)Channel Organizer menu includes: Favorite
Channel, Delete Channel, Skip Channel, Lock
Channel. Press UP/DOWN key to choose the
line where Favorite Channel is, then press the
4-color key on the remote controller: press the
red ZOOM key to set and cancel Favorite
Channel, the green A-B key to set or cancel
Delete Channel, the yellow 3D key to set or
cancel Skip Channel, the blue ANGLE key to
set or cancel Lock Channel; After setting,
corresponding figure will appear.
(4)To rename channel , press UP/DOWN key
to choose the line where the channel to be
renamed is, press LEFT/RIGHT key to enter
the page to rename the channel.
(5)After program editing, to edit the program,
press ENTER key; to set or cancel Lock
Program, the system will hint to input “0000”;
to set Delete Program, the system will hint to
choose dialogue box“Do you want to delete the
selected items?”, Press LEFT/RIGHT key to
choose, choose ”Yes”to delete the program
chosen, “No”to cancel.
(5)Press RETURN key to exit Channel
Organizer page.
Channel Sorting
The channels shall be listed according to
certain sequence so that the user can easily
find them.
(1)you can enter the page As shown in the
figure below via “MENU>Digita TV> Channel
Manager > Channel Sorting”:
(2)It will pop up and dialogue box prompting
that“Channel not available”when there are no
programs in database to enter into, and it will
not enter into channel sorting page.
(3)Before sorting, the type of sorting shall be
set, including the following items:
[a].First Option: choose the programs to be
sorted via the selection area.
[b].Second Option: Press FTA(free of charge),
Scramble(encrypted), ALL Freeand Encryted
Channels.
[c].Third Option: According to alphabetic order
A-Z, or Z-A.
15