1
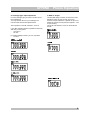
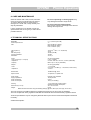
1.
USER MANUAL
PHONO EQUALISER
SPHINX
Phono Equaliser
1. UNPACKING .......................................................................................................................................3
2. SPHINX WARRANTY CARD ..............................................................................................................3
3. THE PHONO EQUALISER AT A GLANCE ........................................................................................4
Front panel................................................................................................................................................... 4
Rear panel ................................................................................................................................................... 5
4. INSTALLATION AND CONNECTIONS ..............................................................................................6
Installation.................................................................................................................................................... 6
Connecting the mains cable ........................................................................................................................ 6
Audio connections ....................................................................................................................................... 6
Connecting the pre-amp .............................................................................................................................. 6
Connecting the turntable.............................................................................................................................. 6
Connecting the optical cables...................................................................................................................... 6
5. CHANGING THE SETTINGS ..............................................................................................................7
Removing the cover ..................................................................................................................................... 7
a. LED: Project or Myth Series standard...................................................................................................... 7
b. Input sensitivity (Gain) ............................................................................................................................. 8
c. Input capacity (MM).................................................................................................................................. 8
d. Cartridge type / Input impedance............................................................................................................. 9
e. RIAA or 78 rpm ........................................................................................................................................ 9
f. 78 rpm filter............................................................................................................................................. 10
Replace the cover ...................................................................................................................................... 10
6. OPERATION......................................................................................................................................11
Switching on............................................................................................................................................... 11
Standby...................................................................................................................................................... 11
Switching off............................................................................................................................................... 11
7. THE 78 RPM MODES .......................................................................................................................11
8. CARE AND MAINTENANCE.............................................................................................................12
9. TECHNICAL SPECIFICATIONS .......................................................................................................12
2
SPHINX
Congratulations on your purchase of the Sphinx
Phono equaliser!
You are now part of an ever-increasing group of
quality-conscious audiophiles using Sphinx
products.
We are very proud of the tradition connected with
the SPHINX name, especially concerning audio
quality perfection.
This manual will help you to gain a maximum
amount of pleasure and quality from your new
Sphinx Phono equaliser.
The Phono equaliser active MM and MC phono prepreamplifier is the first to obtain the extremely high
audio quality standards of the Sphinx product line.
The design has therefor been only been finalised
after numerous intensive comparative listening
sessions. It is based on a radically new amplifier
design using special complementary FETs in a
single housing (the same that are used for the
Project Eight preamplifier). This is guarantees ultralow noise and an incomparable transient response.
It offers numerous user adjustable settings for MM
and MC (Gain, Impedance, etc.). This enables you
to fine-tune the Phono equaliser to almost any
cartridge on the market.
It is however not confined to the regular MM and
MC cartridges but in addition offers special settings
for the use of 78-rpm records!
One of which is a specially designed filter: this
ensures the correct playback correction curve. And
thus prevents the usual annoying increased surface
noise of the records when played via ‘normal’
phono preamps. It restores the actual sound quality
of the records.
Phono Equaliser
1. UNPACKING
Before leaving the factory every Phono equaliser is
subjected to stringent and extensive technical and
exterior quality inspection.
This ensures you will enjoy many years of high
quality audio performance from a perfect-looking
product.
After unpacking your Phono equaliser we therefore
recommend you carefully check it for any transport
damage.
In case of damage: please contact your Sphinx
dealer immediately and retain all packing materials
for possible proof of damage and possible claims.
Even if the component is in perfect condition you
should still keep the packing materials. If you need
to transport your Phono equaliser at a later time it
will be best protected by the original packing
materials.
2. SPHINX WARRANTY CARD
Please take this opportunity to fill out the enclosed
warranty card now! Follow the instructions on the
card or consult your dealer.
Please send the card as soon as possible to the
return address (within 14 days after purchase).
To obtain the maximum quality from this Phono
equaliser it is necessary to use it with top quality
audio components, preferably with other Sphinx
components.
The Phono equaliser may be used with
components from the Sphinx Project Series, the
Myth Series and even with non-Sphinx products.
Please read this manual carefully before you
install or use the Phono equaliser. It is
important to familiarise yourself with the
special functions, operation and possibilities
of the Sphinx Phono equaliser.
Your local dealer will be able to answer any
questions concerning other Sphinx audio
components.
3
SPHINX
Phono Equaliser
3. THE PHONO EQUALISER AT A GLANCE
Front panel
1.
LED:
in green
(for Myth Series: not illuminated)
Standby
red
4
SPHINX
Phono Equaliser
Rear panel
2.
3.
4.
5.
R IN: Connect to this input the right (red) output
cable from the turntable.
L IN: Connect to this input the left (white or
black) output cable from the turntable.
Control IN: Connect here the optical cable from
another Sphinx component’s Control Out
(usually the preamplifier).
GND: Connect here the separate ground wire
from the turntable.
Also connect here the ground wire from the
(pre) amplifier (if applicable).
Control OUT: Connect here the optical cable
that goes to another Sphinx component’s
Control In.
6.
7.
8.
9.
R OUT: Connect this output to the right input of
the (pre-) amplifier
L OUT: Connect this output to the left input of
the (pre-) amplifier.
Manufacturer’s label: This shows important
data for the component, such as serial number
and mains power voltage.
Warning!: This shows important information
about the safety regulations for this equipment.
AC IN: Connect the mains cable to a mains
power outlet (100 - 240 VAC).
The mains fuse is placed behind the cover.
O / I : Mains power switch.
5
SPHINX
Phono Equaliser
4. INSTALLATION AND CONNECTIONS
Installation
Audio connections
The Phono equaliser will not become very hot, so
placement is not critical, although you should not
place it on top of or near other heat-radiating
equipment (such as power amps) or in direct
sunlight.
If you use it in a closed cabinet or on a bookshelf,
please ensure unrestricted ventilation around the
component.
To prevent any possible interference keep power
supply cables away from all audio cables.
Before you start connecting equipment it is always
wise to check whether all the mains power cables of
all components are disconnected from the mains
outlets! This will prevent any damage to the
loudspeakers and amplifiers caused by incorrect
wiring or settings.
Make sure you connect L and R properly. Most cinch
cables use Red for the Right channel and White or
Black for Left.
The cinch connectors on the rear panel of the Phono
equaliser have a red centre for the right channel and
a white one for the left channel.
Note: The mains power transformer of the Phono
equaliser is mounted at the front side.
Position the Phono equaliser as close to the
turntable as possible while keeping the cables as
short as possible.
Always connect the separate ground wire from the
turntable to the GND terminal (6).
When making the connections please refer to the
descriptions for parts 2. to 9. on page 5.
Connecting the pre-amp
If all these conditions are met, the Phono equaliser
will perform to the extremely high standards it is
designed for.
Connect the R OUT and L OUT (6) to the LINE- or
AUX inputs of the pre-amp, using normal cinch cable
(but of top quality!).
Connect the separate ground wire (if supplied) from
the pre-amp to the GND terminal (4).
Connecting the mains cable
Connecting the turntable
Before you connect the cable please check
whether the mains voltage indicated on the
manufacturer’s label on the rear panel is the
same as your local mains voltage.
If not: please contact your dealer and do not connect
the component to the mains.
Connect the (in most cases fixed) audio cable from
the turntable to the R IN and L IN (2).
Connect the separate ground wire from the turntable
to the GND terminal.
After you have switched the Phono equaliser on with
the 0./ 1 switch (9) it will always be active.
This way the electronic circuits will be kept at
optimum working temperature so you can enjoy
maximum audio quality immediately after switching
on. Additionally it significantly increases the life span
of the component.
Via the Control IN input (3) however it may be
remotely switched to Standby by another Sphinx
component.
Connect the mains cable after you have connected
all other components in the system, have doublechecked all connections and after the Phono
equaliser has been matched to the cartridge in use
(see Chapter 5).
Connecting the optical cables
Connect the CONTROL OUT of a Sphinx pre-amp to
the CONTROL IN (3) of the Phono equaliser. It will
then switch to Standby mode as soon as the preamp is set to Standby.
Connect the Phono equaliser’s CONTROL OUT (5)
to the CONTROL IN of another Sphinx component. It
will then automatically switch to Standby as soon as
the Phono equaliser is selected to Standby.
Ensure proper connection of the optical cables,
otherwise the Standby LED on the front panel may
remain off, even though the Standby mode is
activated.
If the CONTROL IN is not used and the Phono
equaliser is placed in strong direct sunlight, the
Standby mode may self-activate.
In that case you should place the supplied dummy
connector in the CONTROL IN jack.
6
SPHINX
Phono Equaliser
5. CHANGING THE SETTINGS
The Phono equaliser may be used with a wide range
of cartridges, including the 78 rpm types.
Before you can use the Phono equaliser it should
therefore be matched to your specific cartridge and
application.
In addition there are two special filters that may be
selected.
Note: The ‘rumble’ filter (12 dB/octave@10 Hz) can
not be deselected.
And you can even select the working mode of the
LED on the front panel: Project Series or Myth
Series!
In order to select the correct settings you’ll need the
following data:
a)
b)
c)
d)
e)
The type of audio system:
Sphinx Project or Myth Series
Re. the cartridge:
The output sensitivity
The output capacitance
The type: MM or MC and
the output impedance
And finally:
The type of records: normal or 78 rpm.
These data you may find in the manuals and/or
technical specifications of the equipment.
Write these (preferably with a pencil) into the last
column of the following table.
The Phono equaliser’s default values are marked in
the first column:
Setting
a.
b.
Default
Your data
LED:
Project Series
High Gain
(250-750 µV)
c.
47 pF
d.
MC cartridge
200 ohm
e.
RIAA
f.
78 rpm filter OFF
In that case you may have to change one or more
settings. You should use the following procedures to
ensure correct results.
You may refer to the sticker inside the cover
showing the settings for each DIP-switch.
Which setting should be changed is wholly
dependent on the default values that differ from your
data.
Note: If you have to change more values, the order
in which you adjust settings a – f is not important.
ATTENTION: Before starting the procedures
always first disconnect the mains cable from the
power outlet!
Removing the cover
Carefully (to prevent any scratching of the surface)
remove the small Phillips screws on the left-hand
side and on the right-hand side.
Remove the cover and store it in a safe place.
However, make sure that you are able to read the
sticker on the inside when necessary.
You’ll see the mains transformer and the circuit
board with the components and switches.
The Phono settings are changed by means of the
small switches in the four red ‘switch blocks’
(showing the text ON).
The LED setting is changed with the small shorting
plug (positioned closest to the 8-pin power supply
connector at the front of the housing).
a. LED: Project or Myth Series standard
When using the Phono equaliser with the Sphinx
Myth Series you are able to give the LED (1.) the
same functionality as that on the Myth Series (when
the equipment is ‘on’ the LED is ‘off’).
Remove the red shorting plug.
You will see two free pins.
Replace the plug so it covers both pins.
Ready!
If there are no other settings to be changed you may
continue with “Replace the cover”. Otherwise select
one of the following settings.
This simplifies the procedure while showing exactly
the default value(s) differing from your data and thus
which setting(s) need to be changed!
A. Default values match your data and system
You do not have to change anything, may skip this
chapter, go straight to Chapter 6 and start using the
Phono equaliser.
B. Some values are different
7
SPHINX
Phono Equaliser
b. Input sensitivity (Gain)
c. Input capacity (MM)
It is important to match the input sensitivity of the
Phono equaliser to the output value of the cartridge
in use. Only this will ensure the maximum S/N ratio
and will prevent distortion.
This setting is specifically for MM cartridges. The
standard value is 47-pF, but some cartridges need a
value of 147-pF for optimum results.
The Gain has three settings:
High: for cartridges with an output signal
between 250 µV and 750 µV.
Mid: for cartridges with an output signal
between 750 µV and 1,5 mV.
Low: for cartridges with an output signal
between 1,5 mV and 15 mV.
Note: This setting has no influence on the MC
settings.
The standard value is ‘LOW’ (47-pF).
The Gain is set with switches 1 and 2 of the large
red ‘switch blocks’ (one for each channel).
Using the value of your cartridge (as marked in the
table), move the switches to the correct value
according to one of the following pictures.
You select the HIGH value by moving switch 3 to the
upper (ON) position.
8
SPHINX
Phono Equaliser
d. Cartridge type / Input impedance
e. RIAA or 78 rpm
For each cartridge type you need to set the correct
input impedance.
You may find the value for your cartridge in its
manual under the technical specifications.
The standard replay correction is RIAA, this is also
suitable for many 78 rpm records. The Phono
equaliser can be switched to a special 78 rpm curve
needed by certain records (see also Chapter-7. “The
78 rpm modes”).
This is set with switches 1 and 2 on the small red
‘blocks’.
.
The impedance is set with switches 4, 5 and 6.
If your MC cartridge needs an impedance other then
200 ohm you may select:
100 ohm or
50 ohm.
For a MM cartridge however you can only select:
51 kohm.
9
SPHINX
Phono Equaliser
f. 78 rpm filter
Replace the cover
To ensure proper 78 rpm replay quality with modern
audio systems, it is necessary to use a special lowpass filter. Otherwise the frequencies above 4 kHz
will become too emphasised. After selecting this
filter the replay quality will be more according to the
‘old’ standards.
After you have changed the settings we advice you
to recheck whether each setting is correctly done. It
is also very useful to make a note of all the changes
you have made for future reference.
Then replace the cover and tighten the screws.
The Phono equaliser is now ready for use with your
audio system.
10
SPHINX
Phono Equaliser
6. OPERATION
7. THE 78 RPM MODES
After you have properly adjusted all settings you
may start using the Phono equaliser.
When ‘cutting’ a record master for vinyl records the
audio signal is sent (for technical reasons) through a
special correction equaliser: this increases the highs
and decreases the lows. During replay of the record
this correction curve is ‘reversed’ by the replay filter
in a phono pre-amp.
The RIAA curve is an international standard curve
for 33 and 45 rpm records. This attenuates the
frequencies above 2120 Hz and amplifies those
below 500 Hz (these points are also known as the
‘corner frequencies’ or fc).
For 78 rpm records there have been a number of –
incompatible – standards. Research by the Sphinx’
designers showed however that the most commonly
used standards were the RCA (2120 and 500 Hz)
and AES (2500 and 500 Hz). These actually use the
same curve as the RIAA, so most 78 rpm records
can properly be played with the normal phono input.
An important (and differing) group was formed by
EMI, Decca and Columbia with fc-‘s of 250, 200 and
300 Hz respectively.
That is why the Phono equaliser offers the special
78RPM mode of 250 Hz (as described in 5e). So
you may also play all these specific 78 rpm records
properly.
Connect the mains cable to a mains outlet
Switching on
Once you have finished connecting all components,
you can power on the Phono equaliser with the
mains switch O / I (9).
The LED (1) will blink red for some time after which
it changes to green (when the Myth setting is
selected it will go off).
The Phono equaliser is always switched on.
This way the electronic circuits will be kept at
optimum working temperature so you can enjoy
maximum audio quality immediately after switching
on. Additionally it significantly increases the life span
of the component.
Standby
The Phono equaliser may be remotely switched to
Standby by another Sphinx component if it is
connected to the CONTROL IN (3) optical input.
The LED will switch to red.
Switching off
The only way to switch the Phono equaliser off
completely is with the 0 / I mains switch.
In the 78rpm era quality of the audio systems was
much worse than today, especially lacking response
above 4000 Hz. Due to this ‘natural low-pass filter’,
record surface noise, etc. was undetectable.
When you replay these records via a modern audio
system however, you will hear an annoying amount
of surface noise and maybe even a ‘thin’ or
‘scratchy’ sound quality.
That is why the Phono equaliser offers the 78RPM
FILTER mode (as described in 5f). This special filter
is designed with the help of many listening tests. It
ensures a usable high frequency replay quality with
modern audio systems.
Note: A special problem are recordings using the
following different standards: ‘old’ RCA, EMI or
Decca. These did not incorporate any HF record
correction!
Playback via a normal system will thus result in
extremely attenuated highs. This is inherent to these
recordings and not caused by the modern replay
systems!
11
SPHINX
Phono Equaliser
8. CARE AND MAINTENANCE
Clean the exterior with a soft, lint-free, anti-static
cloth. Do not use force while wiping the surface.
To remove difficult stains use a few drops of
detergent on a moist cloth, sweep carefully and
wipe dry afterwards.
Do not use polishing or cleaning agents: they
may damage the sensitive acrylic finish.
Do not use aerosol cleaning agents.
Most contain solvents, which might react with and
damage the acrylic finish.
If some scratching occurs, please consult your
Sphinx dealer first. He can give you advice about
possible solutions.
9. TECHNICAL SPECIFICATIONS
Bandwidth
Phase response error
Gain
0 - 111,000 Hz (+0/-3 dB)
<1°
High: 66 dB max. (2000x)
Mid: 58 dB max. (800x)
Low: 37 dB max. (70x)
THD+N (IHF-A)
IMD
S/N ratio (IHF-A)
Channel separation
Slew Rate
<0.02% (2nd harm., 10 – 20,000 Hz)
<0.6%
>80 dB (>90 dB)
>95 dB
>24 V/µs
Inputs
Level, nominal (for 1 V output)
Impedance
Capacity
2x cinch (gold plated)
0.13 V (-18 dBV)
51 kohm, 200 ohm, 100 ohm, 50 ohm (selectable)
MM: 47 pF or 147 pF (selectable)
Outputs
Level
Impedance
2x cinch (gold plated)
1.1 V nominal
9.2 V max. (19.3 dBV) (1 – 100,000 Hz, THD <0.02%)
<10 ohm
Rumble filter
12 dB/octave @ 10 Hz
Sphinx Control
1x optical IN, 1x optical OUT
Power supply
Supply capacitance
Power transformer
Power consumption
Internally, fully stabilised
16,280 µF total
O-core
10 W (7 W standby)
Housing
1,5 mm steel, with powder coating
Chassis acoustically decoupled
Dimensions (h x b x d)
70 x 120 x 340 mm
Weight
6.5 kg
Measurements done while using the following settings: (@1 kHz, MC input, Gain High, Ri 100 ohm)
This unit conforms to the EMC interference regulations issued by the EU and to the CE standards.
This unit complies with safety regulation VDE 0860 and therefore with international safety regulation IEC 65.
Technical specifications may be changed by SPHINX without prior notice if technical developments make this
necessary.
©1999 Audioscript BV
12