1
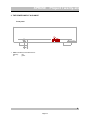
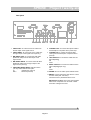
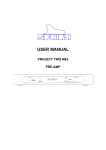
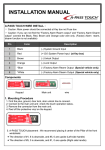
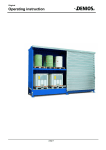
1.
USER MANUAL
PROJECT TWENTY-SIX
MONO
HIGH-POWER AMPLIFIER
PROJECT TWENTY-FOUR
TRUE DUAL MONO
HIGH-POWER AMPLIFIER
SPHINX
Project Twenty-six
1. UNPACKING................................................................................................................................. 3
2. SPHINX WARRANTY CARD......................................................................................................... 3
3. THE POWER AMP AT A GLANCE ............................................................................................... 4
Front panel ............................................................................................................................................ 4
Rear panel............................................................................................................................................. 5
4. INSTALLATION AND CONNECTIONS......................................................................................... 6
Installation............................................................................................................................................. 6
Connections in general .......................................................................................................................... 6
Connecting loudspeakers....................................................................................................................... 6
Connecting the inputs ............................................................................................................................ 6
Balanced ............................................................................................................................................. 6
Unbalanced ......................................................................................................................................... 6
Connecting the optical cables ................................................................................................................ 7
Connecting the mains power cable ........................................................................................................ 7
5. OPERATION ................................................................................................................................. 8
Power On .............................................................................................................................................. 8
Power off ............................................................................................................................................... 8
Warnings............................................................................................................................................... 8
If you encounter problems... .................................................................................................................. 8
CARE AND MAINTENANCE ............................................................................................................. 9
TECHNICAL SPECIFICATIONS PROJECT 26................................................................................. 9
TECHNICAL SPECIFICATIONS PROJECT 24................................................................................. 9
2
Pagina B
SPHINX
Congratulations with your purchase of the
Sphinx Project Twenty-four or Twenty-six!
1. UNPACKING
Before leaving the factory every Project Twenty-six
or Twenty-four is subjected to stringent and
extensive technical and exterior quality inspections.
This ensures you will enjoy many years of high
quality audio from a perfect looking product.
You are now part of an ever increasing group of
quality conscious audiophiles using Sphinx
products.
We are very proud of the tradition connected to the
SPHINX name especially concerning audio quality
perfection.
This manual will help you to gain a maximum
amount of pleasure and quality from your new
Sphinx Project Twenty-six or Project Twenty-four
high-power amp.
Attention: The power amp weighs over 45 kg!
Never lift it out of the carton without someone
helping you.
The Project Twenty-six is even for Sphinx a very
exceptional mono power amplifier: it weighs 45
kilogram and is capable of an effortless 800 W
into 2 ohm and 1400 W into 0,5 ohm (or over 60 A
into 0.3 ohm...) while keeping any sort and size of
loudspeaker under complete control.
The power supply will absolutely prevent any
interference (noise, hum, etc.) from reaching the
audio circuits, have an unconditionally stable
voltage disregarding the load, guarantee a
frequency-independent output impedance (up to at
least 200 kHz), be able to supply current into load
impedances almost equalling 0 ohm and guarantee
maximum reliability and safety while working with
these very high output powers.
The amplification is handled by patented audio
circuits with a linear power bandwidth of over 4
MHz... The input has a RF-filter 'narrowing' the
overall bandwidth to around 200 kHz, to prevent
(unwanted) radio-interference being amplified.
The Project Twenty-four is even more special: it
features two separate power amps with the same
high specs as the unique mono Twenty-six using
the same chassis and power supply. It also weighs
45 kg, but delivers an effortless 2x600 W into 2
ohm and into 1 ohm while keeping all sorts and
sizes of loudspeaker loads completely under
control.
Project Twenty-six
After unpacking your Project Twenty-six or Twentyfour we therefore recommend you carefully check it
for any transport damage.
In case of damage: please contact your Sphinx
dealer immediately and retain all packing materials
for possible proof of damage and possible claims.
Even if the component is in perfect condition you
still should keep the packing materials. If you need
to transport your Project Twenty-six or Twenty-four
at a later time it will be best protected by the
original packing materials.
2. SPHINX WARRANTY CARD
Please takes this opportunity to fill out the enclosed
warranty card now!
Follow the instructions on the card or consult your
dealer.
Please send the card as soon as possible to the
return address (within 14 days after purchase).
To obtain the maximum quality from this power
amp it is necessary to use it with top quality audio
components. So preferably use it with other Sphinx
components.
Please read this manual carefully before you
install or use this high-power amp. It is
important to familiarise yourself with the
special functions, operation and possibilities
of the Sphinx Twenty-six or Twenty-four.
Your local dealer will be able to answer any
questions concerning other Sphinx audio
components.
3
Pagina C
SPHINX
Project Twenty-six
3. THE POWER AMP AT A GLANCE
Front panel
1. LED: Indicates the selected function:
stand-by
red
on
green.
4
Pagina D
SPHINX
Project Twenty-six
Rear panel
1. CINCH LEFT: To connect the cinch cable from
the left output of the signal source.
6. CONTROL OUT: To connect the optical cable to
another Sphinx component like a power amp.
2. CINCH RIGHT: To connect the cinch cable from
the right output of the signal source (24 only).
7. CONTROL IN: To connect the optical cable
coming from another Sphinx component like a
pre-amp.
3. BALANCED LEFT: To connect the XLR cable
(balanced cable) from the left output of the
signal source.
4. BALANCED RIGHT: To connect the XLR cable
(balanced cable) from the right output of the
signal source (24 only).
5. CINCH/BALANCED INPUT: With this switch
you may select between the inputs:
up
unbalanced (3 and 4)
down
balanced (5 and 6)
8. LEFT OUTPUT: To connect the cable from the
left loudspeaker:
red
+
white
9. RIGHT OUTPUT: To connect the cable from the
right loudspeaker (24 only):
red
+
white
10. POWER: This is the mains power master switch.
11. MAINS: Connect the power amp with the cord to
a mains outlet (230 - 240 VAC).
The mains fuse is placed behind the cover.
Manufacturer's label: Here you'll find important
data of this component such as serial number
and mains voltage to be used.
5
Pagina E
SPHINX
Project Twenty-six
4. INSTALLATION AND CONNECTIONS
Installation
Connecting loudspeakers
Attention: The power amp weighs more than 45
kg!
So make sure you place the Project Twenty-six or
Twenty-four on a stable and sturdy support.
We recommend using a double pair of cables if this
is possible with the loudspeakers used (one pair for
the highs and another for the lows).
In most cases you will hear a substantial
improvement in the sound quality (but: be careful to
prevent shorted connections).
Your dealer can recommend the best cables and
connection methods.
Never 'stack' two power amps on top of each other.
The Project Twenty-six or Twenty-four will become
warm so correct placement is critical. Do not
position it on top of or close to other heat radiating
equipment (such as other power amps) or in direct
sunlight.
Please ensure the unrestricted ventilation
around the component.
If you need to use the amp in a closed cabinet or on
a bookshelf you absolutely provide unrestricted
ventilation around the component..
To prevent any possible interference keep power
supply cables away from all audio cables.
If all these conditions will be met the Project
Twenty-six or Twenty-four shall perform to the
extremely high standards it is designed for.
Connections in general
Before you start connecting equipment it always is
wise to check whether all mains power cables of all
components are disconnected from the mains
outlets!
This will prevent any damage to the loudspeakers
and amplifiers caused by incorrect wiring or
settings.
Always use loudspeaker and audio cables and
connectors of the highest quality.
Siltech cable is used throughout internally so we
recommend using this same cable for all external
connections.
If you have the choice between longer loudspeaker
cables or longer audio cables, choose the latter
(cables between preamp and power amp will cause
the least signal quality loss).
Connect the red RIGHT OUTPUT terminal (11.) to
the red or '+' terminal of the right loudspeaker.
Connect the black RIGHT OUTPUT terminal (11.) to
the black or '— ' terminal of the right loudspeaker.
Connect the left loudspeaker in the same way to the
LEFT OUTPUT terminals (10.)
When using unterminated cables please check
carefully if there are no 'loose ends' cause a short
between the '+' and the '— ' of the terminals on amp
and loudspeakers!
Connecting the inputs
Make sure you connect L and R properly. Most
cinch cables use Red for the Right channel and
White or Black for Left.
All cinch connectors on the Project Twenty-six or
Twenty-four's rear panel have a red centre for the
right channel and a white one for the left channel.
The XLR connectors are marked BALANCED
RIGHT and LEFT.
When making the connections please refer to the
descriptions for parts 3. up to 13. on page 5.
The Project Twenty-six or Twenty-four has two input
types.
Balanced
To the BALANCED LEFT and RIGHT(600 Ω ) inputs
you connect the corresponding outputs from the
pre-amp.
Unbalanced
The unbalanced inputs CINCH LEFT and CINCH
RIGHT (20 kΩ ) can be used for any unbalanced line
level signal (like from a pre-amp).
Use only one type of input. The switch (7.) on the
rear panel lets you select between the type of
inputs.
Note: Do not place a so-called 'shorting connector'
in the unused input.
6
Pagina F
SPHINX
Project Twenty-six
Connecting the optical cables
Connecting the mains power cable
The Project Twenty-six or Twenty-four has optical
jack connectors for CONTROL IN and CONTROL
OUT.
Before you connect the cable please check
whether the mains voltage indicated on the
manufacturers label on the rear panel is the
same as your local mains voltage.
If not: please contact your dealer and do not
connect the component to the mains.
When the CONTROL IN of the Project Twenty-six or
Twenty-four has been connected to the CONTROL
OUT of another Sphinx component (e.g. a pre-amp)
you don't have to switch the Project Twenty-six or
Twenty-four with the POWER switch (12.). The
power amp will automatically select Stand-by mode
as soon as the other component is set to stand-by.
Connect the mains cable after you have connected
all other components in the system and have
double-checked all connections.
In 'stand-by' mode the bias current of the power
amp is set to a lower level which drastically
decreases the temperature and power consumption.
On top of that it significantly increases the life span
of the component.
The power amp also warms up more speedily so
you will be able to enjoy it's maximum performance
without significant delay.
When the CONTROL OUT of the Project Twenty-six
or Twenty-four has been connected to the
CONTROL IN of another Sphinx component (which
most likely will be another power amp) this
component will be selected to stand-by by the
Project Twenty-six or Twenty-four's stand-by mode.
Ensure proper connection of the optical cables
(from CONTROL OUT to CONTROL IN), otherwise
the LED (1.) on the front panel may remain green
although the stand-by mode is activated.
If the Project Twenty-six or Twenty-four is placed in
strong direct sunlight the stand-by mode might be
self-activated. In that case you should place the
supplied dummy connector in the CONTROL IN (9.)
jack (but only if this is not being used).
We strongly recommend against placing the
component in direct sunlight though.
7
Pagina G
SPHINX
Project Twenty-six
5. OPERATION
Warnings
Connect the mains cable of the Project Twenty-six
or Twenty-four to a mains outlet.
1. Never put two amps on top of each other.
Only after you have connected all other
components, you may switch the Project Twenty-six
or Twenty-four on with the POWER switch (12.) on
the rear panel.
The LED on the front panel will blink green/red for
about one minute after which it remains green.
From now on you should switch the power amp on
and off with the ST ANDBY button of another Sphinx
component connected to the optical CONTROL IN
jack (usually the pre-amp).
This way all circuits will remain at working
temperature and the audio quality will be 100 %
within 30 minutes after activating. On top of that it
considerably increases the life span of the
component.
2. The component should not be subjected to
moisture of fluids.
3. Do not touch the component and the
loudspeaker outputs in particular with moist
hands: this powerful amp can output voltages in
excess of 36 volt.
4. Before removing the top panel, you should
disconnect the mains cable and wait at least 30
m inutes (because the power supply remains at
the maximum voltage for a long time).
Removing the top panel does void your warranty
though: the panel should therefore only be
removed by an official Sphinx service engineer!
5. Before disconnecting a loudspeaker or audio
cable, please switch of the component with the
POWER switch (12.)
The Project Twenty-six or Twenty-four is in stand-by
mode and the LED (1.) shows a red indication.
6. An AC extension cord should never be used
wholly or partly coiled: this poses a severe fire
risk!
Power On
If you encounter problems...
You switch the Project Twenty-six or Twenty-four on
with the ST ANDBY button of the other Sphinx
component: the LED becomes green.
If after power on the protection circuits detect
something wrong the Project Twenty-six or Twentyfour will immediately switch to stand-by: the LED
indication will be red.
If you activate the power amp for the first time or
after a long period of non-use with the power 'off'
the amp will be at maximum performance after one
hour.
From stand-by mode it only takes around 30
m inutes.
In almost all occurrences the problem has to do
with the loudspeaker cables.
Check every single one and solve the problem.
If you can't find the problem or the cause is
definitely not the cables, please contact your Sphinx
dealer.
Power off
You switch the Project Twenty-six or Twenty-four off
(stand-by) with the ST ANDBY button of the other
component.
Only if you will not be using the amp for a long
period (e.g. during holidays) we recommend
switching the amp off with the POWER switch (12.).
Because in stand-by mode the Project Twenty-six or
Twenty-four's power consumption is still around the
70 W mark.
Should for some reason the mains fuse be
destroyed you should replace it with a new one of
exactly the same type and rating:
5x20 mm
250 VAC / 6 A / slow (Project 26)
250 VAC / 6 A / slow (Project 24)
The fuse sits behind the cover in the mains
connector (13.).
Never use a fuse of a different rating: this could
lead to serious damage and may cause fire!
8
Pagina H
SPHINX
Project Twenty-six
If some scratching might occur, please first consult
your Sphinx dealer. He can give you advice about
possible solutions.
CARE AND MAINTENANCE
Clean the exterior with a soft, lint-free, anti-static
cloth. Do not use force while wiping the surface.
To remove difficult stains use a few drops of
detergent on a moist cloth, sweep carefully and
wipe dry afterwards.
Do not use polishing or cleaning agents: they
may damage the sensitive acrylic finish.
Do not use aerosol cleaning agents.
Most contain solvents which might actively react
and damage the acrylic finish.
TECHNICAL SPECIFICATIONS PROJECT 26
Bandwidth
0 - 4 MHz (+0/-3 dB)
0 - 200,000 Hz after RF input filter
<1° (0 - 20,000 Hz)
28 dB max.
>200 W into 8 ohm (23.0 dBW), T HD <0.01%
>400 W into 4 ohm (26.0 dBW), T HD <0.01%
>800 W into 2 ohm (29.0 dBW), T HD <0.015%
>1200 W into 1 ohm (30.8 dBW), T HD <0.025%
>1400 W into 0.5 ohm (31.5 dBW), T HD <0.05%
42 V / 60 A (into 0.3 ohm)
<0.009% (200 W into 8 ohm, 1 - 20,000 Hz )
<0.01%
>122 dB
>50 V/µs (unbalanced)
>100 V/µs (balanced)
>500 (1 - 20,000 Hz)
unbalanced
/ balanced
1.5 V ( 3.5 dBV) / 1.5 V ( 3.5 dBV)
20 kohm
/ 600 ohm
Phase response error
Gain
Minimum Power Output (0 - 20,000 Hz)
Output voltage / current, max.
T HD+N (IHF-A)
IMD
S/N ratio (IHF-A)
Slew rate
Damping factor
Input
level, nominal
impedance
Supply capacitance
Power consumption
88,000 µF total
4000 W max. (30 W standby)
2400 W (for loads between 1 and 8 ohm)
190 x 482 x 620 mm
45 kg
5 year
Dimensions (h x w x d)
Weight
Warranty
TECHNICAL SPECIFICATIONS PROJECT 24
(only when different from Project 26)
Minimum Power Output (1 - 20,000 Hz)
Output voltage / current, max.
T HD+N (IHF-A)
IMD
S/N ratio (IHF-A)
Damping factor
>2x 200 W into 8 ohm (23.0 dBW), THD <0.05%
>2x 400 W into 4 ohm (26.0 dBW), THD <0.05%
>2x 600 W into 2 ohm (27.7 dBW), THD <0.05%
>2x 600 W into 1 ohm (27.7 dBW), THD <0.05%
42 V / 27 A (into 0.8 ohm)
<0.003% (1 W into 8 ohm, 1- 20,000 Hz )
<0.005%
>118 dB
>250 (0 - 20,000 Hz)
Power consumption
2500 W max. (70 W standby)
This unit conforms to the EMC interference regulations from the EU and to the CE standards.
This unit complies with safety regulation VDE 0860 and thus with international safety regulation IEC 65.
Technical specifications can be changed by SPHINX without prior notice if technical developments make this
necessary.
©1996 Audioscript BV
9
Pagina I