1
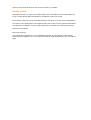
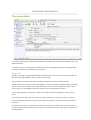
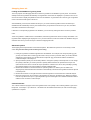
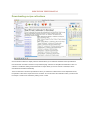
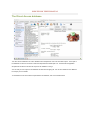
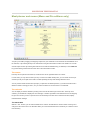
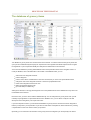
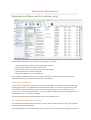
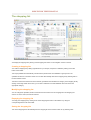
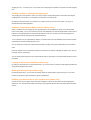
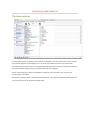
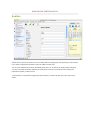
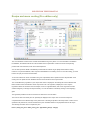
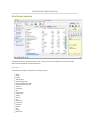
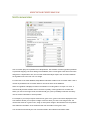
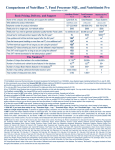
SHOP'NCOOK USER'S MANUAL
Table of contents
Introduction
Cookbooks
The recipe editor
Downloading recipe collections
The Direct Access database
Meal planner and menus (Menu and Pro editions only)
Ingredients, grocery items and articles
The database of grocery items
Supermarkets (Menu and Pro editions only)
The shopping list
The item selector
Sublists
Recipe and menu costing (Pro edition only)
Nutritional analysis
The color code
Pantry and substitutions
Unit conversion
Waste
Synchronization (Menu and Pro editions only)
The mini-toolbar
The preferences
Troubleshooting
SHOP'NCOOK USER'S MANUAL
Introduction
The program Shop'NCook is a complete solution for the kitchen that will allow you to
effortlessly organize your own recipes,
grow your recipe collection by discovering and importing new recipes and collections of
recipes from internet,
plan your meals,
streamline your grocery shopping,
analyze the nutritional content and cost of your recipes and menus
and access your recipes from anywhere with a built-in synchronization function.
This help is for the three editions of Shop'NCook: Shop'NCook Home, Shop'NCook Menu and
Shop'NCook Pro. Not all these above features may be available in your edition. See the table below
to learn which features are available in it:
Shop'NCook
Home
Shop'NCook
Menu
Shop'NCook
Pro
Easy import of recipe
✓
✓
✓
Organization in cookbooks
✓
✓
✓
Collection of free cookbooks
✓
✓
✓
Access to the recipe of the Direct
Access database
✓
✓
✓
Automatic nutritional analysis
✓
✓
✓
Shopping lists
✓
✓
✓
Sublists
✓
✓
✓
Automatic ingredient substitution
✓
✓
✓
Possibility to combine recipes
✓
✓
✓
Pantry
✓
✓
✓
Shopping lists for several markets
✓
✓
Meal plans
✓
✓
Organization of cookbooks by
chapters
✓
✓
Synchronization
✓
✓
Costing
✓
Easy import of supplier's data
✓
Important: The screenshots in this help are for the Pro edition of the software. If you cannot find
features described in this help or if the screenshot of your application doesn't look exactly like the
picture, refer to the table above to see what is included in your edition.
Getting started
Shop'NCook is built in a way that it provides easy-to-use functionalities from the start without any
set-up, but also allows deep customization of its features to meet your needs.
Each section of this help can be read independently of the others. If you are new to Shop'NCook, I
recommend you to start with the next chapter to learn how to add your own recipes and download
the collection of cookbooks. Try then to play a little with the software and consult the remaining
sections as need arises.
More help resources
This manual is not exhaustive. For more detailed information on some feature, video tutorials,
frequently asked questions, etc. or to contact us directly for a personalized help, go to our support
page.
SHOP'NCOOK USER'S MANUAL
Cookbooks
You open a cookbook by clicking on its name on the column on the right. The main cookbook is a special cookbook
that cannot be removed or organized by chapters. It is the default cookbook that opens when you start the software,
although you can change this in the preferences.
When a padlock sign appears next to a cookbook name, the cookbook is locked and cannot be modified. You can
unlock it in the Cookbooks menu.
You can create a new cookbook by clicking on the + button of the mini-toolbar or from the File menu. In the cookbook
information editor (Cookbooks menu), you can add a text and a picture to display when the cookbook is opened.
Adding a recipe
To add a recipe from the internet, open the cookbook of your choice, copy the whole recipe to the clipboard and use
the clip button of the toolbar. Alternatively, you can add the recipe by selecting it with the mouse and dragging it onto
the recipe display panel. A photo can be added in the same way.
To add a new recipe from scratch, click on the New button and type the recipe in the wizard. The wizard will analyze
the recipe and open it in the recipe editor where you can fine-tune it.
To modify a recipe, click on the Edit button of the toolbar. For more information, see the recipe editor.
Viewing and scaling the recipes
To view a recipe, click on its name in the column on the left of the cookbook view. If you double-click, it will open in a
separate window. There is a scaling tool at the top of the recipe where you can scale the recipe by changing the
number of servings or the size of the servings. If the number of servings is undefined, you can change the yield of
the recipe.
The nutritional analysis is displayed at the bottom of the recipe. In the Pro edition, the food cost estimate is displayed
in the recipe header. To see the break down per ingredient of the nutritional and cost analysis, display the Nutrition,
respectively Costing tab of the recipe.
Adding to the shopping list
You add the ingredients of a recipe to the shopping list by clicking on the + button of the toolbar. The Shopping items
tab of the recipe gives you more control on which ingredients you add to the shopping list. You can also make
automatic ingredient substitutions and deselect automatically the ingredients of your pantry with the Substitution and
Pantry features.
You can select in the preferences which information you want displayed in the recipe.
Organizing the recipes
A cookbook can be organized both in categories and in chapters. A recipe can belong to several categories, but only
to one chapter. When you display a cookbook in category mode, you can select a category in toolbar to display the
recipes belonging to it. The recipes are displayed by alphabetical order. This is the default view of the cookbooks.
In chapter mode, only the recipes belonging to a chapter are displayed. You can establish the chapters in the chapter
editor (Cookbooks menu). The recipes can only belong to one chapter and will be displayed in the order you selected
in the chapter editor. Once all the recipes of a cookbook have been attributed to a chapter, the cookbook will be
displayed in chapter mode at opening.
You can switch between chapter and category mode in the Cookbooks menu.
Combining recipes
Recipes are combined when you list a recipe as an ingredient in another recipe. For the link to be successful, the
following condition must be fulfilled:
1. The two recipes must belong to the same cookbook.
2. The ingredient must be spelled exactly like the recipe name.
3. Linking to the database of grocery items has priority over linking to recipes, therefore there should not be an
ingredient of same name in the database.
4. The software must be able to determine which quantity of the recipe is required.
5. A recipe cannot link to another recipe that links to the first one, i.e. there cannot be a loop.
A simple way to link two recipes is to list the linked recipe as "1 recipe" followed by the recipe name, for example: 1
recipe Hollandaise sauce. If you need a specific quantity of the linked recipe, for example 1 cup Hollandaise sauce,
you need to specify the yield of the link recipe so that the recipe can be correctly scaled.
A linked recipe is underlined in the recipe. When you click it, it opens correctly scaled in a separate window.
Searching recipes
To open the search tool, click on the binoculars in the mini-toolbar. You can search by ingredients, category, recipe
title, or search the whole text of your recipes. To add a search criteria, click on the + button.
You can select the cookbooks the search must take place. To select several cookbooks, press the control key on
Windows or the command key on Mac. Your cookbooks are indexed to allow an ultra fast search of the recipes. If
you have just imported a cookbook, it may not be yet fully indexed. In this case, it will be displayed in red and the
search results may be partial.
Printing and sending recipes by e-mail
To print or send recipes by e-mail, select the recipe(s) and click on the Print, respectively the Send button of the
toolbar. You can select several recipes by pressing the control key on Windows or the command key on Mac.
Sharing on the internet
You can upload a recipe to the Direct Access recipe database by clicking on the Share button. You will be able to
access the recipe you upload on Shop'NCook Lite iPhone/iPad application.
SHOP'NCOOK USER'S MANUAL
The recipe editor
You reach the recipe editor by clicking on the Edit button of the toolbar of your cookbook or when adding a new recipe
with the New button.
You should first work on the Recipe tab of the editor, then switch to the Shopping items tab to check the ingredients
have been correctly linked to the database of grocery items.
Recipe tab
Typically, your recipes are automatically formatted by the recipe wizard. You need to open a recipe in the editor only
when the wizard made mistakes or when you want to modify a recipe.
The ingredient lines are split in three parts: the quantity, the ingredient name and an optional comment.
When the wizard did not correctly recognized an ingredient, or wrongly recognized as ingredient the text of the recipe,
select the line to correct and press on the magic wand button to fix it. If it is an ingredient that the software doesn't
know, it will give you the possibility to add it to the dictionary so that it recognizes it the next time.
You can add ingredients by clicking on the + button of the toolbar and add new paragraphs by clicking on the A+
button.
To add a picture to the recipe, click on the "Set Picture" button. Click then on + to select from a file or on the clip
button to add from the clipboard. You can also crop the picture by selecting an area with the mouse and clicking on
the scissors.
For the size of the recipe, you can either input the number of servings and the serving size, or leave the number of
servings to zero and specify the total yield of the recipe. If you leave the serving size or yield empty, it is taken to be 1
for scaling purpose.
Shopping items tab
Linking to the database of grocery items
The main purpose of the Shopping item tab is to link the ingredients to the database of grocery items. The software
attempts to link the ingredients automatically. The ingredients it couldn't link are displayed in a pull-down menu in red.
Click on the arrow to display the possible choices from the database. To get another set of choices, type an ingredient
name in the field and click again on the arrow.
After establishing a new link, the software will ask you if you want to add the ingredient name to the dictionary to
establish the link automatically. This way, the software learns your preferences and the more you use it, the easier
and faster it will become to add a recipe.
If there are no corresponding ingredient in the database, you can add it by clicking the button next to the pull-down
menu.
To link an ingredient to a different item of the database, select the ingredient and click on the magic wand button. The
ingredient will be displayed again displayed in red. If you leave it like that, it will be re-linked to the database using the
automatic rules when you save the recipe or leave the Shopping items tab.
Advanced options
The Shopping item tab provides also some advanced options. Note that these options are not necessary in usual
cases. Only use them when you know what you are doing.
1. Linking an ingredient to a different ingredient from the database. For example, if the recipe requires egg yolk,
you may want to link them to whole eggs since this is what you have to purchase. When you do that, DO NOT
add this link to the dictionary or it will affect all the recipes with egg yolk. Note also that this will affect the
nutritional analysis of the recipe too.
2. Specify a different quantity. It is almost always better to change the quantity in the Recipe tab. You can change
the quantity in this tab if you want to purchase a quantity different that the one specified in the recipe. This
option should not be used to convert the recipe quantities to a different unit. This is done preferably by setting
the preferred shopping unit of the ingredient in the main database editor.
3. Deselect the checkbox on the left hand-side for optional ingredients, so that they are not added to the
shopping list by default. Note that the checkbox is automatically unchecked if the ingredient is listed as optional
in the Recipe tab.
4. Deselect the checkbox on the right hand-side so that the ingredient is not included in the nutritional analysis.
5. Define the weight of the unit of measure of the ingredient by clicking on the balance sign. Defining the weight
here will only affect this recipe. It is generally better to give the unit weight in the nutritional information editor to
enable the unit conversion in all the recipes.
Cooked indicator
The "cooked" indicator may appear next to the ingredient name if the quantity of the cooked ingredient is given in the
Recipe tab - for example: 1 cup cooked rice . This affects how the nutritional information, the cost and the shopping
quantities are computed.
SHOP'NCOOK USER'S MANUAL
Downloading recipe collections
Click on Browse Collection to display a browser tool that allows you to download cookbooks and recipe collections
from the internet. Click first on the link to recipe download page. Click then on Shop'NCook Cookbooks to reach our
collection of cookbooks, totaling several thousands of recipes. When you click on a link to a cookbook, it will be
downloaded and installed automatically.
There are also links to several recipe collections. When you download a collection that is not in Shop'NCook format,
the operation is slow as the recipes have to be converted. You can also select the cookbook to which you want to add
the recipes or create a new cookbook by clicking on the + button.
SHOP'NCOOK USER'S MANUAL
The Direct Access database
The direct access database is an online database where Shop'NCook users can share their recipes. The recipes of
the database can also be accessed on internet at http://DirectAccessRecipes.com. The iPhone/iPad application
Shop'NCook Lite allows to browse the recipes of the database on the go.
You can add your own recipes to the database and also add a shopping list. You can also delete from the database
the recipes you have added.
To download the index of the latest recipes added to the database, click on the Refresh button.
SHOP'NCOOK USER'S MANUAL
Meal planner and menus (Menu and Pro editions only)
You plan your meals by dragging and dropping recipes from your cookbooks or from the Direct Access database on to
the calendar, or by selecting the day in the calendar and using the "Add to Menu" button of the toolbar. You can add
several recipes at a time by selecting them with the mouse with the CONTROL key (on Windows) or the COMMAND
key (on Mac OS X) pressed down and then click on the "Add to Menu" button.
The menus
Each day can be split into several menus, and the menus can be organized further into courses.
In most cases, you only need one menu per day. To create a re-usable weekly menu, you can create one menu per
week and put all your recipes for the week in it while separating the days with headings within the menu.
You only need to create several menus per day if you plan them for different persons, if you want to be able to set a
different number of servings per menu, or if you want to be able to re-use the menus on a meal basis.
The calendar
You can display or hide the calendar by clicking on the arrow at the bottom right of the screen. At the top of the
calendar, you find buttons to display the menu manager, or add the ingredients of the selected menu to the shopping
list, print it or send it by e-mail. To process menus for several days at a time and for advanced functions, display
instead the Menu manager.
The menu table
With the + and - buttons, you can add and delete menus. Click on the edit button to set the number of servings or to
change the name of the menu. The lib button allows you to save the selected menu to the library or to retrieve a menu
from the library.
The recipe table
The recipe table below the menu table displays the recipes of the selected menu. You add a recipe to a menu with
drag & drop or by clicking on the "Add to Menu" button of the toolbar of the cookbook or Direct Access sections. You
remove a recipe with the - button below the recipe table. The + button allows you to add a heading (or course), a
comment, or a grocery item to your menu.
You can change the order of the recipes in your menu by using the up and down arrows or with drag & drop.
The number of servings of your recipes is automatically adjusted to the number of servings of the menu. If the number
of servings of the menu or the number of servings of the recipe are undefined, the recipe is not modified. You can also
change manually the number of servings of a recipe or scale it by clicking on the edit button.
The view and print buttons allow you to view, respectively print the selected recipes.
The library
You reach the menu library by clicking on the Library tab of the calendar. You can store individual menus in the library.
To add or retrieve a menu from the library, use the lib button below the menu table in the Calendar tab.
The menu manager
You display the menu manager by clicking on the Menu manager button on the toolbar of the calendar, or by selecting
Menus in the column on the left.
First, choose in the toolbar of the menu manager the number of days of menus you want to process. You have the
choice between a single menu, a day of menus, an arbitrary number of days up to 14 days, a week or a month. A
month is for the current month of the calendar. A week is for the current week, starting on Sunday.
You can change the starting day of the week or the default number of days of the menu manager in the Preferences.
Click on the Add button to add the ingredients of the selected days of menus to the shopping list. The Shopping items
tab of the menu manager gives you precise control on which ingredients get added. You can also make automatic
ingredient substitutions and deselected automatically the ingredients in your pantry by using the Substitution and
Pantry features.
The nutrition and costing tabs give you a break-down of the nutritional analysis, respectively the cost analysis of your
menus. Click on the arrows to show or hide the details of the menus and recipes.
Yearly meal planning
Although you can display at the maximum one month of menus at a time, you can plan as far in advance as you want.
If you want to plan your supplies for several months or even years, you can add them to the shopping list by adding
the first month, select another month and repeat the operation as many times as you need.
SHOP'NCOOK USER'S MANUAL
Ingredients, grocery items and articles
In the following chapters, you will learn about the database of grocery items, supermarkets and shopping lists. To understand better their roles,
you have to understand the difference between ingredients, grocery items and articles.
Ingredients are listed in recipes. They need to be linked to a specific grocery item from the main database. Different ingredients must be linked
to different grocery items.
The main database contains grocery items. You can think of grocery items as the generic name for an article - like canned tomato - without the
brand and size information.
Supermarkets are made of articles. Articles are the actual product you buy for the given grocery item - like Del Monte tomatoes whole peeled
#10. Articles can include brand, size, price and aisle information. There can be several articles per supermarket corresponding to the same
grocery item.
Shopping lists are made of grocery items and articles.
Supermarkets are only available in the Menu and Pro editions.
SHOP'NCOOK USER'S MANUAL
The database of grocery items
The database of grocery items has a central function in the software. It contains more than 2000 grocery items with
synonyms and nutritional analysis and plays an important role in the algorithm that allows Shop'NCook to recognize
the ingredients of your recipes automatically and analyze their nutritional and cost information.
You access the database by clicking "Main database" below the supermarket section of the navigation column. To
modify to database, click on the Edit button of the toolbar. In the database editor, you can:
add and remove categories and items
rename categories
rename custom items. Predefined items cannot be renamed, but you can do it in supermarkets instead.
change the order of the categories and items or sort them by alphabetical order
select which categories and items are main
define the preferred shopping units
input cost data (Pro edition only).
Although it is allowed, it is strongly discouraged to remove the predefined items of the database as it may affect core
functionalities of the software.
Most of the time, you won't need to edit the database directly. You can easily add new grocery items when you link
manually recipe ingredients or supermarket articles to the database. Also, you can add or modify the cost data
directly from the Costing tab of your recipes and menus.
If you have Shop'NCook Home, you should edit the database of grocery items to rename and sort the categories so
that they correspond to your supermarket. If you have an other edition of Shop'NCook, this is better done by creating
a supermarket for each of the stores in which you purchase.
Optionally, you can select the main checkbox of the grocery items and categories you use frequently to be able to
add them easily to the database in the Item selector section.
Note on the preferred units
Each of the grocery items of the database has an associated preferred unit for the shopping list. The software tries to
convert the quantity to this unit when adding an ingredient to the shopping list. If you want to change the preferred
unit, edit the database and type the unit of your choice in the preferred unit field.
The preferred unit can also take three special values:
WEIGHT: the preferred weight unit, oz or kg, depending on the settings in the Preferences.
VOLUME: the preferred volume unit, fl oz or liter, depending on the settings in the Preferences.
NO_UNIT_DEFINED: disable the conversion of unit for the item altogether.
SHOP'NCOOK USER'S MANUAL
Supermarkets (Menu and Pro editions only)
Creating supermarkets allow you to customize your shopping list in many ways:
make shopping lists for several stores and organize them by aisles
list the exact product names, including brand and size
know the actual number of units of the products you must purchase
estimate precisely the cost of the shopping list
get the lowest possible price for your grocery list
Before creating a supermarket, make sure you understand the difference between the articles that are stored in
supermarkets and the grocery items that are stored in the main database.
Creating a supermarket
You can create a supermarket by clicking on the + button of the mini-toolbar. You can also create a supermarket when
importing supplier's data. In the supermarket information window that opens, you must input at the minimum a name
for the new supermarket, select what you want to include: all the grocery items of the main database, the main
grocery items, or create an empty supermarket. If you need to make a shopping lists in a different language than the
main supermarket, you can also select a language.
The new supermarket appears in the Supermarkets section of the navigation column.
The supermarket information window
The supermarket information window opens when you create a new supermarket or when you click on the information
button of the toolbar of the supermarket.
In the shopping list tab of the information window, you can select how to sort the articles in the shopping list: by aisles,
alphabetical order, product ids, etc. You can also select which information you want to include in the shopping list, like
brand, product size, quantity, price, etc.
You can also include an overhead cost, that is the cost to go to the supermarket or the cost to order from this supplier.
The overhead cost will be used to compute the best value for you shopping list.
In the ordering information tab, you can specify an e-mail address and default e-mail message to send directly your
orders to the supermarket or supplier.
The overhead cost, price information and ordering information tabs are only included in the Pro edition.
Creating a supermarket to sort the shopping list by aisle
In the simplest case, you only want to create a supermarket to sort the shopping list by aisles. In this case, create a
supermarket with all the items of the main database. Edit the supermarket, rename the category names with the aisle
number. Then sort the supermarket by aisles by clicking on the sort button of the toolbar.
The supermarket editor
In the supermarket editor, you can:
add and remove aisles (or categories) and articles
rename aisles and articles
change the order of the aisles and articles or sort them by alphabetical order
link the articles with the database of grocery items
look up an article by barcode
You can also input the following information for the articles:
brand
product id
size
selling unit
price (Pro edition only)
indicate if the article can only be bought in whole quantities or not
Important note about the article size, the selling unit and the price: The article size gives the size of one unit of
the product. The selling unit must correspond to the article size. For example, the article size may be "6 x 500g" and
the selling unit may be "pack". In this case, the shopping list will give the quantity to purchase in "pack" unit, each
pack corresponding to 6 x 500 g. The price must correspond to one unit of the product, i.e. 6 x 500 g or one pack.
When the selling unit is known by the software, for example pound, it is possible to omit the article size, which would
be "1 pound" in this case.
Importing supplier's data (Pro edition only)
You import suppliers data by selecting "Import supermarket data" in the File menu. You can import data file in the
following formats:
tab-delimited
comma-separated values
semi-colon separated values
fixed width columns.
You can import the data in an existing supermarket and import it as a new supermarket.
You indicate to the software which data the columns of your file contain: article name, aisle, brand, etc. You can also
ignore columns.
If you are importing for the first time, select to import as new articles. You can also select to match automatically the
articles with the database of grocery items.
If you are updating the supplier data, select to update and select a column to match the original supermarket data
with the data being imported. Usually, the product id and the barcode are a good choices for the matching column as
they are unique. If they are not available, you can choose also the article name. When updating, you don't need to
import all the data of all the columns again. You can only specified the columns you want to update, like the price
column.
After importing the data, the new supermarket is opened in edit mode. You can save or discard the modifications.
When importing a supplier data for the first time, you may have to link manually the articles with the database of
grocery items. This has only to be done the first time you import. You won't have to do it when updating the data.
To link an article to the main database, click on the pull-down menus of the DB Item column and select among the
proposed choices. If you don't find an appropriate item, you can get another set of choices by typing a word in the
field of the pull-down menu and clicking on the arrow again. By clicking on the + button next to the pull-down menu,
you can also add a new grocery item to the database.
SHOP'NCOOK USER'S MANUAL
The shopping list
You display the shopping list by clicking on the Shopping List section on the navigation column on the left.
Creating a shopping list
You create a shopping list by adding ingredients from your recipes, meal plans or sublists by clicking on the Add
button of the toolbar.
The recipe quantities are automatically converted to the preferred unit of the database of grocery items. The
quantities can also be corrected for waste. You can also add manually items to the shopping list by selecting them in
the Item selector section.
The items in red that are unknown from the software get added to the miscellaneous category of the shopping list. By
clicking on the magic wand next to them, you can link or add them to the main database and move them to the
appropriate category.
Modifying the shopping list
You can change the quantities, edit the comments and remove items from the shopping list in the Shopping List
section. for a finer control, use the item selector.
Emptying the shopping list
You empty the shopping list by clicking on the "Clear shopping list" button of the toolbar or by using the
corresponding button in the mini-toolbar.
Saving the shopping list
The current shopping list is automatically saved. A shopping list can be saved for later use by selecting "Save
Shopping List As..." in the File menu. You can also save a shopping list as sublist to incorporate it in other shopping
lists.
Printing, sending or sharing the shopping list
The shopping list can be printed or sent by e-mail by using the corresponding buttons of the toolbar. Sending the
shopping list by e-mail is also a convenient way to transmit it to a mobile device.
By clicking on the Share button, you upload it to your Direct Access account to access online or on the go on
Shop'NCook iPhone/iPad application.
Selecting a supermarket (Menu and Pro editions only)
When you add items to the shopping list, they get added to the main database. By clicking on the Supermarket
button of the toolbar, you can move the items from the main database to the selected supermarkets. Only the items
that have a corresponding article in the supermarket will be moved. You can then move the remaining items to
another supermarket by using again the Supermarket button.
To move articles from one supermarket to another, move them back to the main database first, then select another
supermarket in the Supermarket pull-down menu.
You can assign also an article to a supermarket manually by clicking on the supermarket button next to the article
name.
When the software cannot compute the quantity of the article that is required, it displays the article in blue. Click on
the magic wand to fix the article.
You can display the shopping list of one supermarket at a time by selecting it in the Supermarket pull-down menu of
the toolbar.
Locking an article (Pro and Menu edition only)
By clicking on the padlock next a supermarket article, you can lock it there so that the corresponding ingredients are
automatically assigned to this article.
Getting the best price (Pro edition only)
By selecting "Best value", you can have the software select the supermarkets to get the best price. For the best
results, you should have price information in all the supermarkets.
Sending a purchase order to your supplier (Pro edition only)
Click the "Send order to supplier" button and select a supplier to send a purchase order with the shopping list in
attachment. The message e-mail address and body are pre-populated with the data in the supermarket information
window.
SHOP'NCOOK USER'S MANUAL
The item selector
You open the item selector by clicking on Item selector in the Shopping List section of the navigator column. It allows
you to add manually items to the shopping list. You can specify the quantities of the item in the comment field.
At the bottom of each category, there are a couple of empty fields that allow you to add to the shopping list items that
are not in the database. Note that they are not added permanently to the database.
At start, only the main grocery items of the database are displayed. To see all the items, you can click on the
magnifying glass of the toolbar.
By clicking on the question mark on the right hand side of the items, you display the nutritional information of the item.
You reach also from there the nutritional information editor.
SHOP'NCOOK USER'S MANUAL
Sublists
Sublists are list of grocery items that you can conveniently add to the shopping list. The easiest way to make a sublist
is by creating a shopping list and select to save it as sublist in the File menu.
You can create sublists around a theme, like birthday party, picnic, etc. so that you can easily purchase everything
you need. You should also make a sublist for your pantry items so that you can easily see what is missing and
replenish the supplies you keep on hand.
To add the items of a sublist to the shopping list, select the items you want to add and click on the + button of the
toolbar.
SHOP'NCOOK USER'S MANUAL
Recipe and menu costing (Pro edition only)
The cost calculation is based on the cost data of the database of grocery items. If no cost information is available in
the database, the software will use the cost information of the supermarkets. If there are several corresponding
products with cost information, it will use the least expensive.
You can also import the default cost database provided with the software to get rapidly started with the costing
functions. To import the database, select "Import Cost Database" in the Costing menu. For accurate costing, you need
however to input your actual cost information.
To force the software to use the cost data from a given supermarket, select "Update Cost from Supermarket" in the
Costing menu to update the main database with the cost information from the supermarket.
The cost breakdown by ingredient of your recipes and menus is displayed in the Costing tab of the Cookbooks and
Menus sections. When the software cannot compute the cost of an ingredient, it displays it in color. Only the
ingredient in black are included in the cost analysis. To turn an ingredient black, click on the magic wand and the
software will guide you through the steps necessary. You can also edit the cost data by clicking on the magnifying
glass.
The ingredient quantities can also be corrected for waste in the cost calculation.
The food cost and recommend price can optionally be displayed in the recipe view. The recommend price is
computed based on the default margin of the preferences or the margin specified in the recipe editor. If a labor cost is
specified in the preferences, it is also included in the price calculation based on the preparation time of the recipe.
The following formula is used to compute the price:
Price = (Total_food_cost + labor_hourly_rate * preparation_time)/(1 - margin)
SHOP'NCOOK USER'S MANUAL
Nutritional analysis
Shop'NCook knows the nutritional analysis of most of the grocery items of its database and includes the USDA
National Nutrient Database for Standard Reference.
Nutrients
The nutritional information is available for the following nutrients:
Water
Energy
Protein
Total fat (lipid)
Saturated fatty acids
Monounsaturated fatty acids
Polyunsaturated fatty acids
Trans fat
Cholesterol
Ash
Carbohydrate
Dietary fibers
Sugars
Calcium
Iron
Magnesium
Phosphorus
Potassium
Sodium
Zinc
Copper
Manganese
Selenium
Vitamin A (IU)
Vitamin A (RAE)
Retinol (vitamin A1)
Thiamin (vitamin B1)
Riboflavin (vitamin B2)
Niacin (vitamin B7)
Pantothenic acid (vitamin B3)
Vitamin B6
Folate
Folic acid
Food folate
Dietary folate equivalent
Vitamin B12
Vitamin C
Vitamin D
Vitamin E
Vitamin K
Alpha-carotene
Beta-carotene
Beta-cryptoxanthin
Lycopene
Lutein+Zeozanthin
Alcohol
Caffeine
Starch
Theobromine
Phytosterols
Sugar alcohol
Glutamic acid
Viewing the nutritional data
You can view the nutritional information of an item of the database in the Item selector by clicking on the
question mark next to the item name. The window that opens displays the nutritional information of the
raw item. Click on the "Cooked" button of the toolbar to display the nutritional information of the cooked
item. You can scale the nutritional information by inputting a quantity in the toolbar and clicking on the
Calculate button.
Editing the nutritional data
In the nutritional information window (see above), click on the Edit button to open the nutritional
information editor. In the editor, you can import the nutritional data from the USDA database by clicking
on the database button of the toolbar. You can modify the nutrient values and input new unit conversion
information.
Computation of the nutritional analysis
The nutritional analysis of your recipes and menus is computed based on the nutritional information of
the raw ingredients. It does not take into account the nutrient loss due to processing.
When the nutritional information of an ingredient cannot be computer, the ingredient is displayed in color
in the Nutrition tab of the recipe or menu. Only the ingredients in black are included in the nutritional
analysis. To turn an ingredient black, click on the magic wand and the software will guide you through
the steps necessary to fix the ingredient.
Note that the default nutritional information of the ingredients may be different from the actual nutritional
value of the ingredients you are using. For a more accurate analysis, you should make sure that the
nutritional information corresponds to your ingredients.
DISCLAIMER
The nutritional analysis provided is not intended for medical nutrition therapy. If you are following a strict
diet for medical or dietary reason, consult first with a physician or dietician before planning your meals
based on this software.
Displaying the nutritional analysis
The nutritional breakdown by ingredients is displayed in the Nutrition tabs of the Cookbooks and Menus
section. The nutritional analysis is also optionally displayed at the bottom of the recipes and menus.
You control in the Preferences which nutrients are displayed in the Nutrition tab and the format of the
nutritional analysis. You can choose among a large selection of available formats.
Shop'NCook allows you also to define your own nutritional data format by writing so-called nutrition
scripts. Nutrition scripts can also compute points from a formula and display them automatically in your
recipes. Nutrition scripts are outside the scope of this help. See Shop'NCook support page for more
information.
SHOP'NCOOK USER'S MANUAL
The color code
Shop'NCook uses a color code to indicate when an ingredient has a problem that prevents it from
being added to the nutrition and cost calculation. The different colors require different actions to fix
the problem.
The color code is as follows:
Red
Meaning The ingredient is not linked to a grocery item.
Action
Blue
Meaning The ingredient quantity is not specified or the software does not
know how to convert the unit.
Action
Green
Click on the magic wand and link it to the database manually or
add it.
If the quantity is missing, edit the recipe and input a quantity for
the ingredient. Otherwise, click on the magic wand and input the
necessary unit conversion information.
Meaning Nutrition tab: the nutritional information is missing; Costing tab: the
cost information is missing.
Action
Click on the magic wand to be taken to the nutritional information
editor or to the cost information dialog to input the missing
information.
SHOP'NCOOK USER'S MANUAL
Pantry and substitutions
In the Shopping List tab of the Preferences, you can enable the pantry and the list of substitutions.
The pantry
The ingredients you keep in your pantry are not added by default to the shopping list when adding
from a recipe or a menu. Keep in the pantry a list of all the ingredients you have usually on hand.
To replenish your pantry with a click of the mouse, it is practical to create also a corresponding
sublist with the ingredients of your pantry.
The list of substitutions
With the list of substitutions, you can substitute automatically an ingredient for another. Substitutions
takes place when adding the ingredients of your recipes to the shopping list. It will also affect the
cost analysis of your recipes. You can select in the Preferences to make the replacement in the
recipe itself, in which case it will change the nutritional analysis too.
You can use the substitution feature to group together ingredients that are equivalent for you (for
example butter and unsalted butter) or to substitute another ingredient for health reason, like
substituting automatically a low fat alternative of the ingredients.
Editing the pantry and the substitution lists
After enabling these functions in the preferences, you can click on the edit button to modify them. In
the pantry and substitution editors, click on the + button to add a new ingredient. Click on the empty
ingredient field, type the name of the ingredient and link it to a corresponding item of the database.
SHOP'NCOOK USER'S MANUAL
Unit conversion
Unit conversion plays an important role in Shop'NCook. The software converts ingredient quantities
to preferred shopping unit when adding to the database, then convert again to the article size when
assigned to a supermarket. Also, the cost and nutritional analysis require unit conversion between
the ingredient unit to the cost unit or to weight.
For each item of the main database, Shop'NCook maintains a table of unit conversion data. It has a
number of predefined unit conversion data for most of the items of the database.
When an ingredient is displayed in blue in the Nutrition or Costing tabs of a recipe or a menu, it
means usually that the software cannot convert the quantity of the ingredient into a usable unit.
When you click on the magic wand, the software will give you the possibility to add the necessary
unit conversion information to fix the problem.
For example, if your recipe requires 2 bunches of green onion, green onion will be displayed in blue.
The software will ask you to input the weight of a bunch when you click on the magic wand. You
need to take a bunch of green onion, weigh it, and input its weight in the software to fix the problem
and enable the calculation of the nutritional and cost information of the green onion.
You can also access directly the unit conversion table in the nutritional information editor.
SHOP'NCOOK USER'S MANUAL
Waste
Shop'NCook can correct the ingredient quantities for waste when adding to the shopping list or
when costing. For example, if your recipe requires 1 cup of chopped onion, it corresponds to a
weight 5.7 oz or 160 g of onion without peel. But you purchase usually onion with peel. Therefore,
the weight of the onion has to be corrected for the peel, which is about a 3% increase.
To see the predefined waste or refuse percent, display the nutritional information window of the item.
You can enable the waste treatment in the Preferences.
The waste depends on how your ingredients are pre-processed. For example, you can buy clams
with shell or without shells. This will give a great difference in the quantity of refuse. If you enable
the waste correction, you should always make sure that it corresponds to the ingredient as you
purchase it.
Note that waste correction should only be done when the quantity in the recipe corresponds to the
ingredient without waste. If the ingredient is measured with waste, then waste correction should not
take place.
SHOP'NCOOK USER'S MANUAL
Synchronization (Menu and Pro editions only)
Synchronizing allows you to share your data between several computers and mobile devices. When
you synchronize, the cookbooks you have added to the synchronization are uploaded to
Shop'NCook synchronization server and from there distributed where they are needed.
The synchronization feature requires a subscription to a synchronization account.
Contrary to the recipes on the Direct Access database, your data stays private. Your account is
protected by a password. Only the people knowing your account information have access to your
recipes.
The data that can be synchronized includes a selection of cookbooks, the database of grocery items
(including cost and nutritional information). Optionally the current shopping list and the supermarket
can be synchronized.
Note that the synchronization should not be relied on to backup your recipes as it has not been
designed as a backup device. You should backup separately your data.
To initiate the synchronization, click on the Sync button of the mini-toolbar and follow the
instructions.
To add cookbooks to the synchronization scheme, open the synchronization options in the Sync
dialog, select the cookbooks you want to include and click on the Synchronize button.
Once you have synchronized the first computer, you can synchronize another computer by clicking
on the Sync button and inputting the same account information.
To remove all your data from the synchronization server, open the synchronization options in the
Sync menu, desynchronize all the cookbooks, supermarkets and shopping list. You can then disable
the synchronization for your computer in the Sync menu.
SHOP'NCOOK USER'S MANUAL
The mini-toolbar
The mini-toolbar is at the bottom left of the screen. You can access there some useful functions from
anywhere in the software:
clear the shopping list
create a cookbook, sublist or supermarket
search the cookbooks for recipes
search for a recipe on internet
synchronize
open the preferences
open the help.
SHOP'NCOOK USER'S MANUAL
The preferences
You open the Preferences from the mini-toolbar.
You can customize Shop'NCook in many ways in the Preferences. Here is a non-exhaustive list:
General tab
Change the size of the characters of the software
Select what you want displayed at program start
Page to open when you search for recipes on internet
Default style of the recipes and menu when exporting to HTML
Shopping List tab
Enable adding recipe title to the comment field of the shopping list
Correct the weight for refuse
Use preferred shopping units when adding to the shopping list
Use US or metric units as default
Enable the pantry and list of substitutions
Recipes tab
Select which information is displayed in the recipe header
Scaling tab
Scale recipes by default to some fix number of servings
Enable automatic substitutions in recipes
display the original quantities in parenthesis
Convert volume to weight units
Convert metric weight unit to US weight units, or vice versa
Menu tab (Menu and Pro editions only)
Create new menu by default with a fixed number of servings
Default mode of the menu manager: single menu, day, week, etc.
First day of the week of the calendar
Appearance
Default character font, size and color for the recipe and shopping list display and print out
Print
Margin size
Include headings in the shopping list
Print the shopping list in two columns
Include a main comment to the shopping list
E-Mail tab
E-mail settings
Preferred format (plain text or HTML)
Character encoding
List of e-mail addresses for fast access
Nutrition tab
Nutrients to display in the nutritional analysis
Switch between the energy in Cal or in kJ
Format of the nutritional analysis
Costing tag (only Pro edition)
Currency
Enable the correction for refuse
Default profit margin
Hourly labor rate
Network tab
Language of the recipe on the Direct Access database
Check automatically for software update
SHOP'NCOOK USER'S MANUAL
Troubleshooting
If you encounter problem with using the software, select "Send Error Report" in the Help menu,
describe the problem in detail. Don't forget to write your e-mail address and indicate if you want a
reply, and we will be in touch with you rapidly.