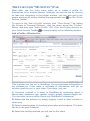
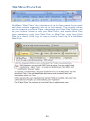
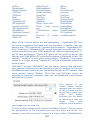
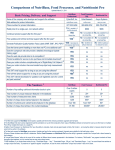
1
NutriBase 11 User's Manual Revision date: April 10, 2014 NutriBase version: v.11.5 CyberSoft, Incorporated 2016 E. Muirwood Drive Phoenix Arizona 85048 [email protected] 1 Copyright © 1986 - 2014 by CyberSoft, Inc. an Arizona corporation. All rights reserved. The NutriBase Nutrient Database represents copyrighted materials and intellectual property belonging to CyberSoft, Inc. All rights are reserved. If you are interested in reprinting our nutrient data for any purpose, you must contact CyberSoft, Inc. and obtain a written license to use the nutrient data. Please address correspondence regarding corrections and/or suggestions to: CyberSoft, Inc., 2016 E. Muirwood Drive, Phoenix, Arizona 85048, call us at 480-626-2025 (8-3, Mon-Thurs, Arizona time), email us at [email protected], FAX us at 480-704-4116, or visit our web site at nutribase.com. CyberSoft Inc. assumes no liability arising out of the application or use of the data. 2 Table of Contents NutriBase Introduction ........................................................ 9 ABOUT THIS USER’S MANUAL ................................................................................. 9 NutriBase Basics .................................................................. 9 USE THE “RIGHT MOUSE CLICK” ............................................................................. 9 CREATE A CLIENT PROFILE OR A USER PROFILE .................................................... 10 READ THE “HOW TO” TOPICS ................................................................................ 11 USE YOUR TABLE OF CONTENTS ........................................................................... 11 THE NUTRIBASE TABS........................................................................................... 11 Introduction to Web-Based Synchronization .................... 12 WHAT IS WEB-BASED FILE SYNCHRONIZATION? .................................................. 12 WHAT IS A WEB-BASED SYNCHRONIZATION SERVICE? ......................................... 13 HOW DOES WEB-BASED SYNCHRONIZATION WORK? ........................................... 14 The Home Tab .................................................................... 15 HOME .................................................................................................................... 17 THE INFORMATION WINDOW ................................................................................. 17 The Client (or “My Setups”) Tab ...................................... 20 ADDITIONAL CLIENT WINDOWS ............................................................................ 23 “CLIENT SETUP” TAB (“MY SETUPS” IN PERSONAL EDITIONS) ............................. 24 CLIENT SETUPS - NUTRIENTS ................................................................................. 24 CLIENT SETUPS – CRITERIA (PRO AND HIGHER)..................................................... 25 CALORIE TRACKING OPTIONS................................................................................ 25 FOOD ALARMS....................................................................................................... 25 SUCCESS CRITERIA ................................................................................................ 25 TRACKING BODY WEIGHT AND/OR BODY FAT CONTENT ...................................... 25 CLIENT SETUPS - EXERCISE ................................................................................... 26 CLIENT SETTINGS .................................................................................................. 26 CLIENT FOLDERS ................................................................................................... 26 CLIENT PROFILES................................................................................................... 27 CLIENT CONTACT LIST .......................................................................................... 28 WEB PROFILES (FROM WEB-BASED QUESTIONNAIRE) .......................................... 28 The Food Log Tab .............................................................. 29 THE FOOD LOG WINDOW ...................................................................................... 30 THE NBFTE FUNCTION ......................................................................................... 32 CHANGING SERVINGS SIZES .................................................................................. 34 PUF DISPLAY ........................................................................................................ 35 FOOD LOG COPY .................................................................................................... 35 AUTO RECORD FOODS ........................................................................................... 35 The Exercise Tab ................................................................ 36 EXERCISE SETUP .................................................................................................... 37 WORKOUTS............................................................................................................ 37 DAILY EXERCISE ................................................................................................... 37 3 THE EXERCISE WINDOW ........................................................................................ 38 EXERCISE LOGS ..................................................................................................... 39 The Tracker Tab ................................................................. 39 WEIGHT/BODY FAT TRACKER ............................................................................... 39 PERSONAL INFORMATION ...................................................................................... 40 TRACKER LOGS ..................................................................................................... 40 THE INFORMATION TRACKER WINDOW ................................................................. 40 The Personal Foods Tab .................................................... 41 PERSONAL FOODS WINDOW .................................................................................. 42 PFI ORGANIZER ..................................................................................................... 43 ADD NEW FOODS TO NUTRIBASE .......................................................................... 43 PFI FOLDERS ......................................................................................................... 44 ADD PFI’S TO FOOD LOGS, RECIPES, MEALS, MEAL PLANS .................................. 45 ADDING A NEW FOOD ITEM TO NUTRIBASE .......................................................... 45 The Meals Tab .................................................................... 47 MEALS ................................................................................................................... 48 MEAL ORGANIZER ................................................................................................. 48 MEAL FOLDERS ..................................................................................................... 49 MEAL CRITERIA (PRO AND HIGHER) ...................................................................... 50 CREATE A MEAL .................................................................................................... 50 PUF DISPLAY ........................................................................................................ 51 ADD YOUR MEAL TO A FOOD LOG OR MEAL PLAN................................................ 52 REFRESH YOUR MEALS ......................................................................................... 52 The Recipes Tab ................................................................. 53 RECIPE ORGANIZER ............................................................................................... 53 THE RECIPES WINDOW .......................................................................................... 54 RECIPE FOLDERS ................................................................................................... 57 RECIPE CRITERIA (CHEF AND HIGHER) .................................................................. 59 CREATE A RECIPE .................................................................................................. 59 COSTING A RECIPE (CHEF AND HIGHER) ................................................................ 60 PUI DISPLAY ......................................................................................................... 60 HOW TO ADD RECIPES TO FOOD LOGS, RECIPES, MEALS, OR MEAL PLANS .......... 62 REFRESH YOUR RECIPES ....................................................................................... 62 The Meal Plans Tab ........................................................... 63 MEAL PLANS WINDOW .......................................................................................... 64 MEAL PLANS ORGANIZER ...................................................................................... 66 MEAL PLAN FOLDERS ............................................................................................ 66 MEAL PLAN CRITERIA (PRO AND HIGHER)............................................................. 67 CREATE A MEAL PLAN .......................................................................................... 67 PUF DISPLAY ........................................................................................................ 68 MEAL PLAN COPY ................................................................................................. 69 HOW TO EDIT AN EXISTING NUTRIBASE MEAL PLAN ............................................ 69 The Reports Tab ................................................................. 70 4 THE REPORTS WINDOW ......................................................................................... 71 UNDER/OVER REPORTS ......................................................................................... 72 THE NUTRIENT DENSITY INDEX REPORT (PRO AND HIGHER)................................. 73 The Graphs Tab .................................................................. 74 GRAPHS WINDOW .................................................................................................. 74 The Notes and Lists Tab..................................................... 75 PLANNER AND TO DO LIST .................................................................................... 75 SHOPPING LIST ...................................................................................................... 75 SHOPPING LIST WINDOW ....................................................................................... 76 Client Intake Module (Pro and higher) ............................ 78 “CLIENT INTAKE MODULE” TAB ........................................................................... 79 BURN A CD (AFTER CUSTOMIZING YOUR CIM) .................................................... 80 TWO DOCUMENTS YOU CAN USE WITH THE CIM ................................................. 81 UPLOAD A CUSTOM CIM FOR CLIENTS TO DOWNLOAD ........................................ 81 EXPORTING AND IMPORTING DATA FROM THE CIM .............................................. 82 EXPORTING CLIENT INTAKE MODULE DATA TO A FILE ......................................... 82 IMPORTING CLIENT DATA FROM THE CIM (PRO AND HIGHER) .............................. 82 EXPORTING AND IMPORTING CLIENT DATA ........................................................... 82 EXPORTING CLIENT DATA FROM A PERSONAL EDITION ........................................ 83 IMPORT CLIENT DATA FROM A NUTRIBASE PERSONAL EDITION (PRO OR HIGHER)83 EXPORTING/IMPORTING PFI'S, RECIPES, MEALS, MEAL PLANS ............................. 84 EXPORTING PFI’S, RECIPES, MEALS, OR MEAL PLANS .......................................... 84 IMPORTING PFI'S, RECIPES, MEALS, MEAL PLANS ................................................ 84 THE NUTRIBASE MENU ......................................................................................... 85 EULA .................................................................................................................... 85 RECYCLE BIN......................................................................................................... 85 BACKUP ................................................................................................................. 85 RESTORE ................................................................................................................ 86 NutriBase Options .............................................................. 86 GENERAL ............................................................................................................... 86 EMAIL SETUP ......................................................................................................... 87 AUTOMATIC BACKUP (SCHEDULING) OPTIONS...................................................... 87 QUICK ACCESS TOOLBAR ...................................................................................... 87 FILE LOCATIONS .................................................................................................... 88 RESOURCES ........................................................................................................... 88 Create an Initial Assessment Report ................................. 88 Documentation for the USDA Database ........................... 90 SPECIFIC UPDATES TO THIS EDITION ..................................................................... 92 CONTENTS OF THE USDA SR NUTRIENT DATABASE............................................. 94 PROXIMATES.......................................................................................................... 95 MINERALS ............................................................................................................. 97 VITAMINS .............................................................................................................. 98 LIPID COMPONENTS ............................................................................................. 105 5 RETENTION FACTORS .......................................................................................... 113 WEIGHTS AND MEASURES ................................................................................... 113 ABBREVIATIONS USED IN THE NUTRIENT DATA .................................................. 116 REFERENCES FOR USDA SR NUTRIENT DATA .................................................... 118 The Canadian Food Composition Data .......................... 123 INTRODUCTION TO THE CANADIAN NUTRIENT FILES ........................................... 123 LIMITATIONS TO THE DATA ................................................................................. 125 INFORMATION REGARDING CANADIAN NUTRIENTS............................................. 130 METRIC SYSTEM EQUIVALENTS FOR UNITS OF MEASURE ................................... 135 REFERENCES FOR CNF NUTRIENT DATA ............................................................. 135 Glossary of NutriBase Terms........................................... 138 The Atwater Conversion Factors ..................................... 150 The 4-4-9 Method ............................................................. 153 The Compensated 4-4-9 Method ...................................... 154 Installation and Setup “How To” Topics ........................ 156 HOW TO INSTALL NUTRIBASE TO RUN ON YOUR COMPUTER .............................. 156 INSTALLING NB11WITH A SYNC FOLDER FOR THE FIRST TIME .......................... 156 HOW TO UPGRADE FROM NB10 TO NB11 ON YOUR COMPUTER......................... 160 HOW TO DO A “CLEAN” INSTALL OF NUTRIBASE TO OTHER COMPUTERS ........... 164 HOW TO INSTALL NB11 OVER AN EXISTING COPY OF NB10 OR ON YOUR SECOND AND SUBSEQUENT COMPUTERS ........................................................................... 164 HOW TO INSTALL NUTRIBASE FOR A WORKGROUP ............................................. 166 HOW TO USE YOUR SYNC FOLDER WITH WORKGROUPS .................................... 167 HOW TO USE WORKGROUP NUMBERS ................................................................. 167 WORKGROUP GUIDELINES AND SUGGESTIONS .................................................... 168 OTHER WORKGROUP SUGGESTIONS .................................................................... 169 HOW TO DOWNLOAD FREE UPDATES ANYTIME 24/7........................................... 170 HOW TO UPGRADE YOUR COPY OF NUTRIBASE .................................................. 170 HOW TO RUN NUTRIBASE AS AN ADMINISTRATOR ............................................. 171 HOW TO ACTIVATE YOUR SOFTWARE ................................................................. 171 HOW TO REVIEW THE NUTRIBASE UPDATE HISTORY .......................................... 173 HOW TO OBTAIN PRODUCT SUPPORT .................................................................. 173 HOW TO MAKE A SUGGESTION ............................................................................ 173 HOW TO PRINT A RECIPE REPORT ........................................................................ 173 HOW TO SAVE A MEAL PLAN REPORT AS A PDF FILE ......................................... 175 HOW TO BACKUP YOUR NUTRIBASE DATA ......................................................... 175 HOW TO RESTORE YOUR NUTRIBASE DATA ....................................................... 175 HOW TO MOVE YOUR DATA FROM ONE COMPUTER TO ANOTHER ..................... 177 HOW TO SCHEDULE YOUR NUTRIBASE BACKUPS ................................................ 177 HOW TO ADD A NEW FOOD TO NUTRIBASE......................................................... 178 HOW TO ENTER YOUR BODY WEIGHT (OR FAT) FOR THE DAY............................ 179 HOW TO ADD AN EXERCISE TO NUTRIBASE ........................................................ 180 HOW TO MODIFY A USER’S GOAL FOR WATER (OR ANYTHING ELSE) .................. 182 6 HOW TO EDIT AN NB RECIPE ............................................................................... 182 HOW TO CREATE A NEW RECIPE BASED ON AN EXISTING RECIPE ....................... 184 HOW TO CREATE A NEW RECIPE FOLDER ............................................................ 184 HOW TO SCALE A RECIPE .................................................................................... 185 HOW TO ORGANIZE AN EXISTING RECIPE FOLDER .............................................. 186 HOW TO ADD A RECIPE TO ANOTHER RECIPE ...................................................... 187 HOW TO EXPORT RECIPES FOR USE IN ANOTHER COPY OF NUTRIBASE .............. 189 HOW TO IMPORT A RECIPES FROM ANOTHER COPY OF NUTRIBASE .................... 190 HOW TO ADD PFI’S, RECIPES, AND MEALS TO FOOD LOGS ................................. 190 HOW TO EXPORT A RECIPE TO AN EXCEL FILE (CHEF AND HIGHER) .................... 190 HOW TO CREATE U.S. NUTRITION FACTS LABELS (CHEF AND HIGHER) .............. 192 HOW TO CREATE CANADIAN NUTRITION LABELS (CHEF AND HIGHER) ............... 194 HOW TO SET UP YOUR HOME WINDOW GRAPH .................................................. 196 HOW TO CREATE SERVINGS SIZES MEASURED IN CALORIES ............................... 198 HOW TO IMPORT DATA FROM THE CLIENT INTAKE MODULE (PRO AND HIGHER) 199 HOW TO PRINT A MEAL PLAN REPORT WITH INCLUDED RECIPES ........................ 200 HOW TO EDIT AN NB MEAL PLAN ....................................................................... 201 HOW TO EDIT AN EXISTING MEAL PLAN ............................................................. 203 HOW TO CREATE A MEAL PLAN FROM SCRATCH ................................................ 204 HOW TO COPY A MEAL PLAN TO A CLIENT’S FOOD LOG ..................................... 207 HOW TO ADD COST DATA TO YOUR FOOD ITEMS (CHEF AND HIGHER) ............... 208 HOW TO ADD CUSTOM HEADERS TO YOUR REPORTS (CHEF AND HIGHER) .......... 211 HOW TO EDIT YOUR UNDER/OVER COMMENTS (PRO AND HIGHER) .................... 213 HOW TO PERFORM A GLOBAL RANKING .............................................................. 215 HOW TO DELETE A FOOD ITEM FROM YOUR FOOD LOG ...................................... 216 HOW TO MOVE A FOOD LOG ITEM TO ANOTHER MEAL....................................... 216 HOW TO SAVE YOUR SHOPPING LIST IN RTF FORMAT ........................................ 216 HOW TO EXPORT YOUR SHOPPING LIST TO CSV FORMAT (CHEF AND HIGHER) .. 217 HOW TO ADD A FOOD ITEM TO YOUR QUICK ADD LIST ...................................... 217 HOW TO REFRESH YOUR MEALS AND/OR RECIPES .............................................. 217 HOW TO VIEW AND PRINT INFORMATION TOPICS ................................................ 217 HOW TO EDIT OR CREATE NEW INFORMATION TOPICS ........................................ 219 HOW TO VIEW YOUR NBFTE (NEXT BEST FOOD TO EAT) ................................. 220 HOW TO CREATE A CUSTOM RECIPE WEB PAGE (CHEF AND HIGHER) ................. 221 HOW TO CREATE AN NDI REPORT (PRO AND HIGHER) ........................................ 222 Food Search “How To” Topics ....................................... 225 HOW TO CONDUCT FOOD LOOKUPS .................................................................... 226 HOW TO CONDUCT A FOOD NAME SEARCH ......................................................... 227 HOW TO INTERPRET NUTRIBASE ALERTS ............................................................ 228 HOW TO CONDUCT A BRAND NAME SEARCH ...................................................... 228 HOW TO VIEW DATA BY FOOD CATEGORY.......................................................... 229 HOW TO CONDUCT A GLOBAL RANKING ............................................................. 230 HOW TO SEARCH ON THE NUTRIBASE FOOD ID .................................................. 231 HOW TO VIEW DATA USING THE NUTRIENT DENSITY VIEW ............................... 232 7 HOW TO CONDUCT A QUERY ............................................................................... 233 HOW TO CONDUCT AN ADVANCED FOOD ITEM SEARCH ..................................... 234 HOW TO IMPORT WEB PROFILES (PRO AND HIGHER) ........................................... 236 The NutriBase Food Categories ...................................... 238 Macros for Use with Assessment Reports ....................... 241 CLIENT-RELATED MACROS ................................................................................. 241 CALORIE-RELATED MACROS ............................................................................... 242 GENERAL NUTRIENT GOAL MACROS................................................................... 242 CLIENT’S MINERAL GOAL MACROS .................................................................... 243 CLIENT’S VITAMIN GOAL MACROS ..................................................................... 243 EXERCISE-RELATED MACROS ............................................................................. 244 CLIENT'S FAT GOAL MACROS .............................................................................. 244 CLIENT'S FAT GOAL MACROS .............................................................................. 245 CLIENT'S AMINO ACID GOAL MACROS ................................................................ 246 MACROS FOR USE WITH NUTRIBASE CUSTOM MEAL REPORTS ........................... 246 MACROS FOR USE WITH NUTRIBASE CUSTOM PFI REPORTS ............................... 248 MACROS FOR USE WITH CUSTOM RECIPE REPORTS ............................................. 249 INFORMATION FROM THE WEB-BASED QUESTIONNAIRE ..................................... 253 NutriBase Enterprise Edition Network Guide ................ 256 INSTALLING THE ENTERPRISE EDITION OF NUTRIBASE ....................................... 256 HOW TO INSTALL THE NUTRIBASE ENTERPRISE EDITION .................................... 257 YOUR NBPD.INI TEXT FILE................................................................................ 258 SET PERMISSIONS FOR THE PROGRAM DATA FOLDER .......................................... 258 PLACE SHORTCUTS ON EVERY WORKSTATION .................................................... 259 THE PASSWORD FILE (“NBASENET.DAT”) ...................................................... 259 ACCESS SETTINGS SUMMARY .............................................................................. 263 MASTER USER PRIVILEGES .................................................................................. 265 NUTRIBASE END USER LICENSE AGREEMENT ..................................................... 266 Disclaimer ......................................................................... 268 NutriBase Product Support.............................................. 269 8 NUTRIBASE INTRODUCTION NutriBase is a powerful and flexible nutrition and fitness software program. To help you get the most out of NutriBase, we provide you this User’s Manual. The NutriBase software includes a context sensitive Help system. We provide email support 24/7 ([email protected]) and telephone support at 480-603-8359 (8-3, Mon-Thu, Arizona time). About this User’s Manual Not every feature described in this User’s Manual applies to all versions of NutriBase. Many of the “high-end” features apply only to NutriBase Professional and higher editions. Some of these high end features include the ability to create Nutrition Facts Labels and save them into publication quality image formats, save reports to a variety of formats (PDF, Excel, CSV, etc.), the ability to create a Client Intake Module, support for a web-based questionnaire, access to 180+ nutrient variables (including amino acid and fatty acid profiles), support for an unlimited number of clients, etc. NUTRIBASE BASICS The sooner you understand these basics, the better. Use the “Right Mouse Click” In NutriBase, you access over 95% of software functions via the right mouse click. Using the right mouse click saves screen space and unclutters the interface... it also makes it easy to view, understand, and implement your options. Display your options in NutriBase by pointing to the section of the window that you are interested in, then RMC. When you start learning NutriBase, we recommend that each time you visit a new window, you point to a section of interest on this window and RMC. Study and click on your options. This way, you will to learn what you can do in any of many locations within NutriBase. The image on the right shows you what you see when you right mouse click over your ingredient listing in a recipe (while using the Professional Edition). These options can vary depending on the version of NutriBase you are using. 9 The most frequent question new users ask is “How do I…?” and the most common answer is “RMC.” Schedule Automatic Backups for All Your Work - NutriBase can create backup files for you. Backup files contain all the work you ever created in NutriBase. If you should suffer a hard drive crash or any other catastrophe, you can reinstall NutriBase and restore your latest backup file to reclaim your lost work. Scheduling your backups reduces your probability of losing your hardearned work. (This is a hard lesson to learn after you suffer a hard drive failure.) To set this up now, click the NutriBase Menu Icon in the upper left corner of the NutriBase window, click the “Options” Button, and then select “Automatic Backup.” Create a Client Profile or a User Profile The first thing most new users do in NutriBase is create a client profile (Professional Editions) or a User Profile (Personal Editions). This involves taking a minute or two to tell NutriBase a few things about yourself or a new client. This “client” could be a patient or family member – we use the term “client” to mean anyone you enter into the software for tracking purposes. The things you provide include basic information like age, gender, height, weight, desired weight, etc. If you are a woman, it also asks you whether you are pregnant or lactating. You also have the option to enter in your Body Fat Content – NutriBase will track your progress in terms of body fat content as well as in terms of body weight. (Many experts consider Body fat content to be a more accurate indicator of “ideal weight” than the published charts or Body Mass Index.) NutriBase uses this profile information you provide to determine your client’s DRI’s (nutrition goals), your client’s Daily Calorie Allotment, and to calculate close to 200 things that relate directly to this person (nutrient goals, calorie needs, etc.). These data are used by NutriBase to make calculations and predictions for you and your clients. In Professional versions, you can also insert any of these bits of information directly into custom reports that you are able to generate. Here are two ways to move to your Profile Window: Method 1: Click the “Client Setups” Tab. This is called “Client setups” in Professional Editions or “My Setups” in the personal editions. Click the down arrow inside the “Profiles” Button. Select the option called: “Create a Profile” Method 2: Click the Profile icon in your Quick Access ToolBar: Once you create a profile, you can record foods to this person's profile by clicking the “Food Log” Tab. (The “Food Log” Tab will be discussed shortly.) 10 Note: When creating your Client Profile, be certain to indicate your start date as the first date to which you will record anything for this client, including her body weight, food log, exercise, etc. The reason this is important for you to do this is that NutriBase will not allow you to enter any information for a client to a date prior to her start date. Quick Access ToolBar After using NutriBase for a while, you may want to set up your Quick Access ToolBar shortcuts. It’s a good idea to get familiar with NutriBase before setting up your Quick Access ToolBar shortcuts. Once you figure out which features you will be using the most, you may want to create shortcuts to these capabilities so you can jump to them quickly. To setup up your Quick Access Shortcuts, click the down arrow (circled in the image to the left). What you should do next will be revealed to you. Green underlined text (in the software) provide you with explanations... regarding the text topic you click on. These glyphs are scattered throughout the software. Click them for context sensitive help. Read the “How To” Topics We added dozens of “How To” topics to this Manual to help you figure out how to perform a variety of tasks. Check your Table of Contents to locate the “How To’ Topics.” We recommend you take a good look at all of these topics and step through as many of these as you find helpful. Performing these tasks will not only teach you how to perform the task at hand – it will show you how to perform many other similar tasks… going through these “How To” topics will get you up to speed with NutriBase very quickly. Use Your Table of Contents Spend a minute to review your Table of Contents. This is a simple but often overlooked approach to learning how to use NutriBase. The NutriBase Tabs Take time to look at each Tab in your user interface and learn what you can do in each of these sections. Knowing that something can be 11 done and knowing where to do it are more than half of knowing how to do it. The following pages provide a brief overview of the various windows available in NutriBase. We recommend you look at each window and read the listing of functions you can access from each window. As you become familiar with NutriBase, you will notice that the user interface is deceptively simple. This is partly because it isn’t loaded down with buttons to access every capability we support in each window. You access almost everything via RMC. INTRODUCTION TO WEB-BASED SYNCHRONIZATION Before you can use the web-based synchronization features of NutriBase, you need to install it to incorporate this capability. To install NutriBase to use a Sync Folder, take a look at the appropriate topics in the “How To” sections (regarding the installation of NutriBase) to use a Sync folder of this manual. Check your Table of Contents to locate these topics. Using web based synchronization allows you to have your NutriBase data (food logs, recipes, meal plans, etc.) synchronized across all of your computers. Many of you are already familiar with the idea of webbased synchronization. You may already be using services like Dropbox and SkyDrive to synchronize your pictures and music. If you are already familiar with web-based file synchronization services, you may want to skip this section and move directly into one of the sections in the “How To” sections regarding the installation of NutriBase to use a Sync folder. What is Web-Based File Synchronization? “Web-based file synchronization” is an enabling technology that is available at no cost or low cost from a number of companies. This technology allows you to run NutriBase on several computers and then access your most current data (food logs, recipes, etc.) at any time – no matter which of your computers you created or edited them on, no matter which computer you are using at the moment, no matter what time of day it is, and no matter where your computers are located. When you make any change to any of your data files, these changes are immediately propagated across all of your computers. If one of your computers is turned off or lacks Internet access, it will be updated as soon as Internet access is restored. There is no longer a need to move individual NutriBase files (recipes, meal plans, etc.) from one of your computers to another. If you create a new recipe or meal plan while on the road, you won’t have to transfer it to your work computer when you return – it will already be there. Your files would be “synchronized.” Workgroup Synchronization. If you are one of several colleagues collaborating on a NutriBase project, you’ll be able to share the most upto-date recipes, food logs, etc. without the need to check revision numbers or creation dates of your NutriBase data files. All members of 12 the workgroup would be working with the same, up-to-date data. You would no longer need to email each other recipes, meal plans, or backup files. If members of your workgroup create a hundred new recipes, you don’t have to do anything to share them with others in the workgroup they would all appear to every member of the workgroup as they are created. We suggest that before you share your Sync Folder with others, that you read the suggestions at the end of this document for eliminating “conflicted copies” of files caused when two or more users save the same file at the same time. Starting with version 11.1, NutriBase can use a web-based synchronization service to keep your most up-to-date data files at your fingertips at all times across all your computers. And by signing up for one of the business web-based synchronization services, you can reliably collaborate with workgroups of a few to dozens or even hundreds of nutritionists, trainers, or chefs. With NutriBase, your work will conveniently exist on all your computers. What is a Web-Based Synchronization Service? At its most basic, a web-based synchronization service is a service that allows you to synchronize a folder on your computer with the same folder on all your other computers. We refer to this special synchronized folder as your “Sync Folder.” To get a personal Sync Folder, all you have to do is sign up with a free web-based synchronization service and install their software on your computer. Fortunately, the Internet abounds with these synchronization services. They go by names like Box, Dropbox, SkyDrive, SugarSync, CX, FreeFileSync, GoodSync, iDriveSync, or Syncplicity. There are other sync services as well. A free account is normally all you need to synchronize NutriBase files across your own personal computers. But a business account may serve you better if you are a professional user collaborating with other NutriBase users (much more on this later). Once you create a web-based synchronization account and install their software to your computer, you can begin using your Sync Folder. Anything you put into your Sync Folder will almost immediately appear on your other computers. Most users organize the files in their Sync Folder by using subfolders. Common subfolder names include “Pictures” and “Music.” We ask you to create a subfolder called “NutriBase” and use it to hold your NutriBase Data (food logs, client information, recipes, meals, meal plans, etc.). To create this subfolder, you will tell the NutriBase Setup Program where you want this folder to exist. After that, NutriBase will take care of the Sync Folder for you. 13 How Does Web-Based Synchronization Work? The task of all web-based synchronization services is to keep files on multiple remote computers identical at all times – to keep them synchronized. To do this, you create an account with them and install their software to your computer. After you do this, the service creates a “Sync Folder” (a synchronized folder) for you on your computer and makes an identical copy of it on “the Cloud”1. As soon as your files begin to appear in your Sync Folder in the Cloud, the synchronization service will begin propagating exact copies of these files onto every computer you set up with this synchronization service. Thereafter, any time a change is made in the Sync Folder of any computer on this account, this change will be propagated across all computers using this account. You could have a computer at home in Phoenix, one on a work computer in California, and a laptop in the airport in Hong Kong. It won’t matter where you are, you’ll have access to the latest copy of your data from anywhere.2 When you run the NutriBase Setup Program to install NutriBase to your computer, it will install a large number of data files into your Sync Folder. As soon as these files are copied into your Sync Folder, they will immediately begin synchronizing to the Cloud. This will take a certain amount of time. This upload latency will vary from service to service. A paid-for account may synchronize more quickly than a free account due to the priorities assigned to your data. The important thing to remember, however, is that as soon as you run the NutriBase Setup Program for the first time, your NutriBase files will begin uploading to the Cloud. Depending on your sync provider and other factors, this can take a few minutes to an hour or even longer. After all the NutriBase data files on your computer have been synchronized to the Cloud, future synchronizations occur much more quickly. This is because only the files that change (and often, only the parts of the files that change) will be transferred during the sync operation. After the initial synchronization upload, future synchronization will appear to occur almost immediately. After you set up your account and install NutriBase according to the instructions that follow, NutriBase will automatically use your Sync Folder to store all changes when you add, edit, or delete a food log, 1 The “Cloud” is a popular way to refer to a server or to a network of servers that belong to (or are leased by) your sync service provider for the purpose of providing you their services. 2 This assumes that all computers involved have Internet access and that all your computers have been set up properly with your synchronization service. If a computer does not have Internet access, it will “sync” with your data after Internet access is restored. This is a situation that laptops will experience from time-to-time when you travel. After you restore Internet access, it will generally take only a few moments for your files to update. 14 recipe, meal plan, client information, etc. The synchronization service will do its part and automatically update all the other computers that use this Sync Folder. You will be able to access your latest data from any location with Internet access. Important. When you work with a synced copy of NutriBase, you are NOT working with data in the Cloud – you are working with data on your computer. When you save your work, a file is saved to your computer in your Sync Folder. It is after you save this file that your file is synchronized to the Cloud. If you are collaborating with someone who is sharing your Sync Folder, they will save their work. When they save their work, a file is saved to their computer. After this file is saved to their computer, it is then queued up to synchronize with the Cloud. And after that file updates the Cloud, the file is downloaded to your computer (and other computers that are sharing the same Sync Folder). There will always be a time delay – normally brief - for these things to occur. THE HOME TAB Think of the NutriBase Home window as your “command and control” page. From here, you can: 1) Select which client you want to work with. You can have an unlimited number of clients organized into Client Folders for easy, alphabetical access. 2) Configure your Quick Access Toolbar to provide instant access to the functions you most frequently use. 15 3) Right mouse click over your graph area to see your setup options. Click on each of these menu options and study your options. You can select background color, background images, graphing styles (line, step, points, hollow, etc.). The “Data entries per page” option lets you select how many entries you include on a single window (a week, a month, a year, etc.). And, of course you can print the graph or save it in a wide variety of image formats. 4) The graph shows you the active client's progress over time. The “active client” is the client whose name appears at the top of the windows. To change the active client, click the down arrow next to the client name and select a different client. 5) Click the down arrow just above the graph on the right hand side to select your display options: show body weight, weight v. goal, body fat content, body fat v. goal, both weight and body fat, forecast future weight based on all past performance, etc. 6) Access your choice of weight loss quotes, dieting tips, software usage tips, etc. You can also add your own favorite quotes. Click the down arrow in the NutriBase Tips section (lower left of you Home Window). Select the “My Quotes” option. To edit any existing quotes or to add new quotes, right mouse click and select the option to edit your quotes. Add as many new quotes as you like. 7) The Calendar uses “Happy Faces” to indicate days on which this user did not exceed their Daily Calorie Allotment (which is calculated for you by NutriBase). The “X” icon indicates a day when the user exceeded his Daily Calorie Allotment. 8) Click the “Quick Report” Button to generate a quick report that summarizes the most salient information for this client in a compact format. 9) NutriBase allows you to color-code the bar charts in the lower right corner graphs via RMC. This user “earned” 513 calories by exercising today... this is indicated in orange on the graph. The blue bar indicates the Daily Calorie Allotment for this user and the yellow bar indicates the actual calories eaten so far today. 10) right mouse click over the various sections of the home window to see your numerous options. Use right mouse click to set your preferences and customize your home window. 11) Click the NutriBase Menu Icon to access your NutriBase system options, including backup, restore, importing data, editing your food cost data (available only when 16 you click the NutriBase Menu Icon while you are on the Home Window), and setting up a wide variety of NutriBase options (via the “Options” Button). Clicking the “Options” Button allows you to set up password protection, select window color schemes, choose Metric or English measures, set prompts , configure your integrated emailer, schedule NutriBase data backups, set file locations, etc. The “Home” Tab provides two button options: Home and Information. Click the “Home” Button to view information about the current client or user. Click the “Information” Button to access a large number of PDF documents you can open, save, or print out for your clients. Home This section provides information about the current client or user. View user tips and quotes, a Progress Calendar, graphs, generate a Quick Report, and view a variety of graphs showing weight and/or body fat progress over time or a Forecast of weight loss based on past performance (average daily calorie intake since Day One). Notes: 1) Your Quick Report gives you a snapshot of information for the current date. You can select up to 12 nutrients to include in your Quick Report. Here’s how: Hover over or near your “Quick report” Button (on your Home window), RMC, and select the option called “Quick Report Nutrients.” 2) You can add as many new quotes into a section called “My Quotes.” To do this, go to the window in the lower left corner of your Home Window. (This is the window that shows you NutriBase Tips, Dieting Tips, Dieting Quotes, etc.) Click the down arrow and select the My Quotes” option. To edit any existing quotes or to add new quotes, right mouse click and select the option to edit your quotes. You can add as many new quotes as you like. The Information Window The “Information” Tab provides access to informative topics (in PDF format) that you can provide to your clients or users. This tab will allow you to access PDF documents from a variety of categories. After selecting a Topic Category (from a dropdown menu similar to the one shown here), you can select a particular document to view and/or print are some documents you can 17 view in the “Fats, Oils, and Sweeteners” category: You have the ability to add and/or remove topics and organize them any way you wish. To do this, you simply organize your files inside of a set of Folders on your hard drive. Each of these Folders is listed as a Menu Item in your Home Window Information section. In the example below, the Folder called “Child Care” shows up as a Menu Item called “Child Care”. The other menu item topics are the names of other Folders. These folders exist in your “Program Data PDF Folder” (we’ll tell you where this is on your hard drive in a moment). Each of the Menu Items above represents an actual Folder on your hard drive. You can create many new categories if you like by adding new Folders that will appear in the left hand drop-down menu. Each of these Folder contains a set of either actual PDF files or what we refer to as “link files.” NutriBase link files are simple text files that include the hyperlink to a web-based PDF that will appear when you click on it. The name of the link files or PDF files is displayed in the drop down menu. The menu automatically alphabetizes this menu based on the file names of these PDF and/or link files. Not all of these Folders exist in all versions of NutriBase – the Professional Editions provide access to more documents. The link files installed by the NutriBase Setup Program point to files on the NutriBase web site. However, you can add new link files if you like and you can hyperlink them to PDF’s anywhere on the Web… including your own web site if you have one. Understanding how to create Folders, organize PDF’s, and create and using link files gives you a great deal of control over your Information Menu. 18 We mentioned above that your Folders and your files (PDF or link files) exist on your hard drive. In Windows Vista, Win7, and Win8, these Folders are located on your hard drive in c:\ProgramData\NutriBase\pdf. (“ProgramData” is a hidden folder.) In Windows XP, this folder is in: c:\Documents and Settings\<username>\Local Settings\Application Data\NutriBase. Substitute your username for “<username>”. You can add new Folders to add new major menu categories. Store your PDF files and link files in these Folders to create topics inside these categories. Name each PDF file and/or NutriBase link file as you want it to appear on the Information menu. Keep in mind that all these Folders and files will self-alphabetize themselves for you in their respective menus. Here is an example of a typical NutriBase Link File. The file name is “Acne Fact Sheet.link.” It contains a single line: http://nutribase.com/ ipdf/Miscellaneous/Acne Fact Sheet.pdf. Based on its filename, it will likely be one of the first topics in your menu of topics. The single line in this example is a hyperlink to the Acne Fact Sheet PDF file that resides for you on the NutriBase web site. You can create as many new link files as you wish by using this example as a template. If you want to delete a major category from your menu, you can do so by deleting the existing folder from your hard drive – that will remove them from your Information window. You can rename the folders to change their alphabetical sequence in the menu. You can rename the PDF documents and link files to change their display sequence if you like. You can create new folders containing new PDF’s and/or link files to create new major Information categories and topics. One folder you may find interesting is the Workouts Folder. This folder contains several sample weight training workout schedules. If you look in the Workout folder on your hard drive, you will see MS Word docs that represent each of these workouts. However, these documents have been saved as PDF files in this folder because NutriBase won’t display Word docs – it will only display the PDF files it sees in this folder. You can edit these MS Word docs and save them as PDF files in this folder… the modified PDF’s will be displayed in the Information window of NutriBase for you. But you can do much more – you can create new workout docs and save them to this folder as PDF’s… they will show up alphabetically in your drop-down menus. For more information, please read the “How to Edit or Create New Information Topics” in the “How To” section of this manual. 19 THE CLIENT (OR “MY SETUPS”) TAB Most often, the first thing many users do is create a profile for themselves or for another person. Although you can do this by clicking on tabs and navigating to the proper window, you can also get to the proper windows by simply clicking the appropriate icon on the “Quick Access Toolbar.” To move to the “Add a Profile” window, click “Client Setup” Tab (called My Setups in Personal Editions), click the down arrow the “Profiles” Button, and then click “Add a Profile.” OR: Click the Profiles shortcut on your Quick Access ToolBar to jump instantly to the following window: Add a Profile - Window One This is where you “log on” to NutriBase. You provide basic information to the software so it can make a multitude of calculations and set up nutrition goals for you or your client. From here, you can: 1) Introduce yourself or a client to NutriBase by answering about a dozen basic questions: age, gender, height, weight, desired weight, etc. You can enter up to a million clients into NutriBase Professional. 2) Abbreviate the process by simply logging in with a client number or name only. 3) Select a starting date for tracking information and progress. This date can be in the past if desired. 4) Select the tracking method you will use for this client. 20 5) Enter in starting and desired body weight. 6) Enter in starting and desired body fat content. This is optional, but many health experts believe that body fat content is a more accurate indicator of healthy body composition/weight. To facilitate the use of this option, we sometimes provide an incentive in the form of free digital body fat calipers with your purchase. By clicking the “Continue” Button, you move to the second window of the Profile section. This second window looks like this: Add a Profile - Window Two 7) From this second window, you can click the “Edit nutrient goals” Button to customize your client's nutritional goals. The default values are auto-selected by NutriBase based on the DRI for the client's age and gender, but you can modify any nutrient goal or establish nutrient goals for nutrients that are not addressed by the DRI's. 8) Establish your desired PCF Ratio (your percentage intake of Protein, Carbohydrates, and Fat). Use our default values - based on National Dietary Guidelines - if you like. 9) Set your maximum desired % of Saturated Fat intake. (Default value of 7% is presented.) 10) Define your Success Criteria - the factors your food intake must meet for you to earn a happy face (or gold star, check mark, etc.) on any give calendar day. 21 10) Define Alarms to warn you when you are selecting foods that exceed desired parameters. For example, you may want to be notified if a serving of any food contains more than 600 mg of Sodium. 11) Add and/or edit your contact information for this client. 12) You can tell NutriBase which calorie formula to use. You can edit these formulas by clicking the “Calorie formulas” link to the right of the drop down menu. The default formula is the Harris-Benedict formula. Intermittent Fasting Diet Support. There is one option in this menu you should be familiar with. It is the final option: “Specify Daily Calorie Goals (enter your own daily values). This option is the one to select if you want to set different calorie goals for each day of the week. This is a requirement for Intermittent Fasting Diets (IF Diets). An Intermittent Fasting Diet may require the subject to take in, say 600 calories on Mondays and Wednesdays, plus 2000 calories on each of the other days of the week. This option will allow you to specify different calorie levels for each day of the week. Click the Finished Button to have NutriBase calculate the weight loss per week, goal reached date, etc. 22 Additional Client Windows The “Client” Tab also provides access to additional windows. These windows allow you to: 1) Select your default formula for calculating a client's daily calorie needs. You may select the formula and you can modify the formula as desired. 2) Select whether your client's Food Log will be compared to a full day's nutritional requirements or to 2/3 or 1/3 of the day's nutritional requirements. 3) Organize your clients into Folders. For example, you may want to save all your weight loss clients in one folder and keep all your athletes in another. 4) Add profiles, edit existing profiles, or delete profiles. 5) Manage your client contact list. Record names, addresses, phone numbers, email addresses, home, work, family information, etc. Their email address is a link... just click to contact them. 6) This is where you go to process a Web Form created by your webbased questionnaire. (Bear in mind that this is a feature of the SE Editions available with NutriBase Professional and higher.) The webbased questionnaire is a web-based marketing tool. The idea is to get 100 hits a day, 700 hits a week, and 35,000 hits a year. You gather contact and personal information (age, gender, height, weight, desired weight, etc.... the information NutriBase needs to add their profile into the software). NutriBase can read this information and import it. The contact information goes into the NutriBase Contact Manager and the personal information is used to log each person in as a client. At this 23 point, you can use NutriBase to generate a wide variety of reports for them. Save these reports in PDF format and email them to your client. “Client Setup” Tab (“My Setups” in Personal Editions) This tab allows you to control your Client Settings (nutrient goals, how calorie needs are calculated, setting goals for protein, carbohydrates, fat, sat fat and other nutrients). In the Junior, Personal, and Personal Plus editions, this tab is called “My Setups” and you can add, edit, or delete the profiles for two, five, or ten users, depending on your NutriBase edition. This tab also lets you manage your Client Folders by allowing you to add, delete, or rename Client Folders containing lists of clients and moving clients from Folder to Folder if desired. Personal editions do not support (or need) Client Folders. A NutriBase “Profile” is a compilation of information about a particular client that you are working with. It contains data like their name, age, gender, height, weight, desired weight, etc. NutriBase uses this data to make calculations for this client. You can use the “Profiles” Button options to add new client profiles, modify existing client profiles, or delete existing profiles. The Contact List is a grouped and organized list of your clients and their information, including personal, home, work, family information. This option lets you view your client information and to export this data to an XLS (Excel format) file or to a CSV (Comma Separated Values) file for use outside of NutriBase. The Web Profiles option allows you to have NutriBase read in data taken from your Web-based questionnaire if you use one (this is a feature of the SE Editions). Client Setups - Nutrients This window allows you to select DRI (Dietary Reference Intakes) settings, daily calorie formulas or methods, and calorie ratios. Choose the DRI setting that best suits your situation. Full DRI's are the most common. 1/3 DRI may apply to situations in which you are serving one meal per day rather that three. 2/3 DRI would be for situations involving two meals a day. 24 You may select the formula used to calculate daily calorie needs by checking the appropriate radio button. If you are using an indirect calorimeter, you can select the option to enter your own RMR. The final section allows you to specify the default values for the PCF Ratio goals. These percentages must add up to 100%. Saturated Fat is, of course, a subset of total fat. Client Setups – Criteria (Pro and higher) Use this window to set up the default values for client profiles you create. Calorie Tracking Options You have three options for tracking calories: “Calories In versus Calories Out with adjustments as weight changes” tracks the calories you take in from food and compares it with the calories you burn from activities and exercises. This method uses your normal daily activity level to estimate the calories you expend each day then adjusts for exercise and other activities. NutriBase adjusts your calorie requirements as your weight changes over time. “Calories In versus Calories Out” tracks the calories you take in from food and compares it with the calories you burn from activities and exercises. This method uses your normal daily activity level to estimate the calories you expend each day then adjusts for exercise and other activities. NutriBase does not update your calorie requirements based on your changes in weight. “24 hour” method tracks everything you eat versus every activity and exercise you perform - accounting for all 24 hours each day. This means you account for things like sleeping, eating, and sitting as well as the higher calorie burning activities that you perform each day. Food Alarms You can set up warnings (“Alarms”) to notify you when you select foods that you wish to avoid. To set up your Alarms, click the blue “Food Alarms” link. Success Criteria Define what you consider to be a successful day... succeeding each day rewards you with one the Success images (that you can select). These images are displayed each day to the client or user's Calendar. This same idea is also true for the Failure images that you can select. Tracking Body Weight and/or Body Fat Content To enter a client or user’s daily body weight and/or body fat content, click the “Tracker” Tab. 25 Client Setups - Exercise This window lets you select and/or tweak the formulas used to calculate factors related to exercise: resting heart rate, maximum heart rate, and target heart rate zones. Client Settings This window allows you to change the settings for three areas: Nutrients, Criteria, and Exercise. The Nutrients Window. Use this window to set the default values NutriBase will use when you work with your clients. DRI setting. You can adjust what DRI (Dietary Reference Intakes) values to use as your client's daily nutrient goals. Normally, this would be the full DRI. You can make adjustments if you are a facility that serves one or two meals a day. Daily Calories. You may select which formula you want NutriBase to use to calculate your client's daily calorie needs. You can also modify these formulas if you wish. PCF Ratio Goal. You can set a default PCF ration goal here. As long as PCF adds up to 100%, you are fine. Keep in mind these values are the defaults - the starting points for clients. You can always modify any particular client's goals as desired. Keep in mind that if you change these defaults, these new values will not be applied retroactively to existing clients... if you want the goals for existing clients to be different, click Profiles | Edit a profile to make changes. The Criteria Window. Use this window to set default values for how and what you track for your clients. Calorie Tracking. NutriBase offers three distinct methods for tracking calories. Select the method you prefer. Food Alarms. You can set “alarms” so that when you attempt to record a food item that exceeds or doesn't meet requirements you set up for clients. Success Criteria. This section allows you to define a successful day and assign a symbol that you can display to your Calendar (on your Home window) for the active client. For example a successful day may mean that the active client didn't exceed her calorie goal for that day. Or perhaps she didn't exceed her calorie goal and did exceed her goal for Total Dietary Fiber. Exercise. This window allows you to control the formulas used to calculate exercise formulas used in NutriBase. Client Folders 26 NutriBase supports the ability for you to create up to 26 Client Folders. Each Folder is a place you can use to store the names of people that you want to store together as a group. Typical Folder names could be: General Folder (which we include by default), LA Fitness (to store clients that belong to a particular organization), Diabetic (to store clients with a common health need, or Vegetarians (to store all your clients with this special dietary requirement). Your clients will self alphabetize by last name in each of these folders. You can move clients from one folder to another. One client may not reside in more than one folder. To move clients, select them: highlight one if you wish to move one client. Hold the Ctrl key down to “cherry pick” multiple clients. Hold down the Shift key to select a range of clients to move. Press Ctrl A to select all. After you have selected the clients to move, either click the “Move” Button, or simply drag them to the target folder's tab. Client Profiles The “Profiles” option provides a drop-down menu that offers you three functions: Create a Profile Use this window to create a profile for a client. Fill in the information and click the “Continue” Button (or “Save profile” Button). If you never want to compare this client's Food Log with their nutrient goals, you can check the “Track Food Log information only” option. The unique identifier and comment is shown in the Client Facts report along with all other information from this Profile window(s). Edit a Profile Use this window to edit a profile for an existing client. Fill in the information and click the ““Continue button (or “Save profile” Button). Delete a Profile This option takes you to a window used in various locations throughout NutriBase to let you select items from the list on the left and transfer them to the list you create on the right. Once you create your list, you can perform some action on it. Drag and drop items as desired. Click an item to highlight it then click the left or right arrows to move the selected item to the left or right. 27 Click the double headed arrows to move everything to the left or right. Press and hold the Ctrl Key down and use the left mouse click to “cherry pick” a number of individual entries. Press and hold the Shift Key down and click the first and last entries in a range of entries. Use the single arrows to move the selected items left or right. Client Contact List This window provides two options: Information and Export. While in the Information mode, double click any name to add or edit their contact information. To export your contact information to XLS (Excel format), CSV (Comma Separated Values) or RTF (Rich Text Format – a generic word processor format that MS Word can open), click the Export option at the top of the window, select the names you want to export, then right mouse click to select the format you want to export. Web Profiles (From Web-Based Questionnaire) This feature applies to the NutriBase SE versions – the versions that support a web-based questionnaire. The web-based questionnaire is a web-based marketing tool. The idea is to get 100 hits a day, 700 hits a week, and 35,000 hits a year. You gather profile information (like email address, age, gender, height, weight, desired weight, etc.... a total of about a dozen facts). You can import this data directly into NutriBase and log these folks in as clients. Professional users offer an Initial Assessment Report or a monthly newsletter to these folks as an incentive for completing your brief questionnaire. NutriBase can read this profile information and import it. The contact information goes into the NutriBase Contact Manager and the personal information is used to log each person in as a client. Once a client is logged into NutriBase, NutriBase makes calculations and “knows” 180+ things (calorie needs, nutrient goals, body weight, desired body weight, etc.) about that client. At this point, you can use NutriBase to generate a wide variety of reports for them. You can save these reports in PDF format and email them back or post them to your web site. The idea is to market your services to your contact list. For instance, if your client is 43 years old and weighs 400 lbs., your email newsletter would offer services that 43 year old 400 lb. person would be interested in. You can always add the SE feature at a later date if you don't purchase it initially. It is an option on our On-Line Order Form. If you purchased the SE option and had us help you install a web-based questionnaire to your web site, you will want to import the data collected from your webbased questionnaire into NutriBase (Pro or higher). We call the data you collect from your web-based questionnaire “Web Profiles.” We call them web profiles because when you import this client data into NutriBase, it appears as new client profiles…. Profiles downloaded from the Web. Note: To learn how to import your web profiles from your web-based 28 questionnaire, please read the topic titled “How to Import Web Profiles from Your Web-Base Questionnaire” in the “How To…” section of this manual. THE FOOD LOG TAB This Tab takes you to the window you should be in to record a client’s Food Log. The “Food Log” is a list of foods a person has eaten over time. Each day of a person’s Food Log can be organized into three meals and three snacks. You can also Copy a Food Log day to another day or days of the same or different person's Food Log. The Food Log window is also the place to record your blood glucose and other diabetes-related information. When you enter the Diabetic Food Log Information window, be sure to right mouse click to view your numerous options. See what happens when you time stamp your meals. One of the right mouse click options will let you switch between English and Metric units for diabetic tracking. Click the Mood icon on your Food Log window if you want to enter in your overall Mood for this day. You can track this over time and graph this factor against your body weight on your Home Window if desired. Click the Step Per Day icon to enter in your pedometer reading for the day. Many experts recommend you get 10,000 steps per day to maintain an active lifestyle. And finally, you can create an Auto Record list of foods that will be automatically copied to a person's Food Log every day that you record even a single food item to. 29 The Food Log Window This window is partitioned into three major areas: 1) The Food Log 2) The Nutrient Summary 3) The Search Results Screen To record someone’s food intake, the first task is to locate the food item you wish to add to a person's Food Log. You can add USDA food items, Canadian Nutrient File food items, Brand Name food items, Personal Foods (Food items you have added to NutriBase), Recipes, and Meals. The NutriBase Food Log is the place to record everything a client ate (or will eat) over time. In this window, you can: 1) Record everything a client ate or will eat. Look up foods in the lower portion of this window... drag and drop them into the meal or snack tab as you work. For information about how to locate foods, please read the “Food Search ‘How To’ Topics” located in this User’s Manual. 2) Determine the NB FTE – the next best food to eat. 3) Organize foods into one of three meals or three snacks per day. 4) Edit your client's Food Log by removing foods, editing the amounts eaten, or adding new food items. 5) Lookup and record food items from the nutrient database, recipes, or Personal Food Items (foods you have added to NutriBase). 30 6) Create an “Auto-Record” list... a list of foods that are automatically added to your client's Food Log every day you record to their Food Log. You can create different Auto-Record lists for different clients or groups of clients. 7) Sequence food items in any order you prefer. 8) Time stamp meals and snacks. (This is critical to do if you are a diabetic tracking your meals against your blood glucose levels throughout the day.) 9) Copy Food Log items to another day or days of the same or different client. 10) Display the nutrient profile for the Food Log and the Actual PCF Ratio (Protein-Carbohydrate-Fat Ratio) and your goal PCF Ratio updated in real time as you build your Food Log. Display exchanges if desired. 11) Click a button to display your Diabetic Tracking window that graphs your blood glucose levels. View PCF Ratio, Carbohydrates, Fiber, and Sugars by meal. Track and graph your blood glucose along with your exercise calories and actual carbohydrates. Track your medications, note the times for diabetic-related events, graph your blood glucose and the carbohydrates for each meal, and take a keep notes related to your experience. View nutrient intakes pictorially as graphs. 12) Automatically add all food items to a Shopping List. 13) View actual calories for the day against the client's Daily Calorie Allotment. 14) Generate a My Plate report. To do this, right mouse click over the nutrient data in the upper right corner of this window. 15) Highlight any food item from your food log (the foods you have recorded), RMC, then choose the option to add that food item to a NutriBase Meal. This allows you to create Meals (collections of recipes, database items, and Personal Foods that represent a single meal). 16) right mouse click to generate a MyPlate Report. 17) right mouse click a recorded food item and add it to your Quick Add List. Click the “Add from QA” Button (or right mouse click over the window and select this option) to add a food item you previously added to your Quick Add list. This feature can save you a lot of time and effort. Click the Food Log Tab to move to the Food Log window. This is the window you will use to record the foods that you or a client (or user in Personal Editions) has eaten. You can assign these foods to one of three meals or three snacks during the day. This window is partitioned into three areas: The Food Log (upper left corner), the Nutrient Summary (upper right corner) and the Search 31 Screen (lower part of the screen). The first task is to locate the food item you wish to add to a person's Food Log. You can add USDA food items, Canadian Nutrient File food items, Brand Name food items, Personal Foods (Food items you have added to NutriBase), Recipes, and Meals. To locate foods, use the Food Lookup area located in the middle portion of the Food Log window. This window is included in the Food Log, Recipe Manager, Meal Manager, and Meal Plan Manager windows. The NBFTE Function The NBFTE is the acronym for the NutriBase “Next Best Food To Eat.” The NutriBase “NBFTE” Button will tell you the next best food to eat (in a common serving size) based on what you have eaten so far today and compared to your NBFTE goals of up to 25 vitamins and minerals. The NBFTE also uses your “other goals” – goals for Calories, Protein, Carbohydrates, Fat, Saturated Fat, Cholesterol, and Sodium - to exclude undesired foods. The “NBFTE” Button will appear in the center of your Food Log after you have logged in at least 15% of your calories for the day. Once you have recorded 15% of your calories and the “NBFTE” Button appears, you are ready to use this function. We recommend, however, that you do a bit of setup first. In the Nutrient Summary section of your Food Log Window (upper right corner), take a look at your Log Details. You can change the date for the day you are interested in working with. After you confirm the date is correct, click the Progress Tab at the bottom of this Nutrient Summary section to open your Progress Window: This window provides you with feedback regarding what you have eaten. As you begin adding your NBFTE’s, watch the information in the Progress Tab. You can see how close you are to obtaining 100% of your vitamin and mineral goals. You can also see your cumulative calorie intake. And you can see your overall NDI. Your goal will be to reach 100% of your vitamin and mineral goals before your reach your Calorie Goal. This will result in a higher NDI score. You are now you are ready to give 32 the NBFTE button a try. This button will appear in your Food Log as soon as you have logged in 15% of your calories for the day. When the button appears, click it. This will display the “Next Best Food to Eat” window. Your detailed Percent of Goals (POG) Summary is presented on the right side of this window. Use the scroll bar to see individual POG’s. Set any desired options. For example, if you are trying to limit your carbohydrates, you could set a limit on the number of grams of carbohydrates a food item may contain. This would exclude any foods with carbohydrate values higher than desired. You can also set upper limits for calories, protein, and fat, if desired. Click the “Find foods” Button to have NutriBase generate a list of commonly eaten foods for you to consider eating next. The first item in the list will be the most effective food for bringing you closer to each of your NBFTE goals. The second food item will be your second best option for bringing you closer to all of your NBFTE goals. Etc. When your search results appear, you will see your “Filter Categories” option. Click the down arrow to select food categories of interest. When you select a food category, NutriBase will display the NBFTE foods by food category, sorted from high-to-low. 33 Notes: 1) NBFTE results come from the USDA nutrient database. Compared to the Brand Name database, the USDA database provides far more values for the vitamins and minerals we need to evaluate when we calculate NDI’s and NBFTE’s. Brand name data is not suitable for high end analysis because it almost always excludes the vitamin and mineral data that our NDI and NBFTE algorithms rely on. 2) A consequence of using the USDA database is that the foods that appear in your NBFTE listing will tend to be mostly non-brand named foods – vegetables, fruits, cereals, meats, etc. You won’t see many restaurant foods, frozen entrees, or packaged foods recommended (fortified ready-to-eat cereals are an exception). We excluded things you probably wouldn’t eat – like a cup of flour or a tablespoon of baking powder. 3) The NutriBase NBFTE algorithm treats missing values in your band name data as zeros. If you record a lot of brand name foods to your Food Log, this will make the calculations somewhat less accurate. This will cause the NBFTE function to recommend foods that may be somewhat more nutritious than if you had eaten foods exclusively from the USDA database. 4) You will see colored backgrounds behind values for Sodium, Cholesterol, and Saturated Fat. These are Alerts. Alerts indicate whether the value is zero low, medium, or high. The colors move from dark green, to light green, to yellow, and to red. Green is good. Red, not so much. Click your help icon for an explanation of NBFTE and a colorcoded Alert Chart. Changing Servings Sizes When you add a food item to a Food Log (or Recipe, Meal, or Meal Plan, you will see a window similar to the “Add to food log.” Option One: The default to add a food item to a Food Log is shown… you specify the amount and the units – in this case, 1 cup. You have the option to assign it to a meal or snack (or to do it later). This is the standard way of specifying serving sizes. It is the NutriBase default option. Option Two: The second option you can select is to specify your serving amount in calories. This second option is designed to help you create snacks at specific calorie 34 levels. This is handy if you are trying to lower your body weight and you are carefully monitoring your calorie intake. We refer to this as the “make it and take option.” Suppose you wanted to create pre-measured snacks at a particular calorie level – say, at 200 calories per snack. The conventional method for doing this would involve setting up a ratio and using a bit of algebra. Most RD’s are very capable of doing this, but it’s time consuming, it’s a hassle, and you have to repeat this entire process with every new food. And if you want to create a mixture – say, a combination of two ingredients that total 200 calories, that’s an even more involved and time consuming process. With NutriBase, it’s easy to perform this task. The food serving size will be specified in grams. This method works well if you use an accurate digital scale. Note: To learn how to use this second serving size option, please read the topic titled “How to Create Servings Sizes Measured in Calories” in the “How To…” section of this manual. (Use your Table of Contents.) PUF Display Every food item that you add to a Food Log will automatically be added to your PUF (Previously Used Foods) Display. After you have added at least one food to your Food Log, the “PUF Display” Button will appear. Click this button to display an alphabetical listing of all your previously used foods (PUF’s). This can save you time and effort by eliminating the need to re-conduct previous searches. Just select the food item and you are ready to use it. You can delete individual PUF items. To do so, highlight it, RMC, and then select the Delete option. This allows you to keep your food lists current and relevant to your needs. As your PUF display becomes populated with the foods you use most often, your search time will go down and your productivity will go up. Food Log Copy Use this option to copy your Food Log for one day to one or more days of the same or different Food Log. The operation is straight forward: select the people you will copy “from” and “to” - these can be the same person on different days. Select the Food Log day to copy then select the day(s) to copy to. The radio buttons provide you with options regarding what you will copy. When you are finished, click the “Copy foods” Button. Auto Record Foods This window shows you a list of “Auto Record” foods - foods that will be automatically copied to a person the first time you record a Food Log entry for that person each day. To add foods to this list, open the Food Log for the person you want to attach this list of foods to. Record all the food items you want to have 35 automatically recorded. Select all the foods you want to move to your list. Click the “Auto Record” Button to move a copy of these food items to your Auto Record list. Once you have created your Auto Record List, you may edit this list at any time by deleting items as desired. Add items as described above. Every time you record an item to this person, the entire list of items in your Auto Record will be recorded for you as well. Have All Foods Been Assigned to a Meal or Snack? When you create a Report (by clicking the “Reports” Tab and selecting the type of report you want to create), you will want the Food Log items listed in all your Meals and Snacks to equal the tally of foods in your “All Foods” Tab. This will only happen if you have assigned all the foods in your All Food Tab to Meals and Snacks. It’s easy to check to see if all foods have been assigned to a Meal or Snack: Click the “All Foods” Tab (in the “Food Log” Tab), RMC, then select the Copy item to “Meals” Tabs” option. This will only list the food items that have not already been assigned to a Meal or Snack. There is another way to check to see if your food items have been assigned to a Meal or Snack. Just look at your Food Log display. The food items that have not been assigned show a “?” to indicate this: RMC over this display and notice you can select the columns of data you want to have displayed. (The Food ID column is turned on or off by clicking the NutriBase Menu Button in the upper left corner of NutriBase and then clicking the “Options” Button.) THE EXERCISE TAB 36 This section allows you to: setup exercises (add exercises, move them into the infrequent exercise list, etc.), create workouts (combinations of activities and exercises), record your daily exercise, auto record a list of activities and exercises you perform every day, and keep logs of your exercise habits and routines. Exercise Setup This Tab allows you to organize your activities and exercises and to add new exercises when necessary. Click the sub-tabs to view your Frequent Exercises, Target Heart Rate Zone (THRZ) Exercises, Monitored exercises, and Infrequent Exercises. Workouts Workouts are lists for activities that you can group together. They can speed up the recording of your exercises by recording several activities at once. Once you have your workout the way you want it, click the Save option to save in the Workouts section of this (and other) windows. Note: NutriBase allows you to view, print, edit, and create workout routines (and many other types of documents) in the Information window of your home page. Daily Exercise Use this window to record your activities and exercises. Drag and drop exercises or double click to add them to your list for the day. You can double click to edit the duration and intensity. Auto Record Exercise - right mouse click any of the exercises in your daily exercise list (on the right side of the window) and click the “Auto record exercise” option to add the selected exercise to your Auto Record list - a list of exercises that will automatically be recorded for the active client on the days that you specify in your Auto Record list (which you access by clicking the Auto Record Tab). When you edit the intensity, you can move the slider provided. Each increment is plus or minus 10% of the normal calculation. Your Auto Record list is a list of exercises that will automatically be recorded for your active client on the days that you specify in your Auto Record list (which you view by clicking the Auto Record Tab). 37 The Exercise Window The “Exercise” Tab allows you to manage your exercise and workouts, target heart rate training, etc. It helps you determine how many calories your client burns from exercise. From here, you can: 1) Select and record exercises or complete workouts for the day. 2) Edit and record durations and intensities. 3) Manage Target Heart Rate Training. 4) Time stamp your exercise. If you are diabetic, this allows you to compare your blood glucose with exercise in the Food Log. The “Exercise” Tab also takes you to four other windows that provide additional capabilities: 1) Create, configure, and record workouts. 2) Add new exercises. (See the “How To” topics to see the “How to Add a New Exercise” topic.) Delete exercises. Edit exercises. 3) Organize exercises into categories (like Frequent and Infrequent). 4) Set up an “Auto Record” function to automatically record a list of exercises each time you log in to record exercises for this client. This can be a real time saver. 5) Maintain workout logs. Customize the logs. Print them. Export them to XLS (Excel format), RTF (a generic word processor format that MS Word can open), or CSV (Caret Separated Value format). These logs can track weight training, a running regimen, or a custom log that you 38 can create for a specific need. You can create any number of weight training or running program templates, print them out, and give them to your clients. In NutriBase, you access nearly all software functions via the RMC. This approach saves screen space and unclutters the interface... it also makes it easy to quickly view, understand, and implement your options. right mouse click over the window to reveal your options. Exercise Logs This option allows you to make a more detailed record of your workout. NutriBase comes with “sub-tabs” for Weight Training, Cycling, Running/Walking, Swimming, Rowing, or Custom. Use the “Custom” Tab to create a new template for any sport. THE TRACKER TAB This window lets you enter your body weight, log in measurements (biceps, dress size, etc.), Body Chemistry (cholesterol, urine glucose, etc.), and miscellaneous factors. You can also store information pertaining to medical conditions, physician information, hospital, insurance, pharmacy, and emergency contacts. Weight/Body Fat Tracker If you don't already have a shortcut to this window in your Quick Access Toolbar, please add it now. This is where you enter in your daily body weight (or body fat content if that is what you are tracking). To enter your weight or body fat content, click on the date you want to write the data to then type in your weight and/or body weight. When you Exit this window, your data will be saved. 39 Personal Information This window is provided so you can store information pertaining to medical conditions, physician information, hospital, insurance, pharmacy, and emergency contacts. Tracker Logs This window allows you to log in measurements (biceps, dress size, etc.), Body Chemistry (cholesterol, glucose, etc.), and miscellaneous factors. You can also add new items to track. Notice that as you add data, you begin to graph your progress for that tracker item. right mouse click to print or to save to a file. The Information Tracker Window One of the three windows under the “Tracker” Tab is the Weight/Body Fat Window. This is where you log in your body weight and/or body fat content. From here, you can: 1) Enter your body weight and/or body fat content by clicking on the date... your BMI is automatically updated. 2) Print this information. 3) Calculate your required body fat content based on the U.S. Army AR600 Body Fat specification. 4) Add Photo. You can add a photo of your client. You can add several photos of your client. You can delete any photo, copy any photo, or save any photo to a file. If you have several photos, you can display them in a slideshow. 40 The other two windows available under the Tracker Window provide additional capabilities: 1) The “Logs” Button takes you to a window that facilitates the recording of Body Measurements, Chemistry (blood work, urinalysis), and Miscellaneous data. 2) Export your logs to RTF (a generic word processor format you can open with MS Word), CSV (Comma Separated Values) format, or XLS (Excel) format. 3) The “Info” Button allows you to track medical conditions, doctor, hospital, insurance, pharmacy, and emergency information. THE PERSONAL FOODS TAB Personal Food Items (PFI's) are food items that you have added to NutriBase (by key-stroking in the nutrient data) or foods you have located in the nutrient database that you had NutriBase convert into PFI's for you for convenient access via the “Personal Foods” Tab. PFI's are stored here in the Personal Foods window. 41 Personal Foods Window The NutriBase Personal Foods Window allows you add new foods to NutriBase, organize them, and use them in recipes, meals, meal plans, etc. This is one of the Windows you can access. From the “Personal Foods” Tab, you can: 1) Drag and drop Personal Food Items (PFI's) into tabs (like Entrées, Breakfast, Beverages, etc.) 2) Organize sets of Tabs into Folders (like Vegetarian, Diabetic, etc.). The “PFI” Button takes you to a Window that allows you to add a new food item (Personal Food Item) into NutriBase. 1) Click the “PFI” Button to add new food items (called “Personal Food Items” or “PFI's” in NutriBase parlance). You can enter data in units (grams, mg, mcg, IU, etc.) or as a percentage of Daily Value (as food labels often use). You can also add amino acid and fatty acid profiles, exchanges, and other information. 2) We have a screen shot of this window available for you to view. In NutriBase, you access nearly all software functions via the RMC. This approach saves screen space and unclutters the interface... it also makes it easy to quickly view, understand, and implement your options. right mouse click over the window to display your options. 42 PFI Organizer This window allows you to organize your Personal Food Items (PFI's). Personal Food Items (PFI's) are food items that you have added to NutriBase (by key-stroking in the nutrient data) and/or foods you have located in the nutrient database that you had NutriBase convert into PFI's for you. This window is showing you the contents of the Personal Food Folder shown at the top of the screen. You can change this folder by clicking the down arrow and selecting the Folder you want to organize. You can create and use up to 26 Folders. You can create up to 36 tabs in each Folder. The “All PFI” Tab contains all your PFI's. Any new tabs you create will contain any PFI's you put there. You can do this by dragging and dropping PFI's from the “All Foods” Tab. New tabs might be use labels like Desserts, Vegetarian, Beverages, etc. All PFI's will self-alphabetize within the tabs. Take a moment to study the image above to learn how this section of NutriBase is organized. The annotations reveal your options. Create a new folder by clicking the “New folder” Button. Move PFI's from Folder to Folder by clicking the “Move” Button. You have many other options: right mouse click on the data to see your various options. Add New Foods to NutriBase This window is the place where you would go to create a Personal Food Item (PFI) from scratch. You will need the 43 nutrient information for any PFI you want to add to NutriBase. Enter your data into the form provided. Make sure you enter a gram weight for the serving size you define. You can enter percentages from Nutrition Facts Labels. You may add Exchange values if you want to. PFI Folders NutriBase supports up to 26 Folders for your Personal Food Items (PFI's). Personal Food Items (PFI's) are food items that you have added to NutriBase (by key-stroking in the nutrient data) and/or foods you have located in the nutrient database that you had NutriBase convert into PFI's for you. Note: We recommend you organize your PFI’s into multiple Folders. By doing so, you benefit with quicker access to your PFI’s, better organization of these Personal Foods, and faster performance. 44 Add PFI’s to Food Logs, Recipes, Meals, Meal Plans While you are in the “Personal Foods” Tab, you can add a selected PFI to a Food Log, Recipe, Meal or Meal Plan. Do this by selecting a PFI (highlight it with a single click), RMC, then select the appropriate option. For example, click “Add to food log” to add the selected PFI to the active client’s Food Log.) Adding a New Food Item to NutriBase You can add new food items to NutriBase. Once entered, you can use these new food items in your Food Logs, Recipes, Meals, and Meal Plans. We call these new food items “Personal Food Items” – PFI’s. 1) You add food items to NutriBase as Personal Food Items” (PFI's). This window is your interface for adding new foods. 2) Click the “Add more nutrient values” Button to add additional nutrients (vitamins, minerals, amino acids, fatty acids, etc.). 45 3) Use the “Add exchanges” to add ADA exchange values, if desired. 4) The “Enter values by %DV” Button allows you to enter the percentage values (often provided on Nutrition Facts Labels) into NutriBase. NutriBase will convert these percentages into their actual values for you. 6) You can tell NutriBase which shopping list category any PFI belongs to. This saves time later because NutriBase will automatically put the PFI into the proper shopping list category for you when needed. 5) To add this PFI to a client's Food Log or to a Recipe, Meal or Meal Plan, click the “Add to...” Button. 6) You can also perform most of the functions above via the RMC. 46 THE MEALS TAB A NutriBase Meal is a combination of food items that represent a single meal or snack. 1) Create a Meal by combining recipes, database items, and/or personal foods you have added to NutriBase. 2) Edit the Meal, add its ingredients to your shopping list, calculate its cost, or print it out. 3) Generate a Nutrition Facts Label for your Meal. 4) Copy your Meal to your Food Log (or anyone else's). 5) Copy your Meal into a NutriBase Meal Plan (which is a collection of three meals and three snacks a day for four weeks). In NutriBase, you access nearly all software functions via the RMC. This approach saves screen space and unclutters the interface... it also makes it easy to quickly view, understand, and implement your options. Take a moment to point at the various sections of the window shown above and right mouse click to list your options… this is a very good way to learn what you can do where. Try this in all the NutriBase windows that you visit. 47 Meals NutriBase “Meals” are collections of foods that represent a meal or snack. This window allows you to organize your meals, create and manipulate your Folders, set up your Meal Criteria, and create Meals. Meal Organizer Clicking this button brings you something similar to the image above. Please take a moment to familiarize yourself with the various annotated features. This window allows you to organize your “Meals.” NutriBase Meals are collections of foods that represent a meal or snack. They can include items from the nutrient database, PFI's, and recipes. You can organize your meals into “Folders.” You can have up to 26 Folders. Within each Folder, you can organize Meals into as many tabs as you wish. When you are in the “Meals” Tab, look to the very top of your NutriBase window to see which Meal is currently active. In this example, Oatmeal, toast, and coffee breakfast, is the active Meal and it resides in a Folder called “Vegetarian Breakfast.” (“General” is the original default folder for Meals in NutriBase.) 48 The “Vegetarian Breakfast” Folder shown above was created by a user. (When you first start using NutriBase, there is only one Meal Folder called “General.”) The “Vegetarian Breakfast” Folder is currently active. If you want to organize a different Meal Folder, click the down arrow and select the Meal Folder you want to organize. Meal Folders NutriBase supports up to 26 Folders for your Meals. Take a moment to study the features annotated in the image above. Create a new folder by clicking the “New folder” Button. Move Recipes from Folder to Folder by clicking the “Move” Button. You can create a new Meal Folder by clicking the “Folder” Tab (adjacent to the “Organizer” Tab). You can add a new “Meals” Tab by clicking the “New tab” Button. 49 You can create as many tabs as you need in each Folder. Hover over your Meals and right mouse click to rename tabs and perform a variety of other options. The “All Meals” Tab contains all your Meals. Any new tabs you create will contain the Meals you put there from the “All Meals” Tab. You move Meals into tabs by alt-dragging Meals from the “All Meals” Tab or by using your RMC. New tabs you create might have labels similar to: Breakfast - Healthy, Breakfast - Quick, Lunch - Vegan, etc. All Meals self-alphabetize themselves within the tabs. Note: We recommend you organize your meals into multiple Folders. By doing so, you will benefit with quicker access to your meals, better organization, and faster performance. Meal Criteria (Pro and higher) Meal Criteria are a set of nutrient values that you compare your meal's nutrient content to. By default, NutriBase uses the Daily Reference Values. These values are already set up for you. NutriBase uses this standard because these are the basis of the percentage calculations used in the creation of Nutrition Facts Labels. You can create a new standard (we refer to this as a new “Criteria”) by clicking the “New” Button. You might want to do this in special circumstances when you need to compare nutrient intake to your own custom standard of reference (commonly done in nutrition studies for special populations). Create a Meal This is the window you use to create Meals. A “Meal” is a collection of items (from the nutrient database, from your Personal Foods, or NutriBase Recipes). You create a Meal by locating the ingredients, one at a time, and specifying the amount of each item you use. You specify the serving size by telling NutriBase the number of servings in this Meal or by telling NutriBase the number of grams or ounces per serving. This window is partitioned into three areas: The Meal Item List (upper left corner), the Nutrient Summary (upper right corner) and the Search Screen (lower part of the screen). The first task is to give your Meal a name. Type in the Meal name in the Meal name edit box. 50 Next, locate the items you wish to add to your Meal. You can add USDA food items, Canadian Nutrient File food items, Brand Name food items, Personal Foods (Food items you have added to NutriBase), and Recipes. To locate food items from the nutrient database, Personal Foods, recipes, or other Meals use the Search Screen located in the bottom portion of the Recipe window. For information on how to conduct Food Lookups (Searches), read the “Food Search 'How To' Topics.” To add foods to your Ingredient List (located in the upper left corner of this window), highlight the food item you want to record, then click the “Add selected Item” Button. Click the “View item details” Button to view all the data for the selected item in a single, scrolling window. Click the “Add to my PFI” Button to add the selected item to your Personal Foods listing. The Nutrient Summary section displays nutrient information for the foods you have added to your Recipe. PUF Display Every food item that you add to a Meal will automatically be added to your PUF (Previously Used Foods) Display. After you have added at least one food to your Food Log, the “PUF display” Button will appear. When you click this button, you will get an alphabetical listing of all your previously used foods. This can save you time and effort by eliminating the need to reconduct previous searches. Just select the food item and you are ready to use it. You can delete individual PUF items. To do so, highlight it, RMC, and then select the Delete option. This allows you to keep your food lists current and relevant to your needs. As your PUF display becomes populated with the foods you use most often, your search time will go down and your productivity will go up. 51 Add your Meal to a Food Log or Meal Plan While you are in the “Meals” Tab, you can add a selected Meal to the active client’s Food Log or to a Meal or Meal Plan. Do this by selecting a Meal (highlight it with a single click), RMC, then select the appropriate option. For example, click “Add to meal plan” to add the selected Meal to a Meal Plan (NutriBase will help you locate the Meal Plan you will copy to). Refresh Your Meals As you use NutriBase, you may find yourself modifying existing PFI’s (Personal Food Items) that are used in your existing meals. We sometimes release an update that includes updated nutrient data for foods that you may have used in your existing meals. Or you may have updated a recipe that you used inside an existing meal). To update all your meals to make sure you are using the most current data, you can perform a “Refresh” operation. Refresh opens all your meals, then recreates all meals and recipes on the fly using the latest data, newest Personal Food Items, and recipes, then saves them for you. Refreshing all your meals assures that they are as up-to date as your current nutrient information is. To refresh your meals, click your Meals Tab, click your Folders Button, right mouse click, and choose the “Refresh” option. If you don’t use meals, you won’t ever need to refresh them. If you use Recipes only, you can refresh them in a similar manner - click your Recipes Tab, click your Folders button, right mouse click, and choose the “Refresh” option. 52 THE RECIPES TAB Use this window to organize your recipes, organize your folders, set up your recipe criteria, and to create recipes. Recipe Organizer Clicking this button brings you something similar to the image below. Please take a moment to familiarize yourself with the various annotated features. This window allows you to organize your Recipes into “Tabs.” You could, for instance, organize your food items that happen to be cookies all together into a single Tab called “Cookies” or your frozen desserts in another Tab called “Frozen Treats,” etc. Food items will self-alphabetize into these Tabs. With the Organizer button, you work with one Folder (and multiple Tabs) at a time. With the Folder button option, you work with multiple Folders. 53 The Recipes Window NutriBase recipes include food items from our nutrient database, food items you may have added to NutriBase, and other recipes you have created (like sauces). Here are your recipe options: 1) Create a recipe. Include cooking instructions, preparation and cooking time, comments, and a byline (authorship). 2) Define your serving size in ounces, grams, or number of servings in the entire recipe. 3) Scale the recipe. That is, if it serves six, you can scale it to serve any other number of people - say, three people or 500. 4) Display the nutrient profile and the PCF Ratio (Protein-CarbohydrateFat Ratio) updated in real time as you build your recipe. Display exchanges if desired. 5) Create a publication quality Nutrition Facts Label. Include an ingredient listing (sorted in reverse order of gram weight contribution of each ingredient to the recipe). Edit all nutrient values and ingredients (in upper case or mixed case) prior to generating the label. Include allergen information. Save your label in BMP, JPG, EMF, WMF, PDF, or PNG formats. All labels conform to FDA rounding rules and percentage calculations. View, print, or save any label you create. 6) Organize recipes into Folders. Each Folder can contain as many Tabs as you like. A Folder might be named “Vegetarian Recipes” and your Tabs might be named “Entrees,” “Beverages,” “Snacks,” etc. 7) Export a recipe or multiple recipes to a single file that you can tell NutriBase to email to a colleague who uses any version of NutriBase... 54 they can import your recipe or recipes into their copy of NutriBase in one pass. 8) Import any recipe or recipes someone gives you. 9) Use any recipe as an ingredient in another recipe (i.e., using a sauce recipe as an ingredient in an entrée recipe). 10) While viewing a recipe, click an option to add this recipe to a client's Food Log, a Meal, a Meal Plan, or Recipe. 11) Sequence ingredients in any order you prefer. 12) Optionally display costing information for all ingredients. Add costing information for any ingredient. You can add cost information to all your recipe ingredients by using the NutriBase Cost Database. To access this function, click the “Home” Tab to get to the Home Windows, click the NutriBase Menu Icon, and then select the Cost Database option. 13) Calculate your process loss (the weight change due to the process of cooking your recipe). 14) Automatically add all food items to a Shopping List. 15) Use any NutriBase recipes - organized by special needs, including: Body Building, Vegan, Vegetarian, Diabetic, DASH (hypertension), Healthy Heart, Balanced Weight Loss, Low Carbohydrate Weight Loss, and 40-3030 Weight Loss. You can use these recipes as building blocks for your own custom Meal Plans. 16) right mouse click on your Recipe Image or recipe image placeholder (shown on the right) if you haven’t added a photo yet. Doing so will bring you a host of options for adding, deleting, replacing photos or even adding an image of your recipe that you may have found on the Web. In NutriBase, you access nearly all software functions via the RMC. This approach saves screen space and unclutters the interface... it also makes it easy to quickly view, understand, and implement your options. We recommend you view the Recipes Window in your software and right mouse click over each section. This will reveal your many options to you. Study them. Click on them to see where they take you. By doing this in every NutriBase window, you will “get up to speed” with the software far more quickly. A common question we get is “How do I print out a recipe?” Or “How do I generate a recipe report and save it to a PDF (or other) format?” The answer: First you create a Recipe Report. Then print it, or save it, or both. Here’s something to remember: You don’t create a recipe report in the Recipe Window. You create reports in the Reports Window. Check the “How To…” section of this User’s Manual for an example of how to 55 print a recipe report. 56 Recipe Folders A “recipe” is a collection of food items from the nutrient database, from your Personal Foods, or from NutriBase Recipes. You can organize your recipes into “Recipe Folders.” Recipe Folders are major “containers” for recipes. (You can think of them as a hanging folder in a filing cabinet.) You can create up to 26 Recipe Folders in NutriBase. We recommend you create a new Recipe Folder for each major type of recipes you use. For example, you might create a Recipe Folder for “Vegetarian Recipes,” one for “Diabetic Recipes,” one for “Body Building Recipes,” etc. Each Recipe Folder can contain subdivisions called “Tabs.” (Think of Tabs as the individual manila folders you can insert into your hanging folder.) To organize your “Recipes” Tabs, click your “Organizer” Button. For example, if you create a “Diabetic Recipes” Folder, you could subdivide it by creating Tabs with names like: “Entrees,” “Snacks,” “Salads,” “Beverages,” etc. BTW, you can add, delete, or edit (rename) your Tabs. Note: We highly recommend you create multiple Recipe Folders and organize your recipes within them. Why? When you open a Recipe Folder, NutriBase loads all the recipes in that Recipe Folder into memory. The more recipes you load into memory, the longer it takes to locate, open, or edit one. For this reason, if you had, say, 2,000 recipes, it would be far more efficient to organize them into 20 Recipe Folders with 100 recipes per Folder than to put all 2,000 of them into a single Recipe Folder. When you are in the Recipes window, take a look to the very top of NutriBase to see which recipe is currently active. (The “Active” recipe is the recipe you are currently working with.) In this example, “Ambrosia Salad” is the active recipe and it resides in a Recipe Folder called “General.” (“General” is the default folder for recipes in NutriBase.) If you’ve created additional Recipe Folders, clicking the down arrow will list all recipe folders for you and allow you to select the one you want to work with. To create a new Recipe Folder, click the NutriBase “Recipes” Tab, click the “Folder” Button, then click the “New Folder” Button. You can also create a new Recipe Folder by performing a right mouse click over this window and selecting the “New folder” option. Whenever you RMC, take note of your many options – you will eventually use some or all of these options. To organize your “Recipes” Tabs within any Recipe Folder, click the 57 “Recipes” Tab, click the “Organizer” Button, then click the “New tab” Button. You can also create a new “Recipes” Tab by performing an right mouse click over this window and selecting the “New tab” option. You can create as many tabs as you need within each Recipe Folder. To rename a “Recipes” Tab, click on the Tab you want to rename, then RMC. Choose the option to “Rename tab.” When you RMC, familiarize yourself with your many options – you will eventually use some or all of these options. The “All Recipes” Tab contains all your Recipes. Any new “Recipes” Tab can contain recipes that are in your “All Recipes” Tab. You can copy recipes listed in your “All Recipes” Tab into your other “Recipes” Tabs by dragging and dropping recipes into your new Tabs. You can also do this by highlighting a recipe, performing an RMC, then selecting the “Copy to tabs” option. All your recipes will self-alphabetize themselves within their Tabs. Note: We recommend you organize your recipes into multiple Recipe Folders. By avoiding the beginner’s habit of putting all of your recipes into a single Folder (like “General,”) you benefit with quicker access and better organization. 58 Recipe Criteria (Chef and higher) Recipe Criteria are a set of nutrient values to which you compare your recipe's nutrient content. By default, NutriBase uses the Daily Reference Values. These values are already set up for you. NutriBase uses this standard because these are the basis of the percentage calculations used in the creation of Nutrition Facts Labels. You can create a new standard (we refer to this as a new “Criteria”) by clicking the “New” Button. You might want to do this in special circumstances when you need to compare nutrient intake to your own custom standard of reference (commonly done in nutrition studies for special populations). Create a Recipe This is the window you use to create recipes. A “recipe” is a collection of food items from the nutrient database, from your Personal Foods, or from NutriBase Recipes. (BTW, you can use an existing recipe as an ingredient for a new recipe.) You create a Recipe by searching for and locating its ingredients, one at a time, and specifying the amount of each ingredient you are using. You can specify the serving size by telling NutriBase the number of servings in this recipe or by telling NutriBase the number of grams or ounces define a single serving. This window is partitioned into a few areas: The Ingredient List (upper left corner), the Nutrient Summary (upper right corner), the Food Lookups section (near center screen) and the Search Results Screen (the bottom part of the screen). The first task is to give your recipe a name. Just type the recipe name into the Recipe Name edit box. Next, perform Food lookups and locate the items you wish to add to your Recipe. You can add USDA food items, Canadian Nutrient File food items, Brand Name food items, Personal Foods (Food items you have added to NutriBase), Recipes, and Meals. Just check the boxes next to the databases across which you want to conduct your searches. To locate food items from the nutrient database, Personal Food Items, or other recipes, use the Food Lookups section of your window (located near the center of the Recipe window). The Food Lookups area looks something like this: If you fail to locate a food item you believe should be in our nutrient databases, please email us and inquire - new users sometimes fail to understand how to locate a particular food item and we can help you with that. 59 Refer to the “Food Search ‘How To’ Topics” for information regarding how to perform Food Lookups. (Use the Table of Contents.) To add foods to your Ingredient List (located in the upper left corner of this window), highlight the food item you want to record, then click the “Add selected Item” Button. Click the “View item details” Button to view all the data for the selected item in a single, scrolling window. Click the “Add to my PFI” Button to add the selected item to your Personal Foods listing. Click the “PUI Display” Button to see an alphabetical listing of Previously Used Ingredients. Click on any ingredient you want to add to your recipe. Using this features speeds up recipe creation by saving you form looking up a previously used ingredient more than once. You can edit your PUI list by right mouse clicking over your PUI list and selecting the desired option. The Nutrient Summary section in the upper right corner of the Recipe window provides nutrient information for the foods you have added to your Recipe. Click the "View Detailed Nutrition" link for detailed nutritional information regarding this recipe. Costing a Recipe (Chef and higher) NutriBase lets you tell it how much you pay for each ingredient. As long as you tell it what you pay for each ingredient, NutriBase can tell you what it costs you per serving of that recipe. NutriBase will store a history of your food costs over time. To generate Cost Reports, click the “Reports” Tab, click the “Recipes” Button, and select the appropriate report type (in this case, the “Recipe Cost Report.” PUI Display Every food item that you add to a Recipe will automatically be added to your PUI (Previously Used Ingredient) Display. After you have added at least one food to your Recipe, the “PUI Display” Button will appear. Click this button for an alphabetical listing of your previously used ingredients. This can save you time and effort by eliminating the need to re-conduct previous searches. Just select the previously used ingredient (PUI) and you are ready to use it. You can delete PUI entries by clicking the “PUI” Button, highlighting the PUI, and clicking the Delete Key on your keyboard. If you prefer, you can 60 highlight the PUI, RMC, then select the option to delete the PUI. 61 How to Add Recipes to Food Logs, Recipes, Meals, or Meal Plans While you are in the “Recipes” Tab, you can add a selected Recipe to the active client’s Food Log, to another Recipe, to a Meal or to a Meal Plan. Do this by selecting a Recipe (highlight it with a single click), RMC, then select the appropriate option. For example, click “Add to meal” to add the selected Recipe to a Meal (NutriBase will help you locate the Meal you will copy to). You can also drag and drop a meal (listed in your Search Results window) into another meal or meal plan. When you do this, you will see this window: When this window appears, you can select whether to add the selected meal as a meal (one entry) or as meal items (which would list every time in your meal individually). If you would like to make this a default seeing, just click the box to make it so. Refresh Your Recipes As you use NutriBase, you may find yourself modifying existing PFI’s (Personal Food Items) that are used in your existing recipes. We sometimes release an update that includes updated nutrient data for foods that you may have used in your existing recipes (or inside a recipe that you used inside another recipe). To update all your recipes to make sure you are using the most current data, you can perform a “Refresh” operation. Refresh opens all recipes, recreates all meals and recipes on the fly using the latest data, Personal Food Items, and other recipes, then saves them for you. Refreshing all your recipes assures that they are as up-to date as your current nutrient information is. To refresh your recipes, click your Recipes Tab, click your Folders Button, right mouse click, and choose the “Refresh” option. If you use Meals, you can refresh them the same way - click your Meals Tab, click your Folders Button, right mouse click, and choose the “Refresh” option. 62 THE MEAL PLANS TAB NutriBase “Meal Plans” are collections of up to three meals three meals and three snacks organized into up to four weeks. This window allows you to organize your Meal Plans, manipulate your Meal Plan Folders, set up your criteria, create or edit your Meal Plans, and handle Meal Plan copy operations: copy from Meal Plan to Meal Plan, copy from Meal Plan to a client's Food Log, or copy a client's Food Log to a NutriBase Meal Plan. 63 Meal Plans Window A NutriBase Meal Plan is a collection of up to three meals and three snacks for up to four weeks. They generally address a special need of some kind (weight loss, body building, diabetes, etc.) From the Meal Plan windows, you can: 1) Create a Meal Plan by using your Recipes and Meals as building blocks for each day of your Meal Plan. You can also use food items from the database or food items you have added to NutriBase. 2) You can edit your Meal Plan. 3) You can organize which meals and snacks your foods are assigned to. 4) Duplicate a food item to use in another meal if desired. 5) You can add selected Meal Plan items into a new or existing Meal. 6) Add selected food items, days, or all foods in the Meal Plan to your Shopping List. 7) Save the plan, print it out, cost it, add new food items, delete existing food items, or view in-depth nutrient information for your plan. In NutriBase, you access nearly all software functions via the RMC. This approach saves screen space and unclutters the interface... it also makes it easy to quickly view, understand, and implement your options. The NutriBase “Meal Plans” Tab also provides you with five additional windows that provide you with many additional Meal Plan options. Some of the things you can do here include: 1) Copy any existing Meal Plan to any existing client's Food Log. You select the Meal Plan, the calorie level, the client, the start date, and the number of iterations (repetitions of the four week plan). 2) You can copy a Meal Plan to a new Meal Plan (that you may want to edit and save as a modified Meal Plan for a client with special needs). You can copy the entire plan or copy only selected meals and snacks. You can copy days or weeks of your plan - NutriBase lets you set up what you want to copy and how. 3) You can copy a client's Food Log into a Meal Plan you are creating. This is helpful if you have a person who is eating well but just needs a critical analysis and modifications to his eating plan. 4) Organize your Meal Plans into Folders of other similar Meal Plans. 5) Modify the nutrition standard that you compare your Meal Plans to (Default values are the Daily Reference Values used for Nutrition Facts Labels.) The Basic Approach to Creating a Meal Plan 64 This is an overview of a “normal” way of creating a Meal Plan. As you become proficient, you will understand there are a lot of things you can do to speed up the process, but it is important that you at least understand the basic approach. Here it is: First, create the recipes that you plan to use in your Meal Plan. If you are creating a Meal Plans to address the needs of a Hepatic patient, you will want to create a foundation of recipes that are specially tailored to this special need. It will make a lot of sense to put all of these recipes into their own folder so that when you go to retrieve them, you will know that any recipe you select from this Recipe Folder will be for Hepatic patients (in this example). After you have created these recipes, use them as the building blocks for your Meal plans. You build a Meal Plan one day at a time. In the image below, Week One, Day one is selected. Therefore, all foods that you look up and add will be assigned to Week 1, Day 1: Once you open a Meal Plan, you should know that you can add your recipes to your Meal Plan from the “Recipes” Tab. Take a look at the following image to see how this is done. Once you highlight the recipe(s) you want to include in your Meal Plan, right mouse click and select the option to add the selected item(s) to your Meal Plan. Notice, however, that you can also add the selected item(s) to another recipe, a Food Log, or a Meal as well. 65 Meal Plans Organizer This window allows you to organize your Meal Plans. (NutriBase “Meal Plans” are collections of up to three meals and three snacks organized into up to four weeks.) Please take a moment to study the annotated image above to get a feel for what this section has to offer. You can organize your Meal Plans into “Folders.” NutriBase supports up to 26 Folders. Within each Folder, you can organize Meal Plans into “Tabs.” When you are in the Organizer window, look to the very top of your NutriBase window to see which Meal Plan is currently active. In this example, “Vegetarian Meal Plan - 1500 calories” is the active Meal Plan and it resides in a Folder called the “General” Folder. (The General Folder is the default folder for Meal Plans in NutriBase.) If you want to organize a different Meal Plan Folder, click the down arrow and select the Meal Plan Folder you want to organize. Meal Plan Folders You can create a new Meal Plan Folder by clicking the “Folder” Tab (adjacent to the “Organizer” Tab). You can add a new “Meal Plans” Tab by clicking the “New tab” Button. Create as many “Tabs” as you need in each Folder. Hover over your Meal Plans and right mouse click to rename Tabs and perform a variety of other options. (Always right mouse click over new windows to learn what your options are… the most common question is “How do I?…” and the most common answer is “RMC.” The “All Meal Plans” Tab contains all your Meal Plans. Any new tabs you create will contain the Meal Plans you put there from the “All Meal Plans” Tab. You move Meal Plans into Tabs by dragging and dropping Meal Plans from the “All Meal Plans” Tab or by using your RMC. New tabs can have labels similar to: Heart Healthy Plans, Body Building 66 Plans, etc. All Meal Plans self-alphabetize themselves within the tabs. NutriBase supports up to 26 “Folders” for your Meal Plans. Create a new folder by clicking the “New folder” Button. Move Meal Plans from Folder to Folder by clicking the “Move” Button. Meal Plan Criteria (Pro and higher) Meal Plan Criteria are a set of nutrient values that you compare your recipe's nutrient content to. By default, NutriBase uses Daily Reference Values. These values are already set up for you. NutriBase uses this standard because these are the basis of the percentage calculations used to create Nutrition Facts Labels. You can create a new standard (i.e., a new “Criteria”) by clicking the “New” Button. You might want to do this in special circumstances when you need to compare nutrient intake to your own custom standard of reference (commonly done in nutrition studies for special populations). Create a Meal Plan This is the window you use to create Meal Plans. A “Meal Plan” is a collection of up to three meals and three snacks. These meals and snacks can be composed of food items from the nutrient database, your Personal Food Items, or NutriBase Recipes. 67 To create a Meal Plan from scratch, we recommend you first create all the recipes you intend to use in the Meal Plan. After you do this, you can use these recipes as the building blocks for your new Meal Plan. The Meal Plan window is partitioned into three areas: The Meal Plan Meal and Snack Lists (upper left corner), the Nutrient Summary (upper right corner) and the Search Screen (lower part of the screen). The first task is to give your Meal Plan a name. Just type the Meal Plan name into the Meal Plan Name edit box. Add a comment if desired. Add a Byline (usually your name or company name) if desired. Start with Day One of Week One. You create or edit Meal Plans one day at a time. Next, locate the items you wish to add to your Recipe. You can add USDA food items, Canadian Nutrient File food items, Brand Name food items, Personal Foods (Food items you have added to NutriBase), Recipes, and Meals. To locate food items from the nutrient database, Personal Food Items, or other recipes, use the Search Screen located in the bottom portion of the Recipe window. Refer to the “Food Search ‘How To’ Topics” for more information. (Use your Table of Contents) To add foods to your Ingredient List (located in the upper left corner of this window), highlight the food item you want to record, then click the “Add selected Item” Button. Click the “View item details” Button to view all the data for the selected item in a single, scrolling window. Click the “Add to my PFI” Button to add the selected item to your Personal Foods listing. The Nutrient Summary section displays nutrient information for the foods you have added to your Recipe. PUF Display Every food item that you add to a Food Log will automatically be added to your PUF (Previously Used Foods) Display. After you have added at least one food to your Food Log, the “PUF Display” Button will appear. And when you click this button, you will get an alphabetical listing of all your previously used foods. This can save you time and effort by eliminating the need to reconduct previous searches. Just select the food item and you are ready to use it. 68 You can delete individual PUF items. To do so, highlight it, RMC, and then select the Delete option. This allows you to keep your food lists current and relevant to your needs. As your PUF display becomes populated with the foods you use most often, your search time will go down and your productivity will go up. Meal Plan Copy NutriBase supports three copy options for Meal Plans: Use this option to copy one day of a Meal Plan to one or more days to the same or different Meal Plan. You can also use this option to copy a Meal Plan and use it as the content for a new Meal Plan with a new or similar name. When you copy an NB Meal Plan to your General Folder (or any other Meal Plan Folder), you are making a copy that you can edit. This option lets you copy a Meal Plan to a client's Food Log. You select the Meal Plan, specify the person to copy to, and specify the start date. When you initiate the operation, NutriBase will fill in the next four weeks of the selected person's Food Log. Choose this option to copy from a client's Food Log to a Meal Plan. How to Edit an existing NutriBase Meal Plan Many NutriBase prefer to edit an existing plan to creating one from scratch. The NB Meal Plans that we include in NutriBase can be edited and saved. But you can't delete or add to the NB Meal Plans.... they are protected. You may, however, make a copy of any NB Meal Plan, save it, then edit as desired. If you want to use an included NB Meal Plan as the basis for a new Meal Plan, here's how: 1) Click the “Meal Plans” Tab. 2) Click the “Meal Plan Copy” Button. 3) Click the “Meal Plan to Meal Plan” option. 4) Use the resulting window to copy all or selected part of an existing NB Meal Plan to a new Meal Plan. This new Meal Plan will be saved to one of your Meal Plan Folders (as opposed to the NB Meal Plan Folder). You can give it any name you like. 69 5) Click the Folders Tab and open this new Meal Plan and edit as desired. 6) To print a Meal Plan report, click “Reports” Tab, and then click the “Meal Plan” Button. THE REPORTS TAB To create a report in NutriBase, you click the “Reports” Tab, then click the button that represents the type of report you want to create. To create a Recipe report, for example, you click the “Reports” Tab, and then click the “Recipe” Button. For example, to select a report type for a recipe, click the “Reports” Tab, click the “Recipe” Button, then click the down arrow and scroll to select the type of report you want to create: Note that you don’t create a Recipe Report in the “Reports” Tab. you use the “Recipes” Tab to create and organize your recipes but you the “Reports” Tab to create a Recipe Report. This same principle applies to all other types of report. NutriBase provides the ability to create a variety of reports for clients, exercise, personal food items, recipes, meals, and meal plans. Client reports include Comprehensive Report, Comprehensive Summary Report, Food Log Report, Food Log Summary Report, Food Log Query Report, Calories In v. Calories Out, Food Log Composition Analysis, Food Log Ratio Report, Percent of Goals, Weekly Food Journal - Calendar View, Weekly Food Journal Spreadsheet View, Calorie Expenditures Report, Exercise Report, Exercise Summary Report, Diabetic Report, Diabetic Summary Report, Initial Assessment Report, Detailed Client Report, Client List, Client Weight and Body Fat Report. Exercise-related reports include: List or Exercises, List of Workouts, Exercise Detail Report, Workout Detail Report, Target Heart Rate Training Zone Report. Personal Food Item reports include: PFI Listing, PFI Detail 70 Report, and PFI Macro Report. Recipe reports include: Recipe Listing, Simple Recipe Report, Detailed Report, Comprehensive Recipe Report, Composition Report, Recipe Macro Report, and Recipe Cost Report. Meal reports include: Meal Listing, Simple Meal Report, Details Meal Report, Comprehensive Meal Report, Composition Report, Meal Macro Report, and Meal Cost Report. Meal Plan reports include: Meal Plan Report, Meal Plan Summary Report, Meal Plan Criteria Report, and Weekly Summary - Calendar View, Weekly Summary - Spreadsheet View. The Reports Window The “Reports” Tab if where you need to go to create most NutriBase reports. From here, you can: 1) Generate many types of reports. To create a recipe report, click the “Recipe” Button. To create a Meal Plan report, click the “Meal Plan” Button, etc. 2) To generate a Client's Food Log report, go to the click the “Client” Button. 3) Every type of report provides you with a variety of options. This image shows the report options available to you for your Recipe Reports. (These options change as you select different types of Recipe Reports… this particular example shows your options for a Comprehensive Recipe Report.) You click the down-arrow to display your report type... click the report that you want to have NutriBase generate. 71 4) After you select the type of report, you have options (selecting nutrients, days, decimal places, etc.). These options vary, depending on the type of report you select. 5) After you generate a report, you can save it to a file. Depending on the report, you can save them in PDF, RTF (a generic word processor format you can open with MS Word), XLS (Excel format), and CSV (Comma Separated Values) formats. 6) You can email these reports on the spot to any client you want to send the report to... NutriBase features an integrated emailer. Under/Over Reports As you select new report types, you will notice that your options change from report-to-report. These options add a new dimension of flexibility to your reporting options. In most cases, these options are straightforward… you can these options them by clicking on them when needed. One of the options you have when you are creating a client’s POG (Percent of Goal) reports, is called the Under/Over option. If you check this option and create this type of report, you will see a report that includes a series of “Under/Over” comments following the presentation of the nutrient data in this report. The “Under comments” appear when the client has not taken in the amount of her goal for a particular nutrient. These “Under comments” tend to suggest rich food sources for the given nutrient. Conversely, when a client has taken in far more of a particular nutrient than they were attempting to take in, the “Over comment” is inserted as a warning in the report next to the nutrient of interest. The “Over comment” tends to inform the client the maximum safe amounts of that particular nutrient they can take in daily. You can turn this option “on” by checking the box next to the “Add Under/Over comments” option when it is present on your report window. This will happen when you create a POG report or a report that contains a POG report within it. In a POG report, NutriBase shows you the actual amount of each nutrient their Food Log contains for each of these nutrients and the client’s goal for the nutrients that are set for the client (by default, the DRI based on their age and gender). The under/over comments appear in the report after this section. In this window, you can 1) Edit the “Under comments” and the “Over comments” as desired if you like. 2) You can add new “Under” and “Over” comments for nutrients that lack these comments by default. 3) You can select which nutrients will display “Under” and “Over” comments. 72 4) You can set the levels (amounts) that must be eaten by the client to “trigger” the comments. (A setting of “80%” would mean that the client has taken in 80% of her calories for the day.) To change any of these settings, the “Under/Over Setup” Button on your report window. Note: Please read the “How to Edit Your Under/Over Comments” in the “How To” topics section of this User’s Manual for more detailed information for setting up your Under/Over Comments. The Nutrient Density Index Report (Pro and higher) The Nutrient Density Index is an estimate of the mean (“average”) value - per calorie - for the sum of the total amounts of each of up to 25 nutrient factors, most of which are specified in the DRI and are tracked in the USDA Nutrient Database. We call the NDI an “estimate” because it is rarely possible to know the values for each and every nutrient we want to evaluate. NDI values will change somewhat over time as research quality nutrient databases are updated with more accurate data and missing values are filled in. One way to understand what the NDI tells you is to consider what an NDI value of “1” means. An NDI of “1.00” means that one calorie of this food item provides a mean value of 1% of the overall DRI goal per calorie for all nutrients that were evaluated.” Thus, 100 calories of this food item would provide you a mean value of 100% of your DRI goal amounts for the nutrients evaluated in this food. As you can see from this example, an NDI of “1.0” is a very high value. Keep in mind that a mean value of 1% of the overall DRI goal can be the average of your 73 getting 5% of one nutrient and 0% of four other nutrients – the mean (“average”) value of these five nutrient would still be 1% per nutrient per calorie. This underlines the fact that the path to good nutrition will continue to involve eating a wide variety of foods. The NutriBase NBFTE function will help you locate foods that are rich in the nutrients you have the greatest need for. To learn how to create an NDI Report, peruse the “How to Create an ‘/NDI” Report” topic in this Manual. (Locate the page for this topic in your Table of Contents). THE GRAPHS TAB Use this option to create a variety of graphs that relate to your clients. Click options to see what you can do. Once you have the graph as you like, export it to a variety of options, including: BMP, GIF, JPG, WMF, and PDF formats. Graphs Window NutriBase provides a window for graphing virtually anything tracked in the software. Capabilities include: 1) This window allows you to select from a variety of graph styles: 74 2) You can select the type of graph you want. 3) Select the nutrients to include. 4) Select actual, goal, or percentage of goal for nutrients. 5) Graph exercise, weight, and/or body fat content over time. 6) When you select the “Per meal/time of day” option, you can graph your blood glucose levels vs. nutritional information vs. exercise. This is why NutriBase lets you time stamp meals and exercise - it facilitates the accurate comparison of your blood glucose levels with your eating and your activities. 7) Save graphs to a variety of file formats. THE NOTES AND LISTS TAB This option allows you to access a Daily Planner, your Shopping List, and your Notes. Planner and To Do List Use this window to plan your time and to manage your To Do List. Shopping List This is where the foods you have sent to your Shopping List appear. You can right mouse click on foods you see in other areas of NutriBase (including Recipes, Personal Food Items, Meals, and Meal Plans) to click the option to send selected foods to this list. This is where you can organize and edit your list, then print or export it as well. NutriBase consolidates exact food items. Keep in mind that some food items have the same food name but are not the exact same item. You can see this by looking at their NutriBase ID numbers. Note: When looking at serving amounts in your list, NutriBase “rounds up” to the nearest whole recipe. 75 “Notes” Button Use this “Notes” section of NutriBase to create Notes. Generate General Notes, Client General Notes (specific to a client), and Client Day Specific notes (specific to a particular client for a specific day). Shopping List Window The NutriBase Shopping List is one of the options you can reach by clicking the “Notes & Lists” Tab. From the Shopping List window, you can: 1) Edit, add, merge, or delete items. 2) Create new categories. 3) Print your shopping list 4) Save your shopping list in a word processor format or save it in CSV (Comma Separated Values) format for use in an external spreadsheet. To access either of these options, right mouse click over the shopping list and select the Export or Report options. In NutriBase, you access nearly all software functions via the RMC. This approach saves screen space and unclutters the interface... it also makes it easy to quickly view, understand, and implement your options. The “Notes & Lists” Tab also supports two other windows: 1) NutriBase includes a To Do List and a Work Planner/Scheduler. 76 2) NutriBase also supports three types of Notes. 77 CLIENT INTAKE MODULE (PRO AND HIGHER) The NutriBase Client Intake Module (CIM) is a Windows software product that you can give to your clients. It allows them to record their own Food Log information for up to a maximum of 30 days. When they are finished, they can copy their recorded data to a USB Drive to give to you. If they prefer, they can send their data file to you as an email attachment. This is software you can upload to your web site or have NutriBase burn to a CD for you. Once you import this file into NutriBase, it will be as if you had entered this data for them. Note: Please read the topic titled “How to Import Data From Your WebBased Questionnaire” in the “How To…” section of this User’s Manual to learn how to import the data left for you by your web-site visitors. Once this data is imported, you can quickly generate a variety of reports, save them as PDF files, post them to your web site, print out a report to hand to your client, or send them to your client as an email attachment. You can customize this software. There are no per-copy fees, royalties, or any charge of any kind. You can make as many copies as you wish. Any CD's you burn are reusable. They are designed to auto-run when the user inserts their CD into their CD Drive. 78 “Client Intake Module” Tab This Tab allows you to customize and create (“burn”) a Client Intake Module (CIM). 1) The Client Intake Module (CIM) is software you can upload to your web site or have NutriBase burn to a CD for you. You can give this software to a client. They can install this to their own PC and record their own food intake for up to 30 days. They can save this to a flash drive or email it to you as an email attachment. Once you import this file into NutriBase, it's as if you had entered this data for them. You can quickly generate a variety of reports, save them as PDF files, and post them to your web site, email them to your client as an email attachment, or print out the report to hand it to your client. 2) This window allows you to customize your CIM and burn it to a CD. You also have the option to upload this software to your web site and have your clients download directly into their PC's. 3) You can customize this software by embedding your return email address, changing the name of the software to reflect your own company or name, including your own image to appear on the CIM's Home window, and/or include pre-made Personal Food Items you want to include. 4) You can also save this customized software to a compressed zip file for use on your web site. 5) There are no per-copy fees, royalties, or any charge of any kind. You can make as many copies as you wish. Your CD's are reusable. 79 This is an example of a custom Client Intake Manager. You can name the software anything you like. You can select an image to use and you can embed your return email address into the software. Burn a CD (after Customizing Your CIM) This option allows you to customize and then burn a Client Intake Module (CIM) CD for your client. Actually, you can customize your CIM and then upload it to your web site for your clients to download. (You can also implement an order form and have your clients pay for the service prior to downloading your CIM.) After clicking the “Burn CD” Tab, customize your CIM by filling in the information you wish to include. Include your own software caption (this is the software's title). You can include your return email address. You can include PFI's that you want your clients to consider eating. You can specify an image to appear as a background in the CIM. If you do not specify an image, a default red apple image will appear. If you choose not to use the default image, you may create one of your own... you could use your image to advertise your business or to display your instructions to the client. The image size should be 1000 pixels wide and 280 pixels tall. You can use GIF, JPG, or WMF image formats. To burn a CD after you specify your options, insert a blank CD-ROM into your CD Writer, then click the “Burn” Button. 80 Two Documents You Can Use With the CIM We included two MS Word Documents for you. They were installed and should be sitting now in your xxx Documents Folder. They are: NB11 CIM Labels.doc - This single page Word Document contains two Client Intake Module labels. These are formatted for use with CD Stomper label stock. You are free to create your own labels, of course, but we provided these in case you needed to print a few quickly for immediate use. NB11 Sample Cover Letter for CIM.doc - This single page Word Document is a sample cover letter that you may want to use as a template for your own cover letter. Please read this over and especially look at the text in red... these ought to be edited to reflect your own information. Of course, you should edit as freely as you wish. This is just a sample letter that may be helpful in getting you started on your own letter. Upload a Custom CIM for Clients to Download After you customize your CIM as directed above, click the “Zip” Button. This will put all your customization files and your CIM Setup program into a compact zip file. Upload this zip file to your web site. Create a download page that links to this file. You can link to this page after a customer pays for this service or you can simply link to it from any other page(s) on your web site if this is a prepaid service or you don't charge for this service. Your clients will need to download this zip file and double-click it… doing so will reveal the files contained in this zip file. To install the CIM, just have the client double click on the file called N11cimSetup.exe. This will install the CIM on their computer and copy all the customization files as well. There is another way to install the CIM. Have the user right mouse click on the file, then unzip this file by selecting the Extract All option. After the files are unzipped, your client can double click on the N11cimSetup.exe file to run the setup program. This will install the CIM on their computer and copy all the customization files as well. 81 Exporting and Importing Data from the CIM These two functions allow your clients who are using the Client Intake Module (CIM) to transfer their data (“export”) out of their CIM to give to you. You, in turn, would transfer their data (“import”) into your copy of NutriBase Professional or higher. Exporting Client Intake Module Data to a File When your clients finish recording their Food Log for the number of days you’ve suggested to them (three days is a common recommendation), they will need to take their data and transfer it out of NutriBase (“export it”) to a data file and give it to you. They can save this data file to say, a USB Drive or other removable media and bring it to you so you transfer their data in (“import”) to your copy of NutriBase. They also have the option to save their exported data file and send it to you as an email attachment. Notes: The file that will be created will have the name that the CIM user specifies for that file and a file extension of “n11cim.” A useful filename is often simply the user’s name. Importing Client Data from the CIM (Pro and higher) You can import the data that your client exported for you from the NutriBase Client Intake Module (CIM) that you provided for them. You can recognize this file because it will end with a file extension of “n11cim”. It is the same file that your clients can create in the NutriBase Junior, Personal, or Personal Plus editions. There are two basic ways to import this data into NutriBase Please read the topic titled “How to Import Client Data from the CIM” topic in the “How To…” section of this User’s Manual for details. Exporting and Importing Client Data The purpose of these two features – exporting and importing - is to permit users of NutriBase Junior, Personal, or Personal Plus to transfer all of their records – food logs, personal information, exercise, etc. – out (“export”) of their personal; edition version of NutriBase and to allow the nutrition and health professional (who uses NutriBase Professional or higher edition) to transfer this data in (“import”) to their copy of NutriBase. 82 Exporting Client Data from a Personal Edition Exporting client data is a feature of the NutriBase Personal Editions: NutriBase Junior, Personal, and Personal Plus Editions. It allows personal user to take their NutriBase records and transfer (“export”) it from their copy of NutriBase to a data file that can be later be transferred into (“imported”) a copy of NutriBase Professional (or higher edition). Note: RD’s use this ability to keep track of their clients who track their food logs and follow meal plans using any of the Personal Editions of NutriBase. Users can obtain one of these personal editions of NutriBase by visiting dietsoftware.com and ordering a copy on-line. Personal Edition users can export their Client Data client profiles, recipes, food logs, etc.) by clicking their Export tab – it’s the last Tab across the top of the NutriBase window - then clicking the appropriate dates and options. The file that will be created will have the name specified for that file and a file extension of “n11cim.” You can email the resulting file by clicking the Export & Email option. Import Client Data from a NutriBase Personal Edition (Pro or higher) If you are using NutriBase Professional or higher edition, you may want to import your client's data from time to time. This would happen if your customer has been using a copy of one of the NutriBase Personal Editions (Junior, Personal, or Personal Plus). Whenever desired, you can ask your client to export their Client Data to a file and email it to you. This ability to import client data from a person edition of NutriBase allows users of the Professional NutriBase and higher editions to transfer their clients’ data files in (“import”) to their copy of NutriBase. This import option is supported only in the NutriBase Professional and higher. This information is contained in a file that may have been emailed to you (as an email attachment) or given to you on some sort of media - like a USB Drive. You will recognize the client information file because it will end with the “n11cim” extension. The user specifies the file name… a good choice for the file name would be their actual name. 1) If you get this data as an attachment to your email, you can doubleclick on the attached file. NutriBase will process this file and import the data into your Professional or higher edition for you. 2) If they provide you a file on say, a USB Drive, just view their file and double-click on the file they sent to you. You will recognize this file because it will have the file name that they assigned to it and a file extension of “n11cim”.A good choice for the file name might be the client’s actual name. 83 3) To import a client's data while you are in NutriBase, click the NutriBase Menu Icon and click the “Client Import” Button. Point to the file – it will have the file name that your client gave it plus a file extension of “n11cim.” Exporting/Importing PFI's, Recipes, Meals, Meal Plans You can transfer the content (“export”) of any NutriBase Personal Food Item (PFI), recipe, meal or meal plan very easily. Once this information is exported to a file, you can give that file to any other NutriBase user and they can transfer that data in (“import”) to their copy of NutriBase. The major versions of NutriBase that create the files and import the files must be the same. NutriBase 11 can import files that were exported from NB11. There is one exception to this: PFI’s containing additional data (“MyFields” data) cannot be exported or imported. However, you can use backup and restore to move these PFI’s to another PC if you like. Exporting PFI’s, Recipes, Meals, or Meal Plans To export any NutriBase Personal Food Item (PFI), recipe, meal or meal plan, go to the appropriate Tab (i.e., go the “Recipes” Tab to export a recipe or recipes). Click the “Folder” Button for this Tab. Highlight the recipe or recipes you want to export. You can simply click on a single recipe if you only want to export one recipe. You can hold the Shift key down and use the mouse to select the first and last recipe in a range of recipes. Or you can hold the Ctrl key down and use the mouse to “cherry pick” the recipes you wish to export. Once you have selected the recipes you want to export, right mouse click and click the “Export selected” option. This will create a file that uses the file name that you provide plus the “n11im” extension. By default, the file will be saved to your Windows Documents Folder. You can change this default location by going to NutriBase Options, then clicking the Locations option. To do this, go to NutriBase options by clicking the NutriBase Menu Icon in the upper left corner of the NutriBase window. Importing PFI's, Recipes, Meals, Meal Plans NutriBase allows you to import Personal Food Items (PFI's), Recipes, Meals, or Meal Plans that have been exported by other copies of NB11. You can obtain these NutriBase files from friends, associates, and/or a nutrition counselor using NutriBase. As long as these files were created with NB11, these files are compatible across the entire NB11 family from Junior through Professional and Enterprise Editions. There are two ways to import this type of data: Importing by Double Clicking the File - You can import a NutriBase PFI, Recipe, Meal, or Meal Plan by double clicking on its file name. These files use a file extension of “n11im.” If you have NutriBase installed on the same PC that hosts your email program, open the email 84 and double-click the attachment. Otherwise, view the file in Windows Explorer and double click on the file name to import it into NutriBase. Importing from within NutriBase - If you want to import a NutriBase PFI, Recipe, Meal or Meal Plan file while you are working in NutriBase, go to the “Folder” Tab for the data you want to export. For instance, if you want to import a Recipe, click the “Recipes” Tab then the Recipe Folders tab. In the Folders tab, right mouse click and select the Import option. Browse to the recipe file you want to import. The files you are looking for will have a file extension of “n11im”. When you import from within NutriBase as described above, NutriBase will display files with this extension. If you import a PFI, the PFI will appear under your “Personal Foods” Tab. If you import a Meal, it will appear under your “Meals” Tab, etc. The NutriBase Menu To access your “NutriBase Menu” capabilities, click the NutriBase Menu Icon in the upper left corner of the NutriBase window. This button provides access to a menu of options including: viewing your End User License Agreement, restoring deleted PFI's, Recipes, Meals, and Meals Plans, and your Backup and Restore functions. EULA After clicking the NutriBase Menu Icon, click the “EULA” Button to view your End User License Agreement. This EULA indicates your NutriBase usage provisions. Recycle Bin After clicking the NutriBase Menu Icon, click the “Recycle” Button to select the type of file you wish to retrieve from the NutriBase Recycle Bin. Your options include the restoration of Personal Food Items (PFI's), Recipes, Meals, and Meal Plans. Backup Click the “Backup” Button to perform a Manual Backup. This is a backup you perform when you feel like making one. Anytime you do a lot of work in NutriBase, it’s a good idea to make a backup. It may be a better idea to have NutriBase schedule automatic backups by clicking the “Options” Button located at the bottom of this window (more on this soon). 85 Restore After clicking the “NutriBase Menu Icon”, click the “Restore” Button to restore a NutriBase backup. You can only restore a backup for the version you are currently using. For example, if you are using NB11, you can restore NB11 backups. NUTRIBASE OPTIONS Click the NutriBase Menu Icon. Next, click the “Options” Button at the bottom of the resulting window to access and view the NutriBase Options. Doing so takes you to the NutriBase Options window. You will see several choices, including Backup, Restore, Client Import and a button labeled: “Options.” Clicking this “Options” Button will take you to a window that offers additional choices, including: General options, Email Setup, Automatic Backup, Quick Access Toolbar, File Locations, and Resources. General Click this button to access the General options - options that allow you to control a few global features of NutriBase. Click the options as desired to change the settings. The Recipe Prompt Preference allows you to set your preference as to whether you want to add your recipes (to food logs, recipes, meals, and meal plans) as a single item (using the recipe name) or as a listing of all the recipe ingredients. You can also choose to have NutriBase prompt you each time if you prefer. The Meal Prompt Preference option works the same way for meals. NutriBase ID - one of the options in this window is the option to display the NutriBase ID… a unique number that is given to every food item in the nutrient databases. The prefix to these NutriBase ID numbers is called the “source code.” To turn these on, check the boxes for the databases in which you want to display these NutriBase ID numbers. The source code prefixes give you information as follows: SR = USDA SR data. CN = Canadian Nutrient File data from the CNF 2005 data. BN = Brand Name data. 86 Email Setup Your integrated Emailer is pre-configured for you. It requires a “send from” email address. This address is not used to receive email from your clients… it is used only to send email from within NutriBase. We include a default setup for you to save you the time and effort to set this up on your own. This way, NutriBase is ready to send reports and images to associates using the integrated NutriBase Email program. It is ready to run “out of the box.” You can change the pre-configured “Send from” email address if you like. There are two ways to set up your integrated NutriBase Emailer. One is to use the information that you use with your current POP3 email program. This requires you to know your current POP3 mail settings like your User Name, password, Incoming Mail Server Address, SMTP Server Address, etc. This is fine if you have this information or know how to obtain it. If you don’t have the information above, it may be better to use the default settings provided in your installed version of NutriBase. Or. You can set up your email using a Gmail account. This method requires you to obtain to a free Gmail account and to use it to set up your Emailer. Here’s how: Visit Google.com and click the “Gmail” option at the top of the Google home window. “Gmail” is Google's name for their free email service. Obtain a free Gmail email account. When you do this, you’ll obtain an email address and a Gmail password. Remember these two things accurately. Write them down if necessary. Click the NutriBase Menu Icon. Click the “Options” Button. Click the “Email Setup” option. Type in your Gmail email address and your Gmail password. Click the “Okay” Button. You are now ready to use the NutriBase Emailer. Whenever NutriBase can email something for you, this symbol will be displayed either at the top of a report or in the Quick Access Toolbar. Click this image if you want to send the visible window screen shot or a report. Automatic Backup (Scheduling) Options Click this button to set up your automatic backup schedule for the data (PFI's, Food Logs, Recipes, etc.) you create with NutriBase. We highly recommend you schedule backups… this feature may prevent the loss of a lot of your work (recipes, food logs, meals, meal plans, client data). Quick Access Toolbar This option provides a method for customizing your Quick Access Toolbar. After you learn which functions you use the most, take a 87 moment to review this option to make sure that you include shortcuts to these functions. File locations Use this option to see the default locations for the various types of files used or created by NutriBase. You can use this option to change these default locations when desired. Resources This option provides you with links to resources related to NutriBase. CREATE AN INITIAL ASSESSMENT REPORT The Assessment Report (NutriBase Professional and higher) is a clientspecific report that allows you to generate a customized multi-page Initial Assessment Report. To access the Initial Assessment Report capability, click the “Reports” Tab, then select the client for whom this report will be. (Change Folders as needed by clicking the down arrow… The “General” Folder is selected in the image below.) Select a report type of Initial Assessment Report. To generate an assessment report, click the “Create report” Button. 88 Modify the Initial Assessment Report Template A “template” file is a file (that you can edit) that represents the desired report. It contains all the formatting (tables, tabs, boldface, point size, fonts, etc.) that will appear in the final report. The only difference between the final report and the template file is that NutriBase “macros” are inserted in place of the required data. NutriBase “macros” are strings of text that act as placeholders for other information. This allows you to create a customized report template that will suit a wide variety of clients. Every NutriBase macro begins and ends with a caret symbol (“^”). For example, the macro ^LastName^ is a placeholder for the selected client's last name. And ^Salutation^ is the placeholder for the selected client's salutation (“Ms.” or “Mr.”) as appropriate for their gender. Any time you see “^LastName^” in your Template File, it will be replaced with the client’s actual last name in the final report that you create. To create a new assessment report template, open an existing template file; edit it as desired, then us the “Save” or “Save As” option. You can use the same macro as many times as you wish throughout your report. You can add macros as desired to include additional information. Anything you type literally will appear in your report “as is.” To see a list of all the macros available to you, click the green and underlined link labeled “Assessment report macros.” These macros are listing near the end of this manual as well. Make sure the template you want NutriBase to use is selected in the drop down menus provided. You can create several templates for each client situation (whether they are trying to lose, gain or maintain their body weight) and these drop down menus let you select the template you want to use for this particular report. Reports ending in “RTF” (a generic word processor format). You can open an RTF with MS Word if you like and you can save it in Doc or Docx format if you want to. Reports ending in “HTM” are HTML formatted – these are web page formats. Initially, there are three template files for you to edit. The assumption is that you will provide clients with different information depending on whether they wish to lose, gain, or maintain their current body weight. You may add as many new template files as you require. 89 To see the relationship between the template file and the actual assessment report, first look at a template file… then look at the report that it produces. Notes: a) We recommend you generate a report after you edit a template to assure it is error-free. b) If you misspell a macro, it will appear in the report as “UNDEFINEDMACRO”. If you see this in your final report, take note of where it appears and fix it in your template file. c) If you are missing a “^” (caret) symbol in your template, you will have problems. Every macro must have one and only one caret symbol at the beginning and one and only one caret symbol at the end of each macro. d) When the “UNDEFINEDMACRO” note appears in your report, the remaining macros may become unreliable. Company Name. One thing you will likely want to do right away is to assure that your company name will appear in your Initial Assessment reports. Do this by clicking the “Header setup” Button and type in your company information. DOCUMENTATION FOR THE USDA DATABASE A nutrition manager is reliable to the extent that its data is reliable. When you choose to work with the “Research Quality Nutrient Database,” you will access the USDA Nutrient Database for Standard Reference, the vitamin and mineral supplements category, and the medical nutritionals category (enteral and parenteral products). The information available for display will vary with the NutriBase version you are using. Introduction to USDA SR Data USDA Nutrient Database for Standard Reference - The USDA Nutrient Database for Standard Reference is included in the NutriBase software. This nutrient database is prepared by the Nutrient Data Laboratory (NDL), Beltsville Human Nutrition Research Center, United States Department of Agriculture, Department of Agriculture Agricultural Research Service, Beltsville Human Nutrition Research Center Nutrient Data Laboratory, 10300 Baltimore Avenue, Building 005, Room 107, BARC-West Beltsville, Maryland 20705. As information is updated, new versions of the database are released. The NutriBase software, which contains all of the USDA data, was developed by CyberSoft, Inc. without endorsement or collaboration with the Nutrient Data Laboratory. Direct all product inquiries to CyberSoft at 480-603-8359 (8-3, Mon-Thu, Arizona time). The use of trade, firm, or corporation names in the USDA nutrient database is for information and convenience of the user. Such use does not constitute an official 90 endorsement or approval by the USDA Agricultural Research Service of any product or service to the exclusion of others that may be suitable. The U.S. Department of Agriculture (USDA) prohibits discrimination in all its programs and activities on the basis of race, color, national origin, age, disability, and where applicable, sex, marital status, familial status, parental status, religion, sexual orientation, genetic information, political beliefs, reprisal, or because all or part of an individual's income is derived from any public assistance program. (Not all prohibited bases apply to all programs.) Persons with disabilities who require alternative means for communication of program information (Braille, large print, audiotape, etc.) should contact USDA's TARGET Center at (20210cim) 720-2600 (voice and TDD). To file a complaint of discrimination, write to USDA, Director, Office of Civil Rights, 1400 Independence Avenue, S.W., Washington, D.C. 20250-9410, or call (800) 795-3272 (voice) or (202) 720-6382 (TDD). USDA is an equal opportunity provider and employer. The USDA Nutrient Database for Standard Reference is the major source of food composition data in the United States and provides the foundation for most public and private sector databases. This data is used as a component of the database for all versions of NutriBase. As food composition data are updated, new versions of the Standard Reference are released. This version includes composition data for all the food groups and nutrients published in the 21 volumes of Agriculture Handbook 8 (U.S. Department of Agriculture 1976B92), and its four supplements (U.S. Department of Agriculture 1990B93), which superseded the 1963 edition (Watt and Merrill, 1963). Since 1992, updated data have been published electronically on the USDA Nutrient Data Laboratory (NDL) website. SR19 supersedes all previous releases, including the printed versions, in the event of any differences. With the first release of data from our new Nutrient Databank System (NDBS) in July 2001, we changed some formats and added fields to improve the descriptive information for food items and the statistical information about the nutrient values. While data in previous releases have been moved to the new NDBS, they may not have been updated through the complete system. Therefore, many of these new fields contain data only for those items that have been processed through the new NDBS and it will take a number of years before they are populated for most food items in the database. Data have been compiled from published and unpublished sources. Published sources include the scientific literature. Unpublished data include those obtained from the food industry, other government agencies, and research conducted under contracts initiated by USDA’s Agricultural Research Service (ARS). These analyses are currently conducted under the National Food and Nutrient Analysis Program (NFNAP), in cooperation with the National Cancer Institute and other offices and institutes of the National Institutes of Health (Haytowitz et al., 91 2008). Data from the food industry represents the nutrient content of a specific food or food product at the time the data is sent to NDL. The values may change due to reformulations or other processing changes by individual companies between the time that SR is released and the next update of this database. Values in the database may be based on the results of laboratory analyses or calculated by using appropriate algorithms, factors, or recipes, as indicated by the source code in the Nutrient Data file. Not every food item contains a complete nutrient profile. Specific Updates to This Edition Added nutrient values for vitamin D in mcg (Nutr. No. 328) for all foods used in the Food and Nutrient Database for Dietary Studies (FNDDS) (USDA 2008). The FNDDS supports What We Eat in America, the dietary intake interview component of the National Health and Nutrition Examination Survey. At the same time values for vitamin D in IU (Nutr. No. 324) were expanded and updated such that all food items containing a value for Nutr. No. 328 have a corresponding value for Nutr. No. 324. When available, values for D2 (Nutr. No. 325) and D3 (Nutr. No. 326) were also added to the database. A new food group (36), Restaurant Foods, has been added to the database. These are foods sampled at various restaurants (not fast food, which are in food group 21) and are different from the home prepared items or prepared frozen entrees included in Food Group 22, Meals, Entrees, and Side dishes Some food items, such as beverages and rice, though obtained at restaurants are included in their respective food groups. At this time Restaurant Foods contains profiles for 38 food items obtained from family-style restaurants, Latino restaurants, and Chinese restaurants. Two hundred and twenty-five new foods were added to the database using data generated by USDA through the NFNAP or submitted by the food industry. Among these are: muscadine grapes, gold kiwi, formulated bars, brand-name vegetable burgers, and energy drinks. A number of food items were added to the database in response to specific requests from the USDA-ARS Food Surveys Research Group (FSRG) to support future releases of the FNDDS. Nutrient data were updated and expanded for RTE breakfast cereals, cream of wheat, soy-based vegetarian products, onion powder, garlic powder, mustard seed, chilled orange juice, pumpkin and squash seed kernels (both dried and roasted), whole wheat flour, and rye flour. Fatty acid profiles were updated for several highly consumed snack foods where reformulations to low- or no-trans oils have occurred. Several vegetables and seafood items on FDA’s list of the 20 most frequently consumed raw vegetables and seafood in the United States (CFR, Title 21, Pts. 101.42B101.45), not previously analyzed under 92 NFNAP, were sampled, analyzed, and the corresponding nutrient profiles updated. Proximates and fatty acid profiles for fast food fried chicken were updated to reflect the fast food companies’ transition to oils to reduce the amount of trans fat in their products. Nutrient profiles were also updated and expanded for a number of food items in response to specific requests from FSRG to support future releases of the FNDDS. Some margarines and spreads are available on the retail market with or without added vitamin D. New NDB items were created to represent the margarines/spreads with added vitamin D. Seven margarines/spreads were discontinued. The Nutrient Data Laboratory also includes the information needed to calculate household measures (1 cup, 1 tsp., 2 oz., etc.) for most of these basic food entries. CyberSoft performed the required calculations and included the non-100 gram food portions in the database. CyberSoft also added values for iodine, chromium, molybdenum, Omega-3 Fatty Acid, Omega-6 Fatty Acid, fluoride, biotin, and chloride. (Many of these values are available only in NutriBase Professional and higher.) Iodine data was collected by CyberSoft from manufacturers of nutritional supplements and enteral/parenteral products which are included in this release of NutriBase. CyberSoft also derived the Omega3 Fatty Acid and Omega-6 Fatty Acid from the existing USDA Fatty Acid information. Note: The USDA Nutrient Database for Standard Reference provides values of zero or a blank for the conversion factors for mixed-ingredient food entries. Calculating “% Calories from” or “Calories from” values of zero would result in erroneous values. For this reason, CyberSoft used the 4-4-9 method (which is an AOAC approved method) to estimate the six added fields for mixed-ingredient food items. A value of “4.00” was used as the conversion factor for Protein; a value of “4.00” was used as the conversion factor for Carbohydrate, and a value of “9.00” was used as the conversion factor for Fat. 93 Contents of the USDA SR Nutrient Database The following is an itemized summary of the available information for all entries taken from the USDA nutrient database: Nutrient Data Bank Number - The Nutrient Data Bank (NDB) number that uniquely identifies a food item. The NDB numbers assigned by USDA are integers. These numbers contain no letters or other characters. “New” Nutrient Data Bank Numbers - CyberSoft added new NDB numbers to identify the “new” food items that CyberSoft calculated and added for the household measurement information provided by the Nutrient Data Laboratory. CyberSoft created these new numbers by adding lower-case suffix letters (“a”, “b”, “c”, “d”, etc.) to the original NDB numbers for 100 gram portions. The suffixes indicate the relative gram weight of the household measurement: The lowest suffix (“a”) denotes the household measurement with the lowest gram weight. The next letter suffix (“b”) indicates the next highest gram weight, and so on. The new NDB number with the highest letter suffix designator has the highest gram weight. As stated previously, the NDB numbers with no suffixes identify the 100 gram food items in the SR. % Calories from Protein, % Calories from Carbohydrates, and % Calories from Fat - CyberSoft calculated these values by multiplying the conversion factors for protein, carbohydrates, and fat by the total grams of protein, carbohydrates, and fat, then calculating their percentages relative to the total kilocalories in the food item. (Please see note below for information regarding the conversion factors for mixedingredient foods.) Calories from Protein, Calories from Carbohydrates, and Calories from Fat - These values were calculated by multiplying the conversion factors for protein, carbohydrates, and fat by the total grams of protein, carbohydrates, and fat. (Please see note below for information regarding the conversion factors for mixed-ingredient foods.) Note: The USDA Nutrient Database for Standard Reference provides conversion factors of zero or blanks for mixed-ingredient food entries. Calculating “% Calories from” or “Calories from” values would result in erroneous values (i.e., 0% Calories from Fat, Zero Calories from Carbohydrates). For this reason, CyberSoft used the “4-4-9” method to estimate the six added “calories from” fields for mixed-ingredient food items. (The 4-4-9 method is an official AOAC method of calculating calories. Most laboratory analyses still report calories using this method.) A value of “4.00” was used as the conversion factor for Protein and for Carbohydrate, and a value of “9.00” was used as the conversion factor for Fat. These estimated values are footnoted when viewed on-screen. When the USDA fails to include conversion factors for certain foods (as 94 is common for data they accept from brand name food makers), we use the compensated 4-4-9 method to calculate the calories from Protein, Carbohydrates, and Fat. Nutrient values per 100 g are contained in the Nutrient File, along with fields to further describe the mean value. Nutrient values have been rounded to a specified number of decimal places for each nutrient. Proximates The term “proximate components” refers to those macronutrients that include water (moisture), protein, total lipid (fat), total carbohydrate, and ash. Protein The Nutrient Data Laboratory (NDL) derived the values for protein, which were calculated from the level of total nitrogen (N) in the food, using the conversion factors recommended by Jones (1941). The specific factor applied to each food item is provided. The general factor of 6.25 is used to calculate protein in items that do not have a specific factor. There is no factor for items prepared using the recipe program of the NDBS or for items where the manufacturer calculates protein. Protein values for chocolate, cocoa products, coffee, mushrooms, and yeast were adjusted for non-protein nitrogenous material. The adjusted protein conversion factors used to calculate protein for these items are as follows: chocolate and cocoa (4.74), coffee (5.3), mushrooms (4.38), and yeast (5.7). When these items were used as ingredients, such as chocolate in chocolate milk or yeast in bread, only their protein nitrogen content was used to determine their contribution to the calculated protein and amino acid content of the food. Protein calculated from total nitrogen, which may contain non-protein nitrogen, was used in determining carbohydrate by difference. This unadjusted protein value is not given in the Nutrient Data file; rather, it is given as a footnote in printed sections of “Agriculture Handbook 8.” For soybeans, nitrogen values were multiplied by a factor of 5.71 (Jones, 1941) to calculate protein. The soybean industry, however, uses 6.25 to calculate protein. The protein content of soy flours, soy meals, soy protein concentrates, and soy protein isolates is expressed both ways. The item calculated using the 6.25 factor is identified as “crude protein basis.” Total Lipid The total lipid (fat) content of most foods was determined by gravimetric methods, including extraction methods such as those that use ether or a mixed solvent system of chloroform and methanol, or by acid hydrolysis. Total lipid determined by extraction is reported as Nutrient No. 204. It is sometimes referred to as “crude fat” and includes 95 the weight of all lipid components, including glycerol, soluble in the solvent system. Nutrient No. 204 may not be identical to the fat level declared on food labels under the NLEA, where fat is expressed as the amount of triglyceride that would produce the analytically determined amount of lipid fatty acids and does not include other lipid components not soluble in the solvent system. The term “NLEA fat” is commonly referred to as “total fatty acids expressed as triglycerides.” Carbohydrate Carbohydrate, when present, was determined as the difference between 100 and the sum of the percentages of water, protein, total lipid (fat), ash, and, when present, alcohol. Total carbohydrate values include total dietary fiber. Carbohydrate in beer and wine was determined by methods 979.06 (27.1.21) and 985.10 (28.1.18) of AOAC International (AOAC 2003), respectively. Total dietary fiber content was determined by enzymatic-gravimetric methods 985.29 and 991.43 of the AOAC (2003). Total sugars is the term used for the sum of the individual monosaccharides (galactose, glucose, and fructose) and disaccharides (sucrose, lactose, and maltose). Analytical data for individual sugars were determined using AOAC methods (2003), either high-performance liquid chromatography (HPLC) or gas-liquid chromatography (GLC). When analytical data for total sugars were unavailable for items in the FNDDS, values were imputed or obtained from manufacturers and trade associations. Starch was analyzed using the AOAC method 966.11 (2003). Because the analyses of total dietary fiber, total sugars, and starch are performed separately and reflect the analytical variability inherent to the measurement process, the sum of these carbohydrate fractions may not equal the carbohydrate-bydifference value. Food Energy Food energy is expressed in kilocalories (kcal) and kilojoules (kJ). One kcal equals 4.184 kJ. The data are for physiological energy, which is the energy value remaining after losses from digestion and metabolism, are deducted from gross energy. Calorie values, with the exception of multi-ingredient processed foods, are based on the Atwater system for determining energy values. Derivation of the Atwater calorie factors is discussed in “Agriculture Handbook 74” (Merrill and Watt, 1973). For multi-ingredient processed foods, calorie values (source codes 8 or 9; for more information on source codes, see p. 25) generally reflect industry practices (as permitted by NLEA) of calculating calories from 4-4-9 calories per gram of protein, carbohydrate, and fat, respectively, or from 4-4-9 calories per gram of protein, carbohydrate minus insoluble fiber, and fat. The latter method is often used for high-fiber foods. Calorie factors for protein, fat, and carbohydrates are included in the Food Description file. For foods containing alcohol, we used a factor of 6.93 to calculate calories per gram of alcohol. No calorie factors are 96 given for items prepared using the recipe program of the NDBS. Instead, total calories for these items equal the sums of the calories contributed by each ingredient after adjustment for changes in yield, as appropriate. For multi-ingredient processed foods, if the calories calculated by the manufacturer are reported, no calorie factors are given. Calorie factors for fructose and sorbitol, not available in the Atwater system, were derived from the work of Livesay and Marinos (1988). Calorie factors for coffee and tea were estimated from those for seeds and vegetables, respectively. Minerals Nutrient data for the following minerals are included in NutriBase Personal, Personal Pus, Professional and higher: Calcium (mg) Copper (mg) Chloride (mg)* Chromium (mcg)* Fluoride (mg)* Iodine (mcg)* Iron (mg) Magnesium (mg) Manganese (mg) Molybdenum (mcg)* Phosphorus (mg) Potassium (mg) Selenium (mcg) Sodium (mg) Zinc (mg) * Chloride, Chromium, Iodine, and Molybdenum values were not provided by the USDA Nutrient Data Laboratories. All values for these components contained in this software were taken from data provided by manufacturers. Most of this information appears in the categories labeled” “Vitamin and Mineral Supplements,” “Sports and Diet Nutritionals,” and “Medical Nutritionals.” Levels of minerals for most foods were determined by methods of the AOAC (2003). Calcium, iron, magnesium, phosphorus, sodium, potassium, zinc, copper, and manganese were usually determined by atomic absorption (AOAC 985.35) and inductively coupled plasma emission spectrophotometry (AOAC 984.27) Analytical data for selenium were published earlier by USDA (1992) and were determined by the modified selenium hydride and fluorometric methods. Selenium values from the NFNAP were determined by either the modified selenium hydride (AOAC 986.15) or stable isotope dilution gas chromatography-mass spectrometry (Reamer and Veillon, 1981) methods. The selenium content of plants, in particular cereal grains, is strongly influenced by the quantity of biologically available selenium in the soil in which the plants grow, that is, by their geographical origin (Kubota and Allaway, 1972). The values given are national averages and should be used with caution when levels of selenium in locally grown foods are of interest or concern. Values for fluoride, previously released in the USDA National Fluoride Database of Selected Beverages and Foods, Release 2 (USDA, 2005) have been incorporated into SR19, but other analyzed values, including 97 regional values, are not included in SR. Samples were analyzed using a fluoride ion-specific electrode direct read method (VanWinkle, 1995) for clear liquids and a micro-diffusion method (VanWinkle, 1995) for other food samples. Vitamins Nutrient data for the following vitamins are included in the NutriBase Personal Plus and Professional (and higher) databases: Vitamin A (IU) Vitamin A (RE) Thiamin (mg) Riboflavin (mg) Niacin (mg) Pantothenic Acid (mg) Vitamin B-6 (mg) Folate (mcg) Vitamin B-12 (mcg) Ascorbic Acid - Vitamin C (mg) Vitamin D (IU) Vitamin E (α-tocopherol) Vitamin H (mcg)* Vitamin K (mcg) – phylloquinone Choline (mg) Betaine (mg) Vitamin D2 (mcg) Vitamin D3 (mcg) Vitamin D2+D3 (mcg) * Data for Vitamin H (Biotin) was provided by manufacturers. Ascorbic acid In the current database system, all data for ascorbic acid are listed under Nutrient No. 401, total ascorbic acid, determined by the fluorometric method (AOAC 967.22). Older values which have not been updated are primarily reduced ascorbic acid and were determined by the dichloroindophenol method (AOAC 967.21) Thiamin was determined chemically by the fluorometric method (AOAC 942.23). Riboflavin was measured using fluorometric (AOAC 970.65) or microbiological (AOAC 940.33) methods. Niacin was determined by microbiological methods (AOAC 944.13). The values for niacin are for preformed niacin only and do not include the niacin contributed by tryptophan, a niacin precursor. The term “niacin equivalent” applies to the potential niacin value, that is, to the sum of the preformed niacin and the amount that could be derived from tryptophan. To estimate the amounts of niacin available from foods, the mean value of 60 mg tryptophan is considered equivalent to 1 mg niacin (IOM, 1998). mg Niacin equivalents = mg niacin + (mg tryptophan / 60) Pantothenic Acid was determined microbiologically (AOAC 945.74 or 992.07). Vitamins B6 and B12 98 Vitamin B6 was determined by microbiological methods (AOAC 961.15) and B12 was also determined by microbiological methods (AOAC 952.20). Vitamin B12 is found in foods of animal origin or those containing some ingredient of animal origin, for example, cake that contains eggs or milk. For foods that contain only plant products, the value for vitamin B12 is assumed to be zero. Some reports contain values for vitamin B12 in certain fermented foods (beer, soy sauce, and miso). It is believed that this B12 is synthesized not by the microorganisms responsible for the fermentation of the food, but rather by other contaminating microorganisms. Therefore, one should not consider these foods to be a consistent source of vitamin B12 (Liem et al., 1977). The Dietary Reference Intakes (DRI) for vitamin B12 recommend that people older than 50 years meet their Recommended Dietary Allowances (RDA) mainly by consuming foods fortified with vitamin B12 or a vitamin B12-containing supplement (IOM, 1998). Since vitamin B12, added as a fortificant, may provide a significant source of the vitamin in the diet, a nutrient number (#578) for “added vitamin B12” has been added to the database. In this release, there are about 230 foods fortified with vitamin B12. The vast majority are breakfast cereals, infant formulas, and plant based meat substitutes. For these foods, the value for total vitamin B12 was used for “added vitamin B12.” Only a few cereals containing a milk ingredient would contain any intrinsic vitamin B12. Milk-based infant formulas would contain intrinsic vitamin B12. However, infants are not the population of concern for intake of fortified vitamin B12. Plant-based meat substitutes would not contain intrinsic vitamin B12. Folate Values are reported for folic acid, food folate, and total folate reported as µg of dietary folate equivalents (DFEs). These varied folate forms are included as described in the DRI report issued by the Institute of Medicine of the National Academies (IOM, 1998). RDAs for folate are expressed in DFEs, which take into account the greater bioavailability of synthetic folic acid compared with naturally occurring food folate. To calculate DFEs for any single food, it is necessary to have separate values for naturally occurring food folate and added synthetic folic acid in that item. µg DFE = µg food folate + (1.7 * µg folic acid) Folate values for foods analyzed through NFNAP are generated using the trienzyme microbiological procedure (Martin et al., 1990). Microbiological methods measure total folate; for enriched foods, folic acid and food folate are not distinguished from each other. Therefore, to be able to calculate DFE, multi-ingredient enriched foods are analyzed by an additional microbiological procedure without enzymes to estimate the amount of added folic acid (Chun et al., 2006). Food folate is then calculated by difference. The addition of folic acid to enriched cereal99 grain products subject to standards of identity began in the United States on January 1, 1998 (CFR, Title 21, Pts. 136B137). These products include flour, cornmeal and grits, farina, rice, macaroni, noodles, bread, rolls, and buns. Folic acid may continue to be added (with some restrictions on amounts) to breakfast cereals, infant formulas, medical foods, food for special dietary use, and meal replacement products. For unenriched foods, food folate would be equivalent to total folate since folic acid (pteroylmonoglutamic acid) occurs rarely in foods. Therefore, the same value with its number of data points and standard error, if present, is used for total folate and food folate. The folic acid value is assumed to be zero. For enriched cereal-grain products with standards of identity (flour, cornmeal and grits, farina, rice, macaroni, noodles, bread, rolls, and buns), the folic acid value is calculated by subtracting the analytical folate value before fortification from the analytical value for the fortified product. Enriched ready-to-eat (RTE) cereals have generally included folic acid fortification for over 25 years. Therefore, food folate values (before fortification) were not readily available for these products. Food folate was estimated by means of the NDBS formulation program for a variety of high-consumption cereals. Mean folate values were calculated for categories of RTE cereals based on grain content. Added folic acid was then calculated by subtracting estimated food folate from the total folate content. Generally, food folate values represent a small proportion of the total folate in the fortified products. Choline. Beginning with SR19 (2006), total choline and betaine values from the USDA Database for the Choline Content of Common Foods (USDA, 2004) have been incorporated into SR. Values for the individual metabolites have not been added to SR, but are available in the USDA Database for the Choline Content of Common Foods. For analysis, choline compounds are extracted, partitioned into organic and aqueous phases using methanol and chloroform, and analyzed directly by liquid chromatography-electrospray ionizationisotope dilution mass spectrometry (LC-ESI-IDMS) (Koc et al., 2002). Samples are analyzed for betaine and these choline-contributing compounds: free choline (Cho), glycerophosphocholine (GPC), phosphocholine (Pcho), phosphatedylcholine (Ptdcho), and sphingomyelin (SM). Because there are metabolic pathways for the interconversion of Cho, GPC, Pcho, PtdCho, and SM (Zeisel et al., 1994), total choline content is calculated as the sum of these choline-contributing metabolites. Betaine values are not included in the calculation of total choline since the conversion of choline to betaine is irreversible (Zeisel et al., 2003). Vitamin A Beginning with SR15 (2002), in addition to the international units (IUs) that have been reported in the past, we reported values for vitamin A in 100 µg of retinol activity equivalents (RAEs) and µg of retinol. Values in µg of retinol equivalents (REs) were dropped from the database. This change responds to new reference values for vitamin A issued by the Institute of Medicine of the National Academies (IOM, 2001). Along with the new DRIs, the panel recommended changing the factors used for calculating vitamin A activity from the individual provitamin A carotenoids and introduced RAE as a new unit for expressing vitamin A activity. One µg RAE is equivalent to 1 µg of all-trans-retinol, 12 µg of all-trans-ßcarotene, or 24 µg of other provitamin A carotenoids. The RAE conversion factors are based on recent studies that show that the conversion of provitamin A carotenoids to retinol is only half as great as previously thought. Vitamin A in IU will continue to be reported because it is still the unit used for nutrition labeling. One IU is equivalent to 0.3 µg retinol, 0.6 µg ß-carotene, or 1.2 µg other provitamin-A carotenoids (NAS/NRC, 1989). Individual carotenoids, ß-carotene, -carotene, ß-cryptoxanthin, lycopene, and lutein+zeaxanthin are reported. The analytical data are from NFNAP, generated using HPLC methodology (AOAC 941.15) and from the scientific literature. Most analytical systems do not separate lutein and zeaxanthin, so these carotenoids are shown combined. These values supersede those in Holden et al., 1999. Vitamin A values in IU and RAE were calculated from the individual carotenoids (ß- carotene, -carotene, and ß-cryptoxanthin) using the appropriate factors. For food items used in the FNDDS, carotenoid values were imputed if analytical data were not available. For many of these items data were only available for vitamin A in IU. However, the variability in carotenoid levels due to cultivar, season, growing area, etc., as well as rounding within the NDBS, increases the difficulty in matching the calculated vitamin A values from imputed individual carotenoids to the existing IU values. As a result, the vitamin A IU value should agree within ±15 IU of the value calculated from individual carotenoids. When individual carotenoids are not reported for plant foods (such as fruits, vegetables, legumes, nuts, cereal grains, and spices and herbs), µg RAE were calculated by dividing the IU value by 20. In foods of animal origin, such as eggs, beef, pork, poultry, lamb, veal, game, and fish (except for some organ meats and dairy), all of the vitamin A activity is contributed by retinol. For these foods, when analytical data were not available, µg RAE and µg of retinol were calculated by dividing the IU value by 3.33. In foods that contain both retinol and provitamin A carotenoids, the amount of each of these components must be known to calculate RAE. Most of the vitamin A data in the database were received as IU. Therefore, the amounts of the provitamin A carotenoids and retinol had to be estimated based on the amount of retinol and provitamin A carotenoids in the ingredients. Once the components had been 101 estimated, µg RAE were calculated as (IU from carotenoids/20) + (IU from retinol/3.33). µg of retinol were calculated as IU from retinol/3.33. Vitamin D - Due to considerable public health interest in vitamin D, a multi-year project was undertaken by NDL to expand and update the relatively small existing dataset of vitamin D values in SR. Much of the original data for vitamin D had been published earlier in USDA’s Provisional Table (PT-108) (Weihrauch and Tamaki, 1991), with values for fortified foods updated as needed with data received from the food industry. The availability of vitamin D data for foods permitting subsequent dietary intake assessment is expected be a useful tool in investigating dietary requirements of vitamin D in vulnerable groups, one of the specific research recommendations of the 2005 Dietary Guidelines Committee (DGAC. 2004). An Institute of Medicine Committee to Review Dietary Reference Intakes for Vitamin D and Calcium was convened in 2009 to assess current relevant data and revise, as appropriate, the DRIs for vitamin D and calcium. Before foods could be analyzed for vitamin D for inclusion in this release, analytical methodology had to be developed that could be used for a variety of food matrices (Byrdwell, 2008). Although a single method is not required for USDA- sponsored analyses, all participating laboratories must demonstrate that their analysis of quality control materials falls within an acceptable range of values. For vitamin D, all methods involved extraction with solvent(s), cleanup steps, and quantification by HPLC or by HPLC and LC/MS. In the absence of certified quality control materials for vitamin D, NDL, in collaboration with Virginia Tech, developed five matrix-specific materials, one of which was sent with every batch of foods to be analyzed. The materials were: vitamin D3 fortified fluid milk, a vitamin D3 fortified multigrain ready-to-eat cereal, orange juice fortified with calcium and vitamin D3 , pasteurized process cheese fortified with vitamin D3, and canned red salmon, a natural source of D3 (Phillips et al. 2008). Vitamin D may also be present as 25-hydroxycholecalciferol in some foods such as fish, meat, and poultry. At this point the analytical methodology used to determine this metabolite of vitamin D has not been sufficiently validated; when work on this validation is completed 25hydroxycholecalciferol values will be provided in future releases of SR. Once an improved method of analysis was developed (Byrdwell, 2008), and the laboratories certified, a selection of foods, representing natural vitamin D sources and fortified sources, were chosen for sampling and analysis under the National Food and Nutrient Analysis Program (Haytowitz et al. 2008). Analyses have been completed for raw eggs and the following fortified products: fluid milk at 4 fat levels, reduced fat chocolate milk, fruit yogurt, and orange juice. Current analytical values for fish are based on limited analyses; additional samples are being analyzed and values will be updated in future SR releases. Vitamin D 102 analyses have also been completed for selected cuts/pieces of chicken, pork, and beef. Cholecalciferol (vitamin D3; Nutr. No. 326) is the form naturally occurring in animal products and the form most commonly added to fortified foods. Ergocalciferol (vitamin D2 ; Nutr. No. 325) is the form found in plants and is sometimes added to fortified foods, such as soy milk. In this data, vitamin D (Nutr. No. 328) is defined as the sum of vitamin D2 and vitamin D3. Vitamin D values in this data are being provided in both micrograms (mcg) and International Units (IU) to support both the analytical unit (mcg) and the unit (IU) that is currently used in nutrient labeling of foods in the U.S. The biological activity of vitamin D is given as 40 IU/mcg. Where available, specific isomers of vitamin D are reported only in mcg. Calculations for vitamin D in SR include: Vitamin D, mcg (Nutr. No. 328) = vitamin D2, mcg + vitamin D3, mcg Vitamin D, IU (Nutr. No. 324) = vitamin D, mcg x 40 Vitamin D values in mcg (Nutr. No. 328) are provided for all items in this data used to create the FNDDS. In some cases, it was possible to identify food groups for which the foods do not provide or only contain trace amounts of vitamin D. Values for those foods were set to zero. For example, except for mushrooms, plant foods are not expected to contain any appreciable levels of vitamin D. In order to provide vitamin D estimates for the rest of the foods provided to create the FNDDS, data for other foods have been taken from the scientific literature or from other food composition databases, calculated from industry-declared % DV fortification levels, determined by formulation/recipe techniques, or estimated by other USDA imputation methods. Fluid milk available at the retail level is fortified. The dairy industry provided guidance that most dairy products used as ingredients in formulated (commercial multi-ingredient) food, are not likely to be fortified with vitamin D. Likewise, margarine used in commercial products is generally not vitamin D-fortified; a relatively low percentage of vitamin D- fortified margarines and spreads are available in the retail market. For ingredients that could be fortified at the retail level, but generally are not fortified at the food processing level, two related profiles are available in SR – one with added vitamin D and one without. When estimates were calculated for formulated foods, the unfortified profile was used. For home-prepared foods, such as pudding prepared with milk, the fortified ingredient(s) was selected for use in the recipe calculation of vitamin D. In the case of margarine, a market-share blend of fortified and unfortified product was used. For some retail products, such as yogurt, there is considerable brandto- brand difference in vitamin D fortification practices. One brand or line 103 of products may be fortified with vitamin D, whereas another brand may not. Both types are included in the database. The market changes quickly and consumers concerned about vitamin D intake should always confirm vitamin D content by checking the product label. Vitamin E Vitamin E activity for the RDA as defined by the DRI report (IOM, 2000) is now limited to the naturally occurring form and three synthetic forms of -tocopherol. For this reason, -tocopherol equivalents, which included vitamin E activity from -, ß-, -, and -tocopherol and -, ß-, and tocotrienols, were dropped from the database in SR16. Tocopherols were determined by gas-liquid chromatography (GLC) or highperformance liquid chromatography (HPLC) (Lee et al., 1999). For those items in FNDDS, values are presented for -tocopherol. If analytical data were unavailable, values for -tocopherol were imputed. When available, values are also presented for the other tocopherols. In the DRI report for Vitamin E, different factors were used to calculate the milligram amount of -tocopherol from IU of vitamin E (IOM, 2000). The factors vary depending upon the chemical form of -tocopherol used to fortify the food where mg of -tocopherol in food, fortified food, or multivitamin One mg of -tocopherol = IU of the RRR--tocopherol compound × 0.67 and One mg of -tocopherol = IU of the all rac--tocopherol compound × 0.45. Before SR16-1, the conversion factor for RRR--tocopherol was used for all vitamin E fortified foods. New a-tocopherol values have been calculated for breakfast cereals, most infant formulas and a few other foods that are fortified with vitamin E, where we have confirmed that all rac--tocopherol was the form added. For more information about vitamin E in breakfast cereals, see the article in the January 2004 issue of the American Journal of Clinical Nutrition by Leonard et al. (2004). The basis of the vitamin E tolerable upper intake level (UL), another reference value in the DRI report, was established using all forms of supplemental -tocopherol (IOM, 2000).” A new nutrient number (#573) has been added to identify quantities of “added vitamin E.” In this release, there are 100 food items that have values for added vitamin E greater than 0. For the majority of these food items the form added is synthetic vitamin E (all rac--tocopherol). To relate intakes of supplemental -tocopherol to the UL, values for “added vitamin E” should be multiplied by 2 when the added form is synthetic vitamin E. Although the 2S-stereoisomers do not contribute to vitamin E activity for the RDA (IOM, 2000), they do contribute to the UL. Items that are fortified with RRR--tocopherol (natural vitamin E) are identified by a footnote and the added vitamin E can be used directly for contribution to 104 the UL. The majority of foods that are fortified with vitamin E are infant formulas and breakfast cereals. For these foods, the value for total vitamin E was used for “added vitamin E”; the small amount of intrinsic vitamin E was not considered. In fortified peanut butter, the intrinsic vitamin E was calculated since it is a substantial amount. Vitamin K - Much of the data for vitamin K were generated under NFNAP and supersede the values in the Provisional Table (PT-104) (Weihrauch and Chatra, 1994). Vitamin K is extracted with hexane, purified with solid phase extraction using silica columns, and quantitated using HPLC with chemical reduction and fluorescence detection. Losses are corrected using vitamin K1 as internal standard (Booth et al. 1994). Lipid Components Fatty acids are expressed as the actual quantity of fatty acid in g per 100 g of food and do not represent fatty acids as triglycerides. Historically, most fatty acid data were obtained as the percentage of fatty acid methyl esters and determined by GLC analyses (AOAC 996.06). These data were converted to g fatty acid per 100 g total lipid using lipid conversion factors and then to g fatty acid per 100 g edible portion of food using the total lipid content. Details of the derivation of lipid conversion factors were published by Weihrauch et al., 1977. In the redesigned NDBS, fatty acid data may be imported in a variety of units and converted within the system. No conversions are required if data are received as g fatty acid per 100 g edible portion of food. Data received as fatty acid esters and as triglycerides are converted to fatty acids using Sheppard conversion factors. Sheppard conversion factors are based on the molecular weights of the specific fatty acid and its corresponding esters (butyl or methyl) and triglyceride (Sheppard, 1992). When fatty acid data are received as percentages of fatty acid methyl esters, methyl esters are converted to fatty acids using Sheppard conversion factors and then multiplied by total lipid (Nutrient No. 204) to give g fatty acid per 100 g edible portion of food. Occasionally, total lipid values are available from a variety of data sources, but individual fatty acids are available from fewer references. In those cases, it may be necessary to normalize the individual fatty acids to the mean fat value of the food item. In the case of normalized fatty acids, the sum of the individual fatty acids will equal the mean fat value multiplied by the Weihrauch (1977) lipid conversion factor for that food item. No statistics of variability are reported for normalized fatty acids. Individual Fatty Acids Individual Fatty Acids. The basic format for describing individual fatty acids is that the number before the colon indicates the number of carbon atoms in the fatty acid chain, and the number after the colon indicates the number of double bonds. For unsaturated fatty acids, additional nutrient numbers have been added to accommodate the reporting of many specific positional and geometric isomers. Of the specific isomers, 105 there are two basic classifications considered: omega double bond position and cis/trans configuration of double bonds. Omega-3 (n-3) and omega- 6 (n-6) isomers are denoted in shorthand nomenclature as n-3 and n-6. The n- number indicates the position of the first double bond from the methyl end of the carbon chain. The letter c or t indicates whether the bond is cis or trans. For polyunsaturated fatty acids, cis and trans configurations at successive double bonds may be indicated. For example, linoleic acid is an 18 carbon omega- 6 fatty acid with 2 double bonds, both in cis configuration. When data are isomer specific, linoleic acid is described as 18:2 n-6 c,c. Other isomers of 18:2, for which nutrient numbers have now been assigned, include 18:2 c,t; 18:2 t,c; 18:2 t,t; 18:2 t not further defined; and 18:2 i. 18:2 i is not a single isomer but includes isomers other than 18:2 n-6 c,c with peaks that cannot be easily differentiated in the particular food item. Systematic and common names for fatty acids are given in Table 2. Table 2 is provided for the convenience of users in attaching common names or systematic names to fatty acids in this database. Though individual fatty acids are more specific than in past releases, it is not possible to include every possible geometric and positional isomer. Where specific isomers exist for a fatty acid, the common name of the most typical isomer is listed for the undifferentiated fatty acid and an asterisk (*) designates the specific isomer by that name. For example, the most typical isomer for 18:1 is oleic. Thus, the specific isomer by that name, 18:1 c, is designated in Table 2 as oleic. Table 2.Systematic and Common Names for Fatty Acids Fatty acid Systematic name Common name of most typical isomer Saturated fatty acids 4:0 butanoic butyric 6:0 hexanoic caproic 8:0 octanoic caprylic 10:0 decanoic capric 12:0 dodecanoic lauric 13:0 tridecanoic 14:0 tetradecanoic 15:0 pentadecanoic 16:0 hexadecanoic palmitic 17:0 heptadecanoic margaric 106 myristic Common name of Fatty acid Systematic name 18:0 octadecanoic stearic 20:0 eicosanoic arachidic 22:0 docosanoic behenic 24:0 tetracosanoic lignoceric 14:1 tetradecenoic myristoleic 15:1 pentadecenoic 16:1 undifferentiated hexadecenoic most typical isomer Monounsaturated fatty acids palmitoleic 16:1 cis 16:1 trans 17:1 heptadecenoic 18:1 undifferentiated octadecenoic oleic 20:1 eicosenoic gadoleic 22:1 undifferentiated docosenoic erucic cis-tetracosenoic nervonic octadecadienoic linoleic 18:1 cis 18:1 trans 22:1 cis 22:1 trans 24:1 cis Polyunsaturated fatty acids 18:2 undifferentiated 18:2 trans not further defined 18:2 i (mixed isomers) 18:2 n-6 cis, cis 18:2 trans, trans 107 Fatty acid Systematic name Common name of most typical isomer 18:2 conjugated linoleic acid (CLAs) 18:3 undifferentiated octadecatrienoic linolenic 18:3 n-3 cis, cis, cis alpha-linolenic 18:3 n-6 cis, cis, cis gamma-linolenic 18:3 trans (other isomers) 18:4 octadecatetraenoic 20:2 n-6 cis, cis eicosadienoic 20:3 undifferentiated eicosatrienoic parinaric 20:3 n-3 20:3 n-6 20:4 undifferentiated eicosatetraenoic arachidonic eicosapentaenoic (EPA) timnodonic 22:5 n-3 docosapentaenoic (DPA) clupanodonic 22:6 n-3 docosahexaenoic (DHA) 20:4 n-6 20:5 n-3 21:5 22:4 * Designates the specific isomer associated with the common name; the typical isomer is listed for the undifferentiated fatty acid. Fatty acid totals. Only a small portion of the fatty acid data received for release in this data contains specific positional and geometric isomers. Therefore, it has been necessary to maintain the usual nutrient numbers corresponding to fatty acids with no further differentiation other than carbon length and number of double bonds. To aid users of our data, specific isomers are always summed to provide a total value for the undifferentiated fatty acid. For example, mean values for the specific isomers of 18:2 are summed to provide a mean for 18:2 undifferentiated (Nutrient No. 618). Other fatty acid totals provided are (1) the sum of saturated, monounsaturated, and polyunsaturated fatty acids and (2) the sum of trans-monoenoic, the sum of trans-polyenoic, and the sum of all trans fatty acids. 108 Values for total saturated, monounsaturated, and polyunsaturated fatty acids may include individual fatty acids not reported; therefore, the sum of their values may exceed the sum of the individual fatty acids. In rare cases, the sum of the individual fatty acids may exceed the sum of the values given for the total saturated fatty acids (SFA), monounsaturated fatty acids (MUFA), and polyunsaturated fatty acids (PUFA). These differences are generally caused by rounding and should be relatively small. For multi-ingredient processed brand-name foods, industry data are often available for fatty acid classes (SFA, MUFA, and PUFA) but are lacking for individual fatty acids. In these cases, individual fatty acids are calculated from the fatty acids of the individually listed ingredients and normalized to the total fat level. A best-fit approximation has been made to fatty acid classes, but unavoidably, calculated sums of individual fatty acid totals do not always match industry data for fatty acid classes. Zero values for individual fatty acids should be understood to mean that trace amounts may be present. When g fatty acids per 100 g of total lipid are converted to g fatty acids per 100 g of food, values of less than 0.0005 are rounded to 0. The basic format for describing individual fatty acids is that the number before the colon indicates the number of carbon atoms in the fatty acid chain, and the number after the colon indicates the number of double bonds. For unsaturated fatty acids, additional nutrient numbers have been added to accommodate the reporting of many specific positional and geometric isomers. Of the specific isomers, there are two basic classifications considered: omega double bond position and cis/trans configuration of double bonds. Omega-3 and omega-6 isomers are denoted in shorthand nomenclature as n-3 and n-6. The number indicates the position of the first double bond from the methyl end of the carbon chain. The letter c or t indicates whether the bond is cis or trans. For polyunsaturated fatty acids, cis and trans configurations at successive double bonds may be indicated. For example, linoleic acid is an 18 carbon omega-6 fatty acid with 2 double bonds, both in cis configuration. When data are isomer specific, linoleic acid is described as 18:2 n-6 c,c. Other isomers of 18:2, for which new nutrient numbers have been assigned, include 18:2 c,t, 18:2 t,c, and 18:2 t,t; 18:2 t not further defined and 18:2 i. 18:2 i is not a single isomer but includes isomers other than 18:2 n-6 c,c with peaks that cannot be easily differentiated in the particular food item. The lipid components include fatty acids, cholesterol, and phytosterols. These lipids are included in the database: Fatty acid totals. Only a small portion of the fatty acid data contains specific positional and geometric isomers. Therefore, it has been necessary to maintain the usual nutrient numbers corresponding to fatty acids with no further differentiation other than carbon length and number of double bonds. To aid users of our data, specific isomers are always 109 summed to provide a total value for the undifferentiated fatty acid. Thus, mean values for the specific isomers of 18:2 would be summed to provide a mean for 18:2 undifferentiated (Nutrient No. 618). Other fatty acid totals provided are (1) the sum of saturated, monounsaturated, and polyunsaturated fatty acids and (2) the sum of trans-monoenoic, the sum of trans-polyenoic, and the sum of all trans fatty acids. Values for total saturated, monounsaturated, and polyunsaturated fatty acids may include individual fatty acids not reported; therefore, the sum of their values may exceed the sum of the individual fatty acids. In rare cases, the sum of the individual fatty acids may exceed the sum of the values given for the total saturated fatty acids (SFA), monounsaturated fatty acids (MUFA), and polyunsaturated fatty acids (PUFA). These differences are generally caused by rounding and may be relatively small. For multi-ingredient processed brand-name foods, industry data were often available for fatty acid classes (SFA, MUFA, and PUFA) but were lacking for individual fatty acids. In these cases, individual fatty acids were calculated from the fatty acids of the individually listed ingredients and normalized to the total fat level. A best-fit approximation was made to fatty acid classes, but unavoidably, calculated sums of individual fatty acid totals did not always match industry data for fatty acid classes. Zero values for individual fatty acids should be understood to mean that trace amounts may be present. When g fatty acids per 100 g of total lipid were converted to g fatty acids per 100 g of food, values of less than 0.0005 were rounded to 0. Cholesterol. Cholesterol values were generated primarily by GLC procedures (AAOC 994.10). It is assumed that cholesterol is present only in foods of animal origin and foods containing at least one ingredient of animal origin (for example, cake that contains eggs). For mixtures containing ingredients derived from animal products, the cholesterol value may have been calculated from the value for those ingredients. For foods that contain only plant products, the value for cholesterol is assumed to be zero. Plant sterols. Data on plant sterols (campesterol, stigmasterol, and ßsitosterol) were obtained by gas-chromatographic procedures (AOAC 967.18) and summed to calculate total phytosterols. 110 Amino Acids The data for amino acids represent results obtained primarily by ionexchange chromatography. Nutrient data for the following amino acids are included in the database: Alanine (g) Histidine (g) Proline (g) Arginine (g) Isoleucine (g) Serine (g) Aspartic Acid (g) Leucine (g) Threonine (g) Cystine (g) Lysine (g) Tyrosine (g) Glutamic Acid (g) Methionine (g) Tryptophan (g) Glycine (g) Phenylalanine (g) Valine (g) Amino acid data for a class or species of food are aggregated to yield a set of values that serve as the pattern for calculating the amino acid profile of other similar foods. The amino acid values for the pattern are expressed on a per-gram-of-nitrogen basis. Amino acids are extracted in three groups-tryptophan, sulfur-containing amino acids (methionine and cystine), and all others. Tryptophan is determined by alkaline hydrolysis/HPLC (AOAC 988.15), methionine and cystine by performic oxidation/HPLC (AOAC 994.12) and all others by acid hydrolysis/HPLC (AOAC 982.30). The amino acid patterns and the total nitrogen content were used to calculate the levels of individual amino acids per 100 g of food, using the following formula: AAf = (AAn * Vp ) / Nf AAf = Amino acid content per 100 grams of food AAn = Amino acid content per gram of nitrogen Vp = Protein content of food Nf = Nitrogen factor In the past, the number of data points appeared only on the food item for which the amino acid pattern was developed, not on other foods that used the same pattern. It referred to the number of observations used in developing the amino acid pattern for that food. For foods processed in the new NDBS, the number of observations used in developing an amino acid pattern will be released only with the pattern. The amino acid profiles calculated from these patterns will show the number of data points to be zero. If amino acid values are presented for an item with more than one protein-containing ingredient, the values may have been calculated on a per-gram-of-nitrogen basis from the amino acid patterns of the various 111 protein-containing ingredients. Then the amino acid contents for an item on the 100-g basis were calculated as the sum of the amino acids in each protein-containing ingredient multiplied by total nitrogen in the item. 112 Retention Factors When nutrient data for prepared or cooked products were unavailable or incomplete, nutrient values were calculated from comparable raw items or by recipe. When values are calculated in a recipe or from the raw item appropriate nutrient retention and yield factors are applied (U.S. Department of Agriculture 1994). To obtain the content of nutrient per 100 g cooked food, the nutrient content per 100 g of raw food is multiplied by the nutrient retention factor and, when appropriate, yield factors. Vc = (Vr * RF)/Yc Vc = Nutrient content of cooked food Vr = Nutrient content of raw food RF = Retention factor Yc = Yield of cooked food Nutrient retention factors are based on data from USDA research contracts, recent research reported in the literature, and USDA publications. Most retention factors were calculated by the True Retention Method (%TR) (Murphy et al., 1975). This method, as shown below, accounts for the loss of solids from foods that occurs during preparation and cooking. %TR = (Nc*Gc) / (Nr*Gr) * 100 Nc = nutrient content per g of cooked food, Gc = g of cooked food, Nr = nutrient content per g of raw food, and Gr = g of food before cooking. In general, levels of fortified nutrients are the values calculated by the manufacturer or NDL food specialists, based on the Nutrition Labeling and Education Act (NLEA) label declaration of % Daily Value (DV) (CFR, Title 21, Pt. 101) (U.S. Food and Drug Administration-Department of Health and Human Services, 2004). Such values represent the minimum nutrient level one can expect in the product. If analytical values were used to estimate levels of added nutrients, a number is present in the sample count field for these nutrients. Weights and Measures Information is provided on household measures for food items (for example, 1 cup, 1 tablespoon, 1 fruit, and 1 leg). Weights are given for edible material without refuse. The Weight file contains the gram weights and measure descriptions for each food item. This file can be used to calculate nutrient values for food portions from the values provided per 100 g of food. 113 The formula used to calculate the nutrient content per household measure is: N = (V * W)/100 N = Nutrient value per household measure V = Nutrient value per 100 grams W = Gram weight of portion The Gram Weight file can be used to produce reports showing the household measure and nutrient values calculated for that portion. The weights were derived from published sources, industry files, studies conducted by USDA (Adams 1975, Fulton et al. 1977), and the weights and measures used in USDA's Continuing Survey of Food Intakes by Individuals (USDA 1995). Although special efforts were made to provide representative values, weights and measures obtained from different sources vary considerably for some foods. Starting with this release we have combined the Gram Weight File and the Measure Description File to make this information easier to use. Nutrient DataBank Numbers (NDB Numbers) USDA SR Data The USDA publishes nutrient data in the Nutrient Database for Standard Reference for us in products (like NutriBase). They assign a unique “Nutrient Data Bank” (NDB) number to each food item in this database. These food items are for 100 gram portions of these foods. These numbers are integers - they contain no letters, decimals, or other characters. Canadian Nutrient File Numbers Health Canada makes the Canadian Nutrient Files available for use in products (like NutriBase). They assign a unique number to each food item in this database. These food items are for 100 gram portions of these foods. These numbers are integers - they contain no letters, decimals, or other characters. Brand Name Numbers CyberSoft has compiled and included a large number of entries for brand name foods that the USDA has not compiled. CyberSoft has given these entries unique “NutriBase Food ID Numbers.” CyberSoft Brand Name entries include food items and restaurant menu items. Each NutriBase ID Number is unique. No suffixes are used. NutriBase Food ID Numbers For many of the food items in both the SR data and the CNF data, both NDL and Health Canada have provided the gram weights for common household measures. Common household measures for the SR data tend to be in English measurements (tsp, tbsp, cups, oz, etc.) while the common household measures for the CNF data tend to be in metric 114 measurements (grams, ml). CyberSoft did the arithmetic required to derive the nutrient values for all food items that included gram weights for common household measures. CyberSoft added suffixes to these common household measures and thereby produced “new” Food ID Numbers. CyberSoft used these original SR and CNF numbers to create similar numbers that we call the “NutriBase ID Number.” CyberSoft did this by keeping the original identifying numbers for the 100 gram portions of these food items, then adding lower-case suffix letters (“a”, “b”, “c”, “d”, etc.) to these original numbers to represent the common household measures of these food items. These suffixes indicate the relative gram weight of the household measurement. The lowest suffix (“a”) denotes the measurement with the lowest gram weight. The next letter suffix (“b”) indicates the next highest gram weight, and so on. The NutriBase ID Number with the highest letter suffix designator has the highest gram weight (unless it is less than 100 grams). Example: NB ID # Description Measurement Gram Weight 01001 Butter, with salt 100 grams 100.0 01001a Butter, with salt 1 pat 5.0 01001b Butter, with salt 1 tbsp 14.2 01001c Butter, with salt 1 stick 113.4 Notice that the NutriBase ID Number with no suffix is the original number for the 100 gram portion. The lowest suffix (“a”) denotes portion with the lowest gram weight and that the suffixes increment as the gram weights increase. How to Display NutriBase Food ID Numbers You can display the Food ID Numbers for food items by double-clicking on any food item while you are viewing it in any spreadsheet view. Another way to do this is to highlight the food of interest, then clicking the “View” Button. NutriBase Food ID Number Summary: 1) The Food ID Numbers with no suffixes identify the original 100 gram portion food items from the SR Data or the CNF Data. 2) The Food ID Numbers with suffixes identify the new food items that were derived from calculations based on household measure information provided in the SR or CNF data. 3) The smallest household measures have the smallest letter suffixes; the largest serving sizes have the largest letter suffixes. 115 4) The new Food ID Numbers provide a unique identifier for every food item in the database. Abbreviations Used in the Nutrient Data & and L&F Lean and Fat AL Aluminum lb Pound ARS Agricultural Research Service mayo mayonnaise mcg microgram MF milk fat MG Magnesium mg milligram mini miniature ml milliliter NA Sodium NDB Nutrient Data Bank NDL Nutrient Data Laboratory NFMS Non fat milk solids NFS Not Further Specified NLEA Nutrition Labeling & Education Act ATE -Tocopherol Equivalent avg average BF Butter Fat CA Calcium carb carbohydrate choc chocolate cm centimeter com commercial CP Commercially Prepared dia diameter DSP di sodium phosphate fl oz fluid ounce FS Food Service NSA No Sugar Added fzn frozen NSA No Sugar Added g gram NY NY (strip steak) HN High Nitrogen NZ New Zealand HP Home-Prepared oz Ounce ICBINB I Can't Believe It's Not Butter! P Phosphorus PAD Prepared As Directed IU International Units pcs pieces JR Junior PFM Prepared From Mix K Potassium PFR Prepared From Recipe KC Kansas City (steak) pkg package kcal Kilocalorie (“calorie”) pkgd packaged kJ Kilojoule pkt packet 116 prep prepared RTE Ready-to-Eat RAE Retinol Activity Equivalent RTF Ready-to-Feed RTH Ready-to-Heat RE Retinol Equivalent RTS Ready-to-Serve refrig refrigerated RTU Ready-to-Use reg regular s&l solids and liquids RP Restaurant-Prepared SF Separable Fat RTB Ready-to-Bake sir sirloin RTC Ready-to-Cook SLF Separable Lean and Fat RTD Ready-to-Drink SLO Separable Lean Only 117 References for USDA SR Nutrient Data Adams, C.F. 1975. Nutritive Value of American Foods in Common Units. U.S. Department of Agriculture, Agricultural Handbook 456. Association of Official Analytical Chemists. 2003. Official Methods of Analysis, 17th ed., 2nd revision. AOAC International, Gaithersburg, MD. Booth, S.L., K.W. Davidson, and J.A. Sadowski. 1994. Evaluation of an HPLC method for the determination of phylloquinone (vitamin K1) in various food matrices. Journal of Agricultural and Food Chemistry 42:295-300. Byrdwell, W. C., J. Devries, J. Exler, J.M. Harnly, J.M. Holden, M.F. Holick, B.W. Hollis, R.L. Horst, M. Lada, L.E. Lemar, K.Y. Patterson, K.M. Philips, M.T. Tarrago-Trani, W.R. Wolf. 2008. Analyzing vitamin D in foods and supplements: methodologic challenges. American Journal of Clinical Nutrition. 88(2):554S-557S. Chun, J., Martin, J.A., Chen, L., Lee, J., Ye, L., Eitenmiller, R. 2004. A differential assay of folic acid and total folate in foods containing enriched cereal-grain products to calculate mcg dietary folate equivalents (mg DFE). Journal of Food Composition and Analysis 19(23):182-187. Dietary Guidelines Advisory Committee (DGAC). 2004. The Report of the Dietary Guidelines Advisory Committee on Dietary Guidelines for Americans, 2005. Available from http://www.health.gov/ dietaryguidelines/ dga2005/report/default.htm (accessed 06/19/2009). Fulton, L., E. Matthews, and C. Davis. 1977. Average Weight of a Measured Cup of Various Foods. U.S. Department of Agriculture, Home Economics Research Report 41. Gebhardt, S.E., and R.G. Thomas. 2002. Nutritive Value of Foods. U.S. Department of Agriculture, Home and Garden Bulletin 72.* Haytowitz, D.B., P.R. Pehrsson, and J.M Holden. 2008. The national food and nutrient analysis program: a decade of progress. Journal of Food Composition and Analysis 21(Supp. 1):S94-S102. * Holden, J.M., S.A. Bhagwat, and K.Y. Patterson. 2002. Development of a multi-nutrient data quality evaluation system. Journal of Food Composition and Analysis 15(4):339–348.* Holden, J.M., A.L. Eldridge, G.R. Beecher, et al. 1999. Carotenoid content of U.S. foods: An update of the database. Journal of Food Composition and Analysis 12:169–196.* INFOODS. 2009. Tagnames for Food Components. INFOODS website. http://www.fao.org/infoods/tagnames_en.stm. (Accessed 06/19/2009). Institute of Medicine. 1998. Dietary reference intakes for thiamin, riboflavin, niacin, vitamin B6, folate, vitamin B12, pantothenic acid, 118 biotin, and choline. National Academy Press, Washington, DC. Institute of Medicine. 2000. Dietary reference intakes for vitamin C, vitamin E, selenium, and carotenoids. National Academy Press, Washington, DC. Institute of Medicine. 2001. Dietary reference intakes for vitamin A, vitamin K, arsenic, boron, chromium, copper, iodine, iron, manganese, molybdenum, nickel, silicon, vanadium, and zinc. National Academy Press, Washington, DC. Jones, D.B. 1941. Factors for Converting Percentages of Nitrogen in Foods and Feeds into Percentages of Protein. U.S. Department of Agriculture, Circular 83, slight revision.* Koc, H., Mar, M. H., Ranasinghe, A., Swenberg, J. A., and Zeisel, S. H. 2002. Quantitation of choline and its metabolites in tissues and foods by liquid chromatography/electrospray ionization-isotope dilution mass spectrometry. Analytical Chemistry 74:4734-4740. Korz, S., and N.L. Johnson. 1988. Encyclopedia of Statistical Sciences. Vol. 8, pp. 261–262, John Wiley and Son, New York, NY. Kubota, J., and W.H. Allaway. 1972. Geographic distribution of trace element problems. In J.J. Mortvedt, ed., Micronutrients in Agriculture: Proceedings of Symposium held at Muscle Shoals, Alabama, pp. 525– 554. Soil Science Society of America, Madison, WI. Lee, J., Suknark, K., Kluvitse, Y., Philips, R.D, Eitenmiller, R.R. 1999. Rapid liquid chromatographic assay of vitamin E and retinyl palmitate in extruded weaning foods. Journal of Food Science 64:968-972. Leonard, S.W., C.K. Good, E.T. Gugger, and M.G. Traber. 2004. Vitamin E bioavailability from fortified breakfast cereal is greater than that from encapsulated supplements. American Journal of Clinical Nutrition 79:86–92. Liem, I.I.H., K.H. Steinkraus, and J.C. Cronk. 1977. Production of vitamin B12 in tempeh: A fermented soybean food. Applied Environmental Microbiology 34:773–776. Livesay, G., and E. Marinos. 1988. Estimation of energy expenditure, net carbohydrate utilization, and net fat oxidation and synthesis by indirect calorimetry: Evaluation of errors with special reference to the detailed composition of fuels. American Journal of Clinical Nutrition 47:608–628. Mangels, A.R., J.M. Holden, G.R. Beecher, et al. 1993. Carotenoid content of fruits and vegetables: An evaluation of analytic data. Journal of the American Dietetic Association 93:284– 296. Martin, J.I., W.O. Landen, A.M. Soliman, and R.R. Eitenmiller. 1990. Application of a tri-enzyme extraction for total folate determination in foods. Journal of the Association of Analytical Chemistry 73:805–808. 119 Matthews, R.H., and Y.J. Garrison. 1975. Food Yields Summarized by Different Stages of Ppreparation. U.S. Department of Agriculture, Agriculture Handbook 102.* Merrill, A.L., and B.K. Watt. 1973. Energy Value of Foods: Basis and Derivation, revised. U.S. Department of Agriculture, Agriculture Handbook 74.* Murphy, E.W., P.E. Criner, and B.C. Gray. 1975. Comparison of methods for determining retentions of nutrients in cooked foods. Journal of Agriculture and Food Chemistry 23:1153.* National Research Council. 1989. Recommended dietary allowances, 10th ed. National Academy Press, Washington, DC. Phillips K.M., W.C. Byrdwell, J. Exler, J.M. Harnly, J.M. Holden, M.F. Holick, B.W. Hollis, R.L. Horst, L.E. Lemar, K.Y. Patterson, M.T.TarragoTrani, and W.R. Wolf. 2008. Development and validation of control materials for the measurement of vitamin D3 in selected US foods. Journal of Food Composition and Analysis 21:527-534. Reamer, D.C., and C. Veillon. 1981. Determination of selenium in biological materials by stable isotope dilution gas chromatography-mass spectrometry. Analytical Chemistry 53(14):2166– 2169. Schakel, S.F., I.M. Buzzard, and S.E. Gebhardt. 1997. Procedures for estimating nutrient values in food composition databases. Journal of Food Composition and Analysis 10:102–114.* Sheppard, A.J. 1992. Lipid Manual: Methodology Suitable for Fatty acidCholesterol Analysis. William C. Brown Publishers, Dubuque, IA. U.S. Department of Agriculture, Agricultural Research Service. 1976. Composition of Foods: Dairy and Egg products; raw, processed, prepared. Agriculture Handbook 8–1. U.S. Department of Agriculture, Agricultural Research Service. 1977. Composition of Foods: Spices and herbs; raw, processed, prepared. Agriculture Handbook 8–2. U.S. Department of Agriculture, Agricultural Research Service. 1978. Composition of Foods: Baby foods; raw, processed, prepared. Agriculture Handbook 8–3. U.S. Department of Agriculture, Agricultural Research Service. 1979. Composition of Foods: Fats and oils; raw, processed, prepared. Agriculture Handbook 8–4. U.S. Department of Agriculture, Agricultural Research Service. 1979. Composition of Foods: Poultry products; raw, processed, prepared. Agriculture Handbook 8–5. U.S Department of Agriculture, Agricultural Research Service. 1980. Composition of Foods Soups, sauces, and gravies; raw, processed, prepared. Agriculture Handbook 8–6. 120 U.S. Department of Agriculture, Agricultural Research Service. 1980. Composition of Foods Sausages and luncheon meats; raw, processed, prepared. Agriculture Handbook 8–7. U.S. Department of Agriculture, Agricultural Research Service. 1982. Composition of Foods Breakfast cereals; raw, processed, prepared. Agriculture Handbook 8–8. U.S. Department of Agriculture, Agricultural Research Service. 1982. Composition of Foods Fruits and fruit juices; raw, processed, prepared. Agriculture Handbook 8–9. U.S. Department of Agriculture, Agricultural Research Service. 1992. Composition of Foods Pork products; raw, processed, prepared. Agriculture Handbook 8–10. U.S. Department of Agriculture, Agricultural Research Service. 1984. Composition of Foods Vegetables and vegetable products; raw, processed, prepared. Agriculture Handbook 8–11. U.S. Department of Agriculture, Agricultural Research Service. 1984. Composition of Foods Nut and seed products; raw, processed, prepared. Agriculture Handbook 8–12. U.S. Department of Agriculture, Agricultural Research Service. 1990. Composition of Foods Beef products; raw, processed, prepared. Agriculture Handbook 8–13. U.S. Department of Agriculture, Agricultural Research Service. 1986. Composition of Foods Beverages; raw, processed, prepared. Agriculture Handbook 8–14. U.S. Department of Agriculture, Agricultural Research Service. 1987. Composition of Foods Finfish and shellfish products; raw, processed, prepared. Agriculture Handbook 8–15. U.S. Department of Agriculture, Agricultural Research Service. 1986. Composition of Foods Legumes and legume products; raw, processed, prepared. Agriculture Handbook 8–16. U.S. Department of Agriculture, Agricultural Research Service. 1989. Composition of Foods Lamb, veal, and game products; raw, processed, prepared. Agriculture Handbook 8–17. U.S. Department of Agriculture, Agricultural Research Service. 1992. Composition of Foods Baked products; raw, processed, prepared. Agriculture Handbook 8–18. U.S. Department of Agriculture, Agricultural Research Service. 1991. Composition of Foods Snacks and sweets; raw, processed, prepared. Agriculture Handbook 8–19. U.S. Department of Agriculture, Agricultural Research Service. 1989. Composition of Foods Cereal grains and pasta; raw, processed, prepared. Agriculture Handbook 8–20. 121 U.S. Department of Agriculture, Agricultural Research Service. 1988. Composition of Foods Fast foods; raw, processed, prepared. Agriculture Handbook 8–21. U.S. Department of Agriculture, Agricultural Research Service. 1990. Composition of Foods Raw, processed, prepared. Agriculture Handbook 8, 1989 Supplement. U.S. Department of Agriculture, Agricultural Research Service. 1991. Composition of Foods Raw, processed, prepared. Agriculture Handbook 8, 1990 Supplement. U.S. Department of Agriculture, Agricultural Research Service. 1992. Composition of Foods Raw, processed, prepared. Agriculture Handbook 8, 1991 Supplement. U.S. Department of Agriculture, Agricultural Research Service. 1993. Composition of Foods Raw, processed, prepared. Agriculture Handbook 8, 1992 Supplement. U.S. Department of Agriculture, Agricultural Research Service. 1992. Provisional Table on the Selenium Content of Foods. USDA, HNIS, PT– 109. U.S. Department of Agriculture. 2007. USDA Table of Nutrient Retention Factors, Release 6. Nutrient Data Laboratory Home Page at www.ars.usda .gov/nutrientdata. Accessed 6/19/2009* U.S. Department of Agriculture, Agricultural Research Service. 2004. USDA Database for the Choline Content of Common Foods. Nutrient Data Laboratory website: http://www.ars.usda.gov/nutrientdata/choline. Accessed 6/19/2009 * U.S. Department of Agriculture, Agricultural Research Service. 2005. USDA National Fluoride Database of Selected Beverages and Foods Release 2. Nutrient Data Laboratory website: http://www.ars.usda.gov/nutrientdata/ fluoride. (Accessed 6/19/2009)* U.S. Department of Agriculture, Agricultural Research Service. 2008. USDA Food and Nutrient Database for Dietary Studies (release 3.0) [database]. Food Surveys Research Group website: http://www.ars.usda.gov/ba/bhnrc/ fsrg (Accessed 6/19/2009). U.S. Food and Drug Administration, Department of Health and Human Services. 2008. Food Labeling. Code of Federal Regulations, Title 21, Pt. 101. U.S. Government Printing Office website: http://www.gpoaccess.gov/ cfr/ index.html (Accessed 6/19/2009). Van Winkle S, Levy S.M., Kiritsy M.C., Heilman J.R., Wefel J.S., Marshall T. 1995. Water and formula fluoride concentrations: Significance for infants fed formula. Pediatric Dentistry. 17(4):305-310. Watt, B.K., and A.L. Merrill. 1963. Composition of Foods Raw, processed, prepared. U.S. Department of Agriculture, Agriculture 122 Handbook 8. Weihrauch, J.L., and A.S. Chatra. 1994. Provisional Table on the Vitamin K Content of Foods, Revised. USDA, HNIS, PT–104.* Weihrauch, J.L., L.P. Posati, B.A. Anderson, and J. Exler. 1977. Lipid conversion factors for calculating fatty acid content of foods. Journal of the American Oil Chemists Society 54:36–40. Weihrauch, J.L., and J. Tamaki. 1991. Provisional Table on the Vitamin D Content of Foods. USDA, HNIS, PT–108.* Williams, J., Patterson, K., Howe, J. (Retired), Snyder, C., Boillot, K., Lofgren, P., Thompson, L., Luna, A., Nalawade, A., Douglass, L., Holden, J. 2009. Nutrient Composition in Ground Pork using Regression Techniques (Poster). Institute of Food Technologists Annual Meeting + Food Expo. Anaheim, CA. June 6-9, 2009, http://www.ars.usda.gov/ SP2UserFiles/ Place/12354500/Articles/IFT09_GrdPork.pdf (Accessed 8/20/2009) * Zeisel, S. H., and Blusztajn, J. K. 1994. Choline and human nutrition. Annual Reviews of Nutrition. 14:269-296 Zeisel, S.H., Mar, M.H., Howe, J. C., Holden, J. M 2003. Concentrations of choline – containing compounds and betaine in common foods. Journal of Nutrition 133:1302-1307; Erratum. 2003. Journal of Nutrition. 133:2918-2919 THE CANADIAN FOOD COMPOSITION DATA Prepared by Research Division and Biostatistics and Computer Applications Division, Food Directorate, Health Protection Branch, Health Canada. The use of trade, firm or corporation names in this database is for information and convenience of the user. Such use does not constitute an official endorsement or approval by Health Canada of any product or service to the exclusion of others that may be suitable. NutriBase software was independently developed by CyberSoft, Inc. NutriBase software contains major portions of the Canadian Nutrient Files. CyberSoft also calculated eight additional fields of data. These new fields include % Calories from Protein, % Calories from Carbohydrates, % Calories from Fat, and % Calories from Alcohol. CyberSoft also calculated Calories from Protein, Calories from Carbohydrates, Calories from Fat, and Calories from Alcohol and added them into the database. These eight values were calculated using the compensated 4-4-9 method (see Appendix). All eight of these new fields are searchable within the software. Please direct all questions regarding NutriBase to CyberSoft, Inc. at 480-603-8359 (8-3, Mon-Thu, Arizona time). Introduction to the Canadian Nutrient Files The Canadian Nutrient File (CNF) is a computerized food composition database containing average values for nutrients in foods available in 123 Canada. Much of the data in the CNF have been derived from the comprehensive United States Department of Agriculture (USDA) Nutrient Database for Standard Reference, up to and including Standard Release 171. Foods included in the USDA database, which are known not to be on the Canadian market, are excluded. Modification for Canadian levels of fortification and regulatory standards, along with addition of Canadian only foods or Canadian commodity data, as well as where appropriate, some brand name foods, form this standard Canadian resource. 124 USDA Changes Incorporated: Changes include those adopted by USDA since SR13 that were appropriate for addition of foods and/or nutrients as data became available. Prominent changes within the US updates include: • Vitamin E in mg alpha-tocopherol • Removal of Vitamin E in alpha-tocopherol equivalents • Addition of Vitamin A in RAE and mcg retinol • Addition of five carotenoids • Addition of separate nutrient codes for cis and trans isomers of many fatty acids Foods Also, much of the data recently published on Canadian Traditional Native Foods from several sources, have been added to the database. Food Names Food names without abbreviations are now available. The food names themselves are now more consistent in structure for more reliable searches. The 60 characters food name field is still also available. Also many of the foods in the database have new conversion factors for more reasonable and a wider range of reasonable portion size weights. Nutrients • Dietary folate equivalents • Vitamin A expressed in Retinol Activity Equivalents and Retinol in mcg have been added to the database. Vitamin A, in International Units and Retinol Equivalents, has been deleted. • A near comprehensive set of data for Vitamin D values are now available. • A trace field has been added which will indicate when the amount of nutrient in a food is not thought to be zero, but is calculated or estimated to be below international standards defined for trace amounts. • Comprehensive assumed zero entries for Vitamin C, Vitamin B12, cholesterol, caffeine, theobromine and alcohol. Canada's Food Guide for Healthy Eating Assignments • Portion size measures, which relate Canada's Food Guide for Healthy Eating (CFGHE) food grouping principles to each of the CNF foods, have been added to this version of the database. Limitations to the Data It is essential that potential users of the CNF recognize its strengths and limitations. The database is maintained and updated on an ongoing basis. USDA releases, relevant scientific literature, industry data for 125 common brand-name products, and current analyses from Canadian government, university and research laboratories, are gathered and examined to meet inclusion criteria. Imputations are added when determined to be valid. Thus, average amounts of nutrients in foods available in Canada are supplied. The exact nutrient composition of a specific apple or cookie will not be found on the CNF. These averages, except where indicated otherwise, take into account sources of a given food across Canada. Local foods may have a different profile than the national average. Every food item may not contain a complete nutrient data set. Where data is unavailable for a particular nutrient on the database, it is a missing value and not a true zero. Software developers and others personalizing the database must learn to understand and account for the missing values. The CNF is particularly suited for assessment of diets, recipe development, menu planning when ingredients or menu items are not specific and for population nutrition surveillance activities, where nutrient intake distributions are used to conduct risk assessments such as modeling for fortification proposals. It is also useful in the initial stages of product development to ensure that nutritional targets can be met. While there are many target uses of the CNF, use of generic information from reference databases for calculating nutrient values for labeling purposes is generally not recommended since a close match to the product formulation or specific ingredients and processes cannot be assured. Most users are looking for an average or mean value for the generic representation of the foods as described. These generic values have been derived from combining brands of similar products, for example all major brands of ketchup; various varieties of oranges or similar beef cuts from various producers. These data may also be developed by a commodity association utilizing sample units from different producers, and represent a hypothetical, generic product that is represented by a single value. Analytical values represent the total amount of the nutrient present in the edible portion of the food, including any nutrients added in processing. The values do not necessarily represent the nutrient amounts available to the body as often this relates to nutrient interactions, physiological mechanisms, nutritional status and other factors when not enough information is available. New For This Edition Altered Update Approach - Most new editions of the CNF in the past have grouped the major changes by food group. However, much of the maintenance and update work between 2001-2005 has not focused on overhauls to any specific food group or group of like foods, but rather concentrated on revisions to the expressions or content of certain nutrients throughout all of the foods in the database, (refer to the section entitled Information on Nutrients for the details of these changes) an overhaul of the conversion factor or measures information, embedding of 126 Canada's Food Guide for Healthy Eating assignments into the CNF database files, and a lot of behind the scenes work to help the programmers ready the files for internet display and easy search functions. Still 427 foods have been added to the CNF largely through data released by the USDA in standard releases 14, 15, 16, 16-1 and 17. Not all foods included in the USDA database are suitable for the CNF either as they are not marketed here or are not allowed here due to unique Canadian regulations. While we found good success for years in working from USDA update files to track the new nutrients, changed nutrients, new conversion factors etc., informal comparisons revealed that the number of changes to the USDA files that were not tracked in this manner was increasing. Therefore we conducted a “mirroring exercise” to compare by computer application where the differences were true differences and where they were through lack of upkeep. As a result, clients will find many more changes to the nutrients than might be expected strictly from the USDA update files alone. Conversion Factors - Many conversion factors from a variety of sources were used to update the measure for which a weight of measure is provided within the database. Some of these are more userfriendly and embedded as part of the preparation for the web based program. Many clients may find them easier for their own programs as well as fewer calculations will be involved. Assignments in the Meat and Alternates Group - Of particular note for all users of these CFGHE assignments is the considerable difference of approach to recommended serving sizes utilized in the Meat and Alternates group. It is the philosophy of the creators of CFGHE that people tend to eat less meat or alternates at some meals (i.e., lunch meats in a sandwich, an egg in a salad) than others (i.e., fish fillet, meat steak) and that the education messages were better targeted when aimed at an overall consumption of between 100-300g of food per day than a single serving size for a meat or alternate portion. The closest acceptable fit in terms of making an assignment for each meat or alternate food in the database was to give a range of 50-100g for meat, poultry and fish, 1-2 eggs etc. However, we cannot electronically produce nutrient profiles on a range (calculation fields only accept one value), so web clients will see for beef steaks for example, that the indicator of a CFGHE measure description appears beside a measure which reads “50-100g”, but there is no conversion factor or weight associated. However, the user can find the conversion factor for one end of that range, 100g. Similarly, foods that are very high in fat, and/or so low in nutrients that they don't fit into the rainbow, are called “Other foods”. In the CFGHE system, these are not given portion sizes as it was felt that consumers would then consider these to be acceptable or reasonable sizes when in fact their consumption is to be limited entirely. For all other more 127 information on the use, rationales and thresholds utilized to create these assignments please see the section entitled Relating Canada's Food Guide for Healthy Eating to CNF foods at www.healthcanada.ca/cnf. For a list of the groups and subgroups please see Table 1 in the Appendix. For a short time, the online indicators and/or the embedded subgroups within the downloadable CNF files will be the only access to this information. The updated excel file version will be available in the fall of 2005. Native Foods - Data published through a large study conducted by the Centre for Indigenous Peoples' Nutrition and Environment (CINE) 5,6,7,8,9,10,11,12, the Alaska Traditional Knowledge and Native Foods Database13 have been incorporated into the database. They all carry the term Native in the food description and the foods themselves can be located within the group of like foods (i.e., Finfish and Shellfish products, Lamb, Veal and Game Products). Density or Specific Gravity - The CNF data has been changed to provide the density or specific gravity of the edible portion of homogeneous foods. Most of these densities are calculated from the weight of a 2.54 cm cubed (one inch cube). These densities are most commonly applied by those users employing food models. For foods with no refuse, the factor can be used directly; for foods with refuse, the percent refuse must be subtracted from the model volume before applying the factor. Portion Size Conversion Factors - The conversion factors are foodspecific multipliers by which the nutrient values for each food may be multiplied to give the nutrients in described portions. They should not be considered as “average” or “typical” serving sizes. Multiplying by the factors provides the nutrients in the edible portions described in the CNF file (e.g., 1 fruit; 100 ml puree). Local markets must always be checked for available foods and the selection of values to be used in calculations must be based on such local information. The volume portions have been derived from the cup measures and suffer from the same strictures as described in USDA Handbook No. 456, Appendix B (2) as follows: Cup weights - Cup weights shown in the CNF data may or may not be adequate for determining weights of larger measures such as 1 quart or more. Although specific only for 1 cup, the weights are believed reasonably suitable for calculating nutrients in serving portions that are in the range of from less than 1 cup up to 2 cups. Conversion Factors for Volume Weights - In some cases conversion factors are provided for 5 and 15 ml volume weights and have been derived independently from teaspoon and tablespoon amounts (not by multiplying by 0.05 and 0.15) to conform with USDA Handbook No. 456, Appendix B (2) as follows: “For those foods commonly used in units of 1 tablespoon or 1 teaspoon, weights shown are for the foods measured in those units. Weights obtained in this manner are usually less than the weights derived for them by dividing the weight per cup by 16 (the 128 number of tablespoons in 1 cup) or by 48 (the number of teaspoons in 1 cup).” Edible Cooked Food - Occasionally it is more appropriate and useful to provide a weight of edible cooked food from 100 g of raw. In those cases the factors provided are derived from the weight of cooked portions yielded from 100 g raw. They cannot be applied to data for the comparable raw food to “cook by calculation” as there are other factors such as nutrient retention to consider in such calculations. Conversion Factor for Edible Portion per 1 Kg - This is the number by which one would multiply the nutrient amount per 100 g to obtain the nutrient amount in the edible portion per 1 kg as described. Refuse, the inedible material (i.e., seeds, bone, and skin) contained in some foods can be calculated from this by using the following formula: R = 100 - F4 x 1 kg 100 g R = Percent Refuse F4 = Factor 4 For raw meats, the items as purchased are raw; for cooked meats, these conversion values are the amounts in the edible portion from 1 kg of cooked meat with refuse. For meat cuts containing bone, any connective tissue present is included in the value given for bone. Separable fat is not part of the refuse if the meat is described as lean and fat. Lean refers to muscle tissue that can be readily separated out of the intact cut and includes any fat striations within the muscle. All measurements are metric. Metric System Equivalents employed in conversions are supplied in this section. All linear measurements are in centimeters. For certain nutrients there are no data at the present time. 129 Information Regarding Canadian Nutrients For the most part nutrients were determined by AOAC methods14 or by methods approved by Health Canada nutrition research scientists. Documentation accompanying each standard release of the USDA Nutrient Database for Standard Reference1 outlines methodologies employed for each nutrient in detail. The five decimal digits seen throughout the CNF do not reflect the accuracy of the data but have been included for the purpose of minimizing round-off errors in subsequent calculations. Decimal Places. The five decimal digits seen throughout the CNF do not reflect the accuracy of the data but have been included for the purpose of minimizing round-off errors in subsequent calculations. Proximate components include moisture (water), protein, total lipid (fat), carbohydrate and ash. Addition of these 5 components should approach 100. Carbohydrate is determined as the difference between 100 and the sum of the remaining proximate components (and alcohol when present). The determination of total carbohydrate values by this method of calculation includes total dietary fibre. Carbohydrate values are assumed zero in animal products (nutrient source code 12). Protein values are calculated from the level of measured total nitrogen in the food, using the conversion factors recommended by Jones (1941). Protein values for soy products, chocolate, cocoa products, coffee, mushrooms and yeast are adjusted for non-nitrogenous material. The adjusted protein conversion factors used to calculate protein for these items are: soy products 5.71, chocolate and cocoa 4.74, coffee 5.3, mushrooms 4.38, and yeast 5.7. Carbohydrate when present is determined as the difference between 100 and the sum of the remaining proximate components (and alcohol when present). The determination of total carbohydrate values by this method of calculation include total dietary fiber. Carbohydrate values are assumed zero in animal products. Food Energy is expressed in both kilocalories (kcal) and kilojoules (kJ). One kcal equals 4.184kJ. Calorie values are based on the Atwater system for determining energy values; as the specific Atwater factors (specific to described food types) or used, for most foods the calorie value will differ from that calculated by the general 4/9/4 factors for protein/fat/carbohydrate. Details for the derivation of the Atwater calorie factors are outlined in Agriculture Handbook No. 7415. Total Dietary Fiber (TDF) is made of complex and heterogeneous polymeric materials that are not easy to separate from other food components, particularly starch. Methods for dietary fibre have evolved remarkably over the past decade and at the moment there are 3 different AOAC approved methods for measuring TDF. TDF values originating from USDA data are analysed by AOAC14 methods 985.29 (Prosky) and 991.43 (Lee). Values originating from Canadian 130 government laboratories (nutrient source code 3) were analysed using AOAC method 992.16 (Mongeau). TDF is assumed zero in many foods after review of literature and/or consultation with scientific experts (nutrient source code 12). Vitamin A The primary unit of biologic activity for Vitamin A is called alltrans retinol. Carotenoids are a group of plant pigments that are provitamin or precursors to Vitamin A. The body cannot use these inactive forms until they are converted to the active, retinol. Total Vitamin A activity of a food then is expressed as a sum of its retinol and carotenoid content after conversion. Unfortunately, more than one method of expressing this total activity have been developed and not used universally. Also, the National Academy of Sciences16 has recently determined that the contribution from carotenoids is roughly half of that thought previously, resulting in the new unit, Retinol Activity Equivalents. Nutrition labels in the United States use International Units or IU. 1 IU = 0.3 mcg retinol 1 IU = 0.6 mcg ß-carotene 1 IU = 1.2 mcg other carotenoids Vitamin A on the Canadian Nutrition Facts table is expressed in Retinol Equivalents, RE 1 RE = 1 mcg retinol + mcg ß-carotene/6 + mcg other carotenoids/12 The new Dietary Reference Intakes (DRI) recommendations16 have now suggested Vitamin A should be expressed in terms of Retinol Activity Equivalents or RAE 1 RE = 1 mcg retinol + mcg ß-carotene/12 + mcg other carotenoids/24 It is not simple or advisable to convert between RE's and IU's in a food containing both Retinol and carotenoids as one doesn't have information on the proportions of each. Calculating any of these activity standards is best done by starting with the amounts, in g, of each fraction contributing to activity. The CNF 2005 version lists values of Vitamin A activity in terms of RAE, retinol in micrograms, and ß-carotene in micrograms. 131 Other Carotenoids Data compiled by USDA for 4 additional classes of carotenoids have been added to the CNF for this edition: alpha-carotene lycopene ß-cryptoxanthin lutein & zeaxanthin (combined) These carotenoids have a much lower contribution to Vitamin A activity, but act as antioxidants that may have roles in reducing risks of cancer and other diseases. Vitamin D Vitamin D is expressed in units of mcg 40 IU Vitamin D = 1 mcg CNF staff initiated a project to expand the Vitamin D values on the database. Critical examination of the high percentage of formerly “missing values” was undertaken. Some were known by scientific deduction to be zero are now assigned assumed zero status, some values were borrowed from international databases, and some were estimated by recipe calculation to be below international standards for trace amounts. Vitamin D in fish is determined by reverse phase HPLC-UV after sample saponification followed an extraction and an extensive clean-up involving a normal phase HPLC-UV separation. Vitamin E There are a number of isomers of Vitamin E. In the past a calculation of Vitamin E equivalents, which took into account activities of various isomers was most commonly used. However, the National Academy of Sciences has now determined that the only isomer of significant activity is the RRR-”- tocopherol expressed in mg. As such the only expression of Vitamin E activity now in the CNF is “- tocopherol in mg. Niacin is expressed both in terms of mg of preformed niacinamide present in the food as well as niacin equivalents (NE) which includes that which can be formed from tryptophan. There are 2 methods of calculating niacin equivalents: • If preformed niacin, mg and tryptophan, g were present in the database then: (tryptophan x 1000/60) + niacin = NE • If tryptophan was not present it was imputed to be 1.1% of total protein and: (0.011 x protein) x 1000/60 +niacin = NE 132 Folate, Folic Aid, Total Folacin There are two chemical forms now in foods that contribute to folate bioactivity. Naturally occurring (food folate) and the added synthetic form (folic acid). The folic acid is more active than the food folate. As a result one finds in sources of nutrient data: • Folic acid in mcg • Food folate or naturally occurring folate in mcg • The arithmetic sum of the two (not accounting for activity) sometimes referred to as total folacin or simply as Folate in mcg. This is the unit to be used on the Canadian label • Dietary Folate Equivalents 1 DFE = (mcg folic acid x 1.7) + mcg food folate The DFE is now the most commonly unit of expression when referring to recent population nutrition studies. There are a number of assumptions/limitations that need to be recognized before utilizing these data: These data assume that the additions of folic acid are as outlined in the regulations. In practice overages are common. Where a range is allowed we are basing calculations on the average. The addition is optional for cornmeal, pasta and rice but some realities in the marketplace allow us to make generalizations. There are very few manufacturers of cornmeal and they do not want to produce both fortified and unfortified batches. We are assuming that even the cornmeal used as an ingredient by manufacturers (i.e., in tacos shells) is fortified. Most pasta is fortified in Canada. There are some imported brands that are not fortified and there is a separate listing for these in the database. However where it is an ingredient in manufacture of another food we are assuming fortified. In practice up to this point only precooked rice is commonly fortified. Values for cooked pasta were calculated based on the moisture difference between cooked and dry. There are no standard retention factors for folic acid upon cooking/processing. Only rather wide rages are published depending on many factors. Fatty Acids Fatty acids are referred to by a variety of nomenclature systems, many of which date back prior to common knowledge of specific and geometric isomers. For unsaturated fatty acids, the trivial and systematic names reflect the most common isomer, although all isomers are included in the value. The most specific descriptor of the isomers is that indicated through the use of a shorthand system of numbers and letters. The first number in the nutrient description (before the colon) is the number of carbon atoms and the second (after the colon) is the number of double bonds in the chain. The letter c, t or i indicates whether or not the bond is cis or trans. For polyunsaturated fatty acids, cis and trans configurations at successive double bonds may be indicated. The i indicates that the fatty acid is not a single isomer but 133 the peaks cannot be easily differentiated in the particular food item (i.e., 18:2 t depicts a fatty acid with 18 carbon atoms, 2 double bonds, and a trans configuration about at least one of those double bonds). The values shown are for the actual quantity (g/100g) of each fatty acid and do not represent fatty acid triglycerides. These data were converted to grams of fatty acid per 100 g of total lipid (fat) using lipid conversion factors and then to gram of fatty acid per 100 grams edible portion of food using the total lipid content. Details of the derivation of lipid conversion factors have been published18. Fatty Acid Totals As the individual fatty acids are determined by a different analytical method than that of total fat, the sum of fatty acids is rarely exactly equal to the total fat value. Moreover, total fat may include other fatty acids, phospholipids or sterols not analysed in that food. Values for total saturated, monounsaturated and polyunsaturated fatty acids may include individual fatty acids not listed in the CNF: therefore, the sum of their values may exceed the sum of the individual fatty acids listed. In rare cases, the sum of individual fatty acids may exceed the sum of the values given for the total saturated fatty acids (SFA), monounsaturated fatty acids (MUFA), and polyunsaturated fatty acids (PUFA). These differences are generally caused by rounding and should be relatively small. Zero values for individual fatty acids should be understood to mean that trace amounts may be present. When g fatty acids per 100g were calculated to g fatty acids per 100g of food, values of less than 0.000g could be rounded to zero. For formulated or brand name foods, industry data were often available for only the fatty acid classes (SFA, MUFA, PUFA) but were lacking for individual fatty acids. Cholesterol - Cholesterol is present only in foods of animal origin. For foods of plant origin, the value for cholesterol is assumed to be zero. Calculated values - Nutrient values have been recalculated for those nutrients where regulations in Canada require supplementation or fortification of certain foods as described in the Food and Drug Act and Regulations2. Such values are identified both by the food code and the nutrient source codes. In the same manner, certain foods (such as: CREAM, SOUR, cultured, 14%fat) that are not for sale in the U.S. have been calculated in their entirety to approximate Canadian foods and are similarly identified. Calculations are based on the values shown in USDA Nutrient Database for Standard Reference utilizing the conversion factors shown in Table 2 in the Appendix. Some inconsistencies may appear in the last decimal due to the conversion and rounding of numbers but are inconsequential in the overall accuracy of the data. Many amino acid and fatty acid profiles are calculated based on a difference in total protein or total fat from a similar food with an analyzed profile. For these foods no standard error or number of observations appear. 134 Metric System Equivalents for Units of Measure Type US and Imperial measures Metric Equivalents 1 teaspoon 4.9 ml 5 ml 1 tablespoon 14.8 ml 15.0 ml 1 fluid ounce (US) 29.57 ml 1 fluid ounce (Imperial) 28.41 ml 1 cup (8 US fluid ounces) 236.6 ml 1 pint (16 US fluid ounces) 473.2 ml 1 pint (20 Imperial fluid ounces) 568.3 ml 1 quart (32 US fluid ounces) 946.4 ml 1 quart (40 Imperial fluid oz) 1136.5 ml 1 gallon (128 US fluid ounces) 3.786 ml 1 gallon (160 Imperial fluid ounces) 4.546 ml 4L 1 cubic inch 16.39 ml 2.54 cm cube 15.63 ml Length 1 inch 2.54 cm Weight 1 ounce (avoirdupois) 28.35 g 1 pound (avoirdupois) 453.6 g 1 cup (poultry & cooked meats, diced) 140 g 250 ml 148 g 1 cup (poultry & cooked meats, ground) 110 g 250 ml 116 g 1 Calorie 4.184 kJ Volum e Energy Canadian Household Measure 250 ml 500 ml 1L References for CNF Nutrient Data 1. U.S. Department of Agriculture, Agricultural Research Service. USDA Nutrient Database for Standard Reference. Composition of Foods: Raw, 135 Processed, Prepared. Release 14, Release 15, Release 16, Release 161, Release 17. 2. Department of National Health and Welfare. 1981. Food and Drugs Act and Regulations. Minister of Supply and services Canada (plus electronic updates). http://www.hc-sc.gc.ca/foodaliment/friiaraaii/food_drugs-aliments_drogues/act-loi/e_index.html 3. Klensin, J.C., Feskanich, D., Lin, V., Truswell, A.S., and Southgate, D.A..T. 1989. Identification of food components for INFOODS data interchange. United Nations University, Tokyo. www.fao.org/infoods/ tagnames_en.stm 4. Canadian Food Inspection Agency. 1996 (+amendments). Guide to Food Labelling and Advertising. www.cfia-acia.agr.ca. 5. Kuhnlein, H.V., Chan, H.M., Leggee, D., Barthet, V. 2002. Macronutrient, Mineral and Fatty Acid Composition of Canadian Arctic Traditional Food. Journal of Food Composition and Analysis. 15: 545566. 6. Fediuk, K., Hidiroglou, N., Madère, R. and Kuhnlein, H.V. 2002. Vitamin C in Inuit Traditional Food and Women's Diets. Journal of Food Composition and Analysis. 15: 221-235. 7. Belinsky, D.L., Kuhnlein, H.V. 2000. Macronutrient, Mineral and Fatty Acid Composition of Canada Goose (Branta Canadensis): An Important Traditional Food Resource of the Eastern James Bay Cree of Quebec. Journal of Food Composition and Analysis. 13: 101-115 8. Belinsky. D.L., Kuhnlein, H.V., Yegoah, F., Penn, A.F., Chan, H.M. 1996. Composition of Fish Consumed by the James Bay Cree. Journal of Food Composition and Analysis. 9: 148-162. 9. Kuhnlein, H.V., Appavoo, D., Morrison, N., Soueida, R., Pierrot, P. 1994. Use and Nutrient Composition of Traditional Sahtu (Hareskin) Dene / Métis Foods. Journal of Food Composition and Analysis. 7: 144157. 10. Kuhnlein, H.V., Soueida, R. 1992. Use and Nutrient Composition of Traditional Baffin Inuit Foods. Journal of Food Composition and Analysis. 5: 112-126. 11. Kuhnlein, H.V., Kubow, S., Soueida, R. 1991. Lipid Components of Traditional Inuit Foods, and Diets of Baffin Island. Journal of Food Composition and Analysis. 4: 227-236. 12. Morrison, N., Kuhnlein, H.V. 1993. Retinol Content of Wild Foods Consumed by the Sahtu (Hareskin) Dene/ Metis. Journal of Food Composition and Analysis. 6: 10-23. 13. Alaska Traditional Knowledge and Native Foods Database. [on line] http://www.nativeknowledge.org/start.htm 136 14. Association of Official Analytical Chemists. 1995. Official Methods of Analysis. 16th ed. 2 vol. Arlington, VA [and previous editions]. 15. Merrill, A.L. and B.K. Watt. 1973. Energy Value of Foods. Basis and Derivation. Rev. U.S. Dept. of Agric., Agric. Handb. No. 74. 16. National Academy of Sciences. National Research Council. 2000. Dietary Reference Intakes For: Vitamin C, Vitamin E, Selenium and Carotenoids. National Academy Press, Washington, D.C. www.nap.edu 17. National Academy of Sciences. National Research Council. 1999. Dietary Reference Intakes for: Thiamin, Riboflavin, Niacin, Vitamin B6, Folate, Vitamin B12, Pantothenic Acid, Biotin and Choline. National Academy Press, Washington, D.C. www.nap.edu 18. Weihrauch, J.L., L.P. Posati, B.A. Anderson and Exler, J. 1977. Lipid Conversion Factors for Calculating Fatty Acid Content of Foods. J. Amer. Oil Chem. Soc. 54: 36-40. 19. Health Canada. 2005. Relating Canada's Food Guide to Healthy Eating to Canadian Nutrient File Foods [on line]: http://www.hcsc.gc.ca/food-aliment/ns-sc/nr-rn/surveillance/cnffcen/e_relating _cfg.html 20. Health Canada. 2005. Relating Canada's Food Guide to Healthy Eating to Canadian Nutrient File Foods Rationale [on line]: http://www.hc-sc.gc.ca/food-aliment/ns-sc/nrrn/surveillance/cnffcen/e_rationale.html 21. Health Canada. 2005. Thresholds for Assigning Foods to Specific Groups and Subgroups [on line]: http://www.hc-sc.gc.ca/food-aliment/nssc/nr-rn/surveillance/cnf-fcen/e_thresholds.rtf 22. Adams, C.F. 1975. Nutritive Value of American Foods in Common Units. U.S. Dept. of Agric., Agricultural Handbook No. 456. 137 GLOSSARY OF NUTRIBASE TERMS Active Client - The “active client” is the selected client - the one you're currently working with. This client's name appears in the Client Selection List at the top of your screen when you select the Client function. You can select the active client by clicking the down arrow in the Client Selection List and selecting the desired client. The Professional and higher allow you to organize your clients in up to 26 “Client Folders.” “All Foods” Tab - This is a tab in the Food Log. It always contains every food item in the nutrient intake. You can organize and analyze your Food Log by meals or snacks by copying the food items (and/or PFI's and recipes) from the “All Foods” Tab to any of the six meal and/or snack tabs. “All Meals” Tab - This is a tab in the Meal Manager. This tab always contains every Meal in the Meal Manager. You can organize (and analyze) your Meals by copying them from the “All Meals” Tab to any other Meal notebook tab. You can add, edit, and delete “Meals” Tabs as you wish. “All Personal Food Items” Tab - This is a tab in the Personal Food Item Manager. It always contains an alphabetical listing of every PFI in the nutrient intake. “All Recipes” Tab - This is a tab in the Recipes Manager. This tab contains every recipe in the Recipe Manager. You can organize (and analyze) your recipes by copying them from the “All Recipes” Tab to any other recipe notebook tab. You can add, edit, and delete “Recipes” Tabs as you wish. Append - When you “append” information, you add it to the existing information. This way you lose no information. For example, if you “append” to a Meal, you are adding items to the Meal. Army AR600-9 Body Fat – “AR600-9” is the U.S. Army’s regulations regarding a soldier’s body weight requirements. This document explains how to derive these values by using body fat as the primary guide. Auto-Record List - A list of food items and/or exercises that a client eats or performs every day. The Auto-Record List is a list of items that you can create for each and every client if you wish. Each time you record the very first intake item for the day for the selected client, the items in the Auto-Record List are automatically recorded for you. 138 Calendar Images - NutriBase uses images to provide feedback regarding the status of particular calendar days. You can select these images in the Clients Criteria section of NutriBase. Note: When you first copy Meal Plan days to a client's intake days, the images on the calendar will be NutriBase Apple icons. This is because you have not yet acknowledged that the food items copied to that date have been eaten. You can edit the intake for that day to conform to the actual intake (as opposed to the intake recommended by the Meal Plan). When you click the “Save” Button for that day, the NutriBase Apple icon will change into a “Thumbs Up” or “Thumbs Down” icon as appropriate. Client-Specific - Relating specifically to a specific client. Cherry Pick Dates- “Cherry pick” dates from a NutriBase calendar individually and at random. Cherry pick dates by clicking them. Normally, you would cherry pick non-sequential dates since it is often easier to pick contiguous dates using the range option. This function is typically used to select dates for a multi-day intake. You can also cherry pick items from some NutriBase list boxes. Cherry Pick Items - You can “cherry pick” items from some list boxes by pressing the Ctrl key and while continuing to hold this key down, you can click the items you wish to select with the mouse cursor. You can also cherry-pick dates from certain NutriBase calendars by simply clicking the dates. CIM (Client Intake Module) See “Client Intake Module (CIM)” topic below. Client Folders - NutriBase provides up to 26 “Client Folders” for you. Each folder contains an alphabetical listing of the clients you have assigned to that folder. You can organize your recipes into categories with these folders. You could organize clients by special needs (weightloss, diabetic, body-building, etc.) or by location (Bally’s, Bill's Gym, Diet Center, etc.). Click the “Folders” Button to manipulate these folders and their contents. Client Group - A “client group” is a group of clients you have selected and identified as a group. Defining a client group allows you to analyze a group of clients as if they were a single entity. This gives you an analysis of what the group as a whole did. (NutriBase also allows you to analyze each member of the group individually if you like). Client groups are supported in NutriBase Professional and higher only. Use the client group “Create” Button to define a client group. 139 Client Intake Module (CIM) – The Professional and higher editions of NutriBase support the Client Intake Module (CIM). This is software you can upload to your web site or have NutriBase burn to a CD for you. You can give this software to a client. They can install this to their own PC and record their own food intake for up to 30 days. They can save this information to a file on a flash drive or email it to you as an email attachment. The purpose of the CIM software is to record a “snapshot” of how a new client has been eating up until the point they came to you for your help and advice. It is not designed for long-term use. Once you import this file into NutriBase, it is as if you had entered this data for them. You can quickly generate a variety of reports, save them as PDF files, and post them to your web site, email them to your client as an email attachment, or print out the report to hand it to your client. You can customize this software. There are no per-copy fees, royalties, or any charge of any kind. You can make as many copies as you wish. Your CD's are reusable. NutriBase enables you to click a button that will burn a CD for you to provide to your client. Your client can install the NutriBase Client Intake Module on their own PC, record up to 30-days of food and exercise intake, then click a button to email you the results so you can provide an analysis and your recommendations. If you want your client to track their Food Logs long-term, we recommend you have them purchase a personal edition of NutriBase from www.dietsoftware.com. These versions start at $34.95. Users of these low-end versions can record their data and click an Export button to export everything they’ve recorded to a file that they can email to you. When you import it, all their data will appear in your NutriBase Professional or higher edition. The Cloud - The “Cloud” is a popular way to refer to a server or to a network of servers that belong to (or are leased by) your sync service provider for the purpose of providing you their services. Column Header - A “column header” is topmost cell of a spreadsheet view in NutriBase. It contains the column heading in the form of a text string. An example of a header would be “Food Name.” You can drag the column header to the left or right to re-sequence the column order. You can drag the right edge of a column header to resize it. NutriBase will remember the new width for you. Each column resize is specific to the food category you are perusing. Copy Command - The Copy Command lets you copy information (usually a text string or a graphic image) to the Windows Clipboard (a temporary storage area that your operating system sets aside for you). This allows you to save this information to paste into another Windows document of some sort later. To copy text to the clipboard, you must select the information you wish to copy. Select information by clicking your left mouse button down at the point you wish to begin selecting. Drag the mouse to the end of the text or graphic and release the mouse button when you reach the end of the information you want to copy to 140 the clipboard. To copy a graphical image, click on the image (to give it the focus), then press “Alt-Print Scrn” (That is, hold down the Alt key. Then, while still holding the Alt key down, press the Print Scrn key. Let them go simultaneously.) This copies the image to the Windows clipboard. To actually copy this information to the Windows Clipboard, press “Ctrl-C.” That is, hold down the Ctrl key on your keyboard, then, while still holding it down, press the “C” key once and then let them both go. A similar command is the cut command. Cost Database - NutriBase features an updateable and editable Food Cost Database. This feature allows you to more conveniently and quickly edit existing food costs, add new ones, or delete existing records. By letting you display all the ingredients used in your recipes at once, you can add cost information without having to look up each ingredient in the database or in an individual recipe. This vastly simplifies the task of costing your recipes, meals, and/or meal plans. CPF Ratio - The “CPF Ratio” is the ratio of calories from Carbohydrates, Protein, and Fat - in that order - in a client's intake, recipe, or Meal Plan. A CPF Ratio of “40-30-30” indicates that an intake, recipe, or Meal Plan contains 40% of its calories from Carbohydrates, 30% of its calories from Protein, and 30% of its calories from Fat. You can assign CPF Ratio goals to clients. NutriBase provides the CPF Ratios for intakes, recipes and Meal Plans. The CPF Ratio tells you a lot about a client's intake, a recipe, or a Meal Plan. NutriBase will also display the PCF Ratio (if you select this option in the User Preferences). If a food, recipe, or meal contains alcohol, NutriBase will give you the CPFA ratio. CNF Data – CNF stands for “Canadian Nutrient Files,” which in this product, consists of the Canadian Nutrient Files, the data contained in our Medical Nutritionals food category, the data contained in our Vitamins and Mineral Supplements food category, and the data contained in our Commercial Ingredients food category. CSV – Comma Separated Values. When you see “CSV” after a report name (in the “Reports” Tab), it means that you can export the report you create into “Comma Separated Value “ format. This is a text file that you can import into spreadsheets and databases. The file extension is “csv.” Cut Command - The Cut Command lets you cut (remove) information (usually a text string or a graphic image) from a document and copy it to the Windows Clipboard (a temporary storage area that your operating system sets aside for you). This allows you to save this information to paste into another Windows document of some sort later. To cut information to the clipboard, you must select the information you wish to cut. Select information by clicking your left mouse button down at the point you wish to begin selecting. Drag the mouse to the end of the text or graphic and release the mouse button when you reach the end of the information you want to copy to the clipboard. To actually cut this information to the Windows Clipboard, press “Ctrl-X.” That is, hold down the Ctrl key on your keyboard, then, while still holding it down, press the 141 “X” key once and then let them both go. The information you have selected will disappear from the initial document and be available for you in the clipboard. A similar command is the copy command. Drag and Drop - To “drag and drop” an item, use the left mouse button of your mouse. Point the mouse cursor at the item you wish to “drag” with the mouse cursor. Press the left mouse button and while continuing to hold the button down, “drag” your mouse cursor to the new location for the item you selected. After you have the cursor in place, “drop” the item by releasing the left mouse button. NutriBase offers the drag and drop capability in several locations. Enteral Nutrition – Tube-feed formulations. Enteral Nutrition is a way to provide food through a tube placed in the nose and into the stomach or the small intestine. NutriBase provides data for these types of foods in the Medical Nutritionals food category. Exercise Intake - An “exercise intake” is the total exercise that a client performs during some time period. Normally, that time period is one day. When recording an exercise intake with NutriBase, you can select from your Exercise category lists, from previously recorded days of exercise intakes, or from workouts. Food Log - Also called a “nutrient intake” or “intake,” is a listing of the foods a person eats (along with their serving sizes and nutrient information). A “daily intake” is a food log for a single day, a “three day intake” is a food log for all the foods eaten in a three-day period, etc. Frame - A rectangular frame that borders an image. You can resize a frame (and the image inside it) by dragging any of the square “handles” on its four edges. Global Ranking – NutriBase will perform “rankings” for you. A ranking is a sort. You can sort a list of foods (for example, all foods listed in your Fruit food category) from high-to-low or from low-to-high based on the values for any nutrient (you can do this by simply clicking the column header for any nutrient value while it is displayed on the screen). You can also perform a “global ranking.” That is, you can select as many or as few of the food categories and conduct your ranking across these selected food categories. HTML Format - This is the format of World Wide Web pages. HTML is short for “Hypertext Markup Language.” The integrated word processor in the Professional and Enterprise versions of NutriBase will let you save any file in HTML format - you specify HTML as the format you wish to save to. This means you can now publish any NutriBase report, recipe, Meal Plan, or document as a Web Page. The NutriBase word processor also lets you save files in RTF (a generic word processor format you can open with MS Word) format. The HTML option gives you another option for electronic delivery of your work. IF Diet – See details under the “Intermittent Fasting Diet” topic below. 142 Information Topics – On your Home Window, you will find the Information Tab. This tab leads you to a wealth of information. In Professional and higher editions, over 170 topics are available. Each topic is stored in PDF format (either on your hard drive or on our web site). You can email these information topics to your clients or print them out and use them as handouts for your clients. Intermittent Fasting Diet – This is a type of diet that requires you to use different calorie goals for each day of the week. For example you may have “fasting” days on say, Mondays and Tuesdays. In this case, you may take in, say, 600 calories on these two days and, say 2400 calories per day on the remaining five days of the week. This type of dieting may help you create a 3600 calorie deficit (1800 x 2 days) each week that could help you lose one lb. per week. The IF Diet is one of the most popular diets of 2013. Perform a web search on “IF Diet” to learn more about the various strategies used in IF dieting. Kilocalorie (Kcal) – This is the more formal name for what we refer to today as a “large calorie” or “calorie.” A “small calorie” or “gram calorie” (“cal”) approximates the energy needed to increase the temperature of 1 gram of water by 1 °C. This is about 4.2 joules. The “large calorie” (kilogram calorie), “dietary calorie,” or “food calorie” (“Cal”) approximates the energy needed to increase the temperature of 1 kilogram of water by 1 °C. This is exactly 1,000 small calories or about 4.2 kilojoules. The term “Calorie” is used to mean the large calorie or kcal. Key Field - A “key field” is a column of data in a relational database that contains unique numbers or strings. It is used to link data from two or more databases. Macro – A “macro” is a string of characters that begin and end with a caret symbol (^). NutriBase uses macros as placeholders for information that can be used in macro-driven NutriBase reports. For example, ^CompanyName^ holds your company name, ^Date^ hold’s today’s date, and ^DesWeight^ holds your client’s desired body weight. Anytime you type these into a report template that you create, the information that the macro holds will replace that macro in the final report. Meal - A “Meal” is a collection of food items and/or recipes that make up a meal or snack. Along with recipes, meals serve as the building blocks for Meal Plans. Meals are stored in one of seven tabs: the “All Meals” Tab, plus three meals and three snacks. Each notebook is stored in a Meal Folder. Meal Folders - NutriBase provides up to 26 “Meal Folders” for you. Each folder contains a tabbed notebook in which you can organize your Meals. You can organize your Meals into categories with these folders. (For instance, you could create a folder for Body Building Meals, Diabetic Meals, Heart Recovery Meals, etc.) Click the “Folders” Button to manipulate these folders and their contents. 143 Meal Item - A “meal item” is a food item from the nutrient database, a PFI (Personal Food Item), or a recipe you are adding to a Meal. (In a recipe, we call the added items “ingredients.”) Meal Plan - In NutriBase, a “Meal Plan” is a collection of food items, PFI's, recipes, and Meals that are organized into up to three meals and three snacks for up to four weeks. Some professionals refer to these as “cycle menus.” NutriBase Menu Icon – This is the icon in the upper left corner of NutriBase. Clicking this icon will lead you to a variety of functions and options that you can use or view. Next Best Food To Eat (NBFTE) Button – “NBFTE” is the acronym for “Next Best Food To Eat.” The NutriBase “NBFTE” Button will tell you the next best food to eat (in a common serving size) based on what you have eaten so far today compared to your nutrient goals for the day. These goals are normally the DRI for your age and gender, but you may customize them as desired. The first item in your search results will be the most effective food for bringing you closer to each of your daily nutrition goals. The second food item will be your second best option for bringing you closer to all of your daily nutrition goals. Etc. Nutrient Density (ND) – The Nutrient Density of a nutrient is the percentage of the user’s goal for that goal per calorie. You can think of it as a “Single Nutrient NDI.” Nutrient Density Index (NDI) - The Nutrient Density Index is an estimate of the mean (“average”) value - per calorie - for the sum of the total amounts of each of up to 25 nutrient factors, most of which are specified in the DRI and are tracked in the USDA Nutrient Database. We call this an “estimate” because it is not always possible to know the values for every nutrient we want to evaluate. Nutrient Density View - The NutriBase Nutrient Density View lets you display the nutrient values for say, 100 kcal “servings” of all fresh vegetables in a spreadsheet view. You can specify “servings” in your choice of grams or calories. This gives you an “apples-to-apples” comparison for all nutrients for hundreds or even thousands of vegetables at once (NutriBase displays nutrient data in a spreadsheet view). Identify the foods that provide the highest nutrition per calorie. You can rank foods on-screen while using the Nutrient Density View. Overwrite - When you “overwrite” the information, you delete the existing data and replace it with the new information. Parenteral Nutrition – Nutrient injections; intravenous feeding. Also called “parenteral alimentation.” NutriBase provides data for these types of foods in the Medical Nutritionals food category. Paste - To “paste” something into a file means to copy something you've cut or copied into the file at the cursor location. To paste text into your 144 cursor location, you must first have some information (usually text or graphics) that you've cut or copied into the Windows Clipboard (a temporary storage area that your operating system sets aside for you). Place your cursor where you want to insert this information and press “Ctrl-v”. This is, hold down the Ctrl key on your keyboard, then, while still holding it down, press the “v” key once and then let them both go. PCF Ratio - The “PCF Ratio” is the ratio of calories from Protein, Carbohydrates, and Fat - in that order - in a client's intake, recipe, or Meal Plan. A PCF Ratio of “15-55-30” indicates that an intake, recipe, or Meal Plan contains 15% of its calories from Protein, 55% of its calories from Carbohydrates, and 30% of its calories from Fat. You can assign PCF Ratio goals to clients. NutriBase provides the PCF Ratios for recipes and Meal Plans. The PCF Ratio tells you a lot about a client's intake, a recipe, or a Meal Plan. One day, many popular diets may be defined by their PCF Ratio. NutriBase will also display the CPF Ratio. When Alcohol is present, we automatically display the PCFA ratio for you. Personal Food Item (PFI). The PFI is a food item you have added to NutriBase. This occurs when you find a food item that isn’t already in the NutriBase database. You can also create a PFI by highlighting an existing food item, then clicking the Add to “PFI” Button. PFI’s listed in your “Personal Foods” Tab can be edited as desired. You can change the serving size if you like. You can right mouse click on any PFI and send that PFI to a food log, recipe, meal, or meal plan as desired. PFI Folders - NutriBase provides up to 26 “PFI Folders” for you. Each folder contains a tabbed notebook in which you can organize your PFI's (Personal Food Items). You can organize your PFI's into categories with these folders. (For instance, you could create a folder for Body Building PFI's, Vegan PFI's, Heart Recovery PFI's, etc.) Click the “Folders” Button to manipulate these folders and their contents. Process Loss – When you cook a recipe, your recipe will often weigh less than its original non-cooked weight. This “process loss” is due to loss of water. In NutriBase, you can specify the process loss as, say, 40%. When you do this, the software will calculate the cooked weight and base its nutrient analysis on the cooked weight. A process loss of 40% means that a recipe that started with a weight of 100 grams would weigh 60 grams when cooked. This variable is helpful in recipes for commercial use. It helps NutriBase calculate the serving size weight more accurately. Program Data Folder – Everything you ever create with NutriBase exists in the Program Data Folder. This data includes recipes, client information, food logs, etc. The Setup Program automatically knows the default location for the ProgramData Folder (it can differ from one Windows version to another). However, if you plan to synchronize your data across multiple remotely located computers, you will need to tell 145 NutriBase where your Sync Folder is located. Information on how to do this exists in this manual – consult the Table of Contents. PUF List – Every food item that you add to a Meal will automatically be added to your PUF (Previously Used Foods) List. After you have added at least one food to your Food Log, the “PUF Display” Button will appear. When you click this button, you will see an alphabetical listing of all your PUF’s. This saves you time and effort by eliminating the need to reconduct previous searches. Select the PUF of interest and use it as desired. Use the right mouse click to Delete any PUF you no longer want to see listed. PUI List – Every food item that you add to a Recipe will automatically be added to your PUI (Previously Used Ingredients) List. After you have added at least one food to your Food Log, the “PUI Display” Button will appear. When you click this button, you will see an alphabetical listing of all your PUI’s. This saves you time and effort by eliminating the need to re-conduct previous searches. Select the PUI of interest and use it as desired. Use the right mouse click to delete any PUI you no longer want to see listed. Quick Add List – NutriBase features a “Quick Add” option in your Food Log window. After you have added foods to a Food Log, you have the ability to highlight any number of these food items, RMC, then select the option to add the “Food items to Quick Add.” Quick Add differs from PUF and PUI in that it remembers your serving size and meal/snack selection. Quick Add can be a database food item, a PFI, a recipe, or a meal. You can click the “Quick Add” Button to add any of these listed food items to any food log for any day. Read Only - This is a term that refers to a file on your hard drive. It means you can “read” it (look at it and use it), but you cannot modify it and save it (at least with the same name). Read only files are protected from being overwritten. Recipe Folders - NutriBase provides up to 26 “Recipe Folders” for you. Each folder contains a tabbed notebook in which you can organize your recipes. You can organize your recipes into major categories with these folders. (For instance, you could create a folder for Body Building Recipes, Vegan Recipes, Heart Recovery Recipes, etc.) Click the “Folders” Button to manipulate these folders and their contents. Remove - This function “removes” a selected item from the tabbed notebook card or list. The remove function is different from the delete function in that it doesn't permanently remove the selected item from NutriBase… the item remains in the ““All Recipes” Tab,” the ““All Foods” Tab,” or the “All PFI's tab.” To permanently remove a selected item, select the “All” Tab, then use the Delete function. Report Header - A NutriBase “report header” is information that NutriBase can automatically insert as a banner to your reports. Normally you would include your business name, phone number, address, etc. 146 You can include a graphical image (bit map) such as your logo if you wish. You create either type of header by clicking the “Header setup” Button when it is offered. Right Mouse Click – RMC. See the right mouse click topic, next. RMC – The right mouse click. NutriBase supports over 95% of its functions via the right mouse click. In most cases, you select an “item” (a recipe, a PFI, a client name, a Meal, a Meal Plan, etc.) from a list, then click the right mouse button to produce a list of possible actions. RTF - This is the acronym for “Rich Text Format.” It is a document format that defines the formatting features of a word processor page. It is a format that allows a wide variety of commercial word processors to read and interpret. Because the NutriBase word processor can save files in RTF format, you have the ability to open these files with your favorite external word processor. If you use MS Word, you can open RTF files then save them in Doc or Docx formats. Selecting a Food Item - To select a food item, click on the food name or anywhere on the row containing the food name. (Click to the left of the food name if you want to highlight the entire row containing the food name.) Once you've selected a food item, you can print it, export it, view its nutrient content, turn it into a Personal Food Item, add it to an intake, add it to a Meal, or add it to a recipe. Scale a Recipe – If you have a recipe that serves six, you can “scale” it to serve, say, three, 33, or 258 people. Selecting an Item - To select an exercise, food item or other item from a list, click in the box to the left of the item or click the item itself. Selecting a Range – To select a range of items, click the first item in you want to include, then hold the Shift key down and while continuing to hold it down, press the final item you wish to include. The software will select the entire range of items, including the first and the last items. Selecting Data or Text - To select data or text, your use your mouse. Drag the mouse over the column headers to select columns. Drag the mouse over the box to the left of the rows to select rows. (To “drag” the mouse, point at the first cell you wish to select then press down your left mouse button. Then, while continuing to hold left mouse button down, move the mouse to the last cell you wish to select, then let go. Slideshow – In the NutriBase Tracker, you can add one or more photographs for any user (including yourself). If you add multiple photographs, you can display them as a “slideshow.” The slideshow will display the photographs in chronological order (of the picture’s creation date). Spreadsheet Format - This is a tabular display format that places columns and row of nutrient information on the screen. You can scroll 147 vertically and horizontally to view more data. You can double-click on any food item to see all the nutrients for the selected food item at once. You can view the data in split-screen mode. You can resize and/or resequence columns. You can select a food item and copy it to an intake, PFI, recipe, or Meal. You can jump to any food item or brand name. You can export selected data or print it. SR Data – SR stands for “Standard Reference”. It is short for the USDA Nutrient Database for Standard Reference, which in this product, consists of the USDA SR data, the data contained in our Medical Nutritionals food category, the data contained in our Vitamins and Mineral Supplements food category, and the data contained in our Commercial Ingredients food category. Substring Search - A “string” search is one that looks for a “string” of characters such as a food name. A “substring” search is one that looks for a “substring” of characters such as part of a food name. A “substring search” on a food name of “OAT” would locate food items like “OAT”, “GROATS”, “OATMEAL”, etc. Normally, the shorter your search string, the greater number of “hits” you'll locate. Success criteria - Success criteria are predefined nutrition and exercise goals. NutriBase helps you to establish daily goals for your clients. These goals may deal with nutrients and exercise. You can program in a set of criteria regarding these nutrients and exercise goals and have NutriBase award the client a “Thumbs Up” icon or “Thumbs Down” icon on their Calendar. This provides an instant snapshot of how well or how poorly a client is doing. Sync Folder – A “synchronization folder” resides inside a folder created by a web-based synchronization service (like Dropbox or SkyDrive). NutriBase allows you to install its Program Data Folder inside your Sync Folder. (The Program Data Folder contains all the data you ever create in NutriBase – recipes, client information, food logs, etc.) Using a Sync Folder allows you to sync your data across multiple computers that can be located anywhere around the world as long as they have Internet access. Time Stamp – You can specify the time you ate your meals by using the time stamp function. To do this, right mouse click over your Food Log and select the “Time stamp meals” option. This is a handy if you are a diabetic wanting to track your blood glucose measurements against time. You can also time stamp entries in your “Tracker” Tab. Tool Bar - The “Tool Bar” is the row of icons across the top of the NutriBase Screen. Click these Explorer-style icons to perform major functions. The Tool Bar provides an alternative to using the Menu Bar options. USDA SR Data – USDA SR stands for “USDA Standard Reference”. It is short for the USDA Nutrient Database for Standard Reference, which in this product, consists of the USDA SR data, the data contained in our 148 Medical Nutritionals food category, the data contained in our Vitamins and Mineral Supplements food category, and the data contained in our Commercial Ingredients food category. Web-Based Questionnaire – The SE Editions of NutriBase support the web-based questionnaire. The web-based questionnaire is a web-based marketing tool. The idea is to get, say, 100 hits a day, 700 hits a week, 35,000 hits a year. You gather contact information and personal information (like age, gender, height, weight, desired weight, etc.... a total of about a dozen facts). NutriBase can import this data directly and log these folks in as clients. You can offer a monthly newsletter to these folks as an incentive for completing your brief questionnaire. NutriBase can read this Questionnaire information and import it. The contact information goes into the NutriBase Contact Manager and the personal information is used to create a Client Profile for each person. Once the client profile is logged into NutriBase, NutriBase makes calculations and “knows” 180+ things (calorie needs, nutrient goals, etc.) about that client. At this point, you can use NutriBase to generate a wide variety of reports for them. You can save these reports in PDF format and email them back or post them to your web site. The idea is to market your services to your contact list. For instance, if your client is 43 years old and weighs 500 lbs., your email newsletter would offer services that 43 year old 500 lb. person would be interested in. You can always add the SE feature after your initial purchase of the NutriBase Professional or higher edition. Word Processing Format – NutriBase can save some report into RTF – Rich Text Format. Microsoft invented this word processing format. Once you create and save a report into RTF format, you can open it using Microsoft Word. After you have it in Word, you can save it to a doc or docx file format for future use. Workouts - In NutriBase, a “workout” is a combination of exercises at specified intensities or target heart rate training zones for a specified duration. For example, a workout could consist of 60 minutes of step aerobics, a 90-minute walk at 3 mph, and 45 minutes of weight training. You can save workouts and recall them whenever you wish. After you retrieve a workout and assign it to a client, you can edit it to reflect the actual workout if it differs from the saved one. XLS – Excel file extension. When you see “XLS” after a report name (in the “Reports” Tab), it means that you can export the report you create into Excel format. The file extension for Excel is “xls.” 149 THE ATWATER CONVERSION FACTORS The following chart shows you the calories per gram of Protein, Carbohydrates, Fat and Alcohol contained in a variety of foods. The data makes it clear that although the official AOAC approved “4-4-9” method of calculating calories is simple, it is also a crude calculation method. Food Item Protein Carbs Fat Alcohol Baked Beans with Pork, Tomato Sauce 3.50 4.00 8.80 - Baked Beans with Tomato Sauce 3.40 4.00 8.40 - Barley 3.55 3.95 8.37 - Beans 3.47 4.07 8.37 - Beans, Refried 3.50 4.10 8.90 - Beef Tongue 4.27 4.11 9.02 - Beef 4.27 - 9.02 - Beef, Processed 4.27 3.68 3.87 9.02 - Beer 3.87 4.12 8.37 6.93 - 3.87 - - Breakfast cereals 1.82 3.82 2.80 4.16 8.37 8.80 - Brown Rice 3.41 3.82 4.12 4.16 8.37 - Buckwheat 3.37 3.78 8.37 - Bulgur Wheat 3.59 3.78 8.37 - Butter 4.27 3.87 8.79 - - 3.87 - - Carbonated Soft Drinks 3.36 3.87 8.37 - Cellophane 3.47 4.07 8.37 - Chili with Beans 3.50 4.00 8.70 - Chocolate 1.83 1.33 8.37 - Chow Mein Noodles 3.93 4.12 8.93 - Beet Sugar Cane Sugar 150 Cocoa 1.83 1.33 8.37 - Coffee 3.47 4.07 8.37 - Corn Bran 1.82 2.35 8.30 8.37 - Corn flour 2.73 3.95 8.37 - Corn grits 2.73 4.03 8.37 - Cornmeal, Degermed 3.46 4.16 8.37 - Couscous 4.05 4.12 8.37 - Egg Noodles 3.93 4.09 8.41 - Egg Noodles, Spinach 3.88 4.08 8.41 - Eggs 4.36 3.68 9.02 - Farina 4.05 4.12 8.37 - Protein Carbs Fat Alcohol 4.27 - 9.02 - 2.96 4.04 3.78 4.12 8.37 - French Fried Potatoes 2.80 4.00 8.80 - Fruit - Flavored Drinks 3.36 3.90 8.37 - Fruits, Canned 3.36 3.60 3.78 8.37 - Fruits, Raw 3.36 2.48 3.60 8.37 - Lemonade 3.36 3.80 8.37 - Limeade 3.36 3.80 8.37 - Long Rice Noodles 3.47 4.07 8.37 - Macaroni, Regular 3.91 4.12 8.37 - Macaroni, Vegetable 3.86 4.11 8.37 - Macaroni, Whole wheat 3.59 3.78 8.37 - Milk and Milk Products 4.27 3.87 8.79 - Millet 3.87 4.12 8.37 - Mushrooms 2.62 3.48 8.37 - Nuts 3.47 4.07 8.37 - Food Item Fish Flours (average of Corn, Rice, Wheat) 151 Oat Bran 1.82 2.35 8.30 8.37 - Peas 3.47 4.07 8.37 - Pork 4.27 3.68 3.87 9.02 - Potato Salad 3.60 4.00 8.90 - Potatoes 2.78 3.48 8.37 - Poultry 4.27 3.87 9.02 - Processed meats 4.27 3.68 3.87 9.02 - Quinoa 3.47 4.07 8.37 - Rice & Pasta w/Seasonings 3.87 4.14 8.37 - Rice Bran 1.82 2.35 8.30 8.37 - Rice, Brown 3.41 4.12 8.37 - Rice, White 3.82 4.16 8.37 - Rye 3.23 3.99 8.37 - Semolina 4.05 4.12 8.37 - Shellfish 4.27 4.11 9.02 - Soba Noodles 3.37 3.78 8.37 - Somen Noodles 3.91 4.12 8.37 - Sorghum 0.91 4.03 8.37 - Soy Bean Flour 3.47 4.07 8.37 - Soy Beans 3.47 4.07 8.37 - Spaghetti, Regular 3.91 4.12 8.37 - Spaghetti, Vegetable 3.86 4.11 8.37 - Food Item Protein Carbs Fat Alcohol Spaghetti, Whole wheat 3.59 3.78 8.37 - Spouted Wheat 3.59 3.78 8.37 - Tea, Unsweetened (all) 2.44 3.57 3.80 8.37 - Tomato Sauce 2.60 3.70 8.40 - Triticale 3.32 3.82 8.37 - 152 Vegetables (average of all) 2.44 3.57 8.37 - Wheat Wheat) 4.05 4.12 8.37 - Wheat Bran 1.82 2.35 8.30 8.37 - Wheat Germ 3.59 3.78 8.37 - - 4.12 - 6.93 3.41 3.82 4.12 4.16 8.37 - Whole wheat 3.59 3.78 8.37 - Whole Wheat 3.59 3.78 8.37 - Wild Rice 3.55 3.95 8.37 - Wine 3.36 3.92 8.37 6.93 Zucchini 2.00 3.70 8.40 - (except Whole Whiskey White Rice THE 4-4-9 METHOD For USDA SR nutrient data for “formulated foods” (items with multiple ingredients), CyberSoft uses the “4-4-9 method” of calculating the “% of total calories from” and the “calories from” values for Protein, Carbohydrates, and Fat. In NutriBase, “PCF Ratio” refers to the percentage ratio of calories from Protein, Carbohydrates, and Fat. (NutriBase also offers a User Preference option to display the CPF Ratio, if preferred.) The 4-4-9 method is an official AOAC method of calculating calories. Most laboratory analyses still report calories using this method. This popular method of estimating calories assumes that one gram of protein contains 4 calories, that one gram of carbohydrate contains 4 calories, and that one gram of fat contains 9 calories. In beverages or foods containing alcohol, it is assumed that each gram of alcohol provides 7 calories. By knowing the total calories in the food and the total calories from the calorie sources contained in the food, it is a fairly straightforward calculation to determine the “Calories from” and the “% Calories from” values. For USDA data, which uses the Atwater Conversion Factors for Protein, Carbohydrates, and Fats for most food items (except for formulated foods), CyberSoft performed calculations based on the factors provided by the USDA. The Atwater Factors used by the USDA are known to be more accurate than the AOAC-approved 4-4-9 method. The Atwater Factors are conversion factors that take into consideration that different types of foods provide different amounts of food energy per unit of any 153 given calorie source. (See that Atwater Conversion Factors in this document to see the amount of variance you can expect to see in common foods.) For USDA “formulated foods,” which include multiple ingredients, CyberSoft used the AOAC-approved 4-4-9 method of calculating calorie ratios. Doing so produced some calorie ratio totals of less than or greater than 100%. (CyberSoft’s policy regarding USDA data is to keep it “as-is.” For this reason, data from the original USDA source files have been retained unchanged.) For food items listed in the Vitamins and Medical Nutritionals section of NutriBase (multiple vitamins, supplements, enteral and parenteral products), CyberSoft calculated calorie ratios by using the manufacturer's information regarding calorie percentages. (These values total 100%.) THE COMPENSATED 4-4-9 METHOD For non-USDA brand name/restaurant foods and Canadian Nutrient Data, CyberSoft developed the “compensated 4-4-9” method of estimating calories and PCF ratios. In NutriBase, “PCF Ratio” refers to the percentage ratio of calories from Protein, Net Carbohydrates, and Fat, in that order. When applying the “straight 4-4-9 method” to actual published data, several factors make this method less than ideal. For one thing, many food makers consider any nutrient containing fewer than 5 calories to be “nutritionally insignificant.” Nutrition Facts labels report all fat amount less than 0.5 grams as “0” (zero). Sometimes they publish a value like “<1.0 gram” for fat, which means that the fat content is somewhere from 0 to 0.99 grams. When a food item contains only a few calories, the “insignificant” rounding of nutrient values can have very significant and misleading consequences. One consequence of this practice of rounding nutrient values is that when the caloric values for protein, carbohydrates, and fat are added up, they rarely match the calorie values published by the food manufacturer or restaurant. This means that to multiply fat grams by 9 and calculate the resulting value as a percentage of the total calorie value will result in a misleading value for % Calories from Fat (or any other percentage value). 154 To more accurately represent “% Calories from” values, CyberSoft developed a simple method for estimating “% calories from” values of the various nutrient components. We call this the CyberSoft “compensated 4-4-9 method.” Here's how it works: 1) Calculate the total calories from the calorie sources by multiplying protein grams by 4, estimated net carbs (carbohydrates minus total dietary fiber) grams by 4, and fat grams by 9. Sum these derived values to produce a “total derived calories” value. 2) Assume that the food maker's published total calorie value is correct. Compare the “total derived calorie” value to the food maker's published total calorie value. If the derived value is lower or higher than 100% of the published value, adjust all the non-zero nutrient values in exactly the same ratio to produce a 100% correlation with total calories. This “unrounding” process” results in “% calories from” values for Protein, Carbohydrates, and Fat that add up to the published total calories and that also add up to 100%. This method - although crude - is arguably the best way to assure the highest possible degree of accuracy from the nutrient data currently available from food makers today. Since the Atwater Conversion Factors are not available for most multi-ingredient brand named foods, this method provides numbers that are likely to be more accurate overall than numbers calculated using the straight 4-4-9 method. For USDA “formulated foods” - food items that include multiple ingredients - CyberSoft used the 4-4-9 method of calculating calorie ratios. CyberSoft's decision to not impose the compensated 4-4-9 method on USDA data produced some calorie ratio totals of less or greater than 100%. For USDA data, which uses the Atwater conversion factors for Protein, Carbohydrates, and Fats, food items, CyberSoft performed calculations based on the conversion factors provided by the USDA. For food items listed in the Vitamins and Medical Nutritionals section of NutriBase (multiple vitamins, supplements, enteral and parenteral products), CyberSoft calculated calorie ratios by using the manufacturer's information regarding calorie percentages. (These values do total 100%.) 155 INSTALLATION AND SETUP “HOW TO” TOPICS NutriBase is robust and these “How To” topics attempt to help you get “up to speed” more quickly. This is because each time you perform one of these topics, you will see things about the software you hadn't known before. After doing many of these, you will see how the same types of actions are used in the same way in other areas of the software. After you become proficient with the provided topics, you should be able to figure out how to do anything else you ever want to do with NutriBase. How to Install NutriBase to Run on Your Computer You can install NutriBase by downloading the latest Setup Program from our web site or by inserting a NutriBase Installation CD into your CDROM drive. After your start the NutriBase Setup Program, the Installation Menu will appear. Following the instructions in the Setup Program will: 1) Perform a first time installation of NutriBase 11 (NB11). 2) Update an older version of NB11 with a newer version of NB11. Insert your Installation CD (or run your downloaded setup program) and follow the instructions just like you do with a first time installation of NutriBase. 3) Upgrade from NB10 Installation. Just install NB11 over the top of an installed version of NB10. The setup program will replace the appropriate NB10 files with the new NB11 files. NOTE: NB11 cannot upgrade versions of NutriBase prior to NB10. There is no upgrade path from NB9 and older versions to NB11. If you have questions or concerns, feel free to email us. How to Install NutriBase To use a Sync Folder. NutriBase version 11.1 and higher can support web-based file synchronization. If you are going to use the sync feature of NutriBase, there are only a few different situations you are likely to find yourself in: 1) This may be the first time you’ve ever installed NutriBase 11 to your computer. 2) You may be upgrading from NB10 to NB11 or updating from an earlier version of NB11 to the current version of NB11. 3) You may be installing NB11 to your second or subsequent computer that has no copy of NutriBase on it. 4) You may be installing NB11 to a second or subsequent computer that already has a copy of NB10 or NB11 on it. The installation process is slightly different under these various scenarios. Here’s how to install NutriBase (v.11.1 or higher) under each of these situations. Installing NB11With a Sync Folder For the First Time This example assumes you have no previous installation of NutriBase on your computer and that you are installing NutriBase 11 for the first time 156 on your computer. This is a “clean” installation. You intend to use the synchronization feature to synchronize your recipes, meal plans, client data, etc. with a free web-based file syncing service called Dropbox. (If you choose to use a different syncing service, you can pretty much substitute their name in place of “Dropbox” and have a successful installation.) Step 1: Create an on-line web-based synchronization account with Dropbox by visiting www.Dropbox.com. After creating your on-line Dropbox account... Step 2: Install the Dropbox software on your computer by following the instructions provided. We recommend you accept their default selections. This will create a Dropbox folder on your computer similar to the image at the right. Make sure your computer is always automatically logged in to your Dropbox account (this is the default setting). The “username” will normally be your name. The Dropbox Sync Folder is named “Dropbox.” Other synchronization services normally use their own name for their Sync Folder as well. Once your Dropbox Folder exists... Step 3: Create your “NutriBase Sync Folder” inside your Dropbox Folder. Do this by right mouse clicking on the Dropbox Folder, selecting the option to add a new folder, and giving it the name of “NutriBase.” (If you prefer, you can add this NutriBase folder in the next step.) Step 4: Run the NutriBase Setup Program to install NutriBase onto your computer. 157 When you run the NutriBase Setup Program, you will eventually reach the window that asks for the path to your NutriBase data files. (Your NutriBase data files include your food logs, recipes, meal plans, client information, etc.) If you don’t intend to use the Sync Folder to synchronize your NutriBase data on two or more computers, just accept the default path as shown above: C:\ProgramData\NutriBase). However, if you do intend to use the Dropbox Sync Folder to synchronize your NutriBase data across two or more computers, you must click the Find button and locate your Dropbox folder. When you do, click on your username to expand that menu. After the menu expands, click on the Dropbox Folder as shown in the image below. After you click on the Dropbox folder, this folder will expand to reveal any folders contained in your Dropbox. If the NutriBase Folder Does not exist, it just means that you have not created it yet. Don’t worry... the NutriBase Setup Program can create it for you if it does not exist. 158 This is what you want to see (sort of): You should see your own username in the Edit Box (rather than “Ed”). If you didn't create the NutriBase folder and click on it when locating our path, you won't see "\NutriBase" in your path. If you didn’t create the NutriBase folder earlier, you can create it now by typing its name into the Edit Box as shown above. Just make sure your path looks similar to the one shown in the image above by adding “\NutriBase” - if necessary - to this path. Important: Before you set up NutriBase on your next computer, you must make sure that the previous installation of NutriBase has fully synchronized with the Cloud. Here is how to tell if your files are fully synchronized when using Dropbox: The image above is a close up of your Task Bar Notification area. If you don’t see the Dropbox icon, it may have been automatically hidden. To view it, click the up arrow symbol on the left. Your license permits you to install NutriBase onto up to three computers for your own personal use. Each user is required to have their own 159 license to use NutriBase. Note: The path to your Dropbox Program Data Folder (We referred to this as the “Program Data Installation Folder” above) is stored in a text file called nbpd.txt which is stored in the NutriBase ProgramData folder (usually c:\programdata\nutribase). If you change this path for any reason, you can edit this text file to tell NutriBase about your new location. Important: If you delete the NutriBase Sync Folder on one of your synchronized computers, this data will disappear from all your synchronized computers – that's what file synchronization does. You can easily retrieve files that have been deleted from Dropbox. Just click on the Trashcan Icon at the top on the window which, when you mouse over, says "Show Deleted Files." Nonetheless, we recommend you make periodic NutriBase Backup files. You can tell NutriBase to prompt you to make backups. Important: Never use your NutriBase Sync Folder to store files that were not installed there by the Setup Program (or put there for you by NutriBase). Never store your NutriBase Backup files in your NutriBase Sync Folder. How to Upgrade From NB10 to NB11 on Your Computer This installation assumes you want to install and use NB11 with synced data on a computer that already has NB10 or an earlier version of NB11 installed on it. In this case, you will most likely want to retain your existing NutriBase Data. This example will show you how to install NutriBase to work with a free synchronization service called Dropbox. (It will install in a similar manner with any of the major sync services.) The following example will show you how to use a free synchronization service with the latest version of NutriBase that you are upgrading or updating to. Step 1: Make a current backup of your NutriBase files by selecting Backup from within your NutriBase program. (Click the NutriBase menu in the upper left corner of your NutriBase window and choose the Backup option.) Keep this backup handy as you will be restoring this data to finish this process. Step 2: Create an on-line web-based synchronization account with Dropbox by visiting www.Dropbox.com. After creating your account... Step 3: Install the Dropbox software onto 160 your computer. Follow the instructions provided. We recommend you accept their default selections. This will create a Dropbox folder on your computer as seen in the image to the right. Make sure your computer is always automatically logged in to your Dropbox account (this is the default setting). The username will normally be your name. The Dropbox Sync Folder is named “Dropbox.” Other synchronization services normally use their own name for their Sync Folder as well. Step 4: Create a NutriBase Folder inside your Dropbox Folder. Do this by right mouse clicking on the Dropbox Folder, selecting the option to add a new folder then giving it the name of “NutriBase.” (If you prefer, you can add this NutriBase folder in the next step when you run the NutriBase Setup Program.) Step 5: Run the latest NutriBase Setup Program to install the very latest NutriBase 11 program onto your computer. Do not uninstall NutriBase first – just install it right over the top of your previous installation. Visit nutribase.com\updates.html to download the latest version of NutriBase 11. (NutriBase versions earlier than version 11.1 do not support a Synced Folder.) When the NutriBase Setup Program asks you to specify the path to your NutriBase data files (your food logs, recipes, meal plans, etc.), click the Find Button and make sure it is formatted similarly to the following: You should see your own username in the Edit Box (rather than “Ed”). 161 If you didn't create the NutriBase folder and click on it when locating our path, you won't see "\NutriBase" in your path. If this is the case, you can create it now by just typing its name into the Edit Box as shown above. Just make sure your path looks similar to the one shown in the image above by adding “\NutriBase” - if necessary - to this path. After you complete the path, click the Next Button to finish setting up NutriBase. You will need to Restore your backed up data into NutriBase so that you have the proper data installed, but you cannot do this immediately. Note: The path to your Dropbox Program Data Folder (We referred to this as the “Program Data Installation Folder” above) is stored in a text file called nbpd.txt which is stored in the NutriBase ProgramData folder (usually c:\programdata\nutribase). If you change this path for any reason, you can edit this text file to tell NutriBase about your new location. Important: After you finish installing NutriBase, you will need to wait for a while. When you installed NutriBase, the Setup Program installed a few thousand data files into your NutriBase Sync Folder. As theses files are copied into your Sync Folder, your Sync Folder immediately began to upload these files to the Cloud. This process can take from a few minutes up to an hour or more to finish this initial synchronization. DO NOT start NutriBase and run the Restore application until your initial installation of NutriBase has fully synchronized with the Cloud. Here is how to tell if your files are fully synchronized when using Dropbox: This is a close up of your Task Bar Notification area. If you don’t see the Dropbox icon, it may have been automatically hidden. To view it, click the up arrow symbol on the left. If did not use Dropbox, take a look at the documentation for the synchronization service you selected to see how to tell when you are fully synchronized. After you finish setting up NutriBase and it has synchronized with the Cloud... Step 6: Start the NutriBase application. After it opens, click the NutriBase Menu button then select the Restore option. The Restore path shown should match the path in the Edit Box that you gave during Setup. If you somehow specified your NutriBase Sync Folder incorrectly, you can click the Change Location Button and enter in 162 the correct path now. Step 7: Restore your NutriBase Backup File. This operation will take a few moments as it copies all the files in your NutriBase Backup into your Synced Folder (as specified in this window). Important: After you restore your NutriBase backup, you will need to wait one more time. This is because as soon as the Restore function begins copying files into your Sync Folder, your Sync Folder will begin synchronizing these new files with the Cloud. This operation can take a few minutes to an hour or more, depending on your sync service and other factors. Here is how to tell if your files are fully synchronized when using Dropbox: This is a close up of your Task Bar Notification area. If you don’t see the Dropbox icon, it may have been automatically hidden. To view it, click the up arrow symbol on the left. If did not use Dropbox, take a look at the documentation for the synchronization service you selected to see how to tell when you are fully synchronized. After this copy of NutriBase is fully synchronized with the Cloud, you can set up your other computer(s) to use Dropbox (or any other synchronization service you selected) and you will be able to synchronize your data on these computers. Note: The path to your Dropbox Program Data Folder (We referred to this as the “Program Data Installation Folder” above) is stored in a text file called nbpd.txt which is stored in the NutriBase ProgramData folder (usually c:\programdata\nutribase). If you change this path for any reason, you can edit this text file to tell NutriBase about your new location. Important: If you delete the NutriBase Sync Folder on one of your synchronized computers, this data will disappear from all your synchronized computers – that's what file synchronization does. You can easily retrieve files that have been deleted from Dropbox. Just click on the Trashcan Icon at the top on the window which, when you mouse over, says "Show Deleted Files." Nonetheless, we recommend you make periodic NutriBase Backup files. You can tell NutriBase to prompt you to make backups. Important: Never use your NutriBase Sync Folder to store files that were not installed there by the Setup Program (or put there for you by 163 NutriBase). Never store your NutriBase Backup files in your NutriBase Sync Folder. How to do a “Clean” Install of NutriBase to Other Computers This installation assumes you have installed NutriBase to one computer and you now want to install NB11 to your second or subsequent computer that does not have a version of NutriBase installed on it. After you install your first sync-enabled copy of NutriBase onto a computer, you can proceed to set up NutriBase onto your other computers. Remember, you must install NutriBase v.11.1 or higher if you want to support Sync Folders. Here are a couple of things for you to be aware of before proceeding. Before you set up NutriBase on your next computer, you must make sure that the previous installation of NutriBase (on the other computer) has fully synchronized with the Cloud. If you Restored a NutriBase Backup file in your previous edition, you must make sure that the restored data in the previous installation of NutriBase has fully synchronized with the Cloud. If your previous installation of NutriBase is fully synchronized with the Cloud, you may go ahead and install to your second and subsequent computers. This example does not include pictures to help you perform these operations. If you would like more detailed instructions, please refer to the similar steps included in the previous two installation examples. Step 1: Install the synchronization software on your new computer (use the same account you created during your first installation of NutriBase). It will immediately begin synchronizing with the NutriBase data on the Cloud. (This data came from your first installation of NutriBase 11.1 or higher.) Step 2: Wait for synchronization. The reason you want to wait is because your sync service is downloading all your latest NutriBase data files from the Cloud and into the Sync folder you just created. This process can take from a few minutes to an hour or more. Step 3: Install NutriBase. After your Sync Folder has synchronized, install NutriBase, making sure to correctly specify the path to your Sync Folder. After you finish your installation of NutriBase, you can begin working with it right away… all your latest data will be available to you. (In case you are wondering, you don’t have to wait for synchronization in this case because the NutriBase Setup is set to never overwrite your Program Data.) How to Install NB11 Over an Existing Copy of NB10 or on Your Second and Subsequent Computers This example assumes you already have a copy of NutriBase 10 or 164 NutriBase 11 installed to your second or subsequent computer. This example does not include pictures or in-depth instructions to help you perform these operations. If you would like more detailed instructions, please refer to the similar steps included in the first two installation examples in this section. Step 1: Install the synchronization software on your new computer (use the same account you created during your initial installation of NutriBase). It will immediately begin synchronizing with the NutriBase data on the Cloud. Step 2: Wait for synchronization. This process can take from a few minutes to an hour or more. After your Sync Folder has synchronized… Step 3: Install NutriBase. Install NutriBase over the top of an earlier version of NB11 if you are updating or over the top of your NB10 version if you are upgrading. Don’t uninstall the previous edition and make sure to correctly specify the path to your Sync Folder. After you finish your installation of NutriBase, you can begin working with it right away… all your latest data will be available to you. (You don’t have to wait for synchronization in this case because the NutriBase Setup is set to never overwrite your Program Data.) Note: The path to your Dropbox Program Data Folder (We referred to this as the “Program Data Installation Folder” above) is stored in a text file called nbpd.txt which is stored in the NutriBase ProgramData folder (usually c:\programdata\nutribase). If you change this path for any reason, you can edit this text file to tell NutriBase about your new location. Important: If you delete the NutriBase Sync Folder on one of your synchronized computers, this data will disappear from all your synchronized computers – that's what file synchronization does. You can easily retrieve files that have been deleted from Dropbox. Just click on the Trashcan Icon at the top on the window which, when you mouse over, says "Show Deleted Files." Nonetheless, we recommend you make periodic NutriBase Backup files. You can tell NutriBase to prompt you to make backups. Important: Never use your NutriBase Sync Folder to store files that were not installed there by the Setup Program (or put there for you by NutriBase). Never store your NutriBase Backup files in your NutriBase Sync Folder. 165 How to Install NutriBase For a Workgroup If you collaborate with a group of colleagues - and you trust the members of this workgroup - you can share your Sync Folder with the members of this group so that all of you can work with the same set of data (food logs, client information, recipes, meal plans, etc.). Each member of the workgroup must have their own NutriBase license. To do this, log onto your Dropbox (or other sync service), select “Share,” and list the email addresses of the individuals you want to collaborate with. Each collaborator will need to install their own licensed copy of NutriBase to their computer(s). The NutriBase End User License Agreement grants each NutriBase customer up to three installations for their own personal use. Each different user, however, is required to have their own licensed copy of NutriBase. Free or Fee? Most of these synchronization services offer free plans. Free plans typically offer one or several gigabytes of space for your use. Some services offer you “rewards” of additional space if you refer friends and associates. Since NutriBase only needs about 1/10th of a gigabyte to function properly, virtually any free web synchronization service will be more than adequate for your personal use with NutriBase. It is more important than ever to keep your NutriBase data backup up by using the NutriBase Backup function. This is because if any member of your workgroup deletes all the files in their NutriBase Sync Folder, all the corresponding files in all the other synchronized computer would also disappear. This could be a huge concern if others were given access to your Sync Folders. Consider Using a Business Account. If you are collaborating with a workgroup, you may want to forego the free account and sign up with a paid-for business account. There are several reasons for this. A business account normally permits you to allow multiple users with various access levels to share your Sync Folder. You can control who can delete files, edit files, or just view files. You can control access to particular folders and files. You can also track statistics about members of groups and see things like when they last logged in, how long they worked, etc. Accountability. Business accounts enforce a higher degree of accountability than simply sharing a folder with associates. Business accounts normally require you to pay a fee of some sort but since you don’t need a lot of drive space to support NutriBase synchronization, you’ll likely be able to purchase the least expensive business plan offered. A business account will also provide you with additional space that can come in handy for facilitating other aspects of your business. 166 How to Use Your Sync Folder With Workgroups When you use your NutriBase Sync Folder to synchronize your own files across your own computers and you are the only person using NutriBase at any one time, there is little risk of getting “conflicted copies” of your files. Conflicted copies occur, for example, when two or more users open the same recipe and edit it at the same time. If you are the only user, you don’t have to worry about this. You can also work on a computer off-line for long periods of time and then simply reconnect to the Internet when you can and all will be well. Situations like this may occur if you are using a laptop computer during air travel. The situation is very different when you share your NutriBase Sync Folder with others. When you are a member of a workgroup that is sharing NutriBase Sync Folder, you run a much higher risk of having two or more users save the same file at the same time – you risk creating “conflicted copies” of files. Dropbox will rename these conflicted copies for you to indicate that they are copies of the original file. If multiple users are editing the same file simultaneously, Dropbox will save all of the versions of that file as "conflicted copies" with the user's name, date, and time stamp. Dropbox will not try to merge or overwrite copies. This is because Dropbox doesn't want anyone’s work to be lost. This situation can be eliminated by using workgroup numbers. How to Use Workgroup Numbers Using workgroup numbers vastly reduces the possibility of creating conflicted files - files that can result when two users save NutriBase data that gets synchronized at the very same moment. This feature – workgroup numbers - is supported in NutriBase (v.11.4 and higher). NutriBase workgroups can support up to 20 individuals. If you are not using a Sync Folder, there is no need for you to use a workgroup number. If you are using a Sync Folder on your own computers for your own personal use, there is no need for you to use a workgroup number. The default radio button of not being in a NutriBase workgroup is correct for this situation. You only use a workgroup number if you are actually in a workgroup. (Conflicted files occur when two or more users save or synchronize at the same time.) If you a member of a workgroup (that is, if you are sharing a Sync Folder with others), you should use one unique workgroup number for each member of the workgroup. It is imperative that each user is assigned a different number. Each workgroup member must have their own NutriBase license and use a unique workgroup number. If there are four members in your workgroup, each member should be assigned the numbers 1 through 4. Normally, the team leader will assign workgroup numbers to make sure that every workgroup member uses a unique workgroup number. Values of 1 through 20 are valid workgroup numbers. 167 Each member of a workgroup must use their own unique workgroup number on all their installed copies of NutriBase. A user’s license permits up to three installations of NutriBase for the user. If you are workgroup member number three and you have NutriBase installed on your work PC, home PC and laptop computers, you need to enter in your NutriBase workgroup number of “3” into your work PC, home PC and laptop. If you are using a Sync Folder from a laptop that isn't currently connected to the Internet, you should connect to the Internet as soon as you can after finishing your work to allow your NutriBase changes to be synchronized. You also need to make sure all changes are synchronized between your laptop and desktop if both are using NutriBase. Workgroup Guidelines and Suggestions If you want to have a trouble-free experience using NutriBase with workgroups, every member of your workgroup should adhere to the following guidelines and suggestions. 1) Stay Synchronized When Using NutriBase. Members of your workgroup should edit workgroup data only while they are connected to the Internet. This keeps them synchronized with the changing data coming from other workgroup members. It is a good practice for workgroups. Do not permit members of a NutriBase workgroup to work off-line and resynchronizing at a later time - this will almost certainly lead to problems. 2) Use Work Numbers. Using workgroup numbers vastly reduces the possibility of creating conflicted files - files that can result when two users save NutriBase data that gets synchronized at the very same moment. Workgroup numbers are discussed in the previous topic. 3) Assign Specific NutriBase Folders to Specific Individuals. NutriBase allows you to organize your recipes into their own Recipe Folders. Assign specific users to work in their own Recipe Folders. You could create a Recipe Folder, for example, named “Sally Smith’s Recipe Folder” if you like. Assign a Recipe Folder to each member of your workgroup to organize recipes by author. These guidelines use the example of recipes, but they also apply equally well to Meal Folders, PFI Folders, Client Information, etc. 4) Restore NutriBase Backups With Care. If you need to restore a NutriBase Backup File, understand that the data on your computer, the Cloud, and in all the other workgroup computers will be replaced with whatever is in your NutriBase Backup File. You must notify all members or your workgroup to avoid using NutriBase until the Cloud is synchronized to the new data that has been restored. 5) Read and Understand the “An Introduction to Web-Based Synchronization” section of this document. Anyone using a webbased synchronization service should understand the basics of how this useful capability works. Understanding the basics will help you 168 understand its limitations as well as its benefits. 6) Read your Synchronization Services Documentation – Watch their videos. Each web-based synchronization service provides information about how their service works. These documents and videos reveal how to tell when all files have synchronized with the Cloud (all workgroup members must know this). Dropbox has a concise under three-minute video regarding their service called Dropbox for Teams that you might benefit from. Understanding your sync service’s documentation and videos improves every workgroup member’s value as a contributor to yourworkgroup’s goals. All members of your workgroup should understand and observe these guidelines. By implementing these common sense ideas, you’ll be able to use your Sync Folder to keep your work flow flowing. Various services have different ways of handling “conflicted files” and you should know how your Sync Folder will handle these situations. It will also be helpful for you to read and understand the introductory copy to this document. If you understand how Sync Folders in general work and how your Sync Folder in particular works, you will be able to use it effectively and without errors. You will also understand why we call our guidelines “common sense” suggestions. Other Workgroup Suggestions Remember to Wait. Any time you use the NutriBase Restore function, you must allow time for the new installation to fully synchronize with the Cloud before using this copy of NutriBase or setting up another copy of NutriBase on another computer. If you working with a workgroup and you are restoring data, it is important that all members of the workgroup refrain from using NutriBase until the data is synchronized (first to the Cloud and then to their own computers). Learn how the sync service you select indicates that it is synchronized. Training. Never allow a new collaborator to join your workgroup without understanding the information in this section of your User’s Guide. Allowing members of your workgroup who don’t understand and observe these common sense guidelines will likely wreak havoc on your valuable work. This is not a risk that most NutriBase users would want to take. You might consider conducting a bit of training and give a quiz to make sure that all your workgroup members know how the Sync Folders work and how use safe practices for workgroups. Backup Frequently. We highly recommend you make at least a daily backup of your NutriBase data. Remember, if you delete all your NutriBase files from your computer’s Sync Folder, the synchronization service will propagate this deletion to all the computers. To make a backup, click the NutriBase Menu and select the Backup option. You can save your NutriBase Backup files to 169 any location on your hard drive except in your Sync Folder. You can also save your NutriBase Backup files to removable media (like a flash drive). If you like, you can set your NutriBase Options to remind you to make backups on a schedule of your own making. How to Download Free Updates Anytime 24/7 You are entitled to all the updates we release for the NutriBase Edition that you purchased. Visit the NutriBase web site at nutribase.com (dietsoftware.com for nonprofessional editions), click the Nav (“Navigation”) Bar located in the lower left corner of every page on the web site and click the “Update NutriBase Versions” option. Clicking the Nav Bar produces a scrolling topic list similar the one shown to the left. Clicking any topic takes you to the page associated with that topic. Clicking “Update NutriBase Versions” takes you to a window that allows you to select and download all the available NutriBase versions. Make sure you download the version you purchased. If you don’t have the current version – that is, if your NutriBase version number is lower than the one that is displayed - click the appropriate link on this web page to download the latest update. We provide a link to this page in your NutriBase software’s options Resources option which you can access by starting NutriBase, clicking the NutriBase Menu icon in the upper left corner of the NutriBase window, clicking on “Options,” then the “Resources” Button. How to Upgrade Your Copy of NutriBase “Upgrades” are not the same thing as “updates.” You are entitled to all the free updates for the version that you purchased. If you have the immediately previous edition, you can purchase an upgrade to the current edition at discount. All updates we release for the version you purchased are free. If you 170 purchased NB11, the free updates would be numbered "11.1," "11.2," "11.3," etc. Upgrades are major new releases. The base number of a major new release is incremented. The upgrade to NutriBase 9 (NB9) is NB10. The upgrade to NB10 is NB11, etc. To upgrade to a latest version, you need to be a registered user of the immediately previous version. How to Run NutriBase as an Administrator Some users get an “Access Denied” error or a “Read/Write” Error when they attempt to save a Profile, recipe, or other NutriBase data file. These error messages often do not come from NutriBase – they come from your operating system. It is telling you that you do not have permission to read or write these files. The Setup Program attempts to set your permissions properly, but for some reason, it sometimes fails to accomplish this. A reinstallation sometimes fixes this issue. If this does not eliminate this type of error message, please do the following: Right mouse click on the NutriBase program's startup icon (located on your Windows Desktop). Click the option to “Run as administrator.” Does this resolve your issue? If so, you can: right mouse click on the NutriBase program's startup icon (located on your Windows Desktop). Click the Properties option. Click the Compatibility Tab. Check the box labeled: “Run this program as an administrator.” This will set NutriBase to always run in this mode. How to Activate Your Software Three days after installing the NutriBase software, NutriBase will begin nagging you to “activate” your software. Activating NutriBase will set it to never expire. A purchase is required for you to obtain your activation information. We normally email you these codes soon after you place your order. To reach the NutriBase 11 Activation Window, click the NutriBase Menu Icon located in the upper left corner of the NutriBase window, then click the “Registration” option: 171 The NutriBase 11 Activation Window tells you how many days you have left before your copy of NutriBase “Expires.” (When you software expires, you must activate it to make it function again.) You can activate NutriBase after it expires and your data will still be present. This window displays your “Registration Number” – a number that you will need to provide to us so we can activate you. Your Registration Number is boldfaced and positioned near the top of the NutriBase 11 Activation Window. Note: This sample image shows the Registration Number as a string of X’s – yours will be a string of different numbers and letters. Clicking the Copy Button on this window copies your Registration Number into the Windows clipboard. Pressing Ctrl-V will paste this number for you. To activate NutriBase, click the option “I have purchased NutriBase and would like to activate it on-line.” This will take you to a page on our web site that will ask you a few questions. It will ask you what your Registration Number is. If you clicked the Copy Button in the previous window, you can paste it into the appropriate location. Answer the remaining questions and submit the form… we will activate your copy of NutriBase for you within 24 hours (but usually much faster). Remember, you can normally still run NutriBase – it will run for eight days before it expires. Check your other options to handle situations not covered above. Once you activate NutriBase, you'll be able to download free updates from our web site without having to re-activate. A new activation is required for each new PC you install NutriBase to. You are entitled to 172 free updates for the NutriBase version you purchased. You will not need to re-activate your version when you update it. When a major new edition becomes available, you may upgrade to the major new edition at a discount. How to Review the NutriBase Update History Are you interested in seeing every new feature since your currently installed version or those we’ve added this century? We’ve itemized every update - its version number, the date of its release, and a detailed description of what is different with this update from all previous editions of NutriBase. To view our Update History Page, visit nutribase.com and click the “Update History” option in the upper right corner of every page on this web site. How to Obtain Product Support 1) Click the help Link (it looks like a question mark in a blue circle) to get help context sensitive help for the window you are in. 2) If you don't find the answers you need, email your question to us at [email protected]. We often send you a marked-up picture of how to resolve your issue. 3) If email help is insufficient, call us. Have your computer turned on with NutriBase running. Call us at 480-626-2025 or toll free at 480-603-8359 (8-3, Mon-Thu, Arizona time). How to Make a Suggestion Most of the improvements and features of NutriBase came from dietitians, nutritionists, sports fitness trainers, physicians, researchers, scientists, athletes, and other users like you. If you have an idea for a new feature, a new report, or an improvement, we'd like to know about it. Please email us at [email protected] How to Print a Recipe Report This topic shows you how to print a Recipe report, but you will use a very similar process to print any type of report. Please notice that you don’t create or print a recipe report from the Recipes window. Instead, you create a recipe report (or any other type of report) from the Reports window. After you create the report, one of your options is to print it. Click the “Reports” Tab, then click the “Recipe” Button. 173 Use the resulting window to select a recipe, chose a recipe report type, specify options, and click the “Create report” Button to create the report: After you create your report, print it by clicking the Print Icon (it looks like a printer) at the top of the report. Note: You don’t create a recipe report in the “Recipes” Tab (where you 174 might expect). You create recipe reports in the “Reports” Tab. To create a Meal Plan Report, click the Reports Tab, then click the Meal Plan Button. To create an Exercise Report, click the Reports Tab, then click the Exercise Button. Etc. How to Save a Meal Plan Report as a PDF File To create a Meal Plan Report, click the “Reports” Tab, then click the “Meal Plan” Button: Use the resulting window to select your Meal Plan, set options, and create a report. After the report appears, click the Save Icon (it looks like a diskette) at the top of the report. Once again, note that you create your Meal Plan report in the “Reports” Tab – not in the “Meal Plans” Tab. The NutriBase edition you are using will determine the formats you can save to. Some of the personal editions do not support the save to PDF feature. How to Backup Your NutriBase Data NutriBase data includes everything you ever created in NutriBase – client information, recipes, meals meal plans, PFI’s, etc. It does not include PDF, Excel, or RTF reports you have saved to your hard drive. We highly recommend that you make periodic backups. Having a recent backup file on hand can save you from a future calamity. To make a backup of all your NutriBase data, start NutriBase, click the NutriBase Menu Icon, and click the “Backup” Button. We highly recommended that you make periodic backups. How to Restore Your NutriBase Data It's simple to restore any NutriBase Backup File you have on hand. Normally, you would use your most recent backup file. To restore a backup file, start NutriBase, click the “NutriBase Menu Icon” and select the Restore option. 175 Navigate to the backup file you want to restore. 176 How to Move Your Data From One Computer to Another With NutriBase, you can move your data from one PC to another. Here is one way to do this: Start NutriBase, click the NutriBase Menu Icon located in the upper left corner of the NutriBase window, and select the Backup option. Insert a USB drive into this PC. Specify this drive in your backup options. After the backup is finished, take your USB drive to your second PC and plug it into the USB port. Start the copy of NutriBase on the second PC, click the NutriBase Menu Icon, select the Restore option, then point to the backup up file on your USB drive. Note: When you restore a backup, it will replace whatever you have on the current PC with the data in the backup file. You can also email your backup to another PC if you like, How to Schedule your NutriBase Backups Start NutriBase, click the NutriBase Menu Icon, and click the “Options” Button. You’ll see a variety of options, including password protection (which you’ll have to enter to start NutriBase if you select this option), color schemes (for your NutriBase windows), and Automatic Backup. To schedule backups, click the Automatic Backup option: 177 How to Add a New Food to NutriBase With NutriBase, you add new food items as “Personal Food Items” (PFI’s). To do this, start NutriBase and click the “Personal Foods” Tab. Then click the “PFI” Button to add a new Personal Food Item. 178 Type in the nutrient data for the food item you are adding. Use the buttons provided to add data not shown on the main window. Be sure to enter a descriptive serving size and the gram weight for each new food item (this will allow you to convert to other serving sizes). When you are finished, click the “Save” Button. Your newly added food item will appear in your PFI Tab under your Organizer and Folder windows. To add any PFI to a Food Log, Recipe, Meal or Meal Plan, visit your Personal Foods Organizer or Folder window, highlight the PFI(s) of interest, right mouse click, then select the appropriate option to add your PFI to your Food Log, Recipe, Meal or Meal Plan. How to Enter Your Body Weight (or Fat) for the Day If you are trying to take control of your body weight and/or body fat content, it’s a good idea to enter your body weight and/o body fat values daily. You do this in the “Tracker” Tab: 179 Click the Weight/Body Fat button and click on the date you want to make your entry to. A quicker way to do this is to simply click your Weight Tracker icon on your Quick Access Toolbar. If you don't already have a shortcut to this window in your Quick Access Toolbar, please add it now. To update your Quick Access Toolbar to include your Weight Tracker, click the down pointing arrow next to your QAT. How To Add an Exercise to NutriBase To add an exercise to NutriBase, click the “Exercise” Tab, click the “Setup” Button, then click the “New exercise” Button: 180 Check the box to sort the exercises based on their burn rate. Click the down button to view your list of exercises sorted by their burn rate. Estimate the burn rate of your new exercise by placing it appropriately between two exercises that most closely match it in terms of intensity. Give the new exercise a name. Type in the burn rate (by interpolating between the two values for the exercises you selected). Then save it. It will be available to you henceforth. 181 How to Modify a User’s Goal for Water (or anything else) NutriBase will automatically set the DRI (Dietary Reference Intake) value for your clients or users based on their age and gender. However, you have the ability to customize these goals as desired. You may want to adjust a client’s goal for vitamin, minerals or other nutrient. Water is a nutrient that NutriBase treats a little differently from other nutrients. With NutriBase, you set your goals for water in ounces but the database tracks the data in grams. One gram of water is equivalent to one cubic centimeter (“cc”) of water. One cc of water is equal to 1 milliliter (“ml”) of water. A liter of water is 1000 ml (or “1000 cc”) of water or 1000 grams of water. If you’d like to change a client or user’s water goal, here’s how: Click the “Client Setup” Tab (or “My Setups” Tab for personal editions). Click the down arrow on the “Profile” Button to select the “Edit a profile” option. Make sure that an active client is selected at the very top of the NutriBase window. (If the proper client or user is not displayed, click the down arrow and select the client whose goal you want to change.) Click the “Continue” Button to move to second page of the client’s profile windows. On this second page, click the “Edit nutrient goals” Button. Water happens to be listed under the “General” Tab of this setup window, so you can just scroll down until you reach the entry for “Water (fl oz).” (If you wanted to adjust a Mineral goal, you would click the “Mineral Tab” and select the mineral of interest.) Click on the existing value for your water goal (it’s in the “Value” column on the right) and type in a new goal value for water. You can adjust other nutrient goals in the same way. When you are finished customizing this client’s goals, click the “Okay” Button. Then – and this is important – click the “Save profile” Button. NutriBase will ask you if you want to overwrite the client’s current goals. Respond with “Yes.” Later, if you go to the “Reports” Tab, click the “Client” Button, select this client’s name, select a Percent of Goal (POG) Report, and display it, you will see that your new goals are reflected in this report. Note: Keep in mind that the POG Report will never show you how much of a particular nutrient a client ate unless you have included a goal for that nutrient in her Client Profile. (If a nutrient has no goal, NutriBase cannot calculate what percentage of that nutrient the client has eaten.) How to Edit an NB Recipe When you run NutriBase, you will see that we have included several hundred recipes for you. We call them "NB Recipes" They are listed in 11 Recipe Folders. You can access them by clicking the "Recipes” tab, then clicking the “NB Recipes” button. Click the Recipe” Folder” tabs to view the recipes within each folder. 182 183 How to Create a New Recipe Based on an Existing Recipe If you'd like to edit an existing NB Recipe (NutriBase Recipe – recipes included with the software), it’s best practice to first save a copy of it to one of your own Recipe Folders (like the default “General” folder), then edit the saved copy of the original recipe. Doing this will keep all your NB Recipes in their original state. To save a copy of an NB Recipe, highlight it, right mouse click, then select the "Save as" option. Edit the food name it suggests to you or give it a totally different name as desired. Click the “Okay” Button. You would use this same procedure to edit one of the recipes you created. For example, you may have created a soup recipe and you want to create two variations of this original recipe – one is a lower sodium version and one is a hot and spicy version. Open the recipe. right mouse click. Select “Save as.” Save twice – once to give it a name indicative of a lower sodium version and another indicative of a hot and spicy version of the original recipe. After you save these two recipes, open them, one at a time and make the required changes. Once you have saved the copy of your recipe, you may open it and edit it by adding ingredients, deleting ingredients, or changing serving amounts. How to Create a New Recipe Folder This topic shows you how to create a new Recipe Folder. But this method also works the same way for creating Meal Folders, Meal Plan Folders, and Personal Food Item (PFI) folders. Recipe Folders are a convenient way to organize your recipes. Each folder holds a set of recipes. Your recipes self-alphabetize themselves within your recipe folder. You can have up to 100 recipe folders. You could put, say, your body-building recipes in a recipe folder you name “Body Building Recipes,” put your vegan recipes in a “Vegan Recipes” 184 folder, etc. It's a great idea to organize your recipes into folders because doing so makes it easier to organize your recipes into logical groups. To create a new Recipe Folder, click the “Recipes” Tab, click the “Folders” Button, then right mouse click. Select the "Add folder" option to add a folder. Notice your other right mouse click options. You can rename an existing folder, delete and existing folder, etc. When you have two or more folders, you can drag and drop recipes from recipe folder to folder. The recipes will self-alphabetize themselves within their new folders. You can also right mouse click and click the “Move” option to move your recipes from folder to folder. How to Scale a Recipe If you have a recipe that serves six, you can “scale” it to serve, say, three, 33, or 258 people. To access this function, open your recipe. right mouse click over the ingredients and select the “Scale recipe” option. 185 Specify how many people you want to feed. NutriBase will create a new recipe that will serve the number of people you specify. The new name will be similar to the original recipe name except that it tells you how many people it will feed. You can then open the newly scaled recipe and scale it again if you wish. How to Organize an Existing Recipe Folder This topic shows you how to edit an existing Recipe Folder. But this method also works the same way for editing Meal Folders, Meal Plan 186 Folders, and Personal Food Item (PFI) folders. When you create a new Recipe Folder, all your recipes exist in your “All Recipes” Tab. You can subdivide this recipe folder into additional tabs to more finely organize your recipes. To create a new tab within a Recipe Folder, click the “Recipes” Tab, click the “Organizer” Tab. right mouse click, then select the option titled “New tab.” Notice you have other right mouse click options like “Copy to tabs” and “Filter all tab.” You can drag and drop recipes into existing tabs as desired. You can drag and drop a recipe into multiple tabs if you like. The “Filter all tab” option, when selected, will remove any recipe you copied into a tab from the “All recipes” Tab. This is an organizing tool that can help you to avoid duplication. (Once you drag and drop a recipe into a tab, it disappears from the “All Recipes” Tab.) Once you organize your recipes into new, individual tabs, you can toggle this option off to display all your recipes in the “All Recipes” Tab… but that is up to you. How to Add a Recipe to Another Recipe NutriBase allows you to add a recipe to another recipe. This is handy if you have several soup stocks, sauces, gravies, etc. that you want to use as ingredients in other recipes. 187 To do this, click your “Recipes” Tab, then in either your Organizer or Folder windows, highlight a recipe, then right mouse click. Select the option to “Add to recipe.” Notice you also have the options to add the highlighted recipe to a Food Log, Meal, or Meal Plan. Just select where you want the highlighted recipe to go. Note: This right mouse click method works in a very similar manner for Food Logs, Personal Food Items, and Meals. If you conduct a View type search to display your recipes in your search results window, you can drag and drop a recipe into another recipe. When you do this, you will see the Add Recipe Preference window. 188 When this widow appears, you can select whether to add the selected recipe as a recipe (one entry) or as recipe ingredients (which would list every ingredient in your recipe). If you would like to make this a default setting, just click the box to make it so. How to Export Recipes for Use in Another Copy of NutriBase You can export recipes in NutriBase to a file that you can provide to friends and associates who use NutriBase. They can import these files into their installation of NutriBase to recreate the recipes you exported for them. To export one or more recipes, click your “Recipes” Tab and then click the Folders Tab. Highlight the recipe you want to export. To "cherry pick" your recipes, hold your Ctrl Key down and while continuing to hold it down, click on all the recipes you want to highlight. To select a range of recipes, hold your Shift Key down, and while continuing to hold it down, click on the first and last recipe of the range you want to include. You can export a lot of recipes into a single file if desired. After you select the recipes to include, right mouse click and choose the “Export selected” option. Give the file a name and a location and click Save. Once you export your recipes to a file, you can share this file with your colleagues. Provide your exported recipe file by emailing it to them or by 189 copying it to a USB drive… when they import this file, it recreates the recipes you stored in the exported file. You can also email it to colleagues as an email attachment. How to Import a Recipes From Another Copy of NutriBase To import the recipes from an exported NutriBase recipe file, click your “Recipes” Tab, click the “Folders” Button, then right mouse click. Select the “Import” option. Point to the recipe file you are importing and execute. Remember, this file could contain a single recipe or hundreds. If they provided you this file on a USB drive, point to the file on this drive. If you received this file from an associate by email, you can simply double-click on the attachment. NutriBase will import this file for you. How to Add PFI’s, Recipes, and Meals to Food Logs Say you have a Recipe that you want to add to a client’s Food Log. You could use the Food Item Search (across Recipes) to locate the recipe, then add it to a client’s Food Log. But you don’t have to. The following method may be faster in some situations: Click the “Recipes” Tab. Click your “Folders” Button and click on a “Recipe” Folder containing recipes. Highlight the recipe you want to add to a client’s Food Log, then RMC. Note that you can add this Recipe to a client’s Food Log, to a Recipe, a Meal, or to a Meal Plan. Choose the option you want to perform. This same method is available to you in Personal Foods, Recipes, Meal, and Meal Plans. And you can copy any selected item into a Food Log, Recipe, Meal, or Meal Plan. How to Export a Recipe to an Excel File (Chef and higher) This is a feature supported in NutriBase Chef Edition and higher. 190 The first step is to generate a recipe report. To do this, click the “Reports” Tab, then click the “Recipe” Button. Select a recipe by highlighting it. Select a report type that includes “Excel” as one of its formats. (Reports with no format indicated are savable in PDF format.) Click the “Create report” Button. Right mouse click over the resulting spreadsheet. A menu appears. Select the Export option, then select XLS for Excel format. Save your Excel file. Open it later with Excel. 191 How to Create U.S. Nutrition Facts Labels (Chef and higher) NutriBase Professional and Enterprise Editions support the creation of U.S. Nutrition Facts Labels. For information regarding the generation of Canadian Nutrition Facts Tables, please see the next topic in this manual. To create a label, open the recipe you want to generate a label for. (If you haven’t created this recipe yet, create it then open it.) After you create your recipe, click the “NFL (U.S.)” Button. NFL stands for “Nutrition Facts Label.” Missing Values: A message may appear and warn you that one (or more) of the ingredients in your recipe is missing a value for one of the listed nutrients. This is because all nutrient databases contain missing values for some nutrients. If you try to primarily use the UDSA or Canadian food items, this problem is minimized but not eliminated. The USDA and Canadian databases contain fewer missing values than Brand Name foods (which contain many missing values - food makers are not required to analyze their foods in depth). When USDA or Canadian data contains a missing value, it is usually because the food isn’t believed to contain much or any of that nutrient. It is expensive and impractical to test for nutrients that experts don’t believe are present. For your convenience, all nutrients that derived from any ingredients that are missing a value for that nutrient are clearly indicated for you. You can select additional nutrients to include in your label. In addition to the basic label data, you can add: Polyunsaturated Fat Iron Monounsaturated Fat Vitamin D Potassium Vitamin E Vitamin A Vitamin K Vitamin C Thiamin Calcium Riboflavin 192 Niacin Magnesium Vitamin B6 Zinc Folate Selenium Vitamin B12 Copper Biotin Manganese Pantothenic Acid Chromium Phosphorus Chloride Iodine Molybdenum Enter an allergen statement. To do so, check the box for this and type in your statement. Because NutriBase does not track the ingredients used in the foods in its database, it does not attempt to automatically notify you when you select foods that may contain allergens. Include a sorted ingredient listing. To do this, check the box to include your ingredient listing. Your ingredients will be listed in descending order based on their gram weight contribution to your recipe. You can edit your ingredient listing as desired. (The ingredient names are truncated after the first comma included in the Food Name so edit as required.) To make permanent changes to the ingredient names, open the recipe and edit the ingredient names in the recipe itself. Click the “Upper Case” and “Mixed Case” Buttons to edit the ingredient cases. Create the NFL. Create the Nutrition Facts Label by clicking the “Create NFL” Button. All values will be rounded in accordance with the FDA rounding rules for Nutrition Facts Labels. The nutrients that are required to be presented as a percentage of daily values will be calculated for you as well. After you create the label, you can print it by clicking the Print icon. To save the label to an image format, click the Save icon (it looks like a diskette). Notice you can save the label as a BMP, JPG, WMF, EMF, PDF, or PNG. The BMP format is suitable for word processor documents and the JPG file will work on any web site page. Consider using the WMF, EMF, or PNG formats for use in producing publication quality label images you can hand over to your printer for mass production. Note: The label created by NutriBase is basic, yet it is by far the most popular label format in use today. If you need labels formatted differently, you may need to use a different software program. However, since other label creation programs tend to be far more expensive than NutriBase, most NutriBase users who need other formats will take the label created by NutriBase and hand it over to a graphics artist to create the new format for their end use. This is not difficult to do because all the rounding rules and percentage calculations have been performed by NutriBase. This is often the most economical way for you to meet the 193 requirements for a variety of labeling requirements. How to Create Canadian Nutrition Labels (Chef and higher) NutriBase Chef, Professional, and Enterprise Editions support the creation of Canadian Nutrition Facts Tables. For information regarding the generation of U.S. Nutrition Facts Labels, please read the previous topic. To create a label, open the recipe you want to generate a label for. (If you haven’t created this recipe yet, create it then open it.) After you create your recipe, click the “NFT (Canadian)” Button. NFT stands for “Nutrition Facts Table.” Missing Values: NutriBase will warn you if any of the ingredients in your recipe is missing or more values for one of the listed nutrients. This is because all nutrient databases contain missing values for some nutrients. If you try to primarily use the UDSA or Canadian food items, this problem is minimized but not eliminated. The USDA and Canadian databases contain fewer missing values than Brand Name foods (which contain many missing values food makers are not required to analyze their foods in depth). When USDA or Canadian data contains a missing value, it is usually because the food isn’t believed to contain much or any of that nutrient. It is expensive and impractical to test for nutrients that experts don’t believe are present. For your convenience, all nutrients that derived from any ingredients that are missing a value for that nutrient are clearly indicated for you. You can select additional nutrients to include in your label. In addition to the basic label data, you can add: Polyunsaturated Fat Calcium Monounsaturated Fat Iron Potassium Vitamin D Vitamin A Vitamin E Vitamin C Vitamin K 194 Thiamin Iodine Riboflavin Magnesium Niacin Zinc Vitamin B6 Selenium Folate Copper Vitamin B12 Manganese Biotin Chromium Pantothenic Acid Chloride Phosphorus Molybdenum Enter an allergen statement. To do so, check the box for this and type in your statement. Because NutriBase does not track the ingredients used in the foods in its database, it does not attempt to automatically notify you when you select foods that may contain allergens. If you will want to create a French, English/French, or French/ English label, click the toggle icon next to the allergen box to toggle between English and French languages. Please type in the French allergen statement as desired. Include a sorted ingredient listing. To include a sorted ingredient listing, check the box labeled: “Add ingredients as follows.” Your ingredients will be listed in descending order based on their gram weight contribution to your recipe. You can edit your ingredient listing as desired. (The ingredient names are truncated after the first comma included in the Food Name so edit as required.) To make permanent changes to the ingredient names, open the recipe and edit the ingredient names in the recipe itself. Click the “Upper Case,” “Lower Case” and “Mixed Case” Buttons to edit the ingredient cases. You can include this ingredient listing in French if desired. Click the “French” Button to display a window that will allow you to type in the French word for the English ingredient. You cannot edit the English words in the dictionary but you can edit them (as you have always been able to) in the NFT window. NutriBase will remember these translations for you for use in future labels. Create the NFT. Create the Nutrition Facts Table by clicking the “Create NFT” Button. All values will be rounded in accordance with the Canadian rounding rules for Nutrition Facts Tables. The nutrients that are required to be presented as a percentage of Canadian Daily Values will be calculated for you as well. After you create the label, you can print it by clicking the Print icon. To save the label to an image format, click the Save icon (it looks like a diskette). Notice you can save the label as a BMP, JPG, WMF, EMF, 195 PDF, or PNG. The BMP format is suitable for word processor documents and the JPG file will work on any web site page. Consider using the WMF, EMF, or PNG formats for use in producing publication quality label images you can hand over to your printer for mass production. Note: The label created by NutriBase is basic, yet it is by far the most popular label format in use today. If you need labels formatted differently, you may need to use a different software program. However, since other label creation programs tend to be far more expensive than NutriBase, most NutriBase users who need other formats will take the label created by NutriBase and hand it over to a graphics artist to create the new format for their end use. This is not difficult to do because all the rounding rules and percentage calculations have been performed by NutriBase. This is often the most economical way for you to meet the requirements for a variety of labeling requirements. With the Canadian labels, you click the down arrow in the first grid row to select from three different “serving size” phrases. These three options are: Serving Size/ Portion (English/French), Per / Par, or Per / Pour For Canadian labels, NutriBase provides three lines rather than the single line (i.e., “1 serving (35g)”) used in U.S. labels. This is to accommodate the requirement that Canadian labels require a “user friendly serving size.” Click the Info icon next to this grid row on the NutriBase window for additional information regarding this topic. Notes: 1) We recommend that you edit the English ingredient names before moving on to French ingredient names. 2) The ingredients toggle button changes your display from English to French. 3) Canadian Nutrition Facts Tables use Canadian Daily Values (rather than U.S. Daily Values). 4) Vitamin A is in Retinol Equivalents as calculated by RE=mcg Retinol + (mcg Beta-Carotene/6) 5) Niacin is in NE as calculated by NE=mg Niacin+(mg Tryptophan/60) 6) Please visit the Canadian Food Inspection Agency web site to learn more about the rules and regulations that govern the creation of Canadian Nutrition Facts Tables. A link is provided on this NutriBase window for your convenience. How to Set Up Your Home Window Graph After you create your first Client Profile, you will want to set up your Home Window Graph. To do this, click the down arrow on the upper right 196 side of this window and select the type of information you want to display on your Home Window graph. The “Weight vs. goal graph” option is a popular selection. 197 RMC over your graph area to see your setup options. Click on each of these menu options and study your options. You can select background color, background images, graphing styles (line, step, points, hollow, etc.). The “Data entries per page” option lets you select how many entries you include on a single window (a week, a month, a year, etc.). And, of course you can print the graph or save it in a wide variety of image formats. How to Create Servings Sizes Measured in Calories Suppose you wanted to create “snack packs” containing 200 calorie servings of, say, walnuts. Here’s how: Click the “Recipes” Tab. Create a recipe. Begin by locating the walnuts you want to use and add it to a new Recipe. (You can drag and drop it or right mouse click to add it to your recipe.) When you add it to your Recipe, you'll see a dialog box that lets you adjust the serving size. Select the second option – the one that allows you to specify servings in calories. Enter in “200” as your calorie amount. Click your mouse cursor inside the “Servings Size in grams” edit box to 198 update the gram weight. This is the gram weight serving amount to create a recipe for 200 calories of this item. Measure out this number of grams, pour it into a zip lock bag... make it and take it! Note: You can use this method to create mixtures of cereals, nuts, berries, etc. Just specify the number of calories you want to include of each ingredient and NutriBase will create custom blends of healthy snacks for yourself or for your clients. How to Import Data from the Client Intake Module (Pro and higher) This is software you can upload to your web site for your customers to download. If your customers are local, you can have NutriBase burn to a CD for you. Affix your own promotional CD label and hand them out to your customers. When they return with the data they entered into the CIM Software, have them return the original Installation CD – they’re reusable. You can give this software to a client. They can install this to their own PC and record their own food intake for up to 30 days. They can save this to a flash drive or email it to you as an email attachment. Once you import this file into NutriBase, it will be as if you had entered this data for them. You can quickly generate a variety of reports, save them as PDF files, post them to your web site, or email them to your client as an email attachment, or print out the hard-copy report to hand to your client. You can customize this software. There are no per-copy fees, royalties, or any charge of any kind. You can make as many copies as you wish. Your CD's are reusable. You can charge a fee for your services or use the resulting report as an incentive to join your health club or to subscribe to your health and nutrition services. Here’s how to import your CIM Data into NutriBase: 1) If you have NutriBase Pro or higher installed on your PC and you receive this file in an email as an attachment, just open the email and double-click on the attached file. You will recognize the CIM file because it will end with the “n11cim” extension. 2) If the file is sitting on a USB Drive, you can open Windows Explorer and view the files on the USB Drive. Then double-click on the file you want to import. 3) You can also start NutriBase (Pro or higher). Click the NutriBase Menu Icon located in the upper left corner of NutriBase). Click the “Client import” option. Then locate the file to import it into NutriBase. 199 How to Print a Meal Plan Report with Included Recipes When you provide a Meal Plan report to a client (or a user in a Personal Edition), you may want to include the recipes with cooking instructions for the recipes included in your Meal Plan. To do this, click the “Reports” Tab. Click the “Meal Plan” Button. Select a Meal Plan. Select the appropriate Meal Plan Report: After you create the report (by clicking the “Create report” Button), you can print the report or save it to PDF. Use the icons at the top of the report window to select the functions you want to perform. 200 How to Edit an NB Meal Plan “NB Meal Plans” are the NutriBase Meal Plans that we provide with your initial installation. These consist of meal plans at eight calorie levels for 11 different “special needs” (diabetic, hypertension, vegan, body building, etc.). Each special need contains meal plans at different calorie levels to address the needs of a wide range of different sized clients. To view your NutriBase Meal Plans, click the “Meal Plans” Tab, then click the “NB Meal Plans” Button. Click the various tabs to view the various special needs that are currently addressed. 201 We don't recommend that you edit the original NB Meal Plans that came with your software. We recommend instead that you make a copy of the original NB Meal Plan then edit the copy. (You can name it anything you like.) To do this, click the “Meal Plans” Tab, click the down arrow on the “Meal Plan Copy” Button, and select the “Copy Meal Plan to Meal Plan copy” option. This will lead you to a window that allows you to copy an NB Meal Plan to a new Meal Plan whose name you will provide. You can also select the Meal Plan Folder you want to save this new Meal Plan to. (Of course, if you have not created any new Meal Plan folders, you will only have one folder option – the default “General” folder.) 202 Notes: 1) To learn how to create a new Meal Plan Folder, take a look at the “How to Create a New Recipe Folder” topic… you create Meal Plan Folders the same way you create Recipe Folders, PFI (Personal Food Item) Folders, or Meal Folders. 2) Read the How to Organize an Existing Recipe Folder topic to learn how to organize your Meal Plan folders – your organize your Folders the same way for Recipes, PFI’s, Meals, and Meal Plans. How to Edit an Existing Meal Plan You edit NutriBase Meal Plans one day at a time. To edit a Meal Plan, click the “Meal Plans” Tab, then click the “Folders” Button. This will display your Meal Plans for you. (If you don’t have any existing Meal Plans, you can copy an NB Meal Plan into your General Folder.) Double-click the Meal Plan you want to edit. This will take you to the Meal Plan window: 203 Let’s suppose you want to edit the first day of the second week of this plan. Click the “+” sign next to “Week 1” to “collapse” it. Click the “-” sign next to Week 2” to “expand it.” Click Day 2 to select it. At this point, you can add food items (conduct your food searches in the bottom portion of the Meal Plan window). You can edit existing food item serving sizes, delete food items, or add new food items. In other words, you can edit this Meal Plan day as you want. After you finish with this day, use the navigation pane to the left to jump to another day to edit. You edit Meal Plans one day at a time. How to Create a Meal Plan From Scratch Some users prefer to edit an existing Meal Plan to modify it to suit a particular client or need, but you can create a NutriBase Meal Plan from scratch if you like. Because recipes normally serve as the foundation for most Meal Plans, the first step in creating a Meal Plan is to create all the recipes you will use in your Meal Plan. You will use these recipes as building blocks for your new Meal Plan. When you build your Meal Plan, you can also add food items from any of the NutriBase nutrient databases. For example, you could an 8 oz. serving of orange juice taken from the USDA database. Or a slice of whole wheat bread, toasted. You create NutriBase Meal Plans the same way you edit them - one day at a time. So, to create a new, click the “Meal Plans” Tab, then click the “Meal Plan” Button. Click the "New Plan" Button to begin your new Meal Plan from scratch: 204 Week One, Day One is selected for you as your starting Meal Plan Day. This is a logical place to begin. You can change the Week number by collapsing Week One by clicking the box next to Week 1. Select another Week by checking the box next to the week of interest. Next, click the Day you want to record foods to. At this point, you can add food items (conduct your food searches in the bottom portion of the Meal Plan window). You can add recipes by conducting a View type search across your recipes: 205 This View search across your recipes will list all your recipes in alphabetical order. Just select the recipe you want and add it to your Meal Plan by dragging and dropping it into your Meal Plan or by right mouse clicking on the recipe and selecting the option to "Add selected recipe..." OR, you can click on the Recipes Tab, click the Folder Button, select on or more recipes, right mouse click, and select the option to add the selected recipes to your Meal Plan. 206 After you right mouse click and click the "Add to meal plan" option, you can select the days of the meal plan to copy the selected recipe(s) to. In this example, we selected the first day of all four weeks of this meal plan: After you finish with this day, use the navigation pane on the left side of your window and select another day to enter foods to and repeat this process until you populate every day of your meal plan. How to Copy a Meal Plan to a Client’s Food Log If you want a client to eat the foods in a pre-planned Meal Plan, you can copy your Meal Plan to this client's Food Log. (This saves you from having to look up and enter every food item and recipe she should eat for four weeks.) You can record the four weeks of an existing Meal Plan (or portions thereof) to a client’s Food Log. You can copy the Meal Plan into their Food Log on their start date, then simply edit the deviations from the plan that the client reports to you. To copy a Meal Plan to a client's Food Log, do this: Click the “Meal Plans” Tab, then click the down arrow of your “Meal Plan Copy” Button. This will take you to a window that will let you copy any portion of any Meal Plan to any client: 207 Use this window to select all the particulars of the copy you want to perform. Choose the Meal Plan. Choose the target client. Select the days and the meals you want to copy. Choose the Start Date. When you have made all your selections, click the Copy button. You can verify that your copy worked by clicking the “Food Log” Tab. Make sure the client you copied to is the active client. You will see that everything you selected to copy from your Meal Plan was copied for you. How to Add Cost Data to Your Food Items (Chef and higher) NutriBase offers you a few ways to add cost data to your foods and ingredients. The most efficient way to add cost information is to use the NutriBase Cost Database. However, there are other ways to add cost information to your recipe ingredients that may be more convenient for you under certain situations. Here are a few ways to add cost data to your NutriBase recipes, meals, and meal plans: Cost Database - You can add cost information to all your recipe ingredients by using the NutriBase Cost Database. To access this function, click the “Home” Tab to get to the Home Window. (You do not access the Cost Database from the Recipe Window - you access it from the Home window.) To access the Cost Database, click the NutriBase Menu Icon, then select the Cost Database option. 208 Select the source of the ingredients to which you will be adding cost information. A source can be a Recipe Folder, a PFI Folder, or a Meal Folder. Then add your cost information. This method is generally the most efficient and fastest way to add cost data to NutriBase. But it is not the only way… You can also add cost information to any food item that you see in the nutrient database. To do this, locate the food item, highlight it, right mouse click, then select the “Item cost” option. To add the cost of an ingredient in a recipe, open the recipe, highlight the ingredient, right mouse click, then select the “Add ingredient cost” option. This could be handy if you already costed all the ingredients previously, but you are adding a totally new ingredient to the recipe today. 209 Notes: To display the costing information for each ingredient in a recipe, open a recipe, right mouse click over the ingredient listing, then select the “Show cost” option… this will add a column of cost data to your recipe window. NutriBase will store a history of your costs over time. To generate Cost Reports, click the “Reports” Tab, click the “Recipes” Button, and select the appropriate report type (in this case, it would be the “Recipe Cost Report.” 210 How to Add Custom Headers to your Reports (Chef and higher) Professional users often include a personalized “report header” to their reports. This header contains your name and contact information to let your client know who you are and how to contact you. To create a report header, click the “Reports” Tab. Click the Reports Tab, then click one of the report type buttons - Client, Exercise, PFI, Recipe, Meal or Meal Plan: Checking the “User report header will tell NutriBase to insert your header into your reports. Un-checking this box will assure that your header will not appear in your reports. Click the “Header setup” Button: 211 Select whether you want to use an image or a text type of header in your reports. If you plan to use a graphical header, create it prior to selecting this option. NutriBase will allow you to browse to your image (so it should exist when you look for it). Click this radio button option and navigate to the image you want to have appear in your reports. If you choose to use a text header, select this option and type in the text you want to have appear. This is normally your name, company name, address, phone, email, web address, etc. Make sure your company name is properly typed into the appropriate box in this window. Click the OK button to save your work. 212 How to Edit Your Under/Over Comments (Pro and higher) Whenever you create a report that contains a POG (Percent of Goals) Report, you have the option to include Under/Over comments. “Under comments” appear when the client eats less than her goal of a particular nutrient. Over comments” appear when the client eats too much of a potentially toxic nutrient. You can control many facets of these comments, including when they appear, what they say, and which ones you want to display. Suppose you don’t like the existing default “Over comment” for vitamin C. You can edit this comment (or any other “Over” or “Under” comment). To edit the Vitamin-C “Over comment,” click the “Reports” Tab. Click the “Client” Button. Click the down arrow and select a “Percent of Goals” report. Click the Under/Over “Setup” Button in your Report window, then click the “Create/Edit files” Button to open your “Under/Over Percent of Goal Setup” window. Scroll down to see the “Vit-C (mg)” entry. The checkmark on the left tells you that this comment is active. Notice further that the “Trigger” points are set at 80% of the client’s goal and 120% of the clients goal for the “Under” and “Over” comments, respectively. That it, when the person’s intake for the day is less than 80% of her goal for the day, this comment will appear in her POG report. And if she consumed more than 120% of her goal for this goal, the “Over” comment would be inserted into her POG report for this nutrient. You can set these “trigger points” as desired. 213 Since, in this example, you want to Edit your “Over” comment for Vitamin C, click the “Create/ Edit Files” Button. Click the down arrow in the resulting window to select OvitC.txt, then click the “Edit” Button. Edit as desired. When you are finished, click the “X” in the upper right corner to close the edit box. NutriBase will ask you if you want to save this change. Say “Yes.” This edited text file will be inserted into your future reports when you check this nutrient in the setup window. This window will also allow you to create new comments for other nutrients or delete existing ones. Henceforth, NutriBase will display your edited copy of this particular “over” comment. You can edit all your “Under comments” in a similar manner. Note: If you are proficient with a text editor and can navigate your hard drive, you can use a text editor to edit these files. These “Under” and “Over” text files are located in your ProgramData\nutribase\underover folder. All “Over” text files begin with the letter “O” followed by a hyphen and the nutrient’s name. All “Under” text files begin with the letter “U” followed by 214 a hyphen and the nutrient’s name. We recommend you follow this convention when you add new nutrient “Under” and “Over” comments to NutriBase. To create a new “Over” or “Under” comment, click the New button. To delete an existing “Over” or “Under” comment, check the boxes next to the comments you want to delete, then click the Delete button. How to Perform a Global Ranking A “global ranking” produces a sorted list of food items based on their values for any nutrient. This sorted list can be taken from the entire NutriBase nutrient database (or any subset of the database). You can rank high-to-low or low-to-high. To access the Global ranking option, click the down arrow of the “Search type:” menu and select “Global ranking.” Mark the databases you want to include in your search. For example, you might select the USDA, Canadian, and Brand Name databases. Click the “Rank Setup” Button and set up your preferences for this search. Click the “Select a food category” Button to select which food categories (and subcategories) you want to search across. Note: If you want to specify Food Subcategories as well as a major Food Category, right mouse click over the Search Results area and click the “Advanced food categories“ option. Click the “Apply” Button to apply this setting. After applying your preferences, you may dismiss this window (by closing it) if you want to. Click the “Search” Button to conduct your global ranking and display your results. Note: When you select Food Categories you have the option to also select the subcategories for the major Food Categories. We call this option using "Advanced Food Categories." To enable this, just right mouse click over the area where you search results are displayed and checking the "Advanced Food Categories" option. Turn this option off by un-checking this option. The "Auto Search" option tells NutriBase to re-conduct the 215 previous search when you select another Food Category. The "Search Footer" option allows you to search for strings within your search results if desired. How to Delete a Food Item from Your Food Log When you are in a Meal or Snack tab, you only have the “Remove” option. The Remove option removes the selected item from your meal or snack, but not from your “All Foods” Tab where all your food items for the day exist. Delete a food item by opening the “All Foods” Tab, highlighting the food item(s) you wish to delete from the Food Log for this day. right mouse click and select the “Delete selected item” option. (If you prefer, you can simply press the Delete key on your keyboard.) The “Delete operation actually deletes the food from this Day's Food Log. It will also disappear from any meal or snack tab that it may have been assigned to. How to Move a Food Log Item to Another Meal One day, you may make a mistake and copy a food item to say, the “Lunch” Tab when you meant to copy it to say, the “Breakfast” Tab. You can fix this: Click the “Lunch” Tab and highlight the food item you intended to place into the “Breakfast” Tab. right mouse click and choose the option to “Remove” this item from this Tab. This operation only removes the food item from the meal or snack tab that you are working in - the food item still remains in your “All Foods” Tab. Next, click the “All Foods” Tab and locate the food item you just removed from your “Lunch” Tab. Highlight it. right mouse click and choose the option to Copy the item to the “Breakfast” Tab. Note: If you prefer, you can Alt-Drag the food item to another meal or snack tab. “Alt-Drag” means to hold the Alt key down and while continuing to hold it down, drag the item (using your mouse cursor) to the desired tab. How to Save Your Shopping List in RTF Format You may find it convenient to save your Shopping List into a word processor format (like RTF), open it with your word processor (like Microsoft Word), edit it as desired, then save it and/or print it. To do this, open your Shopping List, RMC, then click the option called “Report.” You can print this report, email it, edit it, save it to RTF, etc. 216 RTF stands for “Rich Text Format.” It is a word processor format that Microsoft invented. You can open RTF files with Microsoft Word, edit them, and save them to Microsoft doc or docx formats. Other word processors also support the reading of RTF files. How to Export your Shopping List to CSV Format (Chef and higher) You may want to take your shopping list and import it into a spreadsheet application (like Excel). To do this, open your Shopping List, RMC, then click the option called “Export.” Give this file a name and click “Save” to save your shopping list data into Comma Separated Values (CSV) format. Most spreadsheets and database applications can import your CSV formatted file for use. How to Add a Food Item to Your Quick Add List Click your “Food Log” Tab. While recording a client’s food log, right mouse click any recorded food item and click the “Add to QA” Button or right mouse click over the window and select this option. This will add a food item you previously added to your Quick Add list. The Quick Add feature remembers the food item along with this serving size and the mea you normally assign it to. Using the Quick Add feature can save you time and effort. How to Refresh Your Meals and/or Recipes You may find yourself modifying existing PFI’s (Personal Food Items) that are used in your existing recipes and/or meals. We sometimes release an update that includes updated nutrient data for foods that you may have used in your existing recipes or meals (or inside a recipe that you used inside another recipe or another meal). To update all your recipes to make sure you are using the most current data, you can perform a “Refresh” operation on your recipes. Refresh opens all recipes, recreates all recipes on the fly using the latest data, Personal Food Items, and other recipes, then saves them for you. Refreshing all your recipes assures that they are as up-to date as your current nutrient information is. You can also refresh your Meals in a very similar manner. To refresh your recipes, click your Recipes Tab, click your Folders Button, right mouse click, and choose the “Refresh” option. To refresh your Meals, you can refresh them the same way - click your Meals Tab, click your Folders Button, right mouse click, and choose the “Refresh” option. Refreshing Meals will refresh all your recipes as well as all your Meals. The rule of thumb is that if you use meals, refresh them from time to time – especially after updating PFI’s or recipes. And if you use recipes, refresh them from time to time as well. How to View and Print Information Topics “Information Topics” are PDF Topics you can view and/or print for 217 yourself or for your clients. To view these documents, click the Home Tab and then click the Information Button. Click the left-hand drop-down menu to select a major category of information and click the right-hand drop-down menu to select a specific PDF to view and/or print. The information above is all you need to view and/or print the 100+ Information Topics included in NutriBase. The following explains how these PDF files are organized and displayed. This information is useful if you plan to add your own PDF topics for use in NutriBase. These PDF files and/or link files are organized into Folders on your hard drive. Click on the Home tab, the Information button, and then click the down arrow of the left-hand drop-down menu: The menu above shows the names of all the Folders that NutriBase installed for you during Setup. These Folder names appear as the names of the menu items listed in the left-hand drop-down menu. They are automatically sorted alphabetically for you. When you select a category of information files (that is, when you click on a Folder name), the files in that Folder are loaded into the menu on the right. Click the down arrow on the right-hand drop-down menu: The information topics are listed for you alphabetically. These menu items are actually the names of the PDF (on link) files that reside in the Folder you selected in the left-hand drop-down menu. NutriBase provides a number of PDF documents - related to nutrition and 218 health - that you can view and/or print as value-added handouts for your clients. How to Edit or Create New Information Topics If you are a moderately sophisticated Windows user, you can do far more than view and print the existing 100+ Information Topics that we provided. In Windows Vista, Windows 7, and Windows 8, your NutriBase ProgramData folder is located in c:\ProgramData\nutribase (unless you changed this during Setup to support the use of a Sync Folder. The default ProgramData folder is a “hidden” folder – if you haven’t already done so, you will need to “tell” Windows Explorer (or File Explorer) to let you display hidden folders. With sufficient computer skills, you can create new major categories of topics (these are actually just Folders you create on your hard drive). You can also create new topics (these are actually just PDF files that you create and save to the topic Folders. Let’s take a look at an example of some topics you may want to edit or add to. Your “Workout” topic is visible in the left-hand drop-down of your Information window. “Workouts” is the name of a Windows subdirectory (“Folder”) located in c:\ProgramData\nutribase\pdf\Workouts. Note: This location (c:\ProgramData\nutribase\pdf\Workouts) will be correspondingly different if you selected to install NutriBase using a Sync Folder. Please adjust the location references according to where you told NutriBase your Program Data Folder is. The topics listed in the right-hand drop-down menu are either PDF files located in this Workout folder or NutriBase Link Files located in this Workout Folder. If you change the name of this Folder, the corresponding menu item’s name will also change. You can change the sequence of major categories by changing the Folder names to shift them into a different alphabetical order. If you take a look in this Workout folder, you will see several MS Word documents and several PDF files with the same names as the Word docs. We created these Word docs, then saved each one as a PDF file. We saved them as PDF files because NutriBase only recognizes PDF files to display for you in the Information window. We left the Word docs in the folder in case you wanted to edit them or use them as the starting point for new workout docs to include in your workout listing. You can: 1) Edit the name of the Workouts folder to change its sequence in the left-hand menu. (Folder names self alphabetize themselves for you.) 2) Edit the names of the PDF files in the Workouts folder to change their 219 alphabetical sequence in your menu. 3) Open an existing Word doc, edit it, and save it under a new name in your Workouts folder to create a new Workouts menu topic. (Be sure to save it as a PDF file if you want it to appear in your menu.) 4) Create a new workouts doc from scratch. (Save it as a PDF in your Workout folder so NutriBase will see it.) We described this Workout folder to you to give you a simple example of what you can do with your Information section. Bear in mind that you can create many new major (left-hand) menu categories by adding new Folders (subdirectories) to your NutriBase Program Data Folder. You can store new PDF files in these folders to add new topics that you can access through NutriBase. This may be a convenient way for you to create your own custom library of handouts and educational materials for your clients. Note: In higher versions of NutriBase, you will find NutriBase Link Files along with the PDF files. A link file is a simple text file that contains a single line hyperlink to a PDF file located somewhere on the Web. For example, the Folder c:\ProgramData\nutribase\pdf\Nutriton For Everyone contains a link file called “Fish Facts.link”. It contains this text: “http://nutribase.com/ipdf/Nutrition for Everyone/Fish Facts.pdf”. This line is a hyperlink to the Fish Facts PDF file which resides for you on the NutriBase Web Site. How to View Your NBFTE (Next Best Food To Eat) NutriBase can help you select the next best food to eat. Here’s how it works: You first begin recording foods into your daily food log. After you eat a minimum of 15% of your daily calorie goal, the “NBFTE” Button will appear on your Food Log window. Click the “NBFTE” Button to display your next best foods to eat. NutriBase compares the nutrition from the foods you have eaten so far against your nutrition goals for the day. (By default, this goal is the DRI for you age and gender, but you have the ability to customize these 220 goals as desired in your Client Profile (Professional Editions) of your User Profile (Personal Editions). Performing this comparison tells NutriBase which nutrients are needed and which nutrients are the most inadequate based on what you’ve eaten so far today. NutriBase runs a proprietary algorithm that compares your nutrient needs with every food item in our NDI Nutrient Database (see Glossary of NutriBase Terms). The resulting output from this algorithm is a listing of food items. They will appear in your Search Results window in the bottom portion of your Food Log window. Notes: 1) We evaluate the values for 25 nutrients to derive a food item’s NDI (see Glossary of NutriBase Terms). Most Brand Name foods do not qualify for consideration. (A food that lacks values for most vitamins and minerals is unsuitable for consideration as a high nutrition food.) 2) If you rely on the NBFTE function, you can optimize results by recording your Food Log entries using data from the USDA or Canadian nutrient databases. This will give you more complete vitamin and mineral data and provide a more accurate baseline for calculating your NBFTE. 3) When you include Brand Name data in your Food Logs, NutriBase assumes that missing values (displayed in NutriBase as blanks) are zero. This means the NBBFTE function will likely give you foods that offer more nutrition than you actually need to meet your daily nutrient goals .This is not usually a bad tradeoff. How to Create a Custom Recipe Web Page (Chef and higher) To create a custom recipe web page, click the Reports Tab. Click the Recipes Button. From this window, select the Recipe Macro Report (RTF, HTML). This section provides you the ability to define your web site name, your web address, and the path to your images on your web site. All three of these variables are stored in NutriBase "macros." (These macros are placeholders for the information you type into these edit boxes.) For example, your web site name is stored in a macro called ^WebsiteName^. Whenever you type in "^WebsiteName^" into your template file, the name of your web site (as you entered it in the edit box) will appear in your final report. The other two macros are ^WebsiteAddr^ (which holds your web site's URL) and ^WebImgPath^ (which stores the path to your images on your web site). The Website image path is where you must upload your recipe pictures and your recipe Nutrition Facts Labels on your web site. 221 When you create a web version template, you will need to upload your recipe image and your Nutrition Facts Label image up to your web site. You will want to upload them to your ^WebImgPath^ which is normally a folder you reserve on your web site for images. We would recommend you create a folder for holding only recipe images and label images... something like "http://nutribase.com/rcpimages". Your recipe images and your Nutrition Facts Label Images are stored in your ProgramData Folder. This location differs in different Windows versions, but it is commonly located in c:\ProgramData\NutriBase\rcpimages and c:\ProgramData\NutriBase\nflimages. If you are using a Sync Folder, it will be in your Sync folder in a subfolder called rcpimages (recipe images) or nflimages (nutrition facts label images). You can select whether you want to include a U.S. Nutrition Facts Label or a Canadian Nutrition Facts Table. Just select the country format you prefer on the Recipe window (when this macro report is selected). Important: Your ProgramData folder (i.e, c:\ProgramData\NutriBase) is a hidden folder. By default, Windows Explorer (or File Explorer in newer operating systems) does not show this allow you to see this folder. To view hidden folders like your ProgramData folder, adjust your view properties to tell Windows that you want to view hidden folders. Company Name: Click the Header Setup button in the Report window to enter in your Company Name (or your own name). Once you do this, your company name will be captured in a macro called ^CompanyName^ and you will be able to insert your company name into NutriBase reports. The information above is sufficient for any webmaster to be able to use NutriBase recipes on a web site. If you are not a webmaster, we recommend you find someone to help you learn the basics so you can maintain your recipes on your web site. Actual web site maintenance is beyond the scope of support provided by CyberSoft for NutriBase customers. NutriBase will help you create the recipe reports, but it is up to you to know how to upload them to your web site, upload the required images, and link to them from other pages on your site. How to Create an NDI Report (Pro and higher) You can create a “Nutrient Density Index” (see Glossary of NutriBase Terms) report with NutriBase (Pro and higher). To create the NDI Report, click the “Reports” Tab, click the “Client” Button, select a client, choose the “Nutrient Density Index Spreadsheet” report. 222 The “Dietary Reference Intakes” (see Glossary of NutriBase Terms) has been set up for you. To see your DRI nutrient goals, click the “DRI setup” Button. These particular DRI nutrient goals are based on the maximum recommendation for each age group for both genders for each nutrient. You may edit these values as you see fit. Click the “Create report” Button to generate your NDI Report. The resulting report is a spreadsheet that you can print or save in RTF (word processor), CSV (comma separated values), or XLS (Excel spreadsheet format). You can export to any of these three formats using an right mouse click over the report, selecting the export option, and selecting the format you want to save it in. Use the drop-down menu at the top of the report to select subsets of the data to view. You may sort any column from high-to-low by clicking the column header for any column of interest. You can reverse the sort order by clicking the column header again. The first column of this report is your “Nutrient Density Index.” It is the mean (“average”) value per calorie for each nutrient tracked in the DRI for a food item. The higher the NDI value for a food is, the higher the overall nutrition this food provides. Note: An NDI of “1” means that one calorie of this food contains an average of 1% of your goal for each of the nutrients tracked. Bear in mind, however, that it isn’t likely that any food contains exactly 1% of your daily goal for each of up to 25 nutrients tracked by the DRI. More likely, some nutrients will be plentiful while others will be absent or low in value. The totals, however, will average to 1% of the DRI nutrient goal. This means that you will need a variety of foods to reach your goals for every nutrient. The Nutrient Density (ND) value is provided for each nutrient that we 223 track. The ND for a nutrient tells you how much of that nutrient you are getting per calorie. For example an ND of 7.9 tells you that you can get 7.9% of your goal for that one nutrient from 1 calorie of the food item that contains this value. You can think of the ND as a “single nutrient NDI.” You may sort on the ND column for an individual nutrient to identify rich sources of that nutrient. 224 FOOD SEARCH “HOW TO” TOPICS Please study this Search Screen image to get an idea of what’s there. 225 How To Conduct Food Lookups Take a look at the Food Lookups "panel." This panel allows you to do all the things you need to do to conduct NutriBase searches. Clicking the down arrow on the Search Types reveals the many types of NutriBase searches you can perform. Click the down arrow of the Search Type Edit box to display the drop down menu of NutriBase search types. The following text gives you a quick rundown of the various search types you have at your disposal: Food Name Search - You can type in a "search string" (a string of characters you are looking for in a food name) and search across one or more nutrient databases for foods that contain your search string. Brand Name Search - Type in a brand name (or partial brand name) and locate all foods in the databases you have selected that contain your search string. This will let you find all foods that have a brand name of say, "Taco Bell." View Search - This type of search will allow you to select a food category and view them in your search results screen. This allows you to view all foods in, say, your Beverages category. You can also restrict your View to subcategories (alcoholic, carbonated, juices, etc.) if you like. By default, the foods are displayed alphabetically. Nutrient Density View - This lets you view nutrient information for a category of foods based on a specific gram weight of each food item or upon a specific calorie level of each food item. This gives you an applesto-apples comparison of the nutrients in a large number of foods. Food ID Search - Every food item in NutriBase has a unique identifying number. This type of search allows you to locate any food item by its unique identifier. NutriBase uses a similar identifying number system that the USDA uses. Global Ranking Search - This search allows you to rank (sort) all foods in all the databases and food categories from high-to-low or low-to-high based on the food's values for any particular nutrient. Advanced Food Item Search - This type of search allows you to specify which databases you want to search across. It also lets you choose the food categories you want to limit your searches to (Fruits, 226 Vegetables, Beverages, etc.). It also lets you select which columns of information NutriBase will search across - you can include the Food Name Column, the Brand Name Column, and/or the Description Column (which provides additional information about the Food name). You can also select whether you will demand an AND type search or an OR type search. For example, if your search string contains "American cheese nonfat" and you select an AND type search, all "hits" must contain all three words. If you selected and OR type search, you will find the foods that contain any of these three words. Query Search - This is a Boolean AND search. It lets you perform "data mining" in the NutriBase Nutrient databases. How to Conduct a Food Name Search This is the most basic NutriBase Search. It is also one of the easiest types of searches to use. This is a good search type for beginners. Use this type of search to locate food items by their food name. (The “Food Name” is the description displayed in the first column of data when your search results are displayed.) When you conduct a Food Name Search, you are searching the food names in this first column of NutriBase data. In the Food Lookups panel, click the down arrow and select the "Food name search" option. Check the box next to USDA to tell NutriBase you want to limit your search to the USDA database. (You can check other boxes to include other databases if you desire.) Type in your “search string” (food name) in the edit box labeled “Search for:” For this example, let's search on "raw onion." Click the “Search” Button and NutriBase will search across the Food Name column of the selected database (USDA in this example) and display all the “hits” that contain the word or words in your food name. What this means is if you type in to search “onion raw”, the search results will only contain “hits” that include both of these words – in any sequence. To locate more onion entries, you could search again on just “onion.” (Most of the entries would be raw anyway since “raw” is often assumed in food names unless specified with words like “sautéed,” “fried,” “grilled,” etc.) If you fail to locate suitable hits, try including other databases and repeat your search. Or use fewer words or letters in your search string. The shorter your search string, the more hits you should locate. Note: If you have difficulty locating a particular food item, email us at [email protected] and ask us if it’s in our database. If it is, we'll 227 reply with step-by-step instructions for how to locate it. If not, you can always add a new food as a Personal Food Item to NutriBase. How to Interpret NutriBase Alerts When you display nutrient data in NutriBase, the software color codes the background color of your data values for Sodium, Saturated Fat, and Cholesterol. This gives you a quick way to tell how much of these three nutrients any food contains. Note: Keep in mind that NutriBase Alerts are provided for the specified serving size of the food item you are viewing. This means that an alert may be somewhat misleading if you choose to use a far smaller serving size than the one specified in the nutrient database. The normal background color for our nutrient data is white. We use four colors in our Alerts – Green, Light Green, Yellow, and Red. Green means the food contains none (“zero”) of the nutrient. For these nutrients, green is usually interpreted as “good.” The Red Alert, on the other hand, specifies a food that is relatively high in the nutrient it refers to. The chart below shows you the meaning of the four colors we use for Alerts. The back cover of your hard copy User’s Manual provides a color version of this information. NutriBase Alerts appear in your Search Results, in your Single Screen Views (which you can create by double-clicking on any food item), and in your Nutrient Summary (provided in the upper right corner of NutriBase windows with Food Lookup capabilities). How to Conduct a Brand Name Search Use the Brand Name search to list all the foods of a particular brand name. Use this search option to locate and display the foods associated with a particular brand name (i.e., Burger King, Quaker, Kashi, etc.). Select this Search Type from the drop down menu. Mark your checkboxes to include the databases you want to include in your search. In this example, we check the Brand database option. This means you will not be locating hits from the USDA database or the Canadian database. (You can include these databases by marking their checkboxes.) 228 Type in your “search string.” Your search string should be the brand name you seek. In this example, let’s search for “taco bell.” (Restaurants are brand names.) Click the “Search” Button and NutriBase will search the Brand Name column of every food category in the selected database (the “Brand Name database” in this example) and display all the hits that contain the characters in your search string. In this example, NutriBase will search the Brand Name column of the Brand nutrient database and display all the foods that contain “Taco Bell” in that column. Your search results screen will display a listing of all the Taco Bell foods contained in the NutriBase Brand Name database. If you search on just one word - “Taco” - you will locate hits for Taco Bell, Del Taco, Taco John, etc. In general, the shorter your search string, the more hits you will locate. To get more hits, make your search string shorter. To reduce the number of hits, narrow your searches by using longer search strings or more words. When you use more than one word, you will locate hits that contain both words in any order. If you fail to locate suitable brand name hits, try selecting another database to search across. Each new release of the USDA database contains more brand name data. And you have the option to search the brand name data column in both the USDA database and the Brand Name database at the same time if you want to - just tag both checkboxes and conduct your search. How to View Data by Food Category Suppose you want to view an alphabetical listing of the food items in the Fruits food category of the USDA nutrient database. NutriBase supports this type of search with the "View" option. To do this, click the down arrow in the Search type section, select the “View” option, then click the "Select a food category" button and select the Fruits food category. Click Apply. You can dismiss the Food Categories window if you like. Click the Search button to display all the Fruit in the USDA Fruits in alphabetical order. Click any column header to sort all the displayed data from high-to-low based on the values in that column. (This is a very popular feature.) Click the same column header again to reverse the sort order. You can do this for any nutrient. To add one of the displayed Food Items to a Food Log, Recipe, Meal, or Meal Plan (depending on which NutriBase window you happen to be in), 229 highlight it then: Drag and drop it into the food list in the upper left of this window, Click the “Add selected item” Button, or Right mouse click and select the option to Add selected food item. Note: When you select Food Categories you have the option to also select the subcategories for the major Food Categories. We call this option using "Advanced Food Categories." To enable this, just right mouse click over the area where you search results are displayed and checking the "Advanced Food Categories" option. Turn this option off by un-checking this option. The "Auto Search" option tells NutriBase to reconduct the previous search when you select another Food Category. The "Search Footer" option allows you to search for strings within your search results if desired. How to Conduct a Global Ranking A “global ranking” produces a sorted list of food items based on their values for any nutrient. This sorted list can be taken from the entire NutriBase nutrient database (or any subset of the database). You can rank high-to-low or low-to-high. To access the Global ranking option, click the down arrow of the “Search type:” menu and select “Global ranking.” Mark the databases you want to include in your search. For example, you might select the USDA, Canadian, and Brand Name databases. Click the “Rank Setup” Button and set up your preferences for this search. Click the “Select a food category” Button to select which food categories (and subcategories) you want to search across. Note: If you want to specify Food Subcategories as well as a major Food Category, right mouse click over the Search Results area and click the “Advanced food categories“ option. Click the “Apply” Button to apply this setting. After applying your preferences, you may dismiss this window 230 (by closing it) if you want to. Click the “Search” Button to conduct your global ranking and display your results. Note: When you select Food Categories you have the option to also select the subcategories for the major Food Categories. We call this option using "Advanced Food Categories." To enable this, just right mouse click over the area where you search results are displayed and checking the "Advanced Food Categories" option. Turn this option off by un-checking this option. The "Auto Search" option tells NutriBase to reconduct the previous search when you select another Food Category. The "Search Footer" option allows you to search for strings within your search results if desired. How to Search on the NutriBase Food ID Every food item in NutriBase has a unique identifying number. We call this the “NutriBase Food ID.” This allows you to positively identify a particular food item. To conduct this type of search, click the down arrow in the Search type drop down and select the "Food ID search." Type in the NutriBase Food ID number and conduct your search. If you double click on a food item when it is displayed in the search results screen, you will see all of the data for that food item displayed in a single, scrolling window.The first data to appear after the food name is the NutriBase Food ID. You can have NutriBase display the NutriBase Food ID for all foods by clicking your NutriBase Menu, clicking Options, then check the box to show NutriBase Food ID numbers for database items. (There are many other options available to you in your NutriBase Options window.) If you ever want to talk to us about a particular food entry, double click it and refer to this food item by its Food ID. That way, neither of us will have any confusion over which food entry we are discussing. If you want to look up a food by its NutriBase Food ID, simply choose the Food ID option from the Search type menu, click the “USDA” Button to limit your search across USDA food items, then click the “Search” Button to conduct your Food Item search. All foods containing the search string will be displayed. Different suffixes 231 denote different common household measures. How to View Data Using the Nutrient Density View The Nutrient density view option allows you to compare similar foods in an “apples-to-apples” way. Here’s how it works and how you conduct this type of food look up. Select the Nutrient density view option from the Search type down-down menu. Select a Food Category. In this example, let's select the Fruits food category. Click Apply. You can specify your comparison level value based on either calories or grams. The default calorie level is 100 calories (kcal), but you can type in a different value if you like. When you specify a comparison level of 100 calories, you will be viewing the nutrient data for 100 calorie “serving sizes” of all foods in your selected food category. Similarly, if you specify 100 grams as your comparison level, you will be viewing the nutrient data for 100 gram “serving sizes” of all foods in your selected food category. Click the “USDA” Button to select the research quality data from the USDA. (You can choose other databases if you like.) Click the “Search” Button to conduct this search. In the search results screen below, we clicked the column header for Protein. Notice that the food items in this display are sorted from high-to-low based on the Protein values for 100-calorie “servings” of each fruit. To rank all Fruit based on any other nutrient, scroll to that nutrient and click its column header. Click the column header again to reverse the sort. In the Serving Size column, notice that each serving is for 100 calories of that food and the amount is provided in this Serving Size column for your convenience. Click any column header to sort all the displayed data from high-to-low based on the value in that column. Click the same column header again to reverse the sort order. You can do this for any nutrient. To add one of the displayed Food Items to a Food Log, Recipe, Meal, or Meal Plan (depending on which NutriBase window you happen to be in), highlight it then: Drag and drop it into the food list in the upper left of this window, Click the “Add selected item” Button, or Right mouse click and select the option to Add selected food item. 232 Note: When you select Food Categories you have the option to also select the subcategories for the major Food Categories. We call this option using "Advanced Food Categories." To enable this, just right mouse click over the area where you search results are displayed and checking the "Advanced Food Categories" option. Turn this option off by un-checking this option. The "Auto Search" option tells NutriBase to re-conduct the previous search when you select another Food Category. The "Search Footer" option allows you to search for strings within your search results if desired. How to Conduct a Query In the Search type section, choose the “Query” option. Click the “Select a food category” Button. Select a Food Category across which you will conduct your Query. For this example, please select "Fruits" as your food category. You can dismiss this window by closing it. Click the USDA button to confine your Query to the USDA Nutrient Database for Standard Reference. Note: If you want to specify Food Subcategories as well as a major Food Category, right mouse click over the Search Results area and click the “Advanced food categories“ option. You may dismiss this window (by closing it) if you want to. Selecting this option allows you to select not only the major Food Category ("Fruits"), but also this major food category's subcategories (All, Dried, Fresh, Packaged).Clicking the ALL option will check all the options (Dried, Fresh, Packaged) for you or uncheck them all. Clicking the ALL option will check all the options or uncheck them all. Click the “Setup query parameters” Button. The window shown below will appear. Resize this window as desired. Use this window to define your query parameters. 233 In this case, we are searching for “Fruits.” We set 500 calories as the maximum number of calories any food can contain and we told NutriBase to sort these foods from lowest calories to highest. We further specified NutriBase to display foods with at least zero protein and display them from high to low. You can specify as many or as few parameters as you wish. In general, the fewer parameters you specify, the more hits you will get. Click the “Okay” Button when you are finished. Click the “Search” Button to conduct the Query. When this search is finished, notice that the foods are arranged from lowest calories to highest (up to a maximum of 500 calories). The protein values are listed from high-to-low. When two foods have the same number of calories, the one with the most protein is listed first. This type of logic applies to all your queries, even if you specify a large number of parameters. Play with the Query search to “mine” your nutrient database. How to Conduct an Advanced Food Item Search The Advanced Food Item Search is powerful and flexible. It is a more 234 complex type of search than most NutriBase search types. Mastering this option will help make you an expert NutriBase user. This sample search is an “Advanced food item search” for “presifted flour.” Under Search type we selected the “Advanced food item" search. (Clicking the down arrow in this box will list your other search options.) The “Brand” Button is checked to indicate that your search will be limited to Brand Name database only. When you conduct an Advanced Food Item search, the box on the right side of the screen below the “Search” button appears. Clicking this arrow icon opens and closes this box. For convenience, we call this the "Search Setups" box and we take a closer look at this box here: This window let’s you select whether you will conduct an AND type search or an OR type search. If you select an AND type search, ALL the words in your search string must be present to make a food item a valid hit. If you select the OR type search, a valid hit would result if ANY word or words in your search string were present. This Search Setups window also lets you determine which columns of data you want NutriBase to search across. The Food Name Search only searches the database column named "Food Name." The Brand Name Search searches only on the column named "Brand Name." but this Advanced Food Item search lets you search up to four columns: Food Name, Brand, Description, and Serving size. Important. If your search fails, check to make sure these settings are correct. In this example, make sure you check the option to search the Description field. (This is important in this particular case because the search string “presifted” exists only in the Description field – if you didn’t include this field in your search, you wouldn’t locate any hits.) 235 You also have the option to select which food categories you want to conduct your search across. Click the “Food categories” button to select which food categories you want to limit your search to. If you have selected food categories that do not contain your search stings, you will not locate any hits. (For example, you won't find bananas in the Vegetables food category.) The Advanced Food Item Search gives you many search options and using this search type will require you to understand your options. When conducting a search, think about the food categories you want to restrict your search to. Think about the columns in the food category you want to search across. Note: When you are unable to locate food items, make sure you have the appropriate Food Categories selected – you won’t find a Snickers bar if you told NutriBase to search across the Vegetables food category. To check which food categories you have selected, click the “Food Categories” Button. Type “presifted flour” in the “Search for” edit box, then click the “Search” button to start your search. Because this example specifies the AND type search, the search will only locate food Items that contain both “presifted” AND “flour” in its Food Name, Brand name or Description columns. It won’t matter what order they appear in your search… as long as both words are present anywhere in the selected columns, it will produce a hit. To add one of the displayed Food Items to a Food Log (or Recipe, or Meal, or Meal Plan), highlight it, then drag and drop it into the food list in the upper left of this window. You can also highlight and click the “Add selected item” Button. Or you can highlight it, right mouse click, and select the option to “Add selected food item.” Note: When you select Food Categories you have the option to also select the subcategories for the major Food Categories. We call this option using "Advanced Food Categories." To enable this, just right mouse click over the area where you search results are displayed and checking the "Advanced Food Categories" option. Turn this option off by un-checking this option. The "Auto Search" option tells NutriBase to re-conduct the previous search when you select another Food Category. The "Search Footer" option allows you to search for strings within your search results if desired. How to Import Web Profiles (Pro and higher) 236 Once you begin collecting profile data from your web-based questionnaire (that we helped you install as a part of the SE Edition package), you will want to download the data and import it into NutriBase. Once you do this, you can create a variety of reports for these new “clients” to send to them via email. To import the client data collected from your web-based questionnaire, click the “Client Setup” Tab then click the “Web Profiles” Button. Doing this takes you to a window that asks you to select the file and a Folder to which you will save all the on-line profiles that you plan to process. To create a new folder, click the Folders Tab and click the “New folder” Button. Note: We recommend you always download your questionnaire profile data to the same folder. NutriBase will “remember” this location for you for use in subsequent downloads. Once you have specified where you want to store your downloaded profile data, click the “Select data file” Button and point to the file. When we set up your Web Profile for you, we create a folder for you on our web site. This is the location where we store any web-based submissions for you to download. Here is an example of how to download your data file from your folder. Browse to your private Folder located on at http://nutribase.com. If this example, the folder address is http://nutribase.com/ NB/JohnDoe. Use your web browser to visit this location. Locate the file you want to download. (As a convenience, the name of the file will be the date that it was created.) 237 RMC on the file you want to download and click the option to “Save Target As…” When you click the “Save Target As…” option, you can specify where you want to download this file to. In this example, the user saved her file to a folder in his Documents Folder that he named “Web Profiles.” To import this file into NutriBase, start NutriBase, Click Client Setups, then click the “Web Profiles” Button. Once you do this, all the profile information contained in the downloaded file will be imported. When you look at your client listing, you will see that the new clients will appear in your list. You can create reports for these added clients if you want to. Save them as PDF files and email the report to these clients. (Their contact information will be waiting for you in the Contact List section of the Client Window.) THE NUTRIBASE FOOD CATEGORIES The following food categories (and sub-categories) are covered in NutriBase software products. Accompaniments Condiments Creamers Croutons Dips Gravy Jellies, Jams, Preserves, Marmalades Pickles, Relish, Peppers, Olives Salad Dressings Salsa Sauces Spreads Syrups Toppings Baby Foods Cereals Desserts and Snacks Fruits Infant Formulas Juices Meats and Meat Combinations Vegetables Other Baby Foods Beef Products Brisket Chuck 238 Flank, Shank Crosscuts Ground Beef, Prepared Beef Retail Cuts Rib Round Short Loin Sirloin Variety Meats, ByProducts Beverages Alcohol and Related Carbonated Soft Drinks Chocolate Beverages Coffee and Related Drinks Fruit Juices and Nectars Milk and Related Tea Vegetable Juices Other Beverages Bread Bagels Biscuits, Croissants, Buns, Rolls Breads, Bread Dough Cornbread English Muffins Muffins Pancakes, Waffles, French Toast Cereals, Ready to Eat Cereals, Ready-toEat Hot Cereals Candy Candy Bars Gum Hard Candy Other Candies Cereal Grains and Pasta Flour, Meal Grains, Grasses Pasta, Noodles Cookies and Crackers Cookies Crackers Dairy Products Butter Cheese Cream, Sour Cream, Whey Eggs Yogurt Desserts Brownies Cakes Custard, Flan, Rennin Gelatin Ice Cream, Frozen Desserts Mousse Pastries Pies Pudding Sweet Breads Entrees Beef, Pork, and Other Meats Breakfast Lunch Mexican Pasta Pizza Poultry Sandwiches Seafood Other Mixed Dishes Fats and Oils Fats Margarine, Margarine Substitutes Oils Shortening Finfish and Shellfish Products Fin Fish Shellfish Fruits Fresh Dried Packaged Ingredients Cake Frosting Coatings, Batter Mixes, Crumbs Cooking Ingredients Fruit Fillings Marinade, Tenderizers Seasonings Sweeteners Tomato Products Lamb, Veal, and Game Products 239 Lamb, Australian Lamb, Domestic Lamb, New Zealand Lamb, Iceland Veal and Organ Meats Game and Other Meats Legumes Beans, Peas Peanuts Soy, Carob Medical Nutritionals Carbohydrate & Protein Supplements Critical Care/Healing Support Diabetes/Glucose Intolerance Elemental Diet Gastro-Intestinal Support Hepatic Support Intact Protein Diet Parenteral (Nutrient Injections) Pediatric Pulmonary Support Renal Support Other Nuts and Seeds Flour, Meal, Powder Nuts Paste, Butter, Oil, Extract Seeds Pork Products Ham Pork Pork Products Poultry Chicken Turkey Other Poultry Restaurants, Burgers and Tacos Pasta Breakfast Beef, Pork, and Other Meats Sides, Vegetables, Fruits Desserts and Snacks Poultry and Seafood Sandwiches Beverages, Shakes Burgers Mexican Pizza Soup, Chili Condiments, Dressings, Sauces, Toppings Salads, Salad Bar Items Breads, Muffins, Crackers Restaurants, Pizza and Sandwiches Pasta Breakfast Beef, Pork, and Other Meats Sides, Vegetables, Fruits Desserts and Snacks Poultry and Seafood Sandwiches Beverages, Shakes Burgers Mexican Pizza Soup, Chili Condiments, Dressings, Sauces, Toppings Salads, Salad Bar Items Breads, Muffins, Crackers Restaurants, Sit Down Pasta Breakfast Beef, Pork, and Other Meats Sides, Vegetables, Fruits Desserts and Snacks Poultry and Seafood Sandwiches Beverages, Shakes Burgers Mexican Pizza Soup, Chili Condiments, Dressings, Sauces, Toppings Salads, Salad Bar Items Breads, Muffins, Crackers Restaurants, Specialty Pasta Breakfast Beef, Pork, and Other Meats Sides, Vegetables, Fruits Desserts and Snacks Poultry and Seafood Sandwiches Beverages, Shakes Burgers Mexican Pizza Soup, Chili Condiments, Dressings, Sauces, Toppings Salads, Salad Bar Items Breads, Muffins, Crackers Restaurants, Generic Pasta Breakfast Beef, Pork, and Other Meats Sides, Vegetables, Fruits Desserts and Snacks 240 Poultry and Seafood Sandwiches Beverages, Shakes Burgers Mexican Pizza Soup, Chili Condiments, Dressings, Sauces, Toppings Salads, Salad Bar Items Breads, Muffins, Crackers Sausages and Luncheon Meats Frankfurters Lunch Meats Meat Spreads Fillings, and Snacks Sausages Side Dishes Meat Dishes Potato and Onion Dishes Rice, Legumes Salads and Other Dishes Stuffing Vegetable Dishes Snacks Chips Crisps, Puffs, Curls, Balls, Sticks, etc. Fruit Snacks and Bars Grain Cakes and Snacks Granola and Granola Bars Popcorn Pretzels Snack Bars Snack Mixes Toaster Snacks Soups Bouillon Food Service Soups, Condensed Soups, Mixes Soups, Ready-toServe Spices Fresh Ground, Crumbled, Dried, Powdered Seeds Sports and Diet Nutritionals Bars, Wafers, Puddings Drinks Vegetables Dried Fresh Frozen Packaged Vegetarian Products Beef Substitutes Egg Substitutes Fish and Poultry Substitutes Legume-Based Substitutes Meat Substitutes, Nonspecific Pork Substitutes Soup, Chili Other Vegetarian Products Vitamins & Mineral Supplements Minerals Multi-Vitamins and Minerals Vitamins MACROS FOR USE WITH ASSESSMENT REPORTS All NutriBase macros begin and end with “^”. Typing the macro in the first column below will insert the value indicated in the second column. Use these macros anywhere you wish and as many times as you wish in your Initial Assessment Report template file. Macros are supported in the Professional and higher of NutriBase. These macros are not casesensitive. Client-Related Macros ^CompanyName^ User’s company name or actual name. (Set in the Report section Header setup). ^ActivLev^ Client's activity level (“sedentary, “moderately active,” or “very active.”) ^Age^ Client's age in years. ^BasicCalReq^ Client's daily Energy (Kcal) requirement. (Doesn’t account for activity or exercise.) ^Bfcalcmethod^ Method that was used to calculate body fat content. ^BodyFrame^ Client's body frame type (“small,” “medium,” or “large”). ^CalCutPerWk^ Client's number of calories (Kcal) to cut per week to reach his or her weight goal. ^Cnum^ Customer Number (as identified in the Client Contact List). ^Date^ Today's date. ^DesBMI^ Client's desired BMI. ^DesBodyFat^ Client's desired (goal) body fat content as a percentage of body weight. ^DesWtKgs^ Client's desired (goal) weight in kilograms. ^DesWtLbs^ Client's desired (goal) weight in pounds. ^FirstName^ Client's first name. ^Gender^ Client's sex. ^GoalDate^ The date that the client is expected to reach his or her goal. ^HeightCm^ Client's height in centimeters. ^Heightftin^ Client's height in feet and inches. 241 ^HeightIn^ Client's height in inches. ^IsCalOvride^ Has the client's calorie (Kcal) requirement been overridden? (“yes” or “no”) ^IsNurs^ Is the client nursing (“yes” or “no”)? ^IsPreg^ Is the client pregnant (“yes” or “no”)? ^Kgs2L-G/Wk^ Client's kilograms to lose or gain per week. ^LastName^ Client's last name. ^Lbs2L-G/Wk^ Client's pounds to lose or gain per week. ^Mhr^ Client's maximum heart rate. ^MI^ Client's middle initial. ^ModDate^ Modification Date (user modified start date). ^NursCal^ Calories to add to client's daily calorie allotment because she is lactating. ^PregCal^ Calories to add to client's daily calorie allotment due to her pregnancy. ^Rhr^ Client's resting heart rate. ^Salutation^ Client's salutation (“Mr.” or “Ms.”) ^StartBMI^ Client's starting BMI ^StartBodyFat^ Client's starting body fat content as a percentage of total body weight. ^StartDate^ The date when the client information was first logged in to NutriBase. ^StartWtKgs^ Client's starting weight in kilograms. ^StartWtLbs^ Client's starting weight in pounds. ^TotKgsToL-G^ Client's total weight in kilograms to lose or gain. ^TotLbsToL-G^Client's total weight in pounds to lose or gain. ^Wks2Goal^ Client's approximate number of weeks to reach his or her weight goal. Calorie-Related Macros ^AlcCal^ ^AlcPerc^ calories. ^Calories^ or her goal. ^CarbCal^ ^CarbPerc^ calories. ^DayCal2Main^ ^Fat^ ^FatCal^ ^FatPerc^ ^FoodEnergy^ ^NetCarbs^ ^ProtCal^ ^ProtGms^ ^ProtPerc^ Client's daily alcohol goal in calories. Client's daily alcohol goal as a percentage of total Client's daily calorie (Kcal) intake goal to reach his Client's daily carbohydrate requirement in calories. Client's daily carbohydrate requirement as a percentage of total Client's daily calories (Kcal) to maintain current body weight. Client's daily total Fat (g) goal. Client's daily total fat requirement in calories. Client's daily fat requirement as a percentage of total calories. Client's daily Food Energy (Kj) goal. Client's daily Net Carbohydrates (g) goal. Client's daily protein requirement in calories. Client's daily Protein (g) goal. Client's daily protein requirement as a percentage of total calories. General Nutrient Goal Macros ^Alcohol^ ^Ash^ ^Beta-Sitosterol^ ^Biotin^ ^Caffeine^ Client's daily Alcohol (g) goal. Client's daily Ash (g) goal. Client's daily Beta-Sitosterol (mg) goal. Client's daily Biotin (mcg) goal. Client's daily Caffeine (mg) goal. 242 ^Campesterol^ ^Carbs^ ^Cholesterol^ ^Fiber^ ^Fructose^ ^Galactose^ ^Glucose^ ^Lactose^ ^Maltose^ ^Phytosterols^ ^Starch^ ^Stigmasterol^ ^Sucrose^ ^Sugars^ ^Theobromine^ ^Water^ Client's daily Campesterol (mg) goal. Client's daily Carbohydrates, by difference (g) goal. Client's daily Cholesterol (mg) goal. Client's daily Fiber, Total Dietary (g) goal. Client's daily Fructose (g) goal. Client's daily Galactose (g) goal. Client's daily Glucose (g) goal. Client's daily Lactose (g) goal. Client's daily Maltose (g) goal. Client's daily Phytosterols (mg) goal. Client's daily Starch (g) goal. Client's daily Stigmasterol (mg) goal. Client's daily Sucrose (g) goal. Client's daily Sugars (mg) goal. Client's daily Theobromine (mg) goal. Client's daily Water (g) goal. Client’s Mineral Goal Macros ^Calcium^ ^Chloride^ ^Chromium^ ^Copper^ ^Fluoride^ ^Iodine^ ^Iron^ ^Magnesium^ ^Manganese^ ^Molybdenum^ ^Phosphorus^ ^Potassium^ ^Selenium^ ^Sodium^ ^Zinc^ Client's daily mineral Calcium (mg) goal. Client's daily mineral Chloride (mg) goal. Client's daily mineral Chromium (mcg) goal. Client's daily mineral Copper (mg) goal. Client's daily mineral Fluoride (mg) goal. Client's daily mineral Iodine (mg) goal. Client's daily mineral Iron (mg) goal. Client's daily mineral Magnesium (mg) goal. Client's daily mineral Manganese (mg) goal. Client's daily mineral Molybdenum (mcg) goal. Client's daily mineral Phosphorus (mg) goal. Client's daily mineral Potassium (mg)goal. Client's daily mineral Selenium (mcg) goal. Client's daily mineral Sodium (mg) goal. Client's daily mineral Zinc (mg) goal. Client’s Vitamin Goal Macros ^AlphaCarotene^ ^AlphaToc^ goal. ^BetaCarotene^ ^BetaCrypto^ ^BetaToc^ ^DeltaToc^ ^Folate DFE^ ^Folic Acid^ ^Food Folate^ ^GammaToc^ ^Niacin^ ^Pantothenic^ ^Retinol^ Client's daily Carotene, Alpha (mcg) goal. Client's daily Vitamin E Alpha Tocopherol (mg) Client's daily Carotene, Beta (mcg) goal. Client's daily Cryptoxanthin, Beta (mcg) goal. Client's daily Tocopherol, Beta (mg) goal. Client's daily Tocopherol, Delta (mg) goal. Client's Folate DFE goal Client's Folic Acid (mcg) goal. Client's Food Folate (mcg) Client's daily Tocopherol, Gamma (mg) goal. Client's daily vitamin Niacin (mg) goal. Client's daily vitamin Pantothenic acid (mg) goal. Client's daily Retinol (mcg) goal. 243 ^Riboflavin^ ^Thiamine^ ^Total Folate^ ^Vit-A IU^ ^Vit-A RAE^ ^Vit-A RE^ ^Vit-B12^ ^Vit-B6^ ^Vit-C^ ^Vit-D^ ^Vit-E ATE^ ^Vit-E IU^ ^Vit-K^ Client's daily vitamin Riboflavin (mg) goal. Client's daily vitamin Thiamin goal. Client's Total Folate (mcg). Client's daily vitamin A, IU goal. Client's daily vitamin A (mcg) RAE goal. Client's daily vitamin A, RE goal. Client's daily vitamin B-12 (mg) goal. Client's daily vitamin B-6 (mg) goal. Client's daily vitamin C (mg) goal. Client's daily vitamin D (IU) goal. Client's daily vitamin E (mg) ATE goal. Client's daily vitamin E (IU) goal. Client's daily vitamin K (mcg) goal. Exercise-Related Macros ^AvgDailyExCal^ days / 7). ^SunEx^ ^MonEx^ ^TueEx^ ^WedEx^ ^ThuEx^ ^FriEx^ ^SatEx^ Average daily exercise calories (sum of the seven Reserved Reserved Reserved Reserved Reserved Reserved Reserved. Client's Fat Goal Macros ^FA 10:0^ Client's daily Fatty Acid 10:0 Capric (g) goal. ^FA 12:0^ Client's daily Fatty Acid 12:0 Lauric (g) goal. ^FA 13:0^ Client's daily Fatty Acid 13:0 (g) goal. ^FA 14:0^ Client's daily Fatty Acid 14:0 Myristic (g) goal. ^FA 14:1^ Client's daily Fatty Acid 14:1 Myristoleic (g) goal. ^FA 15:0^ Client's daily Fatty Acid 15.0 Pentadecanoic (g) goal. ^FA 15:1^ Client's daily Fatty Acid 15:1 (g) goal. ^FA 16:0^ Client's daily Fatty Acid 16:0 Palmitic (g) goal. ^FA 16:1c^ Client's daily Fatty Acid 16:1c (g) goal. ^FA 16:1t^ Client's daily Fatty Acid 16:1t (g) goal. ^FA 16:1u^ Client's daily Fatty Acid 16:1 undifferentiated Palmitoleic (g) goal. ^FA 17:0^ Client's daily Fatty Acid 17:0 Heptadecanoic (g) goal. ^FA 17:1^ Client's daily Fatty Acid 17:1 (g) goal. ^FA 18:0^ Client's daily Fatty Acid 18:0 Stearic (g) goal. ^FA 18:1c^ Client's daily Fatty Acid 18:1c (g) goal. ^FA 18:1t^ Client's daily Fatty Acid 18:1t (g) goal. ^FA 18:1u^ Client's daily Fatty Acid 18:1 undifferentiated Oleic (g) goal. ^FA 18:2cla^ Client's daily Fatty Acid 18:2CLAs (g) goal. ^FA 18:2i^ Client's daily Fatty Acid 18:2i (g) goal. 244 ^FA 18:2n-6^ Client's daily Fatty Acid 18:2 n6 c,c (g) goal. ^FA 18:2t^ Client's daily Fatty Acid 18:2 t, not further defined (g) goal. ^FA 18:2u^ Client's daily Fatty Acid 18:2 undifferentiated Linoleic (g) goal. ^FA 18:3i^ Client's daily Fatty Acid 18:3 i (g) goal. Client's Fat Goal Macros ^FA 18:3n^ Client's daily Fatty Acid 18:3 n-3 c,c,c, (g) goal. ^FA 18:3n-3^ Client's daily Fatty Acid 18:3 n-3 c,c,c alpha-linolenic (g) goal. ^FA 18:3n-6^ Client's daily Fatty Acid 18:3 n-6 c,c,c, gamma-linolenic (g) goal. ^FA 18:3u^ Client's daily Fatty Acid 18:3 undifferentiated, linolenic (g) goal. ^FA 18:4^ Client's daily Fatty Acid 18:4 Moroctic (g) goal. ^FA 20:0^ Client's daily Fatty Acid 20:0 Arachidic (g) goal. ^FA 20:1^ Client's daily Fatty Acid 20:1 Gadoleic (g) goal. ^FA 20:2n^ Client's daily Fatty Acid 20:2 n-6 c,c (g) goal. ^FA 20:2n-6^ Client's daily Fatty Acid 20:2 n-6 c,c (g) goal. ^FA 20:3u^ Client's daily Fatty Acid 20:3 undifferentiated (g) goal. ^FA 20:4u^ Client's daily Fatty Acid 20:4 undifferentiated Arachidonic (g) goal. ^FA 20:5n-3^ Client's daily Fatty Acid 20:5 n-3 timnodonic (g) goal. ^FA 22:0^ Client's daily Fatty Acid 22:0 Behenic (g) goal. ^FA 22:1c^ Client's daily Fatty Acid 21:1 c (g) goal. ^FA 22:1u^ Client's daily Fatty Acid 22:1 undifferentiated Erucic (g) goal. ^FA 22:5n-3^ Client's daily Fatty Acid 22:5 n-3 Clupanodonic (g) goal ^FA 22:6n-3^ Client's daily Fatty Acid 22:6 n-3 (g) goal. ^FA 24:0^ Client's daily Fatty Acid 24:0 Tetracosanoic (g) goal. ^FA 24:1c^ Client's daily Fatty Acid 24:1c Nervonic (g) goal. ^FA 4:0^ Client's daily Fatty Acid 4:0 Butyric (g) goal. ^FA 6:0^ Client's daily Fatty Acid 6:0 Caproic (g) goal. ^FA 8:0^ Client's daily Fatty Acid 8:0 Caprylic (g) goal. ^MonoFat^ Client's daily Fat, Monounsaturated (g) goal. ^Omega-3^ Client's daily Omega-3 (g) goal. ^Omega-6^ Client's daily Omega 6 (g) goal. ^PolyFat^ Client's daily Fat, Polyunsaturated (g) goal. ^SatFat^ Client's daily Saturated Fat (g) goal. ^SatFatPer^ Client's daily saturated fat goal as a percentage of total calories. ^TransFat^ Client's daily Trans Fat (g) goal. ^TransMonoFat^ Client's daily Trans-Monoenoic Fat (g) goal. ^TransPolyFat^ Client's daily Trans-Polyenoic Fat (g) goal. 245 Client's Amino Acid Goal Macros ^Alanine^ ^Arginine^ ^Aspartic^ ^Cystine^ ^Glutamic^ ^Glycine^ ^Histidine^ ^Hydroxy^ ^Isoleucine^ ^Leucine^ ^Lutein^ ^Lycopene^ ^Lysine^ ^Methionine^ ^Phenylalanine^ ^Proline^ ^Serine^ ^Threonine^ ^Tryptophan^ ^Tyrosine^ ^Valine^ Client's daily amino acid Alanine (g) goal. Client's daily amino acid Arginine (g) goal. Client's daily amino acid Aspartic acid (g) goal. Client's daily amino acid Cystine (g) goal. Client's daily amino acid Glutamic Acid (g) goal. Client's daily amino acid Glycine (g) goal. Client's daily amino acid Histidine (g) goal. Client's daily amino acid Hydroxyproline (g) goal. Client's daily amino acid Isoleucine (g) goal. Client's daily amino acid Leucine (g) goal. Client's daily amino acid Lutein (g) goal. Client's daily amino acid Lycopene (g) goal. Client's daily amino acid Lysine (g) goal. Client's daily amino acid Methionine (g) goal. Client's daily amino acid Phenylalanine (g) goal. Client's daily amino acid Proline (g) goal. Client's daily amino acid Serine (g) goal. Client's daily amino acid Threonine (g) goal. Client's daily amino acid Tryptophan (g) goal. Client's daily amino acid Tyrosine (g) goal. Client's daily amino acid Valine (g) goal. Macros for Use with NutriBase Custom Meal Reports NutriBase macros begin and end with “^” and are not case-sensitive. Typing the macro in the column below insert its associated in that position. Use these macros and as many times as you wish in your template file for custom Meal reports. Macros are supported in the Professional and higher. ^Calories^ ^FoodEnergy^ ^Protein^ ^ProtCal^ ^ProtPerc^ ^Carbs^ ^Starch^ ^Sugars^ ^Glucose^ ^Fructose^ ^Galactose^ ^Sucrose^ ^Lactose^ ^Maltose^ ^Fiber^ ^NetCarbs^ ^CarbCal^ ^CarbPerc^ ^Fat^ ^SatFat^ ^TransFat^ ^TransMonoFat^ ^TransPolyFat^ ^MonoFat^ ^PolyFat^ ^Omega-3^ ^Omega-6^ ^FatCal^ 246 ^FatPerc^ ^Cholesterol^ ^Alcohol^ ^AlcCal^ ^AlcPerc^ ^Ash^ ^Water^ ^Caffeine^ ^Theobromine^ ^Phytosterols^ ^Stigmasterol^ ^Campesterol^ ^Beta-Sitosterol^ ^Vit-A RAE^ ^Retinol^ ^BetaCarotene^ ^AlphaCarotene^ ^BetaCrypto^ ^Lycopene^ ^Lutein^ ^Vit-A IU^ ^Thiamine^ ^Riboflavin^ ^Niacin^ ^Pantothenic^ ^Vit-B6^ ^Total Folate^ ^Food Folate^ ^Folic Acid^ ^Folate DFE^ ^Vit-B12^ ^Biotin^ ^Vit-C^ ^Vit-D^ ^AlphaToc^ ^BetaToc^ ^GammaToc^ ^DeltaToc^ ^Vit-E IU^ ^Vit-K^ ^Calcium^ ^Magnesium^ ^Phosphorus^ ^Potassium^ ^Sodium^ ^Chloride^ ^Chromium^ ^Copper^ ^Fluoride^ ^Iodine^ ^Iron^ ^Manganese^ ^Molybdenum^ ^Selenium^ ^Zinc^ ^Histidine^ ^Isoleucine^ ^Leucine^ ^Lysine^ ^Methionine^ ^Phenylalanine^ ^Threonine^ ^Tryptophan^ ^Valine^ ^Alanine^ ^Arginine^ ^Aspartic^ ^Cystine^ ^Glutamic^ ^Glycine^ ^Hydroxy^ ^Proline^ ^Serine^ ^Tyrosine^ ^FA 4:0^ ^FA 6:0^ ^FA 8:0^ ^FA 10:0^ ^FA 12:0^ ^FA 13:0^ ^FA 14:0^ ^FA 15:0^ ^FA 16:0^ ^FA 17:0^ ^FA 18:0^ ^FA 20:0^ ^FA 22:0^ ^FA 24:0^ ^FA 14:1^ ^FA 15:1^ ^FA 16:1u^ ^FA 16:1c^ ^FA 16:1t^ ^FA 17:1^ ^FA 18:1u^ ^FA 18:1c^ ^FA 18:1t^ ^FA 20:1^ ^FA 22:1u^ ^FA 22:1c^ ^FA 24:1c^ ^FA 18:2u^ ^FA 18:2n-6^ ^FA 18:2i^ ^FA 18:2t^ ^FA 18:2cla^ ^FA 18:3u^ ^FA 18:3n-3^ 247 ^FA 18:3n-6^ ^FA 18:3i^ ^FA 18:4^ ^FA 20:2n-6^ ^FA 20:3u^ ^FA 20:4u^ ^FA 20:5n-3^ ^FA 22:5n-3^ ^FA 22:6n-3^ ^XStarch^ ^XVLM^ ^XLM^ ^XMFM^ ^XHFM^ ^XVeg^ ^XFru^ ^XSMilk^ ^XLMilk^ ^XWMilk^ ^XFat^ ^XOther^ ^MealName^ ^MealComment^ ^PFCRatio^ ^CPFRatio^ ^Date^ ^Filler^ ^Fooditems-SS^ ^SS-Fooditems^ ^Fooditems-SS-htm^ ^SS-Fooditems-htm^ ^MyField1^ MyField20^ Most of the Meal Report macros are self-explanatory. Consult the Initial Assessment Report Macros (in the prior section) for definitions. ^Fooditems-SS^ Lists the food items formatted with the food item, a hyphen and then the serving size. ^SS-Fooditems^ Lists the food items formatted with the serving size, a hyphen and then the food name. ^Fooditems-SS-htm^ and ^SS-Fooditems-htm^ Are the same as the two macros above except that we added a line break (“<br>“) to the end of each line to facilitate the smooth flow into an HTM formatted file. ^MyField1^ through ^MyField20^ are the twenty macros that represent the optional nutrients you have decided to track in addition to the ones NutriBase already tracks for you (accessed through the PFI options “Add more nutrient values” Button). PFI’s that use MyFields cannot be exported or imported. However, they can be transferred using backup and restore functions. Macros for Use with NutriBase Custom PFI Reports NutriBase macros begin and end with “^” and are not case-sensitive. Typing the macro in the column below insert its associated in that position. Use these macros and as many times as you wish in your template file for custom PFI reports. Macros are supported in the Professional and higher. ^Calories^ ^FoodEnergy^ ^Protein^ ^ProtCal^ ^ProtPerc^ ^Carbs^ ^Starch^ ^Sugars^ ^Glucose^ ^Fructose^ ^Galactose^ ^Sucrose^ ^Lactose^ ^Maltose^ ^Fiber^ ^NetCarbs^ ^CarbCal^ ^CarbPerc^ ^Fat^ ^SatFat^ ^TransFat^ ^TransMonoFat^ ^TransPolyFat^ ^MonoFat^ ^PolyFat^ ^Omega-3^ ^Omega-6^ ^FatCal^ ^FatPerc^ ^Cholesterol^ ^Alcohol^ ^AlcCal^ ^AlcPerc^ ^Ash^ ^Water^ ^Caffeine^ ^Theobromine^ ^Phytosterols^ ^Stigmasterol^ ^Campesterol^ ^Beta-Sitosterol^ ^Vit-A RAE^ ^Retinol^ ^BetaCarotene^ ^AlphaCarotene^ ^BetaCrypto^ ^Lycopene^ ^Lutein^ 248 ^Vit-A IU^ ^Thiamine^ ^Riboflavin^ ^Niacin^ ^Pantothenic^ ^Vit-B6^ ^Total Folate^ ^Food Folate^ ^Folic Acid^ ^Folate DFE^ ^Vit-B12^ ^Biotin^ ^Vit-C^ ^Vit-D^ ^AlphaToc^ ^BetaToc^ ^GammaToc^ ^DeltaToc^ ^Vit-E IU^ ^Vit-K^ ^Calcium^ ^Magnesium^ ^Phosphorus^ ^Potassium^ ^Sodium^ ^Chloride^ ^Chromium^ ^Copper^ ^Fluoride^ ^Iodine^ ^Iron^ ^Manganese^ ^Molybdenum^ ^Selenium^ ^Zinc^ ^Histidine^ ^Isoleucine^ ^Leucine^ ^Lysine^ ^Methionine^ ^Phenylalanine^ ^Threonine^ ^Tryptophan^ ^Valine^ ^Alanine^ ^Arginine^ ^Aspartic^ ^Cystine^ ^Glutamic^ ^Glycine^ ^Hydroxy^ ^Proline^ ^Serine^ ^Tyrosine^ ^FA 4:0^ ^FA 6:0^ ^FA 8:0^ ^FA 10:0^ ^FA 12:0^ ^FA 13:0^ ^FA 14:0^ ^FA 15:0^ ^FA 16:0^ ^FA 17:0^ ^FA 18:0^ ^FA 20:0^ ^FA 22:0^ ^FA 24:0^ ^FA 14:1^ ^FA 15:1^ ^FA 16:1u^ ^FA 16:1c^ ^FA 16:1t^ ^FA 17:1^ ^FA 18:1u^ ^FA 18:1c^ ^FA 18:1t^ ^FA 20:1^ ^FA 22:1u^ ^FA 22:1c^ ^FA 24:1c^ ^FA 18:2u^ ^FA 18:2n-6^ ^FA 18:2i^ ^FA 18:2t^ ^FA 18:2cla^ ^FA 18:3u^ ^FA 18:3n-3^ ^FA 18:3n-6^ ^FA 18:3i^ ^FA 18:4^ ^FA 20:2n-6^ ^FA 20:3u^ ^FA 20:4u^ ^FA 20:5n-3^ ^FA 22:5n-3^ ^FA 22:6n-3^ ^XStarch^ ^XVLM^ ^XLM^ ^XMFM^ ^XHFM^ ^XVeg^ ^XFru^ ^XSMilk^ ^XLMilk^ ^XWMilk^ ^XFat^ ^XOther^ ^PfiName^ ^PfiComment^ ^PFCRatio^ ^CPFRatio^ ^Date^ ^PfiServing^ ^MyField1^ to ^MyField20^ ^MyField1^ through ^MyField20^ are the twenty macros that represent your optional nutrients you have decided to track in addition to the ones NutriBase already tracks for you (accessed through the PFI options “Add more nutrient values” Button). PFI’s that use MyFields cannot be exported or imported. However, they can be transferred using backup and restore functions. Macros for Use with Custom Recipe Reports NutriBase macros begin and end with “^” and are not case-sensitive. Typing the macro in the column below insert its associated in that position. Use these macros and as many times as you wish in your template file for custom recipe reports. Macros are supported in the Professional and higher. ^Calories^ ^FoodEnergy^ ^Protein^ ^ProtCal^ ^ProtPerc^ ^Carbs^ ^Starch^ ^Sugars^ ^Glucose^ 249 ^Fructose^ ^Galactose^ ^Sucrose^ ^Lactose^ ^Maltose^ ^Fiber^ ^NetCarbs^ ^CarbCal^ ^CarbPerc^ ^Fat^ ^SatFat^ ^TransFat^ ^TransMonoFat^ ^TransPolyFat^ ^MonoFat^ ^PolyFat^ ^Omega-3^ ^Omega-6^ ^FatCal^ ^FatPerc^ ^Cholest^ ^Alcohol^ ^AlcCal^ ^AlcPerc^ ^Ash^ ^Water^ ^Caffeine^ ^Theobromine^ ^Phytosterols^ ^Stigmasterol^ ^Campesterol^ ^Beta-Sitosterol^ ^Vit-A RAE^ ^Retinol^ ^BetaCarotene^ ^AlphaCarotene^ ^BetaCrypto^ ^Lycopene^ ^Lutein^ ^Vit-A IU^ ^Thiamine^ ^Riboflavin^ ^Niacin^ ^Pantothenic^ ^Vit-B6^ ^Total Folate^ ^Food Folate^ ^Folic Acid^ ^Folate DFE^ ^Vit-B12^ ^Biotin^ ^Vit-C^ ^Vit-D^ ^AlphaToc^ ^BetaToc^ ^GammaToc^ ^DeltaToc^ ^Vit-E IU^ ^Vit-K^ ^Calcium^ ^Magnesium^ ^Phosphorus^ ^Potassium^ ^Sodium^ ^Chloride^ ^Chromium^ ^Copper^ ^Fluoride^ ^Iodine^ ^Iron^ ^Manganese^ ^Molybdenum^ ^Selenium^ ^Zinc^ ^Histidine^ ^Isoleucine^ ^Leucine^ ^Lysine^ ^Methionine^ ^Phenylalanine^ ^Threonine^ ^Tryptophan^ ^Valine^ ^Alanine^ ^Arginine^ ^Aspartic^ ^Cystine^ ^Glutamic^ ^Glycine^ ^Hydroxy^ ^Proline^ ^Serine^ ^Tyrosine^ ^FA 4:0^ ^FA 6:0^ ^FA 8:0^ ^FA 10:0^ ^FA 12:0^ 250 ^FA 13:0^ ^FA 14:0^ ^FA 15:0^ ^FA 16:0^ ^FA 17:0^ ^FA 18:0^ ^FA 20:0^ ^FA 22:0^ ^FA 24:0^ ^FA 14:1^ ^FA 15:1^ ^FA 16:1u^ ^FA 16:1c^ ^FA 16:1t^ ^FA 17:1^ ^FA 18:1u^ ^FA 18:1c^ ^FA 18:1t^ ^FA 20:1^ ^FA 22:1u^ ^FA 22:1c^ ^FA 24:1c^ ^FA 18:2u^ ^FA 18:2n-6^ ^FA 18:2i^ ^FA 18:2t^ ^FA 18:2cla^ ^FA 18:3u^ ^FA 18:3n-3^ ^FA 18:3n-6^ ^FA 18:3i^ ^FA 18:4^ ^FA 20:2n-6^ ^FA 20:3u^ ^FA 20:4u^ ^FA 20:5n-3^ ^FA 22:5n-3^ ^FA 22:6n-3^ ^XStarch^ ^XVLM^ ^XLM^ ^XMFM^ ^XHFM^ ^XVeg^ ^XFru^ ^XSMilk^ ^XLMilk^ ^XWMilk^ ^XFat^ ^XOther^ ^RecipeName^ ^RecipeComment^ ^PCFRatio^ ^CPFRatio^ ^Date^ ^Servings^ ^Ingredients-SS^ ^SS-Ingredients^ ^Ingredients-SS-htm^ ^SS-Ingredients-htm^ ^RecipeByline^ ^SingleServComment^ ^RecipeDirections^ ^FatPer100^ ^SatFatPer100^ ^AddIngredBrand^ ^NoIngredHyphen^ ^IngredLowerCase^ ^IngredTab^ ^TotalGm^ ^SingleGm^ ^IngredList^ ^RCost^ (recipe cost) ^SCost^ (single serving cost) ^TotGmPreLoss^ (preloss wt) ^PercLoss^ (% process loss) ^RCost^ ^SCost^ ^TotGmPreLoss^ ^PercLoss^ ^PrepTime^ ^CookTime^ ^CompanyName^ ^WebsiteName^ ^WebsiteAddr^ ^RcpImgName^ ^WebImgPath^ ^LocalNFLImgPath^ ^NFLImgName^ ^LocalRcpImgPath^ Most of the macros above are self-explanatory. ^Ingredients-SS^ lists the recipe ingredients formatted with the ingredient, a hyphen, then the serving size. ^SS-Ingredients^ reverses this sequence. ^Ingredients-SShtm^ is similar to ^Ingredients-SS^ except that each line ends with “<br>“ to flow smoothly into your HTM template file. Macros beginning with “X” are for food exchanges. ^FatPer100^ gives you the grams of fat per 100 calories and ^SatFatPer100^ provides the grams of saturated fat per 100 calories. ^TotalGm^ is total gram recipe weight. ^SingleGm^ is the gram weight for a single serving. ^IngredList^ lists the ingredients without the serving sizes. ^MyField1^ through ^Myfield20^ are the twenty macros that represent your optional nutrients you have decided to track in addition to the ones NutriBase already tracks for you (accessed through the PFI options “Add more nutrient values” Button). PFI’s that use MyFields cannot be exported or imported. However, they can be transferred using backup and restore functions. This section of the Recipe Report window appears when you select to edit or create a macro report (like a recipe web page). This section provides you the ability to define your web site name, your web address, and the path to your images on your web site. All three of these variables are stored in NutriBase "macros." (These macros are placeholders for the information you type into these edit boxes.) For example, your web site name is stored in a macro called ^WebsiteName^. 251 Whenever you type in "^WebsiteName^" into your template file, the name of your web site (as you entered it in the edit box) will appear in your final report. The other two macros are ^WebsiteAddr^ (which holds your web site's URL) and ^WebImgPath^ (which stores the path to your images on your web site). The Website image path is where you must upload your recipe pictures and your recipe Nutrition Facts Labels on your web site. When you create a web version template, you will need to upload your recipe image and your Nutrition Facts Label image up to your web site. You will want to upload them to your ^WebImgPath^ which is normally a folder you reserve on your web site for images. We would recommend you create a folder for holding only recipe images and label images... something like "http://nutribase.com/rcpimages". Your recipe images and your Nutrition Facts Label Images are stored in your ProgramData Folder. This location differs in different Windows versions, but it is commonly located in c:\ProgramData\NutriBase\rcpimages and c:\ProgramData\NutriBase\nflimages. If you are using a Sync Folder, it will be in your Sync folder in a subfolder called rcpimages (recipe images) or nflimages (nutrition facts label images). Important: Your ProgramData folder (i.e, c:\ProgramData\NutriBase) is a hidden folder. By default, Windows Explorer (or File Explorer in newer operating systems) does not show this allow you to see this folder. To view hidden folders like your ProgramData folder, adjust your view properties to tell Windows that you want to view hidden folders. Company Name: Click the Header Setup button in the Report window to enter in your Company Name (or your own name). Once you do this, your company name will be captured in a macro called ^CompanyName^ and you will be able to insert your company name into NutriBase reports. The information above is sufficient for any webmaster to be able to use NutriBase recipes on a web site. If you are not a webmaster, we recommend you find someone to help you learn the basics so you can maintain your recipes on your web site. Actual web site maintenance is beyond the scope of support provided by CyberSoft for NutriBase customers. NutriBase will help you create the recipe reports, but it is up to you to know how to upload them to your web site, upload the required images, and link to them from other pages on your site. The following Setup Macros are embedded on the first line of the recipe template file and are separated by single spaces. They alter the way certain other macros behave. Some are used in the default recipe template file that comes with NutriBase. Setup Macros are for use only with RTF (a generic word processor format you can open with MS Word) style reports. Don’t use them with HTM style reports. ^AddIngredBrand^ Adds the Brand name to ingredient listings. ^NoIngredHyphen^ Removes the hyphen from ingredient listings. ^IngredLowerCase^ Forces lower case of ingredients 252 ^IngredTab^ Uses tabs instead of hyphens. ^IngredDec1^ Sets recipe nutrients to 1 decimal place rather than the default value of 2 decimal places. Information from the Web-Based Questionnaire 1 2 3 4 5 6 7 8 9 10 11 12 13 14 15 16 17 18 19 20 21 22 23 Date Time name=fname name=mi name=Name name=Email name=phone name=address1 name=address2 name=city name=state name=postalcode name=country name=measure (Date of the submission) (Time of the submission) (First Name) (Middle Initial) (First Name) (Email Address) (Telephone) (Address Line One) (Address Line Two) (City) (State) (Postal Code) (Country) (Measure) value=“e” value=“m” name=sex value=“f” value=“m” name=“p/n” value=“na” value=“pregnant” value=“nursing” name=“height” name=“age” name=“bodyframe” value=“sm” value=“md” value=“lg” name=“activity” value=“sed” value=“mod” value=“va” name=“presweight” name=“desweight” name=“lgw” value=“.1” value=“.2” value=“.3” value=“.4” value=“.5” value=“.6” value=“.7” 253 (English - inches, lbs.) (Metric - (cm, K(g) (Female) (Male) (pregnant/nursin(g) (Not Applicable - checked) (Pregnant) (Nursin(g) (Small) (Medium) (Large) (Activity Level) (Sedentary) (Moderately Active) (Very Active) (Present Weight) (Desired Weight) (Desired loss or gain/week) (0.1 lbs.) (0.2 lbs.) (0.3 lbs.) (0.4 lbs.) (0.5 lbs.) (0.6 lbs.) (0.7 lbs.) 24 25 26 27 28 calories) 29 30 31 32 33 34 35 36 37 38 39 name=“medical” value=“.8” value=“.9” value=“1” value=“1.1” value=“1.2” value=“1.3” value=“1.4” value=“1.5” value=“1.6” value=“1.7” value=“1.8” value=“1.9” value=“2.0” value=“2.5” value=“3” name=“pfat” name=“dfat” name=“monex” name=“tueex” name=“wedex” (0.8 lbs.) (0.9 lbs.) (1.0 lbs.) (1.1 lbs.) (1.2 lbs.) (1.3 lbs.) (1.4 lbs.) (1.5 lbs.) (1.6 lbs.) (1.7 lbs.) (1.8 lbs.) (1.9 lbs.) (2.0 lbs.) (2.5 lbs.) (3.0 lbs.) (Present body fat content) (Desired body fat content) (Monday's exercise calories) (Tuesday's exercise calories) (Wednesday's exercise name=“thuex” name=“friex” name=“satex” name=“sunex” name=“%p” name=“%c” name=“%f” name=“pg” value=“lw” value=“mw” value=“gw” value=“iap” name=“pw” name=“pwhen” value=“now” value=“3mos” value=“6mos” value=“12mos” value=“2yrs” value=“5yrs” value=“5+yr” (Medical conditions) value=“anemia” value=“asthma” value=“colitis” value=“diabetes” value=gastricreflux” value=“hypertension” (Thursday's exercise calories) (Friday's exercise calories) (Saturday's exercise calories) (Sunday's exercise calories) (Percent Protein Goal) (Percent Carbohydrate Goal) (Percent Fat Goal) (Personal Goal) (Lose Weight) (Maintain Weight) (Gain Weight) (Increase Athletic Performance) (Peak weight) (When was this peak weight?) (This is my present weight.) (Within the past 3 months.) (Within the past 6 months.) (Within the past 12 months.) (Within the past 2 years.) (Within the past 5 years.) (More than 5 years ago.) 254 (Anemia) (Asthma) (Colitis) (Diabetes) (Gastric Reflux) (Hypertension) 40 41 value=“hypoglycemia” value=“ibs” value=“heart” value=“hernia” value=“liver” value=“other” name=“othername” name=“notes” (Hypoglycemia) (Irritable Bowel Syndrome) (Heart Disease) (Hiatal Hernia) (Liver Disease) (Other medical condition) (“Other” medical condition) (Notes and comments) * Web forms require NutriBase Professional and higher in conjunction with special server-side software that must be installed. Email us at [email protected] or call us at 480-603-8359 (9-3, Mon-Thu, Arizona time) for more information. You may add as many nonmandatory fields as you wish to your form. This listing is for the ones provided with your initial assessment questionnaire... you may add other questions as desired. 255 NUTRIBASE ENTERPRISE EDITION NETWORK GUIDE Installing the Enterprise Edition of NutriBase The Enterprise Edition of NutriBase is a network edition. It is installed onto your server and can be accessed by workstations in your facility connected to your local area network. The 5-Node edition handles up to 5 simultaneous users; the 50-Node Enterprise Edition handles up to 50 simultaneous users; etc. The Enterprise Edition End User License permits installation on a single one server. Installing and setting up the NutriBase Enterprise Edition is not difficult, but it should be done by a qualified network administrator using the procedure described in the Network Guide, included near the end of this User’s Manual (see your Table of Contents to locate anything in this document). The Network Guide discusses the Enterprise Edition installation and explains how to set permissions and configure the “password file” (NBASENET.DAT) so the software functions as required. It summarizes the access settings available to you. Installing the NutriBase Enterprise Edition correctly the first time saves you time by avoiding uninstalling, reinstalling, and troubleshooting. Master User. We call the main NutriBase user – the person in charge of the Enterprise Edition software - the “M aster User.” The Master User should read the section of the Network Guide that discusses the privileges and options available only to the Master User. The Master User will need to be aware of most of these Master User topics. The Enterprise Edition of NutriBase is a network-aware version of NutriBase Professional. This document is intended for the Network Administrator and the person in charge of the NutriBase Enterprise Edition (the “Master User”). Each Enterprise Edition is defined by the number of “nodes” that it supports. “Nodes” are the number of simultaneous users supported by the NutriBase Enterprise Edition. For example, the 50-node version of NutriBase would permit up to 50 users to use the software at any one time... you can include passwords for more than 50 users and they can all use the software, but “only” 50 of them can use it at the same time. The NutriBase Enterprise Edition is very similar to the Professional Edition except that it handles multiple simultaneous users. The Enterprise Edition requires passwords for each of its users. You can set the “Access Level” for all users at once or you can set the access level for individuals separately if desired. The NutriBase Enterprise Editions are not designed to run on terminal servers. NutriBase requires Windows OS version 5.1 or higher. This means that NutriBase requires Windows Server 2003, Windows Server 2008, or Windows Server 2008 R2. The Master User is able to perform functions that other users will not be able to perform. These are functions are described in detail ahead. 256 Although this document often refers to the installation as if it were for an educational facility, the content applies to any network installation. How to Install the NutriBase Enterprise Edition Basically, you will install NB11 Enterprise Edition to your server, then place shortcuts to the NutriBase application on each workstation that you will enable to access NutriBase. You will set a few permissions. And you will set up the NBASENET.DAT text file to control passwords and access levels to the NutriBase application. 1) Insert your Installation CD into a CD Drive and run the Setup Program. If you downloaded the Setup Program, simply run it. 2) The Setup Program will ask you where you want to install your Program Data Folder. This is the folder that will contain a set of subfolders containing all the user-created food logs, recipes, meals, meal plans, client information, documents, etc. You can accept the default location (x:%AppFolder%\Data) or you can specify a different location to accommodate your particular requirements. If you change the location from the default location, please make a note as to where it is so that future upgrades will install smoothly. Do not make your Program Data Folder the same as folder your Application Folder. The permissions to these two folders are different. 3) The Setup Program will create a small text file in your NutriBase Application Folder called “NBPD.INI”. This text file will contain the path to your Program Data Folder. This path must be correct for BOTH your server and for your workstations. If you need to edit this file, you may. (More about the NBPD.INI text file and how to edit it is presented below.) 4) After installation, you must make sure that all users of the NutriBase application have read/write permission to access your Program Data Folder. Accomplish this by setting the permissions for your Program Data Folder to total access for “Everyone.” 5) After setting your permissions to your ProgramData Folder, you must edit your “NBASENET.DAT” file. (This process is explained in detail shortly.) 6) Place shortcuts (to NB11NW.EXE) on the workstations from which users will be able to access NutriBase. 7) Make sure that the folder named in Line 3 of the “NBASENET.DAT” file exists on each workstation. Each user must have permission to read and write to this folder. The default location for this folder is “Windows,” but may administrators change this to something like “nutribase.” More on this later. 8) A few days after you install NutriBase, it will nag you to “register” it. To register NutriBase, select the option to register on-line, then enter in the Registration Number that NutriBase provides you. Enterprise Editions are entitled to one activation on a single server. 257 9) To enter NutriBase, you enter a password – either a user password (which you probably won’t have set up the first time you run NutriBase) or the “Master User Password.” The default value for the “Master User password” is “Master12User”. Use this password to enter NutriBase for the first time. This topic will be discussed in depth ahead. Your NBPD.INI Text File When the installation is finished, there will be an “NBPD.INI” file (discussed previously in Step 3 above) located in your NutriBase Application Folder. It is a text file whose purpose is to indicate the correct path to NutriBase data (where food logs, recipes, meals, client information, etc. are stored). This path must allow NutriBase to find this data from both the server AND the workstations. Since you specify this path during setup, you should not have to edit it. However, if you need to, you can edit this path to be a mapped drive, an unmapped drive or even an environmental variable. Here are examples of three valid text entries for your NBPD.INI file: a) x:\NutriBase Data b) \\server\program files\NutriBase\Data c) @env:nutribase_data Keep in mind that these are arbitrary examples and that you should not use these literally unless they happen to be the correct path for accessing the NutriBase data files from both your server and for your workstations. Set Permissions for the Program Data Folder You must set the permissions to the ProgramData Folder (which is defined in your NBPD.INI file (discussed in step 4 above) so that all users can access it with read and write privileges. This is normally accomplished by setting the permissions for this Program Data Folder to total access for “Everyone.” (The NutriBase Setup Program attempts to set this for you during installation, but if it is prevented from doing so, you will have to set this yourself after installation.) Starting NutriBase for the First Time It is imperative that the NutriBase Enterprise Edition be started for the first time on your server. Doing so will assure that NutriBase is activated properly. The Setup Program will attempt to start NutriBase immediately after installation. If NutriBase does not start immediately after the Setup Program is finished, please start it manually from your server. NutriBase will start and a password will be required to get into the application. “Master12User” (case sensitive) is the default password. You can change this password (by editing your NBASENET.DAT file) later. Edit your NBASENET.DAT File (Step 5 above) 258 This file is located in the “NBNET” folder of your NutriBase application folder. The “NBASENET.DAT” file is a text file that you (assuming you have administrative rights) can edit using a text editor. This process is discussed later in this document. Place Shortcuts on Every Workstation As part of the setup process, you must place shortcuts on each workstation on the network from which you want users to be able to access NutriBase. Have the shortcut point to the executable file on your server. “NB11NW.EXE” is the executable for the NutriBase Enterprise Editions. The default application folder for the NutriBase Enterprise Edition is x:\Program Files\NutriBase. To access NutriBase, users can henceforth click the NutriBase Desktop shortcut Icon. They will need to know their password (which you will have set up for them in the NBASENET.DAT text file). Set Permissions Set permissions so that NutriBase can read and write to its Program Data folder (by default: x:\Program Files\NutriBase\Data). This is accomplished when you set the permissions for the NutriBase Program Data Folder to total access for “Everyone.” There is one other important permission to set: make sure that users on the individual workstations have permission to read and write to the folder specified in Line 3 of the “NBASENET.DAT” file. This Folder holds tiny INI and USR files that remember personal settings like screen color, location, size, and preferences. It is imperative that this folder exists on each workstation. Not setting the permission to this folder is a commonly overlooked task. Administrators often change this third line of the NABASENET.DAT text file from “c:\windows” to something like “c:\nutribase”. If you do this, you must make certain you create a folder called “c:\nutribase” on each workstation and make sure the user has read/write access to this folder. The Password File (“NBASENET.DAT”) “NBASENET.DAT” is the text file that we refer to as your “password file.” It is located in the “NBNET” folder of the NutriBase application folder. Normally, this file is modified by the Network Administrator with guidance from the Master User. (Of course, if the Master User has administrative rights, he or she can modify this file themselves.)The procedure for modifying this text file is explained later in this document. The NBASENET.DAT file is a text file that lets you determine the following things: 1) The system wide access level (this is set on line 1) 2) The Master User's password (this is set on line 2) 3) The location for each user's workstation’s Preference Files (this is set 259 on line 3). 4) The passwords for each user (these are set on lines 4, 5, 6, etc. as needed). 5) Override any user's access level (this option is set on the individual lines containing the password for specific users). Each of the features above are discussed in detail ahead. You can edit the NBASENET.DAT text file with a text editor like Notepad. If you use a word processor to edit this file, make sure you save it as a text file. The password file is located in the “x:\Program Files\NutriBase\nbnet” Folder. LINE 1 - The System-Wide Access Level The first line in the password file (“NBASENET.DAT”) specifies the access level for (almost) all the users of the network version. There are two exceptions to this system-wide setting: the Master User (who always has Full Unrestricted Access) and users for whom you override this setting. Both of these exceptions are discussed later. 260 Access Levels for Line 1 There are five system access levels: 0 - Full Access: all users can view, modify, or delete each other's work. 1 - Full Restrictions: users can view, modify, and delete only the work they've created. 2 - Partial Access: all users can view what others have done, but can only modify or delete their own work. Note: For options 0, 1, and 2, NutriBase will write several small preference files to the location specified on Line 3 of your password file (NBASENET.DAT). 3 - Full Restrictions; Write Prefs to a USB Drive in the workstation: users can view, modify, and delete only the work they've created. 4 - Partial Access; Write Prefs to a USB Drive in the workstation: all users can view what others have done, but can only modify or delete their own work. Note: For options 3 and 4, NutriBase will write several small preference files to the USB Drive (if it exists). Users will need to insert a USB Drive into a USB socket to use NutriBase. If NutriBase does not locate your USB, it will prompt you for a location to which to save these files. If you are editing the sample NBASENET.DAT file, simply type a “0”, “1”, “2”, “3”, or “4” on the first line to set the access level. This access level will apply to all users of the system except for the Master User and any users whose access level you have overridden. The Master User's access level will always be Full Access and the overridden user's setting will be 0, 1, or 2 as you determine (explained below). LINE 2 - The Master User's Password The Master User has no restrictions despite the access level specified on line 1 of the NBASENET.DAT file. The text entry on line two of the NBASENET.DAT file is the Master User's Password. The password must contain at least 1 character and no more than 20 characters. All PC keyboard characters are valid. The characters are case sensitive. No leading or trailing blanks are permitted. No null passwords are allowed. The initial Master User's password is “Master12User.” LINE 3 - The path to the local NutriBase Folder Line three of the NBASENET.DAT file is where the path to the local user’s folder is stored. The user’s folder is a folder to where NutriBase saves small user-specific preference files (things like color preferences, email setups, settings for the Quick Access Toolbar, etc.). The default value for Line 3 is “c:\Windows”, but you can change it to anything you like. Some users prefer to use “c:\nutribase” for this folder. The name of 261 the folder is not important, but it is important that a folder with this name exists on every workstation that is used to access the NutriBase Enterprise Edition. Note: The user of the workstation where this folder is located must have permission to read and write to this local folder. (We emphasize this because this is a common problem on new installations.) All the data that your users create - recipes, client data, Personal Food Items, Meals, Meal Plans, etc. - are stored on the server in the ProgramData Folder that you specified. This makes it convenient for your data to be shared with other users across your network. NutriBase can support a specific path (i.e., a full pathname) as indicated above. But you can also use variables to define your path. We use these variables because different operating systems use different paths to these folders. The variables we support are: 1) %LOCAL% - The User's Folder 2) %LOCALDOC% - The User's Documents Folder Note that NutriBase appends “\NutriBase” to the variable you use to specify the folder where the user preference files will be stored. NutriBase does not append “\NutriBase” if you provide a specific path because it assumes you will specify the folder you want to use. If you selected access options 3 or 4, NutriBase will attempt to locate a removable drive. If found, NutriBase will create a NutriBase Folder on that drive (i.e., x:/NutriBase). If a removable drive isn't found, NutriBase prompts the user for a specific location to which to save the user preference files. LINE 4 through the end of the file - User Password Lines Place one user's password per line until you've specified every user you will permit to access the software. These passwords are normally assigned by the Master User. Each user must be assigned a unique password. (If you assign the same password to several users, NutriBase will think that they are all the same user and will permit only one client to be logged all for all the users using the common password.) Each password must contain at least 1 character or number. You can use a maximum of 20 characters. All PC keyboard characters are valid. The characters are case sensitive. No leading or trailing blanks are permitted. No null passwords are allowed. It may be helpful to include the user's name - or part of their name - in their password so they are instantly recognizable as being a particular user’s password. 262 You may specify as many passwords as you require. If, for instance, you are running a 50-node system and you have 100 users, you may enter all 100 passwords and assign them to these users. All 100 users can use the system, but “only” a maximum of 50 users can use them at any one time. A Sample NBASENET.DAT File The following is a sample password (“NBASENET.DAT”) file. 1 <This “access level” indicates that the access level is “fully restricted.”> Master12User <This is the master user's password> C:\Windows <This is where user's preference files are stored on the user's workstation> Userpassword1 <This is the first user's password.> Userpassword2 <This is the second user's password.> Userpassword3 <This is the third user's password.> ^0^Userpassword4 <The access level for this fourth user has been overridden> Userpassword5 <This is the fifth user's password.> Comments: 1) The default value for the Master User's password is “Master12User” (as indicated on line 1) but you can change this to anything you like. 2) There are several very small files that are stored to the user's workstation. By default, we have this set to C:\Windows (as indicated on line 2) but you can change this to something different (like “C:\NutriBase”) if you like. But if you do, you must make sure that a “NutriBase” folder exists on every workstation that users will use to access NutriBase Enterprise Edition. 3) The access level specified on line one provides the same access for all users - except for users whose access level you have overridden - like in the fourth user in the sample above. You do this by putting the override restriction between caret symbols. For example: “^0^Userpassword4” .would give the person with a password of “Userpassword4” no restrictions regardless of the system-wide setting on line 1. 4) Including the user's name in the password may make it easier for you to identify a user's password. In other words, “JoeBlow34” may be an easier password for user Joe Blow to remember than a random string. Access Settings Summary 0 = No Restrictions 1 = Full Restrictions Users can see Personal Food Items, Recipes, Meal Plans associated with their password. Users can analyze only the Recipes, PFI's and Meal Plans associated with their own password. Users can only view logged on client associated with password. Users cannot import PFI's, Recipes, or Meal Plans Users cannot export data but can export PFI, Recipes and Meal Plans associated 263 with password. Users cannot add, delete, or modify PFI or “Recipes” Tabs. Users don't have access to Client Contact List. Users cannot move or delete exercises in the master exercise list. Users cannot edit or delete nutrient goals. Users cannot edit or delete the success criteria. Users cannot edit or delete alarm criteria. Users cannot import Web Profiles or Client Intake Module files. All users can analyze NB Recipes and NB Meal Plans. 2 = Partial Restrictions Users can see all PFI's, Recipes, Meal Plans but can only modify those associated with password Users can analyze all Recipes, PFI's, and Meal Plans Users can modify and view only the client information associated with their password Users cannot import PFI's, Recipes, or Meal Plans Users cannot export data but can export PFI's, Recipes, Meal Plans associated with password. Users cannot add, delete, or modify PFI or “Recipes” Tabs. Users don't have access to the Client Contact List. Users cannot edit, move, or delete exercises in the master exercise list. Users cannot edit or delete nutrient goals. Users cannot edit or delete the success criteria. Users cannot edit or delete alarm criteria. Users can import Web Profiles and Client Intake Module files. All users can analyze NB Recipes and NB Meal Plans. Note: “NutriBase Recipes” and “NutriBase Meal Plans” are the recipe and meal plans provided with NutriBase. You can ignore them but you cannot delete them. These NutriBase items are available to all users. However, the Access Levels defined for each user still pertains to them (this means, for instance, that users with partial restrictions and full restrictions cannot edit them). 264 Master User Privileges Every Enterprise Edition installation needs a “Master User” who has unrestricted access to everything NutriBase can do. When using NutriBase, the Master User can access an option called “Master User Functions” by clicking the NutriBase Menu Icon located in the upper left corner of the NutriBase window. From this window, the Master User can: 1) Assign a Global Access password to PFI's, Recipes, Meals or Meal Plans. This means all users, regardless of restriction, can see these items. 2) Reassign passwords assigned to users. This way a different person can take over a client's information if a student (or employee) leaves. 3) Delete clients, PFI's, Recipes, Meals and/or Meal Plans. This way, a university could clear out information for the next semester but keep all Global Access items for use by new students or employees, if desired. The Master User also has other privileges. The Master User can: 1) Edit or delete anything in NutriBase that can be edited. This includes anyone's work and can modify or delete any client information, PFI's, recipes, meal, Meal Plans, Food Logs, etc. 2) Access the backup and restore options. This is located by clicking the NutriBase Menu Icon. Other users will not see the Backup of Restore options. Unlike the single-user editions of NutriBase, the Enterprise Edition does not provide automated scheduled backups. 3) You can clear out all the data in NutriBase. This is convenient to do between semesters when used in a classroom setting. To do this, log on as the Master User, click the NutriBase Menu Icon in the upper left corner and select “Master User Options.” You can select to delete PFI’s, Recipes, Client Data, etc. There is one option called the “Global Access items.” These are PFI, Recipes etc., created by the Master User that all users, regardless of password, can view and use. Global Access items are usually PFI’s that an instructor adds to NutriBase before the start of a semester that he or she wants all students to have access to… often he or she would not want these to be deleted each time the rest of the data is cleared out. 265 NutriBase End User License Agreement 1. By purchasing NutriBase software, you agree to "activate" the software by sending us your "Registration Number" (provided by your installed copy of NutriBase) in an email request. Activating your software assures that it will not expire at the end of its eight day evaluation period. 2. A license for any single-user edition of NutriBase (Junior, Personal, Personal Plus, or Professional) entitles you to up to three installations of NutriBase for your own personal use. 3. The installations provided for in this license may not be shared with other individuals - each individual is required to obtain their own license for NutriBase. 4. If you require additional installations of NutriBase, you may purchase additional licenses of NutriBase. 5. You may not sell, rent, lease, loan, give, sublicense or otherwise transfer the software or any copy of the software in whole or in part to any other person or third party. 6. CyberSoft provides licensed users of the Professional and higher editions of NutriBase the right to sublicense the NutriBase Client Intake Module (CIM) for use by their clients on their own computers. There is no charge or royalty fee for this right. 7. Licensors of the NutriBase Enterprise Edition are entitled to one activation on a single server. 8. All sales are final once the NutriBase software is activated or 30 days after purchase, whichever occurs first. 9. Updates (interim releases within the current version) are free for the version you purchased; upgrades (major new releases) are discounted from the original purchase price. To qualify for upgrade discount pricing, you just be a registered user of the immediately previous edition. 10. If you purchase NutriBase within 60 days of a major new release, the new release is free to you as a download. 11. This software license agreement is effective upon your purchasing or installing this program and shall continue until it is terminated. This software license will terminate upon breach of any of the terms and conditions of this agreement. 12. The software is provided "as is" without warranty of any kind, either expressed or implied, including but not limited to the implied warranties of merchantability and fitness for a particular purpose. 13. If you have complied with the terms and conditions of this agreement, CyberSoft's entire liability and your exclusive remedy shall be the replacement of any defective files. In no event shall CyberSoft, Inc. be liable to you for any other damages arising out of your use of this program. 266 14. In the event of a product return, you are responsible for confirming your eligibility with CyberSoft, Inc. Once eligibility is confirmed, you are responsible for returning all materials and acquiring proof of delivery. CyberSoft shall assess a 15% restock/card processing/activation/ invoicing fee. Shipping and handling fees are not refundable. Opened calipers or measuring tapes may not be returned and you will be responsible for the full retail price of these instruments. 15. CyberSoft makes the current version of NutriBase and the three immediately previous versions of this NutriBase software available for download from our web site. End users who wish to continue using discontinued versions of NutriBase should make an archival copy of NutriBase for this purpose. 16. The terms of this NutriBase End User License Agreement may change at any time and without notice. 17. For clarification of any facet of this End User License Agreement or for site licensing information, email us at [email protected] or call CyberSoft, Inc. At 480-603-8359 (Mon-Thu, 8-3, Arizona time). 267 DISCLAIMER “NutriBase” is a trademark of CyberSoft, Incorporated. Phoenix, Arizona. Information in this document is subject to change without notice. The revision date is printed on the previous page. To download the PDF version of the most current User's Manual, visit www.nutribase.com, click the Navigation Bar in the lower left corner of every page option and select the “Download User’s Manual” option. The nutritional contents of many brand name foods change regularly and often. Food makers change recipes, menus and vendors. Products are discontinued. Hundreds of new foods are introduced monthly. Restaurants concede variations in their foods from region-to-region and from store-to-store. Food makers are constantly improving products by lowering Fat, Cholesterol, and/or Sodium. The result is that for many products, the nutritional information changes almost as often as new food labels are printed. Although considerable effort has been made to assure the accuracy of the data contained in this product, we cannot guarantee that the information is 100% error-free. The data presented here are guidelines not gospel. If you wish to obtain information on a new product that hasn't yet been included in the data, simply call the appropriate food maker. You may add as many new food items to NutriBase as you wish by using the Personal Food Item function. NutriBase includes a few recipes and Meal Plans. While the descriptions may imply that these Meal Plans are “for” a particular purpose (renal, heart, diabetes, etc.), CyberSoft assumes no responsibility for determining that any particular recipe or Meal Plan is appropriate for any particular client, patient, or user. Recipes and Meal Plans are provided “as is” for your convenience and are intended to serve as starting points for a nutrition professional to edit and modify as necessary to meet the particular needs of particular clients, patients, or users. CyberSoft maintains this nutritional database with a staff dedicated solely to this task. This data represents over 62,000 hours of collection, assembly, and proofreading. If you suspect an error or omission, we welcome your inputs. We will confirm and correct any problems and update the database. Please address correspondence regarding corrections and/or suggestions to: CyberSoft, Inc., 2016 E. Muirwood Drive, Phoenix, Arizona 85048, call us at 480-603-8359 (8-3, Mon-Thu, Arizona time), FAX us at 480-704-4116, email us at support@ nutribase.com, or visit our web site at www.nutribase.com. CyberSoft Inc. assumes no liability arising out of the application or use of the data. The NutriBase Nutrient Database represents copyrighted materials and intellectual property belonging to CyberSoft, Inc. All rights are reserved. If you are interested in reprinting our nutrient data for any purpose, you 268 must contact CyberSoft, Inc. at [email protected] and request a written authorization to use the nutrient data. NUTRIBASE PRODUCT SUPPORT Please email your questions – 24/7 - to [email protected]. For phone support, 480-603-8359 (8-3, Mon-Thu, Arizona time). 269