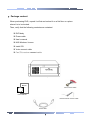
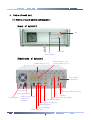
1
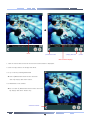
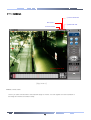
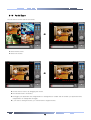
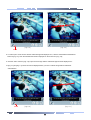
FX-STATION User’s Manual Speed dome camera Note book 9/16 Channels System 0 Before starting This document is a basic manual for the DVR (9/16 Channels System) users. This manual describes the appearance and name of products, how to configure the system program and how to use the system. Before using DVR, a user should read the contents of user manual and then, deal with the product considering the precautions defined in the manual. To open the system case and touch the inner parts for corrective maintenance, a user should contact the place where he/she purchased the products to get the help from expert. In addition, if there is any question for use or any damage on the product, please contact call the place where he/she purchased the products. 1 Precautions for safety (User should observe) 1. Precautions for installation Install the product on a flat floor not closed and retain the distance of more than 15 cm from the rear panel to the wall. Install the product on a well-ventilated place. Keep it away from strong magnetism or electromagnetic wave. Installing it near radio equipment such as TV and radio may cause a fault. Do not install it on a place that is exposed directly to the sun or contains lots of heat such as near a heating apparatus. Do not install it on a cold place. Place the equipment or tools in the site remote from a busy road so that people are not hurt. Do not install it on a place where there is severe vibration, much humidity or soot. Should use the product in the rated voltage (The equipment is used as both 110V and 220V, but it is set to 220V for delivery. It is possible to adjust it with the changeover switch on the rear panel.) Connect it to the outlet with the ground terminal. Discard the plastic bag well. (It is dangerous to put it on the head.) 2 2. Precautions for use For the repair, contact the company or the place where you purchased the product. Read the user manual before using the product. Do not open the cover at your discretion because there are parts sensitive to the environment within the equipment. Arrange the power cord safely and do not touch it with wet hands. Do not use a loose outlet or a damaged power cable. Do not use benzene, thinner and alcohol for cleaning. They may deform the product. Do not touch the exposed terminal. For the power-off of system, normally turn off the power of the program and then, power off the peripherals. (Do not power it off with the power button on the front panel of body.) Be careful to prevent a conductive object from falling into a hole that was punched for ventilation. Do not dissemble and remodel the product. Do not place a heavy thing on the body. Do not give a shock during the movement of equipment. If you use the product in the state of smoke or smell emitted, it may cause a fire or an electric shock. For this case, immediately block the power switch and contact the company or the place where you purchased the product to consult It with a special technician. 3 INDEX Ⅰ. Package content Ⅱ. Name of each part & configuration Ⅲ. System Configuration & How to use DVR 1. Monitoring Mode (Initial Screen) 1-1 Initial screen configuration and names 1-2 Pan/tilt adjustment 2. System Setting Mode 2-1 System setup 2-2 Camera setup 2-3 Sensor & control setup 2-4 Motion & color setup 2-5 Network setup 2-6 Backup setup 2-7 User setup 2-8 Select Voice Channel setup 2-9 System information 3. Search Mode 3-1 Switch to search mode 3-2 Search mode screen configuration and names 3-3 Date and time setup 3-4 Search camera setup 3-5 Playing voice recording 3-6 Stop recording while searching 3-7 Playback 3-8 Playback speed adjustment 3-9 Screen adjustment 3-10 History search 3-11 Moving picture backup 3-12 Print 3-13 Save / Water mark 3-14 Bookmark 3-15 Bookmark search 3-16 Partial Zoom 4. Image viewer <When searching a (Watermark authentication) stored floppy disk from normal PC> 5. Backup viewer <Search backup data> 4 Ⅰ. Package content When purchasing DVR, unpack it at first and unload it on a flat floor or a place where it is to be located. Then, verify that the following contents are contained. DVR body Power cable User’s manual M/S Windows license Install CD Voice connect cable Pan/Tilt receiver connect cable FX-STATION DVR body Manual Manual Voice connect cable User’s manual Pan/Tilt receiver connect cable Power cable 5 Ⅱ. Name of each part (1) Name of each part & configuration [Front of system] FDD CD-ROM Power Switch [Back side of system] Camera input (1~16) Sensor input (1~16) Control output (1~16) Voice cable connection 110V/220V Pan/Tilt receiver connection Power connection Power Switch LAN port Green: For a mouse General monitor (TV) output PC monitor output Violet: For a keyboard L-OUT, L-IN, MIC-IN COM2 serial port Printer connection COM1 Serial port 6 (2) Configuration AUDIO CABLE VIDEO CABLE or MIC CAMERA (With amplifier embedded microphone) or Pan/Tilt receiver Speaker (Internal Amplifier Type) or Headphone 7 Pan/Tilt camera Ⅲ. System Configuration and How to use 1. Monitoring Mode (Initial Screen) If you power on DVR, the system boots and the initial screen displays Monitoring mode as shown in Figure 1-1-1. The screen image displays a real-time motion picture. 1-1 Main screen configuration and names (14) Note (channel/camera installation site etc.) (15) Motion detection line (3) Network indicator 02 Bank (8) Date/Time (10) Search (7) Pan/Tilt button (9) Manual recording (13) System setting (2) Division Screen (4) Auto rotation screen (5) Full screen (16) Power (1) Camera Button (17) Recording Mode (12) Sound Alarm (11) Alarm indicator (6) Live Voice channel [Fig. 1-1-1] Monitoring mode (Initial screen) 8 (1) Camera button z Press the button for monitoring via one channel. z You can also double-click an image. (2) Division screen selection button z It is used to monitor the channels in the required screen division. (3) Network indicator z If the Net-DVR software is installed in remote location, and is monitoring across the network, the network indicator flashes. (4) Auto rotation (sequence) screen z The monitoring screen switches from Channel 1 by a channel. z To finish the function, click this button again. (5) Full screen z The monitoring screen is enlarged to the full screen over the function buttons. z In order to return to the previous image, click the right mouse button, and then, click <(F) Full screen> to deactivate this function. [Fig. 1-1-2] (6) Live voice channel z You can hear the live voice from the selected channel. z You can set up to 8 voice channels. z In order to use the live voice function, you can use the voice cameras (Internal Amplifier Type), or shall install additional micro phones (Internal amplifier type). You can hear voice from DVR through a speaker (Internal Amplifier Type) or a headphone. z See Page 4 of this User Manual on how to install the voice cable. (Setup : See Chapter 2-8 for details) (7) Pan/Tilt button z If a Pan/Tilt camera is installed, you can adjust the camera on the Pan/Tilt Adjustment screen. (See Page 4 and Chapter 1-2 for details) (8) Date/Time indicator z Shows current date, time and day of a week. (See Chapter 2-1 for details) (9) Manual Recording button z You can record all the channels regardless of the recording mode set in the <System Setting> mode. z It is used for emergency. To end the forced recording, click the <Manual Recording> button again. (10) Search z It is used to search the recorded video data. (See Chapter 3 for details.) 9 (11) Alarm indicator z The indicator becomes on when an external alarm device is running. z You can interface the external alarm device to the external sensor, so that the alarm device is automatically switched on when you switch the sensor on. (See Chapter 2-3 for details.) z As the alarm device is on when you click the alarm indicator, do not switch the alarm device on except for the initial test. (12) Sound Alarm ON/OFF z The alarm is on if any motion is detected or the sensor starts operation. z The alarm is active if the recording mode in <System Setting> is set to <Sensor> or <Motion> or <Sensor & Motion>, and when <System Setting>-<System>-<Alarm Sound Setting> is set to <Use>. (See Chapter 2-1 for details) z You can select the alarm tone in the <System Setup> mode. (13) System setting z It is used to set up the system environment and functions. (See Chapter 2 for details.) (14) Note (Cannel No. / Camera location etc.) z Displays the location that is being monitored. z You can set up the location in the <System Setting> mode. (See Chapter 2-2 for details) ※ To hide (2) place the mouse pointer on the monitoring screen, click the right mouse button, and then click <Display camera ID>. To display the channel information of (2) click the right mouse button again. [Fig. 1-1-3] (15) Motion detection line z If recording is made in <Motion Detection> mode, the area set in the <System Setting> mode is displayed in red. z The motion detection line is displayed only when a motion is detected in the detection line. (See Chapter 2-4 for details) z To hide the motion detection line, click the right mouse button and click <Display Motion Line> shown in Figure 1-1-3. To display the motion detection line again, click the right mouse button again. (16) Power z Shuts down the system. 10 ※ If you click (7)Pan/Tilt button, (12)Search, (14)System setting or (17) Power the User ID/Password window is displayed. If a user is not registered in the <System Setting> mode, anyone can use all the features of DVR. Once a user is registered in the <System Setup> mode, the digital password system starts and allows only the registered user for the designated functions. [Fig. 1-1-4] (See Chapter 2-7 for details.) If you click <(17)Power>, and type the user name and password in [Figure 1-1-4], you can select <Power off> or <Exit to window> in [Figure 1-1-5]. [Fig 1-1-5] ※ The followings are the descriptions on the window displayed when you click the right mouse button on the monitoring screen, [Fig.1-1-1]-(2): Divides the screen into 4. (Ch No. 1,2,3,4) [Fig.1-1-1]-(2): Divides the screen into 4. (Ch No. 5,6,7,8) [Fig.1-1-1]-(2): Divides the screen into 4. (Ch No. 9,10,11,12) [Fig.1-1-1]-(2): Divides the screen into 4. (Ch No. 13,14,15,16) [Fig.1-1-1]-(2): Divides the screen into 9. (Ch No. 1 ~ 9) [Fig.1-1-1]-(2): Divides the screen into 9. (Ch No. 8 ~ 16) [Fig.1-1-1]-(2): Divides the screen into 16 [Fig.1-1-1]-(5): Enlarges the screen into full screen. [Fig.1-1-1]-(4):Automatically switches the monitoring screen from Channel 1 in sequence. : Displays system information [Fig.1-1-1]-(16): Displays motion detection line [Fig.1-1-1]-(15): Displays notes (Channel data). (17) Recording Mode : Continuous Recording : Sensor Recording : Motion Recording : Force Recording : No Recording 11 1-2 Pan/tilt adjustment This is used when a Pan/Tilt camera is installed. The functions below are available when a Pan/Tilt camera is installed. 01 Bank ⑨ PAN/TILT BUTTON ② PAN/TILT CONTROL ① Channel No. ③ ZOOM ④ FOCUS ⑤ AUX.OUTPUT ⑥ CAMERA POWER ⑦ LIGHT ⑧ WIPER [Fig. 1-2-1] Pan/tilt adjustment screen z To adjust the Pan/Tilt camera, select the screen of the Pan/Tilt camera, and then, click the [Fig.1-1-1]-(7) button. ① [Channel No.] ② [Pan / Tilt adjustment] z You can adjust the camera direction to up/down/left/right. ③ [Zoom] z You can zoom in/out the image. ④ [Focus] z You can adjust the focus of the camera lens. z It is not activated when the auto focus lens is used ⑤ [AUX Output] z It is used when the Pan/Tilt camera is connected to an auxiliary device. ⑥ [Camera Power] z Camera Power ON/OFF . ⑦ [Camera Light] z Camera light ON/OFF. ⑧ [Camera Wiper] z Camera wiper ON/OFF. ⑨ [Pan/Tilt Button] z Now the Pan/Tilt adjust buttons are open or close. 12 2. System Setting Mode The DVR system is supplied with default setting. You can display/change the DVR setting. On Figure 1-1-1 of the main screen, press <(14) System Setting> button to display or change setting. If you press <(14) System Setting> button, the User ID/Password window is displayed in [Fig. 1-1-4]. Because no user is registered when the system is supplied, anyone can set up the system option if he/she click <OK>. Once a user is registered in <System Setting>, only the registered user is allowed to use the designated functions. 2-1. System setup ① [Video Signal Type (Camera type)] z You can set up the system to the type of NTSC/PAL camera. z The default setting is to the type used in the country. z You must reboot the system after selecting NTSC/PAL camera type. z No image will be displayed on the screen if the camera type mismatch the system setting. ② [Manual Recording Resolution] z You can set the resolution of the forced recording screen by clicking the <Manual Recording> button in the main window in [Figure 1-1-1]. z The higher is the setup value, the better the resolution is but the bigger the screen size is. z 720X480 (High), 720X240 (Middle), 360X240 (Low) 13 ③ [Compression Format] z You can select the video data compression mode. (1) JPEG : Provides high picture quality but has larger file size than wavelet. z Select JPEG and click to adjust picture quality. ① LOW : Low picture quality with the least compressed file size. ② Medium : Medium level picture quality and compressed file size. ③ High : High picture quality with the largest compressed file size. (2) Wavelet : Picture quality is lower than that of JPEG, while compressed file size is small. z Select Wavelet and click to adjust picture quality. ① LOW : Low picture quality with the least file size. ② Medium : Medium level picture quality and file size. ③ High : High picture quality with the largest file size. ④ [Initializing Screen Mode] z This function enables you to select the initial screen of monitoring mode first displayed when the system is powered on after shutdown. z You can click and select the desired initializing mode from the right combo box. z Full screen : Monitoring screen is enlarged to full screen over the function button. ⑤ [Auto Reboot Setting] z Click on the day and set the time. The system is automatically rebooted automatically at the time you set. z The function is used to operate the system in stable manner. ⑥ [O/S Setting] z If you click <Open Control Panel>, <Control panel> of <Windows> is displayed. z You can change date/time and printer setup. ⑦ [History] z You can record and search major system operating items separately. z Click on <Use> and click <Setting>. z System event record: System ON/OFF Sensor event record: Sensor device ON/OFF Control event record: Control device ON/OFF Camera event record: Camera ON/OFF Login event record: Login (connection) Network event record: Network login (connection) 14 ⑧ [Auto Rotation Screen (Sequence)] z Click button. z On the initial screen [Figure 1-1-1], if you click <(4) Auto rotation screen> the screen is switched automatically from Channel No. 1 in sequential order. z Only the channel with is switched and displayed. z <Auto rotation time (sec)>: You can set the time taken to switch screens. ⑨ [TV Output] z Click button. z IF you connect <TV Output> terminal at the back side of the body, you can watch the camera screen via TV as well as PC monitor. z The channels with are displayed in turns. z <Auto rotation time (sec)>: You can set the time taken to switch screens. ⑩ [Alarm Sound Setting] z You can turn on/off the sound of system on/off, sensor detection, and etc.. z The default value is set from the factory. z Click <Use>, and you can toggle between <Use> and <No use>. z You can find and change <Wave Files (*.wav)> file by double clicking the desired item. ⑪ [Apply] z Click the buttons to save the setting. z Once you click the <Apply> button, the setting will not be cancelled even if you click the ⑮ <Cancel> button. 15 ⑫ [Save to Default] z The default value is set from the factory. z This enables the user to change the default value. z If [Save to default] is executed, the factory value is lost. ⑬ [Load Default] z Clicking this button changes the value to default. DRIVE NAME z If you’ve ever executed ⑫<Save to Default>, TOTAL SPACE the value saved last is displayed. USED SPACE FREE SPACE ⑭ [Add Basket] z The current state is displayed as video and audio data. z The state of using drive and basket (saving unit) is displayed. z If the drive has empty space, you can extend the saving time by enlarging the basket z Double-click the drive. Double click IMAGE/SOUND BASKET SELECTION CREATED BASKET STATUS z Enter the number of baskets to create in <Number of baskets>, and click <OK>. z The size of a basket is approximately 100M. z It is recommended that you reserve about 20 baskets for stable system operation. z When users use voice recording function a lot. choose the <Voice basket> in DRIVE NAME NO. OF BASKETS AVAILABLE TO BE CREATED NO. OF BASKET TO BE CREATED <Image/Sound Basket Selection> and then create basket more. z When you record 8 channel simultaneously, you can record about 25 minutes by per one basket. ⑮ [OK / Cancel] z If you click any of the two buttons, the <System Setting> screen is closed, and the main screen is displayed. z If you have changed the setting and clicked <⑪ Apply>, either key will save the changed setting. z If you have changed the setting and have not clicked <⑪ Apply>, a. <OK> will save the changed setting, and return to the main screen. b. <Cancel> will return to the main screen without saving the changed setting. 16 2-2. Camera Setup ① ③ ④ ⑥ ⑤ ⑦ ② ⑧ ① [Select a camera] z Select the camera to set up. z You may select numbers of cameras. (with Ctrl, Shift key or mouse dragging) ② [Pop up interval time (second)] z Pop up : If a camera detects motion, the screen of the channel is enlarged. z The popup channel is maintained until any motion is detected by other channel. z Popup interval time : If a camera detects motion, the screen of the channel is enlarged. You can select how long the screen will be maintained before it switches to the new channel that detects a new motion. z Popup interval time is counted from the moment the motion is stopped and motion detection line is disappeared. Therefore, if the motion detection line is disappeared, the channel is switched as soon as another channel detects motion. ③ [Setting] z <Use>: Click the camera to be used with z <Hide screen>: The camera with . is hidden on the monitoring screen (initial screen). z <Popup>: The Popup function is active for the channel with . (The channel that detects motion is enlarged to full screen.) z <Frame per second>: Set the number of frames (screens) to be recorded per second for each camera. The more the frames are, the better the screen resolution is but the shorter the recording time is. 17 ④ [Event recording] z You can set the screen to be recorded before/after the motion is detected. z It is executed when set to <Motion>, <Sensor> and <Sensor & Motion> on <⑦ Schedule>. ⑤ [Resolution] z You can adjust picture quality. z The higher the resolution is, the window gives bigger and clear screen. z The higher the resolution is, the data size becomes bigger, and the total recording time becomes shorter. ⑥ [Camera ID (Note)] z You can enter any note, such as the camera location, to be displayed on main screen [Fig. 1-1-1]-(15). ⑦ [Schedule] z You can set up the recording mode by day of a week and by hour. z If you click a recording mode, the recording mode icon color is changed. z Set the hour by clicking or dragging the mouse on the schedule table. ※ How to drag : Press the left mouse button, and drag the mouse pointer to the desired position, holding the mouse button. Recording Mode Continuous : continuously record the image - Search mode indicator: CR Sensor : Recording during the sensor detection : Effect of record time expansion - Search mode indicator: AR Motion : Recording during the motion detect: Effect of record time expansion - Search mode indicator: MR Sensor & Motion : Recorded for the alarm detection or the motion detect - Search mode indicator: AR or MR No Rec. : No record ⑧ [Receiver (Pan/Tilt)] z <Use> : Click to use the Pan/Tilt camera. z Click the combo box, and select the type of receiver to install. z <Address> : Enter the receiver internal address. z Check the receiver spec before installation, and make sure that the receiver supports this system (DVR). 18 2-3. Sensor & Control setup ① ③ ② ④ ⑤ ⑥ ⑦ ⑨ ⑩ ⑪ ⑧ ① [Setting mode & Select a sensor] z Select the mode (Sensor or Control) to set up. z Select the Sensor No. or Control No. ② [Use] z Indicate the using state. ③ [Sensor Type] z Set up the option to the installed sensor type. (NO or NC) NO : Normal Open Type NC : Normal Close Type ④ [ID (Note)] z Enter the sensor type and installation location etc. ⑤ [Select Camera] z Set the camera to interfaced. z You can interface a sensor with a number of cameras at the same time. (ex. You can interface the sensor of no.1 Channel with the camera of no1./no2./no3. Channel.) 19 ⑥ [Select Control] z Set the external alarm to be interfaced. z You can interface multiple alarms at the same time. (ex. You can interface the sensor of no1. Channel with the alarm of no.1/no.2/no.3 Channel.) ⑦ [Output Control Setting] z Select the external alarm device to interface. z Click the ①<Control> button. z Select the Control No. ⑧ [Use] z Indicate the using state. ⑨ [Off mode (Working mode)] z Clock the combo box to set the working mode of alarm device. z Working mode a. Sensor : Working only in case of sensor detection b. Timer : Working only for specified time c. Manual : Working in case of sensor detection, off by manual - Off by manual: When the alarm is on, <(9) Alarm indicator> of the main screen [Figure 1-1-1] is lighted on. At this time, if you click the alarm indicator on, the alarm stops. ⑩ [Minute/Second] z Set the alarm working time. z In case you set <Timer> as a operating mode, you can set operating time. ⑪ [ID (Note)] z Enter the name and location of alarm device. . 20 2-4. Motion & Color Setup ① ② ③ ④ ⑤ ⑩ ⑪ ⑥ ⑦ ⑧ ⑨ ① [Select Camera ] z Select the camera to set up. ② [Color Setting] z Set Brightness/Saturation/Hue/Contrast of the image of the selected camera. z If you click <Default>, the default value set from the factory is displayed, and if the value has changed, it is displayed. ③ [Motion Detection Setting] z Set the motion detection area. ④ [Sensitivity] z You can adjust the sensitivity of the camera to motion. z The higher the sensitivity to (+) direction, the camera detects more detailed motion. ⑤ [Select Motion Area] z Select the detection area number to set up. z You can select up to 10 areas for detection. ⑥ [Select Full Screen] 1 z You set the full screen as the detection area. z Select <⑤ Select Motion Area>, and then, click <⑥Select Full Screen>. z At this time, the full screen is indicated as a designated line. 21 ⑦ [Select Area] z You can select a part of the screen as the detection area. z Designate the <⑤Select Motion Area>, and click <⑦Select Area>. z Click the left mouse button, and drag the mouse pointer to set the area. ⑧ [Delete Selected Area] z You can release a part of detection area setting. z Click on <⑪Display All Areas> to check the area number to be deleted. z Select and click the area number to be deleted from area <⑤Select Motion Area>. z The area is released from the detection area as you click the <⑧ Delete Selected Area> button. ⑨ [Delete All Areas] z You can release all the detection area settings. z Click the <⑤Select Motion Area> button. You do not have the designate the areas in <⑨ Delete All Areas>. ⑩ [Show Detected Motion Area] z It is used to set the working state and the sensitivity of the detection line for the designated number of detection area on <⑤Select Motion Area>. z Select the area number to be checked on <⑤Select Motion Area>. z Click on <⑩ Show Detected Motion Area>. [BEFORE MOTION DETECTION] [AFTER MOTION DETECTION] z If the motion is detected on the designated area, the detection line is changed into red. z Adjust <Sensitivity> to avoid unnecessary recording for too detailed motion, ① ⑪ [Display All Areas] z Displays the full motion detection area specified by the user. z Click ② on <⑪ Display All Areas>. z Indicates the full motion detection area specified. [BEFORE INDICATION] ∗ If you click on both <⑩ Show Detected Motion Area> and <⑪ Display All Areas>, full area specified is displayed and the detection line for the motion detected area is changed into red. ① ① ② [BEFORE MOTION DETECTION] . 22 [AFTER INDICATION] ② [AFTER MOTION DETECTION] 2-5 Network setup ③ ① ② ① [Use Network] z Check on <Use> to use the remote monitoring function. ② [Resolution Select] z You can select the picture quality. z Resolution is inversely proportional to transmission rate. z <High> : High picture quality with lower transmission rate. <Low> : Low picture quality with high transmission rate. ③ [IP Address] z It shows IP address of system. 23 2-6. Backup setup ① ② ④ ③ ⑥ ⑬ ⑤ ⑦ ⑫ ⑧ ⑨ ⑩ ⑪ ① [Hard Disk Backup] • When you back up recorded image in DVR hard disk or in other system through Network, you can use it. • ⑬ button : Select the <Video data list> or <Voice data list> : • Video data backup and voice data backup. • If same video data as voice data : video and voice playback ② [Basket List (Original data)] • Click and select the desired hour to be backed up. • You can select one or several data. (ex. To select no.1, no.3, and no.5, click the data while pressing <Ctrl> button on the keyboard.) ③ [Direction Key] • If you select <Basket List>, click the direction key >>, the selected data moves to <④Selected Basket>. ④ [Selected Basket (Data to be backed up)] • Indicates the data to be backed up. • To delete the data, select the data and click <③ Direction key << >. • <Capacity required> indicates the capacity required for the backup of the selected data. 24 ⑤ [Browse] • Select the drive to be backed up. ⑥ [Destination Path] • The selected drive is displayed. ⑦ [Start Backup (Hard disk backup start)] z Execute backup on the hard disk. ⑧ [CD-RW or Tape Backup] z It is used to back up the data in ④ to CD-RE or the tape. ⑨ [Browse] z Click <Browse> to select the operating program of CD-RW or tape. ⑩ [Start] z Click <Start> to run the program stored in the CD-RW or the tape designated in ⑨. ♣ Recording of image stops until the completion of CD-RW or tape backup. ⑪ [End] z After finishing backup, click <End> to complete the backup. ⑫ [Disk information] z Hard disk drive that is currently assigned is displayed. z You can check the current capacity available, full capacity, and assigned state for each drive. 25 2-7. User Setup ① ② ③ ④ ⑤ This is the mode for restricting DVR user. The user is not registered on default. When the user is not registered, anyone can use the function of DVR. However, after the user is registered, only the registered user can use the function as much as he/she is given the authority. As only the <Supervisor> can use <User Setup> function, please register <Supervisor> first. ① [Registration writing] z User level: Supervisor / Manager / Operator z Name: User name z ID: Up to 8 digits of English characters, number, or character/number combination are available. z Password: Up to 8 digits of English characters, number, or character/number combination are available. z Password confirm: Enter the password again. z Note: Enter the user related information. z Authority given for each user User Monitoring Pan/Tilt Search Mode Option Setup Network Power Create basket User Setup Others Monitoring Search Supervisor O O O O O O O O O Manager O O O O X O O O O Operator O O X O X X X X X 26 ② [Add] z If you fill in registration and click <Add>, the registration of ⑤ is made. ③ [Modify] z Change the information of the registered user. z Click the registered user to be changed in ⑤ , change the information, and then, click <③ Modify>. ④ [Delete] z Delete the registered user. z Click the registered user to be deleted in ⑤, and then click <④ Delete>. ⑤ [User registration state] z The registered users are displayed. 27 2-8. Select voice channel setup ① ② ③ z Connect the <Voice cable (Supplied by provider)> with the DVR. z Connect the voice line of the voice camera or microphone with the <Voice cable>. ① [Use (Select channel to record)] z In ①, the number above each speaker indicates the <Voice cable> terminal number. z Mark on the number of the <Voice cable> to use. z If you click the speaker, the list of cameras is displayed. z Select a camera. ② [Volume Control] z Adjust the volume. z The more you drag up, the volume is louder and the more you drag down, the volume is lower. z When you mark ‘V’ in check box which is below the button of volume control, you can listen from linked volume source. z Listening voice lively, you can control volume. ③ Checking setting. z You can check the setting made in ①. 28 2-9. System Information ① ② ③ ④ ⑤ This mode is used to display the using program and the information of the manufacturing company. ① [Version] z Indicates the version of DVR program installed. ② [Phone] z Telephone number of the manufacturer ③ [Home Page] z Homepage of the manufacturer ④ [E-mail] z E-mail of the manufacturer ⑤ [System Information] z O/S version z CPU specification z RAM capacity z Computer name z Indicates Direct-X version. 29 3. Search Mode 3-1 Switch to search mode 02 Bank SEARCH Click the <Search> button in Monitoring Mode (Initial Screen), and check the <User ID> and <Password>. 01 MR 02 MR 03 CR 04 2002-09-04 13:16:03 2002-09-04 13:16:03 2002-09-04 13:16:03 05 06 07 MR MR 2002-09-04 13:16:03 2002-09-04 13:16:03 09 10 11 MR MR 2002-09-04 13:16:03 2002-09-04 13:16:03 13 14 15 2002-09-04 13:16:03 MR 2002-09-04 13:16:03 CR 2002-09-04 13:16:03 AR 2002-09-04 13:16:03 CR 12 2002-09-04 13:16:03 MR 2002-09-04 13:16:03 CR 08 2002-09-04 13:16:03 AR CR 2002-09-04 13:16:03 16 MR 2002-09-04 13:16:03 SEARCH END To switch to Monitoring Mode (Initial Screen), click the <Search End> button. 30 3-2 Search mode screen (4) RECORD TIME (2)CHANNEL 01 MR (27) BOOKMARK (3)RECORDING MODE 02 MR 03 CR 04 AR (1)DATE/TIME (23) HISTORY SEARCH 2002-09-04 13:16:03 05 2002-09-04 13:16:03 MR 06 MR 2002-09-04 13:16:03 07 (24)Moving Picture Backup 2002-09-04 13:16:03 CR 08 AR (25)PRINT (26)SAVE/WATERMARK (20)PLAYBACK SPEED 2002-09-04 13:16:03 09 MR 2002-09-04 13:16:03 10 2002-09-04 13:16:03 13 MR MR 2002-09-04 13:16:03 14 MR 2002-09-04 13:16:03 11 (21) ENLARGEMENT/ REDUCTION (22)BRIGHTNESS 2002-09-04 13:16:03 CR 12 CR 2002-09-04 13:16:03 2002-09-04 13:16:03 15 16 CR (17)STOP (13)NEXT FRAME (14) PREVIOUS FRAME (18)FAST PLAYBACK (19)Fast Play Reverse (15)PLAYBACK (16) REVERSE PLAYBACK MR (5)CALENDAR / MONTH (6)DATE 2002-09-04 13:16:03 2002-09-04 13:16:03 (7) RECORDING TIME (9)CHANNEL UP/DOWN 2002-09-04 13:16:03 2002-09-04 13:16:03 (11)VOICE OUTPUT/VOLUME (8)RECORDING TIME SEARCH POINT (10)SCREEN SELECTION (12)STOP RECORDING WHILE SEARCHING (1) [Date / Time] z Displays current date, time and day of a week. (2) [Channel] z Displays the camera number. (3) [Recording Mode] z Indicates the recording mode. z Continuous Record : CR z Motion Record : MR z Alarm Record : AR z Alarm / Motion Record : MR or AR (It is indicated, being interworked with the applied mode.) z If recording failed : No image is displayed. (4) [Recording Time] 31 3-3 Date and time setup z Select Year/Month/Date/Hour/Minute to search. (5) [Calendar ] z Select a month with the “<“ or “>” button. (6) [Date] z Click the date you want to choose. z Date in yellow : There is a recording. z Date in red : The date to search. (7) [Recording time] z The time zone with recording data is displayed in red, and without recording data is displayed in pink. (8) [Recording time search point ] z The red bar indicates the time point to start search. z If you click the [Recording time (Red)] to search, the search point is moved to the part. z To enlarge the time zone, click the time. z The time zone is enlarged in 5 steps centering around the search point. 3-4 Search camera setup (9) [Select Channel] z Select a channel with the “∧” or “∨” button. z Click the camera number to search with a channel. z You double-click the image on the division screen to select 1 channel. (10) [Screen Selection] z Click the required screen division mode if you want to perform search on the divided screen. 32 02 MR 2002-09-04 13:16:03 (7) RECORDING TIME (9)CHANNEL UP/DOWN (11)VOICE OUTPUT/VOLUME (8)RECORDING TIME SEARCH POINT (10)SCREEN SELECTION 3-5 Playing voice recording (11) [[Voice Output / Volume ] z You can play the recorded voice. z Click (11)[Voice Output / Volume] to search the voice recording data. z The button changes into red. z The recording table changes color. z Blue : Voice data. (It is possible that there is no image data.) z Red : Image data only. z Control volume with the volume button. z You can select only one channel to play the recorded voice. 33 (12)STOP RECORDING WHILE SEARCHING 3-6 Stop recording while searching (12) [Stop recording while searching] z Stops recording temporarily while searching the recorded screen. z It is used when more smooth search is required. 3-7 Playback (13) [Next Frame] z Forward to the next frame at the stopped screen. (14) [Previous Frame ] z Backward to the previous frame at the stopped screen. (15) [Play ] z Plays forward. (16) [Reverse Play ] z Plays reverse from the designated time point . (17) [Stop ] z Stops play and reverse play. (18) [Fast Playback] z You can play the screen fast. z Play speed gets faster for each click in 5 steps (20%, 40%, 60%, 80%,100%). z The function is available in play mode. (19) [Fast Play Reverse] z You can adjust the reverse play speed. z Reverse play speed gets faster for each click in 5 steps (20%, 40%, 60%, 80%,100%). zThe function is available in reverse play mode. 3-8 Playback speed adjustment (20) [Playback speed] z You can adjust speed as you playing or playing reverse the screen. z The speed gets faster as the point goes to <+> direction. If you click <+>, you can decrease the speed in 10 steps from 10% to 100. zThe speed gets slower as the point goes to <-> direction. If you click <-> , you can increase the speed in 10 steps from -10% to -100%. 34 3-9 Screen adjustment (21) [Image Enlargement/Reduction] z You can enlarge/reduce the screen when you search on a channel. (22) [Brightness] z You can adjust brightness of the screen when you search on a channel. 3-10 History Search (23) [History search] z You can record the important items of system operation separately and search them later. z Only the items specified on <System Setting> - <System> - <⑦ History> are recorded. (See Chapter 2-1 for details.) ① ③ ② 35 ① [Search item] z Click on the item to be searched from <System Setting> - <System> - <⑦ History>. ② [History search window] z The recorded list for the items selected from ① is displayed. ③ [Data scroll] z You can find the data quickly by scrolling the data list of <② History search window>. ④ [Search screen moving] z If you double click the desired data of <② History search window>, the search screen for that time is displayed. MR 02 2002-04-15 09:14:12 36 ④ ① ② ③ ⑤ [Search by recording situation] z You can see the recording situation by channel/time at one screen. z Select the desired date from the search screen , and then, execute this function. ① [Recording channel/date/time] z Channel/date/time displayed by ④ and ⑤ are indicated. ② [Channel / time search window] z Channel is displayed on the left side and time on the right side, and the recorded channel time are displayed in blue color. ③ [Time detailed search window] z If you click any point of the recorded data from (2), you can search the data by minute and in detail. z The first line indicates 0 ~ 19 minute, the second line indicates 20~39 minute, and the third line indicates 40~59 minute. z Recording indication is displayed with the color matched with the recording mode. ④ [Search screen move] z If you select ④ and ⑤ and click <OK> button, the search screen of that channel/date is displayed. 37 3-11 Moving Picture Backup 3-11-1. Backup (24) [Moving Picture Backup] z You can save the searched image as a moving picture. z Click the <(24)Moving Picture Backup> button to return to the moving picture backup mode. z To return to the search mode from the moving picture backup mode, click <(24)Moving Picture Backup> again. z The moving picture backup mode is active only when you select a channel. z The moving picture backup mode deactivates the functions such as History, Bookmark, Still image saving, Print, Zoom and Tone control. MR 02 (24) Moving Picture Backup 2002-04-15 09:14:12 38 ① Compression size ③ Compression start ② Remaining temporary disk (system disk) space ⑤ Finish compression ⑥ Compressed data size 01 CR ④ Playback 2002 09 07 15:00 ① [Compression size] z Select the data size for moving picture backup. z Select the size from the combo box menu. z A floppy disk is about 1.4MB, and a CD-ROM is about 640MB. ② [[Temporary disk (System disk) space] z Moving picture backup is saved temporarily in C: drive (system drive). z Therefore, you should check the remaining system drive space. z Stable backup requires at lest 600MB of remaining space. ③ [Compression start] z Check the compression size and disk space in ① and ②, click ③ to start compressing the data and saving on the system disk. ④ [Playback] z Click ④ Playback button to compress the data while viewing the screen. 39 ⑤ [Finish compression] z You can finish compression of backup data in the following manners. (1) If the compressed data size is larger than the size set in <① Compression size>, - When the <① Compression size> is reached, compression is automatically stopped, and <Save As> window is displayed. (2) If you want to finish compression before the data reaches the <① Compression size>, - Click the button to finish compression. The <Save As> window is displayed. z Save the compressed data on the required drive. z You can save the data on the floppy disk / hard disk / other PC on the network / external storage device. z When you saving the data on a CD, (1) You cannot save the data directly to CD even if a CD Read/Write is installed in the DVR. (2) In this case, save the data on other PC on the network, and save the data, using the CD-Write program of the network PC. Or, you may search the data in <System Setting>-<Backup>, and save it on the CD. ⑥ [Compressed data size] z The size of the data compressed at the finish of compression with (1) or (2) of ⑤. 3-11-2. Searching backup data z You can play the backup moving picture data with <Windows Media Player>. z The data on the floppy disk may cause cut in the moving image. You can copy the backup data from the floppy disk to the hard drive, and then play the moving picture with <Windows Media Player>. 40 3-12 Print MR 02 (25) PRINT 2002-04-15 09:14:12 (25) [Print] z To print out the searched still image with the printer, click the <print> button. z The print can be set identically with the window setup method. z Select 1 channel still image ¨ Click <(25)Print>button ¨ Click “Print” on the left upper part of screen ¨Click “Print Start” 41 3-13 Floppy disk save / Watermark What is Watermark? In bank notes, we implant a specific image to prevent and discriminate counterfeit notes. Video image in BMP file or JPG file can be forged and edited by the user. In order to prevent such forgery, the <Watermarking> is applied to the saved images. The < Image viewer > program is for water mark check. Therefore, to search the video image saved in the floppy disk, you need to install the < Image viewer > program on the PC. 01 MR 2002-09-04 13:16:03 05 MR 02 MR 2002-09-04 13:16:03 06 MR 03 CR 2002-09-04 13:16:03 07 CR 04 AR 2002-09-04 13:16:03 08 AR (26)SAVE/ WATERMARK 2002-09-04 13:16:03 09 MR 2002-09-04 13:16:03 13 MR 2002-09-04 13:16:03 2002-09-04 13:16:03 10 MR 2002-09-04 13:16:03 14 MR 2002-09-04 13:16:03 2002-09-04 13:16:03 11 2002-09-04 13:16:03 CR 12 CR 2002-09-04 13:16:03 2002-09-04 13:16:03 15 16 CR 2002-09-04 13:16:03 MR 2002-09-04 13:16:03 (26) [Save / Watermark] z On Search screen, select a screen to display Watermark. (Partition screen or one channel) z Click the <(26) Save/Watermark> button. 42 Î <Click> ①Watermark check ②Floppy disk save < Record status display> 1. Click the screen with the mouse and the record information is displayed. 2. Insert a floppy disk to the Floppy Disk Drive. 3. If try to store by marking Watermark z Click <①Watermark check> button and then click <② Floppy disk save> button. 4. If Watermark is not needed z Do not click <① Watermark check> button and click <② Floppy disk save> button only. Watermark indicate 43 ③Close 5. If the storage is successfully executed, a screen like [Figure] appears. 6. When the storage is finished, click <③Close> button to end the work. 7. Pull out the floppy disk. Stored file name 44 3-14 Bookmark ① Add to Bookmark Next screen ②Bookmark edit Previous screen 02 MR 02 2002-04-15 09:14:12 [Fig. 3-14-1] What is book mark? Just as you place a book mark to the important page of a book. You can register the current position of the image and search the location easily. 45 1. When trying to bookmark a image of [Figure 3-14-1], click <①Add to Bookmark> button. ②Click ①Click [Fig. 3-14-2] 2. To input the contents into the setup bookmark, click<②Bookmark edit> button. 3. The bookmark edit window appears like [Figure 3-14-3]. 4. In the <Bookmark Edit> window of [Fig 3-14-3], click an item, and then select the following options. z Priority : Click any of the <Priority> buttons to display the color on the No. of each item. z LOCK : Click the <Lock> button to prevent deletion of data. <V> is displayed on the Lock field of the protected item. Click <Un Lock> to release the function. z Comment : Click the <Comment input window>, and then enter the comment. 5. Click <Comment save> button to store the inputted contents into <Bookmark edit window>. [Fig. 3-14-3] MOVE TO UP-1 PAGE MOVE TO DOWN-1 PAGE DELETE THE SELECTED LIST CONTENT SAVE BUTTON PRIORITY LOCK CONTENT INPUT WINDOW 46 6. [Delete] z In order to delete an item from the list, click the item, and then click the <Delete> button. 7. [Up Scroll / Down Scroll] z You can scroll up/down the page when there are many items on the list. 8. [Exit bookmark edit window] z When you finish registering a bookmark, click the <②Bookmark Edit> button to return to the search screen. 3-15 Bookmark search 1. In order to search the screen registered to the bookmark, click the <Bookmark Edit> button in the search window. 02 MR DOUBLE CLICK Î 2002-09-06 15:11:53 [Fig. 3-14-4] [Fig. 3-14-5] 2. Double click the item on the list. 3. The search window for the selected item is displayed as in [Fig. 3-14-5]. 4. Search function is performed as in the general search mode. 47 3-16 Partial Zoom You can see to zoom in part of the screen. CR 01 2002-04-15 09:14:12 03 MR 02 01 CR 2002-04-15 09:14:12 MR 2002-04-15 09:14:12 AR 04 Î 2002-04-15 09:14:12 2002-04-15 09:14:12 z Select search mode z Select one screen 01 CR 01 CR Î 2002-04-15 09:14:12 2002-04-15 09:14:12 z Set the area to zoom in by dragging the mouse. z The selected area is zoomed in. z The bigger you appointed area, magnification of enlargement is smaller and the smaller you appointed area, magnification of enlargement is bigger. z If you click on enlarged screen, you can be back to original screen. 48 4. Image viewer <When searching a (Watermark authentication) stored floppy disk from normal PC> z < Image viewer >is a separate program for searching image saved in floppy disk. z For verifying ‘Watermark’ authentication, you need to install < Image viewer > program. z You can find < Image viewer >program in provided CD. 1. Install “Image viewer” program in a PC to be searched. 2. Icon is generated on the basic screen. Image viewer 3. Double clock program. icon to execute “Image viewer” Image viewer 4. A screen like [Fig. 4-1] appears. Watermark authentication Confirm button 5. Insert a floppy disk into the floppy disk driver of the PC. Print File open Close [Fig. 4-1] 6. Click <File Open> button in [Fig. 4-1]. 7. If you open the file in [Fig. 4-2], the file authentication message is displayed. [Fig. 4-3] 02 CR Click 1 Click 2 2002-04-02 11:54:55 [Fig. 4-2] [Fig. 4-3] 49 02 02 CR CR on Authorizati approved. 2002-04-02 11:54:55 2002-04-02 11:54:55 [Fig 4-4] [Fig 4-5] Click 8. In order to print out the screen with the watermark approval displayed on it, click the <Watermark Authentication> button as [Fig. 4-4]. Then the authentication mark is displayed on the screen as in [Fig. 4-5]. 9. Click the <Print> button in [Fig. 4-5] to print out the image with the watermark approval mark displayed on it. 10. [Fig. 4-6] and [Fig. 4-7] shows the screens displayed when you save or edit the image without watermark authentication. 02 CR 02 CR roved on unapp ti a z ri o th u A 2002-04-02 11:54:55 Click 2002-04-02 11:54:55 [Fig.4-6] [Fig. 4-7] 50 5. Backup viewer < Search backup data > z <Backup viewer>is a separate program for searching saved backup image. z For searching backup image in PC, you should install < Backup viewer >program. z You can find < Backup viewer >program in provided CD. 1. Install “Backup viewer” program in your PC for searching. 2. You can see the icon in your desktop. Backup viewer 3. Install the backup device in your PC for searching. 4. Double click icon, run “Backup viewer” program. Backup viewer 5. A screen like [Fig. 1] appears. ⑩ [Fig. 1] 51 ① ② ⑤ ③ ④ ⑦ ⑥ ⑧ ⑨ ⑩ [Fig. 2] ① [Search Video Files] • When you search recorded image, you can use it. • When you see recorded all data, click <① Search Video Files>. • When you select by each drive or files , click the button ②, and click <① Search Video Files>. • See [Fig. 2] • Select the desired hour to be search. And click the file name (③). • You can select one or several data. (ex. To select no.1, no.3, and no.5, click the data while pressing <Ctrl> button on the keyboard.) • If you select <③ Data List>, click the direction key <④ >>>, the selected data moves to <⑤Selected data file>. ⑤ [Search Voice Files] • When you search recorded voice, you can use it. • Setup : Same the ① [Search Video Files] ■ Simultaneous searching of image and voice : Select the same time data. ⑩ [Make Search Data] z Click the <⑩ Make Search Data>, moves to search screen. [Fig. 3] 52 [Fig. 3] z See Chapter 3 for details. 53 Printed in Korea Manual Version: 3.05.01 54