1
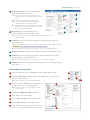
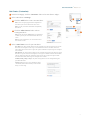
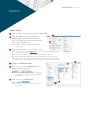
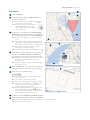
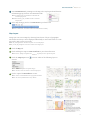
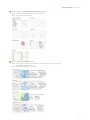
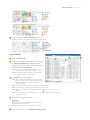
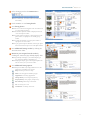
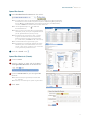
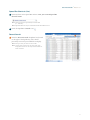
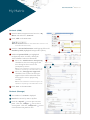
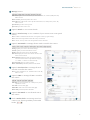
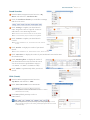
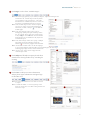
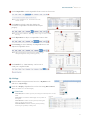
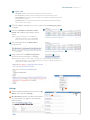
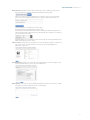
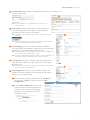
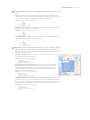
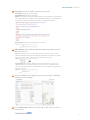
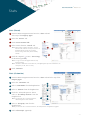
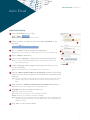
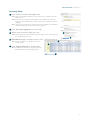
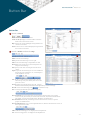
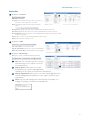
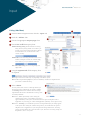
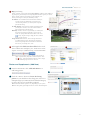
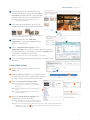
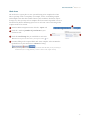
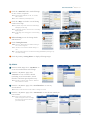
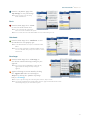
6.7 Quick Start Guide Quick Start Guide Matrix™ 6.7 Confidential to CoreLogic® The recipient of this document agrees that at all times and notwithstanding any other agreement or understanding, it will hold in strict confidence and not disclose the contents of this document to any third party and will use this document for no purpose other than evaluating or pursuing a business relationship with CoreLogic. No material herein may be reproduced, in whole or in part, by any means without the express written consent of CoreLogic. Unauthorized distribution is strictly prohibited. ii Table of Contents Quick Start Guide Matrix™ 6.7 Introduction...................................................................................................................................................................... 1 Welcome ......................................................................................................................................................................... 1 A few things you should know. .............................................................................................................................. 1 Home .................................................................................................................................................................................... 3 Home Widgets ............................................................................................................................................................ 3 Market Watch (Customize) ..................................................................................................................................... 4 Hot Sheets (Customize) ........................................................................................................................................... 5 Search .................................................................................................................................................................................. 7 Criteria Search ............................................................................................................................................................. 7 Map Search ................................................................................................................................................................... 8 Map Layers .................................................................................................................................................................... 9 Search Results ............................................................................................................................................................. 11 Speed Bar Search ......................................................................................................................................................13 Speed Bar Shortcut (Create) ................................................................................................................................13 Speed Bar Shortcut (Use) ......................................................................................................................................14 Recent Search.............................................................................................................................................................14 My Matrix ..........................................................................................................................................................................15 Contacts (Add) .......................................................................................................................................................... 15 Contacts (Manage) ................................................................................................................................................... 15 Saved Searches .......................................................................................................................................................... 17 CMA (Create) .............................................................................................................................................................. 17 My Listings ...................................................................................................................................................................19 Settings ........................................................................................................................................................................20 Stats .................................................................................................................................................................................... 25 Stats (Preset) ............................................................................................................................................................. 25 Stats (Customize)..................................................................................................................................................... 25 Stats (Save) ................................................................................................................................................................26 Continued ► iii Quick Start Guide Matrix™ 6.7 Auto Email ...................................................................................................................................................................... 27 Auto Email (Create)................................................................................................................................................. 27 Concierge Mode........................................................................................................................................................28 Button Bar ......................................................................................................................................................................29 Button Bar ...................................................................................................................................................................29 Input ....................................................................................................................................................................................33 Listing (Add New)....................................................................................................................................................33 Photos and Supplements (Add New) ..............................................................................................................34 Listing (Edit Existing) .............................................................................................................................................35 Work Area ...................................................................................................................................................................36 Matrix Mobile ................................................................................................................................................................ 37 iv Quick Start Guide Matrix™ 6.7 Introduction Welcome Whether you're a seasoned veteran or brand new to Matrix™, we'd like to welcome you to version 6.7. Matrix is mobile friendly, cross-browser compatible and has long been considered, by many, the most intuitive MLS software available today. However, like most new learning curves, there may sometimes be confusion along the way. Well, you can relax and consider this manual your personal guide to help get you to where you need to be in the quickest, most productive, way possible. The Matrix team is always looking for new ways to improve an agent's user experience. Whether developing efficiency-rich features or creating in-depth training tutorials, we are committed to bringing the best out in you. A few things you should know. Matrix is currently used by over 250,000 real estate professionals. However, because no two MLS's, or Associations, are exactly alike, some of the fields, data and images used in this guide may differ slightly from the system that you're currently working on. Rest assured, however, that the concepts are the same and that you will easily recognize the ones used here with those of your own. Secondly, Matrix is an online MLS software system so you must be using an active Internet connection. Third, all Matrix fields highlighted in a yellow are mandatory and must be completed before you are able to proceed with that feature. Finally, if after reading this guide, you're still unclear about anything, check out the video tutorials at marketlinx.com/matrix/helpme. Enjoy. The Matrix Team 1 Quick Start Guide Matrix™ 6.7 Home Home Widgets All Home widgets, with the exception of the, “News” widget, can be repositioned by clicking, and dragging, the widget header. Widgets can be collapsed or expanded by hovering over the widget header and clicking the, “up” or, “down” icon. Widgets can be closed by hovering over the widget header and clicking the, “close” icon. Closed widgets are automatically sent to the, “Additional” widget and can be removed simply by clicking, and dragging, the closed widget header out of the, “Additional” widget. 1 News: click an item from the list to display news content. 1 Note: upon login, each important news alert will open automatically and display an, “exclamation mark” icon beside the news item in the list. Note: close an important news alert by choosing to either read the item immediately or at a later time. 2 My Carts: click a cart link to display all listings currently saved in a recently used Cart. 3 Market Watch: click on a status link to display all listings with a change to that selected status. Note: each link displays the status and (in brackets) the number of listings for the selected property type and time frame indicated in the dropdown lists. 3 Note: see, “Market Watch (Customize)” in the, “Home” section to customize this widget. 4 Recent Portal Visitors: quickly view a recent Portal visitor's information by clicking on their name or open their Portal by clicking on the associated, “Portal” icon. Note: includes only the 10 most recent portal visitors within the last 30 days. 4 2 Note: the time/date stamp indicates when the contact last visited their portal. Note: the Note icon indicates any new notes, to you, from a portal visitor. Click this image, or its associated number, to view the note. Note: the Favorite and Possibility icons indicate where listings have been added. Click this image, or its associated number, to view the affected listings. 3 Quick Start Guide Matrix™ 6.7 5 My Favorite Searches: click a link to display the results of your favorite saved search. 7 Note: manage your favorite search by clicking on the, “Manage” link located to the right of the saved search name. 8 Note: a maximum of 10 favorite searches per agent. Note: to create a favorite search, see, “New Saved Search” under, “Button Bar” in the. “Search” section. 9 Note: click, “Update All” to view the number of new listings there are for each Favorite Search since the last time the, “Update All” link was clicked. 6 5 10 My Listings: click a link to display all your listings (based on status and property type). 6 Note: each link displays the status, the property type and (in brackets) the current number of listings. 7 Concierge: click a client's name to display all listings waiting on approval before being sent. Note: each link displays the client's name and (in brackets) the number of listings waiting on approval. Note: a, "Concierge Alert" also appears, on each page, to the left of the Speed Bar textbox. 8 Recent Use Contacts: click a name to display details of a recently used contact. 9 Hot Sheets: click on a property type link to display all listings with a status change during the specified time frame. Note: see, “Hot Sheets (Customize)” in the, “Home” section to customize this widget. 10 Additional: click and drag widget headers to and from this area to help manage Home layout. Market Watch (Customize) 1 From the Home Page, click, “Customize” on the, “Market Watch” widget. 8 2 Click the, “Map Search” link and use the map shape tools to select specific areas to watch (optional). 6 7 1 Note: select general locations from the listboxes below. 3 Enter the specific criteria that you would like to include as part of your customized search. 2 Note: for more information, see, “Criteria Search” in the, “Search” section. 4 Add/Remove Additional Fields (optional). 5 Click, “Save” on the Button Bar. 6 Select a property type from the dropdown list. 7 Select a time frame from the dropdown list. 8 Click a status link to view listings that now meet your new, custom Market Watch search criteria. 3 5 4 4 Quick Start Guide Matrix™ 6.7 Hot Sheets (Customize) 1 From the homepage, click the “Customize” link on the “Hot Sheets” widget . 2 Select a Hot Sheet to manage. 2a 1 3 Click the "Add" link to create a new Hot Sheet. Note: select a Property Type from the dropdown list then name your new Hot Sheet and click, "Save". Note: you may customize a maximum of 10 (default) Hot Sheets. 2b Click the "Edit Criteria" link to edit an existing Hot Sheet. 2 2a 2b Note: Enter the specific criteria that you would like to include as part of your customized search then click, "Save". Note: for more information, see "Criteria Search" in the "Search" section. 3 Select a time frame to use for your Hot Sheet. New Only: only shows listings which are new/changed since the last time the user ran the Hot Sheet. For example: if a user logs in at 9:00am and runs the Hot Sheet, then later within that same sessions runs it again, this option would show only listings new/changed since 9:00am. This Session: only shows listings which are new/changed since the last time the user ran the Hot Sheet in a prior session. For example, if a user logs in at 9:00am and runs the Hot Sheet and sees 50 listings, then later within that same session runs it again, this option would show them those same 50 listings new/changed since 9:00am. 24 Hour, Today, 3 Days, 7 Days: only shows listings which are new/changed during the specified time frame. Custom: allows the user to run a Hot Sheet using a custom date (within the last 30 days of the current date), or a time range. 5 Quick Start Guide Matrix™ 6.7 Search Criteria Search 1 2 From the Matrix navigation menu, hover the Search Tab. From the dropdown list, select the desired Property Type (e.g. Residential, Commercial, Land, Cross-Property etc.) then click on the link for the type of search to run. 1 2 Note: clicking on the Search tab displays a page with all property types. 3 From the Criteria tab, enter your search criteria. Note: click the, “Map Search” link (Map Search: ) or click on the Map p tab to include/exclude specific map areas to your search. Note: enter price in thousands of dollars (i.e. 300+ means $300,000 and over). Note: select multiple listbox options by clicking an item while holding down the CTRL key Note: select the, “Or” radio button for search results that contain any of your selected item(s). Select the, “Not” radio button for search results that do not contain your selected item(s). 3 4 Add/Remove Additional Fields. 5 Select the search results Display type and/or number of results per page. 5 Note: set your custom displayy as the default by clicking the Criteria Settings icon > Set display and count per page as default. 6 Click, “Search” on the Button Bar. 6 Note: see, “Button Bar” section for a full list of Button Bar functionality. 4 7 Quick Start Guide Matrix™ 6.7 Map Search 1 Click the Map tab. 2 Click and drag the map or zoom in and out to your desired location. Note: Use the, “Jump to Address” dropdown list quickly locate a specific map area. 1 3 2 to Note: if your search criteria generates between 500 and 5000 results, click on a map cluster to display the (indicated number of) listings for that area. 3 Using one, or a combination of all three shape tools (Radius, Rectangle and Polygon ), draw to isolate as many areas on the map as you like. Note: be sure you have added search criteria in the Criteria section. 5 Note: If the number of results exceeds the maximum number of listings allowed to display (at this time, 500) then you may have to zoom in on the map or narrow your search criteria. 6 7 Note: during radius sizing, shape automatically displays distance from its center to the edge. Note: clear all shapes by clicking the, “Clear All Shapes” icon 4 4 . When all areas on the map have been selected, you may choose to Delete, Include or Exclude any area simply by hovering over the shapes red dot. 8 Note: overlap two shapes then hover either red dot > Exclude this Shape to also exclude the area where the two shapes intercept. Note: reposition a shape by clicking its red dot and dragging it to the new location. 5 6 10 Click the Ruler link, then click any two points on the map to measure the distance between them. 9 Select/de-select multiple listings. Note: “All” selects all listings on the map whether visible in the viewport or not. Note: “None” deselects all selected map listings. Note: “Page” selects only map listings visible in the viewport. allows you to Note: clicking the, “Single Checkbox” icon select listings, one-by-one. Clicking the, “Single Checkbox” again turns this feature off. Note: clicking the, “Multiple Checkbox” icon allows you to select multiple listings by clicking and dragging your cursor over the desired listings. This feature automatically turns off when the listings have been selected. 7 Choose from either a Road view or Bird’s eye view. 8 View partial listing details by clicking on any marker. Note: from inside the map marker pop-up, click the MLS# to view the full listing display. Note: click checkbox to select listing. 8 Quick Start Guide Matrix™ 6.7 9 View Lot Dimensions by zooming in on the map, select any lot parcel and, from the information pop-up, click the "Lot Dimensions" link. Note: Lot Dimensions are available for both listed and non-listed properties. Note: This feature is only available for Mtrix customers using Realist®. 10 Select map listing(s) and use the Button Bar to perform a task. Note: see, “Button Bar” section for a full list of Button Bar functionality. Map Layers Design your own custom maps by choosing from dozens of layers of geographic information. Each layer can be displayed individually or mixed with others to create the perfect map to meet your needs. Note: only existing Realist® customers may have access to Map Layers. Note: you may be prompted to zoom in to enable certain map layers. 1 Click the Map tab. 2 Click and drag the map or zoom in and out to your desired location. Note: use the, “Jump to” dropdown list 3 Click the, Map Layers icon activate. to quickly locate a specific map area. to choose which of the following layers to Note: click a section panel to expand category. Note: click the, “Clear All” button to reset the map layers. 4 Click to expand the Boundaries section. Note: contains colored delineations of geopolitical entities. Note: ctrl-click any shaded area for layer details. 9 Quick Start Guide Matrix™ 6.7 5 Click to expand the Property Characteristics section. Note: contains detailed information about individual properties. Note: click any parcel for parcel details. 6 Click to expand the Trends section. Note: contains aggregated information available for condos, single-family, or both, for each of zip and neighborhood aggregation levels. Note: ctrl-click any shaded area for layer details. 10 Quick Start Guide Matrix™ 6.7 7 Click to expand the Points of Interest section. Note: Bing-provided, local business and community location markers. Search Results 1 2 5 Click the Results tab. 2 4 1 3 Change your display by selecting a new view from the Display dropdown list. Change the total results per page by selecting a new number from the Page Count dropdown list. Note: save both settings by clicking the Settings icon Set display and count per page as default. > Note: reset display and page count by clicking the Settings icon > Reset to the system defaults. 3 Customize the display columns. Note: while in, "Single Line" display mode, click the column header to open the column's property dialogue box (do not click the header text as this will only affect the column sort order). Note: an existing column may be renamed, removed, resized or realigned. Note: new columns may be added by clicking the, "Insert Column" link. Note: "Apply" any changes then click the, "Manage Display" Display. icon to save your new Custom Note: to create, or manage, a Custom Display, also see, "Custom Displays" under, "Settings" in the, "My Matrix" section. 4 Select/deselect multiple listings. All: selects all listings whether visible in the viewport or not. None: deselects all selected listings. Page: selects only listings currently visible in the viewport. 5 Click Previous/Next to view additional listing results. 11 Quick Start Guide Matrix™ 6.7 6 Select listing(s) and use the Button Bar to perform a task. Note: see, “Button Bar” section for a full list of Button Bar functionality. 7 Click an MLS# to view listing details. 8 View listing photos. 7 Note: hover over the main listing photo and click either arrow to cycle through the photos. Note: the number of photos available is displayed in the left corner of the photo taskbar. Note: click the main listing photo, or the Expand icon in the photo task bar, to open photos in a modal pop-up window. 6 Note: click the New Window icon in the photo taskbar to open photos in a new window. Note: to play/pause the photo slideshow, click the play/pause button located in the right corner of the photo taskbar. 9 10 9 10 View additional listings results by clicking the, “Previous/Next” links. 8 Return to your original search results by clicking the, “Return to [my default] display” link. Note: [my default] will display as your default display type (e.g. Single Line, Multiline, Thumbnail etc.). Note: changing the display type in the Display dropdown list will also return you to your search results. 11 View additional listing options. Note: though some MLS’s may display additional icons, the following are included in most systems. Map: view listing location on a map. Photo: view listing photo/slideshow pop-up. Supplements: view listing supplements. Change History: view listing change history. Property History: view property listing history. Watch Listing: add listing to watched list. Tax: view listing tax record. Virtual Tour: view listing virtual tour. 11 12 Quick Start Guide Matrix™ 6.7 Speed Bar Search 1 Enter shorthand search criteria into the textbox. Note: every MLS choose their own shorthand definitions. For example, for one MLS, the Speed Bar shorthand criteria above would read: (show me all) Active, Sold, Pending Backup offers (from the past 180 days) and Pending Short sales (from the past 180 days), in the 03 (Rosedale) area, that are RESIdential with 2+ bedrooms and 3+ bathrooms. Note: click the Speed Bar help icon shorthand definitions. for additional Note: if there is criteria you use often that is not represented by a shorthand, you may create your own Speed Bar shortcut (see the, “Speed Bar Shortcut (Create)” section). 1 2 Note: shorthand can be entered in any order—with the exception that bedrooms must be entered before bathrooms and statuses must be grouped together (i.e., as indicated by “A S PB PS” in the criteria above). Note: each shorthand must be separated by a space. Note: shorthand criteria automatically populate the textbox immediately after each standard search is run. Hover over the, “other criteria” checkbox to view criteria that is not represented by shorthand criteria. 2 Click the, “Search” icon . Speed Bar Shortcut (Create) 1 Create a search. 2 From the, “Results” or “Map” tab, click, “Save” > “New Speed Bar Shortcut” on the Button Bar. 1 3 Create a custom name for your new Speed Bar Shortcut. Note: name must always be preceded by a forward slash (i.e., /lakeside). Note: name may not include spaces, symbols or punctuation. 4 Click, “Save”. 2 3 4 13 Quick Start Guide Matrix™ 6.7 Speed Bar Shortcut (Use) 1 From anywhere in the Speed Bar textbox, enter your custom Speed Bar Shortcut name. Note: name must always be preceded by a forward slash (i.e., /lakeside). Note: Speed Bar Shortcut may be combined with other Shorthand criteria. 2 Click, the Speed Bar “Search” icon . Recent Search 1 1 From the "Recent Search" dropdown list (located to the right of the Speed Bar), select which previously run search you would like to display. Note: lists up to 50 of your most recent searches. Note: each list item contains search criteria, date/time stamp (when search was last run) and the number of results returned. 14 Quick Start Guide Matrix™ 6.7 My Matrix Contacts (Add) 1 2 From the Matrix navigation menu, hover the, “My Matrix” tab and select, “Contacts”. 1 Click, “Add” on the Button Bar. 4a 3 Note: see, “My Matrix > Contacts” in the “Button Bar” section for a full ull list of Button Bar functionality. 3 4 From the, “Personal Information” modal pop-up, fill out all mandatory fields (highlighted background in yellow). 4b 5 4 Additional optional fields, (no highlighted background) can be viewed by clicking the, “Show All Fields” link on the Button Bar. 4a Select the, "Enable Reverse Prospecting" checkbox to show the listing agent that their listing has been sent to this (anonymous) contact. 2 2 1 3 5 Note: for more information on "Reverse Prospect" see, "My Matrix > My Listings" in the "Button Bar" section. 4b Select the, "Mortgage Pre-Approved" checkbox if this contact has been preapproved (this will be indicated in the listing agent's reverse prospecting section). Note: for more information on "Reverse Prospect" see, "My Matrix > My Listings" in the "Button Bar" section. 5 Click, “Save” on the Button Bar. Contacts (Manage) 1 View number of, “Contacts” displayed. 2 Search for contacts by name or by filter. 3 Click the, “Expand” icon to open a section panel. Click the, “Collapse” icon to close a section panel. Click the, “Collapse All” icon to close all subsection panels at once. 4 15 Quick Start Guide Matrix™ 6.7 4 Manage Contact. Edit Contact: update contact information (for more information, see, “Contacts (Add) in the, ”My Matrix” section. Delete Contact: permanently delete this contact. Start CMA: start a CMA for this contact (for more information, see, “CMA (Create)” in the, “My Matrix” section. Open Portal: open this contact’s portal. Open Cart: open this contact’s cart. 5 Expand, “Details” to view contact details. 6 Expand, “Portal Activity” to view a timeline of your contact’s most recent portal activity. Note: includes a maximum of the 40 most recent portal activities (or, past 30 days). Note: a date/time stamp indicates when the activity was initiated. Note: click an, “Activity” link to view that specified action in the Portal. 7 Expand, “Auto Emails” to manage all auto emails created for this contact. Settings: update your contact’s Auto Email settings. Criteria: update your Auto Email Search criteria. Results: display the results sent in this Auto Email. Date Since: display the results since the last time the, “Date Since” link was clicked. Market Update: display the results since the last time the search was run or between a specified date range (i.e. 7/1/2004+, 7/1/2012-7/31/2012 or 0-60). 6 7 Open in Portal: open your contact’s portal. Delete Auto Email: permanently delete this Auto Email. 8 Expand, “Saved Searches” to manage all saved searches created for this contact. 8 Note: for more information, see, “Saved Searches” in the “My Matrix” section. 9 9 Expand, “CMAs” to manage all CMA’s created for this contact. Edit CMA: for more information, see, “CMA (Create)” in the, “My Matrix” section. View CMA: view this CMA (.pdf). 10 Email CMA: email a link to this online CMA (.pdf). Delete CMA: permanently delete this CMA. 10 Expand, “Sent Email” to view all emails sent to this contact. 11 Click a number link to view listings stored in a contact’s cart, favorite, possibility or discarded . bucket 11 16 Quick Start Guide Matrix™ 6.7 Saved Searches 1 From the Matrix navigation menu, hover the, “My Matrix” tab and select, “Saved Searches”. 2 Click, the Saved Search name you would like to managee and select an action. 3 Click, “Settings” to update your Saved Search name, assign the search to a specific contact or add/remove it as a Home Page favorite. 1 2 Note: saved search can also be turned into an Auto Email. Note: a criteria summary may be viewed, but not updated. 4 4 3 Click, “Criteria” to update your Saved Search criteria. Note: for more information, see, “Criteria Search” in the, “Search” section. 5 Click, “Results” to display the results of your Saved Search. Note: for more information, see, “Search Results” in the, “Search” section. 6 Click, “Date Since” to display the results of your Saved Search since the last time the search was run. 7 Click, “Market Update” to display the results of your Saved Search since the last time the search was run or between a specified date range (i.e. 7/1/2004+, 7/1/2012-7/31/2012 or 0-60). 8 Click, “Delete” to permanently delete your Saved Search. 5 7 CMA (Create) 1 From the Matrix navigation menu, hover the, “My Matrix” tab and select, “CMA”. 2 Click, “Start a New CMA” on the Button Bar. Note: see, “My Matrix > CMA” in the “Button Bar” section for a full list st of Button Bar functionality. 1 3 Click Start (default position) to select a CMA Contact. 3 Note: from the dropdown list, you may also change your CMA property type as well as add an optional description in the textbox provided (description will not be visible on the final CMA). 17 Quick Start Guide Matrix™ 6.7 4 Click Pages to select from, “Available Pages”. Note: add Custom Pages (.pdf only) to your CMA by clicking the, “Upload Custom Pages” link located below the, “Available Pages” listbox. By default, 4 you are limited to 5 “My Custom Pages” - each with a maximum file size of 250KB. Only letter size content can be properly accommodated (landscape or portrait). Note: in the, “Available Pages” listbox, click the, “Expand” icon next to a category to reveal the available pages. Alternatively, click the, “Collapse” icon to hide the available pages. Note: in the, “Selected Pages” listbox, select a page, or multiple pages (while pressing the CTRL key), and use the, “Up” and, “Down” icons to reorder page(s) as they will appear in the final CMA. Also note that the final CMA pages are not numbered so they may also be reordered after print. Note: in the, “Selected Pages” listbox, select a page, or multiple pages (while pressing the CTRL key), and use the, “Remove” icon to remove page(s) from the final CMA. Note: click the, “Set as Default” link to set the selected pages as your starting default for all future CMA’s. To restore default pages after removing or reordering pages, simply click the, “Restore Defaults” link. 5 Note: click the, “Clear” link to remove all pages from the, “Selected Pages” listbox. 5 Click Subject to fill Subject Property details from a blank form, a listing number or by searching for a listing. 6 Click Cover to add your contact information, subject photo, agent information and agent logo to the CMA cover. Note: this step will be disabled if no cover sheet was selected in, “Pages”. Note: to include the default, or a custom, agent logo on the final cover, ensure that, “Cover Sheet with Agent Photo was selected in, ”Pages”. 6 18 Quick Start Guide Matrix™ 6.7 7 Click Comparables to add comparables from a search or from a cart. Note: for more information, see, “Criteria Search” in the, “Search” section. 8 Click Map to include a map that displays the location of comparables in relation to the subject property. 7 8 Note: you must first include the, “Map” page, in the, “Pages” section to enable this step. 9 Click Adjustments to adjust a comparable’s feature value. 10 Click Pricing to view a Summary of Comparable Prices and Adjusted Comparable Prices. Note: add a suggested price based on the low, median, average and high comparable values provided (optional). 11 9 Click Finish for a, “CMA Summary” and to view or email your completed CMA. 10 My Listings 1 From the Matrix navigation menu, hover the, “My Matrix” tab and select, “My Listings”. 2 Click the, “Display” dropdown list to select the listing Hit Counters. s. Note: all columns are re-calculated nightly. 2a Client Data 1 Client Portals: the number of portals your listing has reached by Direct or Auto uto Email. Client Views: total number of Full Display views by Clients in their portal. 2 Client Favorites: number of Clients presently marking this listing as a favorite in their portal. Client Possibilities: number of Clients presently marking this listing as a possibility in their portal. 19 Quick Start Guide Matrix™ 6.7 2b Agent Data Auto Emails: number of Auto Email searches presently matching listing. Prev 14 Day Views: number of times this listing has been viewed in the past 14 days. Agent Published: in Concierge mode, the number of Auto Emails that found this listing and was approved/sent by agent. Agent Rejected: in Concierge mode, the number of Auto Emails that found this listing but was rejected/not sent by agent. 3 Click the, “Show” dropdown list to select which of your listing type groups to display. 4 Click the, “Click here to run this as a Full Search” link to display your listings as search results. 4 3 Note: running your listings as a search allows for additional functionality. See, “Search Results” in the, “Search” section for more information. 5 Select a listing and use the Button Bar to perform a task. Note: see, “Button Bar” section for a full list of Button Bar functionality. 6 5 Copy a URL from the “Public Listing Links” section to share your listings to a webpage. 6 Note: an iframe is a perfect way to include your listings in an existing webpage. For example, save, and run, the following text as, “mylistings.html” (be sure, however, to update the iframe src to a URL from your, “Public Listing Links). 1 Settings 1 2 From the Matrix navigation menu, hover the, “My Matrix” tab and select, “Settings”. 2 My Information: update your Roster information as you would like it to appear in the following Matrix features: Information: IIn nffo n orm or rmati atttiion: a atio on: on n: u us used sed ed to to p pre pre-populate re-po re pop po pul pu ulaat ul ate te th te the ffollowing the ollowi oll owing ng Mat Matrix rix features, fe ffea eatu ea ttur ures ur ees, s, cch s, check heeck ecck ck th tthe, he, “O ““Override” “Ov Oveerr Ov errr rriide id dee” ccheckbox d hec he h e kbox to override any associat associated teed d Ros Roster ter in infor information. format mation ion. Cli Click, ck, “S “Save”. Save ave”. 20 Quick Start Guide Matrix™ 6.7 Header & Footer: displayed in reports and auto emails, click, “Select a different package” on the Button Bar to choose a custom or predefined system header/footer package. Select the, “I choose not to use a header/footer at this time” option to not use a header/ footer or select the, “Upload custom header/footer images” option to upload your own. Custom Header (for screen) dimensions: 745px x 85px. Header and footer (for print) dimensions: 670px x 85px. Customize the look and feel of the Client Portal by changing the header background color and text foreground color simply by entering a hexadecimal color manually or by clicking on the associated box to the right. Uploading images for a custom Header/Footer will override your selected predefined system header/footer package (and vice versa). CMA Cover Sheet: manage how you would like your contact information to appear on a CMA cover page. Click on the, “Override” checkbox to override any associated pre-populated information. Click, “Save”. Portal Information: manage, in any order, the Agent information that you wish to display on your Client Portal Welcome page. Click, “Save” on the Button Bar. Email Signature: enter your text, check spelling (optional) then click the, “Save” button to include this signature on all email messages sent, by you, from Matrix. 21 Quick Start Guide Matrix™ 6.7 3 Speed Bar Shortcuts: manage existing Speed Bar shortcuts by clicking on your custom shortcut name. 4 Note: for more information, see, “Speed Bar Shortcut (Create)” in the, “Search” section. 4 Team Settings: manage team members by allowing them to create new listings, send CMA’s, Reports, and email under your identity or just to work on your behalf. Note: customize your team name by entering it in the, “My team name” textbox (optional). 5 Note: team members may switch their identity by hovering, then selecting, their new one in the dropdown beside the, “Logout” link. 5 Custom Displays: from the, “Available Columns” listbox, first select which fields you would like to appear on your custom results display, name your custom display, then click, “Save”. Note: additional columns such as a checkbox, feature icons and listing address can be selected from the, “Special Columns” section. Note: view your custom display by selecting it from the, “Display” dropdown list on the, “Results” tab (see, “Search Results” in the, “Search” section). 6 Custom Exports: from the, “Available Fields” listbox, first select which fields you would like to export, name your custom export, then click, “Save”. Note: download your custom export by selecting your listing(s) in, “Search Results” then click, “Export” on the Button Bar. 7 6 IDX Configuration: short for, “Internet Data Exchange”, add Listings and Search capabilities to your website by inserting an iframe into any existing webpage. 7a From the Matrix navigation menu, hover the, “My Matrix” tab and select, “Settings”. From here, click on, “IDX Configuration”. 7b From the IDX Configuration section, either select the name of an existing IDX page to manage or click, “Create a new IDX page” then add a unique name for the one you would like to create. 7a 22 Quick Start Guide Matrix™ 6.7 7c Form Selection: choose one of the following IDX forms to include on your website. Search: select the, “Search” option then, from the, “Search Form” dropdown list, choose which Search Criteria form to display on your webpage. If available, select how you would like your results displayed by choosing from the, “Display” dropdown list. My Listings: select the, “My Listings” option then, from the, “My Listings Query” dropdown list, which listings to display on your webpage. Map Search: select the, “Map Search” option then, from the, “Search Form” dropdown list, which Search Criteria form to display with the map. 7d Map Area: when including a Map Search IDX on your webpage, specify if you would like to set any search area restrictions or an initial map view. Note: the, “Map Area” section will appear only when the, “Map Search” option (in the, “Form Selection” section) is selected. Do not specify a map area: select this option to remove any restrictions placed on where a user may search on the map. 7d Restrict searches to a specific map area: select this option to restrict users from searching outside the map area that you specify. Click the, “Set Map Area” link to open the map then, from the map, select a shape tool to select an area. Delete the area by hovering over the shape’s red dot then click the, “Delete Shape” link. Your selection also sets the initial map view. Specify an initial map view. Users are free to search outside this area: select this option to set the initial map view. Click the, “Set Map Area” link to open the map then, from the map, select a shape tool to select an area. Delete the area by hovering over the shape’s red dot then click the, “Delete Shape” link. Users may still search outside the selected area. 23 Quick Start Guide Matrix™ 6.7 7e Activation: activate, or disable, the IDX on your website. IDX Enabled: display IDX on your webpage. IDX Disabled: hide IDX from your webpage. HTML: copy and paste the generated <iframe> directly into your webpage. If you’re unfamiliar with coding, simply create a webpage by saving the following example text as, “myidx.html” (be sure, however, to replace the <iframe> with the one that was generated in Matrix). Referring Page: the page that referred visitors to your IDX. 7f Other Options: offers additional IDX functionality depending on which IDX form is selected. Style: when selecting, “Search” or, “My Listings” from the, “Form Selection” step, you are offered the following style options to help integrate the IDX with your website’s color scheme. Click a box to select a color or enter the specific hexadecimal color code. Sign-Up Form: when selecting, “Map Search” from the, “Form Selection” step, you are offered the option to allow users to sign up, from your website, as a new Matrix contact. Select the, “Include Sign-Up Form” checkbox then either use the default sign-up message or write one of your own. 7g Click the, “Preview” tab to display how your Search, Listings or Map IDX will appear on your webpage. 7h Use the Button Bar to delete the current IDX or click, “Save” to create a brand new one. 24 Quick Start Guide Matrix™ 6.7 Stats Stats (Preset) 1 1 From the Matrix navigation menu, hover the, “Stats” tab and select any of the Property Types. 2 Select the, “Presets” tab. 3 Click a Preset statistic link. 4 Select criteria from the, “Search” tab. 2 4 Note: when running a regular search (see, “Criteria Search” in the, “Search” section), click, “Stats” on the Button Bar for a quick way of viewing statistics using criteria that you have already entered. 5 3 5 6 Click the, “Expand” icon to, “Save a Copy” of this Preset (optional). Note: a “Copy of ” Preset will appear under the, “My Presets” heading. Note: customize or add search criteria then save your updated preset (for more information, see, “Stats (Save)” in the, “Stats” section). 6 Click, “Generate”. Stats (Customize) 1 1 From the Matrix navigation menu, hover the, “Stats” tab and select any of the Property Types. 2 Select the, “Customize” tab. 3 Select a, “Time Frame” from the dropdown list. 3 4 Select a, “Statistic” from the dropdown list. 4 5 Click the, “Advanced Options” link to select a, “Secondary Statistic” from the dropdown list. Note: you must first select a statistic before the, “Advanced Options” link is enabled. 6 2 6 5 7 Select a, “Group By” item from the dropdown list. Note: you must first select a statistic before the, “Secondary Statistic” dropdown box appears. 7 Add a, “Chart Style” (optional). 25 Quick Start Guide Matrix™ 6.7 8 Select criteria from the, “Search” tab. 9 8 Note: when running a regular search (see, “Criteria Search” in the, “Search” section), click, “Stats” on the Button Bar for a quick way of viewing statistics using criteria that you have already created. 9 Give your statistic a Name (optional). 10 Click, “Generate”. Note: use Button Bar to print/email statistics as well as clear custom settings. 10 Stats (Save) 1 After choosing a Preset or a Customized stat, select the, “Save” tab. 2 Give your statistic a, “Name” (optional). 3 Check, “Save Search Criteria with Preset” to save the statistic(s) and the criteria together (optional). 1 2 4 3 5 Note: when clicking this from, “My Presets” on the, “Presets” tab, you will have the option of running this with, or without, the saved criteria. 4 Check, “Show on Home Page Stats Widget” to save this statistic for quick access on the Home Page Stats Widget (optional). Note: you must check the, “Save Search Criteria with Preset” checkbox to include this on the Home Page Stats Widget. 5 Click, “Save”. 26 Quick Start Guide Matrix™ 6.7 Auto Email Auto Email (Create) 1 Create a Search and view the results. 3 Note: for more information, see the, “Search” section. 4 2 From the, “Results” or, “Map” tab, click, “Save > New Auto Email” on the Button Bar. 3 Select a, “Contact” from the dropdown list (mandatory). Note: click the, “Create a New Contact” link to add a contact not yet in your address book. 4 Enter a, “Subject” (mandatory). 5 Enter a custom, “Message” to include with each Auto Email (optional). 5 6 7 8 9 Note: if no message is added, Matrix will automatically include a default message, in the email, with the portal link. 10 6 Enable, “Concierge” Mode to approve each listing before they are sent to the client (optional). Note: for more information, see, “Concierge Mode” in the, “Portal” section. 7 Click the, “Make available for Reverse Prospecting” checkbox to allow listing agents to see when their listings have been included in an Auto Email’s results (optional). Note: navigate to, “My Matrix > My Listings”, select the checkbox beside one listing then click the, “Reverse Prospect” button to view information on who has sent your listings in an Auto Email. 8 Click checkbox to, “Enable as a Favorite Search on Home tab” (optional). Note: Favorite Search name will appear as the Auto Email Subject line. 9 “Schedule” when this Auto Email should be sent: ASAP: Emails are sent as soon as possible. Daily: Emails are sent on the days you choose (including AM or PM). Monthly: Emails are sent on the first of the month at midnight. Note: Auto Emails that are not read within a MLS-specified period of time are suspended until reenabled by you (for more information, see, “Auto Emails” under, “Contacts (Manage) in the, ”My Matrix” section). 10 Click, “Save” to create this Auto Email. 27 Quick Start Guide Matrix™ 6.7 Concierge Mode 1 Click checkbox to enable, “Concierge” Mode. Note: when Concierge Mode is enabled, you are no longer able to, “Schedule” when Auto Emails are sent. Note: notification of new listings waiting for approval can be found in the, “Concierge” widget located on the Home Page as well as to the left of the, “Speed Bar” textbox on each page. Note: click the, “Also send me the alert notifications by email” checkbox if you would like to also be notified by email of new listings waiting for approval. 2 Click, “Save; Go to Approvals” to review listings. 3 View if/when a listing has already been sent. 1 Note: listings that have never been emailed to this client display, “Never” while listings that have will display their date sent. 4 Select/deselect single, or multiple, listings to send. Note: for more information, see, “Search Results” in the, “Search” section. 5 2 4 3 Click, “Approve Selected” on the Button Bar. Note: if no listings are selected, the, “Approval” link on the Button Bar will give the option of approving all. 5 28 Quick Start Guide Matrix™ 6.7 Button Bar Button Bar 1 1 Search > Criteria Clear: removes all current search criteria. Count-on-the-fly: displays a real-time number of matches based on the current search criteria. Map: switches view to map and displays listings based on the current search criteria. Search: switches view to results and displays listings based on the current search criteria. 2 Search > Results and Search > Map 2 Criteria: return to the, “Criteria” tab. Email: email the selected listings. Print: print the selected listings or create a .pdf. CMA: use the selected listings as comparables in a CMA. Directions: create custom, turn-by-turn driving directions using the selected listings. Stats: quickly create chart stats using the selected search criteria. Export: export the selected listings as one of several different file types (for more information, see, “Custom Exports” in the, “My Matrix” section). View as: select a name from the dropdown list to display which listings, if any, have already been sent to that particular contact. Narrow: displays only selected listings (click the, “Original Results” breadcrumb link (located beneath the Speed Bar) to return all listings). Discard: removes selected listings (click to undo this action). Sort: sort listings by field order (unavailable on Map tab). New Saved Search: save your search criteria to use again for a general search, or for a specific contact. You may also include your search as a favorite on the, “My Favorite Searches” Home Page widget. Access all saved searches under, “My Matrix > Saved Searches”). New Auto Email: automatically send listings, based on selected search criteria, to a specific prospect at scheduled times. New Speed Bar Shortcut: create a custom Speed Bar shortcut, based on selected search criteria, to use for quick search results. Add to: add selected listing(s) to cart displayed in the dropdown list. View: view the listing(s) of the cart displayed in the dropdown list. 29 Quick Start Guide Matrix™ 6.7 Button Bar 1 My Matrix > Contacts 1 Add: add a new contact. Set Inactive: set selected contact(s) to inactive. You may not deactivate a contact with active auto emails. Delete: permanently delete selected contact(s) and their history. Show (X) Active: display only active contacts (disabled when already viewing active). Show All (X): display all active and inactive contacts (disabled when no inactive contacts). Show (X) Inactive: display only inactive contacts (disabled when already viewing inactive or when there are no inactive). Import: import a contact .csv file created with Matrix Contact Export. Export: export selected contact(s) to a .csv. 2 My Matrix > CMA Start a New CMA: create a brand new CMA. Copy the selected CMA : make an exact copy of one selected CMA. Delete the selected CMAs: permanently delete selected CMA(s). 3 2 My Matrix > My Listings Note: select a listing to enable Button Bar functionality. 3a Edit: edit the selected listing (see, "Listing (Edit Existing)" in the, "Input" section for more information). 3b Manage Photos: add, remove or re-order listing photos (see, "Photos and Supplements (Add New)" in the, "Input" section for more information). 3c Manage Supplements: add, remove or re-order listing supplements (see, "Photos and Supplements (Add New)" in the, "Input" section for more information). 3d Share: copy the URL to display the selected listing, for example, on a webpage or, perhaps, your favorite social media site. 3 30 Quick Start Guide Matrix™ 6.7 3e Reverse Prospect: view agents with clients who have been sent Direct, or Auto, Emails that include your selected listing. Agent Name: click the Agent's name to send them an email from Matrix. Ref #: this is the reference number that the listing agent may use to identify which client received the selected listing. The recipient's agent can find this reference number under, "My Matrix > Contacts". Pre-approved: displays a checkmark if the contact has Mortgage Preapproval. Note: flags can be set for each contact (for more information, see "Contacts (Add)" in the "My Matrix" section). Count: indicates the number of listings returned in a search that match the client's criteria. Email address: click the Agent's email address to send an email from your default mail client. Date Sent: indicates when the contact was notified of the listing. File Folder Icons: displayed if the referenced contact flagged listing as a Favorite displayed if contact flagged listing as a Possibility Note: if the contact discarded the listing—that contact's Agent and Reference Number row will not appear in Reverse Prospecting 31 Quick Start Guide Matrix™ 6.7 Input Listing (Add New) 1 1 From the Matrix navigation menu, click the, “Input” tab. 2 Click the, “Add new” link. 3 Choose the appropriate Property Type form. 4 Choose how to fill the Property form. 3 2 Fill From Existing Listing: fill the form from an existing listing. Search by listing number or search for a preexisting Cross Property listing from which to Fill (for more information, see, “Criteria Search” in the, “Search” section). 4 Fill From Tax: fill the form using information such as a tax number. If multiple tax results are returned, simply select which tax year you would like to fill from. Start with a blank listing: fill the form beginning with empty fields. 5 Using the Input Wizard, fill the Property form as required. Note: input wizard section names may vary depending on the Matrix system. Note: all Matrix Input fields highlighted in yellow are mandatory and must be completed before you are able to submit the listing. 6 Select a Status. In some systems, under, “Status” on the Input Wizard, you may have the option of submitting your listing as, “Active” or “Incoming”. Both statuses each have their own unique required fields that must first be filled before a listing can be successfully submitted. 5 6 Note: select, “Active” (the default) if, after clicking the, “Submit Listing” button, you would like your listing to appear immediately on the system. You will then have the option to add photos and/or supplements to your listing (see, “Photos and Supplements (Add New)” in the, Input section). Note: select, “Incoming” if you would like to generate a Listing Number before your listing appears on the system. After clicking the, “Submit Listing” button, you will then have the option to add photos and/or supplements to your listing. Because listings submitted as, “Incoming” generate a listing number, they cannot be saved to your, “Work Area”. “Incoming” listings can be updated to, “Active” at any time. 33 Quick Start Guide Matrix™ 6.7 7 Map your listing. Under, “General” on the Input Wizard, map a listing by address, LINC Number or by placing the pin manually on the map. Regardless of which option you choose, always visually verify that the map pin is placed directly over where your listing is located (see, “Manually” below). On Address: once an address been entered either manually or, in some systems, auto filled from a street dictionary, click the, “Map Address” (or similar) link to map the pin with the listing. On LINC Number: enter the LINC number (available in some systems) then click the, “Geocode on LINC/address” link to map the pin with the listing. 7 Manually: click the, “Set Lat/Long manually” (or similar) link then, after the map pop-up displays, zoom in for an aerial view (using either the mouse wheel or the zoom icons). To place the pin, simply left click, with the mouse, on the property. Google Street View: click the, “Choose Google Street View” (or similar) link then, after the map pop-up displays, use the Google Map directional arrows to choose the best view of your listing. Click, “OK”. 8 When applicable fields have been filled, either click, “Save to Work Area and Quit” (see, “Work Area” in the, “Input” section) or “Submit listing” on the Button Bar. 8 Note: If any errors exist when trying to submit a listing (such as, empty required fields), they will be indicated by an, “Alert” icon in the, “Input Wizard” Button Bar. To resolve, simply click the offending step and correct the error. Photos and Supplements (Add New) 1 2 From the Button Bar, click, “Add/Edit Photos” to add listing photos. Click the, “Browse” button to locate the listing photos on your hard drive then drag your cursor over multiple images (or CTRL and click individual images) to select the ones you would like to upload. 1 5 2 Note: maximum number of photos vary depending on your system. Note: for best quality, upload photos that are at least 1024x768 pixels. 34 Quick Start Guide Matrix™ 6.7 3 Once listing photos have uploaded, click any thumbnail to enlarge the image and add a photo description (optional). Click the, “Done” link when finished, followed by, “Save” on the Button Bar. Note: thumbnails outlined in red indicate lower than recommended dimensions. 4 Click and drag the thumbnail, “Slot: [#]*” to reorder the photos as they will appear in the listing. 3 Note: the, “Primary slot” indicates which image will display as the Primary photo on the listing. 5 6 From the Button Bar, click, “Add/Edit Supplements” to add listing supplements (also known as, “Attachments”). 6 Enter a, “Supplement Description”, choose a, “Supplement Type” then click the, “Browse” button to locate the listing supplement on your hard drive. Click the, “Upload” button to upload this supplement to the listing. Note: the combined total file size varies depending on your system. 7 Once the final supplement has been uploaded, click, “Save” on the Button Bar. Listing (Edit Existing) 1 From the Matrix navigation menu, select the, “Input” tab. 7 2 Choose a listing to edit either by clicking the, “Edit existing” link, by selecting a listing from the dropdown list or by entering a listing number in the textbox. 3 Select which part of the listing to edit. 1 Note: click the Property Type link (i.e. Residential, Commercial etc.) to edit any of the fields from the listing. Note: click the, “Manage Photos” link to update listing photos. 2 3 Note: click the, “Manage Supplements” link to update listing supplements. 4 4 When your listing has been updated, click, “Submit listing” on the Button Bar. Note: since your listing already has a number, you will not have the ability to save your listing to the Work Area. Note: If any errors exist when trying to submit a listing (such as, empty required fields), they will be indicated by an, “Alert” icon in the, “Input Wizard” Button Bar. To resolve, simply click the offending step and correct the error. 35 Quick Start Guide Matrix™ 6.7 Work Area The work area is a great place to save a partial listing (to be completed at a later time or, perhaps, used as a template). For example, if there is a building complex with multiple units that share similar features (such as address, bedrooms, square footage etc.), then you may wish to complete the form as much as possible, save it to the Work Area (before submitting it) then use it each time a new unit listing in this complex needs to be created. 1 1 From the Matrix navigation menu, click the, “Input” tab. 2 Click the, “You have [number of] saved Items in your work area” link. 3 Click the saved listing that you would like to work with. 2 Note: delete listings from the Work Area by clicking the, “Delete” 4 3 icon. Continue filling in the required fields and, when complete, either re-save the updated form to your Work Area or submit the listing. Note: if your listing status is set to, “Incoming” you will not have the ability to save your listing to the Work Area (see. “Listing (Add New) > “Select a status” in the, “Input” section). 36 Quick Start Guide Matrix™ 6.7 Matrix Mobile Matrix Mobile is designed as a light, versatile solution to quickly access the system’s most essential functions. Note: custom settings from the desktop version of Matrix are automatically transferred to Matrix Mobile. Use the following icons to navigate through the sections: 1 1 Home Page Next Item Last Page Previous Item 1 1 To access Matrix Mobile, navigate to the Matrix Mobile Login page then enter your, “User ID” and “Password”. Note: click the, “Matrix Desktop” link to access additional Matrix features and functionality from the full version of Matrix. Speed Bar 1 Enter Speed Bar shortcut criteria to quickly find listing, or roster, information from the Matrix database. 3 1 Note: shortcuts will automatically populate the Speed Bar following each search created from the, “Search” page. 2 News 1 From the Home Page, select, “News” to view recently posted news items. Search 1 From the Home Page, select, “Search” to enter search criteria for a variety of property types. 2 Select a Property Type to search. Note: click the, “Recent Searches” link, at the bottom of the page, to view a list of your most recent searches. 3 Enter your Search Criteria, scroll to the bottom of the page and click the, “Search” button. Note: in the, “Area” textbox, enter an area name such as, “Los Angeles Southwest” (or its numeric equivalent, “C34”). To search multiple areas, simply separate values using a comma (i.e., “C34, 276” or, “Los Angeles Southwest, Highland”). Note: click the, “Calendar” icon to add a date, or date range, to your search. Note: expand any panel with a, “Open” icon to enter additional Search Criteria. 37 Quick Start Guide Matrix™ 6.7 4 Click the, “Email All” link to send all listings to one, or more, recipients. Note: separate email addresses, in the, “To” textbox, with a comma. Note: enter a mandatory email subject line. 5 Click the, “Map” icon link to view all listing results on the map. Note: by default, only results of less than 100 listings will display on the map. 4 5 Note: on the map, click the, “down” arrow to reveal map display options. Note: on the map, click a listing pin to view the listing details. 6 Select a listing to view the listing details and functions. 7 Click a listing function. 6 8 Email: click the, “Email” button to email this listing to one, or more, recipients. 7 Cart: click the, “Cart” button to add this listing to a cart. Map: click the, “Map” button to view where the listing (identified by the large icon) is located on a map. 8 Click the primary, “Listing Photo” to display all listing images. My Matrix 1 From the Home Page, select, “My Matrix” to access client information and settings. 2 From the, “My Matrix” page, click, “Contacts” to view a contact’s details (including, saved “Auto Emails”, “Saved Searches” and client portal preferences). 2 1 Note: from the, “Contacts” page, click the, “Add New” link to add a new contact. 3 From the, “My Matrix” page, click, “Saved Searches” to view any saved searches. Note: select a saved search to view the results or change its criteria. 4 From the, “My Matrix” page, click, “Auto Emails” to view the auto emails you have created. Note: select an auto email to view the results, change the criteria or display the new listings since the last time you ran this search. 3 4 38 Quick Start Guide Matrix™ 6.7 5 From the, “My Matrix” page, click, “My Listings” to view your listings. Note: select a listing to view the listing details and functions. 5 1 Carts 1 From the Home Page, select, “Carts” to view a list of all current carts. Note: a cart is automatically created each time a new contact is added to the system. Note: see #7, under, “Search” in the Matrix Mobile section, to add a listing to a cart. Hotsheets 1 From the Home Page, select, “Hotsheets” to view the Hotsheet for each property type. 1 Note: a customized Hotsheet can only be created from within Matrix. Note: see #3, under, “My Matrix” in the Matrix Mobile section, to access a Hotsheet that you may have saved as a custom saved search. 1 Concierge 1 From the Home Page, select, “Concierge” to view all auto emails with listings waiting for your approval. Note: the concierge option, highlighted in yellow, will only appear if there are listings currently waiting for approval. 2 2 Approve all listings in an Auto Email by clicking the, “Approve All” link or access listings to, “Reject” by clicking the, “[number of] listings” link (i.e., 13 listings). Note: to reject a specific listing, select the listing then click the, “Reject” button. Note: once all rejected listings have been discarded, click the, “Approve and Send All” link to send all remaining listings to your Auto Email recipient. 39 Quick Start Guide Matrix™ 6.7 Notes ___________________________________________________________________________ ___________________________________________________________________________ ___________________________________________________________________________ ___________________________________________________________________________ ___________________________________________________________________________ ___________________________________________________________________________ ___________________________________________________________________________ ___________________________________________________________________________ ___________________________________________________________________________ ___________________________________________________________________________ ___________________________________________________________________________ ___________________________________________________________________________ ___________________________________________________________________________ ___________________________________________________________________________ ___________________________________________________________________________ ___________________________________________________________________________ ___________________________________________________________________________ ___________________________________________________________________________ ___________________________________________________________________________ ___________________________________________________________________________ ___________________________________________________________________________ ___________________________________________________________________________ ___________________________________________________________________________ ___________________________________________________________________________ ___________________________________________________________________________ 41 Quick Start Guide Matrix™ 6.7 FOR MORE INFORMATION PLEASE VISIT MARKETLINX.COM/MATRIX/HELPME © 2014 CoreLogic, Inc. All rights reserved. CORELOGIC, the CoreLogic logo, MATRIX, REALIST and REALAVM are trademarks of CoreLogic, Inc. and/or its subsidiaries. In Canada, the trademarks MLS®, Multiple Listing Services® and the associated logos are owned by The Canadian Real Estate Association (CREA) and identify the quality of services provided by real estate professionals who are members of CREA. 19-MATRIXQSG-6.7-0314-00 corelogic.com