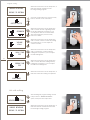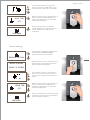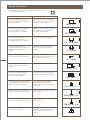
1
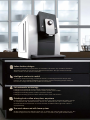
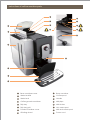
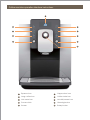
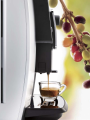
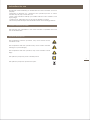
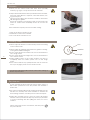
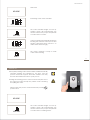
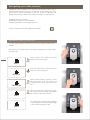
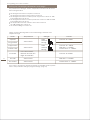
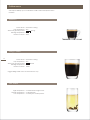
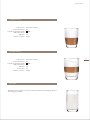
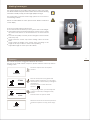
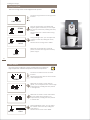
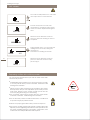
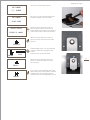
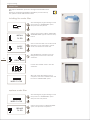
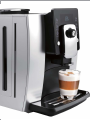
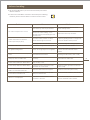
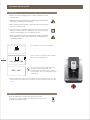
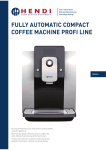
Fully Automatic Coffee Machine
OPERATION MANUAL
Item No. 981010001
Italian fashion designs
Once more excellent explanation of minimalist, abandon any worthless elements.
With brief outlines, shows the most graceful fascination. Not just coffee machine,
what’s more, it is the actor of fashion.
Intelligent one touch control
As science and technology combines fashion, everything becomes simple and
perfect. The humanized intelligent touch-screen, make everything simple. With just
one touch, enjoy the aroma of coffee in a moment.
Full-automatic technology
Intelligent pre-brewing system makes coffee more aroma.
Intelligent temperature control system makes quality more stable.
Intelligent reminding system makes operation simpler.
Intelligent cleaning system makes maintenance more convenient
Grinding fresh coffee at anytime, anywhere
In the office tea room, hotel’s business center. In the airport departure lobby, lounge
of conference hall, private kitchen, and so on. Wherever you are, it means more
professional and convenient. In a few seconds, traditional fresh ground coffee is
enjoyed freely.
The most advanced milk foam system
Makes milk foam more delicate and soft, to create the ultimate silky taste for you. No
matter Cappuccino or Coffee latte, Just as if it’s made by the gold medal barista.
Instructions of coffee machine parts
7
12
1
8
13
9
14
10
15
2
16
3
11
4
5
6
1
Bean container cover
9
Bean container
2
Water tank lid
10
Coffee spout
3
Water tank
11
Handle
4
Coffee grounds container
12
Milk pipe
5
Drip tray
13
Milk frother
6
Drip tray grid
14
Hot water spout
7
Powder container cover
15
Milk and cream spout
8
Grinding wheel
16
Power cord
Coffee machine operation interface instructions.
5
READY
1
6
2
7
3
8
4
9
10
1
Espresso icon
6
Cappuccino icon
2
Long coffee icon
7
Coffee Latte icon
3
Hot water icon
8
Hot milk/cream icon
4
Power switch
9
Cleaning button
5
Screen
10
Rotary button
Fully Automatic Coffee Machine
OPERATION MANUAL
Safety Instructions
Please see specification label on the bottom of coffee machine or specification
parameters indicated in instruction manual(P53).
Precautions
● Please do not contact with heat parts of coffee machine to avoid scalding.
● To avoid operator’s injury caused by burn, electric shock or other unexpected
reasons, please do not contact the power cord, plug, and main body with
water.
● Children shall operate the machine under the supervision of adults.
● Please keep various packages, cartons, plastic bags and Styrofoam away
from children’s reach.
● Unplug from outlet when stop using and before cleaning. Allow to cool
before disassembling and cleaning the coffee machine.
● Stop using the machine once power cord or plug is damaged. Take the
machine to authorized after-sale service center for testing and repairing.
● Use of parts that are not explicitly recommended would result in a fire of
coffee machine, electric shock, or injury to persons.
● Please do not use the machine outdoor.
● Please do not hang up the power cord to the edges of the table, for it might
be abased to an electric leakage, and cause injury to operators.
● Please place the machine in a fixed and stable workbench, and keep far
away from high temperature (e.g. gas stoves, electric cookers, induction
cookers, etc).
● Power off the machine, until the cleaning program finished and no
indication on screen, and then unplug the power.
● When using espresso, long coffee and hot water, liquid in high temperature
will flow from coffee spout and hot water spout. Please do not touch it to
avoid scalding.
● When using cappuccino, coffee latte, hot milk/cream, please confirm that
the milk pipe has been connected from the milk frother to milk before
making cappuccino, coffee latte, and hot milk/cream. Otherwise, high
temperature steam may cause personal injury.
Warnings
Never disassemble and repair the machine without authorization. If there is
any errors, please sent it to authorized service center for repairing.
Prohibitions
Except cleaning and daily maintenance for coffee machine, if it failures,
please send it to authorized after-sale service center for repairing, or contact
with customer service for after-sale services.
● Never immerse the machine into water, and do not put the machine near
the water tap or water tank.
● Never disassemble coffee machine without authorization, for any maintenance,
please return it to Service Centre or contact after-sales service center.
● Never use an unmatched voltage to the electric specification of the
machine; otherwise, the machine would be burnt.
● Only purified water in room temperature is allowed to be filled into the water
tank. Never put warm water, hot water, milk or other liquid into it.
● Never carry or move the coffee machine while working. For moving or
carrying the coffee machine, please switch it off and unplug the power
cord first.
● The machine may release heat. Therefore, when placing the machine in the
workbench, at least 3cm must be left against its surface, sides and wall side;
at least 15cm must be left against its top. Prohibit placing the machine into
a narrow space. As for dimension of the machine, please look up the
Technical Data of User Manual (Page 53).
3
Safety Instructions
● Never use non-family usage detergent to wipe the machine, otherwise it
may cause corrosion of coffee machine, and result in a risk of electric shock.
● Never use wet rag to wipe coffee machine, may result in a risk of electric
shock.
● Never use hard edged tool or rough rag to clean the stain on the machine,
it will damage the machine. To wipe the coffee machine with a rag
provided is recommended.
● Never put instant coffee powder or cocoa powder and other mixture into
the bean container or powder container. It would cause coffee machine
damaged.
● Never fill specially treated coffee bean (e.g. cocoa, sugar coated) into the
bean container, it would cause coffee machine damaged.
● Only roasted coffee bean is allowed to put into the bean container. Rice,
soybean, chocolate bean, nut, sugar, spice etc are prohibited. Otherwise it
would cause coffee machine damaged.
● Never wash bean container or powder container with water, it will damage
the machine.
● Never use coffee machine in the environment temperature below 0 °C.
Water inside the machine will freeze and cause the coffee machine
damaged.
● Never expose the machine in rainy, snowy, frosty environment. It would
cause coffee machine damaged.
If the coffee machine is damaged because of the situation that has
been warned above, it is not covered in the warranty!
Proper operation
4
To guarantee the coffee taste, make sure that temperature of the water filled
into the water tank is at 25℃ or so.
Coffee machine can only be used for preparing coffee, hot milk, milk foam,
and hot water. Do not use it for any other intended use. We will not in charge
of any responsibility for the consequences of improper use. Please carefully
read all the contents of this manual, so that you can know the coffee machine
sufficiently.
Please keep this manual properly for looking up at any time.
Safety Tips
Please notice the following tips to avoid personal injury from electric shock.
● Do not operate the coffee machine if the appliance or the power cord is
damaged.
● When encountering breakdowns of the machine (if any burning smell or
smoke), unplug the power cord immediately and contact with service
center.
● If the power cord coffee machine is damaged, please contact with service
center.
● Place the coffee machine and the power cord far away from heat sources.
● Please don't contact power cord with sharp tools.
● Do not repair the coffee machine without authorization or operate it in the
way that was not mentioned in this manual, to avoid personal injury.
● Place the coffee machine out of the reach of children.
● When Coffee machine is unused for long periods, unplug the power cord
and put it away, so that not to trip up people or damage to the power cord.
● Please don't use unoriginal parts, otherwise, it may cause the machine
damaged.
Instructions for use
Reading this manual will help you familiar with the coffee machine, and use it
properly.
“Instruction for first-time use " introduces the operation process of coffee
machine step-by-step, for first-time use.
“Know coffee machine" will help you familiar with the coffee machine, and
enjoy using it.
“Coffee menu " will guide you how to prepare all kinds of coffee.
“Encounter problem" will provide information when encountering problems.
Coffee machine model
This Manual is only applicable to the coffee machine of QUARZA series and
the model 980101001.
Symbol description
Non-compliance with the operation, may cause electric shock,
and threat to life.
Non-compliance with the operation may cause Coffee machine
damaged, or personal injury.
Non-compliance with the operation, may cause scalded or burn
injury.
This symbol, if prompted, please carefully read it.
5
This symbol, if prompted, represents recycle.
Catalogue
Safety Instructions
3
Proper usage
4
Instructions for use
5
Coffee machine model
Symbol description
Instructions for first time use
5
8
Standard configuration
8
Power connection
8
Testing and setting water hardness
8
Fill water tank
9
Installing water filter
9
Fill beans
10
Grinding wheel
10
First-time use
10
Power on
11
Power off
Recognizing your Coffee machine
12
14
Preparing coffee by touch icon
14
Single time setting of coffee parameters
15
Setting beverage parameters and scopes
6
5
16
Coffee menu
18
Making beverages
21
Espresso
21
Long coffee
22
Hot water
22
Cappuccino
23
Coffee Latte
24
Hot milk
25
Hot cream
26
Preparing coffee with coffee powder
Program setting
26
29
Maintenance setting
29
Beverage setting
29
Water filter
34
Adjusting the water hardness setting
35
Energy-saving setting
35
Automatic power off
36
Reset
37
Information
37
Language
38
Exit
Cleaning and maintenance
39
41
Cleaning the coffee machine before operation
41
Cleaning brewing unit
41
Descaling the coffee machine
42
Cleaning coffee grounds container and drip tray
44
Cleaning water tank
45
Cleaning bean container
45
Catalogue
Dismantling and cleaning the milk frother
Cleaning coffee machine
46
46
Display information
48
Failures handling
49
Transport and recycle
50
Technical data
51
7
Instructions for first-time use
This chapter will help you to know the basic operations and settings for your
first time use
Standard configuration
● Full-automatic coffee machine
● Accessory bag
● User manual
● Warranty card
● Wiping cloth ×1
● Water hardness test paper ×1
● Descaling powder ×1
● Coffee powder spoon ×1
● Milk pipe ×2
● Packing box
● Styrofoam packing materials
● Plastic PE bag
Do not discard all the boxes of the coffee machine, in case to use them again
to prevent the coffee machine damaging during transportation.
Power conection
8
● Place the coffee machine on a stable workbench that is not
close to water.
● Keep the coffee machine far away from high temperature
heat source.
● Be sure to use power supply that is in accord with regulation.
● Put the power cable at a suitable place to avoid people
tripping over.
Plug the power cord in the patch board.
Testing and setting water hardness
● The harder the water is, the higher frequency the coffee
machine need descaling.
● You need to re-test the hardness of water once you change
the water resource. If the water hardness setting on the
coffee machine does not match the actual water hardness,
it will not give a good taste of coffee, or even damage the
machine.
1: Take out the water hardness test paper from the accessory
bag.
2: Put the testing part in the water for 5 seconds.
3: Take out the paper from water, and observe the color. Then
set the water hardness number according to the contrast
card. Please refer to P37 for water hardness setting.
Water hardness test
5 sec.
0
25
1
50
2
120
3
250
425
4
1:
2:
3:
4:
10 sec.
Water hardness contrast card
Reaction time
10 S mg/L
0
25
50
120
250
425
First-time use
Fill water tank
● Only purified water at room temperature is allowed to fill in
the water tank, never fill any other liquid (e.g. warm water,
hot water, milk). It will damage coffee machine. In order to
ensure the taste of coffee, it is recommended to use water at
25℃ or so. Low temperature water will not make a good
taste.
● To ensure healthy and the taste of coffee, please change
the water in the tank every day.
● The amount of water in the water tank cannot exceed the
height of the MAX mark.
1. Open the water tank lid.
2. Take out the water tank.
3. Fill the water tank with purified water at room temperature,
and insert the tank back to the machine.
4. Cover the water tank lid.
1
2
3
9
Insert the water filter
● Do not stop water filter cleaning process, thus ensuring the
water filter is well cleaned and pre-brewing, and reaching
the best effect of filtering.
● After 2 months use, the water filter will lose efficacy. There is a
month indicator on the water filter. Please adjust the rotary
button to the month when you insert the water filter.
● Please use the original model of water filters. If you need to
buy one, please contact the authorized service center.
Water filters can effectively filter impurities in the water and
● reduce the degree of water hardness. If you use a water
filter, your appliance needs no descaling.
1. Adjust the date rotary button at the top of water filter to the
current month.
2. Insert the water filter into the water tank.
1
2
3
First-time use
Fill beans
● Never put the coffee beans that have been specially
treated (e.g. sugar, cocoa) into the bean container.
● Only roasted coffee beans can be put into the bean container,
never put others like rice, soybeans, chocolate beans, nuts,
sugar, and spices.
● Never put hard objects into the bean container, otherwise it
will damage the grinder.
● The bean container cover playing a role as seal. It keeps the
aroma of coffee bean maximally. Please do not lose the
cover.
● The maximum capacity of bean container is 250g
1. Take off the bean container cover.
2. Add beans to the bean container.
3. Put on the bean container cover.
Grinding wheel
10
● Please adjust the fineness of coffee bean powder according
to the coffee beans.
Fine
● Please adjust the grinding wheel when the grinder is running,
or the grinder will be damaged.
● If your coffee beans are in dark color, it is recommended to
set to rough mode.
● If your coffee beans are in light color, it is recommended to
set to the fine mode.
● During making coffee, if the coffee outflows very slow or
completely does not outflow, please set it to the rough
mode.
● If the coffee outflows very quickly and the color of crema on
the top is very light, please set it to the fine mode.
Medium
The fineness adjustment will come into effect after making at
least 2 cups of coffee.
First-time use
● As the machine has been tested at factory, there may be a
little coffee powder left over. We promise the machine is
brand new.
● The coffee machine will start self-testing and cleaning at the
first-time use, this helps the coffee machine to achieve the
best working condition, and this process cannot be skiped.
● During the cleaning process, some hot water will outflow
from the coffee spout into the drip tray. Please pay attention
to avoid contacting with the spilling hot water, not to be
scalded.
Please ensure the power is connected, and then press
the power button.
Rough
First-time use
Welcomes
WELCOME
Self-testing of the coffee machine
SELF TESTING
HEATING
CLEANING
The coffee machine begins to heat up.
Heating system will automatically stop
when it reaches the proper temperature
to make coffee or steam.
Coffee machine automatically cleans the
brewing unit and both coffee spouts after
heating (Automatic-clean process is to
make coffee fresh enough).
The coffee machine is ready to make
coffee after cleaning.
READY
11
Power on
● Every time powering on the coffee machine, it will automatically
complete heating and cleaning for one time, and the
process cannot be stopped. The coffee machine can only
be used after finished the above cycle process.
● During the cleaning process, some hot water may flow out of
the coffee spout into the drip tray. Please avoid contacting
the spilling hot water.
Please ensure the power is connected before pressing
power button.
WELCOME
HEATING
The coffee machine begins to heat up.
Heating system will automatically stop
when it reaches the proper temperature
to make coffee or making steam.
First-time use
Coffee machine automatically cleans the
brewing unit and both coffee spouts.
(Automatic-clean process is to make the
coffee fresh enough).
CLEANING
The machine is ready. Please begin to
make coffee
READY
Power off
● Every time when powering off the coffee machine, it will
automatically complete cleaning process for one time, and
the process cannot be stopped. This operation is to clean up
the coffee pipelines and remove the coffee grounds.
● During the cleaning process, some hot water will flow out of
the coffee spout into the drip tray. Avoid touching spilt hot
water, so as not to be burned.
When you press
power button, the machine will be
power off after auto cleaning.
12
Cleaning coffee machine
CLEANING
GOODBYE
When “goodbye” is displayed, it means
cleaning process has been completed,
and the coffee machine is being switched
off.
READY
Recognizing your coffee machine
Owning the coffee machine, you need just one touch to get a cup of
perfect coffee instantly. Moreover, you can also set the fineness of coffee,
the volume of coffee, the volume of milk, the volume of milk foam, the
temperature and the volume of hot water according to your preference.
● Making coffee by touch icon
● Single time setting of coffee parameters
● Default parameters of beverage can be set
Press the rotary button to stop making of beverage.
Preparing coffee by touch icon
You can make any kinds of coffee by touch icons, when the screen shows
“READY”
READY
Take espresso and cappuccino for example to explain how to make coffee
by touch icons.
Touch espresso icon, when the screen
indicates as the left picture.
14
READY
Press the rotary button, when the screen
indicates as the left picture.
ESPRESSO
ESPRESSO
CAPPUCCINO
When screen indicates "espresso", touch
the cappuccino icon. The screen will
change to the content of picture on the
left.
When screen shows "cappuccino", touch
the cappuccino icon again. It will display
the content of picture on the left.
READY
READY
No operation in 10 seconds after touching
any beverage icon, the screen will change
to the content of picture on left.
READY
Recognizing your coffee machine
Single time setting of coffee parameters
8 items as bellow can be set at single time.
●
●
●
●
●
●
●
●
Set the amount of coffee beans during grinding process.
Set the volume of coffee when making coffee
Set the making time of milk foam when making cappuccino
Set the making time of milk when making latte
Set the temperature of hot water before making hot water
Set the hot water volume when making hot water
Set the making time of hot milk when making hot milk
Set the making time of hot cream when making hot cream
Detail instructions
You can set the fineness of coffee and the volume of beverage before or
during making the beverage at single time, the setting will not be saved.
Change default setting, please refers to the parameter settings(P31)
STRONG
When grinding the coffee beans, you can
rotate the rotary button to adjust the amount of
coffee beans, to left is mild
strong
, and to right is
. The default value is normal
.
VOLUME
CREAM
MILK
40ML
30S
30S
When making cappuccino, milk foam making
time can be adjusted by rotating the rotary
button while milk foam outflows. For example
the current time is 20SEC,2 cells to left to
reduce to 19SEC, and 2 cells to right to
increase to 21SEC.
When making cappuccino, milk foam making
time can be adjusted by rotating the rotary
button while milk foam outflows. For example
the current time is 20SEC,2 cells to left to
reduce to 19SEC, and 2 cells to right to
increase to 21SEC.
When making coffee latte, milk making time
can be adjusted by rotating the rotary button.
For example, the current value of milk making
time is 20SEC, 2 cells to left to reduce to
19SEC, and 2 cells to right to increase to
21SEC.
Before making hot water, the temperature can
be adjusted by rotating the rotary button. To
left is low, to right is high. The default temperature is
normal.
NORMAL
VOLUME
MILK
CREAM
60ML
When making hot water, the hot water volume
can be adjusted by rotating the rotary button.
For example, the current volume is 150ML, 2
cells to left to reduce to 145ML, and 2 cells to
right to increase to 155ML.
20S
When making hot milk, hot milk making time
can be adjusted by rotating the rotary button.
For example, the current time is 20SEC, 2 cells
to left to reduce to 19SEC, and 2 cells to right
to increase to 21SEC.
20S
When making milk foam, milk foam making
time can be adjusted by rotating the rotary
button. For example, the current time is
20SEC,2 cells to left to reduce to 19SEC, and 2
cells to right to increase to 21SEC.
15
Recognizing your coffee machine
Setting up beverage parameters and range
The parameters as strength, volume, temperature and time can be set for
the beverages bellow.
● The strength and volume of espresso can be set
● The strength and volume of long coffee can be set
● The strength and volume of coffee part in cappuccino can be set. Milk
foam making time can be set
● The strength and volume of coffee part in latte can be set. Milk and milk
foam making time can be set
● The temperature and the volume of hot water can be set
● Hot milk making time can be set
● Hot cream making out can be set
Please read the following table for the detail setting parameters and
adjustment range
Drinks
espresso
long coffee
cappuccino
coffee Latte
16
Temperature
Strength
Volume
Around 80℃
Mild:
Normal:
Strong:
Volume: 25 -120ML
Around 60℃
Mild:
Normal:
Strong:
Volume: 25 - 240ML
Milk time: 3 - 120SEC
Cream tiem: 3 - 120SEC
Volume: 25 - 240ML
hot water
Low: around 60℃
Normal: around 70℃
High: around 80℃
hot milk
Around 40℃
Milk time: 3 -120SEC
hot cream
Around 50℃
Cream time: 3 -120SEC
If you want to change the default parameters for detailed method, please
refer to the parameter settings in program settings. (Page 31)
Volume: 25 -450ML
Coffee menu
This chapter will help you to make kinds of milk coffee with Quarza coffee
machine.
Espresso
Coffee bean:
Cup temperature:
Amount of ground powder:
Brewing temperature:
Volume of coffee:
Moderate roasting
55℃
Strong
93℃
50ML
Long Coffee
18
Coffee bean:
Cup temperature:
Amount of ground powder:
Brewing temperature:
Volume of coffee:
Moderate roasting
55℃
Normal
93℃
100ML
Suggest filling 100ML more hot water into the cup.
Hot water
High temperature: To make black tea/green tea
Normal temperature: To drink directly
Low temperature: To make juice or milk powder.
Coffee menu
Cappuccino
Coffee bean:
Cup temperature:
Amount of ground powder:
Milk temperature:
Milk time:
Volume of coffee:
Moderate roasting
55℃
Mild
10℃
15S
100ML
Coffee Latte
Coffee bean:
Cup temperature:
Amount of ground powder:
Milk temperature:
Milk time:
Cream time:
Volume of coffee:
Moderate roasting
55℃
Mild
10℃
15S
15S
100ML
Hot milk
The milk can be heated up to the perfect temperature for drinking without
destroying the nutrition.
19
22
PHOTO
Making beverages
This chapter instructs you making various kinds of coffee, hot water,
hot milk and milk foam by this coffee machine. Please read the following
instructions carefully to help you make high-quality beverages.
The temperature of the hot water is high, please do not touch it to
avoid being scalded.
Before we make all kinds of coffee, please ensure “READY” is indicated
on the display.
READY
● Never use dark roasted coffee beans.
● The coffee beans should be put at dry place and avoid sunlight.
● Only purified water at normal temperature can be used. To make
the coffee taste better, it is recommended to use water around
25℃.
● To ensure the quality of coffee, please change the water in water
tank every day.
● Please warm the coffee cup before making coffee for better
taste.
● Please adjust the height of the coffee spout according to the
height of the cup in order to avoid coffee splashing.
● Adjustable height of coffee spout: 80-140mm.
21
Espresso
The volume of espresso is suggested between 30 to 50ml.
Because of the small volume of espresso, please warm the coffee cup before
making coffee.
Touch the espresso icon for espresso
function.
ESPRESSO
STRONG
VOLUME
40ML
Press the rotary button, the grinder will
begin to grind. At this time, you can adjust
the amount of coffee beans by rotating the
rotary button.
Default amount of coffee beans for
espresso:
During making coffee, you can adjust the
volume of coffee by rotating the rotary
button.
Default volume of espresso: 50ML
When the screen shows as the left picture, it
means the espresso is ready, please enjoy
it.
ENJOY !
Making beverages
Long coffee
The taste of long coffee is much lighter than espresso.
Touch the long coffee icon for long coffee
function.
LONG COFFEE
READY
STRONG
140ML
VOLUME
Press the rotary button, the grinder will
begin to grind. At this time, you can adjust
the amount of beans by rotating the rotary
button.
Default amount of coffee beans for long
coffee:
During making coffee, you can adjust the
volume of coffee by rotating the rotary
button.
Default volume of long coffee: 150ML
When the screen indicates as the left
picture, it means the long coffee is ready,
please enjoy it.
ENJOY !
22
Hot water
Hot water can be adjusted to three temperature level, which are
high temperature, medium temperature and low temperature.
NORMAL
When the hot water is at the medium
grade, you can adjust the hot water to high
temperature by rotating the rotary button
to the right side.
HIGH
When the hot water is at the normal level,
you can adjust the hot water to low
temperature by rotating the rotary button
to the left side.
LOW
VOLUME
Touch the hot water icon for hot water
function.
Default temperature level of the hot water:
normal temperature.
60ML
During making hot water, you can adjust
the volume of hot water by rotating the
rotary button.
Default volume of hot water: 200ML
Making beverages
Cappuccino
● When making cappuccino, steam will erupt from the spout,
please be careful to avoid being scalded.
● When making cappuccino, coffee latte, hot milk and milk
foam, please ensure the milk frother has been set up in the
machine and connected to the milk pipe; please insert the
milk pipe into the milk before making.
● It will achieve the best foam quality if the milk temperature is
below 10℃.
● One electric rapid heater controls the steam separately, and
it needs to be heated under energy saving mode, and this
process cannot be skipped.
Touch the cappuccino icon for
cappuccino function.
CAPPUCCINO
Produce the temperature is not high
enough to produce steam, the electric
rapid heater will begin to heat.
1
HEATING
When the screen indicates as the left
picture, it means the heating process is
completed.
MILK
23
CAPPUCCINO READY
STRONG
Press the rotary button, the grinder will
begin to grind. At this time, you can adjust
the amount of coffee beans by rotating the
rotary button.
Default amount of coffee beans for
cappuccino:
2
When the screen indicates as the left
picture, it begins to make cream.
CREAM
20S
MILK
During making cream, you can adjust the
volume of cream by rotating the rotary
button.
Default time for making cream: 20s
CREAM
30S
3
When the screen indicates as the left
picture, it begins to make coffee.
VOLUME
VOLUME
110ML
140ML
During making coffee, you can adjust the
volume of coffee by rotating the rotary
button.
Default volume of coffee: 100ML
MILK
When the screen indicates as the left
picture, it means the cappuccino is ready,
please enjoy it.
4
ENJOY !
coffee Latte
● Please use a bigger cup to make coffee latte.
● When making coffee latte, steam will erupt from the spout,
please be careful to avoid being scalded.
Touch the coffee latte icon for coffee latte
function.
COFFEE LATTE
If the temperature is not high enough to
make steam, the electric rapid heater
begins to heat.
24
HEATING
1
When the screen indicates as the left
picture, it means the heating of coffee
latte is completed.
LATTE READY
STRONG
When the screen indicates as the left
picture, it begins to make hot milk.
MILK
10S
When the screen indicates as the left
picture, it begins to make cream.
CREAM
2
10S
During making hot milk, you can adjust the
volume of hot milk by rotating the rotary
button.
Default time for making hot milk: 15S
MILK
MILK
Press the rotary button, the grinder will
begin to grind. At this time, you can adjust
the amount of coffee beans by rotating
the rotary button.
Default amount of coffee beans for coffee
latte:
20S
MILK
Making beverages
During making cream, you can adjust the
making time of cream by rotating the
rotary button.
Default time for making cream: 15S
3
20S
CREAM
When the screen indicates as the left
picture, it begins to make coffee.
MILK
110ML
VOLUME
110ML
VOLUME
During making coffee, you can adjust the
volume of coffee by rotating the rotary
button.
Default volume of coffee: 100ML
4
When the screen indicates as the left
picture, it means the cappuccino is ready,
please enjoy it.
ENJOY !
Hot milk
● When making hot milk, steam will erupt from the spout, please
be careful to avoid being scalded.
Touch the Hot milk/Cream icon, and rotate
the rotary button for hot milk function.
HOT MILK
HEATING
Press the rotary button to start. If the
temperature is not high enough to make
steam, the electric rapid heater begins to
heat.
When the screen indicates as the left
picture, it means the heating of hot milk is
completed.
HOT MILK READY
MILK
30S
During making hot milk, you can adjust the
making time of hot milk by rotating the
rotary button.
Default time for making hot milk: 20SEC
When the screen indicates as the left
picture, it means the hot milk is ready,
please enjoy it.
ENJOY !
25
Making beverages
Hot cream
Touch the Hot milk/Cream icon, and rotate
the rotary button for cream function.
CREAM
HEATING
Press the rotary button to start; if the
temperature is not high enough to make
steam, the electric rapid heater begins to
heat.
When the screen indicates as the left
picture, it means the heating of cream is
completed.
CREAM READY
During making cream, you can adjust the
making time of cream by rotating the
rotary button.
Default time for making cream: 20S
CREAM
30S
26
When the screen indicates as the left
picture, it means the cream is ready,
please enjoy it.
ENJOY !
Preparing coffee with coffee powder
You can choose this function if you want to make coffee with
coffee bean powder.
● Prohibit filling other mixtures such as instant coffee powder
or cocoa powder in the powder container. Otherwise it will
damage the machine.
● Please use the coffee powder spoon provided to get coffee
bean powder, and you can only fill one spoon of the powder
each time. Please put the coffee powder spoon into the
accessory bag after using to avoid missing.
● Do not fill the coffee bean powder into the coffee bean
container, otherwise, it will damage the machine.
● Do not rinse the powder container with water, or it will result
in operator’s injury by electric shock.
● Please use proper grounded coffee powder for espresso.
● The process of using coffee bean powder to make coffee only
skips the process of grinding coffee beans, other operations are
the same as making espresso, long coffee, cappuccino, and
coffee latte. This chapter illustrates with espresso.
ġ1
MAX
Making beverages
Open the coffee bean powder lid
USE POWDER
Fill POWDER
USE POWDER
Fill 1 spoon of coffee bean powder in the
powder container, and close the lid.
CLOSE COVER
SELECT COFFEE
ROTARY TO CANCEL
When the screen indicates as the left
picture, please choose one of the four
coffee drinks. Take espresso for example, to
make espresso with coffee bean powder.
SELECT COFFEE
请选择咖啡
ROTARY TO CANCEL
按中间按钮开始
When the screen indicates as the left
picture, press the rotary button to make
espresso.
ESPRESSO
VOLUME
40ML
During making coffee, you can adjust the
volume of coffee by rotating the rotary
button.
Default volume of espresso: 50ML
意式浓缩咖啡
ESPRESSO
When the screen indicates as the left
picture, it means the espresso is ready,
please enjoy it.
ENJOY !
CANCEL
If you want to cancel making coffee after
fill in coffee bean powder, please continue
making coffee first, and then press the
rotary button to stop during making coffee.
27
Program setting
● This chapter will give instructions on program setting.
● When ensuring the coffee machine shows “READY”, press the
rotary button for two seconds, then you can enter into the
program setting menu.
Maintenance setting
Please read the detailed instructions about rinsing the brewing unit and
decalcifying on Page 43.
Beverage setting
● This chapter will instruct you how to set beverages. The setting parameters
include coffee taste strength, amount of coffee, temperature of hot water,
amount of hot water, time of making hot milk, time of making hot cream.
The range of beverage settings is instructed on Page 23.
● The parameters accomplished by beverage setting will be the default
values for each beverage.
1. Epresso setting
2. Long coffee setting
3. Hot water setting
4. Cappuccino setting
5. Coffee latte setting
6. Hot milk setting
7. Hot cream setting
29
Espresso setting
BEVERAGE SETTING
After entering the program setting, turn the
rotary button until “BEVERAGE SETTING”
option appears, and then press the rotary
button.
CHOOSE BEVERAGE
ROTARY TO RETRUN
CHOOSE BEVERAGE
ROTARY TO RETRUN
When the screen shows as the right picture
(six beverage icons flickering at the same
time), it indicates that the machine has
entered into the beverage setting program.
Touch the “espresso” icon, and press the
rotary button to start to set espresso.
ESPRESSO
Program setting
STRENGTH
VOLUME
40ML
When the screen shows as the left picture,
start to set up the grinding amount of coffee
bean. By turning the rotary button, you can
adjust the amount of coffee beans.
ESPRESSO
When the screen shows as the left picture,
start to set up the volume of coffee. By
turning the rotary button, you can adjust
the amount of coffee.
Press the center rotary button to confirm
setting. When the screen appears as the
left picture, it indicates espresso setting is
completedd.
CONFIRMED
Long coffee setting
The procedure of setting Long coffee is the same as Espresso. We will not
instruct it in this section any more.
30
Hot water setting
BEVERAGE SETTING
CHOOSE BEVERAGE
After entering the program setting, turn the
rotary button until the “BEVERAGE SETTING”
option appears, and then press the rotary
button.
When the screen shows as the left picture, it
indicates that the machine has entered
into the beverage setting program.
HOT WATER
ROTARY TO RETRUN
Touch the hot water icon, and press the
rotary button to start setting hot water.
HOT WATER
NORMAL
VOLUME
60ML
When the screen shows as the left picture,
start to set up the temperature of hot water.
By turning the rotary button, you can adjust
the temperature of hot water. After the
adjustment, press the rotary button to
confirm setting.
When the screen shows as the left picture,
start to set up the volume of hot water. By
turning the rotary button, you can adjust
the volume of hot water.
NORMAL
Program setting
Press the rotary button to confirm setting,
when the screen shows as the left picture, it
indicates hot water setting is completedd.
CONFIRMED
Cappuccino setting
After entering the program setting, turn the
rotary button to “BEVERAGE SETTING”
option, then press the rotary button.
BEVERAGE SETTING
CAPPUCCINO
CHOOSE BEVERAGE
When the screen shows as the left picture, it
indicates that the machine has been into
the beverage setting program.
ROTARY TO RETRUN
Touch the cappuccino icon. Press the
rotary button to start to set cappuccino.
CAPPUCCINO
STRENGTH
VOLUME
40ML
STRENGTH
When the screen shows as the left picture,
start to set the grinding amount of coffee
beans. By turning the rotary button, you
can adjust the amount of coffee bean
powder. After confirmation, press the rotary
button to finish setting.
31
When the screen shows as the left picture,
start to set the volume of coffee for
cappuccino. By turning the rotary button,
you can adjust the volume of coffee.
VOLUME
40ML
CREAM TIME
30S
When the screen shows as the left picture,
start to set the cream making time by
turning the rotary button, you can adjust
the cream making time.
When the screen shows as the left picture, it
indicates cappuccino setting is completed.
CONFIRMED
Coffee latte setting
After entering the program setting, turn the
rotary button to “BEVERAGE SETTING”
option, then press the rotary button.
BEVERAGE SETTING
Program setting
CHOOSE BEVERAGE
When the screen shows as the left picture, it
indicates that the machine is in the
beverage setting program.
COFFEE LATTE
ROTARY TO RETRUN
Touch the coffee latte icon, press the rotary
button, and start to set coffee latte.
COFFEE LATTE
STRENGTH
VOLUME
40ML
MILK TIME
30S
When the screen shows as the left picture,
start to set the amount of grinding coffee
beans. By turning the rotary button, you
can adjust the amount of coffee beans.
After the adjustment, press the rotary
button to confirm.
STRENGTH
When the screen shows as the left picture,
start to set the volume of coffee. By turning
the rotary button, you can adjust the
volume of coffee.
When the screen shows as the left picture,
start to set the time of coffee latte. By
turning the rotary button, you can adjust
the milk making time.
VOLUME
40ML
32
CREAM TIME
30S
When the screen shows as the left picture,
start to set the milk foam making time. By
turning the rotary button, you can adjust
the milk foam making time.
When the screen shows as the left picture, it
indicates coffee latte setting is completed.
CONFIRMED
Hot milk setting
After entering the program setting, turn the
rotary button to “BEVERAGE SETTING”
option, then press the rotary button.
BEVERAGE SETTING
CHOOSE BEVERAGE
ROTARY TO RETRUN
When the screen shows as the left picture, it
indicates that the machine has been into
the beverage setting program.
MILK
Program setting
Touch the hot milk icon, turn the rotary
button, choose the hot milk setting, press
the rotary button. And start to set hot milk.
MILK TIME
30S
HOT MILK
MILK TIME
30S
When the screen shows as the left picture, it
starts to set the hot milk making time. By
turning the rotary button, you can adjust
the hot milk making time.
Press the rotary button to confirm the
setting. When the screen shows as the left
picture, it indicates hot milk setting is
completed.
CONFIRMED
Cream setting
After entering the program setting, turn the
rotary button to “BEVERAGE SETTING”
option, then press the rotary button.
BEVERAGE SETTING
CHOOSE BEVERAGE
CREAM
When the screen shows as the left picture, it
indicates that the machine has been into
the beverage setting program.
ROTARY TO RETRUN
CREAM
CREAM TIME
30S
Touch the hot cream icon, turn the rotary
button, and choose the cream setting.
Then press the rotary button to start to set
cream.
When the screen shows as the left picture, it
starts to set the cream making time. By
turning the rotary button, you can adjust
the cream making time.
Press the rotary button to confirm. When the
screen shows as the left picture, it indicates
cream setting is completed.
CONFIRMED
CREAM TIME
30S
33
Program setting
Water filter
This chapter will instruct you how to change and install the water
filter.
Please use authorised specifying water filter. If you need to buy
one, please contact with service center.
1
Installing the water filter
After entering the program setting, turn the
rotary button to “WATER FILTER” option,
then press the rotary button.
FILTER
INSTALL
FILTER
INSERT
FILTER
Turn the rotary button until the “INSTALLING
THE WATER FILTER” appears. Press the rotary
button.
2
Take out the water filter, and set the month
information on the water filter to current
month, and insert it into water tank.
After installing the water filter, press the
rinsing button, then it starts to rinse the
water filter.
34
PRESS RINSE
It needs about 500ML water to rinse the
water filter.
CLEANTING
When the water filter rinsing process is
completed, the coffee machine menu will
be back to “WATER FILTER” option.
WATER FILTER
replace water filter
After entering the program setting, turn the
rotary button to “WATER FILTER” option.
Then press the rotary button.
WATER FILTER
REPLACE
FILTER
Turn the rotary button to “REPLACE FILTER”
option, and press the rotary button.
3
Program setting
INSERT
FILTER
Remove the water filter from water tank.
Adjust the month information on the new
water filter to the current month, and insert
it into water tank.
After changing the water filter, press the
rinsing button. It starts to rinse the water
filter.
PRESS RINSE
It needs about 500ML water to rinse the
water filter.
CLEANTING
When the water filter rinsing process is
completed, the coffee machine will return
to “WATER FILTER” option.
WATER FILTER
Adjusting the water hardness setting
● Please refer to Page 10 for how to test the water hardness, and please
adjust the water hardness setting according to the test result by the water
hardness test paper.
● The factory default setting:
WATER HARDNESS
HARDNESS
After entering the program setting, please
turn the rotary button to the “WATER
HARDNESS” option, and then press the
rotary button.
By turning the rotary button, you can adjust
water hardness parameters to:
“
” “
”
“
” “
”
By pressing the rotary button to confirm the
selection, the setting is completed.
CONFIRMED
After completing the setting, the machine
will return to the “WATER HARDNESS ”
option.
WATER HARDNESS
Energy-saving setting
● In the energy-saving mode, the machine needs 30 seconds to warm up
and then to make Cappuccino, Coffee Latte, Hot milk and Cream. While
for normal mode, making above beverages without waiting heat up. The
normal mode is more energy consumption than the energy-saving mode.
● The factory default setting of the machine is normal mode.
35
Program setting
After entering the program setting, please
turn the rotary button to “ECO SETTING”
option, then press the rotary button.
ECO SETTING
Press the rotary button after turning the
rotary button to “ECO MODE” option.
ECO MODE
NORMAL MODE
Press the rotary button after turning the
rotary button to the “NORMAL MODE”
option
After pressing the rotary button to confirm
the selection, the setting is completed.
CONFIRMED
After completing the setting, the machine
menu will return to the “ECO SETTING”
option
ECO SETTING
36
Automatic switch-off
● By setting the machine to automatically switch off, it can
save energy.
● The machine’s default switch off time is 2 hours, which means
the machine will automatically switches off after power on 2
hours.
● The setting range of automatic switch-off is from 15 minutes to
15 hours.
After entering the program setting, please
turn the rotary button to the “Auto-off”
option. Then press the rotary button.
AUTO OFF
Turning the rotary button to adjust the
automatically switch off time.
1 HOUR
By pressing the rotary button to confirm the
selection, the setting is completed.
CONFIRMED
After completing the setting, the machine
menu will return to the “Auto-off” option.
AUTO-OFF
Program setting
Reset
● This function will reset all the menu setting and default
beverage parameters to the factory settings (except the
language options). In addition, the information options will
not be reset.
After entering the program setting, please
turn the rotary button to “RESET” option
then press the rotary button.
RESET
By turning the rotary button to confirm reset
then setting is completed.
YES NO
ARE YOU SURE
After completing the setting, the machine
menu will return to the “RESET” option.
RESET
Information
● In this program you can view the information on numbers of
produced each drinks, total drinks numbers, and maintenance
times.
1. Total numbers on produced drinks
2. Numbers of produced espresso
3. Numbers of produced long coffee
4. Numbers of produced hot water
5. Numbers of produced cappuccino
6. Numbers of produced coffee Latte
7. Numbers of produced coffee by coffee powder
8. Numbers of produced hot milk
9. Numbers of produced cream
10. Numbers of rinsing operations
11. Numbers of rinsing brewing unit operations
12. Numbers of decalcifying operations
13. Numbers of installing and changing the water filter
● At the first-time use, there is already a number of produced
beverages because each coffee machine has been tested
before out factory.
After entering the program setting, turn the
rotary button to “INFORMATION” option
then press the rotary button.
INFORMATION
VERSION
HMI:V9.19
CONTROL:V10.11
You can view the program version number
by turning the rotary button.
37
Program setting
NUMBER OF USE
TOTAL AMOUNT
You can view the number statistics by
turning the rotary button, and view the total
numbers of produced beverages and the
times of maintenance programs performed
by pressing the rotary button.
The total numbers of produced beverages
appears first on the screen.
502
AMOUNT OF
ESPRESSO
100
语言
INFORMATION
By turning the rotary button, the number of
produced espresso shows on the screen,
then turn the rotary button continuously,
you can view the number of other produced
beverages. You can return to the previous
menu by pressing the rotary button.
After turning the rotary button to “return”
option, press the rotary button to return to
“INFORMATION” option.
38
Language
● You can set the language of coffee machine to following languages:
1. Chinese
2. English
● The default language of the coffee machine is Chinese.
After entering the program setting, turn the
rotary button to “CHOOSE LANGUAGE”
option, then press the rotary button.
CHOOSE LANGUAGE
Confirm the selection by pressing the rotary
button to set it to Chinese.
中文
EN
Confirm the selection by pressing the rotary
button to set it to English.
中文
EN
When pressing the rotary button to select
“Chinese”, the machine’s screen is Chinese
interface.
设置完成
Program setting
When pressing the rotary button to select
“English”, the machine’s screen is English
interface.
CONFIRMED
After setting to English interface, the
machine menu will return to the “CHOOSE
LANGUAGE” option.
CHOOSE LANGUAGE
EXIT
If you want to exit program setting, please select this program item to return
to main menu.
After entering the program setting, please
turn the rotary button to the “EXIT” option.
Then press the rotary button.
退出
EXIT
After completing setting, the machine will
return to “READY” .
READY
39
Cleaning and maintenance
● This chapter will instruct you how to clean and maintain the
coffee machine.
● Paying attention to daily maintenance of coffee machine,
not only ensure the taste of each cup of coffee, but also
extend the life of the coffee machine.
Cleaning the coffee machine before operation
● This chapter will instrut you how to clean and maintain the
coffee machine.
● When making coffee, press the cleaning button before the
cleaning light is lit. It will pre-heat the brewing unit and inner
pipeline, to improve the taste of the coffee next time.
● Cleaning function must start in the “READY” state.
READY
When the coffee machine is in “READY”
status and the cleaning indicator light is not
lit, press the cleaning button to start
cleaning the brewing unit and coffee
spout.
The process of cleaning coffee machine
cannot be interrupted, and it will
automatically return to “READY” status after
cleaning.
CLEANING
Cleaning the brewing unit
● After a long-term use, there will be some coffee bean powder left on the
brewing unit. Remove the left powder by clean the brewing unit.
● The process of cleaning brewing unit takes about 3 minutes.
After entering the program settings, turn the
rotary button to the "MAINTENANCE" option,
and press the rotary button.
MAINTENANCE
READY
41
Cleaning and maintenance
CLEAN
When the screen shows the picture as left, it
indicates cleaning brewing unit program
has been selected. Press the cleaning
button to start cleaning the brewing unit.
Brewing unit is cleaning.
CLEANING
After cleaning, coffee machine enters
“READY” status.
READY
Descaling the coffee machine
42
● The daily usage will cause calcareous deposited in coffee
machine. The depositing rate vary with the local water
hardness.
● Decalcifiercontains acidic substances that would stimulate
your eyes and skin, so you must strictly comply with the
security warnings noted by manufacturer on the packaging.
If you have contacted it with your eyes or skin by accident,
please wash it with clean water immediately.
● Only the original decalcifier can be used, use of other
decalcifier may cause damage to your coffee machine.
● When descaling and cleaning, please take out the filter
from the water tank first, so as not to damage the water
filter.
● Dissolve the decalcifier in clean water, and then lead the
mixed liquid into the water tank. Fully dissolve the decalcifier
can descale the coffee machine more thoroughly.
1
● The whole descaling process takes about 30 minutes.
● The termination during the descaling process will damage
the coffee machine. So once you start the descaling process,
please do not terminate it midway.
● If the decalcifieris used up, you can contact the maintenance
center for consultation and purchase.
2
NEED DESCALE
PRESS RINSE
After a long-time use, if it reaches the
degree of descaling, “NEEDS DESCALE"and"
PRESS RINSE " will automatically prompt on
the display alternately. Now, press the
cleaning button to enter the descaling
program.
Cleaning and maintenance
Turn the rotary button to maintenance
setting option, press rotary button to enter.
3
MAINTENANCE
Turn the rotary button to descaling option,
press rotary button to enter.
DESCALE
30 MINS
After entering the descaling program, press
cleaning button to start the descaling
program; it will take 30 minutes.
4
PRESS RINSE
Preparation for descaling and cleaning.
First of all, empty the drip tray, because it
would drain some waste water intodrip tray.
EMPTY TRAY
Take a bag of decalcifier and sufficiently
dissolves it in clean water, then lead this
mixed liquid to the water tank, and reinstall
the water tank to coffee machine.
5
SOLVENT IN TANK
43
After adding decalcifier, press cleaning
button to start descaling and cleaning.
PRESS RINSE
DECALCIFYING
FILL WATER TANK
PRESS RINSE
To start descaling and cleaning for the first
time, put a container, of which the
capacity is more than 1L, under the coffee
spout.
After descaling and cleaning for the first
time, take the water tank out, empty the
rest water and clean it. Add purified water
again, and reinstall it to the coffee
machine
Press cleaning button to enter descaling
and cleaning for the second time. To clean
the residual decalcifierin water in pipes at
this time .Put a container, of which the
capacity is more than 1L, under the coffee
spout.
After the second time descaling and
cleaning, coffee machine begins to heat
up.
HEATING
6
7
Cleaning and maintenance
After heating up, prepare for the third time
descaling and cleaning.
8
CLEANING
When the screen shows “READY”, it indicates
the descaling is completed; Now, you can
continue to make coffee.
COFFEE READY
Cleaning the coffee grounds container and the drip tray
● Do not use chemical solvents and erosive cleaner or alcohol
to clean the coffee grounds container and drip tray.
● The drip tray and coffee grounds container cannot be cleaned
in dishwasher.
● Do not use metal objects to clean dirt or coffee precipitate to
avoid scraping the drip tray and coffee grounds container.
● When prompted to clean the coffee grounds, coffee grounds
must be cleaned up, or it will cause the machine damaged.
When it cumulates to 15 cups, it will
automatically indicate “EMPTY GROUNDS”.
44
1
EMPTY GROUNDS
INSTALL TRAY
When it shows “INSTALL TRAY “, please
remove coffee grounds of the drip tray and
coffee grounds container. This will take
more than3 seconds.
2
Reinstall the water drip tray to the machine,
it returns to “READY” status. You can
continue using the machine.
READY
If the drip tray is full, the machine will
automatically prompt "EMPTY TRAY". Take
out the water drip tray and pour the waste
water.
EMPTY TRAY
3
READY
After clearing the waste water, reinstall the
drip tray to the coffee machine, it returns to
“READY” status. You can continue using the
machine.
Cleaning and maintenance
● Every time when cleaning coffee grounds and waste water in
the drip tray, please clean the drip tray and coffee grounds
container.
● After cleaning drip tray, please wipe dry the 2 pieces of
sheetmetals at the end of the drip tray, and then reinstall the
drip tray to the coffee machine.
Cleaning the water tank
● Suggested that, each time adding water, clean the tank
thoroughly with running water first.
1
● Cleaning water tank regularly about 1 time per month, or every
time when changing the water filter), it would be better to use
wet rag and some mild cleaning fluid.
● Because the water tank is made from food-grade and environmental
materials, it might be friable to crack. Please be gently to pick it
up and put it down, and never let it fall down. If the water tank
damaged, please contact with customer sevice center.
2
Cleaning the bean container
● Please do not use water to wash the beans container, it would
cause the grinder damaged.
● Please use a dry rag or a paper towel to clean the residuary
grease in the bean container.
● Because the bean container cover is made from food-grade
and environmental materials, it might be friable to crack.
Please be gently to pick it up and put it down, and never let it
fall down. If the beans container lid damaged, please contact
with customer sevice center.
45
Cleaning and maintenance
Disassembling and cleaning the milk frother
In order to guarantee the fine and smooth milk foam, please
clean the milk frother every day.
1. Carefully take off the milk frother.
2. Disassemble each part of the milk frother thoroughly.
3. Please clean away residues inside the holes.
4. Wash the parts with running water.
5. Reassemble the milk frother, and install it to the coffee
machine. Then the milk frother cleaning is completed.
1
2
4
5
46
Cleaning the coffee machine
● Before cleaning the interior of the coffee machine, power it
off, and pull out plug. Never immerse the coffee machine in
water. There will be a risk of electric shock.
● Regularly check the coffee machine whether there is excessive
coffee bean powder precipitate inside the machine. You can
use a brush to remove the coffee precipitate.
● Use a dry and soft rag to wipe the touch panel of the machine.
As the touch panel is made of glass, please do not hit it to
avoid the risk of electric shock once the glass broken.
● Use a dry and soft rag to wipe the surface of the machine,
and never use hard objects to clean coffee leftover on the
surface, otherwise it would cause the surface damaged.
3
Display information
● This chapter will instruct you the information shows on the
screen and the solutions.
Causes
If the water drip tray is full, any
function of making beverage will
be out of service.
Solutions
Take the drip tray out, empty the
waste water in the drip tray and
reinstall it to the machine.
EMPTY TRAY
If the coffee grounds container is
full, any function of making
beverage will be out of service.
Take the coffee grounds container
out, empty the coffee grounds
container and reinstall it.
EMPTY GROUNDS
If water in the water tank is used
up, any function of making
beverage will be out of service.
Top up the water tank with water.
If coffee beans in the bean
container are used up, function of
making coffee will be out of
service.
Add beans into bean container,
and press the rotary button to
release.
There is not enough coffee bean
powder in the powder container.
Next time when making coffee
with coffee bean powder, please
put a full spoon of powder.
48
The drip tray is not installed
correctly; any function is out of
service.
FILL WATER TANK
FILL BEANS
FILL POWDER
Installed the drip tray correctly.
INSTALL TRAY
The water in the pipe inside the
machine is not enough; any
function is out of service.
Press the rotary button to release,
to run the water replenishing system.
UNIT EMPTY
1. Using dark roasted coffee beans
or over fine coffee powder; 2. The
filter of the brewer is clogged.
1. Use coffee beans or coffee
powder which is suitable for
espresso; 2. Start brewer cleaning
procedure.
Temperature of the machine is too
high, the machine cannot be used.
Power off the main power, and use
it 1 hour later.
PRESSURE HIGH
TEMPERATURE HIGH
Temperature of the machine is too
low, the machine cannot be used.
Increase environmental temperature
to above 10℃.
TEMPERATURE LOW
The coffee machine failures, may
not be able to be used.
1. Power off, restarting up ;2. If still
unresolved, please pull out the plug.
Contact with customer sevice
center.
ERROR 1
Failures handling
● This chapter will instruct you some errors that may encounter
and the solutions.
● If there are some failures cannot be resolved by the following
methods, please contact with the customer sevice center.
Problem
The coffee temperature is too low.
Coffee only comes out from the
coffee spout drop by drop.
Cause
Solutions
The coffee cup was not pre-heated.
Wash the coffee cup with hot water
before making coffee.
Several minutes have passed since the
last time of coffee making , so the
brewing unit and the internal pipes are
already cold.
Make some more cups of coffee.
Over fine coffee powder or coffee
bean has been ground too fine.
Adjust the grinding wheel to a rough state
or use the suitable coffee powder.
Brewing unit filter was blocked.
Run the brewing unit washing program.
Insufficient coffee oil.
Picked the wrong coffee bean types.
Use the suitable coffee beans.
The grinder arising noises.
There are foreign objects in the grinder.
Make coffee again, if it still failures, please
contact with the customer sevice
center.
The milk frother cannot make any milk
foam.
The milk frother is blocked.
Cleaning the milk frother ( refer to P48).
Milk sprays from the milk frother.
The milk frother was not assembled
correctly.
Reassemble the milk frother.
Screen always indicates "EMPTY TRAY".
The sheetmetals at the end of the drip
tray are dirty or wet.
Wipe the sheetmetals to dry ( refer to P47).
Screen always indicates "INSTALL TRAY".
Coffee grounds in the bottom of the
machine are not cleaned.
Clean the coffee grounds in the bottom
( refer to P48).
Screen always indicates “FILL WATER
TANK”, but the water tank is full.
The water tank inductor is trapped.
Clean the water tank ( refer to P47).
Screen always indicates “FILL BEANS”,
but the bean container is full.
The beans container is too oily and
sticky for coffee beans.
Clean the beans container ( refer to P47).
“Errors 1 to 7”is displayed.
The coffee machine failures, cannot
continue to be used.
Switch off the main power, and contact
with the customer sevice center.
49
Transport and recycle
Transport
● Please save the packaging of the coffee machine for future
transportation.
● Make sure to empty water inside the machine before transportation,
otherwise, it will damage the machine.
● After emptying the waterway, please wipe the machine both
inside and outside to dry.
● Once the empty waterway program was executed, the system
will rerun to the program of “first-time use”, when the coffee
machine is used again.( refer to P12,First-time use)
● While emptying the waterway, there will be a high-temperature
steam sprays from coffee spout. Please pay special attention to
avoid being scalded.
The machine is on the state of “READY”.
READY
Take out the water tank, and the machine
indicates “FILL WATER TANK”.
50
EMPTY UNIT
FILL WATER TANK
EMPTY UNIT
Hold on pressing the cleaning button until
the screen shows "EMPTY UNIT", the
machine begin to clean up the waterway
automatically, and water will spray from the
coffee spout
● After emptying the waterway, the machine will automatically power off. Take
the drip tray out after the power is switched off, and clear the water in the drip
tray.
Recycle
When recycling the machine, some inner parts can be
recycled to use again. Please pay attention to recycle them
for environmental protection.
Technical Data
Voltage/Frequency
220 VAC / 50 HZ
Heating power
1200 W
Grinding power
20 W
Pump pressure
19 bar
Capacity of water tank
1.8 L
Capacity of bean container
250 g
Capacity of coffee grounds container
15 cakes
Capacity of the brewing unit
7 - 14 g
Adjusting height of coffee spout
80 - 140 mm
Length of power cord
1.2 m
Net weight
13 kg
Dimensions (Length×Width×Height)
450mm×302mm×370mm
51