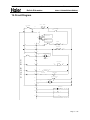
1
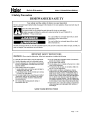
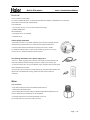
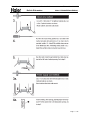
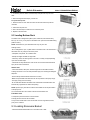
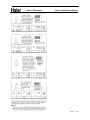
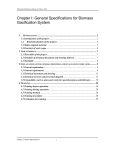
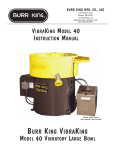
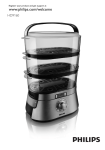
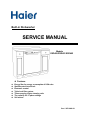
Built-in Dishwasher
SERVICE MANUAL
Models
ESD400/ESD401/ESD402
Features
Energy Star for energy consumption of USA rules
Stainless steel Interior tub
Electronic control
Triple level filter system
Three-spraying, higher cleaning ratio
The capacity for 12 place settings
Soil sensor
Part # DW-8888-26
Serial Number:
Version:00.00
Built-In Dishwasher
Edition: Nov.-23-2005
Model: ESD400/ESD401/ESD402
Page 1 / 48
Serial Number:
Version:00.00
Built-In Dishwasher
Edition: Nov.-23-2005
Model: ESD400/ESD401/ESD402
Contents
1.Product Code Illumination and Series Introduction ............................................................2
2.Features ..............................................................................................................................2
3.Safety Precaution................................................................................................................4
4.Net dimension .....................................................................................................................5
5.Installation ...........................................................................................................................5
6.Parts and Features .......................................................................................................... 25
7.Control Panel ................................................................................................................... 25
8. Start-Upguide .................................................................................................................. 26
9.Dishwasher Loading ........................................................................................................ 26
10. Dishwasher Use............................................................................................................ 30
11.Washing System ............................................................................................................ 36
12.Drying System................................................................................................................ 36
13.Overfill Protection Float ................................................................................................. 36
14.Washing special items and dishwasher care................................................................. 37
15. Drain Air Gap ................................................................................................................ 38
16.Storing ............................................................................................................................ 38
17. Function Schedule ........................................................................................................ 39
18.Maintenances Services and Trouble Shooting .............................................................. 41
19.Circuit Diagram .............................................................................................................. 46
Page 2 / 48
Serial Number:
Version:00.00
Built-In Dishwasher
Edition: Nov.-23-2005
Model: ESD400/ESD401/ESD402
1.Product Code Illumination and Series Introduction
Model Identification
ESD □□
A
B
□
C
A: Energy Star Dishwasher
B: Series of factory design
C: Code of Color
0:White 1:Black 2:Stainless steel
Examples:
ESD400
It represents energy star dishwasher of 400 series, the color of appearance is white.
ESD401
It represents energy star dishwasher of 400 series, the color of appearance is black.
ESD402
It represents energy star dishwasher of 400 series, the color of appearance is stainless
steel.
2.Features
2.1 Energy Star for energy consumption of USA rules
2.2 Stainless steel Interior tub
2.3 Electronic control
2.4 Triple level filter system
2.5 Three-spraying, higher cleaning ratio
2.6 The capacity for 12 place settings
2.7 Soil sensor
Page 3 / 48
Serial Number:
Version:00.00
Built-In Dishwasher
Edition: Nov.-23-2005
Model: ESD400/ESD401/ESD402
3.Safety Precaution
Page 4 / 48
Serial Number:
Version:00.00
Built-In Dishwasher
Edition: Nov.-23-2005
Model: ESD400/ESD401/ESD402
4.Net dimension
Page 5 / 48
Serial Number:
Version:00.00
Built-In Dishwasher
Edition: Nov.-23-2005
Model: ESD400/ESD401/ESD402
3/4”(1.9 cm)
insulation-may
be compressed
33-7/8”(86cm) min.with
wheels removed
5.Installation
5.1 Tools and materials needed
A. pliers
C. 5/8”open end wrench
B. Phillips screwdriver
D. measuring tape or ruler
E. 10” adjustable wrench that opens to 1-1/8”(2.9cm)
F. flat-blade screwdriver
G. gloves
H. utility knife
I. 2 twist-on wire connectors, which are the proper size to connect your household
wiring to 16-gauge wiring in dishwasher
J. small level
K. safety glasses
L. 90° bow with 3/8” N.P.T external threads on one end.(The other end must fit your water
supply line.)
M. flashlight
N. Teflon® tape or pipe joint compound
O. shallow pan
P. Shim stock (if installed with built-up floor)
P. electric drill
Q. 1/2”, 3/4”and 1-1/2” hole saw bits
R. small tubing cutter
S. wire stripper
T. 1-1/2”-2” screw-type clamp
if connecting to waste-tee U. copper tubing (3/8”
recommended) or flexible stainless steel braided fill line V. clamp connector or conduit
connector to fit a 7/8”(2.2cm) diameter hole
Page 6 / 48
Serial Number:
Version:00.00
Built-In Dishwasher
Edition: Nov.-23-2005
Model: ESD400/ESD401/ESD402
5.2 Parts supplied
A.
2 drain hose clamps
1-large
1-small
Make sure all these parts are included. See parts list for
accessories available for your dishwasher.
B. 2 No.ST4.2 X 18 Philips-head screws
C. Drain hose
Cabinet opening
Do not run water drain lines or electrical wiring where they can interfere with or contact dishwasher motor or legs.
The location where the dishwasher will be installed must provide clearance between motor and flooring.
Do not install dishwasher over carpeted flooring.
Protect dishwasher and water lines leading to dishwasher against freezing. Damage from freezing is not
covered by the warranty.
A side panel kit is available from your dealer for installing your dishwasher at end of cabinet.
Check location where dishwasher will be installed.
The location must provide:
- Easy access to water, electricity and drain.
- Convenient loading. Corner locations require a 2” (5.1cm) minimum clearance between the side of the dishwasher
door and wall or cabinet.
- Square opening for proper operation and appearance.
- Cabinet front perpendicular to floor.
- Level floor .If floor at front of opening is not level with floor at rear of opening, shims may be needed to level
dishwasher.
NOTE: Shims must be securely attached to floor to prevent their movement when dishwasher is being operated.
If dishwasher will be left unused for a period of time or in a location where it may be subject to freezing, have it
winterized by authorized service personnel.
Make sure pipes, wires and drain hose are within the shaded area.
HELPFUL TIP:
If the floor in the dishwasher opening in uneven (example: tile flooring only part way into opening) you will needed to take special
care in measuring
dimensions and in leveling dishwasher.
Page 7 / 48
Serial Number:
Version:00.00
Built-In Dishwasher
Edition: Nov.-23-2005
Model: ESD400/ESD401/ESD402
Electrical
It is the customer’s responsibility:
To contact a qualified electrician. To assure that the electrical installation is adequate and in conformance
will all national and local codes and ordinances.
You must have:
- 120-volt, 60Hz, AC-only, 15- or 20-amp.,fused electrical supply.
- COPPER WIRE ONLY.
We recommend:
- a time-delay fuse or circuit breaker.
- a separate circuit.
If direct wiring dishwasher
- Use flexible, armored or non-metallic sheathed, copper wire with grounding wire that
meets the wiring requirements for your home and local codes and ordinances.
- Use strain relief method provided with house wiring junction box or install a
U.L-listed/CSA-certified clamp connector to the house wiring junction box. If using
conduit, use a U.L-listed/CSA-certified conduit connector.
If connecting dishwasher with a power supply cord:
- Use a U.L. -listed, 16-gauge, three-conductor power supply cord that meets all local
codes and ordinances. Maximum length of the power supply cord is 6 feet (1.8m).
- a clamp connector to fit a 7/8” (2.2cm) diameter hole is required to secure power supply
cord to dishwasher terminal box.
- Power supply cord must plug into a mating three-prong, grounded outlet, located in the
cabinet next to the dishwasher opening. Outlet must meet all local codes and
ordinances.
Water
You must have:
- a hot water line with 20-120 PSI (138-862 KPa) water pressure.
- 120°F(49°C) water at dishwasher.
- 3/8”O.D.tubing with compression fitting or flexible stainless steel braided fill line (1/2”
minimum plastic tubing is optional but not recommended).
- a 90° elbow with 3/8”N.P.T. external pipe threads on one end.
Do not solder within 6”(15.2cm) from water inlet valve.
Page 8 / 48
Serial Number:
Version:00.00
Edition: Nov.-23-2005
Built-In Dishwasher
Model: ESD400/ESD401/ESD402
Drain
You must :
- Use the new drain hose supplied with your dishwasher. If this is not suitable, use
a new drain hose with a maximum length of 12 feet(3.7 m) that meets all current
AHAM/IAPMO test standards, is resistant to heat and detergent, and fits the drain
connector on your dishwasher.
- have a high drain loop 20 inches (50.8cm) above the subfloor or floor.
- connect drain hose to waste tee or disposer inlet above drain trap in house
plumbing and 20 inches (50.8cm) minimum above the floor.
- use an air gap if the drain hose is connected to house plumbing lower than 20
inches (50.8cm) above subfloor or floor.
- use 1/2” minimum I.D. drain line fittings.
*
Measured from the lowest point on the underside of
countertop. May be reduced to 33-7/8” (86cm) by
removing wheels from dishwasher.
**
Minimum, measured from narrowest point of
opening.
* **
Maybe increased to 6-7/8”(17.5cm) if height of
opening is 34-1/2”(87.6cm)at lowest point.
Cut openings in shaded area of cabinet walls or floor as specified in chart:
Page 9 / 48
Serial Number:
Version:00.00
Built-In Dishwasher
Edition: Nov.-23-2005
Model: ESD400/ESD401/ESD402
Page 10 / 48
Serial Number:
Version:00.00
Built-In Dishwasher
Edition: Nov.-23-2005
Model: ESD400/ESD401/ESD402
Page 11 / 48
Serial Number:
Version:00.00
Built-In Dishwasher
Edition: Nov.-23-2005
Model: ESD400/ESD401/ESD402
Page 12 / 48
Serial Number:
Version:00.00
Built-In Dishwasher
Edition: Nov.-23-2005
Model: ESD400/ESD401/ESD402
Page 13 / 48
Serial Number:
Version:00.00
Built-In Dishwasher
Edition: Nov.-23-2005
Model: ESD400/ESD401/ESD402
Page 14 / 48
Serial Number:
Version:00.00
Built-In Dishwasher
Edition: Nov.-23-2005
Model: ESD400/ESD401/ESD402
Page 15 / 48
Serial Number:
Version:00.00
Built-In Dishwasher
Edition: Nov.-23-2005
Model: ESD400/ESD401/ESD402
Page 16 / 48
Serial Number:
Version:00.00
Built-In Dishwasher
Edition: Nov.-23-2005
Model: ESD400/ESD401/ESD402
Page 17 / 48
Serial Number:
Version:00.00
Built-In Dishwasher
Edition: Nov.-23-2005
Model: ESD400/ESD401/ESD402
Page 18 / 48
Serial Number:
Version:00.00
Built-In Dishwasher
Edition: Nov.-23-2005
Model: ESD400/ESD401/ESD402
Page 19 / 48
Serial Number:
Version:00.00
Built-In Dishwasher
Edition: Nov.-23-2005
Model: ESD400/ESD401/ESD402
Page 20 / 48
Serial Number:
Version:00.00
Built-In Dishwasher
Edition: Nov.-23-2005
Model: ESD400/ESD401/ESD402
Page 21 / 48
Serial Number:
Version:00.00
Built-In Dishwasher
Edition: Nov.-23-2005
Model: ESD400/ESD401/ESD402
Page 22 / 48
Serial Number:
Version:00.00
Built-In Dishwasher
Edition: Nov.-23-2005
Model: ESD400/ESD401/ESD402
Page 23 / 48
Serial Number:
Version:00.00
Built-In Dishwasher
Edition: Nov.-23-2005
Model: ESD400/ESD401/ESD402
Page 24 / 48
Serial Number:
Version:00.00
Built-In Dishwasher
Edition: Nov.-23-2005
Model: ESD400/ESD401/ESD402
Page 25 / 48
Serial Number:
Version:00.00
Built-In Dishwasher
Edition: Nov.-23-2005
Model: ESD400/ESD401/ESD402
6. PARTS AND FEATURES
7. Control Panel
Page 26 / 48
Serial Number:
Version:00.00
Built-In Dishwasher
Edition: Nov.-23-2005
Model: ESD400/ESD401/ESD402
8.START-UPGUIDE
Before using your dishwasher, remove all packaging materials.
Using New Dishwasher
1. Rinse aid is essential for good drying. Be sure to fill the dispenser before you use your new
dishwasher. Each filling will last about 1 to 3 months depending on your usage.
2. Scrape large food soil and hard items (toothpicks or bones) from dishes. You do not need to
pre-rinse your dishes.
3. Properly load the dishwasher. (See" Dishwasher Loading.") Load
dishes with space in between so water will reach the soiled surfaces.
Make sure nothing prevents the spray arm(s) from spinning freely.
4. Add detergent. Always use a quality brand detergent.
5. Close the door.
6. Press the desired cycle and option selections. The dishwasher starts filling
when you press a cycle. You can select options as the machine fills (See "
Dishwasher Use.")
9.DISHWASHER LOADING
-Remove leftover food, bones, toothpicks and other hard items from the dishes. To conserve water, energy and save
time, it is not necessary to rinse dishes before putting them into the dishwasher. The wash module removes food particles
from the water. The module contains a chopping device, which will reduce the size of food items.
NOTE: If hard items such as fruit seeds, nuts, and eggshells enter the wash module, you might hear chopping, grinding,
crunching, or buzzing sounds. These sounds are normal when hard items enter the module. Do not let metallic items
(such as pot handle screws) get into the wash module.
Damage can occur.
-It is important for the water spray to reach all soiled surfaces.
-Load dishes so they are not stacked or overlapping if possible. For best drying, water must be able to drain from all
surfaces
-Load heavy pots and pans carefully. Heavy items can dent the stainless steel interior of the door if they are dropped
Page 27 / 48
Serial Number:
Version:00.00
Built-In Dishwasher
Edition: Nov.-23-2005
Model: ESD400/ESD401/ESD402
or bumped.
-Make sure pot lids and handles, pizza pans, cookie sheets, etc., do not interfere with the spray arm rotation.
-Conserve water, energy and save time over hand rinsing by running a rinse cycle to keep dishes moist if you do not
plan to wash them soon. Foods such as eggs, rice, pasta, spinach, and cooked cereals may be hard to remove if they
are left to dry over a period of time.
Quiet operating tips
-To avoid thumping/clattering noises during operation: Make sure lightweight load items are secured in the racks.
-Make sure pot lids and handles, pizza pans, cookie sheets, etc., do not touch interior walls or interfere with the rotation
of the spray arm.
-Load dishes so they do not touch one another.
NOTE: For built-in models, keep sink drain plugs closed during dishwasher operation to prevent noise transfer through
drains.
9.1 Loading Top Rack
The top rack is designed for cups, glasses, and smaller items, Many items, up to 9
in. (22 cm), fit in the top rack. (See
recommended loading patterns shown.)
NOTE: The features on your dishwasher rack may vary from the drawings shown.
-Place items so open ends face down for cleaning and draining.
-Load glasses and cups in top rack only. The bottom rack is not designed for
glasses and cups. Damage can occur.
-Place cups and glasses in the rows between tines. Placing them over the tines
can lead to breakage and water spots.
-China, crystal, and other delicate items must not touch each other during
dishwasher operation. Damage may occur.
-Load plastic items in the top rack only. Only plastic items marked "dishwasher
safe" are recommended.
-Load plastic items so the force of the spray does not move them during the cycle.
-To avoid chipping, do not let stemware touch other items.
-Small bowls, pans, and other utensils can be placed in the top rack. Load bowls
in the center section for best stability.
Utility shelf
Fold down the extra shelf on the left or right side of the top rack to hold
additional cups, stemware or long items such as utensils and spatulas.
Adjustable 2-position top rack
You can raise or lower the top rack to fit tall items in either the
top or bottom rack. Raise the top rack to accommodate items
up to 7.1 in. (18 cm) in the top rack and 12.2 in. (31cm) in the
bottom rack, or lower the top rack to accommodate items up to
9 in. (23 cm) in the top rack and 10.2in. (26cm) bottom racks.
Adjusters are located on each side of the top rack.
To remove the top rack
1. Pull the rack forward slightly to access track stops.
Page 28 / 48
Serial Number:
Version:00.00
Built-In Dishwasher
Edition: Nov.-23-2005
Model: ESD400/ESD401/ESD402
2. To release, press the button of the track stop and pull track stop out of the
track.
3. After removing both track stops, pull rack out.
To replace the top rack
1. Place the rollers on each side of the rack into the rack tracks and push the
rack back.
2. Insert track stop into rack .
3. Pull on the track stop to make sure it is locked into place.
4. Repeat on the other side.
9.2 Loading Bottom Rack
The bottom rack is designed for plates, pans, casseroles, and utensils. Many
items, up to 12.2 in. (31 cm) tall, fit in the bottom rack. (See recommended loading
patterns shown.)
NOTE: The features on your dishwasher rack may vary from the
drawings shown.
-Do not load glasses, cups, or plastic items in the bottom rack. Load small items in
the bottom rack only if they are secured in place.
-Load plates, soup bowls, etc., between tines.
-Overlap the edges of Plates for large loads.
-Load soup, cereal, and serving bows in the rack in a variety of ways depending
upon their size and shape.
-Load bowls securely between the rows of tines. Do not nest bowls because the
spray will not reach all surfaces.
Utensil load
-Load cookie sheets, cake pans, and other large items at the sides and back.
Loading such items in front can keep the water spray from reaching the detergent
dispenser.
-Secure heavily soiled cookware face down in the rack.
-Make sure pot handles and other items do not stop rotation of the spray arm(s).
-The spray arm(s) must move freely.
-Do not load items between the bottom rack and the side of the dishwasher tub
because they might block the water inlet opening.
NOTE: Spin the spray arms. Be sure items in the basket do not stop the rotation
of the spray arms.
You can fold down two rows of tines at the front of the bottom rack.
Fold-down rack
1.Grasp the tip of the tine that is in the tine holder.
2.Gently pull the tine out of the tine holder.
3.Lay the row of tines down in the rack to make room for larger dishes, bowls,
pots, pans or roasters.
9.3 Loading Silverware Basket
-Load the silverware basket while it is in the bottom rack or take
Page 29 / 48
Serial Number:
Version:00.00
Built-In Dishwasher
Edition: Nov.-23-2005
Model: ESD400/ESD401/ESD402
the basket out for loading on a counter or table .(See recommended loading pattern shown )
NOTE: Unload or remove the basket before unloading the racks
to avoid spilling water droplets on the silverware .
-Load items with covers down, using the separators, to prevent
silverware nesting.
-Place small items such as baby bottle caps, jar lids, corncob
holders, etc., in the section(s) with hinged cover(s) Close the cover
to hold small items in place.
IMPORTANT: Always load sharp items (knives, skewers, etc.)
pointing down.
-Do not load silver or silver-plated silverware with stainless steel.
These metals can be damaged by contact with each
other during washing.
-Some foods (such as salt, vinegar, milk products, fruit juices, etc., can pit or corrode silverware. Run a rinse cycle if you
do not have a full load to wash immediately.
10. DISHWASHER USE
10.1 Proper Use of Detergent
Use only detergent specifically made for use in dishwashers. Cascade, Cascade Complete and Electrasol Automatic
Dishwashing Detergents have been approved for use in all Haier dishwashers. Keep your detergent fresh and dry. Don't
put powder detergent into the dispenser until you're ready to wash dishes.
All wash cycles except RINSE ONLY require detergent in the main and pre-wash cup.
10.2 Detergent Dispenser
The detergent dispenser has 2 sections. The small Pre-Wash section empties
detergent into dishwasher when you close the door.
The larger Main wash section automatically empties detergent into the
dishwasher during the wash (See the "cycle Selection Charts")
Use automatic dishwashing detergent only. Other detergents can produce
excessive suds that can overflow out of the
dishwasher and reduce washing performance .
Add detergent just before starting a cycle.
Store tightly closed detergent in a cool, dry place. Fresh automatic dishwasher
detergent results in better cleaning.
NOTE: Do not use detergent with a rinse cycle.
Filling the dispenser
1. If the dispenser over is closed, open the cover by pushing the cover latch .
2. Fill the Main Wash section with detergent. See "How much
detergent to use ".
3. Fill the Pre-Wash section, if needed.
4. Close the dispenser cover.
It is normal for the cover to open partially when dispensing
Page 30 / 48
Serial Number:
Version:00.00
Built-In Dishwasher
Edition: Nov.-23-2005
Model: ESD400/ESD401/ESD402
detergent.
NOTE: Use both sections for cycles with 2 washes. Use only the
main wash section for cycles with 1 wash, See the "Cycle
Selection Charts "for more details.
How much detergent to use
-Different brands of dishwasher detergent have different
amounts of phosphorous for softening water .If you have hard
water and use a detergent with a phosphorous content of less than 8.7%, you might need to use more detergent , or use a
detergent with a phosphorous content higher than 8.7%.
-The amount of detergent to use depends on the hardness of your water and the type of detergent .If you use too little,
dishes won't be clean . If you use too much in soft water glassware will etch.
10.3 Rinse Aid dispenser
Rinse aids prevent water from forming droplets that can dry as spots or
streaks . They also improve drying by allowing water to drain off of the
dishes during the final rinse by releasing a small amount of the rinse aid
into the rinse water. Your dishwasher is designed to use a liquid rinse aid.
Do not use a solid or bartype.
Filling the dispenser
The rinse aid dispenser holds 4.8 oz(145ml) of rinse aid. Under
normal conditions, this will last for about three months. Rinse aid is released
through an opening in the dispenser. You do not to wait until the dispenser is
empty to refilled it. Try to keep it full, but be careful not to overfill it.
1. Make sure the dishwasher door is fully open.
2. Open the dispenser by pushing the cover latch.
3. Add rinse aid until the indicator window looks full.
4. Clean up any spilled rinse aid with a damp cloth.
5. Close the cover.
Rinse aid setting
The amount of rinse aid released into the final wash can be adjusted .The factory setting is at
3. For most water conditions. Set the adjuster to 2 or 3.If there are rings or calcium (hard
water) spots on dishes, try a higher setting.
To adjust the setting
Open the dispenser cover. Turn the adjuster inside the dispenser to the desired setting.
10.4 Cycle Selection Charts
Page 31 / 48
Serial Number:
Version:00.00
Built-In Dishwasher
Edition: Nov.-23-2005
Model: ESD400/ESD401/ESD402
Page 32 / 48
Serial Number:
Version:00.00
Built-In Dishwasher
Edition: Nov.-23-2005
Model: ESD400/ESD401/ESD402
Page 33 / 48
Serial Number:
Version:00.00
Built-In Dishwasher
Edition: Nov.-23-2005
Model: ESD400/ESD401/ESD402
10.5 Canceling a cycle
10.6 Changing a cycle
10.6 Adding Items During a Cycle
Page 34 / 48
Serial Number:
Version:00.00
Built-In Dishwasher
You can add an item anytime before the main wash starts. Open
Edition: Nov.-23-2005
Model: ESD400/ESD401/ESD402
the door and check the detergent dispenser If the cover
is still closed, you can add items.
TO add items
1. Carefully open the door slightly to stop the cycle. Wait for the spraying action to stop before opening the door.
2. Open the door. If the detergent dispenser cover is still closed, add the item.
3. Close the door firmly until it latches. The dishwasher resumes the cycle after about a 10 seconds pause.
10.7 Option Selections
You can customize your cycles by pressing an option. If you change your mind, press the option again to turn the option
off. Select a different option if desired. You cancel change an option anytime before selected option begins. For example,
you can press an unheated drying option anytime before drying begins.
Hi-Temp Wash
Select this option to heat the water during parts of the cycle. Higher water temperatures helps clean tough soils. Hi-Temp
Wash, with the Pots & Pans, Normal raises the water temperature in the main wash. This option adds heat, water and
wash time to a cycle.
NOTE: Hi-Temp Wash is an option with the Pots & Pans and Normal cycles. Always use Hi-Temp Wash if you have hard
water. You can’t change this option after the first filling.
NOTE: Anti- bacteria Wash automatically uses this option. Sanitize Rinse is an option with the Pots & Pans, Normal cycle.
Only these sanitization cycles have been designed to meet the NSF/ANSI requirements. You can’t change this option
after the main wash complete. If you change this option, the remaining time displayed by LED will reduce/add 3 minutes.
Heated Dry
Select this option to dry dishes with heat. The dishes take longer to dry and some spotting can occur For best drying,
always use a liquid rinse and. Some items (such as plastics) may need towel drying.
NOTE: Heated Dry is an option with Anti-bacteria Wash, Pots and Pans Wash, Normal and China cycles. If you change
this option, the remaining time displayed by LED will add/reduce 25 minutes.
Sanitize Rinse
Select this option to raise the Water temperature in the final rinse approximately 160 F (71*). The Sanitize Rinse Option
adds heat and time to the cycle, This high temperature rinse sanitizes your dishes and glassware in accordance With
NSF/ANSI standard 184 for Residential Dishwashers. Certified residential dishwashers are not intended for licensed food
establishments.
Child Lock (On ESD310/311/312 models)
Use Child Lock to prevent un intended use of the dishwasher. You can also use the Child Lock feature to prevent
unintended cycle or option changes during a cycle. When Child Lock is lit, all buttons are disabled.
NOTE: The dishwasher door can be opened while the controls are locked.
To turn on the Lock
Press and hold heated dry button for 3 seconds. Child Lock glows.
If you press any pad while your dishwasher control is locked, the light flashes 3 times and selection is ignored.
To turn off the Lock
Press and hold Heated Dry button for 3 seconds. The light turns off.
Delay Start (On ESD310/311/312 models)
Select this option to run your dishwasher at a later time or during off-peak hours. You can add items to the load anytime
during the delay countdown. After adding items, close the door firmly until it latches. The delay countdown will not
continue if the door is not latched. You can delay the start of a cycle up to 12 hours. The first time you use Delay Start, you
will see showing a 1-hour delay.
Page 35 / 48
Serial Number:
Version:00.00
Built-In Dishwasher
Edition: Nov.-23-2005
Model: ESD400/ESD401/ESD402
After the first time that you use delay, the control will start by calling up the last delay that you can. You can adjust from
there if you want to change it.
To delay the start
1.Close the door.
2.Repeatedly press until you see the desired hours of delay in the display.
When the delay reaches 12 hours, the delay turns off. Press Delay Start again to select a new number of delay hours.
3.Select a wash cycle and options.
NOTE: To cancel the delay and cycle, press Cancel .To cancel the delay and start the cycle immediately, press Delay
Start until no hours show in the display.
Plate Warmer
Use the Plate Warmer option to warm serving dishes or dinner plates.
Note: Do not use the option with cycles.
1.Open the door
2.Press plate warmer button, plate warmer glows.
3.Allow 8 minutes to heated the dishware.
10.7 Cycles Status Indicators
Follow the progress of your dishwasher with the Cycle Status indicators.
Water Heated (on ESD310/311/312 models)
Water Heated glows only when the cycle pauses to heat water to a set temperature .Washing or rinsing continues as
water
heated. Once water reaches the set temperature, the light goes off and the cycle resumes.
Washing (on ESD310/311/312 models)
Washing glows during prewash and main wash periods.
Turbidity Sensor (on ESD310/311/312 models)
Turbidity Sensor glows during the sensing part of the cycle. Your dishwasher sense soil lever at the end of the Pre-Wash.
Washing continues while Sensing occurs.
Rinsing (on ESD310/311/312 models)
Rinsing glows during rinse periods.
Drying (on ESD310/311/312 models)
Drying glows when the dishwasher is drying after the final rinse.
Clean
Clean glows when a wash cycle is complete. The light will remain ON until door is opened.
Sanitized
Sanitized glows when cycle has met sanitization condition. The light will remain ON until door is opened.
Add Rinse Aid (on ESD310/311/312 models)
Fill the Rinse Aid dispenser when Add Rinse Aid is lit. A rinse aid prevents water from forming droplets that dry as spots or
streaks. If the Rinse Aid dispenser is empty, the light glows when you select a cycle or while a cycle is running.
11.Wash System
The five-level wash system provides excellent cleaning results. Three levels
of filtration and a Soil collector system filter the wash water and prevent food
Page 36 / 48
Serial Number:
Version:00.00
Built-In Dishwasher
Edition: Nov.-23-2005
Model: ESD400/ESD401/ESD402
particles from redepositing on the clean dishes.
The wash water continuously flows through the filter, trapping food particles.
-Two water jets, located under the spray arm, remove the food particles from the filter.
-A coarse strainer prevents bones, pits, and other large objects from entering the pump system.
12.Drying System
During drying, you can see steam escaping through the vent at
the upper left corner of the door. This is normal as the heat dries
your dishes.
13.Overfill Protection Float
The over fill protection float (in the front right corner of the dishwasher tub)
keeps the dishwasher from overfilling. It must
be in place for the dishwasher to operate. Check under the float for objects that
may keep the protector from moving up or down.
NOTE: Periodically check the coarse strainer and remove any
objects on the strainer.
IMPORTANT: The vapor is hot. Do not touch the vent.
Page 37 / 48
Serial Number:
Version:00.00
Built-In Dishwasher
Edition: Nov.-23-2005
Model: ESD400/ESD401/ESD402
14.Washing special items and dishwasher care
To clean interior
Page 38 / 48
Serial Number:
Version:00.00
Built-In Dishwasher
Edition: Nov.-23-2005
Model: ESD400/ESD401/ESD402
Make a paste with powdered dishwasher detergent on a damp sponge and clean.
OR
Use liquid automatic dishwasher detergent and clean with a damp sponge.
OR
See the vinegar rinse procedure in "spotting and filming on dishes" in "Troubleshooting."
NOTE: Run a Normal cycle with detergent after cleaning the interior
15.Drain Air Gap
Check the drain air gap anytime your dishwasher isn't draining well.
Some state or local plumbing codes require the addition of a drain air gap between a built-in dishwasher and the home
drain system. If a drain is clogged, the drain air gap protects your dishwasher from water backing up into it. The drain air
gap is usually located on top of the sink or countertop near the dishwasher.
NOTE: The drain air gap is an external plumbing device that is not part of your dishwasher. The warranty provided with
your dishwasher does not cover service costs directly associated with the cleaning or repair of the external drain air gap.
TO clean the drain air gap
Clean the drain air gap periodically to ensure proper drainage of your dishwasher. Follow the cleaning instructions
provided by the manufacturer. With most types, you lift off the chrome cover. Unscrew the plastic cap. Then check for any
soil buildup. Clean if necessary.
16.Storing
Storing for the Summer
Protect your dishwasher during the summer months by turning off the water supply and power supply to the dishwasher
Winterizing your dishwasher
Protect your dishwasher and home against water damage due to freezing water lines. If your dishwasher is left in a
seasonal dwelling or could be exposed to near freezing temperatures, have your dishwasher winterized by authorized
service personnel.
Page 39 / 48
Serial Number:
Version:00.00
Edition: Nov.-23-2005
Built-In Dishwasher
Model: ESD400/ESD401/ESD402
17.Function Schedule
1、Anti-Bacterial wash(Heavy soil)
130F Pre-wash
Third rinse
Second rinse
First Rinse
161F Sanitize Rinse
150F Main wash
Drying(If heated dry is selected)
Notice: If user selected the soak option, the dishwasher would add a 4h scour & soak rinse
before the cycle start.
2、Anti-Bacterial wash(Middle and light soil)
130F Pre-wash
Rinse
161F Sanitize Rinse
150F Main Wash
Drying (if Heated dry is selected
Notice: If user selected the soak option, the dishwasher would add a 4h scour & soak rinse
before the cycle start.
3、Pots and Pans Wash
Pre-wash warmly
Third rinse
First Rinse
**Final Rinse
Second rinse
*140F Main wash
Drying(If heated dry is selected)
Notice:
*: The temp. Should 150 F when selecting Hi-Temp Wash.
**:If user select Sanitize Rinse option, the dishwasher would heat water to 161F in this step.
If user selected the soak option, the dishwasher would add a 4h scour & soak rinse before
the cycle start.
Notice:
*:The temp. should 140 F when selecting Hi-Temp Wash.
**:If user select Sanitize Rinse option, the dishwasher would heat water to 161F in this step.
4.Normal Wash (Heavy soil level)
Pre-wash warmly
Third rinse
First Rinse
**Final Rinse
Second rinse
*130F Main wash
Drying(If heated dry is selected)
Notice:
*:The temp. Should 140 F when selecting Hi-Temp Wash.
**:If user select Sanitize Rinse option, the dishwasher would heat water to 161F in this step.
Page 40 / 48
Serial Number:
Version:00.00
Built-In Dishwasher
Edition: Nov.-23-2005
Model: ESD400/ESD401/ESD402
5.Normal Wash( Middle soil level)
Pre-wash warmly
*130F Main wash
Rinse
**Final Rinse
Drying(If heated dry is selected)
Notice:
*:The temp. should 140 F when selecting Hi-Temp Wash.
**:If user select Sanitize Rinse option, the dishwasher would heat water to 161F in this step.
6.Normal Wash(Light soil level)
Pre-wash warmly
*130F Main wash
**Final Rinse
Drying(If heated dry is selected)
Notice:
*:The temp. should 140 F when selecting Hi-Temp Wash.
**:If user select Sanitize Rinse option, the dishwasher would heat water to 161F in this step.
7.China/Crystyle Wash
Pre-wash warmly
130F Main wash
Final Rinse
Drying(If heated dry is selected)
10.Speed Wash
120F Main wash
Final Rinse
11.Rinse & Hold
Rinse only
12.Plate Warmer
Drying
Page 41 / 48
Serial Number:
Version:00.00
Edition: Nov.-23-2005
Built-In Dishwasher
Model: ESD400/ESD401/ESD402
18.Maintenances Services and Trouble Shooting
L1
K1
L2
K2
L3
K3
L4
K4
L5
L6
L01
K6
K5
S1
K01
S2
S3
S4
S5
S6
L7
K7
S7
L8
K8
L9
K9
L10
K10
L02
L11
K02
S8
If the 2-digit 7-segment displayer display “Er”, it shown that the temperature sensor
is fault.
Page 42 / 48
Serial Number:
Version:00.00
Built-In Dishwasher
Edition: Nov.-23-2005
Model: ESD400/ESD401/ESD402
Analysis of the common breakdowns.
Phenomenon: the cycle and option can not been selected
Is the door closed?
N
Close the door
Y
N
Do you put the plug(if
Put the plug into the outlet.
installed) into the outlet?
Y
Is the power switch
(if installed)turned on?
N
Turn on the switch
Y
Is the film is ok?
N
Change the film switch
Y
Change the controller
Page 43 / 48
Serial Number:
Version:00.00
Built-In Dishwasher
Edition: Nov.-23-2005
Model: ESD400/ESD401/ESD402
Phenomenon: the dishwasher is running properly without water in tub
N
Is the water shut-up valve turned on?
Turn on the valve
Y
Y
The overfill floater is
up?
Press the floater
N
The water pressure is too
slow,a A booster pump before
The water pressure is
20-120PSI
N
filling shoule be added.
Y
Is the water inlet valve
ok?
N
Change water Inlet valve
Page 44 / 48
Serial Number:
Version:00.00
Edition: Nov.-23-2005
Built-In Dishwasher
Model: ESD400/ESD401/ESD402
Heating trouble
Phenomenon: program controller stop turning
Whether socket connector is connected well
N
Connect it well
Y
Whether thermo limiter is
OK
N
change thermo limiter
Y
Whether heater is OK
N
change
heater
Y
PCB or circuit is
broken
Page 45 / 48
Serial Number:
Version:00.00
Built-In Dishwasher
Edition: Nov.-23-2005
Model: ESD400/ESD401/ESD402
Power supply trouble
Phenomenon: dishwasher cannot work
check
whether
the the
power
connector
check
whether
power
connector
is in position
is in position
Connect it properly
N
Y
check whether the circuit
between the two terminals
is open
N
the cable or the controller board
should be suspected
Page 46 / 48
Serial Number:
Version:00.00
Edition: Nov.-23-2005
Built-In Dishwasher
Model: ESD400/ESD401/ESD402
19.Circuit Diagram
120V~
60HZ
D o o r s w it c h
BK
BK
W
W
D o o r s w it c h
BK
BK
G ro u n d
W
W -W
P 2 -6
C o n to rl b o a rd
P1
D is p l a y
H e a te r
T e m p e r a t u r e lim it e r
OR
P6
W
OR
W a x m o to r
P10
Y
P9
B U (W )
Y
BU
W a s h in g m o t o r
P5
PK
BU
C a p a c it o r
P
C
B
B
O
A
R
D
P4
D r a in m o t o r
P3
GY
GY
O R -Y
D is p e n s e r
P 2 -4
O R -B U
PK
P 2 -3
BU
F lo a t s w it c h
I n le t v a l v e
Y
R in s e A id S e n s o r
P 2 -1
Y
B U -R
Y
T h e rm o s ta t
R
P 2 -2
P7
R
W -W
S o il s e n s o r
P 1 2 :1
R
P 1 2 :2
W
P 2 :3
BU
+5V
Page 47 / 48
Serial Number:
Version:00.00
Built-In Dishwasher
Edition: Nov.-23-2005
Model: ESD400/ESD401/ESD402
Sincere Forever
Page 48 / 48