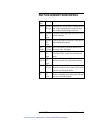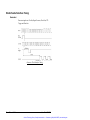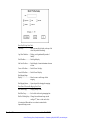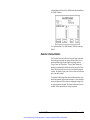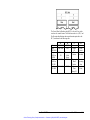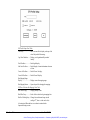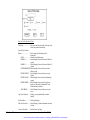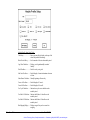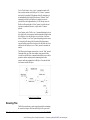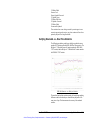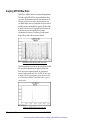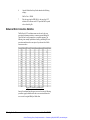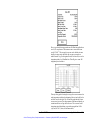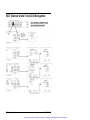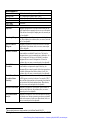
1
Artisan Technology Group is your source for quality
new and certified-used/pre-owned equipment
• FAST SHIPPING AND
DELIVERY
• TENS OF THOUSANDS OF
IN-STOCK ITEMS
• EQUIPMENT DEMOS
• HUNDREDS OF
MANUFACTURERS
SUPPORTED
• LEASING/MONTHLY
RENTALS
• ITAR CERTIFIED
SECURE ASSET SOLUTIONS
SERVICE CENTER REPAIRS
Experienced engineers and technicians on staff
at our full-service, in-house repair center
WE BUY USED EQUIPMENT
Sell your excess, underutilized, and idle used equipment
We also offer credit for buy-backs and trade-ins
www.artisantg.com/WeBuyEquipment
InstraView REMOTE INSPECTION
LOOKING FOR MORE INFORMATION?
Visit us on the web at www.artisantg.com for more
information on price quotations, drivers, technical
specifications, manuals, and documentation
SM
Remotely inspect equipment before purchasing with
our interactive website at www.instraview.com
Contact us: (888) 88-SOURCE | [email protected] | www.artisantg.com
User Guide
BA622
By SyntheSys Research Inc.
Artisan Technology Group - Quality Instrumentation ... Guaranteed | (888) 88-SOURCE | www.artisantg.com
Artisan Technology Group - Quality Instrumentation ... Guaranteed | (888) 88-SOURCE | www.artisantg.com
Contents
Safety Notice .................................................................... 1
Warranty ........................................................................... 2
Service and Support ........................................................ 4
Introduction...................................................................... 5
The BitAlyzer622 ........................................................................... 5
Getting Started................................................................. 6
Opening the Box ............................................................................. 6
Verifying Shipment......................................................................... 7
Mechanical Inspection..................................................................... 8
Front View ................................................................................. 8
Rear Panel View ......................................................................... 9
Installation...................................................................... 10
Software ....................................................................................... 10
Config.Sys Requirements .......................................................... 10
Autoexec.Bat Requirements ...................................................... 11
Files and Directories ................................................................. 12
Installing Software Updates....................................................... 13
Running BitAlyzer Software on Another PC .............................. 13
Interfacing to Your Channel .......................................................... 14
Measurements............................................................................... 15
Generator Frequency................................................................. 16
Detector Frequency................................................................... 16
Internal Clock Frequency .......................................................... 16
Bit Error Rate ........................................................................... 16
Non-Burst Error Rate ................................................................ 16
Burst Error Rate........................................................................ 16
Errors ....................................................................................... 17
Non-Burst Errors ...................................................................... 17
Burst Errors .............................................................................. 17
Burst Events ............................................................................. 17
Number of Events ..................................................................... 17
Number of Resyncs................................................................... 17
Number of “Blocks”.................................................................. 17
Number of Errored “Blocks” ..................................................... 17
User Guide BA622
Artisan Technology Group - Quality Instrumentation ... Guaranteed | (888) 88-SOURCE | www.artisantg.com
Contents • i
Important Settings......................................................................... 18
Clock Set Frequency ................................................................. 18
Generator Clock Source ............................................................ 18
Generator Pattern Type ............................................................. 19
Generator Output Interface........................................................ 20
Detector Input Interface............................................................. 20
Detector Pattern Type ............................................................... 20
Detector Event Enabling ........................................................... 21
Integration Period Definition ..................................................... 22
Error Free Interval (EFI) Definition ........................................... 22
Minimum Burst Length Definition............................................. 23
Block Definition ....................................................................... 23
Bin Mapping............................................................................. 24
Resync Threshold Definition ..................................................... 24
Technical Reference.......................................................26
Mechanical Description................................................................. 26
Front Panel Detector Interfaces...................................................... 28
Rear Panel Detector Parallel Interface............................................ 29
Front Panel Generator Interfaces ................................................... 30
Rear Panel Generator Parallel Interfaces ........................................ 31
Parallel Data Cable Connector Pin-Outs ........................................ 32
Parallel Generator ..................................................................... 32
Parallel Detector ....................................................................... 33
Blanking & Resynchronization.................................................. 34
Begin Detect and Begin Generate .............................................. 35
Interface Timing ........................................................................... 36
Bit-Serial Interface Timing........................................................ 36
Byte-Parallel Interface Timing................................................... 38
Word-Parallel Interface Timing ................................................. 40
User Interface Techniques.............................................42
Basic Screen Motif........................................................................ 42
Plug-In Index Dashboard Panels................................................ 42
Status Dashboard Panel............................................................. 43
Configuration Dashboard Panel ................................................. 43
Plug-In Panels........................................................................... 44
Moving and Resizing Panels...................................................... 44
Basic Interaction ........................................................................... 45
Entering Text and Numbers....................................................... 45
Selecting Checkboxes ............................................................... 46
Pushing Buttons........................................................................ 46
Scrolling Lists........................................................................... 46
Using Selectors......................................................................... 47
Using Sliders ............................................................................ 47
Keyboard Commands.................................................................... 48
Standard Dialogs........................................................................... 48
OK Messages............................................................................ 48
ii • Contents
User Guide BA622
Artisan Technology Group - Quality Instrumentation ... Guaranteed | (888) 88-SOURCE | www.artisantg.com
Yes/No Messages...................................................................... 48
Working Messages.................................................................... 49
File Selection Dialog................................................................. 49
Using the Knob............................................................................. 51
Using a Mouse .............................................................................. 51
Interacting with Charts .................................................................. 52
Log Charts................................................................................ 52
Grids ........................................................................................ 52
Cursors A and B ....................................................................... 52
Info Line .................................................................................. 53
Screen Zoom ............................................................................ 53
Panning Using Touch Screen..................................................... 54
Scaling Using Touch Screen...................................................... 54
Removing Chart Buttons ........................................................... 54
Enabling and Disabling Charts .................................................. 54
Chart Boundaries ...................................................................... 55
Metastrings in Titles.................................................................. 55
System Procedures ....................................................... 56
Remote Control Operations ........................................................... 56
RS-232 Interfacing.................................................................... 57
IEEE-488 Interfacing ................................................................ 58
Printing......................................................................................... 59
Selecting Printers...................................................................... 59
Printing Hardcopy..................................................................... 59
Printing to a File ....................................................................... 60
Touch Screen ................................................................................ 61
Touch Screen Calibration .......................................................... 61
Touch Screen Cleaning ............................................................. 61
Hard Disk Management................................................................. 62
Screen Saver ................................................................................. 62
High Error Rate Situations ............................................................ 62
Panel Reference............................................................. 64
Configuration Dashboard .............................................................. 64
Plug-In Index Dashboard............................................................... 66
Status Dashboard .......................................................................... 69
Analyzer Panel.............................................................................. 71
Analyzer Status......................................................................... 72
Live Mode................................................................................ 72
Record Mode ............................................................................ 72
Play Mode ................................................................................ 73
Reset ........................................................................................ 73
Analyzer Setup ......................................................................... 73
Select Scanners Button.............................................................. 76
AuxBERT Panel* ......................................................................... 78
Basic BER Panel........................................................................... 79
Basic BER Setup Button ........................................................... 80
User Guide BA622
Artisan Technology Group - Quality Instrumentation ... Guaranteed | (888) 88-SOURCE | www.artisantg.com
Contents • iii
Block Histogram Panel.................................................................. 83
Block Profile Setup Button........................................................ 84
Burst Histogram Panel .................................................................. 86
Burst Profile Setup Button......................................................... 87
Calculator Panel............................................................................ 89
EXTENDED Mode Operations ................................................. 90
CCITT G.821 Panel ...................................................................... 92
CCITT G.821 Setup Button....................................................... 93
Channel Interface Panel*............................................................... 95
Clock Panel (Option)*................................................................... 96
Set Clock Frequency Entry........................................................ 96
Detector Panel............................................................................... 97
Detector Status Display............................................................. 98
Detector Scan For Pattern.......................................................... 98
Detector Setup Button ............................................................... 99
Setup Detector RAM (Optional) .............................................. 102
Detector Checkout Button ....................................................... 107
Explanation of Detector Pattern Types..................................... 109
DUT (Device Under Test) Control Panel* ................................... 110
Select DUT Type .................................................................... 112
Generic DUT Setup................................................................. 112
Sony DIR-1000 DUT Setup..................................................... 115
Ampex DCRS DUT Setup....................................................... 118
Metrum VLDS/BVLDS DUT Setup ........................................ 121
Loral DV-6000 DUT Setup ..................................................... 124
DUT (Device Under Test) Status Panel*...................................... 127
Generic DUT Status................................................................ 127
Sony DIR-1000 DUT Status.................................................... 129
Ampex DCRS DUT Status ...................................................... 130
Metrum VLDS/BVLDS DUT Status........................................ 131
Loral DV-6000 DUT Status..................................................... 133
ECC Panel* ................................................................................ 135
ECC Setup Button................................................................... 137
EFI Histogram Panel ................................................................... 140
EFI Profile Setup Button ......................................................... 141
Finder Panel................................................................................ 143
Working Directory Display ..................................................... 143
Disk Free Display ................................................................... 144
Directory Files List ................................................................. 144
Search .................................................................................... 144
Copy ...................................................................................... 145
Rename .................................................................................. 145
Delete..................................................................................... 145
Drive ...................................................................................... 146
Generator Panel .......................................................................... 147
Generator Status Display......................................................... 148
Generator Setup Button........................................................... 149
Setup Generator RAM............................................................. 151
iv • Contents
User Guide BA622
Artisan Technology Group - Quality Instrumentation ... Guaranteed | (888) 88-SOURCE | www.artisantg.com
Interval Histogram Panel............................................................. 153
Interval Profile Setup Button ................................................... 153
Mask Panel ................................................................................. 156
Mask Panel Setup Button ........................................................ 157
Media Scan Chart Panel* ............................................................ 159
Media Scan Setup Button ........................................................ 159
Modulo Histogram Panel............................................................. 162
Modulo Profile Setup Button................................................... 163
Modulo Advanced Setup Panel................................................ 165
More BER Panel ......................................................................... 166
More BER Setup Button.......................................................... 168
Multi-Channel BER Panel........................................................... 169
Multi-Channel Setup............................................................... 170
Log File.................................................................................. 171
Packbits Panel............................................................................. 173
Packbits Setup Button ............................................................. 175
Space Mark Panel ....................................................................... 176
Space Mark Panel Setup Button............................................... 176
Spectrum Panel ........................................................................... 178
Spectrum Profile Setup Button ................................................ 179
Strip Chart Panel......................................................................... 181
Strip Chart Setup Button ......................................................... 182
System Panel .............................................................................. 184
Remote Control Button ........................................................... 184
System Parameters Button....................................................... 187
Printer Type Selector .............................................................. 187
Print Destination ..................................................................... 188
Print Button ............................................................................ 188
Quit Button............................................................................. 188
BitAlyzer Utility Programs........................................... 189
Burst Locate ............................................................................... 189
Block Bit Error Rate ................................................................... 191
Error File Counter....................................................................... 194
Cull Block .................................................................................. 196
Error Edit.................................................................................... 198
Extract ........................................................................................ 200
File Status................................................................................... 201
Word Order Flipper..................................................................... 202
Head Errors................................................................................. 204
Longitudinal Track Extractor....................................................... 205
File Marker Spacer...................................................................... 206
Translate..................................................................................... 208
Remote Control............................................................ 210
Programming Techniques............................................................ 210
Sending Text Commands ........................................................ 210
User Guide BA622
Artisan Technology Group - Quality Instrumentation ... Guaranteed | (888) 88-SOURCE | www.artisantg.com
Contents • v
Receiving Text Replies ........................................................... 210
Receiving Histogram Bins....................................................... 211
Sending Files .......................................................................... 211
Receiving Files ....................................................................... 212
Obtaining Histogram Bins....................................................... 213
Synchronizing Multiple BitAlyzers.......................................... 214
Bit Fields................................................................................ 216
Remote Control Programming Examples ................................. 217
Command Protocol ..................................................................... 240
Abort...................................................................................... 240
Adhoc..................................................................................... 240
Analyzer................................................................................. 241
Auxbert .................................................................................. 246
Basic ...................................................................................... 254
Block...................................................................................... 258
Buffer..................................................................................... 261
Burst ...................................................................................... 262
Clock...................................................................................... 265
Config .................................................................................... 266
Continue................................................................................. 268
Det ......................................................................................... 268
DetRam .................................................................................. 273
Directory ................................................................................ 278
Done ...................................................................................... 279
Ecc......................................................................................... 279
Efi .......................................................................................... 285
Finder..................................................................................... 288
G821 ...................................................................................... 290
Gen ........................................................................................ 296
GenRam ................................................................................. 301
Get ......................................................................................... 305
Interval................................................................................... 306
Mask ...................................................................................... 309
Modulo................................................................................... 310
More ...................................................................................... 313
MultiCh.................................................................................. 316
Packbits.................................................................................. 318
Panel ...................................................................................... 318
Quit........................................................................................ 320
Reply...................................................................................... 320
Send ....................................................................................... 321
SpaceMark ............................................................................. 322
Spectrum ................................................................................ 323
Status ..................................................................................... 327
Strip ....................................................................................... 328
System.................................................................................... 330
Application Notes .........................................................332
RAM Example — Disk Drive and Spin Stands ............................ 332
vi • Contents
User Guide BA622
Artisan Technology Group - Quality Instrumentation ... Guaranteed | (888) 88-SOURCE | www.artisantg.com
RAM Data File Format ............................................................... 334
Re-Interleaving ID1 Error Data ................................................... 335
Hardware Interfacing .............................................................. 335
ID1 Interleaving during Record ............................................... 336
ID1 De-Interleaving during Playback....................................... 337
Using the BA622 to Re-Interleave ID1 Data ............................ 337
Analysis Examples.................................................................. 339
ID1 ECC Monitoring and Media Verification .............................. 344
DIR-1000 Real-Time ECC Statistics........................................ 344
BitAlyzer Emulated ECC Statistics.......................................... 344
Verifying Emulated -vs.- Real Time Statistics.......................... 345
Analyzing DIR-1000 Raw Errors............................................. 346
Steps in Producing ECC Performance Reports ......................... 347
Enhanced Error Correction Statistics ....................................... 348
BitAlyzer Analysis on Multi-Track Instrumentation Recorders .... 350
Introduction ............................................................................ 350
Bit Error Rate ......................................................................... 350
Burst Length Profile................................................................ 352
Error Free Interval .................................................................. 353
Modulo Analysis..................................................................... 354
Media Scan............................................................................. 355
Second Pass............................................................................ 357
Discussion .............................................................................. 357
Conclusion ............................................................................. 361
Event Logging during Blanked Intervals...................................... 361
G.821 Analysis ........................................................................... 362
Hardware Interfacing to Recorders .............................................. 370
Loral DV-6000 ....................................................................... 370
DUT (Device Under Test) GUI Navigation.................................. 372
Appendices .................................................................. 373
Specifications ............................................................................. 373
Config.Sys Listing ...................................................................... 380
Autoexec.Bat Listing................................................................... 380
Exit Error Codes ......................................................................... 381
Glossary of Terms ....................................................... 383
Index ............................................................................. 387
*Not standard equipment.
User Guide BA622
Artisan Technology Group - Quality Instrumentation ... Guaranteed | (888) 88-SOURCE | www.artisantg.com
Contents • vii
Artisan Technology Group - Quality Instrumentation ... Guaranteed | (888) 88-SOURCE | www.artisantg.com
Safety Notice
Please review the following list of safety precautions to avoid
injury and prevent damage to this product or any products
connected to it. To avoid potential hazards, use this product only as
specified. Only qualified personnel should operate this product.
1.
Use Proper Power Cord
2.
Ground the Product
3.
Observe all Terminal Ratings
4.
Do Not Operate with Cover Off
5.
Avoid Exposed Circuitry
6.
Do Not Operate with Suspected Failures
7.
Do Not Operate in Wet or Damp Conditions
8.
Do Not Operate in Explosive Atmosphere
9.
Provide Proper Ventilation
User Guide BA622
Artisan Technology Group - Quality Instrumentation ... Guaranteed | (888) 88-SOURCE | www.artisantg.com
Safety Notice • 1
Warranty
SyntheSys Research warrants that this product will be free from
defects in materials and workmanship for a period of one (1) year
from the date of shipment. If a product proves defective during this
period, SyntheSys Research will either repair the defective product
without charge for parts and labor, or will provide a replacement in
exchange for the defective product, at its option.
In order to obtain warranty service, you must notify SyntheSys
Research of the defect before the warranty period expires and
make appropriate arrangements for service. You shall be
responsible for packaging and shipping the defective product to the
service center designated by SyntheSys Research, with shipping
charges prepaid. SyntheSys Research shall pay for the return
shipment of the product to you if the shipment is to a location
within the country where the service center resides. You shall be
responsible for paying all shipping charges, duties, taxes, and any
other charges for products returned to any other location.
This warranty shall not apply to any defect, failure, or damage
caused by using this product improperly or by inadequate
maintenance or care. SyntheSys Research shall not be obliged to
furnish warranty service to repair damage resulting from
connection to incompatible equipment or improper use. SyntheSys
Research shall not be obliged to furnish warranty service to repair
damage resulting from attempts by non-SyntheSys Research
representatives or designees to install, repair, or service the
product. SyntheSys Research shall not be obliged to furnish
warranty service to repair any damage or malfunction caused by
the use of non-SyntheSys Research supplies. SyntheSys Research
shall not be obliged to furnish service under this warranty to
service a product that has been modified or integrated with other
products when the effect of such modification or integration
increases the time or difficulty of servicing the product.
2 • Warranty
User Guide BA622
Artisan Technology Group - Quality Instrumentation ... Guaranteed | (888) 88-SOURCE | www.artisantg.com
SyntheSys Research disclaims any implied warranties of
merchantability or fitness for a particular purpose. SyntheSys
Research’s responsibility to replace or repair the defective products
is the sole and exclusive remedy for breach of this warranty.
SyntheSys Research will not be liable for any indirect, incidental,
special, or consequential damages irrespective of whether
SyntheSys Research has advance notice of the possibility of such
damages. This warranty is given by SyntheSys Research in lieu of
any other warranties, express or implied.
User Guide BA622
Artisan Technology Group - Quality Instrumentation ... Guaranteed | (888) 88-SOURCE | www.artisantg.com
Warranty • 3
Service and Support
If you have not already purchased extended warranty options for
this product, you may do so at any time during the product’s
warranty period. This extended warranty provides continued
warranty coverage for up to two additional years, on top of the
normal one-year warranty period.
For service or questions, please contact us at:
Service Department
SyntheSys Research Inc.
3475-D Edison Way
Menlo Park, CA 94025 U.S.A.
Voice:
650 364-1853
Fax:
650 364-5716
Email:
[email protected]
Website: www.synthesysresearch.com
When you contact SyntheSys Research for service, please have
your product model number, serial number, and purchase date
information available. Our service department is available from
9:00 a.m. to 5:00 p.m. (Pacific Time), Monday through Friday.
4 • Service and Support
User Guide BA622
Artisan Technology Group - Quality Instrumentation ... Guaranteed | (888) 88-SOURCE | www.artisantg.com
Introduction
The BitAlyzer622
The BitAlyzer™ is a high-speed instrument that analyzes the exact
nature of digital errors in communications channels of all kinds.
SyntheSys Research Incorporated invented the BitAlyzer out of the
frustration of using other bit error rate test sets to design/debug digital
channels. The BitAlyzer is the result of a tight integration between
high-speed digital logic, sophisticated user interface and powerful
analysis capabilities. The key difference between the BitAlyzer and any
other equipment is its ability not only to identify errors but also to
study exactly where they occurred.
Error location information becomes the database which BitAlyzer
analysis algorithms draw on to present numerous views of channel
performance. Where traditional instruments only measure the bit error
rate of a channel, the BitAlyzer can show bit versus burst error
statistics, as well as graphs of error lengths, frequencies, correlation,
two-dimensional images, and many more.
BitAlyzer error analysis is used in industries such as: Magnetic/Optical
Disk and Tape, Satellite Communications, Ground Data Links, Systems
Integration, as well as pure research. SyntheSys Research Incorporated
is committed to providing the new state-of-the-art in digital error
analysis equipment.
User Guide BA622
Artisan Technology Group - Quality Instrumentation ... Guaranteed | (888) 88-SOURCE | www.artisantg.com
Introduction • 5
Getting Started
Congratulations! You now have the finest product available for testing
advanced digital channels. It will help you work faster by
comprehensively testing your signals and pinpointing any problems
more quickly. Before you begin testing, we recommend you review the
contents of the User Guide and visit the instructions contained in this
section for unpacking the box and checking out the unit for damage
during shipment. This section also has very useful information for basic
operations, which may just be enough to send you on your way.
Don’t forget, though, if you get stuck, just press the “Help” button (the
question mark button) on the touch screen. This entire User Guide is
also available as an online help facility within the analyzer.
So, let’s get started!
Opening the Box
The BitAlyzer622 Error Analyzer has been inspected both
mechanically and electrically before shipment. It should be free of mars
or scratches and should meet all electrical specifications.
A clear indicator of potential damage is a damaged shipping container.
Please inspect the exterior of the shipping container(s) to assess any
damage. If damage is apparent, we recommend you keep the shipping
container and all materials until the unit has been checked out
electronically and mechanically. If damage has occurred, we
recommend you contact your shipping agent as well as SyntheSys
Research as soon as possible to report the situation.
Should your unit require repair in the future, you are responsible for
packaging the unit in an adequate manner for return shipment. For this
purpose, we recommend you retain the original shipping container and
shipping materials.
To confirm that the instrument is operating properly, perform the
simple Electronics-to-Electronics test described in the Technical
Reference section.
This instrument can operate from either 90V to 240V (auto sensing)
nominal supply source at 50-60 Hertz. It has a three-wire power cord
and operates from a single-phase power source. Before making
6 • Getting Started
User Guide BA622
Artisan Technology Group - Quality Instrumentation ... Guaranteed | (888) 88-SOURCE | www.artisantg.com
connection to the power source, check that the voltage selector switch
on the back panel of the unit is properly set.
Grounding. This instrument is safety Class 1 equipment (IEC
designation). All accessible conductive parts are directly connected
through the grounding conductor of the power cord to the grounded
(earthing) contact of the power plug. Do not defeat the grounding
connection. Any interruption of the grounding connection can create an
electric shock hazard.
The BitAlyzer622 is cooled by air drawn through the top and bottom of
the front panel and out the back of the unit. To ensure proper cooling of
the instrument, allow at least two inches of clearance on the front and
back of the unit. The top and bottom of the unit do not require
ventilation clearance.
Verifying Shipment
The items that were shipped to you include:
1.
2.
3.
4.
BA622 Digital Channel Error Analyzer
Keyboard
User Guide
Power Cord
If the shipping container contents are not complete, please notify
SyntheSys Research immediately. Other items may be shipped with
your unit depending on optional configurations.
User Guide BA622
Artisan Technology Group - Quality Instrumentation ... Guaranteed | (888) 88-SOURCE | www.artisantg.com
Getting Started • 7
Mechanical Inspection
The BA622 consists of a metal-enclosed chassis with a glass-covered
LCD display on the front and numerous electrical connectors on the
back. In addition, a separate compact keyboard is included for
maintenance and file editing operations.
If there is damage
during shipment, your
shipper will want to
inspect the shipping
materials.
First, with the power off, inspect the BA622 chassis, including the metal
cover, glass-covered LCD, and rear panel connectors. If the unit is
dented or marred, or if the glass or any of the connectors are damaged,
please notify your shipper and SyntheSys Research immediately.
Front View
8 • Getting Started
User Guide BA622
Artisan Technology Group - Quality Instrumentation ... Guaranteed | (888) 88-SOURCE | www.artisantg.com
Rear Panel View
See the Technical Reference section for more detailed configuration
and connection information.
User Guide BA622
Artisan Technology Group - Quality Instrumentation ... Guaranteed | (888) 88-SOURCE | www.artisantg.com
Getting Started • 9
Installation
Software
All program files and directories are loaded into your BitAlyzer622 at
the factory. Your system will boot-up running the BitAlyzer622
software immediately upon power-on. No additional computer
maintenance or file system maintenance is required. In spite of this, we
have found that some basic information regarding the software
installation is helpful, and allows simple customizations.
The BitAlyzer622 is composed of hardware components interfaced to a
Pentium-class computer. The main CPU runs DOS 6.22, which is
booted whenever the CPU is turned on or reset. During the boot-up
procedure, low-level drivers and support programs are loaded into the
computer's memory, after which the BitAlyzer operating system
software is initiated.
The following section describes requirements of the special DOS boot
files: CONFIG.SYS and AUTOEXEC.BAT. The contents of these files
are very important and crucial to correct operations of the BitAlyzer
software.
Config.Sys Requirements
In DOS computers, this file, contained in the disk root directory, is
used to configure DOS parameters and device drivers. The
BitAlyzer622 operating system utilizes extended and expanded
memory types, so the device drivers to support these features must be
installed here. See the appendix for a complete listing of the
CONFIG.SYS file.
DOS=HIGH, UMB
This command loads the DOS operating system into high memory,
leaving as much low memory as possible for use by the BitAlyzer622
program. This command also provides access to DOS upper memory
blocks (UMB).
HIMEM.SYS
This driver enables the use of Extended Memory, which the
BitAlyzer622 uses for disk caching. See "SMARTDRV.EXE" below.
10 • Installation
User Guide BA622
Artisan Technology Group - Quality Instrumentation ... Guaranteed | (888) 88-SOURCE | www.artisantg.com
EMM386.EXE
This driver enables use of Expanded Memory, which the BitAlyzer622
uses for off-screen graphics drawing and DOS UMB. The manager
must be loaded in order for the BitAlyzer622 operating system to work
properly.
Autoexec.Bat Requirements
In DOS computers, this file contained in the disk root directory is
invoked as the last step in the boot-up procedure. The BitAlyzer622
operating system uses this feature to install disk cache software and to
initiate the main executing program. See the appendix for a complete
listing of the AUTOEXEC.BAT procedure.
SMARTDRV.EXE
The SMARTDRV.EXE program initiates disk caching, which creates a
write buffer to accommodate the difference in speeds between
computer RAM and disk memory. The use of this feature may improve
your ability to acquire error data during high error rate conditions.
High error rates may be composed of high overall average errors, or of
a large burst of errors during an otherwise normal average error
condition. Disk caching will not improve the former situation, but will
improve the latter.
BA5P.EXE
The BA5P.EXE program file contains the BitAlyzer622 operating
system software program. This program initiates a graphical user
interface (GUI) and hardware interface support for measuring error
performance. The BA5P.EXE program has a variety of command line
switches, shown below:
BA5P.EXE Command Line Switches:
-h............. Help
-m............ Mouse (Use the installed mouse driver)
-m1.......... Mouse (Use Logitech mouse only [Com1])
-m2.......... Mouse (Use Logitech mouse only [Com2])
-v............. Use 800x600 Super VGA (Standalone version only)
-v2........... Use 1024x768 Super VGA (Standalone version only)
-v3........... Use Tseng 4000 1024x768x256 (Standalone version only)
-v4........... Use VESA 1024x768x256 (Standalone version only)
-v5........... Use VESA 640x480x256 (Standalone version only)
-s3 ........... Use 1024x768 S3-SVGA Hardware Accelerated
(Standalone version only)
User Guide BA622
Artisan Technology Group - Quality Instrumentation ... Guaranteed | (888) 88-SOURCE | www.artisantg.com
Installation • 11
-k............. Knob
-a ............. Override auto-sense for access to hardware panels
-r ............. Restore previous configuration
-t.............. Use touch screen
-p............. Regular VGA palette
Normally, however, the switches needed to run the BitAlyzer622
operating system in its basic configuration are not necessary. These
include -t (touch screen), -k (knob), and -a (hardware). As long as
hardware cards are detected, these switches are automatically set.
To invoke a command line switch, make sure it is present on the
command line after the BA622 program name (BA5P.EXE). Order is
not significant; however, if a switch requires a parameter, the parameter
must immediately follow the switch (separate the two with a space).
For instance, to use a Logitech three-button mouse or a Microsoft
mouse with your BitAlyzer622, plug in the mouse to serial port COM1,
and use the -m1 (Mouse) switch.
BA5p -m1.......... Command Line for using mouse with BA622
Operating System mouse driver
Files and Directories
The BitAlyzer operating system program files are contained in the
C:\USR\BIN directory. As shown below, this directory contains
executable programs, GUI graphics drivers, GUI fonts, and
configuration files.
During BitAlyzer operations, some interactions require a destination
file. For instance, when acquiring error data, you must specify a
destination filename for storing the data acquired. It is highly
recommended NOT to put these data files into the C:\USR\BIN
directory. The system performs normally if you do put data files into
the program directory, but you may find it difficult to locate your data
files when they are in directories full of other program files.
Directories Created At the Factory:
\ .............................Contains AUTOEXEC.BAT and CONFIG.SYS
\UTIL ....................Contains directories for drivers and utilities
\BATCH ................Contains .BAT files
\DOS .....................Contains MS-DOS files
\USR\BIN ..............Contains BitAlyzer622 Operating System files
\USR\DATA ..........Contains your BitAlyzer622 user data files
12 • Installation
User Guide BA622
Artisan Technology Group - Quality Instrumentation ... Guaranteed | (888) 88-SOURCE | www.artisantg.com
Installing Software Updates
SyntheSys Research, Incorporated, makes every effort including
rigorous test procedures, alpha and beta testing cycles, and solid
software programming architectures to ensure against software failures.
If they occur, however, we can easily update your BitAlyzer622 by
sending you a 3.5" floppy diskette and having you install the update.
Updates will have accompanying documentation describing exact
installation procedures and new features.
Basic Update Installation Procedure:
1.
Turn on BitAlyzer622
2.
Quit the BitAlyzer622 program (See "Plug-In Index Dashboard
Panel; Quit Button" or "System Plug-In Panel; Quit Button")
3.
Insert floppy
4.
Type "A:\UPDATE A: C:" <cr>
5.
Flush SmartDrive cache (type "FLUSH")
6.
Repeat Steps 3 through 5 for the second floppy
7.
Remove floppy and power cycle (power off, then turn back on).
Running BitAlyzer Software on Another PC
It is possible to run the BA5P.EXE BitAlyzer622 operating system on
stand-alone computers; however, an additional license is required. A
minimum 80386 CPU type and 4 MB of extended memory are
necessary. Certain Super VGA graphics modes are supported to give
you more screen area to show more plug-in panels at the same time.
User Guide BA622
Artisan Technology Group - Quality Instrumentation ... Guaranteed | (888) 88-SOURCE | www.artisantg.com
Installation • 13
Interfacing to Your Channel
In order to interface the BitAlyzer622 to a channel, the first selection
that must be made is to choose the data interface format. The Generator
has a clock input as well as a clock and data output. The Detector has a
clock and data input. The BitAlyzer622 provides three data formats.
For parallel formats, the data will be transmitted or received on rear
panel multi-pin connectors.
Format
Bit Serial
8-Bit Parallel
16-Bit Parallel
Electrical Interface
Single-Ended ECL
Differential ECL
Differential ECL
Location
Front of Chassis
Rear of Chassis
Rear of Chassis
Once a format is selected, whether to use any of the additional
connections must be decided. In some cases, additional signals are
required. In other cases, the use of additional signals can enhance the
quality of analysis.
Interface signals are found on the front and the rear of the chassis. In
general, the front of the unit holds the high-speed single-ended ECL
serial interface and the differential ECL parallel interface is on the rear.
The single-ended ECL interface uses 50-ohm SMA and BNC
connectors, which extend from the front chassis. It is recommended
that RG58AU cabling or better be used for all interfacing at high
speeds. RG174U can be used at lower speeds over short distances.
The setup time for the serial interface is specified to be 150
picoseconds and the hold time is specified to be 175 picoseconds.
The following input and output examples are recommended interfacing
circuits for the singled-ended ECL connections.
Single-Ended ECL Interface Example
14 • Installation
User Guide BA622
Artisan Technology Group - Quality Instrumentation ... Guaranteed | (888) 88-SOURCE | www.artisantg.com
The differential ECL interface uses a 50-pin shrouded header. The
recommended cable for this interface is 110-120 ohm shielded twisted
pair flat cable. This cable can be press-fit for mass termination. In the
event that this type of cable or connector is not convenient, any 110120 ohm twisted pair cable (preferably shielded) can be used and a 2 x
25 .100" center crimp-type connector can be substituted.
The following input and output examples are recommended interfacing
circuits for the differential ECL connections.
Differential ECL Interface Example
When the BitAlyzer622 generates a serial stream of data from a parallel
16-bit word, it does so by shifting out the most significant bit first.
Likewise, when a 16-bit word is derived by serial-to-parallel converting
an incoming serial bit stream, the first bit in becomes the most
significant bit in the word.
Measurements
Once a channel is connected and the BitAlyzer622 can identify the type
of incoming data (e.g., pseudo-random sequences, RAM sequences,
etc.) without losing synchronization, then Measurement and Analysis
are ready to be started.
The BitAlyzer hardware places Events in a FIFO RAM, which
indicates the location of errors as well as the location of other types of
events (such as Markers). The processor can analyze this event data
stream either in real-time or in a post-processing mode. When analysis
is desired in a post-processing mode, an "Acquire" session must first be
done in "Record Only" mode to create the data file used during post
processing. This mode can be very useful for unattended operation or in
high error rate channels where real-time error events come too quickly
for complete live analysis.
The "Block" Measurements are based on a unit of bits per block
assigned in the Basic Setup Window. For example, setting bits per
User Guide BA622
Artisan Technology Group - Quality Instrumentation ... Guaranteed | (888) 88-SOURCE | www.artisantg.com
Installation • 15
block to 100000000 and assigning the block label to be "Second,"
programs the BitAlyzer to compute the number of errors per
100,000,000 bits and display them on the Basic BER Panel as "Errors
per Second."
At times when error rates flood the system's capability to process them,
SQUELCH events are inserted into the error stream and "Lost Bits"
periods occur.
The following measurements are performed:
Generator Frequency
The input clock to the Generator (internal or external, serial, 8-bit or
16-bit) is measured. Frequencies less than 1 kHz are estimated.
Detector Frequency
The input clock to the Detector (serial, 8-bit or 16-bit) is measured.
Frequencies less than 1 kHz are estimated.
Internal Clock Frequency
The internal clock source frequency is measured. All frequencies down
to 667 Hz are accurately measured.
Bit Error Rate
The total number of errors detected divided by the total number of bits
that passed through the Detector.
Non-Burst Error Rate
The number of bit-related1 errors (as opposed to burst errors) detected
divided by the total number of bits that passed through the Detector.
Burst Error Rate
The number of burst-related errors (as opposed to bit-related errors)
detected divided by the total number of bits that passed through the
Detector.
1
Differentiating between Bit and Burst errors is done using a model based on the Error Free
Interval between errors. This model is defined by the user and can be changed from analysis to
analysis. See definition of Burst Events.
16 • Installation
User Guide BA622
Artisan Technology Group - Quality Instrumentation ... Guaranteed | (888) 88-SOURCE | www.artisantg.com
Errors
A running count of the total number of errors seen by the Detector.
This is the algebraic sum of the Total Number of Bit Errors and the
Total Number of Burst Errors.
Non-Burst Errors
A running count of the bit-related errors seen by the Detector.
Burst Errors
A running count of the Burst-related errors seen by the Detector.
Burst Events
A running count of the number of Burst Events interpreted. A burst
event is defined as a single grouping of errors, where the distance
between the first error and the last error is greater than the Minimum
Burst Length setting, and which has no error-free interval inside the
event that is greater than the Minimum Error Free Interval setting.
Number of Events
A running count of the number of sampled rising edges on the Marker
inputs. Separate counts are maintained for Marker A and Marker B.
Number of Resyncs
A running count of the number of internally or externally requested
resynchronizations.
Number of “Blocks”
A running count of the number of user bits divided by a userprogrammable block size. These are re-namable to any string. So, for
example, one could define blocks to be "seconds" and a block size to be
1,000,000 bits for a 1 Mbit/sec channel and this measurement would
then read "Number of Seconds."
Number of Errored “Blocks”
A running count of the number of blocks with errors in them. Again,
the block size and name are defined by the user and, as in the example
above, could be set to read "Number of Errored Seconds."
User Guide BA622
Artisan Technology Group - Quality Instrumentation ... Guaranteed | (888) 88-SOURCE | www.artisantg.com
Installation • 17
Important Settings
Using the Plug-In Index Dashboard panel, you can open specific plugin panels on the screen. These panels often have more buttons for
performing setup-style operations for that specific plug-in module.
These various setup panels are used to set values for certain system
parameters that are used throughout the operating system and GUI.
All system parameters are described more fully in the Panel Reference
section. The following section highlights a handful of these parameters
that are crucial for normal operations of the BitAlyzer622.
Clock Set Frequency
The Clock Set Frequency parameter is set directly from the Clock plugin panel. This parameter refers to the bit-frequency being generated by
the BitAlyzer622's internal clock source. This frequency is divided
down for use with the byte-parallel and word-parallel hardware
interfaces.
You can change the clock frequency value by editing the entry field
and replacing the current value with a new numeric value representing
the new frequency in Hertz, or you can enter a numeric value, then one
of the following unit indicators: MHz, kHz, or Hz (typing upper or
lower case is insignificant).
You can also change the clock frequency by pressing on the entry field
and then rotating the user knob. The quantity of incrementing and
decrementing is determined by the units of displayed frequency.
Generator Clock Source
The Generator Clock Source refers to a source clock signal used in
generating data patterns. Either this source clock signal is provided by
you (External Clock Source), or it is internally generated by the
BitAlyzer622's internal clock source.
Generator Clock Source Selections
External Clock Source
Internal Clock Source
Once the BitAlyzer622 has a properly set Generator Clock Source, the
Generator plug-in panel will measure and display the frequency of the
clock signal on that source. This also enables the Generator to
18 • Installation
User Guide BA622
Artisan Technology Group - Quality Instrumentation ... Guaranteed | (888) 88-SOURCE | www.artisantg.com
immediately begin transmitting the selected pseudo-random, fixed, or
RAM-based pattern.
Generator Pattern Type
Once the Generator Clock Source is set properly, the Generator
circuitry immediately begins transmitting the pattern type you've
selected as the Generator Pattern Type.
Generator Pattern Type Selections
PRN-7
PRN-15
PRN-20
PRN-23
16-Bit
RAM Trigger
RAM Cycle
Random
Pattern
Generating
Polynomial
Length of
Random Pattern
PRN-7
PRN-15
PRN-20
PRN-23
x7 + x + 1
x15 + x + 1
x20 + x5 + 1
x23 + x5 + 1
27 – 1
215 - 1
220 - 1
223 - 1
(127)
(32,767)
(1,048,575)
(8,388,607)
Using the 16-Bit pattern type requires you to set a 16-bit value in the
adjacent entry field in the Generator setup panel. In this mode, the
Generator continuously transmits the 16-bit value. On the serial
interface, the most significant bit is transmitted first. On the byte
interface, the most significant byte is transmitted first.
The RAM Trigger and RAM Cycle modes refer to generating data
patterns contained in the Generator circuitry's optional fixed RAM
memory. To use this feature, you must first set up the Generator RAM
content using the Generator plug-in panel's Generator RAM button.
In RAM Trigger mode, the Generator restarts transmitting the contents
of the RAMs every time a front panel connector Begin Generate signal
occurs. In RAM Cycle mode, the Generator repeatedly transmits a
specific number of words from its RAM. The quantity is known as the
RAM Word Count.
User Guide BA622
Artisan Technology Group - Quality Instrumentation ... Guaranteed | (888) 88-SOURCE | www.artisantg.com
Installation • 19
Generator Output Interface
The Generator includes three types of clock and data signal interfaces.
Serial interfaces are on the front of the BitAlyzer, and parallel
interfaces are on the back.
Generator Output Interface Selections:
Bit Serial
Byte Parallel
Word Parallel (16-Bit Words)
Detector Input Interface
Detector Input refers to both clock and data signals, and the Detector
Input Interface refers to whether the Detector should look for incoming
data patterns on the bit-serial, byte-parallel, or word-parallel hardware
input interfaces. Serial Interfaces are on the front of the BitAlyzer622,
and parallel interfaces are on the back.
Detector Input Interface Selections:
Bit Serial
Byte Parallel
Word Parallel (16-Bit Words)
Once the Detector receives a proper input clock, the Detector plug-in
panel will immediately begin measuring and displaying the incoming
frequency. If an unrecognizable data pattern is being input to the
BitAlyzer622, the Detector plug-in panel will display a “NO SYNC”
message. Once a proper data pattern synchronization has occurred, this
display will show the data pattern type in use.
Detector Pattern Type
Once the Detector circuitry is provided with both clock and data
signals, it can examine the data to see what kind of pattern is being
received. If you manually select a specific Detector data pattern, the
Detector will search for only that one pattern. This is most often the
case, as you usually know what data is going through the channel.
Alternatively, you can set the SEARCH pattern type, which informs the
BitAlyzer622 to cyclically try each of its internally produced reference
patterns.
20 • Installation
User Guide BA622
Artisan Technology Group - Quality Instrumentation ... Guaranteed | (888) 88-SOURCE | www.artisantg.com
Detector Pattern Type Selections:
Search
PRN-7
PRN-15
PRN-20
PRN-23
16-Bit
RAM Trigger
RAM Grab
Zero
When you use the 16-Bit pattern type, a read-back 16-bit value is
displayed in the Detector setup panel. On the serial interface, the most
significant bit is received first. On the byte interface, the most
significant byte is received first.
The RAM Trig and RAM Grab modes refer to detecting against data
patterns contained in the Detector circuitry's optional fixed RAM
memory. To use this feature, you must first set up the Detector RAM
content using the Detector plug-in panel's Detector RAM button.
In RAM Grab mode, the Detector grabs a specified quantity of words
and immediately thereafter uses the grabbed data as the reference data
pattern. The quantity is known as the RAM Word Count. In RAM Trig
mode, the Detector is previously loaded with a specified data pattern or
DOS file. The loaded RAM content is then used as the reference data
pattern to compare with. Front panel Begin Det(ect) trigger signals
reset the comparisons back to the start of the RAM.
Detector Event Enabling
When the Detector circuitry encounters errors, it communicates the
location of the errors to the software using a queue of "error events." In
addition to these events, other types of events can also be
communicated from the Detector circuitry to software processing. This
feature can be used to communicate the word-address of certain
hardware signals to software processing.
Detector Event Types:
Error Events .................... Non-zero result of xor-ing incoming data
with words of reference data.
Marker Events ................. Rising-edge of Marker-A or Marker-B
marker input signals.
Resync Events.................. Hardware or software request for data
pattern resynchroni-zation.
Blank Events ................... Hardware input pulses during which data is
not compared.
User Guide BA622
Artisan Technology Group - Quality Instrumentation ... Guaranteed | (888) 88-SOURCE | www.artisantg.com
Installation • 21
Restart Events.................. Data pattern resynchronization successful.
Cycle Event ..................... First re-start of pattern transmission after
data resynchroni-zation.
Each of these types can be enabled or disabled in software from the
event enabling button contained within the Detector setup panel.
Integration Period Definition
The integration period is used when calculating error rates. Before
dividing the number of errors by the number of bits, you must first wait
until enough bits are transmitted for the division result to have
significance. For instance, if you have an error rate of one error in 1e2
(100) bits, unless you wait 1e2 bits before dividing, you'll probably get
zero as a division result. In this case, you'd want to wait at least 1e4
(10,000) bits before dividing so there would be two significant digits in
the division result.
If your integration period is too long, you may wait a while before
getting an error rate measurement. If it's too short, you may get
“jumpy” error rate measurements. A good rule of thumb is: Take the
expected error rate, change the sign of the exponent, and add two to the
exponent. An expected error rate of 1e-6 translates to an integration
period of 1e8.
Burst error identification is reset upon integration period boundaries.
Error Free Interval (EFI) Definition
Burst errors are characterized as groups of single bit errors that are
adjacent to one another. The Error Free Interval (EFI) parameter is used
to program the degree of adjacency that is required to group single bit
errors together to form bursts.
Another way to look at the EFI is, as the number of good bits required
to terminate a burst. A setting of one (1) means the burst must not
contain any good bits; a setting of two (2) means bursts can include
single good bits interspersed with error bits.
Setting the EFI will change the shape of your burst length profiles
because it changes the specification of a burst.
22 • Installation
User Guide BA622
Artisan Technology Group - Quality Instrumentation ... Guaranteed | (888) 88-SOURCE | www.artisantg.com
Minimum Burst Length Definition
The Minimum Burst Length parameter is used to distinguish errors as
either being part of a burst or not. Errors that are not part of bursts are
shown throughout the user interface as “Non-Burst” errors; these are
the small, often random, errors.
During basic error analysis, single bit errors are grouped together using
the Error Free Interval (EFI) definition described above. The resulting
group is assigned a group length, which is defined to start at the first
error of the group and end at the last error (surrounding EFIs are not
included in the burst length). This length is then compared to the
Minimum Burst Length parameter and the group is handled as either a
Burst or a Non-Burst, depending on the outcome.
By incrementing the Minimum Burst Length parameter, you specify
that fewer and fewer error groups should qualify as bursts.
Block Definition
A Block is a contiguous number of bits for which an error count is
calculated. You can assign custom labels for blocks, such as “Seconds
or “Packet Frames” or “Cylinders, and then the BitAlyzer622 will
compute and display the number of erred “Seconds,
Frames,”
or “Cylinders.”
Furthermore, the Block Histogram will show the occurrences of
different quantities of errors within the blocks being analyzed.
Histogram Bin One will show the number of blocks that had one (and
only one) error; Histogram Bin Two will show the number of blocks
that had two (and only two) errors, and so on.
This is useful for channel error correction analysis. In some cases, error
correction block sizes are fixed due to pre-existing packet frame sizes,
or sector sizes, or what have you. If you set the BitAlyzer622 Block
definition to be this physical size, the Block histogram will show you a
profile of how many errors occur in all the blocks. The shape of this
curve will determine an effective value for the tradeoff between error
correction strength and coding overhead.
Block statistics are shown in the Scope plug-in panel, but the Block
Divisor and Block Label designations are set within the Basic BER
setup panel.
User Guide BA622
Artisan Technology Group - Quality Instrumentation ... Guaranteed | (888) 88-SOURCE | www.artisantg.com
Installation • 23
Bin Mapping
A Bin refers to a software data structure that is used for every
histogram to maintain the histogram information. For instance, if you
are histogramming 10,000 bit positions using a modulo histogram, the
BitAlyzer622 maps these 10,000 positions into only 256 actual separate
counters. It can do this by squeezing 64 bit positions into each of the
256 separate counters. This yields a range of histogram data from the
zero'th bit position to a bit position of 16,383 [(256 x 64) – 1].
This mechanism represents vast amounts of data in small numbers of
counters, which preserves computer memory during analysis.
When specifying how many data values should be represented by a bin,
only powers of two are permitted. When entering the Bin Scale factor,
however, you can enter a non-power of two scaling factor, and the user
interface will compute the appropriate power of two value, rounding
upwards.
In addition to specifying how many data values should be scaled into
each bin, you can also specify an offset to skip before allocating data
values to bins. For instance, you could program the Bin Mapping to
skip to location 9,744 and then map only one data value per bin to
achieve one-to-one resolution at the end of a 10,000-position modulo
histogram. This feature permits you to focus higher data resolutions on
specific locations within a data range.
The first and last counters are special, in that any values that fall
beyond the range of the current bin mapping are truncated to these
counters. On a histogram, this will tell you if there is a lot of data
outside your present mapping, as the first or last bin will become
astronomically full.
The bins must be mapped before the data is analyzed.
Resync Threshold Definition
The Resync Threshold parameter informs the BitAlyzer622 how many
adjacent word-errors in the incoming data should trigger a software
resynchronization attempt.
Software resynchronizations triggered in this mode do not try other
data patterns, even if you've set the Detector Pattern Type to AUTO
SEARCH. When the request occurs, the pseudo-random reference
generator is re-seeded with two 16-bit words of incoming data and
continuous comparison of reference data and incoming data is restarted.
24 • Installation
User Guide BA622
Artisan Technology Group - Quality Instrumentation ... Guaranteed | (888) 88-SOURCE | www.artisantg.com
You can disable automatic software resynchronization attempts
completely by setting the Resync Threshold entry field to zero (0).
When using RAM-Triggered mode in the Detector, the Resync
Threshold is typically set to zero.
Using the Detector's enables for Resync and Restart events, you can
enqueue information into the data stream at times when
resynchronization is requested and achieved. This feature enqueues
event information for both hardware and software sources of
resynchronization requests.
User Guide BA622
Artisan Technology Group - Quality Instrumentation ... Guaranteed | (888) 88-SOURCE | www.artisantg.com
Installation • 25
Technical Reference
Mechanical Description
The BitAlyzer622 is 17" (67 cm) x 8.75" (34 cm) x 15.5" (39 cm) and
weighs 45 lb. (20.1 kg). It is packaged in a custom-designed steel and
aluminum chassis that houses all electronics, power supplies, disk
drives, fans, display and touch-screen. External to this unit, the user
may connect a keyboard, external VGA-compatible monitor, and/or
mouse. The 640 x 480-pixel active matrix TFT display is integrated
directly into the case on the front of the unit. There is a glass-based
analog resistive touch-screen sensor installed between the display and
the front panel. Optional 19" rack-mounting slides are available that
fasten directly onto the side of the BitAlyzer.
BitAlyzer622 Front View
A
B
C
D
E
F
G
H
26 • Technical Reference
Touch Screen and Active Matrix TFT Color Display
Multi-purpose User Interface Knob
MB, 3.25" DOS Floppy Drive
Single-Ended ECL Serial BitAlyzer Interface Connectors
Power Switch
Upper Air Intake
Lower Air Intake
Tilt-Up Stand
User Guide BA622
Artisan Technology Group - Quality Instrumentation ... Guaranteed | (888) 88-SOURCE | www.artisantg.com
BitAlyzer622 Rear Panel View
J
L
M
N
P
R
S
T
U
VAC Connector with On/Off Switch
Fan Exhaust
External VGA Monitor Connector
IEEE-488 GPIB Connector
Centronix Parallel Printer Port
RS-232 COM1
AT Keyboard Connector
Detector Byte and Word Parallel I/F Connectors
Generator Byte and Word Parallel I/F Connectors
User Guide BA622
Artisan Technology Group - Quality Instrumentation ... Guaranteed | (888) 88-SOURCE | www.artisantg.com
Technical Reference • 27
Front Panel Detector Interfaces
Clock In
SingleEnded ECL
Input
Data In
SingleEnded ECL
Input
SingleEnded ECL
Input
Blank
Marker A
SingleEnded ECL
Input
Begin
Detect
SingleEnded ECL
Input
Input Clock signal. Data is sampled on one edge of this input.
Which edge to use is selectable through the user interface. If one
edge of the clock produces a high error rate due to bad setup or
hold conditions, try using the other edge of the clock.
Input data provided by user for analysis.
The counting of errors is "blanked" when this input is active. The
active level of the input can be selected through the user-interface.
Blanked bits can be interpreted as either good data or non-data, in
which case the clocking information is also blanked. External
resynchronization requests are made by using this input and
selecting the correct mode in the Detector settings. External
resynchronization is required when the data sequence phase is
known to jump. When entering a new sequence phase, a hardware
request to resynchronize should be issued.2,3
Event Markers are user-provided (low frequency < TBD kHz). The
locations of marker rising edges are recorded along with the
position of errors so that error analysis can be done correlated to
external marker. Enabling the use of markers is done through the
user interface.4
When using the 4 or 16 Mbit RAM option in Detect-from-Trigger
mode, this input is the externally applied trigger used to instruct
the BitAlyzer to restart the RAM data sequence. This RAM
sequence is then compared bit-for-bit with the incoming data after
this point for error. This input is bit accurate and DEFINES where
the 16-bit word alignment is to begin. The active level of this input
is selectable through the user interface. The Blank signal must be
used in coordination with this signal to assure blanking of errors
before the Begin Detect signal's proper re-alignment.
2
Used for Serial, Byte, or Word operations. See Application Notes for an example of usage.
All inputs EXCEPT for Clock, Data and Begin are always sampled at the 16-bit word rate. This
includes Markers and Blank. This limits their exact bit location identification and requires that these
signals be active for at least one word-rate clock cycle so that they are sampled and seen. Clock,
Data and Begin signals for both the Generator and Detector are sample-accurate (e.g., bit-accurate
for serial format, byte-accurate for 8-bit format and word-accurate for 16-bit format).
4
The TTL outputs are taken directly from the output of a 74F244 driver with no limiting resistance.
This should be looked at using a high-impedance input.
3
28 • Technical Reference
User Guide BA622
Artisan Technology Group - Quality Instrumentation ... Guaranteed | (888) 88-SOURCE | www.artisantg.com
Error
TTL
Output
Trigger
TTL
Output
This output will be high whenever one or more errors are
identified in a 16-bit word. Blanking the input will cause the
output error pulse to be blanked as well.8
This output will transition once per 16 serial rotations of the
pseudo-random or 16-bit data sequence, or at the beginning of the
RAM sequence during the Detection process. It is intended for use
as an oscilloscope trigger.8
Rear Panel Detector Parallel Interface
Signal
Name
Clock In
Electrical
Use
Differential
ECL Input
Data[0..15]
Differential
ECL Input
Differential
ECL Input
Differential
ECL Input
Input Clock signal. Data is sampled on one edge of this input.
Which edge to use is selectable through the user interface. If one
edge of the clock produces a high error rate due to bad setup or
hold conditions, try using the other edge of the clock.
Input data provided by user for analysis. Only the lower 8 bits are
used with an 8-bit format.
Same as for Serial Interface. Both markers can be used
simultaneously.7
Same as for Serial Interface except this input is used when using
either the 8-bit or 16-bit formats. When using the 8-bit format, this
input DEFINES the byte alignment of the 16-bit words.
Parity check bit. This bit is used for both 8-bit and 16-bit formats.
This input is not required. Detection of errors for either odd or even
parity is selectable from the user-interface.
This ad-hoc input is provided for convenience to some equipment
that provides an output that needs to be monitored. The level of this
signal can be viewed from the user interface.
This ad-hoc output is provided for convenience to some equipment
that requires a commanded signal to initiate operation. This signal
can be set or reset from the user interface.
Marker B
Begin
Detect
Parity In
Differential
ECL Input
Ad-Hoc In
Differential
ECL Input
Ad-Hoc
Out
Differential
ECL
Output
User Guide BA622
Artisan Technology Group - Quality Instrumentation ... Guaranteed | (888) 88-SOURCE | www.artisantg.com
Technical Reference • 29
Front Panel Generator Interfaces
Signal
Name
Clock In
Data
Clock Out
Begin
Generate
Trigger
Electrical
Use
SingleEnded ECL
Input
SingleEnded ECL
Output
SingleEnded ECL
Output
SingleEnded ECL
Input
External input clock. Either this clock of the optional internal clock
source is used to sample the Begin Generate signal. The edge to use
for sampling is selectable through the user interface.
Data stream to be used in digital channel.
TTL
Output
30 • Technical Reference
Output clock phase aligned with output data. This clock signal can
be inverted through the user interface.
When using the 4 or 16 Mbit RAM option in Generate-fromTrigger mode, this input is the trigger that is used to request retransmit of the data from the RAM starting at the beginning. This
input is bit-accurate.
This output will transition once per repetition of the pseudorandom data sequence or at the beginning of the RAM sequence
during the Detection process. It is intended for use as an
oscilloscope trigger when viewing data sequences.
User Guide BA622
Artisan Technology Group - Quality Instrumentation ... Guaranteed | (888) 88-SOURCE | www.artisantg.com
Rear Panel Generator Parallel Interfaces
Signal
Name
Clock In
Electrical
Use
Differential
ECL Input
Data[0..15]
Differential
ECL
Output
Differential
ECL
Output
Differential
ECL Input
Differential
ECL
Output
Differential
ECL
Output
Differential
ECL Input
External input clock. Either this clock of the optional internal clock
source is used to sample the Begin Generate signal. The edge to
use for sampling is selectable through the user interface.
Data stream to be used in digital channel. Only the lower 8 bits are
used in the 8-bit format.
Clock Out
Begin
Generate
Parity Out
Alternate
Clock Out
Ad-Hoc In
Ad-Hoc
Out
Differential
ECL
Output
Output clock phase aligned with output data. This clock signal can
be inverted through the user interface.
Same as in Serial Interface except that this input must be used
when using the 8-bit or 16-bit formats.
Output parity is generated by the BitAlyzer622 for either the 8-bit
or 16-bit formats. Odd or even parity can be selected by the user
interface.
When in word (16-bit) format, one-half the word rate clock is
provided as a convenience (a byte clock) for help in interfacing.
This ad-hoc input is provided for convenience to some equipment
that provides an output that needs to be monitored. The level of this
signal can be viewed from the user interface.
This ad-hoc output is provided for convenience to some equipment
that requires a commanded signal to initiate operation. This signal
can be set or reset from the user interface.
User Guide BA622
Artisan Technology Group - Quality Instrumentation ... Guaranteed | (888) 88-SOURCE | www.artisantg.com
Technical Reference • 31
Parallel Data Cable Connector Pin-Outs
Parallel Generator
The 50-pin Parallel Generator shrouded header is found on the rear
panel of the BitAlyzer622. Signals found on this connector are
differential ECL levels. Recommended interfacing circuits are
described in the Channel Interfacing section.
D0+
D1+
D2+
D3+
D4+
D5+
D6+
D7+
D8+
D9+
D10+
D11+
D12+
D13+
D14+
D15+
Parity+
Clock Out+
Spare
Ad Hoc Input+
Alternate Byte Clock Out+
Ad Hoc Output+
Clock In+
Begin Generate+
GROUND
32 • Technical Reference
1
3
5
7
9
11
13
15
17
19
21
23
25
27
29
31
33
35
37
39
41
43
45
47
49
2
4
6
8
10
12
14
16
18
20
22
24
26
28
30
32
34
36
38
40
42
44
46
48
50
D0D1D2D3D4D5D6D7D8D9D10D11D12D13D14D15ParityClock OutSpare
Ad Hoc InputAlternate Byte Clock OutAd Hoc OutputClock InBegin GenerateGROUND
User Guide BA622
Artisan Technology Group - Quality Instrumentation ... Guaranteed | (888) 88-SOURCE | www.artisantg.com
Parallel Detector
The 50-pin Parallel Detector shrouded header is also found on the rear
panel of the BitAlyzer622. Signals found on this connector are
differential ECL levels. Recommended interfacing circuits are
described in the "Channel Interfacing" section. The Detector connector
is very similar to the Generator connector and, in fact, a one-to-one
mass-terminated ribbon cable can be used for parallel End-to-End tests
of direct Generator to Detector testing.
D0+
D1+
D2+
D3+
D4+
D5+
D6+
D7+
D8+
D9+
D10+
D11+
D12+
D13+
D14+
D15+
Parity+
Clock In+
Marker B+
Ad Hoc Output+
Spare
Ad Hoc Input+
Spare
Begin Detect+
GROUND
1
3
5
7
9
11
13
15
17
19
21
23
25
27
29
31
33
35
37
39
41
43
45
47
49
User Guide BA622
Artisan Technology Group - Quality Instrumentation ... Guaranteed | (888) 88-SOURCE | www.artisantg.com
2
4
6
8
10
12
14
16
18
20
22
24
26
28
30
32
34
36
38
40
42
44
46
48
50
D0D1D2D3D4D5D6D7D8D9D10D11D12D13D14D15ParityClock InMarker BAd Hoc OutputSpare
Ad Hoc InputSpare
Begin DetectGROUND
Technical Reference • 33
Blanking & Resynchronization
Many questions about BitAlyzer622 operation have to do with how and
when to use Blanking and Resynchronization. The signal connected to
the Blank input can be used to instruct the BitAlyzer622 to ignore
detected errors during selected times. The active level of this input for
this purpose is selectable. So, for example, the BitAlyzer622 can be
configured to ignore errors when this input is high.
An application of this would be in a case where a section of a valid
BitAlyzer622 data stream was replaced during user processing with,
say, error detection check-sum symbols or electro-mechanical servo
information. During detection, this section of the data stream will no
longer match the expected BitAlyzer622 data stream and will cause
errors. By enabling the Blank input at this time, these errors will not be
counted.
However, this section of the data stream could be considered "good"
data. If the blanking level was enabled for a large percentage of the
time, the measured error rates would be deflated because not all the
"good" bits were counted. If you wish to count all the bits, even during
blanking, for error rate measurement, "Count During Blanking" in
Detector Setup I/F Settings must be selected.
Many applications that use Blanking will also require
resynchronization. Consider a digital channel where you have times
when the channel is good and times when the channel is known dead.
An example of such a channel is a raw disk drive read/write channel
where good data exists during most of the rotation, and bad data occurs
during the write-splice at the end of the rotation. Another example
would be the raw channel of a scanning tape recorder where heads are
rotating on and off tape. A final example might be a communications
channel that operates in bursts. Consider the following timing diagram:
Resynchronization & Blanking Timing Example
34 • Technical Reference
User Guide BA622
Artisan Technology Group - Quality Instrumentation ... Guaranteed | (888) 88-SOURCE | www.artisantg.com
In this application, the data's phase relationship gets lost during the
channel dead time, which virtually guarantees that the data stream from
the next good area will not align properly with the internal reference
sequence generator found in the Detector circuits. To remedy this, upon
entering the next good data, the Detector needs to be instructed to
re-acquire synchronization. The disabling edge of the Blanking input
can be used to request this resynchronization.
Begin Detect and Begin Generate
The Begin Detect and Begin Generate signals are used in conjunction
with the 4 or 16 Mbit RAM option available with the BitAlyzer622.
These signals control the bit alignment of the data conversion from the
user's external data format to the internal 16-bit format of the
BitAlyzer622, as well as the resetting of the Memory Address Counter
used to sequence through the RAM content.
The bit alignment function is subtle and necessary. Resetting the
Memory Address Counter causes the data coming out of the RAMs
(used for data generation in the Generator and as comparison reference
in the Detector) to restart again at zero. During the Begin Detect restart,
errors are inevitably going to be detected, so Blanking should be
enabled to cover this time.
A classic application of the Begin Detect signal is in read/write channel
design for disk drives. In these applications, users program the
Generator's RAM with data to be written during one rotation of the
disk, including unique data at the beginning of the rotation that is used
as a sync-pattern during playback. The index pulse from the disk is then
used to trigger the Begin Generate signal. This, along with external
coordination of the Write Gate signal for the disk drive, causes the data
to be written.
To analyze the read-back signal, an external sync-pattern detector
establishes the perfect bit alignment of the playback data and is
connected to the Begin Detect signal of the BitAlyzer622. The expected
data during playback is loaded into the Detector's RAM and bit-for-bit
comparisons are made. The results of comparisons are blanked right at
the start until after any bad data is "flushed" through the system, as well
as at the end of the rotation.
User Guide BA622
Artisan Technology Group - Quality Instrumentation ... Guaranteed | (888) 88-SOURCE | www.artisantg.com
Technical Reference • 35
Interface Timing
The BitAlyzer622 has three different interfaces: bit-serial, byte-parallel
and word-parallel. There are separate "Generator" and "Detector"
connections for each interface.
Each connection comprises a series of electrical connections that have
relationships between them. The following diagrams describe the
relationships between different signals for each of the types of
Generator and Detector connections.
Bit-Serial Interface Timing
Generator:
Generator signals are: Clock Out, Begin Generate, Data Out, and TTL
Trigger.
Generator: Bit Interface Timing
36 • Technical Reference
User Guide BA622
Artisan Technology Group - Quality Instrumentation ... Guaranteed | (888) 88-SOURCE | www.artisantg.com
Detector:
Detector signals are: Clock In, Begin Detect, Data, 16-Bit Word, Blank,
Marker, TTL Trigger, and TTL Error.
Detector: Bit Interface Timing
User Guide BA622
Artisan Technology Group - Quality Instrumentation ... Guaranteed | (888) 88-SOURCE | www.artisantg.com
Technical Reference • 37
Byte-Parallel Interface Timing
Generator:
Generator signals are: Clock In, Begin Generate, Clock Out, TTL
Trigger and Data.
Generator: Byte Interface Timing
38 • Technical Reference
User Guide BA622
Artisan Technology Group - Quality Instrumentation ... Guaranteed | (888) 88-SOURCE | www.artisantg.com
Detector:
Detector signals are: Clock, Begin Detect, Data, Blank, TTL Trigger
and TTL Error.
Detector: Byte Interface Timing
User Guide BA622
Artisan Technology Group - Quality Instrumentation ... Guaranteed | (888) 88-SOURCE | www.artisantg.com
Technical Reference • 39
Word-Parallel Interface Timing
Generator:
Generator signals are: Clock In, Begin Generate, Clock Out, TTL
Trigger and Data Out.
Generator: Word Interface Timing
40 • Technical Reference
User Guide BA622
Artisan Technology Group - Quality Instrumentation ... Guaranteed | (888) 88-SOURCE | www.artisantg.com
Detector:
Detector signals are: Clock, Begin Detect, Data, Blank, TTL Trigger
and TTL Error.
Detector: Word Interface Timing
User Guide BA622
Artisan Technology Group - Quality Instrumentation ... Guaranteed | (888) 88-SOURCE | www.artisantg.com
Technical Reference • 41
User Interface Techniques
Basic Screen Motif
The basic motif of the user interface dedicates the bottom portion of the
screen to show a Dashboard panel and reserves the rest of the display to
show as many Plug-In panels as can fit. The dashboard panels have a
"Next" button for scrolling between the available dashboard panels.
The panels contain buttons, selectors, display fields, entry fields,
checkboxes and lists that are used to construct the error analyzer user
interface.
Plug-In Index Dashboard Panels
The Plug-In Index dashboard panels show a button for each available
plug-in panel. Press the button, and the associated plug-in panel opens
and the button highlights. Pressing the button again closes the plug-in
panel. When a plug-in panel is opened, it will automatically be inserted
in the space above the dashboard panel.
In addition to the buttons for each plug-in, there is also a "Next" button
for going on to the next dashboard panel; a "Close" button for closing
all open plug-ins; and a "Setup" button that will open a Plug-In Setup
panel.
42 • User Interface Techniques
User Guide BA622
Artisan Technology Group - Quality Instrumentation ... Guaranteed | (888) 88-SOURCE | www.artisantg.com
The Setup panel enables the user to choose which plug-in buttons
appear on each "page" of the index dashboard panel. A button can be
placed on Page 1, Page 2, or both, to combine particular features in the
most convenient manner.
Status Dashboard Panel
The Status dashboard panel displays various status indicators for
different operations going on within the BitAlyzer622 operating
system. For instance, there are indicators for the remaining disk space,
the current Analyzer operation, and the current time.
There is also a "Next" button for scrolling to the next dashboard panel,
a "Quit" button for terminating the BitAlyzer622 operating software,
and a "Help" button to access the on-line manual.
Configuration Dashboard Panel
User Guide BA622
Artisan Technology Group - Quality Instrumentation ... Guaranteed | (888) 88-SOURCE | www.artisantg.com
User Interface Techniques • 43
The Configuration dashboard panel presents you with a facility for
organizing a number of plug-in panels together under one button. This
button can be used to quickly switch the user interface between sets of
desired plug-in panels.
There is a "Next" button for scrolling to the next dashboard panel.
Refer to the Panel Reference section for an explanation of the "New",
"Delete", "Restore", "Next", "Set" and "Save" buttons.
Plug-In Panels
There are 13 standard and many optional plug-in panels. These include
hardware interfacing (Generator, Detector, and Clock), error analysis
(Analyzer, Basic BER, and More BER), graphical error results (Burst,
EFI, Modulo, Block, and Strip Chart), and maintenance (System and
Finder).
When any of these panels is first opened, it will be inserted in the space
above the dashboard panel, but may be moved by the user thereafter.
Each plug-in panel is described fully in the Panel Reference section.
Moving and Resizing Panels
All plug-in panels on the BitAlyzer's screen can be moved and resized.
To move a panel, touch the panel's title (top center of panel) and drag it
to the desired location (be sure to keep contact with the touch screen
while dragging). To resize a panel, use the zoom button or touch the
panel's border line and drag it accordingly (because the border line is so
small, this may take some practice in touching the line at just the right
location).
44 • User Interface Techniques
User Guide BA622
Artisan Technology Group - Quality Instrumentation ... Guaranteed | (888) 88-SOURCE | www.artisantg.com
Basic Interaction
The BitAlyzer622 operating system provides a basic graphical user
interface (GUI) for interacting with panels using a touch screen, mouse,
user knob, and keyboard. The following paragraphs describe
interactions with basic user interface objects like pushbuttons and entry
fields.
Entering Text and Numbers
Entry fields are displayed in thinly outlined rectangular boxes. They are
used to input numeric and text characters into system variables, and
display the current values of such variables.
To change the value of an entry field, you must first select the field for
editing by pressing on it. The field will blink when it is selected. Then
type the new desired value, which will replace the existing contents.
While entering data, the "Backspace" key deletes characters before the
current entry position and the "Delete" key deletes characters after the
current entry position. You can also use the arrow keys to move the
current entry position.
When you type in new data, it will replace any characters in the entry
field that are already highlighted and blinking. You can select
characters for highlighting by entering a new entry field, which selects
all characters in the field, or by pressing at the beginning of the region,
dragging to the end of the region, and releasing.
Contents can be copied from one entry field and pasted to another. To
copy an entry field, press ALT-C. To paste the contents to another
entry field, select the destination entry field and then either press ALTV or "double-click" on the entry. A "double-click" is two screen
touches or two mouse button clicks in quick succession. To qualify as a
"double-click", the two clicks must occur in the same entry field within
a specific interval. You control the interval using the Double Click
Speed parameter found on the System Parameters sub-panel.
Certain statistics displays can be copied merely by selecting them. The
Plug-In panels that contain selectable statistics are Basic BER, CCITT
G.821, ECC, Mask, More BER, and Space Mark. As an example, the
Total Bits value (from the Basic BER panel) can be pasted to the
User Guide BA622
Artisan Technology Group - Quality Instrumentation ... Guaranteed | (888) 88-SOURCE | www.artisantg.com
User Interface Techniques • 45
Calculator entry field by pressing the Total Bits value (at which point a
box will be drawn around the Total Bits value) and then "doubleclicking" on the Calculator entry field.
Copying "Total Bits" Display to Calculator
Selecting Checkboxes
Checkboxes are used to store a binary Yes or No value for certain
system variables. Pressing on the checkbox or its description causes the
state to change. An "X" within the box signifies that the variable is
selected; otherwise, the box is blank.
Pushing Buttons
Pushbuttons are used widely throughout the user interface. They are
displayed as a thickly outlined rectangular box. When you press on the
center of a pushbutton, it highlights. It doesn't perform any action until
you release the button. This feature gives you the ability to release
elsewhere in case you don't want that action to take place.
Scrolling Lists
46 • User Interface Techniques
User Guide BA622
Artisan Technology Group - Quality Instrumentation ... Guaranteed | (888) 88-SOURCE | www.artisantg.com
Scrolling lists are used in a variety of places in the user interface, such
as the file Finder panel. To scroll the list up, press on the up-arrow
icon. To scroll the list down, press on the down-arrow icon. Large fonts
are purposely used within the list. To select a specific list item, press
and release directly on the item.
Using Selectors
When you press on the selector, a pop-up menu of selector options
appears. You can then press directly on the desired option, use the
keyboard arrow keys to scroll through the options, use the knob (if it is
enabled) to scroll through the options, or press elsewhere to cancel the
interaction. Dimmed selector options are not available for selection by
the user.
Using Sliders
Sliders present a visual picture for particular settings such as the media
scan burst length threshold. Sliders will only be shown if the "Show
Sliders" checkbox is enabled in the chart setup panel. To vary the
setting, touch and drag the current setting indicator (on right of slider)
or press the plus or minus signs shown at the top and bottom of the
slider. Some sliders may allow more than one value.
User Guide BA622
Artisan Technology Group - Quality Instrumentation ... Guaranteed | (888) 88-SOURCE | www.artisantg.com
User Interface Techniques • 47
Keyboard Commands
The keyboard is used in the BitAlyzer622 operating system for data
entry into entry fields, as well as control commands including the
following.
Keyboard Control Commands:
ALT-F ............................. Dump Screen to BA5_nnnn.PCX File.
ALT-P ............................. Print Screen to print destination specified in
System panel (LPT1 is default).
ALT-Z ............................. Hide/Show Buttons on currently selected
chart.
Shift-Shift........................ Emergency Program Exit (without saving
configuration). (Both shift keys pressed
together)
ALT-Q............................. Quit and save the configuration.
ALT-Y............................. Same as pressing the "Yes" button in a
dialogue box.
ALT-N............................. Same as pressing the "No" button in a dialogue
box.
ALT-X............................. Same as pressing the "Next" button on the
Plug-In Index.
Standard Dialogs
Some pop-up dialog interactions are standardized throughout the user
interface. These are described below.
OK Messages
An "OK Message" dialog is a pop-up panel that displays a message
together with an "OK" button. This is used to inform you of some
situation that you probably cannot directly change. The program will
continue to display this message until you press the "OK" button,
whereupon it will continue operations.
Yes/No Messages
A "Yes/No Message" dialog is a pop-up panel that displays a message
together with a "Yes" button and a "No" button. This is used to inform
48 • User Interface Techniques
User Guide BA622
Artisan Technology Group - Quality Instrumentation ... Guaranteed | (888) 88-SOURCE | www.artisantg.com
you of some situation and ask you a Yes/No question. For instance,
when you press the "Quit" button on the Plug-In index panel, a
"Yes/No Message" pops up that asks you "OK to Quit?"
Working Messages
A "Working Message" dialog is a pop-up panel that displays a message
indicating that some continuing operation is in progress. This message
is normally displayed until the operation is completed, and then it is
removed. Some working messages allow you to cancel the operation in
progress by pressing a cancel button.
File Selection Dialog
The "File Selection" dialog is a pop-up panel that displays the file
system hierarchy and allows entry of a file name. The various fields
enable navigation of the DOS file system.
Example File Selection Dialog Panel
The "Change Drive" button toggles which drive the File Selection
dialog accesses for its subdirectories and files.
The Directory list presents all subdirectories under the current
directory, including the parent directory (".."). Choosing an item in the
list causes the current directory to be changed to the selected
subdirectory. When the "Change Drive" button is activated, the current
directory is switched to the root directory (e.g., "C:\").
The File Name list displays all of the files that exist within the current
directory and that match the file name filter (if one is specified). A file
name may be selected from the File Name list, or typed into the File
Name entry field.
User Guide BA622
Artisan Technology Group - Quality Instrumentation ... Guaranteed | (888) 88-SOURCE | www.artisantg.com
User Interface Techniques • 49
File filters restrict the File Name list by requiring the listed items to
match a given pattern. Specify a file filter either by typing the pattern
into the File Name entry, or by picking a pattern from the Filters
selector. For more information concerning file filters, refer to a DOS
reference manual under the topic "wild cards".
50 • User Interface Techniques
User Guide BA622
Artisan Technology Group - Quality Instrumentation ... Guaranteed | (888) 88-SOURCE | www.artisantg.com
Using the Knob
The knob on the front panel of the BitAlyzer622 is used in various
locations throughout the user interface. In many entry fields, the knob
is effective for incrementing and decrementing the numeric value
contained in the field. This is particularly useful in setting the Clock
frequency. Try pressing on the Clock "Set Frequency" entry field until
it is highlighted and blinking, ready for data entry. Then turn the knob
to increment and decrement the frequency adjustment. You can leave
that setting by pressing elsewhere on the user interface, or by pressing
the (keyboard) "Enter" key.
The knob is also used to interact with charting features like cursors,
panning and zooming. These interactions are described in the
Interacting with Charts section.
Using a Mouse
The BitAlyzer622 operating system supports both a touch-screen user
interface and a mouse interface. In fact, they can be used
simultaneously. Operationally, using the mouse is no different from
using your finger, but it is more accurate.
The BitAlyzer operating system software contains mouse drivers for
the Logitech Mouse and Microsoft Mouse. However, it is
recommended that you use the commercial mouse driver program that
accompanies the mouse. To use a mouse, plug it into serial port COM1
or COM2 and power-on the BitAlyzer. Then, execute the BA5P.EXE
program using one of the following switches:
-m.........Use the installed (commercial) mouse driver
-m1.......Use BitAlyzer mouse driver COM1
-m2.......Use BitAlyzer mouse driver COM2
If you execute "BA5P.EXE -m" and the commercial mouse driver is
not installed, then BA5P.EXE will halt and display "Exit Code: 67".
User Guide BA622
Artisan Technology Group - Quality Instrumentation ... Guaranteed | (888) 88-SOURCE | www.artisantg.com
User Interface Techniques • 51
Interacting with Charts
The BitAlyzer622 operating system provides a variety of chart types
for presenting error analysis results graphically. Each chart has specific
controls for unique features, but all charts have basic characteristics
including grids, titles, zoom and pan features, and chart setup. Charts
have three buttons:
Setup ....Opens setup dialog panel for changing chart characteristics.
Zoom ....Toggles between full-screen display and regular display.
Knob.....Selects one user-interaction to assign to the knob and to the
touch screen.
In addition, all charts include the ability to hide or show the above
buttons. Hiding buttons increases the size of the chart and is useful
when printing the screen image. To hide or show the buttons, press
"ALT-Z" on the keyboard. To print the screen image, use "ALT-P" (see
System Panel > Setup).
In the individual chart setup dialog panels, you can select different
features of charts. These are detailed below.
Log Charts
For histograms and strip charts, the individual chart Setup panels have
a checkbox for you to specify logarithmic y-axis instead of linear yaxis. In strip charting, this pertains only to viewing error counts, not
error rates.
Grids
All chart types provide a grid checkbox in their respective chart Setup
panels for enabling and disabling display of x- and y-axis grids.
Cursors A and B
Cursor A and Cursor B are used in histograms to investigate the
quantity of errors at a particular location in the histogram. You can use
just Cursor A and find out how many bursts occurred of a given length,
or use both cursors and find out how many times a burst occurred that
was at least one size but not more than another.
52 • User Interface Techniques
User Guide BA622
Artisan Technology Group - Quality Instrumentation ... Guaranteed | (888) 88-SOURCE | www.artisantg.com
When the knob mode is set to Cursor A or Cursor B, turning the knob
clockwise will move the vertical cursor from left to right. You can also
touch on the chart and reposition the cursor that way.
Cursor A is also very useful for zooming horizontally about a particular
location in the histogram or strip chart. When the knob mode is set to
Cursor A, place the cursor on the point about which you would like to
expand the histogram. Then set the knob mode to Zoom-H, and zoom
in by rotating the knob clockwise or by dragging your finger to the
right on the chart. You will notice that Cursor A will move toward the
center of the chart as the histogram data zooms about the cursor.
At the top of the chart, the cursor value is shown as A=n or B=n.
Info Line
Most chart types also include a checkbox in their chart Setup panels for
enabling and disabling display of a one-line status display at the bottom
of the chart. This line of information displays different information
depending on the chart type.
Histograms
knob mode ......... Present use of knob and touch interactions.
@A=n ............... Number of items at Cursor A location.
@B=n................ Number of items at Cursor B location.
@[AB]=n .......... Number of items inclusively between the two cursors.
C=n ................... Vertical cursor position.
Strip Charts
knob mode ......... Present use of knob and touch interactions
Cursor information is only displayed if the corresponding cursor
checkboxes are selected in the chart Setup panel.
Screen Zoom
Screen zooming is accomplished by pressing the "Zoom" button on a
chart. If the chart is normal size, this button will cause the chart to be
redrawn to occupy the entire screen. If it is screen-size already, it
redraws the chart back in the normal size and position. This is very
useful for screen printing and presentations.
While zoomed to screen-size, the "Setup" button and the "Knob"
selector function as usual, as do screen interactions like panning and
scaling using the knob or your finger.
User Guide BA622
Artisan Technology Group - Quality Instrumentation ... Guaranteed | (888) 88-SOURCE | www.artisantg.com
User Interface Techniques • 53
Panning Using Touch Screen
Panning is vertical or horizontal movement of the data in a chart,
without changing the scale. This can be achieved by assigning the knob
mode to be PAN-H or PAN-V (horizontal or vertical), and then turning
the knob or dragging your finger horizontally or vertically on the chart.
Scaling Using Touch Screen
Scaling the data-layer of a chart vertically or horizontally can be
achieved by assigning the knob mode to be ZOOM-H (horizontal) or
ZOOM-V (vertical), and then turning the knob, or dragging your finger
horizontally or vertically on the chart.
Removing Chart Buttons
All of the charts and histograms contain buttons for zooming and setup.
To prevent the buttons from being shown on the chart, press "ALT-Z".
To show the buttons, press "ALT-Z" again. When hiding or showing
buttons, the BitAlyzer software will automatically resize the current
chart to use the maximum available area in the panel.
Enabling and Disabling Charts
Charts are enabled or disabled based on whether their corresponding
scanners are enabled or disabled. Scanners are toggled via the Analyzer
Scanner Setup sub-panel.
Example of a Disabled Chart
54 • User Interface Techniques
User Guide BA622
Artisan Technology Group - Quality Instrumentation ... Guaranteed | (888) 88-SOURCE | www.artisantg.com
Chart Boundaries
Histogram and Media Scan charts display data that exists within a
finite range. Areas outside of the valid data range ("out-of-bounds"
areas) are represented by diagonal pattern-filled regions.
Example Showing Data Boundaries
Metastrings in Titles
Several metastrings have been defined for use in chart titles. Where one
of these metastrings is included as part of a title, the actual current
setting for that string will be inserted. For instance, typing into a title
entry box "FILE:$D" will result in a title of "FILE:{Current date}".
Metastring Definitions:
$D .......Date
$EF......Error filename
$FD .....Finder directory
$EFI ....Minimum Error Free Interval
$BL .....Minimum Burst Length
$INT....Integration Period
User Guide BA622
Artisan Technology Group - Quality Instrumentation ... Guaranteed | (888) 88-SOURCE | www.artisantg.com
User Interface Techniques • 55
System Procedures
The BitAlyzer622 requires very little maintenance. The following
paragraphs describe how to access the BitAlyzer622 via its remote
control capability, select a printer type for screen-dump printing,
calibrate the touch screen, and maintain the contents of the internal disk
drive. There is also a helpful section on what you can do to improve
system performance during high error situations.
Remote Control Operations
The BitAlyzer622 error analyzer can be remotely controlled using a
text-oriented command language. Commands can be transmitted to the
BitAlyzer via an RS-232 connector, or via an optional IEEE-488
general-purpose interface bus (GPIB) connector. The command
language is identical for both communications channels.
The command protocol enables setting and querying the system
parameters of the BitAlyzer622, and operating the analyzer in different
modes, including live error analysis and off-line playback of previously
recorded error data sets.
The text-oriented commands follow a basic three-part structure,
consisting of one word identifying the major feature of the
BitAlyzer622 being addressed, another word identifying a specific
operation or parameter within that feature, and optional parameters.
The BitAlyzer receives and operates on each command immediately.
Command execution sets a status variable that may be queried by the
user to determine if the previous command was successful.
Alternatively, a mode can be selected in which these statuses are
automatically returned after each command execution.
It is most useful to have an understanding of the basic principles of
BitAlyzer error analysis before undertaking remote control
programming. There is a high degree of similarity between the
BitAlyzer622's graphical user interface and the remote control
command protocol.
See the Remote Control sections on Programming Techniques and
Command Protocol for detailed information.
56 • System Procedures
User Guide BA622
Artisan Technology Group - Quality Instrumentation ... Guaranteed | (888) 88-SOURCE | www.artisantg.com
RS-232 Interfacing
Connecting to the BitAlyzer's remote control features using the RS-232
ports supports two methods of BitAlyzer remote control. The first
method is an interactive approach, and can be used by connecting the
BitAlyzer to a standard ASCII computer terminal or to a terminal
emulator program running on a host computer. In interactive mode, the
BitAlyzer transmits the following banner message when first initiated:
BA622 REMOTE CONTROL
Also, during interactive mode, the BitAlyzer produces a prompt that
looks like this:
BitAlyzer %
Each time a prompt is transmitted from the BitAlyzer, you can enter a
remote control protocol command directly by typing the command and
issuing a "carriage return" character (ASCII 13).
When processing remote control commands in the interactive mode, the
BitAlyzer always replies with the remote control status after each
command is executed. In this method, the remote control status replies
are textual messages (such as "NO_READ_FILE") instead of numeric
status codes.
To put the BitAlyzer remote control port in an interactive mode, you
must select the "Interactive" checkbox in the Remote Control Setup
panel.
Normally, the BitAlyzer will not be used in an interactive mode.
Instead, commands are usually formed in a host computer that creates
ASCII character-string text messages ending in a carriage return
character (ASCII 13). These text messages are transmitted to the
BitAlyzer, which in turn receives the messages and performs the
requested actions. In this mode, the characters received by the
BitAlyzer are not echoed back to the host computer, a prompt is not
produced for each line of input, and a banner message is not displayed
upon system initialization.
Standard RS-232 connectors to the BitAlyzer622 come in either a 9-pin
or 25-pin D-shell configuration. These ports are available to the remote
control software as COM1 and COM2. The following table describes
the signals on the D-shell connectors.
User Guide BA622
Artisan Technology Group - Quality Instrumentation ... Guaranteed | (888) 88-SOURCE | www.artisantg.com
System Procedures • 57
Name
Mnemonic
9-Pin
25-Pin
Carrier Detect ..................DCD ...............1 ................. 8
Receive Data ....................RXD ...............2 ................. 3
Transmit Data..................TXD ...............3 ................. 2
Data Terminal Ready .......DTR................4 ................. 0
Signal Ground..................GND ...............5 ................. 7
Data Set Ready.................DSR ................6 ................. 6
Request To Send ..............RTS ................7 ................. 4
Clear To Send ..................CTS ................8 ................. 5
Ring Indicator..................RI....................9 ................. 22
RS-232 Serial Port Pinout
RS-232 communications may operate at speeds up to 38.4 kbaud.
Transmission distances on RS-232 ports may be extended by replacing
RS-232 interfacing hardware cards with RS-422 equivalents. Consult
SyntheSys Research, Inc., for information regarding this modification.
It should also be noted that hardware flow control (RTS/CTS) is not
supported. This means that higher baud rates in RS-232
communications require faster host computers and may be unreliable
for long-distance runs.
IEEE-488 Interfacing
As an alternative to operating the BitAlyzer remote control features
over the standard RS-232 connections, BitAlyzers may also be
configured with an IEEE-488 interface card for use with remote
control. In this configuration, the BitAlyzer is an IEEE-488 bus
peripheral only; it is not an IEEE-488 bus controller and cannot
produce SRQ signals. The IEEE-488 bus address that the BitAlyzer622
will respond to is selected in the Remote Control Setup panel.
IEEE-488 configurations of BitAlyzer remote control are useful when
many remote control devices are to be commanded by one host
computer, and when high-speed transmissions are required.
It is important to note that the protocol used to communicate from the
host computer to the BitAlyzer622 is the same regardless of the use of
IEEE-488 connections or RS-232 connections.
58 • System Procedures
User Guide BA622
Artisan Technology Group - Quality Instrumentation ... Guaranteed | (888) 88-SOURCE | www.artisantg.com
Printing
Selecting Printers
The BitAlyzer622 user interface supports screen printing in six
different modes. These modes refer to different printer types and
different dot resolutions. To select, open the System plug-in panel and
press the "System Params" button; then use the printer type selector to
choose the appropriate printer.
Printer Type Selections:
Epson (Large).... Large size; low resolution; landscape mode
Epson (Medium) Medium size; medium resolution; portrait mode
HP-1 Printer ...... Large size; low resolution; landscape mode
HP-2 Printer ...... Medium size; medium resolution; portrait mode
HP-3 Printer ...... Small size; high resolution; portrait mode
PCX File............ Dumps screen contents to a .PCX file
Additionally, the print destination can be changed from LPT1 to
another printer port or to a filename. When the destination is a
filename, the raw printer data is stored in the file, rather than sent to the
printer. Use the printer destination selector to enter the appropriate
destination.
Printer Destination Selections:
LPT1 ................. Parallel port one.
LPT2 ................. Parallel port two.
COM1 ............... Serial port one.
COM2 ............... Serial port two.
PRN................... PRN device.
NONE ............... No destination; prevents all port printing.
<filename> ........ File destination (standard DOS format).
The HP printer types support both LaserJet and DeskJet printers. The
Epson printers support most 9-pin models.
Printing Hardcopy
The BitAlyzer622 operating system can print the contents of the screen
to two types of printers in a variety of resolutions and orientations, or to
a file as described above. To print the screen to the current printer
destination, press "ALT-P" on the keyboard.
Either an Epson printer or an HP compatible printer must be connected
to the printer port for a hardcopy, or a local area network program must
User Guide BA622
Artisan Technology Group - Quality Instrumentation ... Guaranteed | (888) 88-SOURCE | www.artisantg.com
System Procedures • 59
be currently capturing the output in order for the "ALT-P" command to
operate correctly.
Printing to a File
As an alternative to printing to a specific printer, the BitAlyzer622
operating system enables you to dump the current contents of the
screen to a .PCX file, which is a popular graphics format, and which
can be manipulated by popular word processing and presentation
programs. Additionally, a print destination filename can be set such
that the .PCX file or raw printer data will be stored in the specified file.
To print to a .PCX file, select "PCX File" from the printer type selector
(found under the "System Params" button in the System plug-in panel).
Then press "ALT-F" when ready. Each time "ALT-F" is pressed, either
a new numbered .PCX file will be created as "BA6_nnnn.PCX" (if no
filename specified) or the file specified by the print destination will be
created.
To print the current printer type to a file, set the printer destination
filename and press "ALT-P". A new filename is needed each time if
you do not wish to overwrite an existing file.
60 • System Procedures
User Guide BA622
Artisan Technology Group - Quality Instrumentation ... Guaranteed | (888) 88-SOURCE | www.artisantg.com
Touch Screen
Touch Screen Calibration
The BitAlyzer's touch screen is hardware-calibrated at the factory to the
best possible accuracy given the resolution of the analog-resistive
technology. Although this technology has the highest resolution
available, it requires run-time software to correct for non-linearity
inherent in the technology. This situation is remedied, for the most part,
by accurate calibration at the factory. Once this calibration is set, it is
highly unusual for the touch screen characteristics to change over time.
Temperature variations, however, may cause changes, and there is a
software recalibration technique available using the BA5CALIB.EXE
program from the DOS command line. This program prompts you to
touch the four corners of the display and saves the configuration in a
configuration file (TOUCH.CFG) which the BitAlyzer622 operating
system accesses when it is initiated.
If your touch screen becomes misaligned, please contact our technical
support for more details about recalibration procedures.
Touch Screen Cleaning
The touch screen is extremely durable and lasts for millions of touches.
Although little maintenance is required, follow these suggested
guidelines:
•
Avoid placing the display unit in direct sunlight or near units that
emit extreme heat.
•
When the sensor needs cleaning, do not spray the cleansing fluid
directly on the sensor. Spray the fluid onto clean multi-layered
cheesecloth. Use either a non-residue cleaner, a small amount of
non-detergent soap mixed with water, or isopropyl alcohol. Clean
and dry the sensor by rubbing gently.
•
Do not use cleaners that contain petroleum distillates such as
naphtha or benzene, or solvents such as acetone or trichlorethelene.
Cleansers with high concentrations of ammonia should also be
avoided.
•
UNDER NO CIRCUMSTANCES should a residue cleanser such
as Glasswax be used. Particle buildup at the edges of the screen
will eventually interfere with electrical wiring.
User Guide BA622
Artisan Technology Group - Quality Instrumentation ... Guaranteed | (888) 88-SOURCE | www.artisantg.com
System Procedures • 61
Hard Disk Management
The DOS hard disk is delivered fully configured with BitAlyzer622
operating system software. This comprises the C:\USR\BIN directory
contents, a CONFIG.SYS file, an AUTOEXEC.BAT file, and a
familiar directory structure providing a directory to put custom batch
files in, C:\BATCH, and a default directory for BitAlyzer error data
files, C:\USR\DATA.
BitAlyzer622 program files include a variety of file types including
executable programs, GUI fonts, configuration files, error data files
(EXAMPLE.ER5), and fixed pattern memory files.
BitAlyzer program file types:
.EXE.....Program Files
.ER5 .....Error Data Files
.RAM ...Fixed Pattern Memory Files
.CFG.....Configuration Files
.FNT.....GUI Fonts
.DRV ....GUI Graphics Drivers
.PCX.....Screen Dumps (PCX Format)
.BAT ....DOS Batch Procedure
.CSV.....Comma-Separated Vector (ASCII Excel Format)
.LOG ....BitAlyzer LOG Format
.TXT.....ASCII Text Format
Screen Saver
The BitAlyzer622 operating system GUI protects the electroluminescent display by reverting to a screen saver display after use.
The screen saver floats a small PCX file on the screen. You can specify
the length of time before the screen saver is invoked from within the
System Parameters panel.
High Error Rate Situations
High error rate situations provide the BitAlyzer622 with the most
challenging requirements. When in use, the BitAlyzer622
simultaneously acquires error information from the hardware, analyzes
it to produce error statistics, and displays these statistics on the screen
in textual and graphic formats. As you can imagine, increasing the error
rate makes each of these processes more engrossing. In this context,
62 • System Procedures
User Guide BA622
Artisan Technology Group - Quality Instrumentation ... Guaranteed | (888) 88-SOURCE | www.artisantg.com
error rates are defined as the number of errors per second. That is, the
BitAlyzer622 can acquire higher error rates at lower data rates, or it can
acquire lower error rates at higher data rates.
To accommodate these situations, you can reduce the amount of
processing the BitAlyzer622 has to do at run time. This can improve
the BitAlyzer622 capability to analyze errors. If errors are frequent,
you may have to rely on off-line error analysis for your results. In this
mode, the BitAlyzer622 acquires error information from the hardware,
copies it directly to a disk file only, and does not perform live error
processing.
Finally, you will know if the BitAlyzer622 is experiencing difficulty
analyzing your channel by examining the "Lost Bits" field in the Basic
BER plug-in panel. When the BitAlyzer622 hardware becomes overfilled with error information, it squelches errors and communicates
these Squelch Events to the software. These events can trigger the
display of a "." on the strip chart if "Show Events" is enabled in the
Strip Chart setup panel.
Even on completely horrendous channels, the BitAlyzer will acquire as
much error information as it possibly can, and adjust the calculated
error rates to represent only the periods of time that are not squelched.
The System Parameters Setup panel contains a checkbox that directs
the GUI to draw off-screen and then copy the finished regions to the
screen (Off-Screen Drawing). This is nice to look at, but very
expensive processing-wise. You can disable this feature and cause the
GUI to blink somewhat, regaining a healthy amount of processing
power in return.
The Analyzer Scanner Setup panel also contains checkboxes for
enabling various types of live error processing. These range from Basic
BER (error counting, error rates at integration periods), to Bursts (burst
profile support), and others. These processing components are called
Data Scanners and each one requires additional processing power to
operate. You must have Basic BER for any other scanner requiring
integration periods (like strip charts), but others can be disabled if
you're not using them, which will regain significant processing power.
You can disable all of them if you disable "Analyze During Record" on
the Analyzer Setup panel before recording to disk.
User Guide BA622
Artisan Technology Group - Quality Instrumentation ... Guaranteed | (888) 88-SOURCE | www.artisantg.com
System Procedures • 63
Panel Reference
The many following sections describe each of the dashboard and plugin panels comprising the BitAlyzer622 operating system. Each
description shows the panel, and describes each of the graphic fields
and how to use it. Some plug-in panel buttons open setup windows for
configuring the system parameters, which are also described in the
following sections.
Configuration Dashboard
The Configuration dashboard panel is one of multiple dashboard panels
(it occupies the bottom "dashboard" location of the screen). The
Configuration panel is used to group multiple plug-in modules together,
save these groupings as configurations, and provide one-button access
to them. As always, the top button on the right of the dashboard panel
is the "Next" button, which provides access to the other dashboard
panels.
Other buttons are used to create new grouping configurations ("New"),
assign the grouping to a button and give it a name ("Set"), or delete an
existing grouping ("Delete"). The "Save" and "Restore" buttons are for
managing the entire set of system parameters.5 The current
configuration is automatically stored when you exit the BitAlyzer
operating system using the "Quit" button. Restart the BitAlyzer
operating system and reinstate the default BA5P.CFG configuration file
by using the -r command-line switch (i.e., "BA5P -r").
The "Set" and "Delete" buttons operate like some old-fashioned car
radio buttons. To set a configuration button, first press the "Set" button
(which highlights, indicating it has been selected); then press the
5
Press Save and you will be asked what file to save the configuration to (e.g., BA5P.CFG). Press
Restore and then enter the filename where the desired configuration is stored.
64 • Panel Reference
User Guide BA622
Artisan Technology Group - Quality Instrumentation ... Guaranteed | (888) 88-SOURCE | www.artisantg.com
configuration button that you want to reset. Likewise, to delete a
button, first press the "Delete" button, then press the button you wish to
delete. In both cases, once you are done, the selection highlight goes
away.
Configuration Dashboard Panel Tools:
New .................. Create a new configuration and button using the
presently displayed plug-in grouping.
Next .................. Open the next plug-in dashboard panel
Delete ............... Delete a button with its grouping configuration.
Set .................... Redefine a button to the present plug-in grouping.
Restore ............. Restore a BitAlyzer622 operating system
configuration file.
Save .................. Save all current system variables into a configuration
file.
User Guide BA622
Artisan Technology Group - Quality Instrumentation ... Guaranteed | (888) 88-SOURCE | www.artisantg.com
Panel Reference • 65
Plug-In Index Dashboard
The Plug-In dashboard presents you with a number of buttons
representing each of the plug-in modules in the BitAlyzer622 system. If
the button is highlighted, that means the plug-in panel is open, or being
displayed on the screen. If the button is not highlighted, you can open
the associated plug-in module by pressing on the button.
The BitAlyzer operating system attempts to locate enough empty space
on the screen to show your plug-in, and opens it in the next available
location (from left to right). If there isn't enough empty space, the panel
will be opened at the left-most position. You can move a panel by
pressing on its title region to "click and drag" the window elsewhere.
Plug-In panels can overlap; they can be tiled and stacked like windows.
They are relatively expensive processing-wise, and this may hinder
error analysis at high error situations. In these environments there are a
number of performance tweaking suggestions, covered under "High
Error Rate Situations".
Following is the list of buttons presently contained on the Plug-In
dashboard panel: The right-most "Next" button toggles to the next
dashboard panel. The "Close" button closes all open plug-in panels.
The "Setup" button opens a plug-in setup panel, where the user can
choose on which "page" of the dashboard panel each plug-in button
appears.
All the other buttons represent plug-in panels that can be opened or
closed. In all but special circumstances, all the plug-ins are performing
their functions whether their panels are opened or not. This means you
can switch from the burst length histogram to the strip chart
immediately, and not have to re-analyze each time you change plug-ins.
Plug-In Dashboard Panel Tools:
Next................................. Open additional "pages" of the plug-in
index, then the status dashboard panel.
Close ............................... Close all open plug-in windows.
66 • Panel Reference
User Guide BA622
Artisan Technology Group - Quality Instrumentation ... Guaranteed | (888) 88-SOURCE | www.artisantg.com
Setup ............................... Open a plug-in setup panel.
Analyzer.......................... Control error data acquisition and playback,
and live analysis.
AuxBERT (optional)........ Control and monitor the low-speed
Auxiliary Bit Error Rate Tester.
Basic BER ....................... Display basic error statistics during
playback and live analysis.
Block ............................... Histogram of block errors.
Burst................................ Burst length histogram.
Calculator........................ Tool for performing computations.
Channel Interface (opt) .... Control a Read/Write Channel Adapter.
Clock (optional)............... Program hardware VCO clock with output
frequency.
Crystal (optional)............. Configure internal or external crystal
oscillator.
Detector........................... Program hardware error detector selections.
DUT Control (optional) ... Enable remote control of Device Under Test
over RS-232.
DUT Status (optional)...... Report status of Device Under Test.
ECC (optional) ................ Program Error Correction simulation
parameters.
EFI .................................. Histogram of error-free intervals.
Finder.............................. File system maintenance panel that selects
the current working directory.
G821 ............................... CCITT G.821 error status over time.
Generator......................... Program hardware data pattern generator
selections.
Interval............................ Histogram of intervals between either bit or
burst errors.
Mask ............................... Control and monitor the masking of errors
from portions of the data stream.
Media Scan (optional)...... Visual graphic of error locations.
Modulo ............................ Modulo analysis histogram.
User Guide BA622
Artisan Technology Group - Quality Instrumentation ... Guaranteed | (888) 88-SOURCE | www.artisantg.com
Panel Reference • 67
More BER........................ Display system-level statistics during
playback and live analysis.
Multi-Channel BER......... Enable simultaneous analysis of multiple
channels.
Pack Bits.......................... Enable analysis of error information before
other scanners, removal of designated bits,
and packing of the remaining bits back into
a contiguous stream for normal analysis.
Space Mark...................... Control and monitor the "normalization" of
the data stream.
Spectrum (optional) ......... Auto-correlation of error locations chart.
Strip Chart....................... Errors-over-time strip chart.
System ............................. Maintenance panel for selecting some
system parameters.
68 • Panel Reference
User Guide BA622
Artisan Technology Group - Quality Instrumentation ... Guaranteed | (888) 88-SOURCE | www.artisantg.com
Status Dashboard
The Status dashboard panel displays multiple system status messages
that are contributed by other plug-in modules. This panel shows you the
time, the clock frequency being generated by the internal clock source,
the expected error rate when using the error injector, and many other
useful things.
These status indicators are display-only fields. The "Next", "Quit", and
"Help" buttons are the only controls on the Status dashboard panel. The
"Next" button opens the next dashboard panel, the "Quit" button
terminates the BitAlyzer operating system, saving the current
configuration in BA5P.CFG, and the "Help" button opens an on-line
version of this User Guide for immediate reference.
Status Dashboard Panel Tools:
Next (Button)................... Open the configuration dashboard panel.
Quit (Button) ................... Terminate the BitAlyzer operating system
and save configuration in BA5P.CFG.
Help (Button)................... Open on-line version of User Guide.
Analyzer File ................... Name of error data recording file.
Analyzer Mode ................ Show analyzer modes (LIVE, RECORD,
PLAY, STOP).
Choke .............................. Performance statistic for memory usage
during acquisition modes.
Clock............................... Read-back display of internal clock
frequency.
Date................................. Current date (changeable via DOS).
Detector........................... Read back status of detector pattern type or
failure mode.
Disk Free ......................... Number of megabytes available on the
current disk.
User Guide BA622
Artisan Technology Group - Quality Instrumentation ... Guaranteed | (888) 88-SOURCE | www.artisantg.com
Panel Reference • 69
Error Injector................... Error Rate of error injection mode, or OFF if
not in use.
Generator......................... Read back status of generator pattern type or
failure mode.
Latency............................ Average latency of system response time in
seconds.
Lost Bits .......................... Percent of lost bits due to system overload.
Progress........................... Progress of Analyzer operation. If a
specified Duration is selected, shows
number of seconds left in the operation.
Otherwise, shows number of seconds into
the operation.
Squelch............................ Count of system squelch events indicating
system overload.
Time................................ Time of day (changeable via DOS).
70 • Panel Reference
User Guide BA622
Artisan Technology Group - Quality Instrumentation ... Guaranteed | (888) 88-SOURCE | www.artisantg.com
Analyzer Panel
The BitAlyzer622 Error Analyzer analyzes error information directly
from live inputs or from a previously recorded file containing error
information. In LIVE mode, the detector hardware routes error
information to the software analyzer that invokes each processing data
scanner for producing error statistics and charts. In RECORD mode,
the detector routes the error information directly into a specified DOS
error data file, which you can play back using PLAY mode. The name
of the DOS error data file is selectable via the plug-in panel's "Setup"
button.
To analyze incoming data, make sure your detector is reporting that it
recognizes an input pattern, then press the "Live" button on the
Analyzer plug-in panel. Subsequent resets from the "Reset" button on
the Status dashboard panel will not affect the analyzer mode, but will
reset error statistics and graphic chart data.
You can record error data and analyze it at the same time by selecting
the "Analyze During Record" checkbox in the Analyzer setup panel. In
this mode, error information is first routed for error statistics
processing, and then recorded in the specified DOS error data file.
The PLAY mode post-processes a DOS error data file by performing
the same error analysis calculations used during live analysis. This,
User Guide BA622
Artisan Technology Group - Quality Instrumentation ... Guaranteed | (888) 88-SOURCE | www.artisantg.com
Panel Reference • 71
however, can usually be accomplished in a fraction of the time of the
original error recording.
Analyzer Status
The Analyzer status is displayed right underneath the plug-in panel's
title. This indicates which operating mode the BitAlyzer622 error
analyzer is in.
Error Analyzer Operating Modes:
LIVE ................. Error analyzing live detector input
RECORD........... Recording live error information to error data file
PLAY ................ Playing back error data file for post-processing
BOTH................ Live error analysis and recording to error data file
performed simultaneously
STOP................. Analyzer stopped
Underneath the analyzer status display, the Analyzer plug-in panel
displays progress (percentage or time).
Live Mode
The "Live" button initiates the error analyzer in the LIVE mode. As
described above, in this mode, the BitAlyzer622 routes error
information from the error detector hardware to the error analyzing
software for immediate processing. Error processing is indicated by
changing statistics in the Basic BER plug-in panel and elsewhere. Use
the "Reset" button on the Status dashboard panel to reset the statistics
to zero.
When the button is pressed, it highlights to indicate that the analyzer is
in the LIVE mode. Pressing the button again will terminate the LIVE
state and stop the analyzer. At this point, the analyzer completes any
software processing that may have been in process. For instance, error
rates are recalculated as the total average error rate, instead of the error
rate of the most recent integration period.
Record Mode
The "Record" button commands the error analyzer to route error
information from the error detector circuits straight to a DOS error data
file. This mode will achieve the system's highest error data recording
performance during high error rate situations. If the "Analyze During
Record" checkbox is selected, the error information will be software
processed and recorded to disk simultaneously (BOTH mode).
72 • Panel Reference
User Guide BA622
Artisan Technology Group - Quality Instrumentation ... Guaranteed | (888) 88-SOURCE | www.artisantg.com
When the button is pressed, it highlights to indicate that the analyzer is
in the RECORD mode. Pressing the button again will terminate the
RECORD mode and stop the analyzer. At this point, the analyzer
completes any software processing that may have been in process. For
instance, error rates are recalculated as the total average error rate,
instead of the error rate of the most recent integration period.
Play Mode
The "Play" button accesses an error data file specified in the Analyzer
setup panel, and initiates error data processing of the file contents.
While in PLAY mode, the Analyzer plug-in panel progress display will
indicate the percent-complete of the file processing.
When the button is pressed, it highlights to indicate that the analyzer is
in the PLAY mode. Pressing the button again will terminate the PLAY
mode and stop the analyzer. At this point, the analyzer completes any
software processing that may have been in process. For instance, error
rates are recalculated as the total average error rate, instead of the error
rate of the most recent integration period.
Reset
The "Reset" button causes all statistics to be reset to zero. If the
Analyzer is not engaged, pressing this button also causes a
reprogramming of all hardware settings.
Analyzer Setup
The "Setup" button on the Analyzer plug-in panel opens a modal dialog
window containing setup parameters for the error analyzer. These
parameters are changeable by interacting with their respective GUI
fields. Changes can be canceled by pressing the "Cancel" button, or
installed by pressing the "OK" button. These parameters can be
permanently saved and restored from the Configuration dashboard
panel.
User Guide BA622
Artisan Technology Group - Quality Instrumentation ... Guaranteed | (888) 88-SOURCE | www.artisantg.com
Panel Reference • 73
Analyzer Panel Tools:
Error Filename Entry....... Enter name of file used for PLAY and
RECORD modes.
Duration Type Selector .... Select type of event used to limit duration of
LIVE, RECORD, or PLAY analyzer modes.
Events are:
Word Errors............. Whenever at least one bit of a 16-bit word is in
error, a Word Error is recognized.
Bits.......................... A specific number of bits to process.
Events...................... The stream of 6-byte events used as input data
by the BitAlyzer to perform all of its error
analysis functions.
Mark #1, Mark #2.... User-supplied Marker #1 or Marker #2 signals.
Seconds ................... A number of seconds based on the PC's
internal clock.
Duration Amount Entry ... Set the number of events detected before
terminating the current mode.
Byte Offset Entry ............. Set number of error free bytes inserted before
analysis data.
74 • Panel Reference
User Guide BA622
Artisan Technology Group - Quality Instrumentation ... Guaranteed | (888) 88-SOURCE | www.artisantg.com
Skip To Mark #1
Checkbox......................... Enable Skip To Mark #1 during start of
RECORD and LIVE modes.
Skip to Mark #2
Checkbox......................... Enable Skip to Mark #2 during start of
RECORD and LIVE modes.
Analyze During Record
Checkbox......................... Indicate whether the BitAlyzer622 should
record error information straight to disk, or
perform software error analysis at the same
time.
Ignore Events Checkbox .. All event occurrences will not be shown or
recorded.
Without Main Checkbox.. Disable gathering of error information from
the main detector. Useful when only
AuxBERT error information gathering is
desired.
Without AuxBERT
Checkbox........................ Disable gathering of error information from
the AuxBERT detector. Useful when only
main error information gathering is desired.
Select Scanners Button .... Open a window to enable/disable error
scanners (disable all unnecessary scanners for
high error rate situations).
The Skip To Mark m (#1 or #2) modes are used during the start of a
RECORD or LIVE analyzer operation to synchronize error analysis
with the next occurrence of a hardware input signal called the Marker
detector input. This facility ensures accuracy of alignment between the
next byte after the marker signal with the first byte of error processing.
The Duration Type selector and Duration Amount entry are used during
the LIVE, RECORD, and PLAY operational modes to terminate the
mode after a desired number of events have occurred. The types of
events are described below:
Word Errors..................... The BitAlyzer groups the bit stream into 16-bit
words. Whenever at least one bit of the 16 bits
is in error, a Word Error is recognized.
Bits.................................. Duration Amount specifies the number of bits
to process before terminating the current
mode.
User Guide BA622
Artisan Technology Group - Quality Instrumentation ... Guaranteed | (888) 88-SOURCE | www.artisantg.com
Panel Reference • 75
Events.............................. The BitAlyzer uses a stream of six-byte events
as input data to perform all of its error analysis
functions. The "Events" type is particularly
useful in RECORD mode to control the size of
a recorded error file. The resulting error file
size can be computed by multiplying the
Duration Amount by six.
Mark #1, Mark #2............ Terminates present mode when the number of
user-supplied Marker #1 or Marker #2 signals
detected has exceeded the Duration Amount.
For example, if the Duration Type is "Mark
#1" and the Duration Amount is 10, as soon as
the 11th Marker #1 signal is detected, the
operational mode will switch to STOP. The
computed statistics will be based on all data up
to but not including the 11th Marker #1 event.
Seconds ........................... The time-out is based on the PC's internal
clock and is accurate to one second.
Select Scanners Button
Analyzer Scanner Setup Panel Tools:
Pack Bits.......................... Enable removal of designated bits and packing
the remaining bits back into a contiguous
stream for normal analysis.
76 • Panel Reference
User Guide BA622
Artisan Technology Group - Quality Instrumentation ... Guaranteed | (888) 88-SOURCE | www.artisantg.com
Space Mark...................... Enable the "normalization" of the data stream.
ECC Emulation ............... Enable ECC Emulation processing. (Optional)
Mask Scanner .................. Enable masking of errors from portions of the
data stream.
Basic BER ....................... Enable basic error counting and error rates at
integration periods.
More BER ....................... Enable more basic error counting information.
Strip Chart....................... Enable strip chart of error rates and error
counts over time.
Burst Histogram............... Enable burst histogram processing.
EFI Histogram ................. Enable error free interval histogram.
Block Histogram.............. Enable block error histogram.
Modulo Histogram........... Enable modulo analysis histogram.
Interval Histogram........... Enable interval histogram processing.
Media Scan...................... Enable media analysis chart. (Optional)
Spectrum Histogram ........ Enable chart showing the auto-correlation of
error locations. (Optional)
Multi-Channel BER......... Enable simultaneous analysis of multiple
channels.
G.821 .............................. Enable standard communications error
measurements to be taken. (Optional)
User Guide BA622
Artisan Technology Group - Quality Instrumentation ... Guaranteed | (888) 88-SOURCE | www.artisantg.com
Panel Reference • 77
AuxBERT Panel*
Refer to the Auxiliary Bit Error Rate Tester User Guide, BA4BERT701, for a description of this option and its use.
78 • Panel Reference
User Guide BA622
Artisan Technology Group - Quality Instrumentation ... Guaranteed | (888) 88-SOURCE | www.artisantg.com
Basic BER Panel
The Basic BER plug-in supports basic error counting and calculation of
error rates at integration periods. These statistics are calculated during
LIVE and PLAY analyzer operational modes, if the Basic BER
checkbox in the Analyzer setup panel is enabled. Other analyzer
scanners, such as Strip Chart, rely on the Basic BER scanner to perform
the integration for posting error rates at integration periods. This means
that the Basic BER scanner must be enabled for the Strip Chart scanner
to operate correctly.
The following parameters are displayed on the Basic BER plug-in
panel, which can be opened by pressing the "Basic BER" button on the
Plug-In dashboard panel.
Basic BER Panel Displays:
Total Bits ........................ Number of bits analyzed since most recent
reset.
Total Errors .................... Number of errors counted.
Burst Errors .................... Number of individual actual errors counted as
being part of a burst.
Non-Burst Errors ............ Number of individual actual errors that did not
meet the minimum burst length threshold.
Burst Events ................... Number of Burst Events counted.
User Guide BA622
Artisan Technology Group - Quality Instrumentation ... Guaranteed | (888) 88-SOURCE | www.artisantg.com
Panel Reference • 79
Bit Error Rate ................. Bit error rate posted at integration periods
during operation, or total average error rate
when stopped (total number of errors divided
by total number of bits).
Burst Error Rate .............. Burst error rate posted at integration periods
during operation, or total average burst-error
rate when stopped (total number of errors in
bursts divided by total number of bits).
Non-Burst Error Rate ...... Non-Burst error rate posted at integration
periods during operation, or total average nonburst error rate when stopped (total number of
errors not in bursts divided by total number of
bits).
Burst Event Rate ............. Burst Event rate posted at integration periods
during operation, and total average burst event
rate when stopped.
Lost Bits ......................... Number of bits that could not be processed
(usually due to high error rates).
Lost Bits Percent ............. Percentage of bits lost out of total number of
bits.
Integration Period ............ User-set integration period, specified in bits.
Setup Button .................... Configure basic analysis parameters.
Calculation of "Bit Error Rate" is performed by dividing the number of
errors by the number of bits processed in each integration period.
Normally, this means that each calculation is performed by dividing by
the same quantity each time. This is not the case when Lost Bits exist
during an integration period. In these cases, an "Adjusted Bit Error
Rate" is calculated by reducing the denominator by the quantity of Lost
Bits. This is known as "Sampling Mode." The BitAlyzer622 hardware
error detection circuitry very carefully identifies those durations during
an analysis where the software system cannot keep up with processing
incoming errors. These Lost Bits periods can be reduced by trimming
software processing during an analysis; refer to the section on "High
Error Rate Situations" for more details.
Basic BER Setup Button
By pressing the "Setup" button, you can access the Basic BER setup
panel, where basic system operating parameters used during error
processing are selected. Once this panel is opened, you can edit a new
80 • Panel Reference
User Guide BA622
Artisan Technology Group - Quality Instrumentation ... Guaranteed | (888) 88-SOURCE | www.artisantg.com
configuration. Install your changes by pressing the "OK" button, or
cancel them by pressing the "Cancel" button.
Basic BER Setup Panel Tools:
Integration Period Entry .. Set integration period, specified in bits.
Error Free Interval (EFI)
Entry ............................... Set error free interval, specified in bits.
Minimum Burst Length
Entry ............................... Set minimum burst length, specified in bits.
BER Rate Display
Selector............................ Control how the BER statistics are calculated.
Recent ..................... BER results are produced by dividing the
errors in the most recent integration period by
the number of bits in the integration period.
Accumulated............ BER statistics represent total errors divided by
total bits.
Scientific Display
Checkbox......................... Enable display of Basic BER numbers in
scientific notation (good for large numbers).
Integration Period
The Integration Period is a user-selectable parameter that specifies the
number of bits in an integration period. The Integration Period refers to
the total quantity of bits during which errors are counted before
dividing the error count by the bit count to obtain an error rate. It is
User Guide BA622
Artisan Technology Group - Quality Instrumentation ... Guaranteed | (888) 88-SOURCE | www.artisantg.com
Panel Reference • 81
important to acquire enough errors before dividing to guarantee
significance in the result. These integration periods are also used when
posting error rate results to the strip chart. Each calculation at the
integration period boundaries requires significant processing power, so
larger integration periods will accommodate high error rate situations
better than smaller ones.
We recommend a simple method for selecting integration periods based
on your expected error rate: Take the expected error rate, change the
sign of the exponent and add two; an expected error rate of 10e-8
translates to an integration period of 10e10. This guarantees that 10e10
bits will be processed before calculating each error rate, normally
resulting in two significant digits of precision for the division result.
Error Free Interval (EFI)
The Error Free Interval (EFI) parameter is used by the basic BER
scanner to group errors that occur near each other into bursts, in order
to distinguish errors as being parts of bursts or otherwise. The
technique defines a minimum number of good bits within a burst of
errors required to terminate the burst. This means that there are no error
free intervals within a burst that are greater than or equal to the
minimum EFI.
This also means that a given burst of errors is composed of error bits
and good bits. The length of a given burst begins at the first bit in error
and ends at the last bit in error, and includes intervening error free
intervals less than the EFI. The length of the burst does not include a
trailing (or preceding) Error Free Interval.
Minimum Burst Length
After nearby errors are grouped together by concatenating errors that
are separated by less than the minimum Error Free Interval (EFI) of
good bits, the overall length of the group is used to determine if the
errors are to be counted as burst errors or non-burst errors. Although a
burst includes intervening error free intervals less than the EFI, when
errors are counted, only the actual error bits are considered as burst or
non-burst errors.
When a burst has been identified, its overall length is compared with
the specified Minimum Burst Length. If the length is greater than or
equal to this specification, then the system's count of burst errors
increments by the number of actual error bits comprising the burst. If
the length is less than the Minimum Burst Length specification, the
count of non-burst errors is incremented by the quantity of actual errors
in the given burst.
82 • Panel Reference
User Guide BA622
Artisan Technology Group - Quality Instrumentation ... Guaranteed | (888) 88-SOURCE | www.artisantg.com
Block Histogram Panel
The Block plug-in panel displays the block error histogram that is
calculated during error processing, which may occur in LIVE and
PLAY analyzer operational modes.6 The X-axis represents the number
of errors per block. The Y-axis shows how many blocks have occurred
with a given “errors per block.”
When processing incoming error data for this chart, the BitAlyzer622
delineates incoming data into a series of blocks based on the Block Bits
quantity (see "More BER Plug-In Panel"). An error count is calculated
for each block by counting the number of errors contained in the block.
This quantity is then posted to the chart histogram for each block that is
processed.
This achieves a histogram that represents the quantity of errors from
every block of incoming data. This histogram will answer questions
like, "How often am I getting more than 10 errors per second?" For
example, if you process 10,000 bits per second, set Block Bits to
10,000 to view each block as the number of errors per second.
A text label such as "seconds" may be used in conjunction with block
statistics. This parameter is contained in the More BER Setup panel,
and is called the Block Label.
6
A block is a fixed number of bits as defined by the user in the More BER Setup panel.
User Guide BA622
Artisan Technology Group - Quality Instrumentation ... Guaranteed | (888) 88-SOURCE | www.artisantg.com
Panel Reference • 83
Block Profile Setup Button
The plug-in panel displays a histogram chart and includes a "Setup"
button that accesses the Setup panel. This modal panel enables you to
select processing and display characteristics for the chart. Once you've
edited a new configuration, install the changes by pressing the "OK"
button, or cancel them by pressing the "Cancel" button.
Block Profile Setup Panel Tools:
Title Entry ....................... Enter a custom title for the user's block size.
May include Metastrings.
Log Chart Checkbox ........ Display y-axis logarithmically instead of
linearly.
Grid Checkbox................. Enable grid display.
Info Line Checkbox ......... Enable display of status information at bottom
of chart.
Cursor A Checkbox.......... Enable Cursor A display.
Cursor B Checkbox.......... Enable Cursor B display.
Bin Mapping Range
Display ............................ Show the start to end bit range for bin
mapping.
Bin Mapping Button ........ Open sub-panel for changing bin mapping.
Burst Data Collection Bin Mapping Panel Tools:
Bin Count Display ........... Display quantity of bins.
84 • Panel Reference
User Guide BA622
Artisan Technology Group - Quality Instrumentation ... Guaranteed | (888) 88-SOURCE | www.artisantg.com
Bin Offset Entry............... Set the offset in bits to begin mapping bins.
Bin Pow2 Scaling Entry... Change bin resolution and range (actual
scaling is 2n, where n is the scale value).
A description of Bins and how to use them is contained in the
Important Settings section.
User Guide BA622
Artisan Technology Group - Quality Instrumentation ... Guaranteed | (888) 88-SOURCE | www.artisantg.com
Panel Reference • 85
Burst Histogram Panel
The Burst Length histogram shows the number of times a burst of a
given length has occurred. To acquire this information, the
BitAlyzer622 posts to the histogram the group lengths of error groups
encountered from error detection. These groups are described in more
detail in the Minimum Burst Length and Error Free Interval (EFI)
sections. The selected EFI will affect the Burst Length histogram
because the analyzer will change its requirements for error grouping.
The selected Minimum Burst Length parameter, however, will not
affect the Burst Length histogram, because all groups of errors, whether
they meet the Minimum Burst Length threshold or not, contribute to the
Burst Length histogram.
Burst lengths are very meaningful statistics when analyzing channel
errors. They often imply error correction requirements and strategies to
accommodate a raw channel's burst error performance.
Some applications, especially in the realm of digital recording using
error correction systems like Reed-Solomon ECC, purposely shuffle
their channel data in the error correction process. This has the effect of
splitting large bursts of errors apart and separating them by a quantity
of good bits. This technique enables simpler error correction strengths
to correct the burst, because it is less dense and distributed across many
error correction units.
Two-dimensional error correction techniques define a two-dimensional
table by specifying the number of rows and columns. Data words are
86 • Panel Reference
User Guide BA622
Artisan Technology Group - Quality Instrumentation ... Guaranteed | (888) 88-SOURCE | www.artisantg.com
taken serially from the underlying raw channel and fill the twodimensional table one row at a time. When the table is full, the words
are taken out of the table each column at a time, so the errors from a
contiguous burst put into the table row-major, will come out of the
table column-major, separated by (Row Size - 1) good bits. This
interleaving process can disguise burst error performance in the output
user data as shown by normal BitAlyzer622 Burst Length histogram
processing.
In applications where the underlying channel is interleaved as described
above, it is most useful to de-interleave the user data before calculating
the burst length histogram. This unshuffling is performed by the ECC
plug-in panel (optional), and may be performed LIVE on incoming
data, or during post-processing in PLAY analyzer operational mode.
This process will return the incoming data to its original geometry,
wherein originally adjacent bits that were separated by (Row Size - 1)
other bits in the interleaving process will be put back next to each other
again. This is most often what you want, when analyzing for burst
lengths, if your channel contains an interleaving system.
See the section on basic User Interface Techniques for instructions on
how to interact with the Burst Length Histogram chart.
The ECC plug-in is a BitAlyzer622 software option.
Burst Profile Setup Button
The Burst plug-in panel displays a histogram chart and includes a
"Setup" button that accesses the Setup panel. This modal panel enables
you to select processing and display characteristics for the chart. Once
you've edited a new configuration, install the changes by pressing the
"OK" button, or cancel them by pressing the "Cancel" button.
User Guide BA622
Artisan Technology Group - Quality Instrumentation ... Guaranteed | (888) 88-SOURCE | www.artisantg.com
Panel Reference • 87
Burst Profile Setup Panel Tools:
Title Entry ....................... Enter a custom title for display at the top of the
chart. May include Metastrings.
Log Chart Checkbox ........ Display y-axis logarithmically instead of
linearly.
Grid Checkbox................. Enable grid display.
Info Line Checkbox ......... Enable display of status information at bottom
of chart.
Cursor A Checkbox.......... Enable Cursor A display.
Cursor B Checkbox.......... Enable Cursor B display.
Bin Mapping Range
Display ............................ Show the start to end bit range for bin
mapping.
Bin Mapping Button ........ Open sub-panel for changing bin mapping.
Burst Data Collection Bin Mapping Panel Tools:
Bin Count Display ........... Display quantity of bins.
Bin Offset Entry............... Set the offset in bits to begin mapping bins.
Bin Pow2 Scaling Entry... Change bin resolution and range (actual
scaling is 2n, where n is the scale value).
A description of Bins and how to use them is contained in the
Important Settings section.
88 • Panel Reference
User Guide BA622
Artisan Technology Group - Quality Instrumentation ... Guaranteed | (888) 88-SOURCE | www.artisantg.com
Calculator Panel
The Calculator panel enables a user to perform basic computations,
similar to a hand-held calculator. Also provided are some scientific
functions, such as Sine, Cosine and Tangent, and a conversion function
that can translate numbers into a different base (decimal, hex, or
binary). The Calculator panel has two modes of display, BASIC and
EXTENDED. The BASIC mode display requires less space and has
fewer functions than the EXTENDED mode display. The Calculator
panel starts in BASIC mode.
Calculator Panel Tools:
Display/Entry Field.......... Shows new values entered into the calculator.
Reports results of an operation.
CE/C Button .................... Clear the current value in the Display/Entry
field. If pressed two times consecutively, also
clears the current operation.
DECIMAL/HEX/BINARY
Button.............................. Convert the value currently being displayed to
a different base. DECIMAL -> HEX ->
BINARY -> DECIMAL -> etc. Note that the
label of the button will change to indicate the
current display base.
/, *, -, + Buttons............... Perform division, multiplication, subtraction,
and addition operations, respectively.
= Button .......................... Complete all pending operations and displays
the results.
+/- Button ........................ Change the sign of the value currently being
displayed.
User Guide BA622
Artisan Technology Group - Quality Instrumentation ... Guaranteed | (888) 88-SOURCE | www.artisantg.com
Panel Reference • 89
MORE Button.................. Change the Calculator mode from BASIC to
EXTENDED.
EXTENDED Mode Operations
Some scientific operations are provided by the Calculator panel. Press
the MORE button while in BASIC mode to access the EXTENDED
mode operations. When switching from BASIC to EXTENDED mode,
the Calculator panel widens to expose the EXTENDED mode
operators. The trigonometric functions Sine, Cosine, and Tangent are
available in EXTENDED mode, as are the INVERSE trigonometric
functions via the INVERSE button.
Calculator Panel Extended Mode Tools:
Store Button..................... Save the currently displayed value into
Calculator memory for later Recall.
Recall Button ................... Place the contents of Calculator memory into
the display.
INVERSE Button............. Indicate that if SIN, COS, TAN, LOG, or LN
is the next button pressed, the inverse of the
operation is to be performed.
DEGREES<->RADIANS
Button.............................. Indicate in which system of measurement the
SINE, COSINE, and TANGENT operations
are executed.
SIN, COS, TAN Buttons.. Perform SINE, COSINE, TANGENT
operations, respectively, on the currently
displayed value.
1/X Button....................... Compute the reciprocal on the currently
displayed value.
90 • Panel Reference
User Guide BA622
Artisan Technology Group - Quality Instrumentation ... Guaranteed | (888) 88-SOURCE | www.artisantg.com
Y^X Button ..................... Perform exponentiation using two arguments.
SQRT Button................... Compute the square root of the currently
displayed value.
LOG Button..................... Find the Log (base 10) of the currently
displayed value.
LN Button....................... Find the Natural Log of the currently displayed
value.
LESS Button.................... Switch the Calculator panel from EXTENDED
mode to BASIC mode.
User Guide BA622
Artisan Technology Group - Quality Instrumentation ... Guaranteed | (888) 88-SOURCE | www.artisantg.com
Panel Reference • 91
CCITT G.821 Panel
The CCITT G.821 panel enables standard communications error
measurements to be taken with a BitAlyzer622. You can establish the
quantity of bits in one second, and the number of errors in one second,
which will characterize the second as "Available", "Severely Errored"
or "Unavailable". During operation, this data scanner will count the
number of elapsed seconds and report them as "Total Test Seconds".
All seconds with at least one error are counted as "Errored Seconds".
All seconds with more errors than the Severely Errored Threshold will
be counted as "Severely Errored Seconds", and all seconds with more
errors than the Unavailable Threshold will be counted as "Unavailable
Seconds". This plug-in panel also displays the ratios of "Available
Seconds Percent" and "Available Ok Seconds Percent". Also displayed
are "Available BER" and "Link Status" (enabled or disabled).
The second panel of statistics regarding "Degraded Minutes" is
accessed by pressing the NEXT button. You can define the number
errors allowed within each minute, which will characterize the minute
as "Degraded" or "Non-Degraded".
92 • Panel Reference
User Guide BA622
Artisan Technology Group - Quality Instrumentation ... Guaranteed | (888) 88-SOURCE | www.artisantg.com
CCITT G.821 Panel, Degraded Minutes
CCITT G.821 Setup Button
The "Setup" button on the CCITT G.821 plug-in panel accesses a
modal panel containing various GUI fields representing parameters
used in configuring G.821 analysis. Once you've edited a new
configuration, install the changes by pressing the "OK" button, or press
the "Cancel" button to cancel the changes.
Refer to the Application Notes section for a more detailed description
of G.821 analysis and recommended setup.
User Guide BA622
Artisan Technology Group - Quality Instrumentation ... Guaranteed | (888) 88-SOURCE | www.artisantg.com
Panel Reference • 93
G.821 Setup Panel Tools:
Bit Data Rate Entry.......... Set quantity of Bits Transmitted in One
Second (i.e., Bits per Second or Hz).
Severe Error Threshold
Entry ............................... Set the maximum number of errors within one
second before being classified as a Severely
Errored Second.
Degraded Minute Error
Threshold ........................ Set the maximum number of errors within one
minute before being classified as a Degraded
Minute.
Log File Name Entry ....... Name the log file to be created in the current
Finder directory location. The name must be a
valid DOS filename.
Log Seconds Entry........... Set quantity of seconds that are grouped
together to form one line of output to the log
file.
94 • Panel Reference
User Guide BA622
Artisan Technology Group - Quality Instrumentation ... Guaranteed | (888) 88-SOURCE | www.artisantg.com
Channel Interface Panel*
Refer to the appropriate Read/Write Channel Adapter User Guide,
BA4CAxx-701, for a description of this option and its use.
User Guide BA622
Artisan Technology Group - Quality Instrumentation ... Guaranteed | (888) 88-SOURCE | www.artisantg.com
Panel Reference • 95
Clock Panel (Option)*
This clock source is a highly stable synthesizer-based signal. Users set
the desired clock frequency using the Clock panel.
The internally generated clock source may be accepted as input to the
generator directly, without cabling. In this mode, the serial interface
reads the same bit frequency as the clock source generating frequency.
The byte interface reads the same bit frequency, but is operated on a
byte-clock that is 1/8th the bit frequency. Likewise, the 16-bit word
interface operates on a word-clock that is 1/16th the bit frequency.
Set Clock Frequency Entry
To change the generating frequency, press on the "Set Frequency" entry
field and either type a new frequency on the keyboard, or spin the knob.
When you're done changing the frequency, press elsewhere to exit the
field. Frequencies are accepted from the keyboard either as decimal
numbers representing hertz, say "1000000" representing one
megahertz, or by using one of three appended units labels: "Hz", "kHz",
or "MHz".
96 • Panel Reference
User Guide BA622
Artisan Technology Group - Quality Instrumentation ... Guaranteed | (888) 88-SOURCE | www.artisantg.com
Detector Panel
The Detector plug-in panel is linked directly to the error detector
hardware circuitry. Every time you change and save a detector setting,
the hardware circuitry is reprogrammed and reset. Settings are accessed
by pressing the "Setup" or "Detector RAM" buttons on the Detector
plug-in panel. The "Detector RAM" button is only present in systems
that are equipped with the optional RAM features.
The BitAlyzer622 hardware error detector synchronizes an internal
pattern source with an incoming recognizable data pattern. It then
continues in lock-step with the incoming data, generating 16-bit words
at a time of the source pattern, and comparing them with input words.
Errors are enqueued to software post-processing, which can either
record them to disk as an error data file, or process them immediately
into high-level error statistics and charts, or both.
The detector has many interfacing options, including three different
interfaces; single-ended ECL bit-serial, balanced ECL 8-bit byteparallel, and balanced ECL 16-bit word-parallel. The bit-serial clock
and data input to the detector can be inverted separately, as can marker
and other signals. The blanking signal can be programmed to be activehigh or activelow depending on your application. You can select
whether the word-position counters increment during blanked intervals
or not, and whether or not to perform a hardware resynchronization
with incoming data at the end of each blanked interval. You can also
select incoming serial data to be NRZi decoded.
User Guide BA622
Artisan Technology Group - Quality Instrumentation ... Guaranteed | (888) 88-SOURCE | www.artisantg.com
Panel Reference • 97
The detector can also mask out certain types of events from being sent
to the software for processing. These include supervisory-level events
like "blank begin" and "blank end", that might lead to system overload,
and user-level events like Marker-A and Marker-B signals. You can
also optionally communicate the word positions of all blanking and
resynchronization signals, as well as a pattern-synchronization
indication that can be used to exactly relate errors to their position in
the cyclically produced data patterns. This event-masking feature is
accessible through the "Event Enabling" button on the Detector setup
panel. The typical settings for this is to enable error and marker events.
Detector Status Display
The Detector plug-in panel always displays the current state of the
detector hardware system. If the hardware is not installed in the
computer, it displays a "NO H.W." message. This is the case for the
stand-alone analysis software versions of the operating system. The
states of the error detector include "NO CLOCK", indicating that the
selected detector interface (either serial, byte, or word) is not currently
receiving an input clock signal; and "NO SYNC", indicating that the
error detector has recognized an input clock, but cannot recognize a
data pattern on the incoming data channel. Valid patterns include the
pseudo-random, 16-bit fixed, and RAM-based patterns described
below. If one of these patterns is recognized as input to the error
detector, then a message such as "PRN-7" or "FIXED" will be
displayed.
The detector status also includes a read-back of the frequency of the
clock input to the detector hardware. This is useful to verify
connections.
Detector Scan For Pattern
Resynchronization with incoming data can be triggered by error rates
exceeding the resynchronization threshold, by hardware
resynchronization signals, and by pressing this button. It forces a
number of words to be taken from the input data stream and fed into the
repetitive pattern generator to be used as seed-values for the random
number generators and the 16-bit fixed patterns.
When the detector is not being used by the analyzer in LIVE or
RECORD modes, it is continuously being reprogrammed with the
current detector hardware configuration settings. If the detector data
type is AUTO SEARCH, each time the detector is reprogrammed, each
recognizable data pattern will be tried.
98 • Panel Reference
User Guide BA622
Artisan Technology Group - Quality Instrumentation ... Guaranteed | (888) 88-SOURCE | www.artisantg.com
Detector Setup Button
The "Setup" button on the Detector plug-in panel accesses a modal
panel containing various user interface fields representing parameters
used in configuring the detector hardware. Once you've edited a new
configuration, install the changes by pressing the "OK" button, or press
the "Cancel" button to cancel the changes.
Detector Setup Panel Tools:
Pattern Selector................ Select input pattern that detector will test for
errors:
PRN-7 .................. 27-1 length pseudo-random pattern.
PRN-15 ................. 215-1 length pseudo-random pattern.
PRN-20 ................. 220-1 length pseudo-random pattern.
PRN-23 ................. 223-1 length pseudo-random pattern.
16-Bits .................. Grabbed 16-bit fixed pattern.
RAM-Grab ............ Grabbed RAM content.
RAM-Trig ............. Previously loaded RAM content.
Zero ...................... Constant zero.
Search ................... Search of all recognizable types.
Input I/F Selector............. Select from three interface types.
Bit I/F.............................. Bit-serial, front panel SMA connectors.
Byte I/F............................ Byte-parallel, rear-panel parallel connector.
Word I/F.......................... 16-bit word-parallel, rear-panel parallel
connector.
Resync Threshold Entry... Enter the number of words in error before the
detector attempts to resynchronize.
User Guide BA622
Artisan Technology Group - Quality Instrumentation ... Guaranteed | (888) 88-SOURCE | www.artisantg.com
Panel Reference • 99
Off-Line Reprogramming
Checkbox......................... Enable frequent reprogramming of the detector
hardware when not in LIVE or RECORD
modes.
Faster Bits Updating
Checkbox......................... Update error and bit-count information more
often during LIVE or RECORD modes. Good
for low data rate and low error rate
applications.
Event Enabling Button..... Open sub-panel for enabling/disabling the
processing or recording of particular events.
I/F Settings Button........... Open sub-panel for changing Interface
parameters.
Checkout Button .............. Open sub-panel that monitors detector
circuitry results.
Event Enabling Panel Tools:
Error Events Checkbox .... Enable actual errors represented as the result
of XORing between input data and reference
word.
Marker Events Checkbox . Enable event indicating marker input from
front panel (Marker-A) or back panel (MarkerB) inputs.
Resync Events Checkbox . Enable event indicating hardware or software
resynchronization attempt
Blank Events Checkbox ... Enable event indicating blanking is active.
100 • Panel Reference
User Guide BA622
Artisan Technology Group - Quality Instrumentation ... Guaranteed | (888) 88-SOURCE | www.artisantg.com
Cycle Events Checkbox.... Enable event indicating data is first data-word
of repetitive pattern. This event may occur
once per resynchronization.
Detector Interface Settings Panel Tools:
Invert Clock Checkbox .... Invert input clock signal.
Count During Blanking
Checkbox......................... Continue incrementing word counter during
hardware blanking.
Invert Blank Checkbox .... Invert the blanking signal.
Resync on Blank
Checkbox......................... Perform hardware resynchronization at the end
of each blanking period.
Enable Begin Detect
Checkbox......................... Enable RAM memory begin-detect signal.
Count Errors During
Resync Checkbox............. Enable counting of errors while
resynchronization is in progress.
Invert Begin Detect
Checkbox......................... Invert the RAM memory begin-detect signal.
Parity Odd Checkbox ....... Set parity odd (Otherwise even).
NRZi Decode Checkbox... Decode serial input as NRZi input.
Enable Blanking
Checkbox......................... Enable blanking signal.
Invert Data Checkbox ...... Invert input data signal.
User Guide BA622
Artisan Technology Group - Quality Instrumentation ... Guaranteed | (888) 88-SOURCE | www.artisantg.com
Panel Reference • 101
Data Delay Entry ............. Set amount of delay added to the input data
signal with respect to the detector input clock
signal. Range is –1.147 ns to +1.165 ns.
Setup Detector RAM (Optional)
As an alternative to the repetitively generated reference data patterns,
the error detector is optionally equipped with RAM for storing custom
data patterns. Using the Detector RAM is similar to using pseudorandom or 16-bit fixed data patterns; however, at low data rates,
synchronizing with RAM contents will take longer. Synchronization is
performed by comparing every word contained in the RAM with the
incoming words of user data. There are various ways and sources for
loading RAM and saving RAM contents.
Setup Detector RAM Panel Tools:
Load Test Pattern
Checkbox......................... Load the selected pattern into RAM.
Pattern Selector................ Current Detector RAM pattern:
All ones ................... RAM is loaded with an all-ones pattern.
All zeroes ................ RAM is loaded with an all-zeroes pattern.
Alternating 1/0's ...... RAM is loaded with alternating one/zero
pattern.
Byte Ramp ............... RAM is loaded with repeating bytes ramping
from 0 to 255.
Word Ramp ............. RAM is loaded with repeating words ramping
from 0 to 65535.
102 • Panel Reference
User Guide BA622
Artisan Technology Group - Quality Instrumentation ... Guaranteed | (888) 88-SOURCE | www.artisantg.com
Quick Brown Fox..... RAM is loaded with ASCII text message
"THE QUICK BROWN FOX JUMPED
OVER THE LAZY DOG 0123456789".
PRN-7 Error ............ RAM is loaded with PRN-7 data, except first
bit is in error.
Load File Contents........... Load the selected DOS file into RAM.
Filename Entry ................ Enter or select name of file to be loaded into
RAM.
Load User Data
(Word Quantity) .............. Load RAM from the Detector Input data of the
specified word length and begins comparing it
from now on.
Word Count Entry ........... Select the quantity of words to be used in
"Load User Data". Minimum = 0; Maximum =
262,144 (or 1,048,576 for 16M RAM option).
Load User Data
(Begin-Detect Triggers) ... Load RAM from the Detector Input data
starting with the first Begin Detect pulse and
ending with the second. Compares between
pulses from now on.
Save to Disk Selector ....... Save RAM content of previously specified
length to the DOS filename you specify in the
"Save RAM Contents" window.
RAM contents may be filled from input Detector data, a data file that
you provide, or with software-generated test pattern data formats. The
test patterns include all ones, all zeroes, alternating 1/0's, byte ramp,
word ramp, and "quick brown fox" data sequences. There is also a
PRN-7 pseudo-random data pattern with the first bit in error, which is
useful for system diagnostics. To use these software-generated patterns,
external synchronization using the external Begin Detect signal must be
used. In this case, the Detector pattern must be set to RAM-Trigger.
The Load User Data (Word Count) and Load User Data (Begin-Detect
Triggers) features are useful for channels that transmit repetitive, fixedlength, synchronous sequences of arbitrary data, rather than repetitively
generated patterns like pseudo-random or 16-bit fixed patterns.
Normally the receiver would have to know not only how many words
comprised a repetition of the pattern, but also when the pattern begins,
in order to compare for errors. The Load User Data (Word Count)
pattern type, however, will grab a given quantity of words and
immediately begin comparing with whatever phase of the pattern is
stored sequentially in the RAM. This enables arbitrary data patterns of
User Guide BA622
Artisan Technology Group - Quality Instrumentation ... Guaranteed | (888) 88-SOURCE | www.artisantg.com
Panel Reference • 103
fixed length to be used with error detection, and does not require
additional cabling for the Begin Detect signal. Load User Data (BeginDetect Triggers) grabs data between two Begin Detect signals and uses
it for comparison with incoming data. Both of these methods of loading
RAM are explained more fully below.
The Detector RAM can be used to test transmission channel coding
systems by software-simulating one end of the coding chain. You can
write a program to software-simulate a new coding system and create
the results from encoding a known message, then transmit that message
from the Generator's RAM to test your decoder. Or vice-versa, you can
load the Detector RAM with the data result of encoding a known
message, transmit that known message through your channel and
through the channel's encoder, and then into the BitAlyzer622 error
detector, to evaluate your system encoder.
Loading RAM from User Data Stream
There are two ways to load the Detector RAM from the user's data
stream; Load User Data (Word Quantity) and Load User Data (BeginDetect Triggers).
In Load User Data (Word Quantity) mode, the user must specify the
number of words that the incoming data will repeat. This mode MUST
load the RAM from the user's stream, and cannot pre-load the RAM
from a file. In Load User Data (Word Quantity) mode, the first bit of
the pattern is unknown, so phase is established "on the fly" by looking
at the user's data.
The RAM is loaded with the specified number of words and then is
verified during a second pass to make sure error-free data was loaded.
If a mismatch is found, the process will be reinitiated. If two sequences
do not match, the message NO SYNC will appear in the detector
window. If "Offline Reprogramming" is checked in Detector Setup,
RAM-Grabs are performed every second or so when the Analyzer is in
STOP mode.
In LIVE or RECORD mode, the RAM will continually be cycled and
compared to the incoming data. If a bit-slip or other event occurs that
causes synchronization to be lost, a RESYNC request will
automatically be issued to the hardware (see Resync Threshold in
Detector Setup), causing a reload of the RAM from the data stream.
During the resync process, errors will not be recorded.
Low data rates and large RAM files equate to a long RAM load time.
For example, a complete 4 Mbit data sequence at 100 kbit/sec would
take at least: 4 Mbit x 2 passes x 0.00001 sec/bit = 80 seconds. For
reasonably high data rates, RAM loading occurs very quickly.
104 • Panel Reference
User Guide BA622
Artisan Technology Group - Quality Instrumentation ... Guaranteed | (888) 88-SOURCE | www.artisantg.com
In Load User Data (Begin-Detect Triggers) mode, the user provides an
external phase reference (the Begin Detect signal) between the
expected RAM values and the incoming data. For this reason, the RAM
can be pre-loaded either from a file or from the software-synthesized
patterns (Load Test Pattern: All ones, All zeros, etc.). For a majority of
cases, it is still more convenient to grab a copy of the reference data
from the incoming data stream [Load User Data (Begin-Detect
Triggers)]. Even if the data is incorrect, it establishes the phase
relationship in the RAM between the user's data and the file location. A
grabbed file with errors in it can be saved to disk, edited using a binary
editor, and then re-loaded as a Detector RAM reference file.
In order to grab the data, the user must supply a Begin Detect signal
(and enable it in the Detector Advanced Setup). There must be less than
4 Mbits between two Begin Detect pulses used for the RAM-Trigger
load. If there are more bits, the RAM addressing circuits will wrap
around to address zero and will start overwriting the first RAM
locations.
Once Load User Data (Begin-Detect Triggers) is selected and OK is
pressed, the BitAlyzer will wait (up to one second) for the next Begin
Detect pulse. It will then load the RAM with the incoming data,
displaying a "Load Detector RAM" message (independent of whether
or not the Blanking signal is enabled) until a second Begin Detect
signal is received, at which point RAM loading will stop. The message
"Processing RAM" will then be displayed as the BitAlyzer reviews and
adjusts the RAM contents in preparation for using this as a reference.
Upon completion, the message "RAM Trig." will appear in the
Detector panel. No check is made as to the accuracy of the RAM data
grabbed. The next logical step for the user would be to look at the TTL
error pulse or go LIVE and see that there are no errors.
It is very valuable to monitor the Begin Detect, Blank and TTL Error
signals on an oscilloscope (using Begin Detect as the trigger). The TTL
Trigger signal is also useful, in that a successfully interfaced Begin
Detect signal will cause a one-word-wide pulse to come out of the TTL
Trigger output in a fixed phase with the Begin Detect signal. Jitter on
this signal might indicate that the Begin Detect signal was not
successfully being clocked on the same edge every time.
When the Blank signal is high, the TTL Error signal will be low. This
is a great test in making sure that Blank is enabled and that the correct
level is selected. Do not proceed to the Analysis features of the
BitAlyzer until the oscilloscope shows an error trace that is
predominantly low with the occasional pulse from a real data error.
Error pulses that stay high or "wipe-out" a scan signify very high error
rates and burst errors.
User Guide BA622
Artisan Technology Group - Quality Instrumentation ... Guaranteed | (888) 88-SOURCE | www.artisantg.com
Panel Reference • 105
The steps to begin a Load User Data (Begin-Detect Triggers)
application might include the following. Of course, this would be done
after you have some confidence in data accuracy and data stability with
respect to Begin Detect.
1.
Interface Clock, Data, Blank, Begin Detect to the BitAlyzer
(Marker is optional).
2.
Enable proper data interface and active edge selections.
Disable Blank for now.
3.
Put Begin Detect, Blank, TTL Trigger and TTL Error on
oscilloscope.
4.
Trigger on Begin Detect.
5.
Check that TTL Trigger is present and stable.
6.
See that TTL Error is high.
7.
Enable Blank and see that the error trace goes low when Blank
is active.
8.
Check "Load User Data (Begin-Detect Triggers)" and press
OK.
9.
After RAM is loaded, view the TTL Error output.
If the error trace is low (with occasional pulses), you're ready to begin
analysis. Try LIVE mode in the Analyzer and monitor the Bit Error
Rate using the Basic BER panel. If the error pulse is all high or streaks
high often, check Data, Clock to Data and Clock to Begin Detect
relationships, and verify that there are less than 4 Mbits between the
Begin Detect pulses. You can, at this point, save the RAM to a file and
use a binary editor to view the contents, to see if it is what you
expected. The DOS debug utility is installed on your BitAlyzer. By
typing "debug <filename>", you will have access to the debug
commands. The "d" (dump) command can be used to simply look at the
HEX and ASCII values, starting at the beginning of the file. Note that
the first word in the file will correspond to a delay of a few words after
the Begin Detect input, due to pipeline delays inside the BitAlyzer.
Also remember that the file is organized in 16-bit words, not bytes, and
so must be interpreted that way. SyntheSys Research also provides
other utilities for reviewing the contents of binary RAM files in ASCII
format.
Save to Disk Selector
The Detector RAM content may be saved in a DOS computer file.
Pressing Save to Disk on the Setup Detector RAM panel opens the file
106 • Panel Reference
User Guide BA622
Artisan Technology Group - Quality Instrumentation ... Guaranteed | (888) 88-SOURCE | www.artisantg.com
selection dialog panel shown below. RAM contents files normally have
the ".RAM" extension.
See "Application Notes" for a RAM Example ("Disk Drive and Spin
Stands").
Detector Checkout Button
The "Checkout" button on the Detector Setup panel opens a sub-panel,
Detector Scope, that monitors the detector circuitry results. The two
most useful fields on the left half of the Detector Scope panel are
"Resync Count" and "Parity Errors". "Resync Count" indicates the
number of resynchronizations that the detector has issued. The "Parity
Errors" field represents the count of parity errors that the detector has
recorded. The quantity of parity errors is not as relevant as the fact that
parity errors have occurred.
The right half of the Detector Scope panel contains an interface to the
detector and generator Ad Hoc inputs and outputs. You can control the
detector and generator Ad Hoc outputs by changing the settings of the
two selectors found on this panel. The detector and generator have five
available Ad Hoc output modes (or settings) in common.
User Guide BA622
Artisan Technology Group - Quality Instrumentation ... Guaranteed | (888) 88-SOURCE | www.artisantg.com
Panel Reference • 107
Detector/Generator Ad Hoc Selectors:
Not Used.......................... Ad Hoc output is ignored.
Set to Zero ....................... Set Ad Hoc output to 0.
Set to One........................ Set Ad Hoc output to 1.
Mirror In To Out ............. Set Ad Hoc output to the current value of
the Ad Hoc input. The Ad Hoc output is
refreshed periodically.
Invert In To Out............... Set Ad Hoc output to the complement of the
Ad Hoc input. Ad Hoc output is refreshed
periodically.
The detector has a sixth mode, named "Arm On Adhoc". "Arm On
Adhoc" is used in conjunction with Skip to Mark m and Ignore Events
(both located on the Analyzer Setup panel) to synchronize multiple
BitAlyzers during a RECORD or LIVE scanner session. The "Arm On
Adhoc" input causes the BitAlyzer to wait when a RECORD or LIVE
mode is initiated until a detector ad hoc input signal is received. It then
"pings" this signal to its ad hoc output and initiates the RECORD. This
RECORD will then pause until the next marker is encountered, owing
to the selection of the Skip to Mark mode, and at that point it will
initiate error analysis. Other BitAlyzers in the chain will perform
exactly the same operation, and so they will all begin error analysis at
the same marker signal. Refer to Synchronizing Multiple BitAlyzers,
in Remote Control Programming Techniques for more information on
the use of "Arm On Adhoc".
Changes to the Ad Hoc output mode selections will take effect only
AFTER the Detector Setup panel "OK" button has been pressed.
108 • Panel Reference
User Guide BA622
Artisan Technology Group - Quality Instrumentation ... Guaranteed | (888) 88-SOURCE | www.artisantg.com
Explanation of Detector Pattern Types
Most detector pattern types simply specify a particular bit-sequence
that the BitAlyzer622 will compare incoming data against for bit-error
checking. This includes PRN-7, PRN-15, PRN-20, and PRN-23. In
these modes, the BitAlyzer622 error detector synchronizes with
incoming data whenever an on-line analyzer operating mode is initiated
(Live or Record). Synchronization is performed by grabbing a few
words of incoming data and seeding specific pseudo-random number
generators with the incoming data. The pseudo-random number
generators begin producing data that is subsequently compared with
incoming data.
The 16-bit detector pattern is similar. When synchronization is
requested, one 16-bit word is taken from the incoming data and used as
the pattern for subsequent comparisons. The Zero pattern is a special
case of the 16-bit pattern, where no data is grabbed from the input to be
used as the reference. Instead, a fixed all-zero pattern is used.
In Search Mode, all of the pattern types described so far (Zero, 16-Bit,
PRN-7, PRN-15, PRN-20, and PRN-23) are tried. If synchronization is
not made within a time limit, the next pattern is tried. In some
extremely high error situations, searching through patterns will not
work, and so the specific pattern present in the incoming data must be
specified as the detector pattern type rather than using the Search mode.
The final two pattern types are available only in BitAlyzers equipped
with Fixed Pattern RAM (option). In this configuration, the PRN-15
and PRN-20 patterns, described above, are not available due to
hardware constraints.
In RAM-Grab mode, each time the analyzer is placed in an on-line
mode (Live or Record), the Detector RAM first grabs a specified
quantity of words. This becomes the reference pattern that subsequent
user data input is checked against. This exact word-quantity is specified
in the Detector RAM Setup window. This "Grab-and-Go" feature does
not support grabbing a quantity of words determined by two successive
Begin-Detect hardware signals. It only operates with a specified
quantity of 16-bit words.
In RAM-Trigger mode, the RAM does not automatically fill itself each
time the analyzer is placed in an on-line mode. Rather, it depends on
having the Detector RAM pre-filled before going on-line. Once on-line,
the hardware Begin Detect signal is used to synchronize incoming data
input with the contents of the RAM to perform error checking.
User Guide BA622
Artisan Technology Group - Quality Instrumentation ... Guaranteed | (888) 88-SOURCE | www.artisantg.com
Panel Reference • 109
DUT (Device Under Test) Control Panel*
Various devices may be connected to the BitAlyzer for testing, such as
the Sony DIR-1000 or the Ampex DCRS. DUT (Device Under Test)
Control and Status panels are provided so that operations can be
customized for the device being tested.
When DUT Control is selected, the initial DUT Control panel (with no
device type specified) will appear. Pressing the "Set DUT" button
opens the Select DUT Type panel, where the type of device under test
is specified. Once a type of device to be tested is selected, the Setup
button on the DUT Control Panel will then open the appropriate setup
panel for that device.
Each Setup panel includes entry fields for parameters specific to the
selected Device Under Test. At the bottom of most Setup panels is a
button for Communications Setup, where the appropriate port, baud
rate, and mode are specified.
Device Under Test Control Panel: DUT Type = NONE
DUT Control Panel Tools:
Stop, Play, Record,
Fast Fwd, Fast Rev,
Eject, Reset ...................... Initiate the specified operation in the selected
DUT device.
Set DUT .......................... Open Select DUT Type panel.
Setup ............................... Open setup panel for selected device.
110 • Panel Reference
User Guide BA622
Artisan Technology Group - Quality Instrumentation ... Guaranteed | (888) 88-SOURCE | www.artisantg.com
The Control Panel will indicate which DUT is selected, if any, in the
area above the control buttons. The fields shown above as A, B, C and
D will contain identification and status information particular to the
DUT, as indicated in the following table:
Generic
Sony
DIR-1000
Ampex
DCRS or
DCRSi
Metrum
VLDS or
BVLDS
Loral
DV-6000
A
"GENERIC"
"DIR-1000"
B
"DUT"
"DUT"
Machine
ID
"VLDS"
Command
Mode
Status
"DUT"
"DV-6000"
"DUT"
User Guide BA622
Artisan Technology Group - Quality Instrumentation ... Guaranteed | (888) 88-SOURCE | www.artisantg.com
C
--Reader
ID
Track
Number
D
--Mode
Status
Footage
Location
Principal
Block
Number
Current
Time
Stamp ID
Recorder
Operating
State
Recorder
Mode
Panel Reference • 111
Select DUT Type
Select DUT Type Panel Tools:
DUT Type Selector: ......... None
Generic
Sony DIR-1000
Ampex DCRS or DCRSi
Metrum VLDS or BVLDS
Loral DV-6000
The following sections will explain the setup procedure and options for
each of the DUT types.
Generic DUT Setup
112 • Panel Reference
User Guide BA622
Artisan Technology Group - Quality Instrumentation ... Guaranteed | (888) 88-SOURCE | www.artisantg.com
Each entry field accepts a character string typed in by the user, which
will then be transmitted verbatim out the selected serial
communications port to the DUT when the corresponding control
button is pressed.
Generic DUT Setup Panel Tools:
Control Entries ................ Stop
Play
Record Fast Fwd
Fast Rev Eject
Reset
Communications Setup
Button.............................. Open panel for communications setup.
This panel is used to set up communications for Generic DUT only.
Generic DUT Communications Setup Panel Tools:
Port Selector .................... Select communications port to be used.
Baud Selector................... Select bandwidth of communications channel.
Mode Selector.................. Select communications parity, stop bits and
word length. For example, a mode set to "N18"
indicates no parity, one stop bit, and a word
length of eight bits.
Below is the Status panel as it will appear when a Generic DUT is
selected. The lower portion of the panel shows incoming characters
from the serial port.
User Guide BA622
Artisan Technology Group - Quality Instrumentation ... Guaranteed | (888) 88-SOURCE | www.artisantg.com
Panel Reference • 113
Generic DUT Status Panel Displays:
DUT Type........................ Generic
Comm Errors................... Number of communication errors.
114 • Panel Reference
User Guide BA622
Artisan Technology Group - Quality Instrumentation ... Guaranteed | (888) 88-SOURCE | www.artisantg.com
Sony DIR-1000 DUT Setup
Sony DIR-1000 DUT Setup Panel Tools:
Data Rate Selector ........... Select data rate from the following choices:
10.7
16
32
64
128
256
AUTOMATIC
Fwd E.C.C....................... Select error correction strength:
C1 ......................... 0, 1, 2, 3
C2 ......................... 0, 1, 2, 3
Erase ..................... 0, 1, 2 ...,10
Rec E.C.C........................ Select error correction strength:
C1 ......................... 0, 1, 2, 3
C2 ......................... 0, 1, 2, 3
Erase ..................... 0, 1, 2 ...,10
Reference Selector ........... Select INTERNAL, DATA-IN, or REF-IN
Use External Sync
Checkbox......................... Select external synchronization.
Poll Interval Entry ........... Specify how often status panel is to be
updated.
Communications Setup
Button.............................. Open panel for communications setup.
User Guide BA622
Artisan Technology Group - Quality Instrumentation ... Guaranteed | (888) 88-SOURCE | www.artisantg.com
Panel Reference • 115
Sony DIR-1000 DUT Communications Setup Panel
Sony DIR-1000 DUT Communications Setup Panel Tools:
Port Selector .................... Select communications port to be used.
Baud Selector................... Select bandwidth of communications channel.
Mode Selector.................. Select communications parity, stop bits and
word length. For example, a mode set to "E28"
indicates even parity, two stop bits, and a word
length of eight bits.
Below is the Status panel as it will appear when the Sony DIR-1000 is
selected:
116 • Panel Reference
User Guide BA622
Artisan Technology Group - Quality Instrumentation ... Guaranteed | (888) 88-SOURCE | www.artisantg.com
Sony DIR-1000 DUT Status Panel Displays:
DUT Type........................ Sony DIR-1000
Comm Errors................... Number of communication errors.
Mode ............................... Status of DUT: NONE, LOADING,
EJECTING, NO-TAPE, RECORD, PLAY,
SEARCH, FFWD, FREV, STAND-BY, or
OFF STAND-BY.
IDR ................................. Reader ID.
IDG ................................. Generator ID.
IDC ................................. Counter ID.
Capstan ........................... YES/NO, indicating whether capstan is locked
or unlocked.
Drum ............................... YES/NO, indicating whether drum is locked or
unlocked.
Reference......................... INTERNAL, DATA-IN, or REF-IN.
Data Rate......................... DIR-1000 data rate.
Auto/Manual ................... DIR-1000 clock selection.
FWD E.C.C. .................... C1, C2 and Erase error correction strengths.
REC E.C.C. ..................... C1, C2 and Erase error correction strengths.
User Guide BA622
Artisan Technology Group - Quality Instrumentation ... Guaranteed | (888) 88-SOURCE | www.artisantg.com
Panel Reference • 117
Ampex DCRS DUT Setup
DCRS DUT Setup Panel Tools:
Machine ID Entry ............ Enter ID number for machine being used.
Poll Interval Entry ........... Specify how often status panel is to be
updated.
E.C.C. Disabled
Checkbox......................... Disable DCRS error correction.
Communications Setup
Button.............................. Open panel for communications setup.
118 • Panel Reference
User Guide BA622
Artisan Technology Group - Quality Instrumentation ... Guaranteed | (888) 88-SOURCE | www.artisantg.com
DCRS DUT Communications Setup Panel Tools:
Port Selector .................... Select communications port to be used.
Baud Selector................... Select bandwidth of communications channel.
Mode Selector.................. Select communications parity, stop bits and
word length. For example, a mode set to "N18"
indicates no parity, one stop bit, and a word
length of eight bits.
Below is the Status panel as it will appear when the Ampex DCRS is
selected:
Ampex DCRS DUT Status Panel Displays:
DUT Type........................ Ampex DCRS
Comm Errors................... Number of communication errors.
User Guide BA622
Artisan Technology Group - Quality Instrumentation ... Guaranteed | (888) 88-SOURCE | www.artisantg.com
Panel Reference • 119
Footage Count.................. Current tape position.
Machine ID...................... Identification number of machine under test.
Track Number.................. Current track number.
Command Mode .............. Status of DUT: STOPPED, UNLOADED,
PLAYBACK, RECORD, FAST FWD,
REWIND, or SEARCH.
Maintenance Mode .......... YES/NO, indicating if DCRS recorder is in
Maintenance Mode.
Software Version ............. DCRS software version number.
120 • Panel Reference
User Guide BA622
Artisan Technology Group - Quality Instrumentation ... Guaranteed | (888) 88-SOURCE | www.artisantg.com
Metrum VLDS/BVLDS DUT Setup
VLDS DUT Setup Panel Tools:
Selected Unit Selector ...... Set Unit Address of the device under test.
Playback Format
Selector............................ Choose one of nine playback formats. 10.4G
Buffered is the default. The first eight formats
are non-standard and will not allow recording
to occur.
Operating Mode Selector . Select the data width and Burst vs. Streaming
mode.
Record Threshold Entry... Set the Record Buffer Threshold. The entered
value represents the number of principal
blocks.
Reproduce Threshold
Entry ............................... Set the Reproduce Buffer Threshold. The
entered value represents the number of
principal blocks.
Poll Interval Entry ........... Specify how often status panel is to be
updated.
Auto Eject Disable
Checkbox......................... Disable ejection of the tape when the VLDS is
reset or powered off.
Communications Setup
Button.............................. Open panel for communications setup.
User Guide BA622
Artisan Technology Group - Quality Instrumentation ... Guaranteed | (888) 88-SOURCE | www.artisantg.com
Panel Reference • 121
VLDS DUT Metrabyte Communications Setup Panel Tools:
Card Base I/O
Address Entry .................. Specify the I/O Base Address of the installed
Metrabyte card. Choose a base address 0x340
or above, so that the Metrabyte card will not
be in conflict with the BA622 hardware.
Below is the Status panel as it will appear when the VLDS is selected:
VLDS DUT Status Panel Displays:
DUT Type........................ VLDS, BVLDS
Comm Errors................... Number of communication errors.
122 • Panel Reference
User Guide BA622
Artisan Technology Group - Quality Instrumentation ... Guaranteed | (888) 88-SOURCE | www.artisantg.com
State ................................ Recorder operating state:
IDLE
RECORD
SUBLOAD
REPRODUCE
FAST FWD SEARCHING
FAST REV
FORMATTING
STANDBY
TRANSFERRING
FORWARD TRACKING
REVERSE
PBN................................. Current Principal Block Number
Volume Label .................. Volume Label of the tape cartridge in use.
Cassette Status................. Presence/absence of a tape cartridge, the
protection mode of the tape, and the existence
of a BOT or EOT condition.
VLDS Config................... Hardware configuration of the VLDS under
test.
Buffer CCA Cfg............... For a Buffered VLDS, indicates the revision
level of the Firmware (FW), Interface (IF), and
Hardware (HW).
Firmware Revisions ......... Software revision level for each of the
processors: Transport Control (TC), Scan/Reel
(SR), Capstan (CS).
Self Test Status ................ Result of the VLDS self-test:
DATA PATH BUFFER NONE
Application Note: When the VLDS is in STANDBY state, pressing
STOP will put the VLDS into SUBLOAD state.
User Guide BA622
Artisan Technology Group - Quality Instrumentation ... Guaranteed | (888) 88-SOURCE | www.artisantg.com
Panel Reference • 123
Loral DV-6000 DUT Setup
DV-6000 DUT Setup Panel Tools:
Repro Data Rate
Selector............................ Select data rate:
EXTERNAL Select 1
Select 3
Select 4
Select 2
Select 5
Voice Level Selector ........ Select voice level:
OFF
12.5% 25%
50%
100%
Data Interface Selector..... Select data interface:
1-Bit Serial
8-Bit Parallel
Error Correction
Enabled Checkbox ........... Enable/Disable DV-6000 error correction.
Read After Write
Enabled Checkbox ........... Enable/Disable DV-6000 read-after-write.
Auto Tracking
Enabled Checkbox ........... Enable/Disable DV-6000 auto tracking.
Poll Interval Entry ........... Specify how often status panel is to be
updated.
Communications Setup
Button.............................. Open panel for communications setup.
124 • Panel Reference
User Guide BA622
Artisan Technology Group - Quality Instrumentation ... Guaranteed | (888) 88-SOURCE | www.artisantg.com
DV-6000 DUT Communications Setup Panel Tools:
Port Selector .................... Select communications port to be used.
Baud Selector................... Select bandwidth of communications channel.
Mode Selector.................. Select communications parity, stop bits and
word length. For example, a mode set to "N18"
indicates no parity, one stop bit, and a word
length of eight bits.
Below is the Status panel as it will appear when the DV-6000 is
selected:
User Guide BA622
Artisan Technology Group - Quality Instrumentation ... Guaranteed | (888) 88-SOURCE | www.artisantg.com
Panel Reference • 125
DV-6000 DUT Status Panel Displays:
DUT Type........................ DV-6000
Comm Errors................... Number of communication errors.
Recorder Mode ................ Current mode of DV-6000. Modes include:
Initialization
Pre-Heat
BIT(Built-In-Test)
Low Speed Search
Erase
Pause Write
Wait
Unload
Standby
Write
TSID Search
Format Tape
Pause Read
Pause
Stop
Power-Up Test
Read
Shuttle
Postamble
Pause LS Search
Maintenance
When the mode is followed by "(*)", then the
recorder mode is IN PROGRESS; otherwise it
is ESTABLISHED.
Current TSID................... Current Time Stamp ID.
Remaining Length ........... Length of tape, in feet, remaining in cassette.
Remaining Time .............. Distance, in time, remaining before end of
tape.
Elapsed Time................... Distance, in time, from the beginning of tape.
Alarm Codes.................... Current Alarm Report codes (a 2-byte code).
Fault Codes...................... Current Fault Report codes (a 3-byte code).
Software Version ............. Version and revision numbers of DV-6000
software.
User Write Clock ............. Data rate, in kbits/sec, being used to write to
tape (user generated).
Int. Synthesis Clock ......... Reproduce Data Rate, in kbits/sec, being used
to read from tape (internally generated).
User Extract. Clock.......... Data rate, in kbits/sec, being used to read from
tape (user generated).
Cassette Status ................. Indicates whether or not cassette is loaded. If
loaded, indicates whether or not cassette is
write-protected.
Hours of Operation .......... Total tape run time in hours.
126 • Panel Reference
User Guide BA622
Artisan Technology Group - Quality Instrumentation ... Guaranteed | (888) 88-SOURCE | www.artisantg.com
DUT (Device Under Test) Status Panel*
The initial DUT Status panel indicates "NONE" for the type of device
under test.
From the DUT Control Panel, pressing the "Set DUT" button will open
a Select DUT Type panel, where the type of device to be tested is
chosen. Once the device under test is specified, the DUT Status Panel
will display the current status of that device in customized fields. The
following sections define the DUT Status panel's contents based upon
the DUT selected.
Generic DUT Status
Below is the Status panel as it appears when a Generic DUT is selected.
The lower portion of the panel shows incoming characters from the
serial port.
User Guide BA622
Artisan Technology Group - Quality Instrumentation ... Guaranteed | (888) 88-SOURCE | www.artisantg.com
Panel Reference • 127
Generic DUT Status Panel Displays:
DUT Type........................ Generic
Comm Errors................... Number of communication errors.
128 • Panel Reference
User Guide BA622
Artisan Technology Group - Quality Instrumentation ... Guaranteed | (888) 88-SOURCE | www.artisantg.com
Sony DIR-1000 DUT Status
Sony DIR-1000 DUT Status Panel Displays:
DUT Type........................ Sony DIR-1000
Comm Errors................... Number of communication errors.
Mode ............................... Indicates status of DUT: NONE, LOADING,
EJECTING, NO-TAPE, RECORD, PLAY,
SEARCH, FFWD, FREV, STAND-BY, or
OFF STAND-BY.
IDR ................................. Reader ID.
IDG ................................. Generator ID.
IDC ................................. Counter ID.
Capstan ........................... YES/NO, indicating whether capstan is locked
or unlocked.
Drum ............................... YES/NO, indicating whether drum is locked or
unlocked.
Reference......................... INTERNAL, DATA-IN, or REF-IN.
Data Rate......................... DIR-1000 data rate.
Auto/Manual ................... DIR-1000 clock selection.
FWD E.C.C. .................... C1, C2 and Erase error correction strengths.
REC E.C.C. ..................... C1, C2 and Erase error correction strengths.
User Guide BA622
Artisan Technology Group - Quality Instrumentation ... Guaranteed | (888) 88-SOURCE | www.artisantg.com
Panel Reference • 129
Ampex DCRS DUT Status
Ampex DCRS DUT Status Panel Displays:
DUT Type........................ Ampex DCRS
Comm Errors................... Number of communication errors.
Footage Count.................. Current tape position.
Machine ID...................... Identification number of machine under test.
Track Number.................. Current track number.
Command Mode .............. Status of DUT: STOPPED, UNLOADED,
PLAYBACK, RECORD, FAST FWD,
REWIND, or SEARCH.
Maintenance Mode .......... YES/NO, indicating if DCRS recorder is in
Maintenance Mode.
Software Version ............. DCRS software version number.
130 • Panel Reference
User Guide BA622
Artisan Technology Group - Quality Instrumentation ... Guaranteed | (888) 88-SOURCE | www.artisantg.com
Metrum VLDS/BVLDS DUT Status
VLDS DUT Status Panel Displays:
DUT Type........................ VLDS, BVLDS
Comm Errors................... Number of communication errors.
State ................................ Recorder operating state:
........................................................IDLE
........................................................SUBLOAD
........................................................FAST FWD
........................................................FAST REV
........................................................STANDBY
........................................................FORWARD
........................................................REVERSE
RECORD
REPRODUCE
SEARCHING
FORMATTING
TRANSFERRING
TRACKING
PBN................................. Current Principal Block Number
Volume Label .................. Volume Label of the tape cartridge in use.
Cassette Status................. Presence/absence of a tape cartridge, the
protection mode of the tape, and the existence
of a BOT or EOT condition.
VLDS Config................... Hardware configuration of the VLDS under
test.
Buffer CCA Cfg............... For a Buffered VLDS, indicates the revision
level of the Firmware (FW), Interface (IF), and
Hardware (HW).
Firmware Revisions ......... Software revision level for each of the
processors: Transport Control (TC), Scan/Reel
(SR), Capstan (CS).
Self Test Status ................ Result of the VLDS self-test:
DATA PATH BUFFER NONE
User Guide BA622
Artisan Technology Group - Quality Instrumentation ... Guaranteed | (888) 88-SOURCE | www.artisantg.com
Panel Reference • 131
Application Note: When the VLDS is in STANDBY state, pressing
STOP will put the VLDS into SUBLOAD state.
132 • Panel Reference
User Guide BA622
Artisan Technology Group - Quality Instrumentation ... Guaranteed | (888) 88-SOURCE | www.artisantg.com
Loral DV-6000 DUT Status
DV-6000 DUT Status Panel Displays:
DUT Type........................ DV-6000
Comm Errors................... Number of communication errors.
Recorder Mode ................ Current mode of DV-6000. Modes include:
Initialization
Pre-Heat
BIT(Built-In-Test)
Low Speed Search
Erase
Pause Write
Wait
Unload
Standby
Write
TSID Search
Format Tape
Pause Read
Pause
Stop
Power-Up Test
Read
Shuttle
Postamble
Pause LS Search
Maintenance
When the mode is followed by "(*)", then the
recorder mode is IN PROGRESS; otherwise it
is ESTABLISHED.
Current TSID................... Current Time Stamp ID.
Remaining Length ........... Length of tape, in feet, remaining in cassette.
Remaining Time.............. Distance, in time, remaining before end of
tape.
Elapsed Time................... Distance, in time, from the beginning of tape.
Alarm Codes.................... Current Alarm Report codes (a 2-byte code).
Fault Codes...................... Current Fault Report codes (a 3-byte code).
Software Version ............. Version and revision numbers of DV-6000
software.
User Guide BA622
Artisan Technology Group - Quality Instrumentation ... Guaranteed | (888) 88-SOURCE | www.artisantg.com
Panel Reference • 133
User Write Clock ............. Data rate, in kbits/sec, being used to write to
tape (user generated).
Int. Synthesis Clock ......... Reproduce Data Rate, in kbits/sec, being used
to read from tape (internally generated).
User Extract. Clock.......... Data rate, in kbits/sec, being used to read from
tape (user generated).
Cassette Status ................. Indicates whether or not cassette is loaded. If
loaded, then indicates whether or not cassette
is write-protected.
Hours of Operation .......... Indicates total tape run time in hours.
134 • Panel Reference
User Guide BA622
Artisan Technology Group - Quality Instrumentation ... Guaranteed | (888) 88-SOURCE | www.artisantg.com
ECC Panel*
Normally, BitAlyzer622 error data scanners, like Basic BER or the
Burst Length Histogram, operate on error information that is produced
directly by the BitAlyzer622's hardware error detection circuitry, or
that is read back from a previously recorded error data file. Both of
these cases interpret all of the errors found in the channel at the time of
the error analysis session.
Alternatively, you may wish to remove some errors in between
hardware error detection or playback and actual processing of bit error
rates or histograms. Errors are removed very carefully in order to
exactly mimic those that would have been removed if the same errors
were presented to a specified Reed-Solomon error correction system.
This means that you can connect the BitAlyzer622 to your raw channel
and acquire actual errors, and then configure a software emulation of a
particular Reed-Solomon error correction system, specifying table
dimensions and correction strengths and erasure mode processing, and
then re-examine the error information from your raw channel, as if it
were corrected with the proposed ECC characteristics.
This data scanning feature also performs transformations on the
placement of errors within the channel. This is known as
"Interleaving." The interleaving feature is commonly used in
conjunction with error-removal based on specified ECC correction
strengths, but it may also be used by itself. In this case, no errors are
removed, but they are moved around based on the dimensions of the
specified ECC tables and the selected mode of filling and draining the
tables.
User Guide BA622
Artisan Technology Group - Quality Instrumentation ... Guaranteed | (888) 88-SOURCE | www.artisantg.com
Panel Reference • 135
The BitAlyzer622 system emulates standard 2-Dimensional ReedSolomon ECC, and also allows selection of a number of twodimensional tables to be grouped together for three-dimensional
interleaving. Interleave-only can be emulated by disabling C1
Correction, Erasure Mode, and C2 Correction.
Error analysis is accomplished by comparing the input data with recreated versions of known data patterns. Discrepancies between
internally generated reference data and the input data are considered to
be errors. The bit positions of all such errors are communicated to
software either for immediate statistical analysis or for storage; stored
error information can be analyzed later.
Error position information is input to the ECC data scanner, and errors
are entered into simulated ECC tables in a row-major or column-major
order. When each specified number of table-groups is filled, all the
tables are processed with the first level (C1) correction, by rows or by
columns. Errors are removed from the table if the number of errors in
the row/column does not exceed the C1 correction strength.
If additional errors exist, second level (C2) correction is initiated. Like
C1, C2 processing can be performed by rows or columns. Errors are
removed from the table if the number of errors per C2 block does not
exceed the C2 correction strength. All C2 blocks that are not
completely empty are tagged for optional erasure processing.
If Erasure mode is enabled, the erasure strength is compared with the
number of C2 failure tags communicated from the previous step. If the
number of tags is less than or equal to the erasure strength, then all
errors are removed from the table. Any remaining errors are
uncorrectable, given the circumstances of ECC emulation. Note that
erasure is only valid when C2 correction is enabled.
If the quantity of errors in a particular C1 or C2 block exceeds the
specified C1 or C2 strength, no errors are removed from that block.
This most closely resembles actual hardware ECC behavior.
Finally, each table-group is drained, either rows-first or columns-first.
Draining the table communicates the remaining error information to the
next error data scanner in the "chain" (i.e., Basic BER, Burst
Histogram, etc.).
The ECC plug-in panel displays the status of the ECC system and
enables setup of ECC characteristics.
136 • Panel Reference
User Guide BA622
Artisan Technology Group - Quality Instrumentation ... Guaranteed | (888) 88-SOURCE | www.artisantg.com
ECC Plug-In Panel Displays:
Symbols in Group ............ Number of bytes contained in one error
correction group.
Groups Processed............. Number of error correction groups processed.
C1 Symbol Errors ............ Quantity of symbol errors input to C1.
C1 Blocks With Error ...... Quantity of C1 Blocks with at least 1 symbol
error.
C1 Symbols Corrected ..... Quantity of C1 Symbol Corrections.
C1 Blocks Failed.............. Quantity of C1 Blocks not fully corrected.
This is also the number of Erasures produced.
Erasures Used .................. Quantity of Erasures used.
Erasure Symbols
Corrected......................... Quantity of symbol corrections by Erasure
Processing.
C2 Symbol Errors ............ Quantity of symbol errors input to C2.
C2 Blocks With Error ...... Quantity of C2 Blocks with at least 1 symbol
error.
C2 Symbols Corrected ..... Quantity of C2 Symbol Corrections.
C2 Blocks Failed.............. Quantity of C2 Blocks not fully corrected.
Uncorrectable Symbols .... Quantity of Symbols not corrected.
ECC Setup Button
The plug-in panel includes a "Setup" button that accesses the ECC
setup panel. This modal panel enables you to select an ECC
configuration. Once you've edited a new configuration, install the
changes by pressing the "OK" button, or press the "Cancel" button to
cancel the changes.
User Guide BA622
Artisan Technology Group - Quality Instrumentation ... Guaranteed | (888) 88-SOURCE | www.artisantg.com
Panel Reference • 137
ECC Setup Panel Tools:
Rows per Table ................ Set the number of bytes in each column of a
correction table.
Columns per Table........... Set the number of bytes in each row of a
correction table.
Tables per Group ............. Set the number of tables grouped together for
3-dimensional interleaving.
C1 Strength ..................... Set C1 correction strength (only code words
with errors less than or equal to this strength
will be corrected).
C2 Strength ..................... Set C2 correction strength (only code words
with errors less than or equal to this strength
will be corrected).
Erase Strength ................. Set erasure strength (only tables with
uncorrected C1 code words less than or equal
to this strength will be corrected).
Groups per Log................ Set the number of groups that must be
processed before ECC statistics are posted to a
log file. Maximum = 232 -1.
Fill Tables........................ Specify whether tables are to be filled in rowmajor, column-major, rows-together, or
columns-together order.
C1 Correction .................. Enable/disable C1 correction; specify row or
column processing.
138 • Panel Reference
User Guide BA622
Artisan Technology Group - Quality Instrumentation ... Guaranteed | (888) 88-SOURCE | www.artisantg.com
C2 Correction .................. Enable/disable C2 correction; specify row or
column processing.
Erasure Mode .................. Enable/disable erase mode. Erasure mode is
not valid when C2 correction is not enabled.
Drain Tables.................... Specify whether tables are to be drained by
rows, columns, rows-together, or columnstogether.
Log File ........................... Specify a filename for the file to which ECC
data will be logged.
Each of the first six fields may extend up to 65,535. These settings
permit a wide range of ECC emulation customizations. By selecting
different table sizes, correction strengths and processing modes, you
can immediately see the resulting performance of an emulated
correction system.
"Rows-Together" and "Cols-Together" are specific to multi-table
groups (three-dimensional Reed-Solomon). The rows-together selection
causes parallel rows in each table of the group to be filled or drained
before proceeding to the next row. The columns-together selection
causes parallel columns in each table of the group to be filled or
drained before proceeding to the next column. See the figure below for
an illustration showing the order in which a two-table group would be
filled or drained.
Filling or Draining Order for a Two-Table Group
User Guide BA622
Artisan Technology Group - Quality Instrumentation ... Guaranteed | (888) 88-SOURCE | www.artisantg.com
Panel Reference • 139
EFI Histogram Panel
An Error Free Interval is the length of a run of good bit trans-missions
between errors. There can be no error free interval of zero (0). This
would indicate that it takes zero good bits to terminate a grouping of
errors, and you must have at least one good bit to terminate a grouping.
The lengths of error free runs are often characteristic of your channel,
especially when a repetitive operation is employed in transmitting the
data. Examples of repetitive operations include; recording data onto
rotating disks, using helical rotating heads to lay down fixed-length
tracks of data, or timed retransmissions of communications packets. In
these cases, errors that are prone to occurring coincident with the
repetitive process employed in the transmission will cause error free
intervals that are byproducts of the errors, and which will be detected
by the EFI scanner analyzer, causing specific EFI bins to be
incremented in the EFI histogram.
This histogram often requires adjustment of the EFI bin mapping. Bins
are used to scale and translate the different error free distances into a
small number of physical error counters. They are described more fully
in the section on Important Settings.
Bins are normally set to cover a range of 0-256, but often error free
intervals that you want to analyze are in the range of 1e8 or more. Use
the bin mapping button to access the Bin Scale and Bin Offset
140 • Panel Reference
User Guide BA622
Artisan Technology Group - Quality Instrumentation ... Guaranteed | (888) 88-SOURCE | www.artisantg.com
parameters to accommodate the larger range by squeezing more and
more of it into each physical counter, or bin.
The other error free analysis that is interesting is to examine the very
small error free intervals. This information implies how densely your
errors are grouped into bursts, which can be significant to
characterizing transmission media, and in other applications.
The EFI histogram will often contain many components from different
sources of repetitive errors produced by the many repetitive operations
usually employed in data transmission. Each component is identified by
a spike or a curve shape on the EFI histogram. This histogram identifies
the components (actually frequency domain components) of error
sources in your system, and can be used with modulo analysis by
triggering the modulo period based on a quantity of bits representing
the repetitive operation. This modulo analysis presents the location of
errors, from left to right, within the period of the repetitive operation.
This can be useful if the errors' occurrences in time have a particular
signature, which can be used to identify the source. See the Modulo
plug-in panel for more information.
Often the bit quantity that represents the period of the repetitive
operation is not exactly the error free interval identified by the EFI
histogram. If an error happens every 10,000 bits, and is 100 bits long,
then the EFI histogram would show a spike at 99,900.
Note: The Fourier transform of the error data would identify the exact
time-domain coefficients for all the frequency spectrum components of
repetitive errors. This would be difficult to perform in real-time. The
Error Free Interval value, is, however, the first and usually largest
component of the Fourier series, so it can identify major frequency
components, and represent an approximation of the exact error
spectrum.
EFI Profile Setup Button
The plug-in panel displays a histogram chart and includes a "Setup"
button that accesses the Setup panel. This modal panel enables you to
select processing and display characteristics for the chart. Once you've
edited a new configuration, install the changes by pressing the "OK"
button, or press the "Cancel" button to cancel the changes.
User Guide BA622
Artisan Technology Group - Quality Instrumentation ... Guaranteed | (888) 88-SOURCE | www.artisantg.com
Panel Reference • 141
EFI Profile Setup Panel Tools:
Title Entry ....................... Enter a custom title for display at the top of the
chart. May include Metastrings.
Log Chart Checkbox ........ Display y-axis logarithmically instead of
linearly.
Grid Checkbox................. Enable grid display.
Info Line Checkbox ......... Enable display of status information at bottom
of chart.
Cursor A Checkbox.......... Enable Cursor A display.
Cursor B Checkbox.......... Enable Cursor B display.
Bin Mapping Range
Display ............................ Display current bin mapping range.
Bin Mapping Button ........ Open sub-panel for changing bin mapping.
EFI Data Collection Bin Mapping Panel Tools:
Bin Count Display ........... Display quantity of bins.
Bin Offset Entry............... Set the offset at which to begin mapping bins.
Bin Pow2 Scaling Entry... Change bin resolution and range (actual
scaling is 2n, where n is the scale value).
A description of Bins and how to use them is contained in the
Important Settings section.
142 • Panel Reference
User Guide BA622
Artisan Technology Group - Quality Instrumentation ... Guaranteed | (888) 88-SOURCE | www.artisantg.com
Finder Panel
The Finder plug-in panel is used for performing DOS file system
maintenance, and for selecting one default working directory where the
BitAlyzer622 will access error data files, configuration files, and RAM
content data files.
At boot-up, the BitAlyzer622 operating system identifies how many
disk drives the system has access to. This includes floppy drives, and
possibly network drives that are installed in your system as standard
disk devices, and are named in the standard DOS format of a single
character followed by a colon; for example, "H:".
Working Directory Display
The working directory is a DOS directory of the form "C:\USR\BIN",
which is prepended to all DOS filenames of files accessed by the
BitAlyzer622. This means that your RAM content files, configuration
files, and error data files will all be accessed in the specified working
directory.
One exception to this rule exists, which is using the -R command line
option to run the BitAlyzer622 operating system with a previously
stored configuration. The configuration file that is accessed is
BA5P.CFG from the DOS directory you were in when you launched
the program.
User Guide BA622
Artisan Technology Group - Quality Instrumentation ... Guaranteed | (888) 88-SOURCE | www.artisantg.com
Panel Reference • 143
Disk Free Display
The number of megabytes of free disk space is displayed on the Finder
plug-in panel. This quantity is updated periodically, so that if you're
recording an error data file, you will see this number decrement as your
error data file grows in size.
This update occurs approximately once every other second, and refers
only to the currently selected drive.
Directory Files List
This panel displays the file names of the files contained in the current
working directory in a list format. You can navigate from one directory
to another by pressing on the names that represent directories. The [..]
entry represents the parent directory of the directory that you are in.
Only one directory per disk will not contain a [..] entry. These
directories have no parents; i.e. they are the root directories of the disk.
Pressing on a line in the list "selects" the file contained on that line for
operation with the "Copy", "Rename", and "Delete" buttons. As
described above, if the selected line is a directory, the BitAlyzer622
will automatically change the current working directory to the selected
directory.
Search
By default, the directory files list display will comprise all the files
from the current working directory. You can use the Search button to
toggle the DOS file search criteria for inclusion in the list field. These
different search criteria enable you to do things like see all your
configuration files, or all your error data files, etc. The search criteria
include the following types:
Finder Search Criteria:
*.* ...............All files
*.er5 ............Normally BitAlyzer622 error data set files
*.ram ...........Normally RAM content files
*.cfg ............Normally configuration files
*.bat ............DOS batch files
*.txt .............Normally ASCII text files
*.exe............DOS executable program files
*.csv ............Normally "comma-separated vector" files, which are
commonly used for importing data to spreadsheet programs
like Microsoft's EXCEL
144 • Panel Reference
User Guide BA622
Artisan Technology Group - Quality Instrumentation ... Guaranteed | (888) 88-SOURCE | www.artisantg.com
Pressing the button steps the current search criteria from its existing
type to the next one in the series. If you're at the end of the series,
pressing the button will set the type to the first one of the series.
Copy
The copy button enables copying of a selected file to a new filename
within the same working directory. This feature is useful for making
backups of important files. To copy files to different directory
locations, exit the BitAlyzer622 operating system and use standard
DOS commands. If the destination file you specify already exists in the
working directory, you will be prompted with an "OK to Overwrite?"
message.
During the copy operation, the BitAlyzer622 displays a working
message. If you wish to cancel the operation, press the cancel button on
the working message display.
DOS file names are at most eight characters in length, and followed by
a period, which separates the eight-character name from a threecharacter filename extension.
Rename
The rename button enables designating a new filename for the selected
file. When you press this button, the BitAlyzer operating system will
verify that a file is selected in the directory list display (i.e., that it is
highlighted), and will then prompt you for a new name.
If the new name refers to a file that already exists in the current
working directory, the operation will fail.
Delete
The delete button deletes the file you selected in the file display list. If
no file has been selected, no operation is performed. You will be
prompted with an "Are you sure?" message to ensure that you really
want to delete the file before the operation is initiated. In most cases,
once you've deleted a file, it is irretrievably gone.
Note: In some cases, deleted files can be restored using the DOS
undelete command. Your chances of retrieving the file are greater if
you quit the BitAlyzer622 operating system immediately, without saving
the configuration.
User Guide BA622
Artisan Technology Group - Quality Instrumentation ... Guaranteed | (888) 88-SOURCE | www.artisantg.com
Panel Reference • 145
Drive
The drive button toggles which drive the BitAlyzer operating system
accesses for its working directory. This may include floppy and
network drives, although it is not recommended to use either of these
devices during error analysis because of their inherently lower
performance characteristics.
The drive button operations will skip over any missing disks in the
range of "A:" to "Z:".
146 • Panel Reference
User Guide BA622
Artisan Technology Group - Quality Instrumentation ... Guaranteed | (888) 88-SOURCE | www.artisantg.com
Generator Panel
The BitAlyzer622 Generator plug-in panel provides you with a way to
select data generating characteristics, such as the data pattern type;
which hardware interface to use as the output; other detail setups for
selecting specific interface characteristics such as inverting input
clocks; and whether or not to encode the output using an NRZi encoder.
The BitAlyzer622 generator circuitry may optionally contain a large
bank of RAM organized as 16-bit words, in addition to the iterative
data generating components used to generate pseudo-random and 16-bit
fixed data. The Generator plug-in panel enables you to select this RAM
content to be the source for the generated data pattern, and gives you
two chief ways to fill the RAM. First, there are a number of computersynthesized fixed test patterns. These patterns include sequences like
all zeroes, all ones, or alternating ones and zeroes, which could also be
generated by the 16-bit fixed pattern generator. Other RAMsynthesized patterns include a word ramp consisting of increasing 16bit values from 0 to 65,535, and a byte ramp consisting of increasing 8bit values, which resets to zero after reaching 255. Another pattern is
the "Quick Brown Fox" ASCII text message.
There is also a "PRN-7 Error" pattern that is a software duplicate of the
pseudo-random pattern generated by the hardware, except the first bit is
purposely in error. This error injection mode can be helpful in verifying
User Guide BA622
Artisan Technology Group - Quality Instrumentation ... Guaranteed | (888) 88-SOURCE | www.artisantg.com
Panel Reference • 147
BitAlyzer622 operations, and in verifying interfaces to your channel.
The BitAlyzer622 generator circuitry also contains an error-injection
system that can be used in the same manner on iteratively synthesized
patterns.
Standard error rate testing using the BitAlyzer622 involves setting up
the generator to generate a known pattern, using either its fixed RAM
or one of its iteratively synthesized patterns. The selected pattern is
transmitted via the generator output clock and data interfaces. You can
select serial, byte-parallel, or word-parallel interfaces. In order for the
generator to transmit the data, it must first be fed an input clock signal.
This is the reference clock that is used to generate the transmitted clock
and data. The input clock can be provided externally by connecting an
appropriate clock signal to the generator's clock input, or the optional
internal clock source can be used.
The BitAlyzer generator rear connector is used for both the byteparallel and word-parallel interfaces, and the same generator parallel
clock input signal is used whether you're interfacing with bytes or
words. In these cases, you must select the appropriate generator output
interface on the generator setup panel, which will dictate whether your
input clock will be interpreted as a word-clock or a byte-clock.
Generator Status Display
When the generator is operating, the generator plug-in panel displays
the pattern that is being generated, as well as the clock frequency being
transmitted. The generator status displays "NO CLOCK" if an
appropriate input-clock is not present at the selected clock source
connector. If the BitAlyzer622 is running on another PC that doesn't
have generator circuitry, this status display reads "NO H.W."
148 • Panel Reference
User Guide BA622
Artisan Technology Group - Quality Instrumentation ... Guaranteed | (888) 88-SOURCE | www.artisantg.com
Generator Setup Button
As with most plug-in panels, the Generator plug-in panel contains a
"Setup" button that opens another panel containing various GUI fields
that change Generator operating modes. You can close this panel by
pressing either the "OK" button or the "Cancel" button. The "Cancel"
button closes the panel and reinstates the operating modes from before.
Generator Plug-In Panel Tools:
Pattern Type Selector....... Select the type of pattern to be generated:
PRN-7 ..................... 27-1 length pseudo-random pattern.
PRN-15.................... 215-1 length pseudo-random pattern.
PRN-20.................... 220-1 length pseudo-random pattern.
PRN-23.................... 223-1 length pseudo-random pattern.
16-Bits..................... 16-bit fixed pattern (see 16-bit value below).
RAM-Trigger .......... Generation of pattern from contents of
Generator RAM. This mode requires use of the
Begin Generate signal. Each time the Begin
Generate signal is received, data is retransmitted from the Generator RAM to the
selected output interface, starting at the
beginning of the RAMs.
RAM-Cycle ............. Generation of pattern from contents of
Generator RAM, without use of the Begin
Generate input signal. In this mode, each word
of the RAM content is generated sequentially
until the end is reached, and then transmission
User Guide BA622
Artisan Technology Group - Quality Instrumentation ... Guaranteed | (888) 88-SOURCE | www.artisantg.com
Panel Reference • 149
is continued from the beginning (i.e., the RAM
content is cycled through).
Clock Source Selector ...... Select internal or external source for clock
reference input.
Output I/F Selector........... Select bit, byte-parallel, or word-parallel
output interface.
16-Bit Value Entry........... Enter the 16-bit value (in hex) to be
transmitted in 16-bit pattern mode.
Injected Error Selector ..... Select how many errors to inject: None, 1, 16,
or 32.
Injected Error Interval
Entry ............................... Enter the number of 16-bit words between the
injected errors. Minimum = 0, Maximum =
262,243.
Advanced Setup Button.... Select the Advanced Generator Setup window,
described below.
When using the error injector, the expected BER can be calculated
using the following equation:
150 • Panel Reference
User Guide BA622
Artisan Technology Group - Quality Instrumentation ... Guaranteed | (888) 88-SOURCE | www.artisantg.com
Advanced Generator Setup Panel Tools:
NRZi Encode Serial
Data ................................ Encode output in NRZi format.
Parity Odd ....................... Produce odd parity on parallel output.
Invert Input Clock............ Invert input clock signal.
Invert Begin Generate...... Invert Begin Generate input signal.
Invert Output Clock ......... Invert output clock signal.
Invert Output Data........... Invert output data signal.
Enable Begin Generate .... Enable the RAM Begin Generate signal.
Data Delay Entry ............. Select amount of delay added to the output
data signal with respect to the generator output
clock signal. Range is –1.147 ns to +1.165 ns.
Setup Generator RAM
The Generator RAM content can be changed by pressing this button,
which opens the Setup Generator RAM panel. The "Setup" button is
only available if your BitAlyzer622 is equipped with the Generator
RAM hardware option. From this panel you can select software
synthesized patterns or a DOS computer file to be the source of the
RAM content. This feature enables you to program unique custom file
contents to be used as test patterns.
The Generator RAM is useful in debugging coding applications, as well
as many other system component testing situations. For instance, you
could write a program to shuffle a pseudo-random data sequence in the
User Guide BA622
Artisan Technology Group - Quality Instrumentation ... Guaranteed | (888) 88-SOURCE | www.artisantg.com
Panel Reference • 151
exact manner that your system's interleaving system operates. Then,
you could fill the Generator RAM with this shuffled pattern, transmit it
through just your de-interleaving circuitry, and verify that you get the
original pseudo-random pattern afterwards by using the BitAlyzer622
Detector. In this application it would be necessary to synchronize the
BitAlyzer with your de-interleaving circuitry using the Begin Generate
signal.
Setup Generator RAM Content Panel Tools:
Load Test Pattern
Checkbox......................... Load RAM with a pattern (see Pattern Selector
below).
Pattern Selector................ Select one of the following patterns (the
number of words in the pattern will be shown
when selected):
All Ones .................. All ones pattern.
All Zeroes................ All zeroes pattern.
Alternating 1/0's ...... Alternating one/zero pattern.
Byte Ramp ............... Byte ramp pattern.
Word Ramp ............. Word ramp pattern.
Quick Brown Fox..... ASCII "THE QUICK BROWN FOX
JUMPED OVER THE LAZY DOG
0123456789" pattern.
PRN-7 Error ............ PRN-7 pattern with the first bit in the sequence
in error
Load File Contents
Checkbox......................... Load the RAM content from a specified DOS
computer file (see Filename below).
Filename Entry ................ Enter the filename to be used to load
Generator RAM (the number of words in the
file will be shown in parentheses when
selected).
152 • Panel Reference
User Guide BA622
Artisan Technology Group - Quality Instrumentation ... Guaranteed | (888) 88-SOURCE | www.artisantg.com
Interval Histogram Panel
The Interval Histogram measures bit-intervals between different events.
These can be hardware events such as Marker #1 or Marker #2 signals,
or they can be analyzed results, such as the occurrence of the beginning
of a burst error that meets the burst specification selected in the Basic
BER panel.
Interval Profile Setup Button
The plug-in panel displays a histogram chart and includes a "Setup"
button that accesses the Setup panel. This modal panel enables you to
select processing and display characteristics for the chart. Once you've
edited a new configuration, install the changes by pressing the "OK"
button, or press the "Cancel" button to cancel the changes.
User Guide BA622
Artisan Technology Group - Quality Instrumentation ... Guaranteed | (888) 88-SOURCE | www.artisantg.com
Panel Reference • 153
Interval Profile Stup Panel Tools:
Title Entry ....................... Enter a custom title for display at the top of the
chart. May include Metastrings.
Interval Type Selector
Button.............................. Select among the following interval
delineators:
NONE ..................... Disable Interval Histogram.
MARK #1................ Enable display of intervals between Marker #1
signals.
MARK #2................ Enable display of intervals between Marker #2
signals.
EITHER MARKER . Enable display of intervals between either
Marker signal.
BEGIN RESYNC..... Enable display of intervals between resync
signals.
BEGIN BLANK....... Enable display of intervals between blanking
signals.
BURST ERROR....... Enable display of intervals between bursts.
Results are affected by Minimum EFI and
Minimum Burst selections.
ANY ERROR .......... Enable display of intervals between any bit
errors.
Log Chart Checkbox ........ Display y-axis logarithmically instead of
linearly.
Grid Checkbox................. Enable grid display.
Info Line Checkbox ......... Enable display of status information at bottom
of chart.
Cursor A Checkbox.......... Enable Cursor A display.
154 • Panel Reference
User Guide BA622
Artisan Technology Group - Quality Instrumentation ... Guaranteed | (888) 88-SOURCE | www.artisantg.com
Cursor B Checkbox.......... Enable Cursor B display.
Bin Mapping Display....... Display current bin mapping range in bits.
Bin Mapping Button ........ Open sub-panel for changing bin mapping.
To use Marker analysis, markers must be present in the data. If you are
in LIVE mode, this means you must enable marker events in the
Detector Setup Event Enable panel. You can check if markers are
present by viewing the marker count in the More BER panel.
Interval Data Collection Bin Mapping Panel Tools:
Bin Count Display ........... Display quantity of bins.
Bin Offset Entry............... Set the offset at which to begin mapping bins.
Bin Pow2 Scaling Entry... Change bin resolution and range (actual
scaling is 2n, where n is the scale value).
A description of Bins and how to use them is contained in the
Important Settings section.
User Guide BA622
Artisan Technology Group - Quality Instrumentation ... Guaranteed | (888) 88-SOURCE | www.artisantg.com
Panel Reference • 155
Mask Panel
The Mask data scanner lets you mask-out errors from specified portions
of the data stream. These masked portions no longer contribute to error
statistics, so you can more easily see error effects from the non-masked
portions. This feature is useful in situations where a repetitive error
source overwhelms the total error statistics.
Error masking is performed by selecting a repetition factor that defines
the bit-oriented periodicity of the error source, and then "from" and "to"
bit positions within that periodic factor. The locations inclusively
between the "from" and "to" positions may be masked-out of further
processing ("Notch" mode), or all other locations besides those selected
may be masked ("Bandpass" mode).
For example, if you wish to mask out the last 10 bits of a 100-bit
packet, you would make the following selections:
Modulo: ............. 100
From: ................. 90
To: ..................... 99
Type:.................. Notch
Multiple error sources may be masked in this fashion, by adding
individual mask definitions into the setup list.
156 • Panel Reference
User Guide BA622
Artisan Technology Group - Quality Instrumentation ... Guaranteed | (888) 88-SOURCE | www.artisantg.com
Mask Panel Setup Button
The plug-in panel includes a "Setup" button that accesses the Bit Mask
Setup panel. This panel enables you to select masking characteristics
for the individual filters. Once this panel is opened, install the changes
by pressing the "OK" button, or cancel them by pressing the "Cancel"
button.
Bit Mask Setup Panel Tools:
Filter List......................... Show a list from which to view and select
filters for editing.
New Button...................... Open Mask Editor to add a filter to the list.
Edit Button ...................... Open Mask Editor to edit components of the
highlighted filter.
Delete Button................... Delete the highlighted filter from the list.
The Slider is used to scroll through the list of masks. A highlighted
mask is ready for deleting or editing in the Mask Edit window.
User Guide BA622
Artisan Technology Group - Quality Instrumentation ... Guaranteed | (888) 88-SOURCE | www.artisantg.com
Panel Reference • 157
Mask Editor Panel Tools:
Title Entry ....................... Select Mask title (optional). May include
Metastrings.
Modulo Entry................... Selectable, Modulo window default.
From Entry ...................... Selectable, Modulo cursor "A" default.
To Entry .......................... Selectable, Modulo cursor "B" default.
Filter Type Checkbox....... Toggle "Notch" or "Band-Pass".
Accept changes with the "OK" button, or ignore changes by selecting
the "Cancel" button.
158 • Panel Reference
User Guide BA622
Artisan Technology Group - Quality Instrumentation ... Guaranteed | (888) 88-SOURCE | www.artisantg.com
Media Scan Chart Panel*
Because the human eye is a fantastic correlator, the BitAlyzer622
optionally includes a media scan feature that can display a twodimensional error map showing the actual geometry and error locations
in the medium. This feature displays the bursts identified in the burstlength histogram. The Y-axis in a media scan shows the location of
errors in each block, while the X-axis shows the block number.
Media Scan error maps can take on physical interpretation when the
blocking factor is set appropriately. For example, in rotary scanning
tape recorders, the blocking factor would logically be the number of
bits in a single rotation. The corresponding Media Scan map would
then represent the tape surface, where the Y-axis would relate to the
width of the tape and the X-axis would relate to tape footage. Similar
mapping can be done using index pulses from disk drives or format
block lengths from packetized communications systems.
Media Scan Setup Button
The "Setup" button on the Media Scan plug-in panel opens another
window containing system parameters for the chart display. Once
you've edited a new configuration, install the changes by pressing the
"OK" button, or press the "Cancel" button to cancel the changes.
User Guide BA622
Artisan Technology Group - Quality Instrumentation ... Guaranteed | (888) 88-SOURCE | www.artisantg.com
Panel Reference • 159
Media Scan Setup Panel Tools:
Title Entry ....................... Enter a custom title for display at the top of the
chart. May include Metastrings.
Bits Per Unit Entry .......... Set number of bits in each track/block of
media (y-axis).
Show Info Line
Checkbox......................... Enable display of status information at bottom
of chart.
Show Cursors
Checkbox......................... Enable display of cursors.
Show Begins-Only
Checkbox......................... Indicate beginning locations of bursts only.
Use Mark#1 Checkbox..... Use Marker #1 to separate tracks/blocks.
Use Mark#2 Checkbox..... Use Marker #2 to separate tracks/blocks.
Show Slider Checkbox ..... Display threshold slider next to chart.
Show Relative Scale
Checkbox......................... Place scales on the top and right side of the
chart. Shows relative offset from the current
horizontal and vertical origin (bottom left
corner).
160 • Panel Reference
User Guide BA622
Artisan Technology Group - Quality Instrumentation ... Guaranteed | (888) 88-SOURCE | www.artisantg.com
Reset Scales Button.......... Rescale the chart such that all data will be in
view. The chart is rescaled when the user
presses Ok.
Media Scan Chart Showing Relative Scales
To use Marker analysis, markers must be present in the data. If you are
in LIVE mode, this means you must enable marker events in the
Detector Setup Event Enable panel. You can check if markers are
present by viewing the marker count in the More BER panel.
The Slider can be used to set a minimum and maximum burst-length
for rendering the media scan display. Each burst is compared with these
settings, and only those which meet the criteria are displayed.
Important Note: The minimum EFI selected in the Basic Setup panel
will affect the groupings of errors into bursts, and therefore will affect
the burst display in the Media Scan chart. The Media Scan feature
renders each burst as a solid line, even if there are intervening good-bits
within the burst. To achieve an exact rendering of each and every bit,
set the minimum EFI to 1 in the Basic Setup panel.
User Guide BA622
Artisan Technology Group - Quality Instrumentation ... Guaranteed | (888) 88-SOURCE | www.artisantg.com
Panel Reference • 161
Modulo Histogram Panel
Modulo analysis refers to examining error positions modulo some
quantity of bits, or modulo a repetitive input hardware signal called a
marker input. This analysis shows you if your errors correlate with the
quantity of bits or repetitive marker signal, which is a very effective
way of hunting down problems in channel hardware.
Quite often, there are repetitive operations in your hardware that are
employed in the transmission of your data. These include blockoriented operations such as packet transmissions of a particular fixed
size, processing of tracks that are a fixed size, or convoluting a known
fixed-frequency with your signal. These repetitions can also include
mechanical operations in some applications. For instance, you might
see if errors from a magnetic recording channel are correlated to the
rotation of the calendaring drum used to manufacture the magnetic
tape! This type of analysis is very illuminating when trying to
distinguish the cause of certain errors, which is usually the first step in
solving a system problem.
Using modulo analysis, you can view a histogram representing the
modulo period from left to right. If errors are in no way related to this
modulo period, error placement within the histogram is highly random,
and you would see approximately equal number of errors in every
position of the histogram. If, however, your errors are correlated to the
modulo period, you will see a specific spike or curve-shape within the
162 • Panel Reference
User Guide BA622
Artisan Technology Group - Quality Instrumentation ... Guaranteed | (888) 88-SOURCE | www.artisantg.com
modulo histogram. Anything but a flat histogram indicates there is
some correlation between your errors and that modulo period.
Modulo-marker and plain modulo-N analyses differ in that the latter
places errors into the histogram by dividing the errors' bit positions by a
specific quantity (see modulo-N entry field) and using the remainder of
the division to address the histogram location. Modulo-marker uses a
hardware input signal (detector marker input) to correlate with, instead
of a specific quantity of bits. In this case, the marker input refers to the
first histogram bin.
A third specialty mode of the modulo analysis feature analyzes your
errors with respect to the number of bits in the pseudo-random
sequence you are detecting. This is essentially the same thing as
manually entering a specific N value that happens to be the number of
bits in the period of the pseudo-random data pattern (127 for PRN-7,
65,535 for PRN-15, etc.). There is more, however. If we just look at
errors modulo the pattern period length, we can discover if errors often
occur at particular places within the pseudo-random pattern, but since
we aren't synchronized with the phase of the pattern, we can't really
indicate exactly which data bits are producing the errors. By adding the
"Use Cycle" feature to the setup, however, each time the BitAlyzer622
resynchronizes with data, it embeds information into the error data set
which enables synchronizing the analysis with a known location in the
pseudo-random pattern period.
If your errors are data-dependent, these features enable you to view a
histogram that represents the full length of the pseudo-random pattern,
which will have spikes or curve shapes at locations in the histogram
that correspond to locations in the pseudo-random pattern that are
particularly prone to error.
If your channel is interleaved, you probably want to de-interleave it
before performing a modulo analysis. See the ECC plug-in panel for
more information.
Modulo Profile Setup Button
The "Setup" button on the Modulo plug-in panel opens another window
containing system parameters for the modulo analysis scanner and chart
display. Once you've edited a new configuration, install the changes by
pressing the "OK" button, or press the "Cancel" button to cancel the
changes.
User Guide BA622
Artisan Technology Group - Quality Instrumentation ... Guaranteed | (888) 88-SOURCE | www.artisantg.com
Panel Reference • 163
Modulo Profile Setup Panel Tools:
Title Entry ....................... Enter a custom title for display at the top of the
chart. May include Metastrings.
Bits in Period Entry ......... Set the number of bits in each modulo period.
Log Chart Checkbox ........ Display y-axis logarithmically instead of
linearly.
Grid Checkbox................. Enable x- and y-axis grids.
Info Line Checkbox ......... Enable display of status information at bottom
of chart.
Show Bursts Checkbox .... Identify beginning of bursts only.
Cursor A Checkbox.......... Enable display of Cursor A.
Cursor B Checkbox.......... Enable display of Cursor B.
Use Cycle Checkbox ........ Indicate that cycle events should reset the
modulo period.
Use Mark #1 Checkbox.... Indicate that Marker #1 should reset the
modulo period.
Use Mark #2 Checkbox.... Indicate that Marker #2 should reset the
modulo period.
Bin Mapping Display....... Display range of bins per the current bin
mapping.
164 • Panel Reference
User Guide BA622
Artisan Technology Group - Quality Instrumentation ... Guaranteed | (888) 88-SOURCE | www.artisantg.com
Bin Mapping Button ........ Open sub-panel for changing bin mapping.
Advanced Button ............. Pop up the Modulo Advanced Setup panel.
To use Modulo Marker analysis, markers must be present in the data. If
you are in LIVE mode, this means you must enable marker events in
the Detector Setup Event Enable panel. Check if markers are present by
viewing the marker count in the More BER panel.
Modulo Data Collection Bin Mapping Panel Tools:
Bin Count Display ........... Display quantity of bins.
Bin Offset Entry............... Set the offset at which to begin mapping bins.
Bin Pow2 Scaling Entry... Change bin resolution and range (actual
scaling is 2n, where n is the scale value).
A description of Bins and how to use them is contained in the
Important Settings section.
Modulo Advanced Setup Panel
Modulo Advanced Setup Panel Tools:
Bit Phase Offset Entry...... Used to phase align the bits in the Modulo
analysis.
User Guide BA622
Artisan Technology Group - Quality Instrumentation ... Guaranteed | (888) 88-SOURCE | www.artisantg.com
Panel Reference • 165
More BER Panel
The More BER plug-in panel displays a variety of statistics. In this
panel you can view the number of hardware system events, such as
markers, squelches, resyncs, and blanking events, that have occurred.
Marker #1 events are triggered by the front panel detector Marker #1
input signal. Marker #2 events are triggered by the rear panel parallelconnector detector Marker #2 input signal.
Blanking events are periods when the input channel is ignored, and
errors are not analyzed. Using blanked periods is necessary in many
applications to avoid checking for errors during run-up periods, or
sync-detect periods, or head-switching periods, etc. Blanking may be
active-high or active-low depending on how the blanking level is set up
in the Detector Setup panel. During the blanked periods, the
BitAlyzer622's internal error positioning clock may continue to
increment or not, depending on settings in the Detector Setup panel.
Usually, the clock is "gated" along with the data. Otherwise, your error
rates will be deflated by the amount of bits represented by the blanked
interval.
Resync events are triggered by hardware resynchronization to incoming
data. Resynchronization with incoming data occurs when you first
come on-line, measuring or acquiring error information. It also happens
if you press the "Scan for Pattern" button on the Detector plug-in panel.
It may also be triggered by the hardware blanking signal, depending on
166 • Panel Reference
User Guide BA622
Artisan Technology Group - Quality Instrumentation ... Guaranteed | (888) 88-SOURCE | www.artisantg.com
settings in the Detector Setup panel. Essentially, you can set the
blanking pulse to cause a resynchronization with incoming data at the
end of the blanked interval. Finally, an automatic resynchronization
attempt may also be invoked by the BitAlyzer622 operating system
software, based on the Detector Resync Threshold parameter set in the
Detector Setup panel. This feature inspects incoming errors and if a
user-specified number of 16-bit words in a row are found to be in error,
resynchronization is attempted.
Squelch events represent periods of time where the BitAlyzer622 is
forced to stop examining errors because the hardware is generating too
many errors for the software to keep up with. These situations cause
periods of Lost Bits, which are quantities of bits whose error condition
cannot be determined. The BitAlyzer622 operating system software
omits these periods from error rate calculations by reducing the
denominator in the basic BER=errors/bits equation by the number of
lost bits. If an entire integration period is lost, the error rates are
displayed as zero.
More BER Panel Displays:
Marker #1 Events ............ Quantity of Marker #1 events.
Marker #2 Events ............ Quantity of Marker #2 events.
Pattern Cycle Events........ Quantity of Pattern Period cycle events.
Blanking Events .............. Quantity of blanking events.
Resync Events.................. Quantity of resynchronization events.
Squelch Events ................ Quantity of squelch events.
Bits Per Second................ Number of bits per block as used in the block
histogram (Block Bits entry field from More
BER Setup panel).
Elapsed Seconds .............. Total time elapsed.
Erred Seconds.................. Total amount of time with errors.
Setup Button.................... Access additional setup parameters via the
More BER Setup panel.
To use Marker analysis, markers must be present in the data. If you are
in LIVE mode, this means you must enable marker events in the
Detector Setup Event Enable panel. You can check if markers are
present by viewing the marker count in the More BER panel.
Refer to the Basic BER and Block plug-in panels for further discussion
of block error analysis.
User Guide BA622
Artisan Technology Group - Quality Instrumentation ... Guaranteed | (888) 88-SOURCE | www.artisantg.com
Panel Reference • 167
More BER Setup Button
The "Setup" button accesses the More BER Setup panel, which
contains Block Label and Block Bits user interface fields. Once you've
edited a new configuration, install the changes by pressing the "OK"
button, or press the "Cancel" button to cancel the changes.
More BER Setup Panel Tools:
Block Label Entry ............ Specify a text label to be displayed with the
blocks in the block histogram.
Block Bits Entry .............. Specify the number of bits per block as used in
the block histogram.
168 • Panel Reference
User Guide BA622
Artisan Technology Group - Quality Instrumentation ... Guaranteed | (888) 88-SOURCE | www.artisantg.com
Multi-Channel BER Panel
Multi-Channel BER measures the error rate on multiple channels at the
same time. The chart illustrates the current measurements, in addition
to a history of past measurements, with a series of bars.
The first set of bars (A-H) shows BER measurements of the most
recent "Log Interval". The bars behind these are historic measurements;
16 histories are kept. Each bar represents
(LogInterval * BitsPerChannel) Number of Bits.
User Guide BA622
Artisan Technology Group - Quality Instrumentation ... Guaranteed | (888) 88-SOURCE | www.artisantg.com
Panel Reference • 169
Multi-Channel Setup
Multi-Channel Setup Panel Tools:
Title Entry ....................... Enter a custom title for display at the top of the
chart. May include Metastrings.
Channels Entry ................ Specify number of channels. Maximum 16
(cannot be zero).
Grid Checkbox................. Enable grid display.
Bits Per Channel Entry .... Specify number of bits per channel (cannot be
zero).
Log File Entry.................. If Log File is specified, comma-delimited text
file is produced.
Log Interval Entry ........... Specify log interval (cannot be zero).
Bar History Entry............. Specify the number of history bars to display
for each channel. Maximum 16, minimum 1.
Help Button ..................... Access on-line manual entry explaining the
Multi-Channel Setup panel.
170 • Panel Reference
User Guide BA622
Artisan Technology Group - Quality Instrumentation ... Guaranteed | (888) 88-SOURCE | www.artisantg.com
Log File
If a Log File is specified in the Multi-Channel Setup panel, a commadelimited text file is produced. The file will resemble the following:
MULTI-CHANNEL BER LOG FILE
ANALYZER_FILE,C:\USERS\BA5\BIN\SONY1.ER5
NUM_CHANNELS,8
BITS_PER_CHANNEL,288864
BITS_PER_LOG_ENTRY,288864000
1,1323,10746,1066,2427,1241,2037,2139,1301,
2,451,842,742,922,2511,3462,3120,889,
3,451,1377,1784,1319,1639,1674,1050,1299,
4,7639,10893,8851,9428,9915,10163,7825,8932,
5,13156,21391,15402,21288,17690,23400,20044,18866,
6,861,2198,1228,1718,2302,1583,1485,823,
7,604,1196,497,893,850,1081,1402,1025,
8,2324,2821,1643,1880,2748,3863,2374,2949,
9,906,1315,709,1272,945,1388,1783,1179,
10,909,1267,1381,940,875,1158,1583,1076,
11,947,1454,1214,897,1545,1639,1199,480,
12,13050,15396,15437,22355,28936,19047,4605,5931,
13,1847,689,1535,1089,823,1014,1255,899,
14,1995,2045,3150,3030,2919,3221,3323,3374,
15,716,2097,1846,712,322,1828,844,649,
16,269,940,969,326,800,1175,741,576,
17,1063,998,1218,693,1888,2265,1198,1017,
18,258,680,451,564,991,1710,904,730,
19,1134,202,559,839,522,2054,1260,961,
20,1629,2796,1898,2045,2506,4681,2919,2402,
21,739,1624,1071,1339,2223,1806,2057,1250,
22,798,690,897,1759,1154,774,503,1162,
23,1271,2347,2372,2229,3124,2127,2133,1604,
24,741,876,1960,1304,1081,1953,1744,1509,
25,938,2563,1340,1783,2201,3368,1647,1234,
26,4151,7553,6089,6230,5638,7652,7097,7554,
By filtering the Log File through the "Comma-Delimited Text" mode in
Microsoft Excel, a more readable table can be produced:
User Guide BA622
Artisan Technology Group - Quality Instrumentation ... Guaranteed | (888) 88-SOURCE | www.artisantg.com
Panel Reference • 171
172 • Panel Reference
User Guide BA622
Artisan Technology Group - Quality Instrumentation ... Guaranteed | (888) 88-SOURCE | www.artisantg.com
Packbits Panel
Through use of the Packbits scanner, the BitAlyzer's 16-bit and 8-bit
parallel interfaces may be used with parallel channels of less than 16bit or 8-bit width. When the input channel is narrower than the
BitAlyzer interface, it is desirable to ignore the bits that are not
connected. The Packbits data scanner processes BitAlyzer error
information before other data scanners, takes out designated bits
employing a user-selected mask, and packs the remaining bits back into
a contiguous stream for normal BitAlyzer analysis.
For example: A 10-bit interface connected to the least significant bits of
the BitAlyzer 16-bit interface requires stripping off the high six bits of
every 16-bit word, and repacking the remaining 10-bit values to form a
constant stream. In this case, the Pack Bit Mask would be set to
0x03FF.
A 3-bit interface connected to the 8-bit (byte) parallel BitAlyzer
interface would be used with a Pack Bit Mask value of 0x0707.
The Packbits data scanner can also invert the bits of the 16-bit words
that are processed. Refer to the Flip MSB-LSB feature described
below.
16-Bit Mask
Each bit of the 16-Bit Mask refers to one bit in the parallel interface. A
"1" indicates that this bit is used and should be kept, while a "0"
indicates this bit is not used and should be ignored (masked). The 16bit Mask is used with byte-parallel interfaces. A byte mask should be
repeated to form a 16-bit value (i.e., three least significant bits used out
of eight on the byte parallel interface would require a mask value of
0x0707, while the 3/16 would be 0007).
Flip MSB-LSB
The Packbits scanner can flip the bits of the incoming 16-bit values
before they are processed, packed and output to the remaining scanners.
Flipping means that Bit 15 becomes Bit 0, Bit 14 becomes Bit 1, etc.,
transposing the value so that the most significant bit becomes the least
significant bit and vice-versa.
User Guide BA622
Artisan Technology Group - Quality Instrumentation ... Guaranteed | (888) 88-SOURCE | www.artisantg.com
Panel Reference • 173
Packbits Panel Displays:
16-Bit Mask..................... Displays user-selectable mask entered on the
Packbits Setup panel, a hexadecimal number
from 0001 to FFFF.
Flip Word ........................ Indicates whether Flip Word is enabled or
disabled.
Input Bits......................... Number of bits input to Packbits scanner (userselectable).
Output Bits ...................... Number of bits output from Packbits scanner
(user-selectable).
Setup Button .................... Open Packbits Setup panel.
174 • Panel Reference
User Guide BA622
Artisan Technology Group - Quality Instrumentation ... Guaranteed | (888) 88-SOURCE | www.artisantg.com
Packbits Setup Button
Packbits Setup Panel Tools:
16-Bit Mask Entry ........... Specify bits to be excluded. Hexadecimal, in
the range 0001 to FFFF. Note: Specifying
FFFF does nothing (NO bits excluded).
Flip MSB-LSB Checkbox Enable/disable flipping the bits of the
incoming 16-bit values.
User Guide BA622
Artisan Technology Group - Quality Instrumentation ... Guaranteed | (888) 88-SOURCE | www.artisantg.com
Panel Reference • 175
Space Mark Panel
The SpaceMark scanner is used to "normalize" the number of 16-bit
words between user-defined events, such as Markers, Blanks, etc. This
normalization is especially useful for data files or live measurements in
which the separation of Markers is not uniform, and the user wishes to
measure bit-error intervals. The SpaceMark scanner will ignore those
words that occur beyond the user-defined Marker interval, and
conversely, will "pad" with clean words an interval that is short. This
scanner will affect the total BER measurement, and the user should
take care interpreting data when this scanner is active.
Space Mark Panel Setup Button
The plug-in panel includes a "Setup" button that accesses the Space
Markers Setup panel. This panel enables you to select marker
characteristics. Once this panel is opened, install changes by pressing
the "OK" button, or cancel them by pressing the "Cancel" button.
176 • Panel Reference
User Guide BA622
Artisan Technology Group - Quality Instrumentation ... Guaranteed | (888) 88-SOURCE | www.artisantg.com
Space Mark Setup Panel Tools:
Marker Word Interval
Entry ............................... Select the space between Markers.
Triggering Event Button .. Select event which will serve as trigger:
None........................ Disable triggers.
Mark 1..................... Use Marker #1.
Mark 2..................... Use Marker #2.
Either Marker .......... Use either Marker.
Begin Blank............. Use Begin Blank signal as trigger.
Begin Resync........... Use Begin Resync signal as trigger.
Discard Markers
Checkbox......................... Choose to discard Markers in the scanner
output.
To use Marker analysis, markers must be present in the data. If you are
in LIVE mode, this means you must enable marker events in the
Detector Setup Event Enable panel. You can check if markers are
present by viewing the marker count in the More BER panel.
User Guide BA622
Artisan Technology Group - Quality Instrumentation ... Guaranteed | (888) 88-SOURCE | www.artisantg.com
Panel Reference • 177
Spectrum Panel
The Spectrum data scanner calculates the auto-correlation of the error
locations in the data stream. This auto-correlation demonstrates the
power spectrum of the error-location signal. The power spectrum
demonstrates the probability of having errors at given bit-intervals.
To perform this analysis, the BitAlyzer keeps a list of recent error
positions. The length of this list is defined by the "Memory Units" and
"Window Size" parameters on the setup panel. "Memory Units" defines
the maximum number of error locations that may be kept at one time.
"Window Size" further qualifies the entries that are kept, by their bitdistance proximity.
As each new error location is processed, the distance is calculated from
the new error location to all other error locations in the list, and a
histogram entry representing the distance is incremented for each entry.
Then, the new error location is added to the list. If the list is over-filled,
the oldest entry is removed. Entries which represent errors that are
located more than the "Window Size" number of bits away from the
new error location are also removed.
Note: This data scanner is extremely processor time consuming, and is
not recommended for use in LIVE mode. Processing time may be
improved by selecting smaller quantities for the "Memory Units"
parameter, and by selecting smaller "Window Size" parameters.
178 • Panel Reference
User Guide BA622
Artisan Technology Group - Quality Instrumentation ... Guaranteed | (888) 88-SOURCE | www.artisantg.com
Spectrum Profile Setup Button
The plug-in panel displays a histogram chart and includes a "Setup"
button that accesses the Spectrum Profile Setup panel. This modal
panel enables you to select processing and display characteristics for
the chart. Once this panel is opened, install changes by pressing the
"OK" button, or cancel them by pressing the "Cancel" button.
User Guide BA622
Artisan Technology Group - Quality Instrumentation ... Guaranteed | (888) 88-SOURCE | www.artisantg.com
Panel Reference • 179
Spectrum Profile Setup Panel Tools:
Title Entry ....................... Enter a custom title for display at the top of the
chart. May include Metastrings.
Window Size Entry.......... Set full scale in bits.
Memory Units Entry ........ Set amount of system memory to reserve.
Log Chart Checkbox ........ Display y-axis logarithmically instead of
linearly.
Grid Checkbox................. Enable grid display.
Info Line Checkbox ......... Enable display of status information at bottom
of chart.
Cursor A Checkbox.......... Enable Cursor A display.
Cursor B Checkbox.......... Enable Cursor B display.
Bin Mapping Range
Display ............................ Show the start-to-end bit range for bin
mapping.
Bin Mapping Button ........ Open sub-panel for changing bin mapping.
Spectrum Data Collection Bin Mapping Panel Tools:
Bin Count Display ........... Display quantity of bins.
Bin Offset Entry............... Set the offset at which to begin mapping bins.
Bin Pow2 Scaling Entry... Change bin resolution and range (actual
scaling is 2n, where n is the scale value).
A description of Bins and how to use them is contained in the
Important Settings section.
180 • Panel Reference
User Guide BA622
Artisan Technology Group - Quality Instrumentation ... Guaranteed | (888) 88-SOURCE | www.artisantg.com
Strip Chart Panel
The Strip Chart plug-in panel displays error information over time.
Actually, it shows error information over quantity-of-bits, but this is
related to time by the bit transmission frequency. Error information is
calculated after each integration period, the length of which is set in the
Basic BER panel. When you first begin an analysis with the strip chart,
you won't see anything until an integration-period worth of data has
been analyzed and error rates have been calculated, then "posted" to the
strip chart.
The strip chart can show the error rate calculated during the integration
period. It can also show you system events such as resynchronization,
squelching, etc. Use the checkbox fields in the Strip Chart Setup panel
to select what type of information to display.
The strip chart can show up to 64 postings of each type of system
event. The maximum number of error rate postings is selectable by the
user via the Strip Chart Setup panel. Once these maximums are
reached, the oldest postings are lost in favor of the new postings.
User Guide BA622
Artisan Technology Group - Quality Instrumentation ... Guaranteed | (888) 88-SOURCE | www.artisantg.com
Panel Reference • 181
System Events Portrayed (using single character mnemonics):
R...........Resync
C ..........Pattern Cycle
B...........Blanking
1 ...........Marker #1
2 ...........Marker #2
Squelch system events are drawn as binary logic signals, somewhat
similar to a logic analyzer, where a high signal indicates squelching,
and a low signal indicates no squelching.
During playback and live analyzer operating modes, the position of the
strip chart is monitored and shifted to the left as needed to keep the
most-recent posting within the graph. This animation feature is
especially useful during long runs.
Strip Chart Setup Button
The "Setup" button accesses the Strip Chart Setup panel, which
contains user interface fields affecting the operations of the strip chart
data scanner and the strip chart display. Once you've edited a new
configuration, install the changes by pressing the "OK" button, or press
the "Cancel" button to cancel the changes.
Strip Chart Setup Panel Tools:
Title Entry ....................... Enter a custom title for display at the top of the
chart. May include Metastrings.
182 • Panel Reference
User Guide BA622
Artisan Technology Group - Quality Instrumentation ... Guaranteed | (888) 88-SOURCE | www.artisantg.com
Log File Entry ................. Cause strip chart postings to be saved in the
specified file.
BER History Entry........... Specify the maximum number of Total BER
traces that will be kept recent. Maximum is
1000 (large numbers will affect chart drawing
speed).
Total BER Checkbox ....... Enable display of Total BER.
Burst BER Checkbox ....... Enable display of Burst BER.
Bit BER Checkbox........... Enable display of Bit BER.
Show Events Checkbox.... Enable display of system events.
Grid Checkbox................. Enable grid display.
Info Line Checkbox ......... Enable display of status information at bottom
of chart.
Cursor Checkbox ............. Enable a vertical cursor.
Tick Marks Checkbox...... Enable tick marks to be displayed on postings.
Otherwise, only lines are drawn.
User Guide BA622
Artisan Technology Group - Quality Instrumentation ... Guaranteed | (888) 88-SOURCE | www.artisantg.com
Panel Reference • 183
System Panel
The system plug-in panel contains a number of buttons that access
system-level functions, such as configuring the remote control port and
setting up for printing.
Remote Control Button
The remote control button opens the remote control setup panel.
Remote control of a BitAlyzer622 involves communicating to the
BitAlyzer622 over an RS-232 or IEEE-488 communications link using
a specific BitAlyzer622 remote control protocol, or language. This
language is defined in the Appendix.
The following fields are selectable:
Port.................................. Choose which communications port is to be
used for access to the BitAlyzer's remote
control operations. If the port is set to NONE,
then remote control is disabled. Other port
types include COM1 and COM2, which
identify RS-232 remote control operations.
These choices require selecting proper baud
and mode parameter values, as described
below.
184 • Panel Reference
User Guide BA622
Artisan Technology Group - Quality Instrumentation ... Guaranteed | (888) 88-SOURCE | www.artisantg.com
Baud................................ The baud selector is used in conjunction with a
port type set to COM1 or COM2. Possible
bauds range from 300 bits per second (bps) to
38,400 bps. Although RS-232 communication
is programmed using high-speed, interruptdriven software, the bandwidth limitations of
operating your communications channel at
38,400 bps will be significantly slower if you
are transferring large amounts of binary data.
In our experience, the serial communication at
38,400 bps is sufficient for most other types of
remote control operations.
Mode ............................... This selector is used in conjunction with a port
type set to COM1 or COM2. This single
selection actually specifies three RS-232
communications characteristics: parity, stop
bits and word length. For example, a mode set
to "N18" indicates no parity, one stop bit, and
a word length of eight bits.
IEEE-488 Address ........... This entry field is used in conjunction with a
port type set to IEEE-488. This decimal value
represents the IEEE bus address used in
addressing the BitAlyzer as an IEEE bus
peripheral.
Debugging ....................... Enable/disable the debugging trace feature of
the BitAlyzer operating system. When
enabled, the BitAlyzer outputs debugging
information to a known data file that you can
use to debug your remote control applications.
The data file is contained in the root directory
of the hard disk and is named "stdbug.out".
The file can be viewed using a normal text
editor like DOS EDIT.EXE.
Interactive........................ Enable/disable the BitAlyzer remote control
features to support an interactive mode over an
RS-232 COM1 or COM2 communi-cations
connection. This mode displays a prompt to
the user at which remote control commands
may be directly typed and executed. This
feature is useful in conjunc-tion with a
terminal emulation program running on a host
computer, such as MS.KERMIT.EXE or
PROCOM.EXE, etc.
User Guide BA622
Artisan Technology Group - Quality Instrumentation ... Guaranteed | (888) 88-SOURCE | www.artisantg.com
Panel Reference • 185
Reply Status..................... Enable/disable the immediate reply of a
command execution status after the command
is executed. Normally the BitAlyzer does not
reply immediately with the execution status of
each command; rather, the status is set by the
execution of the command and a second
command, requesting the current status value,
is used to determine the execution status of the
first command. When this checkbox is
enabled, the status is transmitted automatically
after each command. Refer to the "Reply" and
"Status" protocol commands for more
explanation.
Remote Control Setup Panel Tools:
Port Selector .................... COM1, COM2, GPIB (General Purpose
Interface Bus, i.e., IEEE-488).
Baud Selector................... 300-38,400 (RS-232 Only).
Mode Selector.................. E18-O27 (RS-232 Only).
IEEE-488 Address Entry.. GPIB address in the range of 0-255 (GPIB
Only).
Debugging Checkbox....... Enable Debugging Trace messages to
C:\STDBUG.OUT
186 • Panel Reference
User Guide BA622
Artisan Technology Group - Quality Instrumentation ... Guaranteed | (888) 88-SOURCE | www.artisantg.com
Interactive Checkbox ....... Enable interactive RS-232 operations,
including Command Prompts and Status
messages.
Reply Status Checkbox .... Enable immediate Reply of Command
Execution Status.
System Parameters Button
System Parameters Setup Panel Tools:
Printer Type Selector ....... Select format of data.
Screen Saver Entry .......... Specify when to initiate screen saver.
Print Destination Entry .... Specify destination of data.
Double Click Speed
Entry ............................... Select time allowed between clicks.
Off-Screen Drawing
Checkbox......................... Enable/Disable off-screen drawing.
Printer Type Selector
The BitAlyzer622 user interface supports screen printing in six
different modes. These modes refer to different printer types and
different dot resolutions. To make a selection, open the System plug-in
panel and select the "System Params" button; then use the printer type
selector to choose the appropriate printer.
User Guide BA622
Artisan Technology Group - Quality Instrumentation ... Guaranteed | (888) 88-SOURCE | www.artisantg.com
Panel Reference • 187
Printer Type Selections:
Epson-Large .................... Large size; low resolution; landscape mode
Epson-Medium ................ Medium size and resolution; portrait mode
HP-Large ......................... Large size; low resolution; landscape mode
HP-Medium ..................... Medium size and resolution; portrait mode
HP-Small ......................... Small size; high resolution; portrait mode
PCX File.......................... Dumps screen contents to a .PCX file
The HP printer types support both LaserJet and DeskJet printers. The
Epson printers support most 9-pin models.
Print Destination
The print destination can be changed from LPT1 to another printer port
or to a filename. When the destination is a filename, the raw printer
data is stored in the file, rather than sent to the printer. Use the printer
destination selector to enter the appropriate destination.
Printer Destination Selections:
LPT1 ............................... Parallel port one.
LPT2 ............................... Parallel port two.
COM1 ............................. Serial port one.
COM2 ............................. Serial port two.
PRN................................. DOS "prn:" device.
NONE ............................. No destination; prevents all port printing.
<filename> ...................... File destination (standard DOS format).
Print Button
You can use the print button to initiate screen printing, or use the
"ALT-P" key sequence. To print to a .PCX file, use the "ALT-F" key
sequence.
Quit Button
The quit button terminates the BitAlyzer622 operating system software,
saving the current configuration in the BA5P.CFG file. This
configuration can be restored by restarting the BA5P.EXE program
using the -R command line switch. Press both shift keys down to
terminate the BitAlyzer622 operating system immediately without
saving the configuration.
188 • Panel Reference
User Guide BA622
Artisan Technology Group - Quality Instrumentation ... Guaranteed | (888) 88-SOURCE | www.artisantg.com
BitAlyzer Utility Programs
Burst Locate
FILE NAME.................... BLOCATE.EXE
TITLE ............................. BURST LOCATE Version 1.0
BRIEF DESCRIPTION.... Finds locations of bursts within blocks.
Produces output file showing block count,
burst location (bit offset within block to
beginning of burst), burst length, and actual
errors in each burst.
USAGE ........................... BLOCATE [options] SourceFilename
FEATURES..................... One or more of the following parameters may
be added to the command line options.
Option
Description
-160................................. Indicates that the source file uses BitAlyzer
160 data format.
-400................................. Indicates that the source file uses BitAlyzer
400/622 data format. (Default mode)
-p..................................... Progress Flag -- Shows percent complete.
-s1 ................................... Skip to Marker1 -- Ignores all data preceding
first Marker #1 event. (May be combined with
"-s2")
-s2 ................................... Skip to Marker2 -- Ignores all data preceding
first Marker #2 event. (May be combined with
"-s1")
-span................................ Specifies that bursts may span block
boundaries.
-bpb N ............................. Specifies N bits per block as the block size.
-efi N ............................... Specifies N bits as the error free interval (EFI).
-bl N ................................ Specifies N bits as the minimum burst length.
-o F.................................. Specifies filename F as the output file. Data is
separated by commas and entered in rows. If
this option is not used, the output will be
shown on the screen.
User Guide BA622
BitAlyzer Utility Programs • 189
Artisan Technology Group - Quality Instrumentation ... Guaranteed | (888) 88-SOURCE | www.artisantg.com
-nh................................... No header -- the output will not contain a
column header.
MARK1........................... Adds Marker1 to the event mask. *New blocks
will be triggered whenever any event in the
event mask is found. (Used in place of "-bpb
N")
MARK2, CYCLE,
UNUSED1, BLANK,
RESYNC, SQUELCH,
UNUSED2....................... One or more of these events may be added to
the event mask.*
EXAMPLE ...................... Use BLOCATE to process a BitAlyzer622
data file in blocks of 100,000,000 bits and
output the result to file "BLocate.csv". Type at
the DOS prompt:
BLOCATE -400 -p -bpb 1e8 -efi 8 -bl 32 -o BLocate.csv Dcrsi3.er5
The output file "BLocate.csv" will look similar to the following:
BLOCK, BURST LOCATION, BURST SIZE, BURST ERRS
1, 43345852, 60, 28
1, 77781398, 67, 22
1, 77816232, 157, 76
1, 77851111, 36, 20
1, 77851155, 69, 28
2, 9041475, 35, 16
2, 29473966, 54, 24
2, 35108642, 36, 16
3, 42247830, 63, 35
.....etc.
COMMENTS .................. If the "-span" option is selected, a burst may
span block boundaries but will be counted in
the block in which it began. If the "-span"
option is not used, bursts will automatically be
reset on block boundaries.
190 • BitAlyzer Utility Programs
User Guide BA622
Artisan Technology Group - Quality Instrumentation ... Guaranteed | (888) 88-SOURCE | www.artisantg.com
Block Bit Error Rate
FILE NAME.................... BLOCKBER.EXE
TITLE ............................. BLOCK BIT ERROR RATE Version 1.0
BRIEF DESCRIPTION.... Calculates bit error rates, burst error rates, and
non-burst error rates per block. Produces
output file showing block count, bits, errors,
bit error rate (BER), burst errors, burst error
rate, bursts, non-burst errors, and non-burst
error rate for each block.
USAGE ........................... BLOCKBER [options] SourceFilename
FEATURES..................... One or more of the following parameters may
be added to the command line options.
Option
Description
-160................................. Indicates that the source file uses BitAlyzer
160 data format.
-400................................. Indicates that the source file uses BitAlyzer
400/622 data format. (default mode)
-p..................................... Progress Flag -- Shows percent complete.
-s1 ................................... Skip to Marker1 -- Ignores all data preceding
first Marker #1 event. (May be combined with
"-s2")
-s2 ................................... Skip to Marker2 -- Ignores all data preceding
first Marker #2 event. (May be combined with
"-s1")
-span................................ Specifies that bursts may span block
boundaries.
-bpb N ............................. Specifies N bits per block as the block size.
-efi N ............................... Specifies N bits as the error free interval (EFI).
-bl N ................................ Specifies N bits as the minimum burst length.
-o F.................................. Specifies filename F as the output file. Data is
separated by commas and entered in rows. If
this option is not used, the output will be
shown on the screen.
-e N ................................. Specifies N bits as the print-line output error
threshold (minimum bit errors required to
show block info).
User Guide BA622
BitAlyzer Utility Programs • 191
Artisan Technology Group - Quality Instrumentation ... Guaranteed | (888) 88-SOURCE | www.artisantg.com
-nh................................... No header -- the output will not contain a
column header.
MARK1........................... Adds Marker1 to the event mask. *New blocks
will be triggered whenever any event in the
event mask is found. (Used in place of "-bpb
N")
MARK2, CYCLE,
UNUSED1, BLANK,
RESYNC, SQUELCH,
UNUSED2....................... One or more of these events may be added to
the event mask.*
EXAMPLE ...................... Use BLOCKBER to process a BitAlyzer622
data file in blocks of 100,000,000 bits and
output the result to file "BlockBer.csv". Type
at the DOS prompt:
BLOCKBER -400 -p -bpb 1e8 -efi 8 -bl 32 -o BlockBer.csv Dcrsi3.er5
The output file "BlockBer.csv" will look similar to the following:
BLOCK, BITS, BIT ERRS, BER, BURST ERRS, BURST BER, BURSTS,
NON-BURST ERRS,
NON-BURST BER
1, 100000000, 1162, 1.162000e-005, 174, 1.740000e-006, 5,
988, 9.880000e-006
2, 100000000, 1101, 1.101000e-005, 56, 5.600000e-007, 3,
1045, 1.045000e-005
3, 100000000, 931, 9.310000e-006, 60, 6.000000e-007, 2,
871, 8.710000e-006
4, 100000000, 2485, 2.485000e-005, 1457, 1.457000e-005, 16,
1028, 1.028000e-005
.....etc.
COMMENTS .................. If the "-span" option is selected, bursts may
span block boundaries and will therefore be
counted in the block in which the end of the
burst is determined; this situation does skew
error analysis and should be used knowingly.
If the "-span" option is not used, bursts will
automatically be reset on block boundaries.
SPREADSHEETS and
BLOCKBER .................... The data generated by BlockBer is separated
by commas and entered in rows, so it can be
easily imported into most spreadsheet
programs (To use the data in Microsoft
Windows programs, the output file should
have a ".CSV" extension). Shown below is a
Microsoft Excel chart of the example data.
192 • BitAlyzer Utility Programs
User Guide BA622
Artisan Technology Group - Quality Instrumentation ... Guaranteed | (888) 88-SOURCE | www.artisantg.com
To import the data into Microsoft Excel, first use BlockBer to generate
an output file ("-o F" switch; be sure to specify a filename with ".CSV"
for the extension). Next, begin Microsoft Excel and select "File"
"Open". Select the file you generated from the file selector in the Open
dialog box. Click on "Ok" and the data will be imported into Excel in
rows and columns.
User Guide BA622
BitAlyzer Utility Programs • 193
Artisan Technology Group - Quality Instrumentation ... Guaranteed | (888) 88-SOURCE | www.artisantg.com
Error File Counter
FILE NAME.................... COUNTER.EXE
TITLE ............................. ERROR FILE COUNTER Version 1.0
BRIEF DESCRIPTION.... Counts Bits, Blocks, Errors, Events, and
Packets in BitAlyzer data files.
USAGE ........................... COUNTER [options] SourceFilename
FEATURES..................... One or more of the following parameters may
be added to the command line options.
Option
Description
-400 ................................. BitAlyzer 400/622 data source file. (Default)
-160 ................................. BitAlyzer 160 data source file.
-p..................................... Progress Flag -- Shows percent complete.
-s1 ................................... Skip to Marker1 -- Ignores all data preceding
first Marker #1 event. (May be combined with
-s2)
-s2 ................................... Skip to Marker2 -- Ignores all data preceding
first Marker #2 event. (May be combined with
-s1)
-bpb N ............................. Specifies N bits per block as the block size.
-o F.................................. Specifies filename F as the output file. Data is
separated by commas. If this option is not
used, the output will be shown on the screen.
EXAMPLE ...................... The following example uses COUNTER to
count the information in a BitAlyzer 622 data
file. Type at the DOS prompt:
COUNTER -400 -p Dcrsi3.er5
194 • BitAlyzer Utility Programs
User Guide BA622
Artisan Technology Group - Quality Instrumentation ... Guaranteed | (888) 88-SOURCE | www.artisantg.com
The output will look similar to the following:
Total Bits, 1221526960
Bits Per Block, 100000000
Full Blocks, 12
Total Errors, 18703
Total Events, 35054
Mark#1 Events, 0
Mark#2 Events, 35054
Cycle Events, 0
Unused1 Events, 0
Blank Events, 0
Resync Events, 0
Unused2 Events, 0
Squelch Events, 0
Packets, 0
COMMENTS .................. It is important to note that "Total Events"
reflects the number of times one or more
events occurred in a sample (not the sum of all
the different events).
User Guide BA622
BitAlyzer Utility Programs • 195
Artisan Technology Group - Quality Instrumentation ... Guaranteed | (888) 88-SOURCE | www.artisantg.com
Cull Block
FILE NAME.................... CULLBLOC.EXE
TITLE ............................. CULL BLOCK Version 1.2
BRIEF DESCRIPTION.... Removes all bit errors from blocks with fewer
errors than a set threshold, and generates
output file containing the culled data. A
maximum threshold may also be specified and
used in conjunction with the minimum
threshold. May also be used to keep errors
only from specifically identified blocks.
USAGE ........................... CULLBLOCK [options] SourceFilename
DestFileName
FEATURES..................... One or more of the following parameters may
be added to the command line options.
Option
Description
-160 ................................. Indicates that the source file uses BitAlyzer
160 data format.
-400 ................................. Indicates that the source file uses BitAlyzer
400/622 data format. (Default mode)
-p..................................... Progress Flag -- Shows percent complete.
-s1 ................................... Skip to Marker1 -- Ignores all data preceding
first Marker #1 event. (May be combined with
"-s2")
-s2 ................................... Skip to Marker2 -- Ignores all data preceding
first Marker #2 event. (May be combined with
"-s1")
-e N ................................. Specifies N bit errors per block as the
threshold. (Default = 1000)
-b N ................................. Specifies N bytes per block as the block size.
(Default = 8096)
-m1.................................. Causes Marker #1 events to be generated on
block boundaries. (May be combined with "m2")
-m2.................................. Causes Marker #2 events to be generated on
block boundaries. (May be combined with "m1")
-x N ................................. Specifies Maximum Bit Error Threshold
196 • BitAlyzer Utility Programs
User Guide BA622
Artisan Technology Group - Quality Instrumentation ... Guaranteed | (888) 88-SOURCE | www.artisantg.com
-k N ................................. Specifies "Keeper" Block Number
EXAMPLE ...................... Use CULL BLOCK to process a BitAlyzer
622 data file in blocks of 8096 bytes with a
threshold of 100 bits, and generate the output
file "CullBloc.er5". Marker2 events are
produced on block boundaries. Type at the
DOS prompt:
CULLBLOCK -400 -p -e 100 -b 8096 -m2 Dcrsi3.er5 CullBloc.er5
COMMENTS .................. If -x (Maximum Bit Error Threshold) is
specified, then a block must have an errorcount inclusively between the Minimum
threshold and the maximum threshold in order
to be kept. Multiple -k's may be specified. The
number represents the block-number (starting
at 1), of blocks which are to be kept. If -k is
specified, then error-count thresholding is
ignored.
User Guide BA622
BitAlyzer Utility Programs • 197
Artisan Technology Group - Quality Instrumentation ... Guaranteed | (888) 88-SOURCE | www.artisantg.com
Error Edit
FILE NAME.................... ERREDIT.EXE
TITLE ............................. ERROR EDIT Version 5.0
BRIEF DESCRIPTION.... Displays BitAlyzer data files in text format.
Calculates error free intervals and number of
bits since first event. Shows "events" such as
markers, blanking on/off, and
resynchronization.
USAGE ........................... ErrEdit [options] filename
FEATURES..................... One or more of the following parameters may
be added to the command line options:
Option
Description
-o fname .......................... Set output destination filename
-x..................................... Show xor
-v..................................... Show event
-e ..................................... Show EFI
-c ..................................... Show clock
-m.................................... Show mask
-b..................................... Show bits
-p..................................... Show progress
-n..................................... Show count
-a ..................................... Show all of the above. Options -x through -a
specify which columns to output.
-s N.................................. Set "EfiThreshold" value. Sets error free
distance Minimum Threshold requirement to
display sample.
-bf N ................................ Set "BitsFrom" value.
-bt N ................................ Set "BitsTo" value. These two parameters set
the range of bits for which to display samples.
-cf N ................................ Set "CountFrom" value.
-ct N ................................ Set "CountTo" value. These two parameters
set the sample number range for which to
display samples.
-k N ................................. Set "EventMask" value. Sets Event Mask
requirement to display samples.
EXAMPLE ...................... Type at the DOS prompt:
198 • BitAlyzer Utility Programs
User Guide BA622
Artisan Technology Group - Quality Instrumentation ... Guaranteed | (888) 88-SOURCE | www.artisantg.com
ERREDIT -a EXAMPLE.ER5
The output will look similar to the following:
Count
Bits
1
2
3
4
5
6
7
8
9
10
0
16
825904
3530208
3530224
3845488
3845504
3845520
14984320
16509472
W-Efi Clock
0
0
51617
169018
0
19703
0
0
696174
95321
00000001
00000002
0000c9a4
00035ddf
00035de0
0003aad8
0003aad9
0003aada
000e4a49
000fbea3
Event
0000
0000
0000
0000
0000
0000
0000
0000
0000
0000
Mask Xor
0000
0000
0040
0020
2000
0008
0808
2000
0500
0500
...
COMMENTS .................. "W-Efi" is the number of 16-bit words that are
error free since the last event. "Xor" is the hex
representation of the bits in error in a 16-bit
binary sequence (1=error). “Mask” is a onecharacter explanation of the “Event”:
C ..................................... Pattern cycle marker (internal)
B ..................................... Begin blank
1 ...................................... Marker 1 (front panel)
2 ...................................... Marker 2 (rear panel, parallel interface)
R ..................................... Begin resynchronization
S...................................... Begin error squelch
User Guide BA622
BitAlyzer Utility Programs • 199
Artisan Technology Group - Quality Instrumentation ... Guaranteed | (888) 88-SOURCE | www.artisantg.com
Extract
FILE NAME.................... EXTRACT.EXE
TITLE ............................. EXTRACT, Version 1.0
BRIEF DESCRIPTION.... Extracts certain portions of error information
from a previously recorded error data set.
Extraction is performed on 16-bit word
boundaries.
USAGE ........................... Extract [options] input-file output-file
FEATURES..................... One or more of the following parameters may
be added to the command line options:
Option
Description
-p..................................... Show Progress
-fr N ................................ Specify From-Word (Inclusive)
-to N ................................ Specify To-Word (Inclusive)
-v..................................... Show Verbose Messages
COMMENTS .................. To perform data extraction, specify a "FromWord" and a "To-Word" on the command line.
The inclusive range between these two
numbers defines which words are extracted
from the input error file and transferred to the
output error file.
200 • BitAlyzer Utility Programs
User Guide BA622
Artisan Technology Group - Quality Instrumentation ... Guaranteed | (888) 88-SOURCE | www.artisantg.com
File Status
FILE NAME.................... FILESTAT.EXE
TITLE ............................. FILE STATUS Version 1.0
BRIEF DESCRIPTION.... Shows information about specified files (Last
Date Modified, Last Time Modified, Size in
Bytes). Optionally outputs information to a
file.
USAGE ........................... FILESTAT [options] Pathname
FEATURES..................... The Pathname may specify the complete
filename (e.g., "test.er5") or use wild cards
(e.g., "*.er*) to list several files. The following
parameter may be added to the command line
options.
Option
Description
-o F.................................. Specify output file.
EXAMPLE ...................... The following example uses FILE STATUS to
output information on all error files in the
current directory to a summary file
"Summary.err". Type at the DOS prompt:
FILESTAT -o Summary.err *.er*
The output will look similar to the following:
Filename,TEST3.ERR
Date,3-26-93
Time,12:42 pm
Bytes,5068
Filename,EXAMPLE.ERR
Date,6-28-89
Time,8:08 pm
Bytes,150000
Filename,TEST5.ER5
Date,3-26-93
Time,2:41 pm
Bytes,12780
Filename,DCRSI3.ER5
Date,2-3-93
Time,10:44 am
Bytes,258660
COMMENTS .................. The output is shown in comma-separated
columns and can therefore be imported into
many popular spreadsheets.
User Guide BA622
BitAlyzer Utility Programs • 201
Artisan Technology Group - Quality Instrumentation ... Guaranteed | (888) 88-SOURCE | www.artisantg.com
Word Order Flipper
FILE NAME.................... FLIPWORD.EXE
TITLE ............................. WORD ORDER FLIPPER Version 1.0
BRIEF DESCRIPTION.... Reverses, or "flips", the significance of data
(i.e., what was the Most Significant Bit
becomes the Least Significant Bit, or viceversa). This utility performs byte (BA160) or
word (BA622) translations of XOR data.
USAGE ........................... FLIPWORD [options] SourceFilename
DestinationFilename
FEATURES..................... One or more of the following parameters may
be added to the command line options.
Option
Description
-400to160 ........................ BA400/622 input to BA160 output.
-160to400 ........................ BA160 input to BA400/622 output.
-160to160 ........................ BA160 input to BA160 output.
-400to400 ........................ BA400/622 input to BA400/622 output.
(Default)
-p..................................... Progress Flag -- Shows percent complete.
-v..................................... Verbose Flag -- Displays file information.
-d..................................... Debug flag.
-w8 .................................. Set for Byte (8-bit) flipping.
-w16 ................................ Set for Word (16-bit) flipping.
-s1 .................................. Skip to Marker1 -- Ignores all data preceding
the first Marker #1 event.
-s2 ................................... Skip to Marker2 -- Ignores all data preceding
the first Marker #2 event.
-max N ............................ Specify maximum bytes in the output file.
-w (N).............................. Specifies number of (16-bit) words between
markers.
MARK1........................... Add to Event Mask.
MARK2........................... Add to Event Mask.
CYCLE............................ Add to Event Mask.
BLANK ........................... Add to Event Mask.
RESYNC ........................ Add to Event Mask.
202 • BitAlyzer Utility Programs
User Guide BA622
Artisan Technology Group - Quality Instrumentation ... Guaranteed | (888) 88-SOURCE | www.artisantg.com
SQUELCH....................... Add to Event Mask.
ALL................................. All events translated.
NONE ............................. No events translated.
EXAMPLE ...................... Type at the DOS prompt:
FLIPWORD -w8 -160to160 InputFile.ext OutputFile.ext
InputFile.ext = 00001111
OutputFile.ext = 11110000
User Guide BA622
BitAlyzer Utility Programs • 203
Artisan Technology Group - Quality Instrumentation ... Guaranteed | (888) 88-SOURCE | www.artisantg.com
Head Errors
FILE NAME.................... HEADERRS.EXE
TITLE ............................. HEAD ERRORS Version 1.0
BRIEF DESCRIPTION.... Data file scanner which plots errors per head
(i.e., multi-head tape recorder) into a commadelimited ASCII text file suitable for
processing by spreadsheet programs.
USAGE ........................... HEADERRS [options] SourceFilename
FEATURES..................... One or more of the following parameters may
be added to the command line options.
Option
Description
-160 ................................. BitAlyzer 160 format.
-400 ................................. BitAlyzer 400/622 format. (Default)
-p..................................... Progress Flag—Shows percent complete.
-v..................................... Verbose Flag—Displays file information.
-s1 .................................. Skip to Marker1—Ignores all data preceding
first Marker #1 event.
-s2 ................................... Skip to Marker2—Ignores all data preceding
first Marker #2 event.
-o F.................................. Specify output filename.
-h N ................................. Specify number of heads.
-bph N ............................. Specify bits per head.
-r N ................................. Specify rotations per reporting interval.
EXAMPLE ...................... The following example uses HEADERRS to
process an .ERR file to produce a commadelimited output file ready for spreadsheet
analysis:
HEADERRS InputFile.err -o OutputFilename -h 8 -bph 288864 -r 500
The output file "OutputFilename" will look similar to the following:
ROTATIONS,HEAD1,HEAD2,HEAD3,HEAD4,HEAD5,HEAD6,HEAD7,HEAD8
500,0,0,3,0,0,11,4,2
500,1,0,0,0,3,0,0,5
500,10,0,3,5,0,0,12,0
...etc.
204 • BitAlyzer Utility Programs
User Guide BA622
Artisan Technology Group - Quality Instrumentation ... Guaranteed | (888) 88-SOURCE | www.artisantg.com
Longitudinal Track Extractor
FILE NAME.................... LONGTRAK.EXE
TITLE ............................. LONGITUDINAL TRACK EXTRACTOR
Version 1.0
BRIEF DESCRIPTION.... Extracts a longitudinal track from BitAlyzer
data and generates a file containing only the
specified track.
USAGE ........................... LONGTRAK [options] SourceFilename
DestFileName
FEATURES..................... One or more of the following parameters may
be added to the command line options.
Option
Description
-160................................. Indicates that the source file uses BitAlyzer
160 data format.
-400................................. Indicates that the source file uses BitAlyzer
400/622 data format. (Default mode)
-p..................................... Progress Flag -- Shows percent complete.
-s1 ................................... Skip to Marker1 -- Ignores all data preceding
first Marker #1 event. (May be combined with
"-s2")
-s2 ................................... Skip to Marker2 -- Ignores all data preceding
first Marker #2 event. (May be combined with
"-s1")
-bpb N ............................. Specifies N bits per block as the block size.
(Default = 24)
-st N ................................ Specifies N bits as the offset to the start of the
track. (Default = 0)
-tw N ............................... Specifies N bits as the track width. (Default =
1)
EXAMPLE ...................... The following example uses LONGITUDINAL TRACK to process a BitAlyzer 622 data
file in blocks of 24 bits with the start of the
track at bit position 7 and a track width of 1
bit. The output file "Prn16-07.er5" will be
generated. Type at the DOS prompt:
LONGTRAK -400 -p -bpb 24 -st 7 Prn16.er5 Prn16-07.er5
COMMENTS .................. The start of the track should always be less
than the bits per block (the first track would
start at bit position zero).
User Guide BA622
BitAlyzer Utility Programs • 205
Artisan Technology Group - Quality Instrumentation ... Guaranteed | (888) 88-SOURCE | www.artisantg.com
File Marker Spacer
FILE NAME.................... SPACEMRK.EXE
TITLE ............................. FILE MARKER SPACER Version 1.0
BRIEF DESCRIPTION.... Normalizes the number of bits between
markers by truncating the number of bits or by
padding with clean bits. Accepts a userdefined marker spacing.
USAGE ........................... SPACEMRK [options] SourceFilename
DestinationFilename
FEATURES..................... One or more of the following parameters may
be added to the command line options.
Option
Description
-p..................................... Progress Flag -- Shows percent complete.
-v..................................... Verbose Flag -- Displays file information.
-s1 .................................. Skip to Marker1 -- Ignores all data preceding
the first Marker #1 event.
-s2 ................................... Skip to Marker2 -- Ignores all data preceding
the first Marker #2 event.
-dm.................................. Discard markers in the output file.
-w (N).............................. Specifies number of (16-bit) words between
markers.
NONE ............................. Set no marker input trigger.
MARK1........................... Set Marker1 as input trigger, processes data
relative to a Marker #1 event.
MARK2........................... Set Marker2 as input trigger, processes data
relative to a Marker #2 event.
EITHER........................... Set either Marker1 or Marker2 as input trigger.
EXAMPLE ...................... Use SPACEMRK to process a BitAlyzer 622
data file having non-repeating marker
locations. Produce an output file having
repeatable marker spacing. Type at the DOS
prompt:
SPACEMRK -w 2 MARK1 InputFile.ext OutputFile.ext
206 • BitAlyzer Utility Programs
User Guide BA622
Artisan Technology Group - Quality Instrumentation ... Guaranteed | (888) 88-SOURCE | www.artisantg.com
The input file "InputFile.ext" may look similar to the following:
M1 1100000000000000 1100000 M1 000000000 1100000000000000
M1 1100000000000000
1100000000000000 110 M1 0000000000000 1100000000000000
1100000000000000
...etc.
The output file "OutputFile.er5" will look like the following:
M 1100000000000000 1100000000000000 M 0000000001100000
0000000000000000
M 1100000000000000 1100000000000000 M 0000000000000110
0000000000000110...etc.
User Guide BA622
BitAlyzer Utility Programs • 207
Artisan Technology Group - Quality Instrumentation ... Guaranteed | (888) 88-SOURCE | www.artisantg.com
Translate
FILE NAME.................... XLATE.EXE
TITLE ............................. TRANSLATE Version 1.0
BRIEF DESCRIPTION.... Converts between BitAlyzer 160 and 400/622
data formats. Allows skip to mark and event
masking.
USAGE ........................... XLATE [options] SourceFilename
DestFileName
FEATURES..................... One or more of the following parameters may
be added to the command line options.
Option
Description
400to160.......................... Translates BA400/622 data source file to
BA160 data destination file. (Default)
160to400.......................... Translates BA160 data source file to
BA400/622 data destination file.
160to160.......................... Translates BA160 data source file to BA160
data destination file.
400to400.......................... Translates BA400/622 data source file to
BA400/622 data destination file.
-p..................................... Progress Flag -- Shows percent complete.
-s1 ................................... Skip to Marker1 -- Ignores all data preceding
first Marker #1 event. (May be combined with
-s2)
-s2 ................................... Skip to Marker2 -- Ignores all data preceding
first Marker #2 event. (May be combined with
-s1)
MARK1........................... Adds Marker1 to the event mask. *Only events
in the event mask will be translated.
MARK2, CYCLE,
BLANK, RESYNC,
SQUELCH....................... Adds to the event mask.*
ALL................................. Specifies that all events should be translated.
(Default)
NONE ............................. Specifies that no events should be translated.
208 • BitAlyzer Utility Programs
User Guide BA622
Artisan Technology Group - Quality Instrumentation ... Guaranteed | (888) 88-SOURCE | www.artisantg.com
EXAMPLE ...................... Use TRANSLATE to convert all errors and
events in a BitAlyzer 400/622 data file to a
BitAlyzer 160 data file. Type at the DOS
prompt:
XLATE 400to160 -p ALL Dcrsi3.er5 Xlate.er5
User Guide BA622
BitAlyzer Utility Programs • 209
Artisan Technology Group - Quality Instrumentation ... Guaranteed | (888) 88-SOURCE | www.artisantg.com
Remote Control
Programming Techniques
This section describes various topics of BitAlyzer622 remote control
programming. The topics include how to send and receive textual
information, such as remote control commands and remote control
replies; how to send and receive binary information, such as histogram
bin data and error data files; and how to synchronize multiple
BitAlyzers using remote control operations and an external
synchronizing signal.
Sending Text Commands
The BitAlyzer's remote control protocol is a set of one-line, carriagereturn-terminated text commands. An example would be "Status ?",
which requests that the BitAlyzer transmit a return message containing
an ASCII text representation of the current status value as a one-line,
carriage-return-terminated reply. Most commands that you will
transmit to the BitAlyzer consist of at least two words, defining the
major feature of the BitAlyzer and its subfeature that you are
addressing. Take as an example, "Analyzer File foobar.er5". In this
example, "Analyzer" addresses this command to the analyzer feature of
the BitAlyzer622. "File" indicates that you are further addressing the
filename selection subfeature of the analyzer feature. Remaining words
on the command lines are parameters of the protocol; in this example,
"foobar.er5" is a filename that is being selected as the analyzer's file.
Some commands have more than one parameter; for instance, "Block
View <xofs> <yofs> <xscale> <yscale>". This protocol has four
individual parameters representing four different selections of
histogram viewing characteristics. For protocols that have more than
one parameter, the parameters must be separated by at least one space.
They are not separated by commas, semicolons, periods, tabs, etc.
Receiving Text Replies
BitAlyzer622 protocols often are paired, such that a command may
have one version to set parameters, and a second version to respond
with the current selections of those parameters; for instance, "Analyzer
210 • Remote Control
User Guide BA622
Artisan Technology Group - Quality Instrumentation ... Guaranteed | (888) 88-SOURCE | www.artisantg.com
Flags <bit-field>" and "Analyzer Flags ?". "Analyzer Flags 15"
requests that the BitAlyzer set the analyzer flags to the value indicated
by the parameter "15". The protocol "Analyzer Flags ?" requests the
BitAlyzer to respond with the current settings for the analyzer flags.
These responses are also one-line, carriage-return-terminated, ASCII
text messages, transmitted from the BitAlyzer immediately after it
receives the request and processes it.
Some protocols request the BitAlyzer to respond with multiple values.
For instance, the "Basic Values1 ?" command requests total bits, total
errors, burst errors, bit errors, burst events, and lost bits from the Basic
BER user interface panel. In such cases, the responses are on one line
and each individual value is separated from the others with a comma.
This is known as comma-delimited format, commonly used in the
computer industry because it is easy to parse.
Receiving Histogram Bins
In addition to textual replies, the BitAlyzer also may return binary
information representing the histogram data used in displaying
histograms such as Burst Length, EFI, Interval, and Modulo Analysis.
The binary data is transmitted by the BitAlyzer immediately upon
receiving the bin request. For instance, the "Burst Bins ?" command
may be sent from the host computer to the BitAlyzer. Upon receiving
this command, the BitAlyzer replies with a quantity of binary four-byte
values representing the bins of the Burst histogram. The specific
quantity of bins may vary based on the number of bins established in
the "Burst BinMap" protocol. It is recommended that before requesting
and receiving the binary bin information for the various histograms,
you request the appropriate "BinMap" settings to acquire the bin count
(the first parameter of the reply). This count will indicate how many
four-byte values you will be receiving.
It is significant to account for the byte ordering of the four-byte values
being transmitted from the BitAlyzer. It is in an Intel 80X86
architecture format.
Refer to the section below on Programming with Histogram Bins for
more information about the format of the data represented by these
four-byte counter values.
Sending Files
The BitAlyzer implements a packet-oriented scheme for sending the
contents of computer files from the host machine to a destination
computer file on the BitAlyzer.
User Guide BA622
Artisan Technology Group - Quality Instrumentation ... Guaranteed | (888) 88-SOURCE | www.artisantg.com
Remote Control • 211
Use the "Send <fname> <date> <time>" command to transfer a file
from your host machine to the BitAlyzer. The "<fname>" parameter
must specify the complete DOS pathname of the file destination; it is
not automatically placed in the Finder directory. When the "Send"
command is received by the BitAlyzer, it attempts to create the
specified file in the designated directory. If a file already exists, the
BitAlyzer will respond with an "Abort" protocol, on which the send
sequence is terminated. Otherwise, it replies with a "Continue"
protocol.
Upon Continue, send a "Buffer <size>" command indicating the size in
bytes of the buffer to be transferred, and then immediately send the data
to the BitAlyzer. Once the BitAlyzer receives this data, it will issue
either a "Continue" or an "Abort" protocol depending upon the success
of writing the buffer data to disk. Repeat this buffer/data/continue
sequence until the entire file has been sent. After all buffers have been
transferred to the BitAlyzer, issue a "Done" protocol to terminate the
transfer.
The following state diagram represents how to use the "Send" protocol.
Commands on the top of the arrows indicate input protocols being
received from the BitAlyzer; commands underneath the arrows and in
parentheses indicate output protocols emanating from the host
computer and being transmitted to the BitAlyzer. Note that the buffer
sizes must not exceed 4096 bytes.
Sending Files to BitAlyzer
Receiving Files
The BitAlyzer implements a packet-oriented protocol for transmitting
the contents of computer files from the BitAlyzer's file system to the
212 • Remote Control
User Guide BA622
Artisan Technology Group - Quality Instrumentation ... Guaranteed | (888) 88-SOURCE | www.artisantg.com
host computer. This protocol is packet-oriented to enable the receiving
computer to abort the process if its disk becomes full.
Use the "Get <fname>" command to initiate a file transfer from the
BitAlyzer to your host machine. The complete DOS pathname must be
specified as a parameter to the "Get" command. The specified file must
exist in the BitAlyzer's file system in order for the transfer to begin.
The BitAlyzer will respond with a "Directory <date> <time>" protocol
(displaying the requested file's date as MM/DD/YY and its time as
HH:MM:SS) when it is ready to start transferring the file. You should
then reply with a "Continue" protocol, after which you will receive
buffer commands that indicate the number of bytes about to be
transferred in the next data transfer. If, after receiving the data, you
discover you need to abort the transfer, then you should send an
"Abort" protocol. Otherwise, send a "Continue" protocol and the next
buffer command will be issued from the BitAlyzer. When the entire file
content is transferred, the BitAlyzer will send a "Done" protocol.
The following state diagram represents how to use the "Get" protocol.
Commands on the top of the arrows indicate input commands coming
from the BitAlyzer; commands underneath the arrows and in
parentheses indicate output commands being transmitted from the host
computer to the BitAlyzer.
Receiving Files from BitAlyzer
Obtaining Histogram Bins
"Bins" refers to software data structures that are used for every
histogram to maintain the histogram information. For instance, if you
are histogramming 10,000 bit positions using a modulo histogram, the
BitAlyzer622 maps these 10,000 positions into only 256 actual separate
User Guide BA622
Artisan Technology Group - Quality Instrumentation ... Guaranteed | (888) 88-SOURCE | www.artisantg.com
Remote Control • 213
counters. It can do this by squeezing 64 bit positions into each of the
256 counters. This yields a range of histogram data from the zero-th bit
position to a bit position of 16,383 [(256 x 64) -1].
This mechanism represents vast amounts of data in small numbers of
counters, which preserves computer memory during analysis.
When specifying how many data values should be represented by a bin,
only powers of two are permitted. That is why the third parameter of
"BinMap" protocols refers to a "shift" value; this represents a binary
shift-right operation, which is the same as dividing a value by a power
of two.
In addition to specifying how many data values should be scaled into
each bin, you can also specify a bit-position offset to skip to before
allocating data values to bins. For instance, you could program the bin
mapping to skip to location 9,744 and then map only one data value per
bin, to achieve one-to-one resolution at the end of a 10,000-position
modulo histogram. This feature permits you to focus higher data
resolutions on specific locations within a data range.
The first and the last bin counters are special, in that any values which
fall beyond the range of the current bin mapping are truncated to these
counters. On a histogram display, this will tell you if there is a lot of
data outside your present mapping; the first or last bin becomes
astronomically full.
Synchronizing Multiple BitAlyzers
Multiple BitAlyzers may be synchronized using remote control
protocols and an external synchronizing marker signal. This process is
enabled by three features. Two are found in the Analyzer Setup panel;
"SkipToMark" and "IgnoreEvents", and the other is found in the
Detector Scope panel in the DETECTOR ADHOC Selector,
"ArmOnAdhoc". The first feature, "SkipToMark", may be specified as
"SkipToMark #1" or "SkipToMark #2". Marker #1 is the BNC
connector on the front panel of the BitAlyzer622, and Marker #2 is
found on the parallel interface on the back of the BitAlyzer622. When
"SkipToMark" is enabled and a RECORD or LIVE scanner operational
mode is selected, the BitAlyzer initiates the RECORD or LIVE mode
but does not process any error information until the specified marker is
encountered, guaranteeing that processing and/or recording of the error
information will begin on a marker boundary.
This feature is often used with the "IgnoreEvents" feature, which strips
the marker events from the data stream such that they are not placed in
214 • Remote Control
User Guide BA622
Artisan Technology Group - Quality Instrumentation ... Guaranteed | (888) 88-SOURCE | www.artisantg.com
the output data file during RECORD mode. This is an effective way of
reducing the size of error data files.
The marker signal that is used to trigger LIVE or RECORD scanner
mode operation in the "SkipToMark" mode comes into the system as a
marker signal, but is converted to a time-stamp-only event when it is
recorded to the data file during a RECORD scanner operation. This is
important so that future playbacks of the data file will begin at the
location of the first marker, even though markers have been ignored by
enabling the "IgnoreEvents" feature during the record operation.
These two features, "SkipToMark" and "Ignore Events", are used in
conjunction with the "ArmOnAdhoc" feature to effectively synchronize
multiple BitAlyzers during a RECORD or LIVE scanner operational
mode session. The "ArmOnAdhoc" input causes the BitAlyzer to wait
when a RECORD or LIVE mode is initiated until a Detector ad hoc
input signal is received. It then "pings" this signal to its ad hoc output,
and initiates the RECORD. This RECORD will then pause until the
next marker is encountered, owing to the selection of the
"SkipToMark" feature, and at that point it will initiate error analysis.
Other BitAlyzers in the chain will perform exactly the same operation,
and so they will all begin error analysis at the same marker signal.
When synchronizing multiple BitAlyzers, the amount of time used in
communicating the "Analyzer Record" or "Analyzer Live" commands
between machines should be minimized. It is important that you first
set up each machine with protocols for establishing the "Analyzer File"
User Guide BA622
Artisan Technology Group - Quality Instrumentation ... Guaranteed | (888) 88-SOURCE | www.artisantg.com
Remote Control • 215
filename, the "ArmOnAdhoc" input, "SkipToMark", and
"IgnoreEvents" features, etc., and then command the machines to
initiate the RECORD or LIVE mode in the reverse order that they are
wired together in daisy-chain fashion. This means that the last machine
in the daisy chain gets the "Analyzer Record" or "Analyzer Live"
protocol first, and the first machine gets the protocol command last.
The figure above illustrates how the ad hoc inputs and ad hoc outputs
are daisy-chained, and how the first machine in the daisy chain is
special, in that its ad hoc input and marker signals are tied together.
Bit Fields
Several commands issued to and received from the BitAlyzer take
parameters which are referred to as "bit fields"; these include
commands which control flag and scanner settings. A bit field is a fourbyte or 32-bit number in which the individual bits represent whether a
setting is turned on or not (a "1" is on and a "0" is off). Bit 0 is the least
significant bit, and bit 31 is the most significant.
Take for example the command:
Analyzer Flags 16
The "16" represents a bit field setting in binary: 16 = 0000 0000 0001
0000. This means that bit 4 has been set, telling the Analyzer to skip to
Mark2 (see "Analyzer Flags" command protocol).
When using bit fields, it is important to understand that the bit-field
value sent will affect all the settings. Therefore, it is recommended that
you query the bit field first (e.g., "Analyzer Flags ?") and only modify
the bits you need to change.
216 • Remote Control
User Guide BA622
Artisan Technology Group - Quality Instrumentation ... Guaranteed | (888) 88-SOURCE | www.artisantg.com
Remote Control Programming Examples
The following examples demonstrate how the BitAlyzer may be used in
remote control applications. These examples are programmed with a
device-independent communications layer, which enables the same
programs to be run with an IEEE-488 or an RS-232 communications
layer. Please note that the following functions require certain include
files to establish defines, variable declarations, and function prototypes.
Synopsis of Communications Layer
These functions are used to initialize the communications port, to send
commands and data through the port, and to turn the port off.
I.
II.
III.
IV.
V.
VI.
VII.
VIII.
IX.
X.
XI.
XII.
XIII.
XIV.
XV.
XVI.
XVII.
XVIII.
XIX.
XX.
XXI.
XXII.
XXIII.
XXIV.
XXV.
XXVI.
void PortInit(void) ;
/* initializes communications layer */
void PortEnd(void) ;
/* terminates communications layer */
void PortHook(void) ;
/* called to support communications */
int PortOpen( int port ) ;
/* open a communications port */
int PortClose( int port ) ;
/* close a communications port */
int PortWait( int port ) ; /* wait until all activity is comple */
void PortSetComm( int Port, int Baud, int Mode, int Echo);
/* Set RS-232 */
void PortSetIEEE( int Port, int Gpib, int Timeout );
/* Set IEEE-488 */
void PortReset( int port ) ; /* reset the communications port */
unsigned int PortOkToSend( int port,
/*
unsigned int PortOkToGet( int port )
/*
unsigned int count ) ;
send ok? */
;
ok to receive? */
int PortSendText( int port, char *p ) ;
/* send '\n' terminated text */
int PortGetText( int port, char *p, unsigned int maxn ) ;
/* receive '\n' terminated response */
int PortSendBinary( int port, char far *p, unsigned int n ) ;
/* send raw binary data */
int PortGetBinary( int port, char far *p, unsigned int n ) ;
/* receive raw binary data */
User Guide BA622
Artisan Technology Group - Quality Instrumentation ... Guaranteed | (888) 88-SOURCE | www.artisantg.com
Remote Control • 217
Supporting Timeouts on DOS Machines
These commands are used to implement an interrupt-controlled timeout
timer. "StartTimeout" enables the interrupt and initializes the number
of ticks before a timeout will be indicated (there are 18.2 ticks per
second on DOS computers). "IsTimeout" will return a one (1) when the
number of ticks has expired. "StopTimeout" is used to disable the
interrupt service routine which checks for the timeout.
I.
II.
III.
IV.
V.
VI.
VII.
VIII.
IX.
X.
XI.
XII.
XIII.
XIV.
XV.
XVI.
XVII.
XVIII.
XIX.
XX.
XXI.
XXII.
XXIII.
XXIV.
XXV.
XXVI.
XXVII.
XXVIII.
#pragma check_stack(off) /* Important! */
#define TIM_VECTOR 0x1c
static void (interrupt *OldTimeout)() = 0 ;
static long TimeoutValue ;
void interrupt IsrTimeout(void)
{
if( TimeoutValue > 0L ) TimeoutValue-- ;
_chain_intr( OldTimeout ); /* does not return */
}
void StartTimeout( long ticks )
{
TimeoutValue = ticks ;
OldTimeout = _dos_getvect( TIM_VECTOR ) ;
_dos_setvect( TIM_VECTOR, IsrTimeout ) ;
}
void StopTimeout(void)
{
_dos_setvect( TIM_VECTOR, OldTimeout ) ;
}
int IsTimeout(void)
{
return (TimeoutValue>0)? 0 : 1 ;
}
218 • Remote Control
User Guide BA622
Artisan Technology Group - Quality Instrumentation ... Guaranteed | (888) 88-SOURCE | www.artisantg.com
Logging On/Off to BitAlyzer
These functions are used to initialize the BitAlyzer port to be used.
"BaLogon" sets the desired port number (1 or 2), baud rate (300 38400), port mode (i.e., N18), echo on/off (1/0), IEEE GPIB address,
and timeout in seconds. "CheckStat" returns the current BitAlyzer
status. "BaLogoff" closes the communications port.
I.
II.
III.
IV.
)
V.
VI.
VII.
VIII.
IX.
X.
XI.
XII.
XIII.
XIV.
XV.
XVI.
XVII.
XVIII.
XIX.
XX.
XXI.
XXII.
XXIII.
XXIV.
XXV.
XXVI.
XXVII.
XXVIII.
XXIX.
XXX.
XXXI.
XXXII.
XXXIII.
XXXIV.
XXXV.
XXXVI.
XXXVII.
int BaPort = PORT_NONE ;
long BaTimeout ;
int BaLogon( int Port, int Baud, int Mode, int Echo, int Gpib, int Timeout
{
PortInit();
if (!PortOpen (Port) )
{
PortEnd();
return BASTAT_ERROR ;
}
PortSetComm (Port, Baud, Mode, Echo);
PortSetIEEE (Port, Gpib, Timeout );
BaPort = Port ;
BaTimeout = Timeout * 18.2 ;
return CheckStat() ;
}
int CheckStat(void)
{
char Buf[64] ;
int Stat ;
PortSendText( BaPort, "STATUS ?\n" ) ;
if( ! ReceiveReply( Buf, 64 ) ) return BASTAT_TIMEOUT ;
if( sscanf( Buf, "%u", &Stat ) != 1 ) return BASTAT_NOSTAT ;
return Stat ;
}
int BaLogoff( void )
{
if( BaPort == PORT_NONE ) return BASTAT_NOPORT ;
PortWait (BaPort);
PortClose (BaPort);
PortEnd();
return BASTAT_OK ;
}
User Guide BA622
Artisan Technology Group - Quality Instrumentation ... Guaranteed | (888) 88-SOURCE | www.artisantg.com
Remote Control • 219
Support Receiving Replies with Timeouts
"ReceiveReply" returns a one (1) if a reply was received before the
timeout; otherwise it returns a zero (0). The reply is stored in buffer
"Buf" of maximum bytes "Max".
I.
II.
III.
IV.
V.
VI.
VII.
VIII.
IX.
X.
int ReceiveReply( char *Buf, int Max )
{
StartTimeout( BaTimeout ) ;
while( (!PortGetText( BaPort, Buf, Max )) && (!IsTimeout()) )
PortHook() ;
StopTimeout() ;
if( IsTimeout() ) return 0 ;
return 1 ;
}
220 • Remote Control
User Guide BA622
Artisan Technology Group - Quality Instrumentation ... Guaranteed | (888) 88-SOURCE | www.artisantg.com
Support Sending Commands to BitAlyzer
The following functions send commands with various types of
parameters to the BitAlyzer and return a zero if successful; otherwise
an error code is returned. Strings sent should not contain a new line
("\n") since it will automatically be appended as needed.
I.
int
II.
III.
IV.
V.
VI.
VII.
VIII.
IX.
X.
XI.
int
XII.
XIII.
XIV.
XV.
XVI.
XVII.
XVIII.
XIX.
XX.
XXI.
XXII.
XXIII. int
XXIV.
XXV.
XXVI.
XXVII.
XXVIII.
XXIX.
XXX.
XXXI.
XXXII.
XXXIII. int
XXXIV.
XXXV.
XXXVI.
XXXVII.
XXXVIII.
XXXIX.
XL.
XLI.
XLII.
XLIII.
XLIV.
XLV.
int
XLVI.
XLVII.
BaSendCmd (char *CmdStr)
{
char Buf[64] ;
if( BaPort == PORT_NONE ) return BASTAT_NOPORT ;
sprintf( Buf, "%s\n", CmdStr ) ;
PortSendText( BaPort, Buf ) ;
return CheckStat() ;
}
BaSendULongQ (char *CmdStr, unsigned long *ALong)
{
char Buf[64] ;
if( BaPort == PORT_NONE ) return BASTAT_NOPORT ;
sprintf( Buf, "%s ?\n", CmdStr ) ;
PortSendText( BaPort, Buf ) ;
if( ! ReceiveReply( Buf, 64 ) ) return BASTAT_TIMEOUT ;
if( sscanf( Buf, "%lu", ALong ) != 1 ) return BASTAT_REPLY ;
return BASTAT_OK ;
}
BaSendULong (char *CmdStr, unsigned long ALong)
{
char Buf[64] ;
if( BaPort == PORT_NONE ) return BASTAT_NOPORT ;
sprintf( Buf, "%s %lu\n", CmdStr, ALong ) ;
PortSendText( BaPort, Buf ) ;
return CheckStat() ;
}
BaSendUShortQ (char *CmdStr, unsigned short *AShort)
{
char Buf[64] ;
if( BaPort == PORT_NONE ) return BASTAT_NOPORT ;
sprintf( Buf, "%s ?\n", CmdStr ) ;
PortSendText( BaPort, Buf ) ;
if( ! ReceiveReply( Buf, 64 ) ) return BASTAT_TIMEOUT ;
if( sscanf( Buf, "%u", AShort ) != 1 ) return BASTAT_REPLY ;
return BASTAT_OK ;
}
BaSendUShort (char *CmdStr, unsigned short AShort)
{
char Buf[64] ;
User Guide BA622
Artisan Technology Group - Quality Instrumentation ... Guaranteed | (888) 88-SOURCE | www.artisantg.com
Remote Control • 221
XLVIII.
XLIX.
if( BaPort == PORT_NONE ) return BASTAT_NOPORT ;
L.
sprintf( Buf, "%s %u\n", CmdStr, AShort ) ;
LI.
PortSendText( BaPort, Buf ) ;
LII.
return CheckStat() ;
LIII.
}
LIV.
LV.
int BaSendStrQ (char *CmdStr, char *AString)
LVI.
{
LVII.
char Buf[64] ;
LVIII.
LIX.
if( BaPort == PORT_NONE ) return BASTAT_NOPORT ;
LX.
sprintf( Buf, "%s ?\n", CmdStr ) ;
LXI.
PortSendText( BaPort, Buf ) ;
LXII.
if( ! ReceiveReply( Buf, 64 ) ) return BASTAT_TIMEOUT ;
LXIII.
if( sscanf( Buf, "%s", AString ) != 1 ) return BASTAT_REPLY ;
LXIV.
return BASTAT_OK ;
LXV.
}
LXVI.
LXVII. int BaSendStr (char *CmdStr, char *AString)
LXVIII.
{
LXIX.
char Buf[64] ;
LXX.
LXXI.
if( BaPort == PORT_NONE ) return BASTAT_NOPORT ;
LXXII.
sprintf( Buf, "%s %s\n", CmdStr, AString ) ;
LXXIII.
PortSendText( BaPort, Buf ) ;
LXXIV.
return CheckStat() ;
LXXV.
}
LXXVI.
222 • Remote Control
User Guide BA622
Artisan Technology Group - Quality Instrumentation ... Guaranteed | (888) 88-SOURCE | www.artisantg.com
Receiving File from BitAlyzer
This function transfers a file from the BitAlyzer to the host machine.
"Source" is the pathname of the file on the BitAlyzer and "Dest" is the
pathname for the file to be created on the host. Transfers may take
some time, depending on the baud rate and file size.
I.
int
II.
III.
IV.
V.
VI.
VII.
VIII.
IX.
X.
XI.
XII.
XIII.
XIV.
XV.
XVI.
XVII.
XVIII.
XIX.
XX.
XXI.
XXII.
XXIII.
XXIV.
XXV.
XXVI.
XXVII.
XXVIII.
XXIX.
XXX.
XXXI.
XXXII.
XXXIII.
XXXIV.
XXXV.
XXXVI.
XXXVII.
XXXVIII.
XXXIX.
XL.
XLI.
XLII.
XLIII.
XLIV.
XLV.
XLVI.
XLVII.
XLVIII.
BaGetFile (char *Source, char *Dest)
{
char Buf[128];
char Response[64];
unsigned int Size; /*Actual size of data to be read*/
FILE *Fd;
char *DiskBuf;
unsigned Month,Day,Year,
Hours,Minutes,Seconds;
/*Allocate buffer for disk data*/
DiskBuf = (char *) malloc( 4096 ) ;
if( !DiskBuf ) return BASTAT_ERROR ;
/*Initiate get file process*/
sprintf( Buf, "GET %s\n", Source );
PortSendText( BaPort, Buf );
/*Get reply and/or date and time from BA*/
if( ! ReceiveReply( Buf, 64 ) )
return BASTAT_TIMEOUT ;
sscanf( Buf, "%s %2d/%2d/%4d %2d:%2d:%2d",
Response, &Month,&Day,&Year, &Hours,&Minutes,&Seconds );
/*"Directory" indicates successful init*/
if( !strcmpi( Response, "DIRECTORY" ) )
{
if( !(Fd=fopen( Dest, "wb" )) )
{
free(DiskBuf);
return BASTAT_FILE_OPEN ;
}
/*Tell BA to continue Get operation*/
PortSendText( BaPort, "CONTINUE\n" );
}
else
{
free(DiskBuf);
return RER_ABORTED ;
}
/*Get BitAlyzer's reply*/
if( ! ReceiveReply( Buf, 128 ) )
{
free(DiskBuf);
fclose( Fd );
return BASTAT_TIMEOUT ;
}
sscanf( Buf, "%s %u", Response, &Size );
User Guide BA622
Artisan Technology Group - Quality Instrumentation ... Guaranteed | (888) 88-SOURCE | www.artisantg.com
Remote Control • 223
XLIX.
L.
LI.
LII.
LIII.
LIV.
LV.
LVI.
LVII.
LVIII.
LIX.
LX.
LXI.
LXII.
LXIII.
LXIV.
LXV.
LXVI.
LXVII.
LXVIII.
LXIX.
LXX.
LXXI.
LXXII.
LXXIII.
LXXIV.
LXXV.
LXXVI.
LXXVII.
LXXVIII.
LXXIX.
LXXX.
LXXXI.
LXXXII.
LXXXIII.
LXXXIV.
LXXXV.
LXXXVI.
LXXXVII.
LXXXVIII.
LXXXIX.
XC.
XCI.
XCII.
XCIII.
XCIV.
XCV.
XCVI.
XCVII.
XCVIII.
XCIX.
C.
CI.
/*Upon "Buffer", enter file get loop*/
while( !strcmpi( Response, "BUFFER" ) )
{
PortHook() ;
/*Start receiving binary data from BA*/
if( ! PortGetBinary( BaPort, DiskBuf, Size ) )
{
fclose( Fd );
free( DiskBuf );
return BASTAT_TIMEOUT ;
}
/*Wait till all data received*/
if( ! PortWait( BaPort ) )
{
fclose( Fd ); free( DiskBuf );
return BASTAT_TIMEOUT ;
}
/*Write data to hosts disk*/
if( fwrite( DiskBuf, 1, Size, Fd ) != Size )
{
PortSendText( BaPort, "ABORT\n" );
fclose( Fd ); free( DiskBuf );
return BASTAT_ABORTED ;
}
/*Tell BA to continue Get operation*/
PortSendText( BaPort, "CONTINUE\n" );
if( ! ReceiveReply( Buf, 128 ) )
{
fclose( Fd ); free( DiskBuf );
return BASTAT_TIMEOUT ;
}
sscanf( Buf, "%s %u", Response, &Size );
/*Check for usr abort; if so stop xfer*/
if( kbhit() && (getch() == 27 ) )
{
PortSendText( BaPort, "ABORT\n" );
fclose( Fd ); free( DiskBuf );
return BASTAT_ABORTED ;
}
}
/*Set file date and time in proper format*/
_dos_setftime( fileno(Fd), (Year<<9)-1980 + (Month<<5) + Day,
(Hours<<11) + (Minutes<<5) + (Seconds/2) );
fclose( Fd ); free( DiskBuf );
/*"Done" indicates xfer successful*/
if( strcmpi( Response, "DONE" ) )
return RER_ABORTED ;
return BASTAT_OK ;
}
224 • Remote Control
User Guide BA622
Artisan Technology Group - Quality Instrumentation ... Guaranteed | (888) 88-SOURCE | www.artisantg.com
Sending File to BitAlyzer
This function will transfer a file from the host machine to the
BitAlyzer. "Source" is the pathname of the file on the host machine and
"Dest" is the pathname for the file to be created on the BitAlyzer.
Transfers may take some time, depending on the baud rate and file size.
I.
II.
int
III.
IV.
V.
VI.
VII.
VIII.
IX.
X.
XI.
XII.
XIII.
XIV.
XV.
XVI.
XVII.
XVIII.
XIX.
XX.
XXI.
XXII.
XXIII.
XXIV.
XXV.
XXVI.
XXVII.
XXVIII.
XXIX.
XXX.
XXXI.
XXXII.
XXXIII.
XXXIV.
XXXV.
XXXVI.
XXXVII.
XXXVIII.
XXXIX.
XL.
XLI.
XLII.
XLIII.
XLIV.
XLV.
XLVI.
XLVII.
XLVIII.
XLIX.
BaSendFile (char *Source, char *Dest)
{
char Buf[128];
char Response[64];
unsigned int Size; /*Actual size in bytes of data buffer to send*/
FILE *Fs = 0;
char *DiskBuf;
unsigned short Date, Time;
/*Allocate buffer for disk data*/
DiskBuf = (char *) malloc( READ_SIZE );
if( !DiskBuf ) return BASTAT_ERROR ;
/*Open source file for read binary*/
if( !(Fs=fopen( Source, "rb" )) )
{
free(DiskBuf);
return BASTAT_FILE_OPEN;
}
/*Get file date & time*/
_dos_getftime( fileno(Fs), &Date, &Time );
/*Initiate send process, translating
date and time into proper format*/
sprintf( Buf, "SEND %s %u/%u/%u %u:%u:%u\n", Dest,
(Date&0x1e0)>>5, Date&0x1f, 1980+((Date&0xfe00)>>9),
(Time&0xf800)>>11, (Time&0x7e0)>>5, (Time&0x1f)*2 );
PortSendText( BaPort, Buf );
if( ! ReceiveReply(Buf, 64) ) /*Get reply message from BitAlyzer*/
{
free(DiskBuf);
fclose( Fs );
return BASTAT_TIMEOUT ;
}
sscanf( Buf, "%s", Response );
/*Upon "Continue", enter file send loop*/
while( !strcmpi( Response, "CONTINUE") )
{
/*Read source into DiskBuf;
If EOF (size=0), exit send loop*/
PortHook();
Size = fread( DiskBuf, sizeof(char), READ_SIZE, Fs );
if( Size==0 ) break;
/*Start sending binary data*/
sprintf( Buf, "BUFFER %u\n", Size );
User Guide BA622
Artisan Technology Group - Quality Instrumentation ... Guaranteed | (888) 88-SOURCE | www.artisantg.com
Remote Control • 225
L.
LI.
LII.
LIII.
LIV.
LV.
LVI.
LVII.
LVIII.
LIX.
LX.
LXI.
LXII.
LXIII.
LXIV.
LXV.
LXVI.
LXVII.
LXVIII.
LXIX.
LXX.
LXXI.
LXXII.
LXXIII.
LXXIV.
LXXV.
LXXVI.
LXXVII.
LXXVIII.
LXXIX.
LXXX.
LXXXI.
LXXXII.
LXXXIII.
LXXXIV.
LXXXV.
LXXXVI.
LXXXVII.
LXXXVIII.
LXXXIX.
XC.
XCI.
XCII.
XCIII.
XCIV.
PortSendText( BaPort, Buf );
PortSendBinary( BaPort, DiskBuf, Size );
/*Wait until all data sent*/
if( ! PortWait( BaPort ) )
{
fclose( Fs );
free( DiskBuf );
return BASTAT_TIMEOUT ;
}
/*Check for "Continue" or "Abort" from BA*/
if( ! ReceiveReply(Buf, 64) )
{
free(DiskBuf);
fclose( Fs );
return BASTAT_TIMEOUT ;
}
sscanf( Buf, "%s", Response );
if( !strcmpi(Response,"ABORT"))
{
free(DiskBuf);
fclose( Fs );
return RER_ABORTED ;
}
/*Check for usr abort; if so stop xfer*/
if( kbhit() && (getch() == 27 ) )
{
PortSendText( BaPort, "ABORT\n" );
fclose( Fs );
free( DiskBuf );
return BASTAT_ABORTED ;
}
}
fclose( Fs );
free( DiskBuf );
/*If all data sent & no abort, end xfer
with "Done" command*/
if( strcmpi( Response, "CONTINUE" ) )
return RER_ABORTED ;
return BaSendCmd( "DONE" );
}
226 • Remote Control
User Guide BA622
Artisan Technology Group - Quality Instrumentation ... Guaranteed | (888) 88-SOURCE | www.artisantg.com
Retrieving Basic Error Statistics
The following functions show how to retrieve basic error statistics from
the BitAlyzer's Basic BER scanner. TotalBits is the total number of bits
of data, TotalErrs is the total number of bits in error, BurstErrs is the
number of errored bits in all bursts, BitErrs is the number of errored
bits not within any burst, BurstEvents is number of burst events, and
TotalLostBits is the total number of bits lost in processing.
I.
int BaBasicValues1Q (double *TotalBits, unsigned long *TotalErrs,
II.
unsigned long *BurstErrs, unsigned long *BitErrs,
III.
unsigned long *BurstEvents, double *TotalLostBits)
IV.
{
V.
char Buf[128] ;
VI.
VII.
if( BaPort == PORT_NONE ) return BASTAT_NOPORT ;
VIII.
PortSendText( BaPort, "BASIC VALUES1 ?\n" ) ;
IX.
if( ! ReceiveReply( Buf, 128 ) ) return BASTAT_TIMEOUT ;
X.
if( sscanf( Buf, "%lf, %lu, %lu, %lu, %lu, %lf", TotalBits, TotalErrs,
XI.
BurstErrs, BitErrs, BurstEvents, TotalLostBits ) != 6 )
XII.
return BASTAT_REPLY ;
XIII.
return BASTAT_OK ;
XIV.
}
XV.
XVI.
int BaBasicValues2Q (double *TotalRate, double *BurstRate,
XVII.
double *NonBurstRate, double *BurstEventRate, double *LostPercent)
XVIII.
{
XIX.
char Buf[128] ;
XX.
XXI.
if( BaPort == PORT_NONE ) return BASTAT_NOPORT ;
XXII.
PortSendText( BaPort, "BASIC VALUES2 ?\n" ) ;
XXIII.
if( ! ReceiveReply( Buf, 128 ) ) return BASTAT_TIMEOUT ;
XXIV.
if( sscanf( Buf, "%lf, %lf, %lf, %lf, %lf", TotalRate, BurstRate,
XXV.
NonBurstRate, BurstEventRate, LostPercent ) != 5 )
XXVI.
return BASTAT_REPLY ;
XXVII.
return BASTAT_OK ;
XXVIII.
}
XXIX.
User Guide BA622
Artisan Technology Group - Quality Instrumentation ... Guaranteed | (888) 88-SOURCE | www.artisantg.com
Remote Control • 227
Using Live Analyzer Mode
The following example shows how to operate the BitAlyzer622 to
measure live error analysis.
I.
int RCAnalyzerLive(void)
II.
{
III.
char Msg[80] ;
IV.
int stat ;
V.
double TotBits,
VI.
TotLostBits;
VII.
unsigned long TotErrs,
VIII.
BurstErrs,
IX.
BitErrs,
X.
BurstEvents;
XI.
XII.
ReportMsg( 2, " Start Live" );
XIII.
XIV.
stat = BaAnalyzerLive() ;
XV.
if( stat != BASTAT_OK ) return stat ;
XVI.
StartTimeout( (unsigned short)(DURATION*18.2) ) ;
XVII.
while( !IsTimeout() );
XVIII.
StopTimeout() ;
XIX.
XX.
ReportMsg( 2, " Stop Live" );
XXI.
XXII.
stat = BaAnalyzerStop() ;
XXIII.
if( stat != BASTAT_OK ) return stat ;
XXIV.
XXV.
ReportMsg( 2, " Query Basic Values1:" );
XXVI.
XXVII.
stat = BaBasicValues1Q( &TotBits, &TotErrs, &BurstErrs, &BitErrs,
XXVIII.
&BurstEvents, &TotLostBits ) ;
XXIX.
if( stat != BASTAT_OK ) return stat ;
XXX.
XXXI.
sprintf( Msg, "
Total Bits=%.0lf, Total Errors=%lu",
XXXII.
TotBits, TotErrs );
XXXIII.
ReportMsg( 1, Msg );
XXXIV.
XXXV.
return BASTAT_OK ;
XXXVI.
}
228 • Remote Control
User Guide BA622
Artisan Technology Group - Quality Instrumentation ... Guaranteed | (888) 88-SOURCE | www.artisantg.com
Setting the Analyzer File Name
"RCAnalyzerFile" shows how to set the Analyzer file name, which is
required for the recording and playing of data.
I.
int RCAnalyzerFile(void)
II.
{
III.
char Msg[80] ;
IV.
int stat ;
V.
char Filename[64] ;
VI.
VII.
sprintf( Msg, " Set Filename= %s", FILENAME );
VIII.
ReportMsg( 2, Msg );
IX.
X.
stat = BaAnalyzerFile( FILENAME ) ;
XI.
if( stat != BASTAT_OK ) return stat ;
XII.
XIII.
ReportMsg( 2, " Query Filename:" );
XIV.
XV.
stat = BaAnalyzerFileQ( Filename ) ;
XVI.
if( stat != BASTAT_OK ) return stat ;
XVII.
XVIII.
sprintf( Msg, "
%s", Filename );
XIX.
ReportMsg( 2, Msg );
XX.
XXI.
if( strcmpi( Filename, FILENAME ) )
XXII.
return BASTAT_MISMATCH ;
XXIII.
return BASTAT_OK ;
XXIV.
}
XXV.
User Guide BA622
Artisan Technology Group - Quality Instrumentation ... Guaranteed | (888) 88-SOURCE | www.artisantg.com
Remote Control • 229
Using Record Analyzer Mode
The following function shows how to record BitAlyzer error data. The
Analyzer file name must be set before using record.
I.
int
II.
III.
IV.
V.
VI.
VII.
VIII.
IX.
X.
XI.
XII.
XIII.
XIV.
XV.
XVI.
XVII.
XVIII.
XIX.
XX.
XXI.
XXII.
XXIII.
XXIV.
XXV.
XXVI.
XXVII.
XXVIII.
XXIX.
XXX.
XXXI.
XXXII.
XXXIII.
XXXIV.
XXXV.
XXXVI.
XXXVII.
XXXVIII.
XXXIX.
XL.
XLI.
XLII.
XLIII.
XLIV.
XLV.
XLVI.
XLVII.
XLVIII.
XLIX.
L.
RCAnalyzerRecord(void)
{
char Msg[80] ;
int stat ;
unsigned short Status ;
int CountDown = DURATION*2;
double TotBits,
TotLostBits;
unsigned long TotErrs,
BurstErrs,
BitErrs,
BurstEvents;
ReportMsg( 2, "
Start Record" );
stat = BaAnalyzerRecord() ;
if( stat != BASTAT_OK ) return stat ;
do
{
StartTimeout( 18 ) ;
while( !IsTimeout() ) ;
StopTimeout() ;
CountDown-- ;
ReportMsg( 2, "
Query Status:" );
stat = BaAnalyzerStatusQ( &Status ) ;
if( stat != BASTAT_OK ) return stat ;
sprintf( Msg, "
Counter=%d, Status=%u", CountDown, Status );
ReportMsg( 2, Msg );
if( kbhit() && ( getch() == 27 ) )
{
BaAnalyzerStop() ;
return BASTAT_ABORTED ;
}
} while ( Status != SCAN_STOP );
ReportMsg( 2, "
Stop Record" );
stat = BaAnalyzerStop() ;
if( stat != BASTAT_OK ) return stat ;
ReportMsg( 2, "
Query Basic Values1:" );
stat = BaBasicValues1Q( &TotBits, &TotErrs, &BurstErrs, &BitErrs,
&BurstEvents, &TotLostBits ) ;
if( stat != BASTAT_OK ) return stat ;
230 • Remote Control
User Guide BA622
Artisan Technology Group - Quality Instrumentation ... Guaranteed | (888) 88-SOURCE | www.artisantg.com
LI.
LII.
LIII.
LIV.
LV.
LVI.
LVII.
LVIII.
sprintf( Msg, "
Total Bits=%.0lf, Total Errors=%lu",
TotBits, TotErrs );
ReportMsg( 1, Msg );
return BASTAT_OK ;
}
User Guide BA622
Artisan Technology Group - Quality Instrumentation ... Guaranteed | (888) 88-SOURCE | www.artisantg.com
Remote Control • 231
Using Playback Analyzer Mode
This function shows how to play back pre-recorded error files. Be sure
to set the Analyzer file name first.
I.
int
II.
III.
IV.
V.
VI.
VII.
VIII.
IX.
X.
XI.
XII.
XIII.
XIV.
XV.
XVI.
XVII.
XVIII.
XIX.
XX.
XXI.
XXII.
XXIII.
XXIV.
XXV.
XXVI.
XXVII.
XXVIII.
XXIX.
XXX.
XXXI.
XXXII.
XXXIII.
XXXIV.
XXXV.
XXXVI.
XXXVII.
XXXVIII.
XXXIX.
XL.
XLI.
XLII.
XLIII.
XLIV.
XLV.
XLVI.
XLVII.
XLVIII.
XLIX.
RCAnalyzerPlay(void)
{
char Msg[80] ;
int stat ;
int CountDown = DURATION*2;
unsigned short Status ;
double TotBits,
TotLostBits;
unsigned long TotErrs,
BurstErrs,
BitErrs,
BurstEvents;
ReportMsg( 2, "
Start Play" );
stat = BaAnalyzerPlay() ;
if( stat != BASTAT_OK ) return stat ;
do
{
StartTimeout( 18 ) ;
while( !IsTimeout() ) ;
StopTimeout() ;
CountDown-- ;
ReportMsg( 2, "
Query Status:" );
stat = BaAnalyzerStatusQ( &Status ) ;
if( stat != BASTAT_OK ) return stat ;
sprintf( Msg, "
Counter=%u, Status=%u", CountDown, Status );
ReportMsg( 2, Msg );
if( kbhit() && ( getch() == 27 ) )
{
BaAnalyzerStop();
return BASTAT_ABORTED ;
}
} while ( Status != SCAN_STOP );
ReportMsg( 2, "
Stop Play" );
stat = BaAnalyzerStop() ;
if( stat != BASTAT_OK ) return stat ;
ReportMsg( 2, "
Query Basic Values1:" );
stat = BaBasicValues1Q( &TotBits, &TotErrs, &BurstErrs, &BitErrs,
&BurstEvents, &TotLostBits ) ;
232 • Remote Control
User Guide BA622
Artisan Technology Group - Quality Instrumentation ... Guaranteed | (888) 88-SOURCE | www.artisantg.com
L.
LI.
LII.
LIII.
LIV.
LV.
LVI.
LVII.
LVIII.
LIX.
if( stat != BASTAT_OK ) return stat ;
sprintf( Msg, "
Total Bits=%.0lf, Total Errors=%lu",
TotBits, TotErrs );
ReportMsg( 1, Msg );
BaFinderDelete( FILENAME );
return BASTAT_OK ;
}
User Guide BA622
Artisan Technology Group - Quality Instrumentation ... Guaranteed | (888) 88-SOURCE | www.artisantg.com
Remote Control • 233
Low-Level Support for Analyzer Interactions
The following functions illustrate the basic method used in sending Analyzer commands to the
BitAlyzer. Since most remote control commands send or receive one parameter of a specific type,
only a few generic send and receive functions are required.
I.
int
II.
III.
IV.
V.
VI.
int
VII.
VIII.
IX.
X.
XI.
int
XII.
XIII.
XIV.
XV.
XVI.
int
XVII.
XVIII.
XIX.
XX.
XXI.
int
XXII.
XXIII.
XXIV.
XXV.
XXVI.
int
XXVII.
XXVIII.
XXIX.
XXX.
XXXI.
int
XXXII.
XXXIII.
XXXIV.
XXXV.
XXXVI. int
XXXVII.
XXXVIII.
XXXIX.
XL.
XLI.
int
XLII.
XLIII.
XLIV.
XLV.
XLVI.
int
XLVII.
XLVIII.
XLIX.
L.
BaAnalyzerReset (void)
{
return BaSendCmd( "ANALYZER RESET" );
}
BaAnalyzerFileQ (char *Filename)
{
return BaSendStrQ( "ANALYZER FILE", Filename );
}
BaAnalyzerFile (char *Filename)
{
return BaSendStr( "ANALYZER FILE", Filename );
}
BaAnalyzerFlagsQ (unsigned long *Flags)
{
return BaSendULongQ( "ANALYZER FLAGS", Flags );
}
BaAnalyzerFlags (unsigned long Flags)
{
return BaSendULong( "ANALYZER FLAGS", Flags );
}
BaAnalyzerStatusQ (unsigned short *Status)
{
return BaSendUShortQ( "ANALYZER STATUS", Status );
}
BaAnalyzerLive (void)
{
return BaSendCmd( "ANALYZER LIVE" );
}
BaAnalyzerRecord (void)
{
return BaSendCmd( "ANALYZER RECORD" );
}
BaAnalyzerPlay (void)
{
return BaSendCmd( "ANALYZER PLAY" );
}
BaAnalyzerStop (void)
{
return BaSendCmd( "ANALYZER STOP" );
}
234 • Remote Control
User Guide BA622
Artisan Technology Group - Quality Instrumentation ... Guaranteed | (888) 88-SOURCE | www.artisantg.com
LI.
int
LII.
LIII.
LIV.
LV.
LVI.
int
LVII.
LVIII.
LIX.
LX.
LXI.
int
LXII.
LXIII.
LXIV.
LXV.
LXVI.
int
LXVII.
LXVIII.
LXIX.
LXX.
LXXI.
int
LXXII.
LXXIII.
LXXIV.
LXXV.
LXXVI. int
LXXVII.
LXXVIII.
LXXIX.
LXXX.
BaAnalyzerOffsetQ (unsigned long *Bytes)
{
return BaSendULongQ( "ANALYZER OFFSET", Bytes );
}
BaAnalyzerOffset (unsigned long Bytes)
{
return BaSendULong( "ANALYZER OFFSET", Bytes );
}
BaAnalyzerDurationQ (unsigned long *Seconds)
{
return BaSendULongQ( "ANALYZER DURATION", Seconds );
}
BaAnalyzerDuration (unsigned long Seconds)
{
return BaSendULong( "ANALYZER DURATION", Seconds );
}
BaAnalyzerScanQ (unsigned long *Scanners)
{
return BaSendULongQ( "ANALYZER SCAN", Scanners );
}
BaAnalyzerScan (unsigned long Scanners)
{
return BaSendULong( "ANALYZER SCAN", Scanners );
}
User Guide BA622
Artisan Technology Group - Quality Instrumentation ... Guaranteed | (888) 88-SOURCE | www.artisantg.com
Remote Control • 235
Retrieving Histogram Bins
The following functions outline the general method for retrieving
histogram bin data. (Determine the value of 'BinCnt' using the
command "Burst BinMap ?".)
I.
int RCBurstBins(void)
II.
{
III.
int stat;
IV.
unsigned long *BinData =
V.
(unsigned long *) malloc (sizeof(unsigned long)*BinCnt);
VI.
VII.
if (BinData == 0) return BASTAT_ERROR ;
VIII.
ReportMsg( 2, " Query Bins" );
IX.
stat= BaBurstBinsQ( BinData, BinCnt ) ;
X.
XI.
free (BinData);
XII.
return stat;
XIII.
}
XIV.
XV.
int BaBurstBinsQ (unsigned long *BinData, unsigned short BinCnt)
XVI.
{
XVII.
return BaGenericBinsQ( "BURST", BinData, BinCnt );
XVIII.
}
XIX.
XX.
int BaGenericBinsQ(char *BinName, unsigned long *BinData, unsigned short
BinCnt)
XXI.
{
XXII.
char Buf[64] ;
XXIII.
XXIV.
if( BaPort == PORT_NONE ) return BASTAT_NOPORT ;
XXV.
sprintf( Buf, "%s BINS ?\n", BinName );
XXVI.
PortSendText( BaPort, Buf );
XXVII.
XXVIII.
PortGetBinary(BaPort, (char *)BinData, BinCnt*sizeof(unsigned long));
XXIX.
XXX.
if( ! PortWait( BaPort ) )
XXXI.
return BASTAT_TIMEOUT ;
XXXII.
return BASTAT_OK ;
XXXIII.
}
236 • Remote Control
User Guide BA622
Artisan Technology Group - Quality Instrumentation ... Guaranteed | (888) 88-SOURCE | www.artisantg.com
Speeding Up Remote Control: The Alias File
Remote Control commands can be abbreviated using the ALIAS.REM
remote control command alias file. This alias file is an ASCII text file
that contains a list of operation codes (OPCODES) and associated
command strings. Below is an example of an alias file.
ALIAS:
1,ANALYZER STOP
2,ANALYZER LIVE
3,ANALYZER PLAY
4,BASIC VALUES1 ?
5,BASIC VALUES2 ?
6,ANALYZER DURATION
Note that the first parameter is the OPCODE and the second is the
associated command string.
User Guide BA622
Artisan Technology Group - Quality Instrumentation ... Guaranteed | (888) 88-SOURCE | www.artisantg.com
Remote Control • 237
Examples
In order to use the remote control command alias, substitute two bytes,
ESCAPE (ASCII 27) <OPCODE>, for the desired command string. For
example, in order to issue an ANALYZER LIVE command, here is the
C source code necessary to build the two byte command:
#include <stdio.h>
#include <string.h>
…
#define ESCAPE
27
#define ANALYZER_LIVE_OPCODE 2
…
char buffer[64] ;
…
/*
* Build the ANALYZER LIVE command using the two byte
alias.
*/
sprintf( buffer, “%c%c\n”, ESCAPE, ANALYZER_LIVE_OPCODE ) ;
/*
* Send the command string in “buffer” to the BitAlyzer.
*/
…
It is also possible to combine an aliased command with parameters as
seen in the next example.
#include <stdio.h>
#include <string.h>
…
#define ESCAPE
27
#define ANALYZER_DURATION_OPCODE
6
…
char buffer[64] ;
double my_duration ;
…
my_duration = 10000 ;
/*
* Build the ANALYZER DURATION command using the two byte
alias.
* Add the duration parameter at the end.
*/
sprintf( buffer, “%c%c %.0lf\n”, ESCAPE,
ANALYZER_DURATION_OPCODE, my_duration ) ;
/*
* Send the command string in “buffer” to the BitAlyzer.
*/
…
238 • Remote Control
User Guide BA622
Artisan Technology Group - Quality Instrumentation ... Guaranteed | (888) 88-SOURCE | www.artisantg.com
Some usage and syntax rules:
1.
The pathname of the remote control alias file on the BitAlyzer
must be C:\USR\BIN\ALIAS.REM and must exist BEFORE the
BA622 program is executed.
2.
The string “ALIAS:” must be the first line in the ALIAS.REM
file.
3.
There must be no blank lines between alias definitions (OPCODE
and command strings.)
4.
Only one alias definition per line is allowed.
5.
The legal range of OPCODES is 1 to 127.
6.
The two-byte alias (ESCAPE and OPCODE) can be used more
than once in a command string and does not necessarily need to be
placed at the beginning of a command string.
User Guide BA622
Artisan Technology Group - Quality Instrumentation ... Guaranteed | (888) 88-SOURCE | www.artisantg.com
Remote Control • 239
Command Protocol
"Syntax", "Set", and "Query" indicate the formats required for sending
commands. All commands are one line text strings terminated by a
carriage return character.
After each command is sent to the BitAlyzer, a status register will be
set indicating the result. Use the “Status ?” command to see the status
of the last command sent, or set the reply status to one ("Reply 1") to
have the status automatically returned. If an incorrect command was
sent, the status will be "RER_BAD_COMMAND". If the command
executed correctly, the status will be "RER_OK".
The complete list of return code symbols and their numeric equivalents
is included under the “Status” command.
Abort
Cancels a "Send" or "Get" file operation. Use this command to
discontinue file transfer operations as described in Remote Control
Programming Techniques.
Syntax:
Abort
Adhoc
Adhoc Mode
Sets or returns the value of the Detector or Generator Adhoc Mode,
used to control the value to which the Adhoc Output signal is set.
240 • Remote Control
Set:
Adhoc Mode <type> <adhoc_mode>
Query:
Adhoc Mode <type> ?
Params:
<type>................Specifies which Adhoc Mode to set:
DET = Detector, GEN = Generator
<adhoc_mode>...Mode of Adhoc Output signal. Valid
Adhoc Modes are:
0
Not Used
1
Set Adhoc Output to Zero
2
Set Adhoc Output to One
3
Mirror the Adhoc Input to
the Adhoc Output
4
Invert the Adhoc Input to
the Adhoc Output
User Guide BA622
Artisan Technology Group - Quality Instrumentation ... Guaranteed | (888) 88-SOURCE | www.artisantg.com
5
Arm on Adhoc (valid only
for the Detector)
Returns:
<adhoc_mode>
Status:
RER_OK..................................... Successful.
RER_BAD_PARAMETER.......... <type> is not DET or
GEN
RER_PARAM_RANGE .............. <adhoc_mode> is not
0-5 for <type> = DET,
or<adhoc_mode> is
not 0-4 for
<type> = GEN
Adhoc Status
Returns the current value of the Detector and Generator Adhoc Input
signals. The returned value is a bit-field that contains one bit each
representing the Detector and Generator Adhoc Input signals.
Syntax:
Adhoc Status ?
Params:
<bit-field>... Boolean states for two binary flags
associated with the current Adhoc Input
signal values. <bit-field> is defined as:
Bit #
0
Detector Adhoc Input
1
Generator Adhoc Input
Returns:
<bit-field>
Status:
RER_OK..................................... Successful.
Analyzer
Analyzer Duration
Used to set or query the time duration for "Analyzer Record". The
calculation of the duration to record is performed using the computer's
internal clock, not by counting bits received from the channel under
test.
Set:
Analyzer Duration <seconds>
Query:
Analyzer Duration ?
Params:
<seconds> ... Number of seconds recording time: 1 to
4,200,000,000 (unsigned long).
Returns:
<seconds>
Status:
RER_OK..................................... Successful.
User Guide BA622
Artisan Technology Group - Quality Instrumentation ... Guaranteed | (888) 88-SOURCE | www.artisantg.com
Remote Control • 241
RER_BAD_PARAMETER.......... <seconds> not
specified or invalid
(must be positive
whole number;
commas and scientific
notation not allowed).
RER_PARAM_RANGE .............. <seconds> less than
one.
Analyzer Durtype
Used to set or query the type and amount of events used to determine
"Analyzer Live or Record" duration.
Set:
Analyzer Durtype <type> <amount>
Query:
Analyzer Durtype ?
Params:
<type>......... Duration type (unsigned integer). The
following types are defined:
0
NONE
1
Word Errors
2
Bits
3
Events
4
Mark #1 Count
5
Mark #2 Count
6
Seconds
<amount>.... Duration amount (double).
Returns:
<type>,<amount>
Status:
RER_OK..................................... Successful.
RER_BAD_PARAMETER.......... One or both of the
parameters was invalid
or not specified.
Analyzer File
Used to set or query the filename for "Analyzer Record" or "Analyzer
Play". The named file is used for the recording and playing back of
error data sets. If only a filename is given (i.e., FOOBAR.DAT), then
the Finder Directory will be used; otherwise, directories can be
specified along with the file (i.e.,
C:\USERS\BA5\DATA\FOOBAR.DAT). Note that the slash is “\”, not
“/”. Setting this value to "NONE" indicates that there is no file selected
for playback or recording.
Set:
242 • Remote Control
Analyzer File <filename>
User Guide BA622
Artisan Technology Group - Quality Instrumentation ... Guaranteed | (888) 88-SOURCE | www.artisantg.com
Query:
Analyzer File ?
Params:
<filename>.. Name of file used to save and retrieve data
(DOS file format: 8chars.3chars).
Returns:
<filename>
Status:
RER_OK..................................... Successful.
RER_BAD_PARAMETER.......... <filename> not
specified or invalid
format.
Analyzer Flags
Used to set or query the Analyzer flags which control various analyzer
operation modes. Each state is assigned to a specific bit of a 32-bit
value, which is passed as the parameter "<bit-field>".
Set:
Analyzer Flags <bit-field>
Query:
Analyzer Flags ?
Params:
<bit-field>... Boolean states for multiple binary flags
associated with the Analyzer (unsigned
long). Analyzer flag bit assignments include:
Bit #
0
Skip to Mark #1
1
Ignore Events
2
AnalyzeToo
3
Skip to Mark #2
Returns:
<bit-field>
Status:
RER_OK..................................... Successful.
RER_BAD_PARAMETER.......... <bit-field> not
specified or invalid.
Analyzer Live
Places the error analyzer in the LIVE scan mode. In this mode, the
BitAlyzer accepts error information from the channel under test and
processes error statistics immediately without recording the error
information to disk.
Syntax:
Analyzer Live
Status:
RER_OK..................................... Successful.
RER_NO_CLOCK ...................... Detector has no clock
signal.
RER_NOT_IN_SYNC................. Detector not in sync
with a pattern.
User Guide BA622
Artisan Technology Group - Quality Instrumentation ... Guaranteed | (888) 88-SOURCE | www.artisantg.com
Remote Control • 243
RER_MISC_ERROR................... Unable to start live
scanners.
Analyzer Offset
Used to set or query the offset at which analysis is to begin. Sets the
Analyzer's Byte Offset parameter, which is used to phase-adjust all
error processing by a known quantity of error-free bytes. This feature is
useful to adjust some analysis results if the original error information
does not begin on a proper analysis blocking factor boundary and you
know a fixed amount that will correct the phase misalignment.
Set:
Analyzer Offset <bytes>
Query:
Analyzer Offset ?
Params:
<bytes> ....... Number of error free bytes inserted before
analysis data: 0 to 4,200,000,000 (unsigned
long)
Returns:
<bytes>
Status:
RER_OK..................................... Successful.
RER_BAD_PARAMETER.......... <bytes> not specified
or invalid (must be
positive whole number;
commas and scientific
notation not allowed).
Analyzer Play
Places the error analyzer in the PLAY scan mode. In this mode, the
BitAlyzer accepts error information from the designated Analyzer File
and produces error statistics by passing error information on to the
selected scanners. This operation requires that there be some scanners
selected, and that a readable error data file be selected as the Analyzer
File.
Syntax:
Analyzer Play
Status:
RER_OK..................................... Successful.
RER_MISC_ERROR................... Analyzer filename not
set, or unable to start
play scanners.
Analyzer Record
Places the error analyzer in the RECORD scan mode. In this mode, the
BitAlyzer accepts error information from the channel under test and
244 • Remote Control
User Guide BA622
Artisan Technology Group - Quality Instrumentation ... Guaranteed | (888) 88-SOURCE | www.artisantg.com
records it to disk in the file designated as the Analyzer File. If the
analyzer flag "AnalyzeToo" is enabled, the analyzer will also produce
error statistics by passing error information on to the selected scanners.
This operation requires that there be a valid DOS filename specified as
the Analyzer File. If the "AnalyzeToo" flag is enabled, the resulting
scan mode will be BOTH indicating that both recording and live
analysis are being performed. Otherwise the scan mode will be
RECORD.
Syntax:
Analyzer Record
Status:
RER_OK..................................... Successful.
RER_MISC_ERROR................... Analyzer filename not
set, or unable to start
record.
Analyzer Reset
Resets the hardware programming characteristics and data processing
results of the BitAlyzer622. When executed, all BitAlyzer622 hardware
components (including the Generator, Detector, Crystal Clock Source,
and Variable Frequency Clock Source) are reinitialized with their
current settings. Afterwards, all BitAlyzer scanners that are enabled
using the "Analyzer Scan" protocol are reset. Normally, this resets all
intermediate calculations to zero. The hardware reprogramming does
not occur if the analyzer is not currently stopped: If the analyzer
operating mode is PLAY, LIVE, or RECORD, only the scanners are
reset.
Syntax:
Analyzer Reset
Analyzer Scan
Used to set or query which Analyzer scanners are turned on.
Establishes which scanners the analyzer will pass error information
through during LIVE and BOTH processing modes. Each state is
assigned to a specific bit of a 32-bit value, which is passed as the
parameter "<bit-field>".
Set:
Analyzer Scan <bit-field>
Query:
Analyzer Scan ?
Params:
<bit-field> .. Boolean states for multiple binary flags
associated with the Analyzer scanners
(unsigned long). Scanner bit assignments
include:
Bit #
0
ECC
User Guide BA622
Artisan Technology Group - Quality Instrumentation ... Guaranteed | (888) 88-SOURCE | www.artisantg.com
Remote Control • 245
1
2
3
4
5
6
7
8
9
10
11
12
13
Basic BER
More Basic Info
Strip Chart
Burst Histogram
EFI Histogram
Block Histogram
Modulo Histogram
Interval Histogram
G821
Media Scan
SpaceMark
Spectrum
Mask
Returns:
<bit-field>
Status:
RER_OK..................................... Successful.
RER_BAD_PARAMETER.......... <bit-field> not
specified or invalid.
Analyzer Status
Used to query the Analyzer operation mode.
Query:
Analyzer Status ?
Params:
<mode>....... Current Analyzer operation mode. Possible
mode values include:
0
STOP
1
PLAY
2
BOTH
4
RECORD
8
LIVE
Returns:
<mode>
Analyzer Stop
Places the error analyzer in the STOP scan mode. This mode halts any
PLAY, RECORD, LIVE, or BOTH mode in progress.
Syntax:
Analyzer Stop
Auxbert
Auxbert Channels
Query:
246 • Remote Control
Auxbert Channels ?
User Guide BA622
Artisan Technology Group - Quality Instrumentation ... Guaranteed | (888) 88-SOURCE | www.artisantg.com
Params:
<ChPres> .... Number of channels present, integer.
<ChAct> ..... Number of channels activated, integer
Returns:
<ChPres>,<ChAct>
Status:
RER_OK..................................... Successful.
Auxbert ChFlags
Set:
Auxbert ChFlags <Ch> <ChBits>
Query:
Auxbert ChFlags <Ch> ?
Params:
<Ch>........... Sets the flag bits for the indicated channel
<ChBits> .... Unsigned long 'Or-ed' with the following
bits:
Bit #
0
Activated
1
Make Report
2
EE Mode
3
Inject Error
4
Det Resync On Blank
5
Det Enable Arm
6
Det Invert Arm
7
Det Enable Blank
8
Det Invert Blank
9
Det Invert Clock
10
Det Invert Data
11
Det Enable A Resync
12
Gen Use Global Reset
13
Gen use Global Clock
14
Det Use Global Arm
15
Det Use Global Blank
Returns:
<ChBits>
Status:
RER_OK..................................... Successful.
RER_BAD_PARAMETER.......... Parameter not specified
or invalid.
Auxbert ChValues1
Query:
Auxbert ChValues1 <Ch> ?
Params:
<Ch>...............Queries the status of the indicated channel
<Resync> ........Number of Resyncs (unsigned long)
<Windows>.....Number of Windows (unsigned long)
User Guide BA622
Artisan Technology Group - Quality Instrumentation ... Guaranteed | (888) 88-SOURCE | www.artisantg.com
Remote Control • 247
<MissWin> .... Number of Missing Windows (unsigned
long)
<Errs>............ Number of Errors (unsigned long)
<BER>........... BER, scientific double
<SevErrWin>. Severely Errored Windows (unsigned
long)
Returns:
<Resync>,<Windows>,<MissWin>,<Errs>,<BER>,
<SevErrWin>
Status:
RER_OK..................................... Successful.
RER_BAD_PARAMETER.......... <Ch> not specified or
invalid.
Auxbert Column
Set:
Auxbert Column <ColNum> <Ch>
Query:
Auxbert Column <ColNum> ?
Params:
<Ch>........... In Set command, sets the column channel
assignment to the indicated channel. As a
Return value, indicates the channel assigned
to the specified column.
<ColNum> .. Column channel assignment number
(integer).
<Cols> ........ Number of columns available (integer).
<Ch>........... Channel number (integer).
Returns:
<Ch>
Query:
Auxbert Column ?
Returns:
<Cols>
Status:
RER_OK..................................... Successful.
RER_BAD_PARAMETER.......... Parameter not specified
or invalid.
Auxbert DetPatt
Set:
Auxbert DetPatt <Ch> <DetPatt>
Query:
Auxbert DetPatt <Ch> ?
Params:
<Ch>........... Sets the Detector to the indicated channel
<DetPatt>.... Detector Pattern Number, 0-7
248 • Remote Control
User Guide BA622
Artisan Technology Group - Quality Instrumentation ... Guaranteed | (888) 88-SOURCE | www.artisantg.com
16-Bit Fixed Value (uint)
Returns:
<DetPatt>
Status:
RER_OK..................................... Successful.
RER_BAD_PARAMETER.......... Parameter not specified
or invalid.
Auxbert DetWin
Set:
Auxbert DetWin <Ch> <Win-Sel> <BitsInWindow>
Query:
Auxbert DetWin <Ch> ?
Params:
<Ch>....................Sets the Detector window for the
indicated channel.
<Win-Sel> ...........Window Select Number, 0-8
<BitsInWindow>..Bits in Window Value, decimal ugiant
Returns:
<Win-Sel>,<BitsInWindow>
Status:
RER_OK..................................... Successful.
RER_BAD_PARAMETER.......... Parameter not specified
or invalid.
Set:
Auxbert Flags <AuxbertBits>
Query:
Auxbert Flags ?
Params:
<AuxbertBits>.. Unsigned long 'Or-ed' with the following
bits:
Bit #
0
Info
1
Grid
2
Icons
Returns:
<AuxbertBits>
Status:
RER_OK..................................... Successful.
RER_BAD_PARAMETER.......... Parameter not specified
or invalid.
Set:
Auxbert Format <FormatBits>
Query:
Auxbert Format ?
Auxbert Flags
Auxbert Format
User Guide BA622
Artisan Technology Group - Quality Instrumentation ... Guaranteed | (888) 88-SOURCE | www.artisantg.com
Remote Control • 249
Params:
<FormatBits> ... Unsigned long 'Or-ed' with the following
bits:
Bit #
0
Show Activated
1
Show Description
2
Show Report File
3
Threshold
4
Show Gen Clock
5
Show Gen Status
6
Show Gen Indic
7
Show Det Clock
8
Show Det Status
9
Show Det Indic
10
Show Window Size
11
Show Window Count
12
Show Total Bits
13
Show Error Count
14
Show Resync Count
15
Show BER
16
Show Severe
17
Show Missing
18
Show Inject
19
Show Overflows
Returns:
<FormatBits>
Status:
RER_OK..................................... Successful.
RER_BAD_PARAMETER.......... Parameter not specified
or invalid.
Auxbert GenClk
Set:
Auxbert GenClk <Ch> <ClkSrc> <Divider>
Query:
Auxbert GenClk <Ch> ?
Params:
<Ch>........... Sets the Generator to the indicated channel.
<ClkSrc>..... Clock Source Selector Number, 0-3
<Divider>.... Octave Selector Number, 0-8
250 • Remote Control
Returns:
<ClkSrc>,<Divider>
Status:
RER_OK..................................... Successful.
RER_BAD_PARAMETER.......... Parameter not specified
or invalid.
User Guide BA622
Artisan Technology Group - Quality Instrumentation ... Guaranteed | (888) 88-SOURCE | www.artisantg.com
Auxbert GenPatt
Set:
Auxbert GenPatt <Ch> <GenPatt> <Word>
Query:
Auxbert GenPatt <Ch> ?
Params:
<Ch>........... Sets the pattern Generator to the indicated
channel.
<GenPatt>... Generator Pattern Selector Number, 0-7
<Word> ...... 16-Bit Value for Fixed Pattern, '0xFFFF' or
'1234', uint (may be set as hexadecimal or
decimal, feedback is always hexadecimal)
Returns:
<GenPatt>,<Word>
Status:
RER_OK
................................. Successful.
RER_BAD_PARAMETER............ Parameter not
specified or invalid.
Auxbert Log
Used to set or query the filename of the AuxBERT Log File. If only a
filename is given (i.e., FOOBAR.DAT), then the Finder Directory will
be used; otherwise, directories can be specified along with the file (i.e.,
C:\USERS\BA5\DATA\FOOBAR.DAT). Note that the slash is “\”, not
“/”. Setting this value to "NONE" indicates that there is no file selected.
Set:
Auxbert Log <LogSeconds> <LogFile>
Query:
Auxbert Log ?
Params:
<LogSeconds> Log Seconds (unsigned long)
< LogFile >
Log filename, DOS format
Returns:
<LogSeconds>,<LogFile>
Status:
RER_OK
................................. Successful.
RER_BAD_PARAMETER............ Parameter not
specified or invalid.
Auxbert Offline
Disables the on-line mode.
Syntax:
Auxbert Offline
User Guide BA622
Artisan Technology Group - Quality Instrumentation ... Guaranteed | (888) 88-SOURCE | www.artisantg.com
Remote Control • 251
Auxbert Online
Places the Auxbert system in on-line mode for error counting and
report processing.
Syntax:
Auxbert Online
Auxbert Report
Used to set or query the filename of the Channel Report File. If only a
filename is given (i.e., FOOBAR.DAT), then the Finder Directory will
be used; otherwise, directories can be specified along with the file (i.e.,
C:\USERS\BA5\DATA\FOOBAR.DAT). Note that the slash is “\”, not
“/”. Setting this value to "NONE" indicates that there is no file selected.
Set:
Auxbert Report <Ch> <Threshold> <LogFile>
Query:
Auxbert Report <Ch> ?
Params:
<Ch>
Sets the system to the indicated channel.
<Threshold> Severe Error Threshold (unsigned long)
<LogFile>
Channel Report filename, DOS filename
only
Returns:
<Threshold>,<LogFile>
Status:
RER_OK....................................... Successful.
RER_BAD_PARAMETER............ Parameter not
specified or invalid.
Auxbert Reset
Resets statistical variables and reprograms hardware settings.
Syntax:
Auxbert Reset
Auxbert ShowAs
252 • Remote Control
Set:
Auxbert ShowAs <WindowType>
Query:
Auxbert ShowAs ?
Params:
<WindowType> 0
1
2
Returns:
<WindowType>
Status:
RER_OK....................................... Successful.
List
Strip Chart
Columnar
User Guide BA622
Artisan Technology Group - Quality Instrumentation ... Guaranteed | (888) 88-SOURCE | www.artisantg.com
RER_BAD_PARAMETER............ <WindowType> not
specified or invalid.
Auxbert Status
Query:
Auxbert Status <Ch> ?
Params:
<Ch>
Sets the system to the indicated channel.
<GenStat> Generator Status Display Value, 0-8
<RunFreq> Generator Running Frequency, scientific
double
<DetStat>
Detector Status Display Value, 0-8
Returns:
<GenStat>,<RunFreq>,<DetStat>
Status:
RER_OK....................................... Successful.
RER_BAD_PARAMETER............ <Ch> not specified or
invalid.
Auxbert Values1
Query:
Auxbert Values1 ?
Params:
<LogEntries> Log Entries (unsigned long)
<SecBeg>
Seconds since beginning of test (unsigned
long)
Returns:
<LogEntries>,<SecBeg>
Status:
RER_OK....................................... Successful.
User Guide BA622
Artisan Technology Group - Quality Instrumentation ... Guaranteed | (888) 88-SOURCE | www.artisantg.com
Remote Control • 253
Auxbert View
Set:
Auxbert View <xofs> <yofs> <xscale> <yscale>
Query:
Auxbert View ?
Params:
<xofs>......... X-offset for origin of strip chart (decimal
ugiant)
<yofs> ......... Y-offset for origin of strip chart (decimal
ugiant)
<xscale>...... X-scale magnification (signed long)
<yscale>...... Y-scale magnification (signed long)
Returns:
<xofs>,<yofs>,<xscale>,<yscale>
Status:
RER_OK..................................... Successful.
RER_BAD_PARAMETER.......... One or more values not
specified or invalid
(offsets must be
positive numbers;
magnification factors
must be whole
numbers).
Basic
Basic Efi
Sets up the basic analyzer's Error Free Interval parameter, which is
used to differentiate bit errors from burst errors. The Error Free Interval
parameter is used in conjunction with the Minimum Burst Length
parameter. The Error Free Interval parameter represents a quantity of
good bits which, when encountered, will terminate an error grouping.
The length of the error grouping does not include the good bits in the
Error Free Interval; rather, the error grouping ends with the last actual
error in the grouping. If the calculated grouping length is greater than
or equal to the Minimum Burst Length, then the actual errors from this
grouping are considered to be burst errors, and the Burst Event counter
is incremented. Otherwise they are considered non-burst or bit errors.
Changing the Error Free Interval parameter will affect the results of
other error analyses, including burst length profiles.
254 • Remote Control
Set:
Basic Efi <bits>
Query:
Basic Efi ?
User Guide BA622
Artisan Technology Group - Quality Instrumentation ... Guaranteed | (888) 88-SOURCE | www.artisantg.com
Params:
<bits>.......... Minimum number of correct bits before an
error free interval is acknowledged: 1 to
4,200,000,000 (unsigned long).
Returns:
<bits>
Status:
RER_OK..................................... Successful.
RER_BAD_PARAMETER.......... <bits> not specified or
invalid (must be
positive whole number;
commas and scientific
notation not allowed).
RER_PARAM_RANGE .............. <bits> less than 1.
Basic Flags
Used to set or query the Basic flags. Each state is assigned to a specific
bit of a 32-bit unsigned integer value, which is passed as the parameter
"<bit-field>".
Set:
Basic Flags <bit-field>
Query:
Basic Flags ?
Params:
<bit-field>... Boolean states for multiple binary flags
associated with the Basic error scanner
(unsigned long). Basic flag bit assignments
include:
Bit #
0
Use scientific notation
1
Allow bursts to span
integration boundaries
Returns:
<bit-field>
Status:
RER_OK..................................... Successful.
RER_BAD_PARAMETER.......... <bit-field> not
specified or invalid.
Basic Integr
Sets up the Integration Period used in calculating basic error rates.
Error rates are calculated by dividing the number of errors encountered
by the number of bits processed. If division occurs before acquiring
enough of a denominator here, error rate statistics will be jumpy. A
good rule of thumb is to begin with the expected error rate of the
channel. Taking the exponent of the expected error rate, change its
sign, and add two; thus, for a 1e-8 error-rate channel, use a 1e10
integration period before dividing. This yields two significant digits of
precision in the result.
User Guide BA622
Artisan Technology Group - Quality Instrumentation ... Guaranteed | (888) 88-SOURCE | www.artisantg.com
Remote Control • 255
This is a simple description of calculating the error rates. In actual
processing, the quantity of Lost Bits also enters into the calculation.
This exclusion adjusts the calculated error rates to account for periods
of "unknown" error. Essentially, the denominator is reduced by the
quantity of lost bits during the integration period.
Upon each integration period, error rates are calculated and posted to
the strip chart if the strip chart scanner is enabled.
Set:
Basic Integr <bits>
Query:
Basic Integr ?
Params:
<bits>.......... Number of bits analyzed before calculating
an error rate: 1 to 1e100 (double).
Returns:
<bits>
Status:
RER_OK..................................... Successful.
RER_BAD_PARAMETER.......... <bits> not specified or
invalid (must be
positive whole
number)
RER_PARAM_RANGE .............. <bits> less than 1.
Basic MinBurst
Sets up the basic analyzer's Minimum Burst Length parameter, which is
used to differentiate bit errors from burst errors. The Minimum Burst
Length parameter is used in conjunction with the Error Free Interval
parameter. The Error Free Interval parameter represents a quantity of
good bits which, when encountered, will terminate an error grouping.
The length of the error grouping is not computed to the point where the
Error Free Interval was reached, but rather ends with the last actual
error in the grouping. If the calculated grouping length is greater than
or equal to the Minimum Burst Length, then the actual errors from this
grouping are considered to be burst errors, and the Burst Event counter
is incremented. Otherwise they are considered non-burst or bit errors.
Changing the Minimum Burst Length requirement parameter will affect
how errors are characterized. Larger burst length requirements mean
fewer error-groupings will qualify as bursts, and will reduce the burst
event rate.
256 • Remote Control
Set:
Basic MinBurst <bits>
Query:
Basic MinBurst ?
Params:
<bits>.......... Minimum number bits required to establish
a burst: 1 to 4,200,000,000 (unsigned long).
User Guide BA622
Artisan Technology Group - Quality Instrumentation ... Guaranteed | (888) 88-SOURCE | www.artisantg.com
Returns:
<bits>
Status:
RER_OK..................................... Successful.
RER_BAD_PARAMETER.......... <bits> not specified or
invalid (must be
positive whole number;
commas and scientific
notation not allowed).
RER_PARAM_RANGE .............. <bits> less than 1.
Basic Values1
Used to query Basic BER error count statistics. These values are
calculated by the Basic BER scanner during LIVE and BOTH analyzer
mode operations, only when the Basic scanner is enabled. The values
are all returned on one line, in the above order, each separated by a
comma.
Query:
Basic Values1 ?
Params:
<totalbits>.......Total number of bits processed by the
Analyzer: 0 to 1e100 (double).
<totalerrors> ...Total number of bits in error: 0 to
4,200,000,000 (unsigned long).
<bursterrors> ..Number of bits classified as burst errors: 0
to 4,200,000,000.
<biterrors> ......Number of bits classified as bit errors: 0
to 4,200,000,000.
<burstevents>..Number of burst occurrences: 0 to
4,200,000,000.
<lostbits> ........Number of bits lost in processing due to
resynchronizing, overflow, etc.: 0 to
1e100.
Returns:
<totalbits>,<totalerrors>,<bursterrors>,<biterrors>,
<burstevents>,<lostbits>
User Guide BA622
Artisan Technology Group - Quality Instrumentation ... Guaranteed | (888) 88-SOURCE | www.artisantg.com
Remote Control • 257
Basic Values2
Used to query Basic BER error rate statistics. These values are
calculated by the Basic BER scanner during LIVE and BOTH analyzer
mode operations, only when the Basic scanner is enabled. The values
are all returned on one line, in the above order, each separated by a
comma.
Query:
Basic Values2 ?
Params:
<total rate>............ Error rate for all errors found during
analysis: 0 to 1 (double).
<burst rate>........... Error rate for burst errors: 0 to 1.
<non-burst rate>.... Error rate for all non-burst errors: 0 to
1.
<burst event rate>.. Rate of burst occurrences: 0 to 1.
<lost bits> ............. Percentage of lost bits: 0 to 100
(double).
Returns:
<total rate>,<burst rate>,<non-burst rate>, <burst event
rate>,<lost bits>
Block
Block BinMap
Used to set or query histogram bin parameters for the Block Histogram.
These three parameters and their use in creating virtual counter ranges
are described in the Programming Techniques section of this manual.
258 • Remote Control
Set:
Block BinMap <bin count> <offset> <shift>
Query:
Block BinMap ?
Params:
<count>
Quantity of histogram counters; not
programmable by the user.
<offset>
Defines position of first histogram counter:
0 to 4,200,000,000 (unsigned long).
<shift>
Power of two scalar for histogram counters
(increases range, but decreases resolution).
Returns:
<count>,<offset>,<shift>
Status:
RER_OK....................................... Successful.
User Guide BA622
Artisan Technology Group - Quality Instrumentation ... Guaranteed | (888) 88-SOURCE | www.artisantg.com
RER_BAD_PARAMETER............ One or more
parameters not
specified or invalid
(must be positive
whole numbers;
commas and scientific
notation not allowed).
RER_MISC_ERROR..................... Bin data currently
being used in some
operation.
RER_MEMORY_ERR .................. Insufficient memory
(RAM) remaining on
BitAlyzer for the bins.
Block Bins
Retrieves counters representing the Block Histogram bins. Each
counter is a four-byte value defined in byte ordering, a characteristic of
Intel 80X86 architectures. After transmitting this request, the host
should immediately anticipate receiving the bin count times four bytes.
These bytes are transmitted in raw binary form. It is recommended that
before using this command, "Block BinMap" be used to determine the
bin count.
Query:
Block Bins ?
Returns:
binary data; 4 bytes per bin counter (unsigned long)
Status:
RER_OK....................................... Successful.
RER_MEMORY_ERROR............. Insufficient memory
(RAM) remaining on
BitAlyzer for the bins.
Block Cursor
Used to set or query the positions for the two cursors supported by the
Block Histogram. If the Block histogram is open at the time of
execution, it will be redrawn.
Set:
Block Cursor <curs-a> <curs-b>
Query:
Block Cursor ?
Params:
<curs-a>
X-axis value for CursorA: 0 to 1e100
(double).
<hist-a>
Value of histogram at location of Cursor A:
0 to 1e100 (double).
User Guide BA622
Artisan Technology Group - Quality Instrumentation ... Guaranteed | (888) 88-SOURCE | www.artisantg.com
Remote Control • 259
<curs-b>
X-axis value for CursorB: 0 to 1e100
(double).
<hist-b>
Value of histogram at location of Cursor B:
0 to 1e100 (double).
<hist-total> Sum of all histogram values from Cursor A
through Cursor B: 0 to 1e100 (double).
Returns:
<curs-a>,<hist-a>,<curs-b>,<hist-b>,<hist-total>
Status:
RER_OK....................................... Successful.
RER_BAD_PARAMETER............ One or more
parameters not
specified or invalid
(must be positive
numbers).
Block Flags
Used to set or query the Block Histogram flags. Each state is assigned
to a specific bit of a 32-bit value, which is passed as the parameter
"<bit-field>".
260 • Remote Control
Set:
Block Flags <bit-field>
Query:
Block Flags ?
Params:
<bit-field>
Returns:
<bit-field>
Status:
RER_OK....................................... Successful.
RER_BAD_PARAMETER............ <bit-field> not
specified or invalid.
Boolean states for multiple binary flags
associated with the histogram (unsigned
long). Block flag bit assignments include:
Bit #
0
Use Log Scale
1
Show Grid
2
Show CursorA
3
Show CursorB
4
Info
5
Show Buttons
User Guide BA622
Artisan Technology Group - Quality Instrumentation ... Guaranteed | (888) 88-SOURCE | www.artisantg.com
Block View
Used to set or query the Block view parameters. These values are
represented in terms of the chart's X and Y-axes. For instance, a valid
Y-offset in the strip chart may be 1e-2, whereas a valid Y-offset in a
histogram may be 100. The X-scale and Y-scale values are signed long
integers representing magnification factors used to enlarge or reduce
the X and Y scales independently. These magnification factors are
combined with exponential mathematical functions and are therefore
often difficult to calculate analytically. An effective way of utilizing
this protocol would be to establish a chart view manually, using the
knob and/or touch features of chart viewing, and then to retrieve the
current settings for offset and scales using the "Block View ?" protocol.
Set:
Block View <xofs> <yofs> <xscale> <yscale>
Query:
Block View ?
Returns:
Values are all returned in one line, separated by commas.
Status:
<xofs>
X-axis offset for origin of chart: 0 to 1e100
(double).
<yofs>
Y-axis offset for origin of chart: 0 to 1e100
(double).
<xscale>
X-axis magnification factor (signed long).
<yscale>
Y-axis magnification factor (signed long).
RER_OK....................................... Successful.
RER_BAD_PARAMETER............ One or more values
not specified or
invalid (offsets must
be positive numbers;
magnification factors
must be whole
numbers).
Buffer
During "Get" or "Send" file transfer, indicates size of next buffer to be
transferred. Used in conjunction with the file transfer protocols
described in the Programming Techniques section of this manual. Once
file sending or file receiving is initiated using the "Send" or "Get"
commands, this command precedes a block transfer of the exact
number of bytes specified as the parameter. During transfer of these
User Guide BA622
Artisan Technology Group - Quality Instrumentation ... Guaranteed | (888) 88-SOURCE | www.artisantg.com
Remote Control • 261
bytes, no command processing occurs. These bytes are transferred in
binary form from the transmitting machine to the receiving machine.
Syntax:
Buffer <bytes>
Param:
<bytes>
Returns:
Status:
Continue [or] Abort
RER_BAD_XFER......................... Error in transferring
data or transfer not
initiated with "Send"
protocol.
RER_BAD_PARAMETER............ <bytes> not specified
or invalid (must be
positive whole
number; commas and
scientific notation not
allowed).
RER_MEMORY_ERROR ............. Insufficient memory
(RAM) remaining on
BitAlyzer for file
buffer.
Number of bytes in the next block of binary
data transfer (unsigned short).
Burst
Burst BinMap
Used to set or query histogram bin parameters for the Burst Histogram.
These three parameters and their use in creating virtual counter ranges
are described in the Programming Techniques section of this manual.
262 • Remote Control
Set:
Burst BinMap <bin count> <offset> <shift>
Query:
Burst BinMap ?
Params:
<count>
Quantity of histogram counters; not
programmable by the user.
<offset>
Defines position of first histogram counter:
0 to 4,200,000,000 (unsigned long).
<shift>
Power of two scalar for histogram counters
(increases range, but decreases resolution).
Returns:
<count>,<offset>,<shift>
Status:
RER_OK....................................... Successful.
User Guide BA622
Artisan Technology Group - Quality Instrumentation ... Guaranteed | (888) 88-SOURCE | www.artisantg.com
RER_BAD_PARAMETER............ One or more
parameters not
specified or invalid
(must be positive
whole numbers;
commas and scientific
notation not allowed).
RER_MISC_ERROR..................... Bin data currently
being used in some
other operation.
RER_MEMORY_ERR .................. Insufficient memory
(RAM) remaining on
BitAlyzer for the bins.
Burst Bins
Retrieves counters representing the Burst Histogram bins. Each counter
is a four-byte value defined in byte ordering, a characteristic of Intel
80X86 architectures. After transmitting this request, the host should
immediately anticipate receiving the bin count times four bytes. These
bytes are transmitted in raw binary form. It is recommended that before
using this command, "Burst BinMap" be used to determine the bin
count.
Query:
Burst Bins ?
Returns:
binary data; 4 bytes per bin counter (unsigned long)
Status:
RER_OK....................................... Successful.
RER_MEMORY_ERROR............. Insufficient memory
(RAM) remaining on
BitAlyzer for the bins.
Burst Cursor
Used to set or query the positions for the two cursors supported by the
Burst Histogram. If the Burst histogram is open at the time of
execution, it will be redrawn.
Set:
Burst Cursor <curs-a> <curs-b>
Query:
Burst Cursor ?
Params:
<curs-a>
X-axis value for CursorA: 0 to 1e100
(double).
<hist-a>
Value of histogram at location of Cursor A:
0 to 1e100 (double).
User Guide BA622
Artisan Technology Group - Quality Instrumentation ... Guaranteed | (888) 88-SOURCE | www.artisantg.com
Remote Control • 263
<curs-b>
X-axis value for Cursor B: 0 to 1e100
(double).
<hist-b>
Value of histogram at location of CursorB: 0
to 1e100 (double).
<hist-total> Sum of all histogram values from Cursor A
through Cursor B: 0 to 1e100 (double).
Returns:
<curs-a>,<hist-a>,<curs-b>,<hist-b>,<hist-total>
Status:
RER_OK....................................... Successful.
RER_BAD_PARAMETER............ One or more
parameters not
specified of invalid
(must be positive
numbers).
Burst Flags
Used to set or query the Burst Histogram flags. Each state is assigned
to a specific bit of a 32-bit value, which is passed as the parameter
"<bit-field>".
Set:
Burst Flags <bit-field>
Query:
Burst Flags ?
Params:
<bit-field>
Returns:
<bit-field>
Status:
RER_OK....................................... Successful.
RER_BAD_PARAMETER............ <bit-field> not
specified or invalid.
Boolean states for multiple binary flags
associated with the histogram (unsigned
long). Burst flag bit assignments include:
Bit #
0
Use Log Scale
1
Show Grid
2
Show CursorA
3
Show CursorB
4
Info
5
Show Buttons
Burst View
Used to set or query the Burst view parameters. The first two
parameters represent X and Y offsets for the origin of the chart. These
values are represented in terms of the chart's X and Y-axes. For
instance, a valid Y-offset in the strip chart may be 1e-2, whereas a valid
264 • Remote Control
User Guide BA622
Artisan Technology Group - Quality Instrumentation ... Guaranteed | (888) 88-SOURCE | www.artisantg.com
Y-offset in a histogram may be 100. The X-scale and Y-scale values
are signed long integers representing magnification factors used to
enlarge or reduce the X and Y scales independently. These
magnification factors are combined with exponential mathematical
functions and are therefore often difficult to calculate analytically. An
effective way of utilizing this protocol would be to establish a chart
view manually, using the knob and/or touch features of chart viewing,
and then to retrieve the current settings for offset and scales using the
"Burst View ?" protocol.
Set:
Burst View <xofs> <yofs> <xscale> <yscale>
Query:
Burst View ?
Params:
<xofs>
X-axis offset for origin of chart: 0 to 1e100
(double).
<yofs>
Y-axis offset for origin of chart: 0 to 1e100
(double).
<xscale>
X-axis magnification factor (signed long).
<yscale>
Y-axis magnification factor (signed long).
Returns:
<xofs>,<yofs>,<xscale>,<yscale>
Status:
RER_OK....................................... Successful.
RER_BAD_PARAMETER............ One or more values
not specified or
invalid (offsets must
be positive numbers;
magnifi-cation factors
must be whole
numbers).
Clock
Clock Freq
Selects the clock frequency being generated by the clock source.
Set:
Clock Freq <hertz>
Query:
Clock Freq ?
Params:
<hertz>
Returns:
<hertz>
Status:
RER_OK....................................... Successful.
Clock frequency in Hertz: 667 to
625,000,000 (double).
User Guide BA622
Artisan Technology Group - Quality Instrumentation ... Guaranteed | (888) 88-SOURCE | www.artisantg.com
Remote Control • 265
RER_NO_HARDWARE ............... Clock hardware not
present.
RER_BAD_PARAMETER............ <hertz> not specified
or invalid (must be
positive whole
number; commas and
scientific notation not
allowed).
RER_PARAM_RANGE ................ <hertz> out of range.
Config
Config Equipment
Used to query the BitAlyzer for its installed hardware. Returns a 32-bit
value that can be interpreted as a bit field in which each bit represents
certain hardware and software options.
266 • Remote Control
Query:
Config Equipment ?
Params:
<bit-field>
Boolean states for multiple binary flags
indicating the presence of various hardware
(unsigned long). The following table maps
bits contained in the returned value:
Bit #
0
Generator
1
Generator RAM
2
Detector
3
Detector RAM
4
VCO Clock
5
Crystal Clock
6
IEEE-488
7
DCRS Software Option
8
ECC Software Option
9
Media Scan
10
SpaceMark
11
Spectrum
12
Mask
13
Burst
14
EFI
15
Modulo
16
Interval
17
Block
18
G821
19
Dir1k
20
Basic
User Guide BA622
Artisan Technology Group - Quality Instrumentation ... Guaranteed | (888) 88-SOURCE | www.artisantg.com
21
22
23
24
25
26
Returns:
Strip
More
AuxBERT
Multi-Channel
Burst Exclusion
Packbits
<bit-field>
Config Restore
Reinstates a previously saved configuration file consisting of values for
all system parameters. The filename parameter is optional. If it does not
exist, the file BA5P.CFG is assumed. Configuration files must be
located in the Finder's directory.
Syntax:
Config Restore <fname>
Params:
<fname>
Status:
RER_OK....................................... Successful (requires a
few seconds).
RER_BAD_PARAMETER............ <fname> invalid
format.
RER_MISC_ERROR..................... File not found or
unreadable (<fname>
must exist in the
current Finder
directory).
Configuration filename (DOS file format:
8chars.3chars).
Config Save
Stores the current state of all system parameters in a configuration file
that can be retrieved later using the "Config Restore" command. If the
filename is not specified, the standard configuration file, BA5P.CFG, is
utilized. This file will be created in the Finder directory.
Syntax:
Config Save <fname>
Params:
<fname>
Status:
RER_OK....................................... Successful.
RER_BAD_PARAMETER............ <fname> invalid
format.
RER_MISC_ERROR..................... Disk full or disk write
error.
Configuration filename to be created.
User Guide BA622
Artisan Technology Group - Quality Instrumentation ... Guaranteed | (888) 88-SOURCE | www.artisantg.com
Remote Control • 267
Continue
Acknowledges that a file transfer operation may proceed. This
command is used in conjunction with file transfer operations, and is
described in the Programming Techniques section of this manual. After
each buffer has been transmitted, the receiver replies with this
"Continue" message if the transfer may proceed; otherwise, it replies
with an "Abort" message.
Syntax:
Continue
Returns:
binary data [or] Abort
Status:
RER_BAD_XFER......................... Error in transferring
data or transfer not
initiated with "Get"
protocol.
RER_MEMORY_ERROR ............. Insufficient memory
(RAM) remaining on
BitAlyzer for file
buffer.
Det
Det 16Bit
Used to Query the current value of the read-back register on the
Detector board's 16-bit fixed pattern detector. This value is updated
each time the Detector is reprogrammed.
Query:
Det 16Bit ?
Params:
<reg>
Returns:
<reg>
Value of read-back register (unsigned short).
Det DataDelay
Sets or queries the amount of delay added to the detector input data
signal. Note that <delay_in_nanoseconds> is rounded to the closest
delay step. There are 128 delay steps that correspond to delay values
between –1.147 ns and +1.165 ns.
268 • Remote Control
Set:
Det DataDelay <delay_in_nanoseconds>
Query:
Det DataDelay ?
Params:
<delay_in_nanoseconds> Amount of delay added to the
detector data signal with
User Guide BA622
Artisan Technology Group - Quality Instrumentation ... Guaranteed | (888) 88-SOURCE | www.artisantg.com
respect to the detector input
clock. Range is –1.147 ns to
+1.165 ns.
Returns:
<delay_in_nanoseconds>
Status:
RER_OK....................................... Successful.
RER_BAD_PARAMETER
<delay_in_nanos
econds> not specified
or invalid.
RER_PARAM_RANGE
<delay_in_nanos
econds> is outside of
valid range.
Det Events
Used to set or query the Detector event enables. Establishes hardware
enables for specific events that may be enqueued for software
processing during LIVE and RECORD analyzer operating modes. Each
of these events may be enabled or disabled independently by enabling
or disabling specific bits within the bit field parameter associated with
this command.
Although the BitAlyzer supports two separate markers, they can only
be enabled and disabled together.
Set:
Det Events <bit-field>
Query:
Det Events ?
Params:
<bit-field>
Returns:
<bit-field>
Status:
RER_OK..................................... Successful.
RER_BAD_PARAMETER.......... <bit-field> not
specified or invalid.
Boolean states for multiple binary flags
indicating Detector event enables (unsigned
long). Bits are assigned to event types in the
following manner:
Bit #
0
Errors
1
Markers
2
Resync
3
Blank
4
Pattern Cycle
User Guide BA622
Artisan Technology Group - Quality Instrumentation ... Guaranteed | (888) 88-SOURCE | www.artisantg.com
Remote Control • 269
Det Flags
Establishes Boolean states for multiple binary flags associated with the
Detector. Each state is assigned to a specific bit of a 32-bit value, which
is passed as the parameter "<bit-field>".
Set:
Det Flags <bit-field>
Query:
Det Flags ?
Params:
<bit-field>
Returns:
<bit-field>
Status:
RER_OK....................................... Successful.
RER_BAD_PARAMETER............ <bit-field> not
specified or invalid.
Boolean states for multiple binary flags for
the Detector (unsigned long). Bit fields are
assigned the following states:
Bit #
0
InvClock
1
CntBlank
2
InvBlank
3
BlnkResync
4
EnableBegin
5
InvBegin
6
ParityOdd
7
NRZi
8
EnaBlank
9
InvData
10
Occasional
Reprogramming
11
Faster Bit Updating
16
Count Errors During
Resync
Det Freq
Used to query the current operating frequency of the Detector circuits.
Returns a number indicating the current operating frequency of
Detector circuits, determined by measuring the input frequency to the
Detector. If the frequency is changing, this return value is only an
estimate. It takes a few seconds for the BitAlyzer622 to measure the
frequency accurately. The range of this number is from 0 (DC) to
625,000,000 (Hz).
270 • Remote Control
Query:
Det Freq ?
Returns:
<hertz>
Detector circuit frequency in Hertz
(unsigned long).
User Guide BA622
Artisan Technology Group - Quality Instrumentation ... Guaranteed | (888) 88-SOURCE | www.artisantg.com
Det If
Used to set or query the Detector's input interface to be either bit-serial,
byte-parallel, or word-parallel (word-parallel refers to 16-bit words).
The two parallel interfaces are located on the back of the chassis, and
the serial interfaces are on the front SMA connectors.
Set:
Det If <type>
Query:
Det If ?
Returns:
<type>
Status:
RER_OK....................................... Successful.
RER_NO_HARDWARE ............... Detector hardware not
present.
RER_BAD_PARAMETER............ <type> not specified
or invalid.
RER_PARAM_RANGE ................ <type> greater than 2.
Interface selection:
0
Bit
1
Byte
2
Word
Det Pattern
Used to set or query the Detector Pattern Type used to program those
patterns the BitAlyzer searches for during resynchronization. This
Pattern Type may be set to a manual mode or an automatic search
mode. In manual modes, the selected pattern is the only one looked for
in the incoming data. If the manual mode is set to a pseudo-random
pattern, the zero data pattern is searched for before the pseudo-random
pattern, since zero data will synchronize with pseudo-random number
generators in a degenerate case. In auto-search mode, all patterns are
searched for sequentially. The RAM-detect pattern mode is used in
conjunction with the optional Detector RAM hardware feature, which
must be installed in the BitAlyzer. Using this feature, the BitAlyzer can
compare incoming data with the contents of the Detector RAM. See the
"DetRam" protocols for more information about using this feature.
Set:
Det Pattern <pat-num>
Query:
Det Pattern ?
Params:
<pat-num> Pattern type. The following table represents
the different Detector pattern types:
0
Search
1
PRN-7
2
PRN-15
3
PRN-20
User Guide BA622
Artisan Technology Group - Quality Instrumentation ... Guaranteed | (888) 88-SOURCE | www.artisantg.com
Remote Control • 271
4
5
6
7
8
PRN-23
16-bit
RAM Trigger
RAM Grab
Zero
Returns:
<pat-num>
Status:
RER_OK....................................... Successful.
RER_NO_HARDWARE ............... Detector hardware not
present.
RER_BAD_PARAMETER............ <pat-num> not
specified or invalid.
RER_PARAM_RANGE ................ <pat-num> greater
than 8.
Det Resync
Establishes the Detector Resync Threshold parameter, which is used
during LIVE and RECORD analyzer operational modes to determine if
an auto-resynchronization attempt is required. During these modes, the
BitAlyzer's software monitors errors that are contiguous; if the quantity
of 16-bit words in error exceeds this threshold, a software
resynchronization operation is performed. These words in error must be
exactly contiguous.
Set:
Det Resync <words>
Query:
Det Resync ?
Returns:
<words>
Status:
RER_OK....................................... Successful.
RER_NO_HARDWARE ............... Detector hardware not
present.
RER_BAD_PARAMETER............ <words> not specified
or invalid (must be
positive whole
number; commas and
scientific notation not
allowed).
Minimum quantity of 16-bit words in error
for threshold: 0 to 4,200,000,000 (unsigned
long).
Det Scan
Causes the Detector to re-analyze the input data channel for
recognizable data patterns. If the Detector pattern has been set to auto272 • Remote Control
User Guide BA622
Artisan Technology Group - Quality Instrumentation ... Guaranteed | (888) 88-SOURCE | www.artisantg.com
search, then all synthesized data patterns are searched for. In this case,
the most recent previously recognized data pattern is attempted first,
and a zero data pattern is attempted second. These are followed by the
pseudo-random data patterns and the 16-bit fixed data pattern. If the
Detector pattern is set to a specific pattern type, then only that pattern
will satisfy the data pattern recognition procedure. Any other data will
produce a "NO_SYNC" Detector status.
Syntax:
Det Scan
Det Status
Used to query the synchronization status of the BitAlyzer's Detector
circuitry.
Query:
Det Status ?
Params:
<status>
Returns:
<status>
Indicates which pattern the Detector is
currently synchronized with. The following
status modes are represented:
0
No Sync
1
No Clock
2
No Hardware
3
PRN-7
4
PRN-15
5
PRN-20
6
PRN-23
7
16-bit
8
RAM Trigger
9
RAM Grab
10
Zero
DetRam
DetRam File
Used to set or query the filename to be used with Detector RAM. This
file is accessed when the Detector RAM is loaded using the "DetRam
Load" protocol. The file must be specified in a DOS file format. If only
a filename is given (i.e., FOOBAR.DAT), then the Finder Directory
will be used; otherwise, directories can be specified along with the file
(i.e., C:\USERS\BA5\DATA\FOOBAR.DAT). Note that the slash is
“\”, not “/”. Using this protocol does not effect a load of the filename;
you must first set this filename and set the Detector loading mode using
the "DetRam Load" protocol, and then perform a load operation using
User Guide BA622
Artisan Technology Group - Quality Instrumentation ... Guaranteed | (888) 88-SOURCE | www.artisantg.com
Remote Control • 273
the "DetRam Load" protocol. Setting this value to “NONE” indicates
that no file is selected.
Set:
DetRam File <filename>
Query:
DetRam File ?
Params:
format)
<filename> Detector RAM filename (standard DOS
Returns:
<filename>
Status:
RER_OK....................................... Successful.
RER_NO_HARDWARE ............... Detector RAM
hardware not present.
RER_BAD_PARAMETER............ <filename> not
specified or invalid
format.
DetRam Load
Initiates the currently selected mode of Detector RAM loading. The
type of load operation is defined using the "DetRam Mode" protocol,
and is used to select loading the Detector RAMs with a DOS file of
user data grabbed from the Detector data inputs, or with a synthesized
test pattern, such as alternating ones and zeroes. The "DetRam Load"
protocol operates differently based on the value of the "DetRam Mode"
selection. In a "Pattern" mode, the Detector RAM is loaded with a
quantity of words based on the type of pattern selected. In a "File"
mode, the file is accessed in the current data directory and the entire
file is loaded into the Detector RAMs. There are two "Grab User Data"
modes. In one, a quantity of words must be specified beforehand; the
other "Grab" operation grabs data between "Begin Detect" pulses.
274 • Remote Control
Syntax:
DetRam Load
Status:
RER_OK....................................... Successful.
RER_NO_HARDWARE ............... Detector RAM
hardware not present.
RER_NO_READ_FILE................. Either filename not
specified ("DetRam
File") or specified file
does not exist.
RER_WORD_COUNT .................. Either the specified
file is empty or the
word count is zero
("DetRam
WordCount").
User Guide BA622
Artisan Technology Group - Quality Instrumentation ... Guaranteed | (888) 88-SOURCE | www.artisantg.com
DetRam Mode
Used to set or query the mode of Detector RAM load operation. This
command is used in conjunction with the "DetRam Load" protocol.
The "None" mode indicates the Detector RAM loading operation is
disabled. If the Detector RAM is not being used, the mode parameter
should be set to "None". This prevents the Detector RAM from being
loaded when a configuration is restored, since this can be a lengthy
operation.
Setting the Detector RAM mode to "Pattern" automatically loads the
Detector RAMs with a synthesized test pattern specified in the
"DetRam Pattern" protocol. The quantity of words is based on a
repetition factor for the specified pattern. The Detector RAMs are
loaded as full as possible, such that there is a perfect multiple of the
repeating length of the specified pattern. For instance, the "quick brown
fox" test pattern repeats every 28 words; therefore, the quantity of
words loaded by this pattern must be a perfect multiple of 28.
Setting the mode to "File" will load the Detector RAMs with the
contents of the specified file, which must exist in the current data
directory. Setting the mode to "Grab Data (Words)" will cause the
Detector RAMs to be filled with the specified quantity of user data
words as grabbed from the Detector data input signal. Setting the
Detector RAM load mode to "Grab Data (Begin-Detect)" loads the
Detector RAMs with a quantity of words grabbed from the Detector
data input signal. The grab operation begins on the next occurrence of
the Begin-Detect signal and terminates on the subsequent occurrence of
this signal.
Set:
DetRam Mode <mode>
Query:
DetRam Mode ?
Params:
<mode>
Returns:
<mode>
Status:
RER_OK....................................... Successful.
RER_NO_HARDWARE ............... Detector RAM
hardware not present.
RER_BAD_PARAMETER............ <mode> not specified
or invalid.
Detector RAM mode setting, 0 to 4.
0
None
1
Pattern
2
File
3
Grab Data (Words)
4
Grab Data (Begin-Detect)
User Guide BA622
Artisan Technology Group - Quality Instrumentation ... Guaranteed | (888) 88-SOURCE | www.artisantg.com
Remote Control • 275
RER_PARAM_RANGE ................ <mode> greater than
4.
DetRam Pattern
Used to set or query the Detector RAM pattern, and used in conjunction
with the "DetRam Load" protocol to fill the Detector RAMs with a
specified test pattern type of data. These test patterns are synthesized
word sequences, such as alternating ones and zeroes, all zeroes, all
ones, etc. Each test pattern implies a pre-calculated word count that is
used when loading the Detector RAMs. This word count is based on
the number of words required to repeat the specified test pattern as
many times as possible in the maximum quantity of words in the
Detector RAMs, which is 262,144. The "Byte Ramp" test pattern
transmits a sequence of byte values representing a ramp {0, 1, 2, ...,
254, 255 (repeating)}. The "Word Ramp" is a series of word quantities
representing a ramp of word values {0, 1, 2, ..., 65534, 65535
(repeating)}. The "Quick Brown Fox" test is a series of 56 repeating
bytes of the following form:
"THE QUICK BROWN FOX JUMPED OVER THE LAZY DOG
0123456789 "
The "PRN-7 w/Error" pattern is a series of 127 repeating words
representing the same pseudo-random pattern that is generated and
detected by the BitAlyzer's hardware synchronizing pattern generators
and pattern detectors. There is one distinction between this pattern and
those generated by the BitAlyzer's hardware features, in that the first bit
of the first word is in error. Since the "PRN-7 w/Error" is 262,128
words long, this test pattern, if transmitted from the BitAlyzer and
received in the BitAlyzer's hardware PRN-7 Detector, should create an
error rate of one bit in 262,128 words, which corresponds to one error
in 4,194,048 bits, or an error rate of 2.38e-7. This is a good test pattern
to use in testing interfaces when using RAM patterns.
Set:
DetRam Pattern <pat-num>
Query:
DetRam Pattern ?
Params:
<pat-num> Number of pre-programmed pattern to be
used. The following table represents
possible test pattern types:
Pat-Num
0
1
2
3
276 • Remote Control
Test Pattern
Word Count
All ones 262,144
All zeroes 262,144
Alternating 1/0's 262,144
Byte Ramp
262,144
User Guide BA622
Artisan Technology Group - Quality Instrumentation ... Guaranteed | (888) 88-SOURCE | www.artisantg.com
4
5
6
Word Ramp
262,144
Quick Brown Fox 262,136
PRN-7 w/Error
262,128
Returns:
<pat-num>
Status:
RER_OK....................................... Successful.
RER_NO_HARDWARE ............... Detector RAM
hardware not present.
RER_BAD_PARAMETER............ <pat-num> not
specified or invalid.
RER_PARAM_RANGE ................ <pat-num> greater
than 6.
DetRam Save
Saves the contents of the Detector RAMs to a DOS computer file. This
feature may be used to grab the input from the Detector data input
signal to be used in the Generator RAM hardware features to retransmit
the grabbed data pattern. This feature can be used if an odd repeating
data pattern needs to be regenerated. The filename is specified as a
standard DOS computer filename and will be created in the specified
Finder directory.
Syntax:
DetRam Save <fname>
Params:
<fname>
Status:
RER_OK....................................... Successful.
RER_NO_HARDWARE ............... Detector RAM
hardware not present.
RER_BAD_PARAMETER............ <fname> not
specified or invalid
format.
RER_WORD_COUNT.................. The specified
Detector RAM word
count is zero. This
word count is set
automatically by a
load operation, or set
manually if the load
operation is a data
grab based on a word
quantity.
RER_MISC_ERROR..................... Disk full or disk write
error.
Filename to save Detector RAM (DOS
format: 8chars.3chars).
User Guide BA622
Artisan Technology Group - Quality Instrumentation ... Guaranteed | (888) 88-SOURCE | www.artisantg.com
Remote Control • 277
DetRam WordCount
Used to set or query the quantity of words to be grabbed during a
Detector RAM load operation. The Detector RAM loading mode is set
to grab user data from the Detector input signal based on a quantity of
words. In all other cases, the word count is pre-specified based on the
pattern or the file length in the other load modes.
This quantity is usually computed automatically, based on the type of
load operation, or set to the maximum quantity of 262,144 if the load
operation is a grab based on "Begin-Detect" pulses. This word count is
selected by the user if the Detector RAM loading operation mode is
selected to grab user data from the Detector data input signals.
Set:
DetRam WordCount <words>
Query:
DetRam WordCount ?
Params:
<words>
Returns:
<words>
Status:
RER_OK....................................... Successful.
RER_NO_HARDWARE ............... Detector RAM
hardware not present.
RER_BAD_PARAMETER............ <words> not specified
or invalid (must be
positive whole
number; commas and
scientific notation not
allowed).
RER_PARAM_RANGE ................ <words> out of range.
Number of words to be grabbed: 1 to
262,144 (unsigned long).
Directory
Acknowledgment from BitAlyzer for "Get" command (used as reply
only). This protocol is not used as a remote control command to the
BitAlyzer. Rather, it is generated by the BitAlyzer during file transfer
operations as a consequence of the "Get" command. During transfer of
files from the BitAlyzer to the host machine, the BitAlyzer
acknowledges the file to be transmitted by replying with the file's
directory information. This information should be used on the host
machine to recreate the file with identical directory information.
Params:
<fname>
File to be transferred from BitAlyzer to host.
<date>
Date of last modification to file:
mm/dd/yyyy
278 • Remote Control
User Guide BA622
Artisan Technology Group - Quality Instrumentation ... Guaranteed | (888) 88-SOURCE | www.artisantg.com
<time>
Time of last modification to the file:
hh:mm:ss
Returns:
Directory <fname> <date> <time>
Done
Use this command to terminate the sending of a file to the BitAlyzer.
See Remote Control Programming Techniques section of this manual
for more detailed information regarding file transfers. Also, when the
BitAlyzer has finished transferring a file to the host, it will respond
with a "Done" message.
Syntax:
Done
Status:
RER_OK....................................... Successful file
transfer.
RER_BAD_XFER......................... File transfer
unsuccessful or not
initiated with "Send"
command.
Ecc
Ecc Dimens
Establishes system parameters that are required for software ECC
emulation. The BitAlyzer's software ECC emulation system can
perform ECC interleaving geometry transformations and ECC error
removal during error analysis in PLAY and LIVE analyzer operational
modes. To use this feature, the ECC analyzer scanner must be enabled.
Once this scanner is enabled, further analyzers in the chain of enabled
analyzers will receive the results of performing the selected ECC
operations. This protocol, along with "Ecc Modes", is used to establish
ECC operating characteristics. This protocol defines the number of
bytes in an ECC row, the number of bytes in an ECC column, and the
number of tables grouped together to form one ECC group.
Set:
Ecc Dimens <rows> <cols> <tables>
Query:
Ecc Dimens ?
Params:
<rows>
Number of bytes per row: 0 to 65,535
(unsigned short).
<cols>
Number of bytes per column: 0 to 65,535.
<tables>
Number of tables per group: 0 to 65,535.
User Guide BA622
Artisan Technology Group - Quality Instrumentation ... Guaranteed | (888) 88-SOURCE | www.artisantg.com
Remote Control • 279
Returns:
<rows>,<cols>,<tables>
Status:
RER_OK....................................... Successful.
RER_BAD_PARAMETER............ One or more values
not specified or
invalid (must be
positive whole
number; commas and
scientific notation not
allowed).
Ecc LogFile
Used to set or query the posting of ECC data to a log file. If only a
filename is given (i.e., FOOBAR.DAT), then the Finder Directory will
be used; otherwise, directories can be specified along with the file (i.e.,
C:\USERS\BA5\DATA\FOOBAR.DAT). Note that the slash is “\”, not
“/”. By specifying a filename, the ECC data will be logged to an ASCII
comma-delimited file according to the ECC LogGroups size (see
below). To disable this feature, specify a filename "NONE" (the feature
is disabled by default). The format of the log file is defined on the first
line of the log file output.
Set:
Ecc LogFile <filename>
Query:
Ecc LogFile ?
Params:
<fname>
Returns:
<fname>
Status:
RER_OK....................................... Successful.
RER_BAD_PARAMETER............ <fname> not
specified or invalid
format.
Name of ECC Log File (standard DOS
format).
Ecc LogGroups
Sets or queries the number of groups that must be processed before
ECC statistics are posted to the log file.
280 • Remote Control
Set:
Ecc LogGroups <groups>
Query:
Ecc LogGroups ?
Params:
<groups>
Number of ECC groups per log (used in
conjunction with "Ecc LogFile"): 0 to 2e32 1.
User Guide BA622
Artisan Technology Group - Quality Instrumentation ... Guaranteed | (888) 88-SOURCE | www.artisantg.com
Returns:
<groups>
Status:
RER_OK....................................... Successful.
RER_BAD_PARAMETER............ <groups> not
specified or invalid
(must be positive
whole number;
commas and scientific
notation not allowed).
RER_PARAM_RANGE ................ <groups> less than 1.
Ecc Modes
Used to set or query the various modes for five different steps of the
BitAlyzer's software error correction emulation system. Using these
various modes, this system can be configured to perform interleaveonly operations, 1-Dimensional Reed-Solomon emulation, 2Dimensional Reed-Solomon emulation, and multiple-table ReedSolomon emulation. This last type of emulation is often referred to as
3-Dimensional Reed-Solomon; however, the last dimension is an
interleave-only dimension, and error correction is not performed.
Erasure processing is performed in the following manner: During C1,
blocks that cannot be completely corrected are tagged. After all the C1
blocks in a table have been processed, if erasure processing is enabled,
then the quantity of tags produced by the C1 processing is compared
with the erasure strength. If there is enough erasure strength to
accommodate all tags, the table is completely corrected and further C2
processing is not required. Otherwise, if there are more tags than the
erasure strength can accommodate, then C2 processing must be
performed.
Set:
Ecc Modes <fill> <c1> <erase> <c2> <drain>
Query:
Ecc Modes ?
Params:
<fill>
Specifies method used for filling ECC
tables.
<c1>
Specifies mode of C1 error correction
emulation.
<erase>
Enables erasure mode processing.
<c2>
Specifies mode of C2 error correction
emulation.
<drain>
Specifies method for draining the error
correction table.
User Guide BA622
Artisan Technology Group - Quality Instrumentation ... Guaranteed | (888) 88-SOURCE | www.artisantg.com
Remote Control • 281
Returns:
<fill>,<c1>,<erase>,<c2>,<drain>
Status:
RER_OK....................................... Successful.
RER_BAD_PARAMETER............ One or more values
not specified or
invalid.
Ecc Strengths
Used to set or query the amount of error correction that the BitAlyzer's
ECC emulation processing will perform.
Software emulated error correction is performed by filling software
data structures representing three-dimensional ECC tables with errors
from the incoming error data stream. This incoming stream may be a
previously recorded error data file, or live error data. Once a tablegroup is filled, error correction emulation is begun. The first step
involves comparing the number of errors in each C1 block with the C1
correction strength specified by this remote control protocol. If the
quantity of errors in a given block are less than or equal to the C1
correction strength, then these errors are removed from the table. If the
quantity of errors exceeds the correction strength, then no errors are
removed. The second step is called "erasure processing," and is only
used if the erasure mode is enabled. During the first step, all C1 Blocks
which are not corrected cause an erasure-tag counter to increment.
After C1 is completed, this quantity of erasure tags is compared with
the erasure strength specified by this remote control protocol. If the
erasure tags are less than or equal to the erasure strength, then all errors
from the table are removed and C2 processing is skipped. Otherwise,
the third step, C2 processing is performed. C2 processing is similar to
C1 processing. The quantity of errors from each C2 block is compared
with the C2 correction strength specified by this protocol. If the
quantity is less than or equal to the C2 correction strength, then these
errors are removed from the table. If the quantity of errors is greater
than the correction strength, then no errors from this C2 block are
removed. Any errors which remain after C2 processing are considered
uncorrectable errors.
282 • Remote Control
Set:
Ecc Strengths <c1> <c2> <erase>
Query:
Ecc Strengths ?
Params:
<c1>
Number of byte errors in each C1 block
(row) that can be located and corrected: 0 to
65,535 (unsigned short).
User Guide BA622
Artisan Technology Group - Quality Instrumentation ... Guaranteed | (888) 88-SOURCE | www.artisantg.com
<c2>
Number of byte errors in each C2 block
(column) that can be located and corrected:
0 to 65,535.
<erase>
Number of erasure flags that can be
accommodated between C1 and C2 error
correction: 0 to 65,535.
Returns:
<c1>,<c2>,<erase>
Status:
RER_OK....................................... Successful.
RER_BAD_PARAMETER............ One or more values
not specified or
invalid (must be
positive whole
number).
Ecc Values1
Used to query performance values from the ECC emulation procedures.
The Group Size value refers to the number of symbols (i.e., bytes)
contained in one error correction group. This is calculated by
multiplying the number of rows by the number of columns by the
number of tables.
Query:
Ecc Values1 ?
Params:
<grp size>
Group Size: 0 to 4,200,000,000
(unsigned long).
<grp proc>
Groups Processed: 0 to
4,200,000,000.
<Uncorrectable Errs> Uncorrectable Errors: 0 to
4,200,000,000. (unsigned long).
Returns:
<grp size>,<grp proc>,<Uncorrectable Errs>
Ecc Values2
Used to query various statistics for the C1 block from the ECC
emulation procedures. In all cases, "Symbols" refers to bytes.
Query:
Ecc Values2 ?
Params:
<c1 sym err>
C1 Symbol Errors on input: 0 to
4,200,000,000 (unsigned long).
<c1 err blks>
C1 Blocks with Error: 0 to
4,200,000,000.
User Guide BA622
Artisan Technology Group - Quality Instrumentation ... Guaranteed | (888) 88-SOURCE | www.artisantg.com
Remote Control • 283
<c1 sym correct> C1 Symbol Corrections: 0 to
4,200,000,000.
<c1 blk fail>
Returns:
C1 Blocks Failed: 0 to 4,200,000,000.
<c1 sym err>,<c1 err blks>,<c1 sym correct>,<c1 blk
fail>
Ecc Values3
Used to query various statistics for the Erasures from the ECC
emulation procedures. In all cases, "Symbols" refers to bytes. The
number of erasure flags produced is the same as the "C1 Block
Failures".
Query:
Ecc Values3 ?
Params:
<used>
Erasures Used: 0 to 4,200,000,000
(unsigned long).
<sym correct> Symbols Corrected by Erasure
Processing: 0 to 4,200,000,000.
Returns:
<used>,<sym correct>
Ecc Values4
Used to query various statistics for the C2 block from the ECC
emulation procedures. In all cases, "Symbols" refers to bytes.
Query:
Ecc Values4 ?
Params:
<c2 sym err>
C2 Symbol Errors on input: 0 to
4,200,000,000 (unsigned long).
<c2 err blks>
C2 Blocks with Error: 0 to
4,200,000,000.
<c2 sym correct> C2 Symbol Corrections: 0 to
4,200,000,000.
<c2 blk fail>
Returns:
284 • Remote Control
C2 Blocks Failed: 0 to 4,200,000,000.
<c2 sym err>,<c2 err blks>,<c2 sym correct>,<c2 blk
fail>
User Guide BA622
Artisan Technology Group - Quality Instrumentation ... Guaranteed | (888) 88-SOURCE | www.artisantg.com
Efi
Efi BinMap
Used to set or query histogram bin parameters for the EFI Histogram.
These three parameters and their use in creating virtual counter ranges
are described in the Programming Techniques section of this manual.
Set:
Efi BinMap <bin count> <offset> <shift>
Query:
Efi BinMap ?
Params:
<bin count> Quantity of histogram counters; not
programmable by the user.
<offset>
Defines position of first histogram counter:
0 to 4,200,000,000 (unsigned long).
<shift>
Power of two scalar for histogram counters
(increases range, but decreases resolution).
Returns:
<bin count>,<offset>,<shift>
Status:
RER_OK....................................... Successful.
RER_BAD_PARAMETER............ One or more
parameters not
specified or invalid
(must be positive
whole numbers;
commas and scientific
notation not allowed).
RER_MISC_ERROR..................... Bin data currently
being used in some
operation.
RER_MEMORY_ERR .................. Insufficient memory
(RAM) remaining on
BitAlyzer for the bins.
Efi Bins
Retrieves counters representing the EFI histogram bins. Each counter is
a four-byte value defined in byte ordering, a characteristic of Intel
80X86 architectures. After transmitting this request, the host should
immediately anticipate receiving the bin count times four bytes. These
bytes are transmitted in raw binary form. It is recommended that before
using this command, "Efi BinMap" be used to determine the bin count.
Query:
Efi Bins ?
User Guide BA622
Artisan Technology Group - Quality Instrumentation ... Guaranteed | (888) 88-SOURCE | www.artisantg.com
Remote Control • 285
Returns:
binary data; 4 bytes per bin counter (unsigned long)
Status:
RER_OK....................................... Successful.
RER_MEMORY_ERROR ........... Insufficient memory
(RAM) remaining on
BitAlyzer for the bins.
Efi Cursor
Used to set or query the positions for the two cursors supported by the
EFI histogram. If the EFI histogram is open at the time of execution, it
will be redrawn.
Set:
Efi Cursor <curs-a> <curs-b>
Query:
Efi Cursor ?
Params:
<curs-a>
X-axis value for CursorA: 0 to 1e100
(double).
<hist-a>
Value of histogram at location of Cursor A:
0 to 1e100 (double).
<curs-b>
X-axis value for Cursor B: 0 to 1e100
(double).
<hist-b>
Value of histogram at location of CursorB: 0
to 1e100 (double).
<hist-total> Sum of all histogram values from Cursor A
through Cursor B: 0 to 1e100 (double).
Returns:
<curs-a>,<hist-a>,<curs-b>,<hist-b>,<hist-total>
Status:
RER_OK....................................... Successful.
RER_BAD_PARAMETER.......... One or more
parameters not
specified of invalid
(must be positive
numbers).
Efi Flags
Used to set or query the EFI histogram flags. Each state is assigned to a
specific bit of a 32-bit value, which is passed as the parameter "<bitfield>".
286 • Remote Control
Set:
Efi Flags <bit-field>
Query:
Efi Flags ?
User Guide BA622
Artisan Technology Group - Quality Instrumentation ... Guaranteed | (888) 88-SOURCE | www.artisantg.com
Params:
<bit-field>... Boolean states for multiple binary flags
associated with the histogram (unsigned
long). EFI flag bit assignments include:
Bit #
0
Use Log Scale
1
Show Grid
2
Show CursorA
3
Show CursorB
4
Info
5
Show Buttons
Returns:
<bit-field>
Status:
RER_OK..................................... Successful.
RER_BAD_PARAMETER.......... <bit-field> not
specified or invalid.
Efi View
Used to set or query the EFI view parameters. These values are
represented in terms of the chart's X and Y-axes. For instance, a valid
Y-offset in the strip chart may be 1e-2, whereas a valid Y-offset in a
histogram may be 100. The X-scale and Y-scale values are signed long
integers representing magnification factors used to enlarge or reduce
the X and Y scales independently. These magnification factors are
combined with exponential mathematical functions and are therefore
often difficult to calculate analytically. An effective way of utilizing
this protocol would be to establish a chart view manually, using the
knob and/or touch features of chart viewing, and then to retrieve the
current settings for offset and scales using the "Efi View ?" protocol.
Set:
Efi View <xofs> <yofs> <xscale> <yscale>
Query:
Efi View ?
Params:
<xofs>......... X-axis offset for origin of chart: 0 to 1e100
(double).
<yofs>......... Y-axis offset for origin of chart: 0 to 1e100
(double).
<xscale>...... X-axis magnification factor (signed long).
<yscale>...... Y-axis magnification factor (signed long).
Returns:
<xofs>,<yofs>,<xscale>,<yscale>
Status:
RER_OK..................................... Successful.
RER_BAD_PARAMETER.......... One or more values not
specified or invalid
(offsets must be
User Guide BA622
Artisan Technology Group - Quality Instrumentation ... Guaranteed | (888) 88-SOURCE | www.artisantg.com
Remote Control • 287
positive numbers;
magnification factors
must be whole
numbers).
Finder
Finder Copy
Used to copy a BitAlyzer file to another directory/BitAlyzer file. This
copy operation accesses a source file and creates a destination file
within the BitAlyzer. The source file is specified either as a complete
DOS pathname or as a filename only. If it is a filename only, the file
must exist in the current Finder directory. The destination path may
also be specified as a complete DOS pathname or as just a filename. If
only a filename is given, the destination directory will be the current
Finder directory.
Syntax:
Finder Copy <src-pathname> <dest-pathname>
Params:
<src-pathname> .Path and name of source file (standard
DOS format).
<dest-pathname> Path and name of destination file
(standard DOS format).
Status:
RER_OK..................................... Operation successful.
RER_BAD_PARAMETER.......... Either source or
destination file not
specified or invalid
format.
RER_MISC_ERROR................... Either source file was
not found, destination
file could not be
created, or a write error
occurred while writing
to the destination file.
Write errors usually
indicate the disk is full.
Finder Delete
Used to delete a file from the BitAlyzer's file system. The file is
specified either as a complete DOS pathname or as a filename only. If
it is a filename only, the file's directory is taken to be the current Finder
directory.
288 • Remote Control
User Guide BA622
Artisan Technology Group - Quality Instrumentation ... Guaranteed | (888) 88-SOURCE | www.artisantg.com
Syntax:
Finder Delete <pathname>
Params:
<pathname> Path and name of file to delete (standard
DOS format).
Status:
RER_OK..................................... Operation successful.
RER_BAD_PARAMETER.......... <pathname> not
specified or invalid
format.
RER_MISC_ERROR................... The specified file does
not exist or the
specified file could not
be deleted.
Finder Direc
Used to set or query the current Finder directory. This directory is used
when the BitAlyzer accesses any data files, including both error data
files and configuration files. The Finder directory is specified as a
complete DOS pathname. It must be preceded by a drive letter and a
colon, and must be specified with a trailing backslash ("\") character.
Good examples include "c:\", "c:\usr\". Bad examples include "\usr\",
".", "c:".
Set:
Finder Direc <dir-name>
Query:
Finder Direc ?
Params:
<dir-name> . Pathname of finder directory (standard DOS
format).
Returns:
<dir-name>
Status:
RER_OK..................................... Operation successful
RER_BAD_PARAMETER.......... Directory parameter
missing or incorrectly
specified (not
containing a colon as
its second character, or
not containing a
backslash as its last
character)
RER_MISC_ERROR................... Drive indicated as the
first character of the
pathname does not
exist, or specified
directory does not exist
User Guide BA622
Artisan Technology Group - Quality Instrumentation ... Guaranteed | (888) 88-SOURCE | www.artisantg.com
Remote Control • 289
Finder Free
Used to query the amount of free memory available on the disk
indicated by the Finder directory. The current Finder disk is specified
as the first character in the "Finder Direc" command.
Query:
Finder Free ?
Params:
space.
<kbytes>
Returns:
<kbytes>
Number of kilobytes (1024 bytes) free
Finder Rename
Renames an existing file in the BitAlyzer's file system. The "from" file
may be specified as a complete DOS pathname or as only a filename. If
it is a filename, the current Finder directory is assumed. The "to" path
cannot be specified.
Syntax:
Finder Rename <from-name> <to-name>
Params:
<from-name> . Path and name of file to be renamed.
<to-name>...... New name of file.
Status:
RER_OK..................................... Operation successful.
RER_BAD_PARAMETER.......... "from" or "to" name
not indicated or invalid
format.
RER_MISC_ERROR................... Destination file already
exists, or rename
operation was
unsuccessful.
G821
G821 BitsPerSecond
A 10 MHz channel would have the value "10000000". The Bits Per
Second parameter may not be zero, or a negative value.
290 • Remote Control
Set:
G821 BitsPerSecond <BitsPerSecond>
Query:
G821 BitsPerSecond ?
Params:
<BitsPerSecond>... Returns the present setting for the
Bits Per Second parameter. May not
be zero.
User Guide BA622
Artisan Technology Group - Quality Instrumentation ... Guaranteed | (888) 88-SOURCE | www.artisantg.com
Returns:
<BitsPerSecond>
Status:
RER_OK..................................... Successful.
RER_BAD_PARAMETER.......... <BitsPerSecond> is
zero or a negative
value.
G821 Log
If only a filename is specified (i.e., FOOBAR.DAT), then the Finder
Directory will be used; otherwise, directories can be specified along
with the file (i.e., C:\USERS\BA5\DATA\FOOBAR.DAT). Note that
the slash is “\”, not “/”. The Log File Name must be a valid DOS
filename. Selecting the filename to be "NONE", or selecting the
Seconds Interval to be zero, disables the logging feature.
Set:
G821 Log <SecondsInterval> <FileName>
Query:
G821 Log ?
Params:
<SecondsInterval>. Number of seconds that are grouped
together to form each line of output to
the log file.
<FileName> .......... Name of the log file to be created.
Returns:
<SecondsInterval>,<FileName>
Status:
RER_OK..................................... Successful.
RER_BAD_PARAMETER.......... <FileName> is not a
valid DOS filename.
G821 Minute Threshold
Set:
G821 Minute Threshold <ErrorsPerMinute>
Query:
G821 Minute Threshold ?
Params:
<ErrorsPerMinute> ...The minimum number of errors
within one minute that qualifies the
minute to be identified as a
Severely Errored Minute.
Returns:
<ErrorsPerMinute>
Status:
RER_OK..................................... Successful.
G821 Threshold
The Severe Threshold is user-selectable, although CCITT
Recommendation G.821 implies a 1e-3 error rate for this condition. For
User Guide BA622
Artisan Technology Group - Quality Instrumentation ... Guaranteed | (888) 88-SOURCE | www.artisantg.com
Remote Control • 291
a 64,000 Bits Per Second rate, this would suggest a Severe Threshold
of 64.
292 • Remote Control
Set:
G821 Threshold <SevereThreshold>
Query:
G821 Threshold ?
Params:
<SevereThreshold> ...The minimum number of errors
within one second that qualifies the
second to be identified as a
Severely Errored Second.
Returns:
<SevereThreshold>
Status:
RER_OK..................................... Successful.
User Guide BA622
Artisan Technology Group - Quality Instrumentation ... Guaranteed | (888) 88-SOURCE | www.artisantg.com
G821 Values1
Query:
G821 Values1 ?
Params:
TotalTestSeconds ................ Number of seconds since
beginning of test.
SeverelyErroredSeconds ...... Number of seconds with
enough errors to meet the
Severe Threshold.
AvailableSeconds ................ The number of seconds for
which the link is available,
described as the sum of all
seconds which are not
portions of "Break"
intervals.
AvailableErrorFreeSeconds . Number of seconds with no
errors.
AvailableErroredSeconds .... The quantity of seconds
during Available time which
have errors in them. This
includes Non-Severely
Errored Seconds (Ok
Seconds), and possibly
Severely Errored Seconds as
well, because it takes 10
consecutive Severely
Errored Seconds to terminate
Available time.
NumberOfBreaks................. The number of times that 10
consecutive Severely
Errored seconds are
encountered during
Available time, which
initiates a Break in the line
and begins Unavailable time.
SecondsOfBreak.................. The sum of all seconds
during which the link is
Unavailable.
AvailableOkSeconds............ The quantity of seconds
during Available time which
have at least one error, but
User Guide BA622
Artisan Technology Group - Quality Instrumentation ... Guaranteed | (888) 88-SOURCE | www.artisantg.com
Remote Control • 293
do not exceed the Severe
Threshold. These are also
known as Available NonSeverely Errored Seconds.
Returns:
TotalTestSeconds, SeverelyErrored Seconds,
AvailableSeconds, AvailableErrorFreeSeconds,
AvailableErroredSeconds, NumberOfBreaks,
SecondsOfBreak, AvailableOkSeconds
Status:
RER_OK....................................... Successful.
Query:
G821 Values2 ?
Params:
AvailableErrors ................. The quantity of bit errors
encountered during Available
time (unsigned long).
G821 Values2
AvailableBits..................... The quantity of bits
represented by the number of
seconds in Available time
(double).
AvailableBER.................... The ratio of Available Errors
to Available Bits (double).
AvailableOkSecondsPrcnt . The ratio, expressed as a
percentage, of Ok Seconds to
Available Seconds (double).
AvailableSecondsPrcnt ...... The ratio, expressed as a
percentage, of Available
Seconds to Total Test
Seconds (double).
LinkState........................... A determination of the state
of the link (0-4).
0 = Disabled ........ The G.821 analysis feature is
not currently operating.
1 = Available ....... The link is up and available.
2 = Degrading...... A number of Severely
Errored Seconds have been
encountered, but not enough
to meet the Break condition
yet.
294 • Remote Control
User Guide BA622
Artisan Technology Group - Quality Instrumentation ... Guaranteed | (888) 88-SOURCE | www.artisantg.com
3 = Unavailable ... A break condition has
occurred and the link is
currently Unavailable.
4 = Improving...... The link is currently in an
Unavailable state, but a
number of Non-Severely
Errored Seconds have been
encountered, although not
enough to terminate the break
state yet.
Returns:
AvailableErrors, AvailableBits, AvailableBER,
AvailableOkSecondsPrcnt, AvailableSecondsPrcnt,
LinkState
Status:
RER_OK..................................... Successful.
Query:
G821 Values3 ?
Params:
<TotalAvailableMinutes>.The number of minutes
represented by the Available
Seconds divided by 60. If there
are any remaining seconds
from the division, Total
Available Minutes is rounded
up (unsigned long).
G821 Values3
<DegradedMinutes>.........The quantity of minutes for
which the number of errors
exceeded the Degraded Minute
Error Threshold. Degraded
Minutes consist only of
seconds which are in Available
time and which are not
Severely Errored Seconds
(unsigned long).
<DegradedMinutesPrcnt>.The ratio, as expressed as a
percentage, of Degraded
Minutes to Total Available
Minutes (double).
<ExcludedSES> ...............The quantity of Severely
Errored Seconds which occur
User Guide BA622
Artisan Technology Group - Quality Instrumentation ... Guaranteed | (888) 88-SOURCE | www.artisantg.com
Remote Control • 295
during the Available time
(unsigned long).
Returns:
<TotalAvailableMinutes>, <DegradedMinutes>,
<DegradedMinutesPrcnt>, <ExcludedSES>
Status:
RER_OK....................................... Successful.
Gen
Gen 16Bit
Used to set or query the 16-bit fixed pattern generated by the
BitAlyzer's data pattern Generator when it is in the 16-bit generating
mode.
Set:
Gen 16Bit <pattern>
Query:
Gen 16Bit ?
Params:
<pattern> .... A 16-bit (2 byte) pattern to be generated
(decimal unsigned short).
Returns:
<pattern>
Status:
RER_OK..................................... Operation successful.
RER_NO_HARDWARE ............. Generator hardware
does not exist.
RER_BAD_PARAMETER.......... <pattern> not specified
or invalid.
RER_PARAM_RANGE .............. Parameter out of the
range of 0-65535.
Gen Clock
This selection identifies which source the Generator uses for its input
clock signal. The Internal clock selection is only useful if the
BitAlyzer622 is equipped with the internal clock source option.
296 • Remote Control
Set:
Gen Clock <type>
Query:
Gen Clock ?
Params:
<type>......... Clock source type:
0
Internal
1
External
Returns:
<type>
Status:
RER_OK..................................... Successful.
User Guide BA622
Artisan Technology Group - Quality Instrumentation ... Guaranteed | (888) 88-SOURCE | www.artisantg.com
RER_NO_HARDWARE ............. Generator hardware
not present.
RER_BAD_PARAMETER.......... <type> not specified or
invalid.
RER_PARAM_RANGE .............. <type> greater than 1.
Gen CountDown
Used to set or query the Generator's Error Injector Countdown
parameter value, used when the Generator's error injector is enabled.
Each error injector mode represents a quantity of bits enqueued as
errors. To calculate an error rate using the current error injector mode
and the current Error Injector Countdown, use the following function:
(Quantity of Bit Errors)
Injector
= ________________________
Bit Error
Rate
(Countdown Value + 1) * 16
Set:
Gen Countdown <words>
Query:
Gen Countdown ?
Params:
<words>...... Number of words of good data transmitted
in between occurrences of errors as specified
by the error injector mode (unsigned long).
Returns:
<words>
Status:
RER_OK..................................... Successful.
RER_NO_HARDWARE ............. Generator hardware
not present.
RER_BAD_PARAMETER.......... <words> not specified
or invalid (must be
positive whole
number).
RER_PARAM_RANGE .............. <words> out of range.
Gen DataDelay
Sets or queries the amount of delay added to the generator output data
signal. Note that <delay_in_nanoseconds> is rounded to the closest
delay step. There are 128 delay steps that correspond to delay values
between
–1.147 ns and +1.165 ns.
Set:
Gen DataDelay <delay_in_nanoseconds>
Query:
Gen DataDelay ?
User Guide BA622
Artisan Technology Group - Quality Instrumentation ... Guaranteed | (888) 88-SOURCE | www.artisantg.com
Remote Control • 297
Params:
<delay_in_nanoseconds>... Amount of delay added to the
generator data signal with
respect to the generator
output clock. Range is –1.147
ns to +1.165 ns.
Returns:
<delay_in_nanoseconds>
Status:
RER_OK..................................... Successful.
RER_BAD_PARAMETER
<delay_in_nanos
econds> not specified
or invalid.
RER_PARAM_RANGE
<delay_in_nanos
econds> is outside of
valid range.
Gen Flags
Establishes Boolean states for multiple binary flags associated with the
Generator. Each state is assigned to a specific bit of a 32-bit unsigned
integer value, which is passed as the parameter "<bit-field>".
Set:
Gen Flags <bit-field>
Query:
Gen Flags ?
Params:
<bit-field> ... Boolean states for multiple binary flags
associated with the Generator (unsigned
long). Bit fields are assigned the following
states:
Bit #
0
NRZi
1
Parity
2
InvInClk
3
InvBegin
4
InvData
5
EnaBegin
Returns:
<bit-field>
Status:
RER_OK..................................... Successful.
RER_BAD_PARAMETER.......... <bit-field> not
specified or invalid.
Gen Freq
Returns a number indicating the current operating frequency of the
Generator circuits. This frequency is determined by measuring the
298 • Remote Control
User Guide BA622
Artisan Technology Group - Quality Instrumentation ... Guaranteed | (888) 88-SOURCE | www.artisantg.com
input frequency to the Generator. If the frequency is changing, this
return value is only an estimate. It takes a few seconds for the
BitAlyzer622 to measure the frequency accurately.
Query:
Gen Freq ?
Params:
<hertz> ....... Generator circuit frequency in Hertz
(unsigned long). Range is from 0 (DC) to
625,000,000 (Hz).
Returns:
<hertz>
Gen If
Selects the Generator's output interface to be either bit-serial, byteparallel, or word-parallel. Word-parallel refers to 16-bit words. The two
parallel interfaces are located on the back of the chassis, and the serial
interfaces are on the front SMA connectors.
This selection also affects the Generator's clock source interface type.
Set:
Gen If <type>
Query:
Gen If ?
Params:
<type>......... Interface type for Generator:
0
Bit
1
Byte
2
Word.
Returns:
<type>
Status:
RER_OK..................................... Successful.
RER_NO_HARDWARE ............. Generator hardware
not present.
RER_BAD_PARAMETER.......... <type> not specified or
invalid.
RER_PARAM_RANGE .............. <type> greater than 2.
Gen Inj
Used to set or query the mode of the Generator's error injector. If the
error injector is disabled, the mode is set to zero and no errors are
injected. The mode refers to the number of bit errors injected into the
Generator's outgoing data stream at word intervals defined by the
Generator countdown value. This protocol is used in conjunction with
the "Gen CountDown" protocol, which is used to select a word distance
between specified error injections.
Set:
Gen Inj <mode>
User Guide BA622
Artisan Technology Group - Quality Instrumentation ... Guaranteed | (888) 88-SOURCE | www.artisantg.com
Remote Control • 299
Query:
Gen Inj ?
Params:
<mode>....... Injector mode number, 0 to 3. The following
injector modes are defined:
0
None
1
1-bit error
2
16-bit error
3
32-bit error
Returns:
<mode>
Status:
RER_OK..................................... Successful.
RER_NO_HARDWARE ............. Generator hardware
not present.
RER_BAD_PARAMETER.......... <mode> not specified
or invalid.
RER_PARAM_RANGE .............. <mode> greater than 3.
Gen Pattern
Used to set or query the Generator pattern type which is transmitted by
the BitAlyzer's data generating circuits. The pattern may either be a
hardware-implemented, repeating pattern, including pseudo-random
and 16-bit fixed patterns, or it may be the contents of the Generator
RAM memory. When used with the Generator RAM feature, this
protocol requires that the Generator RAMs be loaded previously using
the "GenRam Load" protocol.
300 • Remote Control
Set:
Gen Pattern <pat-num>
Query:
Gen Pattern ?
Params:
<pat-num> .. Pattern type number, 0 to 5. Available types
are as follows:
0
PRN-7
1
PRN-15
2
PRN-20
3
PRN-23
4
16-bit
5
Use RAM
Returns:
<pat-num>
Status:
RER_OK..................................... Successful.
RER_NO_HARDWARE ............. Generator hardware
not present.
RER_BAD_PARAMETER.......... <pat-num> not
specified or invalid.
User Guide BA622
Artisan Technology Group - Quality Instrumentation ... Guaranteed | (888) 88-SOURCE | www.artisantg.com
RER_PARAM_RANGE .............. <pat-num> greater
than 5.
Gen Status
Returns the status of the BitAlyzer's Generator circuitry. This status can
be used to indicate which pattern the Generator is currently
synchronized with.
Query:
Gen Status ?
Params:
<status> ...... Current status of Generator. The following
status codes are represented:
0
No Clock
1
No Hardware
2
PRN-7
3
PRN-15
4
PRN-20
5
PRN-23
6
16-bit
7
Use RAM
Returns:
<status>
GenRam
GenRam File
Used to set or query the filename to be used with Generator RAM. This
file is accessed when the Generator RAM is loaded using the "GenRam
Load" protocol. The file must be specified in a DOS file format. If only
a filename is given (i.e., FOOBAR.DAT), then the Finder Directory
will be used; otherwise, directories can be specified along with the file
(i.e., C:\USERS\BA5\DATA\FOOBAR.DAT). Note that the slash is
“\”, not “/”. Using this protocol does not effect a load of the filename;
you must first set this filename and set the Generator loading mode
using the "GenRam Load" protocol, and then perform a load operation
using the "GenRam Load" protocol.
Set:
GenRam File <filename>
Query:
GenRam File ?
Params:
<filename>.. Generator RAM filename (standard DOS
format).
Returns:
<filename>
Status:
RER_OK..................................... Successful.
User Guide BA622
Artisan Technology Group - Quality Instrumentation ... Guaranteed | (888) 88-SOURCE | www.artisantg.com
Remote Control • 301
RER_NO_HARDWARE ............. Generator RAM
hardware not present.
RER_BAD_PARAMETER.......... <filename> not
specified or invalid
format.
GenRam Load
Initiates the currently selected mode of Generator RAM loading. The
type of load operation is defined using the "GenRam Mode" protocol,
and is used to select loading the Generator RAMs with a DOS file of
user data grabbed from the Generator data inputs, or with a synthesized
test pattern, such as alternating ones and zeroes. The "GenRam Load"
protocol operates differently based on the value of the "GenRam
Mode" selection. In a "Pattern" mode, the Generator RAM is loaded
with a quantity of words based on the type of pattern selected. In a
"File" mode, the file is accessed in the current data directory and the
entire file is loaded into the Generator RAMs.
Syntax:
GenRam Load
Status:
RER_OK..................................... Operation successful
RER_NO_HARDWARE ............. Generator RAM
hardware not present.
RER_NO_READ_FILE............... Either <filename>
(from “GenRam File”)
not specified, or
specified file does not
exist
RER_WORD_COUNT ................ Specified file is empty
GenRam Mode
Used to set or query the mode of the Generator RAM load operation.
This command is used in conjunction with the "GenRam Load"
protocol.
The "None" mode indicates the Generator RAM loading operation is
disabled. If the Generator RAM is not being used, the mode parameter
should be set to "None". This prevents the Generator RAM from being
loaded when a configuration is restored, since this can be a lengthy
operation.
Setting the Generator RAM mode to "Pattern" automatically loads the
Generator RAMs with a synthesized test pattern specified in the
"GenRam Pattern" protocol. The quantity of words is based on a
repetition factor for the specified pattern. The Generator RAMs are
302 • Remote Control
User Guide BA622
Artisan Technology Group - Quality Instrumentation ... Guaranteed | (888) 88-SOURCE | www.artisantg.com
loaded as full as possible, such that there is a perfect multiple of the
repeating length of the specified pattern. For instance, the "Quick
Brown Fox" test pattern repeats every 28 words; therefore, the quantity
of words loaded by this pattern must be a perfect multiple of 28.
Setting the mode to "File" will load the Generator RAMs with the
contents of the specified file, which must exist in the current data
directory.
Set:
GenRam Mode <mode>
Query:
GenRam Mode ?
Params:
<mode>....... Generator RAM mode setting. Possible
modes include:
0
None
1
Pattern
2
File
Returns:
<mode>
Status:
RER_OK..................................... Successful.
RER_NO_HARDWARE ............. Generator RAM
hardware not present.
RER_BAD_PARAMETER.......... <mode> not specified
or invalid.
RER_PARAM_RANGE .............. <mode> greater than 2.
GenRam Pattern
Used in conjunction with the "GenRam Load" protocol to fill the
Generator RAMs with a specified test pattern type of data. These test
patterns are synthesized word sequences, such as alternating ones and
zeroes, all zeroes, all ones, etc. The following table represents possible
test pattern types:
Each test pattern implies a pre-calculated word count that is used when
loading the Generator RAMs. This word count is based on the number
of words required to repeat the specified test pattern as many times as
possible in the maximum quantity of words in the Generator RAMs,
which is 262,144. The "Byte Ramp" test pattern transmits a sequence of
byte values representing a ramp {0, 1, 2, ..., 254, 255 (repeating)}. The
"Word Ramp" is a series of word quantities representing a ramp of
word values {0, 1, 2, ..., 65534, 65535 (repeating)}. The "Quick Brown
Fox" test is a series of 56 repeating bytes of the following form:
"THE QUICK BROWN FOX JUMPED OVER THE LAZY DOG
0123456789 "
User Guide BA622
Artisan Technology Group - Quality Instrumentation ... Guaranteed | (888) 88-SOURCE | www.artisantg.com
Remote Control • 303
The "PRN-7 w/Error" pattern is a series of 127 repeating words
representing the same pseudo-random pattern that is generated and
detected by the BitAlyzer's hardware synchronizing pattern generators
and pattern detectors. There is one distinction between this pattern and
those generated by the BitAlyzer's hardware features, in that the first bit
of the first word is in error. Since the "PRN-7 w/Error" is 262,128
words long, this test pattern, if transmitted from the BitAlyzer and
received in the BitAlyzer's hardware PRN-7 Detector, should create an
error rate of one bit in 262,128 words, which corresponds to one error
in 4,194,048 bits, or an error rate of 2.38e-7. This is a good test pattern
to use in testing interfaces when using RAM patterns.
Set:
GenRam Pattern <pat-num>
Query:
GenRam Pattern ?
Params:
<pat-num> .. Pre-programmed pattern number, 0 to 6.
Pat-Num Test Pattern
Word Count
0
All ones
262,144
1
All zeroes
262,144
2
Alternating 1/0's 262,144
3
Byte Ramp
262,144
4
Word Ramp
262,144
5
Quick Brown Fox 262,136
6
PRN-7 w/Error
262,128
Returns:
<pat-num>
Status:
RER_OK..................................... Successful.
RER_NO_HARDWARE ............. Generator RAM
hardware not present.
RER_BAD_PARAMETER.......... <pat-num> not
specified or invalid.
RER_PARAM_RANGE .............. <pat-num> greater
than 6.
GenRam WordCount
Used to set or query the quantity of words to be grabbed during a
Generator RAM load operation. The word count is pre-specified based
on the pattern or the file length in the load modes. This quantity is
usually computed automatically, based on the type of load operation.
304 • Remote Control
Set:
GenRam WordCount <words>
Query:
GenRam WordCount ?
Params:
<words> ...... Number of words to be grabbed: 0 to
262,144 (unsigned long).
User Guide BA622
Artisan Technology Group - Quality Instrumentation ... Guaranteed | (888) 88-SOURCE | www.artisantg.com
Returns:
<words>
Status:
RER_OK..................................... Successful.
RER_NO_HARDWARE ............. Generator RAM
hardware not present.
RER_BAD_PARAMETER.......... <words> not specified
or invalid (must be
positive whole number;
commas and scientific
notation not allowed).
RER_PARAM_RANGE .............. <words> out of range.
Get
Initiates file transfer from the BitAlyzer to the host machine. The "Get"
command is used in conjunction with the file transfer protocol
described in the Programming Techniques section of this manual.
The filename is specified in complete DOS format. This file does not
necessarily reside in the BitAlyzer's data directory. In all unsuccessful
invocations of this command, the "Abort" command is issued from the
BitAlyzer. Successful invocations of this command cause a "Directory"
command to be generated, indicating the date and time from the
directory entry of the specified file. This information should be used
when creating the local copy of the received file, in order to remain
consistent with the directory entry on the BitAlyzer.
Syntax:
Get <pathname>
Params:
<pathname> Path and name of file on BitAlyzer (standard
DOS format).
<date>......... Last date of modification for the file:
mm/dd/yyyy
<time> ........ Last time of modification for the file:
hh:mm:ss
Returns:
Directory <date> <time>
Status:
RER_OK..................................... Successful.
RER_BAD_XFER....................... A file transfer
operation was already
in progress.
RER_BAD_PARAMETER.......... <pathname> not
specified or invalid.
RER_MEMORY_ERR ................ System memory not
available for temporary
buffer.
User Guide BA622
Artisan Technology Group - Quality Instrumentation ... Guaranteed | (888) 88-SOURCE | www.artisantg.com
Remote Control • 305
RER_NO_READ_FILE............... Specified file was not
found.
Interval
Interval BinMap
Used to set or query histogram bin parameters for the Interval
Histogram. These three parameters and their use in creating virtual
counter ranges are described in the Programming Techniques section of
this manual.
Set:
Interval BinMap <bin count> <offset> <shift>
Query:
Interval BinMap ?
Params:
<count>....... Quantity of histogram counters; not
programmable by the user.
<offset>....... Defines position of first histogram counter:
0 to 4,200,000,000 (unsigned long).
<shift> ........ Power of two scalar for histogram counters
(increases range, but decreases resolution).
Returns:
<count>,<offset>,<shift>
Status:
RER_OK..................................... Successful.
RER_BAD_PARAMETER.......... One or more
parameters not
specified or invalid
(must be positive
whole numbers;
commas and scientific
notation not allowed).
RER_MISC_ERROR................... Bin data currently
being used in some
operation.
RER_MEMORY_ERR ................ Insufficient memory
(RAM) remaining on
BitAlyzer for the bins.
Interval Bins
Retrieves counters representing the Interval Histogram bins. Each
counter is a four-byte value defined in byte ordering, a characteristic of
Intel 80X86 architectures. After transmitting this request, the host
should immediately anticipate receiving the bin count times four bytes.
306 • Remote Control
User Guide BA622
Artisan Technology Group - Quality Instrumentation ... Guaranteed | (888) 88-SOURCE | www.artisantg.com
These bytes are transmitted in raw binary form. It is recommended that
before using this command, "Interval BinMap" be used to determine
the bin count.
Query:
Interval Bins ?
Returns:
binary data; 4 bytes per bin counter (unsigned long)
Status:
RER_OK....................................... Successful.
RER_MEMORY_ERROR........... Insufficient memory
(RAM) remaining on
BitAlyzer for the bins.
Interval Cursor
Used to set or query the positions for the two cursors supported by the
Interval Histogram. If the Interval histogram is open at the time of
execution, it will be redrawn.
Set:
Interval Cursor <curs-a> <curs-b>
Query:
Interval Cursor ?
Params:
<curs-a>...... X-axis value for CursorA: 0 to 1e100
(double).
<hist-a> ...... Value of histogram at location of Cursor A:
0 to 1e100 (double).
<curs-b>...... X-axis value for CursorB: 0 to 1e100
(double).
<hist-b> ...... Value of histogram at location of Cursor B:
0 to 1e100 (double).
<hist-total> . Sum of all histogram values from Cursor A
through Cursor B: 0 to 1e100 (double).
Returns:
<curs-a>,<hist-a>,<curs-b>,<hist-b>,<hist-total>
Status:
RER_OK..................................... Successful.
RER_BAD_PARAMETER.......... One or more
parameters not
specified of invalid
(must be positive
numbers).
User Guide BA622
Artisan Technology Group - Quality Instrumentation ... Guaranteed | (888) 88-SOURCE | www.artisantg.com
Remote Control • 307
Interval Flags
Used to set or query the Interval Histogram flags. Each state is assigned
to a specific bit of a 32-bit value, which is passed as the parameter
"<bit-field>".
Set:
Interval Flags <bit-field>
Query:
Interval Flags ?
Params:
<bit-field> ... Boolean states for multiple binary flags
associated with the histogram (unsigned
long). Interval flag bit assignments include:
Bit #
0
Use Log Scale
1
Show Grid
2
Show CursorA
3
Show CursorB
4
Info
5
Show Buttons
Returns:
<bit-field>
Status:
RER_OK..................................... Successful.
RER_BAD_PARAMETER.......... <bit-field> not
specified or invalid.
Interval View
Used to set or query the Interval view parameters. These values are
represented in terms of the chart's X and Y-axes. For instance, a valid
Y-offset in the strip chart may be 1e-2, whereas a valid Y-offset in a
histogram may be 100. The X-scale and Y-scale values are signed long
integers representing magnification factors used to enlarge or reduce
the X and Y scales independently. These magnification factors are
combined with exponential mathematical functions and are therefore
often difficult to calculate analytically. An effective way of utilizing
this protocol would be to establish a chart view manually, using the
knob and/or touch features of chart viewing, and then to retrieve the
current settings for offset and scales using the "Interval View ?"
protocol.
Set:
Interval View <xofs> <yofs> <xscale> <yscale>
Query:
Interval View ?
Params:
<xofs>......... X-axis offset for origin of chart: 0 to 1e100
(double).
<yofs> ......... Y-axis offset for origin of chart: 0 to 1e100
(double).
308 • Remote Control
User Guide BA622
Artisan Technology Group - Quality Instrumentation ... Guaranteed | (888) 88-SOURCE | www.artisantg.com
<xscale>...... X-axis magnification factor (signed long).
<yscale>...... Y-axis magnification factor (signed long).
Returns:
<xofs>,<yofs>,<xscale>,<yscale>
Status:
RER_OK..................................... Successful.
RER_BAD_PARAMETER.......... One or more values not
specified or invalid
(offsets must be
positive numbers;
magnification factors
must be whole
numbers).
Mask
Mask Clear
Used to clear a mask list of all contents.
Syntax:
Mask Clear
Status:
RER_OK..................................... Successful.
Mask Item
Used to add a mask to a list of 16 items, or to query the settings of an
individual list item. Individual mask list items are not editable.
Set:
Mask Item <type> <modulo> <from> <to>
Query:
Mask Item <number> ?
Params:
<number> ... List item number.
<type>......... Notch (0), or Band-Pass (1).
<modulo>.... Number of bits per modulo period.
<from>........ Locate beginning of mask.
<to> ............ Locate end of mask.
Returns:
<type>,<modulo>,<from>,<to>
Status:
RER_OK..................................... Successful.
RER_BAD_PARAMETER.......... One or more
parameters not
specified or invalid
(must be positive
whole numbers;
User Guide BA622
Artisan Technology Group - Quality Instrumentation ... Guaranteed | (888) 88-SOURCE | www.artisantg.com
Remote Control • 309
commas and scientific
notation not allowed).
RER_PARAM_RANGE .............. Total items in the list
cannot exceed 16.
Modulo
Modulo BinMap
Used to set or query histogram bin parameters for the Modulo
Histogram. These three parameters and their use in creating virtual
counter ranges are described in the Remote Control Programming
Techniques section.
Set:
Modulo BinMap <bin count> <offset> <shift>
Query:
Modulo BinMap ?
Params:
<count>....... Quantity of histogram counters; not
programmable by the user.
<offset>....... Defines position of first histogram counter:
0 to 4,200,000,000 (unsigned long).
<shift> ........ Power of two scalar for histogram counters
(increases range, but decreases resolution).
Returns:
<count>,<offset>,<shift>
Status:
RER_OK..................................... Successful.
RER_BAD_PARAMETER.......... One or more
parameters not
specified or invalid
(must be positive
whole numbers;
commas and scientific
notation not allowed).
RER_MISC_ERROR................... Bin data currently
being used in some
operation.
RER_MEMORY_ERR ................ Insufficient memory
(RAM) remaining on
BitAlyzer for the bins.
Modulo Bins
Retrieves counters representing the Modulo Histogram bins. Each
counter is a four-byte value defined in byte ordering, a characteristic of
310 • Remote Control
User Guide BA622
Artisan Technology Group - Quality Instrumentation ... Guaranteed | (888) 88-SOURCE | www.artisantg.com
Intel 80X86 architectures. After transmitting this request, the host
should immediately anticipate receiving the bin count times four bytes.
These bytes are transmitted in raw binary form. It is recommended that
before using this command, "Modulo BinMap" be used to determine
the bin count.
Query:
Modulo Bins ?
Returns:
binary data; 4 bytes per bin counter (unsigned long)
Status:
RER_OK..................................... Successful.
RER_MEMORY_ERROR........... Insufficient memory
(RAM) remaining on
BitAlyzer for the bins.
Modulo Bits
Used to set or query the number of bits in the modulo period when
using bit modulo type analysis. This mode can be set using the
"Modulo Flags" protocol (disable all other types of modulo analysis).
Set:
Modulo Bits <bits>
Query:
Modulo Bits ?
Params:
<bits>.......... Number of bits per modulo period: 1 to
4,200,000,000 (unsigned long).
Returns:
<bits>
Status:
RER_OK..................................... Successful.
RER_BAD_PARAMETER.......... <bits> not specified or
invalid (must be
positive whole
number).
Modulo Cursor
Used to set or query the positions for the two cursors supported by the
Modulo Histogram. If the Modulo histogram is open at the time of
execution, it will be redrawn.
Set:
Modulo Cursor <curs-a> <curs-b>
Query:
Modulo Cursor ?
Params:
<curs-a>...... X-axis value for CursorA: 0 to 1e100
(double).
<hist-a> ...... Value of histogram at location of Cursor A:
0 to 1e100 (double).
User Guide BA622
Artisan Technology Group - Quality Instrumentation ... Guaranteed | (888) 88-SOURCE | www.artisantg.com
Remote Control • 311
<curs-b>...... X-axis value for CursorB: 0 to 1e100
(double).
<hist-b> ...... Value of histogram at location of Cursor B:
0 to 1e100 (double).
<hist-total> . Sum of all histogram values from Cursor A
through Cursor B: 0 to 1e100 (double).
Returns:
<curs-a>,<hist-a>,<curs-b>,<hist-b>,<hist-total>
Status:
RER_OK..................................... Successful.
RER_BAD_PARAMETER.......... One or more
parameters not
specified of invalid
(must be positive
numbers).
Modulo Flags
Used to set or query the Modulo Histogram flags. Each state is assigned
to a specific bit of a 32-bit value, which is passed as the parameter
"<bit-field>".
312 • Remote Control
Set:
Modulo Flags <bit-field>
Query:
Modulo Flags ?
Params:
<bit-field> ... Boolean states for multiple binary flags
associated with the histogram (unsigned
long). Modulo flag bit assignments include:
Bit #
0
Use Log Scale
1
Show Grid
2
Show CursorA
3
Show CursorB
4
Info
5
Use Cycle
6
Use Mark1
7
Use Mark2
8
Show Bursts
9
Show Buttons
Returns:
<bit-field>
Status:
RER_OK..................................... Successful.
RER_BAD_PARAMETER.......... <bit-field> not
specified or invalid.
User Guide BA622
Artisan Technology Group - Quality Instrumentation ... Guaranteed | (888) 88-SOURCE | www.artisantg.com
Modulo View
Used to set or query the Modulo view parameters. These values are
represented in terms of the chart's X and Y-axes. For instance, a valid
Y-offset in the strip chart may be 1e-2, whereas a valid Y-offset in a
histogram may be 100. The X-scale and Y-scale values are signed long
integers representing magnification factors used to enlarge or reduce
the X and Y scales independently. These magnification factors are
combined with exponential mathematical functions and are therefore
often difficult to calculate analytically. An effective way of utilizing
this protocol would be to establish a chart view manually, using the
knob and/or touch features of chart viewing, and then to retrieve the
current settings for offset and scales using the "Modulo View ?"
protocol.
Set:
Modulo View <xofs> <yofs> <xscale> <yscale>
Query:
Modulo View ?
Params:
<xofs>......... X-axis offset for origin of chart: 0 to 1e100
(double).
<yofs>......... Y-axis offset for origin of chart: 0 to 1e100
(double).
<xscale>...... X-axis magnification factor (signed long).
<yscale>...... Y-axis magnification factor (signed long).
Returns:
<xofs>,<yofs>,<xscale>,<yscale>
Status:
RER_OK..................................... Successful.
RER_BAD_PARAMETER.......... One or more values not
specified or invalid
(offsets must be
positive numbers;
magnification factors
must be whole
numbers).
More
More BlockBits
Used to set or query the number of bits per block as defined in the
block histogram. The calculation of block statistics is only enabled
when the block scanner is enabled in the Analyzer Setup window, or by
using the "Analyzer Scan" remote control protocol.
User Guide BA622
Artisan Technology Group - Quality Instrumentation ... Guaranteed | (888) 88-SOURCE | www.artisantg.com
Remote Control • 313
Set:
More BlockBits <bits>
Query:
More BlockBits ?
Params:
<bits>.......... Number of bits per block: 1 to
4,200,000,000 (unsigned long).
Returns:
<bits>
Status:
RER_OK..................................... Successful.
RER_BAD_PARAMETER.......... <bits> not specified or
invalid (must be
positive whole
number).
RER_PARAM_RANGE .............. <bits> less than 1.
More BlockLabel
Used to set or query the text label assigned to the block analysis
features. This label is displayed on the block histogram and on the
More BER panel.
Set:
More BlockLabel <name>
Query:
More BlockLabel ?
Params:
<name>....... Block analysis label (text string).
Returns:
<name>
More Values1
Returns statistics from the More BER analyzer. These statistics are only
computed if the More BER data scanner is enabled in the analyzer's
Scanner Setup window, or by using the "Analyzer Scan" protocol.
Query:
More Values1 ?
Params:
<mark1 ev>.... Marker #1 events: 0 to 4,200,000,000
(unsigned long).
<mark2 ev>.... Marker #2 events: 0 to 4,200,000,000.
<cycle ev> ...... Cycle events: 0 to 4,200,000,000.
<blank ev> ..... Blank events: 0 to 4,200,000,000.
<resync ev>.... Resync events: 0 to 4,200,000,000.
<squelch ev> .. Squelch events: 0 to 4,200,000,000.
Returns:
314 • Remote Control
<mark1 ev>,<mark2 ev>,<cycle ev>,<blank ev>,
<resync ev>,<squelch ev>
User Guide BA622
Artisan Technology Group - Quality Instrumentation ... Guaranteed | (888) 88-SOURCE | www.artisantg.com
More Values2
Returns statistics from the More BER analyzer. These statistics are only
computed if the More BER data scanner is enabled in the analyzer's
Scanner Setup window, or by using the "Analyzer Scan" protocol.
Query:
More Values2 ?
Params:
Values are all returned in one line, separated by commas.
<block count> ....... Number of blocks: 0 to 4,200,000,000
(unsigned long).
<errored blocks> ... Number of blocks with errors: 0 to
4,200,000,000.
Returns:
<block count>,<errored blocks>
User Guide BA622
Artisan Technology Group - Quality Instrumentation ... Guaranteed | (888) 88-SOURCE | www.artisantg.com
Remote Control • 315
MultiCh
MultiCh BitsPerCh
Set:
MultiCh BitsPerCh <n>
Query:
MultiCh BitsPerCh ?
Params:
<n> ............. Number of bits per channel.
Returns:
<n>
Status:
RER_OK..................................... Successful.
RER_BAD_PARAMETER.......... <n> not specified or
invalid.
MultiCh Flags
Used to set or query the Multi-Channel flags. Each state is assigned to a
specific bit of a 32-bit value, which is passed as the parameter "<bitfield>".
Set:
MultiCh Flags <bit-field>
Query:
MultiCh Flags ?
Params:
<bit-field> ... Boolean states for multiple binary flags
(unsigned long). Multi-Channel flag bit
assignments include:
Bit #
0
Show Grid
1
Show Buttons
Returns:
<bit-field>
Status:
RER_OK..................................... Successful.
RER_BAD_PARAMETER.......... <bit-field> not
specified or invalid.
MultiCh LogFile
If only a filename is specified (i.e., FOOBAR.DAT), then the Finder
Directory will be used; otherwise, directories can be specified along
with the file (i.e., C:\USERS\BA5\DATA\FOOBAR.DAT). Note that
the slash is “\” (backslash), not “/” (forward slash).
316 • Remote Control
Set:
MultiCh LogFile <file>
Query:
MultiCh LogFile ?
Params:
<file> .......... Filename of Log File. Standard DOS format.
User Guide BA622
Artisan Technology Group - Quality Instrumentation ... Guaranteed | (888) 88-SOURCE | www.artisantg.com
Returns:
<file>
Status:
RER_OK..................................... Successful.
RER_BAD_PARAMETER.......... <file> not specified or
invalid filename.
MultiCh LogInterval
Set:
MultiCh LogInterval <n>
Query:
MultiCh LogInterval ?
Params:
<n> ............. Unsigned long. Value greater than zero.
Returns:
<n>
Status:
RER_OK..................................... Successful.
RER_BAD_PARAMETER.......... <n> not specified or
invalid.
MultiCh NumCh
Set:
MultiCh NumCh <n>
Query:
MultiCh NumCh ?
Params:
<n> ............. Number of channels, between 1 and 16
(unsigned integer).
Returns:
<n>
Status:
RER_OK..................................... Successful.
RER_BAD_PARAMETER.......... <n> not specified or
invalid.
Set:
MultiCh View <xofs> <yofs> <xscale> <yscale>
Query:
MultiCh View ?
Params:
<xofs>......... X-axis offset for origin of chart: 0 to 1e100
(double).
MultiCh View
<yofs>......... Y-axis offset for origin of chart: 0 to 1e100
(double).
<xscale>...... X-axis magnification factor (signed long).
<yscale>...... Y-axis magnification factor (signed long).
Returns:
<xofs>,<yofs>,<xscale>,<yscale>
User Guide BA622
Artisan Technology Group - Quality Instrumentation ... Guaranteed | (888) 88-SOURCE | www.artisantg.com
Remote Control • 317
Status:
RER_OK..................................... Successful.
RER_BAD_PARAMETER.......... One or more values not
specified or invalid
(offsets must be
positive numbers;
magnification factors
must be whole
numbers).
Set:
Packbits Flags <n>
Query:
Packbits Flags ?
Params:
<n> ............. LSB used only. Used to indicate Flip-Word.
Number treated as decimal.
Returns:
<n>
Status:
RER_OK..................................... Successful.
RER_BAD_PARAMETER.......... <n> not specified or
invalid.
Set:
Packbits Mask <n>
Query:
Packbits Mask ?
Params:
<n> ............. Valid range, 1 to 65,535. Number treated as
decimal.
Returns:
<n>
Status:
RER_OK..................................... Successful.
RER_BAD_PARAMETER.......... <n> not specified or
invalid.
Packbits
Packbits Flags
Packbits Mask
Panel
Panel Open
Opens a BitAlyzer plug-in panel to be displayed on the BitAlyzer's
screen. To open a specified panel, designate the panel by its name as
displayed on the top of the panel in the BitAlyzer's display. If the panel
name is more than one word, enclose it within double quotes. The panel
318 • Remote Control
User Guide BA622
Artisan Technology Group - Quality Instrumentation ... Guaranteed | (888) 88-SOURCE | www.artisantg.com
opens in its current position. To change the position or size of a panel,
use the "Panel Frame" remote control protocol.
Syntax:
Panel Open <"panel name">
Params:
<"panel name"> . Name of plug-in panel. Enclose a
multiple-word name in double quotes; a
single-word name works with or
without the quotes.
Status:
RER_OK..................................... Successful.
RER_BAD_PARAMETER.......... <name> not specified.
RER_MISC_ERROR................... Non-existent panel
name specified.
Panel Close
Closes a plug-in panel on the BitAlyzer's display. To specify the plugin panel to be closed, designate it using the name displayed on the top
of the panel in the BitAlyzer's display. If the panel name is more than
one word, enclose it within double quotes.
Syntax:
Panel Close <"panel name">
Params:
<"panel name"> . Name of plug-in panel. Enclose a
multiple-word name in double quotes; a
single-word name works with or
without the quotes.
Status:
RER_OK..................................... Successful.
RER_BAD_PARAMETER.......... <name> not specified.
RER_MISC_ERROR................... Non-existent panel
name specified.
Panel Frame
Used to set the position and size of a designated plug-in panel on the
BitAlyzer's display screen. If the panel is opened, the change in size
and position will occur immediately on the screen. If the panel is
closed, the new size and position will be assigned to the designated
panel and the next time it is opened, it will be in its new orientation.
The left, top, right, bottom values are signed decimal short values
indicating the line or pixel positions of the given panel edge. The
BitAlyzer's display orientation puts Pixel 0, Line 0 in the upper left
corner of the display.
Syntax:
<bottom>
Panel Frame <"panel name"> <left> <top> <right>
User Guide BA622
Artisan Technology Group - Quality Instrumentation ... Guaranteed | (888) 88-SOURCE | www.artisantg.com
Remote Control • 319
Params:
<"panel name">Name of plug-in panel. Enclose a
multiple-word name in double quotes; a
single-word name works with or without
the quotes.
<left> ............... Pixel position of left edge of panel
frame.
<top> ............... Pixel position of top edge of panel frame.
<right>............. Pixel position of right edge of panel
frame.
<bottom>.......... Pixel position of bottom edge of panel
frame.
Status:
RER_OK..................................... Successful.
RER_BAD_PARAMETER.......... One or more values not
specified or invalid
(must be positive
whole numbers;
commas and scientific
notation not allowed).
RER_MISC_ERROR................... Non-existent panel
name specified.
Quit
Terminates the BitAlyzer operating system software immediately upon
receipt of command. Once the system software has terminated, no
further communications with the BitAlyzer can occur; therefore this
command does not permit reply status. This command does not save
configuration prior to terminating the system software.
Syntax:
Quit
Reply
Establishes the remote reply status mode of the remote control
interface. Normally, the BitAlyzer does not reply after each command.
Some commands (for instance, "Analyzer Record") are transmitted to
the BitAlyzer without an acknowledgment or reply. This mechanism
assumes guaranteed delivery of protocol messages to the BitAlyzer.
Other commands, such as "Analyzer Status ?", do immediately reply
with information indicating that the command was received and
processed. Every command has a status value associated with the
command execution; this value can be queried after each command is
executed using the "Status ?" command. Alternatively, if the remote
320 • Remote Control
User Guide BA622
Artisan Technology Group - Quality Instrumentation ... Guaranteed | (888) 88-SOURCE | www.artisantg.com
reply status mode is enabled, the BitAlyzer will automatically reply
with command execution status after every command. This feature is
especially useful for commands that take a long time for completion. If
it is necessary to know the time of completion, enabling the remote
reply status mode will cause the BitAlyzer to reply with status after the
command is executed. Using this protocol, you can enable and disable
the remote "Reply" status.
When the remote reply status is enabled, the status is returned as an
ASCII carriage-return terminated string representing an unsigned long
value indicating the status. Refer to the "Status ?" protocol for details.
Set:
Reply <mode>
Query:
Reply ?
Params:
<mode>....... Reply mode for BitAlyzer status:
0
Disable
1
Enable.
<mode>
Returns:
Status:
RER_OK..................................... Successful.
RER_BAD_PARAMETER.......... <mode> not specified
of invalid.
RER_PARAM_RANGE .............. <mode> greater than 1.
Send
This command is used in sending data files from the remote computer
into the BitAlyzer, and is used in conjunction with other file transfer
commands described in the Programming Techniques section of this
manual. This command initiates the file transfer process and replies
with a "CONTINUE" message if initiation is successful. Otherwise, if
initiation fails, the BitAlyzer replies with an "ABORT" message.
Syntax:
Send <pathname> <date> <time>
Params:
<pathname> Path and name of file to be created on the
BitAlyzer (standard DOS format).
<date>......... Date of file to be created: mm/dd/yyyy
<time> ........ Time of file to be created: hh:mm:ss
Returns:
Continue [or] Abort
Status:
RER_OK..................................... Successful.
RER_BAD_XFER....................... A previous file transfer
is already in progress.
User Guide BA622
Artisan Technology Group - Quality Instrumentation ... Guaranteed | (888) 88-SOURCE | www.artisantg.com
Remote Control • 321
RER_BAD_PARAMETER.......... One of the three
parameters associated
with the command is
missing, or the date or
time parameter is
invalid.
RER_MEMORY_ERR ................ No memory available
for temporary buffer.
RER_NO_WRITE_FILE ............. Specified file cannot
be created.
SpaceMark
SpaceMark Flags
Used to set or query the status of the "discard markers" flag. If set, the
scanner output will not contain markers. If not set, the scanner output
will contain markers.
Set:
Space Flags <flag>
Query:
Space Flags ?
Params:
<flag> ......... The "discard markers" flag:
0
Off
1
On
<flag>
Returns:
Status:
RER_OK..................................... Successful.
RER_BAD_PARAMETER.......... Parameter not specified
or invalid (must be a
positive whole number;
commas and scientific
notation not allowed).
SpaceMark Trigger
Used to set or query the marker selection for the SpaceMark scanner. If
set to NONE, the output file will be equal to the Word Interval.
322 • Remote Control
Set:
Space Trigger <source>
Query:
Space Trigger ?
Params:
<source> ..... Marker selection for the SpaceMark scanner.
0
NONE
1
MARKER1
2
MARKER2
User Guide BA622
Artisan Technology Group - Quality Instrumentation ... Guaranteed | (888) 88-SOURCE | www.artisantg.com
3
4
5
EITHER
BLANK
RESYNC
Returns:
<source>
Status:
RER_OK..................................... Successful.
RER_BAD_PARAMETER.......... Parameter not specified
or invalid (must be a
positive whole number;
commas and scientific
notation not allowed).
SpaceMark Values1
Used to query details of the file (live) scan.
Query:
Space Values1 ?
Params:
<input found> ..........Count of trigger events.
<input wrong size> ...Check of anticipated size using
WordCount
Returns:
<input found>,<input wrong size>
Status:
RER_OK..................................... Successful
SpaceMark WordCount
Used to set or query the word interval for the SpaceMark scanner.
Set:
Space WordCount <count>
Query:
Space WordCount ?
Params:
<count>
Returns:
<count>
Status:
RER_OK..................................... Successful.
RER_BAD_PARAMETER.......... Parameter not specified
or invalid (must be a
positive whole number;
commas and scientific
notation not allowed).
The number of words between markers.
Spectrum
Spectrum BinMap
Used to set or query items in the bin map of the Spectrum scanner.
User Guide BA622
Artisan Technology Group - Quality Instrumentation ... Guaranteed | (888) 88-SOURCE | www.artisantg.com
Remote Control • 323
Set:
Spectrum BinMap <count> <offset> <pow2>
Query:
Spectrum BinMap ?
Params:
<count>....... Total number of bins.
<offset>....... Defines bit position of first bin.
<pow2>....... Defines power of 2 scaling factor.
Returns:
<count>,<offset>,<pow2>
Status:
RER_OK..................................... Successful.
RER_BAD_PARAMETER.......... One or more
parameters not
specified or invalid
(must be positive
whole numbers;
commas and scientific
notation not allowed).
Spectrum Cursor
Used to set or query the positions for the two cursors supported by the
Spectrum Histogram. If the Spectrum histogram is open at the time of
execution, it will be redrawn.
Set:
Spectrum Cursor <curs-a> <curs-b>
Query:
Spectrum Cursor ?
Params:
<curs-a>...... X-axis value for CursorA: 0 to 1e100
(double).
<hist-a>....... Value of histogram at location of CursorA: 0
to 1e100.
<curs-b>...... X-axis value for CursorB: 0 to 1e100.
<hist-b> ...... Value of histogram at location of CursorB: 0
to 1e100.
<hist-total> . Sum of all histogram values from CursorA
through CursorB: 0 to 1e100.
324 • Remote Control
Returns:
<curs-a>,<hist-a>,<curs-b>,<hist-b>,<hist-total>
Status:
RER_OK..................................... Successful.
RER_BAD_PARAMETER.......... One or more
parameters not
specified or invalid
User Guide BA622
Artisan Technology Group - Quality Instrumentation ... Guaranteed | (888) 88-SOURCE | www.artisantg.com
(must be positive
numbers).
Spectrum Flags
Used to set or query the Spectrum chart flags. Each state is assigned to
a specific bit of a 32-bit value, which is passed as the parameter "<bitfield>".
Set:
Spectrum Flags <bit-field>
Query:
Spectrum Flags ?
Params:
<bit-field>... Boolean states for multiple binary flags
associated with the chart display. Spectrum
flag assignments include:
Bit #
0
Use Log Scale
1
Show Grid
2
Show CursorA
3
Show CursorB
4
Show Info
Returns:
<bit-field>
Status:
RER_OK..................................... Successful.
RER_BAD_PARAMETER.......... <bit-field> not
specified or invalid.
Spectrum Memory
Used to set or query memory units to reserve for bin-mapping of the
Spectrum scanner.
Set:
Spectrum Memory <count>
Query:
Spectrum Memory ?
Params:
<count>....... Total number of memory units reserved.
Returns:
<count>
Status:
RER_OK..................................... Successful.
RER_BAD_PARAMETER.......... One or more
parameters not
specified or invalid
(must be positive
whole numbers;
commas and scientific
notation not allowed).
User Guide BA622
Artisan Technology Group - Quality Instrumentation ... Guaranteed | (888) 88-SOURCE | www.artisantg.com
Remote Control • 325
Spectrum View
Used to set or query the Spectrum view parameters. These values are
represented in terms of the chart's X and Y-axes. For instance, a valid
Y-offset in the strip chart may be 1e-2, whereas a valid Y-offset in a
histogram may be 100. The X-scale and Y-scale values are signed long
integerss representing magnification factors used to enlarge or reduce
the X and Y scales independently. These magnification factors are
combined with exponential mathematical functions and are therefore
often difficult to calculate analytically. An effective way of utilizing
this protocol would be to establish a chart view manually, using the
knob and/or touch features of chart viewing, and then to retrieve the
current settings for offset and scales using the "Spectrum View ?"
protocol.
Set:
Spectrum View <xofs> <yofs> <xscale> <yscale>
Query:
Spectrum View ?
Params:
<xofs>......... X-axis offset for origin of chart: 0 to 1e100
(double).
<yofs> ......... Y-axis offset for origin of chart: 0 to 1e100
(double).
<xscale>...... X-axis magnification factor (signed long).
<yscale>...... Y-axis magnification factor (signed long).
Returns:
<xofs>,<yofs>,<xscale>,<yscale>
Status:
RER_OK..................................... Successful.
RER_BAD_PARAMETER.......... One or more values not
specified or invalid
(offsets must be
positive numbers;
magnification factors
must be whole
numbers).
Spectrum WindowSize
Used to set or query number of bits to display on the Spectrum chart Xaxis.
326 • Remote Control
Set:
Spectrum Window <size>
Query:
Spectrum Window ?
Params:
<size> ......... Total number of bits displayed (X-axis).
User Guide BA622
Artisan Technology Group - Quality Instrumentation ... Guaranteed | (888) 88-SOURCE | www.artisantg.com
Returns:
<size>
Status:
RER_OK..................................... Successful.
RER_BAD_PARAMETER.......... One or more
parameters not
specified or invalid
(must be positive
whole numbers;
commas and scientific
notation not allowed).
Status
Once the "Status" command executes, the command status is
necessarily changed by the result of executing this command. To
illustrate this point; if the "Reply" status mode is enabled and status
replies from all commands are automatically transmitted by the
BitAlyzer upon execution of each command, then performing a "Status
?" command will first retrieve the status of the previous command and
then display the status of the "Status" command.
Query:
Status ?
Params:
<status> ...... Execution status of the most recently
executed remote control command. The
following status codes are defined:
0
OK
1
MISC_ERROR
2
BAD_PARSE
3
BAD_COMMAND
4
BAD_PARAMETER
5
NO_RECORD_FILE
6
PARAM_RANGE
7
NO_READ_FILE
8
NO_WRITE_FILE
9
NOT_STOPPED
10
FILE_EXISTS
11
NO_HARDWARE
12
BAD_XFER
13
MEMORY_ERR
14
NOT_IN_SYNC
15
WORD_COUNT
16
NO_CLOCK
17
EXECUTION_ERROR
Returns:
<status>
User Guide BA622
Artisan Technology Group - Quality Instrumentation ... Guaranteed | (888) 88-SOURCE | www.artisantg.com
Remote Control • 327
Strip
Strip Flags
Used to set or query the Strip Chart flags. Each state is assigned to a
specific bit of a 32-bit value, which is passed as the parameter "<bitfield>".
Set:
Strip Flags <bit-field>
Query:
Strip Flags ?
Params:
<bit-field> ... Boolean states for multiple binary flags
associated with the Strip chart (unsigned
long). Strip flag bit assignments include:
Bit #
0
TotalBer
1
BurstRate
2
NonBurstRate
3
Show Events
4
Show Buttons
5
Show Grid
6
Info
7
UseBlocks
Returns:
<bit-field>
Status:
RER_OK..................................... Successful.
RER_BAD_PARAMETER.......... <bit-field> not
specified or invalid
(must be positive
whole number).
Strip LogFile
Used to set or query the posting of strip chart data to a log file. By
specifying a filename, the strip chart postings will also be logged to an
ASCII comma-delimited file. If only a filename is specified (i.e.,
FOOBAR.DAT), then the Finder Directory will be used; otherwise,
directories can be specified along with the file (i.e.,
C:\USERS\BA5\DATA\FOOBAR.DAT). Note that the slash is “\”, not
“/”. To disable this feature, specify a filename "NONE" (the feature is
disabled by default).
328 • Remote Control
Set:
Strip LogFile <fname>
Query:
Strip LogFile ?
Params:
<fname>...... Filename of log file (standard DOS format).
User Guide BA622
Artisan Technology Group - Quality Instrumentation ... Guaranteed | (888) 88-SOURCE | www.artisantg.com
Returns:
<fname>
Status:
RER_OK..................................... Successful.
RER_BAD_PARAMETER.......... <fname> not specified
or invalid format.
Strip View
Used to set or query the Strip view parameters. The first two
parameters represent X and Y offsets for the origin of the chart. These
values are represented in terms of the chart's X and Y-axes. For
instance, a valid Y-offset in the strip chart may be 1e-2, whereas a valid
Y-offset in a histogram may be 100. The X-scale and Y-scale values
are signed long integers representing magnification factors used to
enlarge or reduce the X and Y scales independently. These
magnification factors are combined with exponential mathematical
functions and are therefore often difficult to calculate analytically. An
effective way of utilizing this protocol would be to establish a chart
view manually, using the knob and/or touch features of chart viewing,
and then to retrieve the current settings for offset and scales using the
"Strip View ?" protocol.
Set:
Strip View <xofs> <yofs> <xscale> <yscale>
Query:
Strip View ?
Params:
<xofs>......... X-axis offset for origin of chart: 0 to 1e100
(double).
<yofs>......... Y-axis offset for origin of chart: 0 to 1e100
(double).
<xscale>...... X-axis magnification factor (signed long).
<yscale>...... Y-axis magnification factor (signed long).
Returns:
<xofs>,<yofs>,<xscale>,<yscale>
Status:
RER_OK..................................... Successful.
RER_BAD_PARAMETER.......... One or more values not
specified or invalid
(offsets must be
positive numbers;
magnification factors
must be whole
numbers).
User Guide BA622
Artisan Technology Group - Quality Instrumentation ... Guaranteed | (888) 88-SOURCE | www.artisantg.com
Remote Control • 329
System
System ScreenDump
Captures the BitAlyzer's screen and prints it to a printer or to a PCX
graphics format file. To use this protocol, first establish the print
destination using the "System PrinterType" protocol. Then, when this
protocol is invoked, the designated print operation will be performed.
When printing to a PCX file, the BitAlyzer assigns a filename of the
format BA5nnnn.pcx, where nnnn is an incrementing number starting
at 0000. When printing to a system printer, the BitAlyzer (including the
remote control interface) is completely occupied. Given this situation, it
may be helpful to use the "Reply" protocol to indicate that command
status should be returned after each protocol is performed; then the
BitAlyzer will return a status indication when the print operation is
completed.
Syntax:
System ScreenDump
System PrinterDest
Used to set or query the print destination. This command allows the
printout data to be stored in a file rather than sent to the printer port. If
only a filename is specified (i.e., FOOBAR.DAT), then the Finder
Directory will be used; otherwise, directories can be specified along
with the file (i.e., C:\USERS\BA5\DATA\FOOBAR.DAT). Note that
the slash is “\”, not “/”. Specifying a filename "NONE" will disable this
feature. Possible device names include: PRN, LPT1, LPT2, COM1,
COM2.
Set:
System PrinterDest <name>
Query:
System PrinterDest ?
Params:
<name>....... Name of file or device where printout data is
to be sent.
Returns:
<name>
Status:
RER_OK..................................... Successful.
RER_BAD_PARAMETER.......... <name> not specified
or invalid format.
System PrinterType
Used to set or query the print operation type. Print operations can
designate the destination of a print procedure to be a specific printer,
format, or a PCX graphics file.
330 • Remote Control
User Guide BA622
Artisan Technology Group - Quality Instrumentation ... Guaranteed | (888) 88-SOURCE | www.artisantg.com
The Epson print types print to Epson 9-pin printers in two orientations;
small and large. The HP print types print to HP Desk Jet and HP
LaserJet printers in small, medium and large formats.
Set:
System PrinterType <type>
Query:
System PrinterType ?
Params:
<type>......... Print type setting. The following printer
types are defined:
0
Epson (Format #1)
1
Epson (Format #2)
2
HP (Format #1)
3
HP (Format #2)
4
HP (Format #3)
5
Print to PCX File
Returns:
<type>
Status:
RER_OK..................................... Successful.
RER_PARAM_RANGE .............. <type> invalid or
greater than 5.
User Guide BA622
Artisan Technology Group - Quality Instrumentation ... Guaranteed | (888) 88-SOURCE | www.artisantg.com
Remote Control • 331
Application Notes
RAM Example — Disk Drive and Spin Stands
A common application for the BitAlyzer's large RAM option is to
create data for writing to disk drives and to test data read back from
disk drives. In this way, the BitAlyzer's Generator and Detector RAMs
are used. Channel coding theory can easily be experimented with by
taking advantage of the convenience of writing software encoders and
decoders to test hypotheses.
To write data to the disk spin stand, the Generator's RAM is first
manually filled with a test data sequence usually created off-line by
using a programming language or binary editor. This data must include
both the portion of data to be used for BitAlyzer analysis as well as
embedded synchronization data used in conjunction with external
circuitry to derive the Begin Detect signal for playback analysis. It is
often the case that a synchronizing pattern is inserted into the file in
front of the user data portion. To write this data to the disk, the disk's
INDEX pulse is interfaced to the Begin Generate input of the
BitAlyzer, causing the RAM content to be re-transmitted at the start of
every rotation. Note as well, this re-transmission could be done on a
sector-by-sector basis. Once the data is present and synchronized to the
disk rotation, external control of the disk sub-system can be instructed
to write for one rotation.
Error analysis of disk read-back results is the next step. First, the user
must provide external bit-accurate synchronization to the BitAlyzer's
Begin Detect input. For example, this is often done by using an external
synchronization pattern detector. An arbitrary synchronization pattern
detector is available from SyntheSys Research that allows for a flexible
word size and selectable level of accuracy. This same device includes
flexible timing generators to create the MARK and BLANK signals.
Begin Detect signals have been achieved by using invalid code
detection hardware available in certain integrated circuits and then
purposely writing an invalid code during the write process. In addition
to this signal, the user must also provide a BLANK input to the
BitAlyzer to define the region of the disk rotation where error data
should be analyzed. For example, error analysis cannot be done during
332 • Application Notes
User Guide BA622
Artisan Technology Group - Quality Instrumentation ... Guaranteed | (888) 88-SOURCE | www.artisantg.com
write-splices. Blanking signals are often taken from programmable
pulse generators triggered by either the INDEX mark or the Begin
Detect signal.
Once interfaced, the next requirement is to create the data that will be
loaded into the Detector's RAM for the purpose of comparison when it
searches for errors. One can see that if this RAM is not loaded
carefully, and/or the external Begin Detect signal is not accurate,
mismatches will happen all the time and will be identified as errors
though they are not. This RAM can be loaded in two ways. One is to
carefully calculate exactly what should appear in the RAM and then
load this data manually into the Detector RAM at the correct position.
This used to be the only mode of loading Detector RAM in the original
BitAlyzer 160. This is difficult, because finding the exact phase
relationship between your user data and the word position in the RAM
is time-consuming. The second way to load the RAM is to use the
RAM Grab feature to load the RAM directly from the incoming data.
Once loaded, the contents of the RAM can be written to a file and
edited if desired. In this application, the "Load User Data (Begin-Detect
Triggers)" selection would be used when loading RAM from user data
to arm the data grab to begin at one Begin Detect pulse and to stop at
the next pulse. Once the RAM is loaded, it may be saved to a disk file
using the Save To Disk button in the Detector RAM Setup window.
It is always good to test your setups. Users will sometimes record in a
known error, just to make sure, and measure it as well as monitor the
TTL error pulse output and TTL trigger output. For example, once the
Begin Detect signal is properly interfaced, the TTL trigger output
MUST stay in exact phase with this input. If it does not, some interface
or selection is not set correctly.
This is an involved BitAlyzer application. Feel free to contact
SyntheSys Research Incorporated for help bringing this experiment up.
User Guide BA622
Artisan Technology Group - Quality Instrumentation ... Guaranteed | (888) 88-SOURCE | www.artisantg.com
Application Notes • 333
RAM Data File Format
The BitAlyzer622 can be optionally configured with two independent 4
or 16 Mbit RAMs for use in generating data and detecting errors in
user-specified data sequences. These RAMs are 16-bit addressable and
can be loaded from standard MS-DOS compatible files. The file
organization is a word-oriented binary format that can be generated
when writing binary integers to files as words. The following example
shows a sample file of 13 words (26 bytes) which could be loaded into
a BitAlyzer622 RAM. This file will transmit the message "THE
QUICK BROWN FOX JUMPED". Remember for serial formats, the
most significant bit of the word is transmitted first.
Address
00
08
10
18
Data in HEX
48 54 20 45 55 51 43 49
20 4B 52 42 57 4F 20 4E
4F 46 20 58 55 4A 50 4D
44 45
ASCII
HT EUQCI
KRBWO N
OF XUJPM
DE
BitAlyzer622 binary files should be stored with the ".RAM" extension
and cannot exceed 524,288 or 2,097,152 bytes (262,144 or 1,048,576
words). These files are word-oriented.
334 • Application Notes
User Guide BA622
Artisan Technology Group - Quality Instrumentation ... Guaranteed | (888) 88-SOURCE | www.artisantg.com
Re-Interleaving ID1 Error Data
ID1-type tape recorders such as the DIR-1000 are widely used in
industry today. This recorder uses eight helical scanning heads to
sequentially read data off magnetic tape. Each head reads a track length
of 36,108 user-data bytes (288,864 bits) recorded on the tape at a 5degree angle.
When data is recorded to an ID1-type tape, it is interleaved according
to the ID1 standard. Likewise, data scanned from these tapes is passed
through a 3-D Reed-Solomon Error Correction Coding, which corrects
and de-interleaves the data back into user format.
In analysis of ID1 error data, it is most useful to re-interleave the output
data back into the tape format for error measurement and analysis
purposes. This is easily accomplished through the use of the
BitAlyzer622 ECC option.
The following paragraphs describe hardware interfacing, ID1
interleaving, ID1 de-interleaving, and BA622 re-interleaving. Several
analysis examples are included at the end of this section as well.
Hardware Interfacing
The DIR-1000 tape recorder and the BitAlyzer must be connected
properly. The following table details the pin-for-pin connections
between a DIR-1000 and the BitAlyzer. The DIR-1000 requires a 25pin female D-connector while the BitAlyzer requires a 50-pin female
header. The "sync" signal must be connected, since it acts as a marker
signal for the BitAlyzer. This signal identifies the first byte of each
eight-track group.
When performing tests, it is generally beneficial to turn off the DIR1000's error correction (C1, C2, and erasure). This will yield data with
significant error content, allowing a more in-depth analysis. Analysis of
corrected data may also be useful; however this will usually yield errorfree playback and the error analysis will necessarily be less interesting.
See the following section, "ID1 Correction Performance," for more
information on analyzing corrected performance from uncorrected error
analysis.
DIR-1000
P2-1
P2-2
BITALYZER
P1-35
P1-37
User Guide BA622
Artisan Technology Group - Quality Instrumentation ... Guaranteed | (888) 88-SOURCE | www.artisantg.com
SIGNAL NAME
CLOCK +
SYNC +
Application Notes • 335
P2-3
P2-4
P2-5
P2-6
P2-7
P2-8
P2-9
P2-10
P2-11
P2-12
P2-13
P2-14
P2-15
P2-16
P2-17
P2-18
P2-19
P2-20
P2-21
P2-22
P2-23
P2-24
P2-25
P1-15
P1-13
P1-11
P1-9
P1-7
P1-5
P1-3
P1-1
P1-33
P1-36
P1-38
P1-16
P1-14
P1-12
P1-10
P1-8
P1-6
P1-4
P1-2
P1-34
DATA 7+
DATA 6+
DATA 5+
DATA 4+
DATA 3+
DATA 2+
DATA 1+
DATA 0+
PARITY +
(ERROR FLAG +)
FRAME GROUND
CLOCK SYNC DATA 7DATA 6DATA 5DATA 4DATA 3DATA 2DATA 1DATA 0PARITY (ERROR FLAG -)
DIR-1000 and BitAlyzer Pinouts
ID1 Interleaving during Record
During record operations, the DIR-1000 interleaves each track's data
using a three-dimensional group size of 153-byte rows x 118-byte
columns x 2 tables. The user input data is inserted into the group in a
sequential column order (shown below).
Phase 1: User-data fills ECC tables in Column-Major format.
When the group is full, the data is drained in a rows-together order
(shown below), after which it is stored on a magnetic tape. This
procedure results in separating adjacent user-input bytes by 306 bytes
when recorded on tape (this description only pertains to user data; the
actual separation is greater considering added bytes of sync and error
correction data).
336 • Application Notes
User Guide BA622
Artisan Technology Group - Quality Instrumentation ... Guaranteed | (888) 88-SOURCE | www.artisantg.com
Phase 2: ECC tables drained in Rows-Together format to tape track.
ID1 De-Interleaving during Playback
During playback and read-after-write operations, the DIR-1000 deinterleaves data in a three-dimensional group size of 153-byte rows x
118-byte columns x 2 tables. The raw data from tape is inserted into the
group in a rows-together order (shown below).
Phase 1: Tape track data fills ECC tables in Rows-Together format.
After error correction, the data is drained from the group in a sequential
column order (shown below). This achieves the byte-ordering that is
presented to the user as "data-out", and which is necessarily the same
ordering as user data input.
Phase 2: ECC tables drained in Column-Major format
to user-data output.
Using the BA622 to Re-Interleave ID1 Data
The BitAlyzer622 can be used to re-interleave the user data in order to
reorganize the error placement back into the original geometry of the
tape. This is a very important step for accurate media scanning, burst
length profiling, and other forms of error analysis. By disabling
User Guide BA622
Artisan Technology Group - Quality Instrumentation ... Guaranteed | (888) 88-SOURCE | www.artisantg.com
Application Notes • 337
software error correction emulation and setting up an appropriate group
size with proper fill and drain characteristics, the BitAlyzer622's ECC
scanner can be enabled to only re-interleave the error data and not
perform any correction emulation.
To re-interleave ID1 type data on the BitAlyzer, apply the following
steps:
1.
Open the BitAlyzer ECC Plug-in panel and then press the
ECC "Setup" button.
2.
Set rows per table = 118.
3.
Set columns per table = 153.
4.
Set tables per group = 2.
5.
Specify fill tables as "Column Major".
6.
Specify drain tables as "Rows Together".
7.
Make sure C1 correction, erasure mode, and C2 correction are
all disabled.
Your settings should be as illustrated below:
ECC Settings for ID1 Re-Interleaving
338 • Application Notes
8.
Press the "Ok" button on the ECC Setup panel.
9.
Open the Analyzer Plug-in panel and press the Analyzer
"Setup" button. On the Analyzer Setup panel, press the "Select
Scanners" button and make sure the ECC scanner is enabled.
User Guide BA622
Artisan Technology Group - Quality Instrumentation ... Guaranteed | (888) 88-SOURCE | www.artisantg.com
10.
Press the "Ok" button on the Analyzer Select Scanners panel.
11.
If your error data includes markers, select "Skip to Mark" in
the Analyzer Setup panel.
12.
Press the "Ok" button on the Analyzer Setup panel.
13.
Make sure the proper interface parameters for the Generator
and Detector are selected (Clock Source, Interface, Pattern,
etc.).
14.
Make the appropriate hardware connections and press "Live",
"Play", or "Record" on the Analyzer panel. Your data will first
be passed into the ECC scanner where it will be re-interleaved,
and then it will be passed on to the other BitAlyzer scanners.
Analysis Examples
The following is a media scan of ID1-type data prior to BitAlyzer ECC
re-interleaving (user data output from tape recorder). Notice that the
errors are spread out. This is characteristic of the recorder's deinterleaver.
Media Scan (Before Re-Interleaving)
User Guide BA622
Artisan Technology Group - Quality Instrumentation ... Guaranteed | (888) 88-SOURCE | www.artisantg.com
Application Notes • 339
Below is the same error information, only re-interleaved by the
BitAlyzer. Notice that errors are now placed closer to one another. This
media scan illustrates error placement in tape-geometry format.
Media Scan (After Re-Interleaving)
The BitAlyzer's burst length profile can also reveal the before-and-after
effects of re-interleaving. Before re-interleaving, most of the bursts are
smaller (see below). This is expected, since the DIR-1000's deinterleaver is meant to spread adjacent tape errors apart.
Burst Length Profile (Before Re-Interleaving)
After the BitAlyzer re-interleaves the data, we see the bursts as they
would appear on the tape. A large number of the error bursts are longer.
340 • Application Notes
User Guide BA622
Artisan Technology Group - Quality Instrumentation ... Guaranteed | (888) 88-SOURCE | www.artisantg.com
Burst Length Profile (After Re-Interleaving)
The following is a modulo-2,310,912 bits analysis (eight tracks of
data). The data from each of the eight heads is distinguishable in this
analysis.
Modulo 8-Heads Data
A media scan of all eight heads clearly shows that one head of the eight
is much worse than the others (see below).
User Guide BA622
Artisan Technology Group - Quality Instrumentation ... Guaranteed | (888) 88-SOURCE | www.artisantg.com
Application Notes • 341
8-Heads Media Scan
Zooming in on a particular section of the media scan reveals a
phenomenon known as "tape wandering". This is the result of slight
imperfections in the tape, created during manufacturing when the tape
is pressed flat. Notice that the imperfection wanders from side to side,
perpendicular to the tape length. This is because the tape maker moves
the press rollers during manufacturing in order to minimize adjacent
imperfections.
This analysis is often used to determine if system errors are due to poor
media or are recorder-related. Media-related problems will shift with
the wandering of the web during tape manufacturing; recorder
problems will not.
"Web Wandering"
342 • Application Notes
User Guide BA622
Artisan Technology Group - Quality Instrumentation ... Guaranteed | (888) 88-SOURCE | www.artisantg.com
Zooming in even closer on the media scan shows multi-track defects
(see below). These are usually the result of scratches or dimples on the
tape that span more than one track.
Multi-Track Defects
Below is shown a modulo-288,864 bits analysis (one track of data).
Notice how the errors become worse at the beginning and end of the
track. These sections of data are closer to the tape edges. This is
consistent with tape recorder issues, such as errors due to difficulty in
achieving sync at the beginning of each track, and because of tracking
error at the ends of tracks.
Modulo 1-Track Data
User Guide BA622
Artisan Technology Group - Quality Instrumentation ... Guaranteed | (888) 88-SOURCE | www.artisantg.com
Application Notes • 343
ID1 ECC Monitoring and Media Verification
The DIR-1000 has the capability to report error correction statistics
while it is running. Using this feature, these statistics can be collected
over a specified length of tape and compared with raw error statistics
gathered over the same length of tape.
This section describes the capability to accurately estimate the
corrected performance of the playback by acquiring the raw errors from
an uncorrected playback and calculating error correction statistics from
the placement of the errors. These analyses demonstrate media
performance in a qualitative way, rather than as a simple go / no-go
test.
DIR-1000 Real-Time ECC Statistics
The DIR-1000 Reports three error correction statistics during playback
while the error correction system is enabled. The three statistics are:
C1R ......quantity of symbol errors corrected by C1 error correction
processing
C1B ......quantity of C1 error correction Blocks that failed error
correction
UCE .....quantity of uncorrectable errors (This is actually erred-trackgroups)
These statistics report on real-time activity of the Reed-Solomon error
correction performance.
BitAlyzer Emulated ECC Statistics
The BitAlyzer's ECC Scanner produces emulated results for each of the
above three statistics. It does this by analyzing the raw errors during
tape playback, re-creating the processing of the specified ReedSolomon error correction algorithms, and computing detailed statistics
including where errors occur and where correction failures occur.
The ECC Scanner computes the following statistics. These statistics are
output to a comma-delimited file at specified processing intervals, and
can be easily graphed using spreadsheet programs.
C1 Symbol Errors
C1 Blocks With Error
C1 Symbols Corrected
344 • Application Notes
User Guide BA622
Artisan Technology Group - Quality Instrumentation ... Guaranteed | (888) 88-SOURCE | www.artisantg.com
C1 Blocks Failed
Erasures Used
Erasure Symbols Corrected
C2 Symbol Errors
C2 Blocks With Error
C2 Symbols Corrected
C2 Blocks Failed
Uncorrectable Symbols
These statistics show errors being corrected by certain stages in error
correction processing, and can give you a better estimate of how close a
particular playback is to being unreadable.
Verifying Emulated -vs.- Real Time Statistics
The following spreadsheet graph shows the high correlation between
emulated ECC statistics and actual DIR-1000 Real-Time statistics. The
BitAlyzer's "C1SymbolsCorrected" statistic matches the DIR-1000's
"C1R" statistic, and the BitAlyzer's "C1BlocksFailed" statistic matches
the DIR-1000 "C1B" statistic.
DIR-1000 Statistics -vs.- BitAlyzer Statistics
The emulated and real-time statistics match well considering sampling
differences and the fact that they are from different playbacks of the
same piece of tape. This demonstrates the accuracy of the emulated
statistics.
User Guide BA622
Artisan Technology Group - Quality Instrumentation ... Guaranteed | (888) 88-SOURCE | www.artisantg.com
Application Notes • 345
Analyzing DIR-1000 Raw Errors
The BitAlyzer can Media Scan the errors encountered during playback.
This is done with the DIR-1000 Error Correction disabled to achieve
raw statistics. This information can also be used to determine the size
and number of error bursts or error-free intervals, along with error
rates. Modulo analysis can be used to determine where errors occur on
individual tracks by setting the Modulo-N quantity to 288,864, which is
the number of bits in one track. Using the BitAlyzer's interleaver and
media scanner, the data can be translated into a geometric
representation of the error data. The following is a media scanned
image of the tape surface with error correction disabled:
Media Scan of DIR-1000 Data (Before Correction)
The following image shows the same raw tape errors after the specified
ID1 error correction algorithm has been applied by the BitAlyzer.
Notice most errors are completely removed. Any error that is not
removed is an uncorrectable error. Notice: The DIR-1000 only reports
the number of ID track-groups containing at least one uncorrectable
error. The BitAlyzer's emulated "Uncorrectable Symbols" statistic is
symbol accurate.
Media Scan of DIR-1000 Data (After Correction)
346 • Application Notes
User Guide BA622
Artisan Technology Group - Quality Instrumentation ... Guaranteed | (888) 88-SOURCE | www.artisantg.com
Steps in Producing ECC Performance Reports
1.
Record a BitAlyzer known pattern on the test tape using the
DIR-1000 tape recorder.
2.
When ready for playback, disable the DIR-1000's ECC
correction feature and make the required hardware
connections to the BitAlyzer's detector.
3.
Enable the ECC Scanner and the Media Scan Scanner on the
BitAlyzer by entering the Analyzer Setup panel, pressing the
"Select Scanners" button, and checking the appropriate boxes.
4.
Open the ECC Setup Panel and make the following settings
for correction emulation reports:
Rows Per Table = 118
Columns Per Table = 153
Tables Per Group = 2
C1 Strength = 3
C2 Strength = 3
Erase Strength = 10
Fill Tables = Column Major
C1 Correction = Rows
Erasure Mode = Enabled
C2 Correction = Columns
Drain Tables = Rows Together
or these alternative settings for uncorrected (raw) reports:
Rows Per Table = 118
Columns Per Table = 153
Tables Per Group = 2
C1 Strength = 3
C2 Strength = 3
Erase Strength = 10
Fill Tables = Column Major
C1 Correction = Disabled
Erasure Mode = Disabled
C2 Correction = Disabled
Drain Tables = Rows Together
5.
To post ECC statistics to a comma-delimited log file, enter a
log-file name and select the number of "Groups Per Log" (e.g.,
31,855 groups per log will post statistics after approximately
every 15 meters of tape - You can select statistics reporting
one table-group at a time!)
User Guide BA622
Artisan Technology Group - Quality Instrumentation ... Guaranteed | (888) 88-SOURCE | www.artisantg.com
Application Notes • 347
6.
Open the Media Scan Setup Panel and make the following
settings:
Bits Per Unit = 288864
7.
Play the tape using the DIR-1000. As the tape plays, ECC
statistics will be shown on the ECC panel and will be posted
to the selected log file.
Enhanced Error Correction Statistics
The BitAlyzer's ECC emulation scanner can be used to log error
correction performance statistics to a comma-separated format file.
These files can be easily imported to a spreadsheet program. The
following is an example spreadsheet created by performing ID1 error
correction emulation on the same piece of tape shown in the Media
Scan screens above.
Logged ECC Statistics from BitAlyzer
Some of the columns from this report were used to create the following
spreadsheet graph, which identifies the error correction failures that
were seen in the original BitAlyzer Media Scan.
348 • Application Notes
User Guide BA622
Artisan Technology Group - Quality Instrumentation ... Guaranteed | (888) 88-SOURCE | www.artisantg.com
Spreadsheet Graph of BitAlyzer ECC Statistics
In addition to correction failures, this graph shows which errors are
corrected during the different phases of error correction: C1, Erasure,
C2. Notice that the quantity of C2 corrections is very small. This shows
the small number of occurrences when the Erasure Flags are overrun.
The symbols corrected in the Erasure phase of processing are actually
corrected using the C2 code blocks and check words. They are
distinguished from C2 phase corrections, which correct and locate
errors.
It is interesting to notice that the very large errors that appeared on the
media scan about 15% of the way into the playback were corrected
completely.
User Guide BA622
Artisan Technology Group - Quality Instrumentation ... Guaranteed | (888) 88-SOURCE | www.artisantg.com
Application Notes • 349
BitAlyzer Analysis on Multi-Track
Instrumentation Recorders
Introduction
This application note describes a diagnosis session of bit error rate
statistics taken from a failing instrumentation recording sub-system.
Error analysis was performed using BitAlyzer. This example is of
particular interest in that it points out the distinctive strength of the
BitAlyzer in analyzing the EXACT bit position of digital errors,
allowing for very detailed analysis. The alternative approach of using a
standard bit error rate test (BERT) set to measure overall error rate
would not have been able to provide insight into the failing modes.
The procedure for this experiment included transmitting a known data
sequence to the sub-system in a serial fashion. This data was recorded
and later played back through a serial link into the BitAlyzer for error
analysis. The BitAlyzer carefully identifies the position of every mismatch between the incoming data and what was expected, and will
either analyze the results in a "live" mode or store them onto its internal
hard disk drive for later off-line analysis. This analysis was, in fact,
done at SyntheSys Research, Inc., by having a floppy of the error data
sent through the mail.
Bit Error Rate
The first processing pass of the BitAlyzer error data set reported the
basic bit error rate condition of the channel as well as the total number
of bits that were analyzed. Data used for this analysis represented two
passes (at two different data rates) of the same section of tape and could
therefore be used to compare related performance.
350 • Application Notes
User Guide BA622
Artisan Technology Group - Quality Instrumentation ... Guaranteed | (888) 88-SOURCE | www.artisantg.com
Here we see that the data represented some 10 billion bits and that there
were 9,470 errors detected. This measures out to an overall bit error
rate of 9.22x10⁻⁷. This average bit error rate can be looked at in more
detail by viewing a strip chart of the bit error rates averaged over
smaller intervals (e.g., the Integration Period). For this work, we set the
integration period to be 100 million bits. This will give us some 100
integration periods to look at.
This strip chart graph is showing the average bit error rate measured at
each integration period from the beginning of the test (on the left) to the
end of the test (on the right). We see from this graph that the bit error
rate was zero (no errors) for a large amount of the time and that only at
certain times did we see large bursts of errors. The error rates for the
integration periods that had any errors in them ranged from 7x10⁻⁴
(very bad) to 7x10⁻⁷ (better, but still measurable).
User Guide BA622
Artisan Technology Group - Quality Instrumentation ... Guaranteed | (888) 88-SOURCE | www.artisantg.com
Application Notes • 351
The first hypothesis from this analysis is that errors are not always
occurring; that when they do occur, they do not always occur to the
same degree; and that no identifiable pattern can be seen to predict the
frequency of the occurrence.
Burst Length Profile
Next we consider the sizes of the errors. The BitAlyzer burst length
profile is ideal for this. This graph shows the number of times there
have been errors of given lengths. For the purpose of this analysis, we
choose to set a very strict definition to "error length". In this case, we
require (by using the Minimum Error Free Interval setting) that error
bursts be composed of "solid" errors. No error-free bits exist within a
burst. This is an odd definition, in that many times, error bursts will
need to permit spanning a certain number of allowable "good" bits
within the burst because, after all, even a random noise source would
guess a certain number of good bits. However, for this case, my goal is
to see if there are ANY errors that are two or more bits in a row.
The x-axis of this graph represents the different error burst length sizes.
The y-axis represents how many times an error of a given length was
detected. Here we see that all the 9,470 errors measured are isolated
from other errors by at least one good bit. This is of interest and points
to the possibility of errors correlating to some higher-level format than
the bit serial data stream that was input to the BitAlyzer. If there were
interferences, for example, that affected the serial transmission of the
data, the probability of never having two bits in a row as errors would
be very, very low.
This same type of reasoning often exists in systems that have byte-level
interleaving (such as those popularly used in systems equipped with
Reed-Solomon error correction). Byte level interleaving will have a
352 • Application Notes
User Guide BA622
Artisan Technology Group - Quality Instrumentation ... Guaranteed | (888) 88-SOURCE | www.artisantg.com
tell-tale burst length profile, in that error lengths of one to eight bits
will be very likely (and often will start to show the shape of the curve
of error-length probability), only to be followed by extremely low
probability of errors that are nine bits or longer. Physical errors that
occur somewhere in these systems are broken up by the byte interleave.
One-bit long errors can also be very indicative of a generally poor
signal-to-noise ratio, which will relate to the trickle of the random bitsize error rate; however, we already anticipate that errors are not
trickling in because of the bursty nature of the strip chart.
Error Free Interval
To confirm our hypothesis regarding the randomness of errors, we next
consider the histogram of error-free intervals. This graph plots the
number of times we have had occurrences of different spacing between
errors. A truly random error situation would have a linear probability
(occurrences) of error-free intervals of all increasing sizes (e.g.,
probability of the arrival of a random event). Any frequency component
of the error would show as a continually recurring error free interval.
The x-axes of this graph represent the different error free interval
lengths. The y-axis represents the number of times a given error free
interval has been detected. Here we see that error free intervals of 23bits and octaves of 23-bits are extremely likely. This points out that
errors often occur every 24 bits (23 error-free bits plus the error equals
24).
So, what do we know so far? We know that isolated bit errors are
happening in a bursty, unpredictable manner and that when an error
occurs, it is highly likely that the data bit 24 bits downstream will also
be in error.
User Guide BA622
Artisan Technology Group - Quality Instrumentation ... Guaranteed | (888) 88-SOURCE | www.artisantg.com
Application Notes • 353
We now make another hypothesis. Knowing that this data was taken off
a multi-track instrumentation recorder, we find out that, in fact, there
are 24 active data tracks used when recording and playing back data.
We can now anticipate that the format of recording our high-speed
serial data stream is to alternatively send each serial bit to one of the
parallel tracks in a round-robin fashion. One probability is that one
track of the available 24 tracks is promoting errors. This approach
follows the diagnostic axiom of trying to find a single failure point.
This would explain all our graphs so far. Error bursts on one 1/24th bitoriented head would show lengths all equal to one bit with a constantly
re-occurring error-free interval of 23 bits.
Modulo Analysis
To verify this hypothesis we can use another type of BitAlyzer
analysis, namely Modulo Analysis. Modulo Analysis plots the number
of times errors have occurred in a bit position "modulo"7 a userselected divider. In this case, we are interested in seeing errors modulo24 (e.g., the 24 data tracks). If one of the 24 channels is accounting for
all the errors, we would see that all errors would be in one headposition of the modulo-24 analysis.
Alas, this is not the case. This Modulo Analysis result has 24 positions
("bins") representing each of the 24 head channels. The height of the
bar at a given bin represents the number of errors found in that position.
Here we see some head channels have a measured probability of having
errors and others have no errors. Errors are certainly not attributable to
a single head position.
7
This is the mathematics modulo operator which yields the remainder after a division is done. For
example, 10 modulo 3 = 1.
354 • Application Notes
User Guide BA622
Artisan Technology Group - Quality Instrumentation ... Guaranteed | (888) 88-SOURCE | www.artisantg.com
The interesting point of this graph, though, is that not all head channels
in this data set have errors. This again points to a possibility of
systematic error phenomenon. It would be nice to see how these errors
physically occurred on a per-channel basis. For this, we use the
BitAlyzer's media scan analysis.
Media Scan
The Media Scan analysis feature of the BitAlyzer was invented to
provide a two-dimensional image of error data sets that can be zoomed
and panned for an interactive querying. In this case, we will set the
track size of the media scan (the vertical y-axis of the display) to be the
24 channels. The horizontal x-axis will represent time (or tape footage,
or track number, etc.).
Vertical "dashes" in this view represent one or more errors in a headchannel at a specific location. The left of the image is the beginning of
the test run and the right of the image is the end of the test run. The
vertical axis represents each of the 24 user channels. This graph finally
starts to reveal what is really happening in this experiment. Each dash
represents an error "burst" that was a spike in our Strip Chart. Errors
are occurring on isolated head channels and are affecting only the head
channel involved (no errors on neighboring head channels). This would
suggest that media errors that would span multiple head channels are
probably not involved.
We can use the Media Scan's zooming feature to look at a single one of
these bursts in great detail. For example,
User Guide BA622
Artisan Technology Group - Quality Instrumentation ... Guaranteed | (888) 88-SOURCE | www.artisantg.com
Application Notes • 355
This media scan image shows the exact error bit pattern represented by
the first vertical dash in this head channel position from the previous
media scan. We can see that the burst covers more than 300 bits (by
counting). Unfortunately, this view also demonstrates a display
problem with the Media Scan option in the precision of x-axis labeling.
After manually zooming in on more of the error dashes, it can be seen
that they are all error bursts of varying sizes, each isolated to its own
head channel.
Particular interest was taken in the set of error dashes all in the same
vertical column in the media scan above. These dashes are on
alternating head channels, suggesting the possibility of head stack error
correlation; however, not enough data is present to study this in detail.
One explanation might be that a defect on the media surface caused
these errors; however, the fact that the neighboring head channels did
not show errors (even earlier or later on the tape due to head stack
offset) would still need to be explained.
356 • Application Notes
User Guide BA622
Artisan Technology Group - Quality Instrumentation ... Guaranteed | (888) 88-SOURCE | www.artisantg.com
This is an excellent view of isolated error bursts on alternating head
channels in this recording sub-system.
Second Pass
As a check of the work, we can look at a second set of error data taken
from the recording sub-system running at twice the data rate. All of the
graphs in this pass are similar to the first pass except that the overall
error rate was worse and the rate of occurrence of the error bursts was
increased.
This second data pass does not cover as many user bits as in the first
analysis, but the same results can be seen. It can further be seen that
certain head channels have a higher probability of having these small
bursts than others. In fact, an argument might be made for the higher
probability bursts occurring in odd head channels versus even.
Discussion
Once this level of detail is understood, the next step is to try to figure
out what type of sub-system malfunction would cause this kind of error
characteristic. Some possible candidates for common failure points
include:
Bad Media ...........................Possible, but unlikely. Media defects would
be expected to occur on multiple head
User Guide BA622
Artisan Technology Group - Quality Instrumentation ... Guaranteed | (888) 88-SOURCE | www.artisantg.com
Application Notes • 357
channels (at least occasionally). For
example, a crease in the tape would
probably affect all head channels of all head
stacks. In this case, errors are very confined
to a given head channel. It is possible that a
very small cosmetic defect that would not
span multiple head channels "triggered" an
error burst to start, but this would not
explain the alternating head channel error
bursts found in the last example.
Poor Equalization ............... Probably not. Poor equalization would, in
general, decrease the signal-to-noise ratio of
a channel. This would increase the random
error rate, but have really no effect on the
burst error rate. What we are seeing are
definitely burst errors. In fact, the random
error rate looks to be zero.
Bad Serial Interface ............ Probably not. Difficulties with the serial
interface might be quite common (especially
at higher data rates); however, in this case
we can show that all errors correlate to the
magic "24" number. Errors due to the serial
link should randomly affect any one of the
24 head channels. In fact, serial interface
problems would be expected to cause
pattern-sensitive errors (e.g., certain data
patterns would cause more errors than
others). To prove this, we would perform a
modulo analysis where the length of the
modulo analysis was the length of the
pseudo-random or fixed-pattern data that
was being sent through the system. If certain
portions of the data sequence "caused"
errors, we would see a larger number of
error occurrences at certain spots of the data
sequence.
358 • Application Notes
User Guide BA622
Artisan Technology Group - Quality Instrumentation ... Guaranteed | (888) 88-SOURCE | www.artisantg.com
In this graph, we perform a modulo-127
analysis, which would be the case if the
PRN-7 data sequence was being used. Here
we see that each of the 127 bit positions of
the PRN-7 pseudo-random sequence was
equally likely to be in error.
Interference .........................Probably not. External interference would
not be synchronous with the channels and,
again, should show up as errors on any head
channel. Also, it is common that interference
occurs at a given frequency (such as powersupply switching noise) and would show up
in the histogram of error-free intervals as
another spike. Random interference is very
difficult to track down; however, in this
case, due to the 24-channel bit interleaving,
it can probably be ruled out. It is still
possible that interference was occurring on a
per-head-channel basis before the bit
interleaving, but then we would need to
explain why it only occurred typically on
one channel at a time and not on all
channels, as would be expected.
Poor azimuth adjustment .....Unknown. Having an incorrect azimuth
angle or offset would decrease a head signal
pick-up from the desired channel and
increase the "cross-talk" interference pickedup from neighboring channels. This would,
again, look like a poor signal-to-noise ratio,
and would probably cause a more constant
error "trickle" than the bursts we are seeing.
It would also manifest itself more or less
equally on all head channels on that head
stack, which we do not see. We do see that
User Guide BA622
Artisan Technology Group - Quality Instrumentation ... Guaranteed | (888) 88-SOURCE | www.artisantg.com
Application Notes • 359
errors are more frequent on one stack than
the other, so there is probably some
component of the failure that has to do with
odd/even head channel sets. However, this
certainly may be caused in the electronic
architecture of the recording channel as well
as in the head transducer. One would want to
know more about what assemblies
(mechanical and electronic) are used in
common or separated between the two sets
of channels.
PLL drop-out on a channel.. Probably not. If the phase lock loop
somehow lost its input signal and started to
free-run, the clock output frequency would
eventually drift away from the true rate and
a bit-slip would occur (either adding or
deleting one or more bits). This would cause
the data stream to lose synchronization in
the error monitoring equipment and it would
appear as an enormous error burst until a
new synchronization was requested. In our
case, the small bursts that are happening on
a head-channel basis recover completely
after the burst, with no new synchronization.
This could, however, still be the case,
depending on the sophistication of the data
format on tape and the deformatting
electronics' ability to correct for these kinds
of errors.
The errors seen occur more or less randomly on multiple isolated
channels. The density of the errors is very severe and, in some cases, is
preceded by a small error. This might indicate some systematic
problem that is "triggered" by some event and, once triggered, lasts for
a certain length before it corrects itself. Cosmetic media defects have
this attribute; however, we've somewhat eliminated this probability
because of the alternating error problem discovered at one location (this
might have been due to a secondary effect). The next possibility would
be to explore the electronic channels. What is handled in common and
separate between the head stacks, such that a higher number of these
error bursts might occur on one stack over the other?
More data will need to be collected and analyzed and experiments will
need to be done affecting changes to certain parts of the sub-system.
The BitAlyzer error analysis used can shed light on many error
360 • Application Notes
User Guide BA622
Artisan Technology Group - Quality Instrumentation ... Guaranteed | (888) 88-SOURCE | www.artisantg.com
problems, but cannot replace the clever and logical thinking of a good
technical expert.
Conclusion
By viewing the error statistics gathered by the BitAlyzer, exact
correlation can be found for errors in both these data sets to the 24 head
channels used in this sub-system. Because of this correlation, many
possible explanations can be eliminated as candidates for repair. Error
bursts on a per-head-channel basis can now be monitored while repair
and integration continue, to measure success.
Event Logging during Blanked Intervals
Blanking features on the BitAlyzer allow the user to disable error
analysis during certain sections of data by raising the hardware
BLANK signal available on the interface. During the "blanked" time,
errors that are found will be ignored. There are, however, other kinds of
events that may be important even during a "blanked" interval,
including user Marker signals. If a user Marker signal comes in during
a "blanked" interval, it is not ignored by the BitAlyzer. Instead, that
"blanked" event is processed.
A question can arise about the location of the Marker signal. Locations
of events are assigned by the BitAlyzer for processing. If an event is
requested during a "blanked" interval, a location still must be assigned
that is unique in the data stream. If the user has selected the "Count
During Blank" option available in the Detector Setup screen, counts
(e.g., event locations) are continually incrementing during the
"blanked" interval, and so a Marker location can easily be assigned as
the count value present when the Marker came in. The side-effect of
this Detector configuration is that the bits occurring during the
"blanked" interval are interpreted as "good" bits and, therefore, the
user's error rate will be deflated.
If the user chooses not to "Count During Blank," any event that needs a
location assigned during this "blanked" interval will be assigned the
next count value, and the count value will be incremented by one.
The effect of this will be to place a Marker as if it were right next to the
beginning of the upcoming non-blanked interval. For example, in a user
configuration that tested 512 words with blanked intervals of 100 bytes
between, and Markers in the middle of the "blanked" interval, the
BitAlyzer would interpret this as groups of 513 words with the first
word being the Marker location.
User Guide BA622
Artisan Technology Group - Quality Instrumentation ... Guaranteed | (888) 88-SOURCE | www.artisantg.com
Application Notes • 361
This can affect Modulo-Analysis (to perform Modulo-512 word
analysis, the user would need to use a Modulo-513 word setting). Note,
however, that Modulo-Marker Analysis could be used instead.
Multiple events occurring within the same blanked interval are
processed in the identical manner. If "Count During Blank" is disabled,
each event is allocated the current counter value, which is then
incremented by one.
G.821 Analysis
CCITT Recommendation G.821 refers to a common style of bit error
statistics for communications channels. Basically, channel time is
separated into consecutive seconds, and the number of errors in each
second is used to determine when the channel is available. The CCITT
G.821 recommendation suggests that 10 consecutive seconds of an
error rate exceeding 1-in-1,000 (1e-3) initiate a "Break" in the channel,
and that the break condition continue until 10 consecutive seconds of
improved error condition are received. The break condition begins with
the first of the 10 severely errored seconds that initiate the break, and it
ends with the first of the 10 consecutive non-severely errored seconds
that terminate the break. This is shown in the following diagram:
The break condition separates total test time into two classifications:
Available time and Unavailable time. These descriptions, especially
Available time, are given to many G.821 statistics. For instance,
Available Seconds is the number of seconds for which the link was
available. Unavailable Seconds is the number of seconds for which the
link was unavailable, and Total Test Time is the sum of Available
Seconds and Unavailable Seconds.
362 • Application Notes
User Guide BA622
Artisan Technology Group - Quality Instrumentation ... Guaranteed | (888) 88-SOURCE | www.artisantg.com
The following glossary of terms for G.821 analysis may be helpful:
Available BER................. The ratio of Available Errors to Available Bits.
Available Bits .................. The quantity of bits represented by the number
of seconds in Available time.
Available Error Free
Seconds ........................... The quantity of seconds during Available time
that have had zero errors in them.
Available Errored
Seconds ........................... The quantity of seconds during Available time
that have errors in them. This includes NonSeverely Errored Seconds (Ok Seconds), and
possibly Severely Errored Seconds as well,
because it takes 10 consecutive Severely
Errored Seconds to terminate Available time.
Available Errors .............. The quantity of bit errors encountered during
Available time.
Available Ok Seconds ...... The quantity of seconds during Available time
that have at least one error, but do not exceed
the Severe Threshold. These are also known as
Available Non-Severely Errored Seconds.
Available Ok Seconds
Percent ............................ The ratio, expressed as a percentage, of Ok
Seconds to Available Seconds.
Available Seconds............ The number of seconds for which the link is
available, described as the sum of all seconds
that are not portions of "Break" intervals.
Available Seconds
Percent ............................ The ratio, expressed as a percentage, of
Available Seconds to Total Test Seconds.
Bit Data Rate ................... The explicitly specified number of bits
transmitted in one second. This value is
specified in Hertz.
Break............................... The occurrence of 10 consecutive Severely
Errored Seconds initiates a break condition.
This is also known as Unavailable time.
Degraded Minutes............ The quantity of minutes for which the number
of errors exceeded the Degraded Minute Error
Threshold. Degraded Minutes consist only of
User Guide BA622
Artisan Technology Group - Quality Instrumentation ... Guaranteed | (888) 88-SOURCE | www.artisantg.com
Application Notes • 363
seconds which are in Available time and which
are not Severely Errored Seconds.
Degraded Minutes
Percent............................. The ratio, as expressed as a percentage, of
Degraded Minutes to Total Available Minutes.
Excluded SES .................. The quantity of Severely Errored Seconds
which occur during the Available time.
Link Status ...................... A determination of the state of the link.
"Disabled" indicates the G.821 analysis feature
is currently not operating. "Available"
indicates the link is up and available.
"Degrading" indicates that a number of
Severely Errored Seconds have been
encountered, but not enough to meet the Break
condition yet. "Unavailable" indicates a break
condition has occurred and the link is currently
Unavailable. "Improving" indicates that the
link is currently in an Unavailable state, but
that a number of Non-Severely Errored
Seconds have been encountered, although not
enough to terminate the break state yet.
Log File Name ................. The DOS file name that is created during an
analysis session, containing lines of ASCII,
comma-separated statistics compatible with
import features of most common spreadsheet
programs.
Log Seconds Interval ....... The number of seconds of analysis statistics
that are grouped together to form each line of
output to the ASCII log file.
Number of Breaks ............ The number of times that 10 consecutive
Severely Errored seconds are encountered
during Available time, which initiates a Break
in the line and begins Unavailable time.
Seconds of Break ............. The sum of all seconds during which the link
is Unavailable.
Severe Error Threshold.... The quantity of errors during one second that
qualifies the second to be marked as a
Severely Errored Second. CCITT
Recommendation G.821 refers to a 1-in-1,000
error rate (1e-3) for this condition, however
364 • Application Notes
User Guide BA622
Artisan Technology Group - Quality Instrumentation ... Guaranteed | (888) 88-SOURCE | www.artisantg.com
the BitAlyzer622 makes this setting selectable
for convenience.
Severely Errored
Seconds ........................... The quantity of seconds for which the number
of errors met or exceeded the Severe
Threshold parameter as selected by the user.
These statistics include seconds during
Available and Unavailable time.
Total Available Minutes... The number of minutes represented by the
Available Seconds divided by 60. If there are
any remaining seconds from the division, Total
Available Minutes is rounded up.
Total Test Seconds........... The number of seconds in the entire test. This
is the sum of Unavailable plus Available
seconds.
Unavailable Seconds ........ The number of seconds for which the link is
not available. This is the sum of all seconds
during which a break condition is present. This
may be calculated as the Total Test Seconds
minus the Available Seconds.
BitAlyzer622 G.821 Analysis is similar to other forms of error analysis.
First, the Analyzer Scanner Setup window must be accessed to enable
the G.821 error data scanner, and then LIVE, RECORD, and
PLAYBACK analyzer operating modes will also include G.821
analysis.
The G.821 Panel displays current statistics for most of the G.821
results that are calculated by the BitAlyzer.
User Guide BA622
Artisan Technology Group - Quality Instrumentation ... Guaranteed | (888) 88-SOURCE | www.artisantg.com
Application Notes • 365
Pressing the Setup button on the G.821 panel opens the G.821 Setup
modal dialog window, which is used to select features and settings for
G.821 analysis. The Bit Data Rate must be explicitly set. The Severe
Threshold is a user-selectable entry field, although CCITT
Recommendations imply a 1-in-1,000 error condition for this threshold.
An advanced feature of the BitAlyzer622 is the capability to produce an
ASCII-formatted log file containing ongoing results of G.821 analysis.
This is performed by selecting a DOS file name, and the number of
Seconds you wish to combine together to form one line of output to the
log file.
Note: It is possible to produce output for each and every second;
however, the BitAlyzer622 G.821 error analyzer will show seemingly
incorrect results at this level of detail, due to the CCITT
recommendation. As described previously, 10 consecutive non-severely
errored seconds are required before a Break condition is terminated.
Only after the Break is terminated are these 10 seconds attributed as
Available seconds. Therefore, for the 10-second period, it is unknown
whether these intermediate statistics are attributable to other Available
statistics or not. In practice, this is insignificant.
The ASCII log file is a comma-delimited file format, which is
compatible for importing to popular spreadsheet programs. The top of
the file contains some useful information for identifying the contents of
the file and parameters that affect processing. The remaining lines of
the file identify statistics for each Log Seconds interval.
366 • Application Notes
User Guide BA622
Artisan Technology Group - Quality Instrumentation ... Guaranteed | (888) 88-SOURCE | www.artisantg.com
BITALYZER G.821 LOG FILE
BITS PER SECOND,64000
SEVERE THRESHOLD,64
TTS,SES,AS,AEFS,AES,SOB,NOB,AB,AE,SOK,TAM,DM,ESES
1000,0,1000,964,36,0,0,64000000,282,36,16,6,0
2000,0,1000,973,27,0,0,64000000,66,27,17,6,0
3000,0,1000,964,36,0,0,64000000,109,36,17,7,0
4000,0,1000,956,44,0,0,64000000,182,44,16,11,0
5000,0,1000,954,46,0,0,64000000,147,46,17,11,0
6000,1,1000,970,30,0,0,64000000,317,29,17,6,1
7000,0,1000,967,33,0,0,64000000,220,33,17,8,0
8000,0,1000,958,42,0,0,64000000,141,42,17,11,0
9000,0,1000,968,32,0,0,64000000,98,32,16,7,0
10000,0,1000,972,28,0,0,64000000,89,28,17,8,0
11000,0,1000,961,39,0,0,64000000,136,39,17,10,0
12000,0,1000,962,38,0,0,64000000,175,38,16,11,0
13000,0,1000,957,43,0,0,64000000,183,43,17,9,0
14000,0,1000,972,28,0,0,64000000,152,28,17,9,0
15000,0,1000,960,40,0,0,64000000,292,40,16,8,0
16000,0,1000,967,33,0,0,64000000,89,33,17,8,0
17000,0,1000,965,35,0,0,64000000,178,35,17,10,0
18000,0,1000,968,32,0,0,64000000,124,32,16,9,0
19000,1,1000,960,40,0,0,64000000,349,39,17,7,1
20000,0,1000,958,42,0,0,64000000,133,42,17,10,0
21000,0,1000,948,52,0,0,64000000,279,52,16,12,0
22000,0,1000,955,45,0,0,64000000,164,45,17,7,0
The following table explains the acronyms used in the log file format:
TTS -- Total Test Seconds
SES -- Severely Errored Seconds
AS -- Available Seconds
AEFS -- Available Error Free Seconds
AES -- Available Errored Seconds
SOB -- Seconds Of Break
NOB -- Number Of Breaks
AB -- Available Bits
AE -- Available Errors
SOK -- Available OK Seconds
TAM -- Total Available Minutes
DM -- Degraded Minutes
ESES -- Excluded Severely Errored Seconds
All G.821 analysis results are also available from the BitAlyzer622 via
remote control. This includes RS-232 and IEEE-488 ports. The
following table outlines the protocols that are implemented to support
these features.
G821 BitsPerSecond
User Guide BA622
Artisan Technology Group - Quality Instrumentation ... Guaranteed | (888) 88-SOURCE | www.artisantg.com
Application Notes • 367
<BitsPerSecond> ............. Sets the Bits Per Second parameter. This may
not be zero.
G821 BitsPerSecond ?...... Returns the present setting for the Bits Per
Second Parameter.
G821 Threshold
<SevereThreshold>.......... Sets the minimum number of errors within one
second that qualifies it to be considered as a
Severely Errored Second. This is userselectable, although CCITT Recommendation
G.821 implies a 1e-3 error rate for this
condition. For a 64,000 Bits Per Second rate,
this would suggest a Severe Threshold of 64.
G821 Threshold ? ............ Returns the present setting for Severe
Threshold.
G821 Log
<SecondsInterval>
<FileName>..................... Sets two parameters used for performing
G.821 analysis logging. You may set the
number of seconds to group together to form
each line of output to the log file, and you may
select the file name. Files are created in the
current working Finder Directory. Selecting
the file name to be "NONE", or selecting the
Seconds Interval to be zero, disables the
logging feature.
G821 Log ?...................... Returns the present settings for Log Seconds
Interval and File Name.
G821 MinuteThreshold
<MinuteThreshold>......... Sets the maximum number of errors allowed
within one minute before classifying the
minute as a Degraded Minute. This is user
selectable, although the CCITT
Recommendation G.821 implies a 1e-6 error
rate for this condition. For a 64,000 Bits Per
Second rate, this would suggest a Degraded
Minute Error Threshold of 4. (4 Errors,
divided by the quantity 64,000 Bits Per Second
multiplied by 60 Seconds, yields an error rate
of 1.04e-6, which is not considered degraded.)
G821 MinuteThreshold ? . Returns the present setting for Degraded
Minute Error Threshold.
368 • Application Notes
User Guide BA622
Artisan Technology Group - Quality Instrumentation ... Guaranteed | (888) 88-SOURCE | www.artisantg.com
G821 Values1 ? ............... Returns the following analysis results: ulong
TotalTestSeconds, ulong
SeverelyErroredSeconds, ulong
AvailableSeconds, ulong AvailableErrorFreeSeconds, ulong
AvailableErroredSeconds, ulong
NumberOfBreaks, ulong SecondsOfBreak,
ulong AvailableOkSeconds. These values are
all separated by commas.
G821 Values2 ? ............... Returns the following analysis results: ulong
AvailableErrors, double AvailableBits, double
AvailableBER, double
AvailableOkSecondsPrcnt, double
AvailableSecondsPrcnt, uint LinkState
(0=Disabled, 1=Available, 2=Degrading,
3=Unavailable, 4=Improving). These values
are all separated by commas.
G821 Values3 ? ............... Returns the following analysis results: ulong
TotalAvailableMinutes, ulong
DegradedMinutes, double
DegradedMinutesPrcnt, ulong ExcludedSES.
These values are all separated by commas.
User Guide BA622
Artisan Technology Group - Quality Instrumentation ... Guaranteed | (888) 88-SOURCE | www.artisantg.com
Application Notes • 369
Hardware Interfacing to Recorders
The BitAlyzer has the ability to control certain recorders remotely,
using the RS-232 interface. This application note describes the pin-forpin connections between the BitAlyzer and various recorders. The
recorders currently supported are the Sony DIR-1000, the Loral
DV-6000, and the Ampex DCRS.
Loral DV-6000
Signal Name
Data 0 +
Data 0 Data 1 +
Data 1 Data 2 +
Data 2 Data 3 +
Data 3 Data 4 +
Data 4 Data 5 +
Data 5 Data 6 +
Data 6 Data 7 +
Data 7 Clock +
Clock -
370 • Application Notes
DV-6000 (Data In)
P2-79
P2-78
P2-76
P2-75
P2-73
P2-72
P2-70
P2-69
P2-67
P2-66
P2-64
P2-63
P2-61
P2-60
P2-58
P2-57
P2-25
P2-24
BitAlyzer Generator
P1-1
P1-2
P1-3
P1-4
P1-5
P1-6
P1-7
P1-8
P1-9
P1-10
P1-11
P1-12
P1-13
P1-14
P1-15
P1-16
P1-35
P1-36
User Guide BA622
Artisan Technology Group - Quality Instrumentation ... Guaranteed | (888) 88-SOURCE | www.artisantg.com
Signal Name
Data 0 +
Data 0 Data 1 +
Data 1 Data 2 +
Data 2 Data 3 +
Data 3 Data 4 +
Data 4 Data 5 +
Data 5 Data 6 +
Data 6 Data 7 +
Data 7 Parity +
Parity Clock +
Clock -
DV-6000 (Data Out)
P2-79
P2-78
P2-76
P2-75
P2-73
P2-72
P2-70
P2-69
P2-67
P2-66
P2-64
P2-63
P2-61
P2-60
P2-58
P2-57
P2-31
P2-30
P2-25
P2-24
Signal Name
Status Data Control Data 0 V Control Unit
BitAlyzer Detector
P1-1
P1-2
P1-3
P1-4
P1-5
P1-6
P1-7
P1-8
P1-9
P1-10
P1-11
P1-12
P1-13
P1-14
P1-15
P1-16
P1-33
P1-34
P1-35
P1-36
DV-6000 J20
Connector
Control
P2-36
P2-29
P2-43
User Guide BA622
Artisan Technology Group - Quality Instrumentation ... Guaranteed | (888) 88-SOURCE | www.artisantg.com
BitAlyzer
RS-232
P1-2
P1-3
P1-5
Application Notes • 371
DUT (Device Under Test) GUI Navigation
372 • Application Notes
User Guide BA622
Artisan Technology Group - Quality Instrumentation ... Guaranteed | (888) 88-SOURCE | www.artisantg.com
Appendices
Specifications
Specifications are subject to change without notice.
DATA GENERATOR
External Clock Input
Frequency
Connector
Termination
Logic Level
Begin Generate
Setup/Hold
Connector
Termination
Logic Level
Delay to Valid Data
Clock Output
Frequency
Connector
Logic Level
Rise/Fall8
8
External or internal clock supported
622 MHz, maximum
Serial: SMA, front panel
Parallel: 50-pin Locking Header, rear panel
Serial: 50 ohms to –2V
Parallel: 110 ohms
Serial: ECL
Parallel: differential ECL
Restarts output data pattern
(used in generator “RAM-Trigger” mode only)
Serial:150 psec setup, 450 psec hold (reference to clock)
Parallel: 0 ns setup, 8 ns hold (reference to parallel clock)
Serial: SMA, front panel
Parallel: 50-pin Locking Header, rear panel
Serial: 50 ohms to –2V
Parallel: 110 ohms
Serial: ECL, true or inverted
Parallel: differential ECL
Serial: 112 bits clocks
8-bit I/F: 14 clocks
16-bit I/F: 8 clocks
622 MHz maximum
Serial: SMA, front panel
Parallel: 50-pin Locking Header, rear panel
Serial: DC coupled ECL, true or inverted
Parallel: differential ECL, true or inverted
Serial: 300 psec (200 psec typical)
Parallel: 1.7 ns
Rise/fall measurements made between 20% and 80% points
User Guide BA622
Artisan Technology Group - Quality Instrumentation ... Guaranteed | (888) 88-SOURCE | www.artisantg.com
Appendices • 373
Data Output
Data Delay
Connector
Logic Level
Rise/Fall
Patterns
Trigger Output
Connector
Logic Level
Serial: ± 1.25 nsec, 20 psec resolution
Serial: SMA, front panel
Parallel: 50-pin Locking Header, rear panel
Serial: DC coupled ECL, true or inverted
Parallel: differential ECL, true or inverted
Serial: 300 psec (200 psec typical)
Jitter < 100 psec p-p (60 psec p-p typical)
Parallel: 1.7 ns
PRN-7
PRN-15
PRN-20
PRN-23
Optional user-defined 16-bit sequence
4 Mbit or 16 Mbit RAM
RAM is 16-bit addressable
Trigger point of PRN, 16-bit and RAM sequences
BNC, front panel
TTL
ERROR DETECTOR
Clock Input
Connector
Logic Level
Termination
Data Input
Setup/Hold
Connector
Logic Level
Termination
Patterns
374 • Appendices
Serial: SMA, front panel
Parallel: 50-pin Locking Header, rear panel
Serial: ECL, true or inverted
Parallel: differential ECL
Serial: 50 ohms to –2V
Parallel: 110 ohms
Serial: 150 psec setup, 175 psec hold (reference to clock)
Parallel: 3 nsec setup, 2 nsec hold (reference to parallel clock)
Serial: SMA, front panel
Parallel: 50-pin Locking Header, rear panel
Serial: DC coupled ECL, true or inverted
Parallel: differential ECL, true or inverted
Serial: 50 ohms to –2V
Parallel: 110 ohms
PRN-7
PRN-15
PRN-20
PRN-23
Optional user-defined 16-bit sequence
4 Mbit or 16 Mbit RAM
RAM is 16-bit addressable
User Guide BA622
Artisan Technology Group - Quality Instrumentation ... Guaranteed | (888) 88-SOURCE | www.artisantg.com
Data Delay
Begin Detect
Setup/Hold
Connector
Logic Level
Termination
Begin Detect Delay
Blank Input
Connector
Logic Level
Termination
Sampling
Marker Input
Connector
Logic Level
Termination
Max. Frequency
Sampling
Error Output
Connector
Logic Level
Trigger Output
Connector
Logic Level
Serial input clock to data relationship adjustable ± 1.25 nsec in
20 psec steps
External synchronization input used in RAM-Triggered mode only.
Resets detector’s RAM memory addressing for reference pattern
comparison to input data.
Serial: 150 psec setup, 175 psec hold (reference to clock)
Parallel: 3 nsec setup, 2 nsec hold (reference to parallel clock)
Serial: SMA, front panel
Parallel: 50-pin Locking Header, rear panel
Serial: DC coupled ECL, true or inverted
Parallel: differential ECL, true or inverted
Serial: 50 ohms to –2V
Parallel: 110 ohms
Serial: 34 bits clocks
8-bit I/F: 4 clocks
16-bit I/F: 2 clocks
Error counting is only done while BLANK is not active
BNC, front panel (for both serial and parallel interfaces)
ECL, true or inverted
50 ohms to –2 volts
Minimum blanking period covers 16 serial bits or two bytes or one
16-bit word. Blanking can be enabled or disabled by the user.
Markers that accompany data are time-tagged (to 16-bit accuracy)
to enable correlation analysis of errors with respect to user-supplied
markers. Two markers are supported.
Marker 1: BNC, front panel
Marker 2: 50-pin Locking Header, rear panel
Marker 1: ECL
Marker 2: differential ECL
Marker 1: 50 ohms to –2 volts
Marker 2: 110 ohms
fMarker1 + fMarker2 < 10 KHz
Marker location is accurate to within 16 bits of user data
Flag indicating one or more errors within 16 bits
BNC, front panel
TTL, logic high indicates error
Trigger point of PRN, 16-bit and RAM sequences
BNC, front panel
TTL
User Guide BA622
Artisan Technology Group - Quality Instrumentation ... Guaranteed | (888) 88-SOURCE | www.artisantg.com
Appendices • 375
MEASUREMENTS
Generator Clock
Detector Clock
Error Rates
Error Counts
Event Counts
0.01 % resolution for frequencies above 1 MHz
0.01 % resolution for frequencies above 1 MHz
Non-Burst Error Rate, Burst Error Rate, Total Error Rate
Non-Burst Error Count, Burst Error Count, Total Error Count
Error Bursts
ANALYSIS9
Strip Chart
Burst Length Histogram
Error Free Interval
Histogram
Modulo-N Correlation
Modulo-Marker
Correlation
Modulo-Pattern Period
Correlation (Pattern
Sensitivity)
Block Error Distribution
Error Autocorrelation
Analysis
9
Graphical representation of a strip chart recorder which plots the
Total, Bit and/or Burst components of error rate versus the number
of bits that have been analyzed. Sampling intervals, zoom and pan
level are adjustable.
Histogram of the number of burst events versus their length (in
bits). Burst definition, bin resolution, titles, two cursors, zoom and
pan level are adjustable
Histogram of the number of intervals between errors versus their
length (in bits). Bin resolution, titles, two cursors, zoom and pan
levels are adjustable.
Histogram of the number of errors versus their bit position in the
stream modulo a user-defined N-factor divisor. The bin in the
histogram where an error is accumulated into is calculated as: bin =
error_location mod N. In this way, the Modulo-N correlation
histogram will have at most N histogram bins. N-factor, bin
resolution, titles, two cursors, zoom and pan levels are adjustable.
Histogram of the number of errors versus their bit position in the
stream modulo a user-input marker signal. In this way, the
histogram will have at most the number of bits between markers as
the number of histogram bins. Marker selection (A or B), bin
resolution, titles, two cursors, zoom and pan levels are adjustable.
Histogram of the number of errors versus their bit position within
the PRN sequence received at the detector. For example, a PRN-7
pattern will have histogram bins each representing errors found in
one bit position of the pseudo-random sequence. Bin resolution,
titles, two cursors, zoom and pan levels are adjustable.
Histogram of the number of errored blocks versus the number of
errors in a block. Block size, bin resolution, titles, two cursors,
zoom and pan levels are adjustable.
Histogram of the number of errors versus the number of bits away
from another error. Indicates systematic errors that are predictable
based on the occurrence of other errors. Bin resolution, titles, two
cursors, zoom and pan levels are adjustable.
Many analysis features are uniquely enabled by United States Patent #5,414,713
376 • Appendices
User Guide BA622
Artisan Technology Group - Quality Instrumentation ... Guaranteed | (888) 88-SOURCE | www.artisantg.com
Time Division Multiplex
Deformatting
ECC (option)
2-D Error Mapping
(option)
CCITT G.821
Parallel I/F Bit Masking
Multiple bar charts of bit error rates for up to 32 equal-sized time
division multiplexes within the data stream. Number of
multiplexes, bits per multiplex, sampling interval, titles, zoom and
pan level are adjustable.
Status display only. Errors found in correctable locations in the data
stream are removed from any later analysis. Correctable locations
are defined by the user by setting up correction strengths,
row/column formats and erasure capability.
Two-dimensional image map of errors. Errors are plotted in an X-Y
coordinate axis. Y represents the offset within a user-defined
blocking size and X represents the block number. Block size is
defined either by an N-factor number of bits or by an external
Marker. N-factor, imaging threshold, X/Y cursors, zoom and pan
levels are adjustable.
Numeric statistics as defined in CCITT G.821 are measured on
selectable block-size basis. Measurements include: Test Seconds,
Severely Errored Seconds, Number of Breaks, Seconds of Break,
Available Seconds, Available Error Free Seconds, Available
Errored Seconds, Available OK Seconds, Available Seconds
Percent, Available OK Seconds Percent, Available BER, Total
Available Minutes, Degraded Minutes, Degraded Minutes Percent,
and Excluded SES. Data rate, severe error threshold, degraded
minute error threshold adjustable by user.
Configuration display only. Data bits (and errors found on them) in
the specified mask bit positions in the 16-bit interface are removed
from any later analysis. For example, a 10-bit parallel stream can be
tested for bit error content by using this feature in conjunction with
RAM GRAB detector synchronization.
PROCESSING
Operating Modes
Error Event11 Rate
10
11
Live – In live mode, all logged error events10 are processed in realtime to display the selected analysis results.
Record – In record mode, error events are recorded directly to the
hard disk using the specified filename.
Both – In both mode, error events are both analyzed in real-time
and recorded to the internal hard disk drive.
FULL CAPTURE
Live Mode: 120,000 events/sec
Record Mode: 100,000 events/sec
When error event rates exceeds specified rate, analyzer will dutycycle analysis and report to user the number of bits that were not
included in the analysis.
Error events time tag the location of markers or up to 16 consecutive bit errors
Measured with BasicBER scanner active
User Guide BA622
Artisan Technology Group - Quality Instrumentation ... Guaranteed | (888) 88-SOURCE | www.artisantg.com
Appendices • 377
Error Event Storage
Resynchronization
>170 million error events (Record and Both modes only)
Maximum single-shot burst of < 32768 bits can be captured fully
Manual – User presses a button to request pattern resynchronization
Automatic – System automatically resynchronizes if
resynchronization threshold of consecutive word errors occurs.
None – If synchronization is lost, system will wait for manual
resynchronization
PRN sequences are synchronized by seeding a reference generator
with user data. RAM sequences in RAM-Grab mode are
synchronized to by capturing user-defined number of words from
incoming data stream and making a second pass to make sure
reference grab was error free. Searching for synchronization
continues until error-free seed is found or is manually interrupted.
MISCELLANEOUS
Keyboard
Floppy
Display
Touch Screen
Mouse Interface
Knob
Printer Interface
Power
Size
Weight
104-Key for Alphanumeric entry and Maintenance functions
1.44 Mbyte MSDOS Compatible
640 x 480 active matrix color TFT display
1024 x 1024 analog resistive touch sensor
Microsoft12 -compatible mouse interface (mouse not included)
Used to scroll numeric entry fields and pan/zoom operations
Centronix Parallel Printer Port (printer not included)
< 200 watts, 110/220 autoselectable
8.75" x 17.25" x 15.5" (222.25 mm x 438.15 mm x 393.70 mm)
44 lbs (20 kg)
INTERNAL CLOCK SOURCE (OPTION)
Setting Resolution
Accuracy
Stability
Better than 15 ppm
± 1 ppm
± 7 ppm 0° C to 50° C (typical 1 ppm in-lab environment)
REMOTE CONTROL
Interfaces
Command Language
Diagnostic Features
12
IEEE-488.2 (GPIB) or RS-232C
ASCII command language to automatically control manual
functions.
Interactive mode, auto-logging of remote control commands to
HDD file for audit
Registered trademark of Microsoft Corporation
378 • Appendices
User Guide BA622
Artisan Technology Group - Quality Instrumentation ... Guaranteed | (888) 88-SOURCE | www.artisantg.com
AUXILIARY 2-CHANNEL BERT (OPTION)
Function
Logic Family
Generator
Data Patterns
Clock Sources
Detector
Data Patterns
Error Counting
Window
Resynchronization
Measurement Views
Error Logging
2-channel basic PRN data generation and error counting is
supported running simultaneously with BitAlyzer operations.
TTL, ECL or Differential TTL (jumper selectable)
PRN 2n – 1 where n = 7, 11, 15, 20, 23 and 16-bit fixed pattern
Internal crystal and 14 octaves (user-supplied) or external
PRN 2n – 1 where n = 7, 11, 15, 20, 23 and 16-bit fixed pattern
105, 106, 107, 108, 109 or external input
Automatic or external input
Strip Chart, Table and Chart views
ASCII file of error measurements for each window
INSTRUMENTATION RECORDER TEST PACKAGE (OPTION)
Supported Recorders
Basic Remote
Operations
Additional Remote
Features
SONY DIR-1000
Ampex DCRSI
Datatape LP
Metrum VLDS
Enertec DV-6000
Generic (ASCII remote control strings set by user)
STOP, PLAY, RECORD, FAST FORWARD, REVERSE, EJECT,
RESET
Vary depending on recorder. Typically supports control and status
of error correction, tape footage and ID counters
User Guide BA622
Artisan Technology Group - Quality Instrumentation ... Guaranteed | (888) 88-SOURCE | www.artisantg.com
Appendices • 379
Config.Sys Listing
DOS=HIGH,UMB
DEVICE=C:\DOS\HIMEM.SYS
DEVICE=C:\DOS\EMM386.EXE RAM
BUFFERS=24
BREAK=ON
STACKS=0,0
FILES=32
Autoexec.Bat Listing
@Echo OFF
Prompt $P$G
Path C:\DOS;C:\BATCH;C:\USRBIN
Set DIRCMD=/O/L
Set TMP=C:\TMP
LoadHigh SmartDrv C+ 1024
Cd \USR\BIN
Echo BA6 -R
Rem Pause
Ba6 -R
380 • Appendices
User Guide BA622
Artisan Technology Group - Quality Instrumentation ... Guaranteed | (888) 88-SOURCE | www.artisantg.com
Exit Error Codes
NUM
0
1
2
3
4
5
6
7
8
9
10
11
12
13
14
15
16
17
18
19
20
21
22
23
24
25
26
27
28
29
30
31
32
33
34
35
36
37
38
39
40
42
43
41
44
45
46
47
48
49
MACRO
DESCRIPTION
NORMAL_EXIT
ER_POPCATCH
ER_HNDLMEM
ER_PTRMEM
ER_RESRD
ER_RESCNT
ER_RESHNDL
ER_RESMISS
ER_RESMEM
ER_RESFILE
ER_UPDRMEM
ER_INVRECT
ER_DRIVER
ER_FONTMEM
ER_FONTLOCK
ER_FONTFIL
ER_USELOCK
ER_WPAPER
ER_FLOATER
ER_NOFMT
ER_NOSCN
ER_NOPTR
ER_NOVAL
ER_NOWIN
ER_NOFONT
ER_NOSMEM
ER_SCANH
ER_SCANP
ER_BLMEM
ER_BINH
ER_SCMEM
ER_TRACEH
ER_TADD
ER_TFIND
ER_TNEXT
ER_NOT3
ER_FNUM
ER_BITMAP
ER_FONTUSE
ER_FONTDONE
ER_SDMEM
ER_NOHALFKERN
ERINGMAT
ER_2_CMDLISTS
ER_NOCMDLIST
ER_REMMEM
ER_FPERROR
ER_SIGABRT
ER_OVERFLOWLIST
ER_BADPTR
Normal Exit
Unmatched PopCatch UNUSED
No Handle Memory
No Handle Base Memory
Error Reading Resource
Can't Read Resource Count
No Handle For Base Resource Table
Resource Not Found
No Handles At Load Resource
Missing Resource File
No InvalRect Queue
InvalRect Count Reached
Graphics Driver Missing
No Font handles
Can't lock font handle for loading
Can't find font file
Can't lock font handle for use
Can't allocate memory for Wallpaper
Can't allocate memory for Floater
No Fmt Function for ENTRY/Display Field
No Scan Function for ENTRY Field
No Ptr for ENTRY/Display Field
No ValPtr for Checkbox Field
No Window Ptr
Can't read font file
Can't Lock handle during Set-Access
Can't allocate handle for scanner
Can't lock scanner handle
Need Memory for BL Histogram Bins
Using Bin that doesn't have handle memory
Need Memory for Strip Chart Bins
No Trace Handle Memory
No Ptr when adding Trace Item
No Ptr when finding first Trace Item
No Ptr when finding next Trace Item
Fifo Contents Not Divisible by Three
Invalid Font Number
No Memory for Off-Screen Bitmap
Error in UseFont
Error in DoneUsingFont
No Two-D Memory
Need HALFKERN Driver
Singular matrix in InvertMat3
Too many remote command lists
No remote control command list
No remote control memory
Floating point exception
SIGABRT signal
Overflow Media Scan Burst List
Bad Pos/Size Ptr in Slider
User Guide BA622
Artisan Technology Group - Quality Instrumentation ... Guaranteed | (888) 88-SOURCE | www.artisantg.com
Appendices • 381
50
51
52
53
54
55
56
57
58
59
60
61
62
63
64
65
66
67
1001
1002
1003
1004
1005
1006
1007
1008
1009
1010
ER_SBMEM
ER_PALMEM
ER_MWDR0
ER_MWDR1
ER_MWDR2
ER_MWDR3
ER_MWDR4
ER_MWDR5
ER_MWDR6
ER_MWDROK
ER_MWDR7
ER_SIGILL
ER_SIGSEGV
ER_ONEXIT
ER_GUIMGRSEMA
ER_DPMI
ER_AUXBMEM
ER_TIMERSET
ER_MOUSE_DRIVER
ER_ALIST_TOOBIG_1
ER_ALIST_TOOBIG_2
ER_ALIST_TOOBIG_3
ER_ALIST_TOOBIG_4
ER_ALIST_TOOBIG_5
ER_ALIST_TOOBIG_6
ER_ALIST_TOOBIG_7
ER_ALIST_TOOBIG_8
ER_ALIST_TOOBIG_9
ER_ALIST_TOOBIG_10
382 • Appendices
Can't Lock Set Blockhandles Handle
Problem allocating/locking Palette Mem.
MWDRIVER-6 = Loadable Driver Not Found
MWDRIVER-5 = Device Does Not Respond
MWDRIVER-4 = Protected-Mode Memory Error
MWDRIVER-3 = Memory Allocation Error
MWDRIVER-2 = Invalid DEVMODE Value
MWDRIVER-1 = TSR Shell Not Present
MWDRIVER+0 = No Error
ER_MWDR6
MWDRIVER+1 = InitGraphics Already Called
Illegal Instruction Trap
Segment Violation Trap
Failed ON_EXIT
GuiMgr Enabled When Not Disabled
DOS Protected Mode Interface Exception
No Aux-Bert Strip Chart Memory
Timers.c, SetTimer(): Timer is already set.
Mouse driver is not installed. (touch.c)
Too many Formulas defined
Too many Expressions defined
Too many Buttons defined
Too many Checkboxes defined
Too many Displays defined
Too many Entries defined
Too many Selectors defined
Too many SelectorItems defined
Too many Windows defined
Too many FieldItems defined
User Guide BA622
Artisan Technology Group - Quality Instrumentation ... Guaranteed | (888) 88-SOURCE | www.artisantg.com
Glossary of Terms
Bin Range
An array of numbers that represent the histogram bin values from
minimum bin position to maximum bin position.
Bit Error Rate
The ratio of errors to the total number of bits generated.
Burst Length
Single bit errors grouped together using the Maximum Error Free
Interval (EFI) definition. The burst length is defined to start at the first
error of the group and end at the last error.
Data Block
A contiguous number of bits for which an error count is calculated.
Data Capture
Capture user data into the onboard RAM and then store it into a file.
ECC
Error Correction Coding encompasses a variety of ways to handle or
correct errors in communications systems.
Error Free Interval (EFI)
A series of contiguous good data bits with no errors.
Error Inject
Purposeful injection of a known error into a data stream.
User Guide BA622
Artisan Technology Group - Quality Instrumentation ... Guaranteed | (888) 88-SOURCE | www.artisantg.com
Glossary of Terms • 383
Error Location Analysis
Analysis based on measuring the exact bit position of errors in a digital
channel.
Histogram
A graphical representation of a frequency distribution, in the form of a
bar chart.
Integration Period
The number of bits accumulated before calculating an error rate.
Logic Threshold
Signal voltages above this threshold are logic "ones." Signal voltages
below are "zeros." The Data Logic Threshold on the serial interface is
programmable.
Maximum Error Free Interval
The degree of adjacency that is required to group single bit errors
together to form bursts. An interval that exceeds the Maximum will
terminate the burst of errors currently being measured.
Minimum Burst Length
User-defined number of errors that is to be regarded as a burst, to start
at the first error of a group and end at the last error.
Modulo
The mathematical modulo operator refers to the remainder after a
division (e.g., 10 mod 3 = 1).
Modulo Analysis
Correlation of a specified interval to errors, used to identify correlations
in data streams.
384 • Glossary of Terms
User Guide BA622
Artisan Technology Group - Quality Instrumentation ... Guaranteed | (888) 88-SOURCE | www.artisantg.com
Pattern Start
Trigger for a Data Capture operation.
Pseudo-Random Pattern
A pattern generated by a standard polynomial to appear random, while
in reality being exactly reproducible.
Resync Threshold
The number adjacent word-errors in the incoming data that will trigger
a software resynchronization attempt.
Termination Voltage
The DC voltage applied to an input termination resistor.
User Guide BA622
Artisan Technology Group - Quality Instrumentation ... Guaranteed | (888) 88-SOURCE | www.artisantg.com
Glossary of Terms • 385
Artisan Technology Group - Quality Instrumentation ... Guaranteed | (888) 88-SOURCE | www.artisantg.com
Index
A
Abort Command, Remote Control ..........239
Ad Hoc..................................................106
Arm On Adhoc ..................................107
Remote Control Commands................239
Alias File ...............................................236
ALT Key Commands .............................. 47
Analyzer Panel........................................ 70
Operating Modes................................. 71
Remote Control Commands................240
Setup .................................................. 72
Scanner Setup.................................. 75
Status.................................................. 71
AUTOEXEC.BAT.................................. 61
Listing ...............................................379
Requirements ...................................... 11
AuxBERT Panel ..................................... 77
Available Time ......................................361
B
BA5CALIB.EXE .................................... 60
BA5P.EXE ............................................. 11
Command Line Switches..................... 11
Basic BER Panel..................................... 78
Display ............................................... 78
Remote Control Commands................253
Setup .................................................. 79
Error Free Interval (EFI).................. 81
Integration Period............................ 80
Minimum Burst Length ................... 81
Basic Interaction .......... See User Interaction
Baud......................................................184
Begin Detect........................................... 35
Begin Generate ....................................... 35
Bin Mapping........................................... 24
Bit Alignment ......................................... 35
Bit-Serial Interface Timing...................... 36
Blanked Intervals ...................................360
Blanking................................................. 34
Timing Diagram.................................. 34
BLOCATE.EXE ................................... 188
Block Bit Error Rate Utility................... 190
Block Definition ..................................... 23
Block Histogram Panel............................ 82
Block Profile Setup ............................. 83
Remote Control Commands............... 257
BLOCKBER.EXE ................................ 190
Buffer Command, Remote Control ........ 260
Burst Histogram Panel ............................ 85
Burst Profile Setup .............................. 86
Bin Mapping ............................. 83, 87
Remote Control Commands............... 261
Buttons ................................................... 46
Removing ........................................... 53
Byte-Parallel Interface Timing................. 38
C
C\:\\USR\\BIN .................................. 12, 61
Calculator Panel...................................... 88
CCITT .............................................91, 361
Channel Interface Panel........................... 94
Charts ..................................................... 51
Chart Controls..................................... 51
Knob ............................................... 51
Setup Button.................................... 51
Zoom .............................................. 51
Cursors ............................................... 51
Data Boundaries.................................. 54
Enabling and Disabling ....................... 53
Grids................................................... 51
Info Line ............................................. 52
Keyboard Commands .......................... 47
Log Charts .......................................... 51
Metastrings in Titles............................ 54
Panning............................................... 53
Removing Buttons............................... 53
Scaling................................................ 53
Screen Zoom....................................... 52
Checkboxes, Selecting............................. 46
User Guide BA622
Artisan Technology Group - Quality Instrumentation ... Guaranteed | (888) 88-SOURCE | www.artisantg.com
Index • 387
Clock
Clock Setup and Status........................ 95
Generator Clock Source ...................... 18
Set Frequency ..................................... 18
Clock Panel............................................. 95
Set Clock Frequency ........................... 95
Communications Layer ......................... 216
CONFIG.SYS......................................... 61
Listing .............................................. 379
Requirements ...................................... 10
Configuration Dashboard ........................ 63
Remote Control Commands............... 265
Connectors, RS-232 ................................ 56
Continue Command, Remote Control .... 267
COUNTER.EXE................................... 193
Cull Block Utility.................................. 195
CULLBLOC.EXE................................. 195
Cursors ................................................... 51
D
Dashboard Panel ..................................... 42
Configuration.................................44, 63
On-Line Help...................................... 43
Plug-In Index .................................42, 65
Plug-In Panel Setup............................. 42
Status.............................................43, 68
DCRS ................................................... 117
DUT Setup........................................ 117
DUT Status ....................................... 129
Debugging ............................................ 184
Description, Mechanical.......................... 26
Detector
Event Enabling.................................... 21
Input Interface..................................... 20
Interface Timing.................................. 36
Parallel Interface, Rear Panel............... 29
Parallel Pin-Outs ................................. 33
Pattern Type........................................ 20
Explanation of Pattern Types ......... 108
Plug-In Panel ...................................... 96
Setup .................................................. 98
Detector Panel......................................... 96
Remote Control Commands............... 267
Scan For Pattern.................................. 97
388 • Index
Setup................................................... 98
Detector Checkout ......................... 106
Detector Scope .............................. 106
Event Enabling ................................ 99
I/F Settings .................................... 100
Setup Detector RAM ..................... 101
RAM Example........................... 331
Setup Detector RAM
Remote Control Commands ........... 272
Status .................................................. 97
Dialogs ................................................... 48
File Selection ...................................... 49
OK Messages ...................................... 48
Working Messages .............................. 48
Yes/No Messages ................................ 48
Differential ECL Interface Diagram......... 15
Dimensions ............................................. 26
DIR-1000.......................................114, 343
Analyzing Raw Errors ....................... 345
DUT Setup........................................ 114
DUT Status ....................................... 128
ECC Performance Reports................. 346
ECC Statistics, Emulated................... 343
ECC Statistics, Real Time.................. 343
Enhanced ECC Characteristics........... 347
Hardware Interfacing......................... 334
Pinouts to BitAlyzer .......................... 335
Verifying Statistics............................ 344
Directory Command, Remote Control.... 277
Done Command, Remote Control .......... 278
DOS=HIGH............................................ 10
Double Click................................... 45, 186
DUT (Device Under Test) ..................... 109
Hardware Interfacing......................... 369
DV-6000 ....................................... 369
Navigation Map................................. 371
Select Type ....................................... 111
Setup
DCRS............................................ 117
DIR-1000 ...................................... 114
DV-6000 ....................................... 123
Generic.......................................... 111
VLDS............................................ 120
Status ................................................ 126
DCRS............................................ 129
User Guide BA622
Artisan Technology Group - Quality Instrumentation ... Guaranteed | (888) 88-SOURCE | www.artisantg.com
DIR-1000.......................................128
DV-6000 ........................................132
Generic ..........................................126
VLDS ............................................130
DUT (Device Under Test) Panels ...109, 126
Control ..............................................109
Communications Setup...................112
Select DUT Type............................111
Setup..............................................111
Status.................................................126
DV-6000
DUT Setup.........................................123
DUT Status ........................................132
Hardware Interfacing..........................369
E
ECC
BitAlyzer Emulated Statistics .............343
Producing Reports..............................346
ECC Emulation
Remote Control Commands................278
ECC Panel .............................................134
Display ..............................................136
Setup .................................................136
EFI ......................................................... 22
EFI Histogram Panel..............................139
EFI Profile Setup .......................140, 141
Bin Mapping ..................................141
Remote Control Commands................284
EMM386.EXE........................................ 11
Entering Text and Numbers..................... 45
Double Click....................................... 45
Entry Fields ............................................ 45
ERREDIT.EXE......................................197
Error Edit Utility....................................197
Error File Counter Utility .......................193
Error Free Interval .............................22, 81
Error Injector Equation ..........................149
Event Enabling ....................................... 21
Event Logging during Blanking..............360
Event Types............................................ 21
Exit Codes .............................................380
Extract Utility ........................................199
EXTRACT.EXE ....................................199
F
File Marker Spacer Utility..................... 205
File Selection Dialog............................... 49
File Status Utility .................................. 200
FILESTAT.EXE ................................... 200
Finder Panel.......................................... 142
Copy Button...................................... 144
Delete Button .................................... 144
Directory Files List............................ 143
Disk Free Display.............................. 143
Drive Button ..................................... 145
Remote Control Commands............... 287
Rename Button.................................. 144
Search............................................... 143
Search Criteria .................................. 143
Working Directory Display................ 142
FLIPWORD.EXE ................................. 201
Front View.......................................... 8, 26
G
G.821 Analysis ..................................... 361
G.821 Panel .....................................91, 364
Remote Control Commands............... 289
Setup............................................92, 365
Generator
Clock Source....................................... 18
Interface Timing.................................. 36
Interfaces, Front Panel......................... 30
Output Interface .................................. 20
Parallel Cable Pin-Outs ....................... 32
Parallel Interfaces, Rear Panel ............. 31
Pattern Type........................................ 19
Generating Polynomials................... 19
Plug-In Panel .................................... 146
Setup................................................. 148
Status Display ................................... 147
Generator Panel .................................... 146
Remote Control Commands............... 295
Setup................................................. 148
Advanced Generator Setup ............ 150
Setup Generator RAM ................... 150
RAM Example........................... 331
Remote Control Commands ....... 300
Status Display ................................... 147
User Guide BA622
Artisan Technology Group - Quality Instrumentation ... Guaranteed | (888) 88-SOURCE | www.artisantg.com
Index • 389
Get Command, Remote Control............. 304
Grounding ................................................ 7
H
Hard Disk Management........................... 61
Hardware Interfacing ............................ 369
Head Errors Utility................................ 203
HEADERRS.EXE................................. 203
Help, On-Line......................................... 43
High Error Rate Situations ...................... 61
Live Error Processing.......................... 62
HIMEM.SYS .......................................... 10
I
ID1 ................................................334, 343
Analysis Examples............................ 338
De-Interleaving during Playback ....... 336
ECC Settings for Re-Interleaving ...... 337
Interleaving during Record ................ 335
Re-Interleaving Data ......................... 336
IEEE-488
Address............................................. 184
Communications Layer ..................... 216
Interfacing .......................................... 57
Port Selection.................................... 183
Important Settings................................... 18
Bin Mapping ....................................... 24
Block Definition.................................. 23
Clock Set Frequency ........................... 18
Detector Event Enabling...................... 21
Detector Input Interface....................... 20
Detector Pattern Type.......................... 20
Error Free Interval............................... 22
Generator Clock Source ...................... 18
Generator Output Interface .................. 20
Generator Pattern Type........................ 19
Integration Period................................ 22
Minimum Burst Length ....................... 23
Resync Threshold................................ 24
Inspection ................................................. 8
Installation
Autoexec.Bat Requirements ................ 11
Config.Sys Requirements .................... 10
Included Files and Directories ............. 12
390 • Index
Software.............................................. 10
Software Updates ................................ 13
Integration Period.............................. 22, 80
Interactive............................................. 184
Interface Timing...................................... 36
Interfacing to Your Channel .................... 14
Differential ECL.................................. 15
Single-Ended ECL............................... 14
Interval Histogram Panel ....................... 152
Interval Profile Setup..................152, 153
Remote Control Commands............... 305
K
Keyboard Control Commands ................. 47
Knob....................................................... 50
L
Lists, Scrolling........................................ 46
LIVE Mode............................................. 71
Longitudinal Track Extractor Utility...... 204
LONGTRAK.EXE................................ 204
M
Mask
Remote Control Commands............... 308
Mask Panel ........................................... 155
Bit Mask Setup.................................. 156
Mask Editor ...................................... 157
Measurements ......................................... 15
Bit Error Rate...................................... 16
Burst Error Rate .................................. 16
Burst Errors......................................... 17
Burst Events........................................ 17
Detector Frequency ............................. 16
Errors.................................................. 17
Generator Frequency ........................... 16
Internal Clock Frequency..................... 16
Non-Burst Error Rate .......................... 16
Non-Burst Errors................................. 17
Number of "Blocks" ............................ 17
Number of Errored "Blocks"................ 17
Number of Events................................ 17
Number of Resyncs ............................. 17
Mechanical Description........................... 26
User Guide BA622
Artisan Technology Group - Quality Instrumentation ... Guaranteed | (888) 88-SOURCE | www.artisantg.com
Chassis Front View ............................. 26
Chassis Rear View .............................. 27
Specifications.....................................372
Media Scan Chart Panel .........................158
Setup .................................................158
Metastrings............................................. 54
Metrum VLDS.......................................120
DUT Setup.........................................120
DUT Status ........................................130
Minimum Burst Length......................23, 81
Mode .....................................................184
Modulo Histogram Panel........................161
Modulo Profile Setup .........................162
Advanced Setup .............................164
Remote Control Commands................309
More BER Panel....................................165
Display Fields ....................................166
Remote Control Commands................312
Setup .................................................167
Mouse..................................................... 50
Multi-Channel BER Panel......................168
Log File .............................................170
Remote Control Commands................315
Setup .................................................169
Multi-Track Analysis .............................349
Bit Error Rate.....................................349
Burst Length Profile...........................351
Error Free Interval..............................352
Media Scan ........................................354
Modulo Analysis................................353
O
OK Messages.......................................... 48
OPCODE...............................................236
Operating Modes .................................... 71
Operation
Important Settings............................... 18
Interfacing to Channel......................... 14
Measurements..................................... 15
Remote Control................................... 55
P
Packbits
Remote Control Commands................317
Packbits Panel....................................... 172
Setup................................................. 174
Panels ..................................................... 63
Analyzer ............................................. 70
AuxBERT ........................................... 77
Basic BER .......................................... 78
Block Histogram ................................. 82
Burst Histogram .................................. 85
Calculator ........................................... 88
Channel Interface ................................ 94
Clock .................................................. 95
Configuration Dashboard..................... 63
Detector .............................................. 96
DUT Control..................................... 109
DUT Status ....................................... 126
ECC.................................................. 134
EFI Histogram................................... 139
Finder ............................................... 142
G.821.................................................. 91
Generator .......................................... 146
Interval Histogram ............................ 152
Mask................................................. 155
Media Scan Chart.............................. 158
Modulo Histogram ............................ 161
More BER......................................... 165
Moving and Resizing........................... 44
Multi-Channel BER........................... 168
Packbits ............................................ 172
Plug-In Index Dashboard..................... 65
Remote Control Commands............... 317
Space Mark ....................................... 175
Spectrum........................................... 177
Status Dashboard................................. 68
Strip Chart ........................................ 180
System .............................................. 183
Pattern Type
Detector .............................................. 20
Generator ............................................ 19
Pattern Types ........................................ 108
Pin-Outs, Parallel Data Cable .................. 32
PLAY Mode ........................................... 72
Plug-In Index Dashboard................... 18, 65
Plug-In Panel .......................................... 44
Polynomial, Pseudo-Random Generating. 19
Printing
User Guide BA622
Artisan Technology Group - Quality Instrumentation ... Guaranteed | (888) 88-SOURCE | www.artisantg.com
Index • 391
ALT-P, ALT-F.................................... 58
Hardcopy ............................................ 58
Printer Destination .......................58, 187
Printer Types................................58, 187
Selecting Printer.................................. 58
To a File ............................................. 59
Program File Types................................. 61
Pushbuttons ............................................ 46
Q
Quit Command, Remote Control ........... 319
R
RAM Data File Format ......................... 333
Rear Panel View ....................................... 9
Rear View............................................... 27
RECORD Mode...................................... 71
Reed-Solomon ...................................... 135
Re-Interleaving ID1 Error Data ............. 334
Remote Control....................................... 55
Bit Fields .......................................... 215
Command Protocol............................ 239
Abort............................................. 239
Adhoc ........................................... 239
Analyzer ....................................... 240
Auxbert......................................... 245
Basic............................................. 253
Block ............................................ 257
Buffer ........................................... 260
Burst ............................................. 261
Config........................................... 265
Continue ....................................... 267
Detector ........................................ 267
DetRam......................................... 272
Directory....................................... 277
Done ............................................. 278
Ecc................................................ 278
Efi................................................. 284
Finder ........................................... 287
G821............................................. 289
Generator ...................................... 295
GenRam........................................ 300
Get................................................ 304
Interval.......................................... 305
392 • Index
Mask ............................................. 308
Modulo.......................................... 309
More ............................................. 312
MultiCh......................................... 315
Packbits......................................... 317
Panel ............................................. 317
Quit............................................... 319
Reply Status .................................. 319
Send .............................................. 320
SpaceMark .................................... 321
Spectrum ....................................... 322
Status ............................................ 326
Strip .............................................. 327
System .......................................... 329
Commands, Sending.......................... 209
Files, Receiving................................. 211
Files, Sending.................................... 210
Histogram Bins, Programming........... 212
Histogram Bins, Receiving ................ 210
IEEE-488 Interfacing........................... 57
Programming Examples..................... 216
Alias File....................................... 236
Analyzer File Name....................... 228
Analyzer Interactions..................... 233
Commands, Sending ...................... 220
Files, Receiving............................. 222
Files, Sending................................ 224
Live Mode..................................... 227
Logging On/Off............................. 218
Playback Mode.............................. 231
Record Mode................................. 229
Replies, Receiving......................... 219
Retrieving Basic Error Statistics..... 226
Retrieving Histogram Bins............. 235
Timeouts, Supporting..................... 217
Programming Techniques .................. 209
Bins............................................... 210
Bins, Obtaining.............................. 212
Bit Fields....................................... 215
Commands .................................... 209
Files, Receiving............................. 211
Files, Sending................................ 210
Replies .......................................... 209
Synchronizing BitAlyzers .............. 213
Replies, Receiving............................. 209
User Guide BA622
Artisan Technology Group - Quality Instrumentation ... Guaranteed | (888) 88-SOURCE | www.artisantg.com
RS-232 Interfacing.............................. 56
Synchronizing Multiple BitAlyzers.....213
Reply Command, Remote Control..........319
Reply Status...........................................185
RESET Mode ......................................... 72
Resync Threshold ................................... 24
Resynchronization .................................. 34
Timing Diagram.................................. 34
RS-232
Communications Layer ......................216
Interfacing .......................................... 56
Port Selection.....................................183
RS-232 Pinout ........................................ 57
S
Safety Precautions..................................... 1
Scanners, Setup....................................... 75
Screen Motif........................................... 42
Screen Saver........................................... 61
Selectors................................................. 47
Send Command, Remote Control ...........320
Service ..................................................... 4
Setup
Baud ..................................................184
Debugging .........................................184
IEEE-488 Address .............................184
Interactive..........................................184
Mode .................................................184
Reply Status.......................................185
Single-Ended ECL Interface Diagram...... 14
Sliders .................................................... 47
SMARTDRV.EXE ................................. 11
Software ................................................. 10
Running on Another PC ...................... 13
Software Updates.................................... 13
Installation Procedure.......................... 13
Space Mark Panel ..................................175
Space Markers Setup..........................176
SpaceMark Panel
Remote Control Commands................321
SPACEMRK.EXE .................................205
Specifications ........................................372
Spectrum Histogram Panel
Remote Control Commands................322
Spectrum Panel ..................................... 177
Spectrum Profile Setup...................... 178
Bin Mapping ................................. 179
Status
DUT Status Panels ............................ 126
Status Command, Remote Control......... 326
Status Dashboard .................................... 68
Strip Chart Panel................................... 180
Remote Control Commands............... 327
Setup................................................. 181
System Events................................... 181
Support, Technical .................................... 4
Syntax .................................................. 239
System Maintenance ............................... 55
Hard Disk Management....................... 61
High Error Rate Situations................... 61
Screen Saver ....................................... 61
Touch Screen ...................................... 60
System Panel ........................................ 183
Print Button....................................... 187
Print Destination ............................... 187
Printer Destination Selections ........... 187
Printer Type Selections...................... 187
Printer Type Selector......................... 186
Quit Button ....................................... 187
Remote Control Commands............... 329
Remote Control Setup ....................... 183
System Parameters Setup................... 186
T
Technical Support ..................................... 4
Timing Diagram
Blanking ............................................. 34
Detector Bit-Serial Interface ................ 37
Detector Byte-Parallel Interface........... 39
Detector Word-Parallel Interface ......... 41
Generator Bit-Serial Interface .............. 36
Generator Byte-Parallel Interface......... 38
Generator Word-Parallel Interface ....... 40
Resynchronization............................... 34
Timing, Interface..................................... 36
Bit-Serial, Detector.............................. 37
Bit-Serial, Generator ........................... 36
Byte-Parallel, Detector ........................ 39
User Guide BA622
Artisan Technology Group - Quality Instrumentation ... Guaranteed | (888) 88-SOURCE | www.artisantg.com
Index • 393
Byte-Parallel, Generator ...................... 38
Word-Parallel, Detector....................... 41
Word-Parallel, Generator..................... 40
Touch Screen .......................................... 60
Calibration .......................................... 60
Cleaning ............................................. 60
Command line switch.......................... 12
Panning............................................... 53
Scaling................................................ 53
Specification ..................................... 377
TOUCH.CFG.......................................... 60
Translate Utility .................................... 207
U
Unavailable Time.................................. 361
User Interaction ...................................... 45
Checkboxes......................................... 46
Dialogs ............................................... 48
Entering Text and Numbers................. 45
Graphical User Interface (GUI) ........... 45
Knob................................................... 50
Mouse................................................. 50
Pushing Buttons .................................. 46
Scrolling Lists..................................... 46
Selectors ............................................. 47
Sliders................................................. 47
Utility Programs.................................... 188
BLOCATE.EXE ............................... 188
BLOCKBER.EXE............................. 190
394 • Index
COUNTER.EXE ............................... 193
CULLBLOC.EXE ............................. 195
ERREDIT.EXE ................................. 197
EXTRACT.EXE................................ 199
FILESTAT.EXE................................ 200
FLIPWORD.EXE.............................. 201
HEADERRS.EXE ............................. 203
LONGTRAK.EXE ............................ 204
SPACEMRK.EXE............................. 205
XLATE.EXE..................................... 207
W
Warranty Terms ........................................ 2
Extended Warranty................................ 4
Website..................................................... 4
Word Order Flipper Utility .................... 201
Word-Parallel Interface Timing ............... 40
Working Messages .................................. 48
X
XLATE.EXE ........................................ 207
Y
Yes/No Messages.................................... 48
Z
Zoom ................................................ 51, 52
User Guide BA622
Artisan Technology Group - Quality Instrumentation ... Guaranteed | (888) 88-SOURCE | www.artisantg.com
Artisan Technology Group is your source for quality
new and certified-used/pre-owned equipment
• FAST SHIPPING AND
DELIVERY
• TENS OF THOUSANDS OF
IN-STOCK ITEMS
• EQUIPMENT DEMOS
• HUNDREDS OF
MANUFACTURERS
SUPPORTED
• LEASING/MONTHLY
RENTALS
• ITAR CERTIFIED
SECURE ASSET SOLUTIONS
SERVICE CENTER REPAIRS
Experienced engineers and technicians on staff
at our full-service, in-house repair center
WE BUY USED EQUIPMENT
Sell your excess, underutilized, and idle used equipment
We also offer credit for buy-backs and trade-ins
www.artisantg.com/WeBuyEquipment
InstraView REMOTE INSPECTION
LOOKING FOR MORE INFORMATION?
Visit us on the web at www.artisantg.com for more
information on price quotations, drivers, technical
specifications, manuals, and documentation
SM
Remotely inspect equipment before purchasing with
our interactive website at www.instraview.com
Contact us: (888) 88-SOURCE | [email protected] | www.artisantg.com