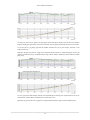
1
Blue Whale Processing
Geophysical Software
User's guide
Blue Whale Processing Geophysical Software: User's guide
Copyright © 2013 RNDr. František Mantlík
Table of Contents
Introduction ......................................................................................................................... v
1. Quick start guide ............................................................................................................... 1
1.1. Create a new project ................................................................................................. 1
1.2. Adjust project properties ............................................................................................ 1
1.3. Input gravity data .................................................................................................... 2
1.3.1. Input gravimeter(s) used for data acquisition .......................................................... 3
1.3.2. Input gravity loop data .................................................................................... 3
1.4. Input stations coordinates ........................................................................................... 5
1.5. View and export results ............................................................................................. 6
2. BlueWhaleProcessing Project structure ..................................................................................... 9
2.1. Project life cycle ..................................................................................................... 9
2.2. Components of the project .......................................................................................... 9
2.3. Adjusting project properties ....................................................................................... 10
2.3.1. Survey parameters ........................................................................................ 11
2.3.2. Gravity processing ........................................................................................ 13
2.3.3. Output and reporting ..................................................................................... 16
3. Processing gravity loops ..................................................................................................... 18
3.1. Gravity loop structure .............................................................................................. 18
3.1.1. Description of reading parameters ..................................................................... 18
3.2. Loop resolution procedure ......................................................................................... 20
3.3. Understanding loop reports ........................................................................................ 20
3.3.1. Loop report structure ..................................................................................... 20
3.3.2. Printing Loop report ..................................................................................... 22
3.3.3. Saving and exporting Loop report ..................................................................... 22
3.4. Import data from Scintrex CG-3/CG-5 dump .................................................................. 22
3.4.1. Prepare data file .......................................................................................... 22
3.4.2. Import dump file into your project ..................................................................... 23
3.5. Batch data updates .................................................................................................. 24
3.5.1. Shift gravity readings time .............................................................................. 24
3.5.2. Group readings selection ................................................................................ 25
4. Work with lines and stations ................................................................................................ 27
4.1. Stations database structure ........................................................................................ 27
4.1.1. Line editing window ..................................................................................... 27
4.1.2. Line plot window ......................................................................................... 29
4.2. Import stations coordinates ........................................................................................ 31
4.2.1. Prepare coordinates file .................................................................................. 31
4.2.2. Import coordinates data into your project ............................................................. 32
4.3. Processing terrain corrections ..................................................................................... 33
4.3.1. Regional terrain corrections ............................................................................. 33
4.3.2. User-provided terrain data import and processing ................................................... 34
4.3.3. Adding local near-zone corrections into the project ................................................. 35
5. Creating maps ................................................................................................................. 36
5.1. Creating a new map ................................................................................................ 36
5.2. Map Palette tools ................................................................................................... 37
5.2.1. Map palette ................................................................................................ 38
5.2.2. Stations palette ............................................................................................ 38
5.2.3. Contour layer palette ..................................................................................... 38
6. Additional features ............................................................................................................ 40
6.1. Setting processing options ......................................................................................... 40
6.2. Sample projects ..................................................................................................... 41
6.2.1. Test project ................................................................................................ 41
6.2.2. Survey example ........................................................................................... 41
6.2.3. Tie example ............................................................................................... 41
6.3. Development version of the software ............................................................................ 42
6.3.1. Installing the development version ..................................................................... 42
6.3.2. Uninstalling the development version ................................................................. 43
6.4. Viewer mode ........................................................................................................ 43
iii
Blue Whale Processing
Geophysical Software
7. Help and support ..............................................................................................................
7.1. How to get help .....................................................................................................
7.2. Report bug or propose software enhancement ..................................................................
8. Processing procedures and formulas .......................................................................................
References .........................................................................................................................
A. License .........................................................................................................................
A.1. Software license ....................................................................................................
A.2. Third party libraries ...............................................................................................
B. Contacts ........................................................................................................................
iv
45
45
45
47
52
53
53
54
55
Introduction
Blue Whale Processing is a Geophysical Software Solution for converting raw potential field data into fully corrected
map formats for interpretation by the end user and incorporation into Geographic Information Systems.
Being both user friendly and cost effective, Blue Whale Processing Geophysical Software is being developed as an
universal system for the treatment of potential field data from a variety of geophysical techniques to provide a flexible
standard presentation that can be incorporated in modeling and presentation of geophysical parameters in a variety
of applications, including minerals and hydrocarbon exploration, civil engineering, archaeology, and any GIS related
application. Its initial development have been directed at gravity data, which incorporates more parameters and requires
more complex processing than most geophysical and other potential field data
Applications:
• in-field data processing, quality check, daily reporting
• project post-processing, final gravity reductions & corrections
• interpretation stage solution
Main features:
• spreadsheet-style data editing
• straightforward data processing
• import gravity data in the Scintrex CG-3/CG-5 format
• Lacoste & Romberg gravity meter instrument calibration tables support
• built-in Earth's tides corrections calculation
• live repetitions statistics for easy and reliable quality check
• automatic computation of absolute gravity, free-air anomalies, Bouguer anomalies and terrain corrections
• customizable loop reports in HTML format
• powerful mapping module - presentation of processing results on the fly at each project stage
v
Introduction
• processed data export in CSV format compatible with most geo-science applications
System requirements:
• Microsoft Windows XP/Vista/7/8, Mac OSX 10.5+ or Linux 2.6
• Sun Java JRE 1.6 [http://java.com/download] or newer
• minimum 1024 Mbyte RAM (2048 Mbyte recommended) and 100 Mbyte HDD free space
• one free USB port
vi
Chapter 1. Quick start guide
This Quick start guide is a guided tour on creating a simple gravity project.
Note
Steps described in this guide can be followed in the full version of the software only. Resulting project
of this guide is one of three sample projects available in both Full version as well as Viewer version.
1.1. Create a new project
Click
toolbar icon. New project is created and opened in the "Projects" window:
1.2. Adjust project properties
Click the newly created project to select it and at the toolbar click the Project properties icon:
Set suitable Project name, approximate coordinates of the survey area and time zone.
Note
Time zone difference is positive with Eastern longitude and negative to the West.
Optionally, select coordinate system in the lower part of the dialog and processing parameters at the Gravity processing
tab. Close the Project properties dialog when ready.
1
Quick start guide
1.3. Input gravity data
Note
If your data were acquired with Scintrex CG-5 gravimeter, skip this chapter and follow the CG-5 import
guide. instead.
Click the + sign in front of your new project. The project structure will be shown:
2
Quick start guide
1.3.1. Input gravimeter(s) used for data acquisition
Right-click the Instruments node and from the pop-up menu select the Add new instrument option.
Right-click the Instruments node again and select the Open option. Instruments window will be opened at the right
hand side of the application.
Tip
Alternatively, you can select Window -> Instruments from the main menu to open Instruments window.
Type the serial number of your gravimeter and adjust type of the instrument from the drop-down box.
Note
If your gravimeter is not listed, select Generic with calibration if your instrument provides dial readings
which should be converted to gravity units by the use of calibration table. If your gravimeter provides
gravity units directly (mGals) or your readings are converted already, select Generic.
Instrument calibration table can be created/modified in the lower part of the Instruments window. Right-click free
space in the calibration table to add new calibration set, i.e. the calibration table item:
When all necessary instrument data were added, the Instruments window can be closed to make more space at the
desktop.
1.3.2. Input gravity loop data
Right-click the Loops node and select Add new loop option. New loop is created. Click the loop name and type a
suitable name for your new loop, e.g. data acquisition date:
3
Quick start guide
Note
Right-click the loop and select Properties to set instrument used for the loop data acquisition. Loop
name can be changed in the Properties window as well.
Double click the loop icon left of the loop name. Loop data window will open in the main desktop space.
Your project is ready for input of gravity readings at this moment. Right-click the loop icon again and select the Add
gravity reading option. Fill-in data for your first observation in the newly added row of the Loop table. As a minimum,
you have to enter Time, Line, Station and Reading values:
Tip
Hold the mouse pointer over the column heading to get more detailed explanation about expected data.
Tip
Press F2 to enter the data cell. Press TAB to move to the next cell.
Click the Enabled column for one of the BASE station readings at the beginning of the loop, usually the last reading.
The reading will be enabled for processing and its icon will change from grey to red signaling a problem - the line
0 and station BASE do not exist in your new project:
4
Quick start guide
Right-click the enabled reading and select the Add line 0 option. New line will be added to the project under Lines
node. Right-click the reading again and select the Add station BASE option. Repeat the same procedure for each station
occupation in the loop. If you expand the Lines, Line 0 and Instruments nodes, your project should look like this:
Note
If your loop data were imported from the gravimeter dump file, all lines and stations included in
the particular loop are added automatically into the project. In addition, last reading for each station
occupation is enabled by default.
1.4. Input stations coordinates
Double click the icon left of the line name. Line data table will open in the main desktop area. Fill-in coordinates, i.e.
latitude, longitude and altitude for each station:
Note
You can import stations coordinates in batch from a coordinates file. Please follow the Import
coordinates guide. Software accepts CSV-formatted data or data pasted to a text file from the Magellan
GNSS Solutions software.
5
Quick start guide
As the final step, set the absolute gravity for the base station and click the Base column for the BASE station:
Gravity base is marked and the gravity loop is solved. Green icons signal solved loop and line with all stations having
at least one gravity result. In the Loop table, dark green gravity reading icon means single reading for the station while
light green means in-loop or cross-loop repetition:
1.5. View and export results
At the Loop table (see previous screenshot) click the View report button. Loop report will be generated and displayed:
6
Quick start guide
Right-click the report and the pop-up menu will be displayed as shown. You can save the report in HTML format or
save the loop data in the .txt or .csv format.
In addition, if you right-click the Project icon in the Projects window, you can save processing results from the whole
project in the CSV format:
7
Quick start guide
Finally, save your project with a click to the Save icon or select File - Save from the main menu..
Important
CONGRATULATIONS! You have processed your first gravity loop!
8
Chapter 2. BlueWhaleProcessing
Project structure
BlueWhaleProcessing project is a basic structure containing all data and processing options for a particular
geophysical problem. Typically, a BlueWhaleProcessing project represents gravity and geodetic data and processing
options and instructions for a given contract or research task.
Project is usually limited to one continuous area and time span of a single geophysical survey.
In addition to "classic" gravity projects, BlueWhaleProcessing software can process special tasks projects, e.g. gravity
base stations tie project or instrument drift stability test project. Sample tie project is included with the software
installation.
BlueWhaleProcessing project is stored in a computer as a single file with extension ".fsp". Software uses it's own
internal format to store project data.
Note
There is no straightforward way to export data from the project file into other formats out of the
BlueWhaleProcessing software, nevertheless data are NOT encrypted inside the project file. Users have
to take their own measures independently of the BlueWhaleProcessing software in order to keep their
project files confidential if needed.
2.1. Project life cycle
Typical BlueWhaleProcessing gravity project consists of a set of daily gravity loops collected by one or more
gravimeters. In addition to gravity data, geodetic data, i.e. stations coordinates and precise elevations are collected
at the same time or independently.
Life cycle of such a project can look as follows:
• On the daily basis, available gravity and geodetic data are merged together and routine completness and quality
check is performed. Daily logistics and QC reports are produced and distributed.
• When needed, intermediate database snapshot exports are provided together with snapshot maps of processed
gravity field parameters like absolute gravity values or various gravity anomalies.
• When field data acquisition is finished, final processing parameters are adjusted and final processing takes place.
Final reports and maps are produced and all data are exported into final database. Usually, finalized project is locked
to avoid unintentional changes.
Principal task of the BlueWhaleProcessing software is to provide all necessary tools needed to accomplish all phases
of the project life cycle.
This chapter of the manual describes BlueWhaleProcessing project structure and general project properties adjustment.
Gravity loops are discussed in detail in the "Processing gravity loops" chapter.
Details about stations data processing can be found in the "Work with lines and stations" chapter.
Chapter "Creating maps" describes mapping features of the software.
2.2. Components of the project
BlueWhaleProcessing project consists of the following components:
• gravity loops
9
BlueWhaleProcessing Project structure
• lines of gravity stations
• instruments
• maps
Each gravity loop consists of a set of gravity readings. Every reading is connected to a particular station of a given
line - see below. All readings of a given loop were made by a single gravimeter. It means, that each reading inside
a loop can be identified by it's acquisition time only.
At least one station observed in a loop span has to be marked as a gravity base. All gravity readings of the loop are
tied to the base station gravity value.
It is a common practice in gravimetry to repeat readings at several stations observed in a loop span in order to
provide data for instrument drift calculation and quality check statistics. BlueWhaleProcessing software can include
all repeated readings into instrument drift assessment procedure. Details are described in the Chapter "Processing
procedures and formulas".
Gravity stations are places where gravity readings take place. Stations are grouped into lines. Currently, lines in the
software can have any name and there are no special means for lines organization. Common use of lines takes place
in grid-shaped projects where each station is identified by line and station coordinate. BlueWhaleProcessing supports
this geometry using stations and lines names as numbers.
Note
Import procedure from the Scintrex CG-3/CG-5 gravimeters dump accepts line and stations numbers
correctly if they are expressed as integers. Fractional parts are omitted. It is recommended to avoid
using fractions in lines and stations numbers when acquiring data with CG-3/CG-5 gravimeters.
Exact station position is defined by it's coordinates. In addition to geographic coordinates and elevation, additional
"Picket height" value can be defined for each station. This value can be used to define elevation difference between
geodetic marker and gravity marker for the station. Picket height is positive when geodetic marker is located above
the gravity marker.
Instruments records collect parameters of all instruments used in the project. If loop data are imported from gravimeter
dumps, instruments records are added automatically to the project when needed using data from the dump.
Instruments which provide readings in dial units and not in gravity units, such as e.g. Lacoste&Romberg gravimeters,
need calibration table to be included into project with instrument data. Most digital instruments, e.g. Scintrex CG-3/
CG-5 gravimeters, do not need calibration table. Calibration table is built inside the gravimeter and instrument readings
are provided in mGals for these new gravimeters.
Presentation layer of a BlueWhaleProcessing project is a list of project maps. Normally, most maps are created in the
final stage of the project life cycle when data acquisition is over. BlueWhaleProcessing software allows creation of
arbitrary number of maps presenting project data from many aspects and in any scale required.
Caution
Please note that the mapping module is under strong development at present and new mapping features
are expected to be included in the near future. Some parts of the mapping module should be considered
experimental. It is not recommended to setup production environment critically dependent on the
mapping module until it's final release will be finished.
2.3. Adjusting project properties
Various aspects of the BlueWhaleProcessing project behavior can be controlled from a complex Project Properties
dialog. There are several ways how to open the Project Properties dialog:
• Select "Project properties" item from the project's context menu
•
Click on
window
Project properties icon at the toolbar when any item in the project node tree is selected in the Projects
10
BlueWhaleProcessing Project structure
• select "File - Project properties" menu item from the main menu when the project is selected in the Projects window.
Project properties dialog consists of three sections. Each section can be selected by clicking on the section title at the
top of the Project Properties dialog.
Following sections describe in detail all parameters adjustable in the Project properties dialog.
Tip
You can get context help on a particular item by pressing F1 when given item is selected.
2.3.1. Survey parameters
Project name
Project name appears in headers of project reports. If filename is not set, Project name is used as the file name.
Description
Free form text describing the project. Optional. Project description does not appear in reports.
Filename
Path and file name of the project file. Project is saved in a single file with extension ".fsp". If filename is not set,
project name is used when the project is saved for the first time.
Project coordinates - latitude, longitude and elevation
Approximate geographic coordinates of the project. These coordinates are used to determine project UTM zone
and possible geodetic reference frames. When changed, check geodetic reference frame settings as well.
11
BlueWhaleProcessing Project structure
Positive value of latitude represents Northern hemisphere and positive value of longitude represent Eastern
hemisphere.
Under normal circumstances, project coordinates are set after new project is created and there is no need for
later changes.
It is not necessary to set coordinates if gravity data are imported from the Scintrex CG-3/CG-5 instrument dump.
If coordinates are not set at the moment of import, survey coordinates from the gravimeter are used.
GMT difference
Difference of local time zone from GMT. Positive value means Eastward shift.
All time related data are saved in GMT in the software database. GMT difference value is used to convert data
in tables and reports. When editing data, local time is converted to GMT seamlessly.
Caution
Data imported from CG-3/CG-5 dump are converted according to GMT_DIFF header parameter.
Please note that CG-3/CG-5 dump GMT_DIFF parameter has opposite sign, i.e. GMT_DIFF is
increasing westards!
Geodetic reference frame
List of available geodetic reference frames for the project area. Project area is determined by the project
coordinates - see above. Each referencing system is presented by a geodetic datum and projection in the form
"Datum / Projection".
All geographic coordinates, i.e. Latitude and Longitude for a given project presented in tables and reports are
referenced to the project's geodetic datum. Projected coordinates, i.e. Easting and Northing are referenced to the
project's projection based on the selected datum.
All project's maps are plotted in the project's projection with respect to the selected geodetic datum.
When importing stations data, all imported coordinates are expected to be referenced to the project's geodetic
datum.
Internally, all coordinates are saved in the BlueWhaleProcessing project database referenced to the WGS-84
datum and necessary conversions are performed where needed.
Geodetic reference frame can be changed at any time. Change of the reference frame does not influence any data
in the BlueWhaleProcessing project database.
Elevation datum
At present, three options are available for elevations referencing:
Ellipsoidal
Elevation above reference ellipsoid.
Geoidal - EGM-84
Elevation above the EGM-84 (EGM-180) geoid. Use of this elevation datum is
deprecated and will be removed from future versions of the software.
Geoidal - EGM-96
Elevation above EGM-96 geoid. Recommended industry standard setting for gravity
processing.
All elevation values in tables and reports are presented referenced to the project's elevation datum. When
importing data, elevations are expected to be referenced to the project's elevation datum as well.
Internally, all elevations are saved in the BlueWhaleProcessing database referenced to the ellipsoid. Necessary
conversions take place where needed.
Automatic project recalculation
When checked, any change in project data causes automatic recalculation of the project. When not checked,
project is recalculated by pressing
Recalculate button at the toolbar.
Turning automatic recalculation off can help if lot of data editing should be done on a slow computer. Avoiding
recalculation while editing can speed up program responses.
12
BlueWhaleProcessing Project structure
Green/blue badge overlay is displayed over the project icon when automatic recalculation is turned off.
Note
If project data are not recalculated automatically, information in reports and maps can be
inconsistent. It is recommended to keep automatic recalculation checked as much as possible.
Save map grids with project
By default, map grids are not saved in the project database. Each time the map is opened, data are regridded with
the use of grid parameters saved with the project.
With the option checked, grid data are saved in the project database. As a result, regridding is not needed when
map is opened. On the other hand, project files are significantly bigger with grids saved and project opening
needs significantly more time.
Lock/unlock project button
Pressing the button toggles lock/unlock state of the project. When the project is locked, no modifications of
project data can be done. Yellow lock overlay
is displayed over the project icon when the project is locked.
2.3.2. Gravity processing
Gravity reduction density
Density used for gravity reductions computation expressed in g.cm -3.
After reduction density change, all existing terrain corrections are automatically recomputed by the formula
13
BlueWhaleProcessing Project structure
(2.1)
where d old represents old density, d new new density after change, t old terrain correction before density change
and t new terrain correction after density change.
Gravity formula
Formula used for gravity reductions. Choice from three formulas is available:
• IGS 1980 (default value)
• IGRS 1967
• IGF 1930 (not recommended for most applications)
Mathematical expressions and references for particular formulas can be found in the Processing formulas section.
Maximum polynom degree for drift calculations
Polynomial model used to determine instrument drift with root mean squares method. 1-st order degree means
linear drift model. Linear model is suitable for regional projects with low number of repetitions in every loop. To
achieve maximum precision in microgravity projects with repeats every 2 hours or even more frequently, higher
order polynom degree can be used to eliminate long period effects like temperature changes, residual tides etc.
Use only base readings for drift calculations
Normally, all in-loop repeats are used for instrument drift model assessment. When this box is checked, non-base
repeats are excluded from drift model calculation. It can be useful when non-base repeats are lower quality than
base readings. It can happen e.g. when reading time is significantly shorter at regular stations than at bases.
Tidal corrections
Five options are available for selection of the tidal potential model computed with the use of spherical harmonical
time/space development:
• Use instrument corrections
Using of built-in tidal formula in the instrument. This option is not recommended for microgravity and highprecision surveys. Built-in formula can differ from the real tidal values for more than 0.005 mGal under some
circumstances.
• Tamura 1987 model (1200 waves)
• Buellesfeld 1985 model (656 waves)
• Cartwright-Taylor-Eden 1973 model (505 waves)
• Doodson 1921 model (378 waves)
Difference between satellite-based models, 1987 and 1985 is less than 0.001 mGal and from the gravimetry point
of view can be considered identical.
Descriptions and references concerning the presented tidal models can be found in the Processing formulas
section.
Terrain corrections
Following options control terrain corrections computation for the project:
• Not computed
Terrain corrections and complete Bouguer anomalies are not computed. If terrain corrections or complete
Bouguer anomalies are requested in reports, corresponding value is printed as "n/a".
• Hammer
Hammer method is used for terrain corrections computation. When new station is added to a line, terrain
correction for the station is computed at the moment of the first project recalculation. More details can be
found in the chapter "Processing procedures and formulas".
14
BlueWhaleProcessing Project structure
• Prism (Plouff)
Plouff method of terrain modeling is used for terrain corrections computation. When new station is added to a
line, terrain correction for the station is computed at the moment of the first project recalculation. More details
can be found in the chapter "Processing procedures and formulas".
• Manual
If "Manual" option is selected, terrain corrections can be edited in the Line edit window. No computation is
performed in BlueWhaleProcessing unless reduction density is changed - see Gravity reduction density.
The "Manual" terrain correction option can be particularly useful in conjunction with project export/import
feature for combination of local and regional terrain corrections in the final steps of the project lifecycle:
In the routine daily processing, regional terrain corrections are computed for zones D-M using Hammer method.
Local terrain corrections for zones B and C are computed based on operator's in-situ readings (qualified
assessment, inclinometer readings, etc.) with the use of external program, e.g. a spreadsheet. Equation 8.13 can
be used for the calculation, of course.
At the final stage of processing when all data are acquired and processed, the whole project is exported to
CSV and imported to a spreadsheet program. Regional corrections are summed with spreadsheet-computed
local correction and replace the former values. Finally, the spreadsheet is exported back to CSV format, terrain
corrections computation method is switched to "Manual" and terrain data are imported back to the project using
"Import coordinates" feature. After recalculation, complete terrain corrections and complete Bouguer anomalies
are available.
Tip
If complete recomputation of all terrain corrections is needed, following procedure can be used:
1. Switch "Terrain corrections" computation method to "Not computed".
2. Save the project and restart the application. The whole project will be recomputed and all terrain
corrections will be set to zero.
3. Switch "Terrain corrections" method to "Hammer" or "Prism (Plouff)" according to your needs.
4. Restart the application again. All terrain corrections will be recomputed with the first project
recalculation. Recomputing of terrain corrections can take long time for projects containing
many stations.
Caution
Terrain corrections module is under strong development at present. Its properties and behavior
can change in future versions of the software.
SRTM difference
Difference between SRTM3 data and vertical datum used in the project for stations elevations. SRTM3 data can
have significant systematic vertical shift as high as up to 15 meters in some areas. This value can correct the shift.
"Compute difference" button can be used to assess the value of SRTM difference. When pressed, project
recomputation is started. For each station, approximate elevation is computed with the use of bilinear interpolation
from the four closest SRTM3 readings. Average of differences between interpolated and real station elevation
over all stations in the project is computed and set as new SRTM difference value.
Download SRTM files
When checked, SRTM3 data are downloaded automatically from the presented address. When not checked or the
presented address is not a valid global SRTM3 data folder, or download failed for any reason, terrain correction
for an affected station is computed using available terrain data only.
If some terrain data are missing, progress information in the progress bar is printed in red. New context menu
item "Missing SRTM data" appears for project node making a list of missing files.
15
BlueWhaleProcessing Project structure
2.3.3. Output and reporting
Geographic coordinates (latitude, longitude)
If checked, geographic coordinates are presented in reports.
UTM coordinates (easting, northing)
If not checked (default), UTM coordinates are not presented in reports.
Picket height
Check if you want to present station picket height in reports.
Instrument height
Check if you want to present instrument height of each gravity reading in reports.
Difference between instrument and computed tidal correction
If checked, instrument tidal correction is presented in parenthesis after the correction computed by the software.
In addition, if the difference exceeds 0.002 mGal, tidal correction values are printed in blue and if the difference
exceeds 0.005 mGal, the difference is printed in red.
Big difference between instrument and computed tidal correction most often means discrepancy in instrument
time/GMT difference setting while acquiring the data, or incorrect survey coordinates in the instrument.
Free Air anomaly
If checked, free air anomalies are presented in reports for each station.
Bouguer anomaly
If checked, Bouguer anomalies are presented in reports for each station.
16
BlueWhaleProcessing Project structure
Complete Bouguer anomaly
If checked, Complete Bouguer anomalies, i.e. anomalies containing terrain corrections, are presented in reports
for each station. If terrain corrections are not computed, "n/a" is printed instead.
17
Chapter 3. Processing gravity loops
Each gravity loop in BlueWhaleProcessing project consists of a set gravity readings collected with a single instrument
in a span of no more than one working day on one or more stations.
First section of this chapter describes gravity loops structure. In particular, gravity readings parameters are described
in detail.
Next section describes in detail loop resolution procedure which takes place any time the project is recalculated.
Detailed description of loop reports is presented in the third section of this chapter.
In the last section, procedures affecting groups of readings are described. Particularly, routine for shifting readings
time in a loop or in the entire project and loop-oriented group readings selection options.
3.1. Gravity loop structure
As mentioned earlier, each gravity loop consists of a series of gravity readings. Readings are imported from a gravity
meter dump or manually added into a loop.
Parameters of each reading of a given loop can be adjusted in the Loop editor window. It can be opened doubleclicking the loop icon or selecting "Open" from loop context menu:
Each line in the table represents a single gravity reading. Parameters of the reading are printed in particular columns.
Most of the parameters can be edited. Click the desired cell or press F2 when the cell is selected to enter edit mode.
Press ENTER when finished editing.
Any change in a reading parameter triggers automatic project recalculation. Automatic recalculation can be turned
off in Project properties.
3.1.1. Description of reading parameters
Gravity reading icon
Icon of a gravity reading changes it's color depending on current reading state as follows:
Disabled reading. This reading is completely ignored.
Bad reading. Line or station does not exist. Check values in Line and Station columns.
Incomplete reading, station coordinates missing or incomplete.
Repeated reading, loop is not solved.Usually caused by not enough base readings in the loop. Check whether
your base station has checked the "Base" checkbox in it's Line table.
Single valid solved reading. Gravity value was established for this reading.
18
Processing gravity loops
Valid solved repeated reading. Gravity value as well as repetition statistics have been established for this
reading.
Time
Presented reading time reflects GMT difference parameter in Project properties.
When time value is edited, both date and time of the reading can be adjusted.
Time column is locked from changes for loops imported from instrument dump, nevertheless it is possible to use
Shift readings time procedure to shift the entire loop data for a given time interval if needed.
Enabled
With the use of checkbox in this column, the reading can be enabled or disabled for processing.
Import procedure from gravimeter dump enables last reading from each station occupation. This strategy gives
best results if the operator is aware about the procedure. Operator simply can leave the station only if he considers
the last reading taken correct. If he is in any doubt about the quality of the last reading, he has to take one more
reading until is fully satisfied with the result.
Line and Station
Line and station name or number.
BlueWhaleProcessing software does not have any restrictions concerning line and station names, nevertheless it
is not recommended to use non-alphanumeric characters and name should not become too long - no more than
10-20 characters.
Import procedure from gravimeter dump cuts off any decimal part of line or station name. It is strongly
recommended avoid using fractions in stations and lines numbers with Scintrex CG-3/CG-5 instruments.
Reading
Instrument reading in dial units for instruments with calibration and in mGal for instruments which convert
readings to mGal internally, e.g. Scintrex CG-3/CG-5 gravimeters.
When imported from instrument dump, Reading column is locked from editing.
Instr. height
Instrument height in meters. This value is never filled in by the import procedure and has to be filled in manually
if needed.
Tidal corr.
Tidal corrections imported from the instrument.
Normally there is no need to enter/edit tidal correction value because it can be computed by the software. This
value is used only if "Use instrument corrections" option is selected in Project properties dialog.
Observation
Observed gravity value in mGal.
If reading value was presented in dial units, Observation value is computed with the use of instrument calibration
table. If reading was imported from gravimeter dump, Observation value is cleared from the effect of internal
instrument tidal correction if needed.
Observation column is not editable and is not computed for disabled readings.
Gravity
Absolute gravity value in mGal.
This value is a result of loop processing and is presented only for enabled solved readings. Gravity value is not
editable.
Resid.
Loop closure residuum in mGal.
19
Processing gravity loops
Residuum is difference between mean gravity value from all solved readings at the particular station from the
current reading processing result.
Non-zero residuum can appear for repeated stations only. Residuals are important indicators of overall quality
of the survey.
Resid. column is not editable.
Description
Free-text description. It is printed in loop reports and exported with loop data.
3.2. Loop resolution procedure
When any station or gravity reading parameter is changed, project is marked as "dirty" and all loops of the project
are recalculated twice.
In the first pass, loops are solved and absolute gravity values for each enabled reading are calculated. In the second
pass, cross-loop repeats are processed and correct gravity values to all stations with repeated cross-loop readings are
established.
Loop processing result is signaled by loop icon presented in each loop node in Projects window as well as in the loop's
edit window icon:
Loop without any reading. All readings in the loop are disabled.
Loop is in error state. At least one enabled reading has invalid line or station.
Loop is not solved and at least one reading is enabled.
Loop is solved, but some readings remain unsolved. Most often, elevations or coordinates are missing for some
stations.
All enabled readings of the loop are solved.
3.3. Understanding loop reports
Detailed report can be generated for any resolved loop, i.e. loop in one of the following states:
To generate report for a loop, click the "View report" button at the header line of the Loop window.
3.3.1. Loop report structure
Generated report looks similarly to the output presented at the example.
20
or
Processing gravity loops
Example 3.1. Loop report of the Loop #1 of the Survey example sample project.
21
Processing gravity loops
Loop report consists of the following parts:
Header
Description of the project and loop and list of the most important processing
parameters.
Loop closure processing
Table of all enabled readings within the loop. Base and repeated readings are
marked in the Remarks column of the table.
Stations results summary
Data from all stations affected by the loop are summarized in this table. Printed
columns can be selected in the Output and reporting tab of the Project Properties
dialog.
3.3.2. Printing Loop report
To print the loop report:
1. With loop report window open and selected, select File - Print from the main menu. Print Preview window will
be opened.
2. Click the Print options button and adjust printed page layout. You can check influence of the changes in the Print
Preview window. Press the Apply or OK button to refresh the preview.
Tip
Tick the "Fit width to: 1 page" selection to avoid horizontal splitting of the report.
3. Press Print button. Your operating system printer dialog will appear for print finalization.
3.3.3. Saving and exporting Loop report
To save loop report in HTML format:
1. Right-click the opened report to save.
2. Select the "Save report" option.
3. Choose name and location for the report.
Stations results from each report can be exported in CSV or ASCII format.
To export stations data from a loop report:
1. Right-click the report to export stations data from.
2. Depending on required format, select "Export (ASCII)" or "Export (CSV)" context menu item.
3. Select name and location for the exported data file.
Tip
Right-click project item in the Projects window and select "Export results (CSV)" to export all data
from the entire project into a single file.
3.4. Import data from Scintrex CG-3/CG-5 dump
3.4.1. Prepare data file
Blue Whale Processing Geophysical Software can import data in Scintrex CG-3 or CG-5 txt format dumped from
the instrument. Dump CG-3 data using serial interface or CG-5 data using BlueWhale RS-232 dump utility [http://
bluewhaleprocessing.com/downloads/?did=5].
The CG-5 file should look like this example:
22
Processing gravity loops
/
/
/
/
/
/
/
/
/
/
/
CG-5 SURVEY
Survey name:
test
Instrument S/N: 10001
Client:
test
Operator:
tt
Date:
2010/ 1/27
Time:
03:07:03
LONG:
015.1000000 E
LAT:
50.0000000 N
ZONE:
13
GMT DIFF.:
-1.0
/
/
/
/
/
/
/
/
/
/
/
CG-5 SETUP PARAMETERS
Gref:
0.000
Gcal1: 9142.072
TiltxS: 616.971
TiltyS: 642.392
TiltxO: 18.041
TiltyO: 80.008
Tempco: -0.138
Drift: 1.000
DriftTime Start: 03:07:04
DriftDate Start: 2010/01/27
/ CG-5 OPTIONS
/ Tide Correction:
YES
/ Cont. Tilt:
YES
/ Auto Rejection:
YES
/ Terrain Corr.:
NO
/ Seismic Filter:
YES
/ Raw Data:
NO
Line
0.000S
/------LINE-----STATION-----ALT.------GRAV.---SD.--TILTX--TILTY-TEMP---TIDE---DUR-REJ-----TIME---DEC.TIME+DATE--TERRAIN---DATE
0.0000000 5000.0000000
22.5096
3179.602 0.006
1.4
-1.4 -1.91 -0.010 60
0 03:08:58
40173.13102
0.0000 2010/01/27
0.0000000 5000.0000000
23.2420
3179.594 0.011
0.3
-2.2 -1.92 -0.009 60
0 03:10:15
40173.13191
0.0000 2010/01/27
0.0000000 5000.0000000
23.7303
3179.592 0.011
-0.9
-3.7 -1.95 -0.009 60
0 03:11:33
40173.13281
0.0000 2010/01/27
The CG-3 file should look similar to this:
------------------------------------------------------------------------------SCINTREX V5.2
AUTOGRAV / Field Mode
R5.21
Ser No:
908464.
Line:
0. Grid:
1.
Job:
1. Date: 11/04/19 Operator:
1.
GREF.:
0. mGals
Tilt x sensit.:
260.0
GCAL.1:
6148.776
Tilt y sensit.:
306.7
GCAL.2:
0.
Deg.Latitude:
43.70
TEMPCO.:
-0.108 mGal/mK
Deg.Longitude:
79.6
Drift const.:
-0.4217727
GMT Difference:
4.hr
Drift Correction Start Time: 17:00:54
Cal.after x samples:
999
Date: 11/04/18
On-Line Tilt Corrected = "*"
------------------------------------------------------------------------------Station Grav.
SD.
Tilt x Tilt y
Temp.
E.T.C. Dur # Rej
Time
999. 8228.076* 0.044
-5.
6.
0.17
0.015
60
0 18:09:43
999. 8228.081* 0.052
-6.
5.
0.15
0.013
60
0 18:12:47
999. 8228.087* 0.045
-6.
6.
0.12
0.010
60
0 18:16:49
Note
Exact format of the import files can slightly differ depending on settings of the instrument; nevertheless
the software should handle any dumped file correctly. If your file was not imported properly, please
report the problem using the Help -> Report bug option from the main menu and copy content of your
imported file into the description field.
3.4.2. Import dump file into your project
Right-click your project in the Projects window and select the Import from Scintrex CG-3/CG-5 option:
23
Processing gravity loops
Select file to import in the file selection dialog and click Open. The file is imported into your project as follows:
• new loop is created in your project and named after imported file name;
• instrument used for the data acquisition is included into Instruments node if not existed yet, the same instrument
is set for the new loop;
• new reading is created in the loop for each reading line in the imported file;
• non-existing lines and stations are created in the project;
• last reading from each station occupation is enabled in the newly created loop.
Note
If your data are imported into new project whose coordinates and GMT difference are not set yet, these
values are imported from the dump file header. You are informed about it in a warning dialog.
3.5. Batch data updates
3.5.1. Shift gravity readings time
If instrument clock or GMT Difference settings are not set properly, tidal corrections were not computed correctly.
Shifting of gravity readings times is a way how to fix this problem.
Typical problem is incorrect sign set for GMT difference in the firmware of the Scintrex CG-5 gravimeter. E.g. if the
survey loop was completed with the GMT difference value +2 for the survey in Eastern Europe instead of the correct
value of -2, all readings have to be shifted 4 hours backwards.
Caution
GMT difference sign in the Scintrex CG-5 firmware is opposite to the sign used in
BlueWhaleProcessing Project Properties settings. BlueWhaleProcessing CG-5 import procedure
converts the GMT difference correctly. Internally, BlueWhaleProcessing stores all time data in GMT.
To shift gravity readings time of a single loop by a given number of hours:
1.
When desired loop is selected (highlighted) in the Projects window, click the
gravity readings times from the main menu.
24
icon or select Tools - Shift
Processing gravity loops
2. Input required time shift in hours, e.g. -4 or 3.3333338
Positive value means forward shift, negative value means backward shift.
3. Press Shift button.
4. Save, close and reopen the project when finished with time shifting.
To shift readings for the entire project, highlight the project item when opening the Shift readings time dialog.
BlueWhaleProcessing can try to estimate proper time shift based on repeated readings from the selected loop.
To estimate time shift from repeated readings, select the loop which should be used for time shift estimation, open the
Shift readings time dialog and press Find optimal time shift button.
Output window shows computation progress. The best time shift is presented in the topmost line. When the estimation
is finished, loop is shifted back to the initial state.
Running time shift computation can be stopped at any moment by pressing the Stop computation button. When the
button is pressed, current computation step is finished and the loop is shifted back to the initial state. Do not close the
Shift readings time dialog while the computation is not completely stopped yet.
Note
Searching for optimal time shift can take a reasonable amount of time.
Check coordinates of base stations used in the processed loop before running time shift determination
procedure.
Time shift determination procedure needs reasonable amount of repeats for proper operation. Overnight
drift test with the instrument sited on a base continuously registering is an optimal case.
Maximum time shift which can be determined by the automatic otpimal time shift determination
procedure is +/- 6 hours.
3.5.2. Group readings selection
When a new gravity loop is imported into the BlueWhaleProcessing project, repeated readings at the same station
occupation are ignored with exception of the last reading before the instrument is moved to the next station. The last
reading is expected to be the most acceptable by the operator and this reading is selected for further processing.
Selection of individual readings can be changed in the Loop table. In addition, all readings of a gravity loop can be
processed by group readings selection procedure.
To change selection for all readings of a loop:
25
Processing gravity loops
1. Select (highlight) the required loop in the Projects window.
2.
Click the
icon or select Edit - Group select readings from the main menu.
3. Choose desired action in the dialog:
Select the last reading at each
station (default)
This option behaves similarly to the selection after loop data import. The
last reading for each station occupation is selected.
Any previously selected readings reamin selected when this option is
processed. If it is not the required behavior, clear all selections first before
using this option.
Unselect all readings
When this option is processed, all readings of the selected loop are
unselected.
Select last reading and readings in
interval...
For this selection, first of all the last reading at a station occupation is
selected. As the next step, all readings of this occupation are scanned in
reverse order until interval between selected and current reading exceeds
provided limit in minutes. If such a reading is found, it is selected and
backward scanning continues until all readings for the occupation are
exhausted.
This procedure is suitable e.g. for processing of an overnight drift loop test.
When the instrument is sited on a base registering in an infinite loop, group
selection of readings with a given interval can be helpful for further drift
processing, reporting and plotting.
4. Click the Proceed! button to start the selected action.
26
Chapter 4. Work with lines and stations
This chapter describes gravity stations database and functions available in the BlueWhaleProcessing software to
manipulate stations data.
First section describes in detail parameters saved for each station in the project database. Line editor window is
explained in detail.
Next section describes various formats available for import of stations coordinates and detailed description of the
import procedure.
Finally, procedures available for processing of terrain corrections are described.
4.1. Stations database structure
Gravity stations in the BlueWhaleProcessing project are grouped into lines. The software does not have limitations
concerning the way how stations are grouped into lines. The only requirement is that line and station names/numbers
must be equal to the names contained in the gravimeter dump file for the corresponding gravity reading.
Note
If you want to use the experimental line plot function, organize your stations into lines according to
their assignment to individual profiles for the profile plots to be drawn correctly.
State of each line in the BlueWhaleProcessing project is signalled by the line icon:
Line is empty.
Some stations of the line are not fully resolved.
All stations of the line are completely resolved.
4.1.1. Line editing window
Parameters of all stations of any line can be revised and edited in the Line editing window. To open it, double-click
the line in the Projects window or select Open from the line context menu.
Each line in the line editor represents a gravity station. The station can be expanded by a click to the "+" symbol to
display all gravity readings at this station from the whole project.
Clik the cell or press F2 to edit station parameters. Press ENTER when editing is finished. Grayed columns and
expanded gravity readings parameters can not be edited.
Description of the Line editor window editable columns:
27
Work with lines and stations
Station icon
Station icon can be represented by one of the three possible symbols:
Regular station
Regular station with terrain correction computed
Base station
Icon color represents the processing state of the station:
Missing station coordinates.
Station horizontal coordinates are defined, altitude is missing.
No gravity readings for the station exist.
Fully processed station.
Station
Station name or number. If you plan to use line plot feature, use numeric station names only
sorted along the line, e.g. station position in meters or other convenient unit.
Base
Base station flag. Click the corresponding cell to toggle the flag.
Each gravity loop has to contain at least one base station.
Base gravity
Absolute gravity value of the base station marker. All readings of a loop containing the base
station will be tied to this value.
Base gravity value is completely ignored for regular (non-base) stations.
Caution
If a loop contains more than one gravity base, base gravity values for each base
have to be consistent (tied together). Othervise loop closure will be wrong.
Latitude
Station latitude. Positive value means Northern latitude, negative value represents Southern
latitude.
When the "latitude" cell for a station is edited or new value is pasted into, either latitude in
degrees or UTM Easting value in meters can be entered. If UTM Easting was entered (value is
greater than 90), following conversion procedure takes place when ENTER is pressed:
• Old station coordinates are converted to UTM according to datum settings in the Project
Properties.
• Computed UTM Easting value is replaced with the entered value.
• Resulting UTM coordinates are converted back to geographic coordinates and both station
latitude and longitude are replaced with new values.
Longitude
Station longitude. Positive value means Eastern longitude, negative value represents Western
longitude.
When the "longitude" cell for a station is edited or new value is pasted into, either longitude in
degrees or UTM Northing value in meters can be entered. If UTM Northing was entered (value
is greater than 180), following conversion procedure takes place when ENTER is pressed:
• Old station coordinates are converted to UTM according to datum settings in the Project
Properties.
• Computed UTM Northing value is replaced with the entered value.
28
Work with lines and stations
• Resulting UTM coordinates are converted back to geographic coordinates and both station
latitude and longitude are replaced with new values.
Altitude
Elevation of the station gravity marker in meters referenced to the datum defined in Project
parameters. Zero value means undefined elevation.
Note
Internally, all elevations are stored referenced to the WGS84 ellipsoid. That
means, that if you need to enter zero value (undefined elevation), elevation datum
must be set to WGS-84 ellipsoidal first.
On the other hand, if your station elevation is zero (referenced to WGS-84
ellipsoid), enter a very small value below survey resolution threshold, e.g.
0.00001 instead to include the station into processing.
Picket height
Relative elevation of the geodetic marker above the gravity marker for the station.
Description
Description of the station. Content of the field is printed in reports at the end of the station line.
Description of the non-editable columns:
Gravity
Absolute gravity for the given gravity reading in mGal.
This field is filled in for the expanded gravity readings of the station only.
Average gravity
Average of absolute gravity values over all gravity readings existing for the given station in
the entire project.
St. dev
Standard deviation computed from repeated readings available for this station. In case of only
a single reading existing for the station, zero is presented.
Max. error
Absolute value of the maximum difference between average gravity and absolute gravity of
each reading for this station.
Terrain corr.
Terrain correction computed for the station.
Depending on the Terranin corrections settings in Project Properties, the value is computed
automatically or can be entered manually.
Switch Terrain corrections to None in Project Properties, close and reopen the project in order
to reset corrections for all stations to zero (not computed yet).
If Terrain corrections setting is set to Plouff or Hammer and current value of the terrain
correction is zero for the station, automatic computation of the terrain correction takes place
with next project recalculation.
4.1.2. Line plot window
Warning
The line/profile plot feature is experimental in this version of the BlueWhaleProcessing software. The
feature can change in the future versions. It is not recommended to set up production environment
criticaly dependent on this feature at this stage of development.
Line plot can be plotted for lines with all reductions, including terrain corrections, applied.
To open the Line plot window, click the View line plot button in the upper part of the Line Editor Window.
29
Work with lines and stations
The Line plot consists of two graphs. The upper graph represents Bouguer anomaly plot (blue line) and Complete
Bouguer anomaly plot (green line) over the extent of the line. The lower graph plots stations elevations as a brown line.
To save the plot as a .png image, right-click the window and select Save plot. To print the plot, select File - Print
from the main menu.
Right-click the plot and select the "Toggle show computed reduction density" to add the third graph into the plot
together with reduction density computed with the Jung's method, analytic modification of the Nettletton method
[Jung 1953].
The new graph shows both Bouguer anomaly and complete Bouguer anomaly plots computed with the use of the
computed new reduction density. Dashed lines are used for both curves.
Right-click the plot and select the "Toggle show computed reduction density" again to hide the additional plot.
30
Work with lines and stations
4.2. Import stations coordinates
4.2.1. Prepare coordinates file
Software can import coordinates from Comma-separated-values (CSV) file format or text data formatted by Magellan
GNSS Solutions software.
4.2.1.1. CSV coordinates file
Comma-separated values (CSV) format coordinates file has to contain station name, latitude, longitude and elevation
data. In addition, line name can be provided.
The CSV file must contain header line with column names. Data are recognized according to the column names as
follows:
Column name
Data values
Line
Name of the line (optional); if the line does not exist, new
line will be created
Station
Name of the station; if the station exists in the given line,
coordinates will be overwritten with new values
Latitude or Lat
Station latitude in degrees
Longitude or Lon
Station longitude in degrees
UTMX or Easting
Station UTM easting in meters
UTMY or Northing
Station UTM nothing in meters
Elevation or Altitude or Alt
Station elevation in meters
Terrain or Terrain corr. or Terrain correction
Value of terrain correction in mGal
Note
Columns in the CSV file can be presented in any order. Unrecognized columns are skipped. Column
names are case-sensitive; e.g. data from the column named "Alt" will be imported as stations elevations
while column named "alt" will be ignored.
Note
UTM coordinates, if present, are preferenced over geographic coordinates.
The CSV coordinates file can look like this example:
Station,Longitude,Latitude,X,Y,Elevation,Line
BASE,29.58821399,37.6643881,728300,4171800,1270,0
0,29.59081675,37.66527561,728526.9,4171904.84,1280.59,200
100,29.59042609,37.66444295,728494.99,4171811.48,1272.76,200
120,29.59033712,37.66427703,728487.65,4171792.85,1270.48,200
Note
Columns X and Y will be ignored in the above example. If you rename columns X nd Y to UTMX
and UTMY, geographic coordinates will be ignored and UTM coordinates will be converted to latitude
and longitude using project datum settings.
4.2.1.2. Import from the GNSS Solutions software
Blue Whale Processing Geophysical Software can import coordinates data from the file prepared from the Stations
table in the Magellan GNSS Solutions software provided as an option by the manufacturer with some Ashtech, Thales
and Magellan GNSS receivers.
31
Work with lines and stations
To prepare the file for import, in the Workbook of your adjusted project in the GNSS Solutions software click the
Points tab. Select the whole table by a click to the upper-left (blank) cell of the table. Right-click the table and select
the "Copy" option. Open a blank text file in Notepad and paste the selected data into it. Save the Notepad txt file at
the suitable location in your computer.
The prepared txt file should look like this:
Name Description Long Lat Ellips height Status Constraints Surv_Horz_Conf Surv_Height_Conf Type
Warning
BASE 15° 17' 47.09059"E 50° 08' 09.01157"N 496.662 Adjusted Horizontal & Vertical Fixed (3D) 0.000
0.000 Control Point No
2001
15° 13' 48.81734"E 50° 07' 42.76530"N 474.735 Adjusted No constraints 0.022 0.015 Logged
Point No
2002
15° 13' 26.49182"E 50° 09' 36.53375"N 413.180 Adjusted No constraints 0.026 0.018 Logged
Point No
2003
15° 16' 21.78458"E 50° 12' 53.36935"N 433.376 Adjusted No constraints 0.031 0.019 Logged
Point No
Note
Only stations with status "Adjusted" will be imported. Please adjust your network solution before
making the import file.
Important
GNSS Solutions import txt file should contain stations from a single line only. In case your GNSS
Solutions project contains stations from more than one line, prepare separate file for each line
containing stations from the corresponding line only.
4.2.2. Import coordinates data into your project
Right-click your project icon in the Projects window and select the "Import coordinates" option:
Select data file prepared in the previous step and click Open. Coordinate data will be imported into appropriate lines/
stations of your project.
Note
Please check the "Geodetic reference frame" and "Elevation datum" settings in the Project properties
dialog whether correspond to your data. After import, all coordinates are transformed to the
BlueWhaleProcessing internal reference, WGS-84 with ellipsoidal elevation datum. This means, that
change of datum or reference frame does never influence any existing coordinates in the project.
32
Work with lines and stations
Tip
If your coordinates file does not contain "Line" column, right-click the icon of line into which you
would like to import data instaed of the project icon. Data will be imported into the proper line. GNSS
Solutions file does never contain line information.
4.3. Processing terrain corrections
Current version of the BlueWhaleProcessing provides partial support for semi-automatic terrain corrections
computation. The following tasks are supported:
• Automatic computation of regional terrain correction with the use of SRTM3 digital terrain model SRTM3 data
[http://www2.jpl.nasa.gov/srtm/] with both Hammer method and Plouff method.
• Support for user-provided terrain data to be included into regional corrections computation in addition to the stations
elevations data and SRTM3 digital terrain data (Hammer method only).
• Simple tool for estimation of difference between SRTM3 elevation datum and stations database elevation reference.
• Indirect support of manual combination of regional terrain corrections computed by the BlueWhaleProcessing
software and local near zone corrections.
Warning
Terrain corrections utilities are under development and improvements in both user interface and data
structures can be expected in the future versions of the BlueWhaleProcessing software.
4.3.1. Regional terrain corrections
BlueWhaleProcessing software currently provides two methods for computation of regional terrain corrections. Both
methods use worldwide SRTM3 digital terrain model with 3 arcsec (~90 m) spacing.
Hammer method [Hammer 1939]
Hammer corrections are computed for zones D-M, i.e. for distances 53 21943 m from the station in concentric rings divided into segments. Elevation
difference of each segment from the station is computed as mean difference of
the station elevation from all SRTM cells whose center falls into the segment.
In addition to the SRTM3 data, all stations elevations are included into
computation, i.e. each existing station in the project contributes to the terrain
corrections calculation.
Finally, user-provided terrain data can be imported into the project.
Plouff method [Plouff 1976]
Plouff method models terrain influence with series of vertical prisms. Each
SRTM3 cell represents a single prism. Terrain correction effect is computed for
each SRTM3 cell with it's center between 80 m and 120 km from the station. If
SRTM3 data are missing for a particular cell, mean value from the neighbour
cells is used.
In normal project lifecycle, computation of terrain corrections takes place as the final processing step.
BlueWhaleProcessing software allows computation of terrain corrections in any stage of processing to provide full
featured intermediate snapshot data, nevertheless it is recommended to clear all terrain corrections and recompute the
whole project terrain corrections from scratch when all project data are collected.
To compute regional terrain corrections:
1. Select Tools - Options from the main menu. Select location where downloaded SRTM3 data will be saved. If local
mirror of the official SRTM server is available, you can modify the default download address accordingly. HTTP
protocol only is supported.
The settings in the Options dialog will affect each project in your BlueWhaleProcessing installation.
33
Work with lines and stations
2. In Project properties Gravity processing tab click the Compute difference by the SRTM difference field.
The software will close the Project Properties dialog and recompute the entire project. As a part of recomputing,
needed SRTM3 data are downloaded. For each station, elevation from the SRTM3 terrain model is interpolated
and the difference between the station elevation and the interpolation is computed. The progress bar displays
intermediate results.
When recomputation is finished, SRTM Difference field value in the Project Properties is replaced by the result of
the computation. Revise and correct the value if needed.
Systematic difference between the SRTM3 data and precise leveling or GPS provided stations data is normal.
SRTM3 model's mean absolute precision is ~ +/- 16 meters and in some regions the difference can be even higher.
Relative precision is much better and as soon as the data are corrected for the systematic absolute shift, terrain
corrections computation provides satisfactory results in most cases.
Tip
You can plot SRTM difference map, i.e. map of differences between the interpolated SRTM model
elevation and station's elevation to assess overall fit of the SRTM data over the project area and to
discover sources of possible discrepancies. See Creating maps chapter for more information about
creating maps.
3. In Project properties Gravity processing tab select method for terrain corrections computation from the drop-down
menu:
Hammer
Hammer method will be used for terrain correction computations.
Prism (Plouff)
Plouff method will be used.
Manual
Terrain corrections will not be computed automatically by the BlueWhaleProcessing
software. You can enter terrain corrections manually for each station in the Stations editor
window.
Tip
When manual method is selected, terrain corrections can be imported with
stations coordinates data. See the Import stations coordinates section for
more information.
None
All terrain corrections in the project will be cleared with the next project recomputation.
4. Close and reopen the project. Necessary SRTM3 data will be downloaded and terrain corrections will be computed
for stations where terrain corrections were not computed yet.
Note
Changing of the computation method will not recompute existing terrain corrections. Terrain correction
of a station will be recomputed automatically with the next project recalculation only if station
coordinates have been changed.
To recompute the entire project, select terrain corrections computation method to None first. Then close
and reopen the project. All terrain corrections will be cleared. Finally, change the terrain corrections
settings to the new value and close and reopen the project again.
Computation of terrain corrections needs reasonable amount of time. Plouff method is significantly
slower than Hammer method.
4.3.2. User-provided terrain data import and processing
When Hammer method is used for terrain corrections computation, user-provided terrain data can be imported into
the project and used for computation.
34
Work with lines and stations
To import terrain data:
1. Prepare the terrain data file in CSV format. Structure of the file is the same as the structure of stations coordinates
file.
2. Right-click the project in the Projects window and select Import terrain data from the context menu.
3. Select file with your terrain data. Finally, completely recompute all terrain corrections as described above.
Note
In order to remove imported terrain data from your project, right-click a project containing imported
terrain data and select Delete terrain data from the context menu. Recompute all terrain corrections
afterwards.
4.3.3. Adding local near-zone corrections into the project
Current version of the BlueWhaleProcessing software does not contain direct support for computation of local nearzone (Hammer zone A-C) terrain corrections which are normally based on operator's estimates at each station, nor
support for combination (superposition) of local and regional terrain corrections.
As a workaround, a spreadsheet program, e.g. Microsoft Excel or OpenOffice Calc can be used for computation of
local corrections and combination of import/export functions of the BlueWhaleProcessing software can help combine
regional corrections computed by BlueWhaleProcessing and local corrections from the spreadsheet.
To combine regional corrections from the BlueWhaleProcessing project with local terrain corrections:
1. Export entire project data into CSV format. Open the CSV file in a spreadsheet program.
2. Rename the Terrain corr. field e.g. to Regional corr. Add a new column to the sheet containing your computed
local terrain corrections and another new column with the sum of regional and local corrections. Name the later
column Terrain corr. Save the spreadsheet in the CSV format.
3. In the BlueWhaleProcessing project switch method of terrain corrections computation to Manual.
4. Import the updated CSV file into your project. Regional terrain corrections computed by the software will be
replaced with the combined corrections.
35
Chapter 5. Creating maps
BlueWhaleProcessing software provides functionality for presenting results of processing in the map form. Maps are
easily replotted when data were changed and provide flexible way to present intermediate data on the fly at any stage
of the project lifecycle.
This chapter describes in detail mapping support features of the software.
Caution
Mapping module is under continuous development. Some of the structures definitions can change in
future version which could cause incompatibility of the generated maps with newer versions of the
software.
At this stage of development, it is not recommended to make production environment criticaly
dependent on the new features introduced with the mapping module.
5.1. Creating a new map
Each BlueWhaleProcessing project can contain any number of independent maps. A map represents in fact set of
parameters constituting the rules how the map presentation has to be created. That means, that the map is independent
from the project data and represents a presentation skeleton for the current project snapshot.
When project data are changed, the map is replotted accordingly keeping the same rules for data presentation. Thus,
at each moment the map vizualization presents the snapshot of the project data at the given moment.
At present, each map can consist of at most two layers, the compulsory stations layer and the optional grid layer.
Stations layer presents stations distribution within the project and grid layer presents selected project data as a coloured
contour map layer.
To create a new map:
1. Right-click the Maps node of the project in Projects window.
2. Select Add new map item. New map is created under Maps node with default Stations layer.
3. Double-click the newly created map in the Projects window or select Open from it's context menu. New map opens
in the main window.
36
Creating maps
Map plot can be zoomed or panned using the mouse wheel. When Ctrl is pressed together with wheel rotation, map
is zoomed/shrinked. When the wheel is pressed down, mouse movement pans the map in the window.
To add a contour layer into the newly created map:
1. Right-click the map node in the Projects window.
2. Select Add new map layer and choose desired option from the list.
Available map layers:
Elevation
Stations elevations map.
Free Air anomaly, Bouguer
anomaly, Terrain corrections,
Complete Bouguer anomaly
Options of gravity processing results plots.
SRTM differences
Map of differences between real station elevation and elevation interpolated
from the SRTM3 digital terrain model.
This map can be helpful to determine reliability of the digital terrain model data
for the area under study.
5.2. Map Palette tools
When a map is opened, Palette window is opened in addition to the map plot window containing graphical tools for
map parameters adjustment.
Selection of tools available in the Palette window depends on type of the currently selected map.
Caution
Palette tools affect currently selected map window. It is recommended to leave a single map window
opened only at any moment to avoid confusion or inproper function of the tools.
37
Creating maps
In the following sections, available palette tools are described.
5.2.1. Map palette
Map parameters
Defines basic parameters of the map:
Auto fit to screen
When checked (default), the map is automatically adjusted to fit the main
window. Resizing of the main window resizes the map accordingly. This
setting is suitable for on-screen map presentation.
When unchecked, map scale can be explicitly set by other settings.
Output resolution, Output scale
When Auto fit is not checked, controls real map size when printed or
saved.
Hide gravity bases
When checked, gravity base stations are completely excluded from the
plotted data.
Show stations without readings
When checked, stations with no gravity readings are included into stations
map. Can be useful for survey planning purposes.
Click Replot map after change to save new parameters and replot the map.
Save map
Save map in PNG format.
5.2.2. Stations palette
Stations parameters
Defines how stations are plotted.
Station names
Toggle show/hide stations names (labels). Select size and color of the
labels. The text "MyStation" demonstrate label appearance when settings
change.
Station position symbols
Adjust shape, size and color of the station symbol. When Show symbols
box is not checked, no station symbols are drawn.
When ready with adjusting station parameters, press Replot map to save changes and apply the settings on the
map.
5.2.3. Contour layer palette
This palette is named according to the name of the contour layer, e.g. Complete Bouguer anomaly. Not every contour
layer contains all tools.
Color scale
Show or hide the color scale bar.
If line width is not correct in the color scale bar, uncheck Automatic contour interval in the Contours tool, replot
the map and check it back. This will fix the problem.
Contours
This tool allows to set contours parameters. When Automatic contour interval is checked, Contour interval and
Label interval are set automatically based on current data values.
Contour lines and contour labels are plotted with the same color.
38
Creating maps
Grid parameters
This tool controls parameters of grid layer creation.
Grid step
Defines grid step in meters. Value of -1 means automatic determination
of the grid step.
Small grid step can cause out of memory errors or very long time needed
for gridding. Large grid step leads to rough map.
Method
Two gridding methods are supported in this version of the software,
Inverse Distance and Minimum Curvature.
Inverse distance gridding is simple and fast while Minimum curvature
method leads to nicer and smoother maps, but is much slower. In addition,
result of the Inverse distance gridding is used as the starting model for
Minimum curvature iterations.
Usually, Inverse distance gridding is used for fast preview while Minimum
curvature parameters are fine-tuned at the final stage of processing to
prepare maps for results presentation.
Weighting order
Exponent used for Inverse distance gridding.
Maximum radius
Maximum radius for the Inverse distance method. Stations with distance
greater than maximum radius from the gridding point are excluded from
computation.
In addition, maximum radius value is used to mask grid layer. Any grid
point for which no station falls into maximum radius threshold is masked
from plotting.
Max. number of stations
Maximum number of stations included into Inverse Distance gridding for
each point in ascending distance order.
Max. no. of iterations
When Minimum Curvature gridding reaches the given number of
iterations, computation stops.
Precision threshold
When squared sum of curvatures for the current iteration step of
the Minimum curvature gridding drops below the given threshold,
computation stops.
Predictive gridding
When checked, Predictive gridding feature is activated for Minimum
curvature procedure. In some cases, predictive gridding gives better
results, but is less stable than regular gridding.
Replot map every x iterations
When checked, map is repeatedly replotted after the given number of
minimum curvature iterations. This can help to assess whether increasing
of number of iterations can improve gridding results.
Press Regrid data button to start gridding.
Minimum curvature gridding can take long time. Gridding in progress can be interrupted by pressing the red
square displayed with the corresponding progress bar.
39
Chapter 6. Additional features
6.1. Setting processing options
Software processing options can be adjusted in the Processing Options panel. To open Processing Options panel, select
Tools - Options from the main menu and click on the Processing toolbar icon.
Adjust desired options and click OK to save changes.
SRTM data folder
Location of the downloaded SRTM data in your computer. SRTM data files are downloaded when needed when
Download SRTM data option is checked in a particular project properties and terrain corrections processing
taking place for this project is missing some DTM data.
All projects share the same SRTM data folder.
Download SRTM data from
URL to the SRTM database. Points to the public USGS SRTM3 server. If your company provides local mirror
of the SRTM3 data, you can provide valid URL of the mirror.
You can point to a folder in your computer with the URL in the form:
file:///full-path-to-SRTM-data/
Local mirror has to exactly follow directory structure of the SRTM3 folder at the USGS server.
Show program credentials in reports
Toggles printing of program credentials in the footer of each loop report.
40
Additional features
6.2. Sample projects
Three sample projects will open in Projects window after pressing the "Open sample projects" button on Welcome
screen:
6.2.1. Test project
The "Test project" example is the result of the Quick Start Guide tutorial.
6.2.2. Survey example
The "Survey example" project represents an excerpt from the real gravity survey in a high mountain area.
Project consists of four consecutive daily loops all of them acquired with the same gravimeter. Each loop starts and
ends with the base reading at the Base station No. 0. Absolute gravity value at the station 0 was not known at the
data acquisition time. At the end of the processing stage the absolute gravity was established so as the complete
Bouguer anomaly is zero at the gravity base. Several in-loop as well as cross-loop repetitions were acquired in each
loop depending on local accessibility of stations.
Presented example demonstrates several features common in many gravity surveys:
• Several stations only are repeated in each loop. In such a case, "Maximum polynom degree for drift calculations"
parameter in Project properties should be limited to "1", i.e. instrument drift is expected to be linear during the
loop data acquisition;
• Drift correction value for the last station reading of the day presented in the Loop report of each loop represents total
residual drift of the instrument during the survey day. This value should be similar for consecutive days taking into
account total acquisition time of a survey day. Irregularities in the instrument drift behavior can signal instrument
problem or improper handling of the instrument;
• Standard deviation of the overall loop closure precision is represented in the "Processing status" item of the Loop
report header. This value is computed from residuals of all in-loop repetitions including base station readings after
drift corrections were applied. This value is an indicator of quality of data acquisition of the particular loop.
• Columns "Number of obs.", "RMS" and "Max. error" in the Stations results summary table represent statistics of
stations repetitions for the entire project. Maximum repetition error of the cross-loop repeated stations represents
independent check of the reliability of the data acquisition and pre-processing.
• Terrain corrections computed using the Plouff prism method in a 3 arcSec SRTM data grid were applied at the final
processing stage. It is evident from the results, that terrain corrections have principal influence on the results in
a given area. Please note, that the block containing the particular station is excluded from the Plouff corrections
computation. In order to obtain results of maximum precision, in addition to the corrections computed by the
software, near-zone terrain corrections corresponding approx. to zones A, B and C of the Hammer sheet should
be computed manually and final results should be corrected for the near zone terrain influence. At this moment,
software does not have a tool for the near zone corrections.
• Stations coordinates were provided in ellipsoidal elevation datum while SRTM data are referenced to geoidal datum.
Parameter "SRTM Difference" in Project settings represents elevation datum difference. Software can compute this
value automatically as a mean of differences of interpolated SRTM elevations and provided stations elevations
over all survey stations. Button "Compute difference" in Project properties performs this computation and newly
computed value is filled-in into the Project properties. If your elevation data are referenced to geoidal heights, the
computed difference should represent the SRTM interpolation uncertainty and should be small, usually less than
5 meters.
6.2.3. Tie example
Processing of gravity tie data, i.e. data acquired for transferring of the absolute gravity value from the reference station
to the field base station(s) is very easy with the Blue Whale Processing software.
41
Additional features
Presented field example represents two daily tie loops transferring the known absolute gravity value from the reference
station No. 1000 to newly established field bases No. 2000 and 3000.
Following common tie survey features can be presented at the Tie example:
• Each loop consists of several observations on both reference and newly established base. At least three observations
at the reference and two observations at each tied station are highly desirable in order to model the instrument drift
as precisely as possible;
• Because of many repetitions available during the span of each loop, "Maximum polynom degree for drift
calculations" parameter in Project properties can be set to a higher value, 2 or 3 depending on the number of
repetitions and loops time span;
• Because of very long instrument transportation often in uneven conditions, recovery effect takes place at each station
occupation. After setting up the instrument, typically 5-30 minutes delay is desirable in order to let the instrument
recover. If readings take place during recovery, instrument behavior can be monitored and optimum recovery time
can be selected;
• Absolute gravity values at newly established stations are the only interesting results, no gravity reductions are
necessary. All columns containing gravity reductions can be turned off in the Loop report by un-checking of
appropriate options in the "Output and reporting" tab of the Project properties dialog.
6.3. Development version of the software
This chapter describes how to test software in development version. Development versions of various software
modules are made available to the public prior the final version is released.
When the version 0.6 of the software was released, further development of the new functionalities was frozen in this
release and updates were provided for serious bug fixes only. New development branch 0.7 was sat up and all new
features were added to the 0.7.x versions of modules. When a particular improvement was finished, new module was
made available in a testing repository. This repository is optionally made available to the users.
Using of the testing repository gives the users an opportunity to take advantage of most fresh features of the software
before they are available in the new release version. In addition, users can make feedback and report eventual bugs
to the developers while using the testing modules.
Caution
Testing versions of the software modules can be unstable and can cause improper functionality of
the software. It is not recommended to make the production environment critically dependent of new
features introduced in the Development version.
6.3.1. Installing the development version
Follow these steps to make the development modules available in your copy of the software:
1. From the main menu select Tools -> Plugins.
2. Select tab Available plugins. If no plugins are available, click Reload Catalog button.
3. In the list of available plugins select Testing version plugin and click the Install button:
42
Additional features
4. Follow the install wizard. The software will be restarted after installation is finished.
5. After restart select Help -> Check for updates from the main menu. Available testing versions of the software
modules will be installed.
Important
Uninstalling of the Testing version plugin will NOT roll back the software to the official release! Please
follow precedure described in the next section to uninstall testing versions of the modules.
6.3.2. Uninstalling the development version
Please follow this procedure to roll-back from the testing version to the official release version of the Blue Whale
Processing software:
Caution
Rolling back will not affect your projects, nevertheless it is recommended to backup your data before
proceeding because possible changes in data structures in the Development version can be incompatible
with the stable version of the software.
1. Uninstall the software using uninstall procedure suitable for your operating software. In the first dialog of the
Uninstall wizard check the Remove directory ..../dev checkbox.
2. Visit http://bluewhaleprocessing.com/download and download the newest installer for your system.
3. Run the downloaded installer and follow the installation wizard. Under some circumstances you have to delete the
instalation directory with system administrator rights manualy before proceeding with installation.
6.4. Viewer mode
Viewer mode version of the Blue Whale Processing software is currently available for free. It is possible to open, view
and export/print data from existing Blue Whale Processing projects in Viewer mode, nevertheless no modifications
can be made in projects data and projects cannot be saved.
43
Additional features
None of these limitations apply to the full version of the software. Please use our Sales representative contacts [http://
www.bluewhaleprocessing.com/contact] to request pricing of the full version.
44
Chapter 7. Help and support
7.1. How to get help
Contextual help
Press F1 to get contextual help concerning the item you are working with. If contextual help is not available, use
Search function of the help system.
On-line resources
• User's manual in PDF is available for download here: http://bluewhaleprocessing.com/downloads/
• Please visit the Frequently asked questions page [http://bluewhaleprocessing.com/support/faq/] for answers to
the most common questions not yet covered in the manual.
• Please find current contacts to the support and sales team here: http://bluewhaleprocessing.com/contacts/
7.2. Report bug or propose software enhancement
Software enhancement proposals and issues can be reported to the BlueWhaleProcessing developers directly from
the application:
1. Select Help - Report bug / Enhancement proposal from the main menu. The Report bug dialog will open.
2. Fill in a short descriptive summary of your report and detailed description of the problem. Both fields must be
filled in for thereport to be accepted.
3. Check Send report as a Guest to send anonymous report or fill in your credentials to the BlueWhaleProcessing
bug reporting system.
You can register here: http://bugzilla.mantlik.cz/createaccount.cgi to submit personalized report.
45
Help and support
You can easily follow resolution progress of your report if you sent the report as a registered user.
4. Press Submit data button to send your report to our developers.
Important
Please check Opened issues page [http://bluewhaleprocessing.com/support/opened-issues/] before
submitting a new report to avoid duplicate reporting.
Note
If the submission of the report fails for any reason, you can create the report directly here: http://
bugzilla.mantlik.cz/enter_bug.cgi?product=BlueWhaleProcessing
Registration is required to submit the report directly.
46
Chapter 8. Processing procedures and
formulas
Each gravity loop is processed independently of other loops. Processing is initiated automatically when any change in
loop data occurred or station coordinates have changed. Automatic processing can be switched off in Project Properties
dialog . If it is the case, processing can be initiated by pressing
Recalculate toolbar button.
Gravity loop processing procedure consists of the following steps:
1. Instrument readings conversion to gravity units
First of all, gravimeter dial readings are converted to gravity units with the use of gravimeter calibration table.
Calibration table can be edited in the Instruments window. Each item in the calibration table represents a linear
calibaration interval defined by instrument dial reading and gravity value at the beginning of the interval and
calibration coefficient appliend for all readings in the given interval. Calibration table entries must be sorted in
dial readings ascending order.
Gravimeter dial reading r falling into dial interval from r i to r i+1 with start gravity value g i and coefficient k
i is converted to gravity value g with the following formula:
(8.1)
Instruments readings conversion does not apply for Scintrex CG-5 and CG-3 instruments. Their readings as
presented in the instrument dump files are expressed in mGals already.
2. Removal of instrument computed tidal correction
This step applies to data imported from Scintrex CG-3/CG-5 instrument dump.
If the instrument applies tidal corrections to the readings (Tide Correction: YES in the dump file header),
instrument-computed tidal corrections are stripped from gravity readings:
(8.2)
where g represents gravity value cleaned from instrument tidal correction, g i represents instrument reading and
t i represents value of instrument-computed tidal correction.
Import from CG-3/CG-5 dump procedure stores value of g as instrument reading and value of t i as tidal correction
into BlueWhaleProcessing database. Imported values can be inspected in the Loop table.
3. Instrument height reduction
Value of g representing relative gravity value at the instrument sensor position is reduced to the ground using free
air reduction coefficient:
(8.3)
where g 1 is the reduced value of gravity, h
coefficient. [Blakely 1995] p. 140.
i
is instrument height and f = 0.3086 mGal/m is free air reduction
4. Tidal correction
Fortran computer program ETGTAB http://www.geo.uni-jena.de/geophysik/etc/etcdat/etgtab/ has been adapted to
Java and the adapted version is used for computation of Earth's tidal effects. This program is able to compute tidal
effects with precision better than 0.001 mGal.
Program ETGTAB computes tidal effect using spherical harmonical analysis for time-space tidal potential
development. [Wenzel 1976]
47
Processing procedures and formulas
Four tidal potential development models are available:
• Tamura 1987 tidal potential development with 1200 waves [Tamura 1987]
• Buellesfeld 1985 tidal potential development with 656 waves [Buellesfeld 1985]
• Cartwright-Taylor-Edden 1973 tidal potential development with 505 waves [Cartwright and Tayler 1971],
[Cartwright and Edden 1973] and [Chojnicki 1973]
• Doodson 1921 tidal potential development with 378 waves [Doodson 1921]
Detailed information concerning procedure and data used for tidal corrections computation can be found following
provided references.
5. Instrument residual drift correction and reduction to the base
Polynomial equation in the form
(8.4)
is used to compute residual instrument drift d r for each reading in a given gravity loop where t is time of observation
and t 0 is time of the first observation in the loop. Vector A represents set of coefficients of the polynomial drift
model,. E.g. A 0 is drift start value at time t 0 and A 1 is linear residual drift of the loop.
With known vector A, absolute gravity g A can be computed from the value of g 1 as follows:
(8.5)
So, for absolute gravity value at the i-th repetition of the m-th station with in-loop repetition g A,m can be written
a linear equation:
(8.6)
Similarly for i-th base reading:
(8.7)
where g B is base absolute gravity value.
Equation 8.6 and Equation 8.7 define over-determined linear system with unknown residual drift coefficients A
and absolute gravities at each non-base station g A,m . This system is solved with the use of RMS method.
6. Absolute gravity
When linear system defined by Equation 8.6 and Equation 8.7 is solved, absolute gravity g A at each loop station
based on gravity value at the base station and residual drift model is computed using equations Equation 8.4 and
Equation 8.5.
For each station with repetitions and for the base station, average of absolute gravities for each repetition, standard
deviation and maximum difference from the average value is computed and presented in reports.
7. Gravity formula and latitude correction
Theoretical gravity value g 0 in mGal for each station latitude is computed using one of the three available options,
depending on gravity formula setting in Project Properties [Blakely 1995] pp. 135-136:
48
• IGS-1980 formula
Processing procedures and formulas
(8.8)
• IGRS-1967 formula
(8.9)
• IGF-1930 formula
(8.10)
Caution
Please note that the IGF-1930 formula theoretical gravity values differ from newer formulas for as
much as approx. 17 mGal!
8. Free Air Anomaly
Correction of gravity decrease with station elevation is called Free Air correction. Gravity value corrected of station
elevation influence is called Free Air Anomaly.
Free Air Anomaly g F is computed by the following formula [Blakely 1995] p. 140:
(8.11)
where h is defined as station elevation above geoid in meters.
Note
Software uses station elevation referenced to the vertical datum defined in the Project Properties.
EGM-96 is recommended datum for gravity reductions.
9. Bouguer Anomaly
Bouguer correction reflects influence of rock slab existing between level of geoid and station level. Gravity anomaly
corrected for influence of this slab is called Bouguer Anomaly.
Bouguer Anomaly g B is computed with the formula [Blakely 1995] p. 143:
(8.12)
where
is slab density in g/cm -3 and is Newton's gravitational constant 6.67 . 10 -11 m 3kg -1s -2.
Note
Reduction density can be set in the Project Properties. Average density of the upper part of the
Earth's crust is 2.67 g.cm-3 which is the default for a new project.
10.Terrain corrections
Terrain corrections compensate influence of the surrounding terrain, i.e. deficiency of masses below the station
elevation and excessive masses above the station. BlueWhaleProcessing software currently supports two methods
of terrain corrections computations, Hammer method and Plouff method.
Hammer method [Hammer 1939] models terrain surrounding the station by segmented concentric rings as defined
in the following table:
49
Processing procedures and formulas
Zone
A
B
C
D
E
F
G
H
I
J
K
L
M
# of segments
1
4
6
6
8
8
12
12
12
16
16
16
16
2.0
16.6
Radius [m]
53.3 170.1 390.1 894.8 1529.4 2614.4 4468.8 6652.2 9902.5 14740.9 21943.3
Gravity effect of a segment with minimum diameter r1 and maximum diameter r2 is computed by the formula:
(8.13)
where h is elevation difference from the station to the average elevation of the segment and N is number of segments
in a given zone.
SRTM3 data [http://www2.jpl.nasa.gov/srtm/] are used by default as a digital terrain model. Hammer corrections
are computed from SRTM3 data starting from Zone D. Corresponding elevation differences are computed as
average value of all valid SRTM3 data nodes which fall into the given segment.
If user terrain data are provided for a project, any segment containing at least one terrain reading is included into
terrain corrections computation for Zones B and C. Any readings in Zone A are ignored. User terrain data which
fall into Zones D - M are combined with SRTM data.
Plouff method [Plouff 1976] models terrain as a series of vertical prisms. Currently, BlueWhaleProcessing software
can compute terrain corrections using the Plouff method from SRTM data only, any user terrain data are ignored.
Vertical component of the gravity field caused by a vertical prism with sides parallel to coordinate axes and limits
relative to the station position x1, x2, y1, y2, z1 and z2 is computed by the formula [Blakely 1995] page 187:
(8.14)
where
(8.15)
(8.16)
Center of each prism is sited in the SRTM3 reading position. When the distance of the prism center from the station
is less than 80 m or more then 120 km, terrain correction is not computed.
Tip
The software can compute average difference between each station elevation approximated from
SRTM data and the precise station elevation in the project. SRTM data can be corrected for this
difference. According to official SRTM documentation, absolute difference of SRTM data can be
up to 15 meters.
11.Complete Bouguer Anomaly
Complete Bouguer anomaly gC is defined as Bouguer anomaly with terrain corrections gt included. Because terrain
effect always lowers measured value of gravity, complete Bouguer anomaly is defined by the formula
(8.17)
12.Reduction density assessment
Analytical Jung method, which is a modification50
of Nettletton method, is used to assess reduction density from line
data [Jung 1953]. New density assessment in g/cm3 is made with the use of the following formula:
Processing procedures and formulas
(8.18)
where
and
are average complete Bouguer anomaly and elevation over all stations of the line, and are
station's complete Bouguer anomaly in mGal and elevation in meters and represents reduction density in g/cm3
used for computation of complete Bouguer anomalies.
51
References
[Blakely 1995] Blakely J. Richard. Potential Theory in Gravity & Magnetic Applications. 1995. Cambridge University Press.
0-521-57547-8.
[Buellesfeld 1985] F. J. Buellesfeld. “Ein Beitrag zur Harmonischen Darstellung des Gezeitenerzeugenden Potentials”. Deutsche
Geodaetische Kommission. Reihe C. Heft Nr. 314. Muenchen . 1985.
[Cartwright and Tayler 1971] D. E. Cartwright. R. J. Tayler. “New Computations of Tide Generating Potential”. The geophysical
journal. 23. 1. Oxford . 1971.
[Cartwright and Edden 1973] D. E. Cartwright. A. C. Edden. “Corrected Tables of Tidal Harmonics”. The geophysical journal.
33. 3. Oxford . 1973.
[Chojnicki 1973] T. Chojnicki. “Ein Verfahren zur Erdgezeitenanalyse in Anlehnung an das Prinzip der Kleinsten Quadrate”.
Mitteilungen aus dem Institut Fuer Theoretische Geodaesie der Universitaet Bonn. 15. Bonn . 1973.
[Doodson 1921] A. T. Doodson. “The Harmonic Development of the Tide Generating Potential”. Proceedings of the Royal Society.
Series A100. 306-328. London . 1921. Reprint. International Hydrographic Revue. 31. 1. Monaco . 1954.
[Hammer 1939] S. Hammer. “Terrain corrections for gravimeter stations”. Geophysics. 4. 3. 184-194. 1939.
[Jung 1953] K. Jung. “Zur bestimmung der bodendichte nach dem Nettletton-verfahren”. Zeit. f. Geoph.. 19 (Sonderband). 54-58.
1953.
[Plouff 1976] D. Plouff. “Gravity and magnetic fields of polygonal prisms and application to magnetic terrain corrections”.
Geophysics. 41. 727-741. 1976.
[Tamura 1987] Y. Tamura. “A Harmonic Development of the Tide Generating Potential”. Bulletin d'informations marees terrestres.
99. Bruxelles . 1987.
[Wenzel 1976] H. G. Wenzel. “Zur Genauigkeit von gravimetrischen Erdgezeitenbeobachtunngen”. Wissenschaftliche Arbeiten
der Lehrtsuehle fuer Geodaesie, Photogrammetrie und Kartographie an der Technischen Universitaet Hannover . 67.
Hannover . 1976.
52
Appendix A. License
Caution
The software is protected by copyright law and international treaties. Unauthorized reproduction or
distribution is prohibited.
A.1. Software license
Copyright (C) 2009-2010 RNDr. Frantisek Mantlik
All Rights Reserved
SOFTWARE LICENSE
Blue Whale Processing
geophysical software
Frantisek Mantlik
Nad Hercovkou 9
Praha 8, Czech Republic
You should carefully read the following terms and conditions before using
the Blue Whale Processing geophysical software (product). Unless you have
a different license agreement signed by Frantisek Mantlik, by using, copying,
transmitting, distributing or installing product, you agree to all of the terms
of this license.
If you do not agree to any of the terms of this license, then do not install,
distribute, transmit, copy or use product. If you have paid Frantisek Mantlik
or an authorized Frantisek Mantlik's distributor for this copy individually,
you may return it unused, within thirty (30) days after purchase, for a full
refund of your payment minus costs.
When this copy of product has been registered, it may be installed on any number
of workstations used by a single person or used non-simultaneously by multiple
people. This is not a concurrent use license.
The license is granted to the purchaser and is non-transferable to either another
individual, company, organization or department within an organization.
You may not alter or modify the product, nor give anyone permission to do so.
THIS SOFTWARE, AND ALL ACCOMPANYING FILES, DATA AND MATERIALS, ARE DISTRIBUTED
"AS IS" AND WITH NO WARRANTIES OF ANY KIND, WHETHER EXPRESS OR IMPLIED.
Good data processing procedure dictates that any program be thoroughly tested
with non-critical data before relying on it. The user must assume the entire
risk of using the program. THIS DISCLAIMER OF WARRANTY CONSTITUTES AN ESSENTIAL
PART OF THE AGREEMENT.
ANY LIABILITY OF FRANTISEK MANTLIK WILL BE LIMITED EXCLUSIVELY TO REFUND
OF PURCHASE PRICE. IN ADDITION, IN NO EVENT SHALL FRANTISEK MANTLIK, OR HIS
PRINCIPALS, SHAREHOLDERS, OFFICERS, EMPLOYEES, AFFILIATES, CONTRACTORS,
SUBSIDIARIES, OR PARENT ORGANIZATIONS, BE LIABLE FOR ANY INCIDENTAL,
CONSEQUENTIAL, OR PUNITIVE DAMAGES WHATSOEVER RELATING TO THE USE OF PRODUCT,
OR YOUR RELATIONSHIP WITH FRANTISEK MANTLIK.
IN ADDITION, IN NO EVENT DOES FRANTISEK MANTLIK AUTHORIZE YOU TO UTILIZE PRODUCT
53
License
IN APPLICATIONS OR SYSTEMS WHERE PRODUCT's FAILURE TO PERFORM CAN REASONABLY
BE EXPECTED TO RESULT IN A SIGNIFICANT PHYSICAL INJURY, OR IN LOSS OF LIFE.
ANY SUCH USE BY YOU IS ENTIRELY AT YOUR OWN RISK, AND YOU AGREE TO HOLD
FRANTISEK MANTLIK HARMLESS FROM ANY CLAIMS OR LOSSES RELATING TO SUCH
UNAUTHORIZED USE.
This Agreement is the complete statement of the Agreement between the parties
on the subject matter, and merges and supersedes all other or prior understandings,
purchase orders, agreements and arrangements. This Agreement shall be governed
by the laws of the Czech Republic. Exclusive jurisdiction and venue for
all matters relating to this Agreement shall be in courts and forums located
in the Czech Republic, and your consent to such jurisdiction and venue is implied.
A.2. Third party libraries
BlueWhaleProcessing software uses third-party libraries built in the software distribution licensed under public opensource licenses.
Please follow links provided in the table below to obtain full text of covering licenses or source code of the
corresponding libraries if needed.
Product
name
Main page
License(s) information
Netbeans http://netbeans.org
dual CDDL v. 1.0 and GPL v. 2 license [http://netbeans.org/about/
legal/index.html]
Geotools
LGPL v. 2.1 license [http://www.gnu.org/licenses/lgpl-2.1.html]
http://geotools.org
Swingbox http://swingbox-javahelpJavahelp viewer.googlecode.com
Viewer
LGPL v. 3.0 license [http://www.gnu.org/licenses/lgpl-3.0.html]
Third parties intelectual properties used in the software are referenced at the corresponding places of the documentation
(this manual) describing the particular features. Full citations can be found in the References.
Most icons were provided by Axialis Software SA [http://www.axialis.com]
54
Appendix B. Contacts
• Software development and support:
Dr.. František Mantlík
Nad Hercovkou 9
CZ-18200 Praha 8
Czech Republic
http://www.bluewhaleprocessing.com
E-mail: <[email protected]>
Phone: +420 603 410 782
• Sales representative in Canada:
Zebra Earth Sciences, Inc.
22 Tumbleweed Rd.
M2J 2N3
Toronto, Ontario
Canada
E-mail: <[email protected]>
Phone: +1 416 490 6558
• Sales representative in Mexico:
Geotem Ingenieria S.A. de C.V.
http://www.geotem.com.mx
Mexico
Mexico D.F.
E-mail: <[email protected]>
Phone: 52(55) 54856032, 54851437 ext. 101, 54855053 ext. 104
Tip
You can submit support or sales questions concerning the software using the online contact form [http://
bluewhaleprocessing.com/contact].
55