1
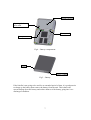
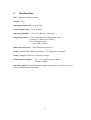
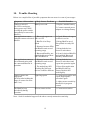
BlueFin User's Manual
Version 1.1
10 August 2005
1
Safety Precautions
Battery charging
The BlueFin unit comes with a power adapter. Please use this power adapter for
operating the unit and charging the battery. Do not attempt to use other adapters or
handphone chargers to operate the unit or charge the battery! Doing so may cause
damage to the unit.
Handling precautions
Do not let the BlueFin unit come into contact with or immersed in water or other
liquids.
If any liquids enters the unit, do not allow unit to power on. Remove the external
power adapter if it is still connected. Also remove the battery from its compartment.
Send the unit back for servicing.
If moisture condensation occurs, allow the unit to dry before using.
Battery handling
The battery used in the BlueFin is a Li-ion type of battery. Some safety precautions
must be observed.
•
•
•
•
•
•
Do not expose to flame or to excessive heat.
Do not short or disassemble the battery
Use only the specified battery charger
Do not transport or store with metal objects such as necklaces or hairpins.
Always insulate the battery terminals with adhesive tape or similar insulating
material when transporting the battery.
Do not immerse in or expose to water
Failure to observe this precaution may cause the battery pack to leak fluid, generate
heat or explode.
Wash off any leaked fluid from the battery pack that comes into contact with skin or
clothing immediately using clean water. If leaked fluid from the battery pack comes in
contact with the eyes, rinse in clean water and seek medical attention immediately.
Discontinue use immediately should you notice any changes in the battery pack, such
as discoloration or deformation
Cleaning the sensor
Do not use any abrasive material to clean the sensor
2
Table of Contents
1.General features...........................................................................................................4
2.Getting started............................................................................................................. 5
3.Capturing fingerprint image........................................................................................ 5
4.Installing and removing the battery............................................................................. 6
5.The power switch........................................................................................................ 8
6.LED status indication.................................................................................................. 8
7.Battery charging.......................................................................................................... 9
8.Care and maintainence................................................................................................ 9
9.Specifications............................................................................................................ 11
10.Trouble Shooting ....................................................................................................12
3
1.
General features
The BlueFin is a portable fingerprint scanner allows the user to capture an image of a
fingerprint, processes the image to enhance the image quality, encrypts the image then
sends the image to a host via a bluetooth interface.
External Adapter socket
Power switch
Power LED
Activity LED
Fingerprint Sensor
Fig. 1 – Front View
Buzzer Sound Outlet
Lanyard
Battery Door
Fig. 2 – Back View
4
2.
Getting started
When the BlueFin unit is first removed from the box, it is recommended to install and
charge the battery, before actually using the unit. Refer to the section on battery
charging for details.
When the BlueFin is powered on, the following sequence takes place:
i. The buzzer beeps once
ii. The 'power' LED lights up in red
iii. The blue 'activity' LED lights up. If the external power adapter is used, the
red 'power' LED remains lighted, otherwise, it turns off.
iv. The 'power' LED lights up in green while the blue 'activity' LED turns off.
v. The blue 'activity' LED lights up. If the external power adapter is used, the
green 'power' LED remains lighted, otherwise it turns off.
vi. The green 'power' LED lights up and the blue 'activity' LED lights up.
vii. The buzzer beeps twice.
The LEDs now revert to their normal functions, and the unit is now ready to use with
its host.
3.
Capturing fingerprint image
Once the BlueFin is powered on and the power-on sequence is complete the blue
'activity' LED flashes at 1 sec interval, indicating that the BlueFin unit is ready to
capture fingerprint image.
The BlueFin unit has a built-in fingerprint sensing algorithm that will automatically
sense a finger on the sensor and initiate fingerprint image capture, so all the user
needs to do is to place their finger on the sensor. However, to ensure reliable and
consistent image capture, a few guidelines should be followed:
i.
The BlueFin unit is intended to be used in the orientation such that the tip of
the finger whose image is being captured is near to the center of the BlueFin
unit (also the top end of the fingerprint sensor), and the first joint of the same
finger is near the bottom end of the fingerprint sensor.
ii. The ideal position of the finger should be such that the midpoint between the
tip of the finger to its first joint should be resting on the center of the
fingerprint sensor. Most adults may be able to use the curvature profile near
the center of the BlueFin unit to guide the finger onto the sensor.
iii. Rest the finger naturally on the fingerprint sensor with a light pressure on the
sensor, ensuring the finger covers a sufficiently large area on the sensor.
iv. Once the finger is in position, hold the finger still for a short while until the
buzzer beeps indicating the fingerprint image is captured, and the finger may
be removed.
5
Once a fingerprint image is captured, it is stored in RAM in the BlueFin unit, and the
'activity' LED stays on until the host retrieves the image from the BlueFin. After the
fingerprint image has been sent to the host, the 'activity' LED resumes its 1 sec
flashing. While the unit is 'on', the BlueFin will keep a copy of the last captured
fingerprint image in its RAM buffer. This image will be overwritten when a new
fingerprint image is captured. If the unit is turned off, this stored image will be lost.
4.
Installing and removing the battery
To open the battery door, press the 2 sets of serration on the battery door and slide the
battery door back.
Battery door catch
Serration
Fig 3 – battery door
When installing the battery, align the battery contacts against the battery connector in
the battery compartment. Push the battery against the battery connector contacts,
ensuring the 2 notches on the battery goes under the 2 plastic catches at the battery
compartment. Seat the battery snugly into the compartment.
To re-install the battery door, place the battery door flush against the bottom housing
of the bluefin unit, aligning the 2 catches with the 2 openings in the bottom housing,
then slide the battery door in place. Check that the battery door seats snugly on the
bottom housing.
When removing the battery, press the 2 sets of serrations on the battery door and slide
the battery door back. Remove the battery door and lift the end of the battery that is
away from the battery contact up away from the bottom cover.
6
Bottom Housing
Opening for battery
door catch
Battery catch
Battery connector
Fig 4. - Battery compartment
Notch
Battery contact
Fig 5. - Battery
If the bluefin is not going to be used for an extended period of time, it is good practice
to charge up the battery then remove the battery from the unit. This reduces the
current leakage from the battery and reduce chances of the battery going into 'overdischarged' condition.
7
5.
The power switch
Press the power switch momentarily to turn on the BlueFin. To turn off the BlueFin,
press and hold the power switch for 3 to 4 seconds until the LED goes off.
If you intend to re-power on the BlueFin after turning it off, allow at least 2 seconds to
lapse after the power LED goes off, before pressing the power switch again.
To conserve battery power, the BlueFin can be programmed to enter sleep mode after
predetermined period of inactivity. During sleep mode, any fingerprint data that has
been captured but not yet transferred to the host will remain intact and can be
transferred to the host after the BlueFin wakes up from sleep mode. Session keys will
also remain intact in sleep mode.
The power switch is also used bring the BlueFin out of the sleep mode.
6.
LED status indication
There are 2 LEDs on the BlueFin unit. The upper LED is used for indicating power
status. The lower LED is used for indicating activity. The LEDs works as follows:
'Power' LED
Green
Unit is on, operating normally. If the unit is running from
battery, (i.e. The power adapter is not plugged in or is not
turned on) then this green status also indicates battery has
enough charge.
Red
Unit is on, operating normally, but battery charge is low
Flashing green Unit is in low-power standby mode and battery level is OK.
(5 secs interval)
Flashing red
Unit is in low-power standby mode and battery level is low.
(5 secs interval)
Flashing orange Unit is off, battery is charging
(2 secs interval)
Steady orange
Unit is off, battery charging is complete
8
'Activity' LED
7.
Flashing blue
(1 sec interval)
Power is on, and unit is ready
Steady blue
Fingerprint captured, waiting for host to pull fingerprint
information over.
Flashing blue
(around 5 Hz)
Fingerprint downloading in process
Battery charging
The BlueFin unit has a built-in charger for the Li-ion battery. Use only good quality
batteries for the BlueFin.
To use the built-in charger for the battery, check that the battery is installed properly
in the BlueFin unit. Check that the unit is off (None of the 2 LEDs are lighted up).
Plug in the external power adapter. Check that the power status LED starts flashing in
orange colour. The unit is now charging the battery. After a period of time, the LED
should turn to a steady orange colour indicating battery charging is complete. This
period of time should normally be less than 6 hours depending on how empty the
battery is before charging starts.
Since the type of battery is a Li-ion battery, it is recommended to charge the battery
regularly. Using the unit until the battery drains completely flat often will degrade the
life of the battery. If the unit is not to be used for a long period of time, it is better to
charge the battery first, then remove the battery from the unit before storing.
8.
Care and maintainence
Cleaning the finger
In normal usage conditions, dirt, residue, oils, or other material can collect on the
users
finger resulting in degradation of the quality of fingerprint captured. For best results it
is recommended that the user ensure their fingers and hands are clean and free of any
residues before use.
Remove dirt from the finger by flushing and rinsing fresh warm water over the hands.
Use water softeners only if only hard water is available. If a soap is used to help dirt
removal then it is recommended to thoroughly rinse with fresh water, followed by a
second warm water rinse. Mineral deposits can accumulate quickly if soap is used and
is sometimes difficult to remove from the skin.
9
Alternatively, alcohol can be used as a cleaning agent for finger skin in high humidity
conditions. Rubbing a commercially available alcohol saturated wipe on the surface of
the finger prior to placing it on the surface of the sensor is preferred. Allow sufficient
time for the excess alcohol to evaporate.
In areas were skin may be dry, lotion may be applied to moisten the skin.
Cleaning the sensor
Before each authentication, it is recommended that the user simply wipe the sensor
slowly with a clean dry finger, and then position the finger for the authentication. This
action assures that residue from previous usage will be removed hence giving the best
surface conditioning.
Clean the sensor periodically. Dampen a lint-free cloth or cotton swab with alcohol or
acetone. Gently rub the cloth across the sensor surface in a left and right direction.
Move slowly down the sensor to cover the entire surface area. Repeat this process 2-3
times. Visually observe that no residual solution remains on the sensor.
Caution: Do not use any abrasive materials to clean the sensor.
10
9.
Specifications
Size : 102mm x 68.5mm x 18mm.
Weight : 100g
Operating temperature : 0 to 50 deg C
Storage temperature : -20 to 70 deg C
Operating humidity : 10% to 90% RH non-condensing
Fingerprint sensor : Upek TouchChip Silicon Fingerprint sensor
18.0mm x 12.8mm sensor surface
256 x 360 square pixels
+/- 15kV ESD resistance
Bluetooth transceiver : Class II bluetooth transceiver.
Battery : Replaceable lithium-ion battery, 3.7V, handphone compatible
Battery charger : Built-in Li-ion battery charger
External power adapter : 5V +/- 5% regulated power adapter
500mA or higher
Operating Speed : Typical fingerprint capture and transfer cycle time < 6 secs in
good communication environment
11
10. Trouble Shooting
Below is a compiled list of possible symptoms that can occur in event of poor usages.
Symptoms / Observations
Likely Causes /Problems
Possible Remedies
Cannot switch ON
Battery too weak.
(No LED or no buzzer
during power up UPON
pressing the power switch
momentarily to turn on the
BlueFin)
1. Replace another battery
Host application cannot
1. Bluetooth support on
find and connect to desired PDA is OFF
BlueFin
2. BlueFin is in Sleep
Mode
1. Check Bluetooth support
on PDA is set On
3. Distance between PDA
and BlueFin unit exceed
operating range
2. Connect external power
adaptor to recharge battery
2. Bring BlueFin out of
Sleep Mode to ready ON
state.
3. Bring both devices
closer to each others
4. Bluetooth PassKey not
established between Host
PDA and BlueFin
4. Scan for desired BlueFin
and establish Bluetooth
PassKey authentication.
Host application cannot or
lost communication with
the connected BlueFin in
operation
1. Distance between PDA
and BlueFin unit exceed
operating range
1. Bring both devices
closer to each others and
repeat last operation again
2. The underlying AES
Working Key between
devices could be different
2. Reset Host application
and BlueFin back to
factory Default AES
working Key
Cannot capture new
fingerprint
(No beep after holding the
finger on sensor for more
than 5 sec)
Light fingerprint
1. Clean sensor surface and
repeat fingercapture
procedure again
The BlueFin beep
periodically during
operation
Dirt on sensor surface
2. Adjust sensor sensitivity
threshold via program
control
1. Clean sensor surface
Note : Seek for technical support if the above remedy actions does not help.
12