1
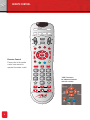
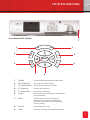
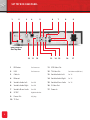
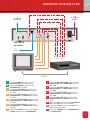
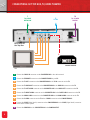
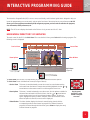
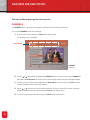
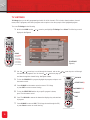
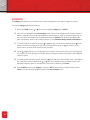
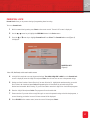
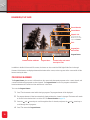
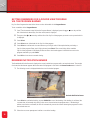
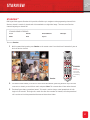
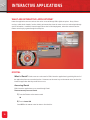
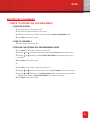
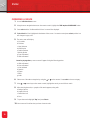
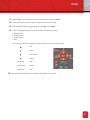
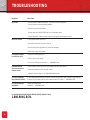
RCN DIGITAL CABLE USERS GUIDE
WELCOME
Congratulations!
Thanks to your new Digital Cable Service, you now have
access to the most cutting-edge cable television services
available, only from RCN.
At RCN, we’re committed to providing you with exceptional services at a
value you just can’t get from the competition. And no where else is that
commitment more evident than in your new digital converter. Because
we didn’t just lease a converter from another company like other cable
companies do. We spoke to our customers. And then built our own
based on your feedback. As a result, your new digital converter is more
interactive, more user-friendly and simply more in-tune with your cable
television needs.
We invite you to take a look at the following pages. Throughout, you’ll
find helpful information regarding your cable TV service, so be sure to
check here first when you have a question, need help connecting your
converter, or require assistance with any of the new features of your new
converter, such as using Starview, ordering Impulse ON-DEMAND, etc.
We’ve tried to think of everything. Of course, if you require further
assistance, please feel free to call 1.800.RING.RCN.
We wish you many long hours of entertainment!
3
REMOTE CONTROL
CheckMate V
RT-U50
Memory GuardTM
R
DEVICE
AUDIO
VCR
DVD
CABLE
TV
POWER
MUTE
CH
VOL
GO BACK
IEW
RV
STA
?
GUIDE
+
SELECT
Remote Control
Please refer to the remote
control user manual to
operate the remote control.
TV GUIDE
EXIT
3
4
5
6
7
8
9
TV/VCR INPUT
VCR/DVD/VOD
0
REW
PLAY
FF
PAUSE
STOP
REC
www.rcn.com
4
“VCR” Functions
for Video on Demand
with this remote:
SET TOP BOX: FRONT PANEL
Front Panel of Set Top Box
1
3
CH-
V+
Gui
de
9
2
CH+
4
B
Go
V-
ack
Select
8
7
5
6
1
2
3
4
5
6
Standby
CH+ Channel Up
CH- Channel Down
V+ Volume Up
V- Volume Down
Arrows
7
Select
Confirms selection and saves settings and
preferences in the Interactive Program Guide
OR invokes the Interactive Program Guide during
normal TV viewing.
8
9
Go Back
Guide
Returns to previous screen.
Switches between operation and standby modes.
Selects the next channel in the list.
Selects the previous channel in the list.
Increases the volume level.
Decreases the volume level.
Used for navigating in the Interactive Program Guide
and channel banner.
Invokes the TV Listings daily programming schedule.
5
SET TOP BOX: REAR PANEL
1
2
3
4
5
6
7
8
9
Rear Panel of
Set Top Box
10
12
13
14 15
16
17
1
IR Blaster
For future use
11 VCR Video Out
2
USB
For future use
12 TV Video Out
2nd video out (DVD etc.)
3
Cable In
13 Variable Audio Left
For TV
4
Ethernet
14 Variable Audio Right
For TV
5
Variable Audio Left
For VCR
15 Variable Mono Audio
For TV
6
Variable Audio Right
For VCR
16 S-Video Out
7
Variable Mono Audio
For VCR
17 Power In
8
SP DIF
Digital Audio Out
9
Power Out
A/C plug
10 TV Out
6
11
CONNECTIONS: SET TOP BOX, TV, VCR
1
14
TO CABLE
NETWORK
TO POWER
MAINS
Rear Panel of
Set Top Box
2
TO PC
3
10
8
9
4
12
11
5
6
7
VCR
TV
TV IN
TV OUT
13
TV IN/OUT
1
2
3
4
5
6
7
Connect the CABLE IN connector on the
CONVERTER BOX to the cable network.
Connect the ETHERNET connector on the
CONVERTER BOX to your PC.
Connect the TV VIDEO OUT connector on the
CONVERTER BOX to the VIDEO IN connector
on the TV.
Connect the TV LEFT AUDIO connector on the
CONVERTER BOX to the AUDIO LEFT connector
on the TV.
Connect the TV RIGHT AUDIO connector on the
CONVERTER BOX to the RIGHT AUDIO connector
on the TV.
Connect the MONO AUDIO connector on the
CONVERTER BOX to the MONO AUDIO connector
on the TV.
Connect the S-VIDEO connector on the TV to the
S-VIDEO connector on the CONVERTER BOX.
8 Connect the VCR MONO AUDIO connector on the
9
10
11
12
13
14
CONVERTER BOX to the MONO AUDIO connector
on the VCR.
Connect the VCR RIGHT AUDIO connector on the
CONVERTER BOX to the RIGHT AUDIO connector
on the VCR.
Connect the VCR LEFT AUDIO connector on the
CONVERTER BOX to the LEFT AUDIO connector
on the VCR.
Connect the VCR VIDEO OUT connector on the
CONVERTER BOX to the VIDEO IN connector on
the TV.
Connect the TV OUT connector on the CONVERTER
BOX to the TV IN connector on the VCR.
Connect the TV OUT connector on the VCR to the
TV IN connector on the TV.
Connect the POWER IN on the CONVERTER BOX to
the POWER OUTLET.
7
CONNECTIONS: SET TOP BOX, TV, HOME THEATER
1
14
2
TO CABLE
NETWORK
TO POWER
MAINS
TO PC
Rear Panel of
Set Top Box
3
4
5
6
7
8
9
Home Theater
TV
1 Connect the CABLE IN connector on the CONVERTER BOX to the cable network.
2 Connect the ETHERNET connector on the CONVERTER BOX to your PC.
3 Connect the TV OUT connector on the CONVERTER BOX to the TV IN connector on the TV.
4 Connect the TV VIDEO OUT connector on the CONVERTER BOX to the VIDEO IN connector on the TV.
5 Connect the TV LEFT AUDIO connector on the CONVERTER BOX to the AUDIO LEFT connector on the TV.
6 Connect the TV RIGHT AUDIO connector on the CONVERTER BOX to the RIGHT AUDIO connector on the TV.
7 Connect the MONO AUDIO connector on the CONVERTER BOX to the MONO AUDIO connector on the TV.
8 Connect the S-VIDEO connector on the TV to the S-VIDEO connector on the CONVERTER BOX.
9 Connect the SP DIF (Digital Audio) connector on the CONVERTER BOX to the SP DIF (Digital Audio) connector
on the Home Theater System.
10 Connect the POWER IN on the CONVERTER BOX to the POWER OUTLET.
8
INTERACTIVE PROGRAMMING GUIDE
The Interactive Program Guide (IPG) is an on-screen, user-friendly, multi-functional guide that is designed to help you
locate the programming you want to watch, and set up the functions of the set-top box to your preferences; the IPG
allows you to view programs transmitted by RCN, navigate to programs, purchase and set reminders for programs,
view information, define preferences, etc.
NOTE: The IPG is set to display time based on the 24-hour clock; you must set it for U.S. time.
MAIN MENU DIRECTORY OF SERVICES
The main control for the IPG is the Main Menu. To access the Main Menu, press Select while viewing a program. The
following screen is displayed:
Current Time
Service Menu
Video Window
Menu Options
?
Main Menu
(Figure 1)
Press the ? button on your
remote to get to HELP.
+
Press the + button on your
remote to get the SYNOPSIS.
The Main Menu gives access to screens where you can view information and select options.
The Main Menu screen is divided into 3 areas (see Figure 1 above):
• Service Menu This menu, located horizontally across the screen, has a text button naming
each menu item. One button is always selected and highlighted. Use the or
arrow buttons on the remote control to scroll through the menu icons.
• Menu Options This menu, located horizontally across the screen, lists the options available for
the menu items selected in the Service Menu. Use the
or
arrow buttons
on the remote control to scroll up and down the menu options. To select an
option, highlight the option you want, and press Select on the remote control.
When and option is selected, a new screen is displayed.
SELECT
Use the arrows
and SELECT on the
remote to navigate
onscreen.
• Video Window The video window displays the channel currently being viewed, with the
accompanying audio for that channel or program. If a different channel or
program is selected through the Main Menu, press Select to display the newly
selected channel or program.
9
MAIN MENU AND MENU OPTIONS
The Service Menu gives options for access to:
CHANNELS
The CHANNELS option in the Main Menu displays the titles of all the channels you subscribe to.
To access the CHANNELS option do the following:
1 While in normal viewing mode, press Select on the remote control.
The following screen is displayed:
Service Menu
CHANNELS
(Figure 2)
2 Use the
or arrow buttons to highlight the CHANNELS button in the Service menu. When CHANNELS is
highlighted, the Menu Options (the left part of the screen) displays channel selections. See Figure 2 above.
3 The titles of all the channels will be displayed in the Menu Options area of the IPG. Press Select to see the
currently highlighted channel in the video window.
4 Use the
or
arrow keys to scroll through channel titles. To view the video of any channel in the video
window, highlight the title of the channel and press Select on the remote control.
5 To exit the IPG and return to normal viewing, press Select on the remote control.
10
GUIDE
The GUIDE option in the Main Menu gives you access to these options:
– Impulse ON-DEMAND
– Favorite Channels
– Reminders
– TV Listings
– Categories
– Digital Music Channels
To access the GUIDE option, do the following:
1 While in normal viewing mode, press Select on the remote control. The Interactive Program Guide (IPG)
is displayed.
GUIDE
(Figure 3)
2 Use the
or arrow buttons to highlight the GUIDE button in the Service Menu. When GUIDE is highlighted,
the Menu Options (the left part of the screen) changes. See Figure 3 above.
3 Use the
or
arrow keys to scroll through the options in the GUIDE. Highlight and press Select to access an
option in the GUIDE.
11
TV LISTINGS
TV Listings gives you the daily programming schedule for all the channels. This includes channel numbers, channel
names, titles of programs, start time of programs and an option to view the synopsis of the highlighted program.
To access TV Listings, do the following:
1 While in the GUIDE use the
or
arrow key and highlight TV Listings. Press Select. The following screen is
displayed. See Figure 4.
CheckMate V
RT-U50
Memory GuardTM
R
DEVICE
AUDIO
VCR
DVD
CABLE
TV
POWER
MUTE
CH
VOL
GO BACK
W
IE
RV
?
GUIDE
+
STA
SELECT
TV GUIDE
EXIT
3
4
5
6
7
8
9
TV/VCR INPUT
VCR/DVD/VOD
0
REW
PLAY
FF
PAUSE
STOP
REC
www.rcn.com
GUIDE
The TV Listings
can also be
accessed by
pressing GUIDE
on the remote
control while in
normal viewing.
2 Use the
or
arrow keys to scroll through the channels, and use the
the start times of programs. Use the channel
or
buttons to page up
and down through the channel listing. See Figure 4 above.
TV LISTINGS
(Figure 4)
or
arrow keys to scroll through
GO BACK
CheckMate V
RT-U50
Memory GuardTM
R
3 To view the SYNOPSIS of a program, highlight the program, and press + on
DEVICE
AUDIO
the remote control.
VCR
DVD
CABLE
TV
START TIME (?)
POWER
MUTE
CH
VOL
GO BACK
4 Press GO BACK on the remote control to return to TV Listings
IEW
RV
STA
?
GUIDE
+
or press EXIT to return to normal viewing.
SYNOPSIS (+)
SELECT
5 To view the START TIME and the day a specific program is shown,
press ? on the remote control.
6 Press ? or GO BACK to remove the banner that displays day and start time
of program.
TV GUIDE
EXIT
4
5
7
8
TV/VCR INPUT
6
9
VCR/DVD/VOD
0
REW
PLAY
FF
PAUSE
STOP
REC
7 Press GO BACK to return to IPG (if TV Listings selected through the IPG),
or press Select to return to normal viewing.
12
SELECT
3
www.rcn.com
EXIT
FAVORITE CHANNELS
The Favorite Channels option allows you to place your favorite channels in one list so that they will be easily available
to you. Your Favorite Channels will be duplicated/located on channels 900 through 919.
To access Favorite Channels do the following:
1 Press GUIDE on the remote control. Use the
or
arrow key and highlight Favorite Channels. Press Select.
2 On the right half of the Favorite Channels screen are the titles of all the available channels (without their
number). The left half is where your favorite channels will be listed.
3 To place your favorite channels in one list, first ensure that you are able to scroll through the
MY FAVORITES list of the screen using the
and
arrow keys. You will only be able to scroll through
the MY FAVORITES list of the screen when the white arrow ( ) points to the right. If it is not pointing to the
right, press (right arrow) on the remote control.
4 Use the
or
key to highlight *none*. Press Select. The white arrow in the middle will now face left. This
would mean that you can now scroll through the CHOICES list on the right half of the screen using the and
arrow keys
and .
5 Scroll through the CHOICES list and choose a channel that you would like placed in your favorites list. Press
Select. The channel will move to the MY FAVORITES half of the screen.
6 Repeat steps 3 to 5 until all of your favorite channels are placed in the MY FAVORITES list.
7 Press GO BACK to return to the GUIDE, or press EXIT to return to normal viewing.
13
CATEGORY
The Category option enables you to view the titles of movies and programs in their specific categories or genre.
To access the Category option do the following:
1 While in the GUIDE use the
or
arrow key and highlight Category. Press SELECT.
2 There are 2 lists displayed in the Select Category screen. The list on the left displays the category or genre of
movies or programs. The list on the right displays the types of movies in a specific category or genre, e.g., on
the screen above, the category that is highlighted on the left is Children’s. The list on the right displays the
types of programs or movies in the children’s category, such as Animated Comedy, Cartoons & Animations etc.
3 To scroll through the list on the left using the
or
arrow keys, first ensure that the white arrow ( ) in the
middle of the screen is pointing to the right. If it is pointing to the left, press the (left) arrow key on the
remote control. The arrow on the screen will now point right.
4 Use the
and arrow keys to scroll through the list on the left. You will notice that as you scroll through the
list on the left, the list on the right also changes, giving you the types of movies or programs in that highlighted
category or genre.
5 To scroll through the list on the right, first press the
(right) arrow key so that the white arrow in the middle of
the screen points to the left. Now use the
or
arrow key to highlight a type of program or movie in the
highlighted category or genre. To view the titles of the movies or programs, press Select.
6 Press GO BACK to return to the Category screen, press EXIT to return to the last channel viewed, or press
Select to view the currently highlighted channel in the Select Program screen.
14
REMINDERS
The Reminders option allows you to view a list of all the programs you would like to be reminded of for future viewing.
Programs with Reminders cannot be watched before their start times.
To view all the programs you have set Reminders for, do the following:
1 While in the GUIDE use the
or
arrow key and highlight Reminders. Press Select.
2 You will see a screen that displays the Reminders, the day they are being broadcast and their start times.
3 Highlight a program using the
or
arrow. Press Select to set or unset the highlighted program as
a reminder.
4 Highlight a program and press + to view a Synopsis.
5 Press GO BACK to return to the IPG , or press EXIT to return to normal viewing.
To set reminders through TV listings:
1 Press Select to access the Interactive Program Guide.
2 Highlight Select in the Service Menu at the top of the screen.
3 To select the desired channel use the
(right) arrow key to highlight the desired program.
4 Press Select.
5 In the Reminders screen, press Select so that a check mark appears in the black box next
to the name of the program.
6 Press Go Back to return to the TV Listings screen.
7 TV Listings screen highlights program in light red.
15
DIGITAL MUSIC CHANNELS
The Digital Music Channels option displays the music channels menu, which provides a way to access commercialfree, digital music by category.
To access Digital Music Channels:
1 While in normal viewing mode, press Select on the remote control. The main IPG screen is displayed.
2 Press the
or
arrow button to highlight Digital Music Channels. Press Select. The Digital Music Channels
screen is displayed.
3 The Digital Music Channels menu lists the individual music channels available. Use the
or
arrow buttons
to highlight the channel you want to listen to. Press Select and tune to the channel highlighted.
4 Press GO BACK on the remote control to return to the GUIDE, or press EXIT to return to normal viewing.
PERSONAL
The PERSONAL option in the Main Menu enables you to set up some features of the RCN Digital Cable Service to
your preference.
To access the PERSONAL option, do the following:
1 While in normal viewing mode, press Select on the remote control.
2 Use the
or
arrow key to highlight the PERSONAL button in the Main Menu. When PERSONAL is
highlighted, the Menu Options (the left part of the screen) changes.
3 The options that you are able to set your personal preferences for are:
• Parental Lock
• SAP Preference
• Guide to Content Icons
• SAP Preference 2
• Select Four-Digit Code
• Stereo Settings
• Account Status
• Reminder Settings
• Pay-Per-View Account
• Banner Duration
• Pay-Per-View PIN
• Customer Service
• Set Pay-Per-View Limit
*Some options listed above may not yet be available.
16
PARENTAL LOCK
Parental Lock allows you to prevent viewing of programming based on rating.
To access Parental Lock:
1 While in normal viewing mode, press Select on the remote control. The main IPG screen is displayed.
2 Use the
or
3 Press the
or
arrow key to highlight the PERSONAL button in the Service menu.
arrow key to highlight Parental Lock. Press Select. The Parental Lock screen (Figure 5)
is displayed.
PARENTAL LOCK
(Figure 5)
Note: NR, Not Rated, could contain adult content.
4 A 4-digit PIN is required to access the parental ratings. The default 4 digit PIN is 0000. Once the Parental Lock
screen is displayed, enter the 4 digit PIN and press Select. You will now have access to the parental ratings.
5 Ratings are listed in order of least offensive (Y) to most offensive (X). Highlight the maximum rating you would
like to allow to be viewed and press Select. Programming that is rated above the selected rating will be
blocked and unviewable. While viewing TV, you will be asked to enter the 4-digit PIN to view blocked programs.
6 Enter the 4-digit PIN and press Select. The program will now be unblocked.
7 Please note that if you enter in the wrong PIN to gain access to the parental ratings or the blocked programs, a
screen informing you that the incorrect PIN was entered will be displayed.
8 Press GO BACK on the remote control, enter the correct PIN and press Select.
17
GUIDE TO CONTENT ICONS
The Guide to Content Icons option displays the content icons and what they represent.
To access Guide to Content Icons:
1 While in normal viewing mode, press Select on the remote control. The main IPG screen is displayed.
2 Use the
or
arrow key to highlight the PERSONAL button in the Service menu.
3 Press the
or
arrow key to highlight Guide to Content Icons. Press Select. The Guide to Content Icons
screen is displayed.
4 Press GO BACK to return to IPG, or press Exit to return to normal viewing.
SELECT 4-DIGIT CODE
The Select 4-Digit Code option allows you to set your personal 4-digit code for features such as Parental Lock etc.
To access Select 4-Digit Code:
1 While in normal viewing mode, press Select on the remote control. The main IPG screen is displayed.
2 Use the
or
arrow key to highlight the PERSONAL button in the Service menu.
3 Press the
or
arrow key to highlight Select 4-Digit Code. Press Select.
The screen requiring you to enter your current code will be displayed.
4 Enter the current code. If is still the default code, then it will be 0000. Press Select.
The screen requiring you to enter a new 4-digit code (of your choice) will be displayed.
5 Enter your new 4-digit code. Press Select. The screen requiring you to confirm your new code
will be displayed.
6 Re-enter your new code and press Select. The main IPG will then be displayed.
Press Exit to return to normal viewing.
NOTE: If you enter the wrong code in the confirmation screen, the ENTER NEW 4-DIGIT CODE screen will again be
displayed. Re-enter and re-confirm your new code.
18
ACCOUNT STATUS
(Not yet available.)
The Account Status option enables you to view the status of your account.
To access Account Status:
1 While in normal viewing mode, press Select on the remote control. The main IPG screen is displayed.
2 Use the
or
arrow key to highlight the PERSONAL button in the Service menu.
3 Press the
or
arrow key to highlight Account Status. Press Select. The screen requiring you to enter your
4-digit code is displayed.
4 Enter the 4-digit code and press Select. The Account Status screen is displayed.
PAY-PER-VIEW ACCOUNT
(Not yet available.)
The Pay-Per-View Account option enables you to view the status of your Pay-Per-View Account.
To access Pay-Per-View Account:
1 While in normal viewing mode, press Select on the remote control. The main IPG screen is displayed.
2 Use the
or
arrow key to highlight the PERSONAL button in the Service menu.
3 Press the
or
arrow key to highlight Pay-Per-View Account. Press Select. The screen requiring you to
enter your 4-digit code is displayed.
4 Enter the 4-digit code and press Select. Pay-Per-View Account screen is displayed.
19
PAY-PER-VIEW PIN
The Pay-Per-View PIN option enables you to set your Pay-Per-View PIN so that access to the Pay-Per-View Account is
limited to those who know the PIN.
To access Pay-Per-View PIN:
1 While in normal viewing mode, press Select on the remote control. The main IPG screen is displayed.
2 Use the
or arrow key to highlight the PERSONAL button in the Service menu. Press the
or
arrow
key to highlight Pay-Per-View PIN. Press Select. The screen requiring you to enter your 4-digit code is
displayed.
3 Enter the 4-digit code and press Select. The Pay-Per-View PIN screen is displayed.
4 Highlight On or Off using the
or
arrow keys, then press Select to set your Pay-Per-View PIN to on or off.
5 Press Exit to return to normal viewing.
SET PAY-PER-VIEW LIMIT
(Not yet available.)
The Set Pay-Per-View Limit option enables you to set your Pay-Per-View Limit. This limit controls the individual
Pay-Per-View movie or event purchase maximum price. Beyond the set maximum requires the use of your 4-digit PIN.
To access Pay-Per-View Limit:
1 While in normal viewing mode, press Select on the remote control. The main IPG screen is displayed.
2 Use the
or
arrow key to highlight the PERSONAL button in the Service menu.
3 Press the
or
arrow key to highlight Pay-Per-View Limit. Press Select. The screen displaying the current
pay-per-view-limit, and requiring you to enter your 4-Digit code is displayed.
4 Enter the 4-digit code and press Select. The screen requiring you to enter your Pay-Per-View Limit.
is displayed.
5 Please note that the Pay-Per-View Limit is entered in cents, eg., if you want to set your limit to $40, then just
enter 4000. If you enter in a wrong amount, or if you would like to change the amount you have entered, press
the (left) arrow key to delete the incorrect amount, and re-enter the correct amount. Press Select. You will
be returned to the Main Menu.
6 Press Exit to return to normal viewing.
20
SECTION DESCRIPTION
SELECT SAP PREFERENCE
The Select SAP Preference option allows you to select your first audio language choice.
To access Select SAP Preference:
1 While in normal viewing mode, press Select on the remote control. The main IPG screen is displayed.
2 Use the
or
3 Press the
arrow key to highlight the PERSONAL button in the Service menu.
or
arrow key to highlight Select SAP Preference. Press Select.
4 Highlight the language of your choice using the
or
arrow key. Press Select.
5 Press Exit to return to normal viewing.
STEREO SETTINGS
The Stereo Settings option allows you to select your first AC3 Downmixing and SPDIF Output Settings.
To access Stereo Settings:
1 While in normal viewing mode, press Select on the remote control. The main IPG screen is displayed.
2 Use the or
3 Press the
arrow key to highlight the PERSONAL button in the Service menu.
or
arrow key to highlight Stereo Settings. Press Select. Press Select.
4 The settings for AC3 Downmixing will be highlighted in the left menu. Press the
or
arrow keys to select
Normal Stereo or Dolby Stereo. Press Select.
5 Press the
(right) arrow key to select SPDIF Output, and press the
Decoded PCM or Undecoded AC3. Press Select.
or
arrow keys to select
6 Press Exit to return to normal viewing or GO BACK to return to main IPG.
21
REMINDER SETTINGS
The Reminder Settings option allows you to automatically tune to programs with set reminders.
To access Reminder Settings:
1 While in normal viewing mode, press Select on the remote control. The main IPG screen is displayed.
2 Use the
3 Press the
or
arrow key to highlight the PERSONAL button in the Service menu.
or
arrow key to highlight Reminder Settings. Press Select.
4 Highlight Auto Retune or No, Don’t Retune using the
or
arrow key. Press Select.
5 Press Exit to return to normal viewing.
BANNER DURATION
The Banner Duration option allows you to set the length of time the banner will be displayed.
To access Banner Duration:
1 While in normal viewing mode, press Select on the remote control. The main IPG screen is displayed.
2 Use the
or
arrow key to highlight the PERSONAL button in the Service menu.
3 Press the
or
arrow key to highlight Banner Duration. Press Select.
4 Using the
or
arrow key, highlight the preferred amount of time you desire the banner to be displayed.
Press Select.
5 The screen requiring you to set the time for Program Reminders will be displayed.
6 Press the
or
arrow keys and highlight the amount of time you want a reminder banner to be displayed
before a reserved program starts. Press Select.
7 Press Exit to return to normal viewing.
22
SETTINGS
The SETTINGS option in the Service Menu gives you access to technical information about the CONVERTER BOX. You
will not use these menus for normal operation of the CONVERTER BOX. However, the technical information listed under
the SETTINGS option is important when calling a service center or your service provider.
FOR RCN TECHNICAL TEAMS ONLY.
Do not access SETTINGS unless requested by Customer Care.
CUSTOMER WARNING!!!
DO NOT ATTEMPT TO MAKE ANY CHANGES IN THE SETTINGS OPTION MENUS. DOING SO COULD CAUSE YOUR RCN DIGITAL
CABLE BOX TO BECOME INOPERABLE. ALWAYS CALL YOUR SERVICE PROVIDER, OR AN ACCREDITED SERVICE CENTER IF YOU
NEED TO MAKE ANY CHANGES IN THE SETTINGS OPTION MENUS.
To access the SETTINGS option do the following:
1 While in normal viewing mode, press Select on the remote control.
2 Use the
or arrow buttons to highlight the SETTINGS button in the Service menu. When SETTINGS
is highlighted, the Menu Options (the left part of the screen) changes.
3 The relevant technical subjects will be displayed in the Menu Options area of the IPG.
4 Use the
and
arrow keys to scroll through the technical subjects. If you press the ? key,
Exclusive application for engineers will be displayed over the IPG.
5 To exit the IPG and return to normal viewing, press Select on the remote control.
23
BANNERS/FLIP BAR
Channel Number
Channel Name
Synopsis Link
You can also press the
+ button on your remote
to get to the SYNOPSIS.
Clock
Program Start
and End Time
Program Banner
Channel Number and Name
Program Name
Parental rating and content
description icons
In addition to the Main Menu and IPG screens, the viewer can also control the RCN Digital Cable Service through
Banners. All the banners are displayed towards the bottom of the screen, and occupy most of the screen width. All the
banners overlay the video.
PROGRAM BANNER
The Program Banner gives access to information on the current and subsequent programs on the current channel, and
current and forthcoming programs on other channels. The Program Banner can access programs scheduled for
broadcast between the current local time and 24 hours in the future.
To access the Program Banner:
1 Press ? on the remote control while viewing a program. The program banner will be displayed.
2 The program banner will also be automatically displayed when the channel is changed. The banner will remain
on screen for the duration that is set in the IPG. See Banner Duration on page 33.
3 Press the
and
arrow keys to scroll through the titles of channels, and press the
scroll through titles of programs.
4 Press ? to remove the Program Banner.
24
and
arrow keys to
SYNOPSIS TEXT BANNER
The Synopsis Text Banner shows a textual description of the program currently selected on the Program Banner.
To access the Synopsis Text Banner:
1 Press + while the Program Banner is displayed. The Synopsis Text Banner will be displayed over the video.
2 Press ? to remove the Synopsis Text Banner.
3 Press ? to remove the Program Banner
LANGUAGE BANNER
The Language Banner shows the currently selected audio and subtitle language, and also allows you to change the
language for the program audio and subtitles.
To access the Language Banner:
1 Press + while viewing a program. The Language Banner will be displayed over the video.
2 Press the
and
arrow keys to scroll through the other audio languages, and press the
keys to scroll through other subtitle languages.
and
arrow
3 Press + to remove the Language Banner.
SETTING A REMINDER WITHIN THE PROGRAM BANNER
Programs that start in the future can also be set as reminders via the Program Banner.
To set a reminder via the Program Banner:
1 Press ? on the remote control. When the Program Banner is displayed, press the
or
arrow key until the
title of the desired channel is displayed
2 Then press the
arrow key until the title of the program you want to book is displayed. Press Select.
3 Press Select to book the program. Ensure that a check mark appears in the black box next to the program
name after you push Select.
4 Press Exit twice to return to normal viewing.
25
SETTING REMINDERS FOR A PAY-PER-VIEW PROGRAM
VIA THE PROGRAM BANNER
Pay-Per-View Programs that start in the future can also be booked via the Program Banner.
To set a reminder via the Program Banner:
1 Press ? on the remote control. When the Program Banner is displayed, press the
or
arrow key until the
title of the desired channel/Pay-Per-View movie/event is displayed.
2 Then press the
or
arrow key until the title of the Pay-Per-View program you want to set up a reminder for
is displayed.
3 Press Select.
4 Press Select to set a Reminder for the Pay-Per-View program.
5 Press Select to confirm order. In some instances your 4-digit code will be required when purchasing a
Pay-Per-View program. Enter your 4-Digit code and press Select. The screen listing all the reminder
Pay-Per-View programs will be displayed. Ensure that a check mark appears in the black box next to the
program name after you push Select.
6 Press Exit twice to return to normal viewing.
REMINDER NOTIFICATION BANNER
The Reminder Notification Banner is displayed on screen just before a program with a set reminder starts. The number
of minutes that the banner appears before the start of the program is selected in the Banner Duration menu in the IPG.
1 The following screen is displayed before the start of a booked program.
Reminder Notification Banner
2 Press Select to confirm the booking, or press GO BACK to cancel the booking. If the booking is confirmed, the
converter box will automatically switch to the correct channel when the program starts. If the booking is
neither cancelled nor confirmed, the IPG will automatically tune to the channel showing the program for which
the reminder was set.
3 Follow the on-screen prompts and confirm or cancel the booking.
26
STARVIEW
STARVIEW
SM
RCN Digital Cable supports Starview which provides a flexible way to navigate to other programming channels. Each
Starview channel is a matrix of channels which is transmitted as a single video image. There are seven Starview
channels beginning on channel 100.
STARVIEW GENRE CATEGORIES:
Local
Movies
Entertainment
News
Kids
Sports
Lifestyles
To access Starview:
1 While in normal viewing mode, press Starview on the remote control. Your television will automatically tune to
the local Starview channel.
CheckMate V
RT-U50
Memory GuardTM
R
DEVICE
AUDIO
VCR
DVD
CABLE
TV
POWER
MUTE
CH
VOL
GO BACK
IEW
RV
STA
?
GUIDE
+
SELECT
TV GUIDE
EXIT
3
4
7
5
6
9
8
TV/VCR INPUT
VCR/DVD/VOD
0
Starview
REW
PLAY
FF
PAUSE
STOP
REC
STARVIEW
Press the
Starview button
on the remote
control while in
normal viewing
mode.
www.rcn.com
2 The remote control enables you to move a cursor around the Starview guide using the arrow keys. Move the
cursor onto a channel you would like to watch and press Select. The converter box will tune to that channel.
3 The above figure shows a promotional mosaic. This mosaic contains a large, central promotional cell with
single cells all around it. The single cells contain live video from a number of channels, while the promotional
cell is used to run live video promotional features and instructional videos.
27
INTERACTIVE APPLICATIONS
WHAT ARE INTERACTIVE APPLICATIONS?
Interactive applications are new services that can be accessed through RCN’s digital set top box. Many of these
services, called virtual channels, function similarly to Internet sites where the users can access and navigate through
specific information. In addition, interactive applications also include simple games, where the customer uses the
remote control to play a game through the set top box.
iPORTAL
What is iPortal? iPortal serves as a main menu for RCN’s interactive applications by providing links to all of
the applications from one convenient location. Customers use the arrow keys on the remote control to select the
interactive application that they would like to access.
Accessing iPortal
RCN’s interactive applications are accessed through iPortal.
There are two ways to access iPortal:
1) Press the i button on the remote control
OR
2) Tune to channel 500
Press EXIT on the remote control to return to live television.
28
iPortal
RCN IMPULSE ON-DEMAND
3 WAYS TO ACCESS THE VOD MAIN MENU
– THROUGH iPORTAL
1. Press the i button on your remote control
2. The iPortal main page will appear on your screen
3. Using the arrow keys on your remote control, highlight the "Impulse ON-DEMAND" button
4. Press Select on the remote control
– TUNE TO CHANNEL 1
1. On your remote control, press “001”
– THROUGH THE INTERACTIVE PROGRAMMING GUIDE
1. Press Select on your remote control to access the IPG
2. Using the and arrow keys on the remote control, highlight Guide at the top of the screen
3. Using the and arrow keys, highlight Impulse ON-DEMAND in the menu on the left side of
the screen
4. Press Select on the remote control
OR
1. Press Select on your remote control to access the IPG
2. Using the and arrow keys on the remote control, highlight Channels at the top of the screen
3. Using the and arrow keys or the Channel Up/Down (which also functions as page up/down),
highlight channel number 1 "Impulse ON-DEMAND" in the channel line up menu
4. Press Select on the remote control
29
iPortal
ORDERING A MOVIE
1. Access VOD Main Menu screen
2. Using the arrow navigation buttons on the remote control, highlight the "RCN Impulse ON-DEMAND" button
3. Press select and the "On Demand Main Menu" screen will be displayed.
4. "Select Movie" will be highlighted at the bottom of the screen. On remote control press select, and the icon
will change to a grey color.
5. The next screen will display:
a. My rentals
b. Previews
c. New Releases
d. $2.99 Movies
e. Double Features
f. Holiday Movies
g. Free on Demand
h. HBO on Demand
Arrow key to page down, a new screen will appear listing the following options:
a. HBO on Demand
b. Max on Demand
c. Kids Unlimited
d. Spanish
e. Events
f. ESPN
g. Adult
6. Choose one of the above categories by using the
7. Using
or
or
on the remote. Press select to choose category.
arrow keys on the remote control, highlight the movie you would like to watch.
8. After selecting the movie, a synopsis of the movie appears, along with:
a. Rating of movie
b. Length of Movie
c. Rental time Left
d. Price
9. To purchase movie highlight "Buy" and press Select.
10. Next screen will confirm what you have chosen to order.
30
iPortal
11. Highlight "OK" If you would like to continue with the purchase. And press Select.
12. The next screen will ask you to enter PIN number, if you have set up a PIN
13. Enter 4-Digit PIN and use the
arrow key to select "OK." Press Select.
14. A new screen appears that confirm the movie that you purchased, including:
a. Rating of movie
b. Length of Movie
c. Rental time Left
d. Price
This screen also includes a diagram of the remote control on the left side of the screen:
Play
Pause
Fast Forward
Rewind
Red Button
Stop
Green Button
Restart
Blue Button
Hide
15. The movie should automatically start after this screen appears for 5 seconds
31
iPortal
RESUME IMPULSE ON-DEMAND VOD
1.
Access Impulse ON-DEMAND (VOD) Main Menu screen
2. Highlight the "Resume Movie" icon at the bottom of the screen. Press Select.
3.
A list of previously purchased movies will appear. Using the arrow keys on the remote control, highlight the
movie you would like to resume watching. Press Select on the remote control.
4. After selecting the movie, a synopsis of the movie appears, along with:
a. Rating of movie
b. Length of Movie
c. Rental time Left
d. Price
5. Using the arrow keys on the remote control, highlight one of the following icons at the bottom of the screen:
a. Continue
(to continue where you stopped watching previously)
b. Restart
(to restart the movie from the beginning)
6. Press Select on the remote control.
7. The next screen will ask you to enter PIN number.
8.
Enter 4-Digit PIN and use the down arrow key to select "OK." Press Select.
9.
A new screen appears that confirm the movie that you purchased, including:
a. Rating of movie
b. Length of Movie
c. Rental time Left
d. Price
This screen also includes a diagram of the remote controls. (See previous page.)
10. The movie should automatically start after this screen appears for 5 seconds
32
iPortal
Pay-Per-View
Accessing Pay-Per-View
1. Access the desired Pay-Per-View channel (3 options):
a. Tune directly to the channel by typing the channel number on your remote control (301 & 316 – 323)
b. Press Guide on the remote control to invoke the TV listing menu, scroll up/down to the desired PPV channel,
press Select.
c. Press Select on the remote control to invoke the IPG, use the left/right arrow keys to highlight CHANNELS in
the Service Menu, use the up/down arrow keys to scroll through the list of channels until you highlight the
desired PPV channel, press Select to view the PPV channel in the video window, press Select again to tune
to the highlighted PPV channel.
Note: If the movie has already begun and it is beyond the window to order the movie/event, a screen will
appear with the following text: “Sorry, you can no longer purchase this Pay-Per-View program (channel #).”
2. A screen will appear with the following information:
• Title of movie/ppv event
• Start time and end time of movie
• Price
• Rating
• Synopsis
3. Press Select on the remote control.
4. A screen will appear with the following information:
• Title of movie/ppv event
• Price
• If the program has already started, the following message will also appear: “Program has already started.”
If you have set up a Pay-Per-View PIN, this screen will also require the 4-digit PIN.
5. Press Select.
6. The program will begin at the scheduled time.
33
iPortal
Zone4Play
Access:
1. Access iPortal by pressing the i button on the remote control or tuning to channel 500.
2. Using the arrow keys on the remote control, highlight the Zone4Play button on the screen.
3. Press Select/OK to enter the Zone4Play casino "lobby”.
4. Using the arrow keys on the remote control, highlight the Zone4Play casino game that you would like to play.
5. Press Select/OK to enter the Zone4Play casino game that you have highlighted.
Play:
Once you have accessed a Zone4Play casino game, the arrow keys on the remote control are used for basic
functionality. The blue, green, yellow, and red buttons on the remote control are used for additional when needed.
The customer can access the "Help" section of the casino game by pressing the ? button on the remote control.
Interactive Weather
1. Access iPortal by pressing the i button on the remote control or tuning to channel 500.
2. Using the arrow keys on the remote control, highlight the Weather button on the screen.
3. Press Select/OK to enter the main weather page.
4. Use the arrow keys on the remote control to navigate through the sections of the weather application.
Interactive Horoscopes
1. Access iPortal by pressing the i button on the remote control or tuning to channel 500.
2. Using the arrow keys on the remote control, highlight the Horoscope button on the screen.
3. Press Select/OK to enter the main Horoscope page.
4. Use the arrow keys on the remote control to highlight the desired zodiac sign and press Select/OK.
Return Procedures
Return to Live Television Program
At any time within the interactive applications, you can press EXIT on your remote control to exit the interactive
applications and return to the last television network that you were watching.
Return to iPortal
At any time within the interactive applications, you can press i on your remote control return to iPortal.
34
MISCELLANEOUS
NAVIGATING TO PROGRAMS
Navigating to programs can be done in the following ways:
• by using the CHANNEL UP and CHANNEL DOWN buttons
to surf through the channels,
• by directly entering the channel number using the
numeric keys on the remote control,
• by using the program guide,
• by navigating from the Program Banner,
• by selecting a program type (genre) from the IPG category,
then selecting a program from the list,
• by selecting a program from the TV LISTINGS menu,
• by selecting from Starview,
• by selecting from the IPG list of digital music channels.
VOLUME AND MUTE
The RCN digital converter box allows you to set the volume to a variable level only.
This should be taken into consideration when recording programs via your VCR.
1 Press the VOLUME UP key on the remote control to increase the volume,
and press the VOLUME DOWN key to decrease the volume.
2 A volume bar indicating the volume level will be displayed at the bottom of the screen,
and will move from left to right when the volume is increased, and from right to left
when the volume is decreased.
3 To mute the audio, press the MUTE key on the remote control.
A mute icon will be displayed on the left corner of the screen.
4 To restore the volume press MUTE or VOLUME UP or VOLUME DOWN.
35
TROUBLESHOOTING
PROBLEM
SOLUTION
No picture
• Ensure that the CONVERTER BOX, TV and all relevant equipment
are switched on and connected properly.
• Check the connection cables.
• Ensure that the CONVERTER BOX is not in standby mode.
• Check the power cable and check that it is plugged into the power outlet.
No or low sound
• Turn up the volume on the TV.
• Check that the mute function is not on.
• Ensure that all the equipment is connected properly.
• Check the connection cables.
Herringbone pattern
or faint lines on TV
• Adjust fine tuning on the TV.
• Check connection cables.
• A service call may be necessary — 1.800.RING.RCN.
CONVERTER BOX
does not respond to
remote control
• Point remote control directly at the CONVERTER BOX front panel.
• Check the batteries of the remote control.
• Check if remote control is in CONVERTER BOX mode.
On screen message :
ONE MOMENT PLEASE
If the CONVERTER BOX does not move from this screen more than 5 minutes after start up.
it means the converter box has lost communication. Call RCN — 1.800.RING.RCN.
On screen message :
NO SIGNAL
Check the cable signal.
Call RCN — 1.800.RING.RCN
IF YOU ENCOUNTER ANY OTHER ERRORS PLEASE CONTACT RCN.
1.800.RING.RCN.
36
CONTACT DETAILS
Telephone
1.800.RING.RCN (1.800.746.4726)
Web site
www.rcn.com
E-MAIL
SALES
- Residential
[email protected]
- Commercial
[email protected]
SERVICE AND SUPPORT
- Dial-Up Internet
[email protected]
- Cable Modem
[email protected]
- Cable TV
[email protected]
- Phone
[email protected]
- Commercial
[email protected]
- ResiLink
[email protected]
Manufacturer’s Web site
www.uec.co.za
37
© 2003 RCN Telecom Services, Inc. All Rights Reserved.