1
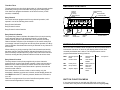
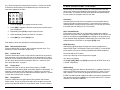
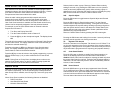
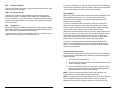
GBH Flex•Mode
Base Station
Owner’s Manual
BK Radio
7100 Technology Drive
West Melbourne, FL 32904
Telephone: (800) 648-0947
FAX: (321) 984-0434
© Copyright 2000 RELM Wireless Corp. Inc. All rights reserved.
P/N 7001-30928-901
08-01
Off Hook/On Hook
TABLE OF CONTENTS
This feature must be programmed into the LZA2027. Some remotes
have an auxiliary button that can be assigned to turn the Hook function
ON and OFF. It simulates the microphone at the radio of being ON or
OFF Hook. While ON Hook the radio scans and is in the tone decode
mode. Taking the radio OFF Hook will take the radio out of scan and out
of the tone decode mode.
LZA2027 PROGRAMMING INSTRUCTIONS
See the LZA2027 Programming and Service Manual (P/N 0300-30944900) for programming instructions.
NOTES
Introduction ........................................................................................
Optional Accessories .........................................................................
Basic Operation .................................................................................
Code Guard Operation.......................................................................
Channel Selection..............................................................................
GBH Radio Controls ..........................................................................
Button Functions ................................................................................
Scan Operation ..................................................................................
Priority Scan.......................................................................................
Dual Priority Scan ..............................................................................
Old-Style BK Priority Scan .................................................................
User Selected Code Guard................................................................
Group Scan........................................................................................
Other Operational Features ...............................................................
Alphanumeric Display Features .........................................................
LZA2027 Option Installed ..................................................................
Service ...............................................................................................
1
2
2
3
4
5
5
9
11
11
12
14
14
15
17
18
20
INTRODUCTION
The GBH-01 includes a power supply, an internal front mounted 5watt speaker, a rugged metal outer case, and a powerful GMH
Series mobile radio. The BK Radio GMH Flex•Mode Series mobile
VHF radio uses a microprocessor core allowing features and
performance previously unavailable in a mobile radio or base station.
It features a 38 MHz operating frequency spread, computer
programmability, alphanumeric display, compact size, and built-in
CTCSS/CDCSS. Please take a moment to acquaint yourself with
the information in this manual to assure optimum performance from
the radio.
SERVICE
If you need service, contact your BK Radio dealer or any other BK
Radio dealer equipped to service your radio. If you find it impractical
to have service performed by your local dealer, contact BK Radio at
the address below:
FCC REQUIREMENTS
The GBH-01 base station radio must be properly licensed by the
Federal Communications Commission prior to use. Your local BK
Radio dealer can assist you in meeting this requirement.
SAFETY PRECAUTIONS
BK Radio
7100 Technology Drive
West Melbourne, FL 32904
Phone: (800) 422-6281
Fax:
(321) 953-7986
Email: [email protected]
20
A. Do not operate the transmitter in close proximity to blasting caps.
B. Do not operate the radio in an explosive atmosphere (petroleum
fuels, solvents, dust, etc.).
C. Do not operate the transmitter if a person vehicle is within two feet of
the antenna or touching the antenna.
D. Do not install the radio in a closed compartment that contains an LP
BK RADIO
GBH Owner's Manual
1
gas container or its fittings.
E. The equipment must be installed and serviced by a qualified
technician.
The groups that are added or deleted in the Group Scan list must be
made at the keypad of the radio. Adding or deleting of Groups in the
scan list cannot be made by the remote. See page 8 of this manual for
instructions to add or delete groups in the scan list.
OPTIONAL ACCESSORIES
•
LZA2027
Tone Termination Panel
Channel Scan ON/OFF
•
LAA0290
Microphone, “Smart” Programming
•
LAA0254
Microphone, Desktop
•
LAA0276
Microphone, Standard Mobile
This feature must be programmed into the LZA2027. Some remotes
have an auxiliary button, or a designated Scan button, that can be
assigned to turn the Channel Scan feature ON and OFF. See page 9 of
this manual for an explanation of the feature.
The channels that are added or deleted in the scan list must be made at
the keypad of the radio. Adding and deleting of channels in the scan list
cannot be made by the remote. See page 6 of this manual for
instructions to add or delete channels from the scan list.
BASIC OPERATION
POWER SUPPLY
The Power Supply input voltage requirements is 110 Vac, 50/60Hz, to
produce 13.8 Vdc output at 22 amps.
The AC power cord of the power supply is to be plugged into a 110 Vac
source. The switch on the bottom left side of the front panel of the base
station is used to switch the power supply “ON” or “OFF”. The power
supply has an AC and DC fuse that protects the circuitry against damage
should a short occur.
The power supply should be plugged into an appropriate outlet with the
power supply switch in the down or OFF position. The switch should be
placed in the up or ON position before switching the radio unit ON.
Priority Scan ON/OFF
This feature must be programmed into the LZA2027. Some remotes
have an auxiliary button that can be assigned to turn the Priority Scan
function ON and OFF. See page 11 of this manual for an explanation of
the feature.
The Priority channel must be selected/changed at the keypad of the
radio. It cannot be changed by the remote. See page 6 of this manual
for instructions to change the Priority channel.
Repeater Talk Around ON/OFF
This feature must be programmed into the LZA2027. Some remotes
have an auxiliary button that can be assigned to turn the Talk Around
function ON and OFF. See page 7 of this manual for an explanation of
the feature.
BASE STATION TRANSCEIVER
RECEIVE
TURN POWER ON by turning the Volume knob clockwise past the OFF
detent. The radio will beep, indicating that it has passed its self-test and
is operational.
SET VOLUME by pressing the MON button to hear squelch noise. Turn the
Volume knob to set a comfortable volume level. Press the MON button
again to stop squelch noise.
Monitor ON/OFF
This feature must be programmed into the LZA2027. Some remotes
have an auxiliary button that can be assigned to turn the Monitor function
ON and OFF. See page 6 of this manual for an explanation of the
feature.
SELECT A CHANNEL GROUP (if applicable) by pressing the GRP button and
turning the Channel Selector knob. Press the GRP button again to return
to channel select mode. See “GRP” on page 6.
2
BK RADIO
GBH Owner's Manual
19
LZA2027 OPTION INSTALLED
SELECT A CHANNEL by turning the Channel Selector knob. After reaching
the highest number, the radio wraps to Channel 1.
The LZA2027 is a factory-installed option that allows connection to most
standard 8 channel or single tone remotes. The programming software
and cable is used to program up to 99 channels and the various features
into the remote. These features include: Go to Group ‘n’ Channel ‘n’;
Group Scan On, Group Scan Off; Channel Scan On, Channel Scan Off;
Priority Scan On, Priority Scan Off; Talk Around On, Talk Around Off;
Monitor On, Monitor Off; Off Hook, On Hook; and Next Channel.
The display can show channel numbers (numeric mode), channel labels
(alphanumeric mode), or receive and transmit frequencies. The display
mode and channel labels are programmed by the technician along with
group labels (if applicable) and channel frequencies. The display shows
slightly different indications during Channel Scan and Priority Scan
operation in alphanumeric and numeric modes.
The audio levels in and out of the LZA2027 might need some
adjustments once the base station is installed and the remote is
connected to the GBH-01 base station. See the Programming and
Service Manual (P/N 0300-30944-900) for making level adjustments.
TRANSMIT
A six pin modular jack is located in the rear of the GBH-01 chassis to
accommodate the tone remote interface cable. A 2 or 4 wire telephone
line is to be used to connect the remote to the GBH-01.
Warning: Do not plug the GBH into any Telco phone system. The GBH
rear modular jack is only used to connect directly to a compatible remote.
Go To Group “n” and Channel “n”
When the proper tones have been programmed into the remote for
respective channel and group assignment, any channel out of any group
can be selected from the remote. For example: Channel one on the
remote can represent Group 1, Channel 2 of the base station; Channel
two on the remote can represent Group 1, Channel 2 of the base station;
Channel three can represent Group 2, Channel 16 of the base station;
and so on. Up to 99 combinations of channel and group assignments can
be made. The GBH-01 is shipped from the factory with the LZA2027
programmed for channels one through eight in Group one.
PRESS THE PTT (Push To Talk) switch on the microphone. The TX
annunciator appears on the display and the red Transmit indicator
illuminates while the PTT is pressed. Talk in a normal voice with the
microphone approximately one to two inches from your mouth. Release
the PTT switch to stop transmitting.
If the TX annunciator does not appear and a tone is heard, you are on a
receive-only channel or the channel is busy (if Busy Channel Lockout is
enabled). Turn the Channel Selector knob to an authorized transmit
channel or wait until the channel is clear (if Busy Channel Lockout is
installed).
If the length of your transmission exceeds the preset time-out timer
setting, the transmitter automatically shuts off and a tone sounds. To
continue the transmission, release the PTT switch, and then press it
again and continue talking.
CODE GUARD OPERATION
The programming of the LZA2027 tones must match the remote. See the
LZA2027Programming and Service Manual (P/N 0300-30944-900) for
programming details.
Code GuardTM allows one radio or group of radios to be selectively called
within a system. If the radio has been programmed with Code Guard,
use the following receive and transmit instructions. Also see “CG” on
page 7.
Group Scan ON/OFF
CODE GUARD RECEIVE
This feature must be programmed into the LZA2027. Some remotes
have an auxiliary button that can be assigned to turn the Group Scan
function ON and OFF. See page 14 of this manual for an explanation of
the feature.
TURN POWER ON by turning the Volume knob clockwise past the OFF
detent. The radio will beep, indicating that it has passed its self test and
is operational.
18
BK RADIO
SET VOLUME by pressing the MON button to hear squelch noise. Turn the
Volume knob to set a comfortable volume level. Press the MON button
again to stop squelch noise.
GBH Owner's Manual
3
SELECT A CHANNEL GROUP (if applicable) by pressing the GRP button and
turning the Channel Selector knob. Press the GRP button again to return
to channel select mode. See “GRP” on page 6.
SELECT A CHANNEL by turning the Channel Selector knob. After reaching
the highest number, the radio wraps to Channel 1.
PRESS THE CG BUTTON to disable or enable Code Guard operation. An
arrow on the display points to the CG button when Code Guard is
disabled. When Code Guard is enabled, a message is heard only when
the proper Code Guard is received.
CODE GUARD TRANSMIT
MONITOR THE CHANNEL, before transmitting on Code Guard channels, by
lifting the microphone off hook or pressing the MON button. Listen to the
channel for a few seconds to ensure that no communications are
occurring on the channel.
PRESS THE PTT (Push To Talk) switch on the microphone. The TX
annunciator appears on the display and the red Transmit indicator
illuminates while the PTT is pressed. Talk in a normal voice with the
microphone approximately one to two inches from your mouth. Release
the PTT switch to stop transmitting.
HANG UP THE MICROPHONE when finished. If you pressed the MON button
to monitor the channel, press it again after the transmission to return to
Code Guard operation.
CHANNEL SELECTION
Radios with more than 16 channels are separated into groups of 16
channels each. Each group of 16 channels can be programmed to have
an "individual personality" with its own set of operational features.
SELECT A CHANNEL GROUP (if applicable) by pressing the GRP button and
turning the Channel Selector knob. Press the GRP button again to
return to channel select mode. See “GRP” on page 6.
SELECT A CHANNEL by turning the Channel Selector knob. After reaching
the highest number, the radio wraps to Channel 1.
Busy Channel Lockout Override
This mode operates in the same manner as busy channel lockout except
that the user can override and transmit by pressing the CG button to
disable receive Code Guard (an arrow will appear over the button). The
transmitter is locked out only if the CG button is off (no arrow above the
CG button).
ALPHANUMERIC DISPLAY FEATURES
GBH Series mobile radios that are equipped with keypad microphones
can be programmed with the following features. Not all microphones
support these functions. Contact your dealer to determine which
features are available with your microphone and have been enabled in
the radio.
Channel Labels
You can program the radio with a label for each of the 15 channel groups
and a label for each of the 16 channels within each group.
To display the channel number associated with a channel label:
Press the [#] key to display the group number.
Press the [#] key again to display the channel number.
Press and hold the [#] key to display the channel label.
Press the [ENT] key or wait for about 5 seconds to revert to normal radio
operation.
Each label can include up to eight characters, with decimal points
available between characters. Characters can include A-Z, 0-9, -, *m $, /,
+, %, \, |, _, <, >, h, or a blank space.
Group Labels
The display can show group labels in addition to group numbers.
To display a group label:
Press the [#] key on the keypad to display the group number.
Press and hold the [#] key to display the group label.
Press the [ENT] key or wait for about 5 seconds to revert to normal radio
operation.
4
BK RADIO
GBH Owner's Manual
17
Time-Out Timer
The transmit time-out timer limits the duration of calls and guards against
accidentally locking on the transmitter and tying up the radio system.
Your dealer can program the duration of the time-out timer (15-225
seconds, or disabled).
GBH RADIO CONTROLS
Transmit
Indicator
Priority
Busy Channel
Light
Display Dimming
Sensor
Function Button
On/Off Indicators
Busy Channel
If the radio has been programmed for busy channel operation, it will
operate in one of the following three modes:
Busy Channel Indication
MON
SCN
Busy Channel Lockout
PRI
OFF -
GRP
SQL
CH
VOL
BK RADIO
GMH
Busy Channel Lockout Override
Busy Channel Indication
The yellow Busy Channel indicator illuminates if there is carrier activity
on the selected channel. If the selected channel is a Code Guard
channel and the proper Code Guard value is not detected, the Busy
Channel indicator remains on for the duration of the carrier activity and
no message is heard. During Scan and Priority Scan operation, the Busy
Channel indicator illuminates when activity is detected on any channel on
the scan list.
When scanning or priority scanning Code Guard channels and activity
has been detected, the Busy Channel indicator illuminates for the time
period necessary to determine if the proper Code Guard value has been
received, causing the Busy Channel indicator to flash at various rates.
Microphone
Connector
When the radio is installed, labels are placed on the front push buttons to
indicate their functions. An arrow on the display points to each front
mounted push button that is active. The five push buttons can be
programmed with the following functions:
TA
SCN
Monitor Squelch
Noise
Channel Scan
PRI
GRP
Priority Scan
Group Select
HOM
NXT
SQL
Squelch Adjust
LPW
If the radio detects an incorrect value or carrier activity only, the
transmitter is disabled, an alert tone is heard, and the display shows the
word BUSY when the PTT switch is pressed, whether the CG button is
on or off.
Channels not programmed for receive Code Guard operation can be
used to transmit regardless of carrier activity.
Function Buttons
BUTTON FUNCTIONS
MON
Busy Channel Lockout
The busy channel lockout feature applies only to those channels
programmed for receive Code Guard operation. When carrier activity is
detected on the channel selected, the radio checks the receive Code
Guard value. If the proper Code Guard value is present, the radio can
transmit on that channel.
Channel
Knob
On/Off
Volume Knob
CG
Repeater Talk
Around
Code Guard
Disable
Home Channel
Next Scan
Channel
Low Power
Select
GSC
Group Scan
BUTTON FUNCTION MENU
If a keypad microphone is used with the GBH radio, many of the
functions above may also be enabled/disabled with the keypad [FCN]
16
BK RADIO
GBH Owner's Manual
5
key. Not all microphones support these functions. Contact your dealer
to determine which features are available with your microphone and
have been enabled in the radio.
1
2
3
FCN
4
5
6
PRI
7
8
9
ENT
*
0
#
CLR
1. Press the [FCN] key to display the function menu.
2. Press [PRI] to toggle the function on/off when the desired menu
item is displayed.
OTHER OPERATIONAL FEATURES
The BK Radio G Series radio is based on a microprocessor core that
allows extra features and operational characteristics to be programmed
into the radio. Your dealer can help define the best operational settings
for your system and program them into the radio.
Scan Delay
Scan delay lets the radio receive a response to a transmission before
scanning the other channels for activity. If you find that your scanner is
restarting before message replies are received, you can ask your dealer
to increase the scan delay time (0-7.5 seconds).
HI/LO Transmit Power
Each channel in the radio can be individually programmed to always
transmit in low-power mode, regardless of the position of the radio's LPW
button (or microphone keypad [FCN] menu setting). If the programming
for the channel allows high-power transmissions, the power level can be
selected with the LPW button or the keypad [FCN] menu.
3. Repeatedly press [FCN] to step through the menu.
4. When the display flashes, the function is enabled.
5. Press [ENT] to exit the [FCN] menu.
Push button controls are described in the following sections.
MON Monitor Squelch Noise
Press the MON button to start or stop monitoring squelch noise. This
allows you to set a comfortable volume level.
SCN
Channel Scan
Press the SCN button to start or stop scanning channels in the scan list.
Scan operation occurs only while the radio is not transmitting. To add or
delete the current channel from the scan list, turn Scan and Priority Scan
off, then press the SCN button and hold it down for 1 second or more.
See “Scan Operation” on page 9.
PRI
Priority Scan
Press the PRI button to start or stop priority scanning. The PR
annunciator and the flashing SCN annunciator appear on the display. To
make the current channel the fixed Priority 1 Channel, turn Scan and
Priority Scan off, then press the PRI button and hold it down for 1 second
or more. See “Priority Scan” on page 11.
GRP Group Select
Press the GRP button to toggle between Group Select and Channel
Select modes. This is used only if the radio has more than one channel
group. Press the GRP button for Group Select mode. Turn the Channel
6
BK RADIO
DTMF Encoding
Radios with keypad-equipped microphones can be programmed to
enable DTMF (Dual Tone Multiple Frequency) encoding. To send DTMF
tones (similar to the tones used by a standard push-button telephone):
Press and hold the PTT switch.
Press any of the keys on the microphone’s keypad.
You will hear a sidetone.
The [FCN], [PRI], [ENT], and [CLR] keys respond as DTMF tones A, B,
C, and D, respectively.
ANI Encoding
ANI encoding (Automatic Numeric Identification), if enabled, transmits a
sequence of DTMF tones each time you press the PTT switch. You will
hear a sidetone. Your dealer can program the ANI number to be sent.
If DTMF and ANI are both enabled, the ANI tone sequence is transmitted
only after the microphone’s [ENT] key is pressed while the PTT switch is
activated. You will hear a sidetone.
GBH Owner's Manual
15
USER SELECTED CODE GUARD
User Selected Code Guard is only available on radios equipped with a
keypad microphone. Not all microphones support this function. Contact
your dealer to determine which features are available with your
microphone and have been enabled in the radio.
When the radio is being programmed with transmit and receive
frequencies for each channel, a receive Code Guard value and a
transmit Code Guard value can also be assigned to each channel. If
User Code Guard selection is enabled, the Code Guard values for any
channel can be temporarily assigned to the knob-selected channel.
For example, to use the Code Guard values of Channel 9 with the
frequencies of Channel 5:
1. Turn Scan and Priority Scan OFF.
2. Turn the Channel Selector knob to Channel 5.
3. Press the [9] key on the microphone keypad. The display shows
CG.
The radio will now operate on the frequencies of Channel 5 with Channel
9 Code Guard values. The display shows the Code Guard channel (9),
and then the selected channel (5).
Press the microphone’s [#] key to display the Code Guard channel
briefly. The display shows the group number, followed by the Code
Guard channel, and then the selected channel.
Press the [0] key to reset all values to the original programming, or press
different number keys (1-16) to select a different set of Code Guard
Values.
NOTE: During Scan or Priority Scan, the display does not show userselected Code Guard values, nor does it qualify incoming signals with
the user-selected Code Guard values in Scan mode.
GROUP SCAN
Channels on each "channel scan list" and groups on the "group scan list"
are scanned sequentially. The knob-selected group is always scanned
when Group Scan is enabled, even if that group is not on the group scan
list.
Selector knob to select a group. Return to Channel Select mode by
waiting 5 seconds, or by pressing the GRP button one time (numeric
mode) or two times (alphanumeric mode). After selecting a group in
alphanumeric mode, press the GRP button one time to display the group
label, and a second time to return to Channel Select mode.
SQL
Squelch Adjust
Press the SQL button to toggle between Squelch Adjust and Channel
Select modes.
Press the SQL button for Squelch Adjust mode. Turn the Channel
Selector knob to adjust the squelch setting. Turning the knob counterclockwise tightens the squelch setting, allowing only stronger signals to
open the squelch and be heard. In the absence of a held channel, the
receiver will be tuned to the main channel. Guard qualification will be
disabled during squelch adjustment.
Return to Channel Select mode by pressing the SQL button again.
Pressing the SQL button and holding for more than 1 second (until beep
is heard) sets the squelch to its factory preset value.
TA
Repeater Talk Around
Press the TA button to turn Repeater Talk Around on or off. When TA is
on, the radio transmits on the receive frequency of the selected channel,
bypassing or “talking around” the repeater. This function may be used on
any channel that is programmed to a frequency pair (repeater channel).
CG
Code Guard Disable
Press the CG button to disable or enable Code Guard operation. An
arrow on the display points to the CG button when Code Guard is
disabled. When Code Guard is enabled, a message is heard only when
the proper Code Guard is received. Transmit Code Guard generation is
unaffected. The CG button may also be used to override Busy Channel
Lockout, if that is installed.
HOM Home Channel
Press the HOM button to go to the pre-programmed Home Channel.
To set a different Home Channel, select the desired channel using the
Channel Selector knob, press the HOM button, and hold it for more than
1 second until the arrow above the HOM button appears on the display.
The new channel then becomes the Home Channel.
When Group Scan is enabled, the following features are disabled:
•
•
•
14
Dual Priority Scan
User-Selected Code Guard
Nuisance Channel Delete
BK RADIO
GBH Owner's Manual
7
NXT
Next Scan Channel
Press the NXT button to select the next consecutive channel in the scan
list (not during Scan operation).
To reply to a message on the priority channel, turn the Channel Selector
knob to the priority channel, and then transmit. Once activity has ceased
on the priority channel, the radio returns to Scan operation.
LPW Low Power Select
Press the LPW button to toggle between high power and low power
transmitter operation. Transmitter power settings can be programmed
from 15 to 50 watts. If per-channel power is enabled, channels locked to
low power will always transmit in low power mode regardless of the state
of the LPW button.
Priority Mode C
With Priority Scan on and Channel Scan off, the radio samples the fixed
priority channel at the preset rate. If activity occurs on the priority
channel, the radio changes to the priority channel and holds for the
duration of the transmission.
GSC Group Scan
Press the GSC button to enable or disable Group Scan operation. During
Group Scan operation, the following features are disabled: Priority Scan,
User Code Guard, and Nuisance Channel Delete.
Turn Group Scan off, then press the GSC button for 1 second or more to
toggle the current group on or off the group scan list.
To reply to a message heard on the priority channel, press the PTT
switch. The radio transmits only on the priority channel when Priority
Scan is on. Once activity has ceased on the priority channel, the radio
returns to the receive channel on the Channel Selector knob.
With Priority Scan and Channel Scan on, the radio scans until it locks on
to an active channel. The radio continues to sample the priority channel
while listening to the active channel. If activity occurs on the priority
channel, the radio overrides the active scan channel, changes to the
priority channel, and holds for the duration of the transmission.
To reply to a message heard on the priority channel, press the PTT
switch. The radio transmits only on the priority channel when Priority
Scan is on. Once activity has ceased on the priority channel, the radio
returns to Scan operation.
Change The Priority Channel
The fixed priority channel can be permanently set or can be changeable.
If the radio has a changeable priority channel, use the following steps to
make this change.
1. Turn Scan and Priority Scan off.
2. Turn the Channel Selector knob to the channel you want to enter
as the new priority channel.
3. Press and hold the PRI button for more than 1 second. A short
beep sounds and PR appears in the display, indicating that the
displayed channel is now the priority channel.
NOTE: If the radio is programmed for Dual Priority operation, only
Priority Channel 1 can be changed with the PRI button.
NOTE: A channel can be the priority channel even if it is on the scan list.
Due to multiple sampling of the same channel, however, maximum
performance occurs when the priority channel is not on the scan list.
8
BK RADIO
GBH Owner's Manual
13
OLD-STYLE BK PRIORITY SCAN
SCAN OPERATION
The radio can be programmed with one of three priority modes: A, B, or
C. The table below shows how the priority channel and the transmit
channel are selected in each mode.
RECEIVE
Mode A
Mode B
Mode C
Priority
Channel
Channel Knob
Preset
Preset
Transmit
Channel
Channel Knob
Channel Knob
Priority Channel
When a signal is detected, scanning stops and the message is received.
The received channel is shown in place of the transmit channel.
Priority Mode A
In Priority Mode A, the priority channel is set by the Channel Selector
knob. Priority Mode A is seldom used by itself because the radio
receives and transmits only on the knob-selected channel.
When Scan and Priority Mode A are enabled, scanning occurs until an
active scan channel is found. The radio receives the message while
continuing to check the priority (knob-selected) channel. The display
shows the scan channel.
If the priority channel becomes active during this message, the Priority
indicator illuminates.
The radio changes to the priority channel and holds for the duration of
the message. The display shows the priority channel.
To reply to a message on the priority channel, press the PTT switch and
transmit on the priority channel. Once activity ceases on the priority
channel, the radio returns to Scan operation.
Priority Mode B
With Priority Scan on and Channel Scan off, the radio can receive on the
knob-selected channel while sampling the priority channel. If the priority
channel becomes active, the Priority indicator illuminates. The radio
changes to the priority channel and holds for the duration of the
transmission
To reply to a message on the priority channel, turn the Channel Selector
knob to the priority channel, and then transmit.
With Priority Scan and Channel Scan on, the radio scans until it locks on
to an active channel. The radio continues to sample the priority channel
while listening to the active scan channel. If activity occurs on the priority
channel, the radio overrides the active scan channel, changes to the
priority channel, and holds for the duration of the transmission.
12
Scan operates only while the radio is not transmitting. The radio checks
for signals on channels in the preset scan list, as well as the channel
selected by the Channel Selector knob.
BK RADIO
Once the signal ends, the radio continues to monitor the channel for the
preset scan delay time before it resumes scanning.
Basic Scan
Press the SCN button to enable Scan (an arrow will appear above the
button).
If Priority Scan is enabled, press the PRI button to turn it off.
The display indicates Scan operation by flashing the SCN annunciator
(alphanumeric mode) or by two flashing bars (numeric mode).
Scan Code Guard Channels
Press the SCN button to enable Scan (an arrow will appear above the
button).
If the CG button has an arrow over it, press the CG button once to turn
Code Guard Disable off.
When a signal is detected, scanning stops while the radio checks for the
proper Code Guard value. If the signal contains the proper Code Guard
value, the radio receives the message. Otherwise, the radio resumes
scanning immediately.
Nuisance Channel Delete
With Channel Scan on and Nuisance Channel Delete enabled, pressing
and holding the SCN button for more than 1 second will temporarily
remove a currently active channel from the scan list. If the radio is
equipped with a keypad microphone, pressing the [CLR] key while Scan
is on will accomplish the same thing. Not all microphones support these
functions. Contact your dealer to determine which features are available
with your microphone and have been enabled in the radio. When the
radio is powered off and back on, the pre-programmed scan list will be
restored.
GBH Owner's Manual
9
TRANSMIT WITH SCAN ON
PRIORITY SCAN
When operating in Scan mode, the radio transmits on the channel
selected by the Channel Selector knob.
Priority Scan enables the radio to receive on any channel while
monitoring for a message on the designated priority channel(s). The
radio samples each priority channel at a preset rate (.25-2.0 seconds)
regardless of activity on any other channel. Priority Scan operates only
while the radio is not transmitting and can be used in combination with
Scan operation.
Select a transmit channel by turning the Channel Selector knob.
Press and hold the PTT switch and talk in a normal voice. When the PTT
switch is released, the radio continues to monitor the selected channel
for the preset scan delay time before it resumes scanning.
Talkback Scan
If your radio is programmed for Talkback Scan, press PTT while a
channel is active or while scan-delay time remains. You will be
responding on the transmit frequency of the received channel.
Talkback Scan will not work if Priority Scan is also on and your radio is
programmed to always transmit on the Priority 1 channel.
When Priority Scan is on, the PR annunciator illuminates, and the display
flashes SCN (alphanumeric mode) or two flashing bars (numeric mode).
If a message is received on a priority channel, the Priority indicator
illuminates, and the radio receiver locks onto that channel for the
duration of the transmission, unless a higher priority channel interrupts.
Priority Scan can be used in combination with Code Guard with:
Priority Scan on (arrow appears above PRI button)
Code Guard Disable off (no arrow above CG button)
CHANGE THE SCAN LIST
The priority channel(s) programmed with Code Guard
The radio can be programmed to enable the user to add or remove
channels from the scan list. If user changes are enabled, follow these
steps to change the scan list:
Turn Scan and Priority Scan off.
Select a channel to be added or removed from the scan list by turning
the Channel Selector knob. If the channel is already on the scan list,
SCN appears in the display.
Press and hold the SCN button for more than 1 second to toggle the
channel on or off the scan list.
If a message is received on a priority channel, the radio receiver locks on
to the priority channel and checks to see if the proper Code Guard value
is present. If the signal contains the proper Code Guard value, the radio
receives the message. Otherwise, the radio will re-check the channel
every 4 seconds, until the activity on the channel ceases.
DUAL PRIORITY SCAN
In each group, up to two of the sixteen channels can be designated as
priority channels. These two, PR1 and PR2, are periodically tested for
activity, even if a different transmission is being listened to. Activity on
PR2 preempts activity on any of the non-priority channels. Receptions
on PR1 have priority over any other channel in the group, including PR2.
Either priority channel can be programmed as a fixed channel, tied to the
Channel Selector knob, or programmed OFF. If the radio is programmed
to transmit on the first priority channel, transmissions will occur on PR1,
if PR1 isn’t programmed OFF, when operating in Dual Priority Scan
mode.
st
If PR1 is a fixed channel, and changes to the 1 priority channel are
allowed, the user can move the channel selector to a new channel and
press and hold the PRI button for more than 1 second to choose a new
PR1 channel.
Dual Priority Scan is automatically disabled when Group Scan is on.
10
BK RADIO
GBH Owner's Manual
11