1
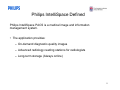
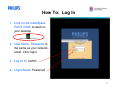
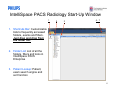
IntelliSpace® PACS Radiology.lnk IntelliSpace PACS 4.4 Radiology Overview For UAHN Radiology Physicians 1 Philips IntelliSpace Defined Philips IntelliSpace PACS is a medical image and information management system. • The application provides: – On-demand diagnostic-quality images – Advanced radiology reading stations for radiologists – Long-term storage (Always online) 2 Learning Objectives Use IntelliSpace PACS Enterprise to: –Search for patients –Select and view exams 3 IntelliSpace PACS Enterprise • Will replace Synapse Fuji PACS for managing images • Used by: Clinicians (Referring Physicians, Nurses, Surgeons, Techs) • For: Viewing, analyzing, & qualifying exams 4 How To: Log In 1. Click on the IntelliSpace PACS ICON: located on your desktop IntelliSpace® PACS Radiology.lnk 2. User Name, Password: Is the same as your network, email, Citrix login. [ 3. Log on to: UAHN 4. Logon Mode: Password 5 IntelliSpace PACS Radiology Start-Up Window 1 2 3 4-7 1. Shortcuts Bar: Customizable lists to frequently accessed folders, exams and filters. Just drag and drop from the folder list. 2. Folder List: List of all the folders, filters and tools in IntelliSpace PACS Enterprise 3. Patient Lookup: Patient, exam search engine and sort function 6 Start-Up Window Continued 4-7 4. iExport Queue: Real-time display status of the exams that have been exported via the iExport feature. 5. Preferences: User, System and Machine Preference dialog boxes 6. Help: IntelliSpace PACS Radiology user manual 7. Logout Button: Exit application and return to login window 7 Shortcut Bar and Folder List • Shortcuts: To add, remove or rename items that have been moved into shortcut menus and create different groups for shortcuts • Exam Lookup: To locate exams performed by searching on specific criteria. (Accession, Exam Date, etc.) • Exceptions Lookup: Folder containing system identified Exceptions • Patient Lookup: To locate patients and by searching on specific criteria. This will show exams with no images in scheduled status. (name, MRN, etc.) 8 Shortcut Bar and Folder List • Exam Lookup: To locate exams preformed by searching on specific criteria. (Accession, Exam Date, etc.) • Exceptions Lookup: Folder containing system identified Exceptions • Patient Lookup: To locate patients and by searching on specific criteria. This will show exams with no images in scheduled status. (name, MRN, etc.) • iQuery: Tool to query and retrieve studies from other DICOM devices (that is, existing archives) 9 Shortcut Bar and Folder List (continued) • Local Export: Utility for copying exams and images from IntelliSpace PACS • Locked Exams: Folder containing Exams which are opened by another user at the same time signifying a Lock. • Machine Filters: Machine-specific search filters (based on modality, body part, etc.) • My Filters: User-specific search filters (based on modality, body part, etc.) • My History: List of user’s 100 most recently viewed exams 10 Shortcut Bar and Folder List (continued) • Resolved Exception: Displays the Resolved Exceptions worklist, allowing you to view a list of all resolved exceptions. • System Filters: Filters that are shared by all users • Personal and Public Folders: Personal or public folders, up to 5 levels deep, 25 subfolder each level, 500 max (for example, rounds, teaching files, seminar, etc.) 11 Shortcut Bar and Folder List (continued) • Add/ Edit Shortcuts: Right-click on shortcut bar for menu. Displayed below! • OR • Add contents to shortcut bar by dragging and dropping • Add/ Edit to Folders: Right-click on Personal or Public (permissionrestricted) folders for menu • OR • Add content to folder by dragging and dropping. 12 Patient Query 13 When Patient Lookup is highlighted in Grey. It is the active search selected. **Scheduled Exams are found only in this search. 14 Patient Search Patient Lookup 1. Search: Search on Patient Name, MRN, etc 2. Click on next to patient name to expand the patient record to locate exams. 3. Clear all: This removes all patient information in the search boxes. 15 Click the Append results to keep original search information; then enter the new search information to see multiple criteria. 16 Exam Lookup is used to located completed exams. 1. Double click the patient highlighted to open images. 2. Right click highlighted exam for available options. For example: Show report if images are not available. 3. If no image icon is located beside the exam; images are not available. 17 Patient/Exam Lookup Symbols 1. Patient/Exam Lookup Criteria: – Right-click to display or hide additional symbols and Patient/exam criteria. STAT Exam Report Available Locked Exam Has Images Linked Exam Exam Scheduled Marked Read Exam Notes Exception 18 Viewing Images 19 Canvas Page 1. Patient Information Area: Patient’s name, DOB, sex, MRN, Referring Physician and Patient Class 2. Patient Timeline: History of and navigation menu to all of a patient’s studies in IntelliSpace PACS 3. Exam notes: When icon is present, indicates diagnostic report is available for the exam. Double click icon to open report. 4. Exam Margin: Access point to exam specific menu and information 20 Canvas Page (continued) 9 5. Thumbnail: Thumbnail view of image 6. Exam Rack: Set of images that make up the exam 7. Image/ Series Information: Image specific information (for example; description, number of images, slice thickness, etc.) 8. Image/ Series date and time: Exam accession number, Date and Time image was acquired 9. Close Exam: Exit from exam and return to patient directory 8 21 Control Strip Return to Patient Lookup or area where exam was initially launched Select bulls eye icon to close current patient record Right-click to navigate between different patients exams 22 Patient History Timeline Left-click to open exam Hover mouse to view exam information • Definition of above Navigation Menu – Including History of exam • Colors and symbols in timeline Green No diagnostic report Blue Diagnostic report available “|” Image available “X” No images “A” Exams on 3rd party digital archive—not on IntelliSpace PACS server 23 Patient History Timeline (continued) Right-click for menu Timeline Sub-menu: Open Exam: Open exam and return to main Patient Directory Close Exam: Close exam and return to main Patient Directory Add Exam to Folder: Copy exam to a folder in folder tree Show Report: View diagnostic report 24 Diagnostic Report 25 Navigation within the Exam Rack • Exam Rack: the set of images in a study • Reorder series by dragging and dropping on grey image header or footer. • Navigating steps to view stacked series. 1. Mouse wheel 2. Select “C” on keyboard 3. Select Cine Loop from context menu Double-click to open in pop-up window 26 Adding/Locating Preliminary Notes 27 • Open the patient’s exam from Exam, Patient, or Exception Lookup. • Single click the clipboard icon. 28 • Click on Exam Notes in the top left corner. • Next click on New Note in the bottom right corner. • Select Preliminary Note Radiologist from the drop down menu. • Subject line must be populated with a remark. • Write remarks in white area then click save note. 29 • You will see your note listed for review and that the Exam Note count has increased. • You will also find the preliminary notes from the ER physician or technologist to you listed under Preliminary Notes ED Physician or Technologist Note. • Critical Note can be highlighted and will place a urgent marking beside the note. 30 Beside the exam will be a yellow square noting the exam has been noted. If marked critical an exclamation point will be on top of the icon. 31 • If you do not want to open the images and only want to view the note(s) available. • Yellow square icon means a note is available to view. • Highlight the exam right click and select View Exam Notes. • Follow the prior instructions to add or view a note. 32 Measurements 33 • Double click the series of image(s) you are measuring or annotating for the best view. • Right click and select Measurements or Annotations; then arrow over to your available options. 34 • A Key Image is created to view and will be presented as the first image when it is viewed again. • Annotation or Measurement is available to view on the image. 35 • Highlight your annotation or measurement and right click to see a menu to edit or delete any errors. 36 The End 37