1
Wasp Connector for
QuickBooks®
Copyright © 2013
Wasp Barcode Technologies
1400 10th St.
Plano, TX 75074
All Rights Reserved
STATEMENTS IN THIS DOCUMENT REGARDING THIRD PARTY PRODUCTS OR SERVICES ARE BASED ON INFORMATION
MADE AVAILABLE BY THIRD PARTIES. WASP BARCODE TECHNOLOGIES AND ITS AFFILIATES ARE NOT THE SOURCE OF
SUCH INFORMATION. THE INFORMATION IN THIS DOCUMENT IS SUBJECT TO CHANGE WITHOUT NOTICE.
Wasp Barcode Technologies, the Wasp logo and WaspTime are registered trademarks and/or trademarks of Wasp Barcode
Technologies in the United States and other countries. Other parties’ trademarks are the property of their respective owners.
Software activation system licensed under Patent No. 5,490,216
Terms, conditions, features, hours and contact information in this document are subject to change without notice. Wasp is
committed to providing great products and exceptional customer service. Occasionally we may decide to update our selection and
change our service offerings so please check www.waspbarcode.com for the latest information.
InventoryControl for Use with QuickBooks® Install Key
(Printed on shipped material)
InventoryControl for Use with QuickBooks® Registration Key
(Obtained from http://www.waspbarcode.com/Register/default.asp)
________________________
________________________
Wasp Connector for QuickBooks User Manual
Table of Contents
Welcome to the Wasp Connector for QuickBooks®............................................................................................... 1
Chapter 1 - Getting Started .................................................................................................................................. 2
Chapter 2 - Settings ........................................................................................................................................... 10
Settings Screen .............................................................................................................................................. 10
Accessing the Settings Screen: ................................................................................................................... 10
Wasp InventoryControl Service Access Information ........................................................................................ 12
Select a QuickBooks® Company File .............................................................................................................. 13
To Connect to a QuickBooks ® Company File.............................................................................................. 13
To Reset the Connection ............................................................................................................................ 14
Account Mapping ........................................................................................................................................... 15
Customize Line Item Description Format String .............................................................................................. 20
Chapter 3 - Importing Information to InventoryControl ........................................................................................ 25
Import Tab Overview ...................................................................................................................................... 25
Importing Items to InventoryControl ................................................................................................................ 27
Before and After Import - Comparing Data in QuickBooks® and InventoryControl ....................................... 28
How To Import Items................................................................................................................................... 31
Importing Customers to InventoryControl ........................................................................................................ 35
Before and After Import - Comparing Data in QuickBooks® and InventoryControl ....................................... 35
How to Import Customers ........................................................................................................................... 37
Importing Vendors to InventoryControl ............................................................................................................ 40
Before and After Import - Comparing Data in QuickBooks® and InventoryControl ....................................... 41
How to Import Vendors ............................................................................................................................... 42
Import Errors .................................................................................................................................................. 46
Chapter 4 - Syncing Purchase Orders/Pick Orders to QuickBooks® ................................................................... 47
Syncing Purchase Orders/Pick Orders to QuickBooks® .................................................................................. 47
Before and After Sync - Comparing Data in QuickBooks® and InventoryControl.......................................... 47
How to Sync Purchase Orders/Pick Orders to QuickBooks® ....................................................................... 51
Chapter 5 - Inventory Value Tab ........................................................................................................................ 55
Inventory Value Tab ....................................................................................................................................... 55
Index ................................................................................................................................................................. 57
i
Wasp Connector for QuickBooks User Manual
Welcome to the Wasp Connector for QuickBooks®
Wasp Barcode Technologies has combined the accounting capabilities of QuickBooks® with the comprehensive
inventory tracking capabilities of Wasp InventoryControl.
®
®
The frustration of accurately keeping track of inventory in QuickBooks is eliminated. QuickBooks remains as
the accounting software. Wasp InventoryControl becomes the software to manage your inventory. And sales
order software such as QuoteWerks becomes the quoting and sales ordering piece. Combined, this solution
enables your business to operate more efficiently and accurately.
®
The Wasp Connector for QuickBooks is the conduit through which you will transfer information between
®
QuickBooks and Wasp InventoryControl. Simply install the InventoryControl Connector for QuickBooks® on
®
the same machine where you have QuickBooks installed. InventoryControl does not need to be installed on
the same machine, but should be accessible via a network connection.
View the Getting Started information to begin setting up your Wasp Connector for QuickBooks®.
1
Wasp Connector for QuickBooks User Manual
Chapter 1 - Getting Started
The first time you use Wasp Connector for QuickBooks®, the system will guide you through setting up the
software. You will need to follow the steps outlined below to enable Wasp Connector to communicate with
®
QuickBooks and transfer data properly.
®
Reminder: Wasp Connector for QuickBooks should be installed on the same machine on which your
®
QuickBooks company file resides in order to connect to it.
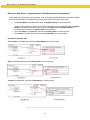
1. Open your Company File - Make sure your QuickBooks® company file is open.
®
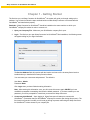
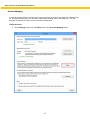
2. Login - The first time you open Wasp Connector for QuickBooks after installation, the following screen
will appear asking for your login information:
The Service Address field will populate with the location and name of the InventoryControl service
installed when you installed the InventoryControl software.
You must enter your user name and password. The default is:
User Name : Admin
Password: Blank
Click Login when you have finished entering information.
Note: After entering this information once, you will not see this screen again UNLESS you have
modified the password to something other than the default password. If you have created your own
password, you will be prompted for it each time you access the Wasp Connector.
3. Connect to QuickBooks® - Upon logging in, Wasp Connector will attempt to connect with
®
®
QuickBooks . (Remember that your QuickBooks company file must be open during this process.) The
first time this connection is made, you will need go through a process authorizing the Wasp Connector
®
for QuickBooks to have access to your company file.
2
Wasp Connector for QuickBooks User Manual
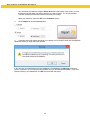
To do this:
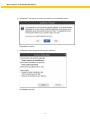
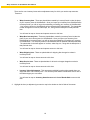
a. The first screen that appears is the following notification screen:
Select Yes, whenever this QuickBooks® company file is open and click Continue.
3
Wasp Connector for QuickBooks User Manual
®
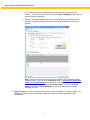
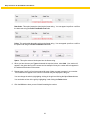
b. QuickBooks will ask you to confirm you selection on the following screen:
Select Yes to continue.
c.
A summary screen will appear outlining your selection:
Click Done to proceed.
4
Wasp Connector for QuickBooks User Manual
4. Account Mapping - Next a message screen appears notifying you that non-inventory items must be
®
created and mapped to certain items in QuickBooks to enable the Wasp Connector to properly
import/export them.
These items include:
Click OK on this screen to close it.
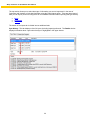
The Account Mappings screen appears next.
This is where you will map your non-inventory items to the appropriate expense or income accounts. It
is very important to map each item type (Shipping, Service, etc.) to the correct account so
InventoryControl can properly import and export those items correctly.
The Expense Account and Income Account drop down lists on the Account Mappings screen
®
display the accounts displayed in QuickBooks . If you do not currently have the "Use Account Number"
®
option turned on in QuickBooks , we recommend you enable it now. If this option is not enabled, the
5
Wasp Connector for QuickBooks User Manual
accounts in these drop down lists will appear by Account Name only. Since Account Names are not
unique, but Account Numbers are, you may have duplicate account names in the lists, making it
harder to select the correct account. The "Use Account Number" option is not enabled by default.
How to enable Use Account Numbers in QuickBooks®.
a.
®
In QuickBooks , select Edit > Preferences.
The Preferences screen appears.
b. On the Preferences screen, select Accounting > Company Preferences tab, then make sure
Use Account Numbers is selected.
c.
Click OK to close the Preferences screen and save your changes.
6
Wasp Connector for QuickBooks User Manual
There are four non-inventory items and one adjustment entry for which you need to map accounts. These are
•
Wasp Inventory Item - These are placeholders created by InventoryControl to take the place
®
®
of your inventory items in QuickBooks . Once you import your inventory from QuickBooks to
®
InventoryControl, you will no longer be maintaining or tracking your inventory in QuickBooks .
®
Your inventory entries in QuickBooks will be replaced with this placeholder. The placeholder
is what will appear on invoices, sales slips, etc., along with the description of that particular
item.
You will need to map an income and expense account to this item.
•
Wasp Non-Inventory Item - These are placeholders created by InventoryControl to take the
®
place of your non-inventory items in QuickBooks . Once you import your inventory from
®
QuickBooks to InventoryControl, you will no longer be maintaining or tracking your inventory in
®
®
QuickBooks . Your inventory entries in QuickBooks will be replaced with this placeholder.
The placeholder is what will appear on invoices, sales slips, etc., along with the description of
that particular item.
You will need to map an income and expense account to this item.
•
Wasp Shipping Item - These are placeholders for shipping fees charged on orders in
InventoryControl.
You will need to map an income account to this item.
•
Wasp Service Item - These are placeholders for all service charges charged on orders in
InventoryContol.
You will need to map an income account to this item.
•
Inventory Value Adjustments - This represents periodical journal entries created when you
adjust the value of an inventory item. You can accept the default Journal Memo text or click in
the field and type your own memo.
You will need to map an Inventory Asset Account and Cost of Goods Sold account to this
item.
To map accounts to these items:
a. Highlight the item (or adjustment) you want to map in the window on the left side of the
screen.
b. You can accept the default Item Name (for example, the Item Name for Wasp
Inventory is IC_Inventory) or type a new name field as shown below:
7
Wasp Connector for QuickBooks User Manual
Keep in mind that the name you select here will appear on invoices as shown below:
c.
You can accept the default Description or type in a different description by clicking in
the Description field.
d. Select an Expense or Income account (or Inventory Asset/Cost of Goods Sold for
Inventory Value Adjustments) to which this item should be associated. Keep in mind
that when you sync purchase order and/or invoices from InventoryControl to
®
QuickBooks the account you selected for these items will be affected by the financial
data in those orders. Make sure you are certain you have your mappings correct
®
before you begin syncing invoices/purchase orders back to QuickBooks .
If you map an expense account where an income account is indicated, or vice-versa,
an error message similar to the following will appear:
8
Wasp Connector for QuickBooks User Manual
If you receive this screen, click OK to close it, then remap the item to the correct
account. You will not be able to save and close the Account Mapping screen until you
resolve all incorrect mappings.
e. When you are finished mapping accounts, click the Save button. Now that you have
®
finished your preliminary setup, the Wasp Connector for QuickBooks main screen
appears:
®
Note: At this point, you can begin the process of importing your QuickBooks data to
InventoryControl, or you can go to the Settings screen to customize the appearance
of the Line Item Description that will appear on invoices and purchase orders. Keep
in mind that you can customize the Line Item Description at any time; unlike the
Login information and Account Mapping, this does not need to be done before
importing your data.
®
6. Import your Data - You are now ready to import your data from QuickBooks to InventoryControl. For
detailed instructions on how to import data, please refer to the topic Importing Information from
®
QuickBooks .
9
Wasp Connector for QuickBooks User Manual
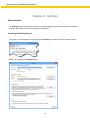
Chapter 2 - Settings
Settings Screen
The Settings screen provides access to all of the connection settings and one-time initial set-up functions
®
needed to get started using Wasp Connector for QuickBooks .
Accessing the Settings Screen:
This screen can be accessed at any time by selecting Settings from the main Wasp Connector screen.
Below is an example of the Settings screen:
10
Wasp Connector for QuickBooks User Manual
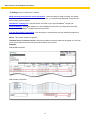
The Settings screen is divided into 5 sections:
Wasp InventoryControl Service Access Information - Upon connecting to Wasp Connector, this section
will populate with your URL of your InventoryControl service, your username and password (if they have not
been changed from the default).
®
®
QuickBooks Company File - Use this section to connect to your open QuickBooks company file.
Account Mapping - This section allows you to link QuickBooks® accounts to your Wasp Items (inventory
®
placeholders in QuickBooks ), Wasp Service Items and Fees.
Line Item Description Format String - Use this section to customize how line item descriptions appear on
your sales orders and invoices.
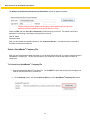
Others - This section contains two options:
List Sales Tax as Line Item on Invoice - When this checkbox is selected, sales tax will appear as a line item
on the invoice rather than as a summary total at the bottom of the invoice.
Examples:
With checkbox selected:
With checkbox unselected:
11
Wasp Connector for QuickBooks User Manual
Update Customer and vendor data in QuickBooks while syncing purchase orders and pick orders ®
When this checkbox is selected, customer and vendor data will be updated in QuickBooks each time you
®
sync your purchase orders and pick orders in InventoryControl to QuickBooks . Keep in mind that only
®
customers/vendors related to a PO will be updated. If you have made changes on the QuickBooks side,
those changes will not be included in the sync. You must reimport those customers/vendors from
QuickBooks® to InventoryControl.
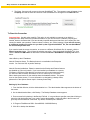
Wasp InventoryControl Service Access Information
The Service Access Information is the URL, Username and Password that allows you to connect the
Wasp service to the Wasp Connector. Upon connecting to the Wasp Connector, this section will automatically
populate with your URL of your InventoryControl service, your username and password.
You can edit this information if needed, but be aware that these fields should only be edited if you are
having trouble connecting the QB Connector to your InventoryControl Service.
Below is an example of the Wasp InventoryControl Service Access Information section:
The above example shows how the section will appear when you are successfully connected to the service.
Note that "Connected to Service" appears below the Login User ID field.
If the Wasp Connector is not able to connect, the following screen will appear:
Click OK on this screen to close it.
12
Wasp Connector for QuickBooks User Manual
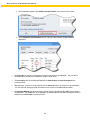
The Wasp InventoryControl Service Access Information section will appear as follows:
Check the URL and your User ID and Password to make sure they are correct. The default User ID and
password for connecting to the Wasp InventoryControl service is:
User ID: Admin
Password: Blank
After you have edited any needed information, click Connect to Service. You should now be connected to
the Wasp InventoryControl Service.
Select a QuickBooks® Company File
After you have connected the Wasp Connector to your InventoryControl Service, you need to select and open a
®
QuickBooks Company file. The file must be open on your computer in order for the Wasp Connector to
connect to it.
To Connect to a QuickBooks ® Company File
®
1. Open the desired QuickBooks Company File. The file MUST be open and running in the background in
order for the QB Connector to connect to it.
®
2. On the Settings screen, click the Connect to QB button in the QuickBooks Company File section.
13
Wasp Connector for QuickBooks User Manual
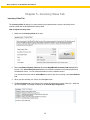
3. The Wasp Connector will connect to the open QuickBooks® file. The company name will appear in the
Company field and the name and location of the QuickBooks® file will appear in the Data File field.
To Reset the Connection
Important Note: Use this option carefully. This option is only available to users set up as Admin in
InventoryControl. Wasp Connector provides this feature so you can connect to a different Company file if
needed; however, be aware that if you have already imported data/synced data from one Company file, then
connect to another, part numbers, customer names, inventory, etc. will be impacted. If you need to connect
®
®
to a different company file, make sure you back up the original QuickBooks file, the new QuickBooks
file and InventoryControl first.
If you need to break the current connection, to connect to a different QuickBooks file, for example, click the
®
Reset Connection button. This will clear the existing connection. Open the desired QuickBooks file, then
®
click the Connect to QB button as described in the To Connect to a QuickBooks Company File section
above.
How to Back up the IC Database:
Note for Enterprise Users: The Backup feature is not available in the Enterprise
version. You must use SQL to perform backups.
Note for Remote Installations: Please be aware that the Backup and Restore features
are disabled on Client only installs. If you have installed your database on a remote
PC/Server (a PC/Server other than the one where you are running InventoryControl),
you will not be able to backup and restore on an IC7 client only PC. You will be
able to backup and restore on the machine where the database resides. This option
is set on the Options screen. For more information on designating a backup folder,
please refer to the Options Screen topic in InventoryControl help.
Backing Up Your Database:
1. From the Main Window, click the Administration icon. The Administration Menu appears at the bottom of
the screen.
2. On the Administration Menu, click Backup. The Backup Database screen appears.
3. Enter a name for this backup in the Backup File field. It is a good idea to specifya name that will help you
select the right backup file later if you need to restore the database. Adding the date in the file name is a
good way to know which file is the latest. By default, the backup file is written to:
4. C:\Program Files\Microsoft SQL Server\MSSQL.1\MSSQL\Backup
5. Click OK to backup the database.
14
Wasp Connector for QuickBooks User Manual
Account Mapping
In order for InventoryControl to properly sync invoice data such as Service Fees, Sales Tax, Shipping Fees,
®
®
etc. to QuickBooks properly, you will need to create them as "Wasp Items" in QuickBooks . You can
associate an expense or income account with each of these items.
To Map Accounts
1. On the Settings screen, click the Define button in the Accounts Mapping section.
15
Wasp Connector for QuickBooks User Manual
The Account Mappings screen appears next.
This is where you will map your non-inventory items to the appropriate expense or income accounts.
It is very important to map each item type (Shipping, Service, etc.) to the correct account so
InventoryControl can properly import and export those items correctly.
The Expense Account and Income Account drop down lists on the Account Mappings screen
display the accounts displayed in QuickBooks®. If you do not currently have the "Use Account
Number" option turned on in QuickBooks®, we recommend you enable it now. If this option is not
enabled, the accounts in these drop down lists will appear by Account Name only. Since Account
Names are not unique, but Account Numbers are, you may have duplicate account names in the
lists, making it harder to select the correct account. The "Use Account Number" option is not
enabled by default.
16
Wasp Connector for QuickBooks User Manual
How to enable Use Account Numbers in QuickBooks®
a.
In QuickBooks®, select Edit > Preferences.
The Preferences screen appears.
b. On the Preferences screen, select Accounting > Company Preferences tab, then make sure
Use Account Numbers is selected.
c.
Click OK to close the Preferences screen and save your changes.
17
Wasp Connector for QuickBooks User Manual
There are four non-inventory items and one adjustment entry for which you need to map accounts.
These are:
•
Wasp Inventory Item - These are placeholders created by InventoryControl to take the place
of your inventory items in QuickBooks®. Once you import your inventory from QuickBooks® to
InventoryControl, you will no longer be maintaining or tracking your inventory in QuickBooks®.
Your inventory entries in QuickBooks® will be replaced with this placeholder. The placeholder
is what will appear on invoices, sales slips, etc., along with the description of that particular
item.
You will need to map an income and expense account to this item.
•
Wasp Non-Inventory Item - These are placeholders created by InventoryControl to take the
place of your non-inventory items in QuickBooks®. Once you import your inventory from
QuickBooks® to InventoryControl, you will no longer be maintaining or tracking your inventory
in QuickBooks®. Your inventory entries in QuickBooks® will be replaced with this placeholder.
The placeholder is what will appear on invoices, sales slips, etc., along with the description of
that particular item.
You will need to map an income and expense account to this item.
•
Wasp Shipping Item - These are placeholders for shipping fees charged on orders in
InventoryControl.
You will need to map an income account to this item.
•
Wasp Service Item - These are placeholders for all service charges charged on orders in
InventoryContol.
You will need to map an income account to this item.
•
Inventory Value Adjustments - This represents periodical journal entries created when you
adjust the value of an inventory item. You can accept the default Journal Memo text or click in
the field and type your own memo.
You will need to map an Inventory Asset Account and Cost of Goods Sold account to this
item.
3. Highlight the item (or adjustment) you want to map in the window on the left side of the screen.
18
Wasp Connector for QuickBooks User Manual
4. You can accept the default Item Name (for example, the Item Name for Wasp Inventory is
IC_Inventory) or type a new name field as shown below:
Keep in mind that the name you select here will appear on invoices as shown below:
Note: If you do not want the Item column to appear on printed invoices, you can remove it from the
Invoice template. Please refer to the Syncing Purchase Orders/Pick Orders topic for instructions
on removing the column.
5. You can accept the default Description or type in a different description by clicking in the Description
field.
19
Wasp Connector for QuickBooks User Manual
6. Select an Expense or Income account (or Inventory Asset/Cost of Goods Sold for Inventory Value
Adjustments) to which this item should be associated. Keep in mind that when you sync purchase
order and/or invoices from InventoryControl to QuickBooks®, the account you selected for these items
will be affected by the financial data in those orders. Make sure you are certain you have your
mappings correct before you begin syncing invoices/purchase orders back to QuickBooks®.
If you map an expense account where an income account is indicated, or vice-versa, an error message
similar to the following will appear:
If you receive this screen, click OK to close it, then remap the item to the correct account. You will not
be able to save and close the Account Mapping screen until you resolve all incorrect mappings.
7. When you are finished mapping accounts, click the Save button.
Customize Line Item Description Format String
Line Item Descriptions appear on purchase orders, sales receipts and invoices that are exported to
QuickBooks® from Wasp InventoryControl. These descriptions include the Item Number and Item
Description. You can customize the Line Item Description to contain additional information such as static
text, serial number, lot, date code and/or pallet. Use this screen to define how you want the line item
description to be worded. Keep in mind that this is a global template that will be applied to all line item
descriptions on purchase orders, sales receipts and invoices.
By default, the line item description on sales orders and invoices for items imported from QuickBooks is in the
following format:
{Item Number} {Item Description}
An example of a line item description in this format is:
1000 Table Top 12"
You can customize how information appears by using the Define Line Item Description Format screen.
To Customize Line Item Descriptions
20
Wasp Connector for QuickBooks User Manual
1. On the Settings Screen click the Customize button in the Line Item Description Format String
section.
The Define Line Item Description Format screen appears.
The screen appears pre-populated with the default line item format string.
2. You can delete elements from the default format string by highlighting a listing, such as Item Number,
then clicking the Delete button. You can rearrange the elements in the default format string by
highlighting a listing, then clicking the Move Up or Move Down button.
3. To add a new element to the format string, select a listing in the Type drop down menu.
21
Wasp Connector for QuickBooks User Manual
Options are:
Item Number - This option adds the Item Number to the format string.
Item Description - This option adds the Item Description to the format string.
Line Number - This option adds the Line Number to the format string. The Line Number represents
the actual line number of the sales order or invoice.
Text - This option adds text or numeric data into the format string. If you select Text, a text field
appears allowing you to enter the text you want to appear in the format string.
Serial Number - This option adds a serial number in the format string. You can append a prefix or a
suffix to the serial number using the Prefix Text/Subfix Text fields.
Lot - This option adds a lot code in the format string. You can append a prefix or a suffix to the lot
code using the Prefix Text/Subfix Text fields.
22
Wasp Connector for QuickBooks User Manual
Date Code - This option inserts the date into the format string. You can append a prefix or a suffix to
the date code using the Prefix Text/Subfix Text fields.
Pallet - This option adds the pallet code into the format string. You can append a prefix or a suffix to
the pallet code using the Prefix Text/Subfix Text fields.
Space - This option enters a blank space into the format string.
4. When you have chosen your Type and entered the required values, select Add. Your entries will
appear in the grid at the top of the screen and an example of how your number will look appears in
the window at the bottom of the screen.
5. Repeat steps 4 and 5 until you have entered all types of data you want to appear in your number.
Your selections will appear in the number in the order they are displayed in the grid.
You can change the order by highlighting a listing in the grid and clicking the Up or Down buttons.
You can delete an item in the grid by highlighting it and clicking the Delete button.
6. Click the OK button when you are finished formatting the number.
23
Wasp Connector for QuickBooks User Manual
Chapter 3 - Importing Information to InventoryControl
Import Tab Overview
After you have connected your QuickBooks® company file, created your Non-Inventory Items and
customized the line item description format string (optional), you are ready to import information from
QuickBooks® to InventoryControl.
Importing only needs to be performed once for items. After you import your items to InventoryControl, you will
maintain them in that application. Vendors and Customers should be maintained in QuickBooks®, so if you
add new vendors or update existing customers, for example, you can re-import them to update
InventoryControl. After you import your inventory from QuickBooks® to InventoryControl, you should
continue to maintain your inventory in InventoryControl rather than QuickBooks®.
To Import Information from QuickBooks® to InventoryControl
Note: These steps should be performed after you have connected to your Wasp InventoryControl service
and have connected to your QuickBooks® Company file.
Upon successfully connecting to the QuickBooks® Connector, the Wasp Barcode QuickBooks® Sync
screen appears. Make sure the QB Import tab is showing.
25
Wasp Connector for QuickBooks User Manual
The top section allows you to select what type of information you want to import and, in the case of
Customers and Vendors, to limit that information using the Partial Import option. There are three types of
data you can import (click on a listing below to view detailed information about importing that type of data):
•
•
•
Items
Customers
Vendors
The bottom of the import tab is divided into two additional tabs:
Sync History - This tab displays a list of all syncs (including imports) performed. The Details window
displays information about a sync when that sync is highlighted in the upper window.
26
Wasp Connector for QuickBooks User Manual
Current Sync Progress - This tab displays information about a sync currently in progress.
Note: These two tabs are visible from the Import, Sync and Inventory Value tabs.
Importing Items to InventoryControl
When importing Items there are several things to keep in mind:
•
•
•
Importing Items only imports Inventory Parts, Non-Inventory Parts and Service Items. Be aware
that assembly items will NOT be imported.
Sales Tax items will be imported, but Group Sales Tax is not supported in InventoryControl.
Price level information is not imported from QuickBooks®. The only "price" information imported is
whether the item is taxable or non-taxable.
Note for Canadian Users: In the Canadian version of QuickBooks, you may have setup two different tax
codes for an item. Having two tax codes on the same item is not supported by InventoryControl.
The following topics are discussed in this section:
Before and After Import - Comparing Data in QuickBooks® and InventoryControl
How to Import Items
27
Wasp Connector for QuickBooks User Manual
Before and After Import - Comparing Data in QuickBooks® and InventoryControl
When you import your items from QuickBooks® to InventoryControl, you are transferring "ownership" of those
items to InventoryControl. The import process removes the items from QuickBooks® and moves them to
InventoryControl, where you will maintain and track them going forward. The items are replaced in
QuickBooks® with the Wasp Inventory placeholder which will appear on invoices and sales orders that are
synced back to QuickBooks® from InventoryControl. This is the placeholder you mapped accounts to when
you setup Wasp Connector for QuickBooks®.
Example:
Below is an example of an Item List in QuickBooks® prior to importing data to InventoryControl:
The Item List in InventoryControl will be empty at this point unless you have manually created items or
imported items from another source.
28
Wasp Connector for QuickBooks User Manual
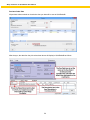
Here is the same QuickBooks® Item List after importing data. Notice that all items have been removed except
those that are not allowed to be included in the import to InventoryControl, such as Assembly Items, or are not
supported by InventoryControl, such as Group Sales Tax. The four non-inventory placeholders to which
you mapped accounts during the Wasp Connector setup process now appear in the Item List. These are
IC_Inventory, IC_Item, IC_Service and IC_Shipping.
Below is an example of the InventoryControl Item List after the import.
29
Wasp Connector for QuickBooks User Manual
Now let’s take a look at an individual item.
Here is an item in QuickBooks® prior to importing.
Here is how that item information appears in InventoryControl after being imported. Note that price level
information was not included in the import, but sales tax status (taxable or non-taxable) was. You can manually
add price information as needed for items, change cost methods, or do any needed editing on the items in
InventoryControl after importing them.
30
Wasp Connector for QuickBooks User Manual
How To Import Items
1. On the Import tab, Select the Items checkbox.
2. You will need to select a Cost Method for QuickBooks® items that are imported to InventoryControl.
You can only select one cost method for all items in the same import. Even if you utilize multiple cost
methods, you can only select one for all items in the import. If some items in the import use a
different cost method from the one selected, you must change the cost method in InventoryControl
immediately after the import (before any transactions are made on the items). Once transactions are
made on the items, you will not be able to change the cost method.
To select a cost method, select a method from the drop down list.
Cost Method options are:
•
Moving Average: When this method is used, the average cost of a particular item is
recalculated based on each purchase.
Example: You purchased 100 computers for $500 each. When you have 10 computers left
in stock, you purchase 100 more, but now your cost for the computers is $600 each.
InventoryControl will calculate the cost of this item as following:
Cost of original computers = 10 x 500 = $5,000
Cost of new computers = 100 x 600 = $60,000
The combined cost of all of the computers is $65,000
Average cost of all of this type of computer that you have in inventory (110 computers) is
65,000 / 110 = 590.91
•
FIFO - When this method is used, the inventory that is added first is removed first.
Example: If you added or received 50 Barcode Laser Scanners on the 1st, 8th and 15th, you
would end up with 150 scanners. If on the 17th you remove 60 scanners, all of the scanners
that came in on the 1st and 10 scanners from the 8th would be removed because the
scanners on the 1st were first in and, therefore, will be first out. Next to be removed would be
scanners from the 8th.
Keep in mind that their is no "Average Cost" valuation for FIFO. The Average Cost field on
the Item List screen will display the cost of the last item in. If you add 50 scanners at $300.00
31
Wasp Connector for QuickBooks User Manual
each on the 1st, and 50 scanners at $315.00 each on the 8th, the Average Cost field will
display $315.00. If you remove 50 scanners from your inventory, the Average Cost will
remain $315.00 since that was the cost of the last items in.
Inventory valuation is calculated by multiplying the quantity by the average price. The
inventory value on the 16th is $46,000 or 150 x $311.67. After 60 are removed the inventory
value is $28,550 or $317.23 x 90.
•
LIFO - When this method is used, the inventory that is added last (most recently) is removed
first.
Keep in mind that their is no "Average Cost" valuation for LIFO. The Average Cost field on
the Item List screen will display the cost of the most recent item still in inventory. If you add
50 scanners at $300.00 each on the 1st, and 50 scanners at $315.00 each on the 8th, the
Average Cost field will display $315.00. If you remove 50 scanners from your inventory, the
Average Cost will return to $300.00 because the most recently added items (the scanners at
$315.00) were removed.
3. After you have made your selection, click the Import button.
(Reminder: You can import more than one type of data at a time.)
32
Wasp Connector for QuickBooks User Manual
4. A warning screen will appear reminding you to backup your InventoryControl and QuickBooks®
databases before you begin the import process.
If you have not yet created backups for the databases, click Cancel on the Warning screen and
perform a backup of your InventoryControl database and your QuickBooks® database. If you have
already backed up your databases, click OK to proceed with the import.
5. The Sync Progress tab at the bottom of the Import tab will display the progress of the import.
33
Wasp Connector for QuickBooks User Manual
6. When the import is completed, a message will display in the Current Sync Progress tab.
The Sync History tab will display the date and time of the import as well as a summary of the data
imported.
You can now go to InventoryControl and view your new data.
If there are errors during the sync, they will appear in the sync progress. After the sync, you can go
through each error to correct the problem, then re-import the items. For more information on resolving
import errors, please refer to the topic Import Errors.
34
Wasp Connector for QuickBooks User Manual
Importing Customers to InventoryControl
You can choose to import all customers or select from a list of customers (only customers whose files have
been edited since 2000 will be imported/included on the selection list).
The topics discussed in this section are:
Before and After Import - Comparing Data in QuickBooks® and InventoryControl
How to Import Customers
Before and After Import - Comparing Data in QuickBooks® and InventoryControl
When customers are imported to InventoryControl, some of the data populates fields that have different
names than their QuickBooks® counterparts while others populate fields that have the same name.
•
The Customer Name in QuickBooks® is stored as Customer Number in InventoryControl.
•
•
Keep in mind that when you sync invoices from InventoryControl back to QuickBooks®, the
Customer Number in InventoryControl will be sent, instead of the Customer Name because
Customer Number in InventoryControl will match the Customer Name in QuickBooks®.
The customer Company Name in QuickBooks® is stored as Company Name in InventoryControl.
The Contact Name in QuickBooks® is stored as Customer Name in InventoryControl.
Examples of imported data:
Customer Name in QuickBooks® becomes Customer Number in InventoryControl:
35
Wasp Connector for QuickBooks User Manual
Company Name in QuickBooks® becomes Company Name in InventoryControl:
Contact Name in QuickBooks® becomes Name in InventoryControl:
In QuickBooks® you can create multiple jobs under the same customer. When this jobs data is imported into
InventoryControl, each job is brought over as a separate customer and the job name is joined to the customer
number.
Examples imported jobs data:
If Joe's Construction as two jobs - Room 1 and Room 2 - in QuickBooks®, it would be set up as follows:
Joe's Construction
Room 1
Room 2
In InventoryControl, each job would be a separate customer with the job name added to the customer name as
follows:
Joe's Construction Room 1
Joe's Construction Room 2
Be aware that you are limited to 30 characters for your customer names in InventoryControl so a joined
customer/job name may exceed this maximum. If this happens, you will receive an error message during the
import. You can edit the customer name or job name in QuickBooks® to make it fit the 30 character maximum,
then continue the import process.
36
Wasp Connector for QuickBooks User Manual
How to Import Customers
1. On the Import tab, select the Customer checkbox.
2. You have two options for importing customers:
•
Import All - Select this option to import all of your customers from QuickBooks®. Only those
customers who have had their file edited in QuickBooks® since 2000 will be included in the
import.
•
Partial Import - When this option is selected a list of customers in your QuickBooks® file
appears:
Note: This screen appears automatically when you select the Partial Import radio button. If
you want to return to this screen at a later time, press the icon next to this button.
37
Wasp Connector for QuickBooks User Manual
You can select all customers using the Select All button at the bottom of the screen, or scroll
through the list and select only those customers you wish to import. The list only displays
customer records that have been edited in some way since 2000.
Make your selections, then click OK on the Customers screen.
3.
On the Import tab, click the Import button.
4.
A warning screen will appear reminding you to backup your InventoryControl and QuickBooks®
databases before you begin the import process.
If you have not yet created backups for the databases, click Cancel on the Warning screen and perform a
backup of your InventoryControl database and your QuickBooks® database. If you have already backed up
your databases, click OK to proceed with the import.
5.
The Current Sync Progress tab at the bottom of the Import tab will display the progress of the import.
38
Wasp Connector for QuickBooks User Manual
6.
When the import is completed, a message will display in the Current Sync Progress tab.
39
Wasp Connector for QuickBooks User Manual
The Sync History tab will display the date and time of the import as well as a summary of the data imported.
You can now go to InventoryControl and view your new data.
If there are errors during the sync, they will appear in the sync progress. After the sync, you can go through each
error to correct the problem, then re-import the items. For more information on resolving import errors, please
refer to the topic Import Errors.
Importing Vendors to InventoryControl
You can choose to import all vendors or select from a list of vendors (only vendors whose files have been
edited since 2000 will be imported/included on the selection list).
Note: Vendors are referred to as Suppliers in InventoryControl. If you want to change the term Suppliers
to Vendors in InventoryControl, you can do so using the Customize Fields function. Please refer to the
Custom Names topic in the InventoryControl help for detailed instructions.
The topics discussed in this section are:
Before and After Import - Comparing Data in QuickBooks® and InventoryControl
How to Import Vendors
40
Wasp Connector for QuickBooks User Manual
Before and After Import - Comparing Data in QuickBooks® and InventoryControl
When vendors are imported to InventoryControl, some of the data populates fields that have different names
than their QuickBooks® counterparts while others populate fields that have the same name.
•
The Vendor Name in QuickBooks® is stored as Supplier Number in InventoryControl.
•
•
Keep in mind that when you sync invoices from InventoryControl back to QuickBooks®, the Supplier
Number in InventoryControl will be sent, instead of the Name because Supplier Number in
InventoryControl will match the Vendor Name in QuickBooks®.
The vendor Name in QuickBooks® is stored as Company Name in InventoryControl.
The Contact in QuickBooks® is stored as the Contact Name in InventoryControl.
Examples of imported data:
Vendor Name in QuickBooks® becomes Vendor Number in InventoryControl:
Name in QuickBooks® becomes Company Name in InventoryControl:
Contact in QuickBooks® becomes Contact Name in InventoryControl:
41
Wasp Connector for QuickBooks User Manual
How to Import Vendors
1. Select the Vendor checkbox on the Import tab.
2. You have two options for importing Vendors:
•
Import All - Select this option to import all vendors who have had their file edited in
QuickBooks® since 2000.
•
Partial Import - When this option is selected a list of vendors in your QuickBooks®
file appears:
Note: This screen appears automatically when you select the Partial Import radio
button. If you want to return to this screen at a later time, press the icon next to this
button.
42
Wasp Connector for QuickBooks User Manual
You can select all customers using the Select All button at the bottom of the screen, or scroll
through the list and select only those customers you wish to import. The list only displays
customer records that have been edited in some way since 2000.
Make your selections, then click OK on the Customers screen.
3.
On the Import tab, click the Import button.
4.
A warning screen will appear reminding you to backup your InventoryControl and QuickBooks®
databases before you begin the import process.
If you have not yet created backups for the databases, click Cancel on the Warning screen and
perform a backup of your InventoryControl database and your QuickBooks® database. If you have
already backed up your databases, click OK to proceed with the import.
43
Wasp Connector for QuickBooks User Manual
The Sync Progress tab at the bottom of the Import tab will display the progress of the import.
5.
When the import is completed, a message will display in the Current Sync Progress tab.
44
Wasp Connector for QuickBooks User Manual
The Sync History tab will display the date and time of the import as well as a summary of the data imported.
You can now go to InventoryControl and view your new data.
If there are errors during the sync, they will appear in the sync progress. After the sync, you can go through each
error to correct the problem, then re-import the items. For more information on resolving import errors, please
refer to the topic Import Errors.
45
Wasp Connector for QuickBooks User Manual
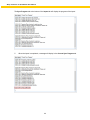
Import Errors
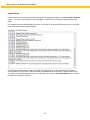
If Wasp Connector encounters errors while syncing data, a message will appear in the Current Sync Progress
screen. You can use the information in this message to correct the error in the data, then perform the sync
again.
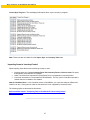
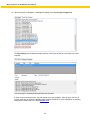
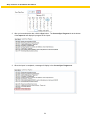
For example, the screen below displays two errors, one at the 10:10:43 AM mark and one at the 10:10:45 AM
mark, encountered when importing vendors.
This message indicates that the vendor name was too long to fit in the Vendor (Supplier) Number field in
InventoryControl. You will need to edit this vendor in QuickBooks®, then re-import it. Keep in mind that you
only want to re-import data that had errors, so in this case, you would use the Partial Import feature to select
just these two vendors to re-import.
46
Wasp Connector for QuickBooks User Manual
Chapter 4 - Syncing Purchase Orders/Pick Orders to
QuickBooks®
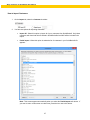
Syncing Purchase Orders/Pick Orders to QuickBooks®
After you receive inventory and mark a purchase order as closed in InventoryControl, it is ready to be synced
back to QuickBooks®.
Note: Before syncing purchase orders and pick orders, you should create a "dummy" vendor in QuickBooks®
for 0% sales tax. This will appear on the Sales Tax Liability and Sales Tax Summary reports.
Before and After Sync - Comparing Data in QuickBooks® and InventoryControl
How to Sync Purchase Orders/Pick Orders to QuickBooks®
Before and After Sync - Comparing Data in QuickBooks® and InventoryControl
Only purchase orders and pick orders that have been fully received/picked and marked as closed will
be imported to QuickBooks®.
Pick Order Data
All pick orders marked as closed since the sync date will be sent to QuickBooks®.
47
Wasp Connector for QuickBooks User Manual
After the sync, the data from the pick order shown above will display in QuickBooks® as follows:
Points to keep in mind:
•
The Item Code field in QuickBooks® displays the Wasp non-inventory item to which you mapped
accounts when setting up the Wasp Connector. This non-inventory item is the placeholder for the
items you imported to InventoryControl. You can change the text that appears here using the
Account Mapping screen if you do not like the default text (IC_Inventory, IC_Service, etc.).
If you do not want the Item Code field to appear on printed invoices, you can remove it from the invoice
template in QuickBooks®.
How to remove the Item Code field from printed invoices.
Note: These instructions were written for QuickBooks® 2012.
1. In QuickBooks®, navigate to Lists > Templates. The Templates list appears.
2. Double click on Invoices on the Templates List. The Basic Customization screen appears
displaying the Invoice template.
48
Wasp Connector for QuickBooks User Manual
3. On the Invoice template, click Additional Customization at the bottom of the screen.
4. On the Additional Customization screen, make sure the checkbox in Item > Print is
deselected.
•
The Due Date you select in InventoryControl will not sync back to QuickBooks®. The due date in
QuickBooks® is calculated by QuickBooks using the credit terms.
•
The Description field in QuickBooks® displays the Item Number and Item Description from
InventoryControl.
•
Tax information is sent from InventoryControl if the Sales Tax feature is turned on in QuickBooks®.
You can manually change the Tax information on the invoice in QuickBooks® as needed.
•
The Payment Method from InventoryControl (called Terms in QuickBooks®) is NOT synced back to
QuickBooks®. The Terms field on the Invoice in QuickBooks® does not reflect the payment method
selected on the Pick Order in InventoryControl.
49
Wasp Connector for QuickBooks User Manual
Purchase Order Data
All purchase orders marked as closed since the sync date will be sent to QuickBooks®.
After the sync, the data from the pick order shown above will display in QuickBooks® as follows:
50
Wasp Connector for QuickBooks User Manual
Points to keep in mind:
•
The Item Code field in QuickBooks® displays the Wasp non-inventory item to which you mapped
accounts when setting up the Wasp Connector. This non-inventory item is the placeholder for the
items you imported to InventoryControl. You can change the text that appears here using the
Account Mapping screen if you do not like the default text (IC_Inventory, IC_Service, etc.).
•
The Bill Due you select in InventoryControl will not sync back to QuickBooks®. The due date in
QuickBooks® is calculated by QuickBooks using the credit terms.
•
The Description field in QuickBooks® displays the Item Number and Item Description from
InventoryControl.
•
Tax information is sent from InventoryControl if the Sales Tax feature is turned on in QuickBooks®.
You can manually change the Tax information on the invoice in QuickBooks® as needed.
•
The Payment Method from InventoryControl (called Terms in QuickBooks®) is NOT synced back to
QuickBooks®. The Terms field on the Bill in QuickBooks® does not reflect the payment method
selected on the Purchase Order in InventoryControl.
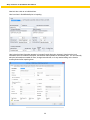
How to Sync Purchase Orders/Pick Orders to QuickBooks®
1. Make sure the Sync tab is displayed.
2. Enter the date in the Sync Data From field from which you want to start the sync. The default date
is the current date. All purchase orders and pick orders closed on or after this date will be included in
the sync. You can select the calendar icon to pick your date from a calendar.
51
Wasp Connector for QuickBooks User Manual
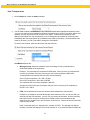
3. After you have selected a date, click the Sync button. The Current Sync Progress tab at the bottom
of the Import tab will display the progress of the import.
4. When the import is completed, a message will display in the Current Sync Progress tab.
52
Wasp Connector for QuickBooks User Manual
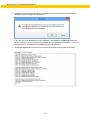
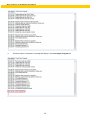
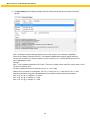
5. The Sync History tab will display the date and time of the import as well as a summary of the data
synced.
Note: The Wasp Connector will break each line item to the "eaches" unit of measure, regardless
of the unit of measure selected on the PO. This enables QuickBooks® to properly display track bys.
The line item is broken into "eaches" whether you use track bys or not. Cost will remain the same, but
will be displayed per "each".
Example:
Item 1 - Unit of Measure selected on PO is case. There are 5 eaches in each case.The cost per case is $120.
The item is tracked by LOT.
PO 0001 contains an order for 4 cases at a cost of - 4 * 120 = $480.
When the PO is received, it is marked as - LOT 10 = 2 cases, LOT 20 = 1 case and LOT 30 = 1 case.
When this information is synced to QuickBooks®, the information will be broken down as follows:
Item 1 LOT 10, qty 10, cost $24 * 10 = $240
Item 1 LOT 20, qty 5, cost $24 * 5 = $120
Item 1 LOT 30, qty 5, cost $24 * 5 = $120
53
Wasp Connector for QuickBooks User Manual
Chapter 5 - Inventory Value Tab
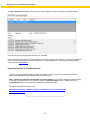
Inventory Value Tab
The Inventory Value tab allows you create periodic journal adjustments to sync the InventoryControl
inventory totals with the QuickBooks® inventory totals.
How to Adjust Inventory Value
1. Make sure the Inventory Value tab is open.
2. The current Wasp Inventory Total and the current QuickBooks® Inventory Total will appear on
this tab. The Journal Entry Amount defaults to the difference between the InventoryControl and
QuickBooks® values. You can accept the default or enter a different amount.
You can also accept the default Journal Memo or enter a new one by clicking in the Journal Memo
field.
3. When you have entered your values, click the Sync button.
4. The Sync Progress tab at the bottom of the screen will display the progress of the sync. When the
sync is completed, a message will display in the Current Sync Progress tab.
55
Wasp Connector for QuickBooks User Manual
5. The Sync History tab will display the date and time of the import as well as a summary of the data
synced.
56
Wasp Connector for QuickBooks User Manual
Index
A
Account Mapping ..................................................11
Adjust Totals .........................................................55
C
Company Name.............................................. 35, 40
Contact .................................................................35
Contact Name.......................................................40
Cost Method - Selecting ........................................27
Customer Import Examples ...................................35
Customer Name....................................................35
Customer Number ................................................35
D
Data Transfer Examples .......................................35
E
Errors - Import ......................................................46
Examples - Customer Import.................................35
I
Import - Customer Data Examples ........................35
Import - items........................................................27
Import Customers .................................................35
Import Errors.........................................................46
Import Suppliers....................................................40
Import Vendor .......................................................40
Importing Customers.............................................35
Importing Customers with multiple jobs .................35
Importing Items .....................................................27
J
Jobs - Importing Customers with multiple ............. 35
Journal Entry........................................................ 55
L
Line Item Description ........................................... 11
P
Pay Method.......................................................... 47
Pick Orders - Syncing .......................................... 47
Purchase Orders - Syncing .................................. 47
S
Settings Screen.................................................... 11
Supplier Import..................................................... 40
Supplier Name ..................................................... 40
Syncing................................................................ 47
Syncing Pick Orders............................................. 47
Syncing Purchase Orders..................................... 47
T
Tax Information - how it is synced ........................ 47
Terms field ........................................................... 47
U
Update Customer or Vendor During Sync ............. 11
V
Vendor Import ...................................................... 40
Vendor Name....................................................... 40
57