1
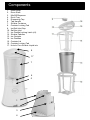
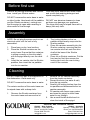
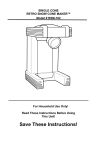
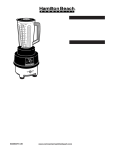
Operating Instructions
Slushie Maker
Item: GSDM200
General care and safety guide
Thank you for choosing this GOLDAIR Slushie Maker. This GOLDAIR appliance
has been designed and manufactured to high standards of engineering and with
proper use and care, as described in this leaflet, will give you years of useful
service. Please read these instructions carefully and keep them for future
reference.
ALWAYS
✔ Always ensure hands are dry before handling
the plug or the Slushie Maker.
✔ Always operate the Slushie Maker on a
secure, dry, level surface.
✔ Always allow adequate air space above and
on all sides for air circulation. Do not allow the
Slushie Maker to touch curtains, wall coverings,
clothing, dishtowels or other flammable
materials during use. Do not use under
cupboards or curtains.
✔ Always be sure to unplug from the socket
when not in use and before cleaning.
✔ Carry out regular checks of the supply cord
to ensure no damage is evident.
✔ Return the Slushie Maker after a malfunction,
or if it has been damaged in any manner, to an
authorised electrical service technician for
examination, repair or adjustment as special
purpose tools are required.
✔ Children should be supervised to ensure that
they do not play with the appliance.
✔ Avoid contact with moving parts. Keep
hands, hair, clothing, as well as spatulas and
other utensils away from the appliance’s moving
parts during operation to reduce the risk of
injury to persons and/or damage to the
appliance.
NEVER
✘ Never use this appliance outdoors.
✘ Never use this appliance for any purpose
other than its intended use. This appliance is
intended for household use only or in similar
applications such as:
•
Staff kitchen areas in shops, offices and
other working environments;
•
Farm houses
•
By clients in hotels, motels and other
residential type environments;
•
Bed and breakfast type environments
TECHNICAL SPECIFICATION
Item:
GSDM200
Power Supply:
240VAC 50Hz
Wattage:
25W
✘ This appliance is not intended for use by
persons (including children) with reduced
physical, sensory or mental capabilities or lack
of experience and knowledge, unless they are
supervised or have been given instruction
concerning the use of the Slushie Maker by a
person responsible for their safety.
✘ Never leave the appliance unattended when
in use.
✘ Never allow the power cord to overhang the
edge of a table or bench top or to touch any hot
surface.
✘ Never place this appliance on or near a hot
gas or electric burner or where it could touch a
heated oven or microwave oven.
✘ Never immerse the Slushie Maker cord set
and plug in water or any other liquid to protect
against electrical hazards.
✘ Never place the Slushie Maker in a
dishwasher.
✘ Never use harsh, abrasive or caustic
cleaners to clean this appliance.
✘ Never use metal scouring pads for cleaning.
Small metal pieces can come loose and cause
short-circuiting of electrical components, which
can cause electric shock or damage the
appliance
✘ Never operate the appliance with a damaged
cord or plug, after it malfunctions, or if it has
been damaged in any manner.
✘ The Slushie Maker is not intended to be
operated by means of an external timer or
separate remote-control system. The use of an
extension cord is not recommended.
✘ Do not use sharp objects or utensils inside
the slushie container or ice canister. Sharp
objects will scratch and damage the inside of
the slushie container. A rubber spatula or
wooden spoon may be used when the
appliance is unplugged and in the
OFF position.
Components
1.
2.
3.
4.
5.
6.
7.
8.
9.
10.
11.
12.
13.
14.
15.
16.
17.
Motor Base
Drive Shaft
Mix/Off/Dispense
Drink Tray
Dispensing Tap
Tap Handle
Slushie Container
Canister Locking Tab
Ice/Salt Inlet Cap
Salt/Ice Inlet
Ice Paddle Locking Latch (x3)
Slushie Paddles
Ice Canister
Ice Paddles
Canister Lid
Canister Locking Tab
Hole to Pour Slushie Liquid into
8
17
7
6
5
1
2
3
4
Before first use
Remove all packing materials and manual
from inside your Slushie maker.
Parts should be washed with warm water
and a mild dish washing detergent and
wiped completely dry. ‘
DO NOT immerse the motor base in water
or other liquids. Hand wash all the paddles
and the Slushie container), making sure
that the spigot is open when washing to
allow water to flow through.
DO NOT use abrasive cleaners to clean
as these may damage your appliance.
The drive shaft may be wiped clean with a
damp (Not wet) cloth.
Assembly
NOTE: Do not plug the power cord into an
electrical outlet until the unit is fully
assembled.
4.
5.
1.
2.
3.
Place base on dry, level surface.
Place the Slushie container on the
motor base. Ensure that the container
is sitting correctly on the drive shaft,
with the spigot directly over the drink
tray.
Insert the ice canister into the Slushie
paddles, then insert the ice paddles
into the ice canister
6.
The locking latches on the ice
paddles should easily snap onto the
Slushie paddles.
Place the canister assembly into the
Slushie container, ensuring that the
ice canister sits flush onto the drive
shaft at the base of the Slushie
container.
Place lid on Slushie container. Put the
front end on first, then secure the
locking latch onto the rear locking
notch of the canister
Cleaning
DO NOT wash any part of the appliance in
the dishwasher. Hand wash only.
2.
3.
DO NOT immerse the motor base in water.
4.
The exterior surface of the motor base can
be wiped clean with a damp cloth.
5.
1.
Remove the Slushie container from
the motor base and remove the lid.
6.
Remove the ice canister assembly
from the slushie container.
Discard the brine (ice water & salt)
from the ice canister.
Carefully lift locking latches from the
ice paddles and disassemble the ice
canister assembly.
Fill canister with warm soapy water
and open the spigot to allow clean
water to run through.
Use a small flexible bottle brush to
clean the inside of the spigot.
SUPPORT AND TECHNICAL ADVICE
Goldair – New Zealand
Monday – Friday 8am-5pm
Phone +64 (0)9 917 4000
Phone 0800 232 633
[email protected]
Goldair – Australia
Monday – Friday 8am-5pm
Phone +61 (0)3 9336 4423
Phone 1300 465 324
[email protected]
Operating your Slushie Maker
Your Slushie Maker jug holds up to 1.0L of
slushie mix.
The ingredients will decrease in volume
once the ice crystals have formed.
However to ensure that the brine (ice and
salt) used to make slushies, or the slushie
mixture is not contaminated, you must not
exceed 1.0L capacity in the slushie
container.
MAKING SLUSHIES
1.
2.
3.
4.
5.
6.
7.
Prepare your Slushie liquid (see
recipe ideas.)
Place 30ml liquid into bottom of ice
canister.
Place 1 layer of ice cubes into the ice
canister. Ice canister should be
approximately half full.
Add 2/3 of a cap (using ice/salt inlet
cap) of rock salt or coarse sea salt to
the ice cubes.
Repeat steps 3 and 4. Ice level
should be approximately 2.5cm below
the rim of the ice canister. This leaves
room to add more ice and salt if
required later. HINT: Regular square
ice cubes work best. NOTE: Ensure
that the spigot is in the closed
position to avoid spillage.
To start the unit, flip the
Mix/Off/Dispense switch up to “Mix”
position. The slushie and ice paddles
will begin to rotate. Slowly pour your
slushie mixture into the rear section of
the lid. The liquid will pour into the
Slushie container; you will see it
begin to rotate in the Slushie
container. CAUTION: Do not exceed
1.0L of liquid as indicated with a
MAX line on the Slushie container.
NOTE: Place a cup or glass on the
drink tray when the unit is running
in case of dripping.
Leave the unit on for approximately
10-15 minutes, depending on the
slushie mix used.
8.
Add more ice cubes and salt if
necessary. Add through ice/salt inlet
opening. Add slowly. DO NOT exceed
2.5cm below rim of ice canister. Unit
may jump and clunk if you add too
much salt.
CAUTION: DO NOT fill the ice canister
higher than 2.5cm from the top as there
is a risk that the slushie mixture will
become contaminated with salt.
IMPORTANT: DO NOT use the slushie
maker to freeze liquids without any
sugar (such as water) as this may
damage the appliance. Water will freeze
very quickly to the exterior of the ice
canister and could damage the unit.
DISPENSING SLUSHIES
1.
2.
3.
4.
5.
When peaks form, slushie mixture
has reached the best consistency. To
serve the slushie mixture, flip the
Mix/Off/Dispense switch to the lowest
position “Dispense.”
Turn the spigot handle clockwise to
pour position. Slushie mixture will
begin to pour out into glass.
Turn spigot counterclockwise to close
off.
To continue mixing, flip switch to
“Mix” position.
Switch to “Off” position when you
have finished using the Slushie
Maker.
If the lid should pop off while the
machine is mixing, turn the switch to
OFF. Use a wooden spatula to scrape
off any ice that may have formed on the
outside of the aluminium ice cylinder.
Carefully replace the lid. If ice is
allowed to build up it may damage the
motor or gear box. Low sugar levels in
your beverage can cause this. You can
now switch back to “Mix” and continue
mixing.
Hints
Smoothies can be made into slushies
however the chilling/freezing time should
be increased to achieve the creamy frozen
texture desired.
HOT DAYS – you may need to add ice and
salt more frequently. Add ice and salt when
the level gets to half way down ice
canister.
Carbonated drinks can be used to make
slushies such as cola, root beer, cream
soda, etc. NOTE: Carbonated diet / low
sugar drinks will not freeze.
HOT DAYS – you may need a higher ration
of salt to ice. Salt helps the ice stay frozen
for longer.
It is best to chill most mixtures in the fridge
or freezer for a few minutes before pouring
into the slushie container as this will speed
up the chilling/freezing process.
If creating alcoholic drinks such as piña
coladas or daiquiris, add the alcohol at the
end of the process (about 3 minutes before
end), as alcohol does not freeze. Adding
alcohol at the beginning this will alter the
results and mixture will not freeze well.
Slushie mixtures with higher sugar
content will reach desired consistency
more quickly than those with milk or
lower sugar content.
Fresh fruit drinks should be blended first to
achieve optimum results. In addition you
may need to add more sweetener as
natural fruit sugars lessen in taste when
frozen.
Always start with liquid mixtures.
Do not use stiff mixtures such as whipped
cream or frozen liquids.
Do not operate the unit longer than
required.
If after 40 minutes the mixture has not yet
achieved the slushie consistency or has
thawed again, do not continue.
DO NOT store slushies in fridge or freezer;
they should be consumed immediately.
POSSIBLE REASONS FOR MIX NOT
FREEZING
1.
2.
3.
4.
5.
The ice canister was not cold enough.
More ice and salt should have been
added.
The mixture was too warm.
Alcohol was added to the mixture too
early.
The mixture did not contain enough
sugar.
POSSIBLE REASONS FOR EXCESSIVE
NOISE & UNEVEN OPERATION
If your Slushie Maker jumps/clunks, it will
be for one of the following reasons:
1. Not enough liquid placed in ice
cansiser before ice
2. Too much salt added to ice so ice is
clumping together
3. Ice canister is not correctly locked in
4. Not enough slushie liquid has been
put into jug so it is freezing around
base of ice cansster
5. Not enough sugar in slushie mix so it
is freezing around ice cansiser
Recipes
NOTE: Reduce the running time for the
slushie maker when you reduce the
amount of liquids.
Each recipe below makes about 500ml.
They can make a maximum of 1.0L if
recipe is doubled, or 250ml if the recipe is
halved.
JUICY SLUSHIES
Fresh fruit drinks should be blended first to
achieve optimum results.
Tropical Fruit Cup
4 tbsp lemon juice pulp
4 tbsp pineapple juice
170ml grape juice
170ml lemon-lime soda
SMOOTHIE STYLE RECIPES
For all Smoothie recipes below, add all
ingredients into the slushie container and
allow the unit to run for approximately 20
minutes to achieve a slush-like smoothie.
Cappuccino Cooler
500ml chilled espresso Coffee
8-10 tbsp milk
Sugar (to taste)
Cinnamon sugar or chocolate to dust
This recipe requires more sugar than an
average coffee. You MUST include sugar
or the mixture freezes around the ice
canister too much and will cause the unit to
jump and clunk.
Peachy-Keen Smoothie
110ml peaches
250ml pineapple juice
4 tbsp lemon juice
Important: Mix ingredients in a blender
before placing in slushie container.
Mango Madness
170ml pureed mango
90ml white grape juice
4 tbsp trim milk
Important: Mix ingredients together in a
container or bowl before pouring into the
slushie container.
Old Fashioned Lemon Ice
285ml chilled water
4 tbsp fresh lemon juice
4 tsp sugar or desired amount
1/8 tsp lemon rind/peel
O.J.G. Slugger
340ml grape juice
110ml orange juice
Breakfast Zing
250ml grapefruit juice
4 tbsp lemon juice
4 tbsp apple juice
Mellowed Yellow
415ml lemon-lime sports drink
4 tbsp pineapple juice
Frozen Apple Cider
340ml apple cider
¼ tsp cinnamon
Sunny Frost Tea
300ml iced tea
4 tbsp lemonade
4 tbsp orange juice
4 tbsp grapefruit juice
NOTE: When preparing alcoholic drinks
better results are achieved when you add
the alcohol 3 minutes before dispensing.
Two year warranty
Thank you for purchasing this Goldair product. Your product is warranted against faults and manufacture
when used in normal domestic use for a period of two years. In non-domestic use Goldair limits the
voluntary warranty to three months.
Goldair undertake to repair or replace this product at no charge if found to be defective due to a
manufacturing fault during the warranty period.
This warranty excludes damage caused by misuse, neglect, shipping accident, incorrect installation, or
work carried out by anyone other than a qualified electrical service technician.
PLEASE KEEP YOUR RECEIPT AS THIS WILL HELP VERIFY YOUR WARRANTY.
The benefits given to you by this warranty are in addition to other rights and remedies available to you
under law in relation to the goods or services to which this warranty relates.
In Australia, our goods come with guarantees that cannot be excluded under the Australian Consumer
Law. You are entitled to a replacement or refund for a major failure and compensation for any other
reasonably foreseeable loss or damage. You are also entitled to have the goods repaired or replaced if the
goods fail to be of acceptable quality and the failure does not amount to a major failure.
In New Zealand this warranty is additional to the conditions and guarantees of the Consumers Guarantee
Act (1993).
Goldair – New Zealand
CDB Goldair
PO Box 100-707
N.S.M.C
Auckland
Phone +64 (0)9 917 4000
Phone 0800 232 633
www.goldair.co.nz
Goldair – Australia
CDB Goldair Australia Pty
PO Box 574
South Morang
Victoria, 3752
Phone +61 (0)3 9336 4423
Phone 1300 GOLDAIR (1300 465 324)
www.goldair.com.au
IMPORTANT: Please complete and retain this warranty card
Name ……………………………………………… Purchased from …………………………………
Address …………………………………………… Date of purchase …………………………………
………………………………………………………. Name of product …………………………………
Suburb …………………………………………… Model no ……………………………………………
Attach a copy of the purchase receipt to this warranty card
Due to continual design improvements, the product illustrated in this User Manual may differ slightly from the actual product.