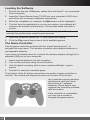
1
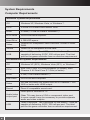
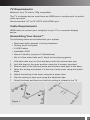
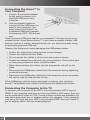
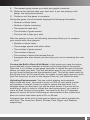
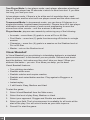
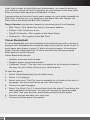
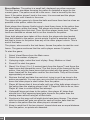
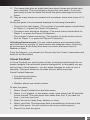
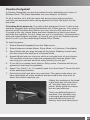
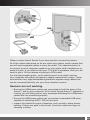
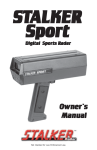
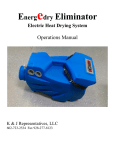
Visual Sports
Arena™
User Guide
2
Contents
Before You Begin................. 5
Warning............................ 5
Physical Activity............... 5
System Requirements..... 6
Computer
Requirements............... 6
Playing Visual Sports
Arena™............................. 15
The Main Menu ............. 15
Visual Games................. 15
Visual Destruction...... 16
Visual Soccer............. 16
TV Requirements......... 7
Visual Baseball........... 18
Cable Requirements.... 7
Visual Basketball........ 20
Assembling Your
Arena™............................ 7
Visual Bocce .............. 21
Positioning your
Arena™ ....................... 9
Visual Football............ 23
Zombie Dodgeball...... 25
Connecting the Arena™
to Your
Computer....................... 10
Troubleshooting................. 27
Connecting the
Computer to the TV........ 10
Sensors are not working..29
Loading the Software..... 12
The Game Controller..... 12
Cannot connect
Computer/TV to Arena... 27
Sensors are not
tracking your actions...... 30
Wireless controller
does not work................ 30
Alkaline Battery
Safety......................... 13
Customer Support............. 30
Setting up Your Play Area.. 13
Limited Warranty............... 31
Recommended Play
Space............................. 14
Software License
Agreement......................... 31
Clearing the Play Area... 14
Disposal of Batteries,
Electrical and Electronic
Equipment......................... 31
During Game Play......... 14
Footwear.................... 14
Ambient Lighting........ 15
Copyright........................... 33
3
4
Before You Begin
Warning
Please read this manual before using your Visual Sports Arena™. Retain all
documentation for future reference.
Also review the limited warranty at the end of this document.
DO NOT RETURN this device to the store from where it was
purchased. If you have any questions or concerns regarding product
installation, operation or warranty replacement, please contact www.
visualsportsarena.com.
This product is intended for users aged 14 and up. Parents need to
supervise young children to determine how the child interacts with the
gaming system and further assess the level of required supervision during
game play.
An adult or parent should review the safety information provided in this
guide, with children who will be using the system without adult supervision.
Physical Activity
Game play with the Visual Sports Arena™ requires varying amounts of
physical activity.
If you have pre-existing health conditions that affect your ability to safely
perform physical activities, consult your doctor before using the Arena™.
Additionally, if:
»» you are or may be pregnant,
»» you have heart, respiratory, back, joint, or other orthopedic conditions,
»» you have high blood pressure,
»» you have difficulty with physical exercise, or
»» you have been instructed to restrict physical activity.
then please consult your doctor before using the Visual Sports Arena™.
Do not play under the influence of drugs or alcohol.
Take breaks periodically. Stop and rest if your muscles, joints, or eyes
become tired or sore.
If you experience excessive fatigue, nausea, shortness of breath, chest
tightness, dizziness, discomfort, or pain, STOP USING THE SYSTEM
IMMEDIATELY and consult your doctor.
5
System Requirements
Computer Requirements
Minimum System Requirements
OS
Windows XP, Windows Vista, or Windows 7.
CPU
2.6GHz P4 or AMD AMD Athlon 3000.
RAM
512MB (1.5 GB for Vista & Windows 7).
DVD Drive
DVD-ROM drive required.
Hard Drive
4 GB HDD space.
Video
DirectX9.0c compatible video card with 128MB of video
RAM.
Sound
Direct X9.0c-compatible sound card.
USB
Three USB ports. Two USB ports for the Arena™ must be
capable of delivering 5VDC, 500 mA per port. The third
port for the game controller has no minimum requirement.
Recommended System Requirements
OS
Windows XP (SP3), Windows Vista (SP1), or Windows 7.
CPU
Intel Core 2 Duo 3.0 GHz processor (or better); AMD
Phenom II X2 Dual-Core 2.7 GHz (or better).
RAM
2 GB (3 GB Vista/Windows 7).
Disc Drive
DVD-ROM drive required.
Video
256 MB NVIDIA® GeForce® 8600 or ATI Radeon™ HD
2600 or better with HDMI output.
Sound
Direct X-compatible sound card.
HDMI port to connect to TV.
Audio/video
output port
USB
6
Older TVs may have a VGA or component video port.
In some cases it may be necessary to provide separate
audio and video outputs.
Three USB ports. Two USB ports for the Arena™ must be
capable of delivering 5VDC, 500 mA per port. The third
port for the game controller has no minimum requirement.
TV Requirements
Minimum: Any TV that is 720p compatible.
The TV or display device must have an HDMI port or another port for audio/
video input port.
Recommended: 42” to 54” HDTV with HDMI input.
Cable Requirements
HDMI cable to connect your computer to your TV or computer display
device.
Assembling Your Arena™
The following items are included with your system.
»» Steel base with cameras + locking hardware
»» Tenting and 4 tent poles
»» 2-USB Cables
»» Installation DVD
»» Game Controller (requires 2-AA batteries)
»» Set of 4 blue foam balls and 1 black tee for playing games.
1.
2.
3.
4.
Fold each side arm out from the base and fully extend each arm.
Lock the base in the open position using the 4 screws, provided.
Extend each of the four tent posts and connect each post to the base.
Open the tenting and attach it to the top of each post, using the elastic
loops.
5. Attach the tenting to the base using the 4 press-clips.
6. Clip the tenting to each post using the attached clips.
7. Orient the base and frame so that the netting is closest to the TV.
Figure 1
7
8
Positioning your Arena™
Once your Arena™ is assembled, position the Arena™ in front of your TV.
Please observe the following when positioning the Visual Sports Arena™:
The Arena™ should be centered, 2 to 3 feet (0.6 to 1.2 meters) in front
of your TV.
»» The Arena™ must be within
10 feet (3 meters) of your
computer in order to connect
the USB/power cables from
the Arena™ base to your
computer.
»» The Arena™ must be placed
on a flat, unobstructed
surface. Do not locate the
Arena™ over heating or air
vents.
»» The Arena™ and specifically
the sensors must be located
away from direct sunlight.
»» The Arena™ must be at least 6 inches (0.15 meters) from pot lights.
Consider locating the arena further than 6 inches (0.15 meters) from
any light sources with significant heat output as the fabric can be
damaged by heat. This could include sunlight through an unshaded
window.
DO NOT attempt to re-position the sensors on the Arena™ base. For
optimal performance, move the whole base as required.
Before use, ensure that you have a clear space to play. Completely clear
the area between you and the Arena™. Move any furniture, cables, loose
carpeting or any other obstacles that may pose a tripping hazard.
Stand 3 to 4 feet (1 to 1.2 meters) back from the Arena™ and begin your
game.
9
Connecting the Arena™ to
Your Computer
1. Connect the wireless adapter
for the game controller to a
standard USB port on the
computer.
2. Use the supplied cables to
connect the two USB ports on
base to your computer. You
must connect the Arena™ to
a standard USB ports capable
of delivering 5VDC, 500 mA per
port.
There are some USB ports that are non-compliant. This type of port is not
suitable for the Visual Sports Arena™. If you have a number of other USB
devices, such as a mouse, external drives, etc, you should consider using
an externally-powered USB hub.
Observe the following to avoid damaging the USB/power cables:
»» Protect the cables from being pinched or bent sharply.
»» Protect the cables from foot traffic
»» Do not expose the cables to direct heat and excess moisture.
»» Protect the cables from pets and very young children. Do not allow pets
or very young children to chew or bite the cable.
»» When disconnecting the cables, use the plug and do not pull on the
cable.
»» Disconnect the USB/power cables from the computer during lightening
or electrical storms.
»» Disconnect the USB/power cables from the computer when the system
will not be used for long periods of time.
If the USB/power cables become damaged in anyway, stop using the
Arena™ immediately and contact Visual Sports for replacement cables.
Connecting the Computer to the TV
To connect your computer to an HDTV, the most common HDTV input is
HDMI. If your graphics card does not have an HDMI or DVI output, then you
can try component video or VGA. If none of these options are available you
may need a converter box or adapter cables. For example, if your computer
only has a DVI jack and your HDTV only accepts HDMI, then you’ll need to
get an adapter cable. See the following figures.
10
For other options see the Troubleshooting section.
11
Loading the Software
1. Ensure that the two USB/power cables from the Arena™ are connected
to the computer.
2. Insert the Visual Sports Arena™ DVD into your computer’s DVD drive
and follow the on-screen installation instructions.
3. When the installation is complete, the Main menu will be displayed.
4. The first time the application is run on your system, the software will
measure the system’s performance. The process takes less than a
minute.
During this time your screen may flicker – this is expected. Do not
interrupt the performance measurement process.
5. Place the computer beside the TV and behind the netting.
6. Click the Play menu item to see a list of available games.
The Game Controller
Use the game controller provided with the Visual Sports Arena™ to
navigate the main menu. The wireless controller uses alkaline batteries or
rechargeable batteries.
If you have not already done so, connect the wireless adapter (dongle) to a
standard USB port on your computer.
1. Insert required batteries into the controller.
2. Turn on the controller using the on/off switch.
3. Use the digital or analog stick to move up/down/left/right in game
menus.
4. Press #1 to start your selected game.
The location of the #1 button varies from one model of game controller to
another. The number will always be shown on the face of the button.
Any controller can be used and
should work, with the Visual
Sports Arena™ software.
However, Visual Sports only
supports the controller provided
with the system.
If the controller is unavailable,
you can use a mouse to
navigate the game menus.
12
Alkaline Battery Safety
Improper use of batteries may result in battery fluid leakage, overheating,
or explosion.
There is a risk of fire you replace the batteries with the incorrect type.
Released battery fluid is corrosive and may be toxic. Battery fluid can cause
skin and eye burns, and is harmful if swallowed.
If a battery leaks, remove all batteries, taking care to keep the leaked fluid
from touching your skin or clothes. If fluid from the battery comes into
contact with your skin or clothes, flush skin with water immediately. Before
inserting new batteries, thoroughly clean the battery compartment with
a damp paper towel, or follow the battery manufacturer’s instructions for
cleanup.
»» To reduce the risk of injury observer the following:
»» Keep batteries out of reach of children.
»» Do not heat, open, puncture, mutilate, or dispose of batteries in fire.
»» Use only alkaline batteries.
»» Do not mix new and old batteries.
»» Remove the batteries if they are worn out or before storing your
controller for an extended period of time.
»» Dispose of batteries in accordance with local disposal regulations.
Before boarding any aircraft or packing the wireless controller in luggage
that will be checked, remove any batteries from the wireless controller. The
wireless controller can transmit radio frequency (RF) energy, much like a
cellular telephone, whenever batteries are installed.
Insert batteries according to the following instructions.
To insert batteries into the wireless controller battery pack:
1. Press the tab on the top of the battery pack and pull down to detach it
from the controller.
2. Insert two new batteries with their positive (+) and negative (–) ends
positioned as shown on the underside of the battery pack.
3. Slide the battery pack back into the controller and push in to lock.
To avoid pinching your fingers, you should push only on the flat surface
of the battery pack.
Setting up Your Play Area
The Arena™ sensors and software capture your movements and translate
your movements as you interact with your game. You need plenty of room
13
to enjoy your Arena™ gaming experience.
Required play space may vary with the type of game you are playing.
Configure your room to allow for the maximum required space.
Recommended Play Space
Single player: approximately 6 feet (1.8 m) in front of the netting and 6 feet
(1.8 m) across.
Two Players: approximately 6 feet (1.8 m) in front of the netting and 8 feet
(2.5 m) across.
Clearing the Play Area
Clear the area to ensure that players will not hit, run into or trip over other
players, bystanders, cords/cables and furniture. You must also be aware of
overhead obstacles such as light fixtures, ceiling fans and low ceilings.
Before setting up the Arena™, inspect your play area as follows:
»» Look in all directions, up, down, left, right, back and front for obstacles.
If possible stand in the intended play space and extend your arms in all
directions to accurately access the required play space.
»» With your arms extended, you should not contact walls, windows,
ceilings or doorways.
»» Your play area must be well away from any stairs!
»» Look for any loose items in the play area and remove them. This
includes toys, tables, chairs, area rugs, mats, etc.
»» Ideally the floor should be flat and level to avoid tripping.
»» The floor must also provide adequate traction so that you do not slip or
slide and fall.
During Game Play
When playing the games, be aware of where you are, relative to other
players and objects in the room. Also be aware of people, pets, etc that
may move into the play area. If necessary, pause your game and re-assess
the play area.
Footwear
»» Do not wear flip flops or other loose fitting footwear that may pose a
tripping or slipping hazard.
»» If playing on hardwood consider playing in bare feet, if appropriate.
»» If playing on tile floors, consider playing in proper gym shoes.
After the Arena™ is assembled; review your the play area once more to
remove any possible hazards, such as packaging.
14
Ambient Lighting
For optimum performance the sensors need to see you clearly. Direct
sunlight or any time of bright lighting may interfere with sensors’ ability to
see you.
Ensure that the play area is well lit, but avoid direct sunlight. If the there
are window surrounding the play area, close blinds or curtains for improved
sensor performance.
Playing Visual Sports Arena™
On your computer start Visual Sports Arena™ by double-clicking on the
desktop icon, “Visual Sports Arena” or you can select the application from
the start group (Start > All Programs > Visual Sports Arena > Play) to start
the software and open the Main menu.
The Main Menu
There are 6 options on this screen.
Play: Access all of the games by clicking on the Play option.
Trophy: All of the trophies that can be achieved are displayed here.
With the awarded trophies highlighted. Hover over any trophy to see a
description of the game and the achievement that needs to be completed to
earn the trophy!
Updates: Check here for current online updates. If Internet connectivity is
available, clicking this option allows the application to connect to the Visual
Sports Arena™ website and download updates. Click Go, in the upper
right-hand corner to connect and update your software.
A demo video and overview of the system are provided while the
application checks for updates.
Options: The options on this screen allow you to configure the video
settings. When the software is first installed, it checks your system and
sets the display resolution accordingly. If you would like to override the
recommended settings you may uncheck the “Use Recommended Settings”
box and adjust your quality settings.
Help: basic troubleshooting information is provided here.
Exit: Click this option to exit the application.
Visual Games
For all Visual games, use only the blue, foam sports equipment supplied
with the Visual Sports Arena™ – using standard, balls or other toys/
devices may damage the netting and your TV/computer.
15
Visual Destruction
In this game you need to destroy a city. Use the ball to hit the targets and
earn points.
1.
2.
3.
4.
Select Visual Destruction from the Main menu.
Select “Start Game”.
Select your city. Currently, one city is available for the Demo Version.
Select “Play”. Stand 3 to 4 feet (1 to 1.2 m) back from the Arena™ and
throw the ball.
5. Retrieve the ball and take your next shot. Continue until all of the
structures are destroyed.
Visual Soccer
In Visual Soccer you are attempting to score by kicking the ball past the
goalie. The goalkeeper reacts in real-time to try and save each shot.
Visual Soccer features:
»» True shooter vs. goaltender simulation
»» Realistic perspective of the goalie and the net
»» Realistic and varied goaltender reaction. 5 different goalies to play
against – including a Zombie goalie!
»» Instant replay
»» Two Modes of Play: Penalty Kick, in which you are one-on-one with the
goalie; Direct Kick – allows the opposing team to form a wall to block
your shot.
To start the game,
1. Select Visual Soccer from the Main menu,
2. Select the number of players. Select from 1 or 2 players or tournament
play.
3. Select the playing mode. For one and two players, you can select
penalty kick or direct kick. For tournament play, select the number of
players (4 or 8) and then the playing mode.
4. Select the level of play - Rookie, Pro, All-Star.
5. Select your field. The beach environment is available for all levels at the
start of the play. You will unlock levels as your skills improve.
6. Press #1 to start the game.
7. Stand 3 to 4 feet (1 to 1.2 meters) back from the Arena™ and center
the ball.
8. Kick the foam soccer ball at the goalie. You have 20 seconds to setup
and take your shot. Use only the foam soccer ball provided!
16
9. The instant replay shows your shot and goalie’s reaction.
10. Retrieve the ball and take your next shot. If you are playing multiplayer, the next player shoots.
11. Continue until the game is complete.
During the game, the scoreboard displays the following information:
»» Number of shots taken
»» Number of shots remaining
»» The speed of each shot
»» The number of goals scored
»» The time left to take your shot.
After the session is over, the following summary allows you to compare
your results with other players:
»» Number of shots taken
»» The average speed of all shots taken
»» The number of goals scored
»» The number of saves
»» The number of shots that missed the net
»» A progress bar also shows you how close you are to unlocking the next
level.
Curving the Ball in Direct Kick Mode: In this mode you have the option
to spin the ball. A spin indicator is shown in the lower right of the screen.
Press the 3 or 4 button on the game controller to adjust the spin of the ball
before you take your shot. This will add some spin to your shot and allow
you to curve the ball around the defenders’ wall. This will be most useful at
the All-star level. At Pro and All-star, the goalie is more agile and very quick
(just like the pros!) so aim for the edges of the net, just inside the bars.
Unlocking Environments: You can unlock playing environments
within each skill level. You need to score on 50% of your shots in each
environment, a total of 3 times in order to unlock the next level, For
example when you first start, you will be at the beach. If you are at the
rookie level, then in order to unlock the next environment, you need to
score at least 3 times on the goalie. You need to do this in 3 separate
games to unlock the level! Unlocking an environment at the rookie level
does not unlock that same level at Pro or All-star.
A progress bar at the end of each game shows your status towards the
next level. The levels are: Beach, Europe, Park, Egypt, and Stadium,
respectively.
17
Two-Player Mode: In two player mode, each player alternates shooting at
the net. Each player has 20 seconds in which to take their shot. If you take
too long, you lose your turn.
In two-player mode, if there is a tie at the end of regulation time, each
player is given another shot until one player scores and the other does not.
Tournament Mode: In tournament mode, you can have 4-8 players in a
single-elimination, bracket-based tournament. Players face off in two-player
elimination rounds with winner of each round progressing to meet the
winner from other rounds – until the a winner is declared.
Player Awards: players earn awards by achieving any of the following:
»» Accurate – score three (3) goals in a row at Pro or All-Star
»» Post Goals – score two (2) goals from bouncing off the bar in a single
session
»» Champion – score four (4) goals in a session on the Stadium level at
Pro or All-Star
»» Master – win on the Stadium level
Visual Baseball
In Visual Baseball you are pitching to intimidating batters in a simulated
game environment. In this session you are pitcher. Strikeout and brush
back the batters...but make sure they don’t take you deep! When you
strikeout the batter – you win. If he takes you deep, you’re done!
Visual Baseball features:
»» True pitching simulation
»» Realistic strike zone
»» Realistic catcher and umpire reaction
»» Realistic and varied batter reaction. Play against a Slugger or a
Zombie.
»» Instant replay
»» 3 skill levels: Easy, Medium and Hard
To start the game:
1.
2.
3.
4.
Select Visual Baseball from the Main menu,
Select the level of play Easy, Medium or Hard.
Select your opponent. Slugger and Zombie are available.
Select your field. The Lot environment is available for all levels at the
start of the play. You will unlock levels as your skills improve.
5. Press #1 to start the game.
18
6. Stand 3 to 4 feet (1 to 1.2 meters) back from the Arena™ and throw the
foam baseball. Use only the foam baseball provided with the game! The
Red Dot indicates the location of your last pitch.
7. The instant replay shows your pitch location over the plate..
8. Retrieve the ball and take your next pitch.
9. Continue until the game is complete. When you strike out three batters
you win!
During the game, the scoreboard displays the following information:
»» Speed of each pitch
»» The number of strikeouts (outs)
»» The count on the current batter (balls, strikes)
»» The score (runs scored against the current pitcher)
»» The number and location of men on base.
After the game is over, the following summary allows you to compare your
results to other players:
»» The number of pitches thrown
»» The number of pitches that were strikes
»» The number of strikeouts during the game
»» The number of hits during the game
»» The number of walks during the game
»» The number of runs scored during the game
Pitch Types: You have 5 different pitches that can be unlocked as your skill
increases.
»» Normal is available all the time at all levels.
»» Breaking Ball—is unlocked by achieving “Wild Thing”.
»» Curveball—is unlocked by achieving “Perfect”.
»» Slider—is unlocked by achieving “Playoff Contender”.
»» Fastball—is unlocked by achieving “Champion”.
Once the pitch has been unlocked, you can scroll through the available
pitches by pressing L1 or R1 on the controller or vertically using 3 and 4
buttons.
Varying your pitches is useful at the medium and hard levels and maybe the
only way to strikeout the experience batters.
Unlocking Environments: You can unlock playing environments within
each skill level. You need to strikeout batter once in each environment. For
example when you first start, you will be at the Lot. If you are at the easy
19
level, then in order to unlock the next environment, you need to strike out
your batter to unlock the level! Unlocking an environment at the Easy level
does not unlock that same level at Medium or Hard.
A progress bar at the end of each game shows you your status towards the
next level. From the Lot, you advance to the Base, then the Temple, the
Aztec Ruins and finally the Ball Park Stadium!
Player Awards: players earn awards by achieving any of the following:
»» Wild Thing—Hit a batter four times in the same session.
»» Perfect—Get 3 strikes in a row.
»» Playoff Contender—Win a game at the Aztec Ruins.
»» Champion— Win a game at the Ball Park
Visual Basketball
In Visual Basketball you shoot baskets at simulated hoops with a variety of
backgrounds. Basketball environments range from parks to street courts. In
each game each player is given 12 shots at varying angles. In two-player
mode, the first player takes his 12 shots and then the next player goes.
Each basket is worth 2-points.
Visual Basketball features:
»» Realistic hoop and back boards
»» Realistic player and crowd reaction
»» 5 different “courts”. The city court is available for all levels at the start of
the play. You will unlock levels as your skills improve.
To start the game,
1. Select Visual Basketball from the Main menu,
2. Select 1 or 2 players.
3. Select your court. The City court is available for all levels at the start of
the game. You will unlock levels as your skills improve.
4. Press #1 to start the game.
5. Stand 3 to 4 feet (1 to 1.2 meters) back from the Arena™ and throw the
foam basketball at the hoop. You have 20 seconds to setup and take
your shot. Use only the foam basketball provided with the game!
6. Retrieve the ball and take your next shot.
7. Continue until the game is complete.
20
During the game, the system’s scoreboard displays the following
information:
»» The number of shots taken
»» The number of shots remaining
»» The score, based on two-point for each basket
After the session is over, the following summary allows you to compare
your results with other players:
»» Number of baskets out of the total number of shots 10
»» The score, based on two-point for each basket
»» Your current ranking among all players
Unlocking Environments: You can unlock playing environments within
each skill level. You need to score at least 2, 3, 4, and 5 shots, 3 times, to
unlock levels 2, 3, 4, and 5, respectively.
For example when you first start, you will be at the city court. If you are at
the rookie level, then in order to unlock the next environment, you need to
score at least 2 baskets in three separate games to unlock the level!
A progress bar at the end of each game shows your status towards the next
level. From City Court, you advance to Abandoned Yard (2), then Space
Station (3), then the Driveway (4), and finally, the Stadium (5)!
Player Awards: players earn awards by achieving any of the following:
»» Hoops Pro—Score 3 baskets in a row.
»» Pro—Score 80% or more in a single session.
»» Backboard Expert—Score 40% or more by hitting the backboard in a
single session.
»» Swish Expert—Score 40% or more by hitting nothing but net in a single
session.
»» All-Star—Win in each of the 5 environments.
Visual Bocce
Visual Bocce simulates the ancient game. You can play against another
player or practice your skills.
Visual Bocce features:
»» True throwing simulation
»» Five different “venues”. The park is available for all levels at the start of
the play. You will unlock levels as you beat the computer
21
Bocce Basics: The palino is a small ball, displayed as yellow onscreen.
The first throw simulates throwing the palino to establish a target for the
current game. The palino must be in the zone – that is bound by the two
lines. If the palino doesn’t land in the zone, it is removed and the player
throws it again until it lands in the zone.
The object of the game is to throw the balls and have them land as close as
possible to the palino, within the zone.
Each player then throws 4 balls trying to land them closer to the palino than
the other player, within the frame. The player who threw the palino, starts
the game taking their first shot. Then the other player bowls next. The next
turns are decided on whose ball is not the closest to the palino.
Once both players have taken all four shots, the player who has landed
their ball closest to the palino, counts points. A point is awarded for each
ball that is closer to the palino than any of the other player’s shots. This is
end of the frame.
The player, who scored in the last frame, throws the palino to start the next
frame. The game continues like this until a player scores 14 points.
To start the game,
1.
2.
3.
4.
5.
Select Visual Bocce from the Main menu.
Select the number of players.
If playing single, select the level of play: Easy, Medium or Hard.
Press #1 to start the game.
Stand 3 to 4 feet (1 to 1.2 meters) back from the Arena™ and throw the
foam bocce ball toward the zone. The first throw of the frame will be the
palino. Use only the foam bocce ball provided with the game! Use the
same foam ball for the palino and for the shot balls. They will be shown
appropriately on-screen.
6. Retrieve the ball and take the next shot, trying to get it as close to the
palino as possible. You can also use your shot to move the palino or to
move the other player’s shot further from the palino.
7. Player #2 throws their 4 bocce balls until one of the balls stops closer to
the palino than the starting player’s ball. If Player #2 fails to do so, then
Player #1 tries to outdo his/her first attempt.
8. If player#2 does get close to the palino, then player #1 takes their
second turn if the opposing team gets closer to the palino than the
starting team without using all of their balls.
9. Continue in this way until all eight shots have been thrown. The player
with the closest ball gets one point for each of his/her balls that are
closer to the palino than the other player’s closest ball.
10. Keep in mind that if the two players’ closest shots are an equal distance
from the palino, no points are awarded.
22
11. The frame ends after all eight balls have been thrown and points have
been awarded. The scoring player begins the next frame. If no team
previously scored, the team that threw the palino last begins the next
frame.
12. Play as many frames as needed until one player has a total score of 14
points.
During the game, the scoreboard displays the following information:
»» The score for each player. (The number of rounded square colored blue
for Player 1, or green for Player 2/Computer).
»» The player who should be throwing. (The score frame colored blue for
Player 1, or green for Player 2/Computer).
»» The number of shots remaining. (The number of small circles colored
blue for Player 1, or green for Player 2/Computer).
Unlocking Environments: You can unlock playing environments within
each skill level by scoring 14 points before the computer does. Unlocking
an environment at the Easy level does not unlock that same level at
Medium or Hard.
From the Mansion, you advance to Resort, then the Coast, Underwater and
finally to the Mountains!
Visual Football
In Visual Football you are the place kicker, kicking the ball through the onscreen uprights in an authentic stadium background. In this game you are
kicking from a fixed distance – but the angle changes for each of your 5
attempts. Field goal distances increase as your ability improves.
Visual Football features:
»» True kicking simulation
»» Realistic end zone
»» Realistic player and crowd reaction
To start the game,
1. Select Visual Football from the Main menu.
2. Select 1 or 2 players. In two-player mode, each player has 20 seconds
to kick the ball. The next player then takes their turn. If you take too
long – you lose your turn.
3. Select the level of play Easy, Medium or Hard.
4. Select your field. The downtown field is available for all levels at the
start of the game. You will unlock levels as your skills improve.
5. Press #1 to start the game.
23
6. Stand 3 to 4 feet (1 to 1.2 meters) back from the Arena™ set the ball up
in the tee and kick towards the uprights. Use only the foam football and
tee provided with the game!
7. The instant replay shows your kick.
8. Retrieve the ball and take your next kick.
9. Continue until the game is complete. The game is completed after 5
field goal attempts.
During the game, the system’s scoreboard displays the following
information:
»» Speed of each kick/throw
»» The number of attempts/the number of attempts remaining
»» The number of field goals scored
»» The distance of the kick
»» The wind speed
After the game is over, the following summary allows you to compare your
results to other players:
»» The number of kicks/throws in the game
»» The number of field goals/completed passes
Unlocking Environments: You can unlock playing environments within
each skill level. You need to score 50% of your shots, a total of 3 times, in
order to unlock the next level.
For example when you first start, you will be at the downtown field. If you
are at the easy level, then in order to unlock the next environment, you
need to score 3 field goals in three separate games to unlock the level!
Unlocking an environment at the Easy level does not unlock that same level
at Medium or Hard.
A progress bar at the end of each game shows your status towards the next
level. From Downtown, you advance to the Aircraft Carrier, then the Wild
West, the Island and finally the Stadium!
Player Awards: players earn awards by achieving any of the following:
»» Kicker—Score 2 field goals in a row.
»» Pro Kicker—Score 3 or more in a single session at the Medium or Hard
level.
»» Post Master—Hit the post and deflect in, to score a field goal.
»» Champion—Score 3 or more in a single session at the Medium or Hard
level in the Stadium.
24
Zombie Dodgeball
In Zombie Dodgeball you are the zombie hunter, defending your town of
Reddow Rock. The foam baseballs are your weapon of choice.
To kill a zombie, hit it with the foam ball and continue killing zombies
until they are destroyed while racing against the clock. Be quick, but be
accurate!
Unlocking Environments: You start at the graveyard (Level 1) with a few
zombies, sluggish from pulling themselves out of their graves. You need to
destroy all the zombies here before you can move to the next level. Level
2 moves to the city, where there are more obstacles to block your shots
and hide the zombies. Level 3 takes you out to a cornfield – more places to
hide and faster/tougher zombies. In Level 4 you go to the Zombie carnival
and in Level 5 you are defending Reddow Rock Castle.
To start the game,
1. Select Zombie Dodgeball from the Main menu.
2. Select between Arcade Mode, Story Mode, or Continue (if Available).
3. Story Mode lets you play through all the levels. Beating a level here
will also unlock the said level in Arcade Mode.
4. Arcade Mode lets you test your skills on a single level of your choice.
The zombies come non-stop and progressively become faster. See
how long you can last and how many points you can get!
5. If you fail on a certain level while in Story mode, Continue will let you
proceed to that level immediately.
6. Stand 3 to 4 feet (1 to 1.2 meters) back from the Arena™ throw the ball
at the attacking zombies.
7. Retrieve the ball and take your next shot. The game ends when you
have eliminated all of the zombies and proceed to the next level or
when the zombie reaches you.
Hitting the zombies in the head
is the best way to finish them
off. You also earn you more
points. Body shots are easier,
but are less effective.
There are different types of
zombies. The zombies vary
in strength and accordingly
required different shots to
destroy them and earn points.
25
Green Zombies are the easiest to hit as they are
slowest moving targets. To destroy them you need:
»» 1 Head hit (200 points)
»» 2 Body hits (100 points)
Yellow zombies are faster and stronger than green
zombies. To destroy them you need:
»» 2 Head hits (300 points)
»» 3 Body hits (200 points)
Red Zombies are the fastest and strongest zombies.
To destroy them you need:
»» 3 Head hits (500 points)
»» Body hits have no effect
King Zombie can summon other zombies.To destroy
them you need:
»» 5 Head hits (1000 points)
»» 10 Body hits (500 points)
During the game boxes will appear on the playing field. You need to hit
these boxes to get the various powerballs!
Ice
Mystery
26
This ball freezes a
zombie for a short
time, slowing his
progress. No damage
is inflicted and no
points are awarded.
This ball changes the
type of zombie that
you hit. No damage is
inflicted and no points
are awarded.
This ball destroys
any zombie on
contact.
Fire
This ball destroys
all the zombies
that are close to
the explosion.
Explosion
During the game, the scoreboard displays the following information:
»» The number of zombies remaining!
»» Your score
»» The elapsed time
»» Your ball type
After the game is over, the summary screen displays the following
information:
»»
»»
»»
»»
The final score.
The number of head and body hits.
The total number of zombies down!
Throwing percentage (number of throws vs number of zombies down).
Troubleshooting
Cannot connect Computer/TV to Arena
If your TV does not support HDMI, then you will need to determine what
kinds of audio/video outputs your computer has and what inputs your
TV has. The most common video inputs on a standard-definition TV are
composite, S-video and component video.
On computers, the most common video output is S-video. On a desktop
PC, you may find the 9-pin S-video jack on your graphics card next to
where you connect your monitor.
Some laptops also have S-video-out jacks, but most have 15-pin VGA jacks
for connecting external monitors. Generally, it is easy to find adapters and
cables that have VGA connectors on one end and S-video connectors on
the other.
Even if you have an old TV that only accepts coaxial video cable (the onepin variety mostly used for cable TV and satellite connections), you can
use something called an RF converter box that can convert S-video or VGA
input into coaxial output. See the following figures for connection details:
»» The first figure illustrates the required connections for S-video from the
computer to the TV.
»» The second figure illustrates the required connections for component
video from the computer to the TV.
»» The last figure figure illustrates the required connections for a VGA
connection from the computer to the TV.
27
28
Please contact Visual Sports if you have specific connectivity issues.
All of the cables discussed so far are video-only cables, which means that
you will need separate cables to carry the audio. The easiest solution is
to connect a set of computer speakers to your audio card’s headphone or
audio-out jack. If you want to use your TV’s built-in speakers, then you will
need to get a 1/8-inch stereo mini-plug-to-RCA cable.
For the best possible audio, you’ll need to invest in an audio card for
your computer with either an optical or digital coaxial audio output. These
connections carry high-bandwidth digital audio signals using cables that
can be connected directly into your home theater receiver.
Sensors are not working.
»» Ensure the USB/power cables are connected to both the base of the
Arena™ and to your computer. If the Visual Sports Arena™ software is
running you will likely see an error message indicating the USB/power
cables are not connected properly.
»» Ensure the USB/power cables are connected to standard USB ports,
capable of delivering 5VDC, 500 mA per port.
»» Inspect the cables for signs of damage, such as kinks, sharp bends,
twisting. If there are pets in the house, check the cables for signs of
chewing or biting.
29
»» Ensure the Visual Sports Arena™ software is running on the computer
that is connected to the Visual Sports Arena™.
Sensors are not tracking your actions
»» Ensure the sensors and tent are not exposed to direct sunlight.
»» Ensure there are no obstacles sitting on or near the sensors.
»» Ensure there is adequate ambient light. If it the room is too dark, the
sensors may not be able to track your movements.
»» You are standing too close or too far away from the Arena™. The
sensors are setup for players standing 3 to 4 feet (1 to 1.2 meters) from
the Arena™. Do not stand inside the tent.
Wireless controller does not work
Turn on the wireless controller by pressing the power button. If the
controller does not connect to the wireless adapter, try the following:
»» Move the controller closer to the console.
»» Make sure the batteries are fresh.
»» Make sure the batteries are oriented correctly in the battery pack. Insert
the batteries as shown on the underside of the battery pack.
»» Ensure there are no large metal objects, between the controller and
the wireless adapter. This includes items such as: file cabinets and
refrigerators.
»» Make sure there are no metallic decorations or stickers on the controller
or computer can interfere with wireless controller performance. Remove
decorations or stickers and try connecting.
»» Make sure the front of the console is positioned in the direction of the
controller and away from nearby walls.
»» Cordless phones (2.4 GHz), wireless LANs, wireless video transmitters,
microwave ovens, some mobile/cell phones, and Bluetooth headsets
can interfere with the operation of the controller. Turn these off or
unplug them and retry connecting.
Customer Support
For answers to questions about installation, configuration, troubleshooting
and game play, please contact us at:
329A Millway Avenue
Concord, Ontario,
Canada
L4K 4T3
30
www.visualsportssys.com/support
Limited Warranty
DO NOT RETURN this device to the store from where it was purchased.
If you are having trouble with installation or setup of the Visual Sports
Arena™, please visit: www.visualsportsarena.com
Software License Agreement
Visual Sports reserves all title, ownership and other intellectual property
interest in the Software included with the Visual Sports Arena™ but grants
Customer a personal, revocable, non-exclusive, non-transferable, nonsublicensable license to use (a) the Software; (b) the trademarks and (c)
the documentation, in each case, only with the Equipment supplied and
for no other purpose. Customer agrees that they shall not (a) reverse
engineer, decompile or disassemble the Software or otherwise modify the
Software; (b) use any of the trademarks except as specified in writing by
Visual Sports; (c) make copies of, or otherwise distribute, the Software or
Documentation other than as specified herein.
Disposal of Batteries, Electrical and Electronic
Equipment
Do not dispose batteries as household waste. It is your responsibility to
dispose of the batteries and waste electronic equipment at an approved
collection point for the recycling of the specific type of material. When
disposing of batteries, observe the following:
»» Do not dispose of batteries in a fire as they may explode.
»» Batteries may also explode if damaged.
»» Do not dismantle, open or shred batteries. In the event of a battery
leak, do not allow the liquid to come in contact with the skin or eyes.
»» In the event of leak or a hazard seek medical help immediately.
Dispose of batteries according to local regulations and recycle when
possible. For more information about where to drop off your batteries
and waste electrical and electronic equipment, contact your local city/
municipality or the retail shop where you purchased this product.
31
Copyright
The information in this document, including the URL and the website
references is subject to change without notice.
Visual Sports Systems, Visual Sports Arena™ and/or other products
referenced herein are trademarks of Visual Sports Systems. The names of
actual companies and products mentioned herein may be the trademarks of
their respective owners. The example companies, organizations, products,
people and events depicted herein are fictitious. No association with any
real company, organization, product, person, or event is intended or should
be inferred. Any rights not expressly granted herein are reserved.
Copyright © 2011 All rights reserved
33