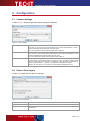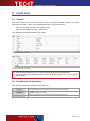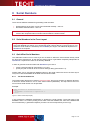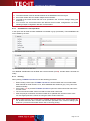
1
TFORMer QuickPrint Instant Form & Label Printing V ers io n 7 .0 User Manual 15 F eb ru ar y 2 0 12 T EC- IT Da te n v er arb e it un g G m bH Ha ns -W agner - Str as s e 6 A- 44 0 0 S te yr , A us t ri a t + + 43 ( 0)7 2 52 72 7 20 f + + 43 ( 0)7 2 52 72 7 20 77 of f ic e @ tec - i t.c om ww w. tec - i t.c om Q ui ck P ri nt Us e r M an ual 1 1 Content Content Table of Figures 2 2 2 Disclaimer 3 3 3.1 3.2 3.3 3.4 Introduction What is TFORMer QuickPrint? How to run TFORMer QuickPrint? System Requirements About this Document 4 4 4 4 4 4.1 4.2 4.3 4.4 4.5 General User Interface Working with TFORMer QuickPrint Configuration Files Print Mode Storing the most recent Print Data 5 5 5 6 6 6 5.1 5.2 5.3 Configuration Common Settings Select a Form Layout Output Configuration 7 7 7 8 6.1 6.2 Input Area General Functions for the Input Area 9 9 9 7.1 Print Form General 1.1 4 5 6 7 8 Serial Numbers 8.1 General 8.2 Serial Numbers in the Form Layout 8.3 QuickPrint Serial Numbers 8.3.1 The Serial Number File 8.3.2 Visualization in the Input Area 8.3.3 Printing 8.3.3.1 Changed Serial Numbers 8.3.3.2 Simultaneous Printing 9 9.1 9.2 9.3 Contact and Support Information Free Support How to Unlock the Demo Version Company Contact Information 10 10 11 11 11 11 11 12 12 13 13 14 14 14 14 1.1 Table of Figures Figure 1: User Interface 5 Figure 2: Common Settings 7 Figure 3: Form Layout Selection 7 Figure 4: Output Configuration 8 Figure 5: Input Area – Form View 9 Figure 6: Input Area – Table View 9 Figure 7: Serial number file (Example) 11 Figure 8: Serial Numbers in the Form View 12 Figure 9: Serial Numbers in the Table View 12 Figure 10: Print dialog – changed serial numbers 13 Figure 11: Print dialog– simultaneous printing 13 Page 2 of 14 Q ui ck P ri nt Us e r M an ual 2 Disclaimer The actual version of this product (document) is available as is. TEC-IT declines all warranties which go beyond applicable rights. The licensee (or reader) bears all risks that might take place during the use of the system (the documentation). TEC-IT and its contractual partners cannot be penalized for direct and indirect damages or losses (this includes non-restrictive, damages through loss of revenues, constriction in the exercise of business, loss of business information or any kind of commercial loss), which is caused by use or inability to use the product (documentation), although the possibility of such damage was pointed out by TEC-IT. We reserve all rights to this document and the information contained therein. Reproduction, use or disclosure to third parties without express authority is strictly forbidden. Für dieses Dokument und den darin dargestellten Gegenstand behalten wir uns alle Rechte vor. Vervielfältigung, Bekanntgabe an Dritte oder Verwendung außerhalb des vereinbarten Zweckes sind nicht gestattet. © 1998-2012 TEC-IT Datenverarbeitung GmbH Hans-Wagner-Str. 6 A-4400 Austria t.: +43 (0)7252 72720 f.: +43 (0)7252 72720 77 http://www.tec-it.com Page 3 of 14 Q ui ck P ri nt Us e r M an ual 3 Introduction 3.1 What is TFORMer QuickPrint? TFORMer QuickPrint is a tool for quickly printing labels, reports and forms. It is shipped together with the form layout designer TFORMer Designer. The tool QuickPrint allows you to load existing layouts, fill them with data and print them on one of the supported output devices (or export them to one of the supported file formats). 3.2 How to run TFORMer QuickPrint? ® In order to start TFORMer QuickPrint use the Windows Start Menu: Start ►All Programs ►TEC-IT TFORMer 7.0 ►Tools ►Printing Tool QuickPrint 3.3 System Requirements ► Windows 2000 or higher. ► TFORMer QuickPrint requires the .NET 2.0 runtime components! 3.4 About this Document This document covers the following issues: User interface and workflow – see chapter 4. Select the form layout and the output type – see chapter 5. Provide the print data – see chapter 6. Start the print job – see chapter 7. Additional information on the use of serial numbers – see chapter 8. Page 4 of 14 Q ui ck P ri nt Us e r M an ual 4 General 4.1 User Interface Figure 1: User Interface The user interface contains the following sections: Common settings. See section 5.1. Form layout selection. See section 5.2. Output configuration. See section 5.3. Input area (and related functions ). See chapter 6. Print. See chapter 7. Menu. Preview of the form. 4.2 Working with TFORMer QuickPrint After starting the tool QuickPrint, first you have to configure some settings (see also chapter 5). Use the buttons to to adjust the common settings, to select the desired layout and to select the output type (file or printer). – Instead of the buttons you can also use the Configuration menu. Next enter the print data in the input area (see chapter 6). Finally start printing with button (see chapter 7). Page 5 of 14 Q ui ck P ri nt Us e r M an ual 4.3 Configuration Files TFORMer QuickPrint supports the loading and saving of configuration files. This gives you the possibility to change the layout, the output medium, an optional serial number file and an optional user data file with a few mouse-clicks. Configuration files use the extension .qpi and are saved in XML format. They contain the settings from to . ► When starting TFORMer QuickPrint the most recently saved settings are loaded automatically. You can continue with the data input and with the printing of the last form layout immediately. ► To load a specific configuration file use the menu File ► Open..., double-click the .qpi file or pass the .qpi file as a command line parameter to TFORMer QuickPrint. You can manage different configurations via the File menu: New Creates a new configuration. All settings are reset to default. Open… Loads an existing configuration. The last used printing data is displayed in the input area. Save / Save as… Saves the current configuration. The filename can be assigned freely. 4.4 Print Mode When you are done with the configuration you have the possibility to switch to the so called “Print Mode” (use the menu Configuration ► Printmode). In this mode all configuration dialogs are locked. You can only change the print data and start a print-job. The current mode (configuration mode or print mode) is stored in the configuration file. – In order to prevent the user from changing the configuration, the configuration file should be marked as readonly. 4.5 Storing the most recent Print Data By default TFORMer QuickPrint automatically stores the most recently used print data (see section 5.2, checkbox “Save data automatically after printing”). This data is restored in the input area whenever a configuration file is opened respectively when QuickPrint is started. For automatically saving the last printed record (and for manually saving the current record by clicking the button Save Data) QuickPrint internally creates one XML file per layout. This file is named <layout file name> + “_QP.xml” and it is stored in the “Data Directory” (see section 5.1). It holds the data for one record. For multiple customers you might probably want to use more than one data file for one layout. Thus the last printed data will be available for each single customer. In order to achieve this we recommend to create multiple configuration files. Then for each configuration file specify a separate data file (see section 5.2). Page 6 of 14 Q ui ck P ri nt Us e r M an ual 5 Configuration 5.1 Common Settings Via the Common button the general program settings are adjusted: Figure 2: Common Settings Username An arbitrary username. This name is only required when the QuickPrint serial number implementation is used instead of embedding the serial number in the form layout! For more information on serial numbers, please refer to chapter 8. Serials Directory The directory for the serial number file “QuickPrint.XML”. This directory is only required when the QuickPrint serial number implementation is used instead of embedding the serial number in the form layout! For more information on serial numbers, please refer to chapter 8. Data Directory The directory for storing the last printed data. In this directory, the last printed data for the layout is stored. This data is loaded together with the corresponding form layout and it is displayed in the input area. The data files are named <layout file name> + “_QP.xml”. For projects new subfolders are created. Please note: This directory is only used if no specific data file is adjusted (see 5.2). 5.2 Select a Form Layout Via the Form button the form layout is selected: Figure 3: Form Layout Selection Repository Select a repository (*.tfr) or stand-alone form layout (*.tff). Project If a repository was selected use this combo-box to select the project inside the repository. Form If a repository was selected use this combo-box to select the form layout inside the project in the repository. Page 7 of 14 Q ui ck P ri nt Us e r M an ual Save data automatically after printing Use this checkbox to automatically save the entered data after printing. If enabled, QuickPrint will show the last printed data in the input area each time a form is re-opened. By default the data will be stored in the Data Directory (see section 5.1). However, you can also specify a specific Data-File (see below). Use a specific Data-File Using this property you can force QuickPrint to use a specific file name and location for the data file (which stores the last used data) instead of the default name and location. Please note: The specified file name does not have to exist yet. You can also create a new file by typing a new file name. 5.3 Output Configuration Via the Output button the output format is selected: Figure 4: Output Configuration Type Select the output format. You can choose one of the following output types: Printer – output to a printer. PDF – output to a PDF file. PostScript® File – output to a PostScript file. PostScript® Printer – output to a PostScript printer. HTML – output to a HTML file. Text – output to a text file. BMP Image – output to a BMP image file. GIF Image – output to a GIF image file. JPG Image – output to a JPG image file. PCX Image – output to a PCX image file. PNG Image – output to a PNG image file. TGA Image – output to a TGA image file. TIF Image – output to a TIF image file. Multi-Page TIF – output to a TIF image with multiple pages. Zebra File – ZPL-II output to a file. Zebra Printer – ZPL-II output to a Zebra printer. File Output file or printer. Depending on the output type, select the output file name (including the file extension) or the printer. Page 8 of 14 Q ui ck P ri nt Us e r M an ual 6 Input Area 6.1 General After a form layout was selected (see section 5.2) the input area is enabled. This area is used for editing the print data. To type in the required field values you can either use the form view (for single records) – see Figure 5 or the table view (for multiple records) – see Figure 6. Use checkbox to switch between the two styles. Figure 5: Input Area – Form View Figure 6: Input Area – Table View ► Only the table view allows you to create and edit multiple records simultaneously. ► To insert a new record edit the record in the last row and press the return key. A new row will be added. 6.2 Functions for the Input Area The following functions are available for the input area: Saves the data from the current record in the data file. So it will be available when re-opening the configuration for the next time (even if the form layout was not printed). Fills each datafield with its default value (as specified in the datafield definitions in the TFORMer Designer form layout). Clears all fields in the form view respectively all records in the table view. Page 9 of 14 Q ui ck P ri nt Us e r M an ual 7 Print Form 7.1 General When pressing the Print button (see Figure 1, ) the output will be created according to the specified output settings (see Chapter 5.3). File: After the successful creation of the file it is automatically opened with the associated ® Windows application (e.g. PDF with Acrobat Reader). Printer: No further confirmation is displayed. Page 10 of 14 Q ui ck P ri nt Us e r M an ual 8 Serial Numbers 8.1 General There are two different methods for generating serial numbers: Serial Numbers in the Form Layout (recommended method) – see 8.2! QuickPrint Serial Numbers – see 8.3! ► Please note: Using serial numbers (both methods) also works with multiple users. TFORMer ensures the unique allocation of serial numbers within the whole network. 8.2 Serial Numbers in the Form Layout For generating serial numbers TFORMer Designer provides a specific datafield type “Serial”. Using this datafield type allows you to embed the serial numbers directly in the form layout. This means the serial number is handled by the TFORMer print engine. No additional adjustments in QuickPrint are required. 8.3 QuickPrint Serial Numbers This alternative method can be used if you do not want to define the serial number directly inside the form layout (see above). In this case the serial number is generated completely independent in QuickPrint. It replaces the value of an arbitrary datafield. In order to generate a serial number with QuickPrint you have to create a serial number file (see section 8.3.1) and specify the path to this file in the Common Settings dialog (see section 5.1). Please make sure to use identical datafield names in the serial number file and in the form layout. Only in this case the datafield will be filled with the serial number. 8.3.1 The Serial Number File The serial number file has to be named “QuickPrint.XML” and can be saved in an arbitrary directory. It stores the actual values for one or more serial numbers (datafields). The step size for the increment of each serial number can be specified. Example: <?xml version="1.0" standalone="yes"?> <root> <ItemNumber current="1017" stepSize="1" /> </root> Figure 7: Serial number file (Example) In this example the datafield “ItemNumber” is treated as a serial number. The actual value of the datafield is set to 1017. When printing a form which uses this datafield, the value of the datafield will be incremented by 1 (parameter stepSize) for each new record respectively record copy. Page 11 of 14 Q ui ck P ri nt Us e r M an ual Please note: ► The serial number must be named identical as the datafield in the form layout. ► One serial number file can contain multiple serial numbers. ► The path to the serial number file has to be specified in the Common Settings dialog (see section 5.1). ► You can also use several directories with different serial number configurations. For better handling multiple configuration files are recommended. 8.3.2 Visualization in the Input Area In the input area all serial number datafields are shaded in gray (see below). These datafields cannot be edited by the user. Figure 8: Serial Numbers in the Form View Figure 9: Serial Numbers in the Table View The datafield “ItemNumber“ will be filled with a serial number (see ). All other data is entered manually. 8.3.3 Printing When printing TFORMer QuickPrint uses the following procedure: 1. When loading a form layout TFORMer QuickPrint checks whether the form contains datafields marked as serial numbers. If so, these datafields are shaded in gray. They cannot be altered manually. 2. If the button Print is pressed TFORMer QuickPrint opens the serial number file and locks it for other users. 3. The current serial number values are read from the serial number file. 4. After the print-job is finished, the serial number file is updated and unlocked. Other users can now again print forms, which are using the same serial number file. ► During each print job, the current user is granted exclusive access to the serial number file. For all other users the file is locked. The username specified in the common settings (see section 5.1) serves as information which user is currently printing. Page 12 of 14 Q ui ck P ri nt Us e r M an ual 8.3.3.1 Changed Serial Numbers If the serial number has changed while editing the print data (because another user has printed the same form in the meantime), you will get the following message: Figure 10: Print dialog – changed serial numbers You can react on the changed counter state as follows: OK: The used serial numbers will be updated and printed. Cancel: The used serial numbers will be updated and the printing is aborted. 8.3.3.2 Simultaneous Printing If you try to print a form containing serial numbers which is already being printed by another user, you will get the following message: Figure 11: Print dialog– simultaneous printing Solution: Wait a few moments and then start the print job again. ► If you cannot print for a considerable time, check whether the print job which causes the lock is still active. If not, delete the lock file “QuickPrint.lck”. You can find this file in the same directory as the file “QuickPrint.XML” (see also section 5.1). Page 13 of 14 Q ui ck P ri nt Us e r M an ual 9 Contact and Support Information 9.1 Free Support If you have any questions, please contact us: Email: Web: [email protected] http://www.tec-it.com/support/ Don’t hesitate to tell us your feedback! If the product does not fulfill your requirements, please tell us why. We are highly interested in meeting the requirements of our customers. 9.2 How to Unlock the Demo Version You can unlock the demo version with a license key. License keys can be obtained from TEC-IT by Email, online order form or FAX. Email: [email protected] Online: http://www.tec-it.com/order/ Fax: +43 / (0)7252 / 72 72 0 – 77 9.3 Company Contact Information TEC-IT Datenverarbeitung GmbH Address: Phone: Fax: Email: Web: Hans-Wagner-Strasse 6 AT-4400 Steyr Austria/Europe +43 / (0)7252 / 72 72 0 +43 / (0)7252 / 72 72 0 – 77 [email protected] http://www.tec-it.com AIX is a registered trademark of IBM Corporation. HTML, DHTML, XML, XHTML are trademarks or registered trademarks of W3C, World Wide Web Consortium, Laboratory for Computer Science NE43-358, Massachusetts Institute of Technology, 545 Technology Square, Cambridge, MA 02139. JAVA® is a registered trademark of Sun Microsystems, Inc., 901 San Antonio Road, Palo Alto, CA 94303 USA. JAVASCRIPT® is a registered trademark of Sun Microsystems, Inc., used under license for technology invented and implemented by Netscape. Microsoft®, Windows®, Microsoft Word®, Microsoft Excel® are registered trademarks of Microsoft Corporation. Navision is a registered trademark of Microsoft Business Solutions ApS in the United States and/or other countries. Oracle® is a registered trademark of Oracle Corporation. PCL® is a registered trademark of the Hewlett-Packard Company. PostScript is a registered trademark of Adobe Systems Inc. SAP, SAP Logo, R/2, R/3, ABAP, SAPscript are trademarks or registered trademarks of SAP AG in Germany (and in several other countries). All other products mentioned are trademarks or registered trademarks of their respective companies. If any trademark on our web site or in this document is not marked as trademark (or registered trademark), we ask you to send us a short message (mailto:[email protected]) Page 14 of 14