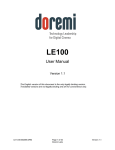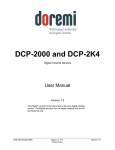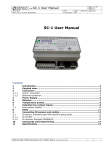
1
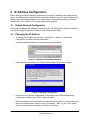
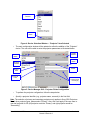
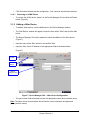
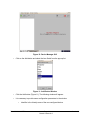
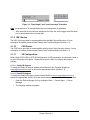
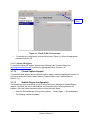
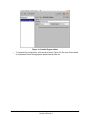
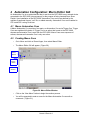
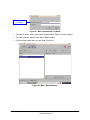
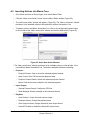
DEVICE
MANAGER
User Manual
Version 1.2
D2K.OM.000314.DRM
Page 1
Doremi Cinema LLC
Version 1.2
Table of Contents
1 INTRODUCTION...................................................................................................................... 4
1.1 PURPOSE.............................................................................................................................. 4
1.2 PRESENTATION........................................................................................................................ 4
1.3 CONTACT INFORMATION............................................................................................................. 4
2 IP ADDRESS CONFIGURATION.............................................................................................5
2.1 DEFAULT NETWORK CONFIGURATION............................................................................................5
2.2 CHANGING THE IP ADDRESS......................................................................................................5
2.3 NETWORK RESTART ................................................................................................................ 6
3 DEVICE MANAGER GUI.......................................................................................................... 7
3.1.1 Adding a Projector.......................................................................................................7
3.1.2 Removing a Device or Projector..................................................................................9
3.1.3 Automation Libraries Management............................................................................10
3.1.4 Adding an eCNA Device............................................................................................10
3.1.4.1 Removing an eCNA Device.................................................................................11
3.1.5 Adding a JNior Device...............................................................................................11
3.1.5.1 Removing a JNior Device....................................................................................12
3.1.6 Adding a Raw Device.................................................................................................12
3.1.7 Removing a Raw Device............................................................................................13
3.1.8 Adding a Serial Device ..............................................................................................13
3.1.9 ISE1 Device............................................................................................................... 16
3.1.10 CSS Device............................................................................................................. 16
3.1.11 3D Configuration......................................................................................................16
3.1.11.1 Dolby 3D Support..............................................................................................16
3.1.11.2 RealD 3D Support.............................................................................................16
3.1.11.3 Sensio 3D Support............................................................................................18
3.1.12 Closed Caption Support...........................................................................................18
3.1.13 Subtitle Engine Configuration...................................................................................18
4 AUTOMATION CONFIGURATION: MACRO EDITOR GUI...................................................21
4.1 MACRO AUTOMATION CUES.....................................................................................................21
4.2 CREATING MACRO CUES.........................................................................................................21
4.3 EDITING A MACRO AUTOMATION CUE.........................................................................................23
4.4 DELETING MACRO CUES......................................................................................................... 23
4.5 INSERTING ACTIONS INTO MACRO CUES......................................................................................24
5 DOCUMENT REVISION HISTORY........................................................................................26
D2K.OM.000314.DRM
Page 2
Doremi Cinema LLC
Version 1.2
Software License Agreement
The software license agreement can be found at the following location:
http://www.doremilabs.com/support/cinema-support/cinema-warranties/
Hardware Warranty
The hardware warranty can be found at the following location:
http://www.doremilabs.com/support/cinema-support/cinema-warranties/
D2K.OM.000314.DRM
Page 3
Doremi Cinema LLC
Version 1.2
1 Introduction
1.1 Purpose
The purpose of this document is to provide guidance on how to use the Device Manager
application. Device Manager is based on a graphical user interface and is used to enable the
connection between a server and multiple devices like a cinema projector(s). It also provides for
the use of Ethernet commands for the control of theater automation devices.
1.2 Presentation
This document is structured according to the following sections:
•
Section 1: Introduction – Overall presentation of the document
•
Section 2: IP Address Configuration – Procedure to set up the IP address for digital
cinema servers
•
Section 3: Device Manager GUI – Illustration of the Device Manager GUI
•
Section 4: Automation Configuration – Description of how to set up automation cue
libraries
•
Section 5: Document Revision History
1.3 Contact Information
USA
24/7 Technical Support line: + 1-866-484-4004
Technical Support Email: [email protected]
Europe
24/7 Technical Support line: + 33 (0) 492-952-847
Technical Support Link: http://support.doremitechno.org/ticketing
Japan
Technical Support line: + 044-966-4855
Technical Support Email: [email protected]
Australia ~ China ~ India ~ Indonesia ~ Korea ~ Malaysia ~ New Zealand ~ Philippines ~
Singapore ~ Taiwan ~ Thailand
Technical Support Email: [email protected]
D2K.OM.000314.DRM
Page 4
Doremi Cinema LLC
Version 1.2
2 IP Address Configuration
Before starting the Device Manager, make sure to set up the IP address of the digital cinema
server, according to the instructions below. Note that CineLink2 uses eth1 which is the second
Ethernet port on the digital cinema server. Please refer to the hardware manual to locate the
Ethernet port. Then connect it to the same switch as the projector.
2.1 Default Network Configuration
All servers are shipped with a default IP address of 192.168.100.50 on the Ethernet port (Eth1)
and a DHCP assigned dynamic IP address on the Ethernet port (Eth0).
2.2 Changing the IP Address
•
To change the IP address of the server, select Menu → System → Networking
Configuration and then follow the steps below:
•
A window will appear asking for a password as illustrated below:
Figure 1: Password Confirmation Window
•
Follow the steps according to the "Ethernet Networking Configuration" Wizard.
Figure 2: Network Configuration
•
Press Enter to confirm the configuration of each page of the "Ethernet Networking
Configuration" Wizard. Press "Tab" to select an option.
•
Enter the desired system’s hostname and then press Enter (Note: It is a good idea to put
the circuit location/screen number in here. For example, “AMC_bir_scr1,” as it will be
easier to identify when connecting via VNC and in the logs).
D2K.OM.000314.DRM
Page 5
Doremi Cinema LLC
Version 1.2
•
Enter the desired system domain name and then press Enter.
•
Select Yes to set eth0 and then press Enter.
•
Select No for Removable Device and then press Enter.
•
Select No for automatically configure device with DHCP and then press Enter.
•
Enter the desired IP address for eth0 and then press Enter.
•
Enter the desired default gateway or leave empty and then press Enter.
•
Enter the desired subnet mask and then press Enter.
•
Select Yes to configure eth1 and then press Enter.
•
Select No for Removable device and then press Enter.
•
Select No for automatically configure device with DHCP and then press Enter.
•
Enter the IP address of eth1 and select OK – in the example, enter 192.168.100.50 and
then press Enter.
Note: Do not put leading zeros (0) in front of any numbers. For example, do not input
0192.168.100.50.
•
Enter the desired default gateway or leave empty and then press Enter.
•
Enter the desired subnet mask and select OK – in our example, enter the same subnet
mask as the projector: 255.255.255.0 and then press Enter.
•
Enter the IP Address of the System's Domain Name Server (or leave empty) and then
press Enter to exit the wizard.
•
To verify the setup, go to Menu → Doremi Apps. → Diagnostic Tool and verify the IP
Address under the Diagnostic Tool System Tab.
2.3 Network Restart
If for any reason the network needs to be restarted, use the terminal command line below:
• Type: /etc/init.d/networking restart <Enter>
D2K.OM.000314.DRM
Page 6
Doremi Cinema LLC
Version 1.2
3 Device Manager GUI
The Device Manager is an application used to enable the connection between a server and
multiple devices like a cinema projector(s). It also provides for the use of Ethernet commands
for the control of theater automation devices.
•
To run the Device Manager, go to Menu → Doremi Apps. → Device Manager.
•
The following window will appear:
Add
button
Figure 3: Device Manager Graphical User Interface (GUI)
3.1.1 Adding a Projector
•
To connect a projector to the unit (server), click the Add button (Figure 3).
•
The "Add Device" window will appear:
•
Select the item called “Projector” and click the Add button as illustrated below:
D2K.OM.000314.DRM
Page 7
Doremi Cinema LLC
Version 1.2
“Projector” item
selected
Add
Button
Figure 4: Device Selection Window – “Projector” Item Selected
•
The main configuration window will be updated to reflect the addition of the "Projector"
device. The user will be able to enter the projector parameters as illustrated below:
"Enable
subtitles"
Delete
Button
Test
Button
Projector
Identifier
Projector
Model
Head IP
Field
Vendor IP
Field
Username and
Password (do
not change)
Figure 5: Device Manager GUI – Projector Fields Configuration
•
To perform the projector configuration, follow the steps below:
•
Specify a projector identifier (e.g., projector name, screen #) in the first field.
Note: The selection of primary and secondary projectors only applies to Sony SRX Projectors.
For all other projector types, please select "Primary." Also, this could apply if the user were to
use dual projector for 3D (left projector would be “Primary” and right projector would be
“Secondary”).
D2K.OM.000314.DRM
Page 8
Doremi Cinema LLC
Version 1.2
•
Choose the correct projector model to connect to the unit using the “Projector model”
field(s).
•
Select the model series for the projector from the drop-down menu on the right. The
projector model series varies for all projector manufacturers.
•
Enter the Head IP address and then click the “test” button.
•
•
If the "DLP Head Connection Test" fails, the IP address is invalid.
Choose to either enable or disable the subtitles.
Note: If the user enables subtitles without the unit being connected to a projector, then the
server will not operate properly.
•
Input the appropriate username and password. The username and password will vary for
all projector manufacturers.
• Check the Enabled check box at the top right corner of the GUI.
• Click the Save button to record the settings. A password confirmation page will appear.
Enter the password to save and record the settings.
3.1.2 Removing a Device or Projector
•
To remove a device or projector, click on it in the left part of the Device Manager GUI.
•
Click the Delete button (Figure 5).
D2K.OM.000314.DRM
Page 9
Doremi Cinema LLC
Version 1.2
3.1.3 Automation Libraries Management
Support for theater automation control is also provided. The list of currently supported devices is
the following:
•
eCNA
•
JNior
A pre-built library of supported automation commands are available for each of these two
devices. These automation commands can then be added to Macro Cues.
3.1.4 Adding an eCNA Device
•
To add the eCNA device, click the Add button in the Device Manager window (Figure 6).
•
The "Add Device" window will appear. Select the item called “eCNA” and click the Add
button.
•
The Device Manager GUI will be updated to reflect the addition of the eCNA device.
•
Input the name of the eCNA device in the Identifier field.
•
Input the eCNA Server IP address in the appropriate field as illustrated below:
Add
Button
Delete
Button
Enabled
Checked
eCNA IP
Address Field
Figure 6: Device Manager GUI – eCNA Device Configuration
•
If not already done so, check the Enabled check-box in the top-right corner of the GUI.
•
Click the Save button to record the settings. A window asking for the password will
appear. Enter the password to save the settings and proceed.
D2K.OM.000314.DRM
Page 10
Doremi Cinema LLC
Version 1.2
•
Click Quit when finished with the configuration. If not, continue and add more devices.
3.1.4.1
•
Removing an eCNA Device
To remove the eCNA device, select it in the Device Manager GUI and click the Delete
button (Figure 6).
3.1.5 Adding a JNior Device
•
To add the JNior device, click the Add button in the Device Manager window.
•
The "Add Device" window will appear. Select the item called “JNior” and click the Add
button.
•
The Device Manager GUI will be updated to reflect the addition of the JNior device
(Figure 7).
•
Input the name of the JNior device in the Identifier field.
•
Input the JNior Server IP address in the appropriate field as illustrated below
(Figure 7).
Add
Button
Delete
Button
JNior IP
Address Field
Figure 7: Device Manager GUI – JNior Device Configuration
•
The port number field will already contain the appropriate value (factory default value).
Note: The JNior device documentation will provide the correct username and password
(factory default values).
D2K.OM.000314.DRM
Page 11
Doremi Cinema LLC
Version 1.2
•
Click the Save button to record the settings. A window will appear asking for a password.
Enter the password to proceed.
•
Click Quit when finished with the configuration. If not, continue and add more devices.
3.1.5.1
Removing a JNior Device
•
To remove the JNior device, click on it in the Device Manager GUI.
•
Click the Delete button (Figure 7).
3.1.6 Adding a Raw Device
A “Raw” device allows for communication with an external device across an Ethernet connection
using "Raw" data formatted as text or binary strings.
•
To add a Raw device, click the Add button.
•
The "Add Device" window will appear. Select the item called “Raw” and click the Add
button.
•
The Device Manager GUI will be updated to reflect the addition of the Raw device
(Figure 8).
•
Input the name of the Raw device in the Identifier field.
Quit
Button
Figure 8: Device Manager GUI – Raw Device Configuration
•
Specify a vendor name in the Vendor field.
•
Specify a product name in the Product Name field.
•
Enter the IP address of the Raw device in the Device IP field (Figure 8).
D2K.OM.000314.DRM
Page 12
Doremi Cinema LLC
Version 1.2
•
Choose the protocol to be used (TCP or UDP) and the proper Port number.
•
Click the Save button to record the settings (Figure 8). A window will appear asking for a
password. Enter the password to proceed.
•
If finished with the configuration, click the Quit button.
3.1.7 Removing a Raw Device
•
To remove the Raw device, click on it in the Device Manager GUI and press the Delete
button (Figure 8).
3.1.8 Adding a Serial Device
The Serial device is used to be able to manage incoming and outgoing messages over a serial
port. It is a new feature that allows the user to control or interact with some old legacy device
that usually communicates only through serial cables. Outgoing messages can be sent to the
automation using a simple basic automation cue.
Incoming messages are parsed, and then sent to the playback engine in the form of a signal
trigger.
•
The schema below explains how the daemon is run:
Figure 9: Serial Device Schema
•
•
The file device.xml contains all elements to configure properly the serial port and how to
scan incoming messages. This file is conveniently managed by the Device Manager GUI
application. The generic serial device driver can manage different serial ports
simultaneously.
Go to Menu → Doremi Apps. → Device Manager and follow the steps below. The
following window will appear:
D2K.OM.000314.DRM
Page 13
Doremi Cinema LLC
Version 1.2
Figure 10: Device Manager GUI
•
Click on the Add button and select the item Serial from the pop-up list.
Figure 11: Add Device Window
•
Click the Add button (Figure 11). The following window will appear:
•
It is necessary to provide some configuration parameters in the window:
•
Identifier is the friendly name of the new configured device.
D2K.OM.000314.DRM
Page 14
Doremi Cinema LLC
Version 1.2
•
Serial Port is the internal device system filename the device driver will
communicate to.
•
Usual values are:
/dev/ttyS0 for embedded serial port on the motherboard
/dev/ttyUSB0 for any USB-serial converter.
•
Speed, Data, Stop Bits, Parity and Flow control are usual parameters used to
configure serial communication. Refer to the original automation documentation
to find out what the correct values are. Usual value is 115200 8N1. No flow
control.
Figure 12: Device Manager GUI - Serial Device Added
•
•
Message type: This parameter indicates how incoming text will be parsed to build
messages. In order to match most existing protocol, two different incoming message
types are handled.
•
Fixed length messages: All messages are always expected to be the same length.
The user has to provide the message length parameter.
•
End of message character: All messages are expected to have a special "magic"
character to indicate the end of message. This type matches most text-based
protocol with an end of line character (\n) to validate the entry. You have to provide
the end of message "magic" character. Multiple character sequence is not supported
(e.g., \r\n). Note that the "magic" character will NOT be part of the message sent to
the playback engine.
Save the new configuration.
D2K.OM.000314.DRM
Page 15
Doremi Cinema LLC
Version 1.2
Figure 13: "fixed-length" and "end of message" Examples
Note: It may take up to 30 seconds before the new configuration is applicable.
•
After the serial device has been configured, the user can set the trigger from the serial
port or automation actions to serial port.
3.1.9 ISE1 Device
The ISE1 Device provides for communication with the IMAX Secure Enclosure. If more
information is needed, please contact Doremi Labs Technical Support (Section 1.3).
3.1.10
CSS Device
The CSS Device provides for communication with the Sony Cavity Security System. If more
information is needed, please contact Doremi Labs Technical Support (Section 1.3).
3.1.11
3D Configuration
When using a DCP-2000 or DCP-2K4 configuration for 3D presentation, the projector needs to
be set to the proper color space. Contact the projector vendor to configure the projector
properly.
3.1.11.1 Dolby 3D Support
To enable the Dolby 3D support, please contact Doremi Labs Technical Support at
[email protected] to receive the appropriate license (Section 1.3).
3.1.11.2 RealD 3D Support
To enable the RealD 3D support, please contact RealD at [email protected] to
request the appropriate license. Once the license has been received, follow the steps below:
•
Open the Device Manager GUI by clicking on Menu → Doremi Apps. → Device
Manager.
•
The following window will appear:
D2K.OM.000314.DRM
Page 16
Doremi Cinema LLC
Version 1.2
Add
Button
Figure 14: Device Manager GUI
•
Click the Add button.
•
The list of available devices will appear as presented below:
Add
Button
Figure 15: List of Available Devices
•
Select the “RealD 3D EQ” device and click the Add button (Figure 15).
•
The device will be visible on the main Device Manager GUI as illustrated below:
D2K.OM.000314.DRM
Page 17
Doremi Cinema LLC
Version 1.2
Save
Button
Figure 16: “RealD 3D EQ” Device Added
•
To complete the configuration, click the Save button (Figure 16). Enter the appropriate
password and click Ok.
3.1.11.3 Sensio 3D Support
To enable the Sensio 3D support, please contact Doremi Labs Technical Support at
[email protected] to receive the appropriate license (Section 1.3).
3.1.12
Closed Caption Support
To enable the Rear Window devices Closed Caption support, install the appropriate license. For
information about the Closed Caption Support, contact Doremi Labs Technical Support
(Section 1.3).
3.1.13
Subtitle Engine Configuration
This sections provides instructions on how to set up the Device Manager for Subtitle Engine
support. It will allow the user to add subtitles into the picture before being exported to the
projector. Once the license has been received, follow the steps below:
• Open the Device Manager GUI by going to Menu → Doremi Apps. → Device Manager.
•
The following window will appear:
D2K.OM.000314.DRM
Page 18
Doremi Cinema LLC
Version 1.2
Add
Button
Figure 17: Device Manager GUI
•
Click the Add button (Figure 17).
•
The "Add Device" window will appear:
Note: In case the user already has a projector configured through Device Manager to display
subtitles, meaning that the “Enable subtitle” filed was set to Yes, adding the Subtitle Engine
device will cause a warning window to appear asking the user to disable all projector subtitle
display. The Subtitle Engine will burn the subtitle inside the picture before exporting the resulting
pictures to the projector. If the user plans to use the Subtitle Engine, click the Yes button in the
warning window to disable all projector subtitles (Figure 18).
Figure 18: Subtitle Engine Warning Window
•
Select the Subtitle Engine device and click the Add button.
•
The device will be visible on the main Device Manager GUI as illustrated below:
D2K.OM.000314.DRM
Page 19
Doremi Cinema LLC
Version 1.2
Figure 19: Subtitle Engine Added
•
To complete the configuration, click the Save button (Figure 19).The user will be asked
for a password. Enter the appropriate password and press Ok.
D2K.OM.000314.DRM
Page 20
Doremi Cinema LLC
Version 1.2
4 Automation Configuration: Macro Editor GUI
An Automation Cue is an action/demand that is sent from the DCP-2000 to any external device
connected to the DCP-2000 (cinema server) for the purpose of being inserted into a Show
Playlist. Upon installation of the DCP-2000, Automation Cues can be pre-defined by the
operator, transferred from an “xml” file, or added manually. Automation Cues can be added to
CPL's and SPL's using CineLister.
4.1 Macro Automation Cues
A Macro Automation Cue consists of two parts, an Automation Cue and a Trigger Cue. Trigger
Cues are explained fully below. A Trigger Cue is an action that is sent to the DCP-2000,
whereas an Automation Cue is sent from the DCP-2000. Macro Cues are a sequence of
actions, whereas an Automation Cue is only one action.
4.2 Creating Macro Cues
•
Go to Menu and click on Doremi Apps., then select Macro Editor.
•
The Macro Editor GUI will appear ( Figure 20).
“New
Macro”
Button
Delete
Macro
Button
Macro
Window
Figure 20: Macro Editor Window
•
Click on the “New Macro” button to begin the creation process.
•
You will be prompted to enter a name for the Macro Automation Cue as well as
comments. ( Figure 21).
D2K.OM.000314.DRM
Page 21
Doremi Cinema LLC
Version 1.2
Macro Automation
Cue Name
Figure 21: Macro Automation Cue Name
•
Click the Ok button when you are done and the Macro Editor GUI will re-appear.
•
The new macro will appear in the Macro Editor window.
•
Click the Save button when you are done (Figure 22).
Figure 22: Macro Editor Window
D2K.OM.000314.DRM
Page 22
Doremi Cinema LLC
Version 1.2
4.3 Editing a Macro Automation Cue
•
To edit the name of an existing Macro Automation Cue, click the Edit button or doubleclick on the Macro itself (Figure 23).
•
Use the up and down arrows to re-arrange the Automation Cues.
•
Click the Save button when finished.
•
Selecting the Reset button will close a document without saving the changes. You will be
prompted to a window asking if you would like to save your changes (Figure 24).
Use the up and
down arrows to
re-arrange the
order of the
commands
Reset
Button
“Delete
Macro”
Button
Remove
Button
Edit
Button
“Insert a
new Action”
Button
Figure 23: Macro Editor Window
Figure 24: Unsaved Changes Window
4.4 Deleting Macro Cues
•
To delete/remove a Macro Automation Cue, select it in the Macro Editor window and
click the “Delete Macro” button (Figure 23).
D2K.OM.000314.DRM
Page 23
Doremi Cinema LLC
Version 1.2
4.5 Inserting Actions into Macro Cues
•
Go to Menu and click on Doremi Apps., then select Macro Editor.
•
Click the “Insert a new Action” button from the Macro Editor window (Figure 23).
•
The “Add a new Action” window will appear ( Figure 25). The “Add a new Action" window
provides a list of available actions to be used within a Macro Automation Cue.
•
To add an action to the Macro Automation Cue, click on its corresponding action button
in the left side of the “Add a new Action” window and click the Add button ( Figure 25).
Figure 25: Add a New Action Window
• The “Add a new Action” window provides a list of available actions, on the left side, to be
used within a Macro Automation Cue. The actions available include the following:
•
Projector:
◦ Projector Dowser: Open or close the selected projector dowser.
◦ Lamp: Power ON or Off the selected projector lamp.
◦ Projector Channel Switch: Switch the selected projector channel.
◦ Macro: Execute the macro defined in the selected projector.
•
Input / Output:
◦ General Purpose Output: Configure a GPO line.
◦ Send Message: Send a message to the connected device.
•
Playback:
◦ Audio Volume: Control the audio volume output.
◦ Playback Actions: Change the playback state.
◦ Video Output Actions: Change the default video output format.
◦ Sensio3D: Enable or disable the Sensio3D output format.
D2K.OM.000314.DRM
Page 24
Doremi Cinema LLC
Version 1.2
◦ RealD SBS: Enable or disable the RealD (Side-by-Side) SBS output format.
•
Macro Control:
◦ Delay: Insert a delay between actions.
◦ Purge Pending Macro: Purge the current macro execution stack.
•
Library:
◦ Certainty: Controls the Integrated Media Block (IMB) board (on ShowVaults only).
◦ Dolby DFC100: Allows for enabling and disabling the Dolby 3D color wheel.
◦ ecna: Allows for controlling the external automation box.
◦ jnior expansion module: Allows for controlling the external automation box (9-16).
◦ jnior: Allows for controlling the external automation box (1-8).
◦ MasterImage3D: Cues Library built-in.
•
System:
◦ System Shutdown: Allows the user to shutdown the player.
•
Click the Cancel button to cancel the action insertion.
Should you have any questions or concerns, please contact your local Doremi Labs Technical
Support team (see Section 1.3 for contact information).
D2K.OM.000314.DRM
Page 25
Doremi Cinema LLC
Version 1.2
5 Document Revision History
Date
Version
01/18/2008
1.0
First version.
01/25/2008
1.1
Dual Projector guidance for stereoscopic usage added.
04/11/2012
1.2
All sections modified. New Doremi logo added.
D2K.OM.000314.DRM
Description
Page 26
Doremi Cinema LLC
Version 1.2