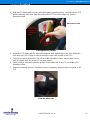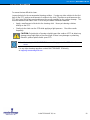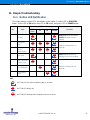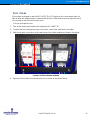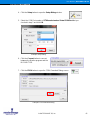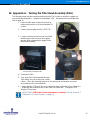
1
Installation & Operation Manual | MI-CLARITY3D MI-CLARITY3D SA Digital 3D Cinema System Installation & Operation Manual Revision No. 3.0 User Manual | MI-CLARITY3D SA User Manual | MI-CLARITY3D User Manual | MI-CLARITY3D Revision History Revision PD 1.2 Date June 8, 2012 Release Status Author Preliminary Document RJG Photo replacement required Preliminary Document RJG Clarity photos added, warnings updated, troubleshooting improved July 19,2012 PD 1.3 Remarks V 2.0 Sept. 15, 2012 Updated Draft RJG System firmware updates V 3.0 Sept. 18, 2012 Initial Release RJG Production Release Copyright © 2005-2012 MASTERIMAGE 3D, INC All Rights Reserved MASTERIMAGE 3D, INC. Proprietary All other trademarks and copyrights are the property of their respective owners. © MASTERIMAGE 3D, Inc. 2 User Manual | MI-CLARITY3D SA User Manual | MI-CLARITY3D User Manual | MI-CLARITY3D Locations MASTERIMAGE 3D, INC th 5358 Melrose Ave., 4 Floor Hollywood CA 90038 TEL: (323) 606-7800 FAX: (323) 960-8008 MASTERIMAGE 3D ASIA, LLC. 22F, BYC HIGHCITY B/D A, 371-17, Gasan-dong, Geumcheon-gu, Seoul 153-803, South Korea TEL.: +82-2-3438-1600 FAX: +82-2-3438-1698 MASTERIMAGE 3D EUROPE, PLC Pinewood Studios Pinewood Rd., Iver Heath Buckinghamshire England SL0 0NH TEL: +44 1753 785131 Fax: +44 1753 656050 URL: http://www.MASTERIMAGE3d.com Email Contact: [email protected] © MASTERIMAGE 3D, Inc. 3 User Manual | MI-CLARITY3D SA User Manual | MI-CLARITY3D User Manual | MI-CLARITY3D Table of Contents 1. Introduction ............................................................................................................. 7 1.1. Welcome ...................................................................................................................... 7 1.2. Contacting Technical Support ....................................................................................... 7 2. Warnings and Cautions .......................................................................................... 8 2.1. Spinning Filter Safety.................................................................................................... 8 2.2. Burning Polarization Filter Warning............................................................................... 8 2.3. New PFD Installation Caution ....................................................................................... 8 2.4. General Electrical Safety .............................................................................................. 8 2.5. Anti-Collision Caution ................................................................................................... 8 3. Quick Installation Guide .......................................................................................... 9 4. System Overview .................................................................................................. 10 4.1. Key Product Components ........................................................................................... 10 4.2. Control Panel .............................................................................................................. 11 4.3. I/O Ports ..................................................................................................................... 11 5. 5.1. Installation and Configuration ............................................................................... 12 Unpacking the MI-CLARITY3D ................................................................................... 12 5.1.1. 5.2. 5.3. 5.4. 6. Unpacking and preparing the MI-CLARITY3D rolling wheels ............................. 13 Orienting the MI-CLARITY3D in front of the Digital Projector ...................................... 13 5.2.1. Orientation 1 - Standard Right ........................................................................... 13 5.2.2. Orientation 2 - Standard Left ............................................................................. 14 5.2.3. Orientations 3 & 4 – Reversed Filter Head Right and Left ................................. 15 Positioning the MI-CLARITY3D .................................................................................. 16 5.3.2. Locking the MI-CLARITY3Ds wheels in place ................................................... 18 5.3.3. Releasing the footpads to move the MI-CLARITY3D ......................................... 19 Projector File Setup .................................................................................................... 19 5.4.1. Series II Projectors ............................................................................................ 19 5.4.2. IMB Configuration Settings ................................................................................ 22 Basic Operation of the MI-CLARITY3D ................................................................ 23 6.1. System Ready (Standby Condition) ............................................................................ 23 6.2. Move Up and Down the PFD ...................................................................................... 24 © MASTERIMAGE 3D, Inc. 4 User Manual | MI-CLARITY3D SA User Manual | MI-CLARITY3D User Manual | MI-CLARITY3D 6.3. Start the System Running ........................................................................................... 24 7. Menu Structure with Default Conditions................................................................ 25 8. Detailed Setup and Configuration of the MI-CLARITY3D ..................................... 29 8.1. Setting the Clock ........................................................................................................ 29 8.2. Setting the Lifting Column Zero Position ..................................................................... 29 8.3. Setting a 3D Position .................................................................................................. 30 8.3.1. 8.4. Setting a 2D Position .................................................................................................. 31 8.4.1. 8.5. Moving FHA to a Predetermined 3D Position .................................................... 31 Moving FHA to a Predetermined 2D Position .................................................... 32 Selecting a Sync Source............................................................................................. 32 8.5.1. Setting Internal Sync Source Frequency ........................................................... 33 8.6. Selecting an Automation Source ................................................................................. 34 8.7. Setting PFD Home Position ........................................................................................ 35 8.8. Adjusting 3D Phase .................................................................................................... 36 8.9. System Diagnostics .................................................................................................... 36 8.10. Setting the Menu Password ........................................................................................ 37 8.11. Ethernet Configuration ................................................................................................ 40 8.12. Performing a Factory Reset ........................................................................................ 42 8.13. Servo Pack Parameter Information ............................................................................. 43 8.14. System Log Information .............................................................................................. 43 8.15. System Information ..................................................................................................... 44 9. Installation Checklist ............................................................................................. 45 10. Maintenance ......................................................................................................... 46 10.1. Changing the Polarizing Filter Disk (PFD)................................................................... 46 10.2. Cleaning the PFD ....................................................................................................... 52 10.2.1. Materials Required ............................................................................................ 52 10.2.2. Cleaning the PFD .............................................................................................. 52 11. Simple Troubleshooting ........................................................................................ 55 11.1. Button LED Notification............................................................................................... 55 11.2. Fuses ......................................................................................................................... 56 11.3. Servopak Correct Status Indication............................................................................. 57 11.4. Servopak Error Status Indication ................................................................................ 58 11.4.1. E Stop Button Pressed ...................................................................................... 58 © MASTERIMAGE 3D, Inc. 5 User Manual | MI-CLARITY3D SA User Manual | MI-CLARITY3D User Manual | MI-CLARITY3D 11.4.2. CN1 Not Connected .......................................................................................... 59 11.4.3. CN2 Not Connected .......................................................................................... 60 12. Firmware Upgrading Process for MI-CLARITY3D Series ..................................... 61 12.1. Download and Install the Upgrading Utility Tools ........................................................ 61 12.2. Upgrade Firmware of MI-CLARITY3D ........................................................................ 61 12.3. Upgrade FPGA Binary ................................................................................................ 64 13. Product Specifications .......................................................................................... 68 14. Appendix A – Turning the Filter Head Assembly (FHA) ........................................ 70 15. Appendix B – MI-CLARITY3D Automation ........................................................... 72 15.1. Ethernet Automation ................................................................................................... 75 15.1.1. Doremi Server ................................................................................................... 76 15.1.2. Qube Server ...................................................................................................... 81 15.1.3. GDC Server....................................................................................................... 84 16. Appendix C – Installation Record.......................................................................... 91 17. Appendix D – Periodic Maintenance ..................................................................... 92 18. Appendix E – Check the STM Virtual COM Port Number ..................................... 93 © MASTERIMAGE 3D, Inc. 6 User Manual | MI-CLARITY3D SA User Manual | MI-CLARITY3D User Manual | MI-CLARITY3D 1. Introduction 1.1. Welcome Congratulations on choosing the finest digital projection 3D system available. The MASTERIMAGE MI-CLARITY3D delivers the clearest full color images in a costeffective and studio-approved single projection digital 3D system. Paired with MASTERIMAGE high quality 3D eyewear, the MI-CLARITY3D provides the clearest and truest color 3D picture of any single filter 3D system. This user manual provides all the information required for simple installations and the operation of the MI-CLARITY3D, with any DLP cinema projector and digital cinema server. 1.2. Contacting Technical Support If you require technical support, our contact information is listed below: MASTERIMAGE 3D, INC Email: [email protected] Web Site: www.MasterImage3d.com USA Tel: +1-323-606-7800 UK Tel: +44 1753 785131 Asia Tel: +82-2-3438-1600 © MASTERIMAGE 3D, Inc. 7 User Manual | MI-CLARITY3D SA User Manual | MI-CLARITY3D User Manual | MI-CLARITY3D 2. Warnings and Cautions 2.1. Spinning Filter Safety The MI-CLARITY3D operates a high speed rotating PFD (Polarizing Filter Disk). Keep all hands and objects away from the system when starting up and operating. 2.2. Burning Polarization Filter Warning In order to avoid burning the polarization filter material, the MI-CLARITY3D PFD must be lowered or moved out of the light path during lamp adjustments. In general the PFD should always be turning when it is in the light path of the projector. 2.3. New PFD Installation Caution If installing or replacing a new PFD, ensure that the protective film pieces have been removed from each of the polarizing filter segments. PFD Home Position adjustment MUST be performed after PFD replacement. Refer to section 8.7, Setting the PFD Home Position, on page 35. 2.4. General Electrical Safety Disconnect the power cord before doing service work or opening the base compartment. 2.5. Anti-Collision Caution © MASTERIMAGE 3D, Inc. 8 User Manual | MI-CLARITY3D SA User Manual | MI-CLARITY3D User Manual | MI-CLARITY3D 3. Quick Installation Guide If you are already experienced in the unpacking, installation and configuration of pervious 3D Cinema Systems from MasterImage 3D Inc. please refer directly to Section 8 of this manual. Follow steps 8.1 to 8.7 for the minimum requirements for the setup of the MI-CLARITY3D to ensure safe installation and optimum performance from this model. IMPORTANT: PFD Home Position adjustment is required at installation. Refer to section 8.7 Setting the PFD Home Position on page 35. Should you be unsure about any particular step, please read this manual in its entirety before contacting Technical Support for assistance. © MASTERIMAGE 3D, Inc. 9 User Manual | MI-CLARITY3D SA User Manual | MI-CLARITY3D User Manual | MI-CLARITY3D 4. System Overview 4.1. Key Product Components Filter Head Assembly & Polarization Filter Disk (PFD) Up/Down Lifting Column System Control Panel I/O Ports for Synchronization & Automation Lockable Wheels Cabinet Lock AC Power Breaker AC Power Inlet © MASTERIMAGE 3D, Inc. 10 User Manual | MI-CLARITY3D SA User Manual | MI-CLARITY3D User Manual | MI-CLARITY3D 4.2. Control Panel Run/Stop Button Emergency Stop Button 3D Button: to move the PFD to the preprogrammed 3D position. The display shows Firmware Version, Current Operating State and Time. 2D Button: to move the PFD to the preprogrammed 2D position. Setup Keys (Menu/Left, Up, Down, Enter/Right) Power Button 4.3. I/O Ports RS-232C Automation RS-422 Automation GPIO: Sync Input & Automation TTL Sync Input RS-232C Sync Input 3D Port: Sync Input & Automation USB (Emulation/Monitoring, Log Message Download, Program Upgrade) Ethernet Automation © MASTERIMAGE 3D, Inc. 11 User Manual | MI-CLARITY3D SA User Manual | MI-CLARITY3D User Manual | MI-CLARITY3D 5. Installation and Configuration 5.1. Unpacking the MI-CLARITY3D 1. Inspect the MI-CLARITY3D crate for any external damage. 2. Carefully remove the crate fasteners, and top and sides of crate using an 8mm socket and power tools. 3. Loosen the shipping straps and remove the protective wrap. 4. Ensure all items are included: MI-CLARITY3D, cover, installation kit box, and spare polarizing filter disk. Replacement PFD Power Cable GPIO Sync Cable USB Cable & Cleaning Cloths Sample 3D Glasses MI-CLARITY3D Installation Kit Box © MASTERIMAGE 3D, Inc. 12 User Manual | MI-CLARITY3D SA User Manual | MI-CLARITY3D User Manual | MI-CLARITY3D 5.1.1. Unpacking and preparing the MI-CLARITY3D rolling wheels The unit is shipped with the rolling wheels locked. After unpacking, turn the orange rings in the wheel assembly to the left (clockwise) in order to raise the locking pads and allow the unit to be rolled easily. MI-CLARITY3D Rolling Wheel 5.2. Orienting the MI-CLARITY3D in front of the Digital Projector There are four ways the filter head and main base can be oriented in order to best fit the space of the projection booth and projector. Note: For all orientations described below, the Polarizing Filter Disk (PFD) filter surface must face the screen. Some setups may require that the PFD be removed and turned around in order for the material surface to face the screen. 5.2.1. Orientation 1 – Standard Right The system is shipped ready to be used in “Standard Right” orientation with the control panel facing the right side of the projector. By using the adjustment slots in the filter motor mount plate, the PDF can be moved laterally by up to 2 inches, for fine adjustment of position relative to the projector lens. This configuration is the most commonly used setup for all projector types. The images below illustrate the standard right orientation, as well as a standard right orientation that has been adjusted/extended toward the projector. © MASTERIMAGE 3D, Inc. 13 User Manual | MI-CLARITY3D SA User Manual | MI-CLARITY3D User Manual | MI-CLARITY3D Projection Lens Projection Lens Max. 2” extension Standard Right Orientation Standard Right Orientation -- Extended 5.2.2. Orientation 2 – Standard Left With overhanging lenses, as commonly found in Christie projectors, the system may be set with the control panel facing the left side of the projector in order to be more convenient to the operator or to deal with floor space issues. See Appendix A – Turning the Filter Head, page 70, for complete instructions on removing and turning the filter disk. See the image below for an illustration of this orientation. Note: For this setup, the Polarizing Filter Disk (PFD) must be removed and turned in order for the filter surface to face the screen. IMPORTANT: PFD Home Position adjustment is required at installation. Refer to section 8.7, Setting the PFD Home Position, on page 35. © MASTERIMAGE 3D, Inc. 14 User Manual | MI-CLARITY3D SA User Manual | MI-CLARITY3D User Manual | MI-CLARITY3D Projection Lens Base Plate: Max.2” extension Standard Left Orientation 5.2.3. Orientations 3 & 4 – Reversed Filter Head Right and Left In rare cases where the lens, projector, floor space or port window do not allow for standard positioning of the filter head, the filter head can be removed and reversed in order to work in the unique spacing requirements and to get the filter disk as close to the lens as required (1/4 to 1/2 inch). See images below for examples of this orientation. If it is necessary to reverse the filter head assembly, see Appendix A – Turning the Filter Head, page 70, for specific instructions. Note: As in the standard setups, the PFD filter surface MUST face the screen. © MASTERIMAGE 3D, Inc. 15 User Manual | MI-CLARITY3D SA User Manual | MI-CLARITY3D User Manual | MI-CLARITY3D Projection Lens 5.3. Projection Lens Positioning the MI-CLARITY3D 1. Position the MI-CLARITY3D centered with the projector lens and adjust the PFD height using Up arrow switch on the control panel. Adjustable height © MASTERIMAGE 3D, Inc. 16 User Manual | MI-CLARITY3D SA User Manual | MI-CLARITY3D User Manual | MI-CLARITY3D Note: This switch can only be used when the system is in READY status. When the Up arrow switch is pressed and held, the up motion of the filter head assembly continues to move until the switch is released. Use extreme caution in adjusting the filter head height for the first time. The control panel may be on either side of the projector, based on user access and closest positioning of the filter to the lens. Result: When in position, the MI-CLARITY3D Filter Head Assembly (FHA) should be parallel to the projector lens from both the top and side views. Make sure all motor mount screws and nuts are tight. 5.3.1. Fine-adjusting the Image Position on the MICLARITY3D PFD CAUTION: Do not make position adjustments while the PFD is turning. Note: To prevent burning the filter, use a darker image for this setup and do not expose the stationary PFD to the image for more than 30 seconds at a time. The PFD cover should be approximately ¼ to ½ inch away from the projector lens when viewed from the side. 1. Project an image onto the screen (see Note above). 2. Pushing the Up or Down arrow button briefly, fine-adjust the position of the image on the MI-CLARITY3D PFD so that it is centered just below the top edge of the PFD area and equally spaced on the left and right sides. The image below illustrates how the projected image should be positioned on the MI-CLARITY3D PFD. © MASTERIMAGE 3D, Inc. 17 User Manual | MI-CLARITY3D SA User Manual | MI-CLARITY3D User Manual | MI-CLARITY3D 3. Once the position has been adjusted, store this as the 3D Position (as described in Setting a 3D Position, page 30). 5.3.2. Locking the MI-CLARITY3Ds wheels in place Lock down all four of the base wheels by lowering the foot pads. To do this, turn the orange ring to the right (counter-clockwise). This will stabilize the unit. Turn the orange ring to the right to bring each footpad down and secure the MI-CLARITY3D. © MASTERIMAGE 3D, Inc. 18 User Manual | MI-CLARITY3D SA User Manual | MI-CLARITY3D User Manual | MI-CLARITY3D 5.3.3. Releasing the footpads to move the MI-CLARITY3D Turn the orange ring to the left (clockwise) to raise each footpad to release it and move the MI-CLARITY3D. Turn the orange ring to the left to raise each footpad to release it and move the MI-CLARITY3D. 5.4. Projector File Setup It is necessary to configure the projectors 3D control file to work with the MI-CLARITY3D. The procedures below describe configuring the control files for Series I and Series II projectors. Follow the instructions for the appropriate projector. Recommended Dark Time Reference Settings: Frame Rate 2:2 4:2 6:2 Remark 24fps N/A 1740 1160 D-Cinema 25fps N/A 1670 1110 3D Live Broadcast 30fps N/A 1390 N/A 3D Live Broadcast 48fps 1740 TBA N/A High Frame Rate 60fps 1390 N/A N/A High Frame Rate 5.4.1. Series II Projectors Configure the projector settings as shown in the illustrations below for NEC, Christie and Barco projectors. Please also note the following: Note: In certain installations, where space is restricted in front of the projector or where the lens protrudes a long way, it may be necessary to install the MI-CLARITY3D the opposite way around, that is, with the PFD motor under the lens. © MASTERIMAGE 3D, Inc. 19 User Manual | MI-CLARITY3D SA User Manual | MI-CLARITY3D User Manual | MI-CLARITY3D In this condition it is important that the PFD itself is refitted the opposite way maintaining the polarizing material facing the screen. (See Orienting the MI-CLARITY3D in front of the Digital Projector, page 13 ). Should the above installation condition be necessary, then the 3D setting for L/R Output Reference Polarity or 3D Sync Polarity should be changed to Inverted. Always make sure that 3D material is viewed on screen to ensure no artifacts are present. Note: If you plan to change any of the settings shown below, first contact MASTERIMAGE technical support for details see Section 1.2. (Contacting Technical Support). NEC Series II file settings for external server playback Note: Settings for NEC where the projector Firmware Release Pack is lower than v2.33 are different from both Christie and Barco file configurations. This projector should have the L/R Input Reference field set to Use selected Input port (polarity=true). It may also be necessary to switch the Input Frame Dominance when viewing the on screen image. © MASTERIMAGE 3D, Inc. 20 User Manual | MI-CLARITY3D SA User Manual | MI-CLARITY3D User Manual | MI-CLARITY3D Christie Series II file settings for external server playback Note: The Christie projectors should have the field 3D Sync Input Mode set to Use line interleave (First line = Left, second line = right). Barco Series II file settings for external server playback Note: The Barco projectors should have the field L/R Input Reference set to Use line interleave (First line = Left, second line = right). Barco Series II projectors have a pre-installed 3D configuration file for the settings required by the MasterImage 3D system; it is possible to select this file rather than making manual entries. © MASTERIMAGE 3D, Inc. 21 User Manual | MI-CLARITY3D SA User Manual | MI-CLARITY3D User Manual | MI-CLARITY3D 5.4.2. IMB Configuration Settings Projector configuration settings when using an IMB (Integrated Media Block) are slightly different; an example of this is given below for a Christie projector and a Doremi IMB. The changes are highlighted in bold. Other projector/IMB manufacturers configurations may vary slightly; please contact the respective manufacturers for specific information. Config. 1 • Input = IMB-Internal • Data Format = 4:4:4 (RGB) • Source File = Based on content resolution + aspect ratio (1998x1080 Flat, 2048x858 Scope, etc.) • Screen File = Site Specific (typically Flat or Scope based on content) • Use PCF = not selected (unchecked) • Lamp File = Site Specific • ILS File = Site Specific • Auxiliary Lens = Site Specific – Selected if Anamorphic Lens or WCL needed, otherwise unselected Config. 2 • Measured Color = Site Specific (Create on site) • Target Color = DC28_DCI_XYZE_314_351 • Colour Space = Unity RGB • Gamma = Gamma 2.6 • LUT-CLUT = Linear_9x9x9 • Scan Type = Progressive • LD Bypass = Selected (this sends IMB output directly to ICP. This is required if no LD is installed) 3D Control • Enable 3D = Selected • 3D Sync Input Mode = Use Selected Input Port (polarity = true) • Frame Rate N:M = 6:2 • L/R Display Sequence = Left (L1R1 L2R2) • 3D Sync Polarity = True (If left/right eye images swapped set to Inverted) • Dark Time = 1157 • Output Delay = 0 • Phase Delay = 0 © MASTERIMAGE 3D, Inc. 22 User Manual | MI-CLARITY3D SA User Manual | MI-CLARITY3D User Manual | MI-CLARITY3D 6. Basic Operation of the MI-CLARITY3D Note: In order to prevent accidental operation, press and hold all function buttons for more than 2 seconds for the system to respond. 6.1. System Ready (Standby Condition) With the projector in 3D mode/channel, 1. Ensure that the AC Power Breaker switch is ON. 2. Push the POWER button on the Control Panel to start the system. Readiness is indicated by: • POWER button LED is illuminated. • The display shows its name and firmware version. • The display shows its status as READY when it is ready to run. • The display shows the current set time. © MASTERIMAGE 3D, Inc. 23 User Manual | MI-CLARITY3D SA User Manual | MI-CLARITY3D User Manual | MI-CLARITY3D 6.2. Move Up and Down the PFD 1. In order to position the PFD in front of the projector lens, push the UP arrow button to move the FHA in an upwards direction or the DOWN arrow button for downwards until the PFD is aligned with the projector lens. 6.3. • The display shows its status as UP MOVING while pressing the UP button. • The display shows its status as DOWN MOVING while pressing the DOWN button. Start the System Running 1. Press and hold the RUN/STOP button for more than 3 seconds. The 3D system will start immediately. • The display shows the sync frequency as received from the projector, or the predefined internal frequency. • After the PFD rotation has become synchronized with the input signal from the projector, the display shows its status as RUNNING (LOCK) along with the input frequency. • This indicates that the system is in sync with the projected 3D images. © MASTERIMAGE 3D, Inc. 24 User Manual | MI-CLARITY3D SA User Manual | MI-CLARITY3D User Manual | MI-CLARITY3D 7. Menu Structure with Default Conditions No. 1 st nd 1 Level CLOCK 2 rd Level 3 Level th 4 Level [MMM] [DD] [YYYY] [HH] : [DD] : [SS] [CANCEL] [SAVE] Set the local date and time. Date: JAN 01 2011 ~ DEC 31 2050 | Default: JAN 01 2011 00:00:00 2 LIFT ZERO Adjust Lifting Adjusting Column Position? Lifting Column! [CANCEL] Wait a second… [OK] Adjust the zero position of lifting column for eliminating accumulated position error of lifting column. 3 3D POSITION OLD: mmmm NEW: [MMMM] [CANCEL] [SAVE] Set a 3D position of PFD Value: 0000 ~ < 1800 | Default: N/A (0xFFFF) 4 2D POSITION OLD: mmmm NEW: [MMMM] [CANCEL] [SAVE] Set a 2D position of PFD Value: 0000 ~ < 1800 | Default: N/A (0xFFFF) 5 SYNC SOURCE 1.GPIO >1 2.3D PORT OLD: mmm 3.RS-232C NEW: [MMM] 4.TTL [CANCEL] 5.INTERNAL INTERNAL Hz [SAVE] >1 6.EXIT Select a 3D synchronization input port Value: GPIO, 3D PORT, RS-232C, TTL, INTERNAL, EXIT | Default: GPIO INTERNAL Sync Value: 48 ~ 75Hz | Default: 48Hz © MASTERIMAGE 3D, Inc. 25 User Manual | MI-CLARITY3D SA User Manual | MI-CLARITY3D User Manual | MI-CLARITY3D No. 6 st nd 1 Level AUTOMATION 2 rd Level th 3 Level 1. MANUAL >1 2. GPIO OLD: mmm 3. RS-232C NEW: [MMM] 4. RS-422 [CANCEL] [SAVE] 4 Level REFERENCE Hz 5. 3D PORT 6. ETHERNET 7. SYNC PULSE >1 8. EXIT Select a 3D automation I/O port Value: MANUAL, GPIO, RS-232C, RS-422, 3D PORT, ETHERNET, SYNC PULSE | Default: MANUAL REFERENCE Hz Value: 48 ~ 75Hz | Default: 72Hz 7 PFD HOME Set MARK Top, Setting PFD PFD Home Setting and Push [RUN] Home Position! Completed! [CANCEL] Wait a second… [EXIT] Set the PFD Home position to teach the system the 3D synchronization position for the PFD during the initial installation, after PFD replacement or Factory Default reset 8 3D PHASE 1. SYNcPOLARITY 2.OFFSET >2 >1 >1 SYNC POLARITY OLD: TRUE 3. EXIT NEW: [INVERT] [CANCEL] [SAVE] >2 OFFSET OLD: mmm NEW: [MMM] [CANCEL] [SAVE] Adjust sync polarity and the offset of 3D phase if any 3D artifacts are seen on screen SYNC POLARITY Value: TRUE, INVERT, Default: TRUE OFFSET Value: -180 ~ +180 | Default: +000 9 DIAGNOSTICS Diagnose FSMC TEST: mm* System Status? EPP TEST: mm [CANCEL] SVO TEST: mm [OK] [EXIT] © MASTERIMAGE 3D, Inc. 26 User Manual | MI-CLARITY3D SA User Manual | MI-CLARITY3D User Manual | MI-CLARITY3D No. st nd 1 Level 2 rd Level th 3 Level 4 Level Diagnose the system status including communication to FPGA, EEPROM, and communication to Servo pack. *mm: Ok or NG 10 SET PASSWORD 1.PASSWORD [OFF]* 2.NEW PASSWORD 3.EXIT >1 >2 >1 SET PASSWORD OLD: mmm* NEW: [MMM]* [CANCEL] >2 [SAVE] NEW PASSWORD KEY: [o] * * * >3 CONFIRM PWD KEY: [o] * [CANCEL] * [OK] >3 * * * [CANCEL] [OK] Turn on or off system password, set new 4-digit password KEY Value: 0 ~ 9 | Default: 0 Password Value: 0000 ~ 9999 | Default: 0000 * Current Status: OFF or ON 11 SET ETHERNET 1.IP >1 >1 2.SUBNET MASK 3.GATEWAY >3 4.PORT NUMBER 5.EXIT >2 IP [MMM].[NNN].[NNN].[OOO] [CANCEL] >4 >2 [SAVE] SUBNET MASK [NNN].[NNN].[NNN].[NNN] [CANCEL] >3 [SAVE] GATEWAY [MMM].[NNN].[NNN].[OOO] [CANCEL] >4 [SAVE] PORT NUMBER [n][m][m][m][m] [CANCEL] [SAVE] Configure Ethernet parameters for automation Value: [MMM] 0 ~ 233, [NNN] 0 ~ 255, [OOO] 0 ~ 254 | IP Default: 192.168.000.101, SUBNET MASK Default: 255.255.255.000, GATEWAY Default: 192.168.000.001 PORT NUMBER: 00001 ~ 49999 | Default: 5000 © MASTERIMAGE 3D, Inc. 27 User Manual | MI-CLARITY3D SA User Manual | MI-CLARITY3D User Manual | MI-CLARITY3D No. 12 st nd 1 Level SET FACTORY 2 rd Level 3 Level Perform Performing a Factory Reset? a Factory Reset! [CANCEL] Wait a second… [OK] th 4 Level Reset all user entered information to the factory condition. 13 SET SERVO ADDRESS:[0xMMM] DATA: [EXIT] [NNNNNNNN] [RD] [WR] Get or set parameters of Servo pack 14 LOG INFO INDEX: [NNNN] YYYY-MM-DD>hh:mm:ss [log_msg][param1][param2] [EXIT] Get log data Value: [NNNN] 0000~2048 15 INFORMATION MASETERIMAGE 3D, INC. DIGITAL 3D CINEMA SYSTEM> MICLARITY3D *F/W VER: 000-004-002 *FPGA VER:00c +1 +2 *Sep 1 2011, 05:26:31 +3 Show system information +1 F/W Version, +2 FPGA Version, +3 Date and time of building F/W © MASTERIMAGE 3D, Inc. 28 User Manual | MI-CLARITY3D SA User Manual | MI-CLARITY3D User Manual | MI-CLARITY3D 8. Detailed Setup and Configuration of the MI-CLARITY3D 8.1. Setting the Clock Note: The Factory Default setting is JAN 01 2011 00:00:00. 1. To set the local time and date on the system from the standby condition, press and hold the MENU key. 2. Press UP or DOWN key to select CLOCK menu in the SETUP screen. 3. Press ENTER key to set clock. 4. Press UP or DOWN key to increase or decrease the value of selected field. • Press LEFT or RIGHT key to select a field for changing its value. • Press and hold the ENTER key on selecting CANCEL to return to the SETUP screen without saving the current value. • Press and hold the ENTER key on selecting SAVE to return to the SETUP screen after saving the current value. Note: To rapidly increase or decrease a value of selected field, press and hold UP or DOWN key. 8.2. Setting the Lifting Column Zero Position 1. To adjust the zero position of the lifting column from the standby condition, press and hold the MENU key. 2. Press UP or DOWN key to select LIFT ZERO menu in the SETUP screen. 3. Press ENTER key to adjust the lifting column zero position. 4. Press LEFT or RIGHT key to select CANCEL or OK. 5. Press and hold the ENTER key on selecting CANCEL to return to the SETUP screen without adjusting the lifting column zero position. 6. Press and hold the ENTER key on selecting OK to adjust the lifting column zero position. • While adjusting the lifting column zero position, the lifting © MASTERIMAGE 3D, Inc. 29 User Manual | MI-CLARITY3D SA User Manual | MI-CLARITY3D User Manual | MI-CLARITY3D column goes down to bottom position, then goes up some distance, and then goes down to bottom position. • 8.3. After finishing adjustment of the lifting column zero position, SETUP screen automatically displays. Setting a 3D Position Note: The Factory Default setting is N/A. 1. To set a 3D position of Filter Head Assembly (FHA) from the standby condition, press and hold the MENU key. 2. Press UP or DOWN key to select 3D POSITION menu in the SETUP screen. 3. Press ENTER key to set a 3D position of FHA 4. Press UP or DOWN key to move the FHA position up or down. The FHA goes up or down quickly while pressing UP or DOWN key. The NEW value shows current position of the FHA. 5. Press LEFT or RIGHT key to select CANCEL, SAVE or NEW value. 6. Pres sand hold the ENTER key on selecting CANCEL to return to the SETUP screen without saving new 3D position value. 7. Press and hold the ENTER key on selecting SAVE to return to the SETUP screen after saving new 3D position value. © MASTERIMAGE 3D, Inc. 30 User Manual | MI-CLARITY3D SA User Manual | MI-CLARITY3D User Manual | MI-CLARITY3D 8.3.1. Moving FHA to a Predetermined 3D Position 1. To move the FHA to a predetermined 3D position from the standby condition, press and hold the 3D button. The display shows its status as 3D POSITION while moving the FHA to a predetermined 3D position. 2. Press 2D or RUN/STOP button to immediately stop the motion of the PFD. 8.4. Setting a 2D Position Note: The Factory Default setting is N/A. 1. To set a 2D position for the FHA from the standby condition, press and hold the MENU key. 2. Press UP or DOWN key to select 2D POSITION menu in the SETUP screen. 3. Press ENTER key to set a 2D position of FHA. 4. Press the UP or DOWN key to move the FHA position up or down. The FHA goes up or down quickly while pressing the UP or DOWN key. The NEW value shows current position of the FHA. 5. Press LEFT or RIGHT key to select CANCEL, OK or NEW value. 6. Press and hold the ENTER key on selecting CANCEL to return to the SETUP screen without saving new 2D position © MASTERIMAGE 3D, Inc. 31 User Manual | MI-CLARITY3D SA User Manual | MI-CLARITY3D User Manual | MI-CLARITY3D value. 7. Press and hold the ENTER key on selecting OK to return to the SETUP screen after saving new 2D position value. 8.4.1. Moving FHA to a Predetermined 2D Position 1. To move the FHA to a predetermined 2D position from the standby condition, press and hold the 2D button. The display shows its status as 2D POSITION while moving the FHA to a predetermined 2D position. 2. Press 3D or RUN/STOP button to immediately stop the FHA motion. 8.5. Selecting a Sync Source Note: The Factory Default setting is GPIO. 1. To select a 3D synchronization input port that is to be used from the standby condition, press and hold the MENU key. 2. Press UP or DOWN key to select SYNC SOURCE menu in the SETUP screen. 3. Press ENTER key to select a sync source. © MASTERIMAGE 3D, Inc. 32 User Manual | MI-CLARITY3D SA User Manual | MI-CLARITY3D User Manual | MI-CLARITY3D SYNC SOURCE shows the current synchronization input port in the list. The selected option is indicated by the asterisk *. 4. Press the UP or DOWN key to select previous or next sync source in the list. The options for sync source include GPIO, 3D PORT, RS232C, TTL, and INTERNAL. 5. Press ENTER key to return to the SETUP screen after saving the current selected item as new sync source. 6. Press ENTER key on selecting EXIT to return to the SETUP screen without changing the current sync source. 8.5.1. Setting Internal Sync Source Frequency Note: The Factory Default setting is 48Hz. If the INTERNAL sync source is selected, the default frequency of the internal sync generator can be adjusted as required from 48 to 75Hz. 1. Press the ENTER key on selecting INTERNAL to set the default frequency of the internal sync generator. The display shows the default frequency of the internal sync generator. 2. Press UP or DOWN key to increment or decrement the default frequency of NEW value. 3. Press LEFT or RIGHT key to select CANCEL, OK or NEW value. 4. Press and hold the ENTER key on selecting CANCEL to return to the SETUP screen without saving new default frequency value. 5. Press and hold the ENTER key on selecting OK to return to the SETUP screen after saving new default frequency value. © MASTERIMAGE 3D, Inc. 33 User Manual | MI-CLARITY3D SA User Manual | MI-CLARITY3D User Manual | MI-CLARITY3D 8.6. Selecting an Automation Source Note: The Factory Default setting is Manual. Options are available to automate the control of the MI-CLARITY3D for both 2D and 3D movie presentation. As a default, all controls are set to be operated from the Control Panel on the system as shown below. 1. To select an automation source from the standby condition, press and hold the MENU key. 2. Press UP or DOWN key to select AUTOMATION menu in the SETUP screen. 3. Press ENTER key to select an automation source. AUTOMATION shows the current automation source in the list. The selected option is indicated by the asterisk *. 4. Press the UP or DOWN key to select previous or next automation source in the list. The options for automation source include MANUAL, GPIO, RS-232C or RS-422, 3D PORT, ETHERNET, and SYNC PULSE. 5. Press the ENTER key to return to the SETUP screen after saving the current selected item as new automation source. 6. Press the ENTER key on selecting EXIT to return to the SETUP screen without changing the current automation source. Note: SYNC PULSE automation: When this option is selected the system will prompt for an entry to be made for the frequency that is to be detected. This input range is from 48 to 75Hz. If, for example, this was set to 72Hz for 6:2 presentation then when the system receives a synchronization signal above 71Hz, the system automatically begins to rotate the PFD and moves the FHA to the 3D position. Equally, when the synchronization signal drops below 71Hz, the system automatically stops PFD rotation and moves the FHA to the 2D position.. © MASTERIMAGE 3D, Inc. 34 User Manual | MI-CLARITY3D SA User Manual | MI-CLARITY3D User Manual | MI-CLARITY3D 8.7. Setting PFD Home Position IMPORTANT: PFD Home Position adjustment is required at installation, after PFD replacement or Factory Default reset. It is necessary to teach the system the 3D synchronization position for the PFD 1. To set PFD home position from the standby condition, press and hold the MENU key. 2. Press the UP or DOWN key to select PFD HOME menu in the SETUP screen. 3. Press the ENTER key to set PFD home position. 4. As instructed, rotate the PFD manually so that the black sensor mark on the outer edge can be seen at the top position of the PFD window in the PFD cover as shown in this illustration. 5. Press the ENTER key on selecting CANCEL to return to the SETUP screen without setting PFD home position. 6. Press the RUN/STOP button to set PFD home position. 7. Press the ENTER key on selecting EXIT to return to the SETUP screen after setting PFD home position. © MASTERIMAGE 3D, Inc. 35 User Manual | MI-CLARITY3D SA User Manual | MI-CLARITY3D User Manual | MI-CLARITY3D 8.8. Adjusting 3D Phase CAUTION: While it is possible to make adjustments to the 3D PHASE angle within the MI-CLARITY3D, this is not usually required or recommended. Note: The Factory Default setting is SYNC POLARITY = TRUE 3D PHASE = +000. If any 3D artifacts are seen on screen, it is possible to manually adjust the 3D phase of the MI-CLARITY3D. 1. To adjust 3D phase from the standby condition, press and hold the MENU key. 2. Press the UP or DOWN key to select 3D PHASE menu in the SETUP screen. 3. Press the ENTER key to adjust 3D phase. 4. The default setting for this item is 0o and can be adjusted both to the positive and negative in 1o steps using the UP or DOWN key. It is necessary to view the image on screen after each adjustment to ensure any artifacts have been eliminated. 5. Press LEFT or RIGHT key to select CANCEL, SAVE or NEW value. 6. Press and hold ENTER key on selecting CANCEL to return to the SETUP screen without saving new 3D phase value. 7. Press and hold ENTER key on selecting SAVE to return to the SETUP screen after saving new 3D phase value. 8.9. System Diagnostics 1. To diagnose the system from the standby condition, press and hold the MENU key. 2. Press UP or DOWN key to select DIAGNOSTICS menu in the SETUP screen. 3. Press ENTER key to diagnose the system. © MASTERIMAGE 3D, Inc. 36 User Manual | MI-CLARITY3D SA User Manual | MI-CLARITY3D User Manual | MI-CLARITY3D 4. Press LEFT or RIGHT key to select CANCEL or OK. 5. Press and hold the ENTER key on selecting CANCEL to return to the SETUP screen without diagnosing the system. 6. Press and hold the ENTER key on selecting OK to start diagnostics. After diagnosing the system, the display shows the system status, as shown at left. • FSMC TEST shows the test result of communication to FPGA. • EEP TEST shows the test result of EEPROM. • SVO TEST shows the test result of communication to Servo Pack. If a test has failed, the display shows its status as NG (Not Good). 7. Press ENTER key to return to the SETUP screen. 8.10. Setting the Menu Password Note: The default password is 0000. 1. To set password from the standby condition, press and hold the MENU key. 2. Press UP or DOWN key to select SET PASSWORD menu in the SETUP screen. 3. Press the ENTER key to set password. To Set Password On/Off The current selected condition is indicated inside the [ ] brackets 1. Press ENTER key on selecting 1.PASSWORD [OFF] to turn on password for protecting the system. © MASTERIMAGE 3D, Inc. 37 User Manual | MI-CLARITY3D SA User Manual | MI-CLARITY3D User Manual | MI-CLARITY3D The display shows the current status of Password on/off. 2. Press UP or DOWN key to turn on or off password protection. 3. Press LEFT or RIGHT key to select CANCEL, SAVE or NEW value. 4. Press and hold the ENTER key on selecting CANCEL to return to the SET PASSWORD screen without saving the new on/off state. 5. Press and hold the ENTER on selecting SAVE to return to the SET PASSWORD screen after saving new on/off state. To Change Password 1. Press the ENTER key on selecting NEW PASSWORD to change password. Note: A password must consist of 4 digits, like “1234”. 2. Press UP or DOWN key to select a digit, CANCEL, or OK value. 3. Press and hold the ENTER key on selecting any digit, to select 4-digit password. 4. Press and hold the ENTER key on selecting CANCEL to return to the SET PASSWORD screen without saving new password. 5. Press and hold the ENTER key on selecting OK to confirm new 4-digit password. Note: A password must consist of 4 digits. There will be no action when pressing ENTER key on selecting OK if new password has been entered with fewer than 4 digits. © MASTERIMAGE 3D, Inc. 38 User Manual | MI-CLARITY3D SA User Manual | MI-CLARITY3D User Manual | MI-CLARITY3D 6. Press UP or DOWN key to select a digit, CANCEL, or OK value. 7. Press and hold the ENTER key on selecting any digit, to select 4-digit password. 8. Press and hold the ENTER key on selecting CANCEL to return to the SET PASSWORD screen without saving new password. 9. Press and hold the ENTER key on selecting OK to return to the SET PASSWORD screen after saving new 4-digit password. To Protect the System with a Password If the password is turned ON, you must enter the correct 4-digit password to access the SETUP screen. 1. Press UP or DOWN key to select a digit, CANCEL, or OK value. 2. Press and hold the ENTER key on selecting any digit. 3. Press and hold the ENTER key on selecting CANCEL to return to the standby condition. 4. Press and hold the ENTER key on selecting OK to enter to the SETUP screen if the password is correct. © MASTERIMAGE 3D, Inc. 39 User Manual | MI-CLARITY3D SA User Manual | MI-CLARITY3D User Manual | MI-CLARITY3D 8.11. Ethernet Configuration Note: Factory Default settings are: IP= 192.168.000.101 SUBNET MASK= 255.255.255.000 GATEWAY= 192.168.000.001 PORT NUMBER= 5000 The items that require configuration are IP, SUBNET MASK, GATEWAY and PORT. 1. To configure Ethernet from the standby condition, press and hold the MENU key. 2. Press UP or DOWN key to select 11.SET ETHERNET menu in the SETUP screen. 3. Press ENTER key to configure Ethernet. 4. Press UP or DOWN key to select previous or next configuration item in the list. The options for Ethernet configuration include IP, SUBNET MASK, GATEWAY and PORT. 5. Press the ENTER key on selecting EXIT to return to the SETUP screen. To Set the IP Address 1. Press ENTER key on selecting 1.IP to change IP address. The display shows the current IP address. 2. Press UP or DOWN key to increment or decrement the selected value. 3. Press LEFT or RIGHT key to select any IP address, CANCEL, or SAVE. 4. Press and hold the ENTER key on selecting CANCEL to return to the SET ETHERNET screen without saving new IP address. 5. Press and hold the ENTER key on selecting SAVE to return to the SET ETHERNET screen after saving new IP address. © MASTERIMAGE 3D, Inc. 40 User Manual | MI-CLARITY3D SA User Manual | MI-CLARITY3D User Manual | MI-CLARITY3D To Set the Subnet Mask 1. Press ENTER key on selecting SUBNET MASK to change Subnet Mask address. The display shows the current Subnet Mask address. 2. Press UP or DOWN key to increment or decrement the selected value. 3. Press LEFT or RIGHT key to select any Subnet Mask address, CANCEL, or SAVE. 4. Press and hold the ENTER key on selecting CANCEL to return to the SET ETHERNET screen without saving new Subnet Mask address. 5. Press and hold the ENTER key on selecting SAVE to return to the SET ETHERNET screen after saving new Subnet Mask address. To Set the Gateway 1. Press ENTER key on selecting 3.GATEWAY to change Gateway address. The display shows the current Gateway address. 2. Press UP or DOWN key to increment or decrement the selected value. 3. Press LEFT or RIGHT key to select any Gateway address, CANCEL, or SAVE. 4. Press ENTER key more than 1 second on selecting CANCEL to return to the SET ETHERNET screen without saving new Gateway address. 5. Press ENTER key more than 1 second on selecting SAVE to return to the SET ETHERNET screen after saving new Gateway address. © MASTERIMAGE 3D, Inc. 41 User Manual | MI-CLARITY3D SA User Manual | MI-CLARITY3D User Manual | MI-CLARITY3D To Set the Port Number 1. Press ENTER key on selecting PORT NUMBER to change the Port Number. The display shows the current Port Number. 2. Press UP or DOWN key to increment or decrement each digit individually to set the desired value. 3. Press LEFT or RIGHT key to select each digit, CANCEL, or SAVE. 4. Press and hold the ENTER key on selecting CANCEL to return to the SET ETHERNET screen without saving new Port Number. 5. Press and hold the ENTER key on selecting SAVE to return to the SET ETHERNET screen after saving new Port Number. 8.12. Performing a Factory Reset This option will reset all user entered information (Date/Time, Ethernet Configuration, 2D and 3D Position, 3D Phase, Password, etc.) to the factory condition. 1. To perform a factory reset from the standby condition, press and hold the MENU key. 2. Press UP or DOWN key to select SET FACTORY menu in the SETUP screen. 3. Press ENTER key to perform a factory reset. 4. Press LEFT or RIGHT key to select CANCEL, or OK. 5. Press and hold the ENTER key on selecting CANCEL to return to the SETUP screen without performing a factory rest. 6. Press and hold the ENTER key on selecting OK to start to perform a factory reset. Wait a short time. © MASTERIMAGE 3D, Inc. 42 User Manual | MI-CLARITY3D SA User Manual | MI-CLARITY3D User Manual | MI-CLARITY3D 7. After completing a factory reset, LIFT ZERO SET screen shows automatically. Press OK to accept this automatic setting. Note: For eliminating accumulated position error of lifting column, adjust lifting column zero position after performing a factory reset. Then the PFD Home Position adjustment MUST be performed again. Refer to section 8.7, Setting the PFD Home Position, on page 35. 8.13. Servo Pack Parameter Information 1. To get or set parameters of Servo Pack from the standby condition, press and hold the MENU key. 2. Press UP or DOWN key to select SET SERVO menu in the SETUP screen. 3. Press ENTER key to set parameters of Servo Pack. 4. Press UP or DOWN key to change values of ADDRESS or DATA 5. Press LEFT or RIGHT key to select ADDRESS, DATA, EXIT, RD, or WR. 6. Press and hold the ENTER key on selecting EXIT to return to the SETUP screen. 7. Press and hold the ENTER key on selecting RD to read data of the defined address from Servo Pack. 8. Press and hold the ENTER key on selecting WR to write data of the defined address into Servo Pack. 8.14. System Log Information Note: The system can store up to 2048 unique operation logs referenced by date and time. These can assist with system troubleshooting should a problem occur. 1. To get system information from the standby condition, press the MENU key more than 1 second. 2. Press UP or DOWN key to select LOG INFO menu in the SETUP screen. 3. Press ENTER key to get and see log data. © MASTERIMAGE 3D, Inc. 43 User Manual | MI-CLARITY3D SA User Manual | MI-CLARITY3D User Manual | MI-CLARITY3D The display shows the index of recent log, time stamp, log name, parameter 1, and parameter 2. 4. Press UP or DOWN key to change the log INDEX. The Index is simply the sequential number of each log data entry. Log Data entries are date/time stamped (the second line in the display). The message is displayed on the third line. The maximum number of stored log messages is 9999. 5. Press LEFT or RIGHT key to select INDEX or EXIT. 6. Press and hold the ENTER key on selecting EXIT to return to the SETUP screen. Current Log Messages Log name st Description nd 1 Parameter 2 Parameter Remarks SSYC Rotating PFD after receivig sync signal Sync signal (Hz) Servo speed (Hz) This log is recorded when locking sync signal. CYNC Changing sync signal Sync signal (Hz) Servo speed (Hz) Stop running PFD or change sync signal more than 3Hz SPER Servo pack Error N/A N/A DC3D PFD moved to 3D position Preset 3D position counter of lifting column Position counter of current lifting column DC2D PFD moved to 2D position Preset 2D position counter of lifting column Position counter of current lifting column 8.15. System Information 1. To get system information from the standby condition, press and hold the MENU key. 2. Press UP or DOWN key to select INFORMATION menu in the SETUP screen. 3. Press ENTER key to get system information. The display shows the Copyright, Product Name, Brand Name, F/W (firmware) version, FPGA version, and date and time of building F/W. 4. Press ENTER key to return to the SETUP screen. © MASTERIMAGE 3D, Inc. 44 User Manual | MI-CLARITY3D SA User Manual | MI-CLARITY3D User Manual | MI-CLARITY3D 9. Installation Checklist No. Item Check 1 Determine spacing and position of the MICLARITY3D in front of the Projector 2 Check that the polarizing filter is on the screen side of the disk, and silver screen and nondepolarizing port glass are installed. 3 Check SYNC Cable connection between MI-CLARITY3D and Projector 4 Check the Projector lens and MI-CLARITY3D filter are parallel and that the base wheels are locked. 5 Check location of the projected image on the top center of MI-CLARITY3D filter. 6 Store the position settings for both 2D and 3D. 7 Confirm that PFD Home Position adjustment has been performed. 8 Check the Projector 3D Control file settings 9 Check that the LCD display is showing the sync frequency and “LOCK” when filter is running 10 Check the 3D picture for proper 3D effects, proper framing and no ghosting. 11 Complete the Installation Record Form, and send it to [email protected] or fax a copy to 323-960-8008. © MASTERIMAGE 3D, Inc. Remarks 45 User Manual | MI-CLARITY3D SA User Manual | MI-CLARITY3D User Manual | MI-CLARITY3D 10. Maintenance WARNING: To avoid electric shock, ensure the power switch is off and unplug the power cord prior to cleaning the PFD Injury may result while working near moving parts. Do not power up the system to spin the PFD while cleaning the PFD. CAUTION: Avoid scratching and damaging the PFD by performing the cleaning procedure and use cleaning solutions only as outlined in this document. CAUTION: Use great care not to touch the image area on either side of the PFD. Only handle the PFD by the outer edge. 10.1. Changing the Polarizing Filter Disk (PFD) Polarizing Filter Disks (PFD) should be replaced annually to ensure proper optical performance. A spare PFD should be kept on hand at all times. Contact your local equipment provider or MASTERIMAGE office for the supply of new PFDs. CAUTION: Use only Polarizing Filter Disks (PFD) with a colored label including the initials “PC”. These will include “PC-OK” and “AR-PC”. Any PFDs without a “PC” label must be changed immediately due to risk of possible material failure. Note: If turning the PFD to suit the system installation conditions please follow steps 1~4 and 8~14 of this section. 1. Disconnect the MI-CLARITY3D power cord and sync cable, and move them out from in front of the projector in order to have good access and lighting to work on the filter head assembly. 2. Carefully remove the PFD cover by removing the eight screws. Remove the screws in a sequence starting with bottom screws and moving on to top screws. © MASTERIMAGE 3D, Inc. 46 User Manual | MI-CLARITY3D SA User Manual | MI-CLARITY3D User Manual | MI-CLARITY3D 3. Unfasten the PFD by removing the twelve outer screws holding it in place followed by the center PFD position guide and screw. 1. PFD 2. PFD Position Guide 3. PFD Position Guide Screw 4. PFD Outer Screws and Washers CAUTION: Use ONLY a hand screwdriver to loosen and tighten the PFD screws. DO NOT use any powered screwdriver or drill motor that could over-tighten the screws and damage the PFD. © MASTERIMAGE 3D, Inc. 47 User Manual | MI-CLARITY3D SA User Manual | MI-CLARITY3D User Manual | MI-CLARITY3D 4. Carefully remove the PFD from the drive hub. 5. Set the old PFD aside and immediately mark it with a permanent marker as follows: “Used, removed on [today’s date]”. 6. Wipe any dust off of the PFD cover back with a suitable cleaning cloth (but not the PFD cleaning cloth). 7. Unwrap the new PFD as follows: • First remove the circular protective film from the polarization filter side of the PFD. • Then remove the individual pieces of cling film from each of the 12 filter segments, if applicable. Note: PFDs labeled with the “AR PC” code, as shown at right, do not have the small segment cling film pieces, so simply remove the circle of protective film. The protective film appears dull and is easily removed – if the filter is shiny, these pieces have already been removed. © MASTERIMAGE 3D, Inc. 48 User Manual | MI-CLARITY3D SA User Manual | MI-CLARITY3D User Manual | MI-CLARITY3D • Last, peel off the sticky film from the clear side of the filter. 8. Orient the disk with the filter material facing the correct side for your theatre. The PFD is labeled to show “This side is towards screen” and “This side is towards projector”. CAUTION: The Projectionist or Operator should inspect the surface of the PFD to check for damage using a bright light such as flash light. If there is any damage on polarizing filter disk, please replace it with spare PFD. 9. Carefully place the PFD on the hub and assemble the PFD Position Guide. The polarizing filter material side of the PFD must always face the screen. © MASTERIMAGE 3D, Inc. 49 User Manual | MI-CLARITY3D SA User Manual | MI-CLARITY3D User Manual | MI-CLARITY3D 10. To secure the PFD, do the following: • Insert the countersunk PFD Position Guide Screw. Do not tighten at this time. • Insert each of the 12 PFD Outer Screws but do not tighten. Ensure flat and spring washers are fitted to each screw. CAUTION: Whenever fitting the PFD on the 3D system, a flat washer and a spring lock washer must be used on the 12 outer screws to fix it securely and safely. • After all the screws are in place, begin tightening each screw one at a time following the pattern indicated below. • Tighten only hand-tight. Do not use a powered screwdriver – DO NOT force, to avoid damage to the PFD. Work once around the PDF to check that all screws have been tightened. • If a suitable torque measuring tool is available, apply a maximum torque to the PFD Position Guide Screw of 13 kgf cm. or 11.3 lbf in. (0.94 lbf ft.) and 12 kgf cm. or 10.4 lbf in. (0.868 lbf ft.) to the 12 PFD Outer Screws. © MASTERIMAGE 3D, Inc. 50 User Manual | MI-CLARITY3D SA User Manual | MI-CLARITY3D User Manual | MI-CLARITY3D 8 2 6 10 11 1 5 4 12 13 7 3 9 11. Replace the PFD cover by carefully placing it over the PFD. Replace all eight screws loosely. Hand-tighten the screws firmly from the top to the bottom. 12. Plug in the power cable, turn on the system power, and push the Run/Stop switch to check the filter turning balance. After a successful check, stop the filter, power off the system, and unplug the power cable. 13. Move the MI-CLARITY3D back into proper position in front of the projector lens, and check that the polarization filter side of the PFD is facing the screen. 14. Plug in the power cable, reconnect the sync cable, and check that the system is functioning properly with 3D content on the screen. CAUTION: PFD Home Position adjustment MUST be performed after PFD replacement. Refer to section 8.7, Setting the PFD Home Position, on page 35. 15. Record the date of the filter change and any comments in the Service Data Records. © MASTERIMAGE 3D, Inc. 51 User Manual | MI-CLARITY3D SA User Manual | MI-CLARITY3D User Manual | MI-CLARITY3D 10.2. Cleaning the PFD 10.2.1. Materials Required To ensure that PFD is cleaned safely, use materials as specified. • Use only approved micro fiber type polishing cloths. These cloths feel extra soft to the touch with absolutely no abrasive texture. Samples are shown in the image below: • Isopropyl alcohol – minimum 70% • Clean film handling gloves (optional) CAUTION:. The use of unapproved chemicals can lead to PFD failure. Please contact MASTERIMAGE with any questions regarding cleaning materials. 10.2.2. Cleaning the PFD Note: The PFD cover does not have to be removed to clean the PDF. If possible, unlock the wheels and move the MI-CLARITY3Daway from the projector lens to an area with bright lighting. If the unit cannot be moved out to an open space, lower the FHA below the lens using the 2D button in order to provide access to the front and back of the filter. 1. Turn off the power switch and unplug the power cord. 2. Being careful to only touch the center hub, spin the wheel slowly until the black sensor mark is at the top of the PFD opening. This is the starting reference point. © MASTERIMAGE 3D, Inc. 52 User Manual | MI-CLARITY3D SA User Manual | MI-CLARITY3D User Manual | MI-CLARITY3D 3. Hold the PFD steady with one hand, and while applying gentle pressure, carefully wipe the PFD with the cleaning cloth. Wipe from the center of the PFD to the outer edge only. See the illustration below. Black sensor mark Wipe in one direction only, from the center – out to the edge Rotate slowly after wiping each section Cleaning the PFD surface 4. Rotate the PFD slightly with the other hand between each upward wipe of the cloth. Refold the cloth after every 2 or 3 wipes in order to maintain a clean cloth surface on the PFD. 5. Continue to rotate and wipe the PFD until one side of the filter is clean. Use the black sensor mark to indicate when the entire PFD has been wiped. 6. Switch hands or sides and repeat the process for the other side of the PFD, as shown in the illustration below: 7. Repeat the cleaning process if required in order to completely remove any dirt or residue on the PFD. Clean the other side © MASTERIMAGE 3D, Inc. 53 User Manual | MI-CLARITY3D SA User Manual | MI-CLARITY3D User Manual | MI-CLARITY3D For areas that are difficult to clean: Isopropyl alcohol is the recommended cleaning solution. If using any other solution for the first time on the PFD, apply a small amount of solution to the cloth. Then wipe a small area near the PFD hub (out of the picture area) and inspect the results carefully for any surface damage. This must be tested on both sides of the PFD as they are made of different materials. • Apply a small amount of alcohol to the cleaning cloth. Never put cleaning solutions directly on the PFD. • Gently rub the cloth over the PFD while applying a light pressure. Check the results frequently. CAUTION: Projectionist or Operator should inspect the surface of PFD to detect any damage using bright light such as flash light. If there is any damage on polarizing filter disk, please replace it with spare PFD. Note: If not using the MI-CLARITY3D for several days, protect the PFD with a clean cover. For any other cleaning questions contact MASTERIMAGE 3D directly at [email protected] . © MASTERIMAGE 3D, Inc. 54 User Manual | MI-CLARITY3D SA User Manual | MI-CLARITY3D User Manual | MI-CLARITY3D 11. Simple Troubleshooting 11.1. Button LED Notification The system buttons contain LEDs that display system status. 1) yellow LED on RUN/STOP button, 2) blue LED on 3D button, blue LED on 2D button, and green LED on POWER button. BUTTON LED No. State 1 Booting 2 Emergency Stop 3 Servopack Alarm (Servo Error) 4 Sync Lock 5 Sync Fail / Prior to Sync Lock 6 PFD Moving Up 7 PFD Moving Down RUN/ STOP 3D 2D POWER Remarks RUN/STOP On while booting POWER On while system running Flashes at intervals of 0.2 seconds RUN/STOP On while PFD running in sync lock condition. Flashes at intervals of 0.8 seconds KEY BUTTON LED On while completing a task or an action BUTTON LED always On BUTTON LED blinking while completing a task or an action © MASTERIMAGE 3D, Inc. 55 User Manual | MI-CLARITY3D SA User Manual | MI-CLARITY3D User Manual | MI-CLARITY3D 11.2. Fuses If the system is plugged in and the MI-CLARITY3Ds LCD display on the control panel does not light up when the power breaker is switched ON and the Power button has been pressed, then it is necessary to check the main power fuses. To check and replace fuses: 1. Turn off the main power breaker and unplug the MI-CLARITY3D. 2. To check the fuses through the base access door, remove the main base cover plate. 3. Unlock and open access door and locate the two fuse holder modules as shown in this photo: Location of 2 fuse holder modules 4. Open each fuse holder and remove the fuses as shown in the photos below: © MASTERIMAGE 3D, Inc. 56 User Manual | MI-CLARITY3D SA User Manual | MI-CLARITY3D User Manual | MI-CLARITY3D 5. Check the fuses for continuity. Open (burned) fuses can be replaced with time delay fuses of either FNM-10 or FNQ-R-10 type. FNM-10 Type Fuse 6. Install the good fuses and any replacements and close the fuse holders and base door. 7. Plug in the MI-CLARITY3D and turn on the power breaker. If fuses blow again or if the fuses are OK and therefore not the problem, then contact your local service provider or MASTERIMAGE Technical Support (see Section 1.2. Contacting Technical Support for details). 11.3. Servopak Correct Status Indication The Servopak inside the MI-CLARITY3D has a 7 segment LED display that indicates different status conditions for the system. Both correct running conditions and error status indications are described below. The images below indicate the correct status indication from the Servopak for both Standby and Running conditions. © MASTERIMAGE 3D, Inc. 57 User Manual | MI-CLARITY3D SA User Manual | MI-CLARITY3D User Manual | MI-CLARITY3D System Standby Indication System Running Indication 11.4. Servopak Error Status Indication The images below indicate particular Servopak error conditions and the respective corrective action that should be taken. 11.4.1. E Stop Button Pressed Indication shown for 1 second as soon as E-Stop is pressed (rarely seen) Indication after 1 second until E-Stop is released. © MASTERIMAGE 3D, Inc. 58 User Manual | MI-CLARITY3D SA User Manual | MI-CLARITY3D User Manual | MI-CLARITY3D The display will show the E-Stop indication along with the Run/Stop, 3D & 2D buttons all flashing. To recover from this condition check the operating situation is safe, release the EStop button by twisting in the direct of the arrows until the button pops out, the system can now be started. 11.4.2. CN1 Not Connected The display will also show an error similar to that shown at left. If this situation is seen, power off the system, check the connection of the CN1 cable, reinsert if necessary and power on the system. © MASTERIMAGE 3D, Inc. 59 User Manual | MI-CLARITY3D SA User Manual | MI-CLARITY3D User Manual | MI-CLARITY3D 11.4.3. CN2 Not Connected The display will also show an error similar to that in the image above. If this situation is seen, power off the system, check the connection of the CN2 cable, reinsert as necessary and power on the system. © MASTERIMAGE 3D, Inc. 60 User Manual | MI-CLARITY3D SA User Manual | MI-CLARITY3D User Manual | MI-CLARITY3D 12. Firmware Upgrading Process for MI-CLARITY3D Series Note: The latest firmware and associated utility tools can be downloaded from the MasterImage FTP site: ftp://masterimage3d.us L: mi3dguest1 P: MI3DuploadASIA The current system firmware version can be seen on the LCD display when the system is in Standby. 12.1. Download and Install the Upgrading Utility Tools Download the firmware upgrading utility and virtual COM port driver from the following URL: ⇒ http://www.st.com/internet/mcu/product/164495.jsp 1. Execute the VCPDriver executable file downloaded from the ftp site to install the virtual COM port driver, following the on-screen instructions to complete the process. 2. Execute the DfuSe_Demo executable file downloaded from the ftp site to install the DfuSe Demo utility program, following the on-screen instructions to complete the process. 12.2. Upgrade Firmware of MI-CLARITY3D 1. Connect between the MI-CLARITY3D and your PC using a USB cable. 2. Push and hold the MI-CLARITY3D POWER button to turn off the system power. 3. Push and hold the ENTER key and push the POWER button to change the system to the DFU (Device Firmware Upgrade) mode. The screen shown below will display on the MI-CLARITY3D. 4. Execute DfuSe Demo utility by double clicking the icon on your PC desktop. 5. Click the Choose button to open the pre-downloaded firmware file. © MASTERIMAGE 3D, Inc. 61 User Manual | MI-CLARITY3D SA User Manual | MI-CLARITY3D User Manual | MI-CLARITY3D 6. Select new firmware file from the location it was saved on your computer, having the *.dfu file extension in the Open dialog box. Then click the Open button to upgrade firmware. 7. Click the Upgrade button to start firmware upgrading. © MASTERIMAGE 3D, Inc. 62 User Manual | MI-CLARITY3D SA User Manual | MI-CLARITY3D User Manual | MI-CLARITY3D 8. Click the Yes button if the utility shows a confirmation dialog such as the example below, after making sure the correct file has been selected for upgrade. 9. Click Quit after confirming the firmware upgrade was successful. © MASTERIMAGE 3D, Inc. 63 User Manual | MI-CLARITY3D SA User Manual | MI-CLARITY3D User Manual | MI-CLARITY3D 10. Turn off the MI-CLARITY3D AC Power Breaker and then turn it on again (“cycle the power”). 11. Press the MI-CLARITY3D POWER button and check the new version number on the System Version screen, as shown below. 12.3. Upgrade FPGA Binary 1. Connect between the MI-CLARITY3D and your PC using a USB ‘A’ to ‘B’ cable. 2. Check the STMicroelectroncis Virtual COM Port number in the Device Manager of your PC. (See Appendix E, page 93.) 3. Execute Monitor program by double clicking the program’s icon in your PC. © MASTERIMAGE 3D, Inc. 64 User Manual | MI-CLARITY3D SA User Manual | MI-CLARITY3D User Manual | MI-CLARITY3D 4. Click the Setup button to open the Setup Dialog window. 5. Select the COM Port number of STMicroelectonices Virtual COM Port that you checked in step 2 and click OK. Example Setup Dialog 6. Click the Connect button to connect between the Monitor program and the MI-CLARITY3D. 7. Click the FPGA button to open the FPGA Download Dialog screen. Example FPGA Download Dialog © MASTERIMAGE 3D, Inc. 65 User Manual | MI-CLARITY3D SA User Manual | MI-CLARITY3D User Manual | MI-CLARITY3D 8. Click the Open button to open the Open dialog. 9. Select new FPGA binary file having ‘*.dat’ file extension in the list of Open dialog box and click the Open button. Example Open Dialog 10. Click Download button to start FPGA binary upgrading. • During FPGA binary upgrade, the FPGA Upgrade screen will be displayed on the control panel. 11. Click the EXIT button after confirming FPGA binary upgrade is successful. 12. Click the Info button to check the new FPGA version number (an example is shown below). © MASTERIMAGE 3D, Inc. 66 User Manual | MI-CLARITY3D SA User Manual | MI-CLARITY3D User Manual | MI-CLARITY3D One the upgrade process is complete, the system will have completed an automatic FACTORY RESET, therefore it will be necessary to reset the following items: • LIFT ZERO – This process will be automatically prompted. See 8.2, Setting the Lifting Column Zero Position, on page 29. • CLOCK – Re-enter the current date and time. See 8.1, Setting the Clock, on page 29. • 3D and 2D Position – Re-enter the required height positions for 3D and 2D. See 8.3, Setting a 3D Position, on page 30, and see 8.4, Setting a 2D Position, on page 31. • PFD Home Position – Perform the Home Position adjustment. Refer to section 8.7, Setting the PFD Home Position, on page 35. • Ethernet Configuration – If using Ethernet automation re-enter the required configuration settings. See8.11, Ethernet Configuration, on page 40. © MASTERIMAGE 3D, Inc. 67 User Manual | MI-CLARITY3D SA User Manual | MI-CLARITY3D User Manual | MI-CLARITY3D 13. Product Specifications Category Specification Model Name [200 ~ 230V] MI-CLARITY3D SA [100 ~ 120V] MI-CLARITY3D SA(T) Size and Weight Projection Height (Max/Min): 1370/870 mm (54.6/34.3 in.) Width: 580 mm (22.8 in.) Depth: 296.6 mm (11.7 in.) Weight: 52 kg (114 lbs.) Polarized Filter Disc (PFD) Head Up/Down Speed: 15 mm/sec (5/8 in./sec) (for standalone only) Dedicated settings and control buttons for 2D/3D positions Enhanced Motor Control: smooth start and stop motor ramping Automation Interface Display: 128x64 Graphic LCD Controls: Power, Run-Stop, 3D/2D, 4-way Menu Navigation, Emergency Stop Log Messages: Over 200 recorded events with time stamp Projectors Supports all professional DLP projectors DCI compliant systems and non-DCI professional systems Screen Size Maximum recommended size: 60 feet/18.2 meters Silver screen is required © MASTERIMAGE 3D, Inc. 68 User Manual | MI-CLARITY3D SA User Manual | MI-CLARITY3D User Manual | MI-CLARITY3D Dimensions in inches. Dimensions in millimeters. © MASTERIMAGE 3D, Inc. 69 User Manual | MI-CLARITY3D SA User Manual | MI-CLARITY3D User Manual | MI-CLARITY3D 14. Appendix A – Turning the Filter Head Assembly (FHA) The following steps describe removing and turning the FHA in order to orient the system in a non-standard configuration. Reference Orientations 3 & 4 – Reversed Filter Head Right and Left on page 15. 1. Raise the filter motor at least 8 cm from its bottom stop position or to the memorized 3D position. 2. Power off and unplug the MI-CLARITY3D. 3. Loosen and remove the four hex-head bolts attaching the motor mount to the support bracket, while supporting the weight of the filter head assembly. Use hex key to remove bolts 4. Remove the FHA. 5. Turn around the head assembly through 180° taking care not to stress the control cables. Place the mounting bracket on the rubber pad and reattach the motor mount with the four hex-head bolts. 6. Confirm that the PFD faces the correct direction when positioned in front of the lens – polarizing filter material to the screen side of the filter disk. Change the PFD direction if necessary. IMPORTANT: PFD Home Position adjustment is required. Refer to section 8.7, Setting the PFD Home Position, on page 35. © MASTERIMAGE 3D, Inc. 70 User Manual | MI-CLARITY3D SA User Manual | MI-CLARITY3D User Manual | MI-CLARITY3D 7. Move system in front of projector. Make various adjustments to PFD position according to standard installation procedures by moving the motor up and down (see 5.3 on page 16) and moving the bracket in its slide in order to position the filter close to the lens at the correct height (see Orienting the MI-CLARITY3D in front of the Digital Projector on page 13). © MASTERIMAGE 3D, Inc. 71 User Manual | MI-CLARITY3D SA User Manual | MI-CLARITY3D User Manual | MI-CLARITY3D 15. Appendix B – MI-CLARITY3D Automation Table B-1. GPIO Automation DSUB9(GPIO) Pin name Pin number NC 1 PRJ_COM_nRUN 2 Comm. Direction 3 4 Description 12(+) PFD RUN command 31(-) 5 PRJ_COM_nUP Pin number Comments No connection 5 PRJ_SYNC DSUB37 9(+) Vertical sync pulse Comparator 24V max, 12V threshold (LM2901H) 28(-) 2(+) PFD UP command Low Pulse • 200ms 5 21(-) GND 5 20,21,22, 28,29,30, 31, Ground PRJ_COM_nDOWN 6 3(+) PFD DOWN command Low Pulse • 200ms (LM2901H) PFD driving status High pulse • 200ms Open collector output 24V, 20mA (SN7407) 5 PRJ_STS_nLOCK 7 22(-) 5 PRJ_STS_nUP 8 20(-) 5 PRJ_STS_nDOWN Shield ground 9 1(+) 10(+) 29(-) 11 5 30 frame frame PFD position status High pulse • 200ms PFD position status High pulse • 200ms Chassis Ground Connection See timing diagram for GPIO Automation, next page. © MASTERIMAGE 3D, Inc. 72 © MASTERIMAGE 3D, Inc. PRJ_STS_nDOWN PRJ_COM_nDOWN PRJ_STS_nLOCK PRJ_COM_nRUN PRJ_STS_nUP PRJ_COM_nUP 200ms ≥ 200ms Synchronization ≥ 200ms GPIO AUTOMATION TIMING DIAGRAM Moving up ≥ 200ms Moving down User Manual | MI-CLARITY3D SA User Manual | MI-CLARITY3D User Manual | MI-CLARITY3D 73 User Manual | MI-CLARITY3D SA User Manual | MI-CLARITY3D User Manual | MI-CLARITY3D Table B-2. TTL Automation DSUB9(TTL) Pin name Pin number NC 1 TX 2 RX 3 NC Comm. Direction DSUB9 Description Pin number 1 No connection 2 Transmitter 3 Receiver (Max :±25V) 4 4 No connection GND 5 5 Ground NC 6 6 No connection NC 7 7 No connection AUTO4_SYNC 8 8 TTL Level SYNC input AUTO3_SYNC 9 9 Shield ground frame frame RS-232 Level SYNC input Comments RS-232 Driver (ST3232ECTR) ST3232ECTR (Max :±25V) Chassis Ground Connection Table B-3. RS232 Automation DSUB9(RS-232) Pin name Pin number NC 1 TX 2 RX 3 NC Comm. Direction DSUB9 Description Pin number 1 No connection 2 Transmitter 3 Receiver (Max :±25V) 4 4 No connection GND 5 5 Ground RXDM 6 6 RXDP 7 7 TXDM 8 8 Inverting transmitter TXDP 9 9 Non inverting transmitter Shield ground frame frame Chassis Ground Connection Inverting receiver (Max :±25V) Non inverting receiver Comments RS-232 Driver (ST3232ECTR) RS-485/422 Driver (ST485BD) (Max :±25V) © MASTERIMAGE 3D, Inc. 74 User Manual | MI-CLARITY3D SA User Manual | MI-CLARITY3D User Manual | MI-CLARITY3D Table B-4. 3D Port Automation DSUB15(3D-Port) Pin name Pin number Comm. Direction DSUB15 1 +12V Max:1A Description Pin number V12A 1 GND 2 2 Ground GND 3 3 Ground AUTO2_TXD 4 4 Transmitter AUTO2_RXD 5 5 Receiver (Max: ±25V) AUTO2_3D_ MODEP 6 6(+) AUTO2_3D_ MODEM 13 13(-) AUTO2_3D_ SYNCP 7 7(+) AUTO2_3D_ SYNCM 14 14(-) AUTO2_INPUT_REFP 8 8(+) AUTO2_INPUT_REFM 10 10(-) AUTO2_DISPLAY_REFP 11 11(+) AUTO2_DISPLAY_REFM 12 12(-) Shield ground frame Comments RS-232 Driver (ST3232ECT R 3D Mode State Comparator Max: ±36V (TS391ILT) SYNC frame 3D L/R Input Reference (P) 3D L/R Display Reference (P) Photocoupler Vce :35V Vec:6V (PC365N) Chassis Ground Connection 15.1. Ethernet Automation This section covers the requirements for Ethernet automation in detail and explains the process for the writing of macros for commonly found digital cinema servers in the market. Note: Attempt these steps only if you are familiar with server configuration settings. If you are unsure of the processes involved, please contact the respective manufacturer of your equipment for further information. If you require detailed information on other forms of automation control please contact MasterImage at [email protected] for details. © MASTERIMAGE 3D, Inc. 75 User Manual | MI-CLARITY3D SA User Manual | MI-CLARITY3D User Manual | MI-CLARITY3D 15.1.1. Doremi Server 1. Within the server menu, open Device Manager (Menu > DTS Digital Cinema > Device Manager) 2. Press the Add button and the list of devices will display (shown right). 3. Select the Raw option to create MasterImage as a known device in the server’s listing. 4. Complete the fields as shown below. Ensure the settings entered match those of the MI-CLARITY3D for IP Address and Port Number. Check the Enabled box and save the entry. The MI-CLARITY3D has now been successfully added into the server configuration. © MASTERIMAGE 3D, Inc. 76 User Manual | MI-CLARITY3D SA User Manual | MI-CLARITY3D User Manual | MI-CLARITY3D It is now possible to create the macro files to enable the server to control the MI-CLARITY3D. The files required are: MasterImage Start, MasterImage Stop, MasterImage 2D, MasterImage 3D and MasterImage Up/Down Stop. These are created in the Macro Editor option of the server menu. (Menu > DTS Digital Cinema > Macro Editor) 1. Within the Automation Cue tab press the + button to start a new macro. Replace the default Test_Macro text with the label for one of the MI macros (for example, MI Start). 2. After the item has been created press OK return to the main Macro Editor screen. Repeat this process for the other four required macros, MasterImage Stop, MasterImage 2D, MasterImage 3D and MasterImage Up/Down Stop. © MASTERIMAGE 3D, Inc. 77 User Manual | MI-CLARITY3D SA User Manual | MI-CLARITY3D User Manual | MI-CLARITY3D 3. To insert an action for each newly created macro, select the macro in question from the list within the Macro window and press the Insert a New Action button which will become available. 4. Highlight the Input/Output option and Send Message, and then press the Add button. The following configuration window will appear: © MASTERIMAGE 3D, Inc. 78 User Manual | MI-CLARITY3D SA User Manual | MI-CLARITY3D User Manual | MI-CLARITY3D 5. In this window, choose the device MasterImage from the Device name dropdown list and type in the Message label of MasterImage Start. Ensure the Message type is Text and type Start\n in the Message box. After all fields have been completed press the OK button. 6. Repeat this step for the remaining four macros entering the corresponding message text: MasterImage Stop Stop\n MasterImage 2D PFD DOWN\n MasterImage 3D PFD UP\n MasterImage Up/Down Stop PFD Stop\n Note: At the end of each command, add the text “\n” to complete the command. 7. Once all message text has been added, press the Save button from the main Macro Editor screen. 8. Now when you return to the CineLister screen and press the Refresh button, the macros will all display in the Automation Cues section (shown below) and can be added to future playlists as required. © MASTERIMAGE 3D, Inc. 79 User Manual | MI-CLARITY3D SA User Manual | MI-CLARITY3D User Manual | MI-CLARITY3D In future versions of Doremi software updates, the MasterImage macros will be included in a file named MasterImage_cueslib. This will remove the requirement for the information to be entered manually as described in the above steps. The MasterImage_cueslib file will be found in the Library section of the Macro Editor and the macros will be seen within that file. © MASTERIMAGE 3D, Inc. 80 User Manual | MI-CLARITY3D SA User Manual | MI-CLARITY3D User Manual | MI-CLARITY3D 15.1.2. Qube Server To create automation macros for the MI-CLARITY3D in the Qube server it is necessary to edit two XML files within the server’s configuration. The files in question are located in the path C:/Program Files/Qube Cinema/XP and are named automationdevices.xml and automationcues.xml Within the same path it is necessary to load a new file named MasterImage.xml 1. First create a link between the server and the MI-CLARITY3D within the automationdevices.xml file. Below you will see the structure of this file: <?xml version="1.0" encoding="utf-8"?> <Devices xmlns="http://schemas.qubecinema.com/Automation/Devices/2008-01-26"> <Device name="Device Name" class="Device Class" enable="true"> <Configuration> <Key name="File" value="file name of the device"/> <Key name="Address" value="address value"/> <Key name="Port" value="port value"/> </Configuration> </Device> </Devices> © MASTERIMAGE 3D, Inc. 81 User Manual | MI-CLARITY3D SA User Manual | MI-CLARITY3D User Manual | MI-CLARITY3D 2. Complete the red fields with the details of the MasterImage MI-CLARITY3D where: “Device Name” is “MasterImage” “Device Class” is “Qube.Automation.streamdevice.TCP” “file name of the device” is “MasterImage.xml” “addess value” is MI-CLARITY3D Assigned IP Address “port value” is “23” It is recommended that Notepad++ or a similar program is used for xml file editing. Note: The automationdevices.xml file is a shared file for all devices that the server can control via automation cues thus it will contain information for devices such as DLP Projector, Sound System and Lighting Control etc. For this reason the file cannot be replaced and must be modified with the lines added as above for the MI-CLARITY3D. Next it is necessary to create and load onto the server the MasterImage.xml file. This file defines and names the commands and text that will be sent to the MI-CLARITY3D. 3. Edit this file so that it contains the information below: <?xml version="1.0" encoding="utf-8"?> <StreamDevice name="MasterImage" xmlns="http://schemas.qubecinema.com/Automation/StreamDevice/2008-01-26"> <Method name="Start"> <Instructions> <Send>Start
</Send> </Instructions> </Method> <Method name="Stop"> <Instructions> <Send>Stop
</Send> </Instructions> </Method> <Method name="3Dposition"> <Instructions> <Send>PFD UP
</Send> </Instructions> </Method> <Method name="2Dposition"> <Instructions> <Send>PFD Down
</Send> © MASTERIMAGE 3D, Inc. 82 User Manual | MI-CLARITY3D SA User Manual | MI-CLARITY3D User Manual | MI-CLARITY3D </Instructions> </Method> <Method name="PFDStop"> <Instructions> <Send>PFD Stop
</Send> </Instructions> </Method> </StreamDevice> The symbols 
 are necessary at the end of each command to close the command in the xml structure. Finally the automationcues.xml file can be edited so that the MI-CLARITY3D device is associated with the command names that have been created. This allows the cues to be seen in the Qube graphical interface. Note: Again, this file is a shared file with other devices in the system so must be edited and not replaced. 4. Edit this file so that it contains the information below: <Cue name="Start 3D"> <Actions> <InvokeMethod name="Start" device="MasterImage"/> </Actions> </Cue> <Cue name="Stop 3D"> <Actions> <InvokeMethod name="Stop" device="MasterImage"/> </Actions> </Cue> <Cue name="3D Position"> <Actions> <InvokeMethod name="3Dposition" device="MasterImage"/> </Actions> </Cue> <Cue name="2D Position"> <Actions> <InvokeMethod name="2Dposition" device="MasterImage"/> </Actions> </Cue> © MASTERIMAGE 3D, Inc. 83 User Manual | MI-CLARITY3D SA User Manual | MI-CLARITY3D User Manual | MI-CLARITY3D <Cue name="Up/Down Stop"> <Actions> <InvokeMethod name="PFDStop" device="MasterImage"/> </Actions> </Cue> Once this file has been edited and saved the graphical interface of the Qube server will display the new cues that can be selected for future playlist creation. 15.1.3. GDC Server The steps described below are specific to the GDC SX-2001 server. If information is required for different models, please contact GDC directly. 1. In the SMS Main Menu press the Control Panel button and log on as Maintenance Access. © MASTERIMAGE 3D, Inc. 84 User Manual | MI-CLARITY3D SA User Manual | MI-CLARITY3D User Manual | MI-CLARITY3D 2. Once you have logged on, press the Automation button found on the General tab. © MASTERIMAGE 3D, Inc. 85 User Manual | MI-CLARITY3D SA User Manual | MI-CLARITY3D User Manual | MI-CLARITY3D The MI-CLARITY3D must be added as a device within the GDC server configuration. 3. Select the Devices tab and press the Add button. The following screen will display: © MASTERIMAGE 3D, Inc. 86 User Manual | MI-CLARITY3D SA User Manual | MI-CLARITY3D User Manual | MI-CLARITY3D 4. Name the new device MasterImage, and ensure the Type selection is set to NETWORKSOCKET, then press OK. 5. In the next screen, enter the configuration settings for the MI-CLARITY3D IP Address and Port Number. 6. In the Transport option select TCP and in the Linefeed Type select CR and ensure the Status is set to Enabled. 7. Once all entries have been made press the Save button. Lastly, it is necessary to program the control macros in the server. 8. Press the Edit Control Cues button and the following screen will display. © MASTERIMAGE 3D, Inc. 87 User Manual | MI-CLARITY3D SA User Manual | MI-CLARITY3D User Manual | MI-CLARITY3D 9. Press the Add button to create a new event. In this case, name the event START. 10. Press the Enter button and enter the command value for the event. Again in this case, START. © MASTERIMAGE 3D, Inc. 88 User Manual | MI-CLARITY3D SA User Manual | MI-CLARITY3D User Manual | MI-CLARITY3D 11. Press the Enter button to save this change, then go back and make entries for the remaining four macros that are required. Event Name STOP Enter Value STOP Event Name 2D POSITION Enter Value PFD DOWN Event Name 3D POSITION Enter Value PFD UP Event Name UP/DOWN STOP Enter Value PFD STOP Once all macros have been created, return to the Actions tab of the Automation screen to create the events that are needed to communicate. This is done by pressing the Add button. 12. For each event, choose the device that was defined in the first step, MasterImage, and then select the required event action from the dropdown list, for example: Start. 13. Follow the same steps to create the rest of the event actions for Stop, 3D Position, 2D Position and Up/Down Stop. © MASTERIMAGE 3D, Inc. 89 User Manual | MI-CLARITY3D SA User Manual | MI-CLARITY3D User Manual | MI-CLARITY3D 14. Once all event actions have been created press the Save button followed by Yes. © MASTERIMAGE 3D, Inc. 90 User Manual | MI-CLARITY3D SA User Manual | MI-CLARITY3D User Manual | MI-CLARITY3D 16. Appendix C – Installation Record The form below and on the next page is an example of the installation record form to be filled out once the MI-CLARITY3D has been set up and configured. For a copy of the form to be filled out, please contact your equipment provider or email a request to [email protected]. Once the form is completed, send it to [email protected] or fax a copy to +1 323-960-8008. © MASTERIMAGE 3D, Inc. 91 User Manual | MI-CLARITY3D SA User Manual | MI-CLARITY3D User Manual | MI-CLARITY3D 17. Appendix D – Periodic Maintenance The table below show the least regular maintenance points carried out by operator in cinema. To guarantee reliable system operation, weekly, monthly and yearly routine maintenance actions should be conducted like manual description or other technical bulletin that MASTERIMAGE released. If you need any assistance regarding these routine jobs, please contact your equipment provider or email [email protected]. INTERVAL ITEM ACTION PFD Cleaning Remove dust from PFD. Refer to Cleaning the PFD, page 52 Check for PFD Damage Inspect surface using flashlight. Burns, scratches, etc. Clean inside of PFD Cover Clean inside PFD cover. Check screws are secure Check all screws on the Filter Head Assembly to verify they are secure. PFD Replacement Replace the PFD. Weekly Monthly Yearly REMARKS © MASTERIMAGE 3D, Inc. Refer to Changing the Polarizing Filter Disk (PFD), page 46 92 User Manual | MI-CLARITY3D SA User Manual | MI-CLARITY3D User Manual | MI-CLARITY3D 18. Appendix E – Check the STM Virtual COM Port Number You can see the virtual COM Port number after connecting MI-CLARITY3D to your PC. • Run the Control Panel in your PC. • Double-click the Device Manager in the Control Panel screen. • Select the Ports (COM & LPT) item in the Device Manager screen. • Check the Port Number of STMicroelectronics Virtual COM Port (COMxx). End of Manual For additional information, go to www.masterimage3d.com. © MASTERIMAGE 3D, Inc. 93