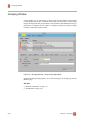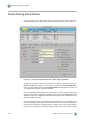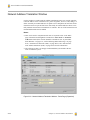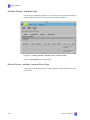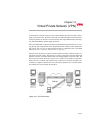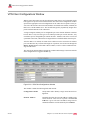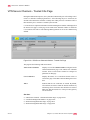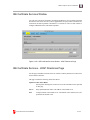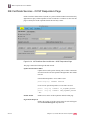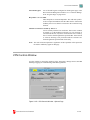
1
CyberGuard Firewall Manual
®
Configuring the CyberGuard Firewall
®
CyberGuard® Firewall for UnixWare®
FW001-080
November 2003
Copyright 2003 by CyberGuard Corporation. All rights reserved. This publication or any part thereof may not be
reproduced for any reason in any form without the written permission of the publisher.
This publication or any part thereof is intended solely for use with CyberGuard Corporation products by CyberGuard
Corporation personnel, customers, and end users.
The information contained in this document is believed to be correct at the time of publication. It is subject to change
without notice. CyberGuard Corporation makes no warranties, express or implied, concerning the information contained in this document.
To report an error or comment on a specific portion of the manual, photocopy the page in question and mark the correction or comment on the copy. Mail the photocopied page (and any additional comments) to CyberGuard Corporation, 2000 West Commercial Boulevard, Suite 200, Fort Lauderdale, FL 33309. Mark the envelope "Attention:
Publications Department."
Printed in U. S. A.
Revision History
Release
Date
Level
Effective With
Original Release
January 1996
0840055-000
0840056-000
CyberGuard 2.1 (CX/SX 6.2)
Previous Release
October 2002
FW001-070
CyberGuard 5.1 (UnixWare 2.1.3)
Current Release
November 2003
FW001-080
CyberGuard 5.2 (UnixWare 2.1.3)
See the CyberGuard Firewall Release Notes for a detailed description of the changes from CyberGuard Firewall
Release 5.1 to CyberGuard Firewall Release 5.2.
Copyright and trademark attributions are documented in “Copyright and Trademark Attributions” in the back of the
book.
Preface
The CyberGuard Firewall Manual consists of three volumes: Administering the
CyberGuard Firewall, Configuring the CyberGuard Firewall, and Configuring
SmartProxies for the CyberGuard Firewall. These volumes document the configuration of the CyberGuard® Firewall, system maintenance, report generation, and the functions of the graphical user interface (GUI). They also explain how to perform common
tasks. Each configurable component of the firewall is documented in three sections: an
overview, a description of its configuration using the GUI, and a description of the underlying files and commands that can be used for background information or for verification
of the GUI by the advanced user. The contents of each volume are described in What Is in
the CyberGuard Firewall Manual? The entire manual is available in both hardcopy and
online (HTML and PDF) formats.
The CyberGuard Firewall Installation Guide explains the procedures for hardware
configuration and setup of the CyberGuard Firewall.
Who Should Read This Manual?
0
This manual is written for network administrators who want basic and advanced, hands-on
information about how to install and use the CyberGuard Firewall system. General knowledge of MotifTM-based graphical user interfaces, UNIX® files and commands, and networking concepts is assumed.
iii
Preface
What Is in the CyberGuard Firewall Manual?
0
Each volume of the CyberGuard Firewall Manual contains a complete Table of Contents, Glossary, and Index as well as the information described below. For quick and easy
access to information, the volume number is represented in the page number as well as in
figure and table numbers. For example, page 215 in Volume 2 is represented as II-215.
Volume 1, “Administering the CyberGuard Firewall,” contains information
relating to setting up and administering your firewall. You will learn about the Graphical
User Interface, Secure Remote Management, Central Management, and High Availability.
This volume also contains information about the extensive reports and tools provided with
the CyberGuard Firewall. Additional information is about the firewall is included in
Appendixes.
Volume 2, “Configuring the CyberGuard Firewall,” contains information
required to configure the CyberGuard Firewall. Each menu item from the Configuration
menu, except for SmartProxies, is described in this volume.
Volume 3, “Configuring SmartProxies for the CyberGuard Firewall,”
describes and explains configuration procedures for each of the SmartProxies of the
CyberGuard Firewall. This volume also explains how to design and implement your own
SmartProxies.
CAUTION!
Screen captures and graphics in this manual are intended as examples and do not necessarily represent a proper or complete configuration or the configuration that is appropriate to your company’s
needs. Often features are enabled so they are clear in the screen
capture. Not all features are appropriate or desirable for your firewall setup.
iv
Preface
Preface
Conventions
0
The following conventions are used throughout this documentation:
italic
New terms, book titles, emphasized words or phrases, variable user input,
and cross-references in the Glossary appear in italic type.
bold
Menu items, field names, default values, push buttons, command names
and options, system manual page references, directories, and file names
appear in bold type. User input for the GUI, which must be entered
exactly as shown, also appears in this type.
code
Value ranges, file samples, and output such as prompts and messages
appears in this type.
code bold
User command input appears in code bold type and must be entered
exactly as shown. Command syntax also appears in this type.
keyboard
Keyboard keys appear in this type.
[]
Brackets indicate that an element of a file or command is optional. Do not
type the brackets if you use the option or argument.
|
This symbol represents a choice between options, arguments, keywords,
or values. When this symbol is present in a file format listing or command syntax, choose one of the items. Do not type this symbol when you
choose an option.
\
A backslash is used at the end of a text or command line to indicate continuation onto the next line. Do not type the backslash.
Related Publications
0
The following publications and sources contain information related to this book:
online
online
online
RN001
IN001
(UnixWare) Network Administration
(UnixWare) System Administration
(UnixWare) System Owner Handbook
CyberGuard Firewall Release Notes
CyberGuard Installation Guide
vendor-supplied
CSMART User’s Guide
vendor-supplied
FullTimeHA+ Installation and Configuration Guide
for UnixWare, provided by Legato Systems, Inc.
vendor-supplied
SecurID, SecureNet Key, and RADIUS documentation
CyberGuard Firewall Manual
v
Preface
vendor-supplied
Websense Enterprise
Websense, Inc.
documentation,
provided
by
vendor-supplied
WebTrends for Firewalls and VPNs, provided by
WebTrends Corporation
http://www.merit.edu
GateD daemon information
[email protected]
E-mail address for the GateD Consortium
[email protected]
E-mail address for the NIC
http://www.socks.permeo.com/AboutSOCKS/SOCKSOverview.asp
SOCKS information
http://www.redcreek.com Red Creek information and documentation:
- MN-00017 B Ravlin IPSec Card Hardware and Installation Guide
- MN-00015 A Ravlin IPSec Card RavlinNodeManager User’s Guide
- MN-00002 C RavlinSoft User's Guide
http://www.3com.com/other/pdfs/infra/corpinfo/en_US/501302.pdf
“Understanding IP Addressing: Everything You Ever
Wanted to Know”
http://tycho.usno.navy.mil/ntp.html
US Navy site with list of NTP servers
ISBN 1-56592-124-0
Building Internet Firewalls by D. Brent Chapman and
Elizabeth D. Zwicky, published by O’Reilly & Associates,
Inc.
ISBN 0-201-63357-5
Firewalls and Internet Security by Cheswick and Bellovin, published by Addison Wesley.
ISBN 1-56592-010-4
DNS and Bind by Albitz and Lui, published by O’Reilly
& Associates, Inc.
ISBN 0-937175-82-X
TCP/IP Network Administration by Craig Hunt, published by O’Reilly & Associates, Inc.
ISBN 1-56592-056-2
sendmail by Bryan Costales with Eric Allman and Neil
Rickert, published by O’Reilly & Associates, Inc.
RFC
RFC
RFC
RFC
RFC
RFC
RFC
RFC
RFC
RFC
vi
793
974
1032
1033
1034
1035
1058
1075
1101
1112
“Transmission Control Protocol”
“Mail routing and the domain system”
“Domain administrators guide”
“Domain administrators operations guide”
“Domain names - concepts and facilities”
“Domain names - implementation and specification”
“Routing Information Protocol”
“Distance Vector Multicast Routing Protocol”
“DNS encoding of network names and other types”
“Host extensions for IP multicasting”
Preface
Preface
RFC 1213
RFC 1535
RFC
RFC
RFC
RFC
1536
1537
1706
1876
RFC
RFC
RFC
RFC
RFC
RFC
RFC
2138
2317
2401
2402
2406
2407
2408
RFC 2409
RFC 2560
CyberGuard Firewall Manual
“Management Information Base for Network Management of TCP/IPbased internets”
“A Security Problem and Proposed Correction With Widely Deployed
DNS Software”
“Common DNS Implementation Errors and Suggested Fixes”
“Common DNS Data File Configuration Error”
“DNS NSAP Resource Records”
“A Means for Expressing Location Information in the Domain Name
System”
“Remote Authentication Dial In User Service (RADIUS)”
“Classless IN-ADDR.ARPA delegation”
“Security Architecture for the Internet Protocol”
“IP Authentication Header”
“IP Encapsulating Security Payload (ESP)”
“The Internet IP Security Domain of Interpretation for ISAKMP”
“Internet Security Association and Key Management Protocol
(ISAKMP)”
“The Internet Key Exchange (IKE)”
“X.509 Internet Public Key Infrastructure Online Certificate Status Protocol - OCSP”
vii
Preface
viii
Preface
Contents
Preface
iii
Who Should Read This Manual?. . . . . . . . . . . . . . . . . . . . . . . . . . . . . . . . . . . . . .
What Is in the CyberGuard Firewall Manual?. . . . . . . . . . . . . . . . . . . . . . . . . . . .
Conventions . . . . . . . . . . . . . . . . . . . . . . . . . . . . . . . . . . . . . . . . . . . . . . . . . . . . . .
Related Publications . . . . . . . . . . . . . . . . . . . . . . . . . . . . . . . . . . . . . . . . . . . . . . .
iii
iv
v
v
Volume 1
Administering the CyberGuard Firewall
Chapter 1
Overview
I-1
CyberGuard Firewall . . . . . . . . . . . . . . . . . . . . . . . . . . . . . . . . . . . . . . . . . . . . . .
I-1
Firewall . . . . . . . . . . . . . . . . . . . . . . . . . . . . . . . . . . . . . . . . . . . . . . . . . . . . . . .
Packet-Filtering Gateway . . . . . . . . . . . . . . . . . . . . . . . . . . . . . . . . . . . . . . . . .
Proxy Gateway . . . . . . . . . . . . . . . . . . . . . . . . . . . . . . . . . . . . . . . . . . . . . . . . .
Bastion Host . . . . . . . . . . . . . . . . . . . . . . . . . . . . . . . . . . . . . . . . . . . . . . . . . . .
I-1
I-2
I-3
I-3
Appliance Firewall . . . . . . . . . . . . . . . . . . . . . . . . . . . . . . . . . . . . . . . . . . . . . . . .
I-3
CyberGuard Firewall Features . . . . . . . . . . . . . . . . . . . . . . . . . . . . . . . . . . . . . .
I-4
Firewall Configuration . . . . . . . . . . . . . . . . . . . . . . . . . . . . . . . . . . . . . . . . . . . . .
I-5
Initial Configuration Procedure . . . . . . . . . . . . . . . . . . . . . . . . . . . . . . . . . . . . . . .
Configuration Procedure . . . . . . . . . . . . . . . . . . . . . . . . . . . . . . . . . . . . . . . . . . . .
I-6
I-7
Chapter 2
Graphical User Interface Features
I-9
Window Components. . . . . . . . . . . . . . . . . . . . . . . . . . . . . . . . . . . . . . . . . . . . . .
I-10
How to Customize the GUI . . . . . . . . . . . . . . . . . . . . . . . . . . . . . . . . . . . . . . . . .
I-11
How to Anchor Windows . . . . . . . . . . . . . . . . . . . . . . . . . . . . . . . . . . . . . . . . . . .
I-12
How to Lock and Unlock the GUI . . . . . . . . . . . . . . . . . . . . . . . . . . . . . . . . . . . .
I-13
Common Colors and Buttons . . . . . . . . . . . . . . . . . . . . . . . . . . . . . . . . . . . . . . .
I-14
Field Colors . . . . . . . . . . . . . . . . . . . . . . . . . . . . . . . . . . . . . . . . . . . . . . . . . . . . . .
Common File Buttons . . . . . . . . . . . . . . . . . . . . . . . . . . . . . . . . . . . . . . . . . . . . . .
I-14
I-14
ix
Contents
List-Manipulation Buttons . . . . . . . . . . . . . . . . . . . . . . . . . . . . . . . . . . . . . . . . . . .
I-16
Keystroke Accelerators and Shortcuts . . . . . . . . . . . . . . . . . . . . . . . . . . . . . . .
I-17
Accelerators . . . . . . . . . . . . . . . . . . . . . . . . . . . . . . . . . . . . . . . . . . . . . . . . . . . . . .
Shortcuts (Mnemonics) . . . . . . . . . . . . . . . . . . . . . . . . . . . . . . . . . . . . . . . . . . . . .
I-17
I-18
Common Icon Groups . . . . . . . . . . . . . . . . . . . . . . . . . . . . . . . . . . . . . . . . . . . . .
I-20
Feature Icons . . . . . . . . . . . . . . . . . . . . . . . . . . . . . . . . . . . . . . . . . . . . . . . . . . . . .
Packet-Filtering Icons . . . . . . . . . . . . . . . . . . . . . . . . . . . . . . . . . . . . . . . . . . . . . .
Placement Icons . . . . . . . . . . . . . . . . . . . . . . . . . . . . . . . . . . . . . . . . . . . . . . . . . . .
SmartProxy-Rules Icons . . . . . . . . . . . . . . . . . . . . . . . . . . . . . . . . . . . . . . . . . . . .
Type Icons . . . . . . . . . . . . . . . . . . . . . . . . . . . . . . . . . . . . . . . . . . . . . . . . . . . . . . .
User-Type Icons . . . . . . . . . . . . . . . . . . . . . . . . . . . . . . . . . . . . . . . . . . . . . . . . . . .
Central Management Icons . . . . . . . . . . . . . . . . . . . . . . . . . . . . . . . . . . . . . . . . . .
I-21
I-24
I-25
I-25
I-26
I-27
I-28
Common Windows . . . . . . . . . . . . . . . . . . . . . . . . . . . . . . . . . . . . . . . . . . . . . . . .
I-29
File Selection Window . . . . . . . . . . . . . . . . . . . . . . . . . . . . . . . . . . . . . . . . . . . . . .
Find Window . . . . . . . . . . . . . . . . . . . . . . . . . . . . . . . . . . . . . . . . . . . . . . . . . . . . .
I-29
I-30
Control Panel . . . . . . . . . . . . . . . . . . . . . . . . . . . . . . . . . . . . . . . . . . . . . . . . . . . .
I-31
System Menu . . . . . . . . . . . . . . . . . . . . . . . . . . . . . . . . . . . . . . . . . . . . . . . . . . . . .
System Shutdown Window . . . . . . . . . . . . . . . . . . . . . . . . . . . . . . . . . . . . . . . .
Configuration Menu. . . . . . . . . . . . . . . . . . . . . . . . . . . . . . . . . . . . . . . . . . . . . . . .
Virtual Private Networks Sub-Menu . . . . . . . . . . . . . . . . . . . . . . . . . . . . . . . . .
Reports Menu . . . . . . . . . . . . . . . . . . . . . . . . . . . . . . . . . . . . . . . . . . . . . . . . . . . . .
Tools Menu. . . . . . . . . . . . . . . . . . . . . . . . . . . . . . . . . . . . . . . . . . . . . . . . . . . . . . .
I-33
I-35
I-36
I-38
I-39
I-40
Online Help . . . . . . . . . . . . . . . . . . . . . . . . . . . . . . . . . . . . . . . . . . . . . . . . . . . . . .
I-41
Help Menu . . . . . . . . . . . . . . . . . . . . . . . . . . . . . . . . . . . . . . . . . . . . . . . . . . . . . . .
System Manual Pages Windows . . . . . . . . . . . . . . . . . . . . . . . . . . . . . . . . . . . .
Help Search Window . . . . . . . . . . . . . . . . . . . . . . . . . . . . . . . . . . . . . . . . . . . . .
Help Windows . . . . . . . . . . . . . . . . . . . . . . . . . . . . . . . . . . . . . . . . . . . . . . . . . . . .
Help History Window . . . . . . . . . . . . . . . . . . . . . . . . . . . . . . . . . . . . . . . . . . . .
How to Use Hypertext Links . . . . . . . . . . . . . . . . . . . . . . . . . . . . . . . . . . . . . . . . .
I-42
I-43
I-44
I-45
I-46
I-46
CyberGuard Firewall Login Window . . . . . . . . . . . . . . . . . . . . . . . . . . . . . . . . . .
I-47
Troubleshooting the Graphical User Interface. . . . . . . . . . . . . . . . . . . . . . . . . .
I-48
Chapter 3
Date and Time
I-51
Date and Time Window . . . . . . . . . . . . . . . . . . . . . . . . . . . . . . . . . . . . . . . . . . . .
I-51
Time Setup Page . . . . . . . . . . . . . . . . . . . . . . . . . . . . . . . . . . . . . . . . . . . . . . . .
NTP Setup Page . . . . . . . . . . . . . . . . . . . . . . . . . . . . . . . . . . . . . . . . . . . . . . . . .
How to Set the System Date and Time . . . . . . . . . . . . . . . . . . . . . . . . . . . . . . . . .
How to Set the Default Time Zone . . . . . . . . . . . . . . . . . . . . . . . . . . . . . . . . . . . .
How to Create a Time-Zone Rule . . . . . . . . . . . . . . . . . . . . . . . . . . . . . . . . . . . . .
How to Configure Network Time Protocol . . . . . . . . . . . . . . . . . . . . . . . . . . . . . .
I-52
I-54
I-55
I-56
I-57
I-58
Date and Time - Underlying Constructs . . . . . . . . . . . . . . . . . . . . . . . . . . . . . . .
I-59
Chapter 4
License Keys
x
I-61
License Keys Window . . . . . . . . . . . . . . . . . . . . . . . . . . . . . . . . . . . . . . . . . . . . .
I-61
How to License Your Firewall . . . . . . . . . . . . . . . . . . . . . . . . . . . . . . . . . . . . . . . .
I-64
Contents
Contents
Chapter 5
Network Interfaces
I-65
Link Aggregation (LAG) . . . . . . . . . . . . . . . . . . . . . . . . . . . . . . . . . . . . . . . . .
ATM Configuration . . . . . . . . . . . . . . . . . . . . . . . . . . . . . . . . . . . . . . . . . . . . . .
I-66
I-67
Network Interfaces Window . . . . . . . . . . . . . . . . . . . . . . . . . . . . . . . . . . . . . . . .
I-68
Interfaces Page . . . . . . . . . . . . . . . . . . . . . . . . . . . . . . . . . . . . . . . . . . . . . . . . .
Aggregates Page . . . . . . . . . . . . . . . . . . . . . . . . . . . . . . . . . . . . . . . . . . . . . . . .
How to Add a Network Interface . . . . . . . . . . . . . . . . . . . . . . . . . . . . . . . . . . . . .
How to Configure Network Interfaces . . . . . . . . . . . . . . . . . . . . . . . . . . . . . . . . .
How to Change a Network Interface . . . . . . . . . . . . . . . . . . . . . . . . . . . . . . . . . . .
Automatic Configuration Changes . . . . . . . . . . . . . . . . . . . . . . . . . . . . . . . . . .
Hosts and Networks Configuration Changes . . . . . . . . . . . . . . . . . . . . . . . . . .
Grouping Configuration Changes . . . . . . . . . . . . . . . . . . . . . . . . . . . . . . . . . . .
Packet-Filtering Rules . . . . . . . . . . . . . . . . . . . . . . . . . . . . . . . . . . . . . . . . . . . .
Network Address Translation (NAT) Configuration Changes . . . . . . . . . . . . .
Routing Configuration Changes . . . . . . . . . . . . . . . . . . . . . . . . . . . . . . . . . . . .
Split Domain Name System Configuration Changes . . . . . . . . . . . . . . . . . . . .
SmartProxies Configuration Changes . . . . . . . . . . . . . . . . . . . . . . . . . . . . . . . .
SOCKS Configuration Changes . . . . . . . . . . . . . . . . . . . . . . . . . . . . . . . . . . . .
How to Configure LAG . . . . . . . . . . . . . . . . . . . . . . . . . . . . . . . . . . . . . . . . . . . . .
How to Configure LAG on an HA pair . . . . . . . . . . . . . . . . . . . . . . . . . . . . . . . . .
I-68
I-71
I-73
I-73
I-74
I-75
I-75
I-75
I-76
I-76
I-76
I-77
I-78
I-80
I-81
I-82
Network Interfaces - Underlying Constructs . . . . . . . . . . . . . . . . . . . . . . . . . . .
I-84
Network Interface File (interface) . . . . . . . . . . . . . . . . . . . . . . . . . . . . . . . . . . . . .
ATM Interface File (ifconfig_atm) . . . . . . . . . . . . . . . . . . . . . . . . . . . . . . . . . . . .
LAG Configuration File (lag.conf) . . . . . . . . . . . . . . . . . . . . . . . . . . . . . . . . . . . .
LAG Administration Command (lagadm). . . . . . . . . . . . . . . . . . . . . . . . . . . . . . .
LAG Status Command (lagstat). . . . . . . . . . . . . . . . . . . . . . . . . . . . . . . . . . . . . . .
I-85
I-86
I-88
I-89
I-91
Troubleshooting Network or Interface Problems . . . . . . . . . . . . . . . . . . . . . . .
I-92
Chapter 6
High Availability
I-95
High Availability Window. . . . . . . . . . . . . . . . . . . . . . . . . . . . . . . . . . . . . . . . . . .
I-96
How to Configure High Availability . . . . . . . . . . . . . . . . . . . . . . . . . . . . . . . . . . .
High Availability Backup and Restore . . . . . . . . . . . . . . . . . . . . . . . . . . . . . . . . .
I-99
I-100
High Availability Monitor Window . . . . . . . . . . . . . . . . . . . . . . . . . . . . . . . . . . .
I-102
Chapter 7
Central Management
Central Management Failover . . . . . . . . . . . . . . . . . . . . . . . . . . . . . . . . . . . . . . . .
Primary and Secondary Managers. . . . . . . . . . . . . . . . . . . . . . . . . . . . . . . . . . .
Monitoring Managers . . . . . . . . . . . . . . . . . . . . . . . . . . . . . . . . . . . . . . . . . . . .
Target Firewalls . . . . . . . . . . . . . . . . . . . . . . . . . . . . . . . . . . . . . . . . . . . . . . . . .
Control. . . . . . . . . . . . . . . . . . . . . . . . . . . . . . . . . . . . . . . . . . . . . . . . . . . . . . . .
Configuration File Synchronization . . . . . . . . . . . . . . . . . . . . . . . . . . . . . . . . .
Address Resolution for Multiple Interfaces . . . . . . . . . . . . . . . . . . . . . . . . . . .
Central Management Security . . . . . . . . . . . . . . . . . . . . . . . . . . . . . . . . . . . . . . . .
Symmetrical Encryption/Decryption Libraries . . . . . . . . . . . . . . . . . . . . . . . . .
Data Encryption Standard . . . . . . . . . . . . . . . . . . . . . . . . . . . . . . . . . . . . . . .
DES 56 . . . . . . . . . . . . . . . . . . . . . . . . . . . . . . . . . . . . . . . . . . . . . . . . . . . . .
CyberGuard Firewall Manual
I-103
I-105
I-106
I-107
I-107
I-108
I-108
I-109
I-110
I-110
I-111
I-111
xi
Contents
Triple DES. . . . . . . . . . . . . . . . . . . . . . . . . . . . . . . . . . . . . . . . . . . . . . . . . . .
CAST-128 . . . . . . . . . . . . . . . . . . . . . . . . . . . . . . . . . . . . . . . . . . . . . . . . . . .
Cryptographic Keys Database . . . . . . . . . . . . . . . . . . . . . . . . . . . . . . . . . . . . . .
Message Digest (MD) Keys . . . . . . . . . . . . . . . . . . . . . . . . . . . . . . . . . . . . .
Security Keys . . . . . . . . . . . . . . . . . . . . . . . . . . . . . . . . . . . . . . . . . . . . . . . .
Central Management and Secure Remote Management . . . . . . . . . . . . . . . . . . . .
xii
I-111
I-112
I-112
I-113
I-113
I-114
Central Management Role Window. . . . . . . . . . . . . . . . . . . . . . . . . . . . . . . . . . .
I-115
Primary Managers Page . . . . . . . . . . . . . . . . . . . . . . . . . . . . . . . . . . . . . . . . . . .
Secondary Managers Page . . . . . . . . . . . . . . . . . . . . . . . . . . . . . . . . . . . . . . . . .
Monitoring Managers Page . . . . . . . . . . . . . . . . . . . . . . . . . . . . . . . . . . . . . . . .
I-117
I-118
I-120
Encryption Window . . . . . . . . . . . . . . . . . . . . . . . . . . . . . . . . . . . . . . . . . . . . . . .
I-122
Central Management Choices Window. . . . . . . . . . . . . . . . . . . . . . . . . . . . . . . .
I-124
Control Panel Changes Based on Configuration Choice . . . . . . . . . . . . . . . . . . . .
Configuration Menu Changes Based on Configuration Choice. . . . . . . . . . . . . . .
File Button Changes on Target Group Configuration Windows . . . . . . . . . . . . . .
Target Firewall Source Window . . . . . . . . . . . . . . . . . . . . . . . . . . . . . . . . . . . .
Configuration Propagation. . . . . . . . . . . . . . . . . . . . . . . . . . . . . . . . . . . . . . . . .
Additional Configuration Window Changes for Target Groups . . . . . . . . . . . . . .
I-126
I-126
I-128
I-129
I-129
I-131
Target Firewall Status Window . . . . . . . . . . . . . . . . . . . . . . . . . . . . . . . . . . . . . .
I-132
Propagation Condition Icons . . . . . . . . . . . . . . . . . . . . . . . . . . . . . . . . . . . . . . .
Propagation and Configuration Error Conditions . . . . . . . . . . . . . . . . . . . . . . .
I-134
I-134
Central Alert Display Window . . . . . . . . . . . . . . . . . . . . . . . . . . . . . . . . . . . . . . .
I-135
Central Alert Icons. . . . . . . . . . . . . . . . . . . . . . . . . . . . . . . . . . . . . . . . . . . . . . .
Central Alert Mouse Controls . . . . . . . . . . . . . . . . . . . . . . . . . . . . . . . . . . . . . .
Central Alert Display Choices . . . . . . . . . . . . . . . . . . . . . . . . . . . . . . . . . . . . . .
Central Alert Summary . . . . . . . . . . . . . . . . . . . . . . . . . . . . . . . . . . . . . . . . . . .
I-136
I-136
I-137
I-138
Target Alert Logs Reports and Logfile Time Dialog Windows . . . . . . . . . . . . .
I-139
How to Configure Central Management . . . . . . . . . . . . . . . . . . . . . . . . . . . . . . .
I-140
How to Prepare for Central Management . . . . . . . . . . . . . . . . . . . . . . . . . . . . . . .
How to Add Central Management Target Groups . . . . . . . . . . . . . . . . . . . . . . . . .
How to Configure a Target Group . . . . . . . . . . . . . . . . . . . . . . . . . . . . . . . . . . . . .
How to Configure Security on the Firewall Manager . . . . . . . . . . . . . . . . . . . . . .
How to Configure Security on a Target Firewall . . . . . . . . . . . . . . . . . . . . . . . . . .
How to Change into a Standalone Firewall . . . . . . . . . . . . . . . . . . . . . . . . . . . . . .
How to Change a Manager or Standalone Firewall into a Target . . . . . . . . . . . . .
How to Change a Target or Standalone Firewall into a Manager . . . . . . . . . . . . .
How to Configure Failover for Central Management . . . . . . . . . . . . . . . . . . . . . .
How to Select to Manage Local Target Groups . . . . . . . . . . . . . . . . . . . . . . . . . . .
How to Select a Primary to Manage . . . . . . . . . . . . . . . . . . . . . . . . . . . . . . . . . . .
How to Delete a Target Group . . . . . . . . . . . . . . . . . . . . . . . . . . . . . . . . . . . . . . . .
How to Change the Name of a Target Group. . . . . . . . . . . . . . . . . . . . . . . . . . . . .
How to Add Members in a Target Group. . . . . . . . . . . . . . . . . . . . . . . . . . . . . . . .
How to Delete Members in a Target Group . . . . . . . . . . . . . . . . . . . . . . . . . . . . . .
How to View the Status of a Target Group . . . . . . . . . . . . . . . . . . . . . . . . . . . . . .
I-140
I-141
I-142
I-144
I-145
I-145
I-146
I-147
I-147
I-148
I-149
I-150
I-150
I-151
I-151
I-152
Central Management - Underlying Constructs . . . . . . . . . . . . . . . . . . . . . . . . .
I-153
Target Firewall Configuration Files. . . . . . . . . . . . . . . . . . . . . . . . . . . . . . . . . .
Firewall Manager Files . . . . . . . . . . . . . . . . . . . . . . . . . . . . . . . . . . . . . . . . . . .
Central Management Daemons . . . . . . . . . . . . . . . . . . . . . . . . . . . . . . . . . . . . .
I-153
I-154
I-155
Contents
Contents
Chapter 8
Secure Remote Management
I-157
Secure Remote Management Window . . . . . . . . . . . . . . . . . . . . . . . . . . . . . . . .
I-157
Control Panel for Target CyberGuard Firewall . . . . . . . . . . . . . . . . . . . . . . . . . . .
How to Prepare for Secure Remote Management . . . . . . . . . . . . . . . . . . . . . . . . .
How to Manage a Remote CyberGuard Firewall . . . . . . . . . . . . . . . . . . . . . . . . .
I-159
I-159
I-161
Troubleshooting Secure Remote Management . . . . . . . . . . . . . . . . . . . . . . . . .
I-162
Chapter 9
Remote Web Administration
Routing, Name Resolution, and Packet-Filtering Rules . . . . . . . . . . . . . . . . . .
Certificates and SSL . . . . . . . . . . . . . . . . . . . . . . . . . . . . . . . . . . . . . . . . . . . . .
How to Install Certificates. . . . . . . . . . . . . . . . . . . . . . . . . . . . . . . . . . . . . . . . .
Caveats and Known Limitations . . . . . . . . . . . . . . . . . . . . . . . . . . . . . . . . . . . .
Netscape and Remote Web Administration. . . . . . . . . . . . . . . . . . . . . . . . . . . .
I-163
I-164
I-164
I-165
I-166
I-167
Remote Web Administration Window . . . . . . . . . . . . . . . . . . . . . . . . . . . . . . . .
I-168
How to Configure Remote Web Administration . . . . . . . . . . . . . . . . . . . . . . . . . .
How to Login to the Firewall using Remote Web Administration . . . . . . . . . . . .
I-169
I-169
Troubleshooting Remote Web Administration . . . . . . . . . . . . . . . . . . . . . . . . .
I-170
Chapter 10
Secure Shell
I-173
Feature Limitations . . . . . . . . . . . . . . . . . . . . . . . . . . . . . . . . . . . . . . . . . . . . . .
Packaging . . . . . . . . . . . . . . . . . . . . . . . . . . . . . . . . . . . . . . . . . . . . . . . . . . . . .
Installation . . . . . . . . . . . . . . . . . . . . . . . . . . . . . . . . . . . . . . . . . . . . . . . . . . . . .
Install Locations . . . . . . . . . . . . . . . . . . . . . . . . . . . . . . . . . . . . . . . . . . . . . .
Multi-Level Security Considerations . . . . . . . . . . . . . . . . . . . . . . . . . . . . . .
Generation of Server ID Keys. . . . . . . . . . . . . . . . . . . . . . . . . . . . . . . . . . . .
Generation of Random Seed Data. . . . . . . . . . . . . . . . . . . . . . . . . . . . . . . . .
FSO/FSM Users . . . . . . . . . . . . . . . . . . . . . . . . . . . . . . . . . . . . . . . . . . . . . . . .
SSH2 Server . . . . . . . . . . . . . . . . . . . . . . . . . . . . . . . . . . . . . . . . . . . . . . . . . . .
/etc/services File . . . . . . . . . . . . . . . . . . . . . . . . . . . . . . . . . . . . . . . . . . . . . .
Packet-Filtering Rules for SSH. . . . . . . . . . . . . . . . . . . . . . . . . . . . . . . . . . .
Restarting the SSH2 Server. . . . . . . . . . . . . . . . . . . . . . . . . . . . . . . . . . . . . .
Activity Report for the SSH2 Server . . . . . . . . . . . . . . . . . . . . . . . . . . . . . .
Troubleshooting the SSH2 Server. . . . . . . . . . . . . . . . . . . . . . . . . . . . . . . . .
SSH2 Client. . . . . . . . . . . . . . . . . . . . . . . . . . . . . . . . . . . . . . . . . . . . . . . . . . . .
SSH2 Client Command Line Options. . . . . . . . . . . . . . . . . . . . . . . . . . . . . .
The .ssh2 User-Specific Directory . . . . . . . . . . . . . . . . . . . . . . . . . . . . . . . .
The SSH2 Client Configuration File. . . . . . . . . . . . . . . . . . . . . . . . . . . . . . .
Accessing a Firewall via an SSH2 Client on a Remote System . . . . . . . . . .
Accessing a Firewall via an SSH2 Client on another CyberGuard Firewall
Running CyberGuard X Windows Applications with the SSH2 Client . . . .
SSH2 Examples. . . . . . . . . . . . . . . . . . . . . . . . . . . . . . . . . . . . . . . . . . . . . . . . .
F-Secure Documentation. . . . . . . . . . . . . . . . . . . . . . . . . . . . . . . . . . . . . . . . . .
Advanced Topics . . . . . . . . . . . . . . . . . . . . . . . . . . . . . . . . . . . . . . . . . . . . . . . .
Using SSH2 with High Availability . . . . . . . . . . . . . . . . . . . . . . . . . . . . . . .
Using Public/Private Keys for Authentication . . . . . . . . . . . . . . . . . . . . . . .
I-174
I-174
I-174
I-175
I-176
I-176
I-177
I-177
I-177
I-179
I-179
I-180
I-180
I-181
I-181
I-182
I-182
I-182
I-183
I-184
I-184
I-184
I-185
I-186
I-186
I-186
Secure Shell Window . . . . . . . . . . . . . . . . . . . . . . . . . . . . . . . . . . . . . . . . . . . . . .
I-189
CyberGuard Firewall Manual
xiii
Contents
SSH - Setup Page. . . . . . . . . . . . . . . . . . . . . . . . . . . . . . . . . . . . . . . . . . . . . . . .
SSH - Clients Page. . . . . . . . . . . . . . . . . . . . . . . . . . . . . . . . . . . . . . . . . . . . . . .
How to Configure SSH . . . . . . . . . . . . . . . . . . . . . . . . . . . . . . . . . . . . . . . . . . . . .
I-189
I-191
I-192
Chapter 11
Authorization Management and Duties
I-193
Authorization Management Window. . . . . . . . . . . . . . . . . . . . . . . . . . . . . . . . . .
I-194
Authorization Management Duties Page . . . . . . . . . . . . . . . . . . . . . . . . . . . . . .
Authorization Management Windows Page . . . . . . . . . . . . . . . . . . . . . . . . . . .
How to Add or Change a Duty. . . . . . . . . . . . . . . . . . . . . . . . . . . . . . . . . . . . . . . .
How to Add or Change a Window Member . . . . . . . . . . . . . . . . . . . . . . . . . . . . .
I-194
I-195
I-197
I-198
Duty Choice Window . . . . . . . . . . . . . . . . . . . . . . . . . . . . . . . . . . . . . . . . . . . . . .
I-199
How to Choose a Duty . . . . . . . . . . . . . . . . . . . . . . . . . . . . . . . . . . . . . . . . . . . . . .
I-200
Authorization Management and Duties - Underlying Constructs . . . . . . . . . .
I-201
Authorization Management Database File (authmgmt.conf). . . . . . . . . . . . . . . . .
I-201
Chapter 12
Configuration Tracking
I-205
Configuration Tracking Ticket Window . . . . . . . . . . . . . . . . . . . . . . . . . . . . . . .
I-205
Configuration Tracking Window . . . . . . . . . . . . . . . . . . . . . . . . . . . . . . . . . . . . .
I-206
Configuration History Window . . . . . . . . . . . . . . . . . . . . . . . . . . . . . . . . . . . . . .
I-207
Sessions Page. . . . . . . . . . . . . . . . . . . . . . . . . . . . . . . . . . . . . . . . . . . . . . . . . . .
Details Page . . . . . . . . . . . . . . . . . . . . . . . . . . . . . . . . . . . . . . . . . . . . . . . . . . . .
Configuration History Save As Window . . . . . . . . . . . . . . . . . . . . . . . . . . . . . .
How to Setup Configuration Tracking . . . . . . . . . . . . . . . . . . . . . . . . . . . . . . . . . .
How to Generate Configuration History Reports . . . . . . . . . . . . . . . . . . . . . . . . .
How to Save a Complete Configuration . . . . . . . . . . . . . . . . . . . . . . . . . . . . . . . .
I-208
I-209
I-210
I-212
I-212
I-214
Chapter 13
Save and Restore
I-215
Save and Restore Window. . . . . . . . . . . . . . . . . . . . . . . . . . . . . . . . . . . . . . . . . .
I-215
Save Page. . . . . . . . . . . . . . . . . . . . . . . . . . . . . . . . . . . . . . . . . . . . . . . . . . . . . .
Scheduler Window. . . . . . . . . . . . . . . . . . . . . . . . . . . . . . . . . . . . . . . . . . . . . . .
Restore Page . . . . . . . . . . . . . . . . . . . . . . . . . . . . . . . . . . . . . . . . . . . . . . . . . . .
Schedule Page . . . . . . . . . . . . . . . . . . . . . . . . . . . . . . . . . . . . . . . . . . . . . . . . . .
Log Page . . . . . . . . . . . . . . . . . . . . . . . . . . . . . . . . . . . . . . . . . . . . . . . . . . . . . .
How to Save and Restore the Active Configuration . . . . . . . . . . . . . . . . . . . . . . .
How to Save and Restore an Archived Configuration . . . . . . . . . . . . . . . . . . . . . .
How to Save and Restore the SCCS Configuration Database . . . . . . . . . . . . . . . .
How to Save and Restore an Arbitrary Directory or File . . . . . . . . . . . . . . . . . . .
How to Schedule the Save Operation . . . . . . . . . . . . . . . . . . . . . . . . . . . . . . . . . .
How to Cancel Pending Save Jobs. . . . . . . . . . . . . . . . . . . . . . . . . . . . . . . . . . . . .
I-217
I-220
I-221
I-224
I-225
I-226
I-227
I-228
I-229
I-231
I-231
Chapter 14
Software Update
xiv
I-233
Software Update Window. . . . . . . . . . . . . . . . . . . . . . . . . . . . . . . . . . . . . . . . . . .
I-234
How to Configure Software Updates . . . . . . . . . . . . . . . . . . . . . . . . . . . . . . . . . . .
I-235
Contents
Contents
Chapter 15
Hardware Health
I-237
Hardware Health Window . . . . . . . . . . . . . . . . . . . . . . . . . . . . . . . . . . . . . . . . . .
I-237
Temp. Sensors Page. . . . . . . . . . . . . . . . . . . . . . . . . . . . . . . . . . . . . . . . . . . . . .
Fan Tachometers Page. . . . . . . . . . . . . . . . . . . . . . . . . . . . . . . . . . . . . . . . . . . .
Voltages Page . . . . . . . . . . . . . . . . . . . . . . . . . . . . . . . . . . . . . . . . . . . . . . . . . .
I-238
I-238
I-239
Chapter 16
UPS Power Fail Support
I-241
UPS Power Fail Support Window . . . . . . . . . . . . . . . . . . . . . . . . . . . . . . . . . . . .
I-242
How to Enable UPS Support . . . . . . . . . . . . . . . . . . . . . . . . . . . . . . . . . . . . . . . . .
I-244
Chapter 17
Reports
I-245
Console Messages Window . . . . . . . . . . . . . . . . . . . . . . . . . . . . . . . . . . . . . . . .
I-245
System Information Window . . . . . . . . . . . . . . . . . . . . . . . . . . . . . . . . . . . . . . . .
I-246
System Information Reports . . . . . . . . . . . . . . . . . . . . . . . . . . . . . . . . . . . . . . . . .
I-247
Alert Summary Window . . . . . . . . . . . . . . . . . . . . . . . . . . . . . . . . . . . . . . . . . . . .
I-250
How to Use the Suspicious-Event Counter . . . . . . . . . . . . . . . . . . . . . . . . . . . . . .
I-252
Activity Reports Window . . . . . . . . . . . . . . . . . . . . . . . . . . . . . . . . . . . . . . . . . . .
I-252
Alert Summary (Suspicious-Event) Reports . . . . . . . . . . . . . . . . . . . . . . . . . . .
Activity Reports . . . . . . . . . . . . . . . . . . . . . . . . . . . . . . . . . . . . . . . . . . . . . . . .
Sort Activity Reports Window . . . . . . . . . . . . . . . . . . . . . . . . . . . . . . . . . . . . .
I-254
I-258
I-260
Audit Logs Reports and Audit Logs Criteria Windows . . . . . . . . . . . . . . . . . .
I-261
Selection Criteria Types. . . . . . . . . . . . . . . . . . . . . . . . . . . . . . . . . . . . . . . . . . . . .
Auditable Network Events . . . . . . . . . . . . . . . . . . . . . . . . . . . . . . . . . . . . . . . .
Auditable Network-Event Classes . . . . . . . . . . . . . . . . . . . . . . . . . . . . . . . . . .
Auditable System Events . . . . . . . . . . . . . . . . . . . . . . . . . . . . . . . . . . . . . . . . .
Auditable System-Event Classes. . . . . . . . . . . . . . . . . . . . . . . . . . . . . . . . . . . .
Privileges . . . . . . . . . . . . . . . . . . . . . . . . . . . . . . . . . . . . . . . . . . . . . . . . . . . . . .
How to Choose Selection Criteria . . . . . . . . . . . . . . . . . . . . . . . . . . . . . . . . . . . . .
How to Generate an Audit-Logs Report . . . . . . . . . . . . . . . . . . . . . . . . . . . . . . . .
I-264
I-265
I-268
I-269
I-271
I-272
I-274
I-275
WebTrends Audit Reports Window . . . . . . . . . . . . . . . . . . . . . . . . . . . . . . . . . .
I-276
Audit-Logs Reports - Underlying Constructs . . . . . . . . . . . . . . . . . . . . . . . . . .
I-277
How to Change the Default Size of Audit-Logs Files. . . . . . . . . . . . . . . . . . . . . .
I-278
Chapter 18
Tools
I-279
Network Ping Test Window . . . . . . . . . . . . . . . . . . . . . . . . . . . . . . . . . . . . . . . . .
I-279
Packet Trap Window . . . . . . . . . . . . . . . . . . . . . . . . . . . . . . . . . . . . . . . . . . . . . .
I-281
System Statistics Window . . . . . . . . . . . . . . . . . . . . . . . . . . . . . . . . . . . . . . . . . .
I-285
How to Change Time Between Statistical Refreshes . . . . . . . . . . . . . . . . . . . . . .
I-286
Packet Filter Statistics Window . . . . . . . . . . . . . . . . . . . . . . . . . . . . . . . . . . . . .
I-287
System Monitor Window . . . . . . . . . . . . . . . . . . . . . . . . . . . . . . . . . . . . . . . . . . .
I-289
System Monitor Options Sub-Window . . . . . . . . . . . . . . . . . . . . . . . . . . . . . . . . .
I-290
CyberGuard Firewall Manual
xv
Contents
System Monitor Alarm Setup Sub-Window . . . . . . . . . . . . . . . . . . . . . . . . . . . . .
How to Graph a System Monitor Statistic . . . . . . . . . . . . . . . . . . . . . . . . . . . . . . .
How to Customize Alarms for System Monitor Statistics . . . . . . . . . . . . . . . . . . .
I-291
I-292
I-293
Performance Monitor Window. . . . . . . . . . . . . . . . . . . . . . . . . . . . . . . . . . . . . . .
I-294
How to Use the Performance Monitor Window. . . . . . . . . . . . . . . . . . . . . . . . . . .
I-296
LDAP Authentication Window . . . . . . . . . . . . . . . . . . . . . . . . . . . . . . . . . . . . . . .
I-297
LDAP Authentication Configuration Utility Main Menu . . . . . . . . . . . . . . . . .
Configure LDAP Server Connection Screen . . . . . . . . . . . . . . . . . . . . . . . . . . .
Configure LDAP TLS Connection Screen . . . . . . . . . . . . . . . . . . . . . . . . . . . .
Configure LDAP User Search Screen . . . . . . . . . . . . . . . . . . . . . . . . . . . . . . . .
Configure RemoteAuth/CentralAuth Authorization Search Screen . . . . . . . . .
How to Configure Remote Authentication with LDAP. . . . . . . . . . . . . . . . . . . . .
Remote Authentication for Passport One Groups . . . . . . . . . . . . . . . . . . . . . . .
Remote Authentication for VPN Client Configuration . . . . . . . . . . . . . . . . . . .
How to Configure Central Authentication with LDAP . . . . . . . . . . . . . . . . . . . . .
How to Test the LDAP Authentication Configuration. . . . . . . . . . . . . . . . . . . . . .
LDAP Authentication - Underlying Constructs. . . . . . . . . . . . . . . . . . . . . . . . . . .
I-299
I-300
I-301
I-302
I-303
I-304
I-304
I-305
I-307
I-309
I-309
Shell Window . . . . . . . . . . . . . . . . . . . . . . . . . . . . . . . . . . . . . . . . . . . . . . . . . . . .
I-310
Appendix A
Directory Tree
I-311
$HOME Directory . . . . . . . . . . . . . . . . . . . . . . . . . . . . . . . . . . . . . . . . . . . . . . . . .
/bin Directory . . . . . . . . . . . . . . . . . . . . . . . . . . . . . . . . . . . . . . . . . . . . . . . . . . . . .
/etc Directory . . . . . . . . . . . . . . . . . . . . . . . . . . . . . . . . . . . . . . . . . . . . . . . . . . . . .
/opt Directory . . . . . . . . . . . . . . . . . . . . . . . . . . . . . . . . . . . . . . . . . . . . . . . . . . . . .
/sbin Directory . . . . . . . . . . . . . . . . . . . . . . . . . . . . . . . . . . . . . . . . . . . . . . . . . . . .
/stand Directory . . . . . . . . . . . . . . . . . . . . . . . . . . . . . . . . . . . . . . . . . . . . . . . . . . .
/usr Directory . . . . . . . . . . . . . . . . . . . . . . . . . . . . . . . . . . . . . . . . . . . . . . . . . . . . .
/var Directory . . . . . . . . . . . . . . . . . . . . . . . . . . . . . . . . . . . . . . . . . . . . . . . . . . . . .
I-311
I-311
I-312
I-315
I-315
I-315
I-316
I-317
Appendix B
System Administration
xvi
I-319
Useful Commands . . . . . . . . . . . . . . . . . . . . . . . . . . . . . . . . . . . . . . . . . . . . . . . .
I-319
UnixWare Commands . . . . . . . . . . . . . . . . . . . . . . . . . . . . . . . . . . . . . . . . . . . .
vi Editor Commands . . . . . . . . . . . . . . . . . . . . . . . . . . . . . . . . . . . . . . . . . . . . .
I-319
I-321
Maintenance Kernel (mUNIX) . . . . . . . . . . . . . . . . . . . . . . . . . . . . . . . . . . . . . . .
I-321
Root User . . . . . . . . . . . . . . . . . . . . . . . . . . . . . . . . . . . . . . . . . . . . . . . . . . . . . . .
I-322
Read-Only Mode . . . . . . . . . . . . . . . . . . . . . . . . . . . . . . . . . . . . . . . . . . . . . . . . . .
I-323
Backup and Restore . . . . . . . . . . . . . . . . . . . . . . . . . . . . . . . . . . . . . . . . . . . . . . .
I-323
How to Back Up an Appliance Firewall Configuration. . . . . . . . . . . . . . . . . . . . .
How to Restore an Appliance Firewall Configuration. . . . . . . . . . . . . . . . . . . . . .
How to Restore a Configuration . . . . . . . . . . . . . . . . . . . . . . . . . . . . . . . . . . . .
How to Restore a Configuration After a System Failure. . . . . . . . . . . . . . . . . .
I-324
I-325
I-325
I-327
Configuration File Copy Utility (config_dump) . . . . . . . . . . . . . . . . . . . . . . . . .
I-330
Application and System Log File Backup Utility (cg_sweep). . . . . . . . . . . . . .
I-330
cg_sweep Configuration File (cg_sweep.conf) . . . . . . . . . . . . . . . . . . . . . . . . .
cg_sweep Command (cg_sweep) . . . . . . . . . . . . . . . . . . . . . . . . . . . . . . . . . . .
I-332
I-333
Contents
Contents
Troubleshooting Secure LAN (seclan) . . . . . . . . . . . . . . . . . . . . . . . . . . . . . . . .
I-333
Appendix C
Networking Tunable Parameters
I-335
Networking Parameters Associated with Security . . . . . . . . . . . . . . . . . . . . . . . .
TCP Parameters Associated with Performance . . . . . . . . . . . . . . . . . . . . . . . . . . .
TCP Parameters Associated with Passport One . . . . . . . . . . . . . . . . . . . . . . . . . .
TCP Parameters for TCP SYN Flood Defense . . . . . . . . . . . . . . . . . . . . . . . . . . .
I-335
I-336
I-338
I-340
Appendix D
Hardware Configuration
I-343
Serial-Port Configuration . . . . . . . . . . . . . . . . . . . . . . . . . . . . . . . . . . . . . . . . . . .
Standard and Rolled RJ45 Connections . . . . . . . . . . . . . . . . . . . . . . . . . . . . . . . .
I-343
I-345
Volume 2
Configuring the CyberGuard Firewall
Chapter 1
Host Names
II-1
Host Names Window . . . . . . . . . . . . . . . . . . . . . . . . . . . . . . . . . . . . . . . . . . . . . .
II-1
How to Configure Host Names . . . . . . . . . . . . . . . . . . . . . . . . . . . . . . . . . . . . . . .
II-3
Host Names - Underlying Constructs. . . . . . . . . . . . . . . . . . . . . . . . . . . . . . . . .
II-4
Host Names Database File (hosts). . . . . . . . . . . . . . . . . . . . . . . . . . . . . . . . . . . . .
II-4
Chapter 2
Network Names
II-5
Network Names Window . . . . . . . . . . . . . . . . . . . . . . . . . . . . . . . . . . . . . . . . . . .
II-5
How to Configure Network Names . . . . . . . . . . . . . . . . . . . . . . . . . . . . . . . . . . . .
II-7
Network Names - Underlying Constructs . . . . . . . . . . . . . . . . . . . . . . . . . . . . .
II-8
Network Names Database File (networks) . . . . . . . . . . . . . . . . . . . . . . . . . . . . . .
II-8
Chapter 3
Grouping
II-9
Grouping Window . . . . . . . . . . . . . . . . . . . . . . . . . . . . . . . . . . . . . . . . . . . . . . . .
II-10
Groups Page . . . . . . . . . . . . . . . . . . . . . . . . . . . . . . . . . . . . . . . . . . . . . . . . . . .
Members Page . . . . . . . . . . . . . . . . . . . . . . . . . . . . . . . . . . . . . . . . . . . . . . . . . .
How to Add or Change a Group . . . . . . . . . . . . . . . . . . . . . . . . . . . . . . . . . . . . . .
How to Add or Change a Group Member . . . . . . . . . . . . . . . . . . . . . . . . . . . . . . .
II-11
II-12
II-15
II-16
Grouping - Underlying Constructs . . . . . . . . . . . . . . . . . . . . . . . . . . . . . . . . . . .
II-18
Grouping Database File (netguard.group) . . . . . . . . . . . . . . . . . . . . . . . . . . . . . . .
II-18
Chapter 4
Packet-Filtering Rules
II-21
Packet-Filtering Rules Window. . . . . . . . . . . . . . . . . . . . . . . . . . . . . . . . . . . . . .
II-22
Packet-Filtering Rules Basic Page . . . . . . . . . . . . . . . . . . . . . . . . . . . . . . . . . .
Packet Origins and Destinations . . . . . . . . . . . . . . . . . . . . . . . . . . . . . . . . . .
II-23
II-26
CyberGuard Firewall Manual
xvii
Contents
TCP SYN Flood Defense . . . . . . . . . . . . . . . . . . . . . . . . . . . . . . . . . . . . . . .
Packet-Filtering Rules IPSec Page . . . . . . . . . . . . . . . . . . . . . . . . . . . . . . . . . .
Packet-Filtering Rules Times Page . . . . . . . . . . . . . . . . . . . . . . . . . . . . . . . . . .
Packet-Filtering Rules RPC Page . . . . . . . . . . . . . . . . . . . . . . . . . . . . . . . . . . .
How to Add or Change a Packet-Filtering Rule . . . . . . . . . . . . . . . . . . . . . . . . . .
How to Prioritize Packet-Filtering Rules . . . . . . . . . . . . . . . . . . . . . . . . . . . . . . . .
II-28
II-29
II-35
II-36
II-37
II-39
Packet-Filtering Rules - Underlying Constructs . . . . . . . . . . . . . . . . . . . . . . . .
II-40
Network Services File (services) . . . . . . . . . . . . . . . . . . . . . . . . . . . . . . . . . . . . . .
Internet Control Message Protocol (ICMP) Services . . . . . . . . . . . . . . . . . . . . . .
Packet-Filtering Rules Configuration File (netguard.conf) . . . . . . . . . . . . . . . . . .
Packet-Filtering Rules for SNMP . . . . . . . . . . . . . . . . . . . . . . . . . . . . . . . . . . . . .
Packet-Filtering Command (netguard). . . . . . . . . . . . . . . . . . . . . . . . . . . . . . . . . .
Key Values (netguard -k) . . . . . . . . . . . . . . . . . . . . . . . . . . . . . . . . . . . . . . . . . .
Kernel Statistics (netguard -I) . . . . . . . . . . . . . . . . . . . . . . . . . . . . . . . . . . . . . .
Kernel Rules Format (netguard -d, netguard -l, netguard -L) . . . . . . . . . . . . . .
Active Kernel Rules Format (netguard -a, netguard -A) . . . . . . . . . . . . . . . . . .
Packet Denial States (netguard -A) . . . . . . . . . . . . . . . . . . . . . . . . . . . . . . . . . .
Warning Messages . . . . . . . . . . . . . . . . . . . . . . . . . . . . . . . . . . . . . . . . . . . . . . .
II-40
II-42
II-43
II-49
II-50
II-52
II-52
II-56
II-59
II-60
II-61
Chapter 5
Network Address Translation
II-63
Network Address Translation Window . . . . . . . . . . . . . . . . . . . . . . . . . . . . . . . .
II-66
NAT Rules Page. . . . . . . . . . . . . . . . . . . . . . . . . . . . . . . . . . . . . . . . . . . . . . . . .
NAT Interfaces Page . . . . . . . . . . . . . . . . . . . . . . . . . . . . . . . . . . . . . . . . . . . . .
How to Configure Network Address Translation Rules . . . . . . . . . . . . . . . . . . . .
How to Enable NAT and Retain Originating Addresses . . . . . . . . . . . . . . . . . . . .
II-67
II-69
II-70
II-72
NAT - Underlying Constructs. . . . . . . . . . . . . . . . . . . . . . . . . . . . . . . . . . . . . . . .
II-73
NAT and PassClientAddr Configuration File (if.conf) . . . . . . . . . . . . . . . . . . . . .
Network Address Translation File (nat.*.conf). . . . . . . . . . . . . . . . . . . . . . . . . . .
Network Address Translation Command (nat) . . . . . . . . . . . . . . . . . . . . . . . . . . .
II-74
II-75
II-77
Chapter 6
Routing
II-79
Static and Dynamic Routing . . . . . . . . . . . . . . . . . . . . . . . . . . . . . . . . . . . . . . .
Multicast Routing . . . . . . . . . . . . . . . . . . . . . . . . . . . . . . . . . . . . . . . . . . . . . . .
xviii
II-79
II-80
Routing Window . . . . . . . . . . . . . . . . . . . . . . . . . . . . . . . . . . . . . . . . . . . . . . . . . .
II-83
Static Routes Page . . . . . . . . . . . . . . . . . . . . . . . . . . . . . . . . . . . . . . . . . . . . . . .
Dynamic Routes Page . . . . . . . . . . . . . . . . . . . . . . . . . . . . . . . . . . . . . . . . . . . .
Dynamic Routing Templates . . . . . . . . . . . . . . . . . . . . . . . . . . . . . . . . . . . . .
Multicast Routes Page . . . . . . . . . . . . . . . . . . . . . . . . . . . . . . . . . . . . . . . . . . . .
Multicast Routes - Defaults Page . . . . . . . . . . . . . . . . . . . . . . . . . . . . . . . . .
Multicast Routes - Boundary Names Page . . . . . . . . . . . . . . . . . . . . . . . . . .
Multicast Routes - Interfaces Page . . . . . . . . . . . . . . . . . . . . . . . . . . . . . . . .
Multicast Routes - DVMRP Tunnels Page . . . . . . . . . . . . . . . . . . . . . . . . . .
Packet-Filtering Rules for Dynamic Routing . . . . . . . . . . . . . . . . . . . . . . . . . .
Packet-Filtering Rules for Multicast Routing . . . . . . . . . . . . . . . . . . . . . . . . . .
How to Configure Static Routing. . . . . . . . . . . . . . . . . . . . . . . . . . . . . . . . . . . . . .
How to Configure Dynamic Routing . . . . . . . . . . . . . . . . . . . . . . . . . . . . . . . . . . .
How to Configure Multicast Routing. . . . . . . . . . . . . . . . . . . . . . . . . . . . . . . . . . .
II-83
II-86
II-87
II-88
II-89
II-90
II-92
II-98
II-104
II-104
II-106
II-107
II-108
Routing - Underlying Constructs . . . . . . . . . . . . . . . . . . . . . . . . . . . . . . . . . . . .
II-109
Contents
Contents
Static Routing Configuration File (routes.conf) . . . . . . . . . . . . . . . . . . . . . . . . . .
II-110
Chapter 7
Split Domain Name System
II-113
Split Domain Name System Window . . . . . . . . . . . . . . . . . . . . . . . . . . . . . . . . .
II-114
DNS Setup Page . . . . . . . . . . . . . . . . . . . . . . . . . . . . . . . . . . . . . . . . . . . . . . . .
DNS Servers Page . . . . . . . . . . . . . . . . . . . . . . . . . . . . . . . . . . . . . . . . . . . . . . .
DNS Zones Page . . . . . . . . . . . . . . . . . . . . . . . . . . . . . . . . . . . . . . . . . . . . . . . .
DNS Hosts Page . . . . . . . . . . . . . . . . . . . . . . . . . . . . . . . . . . . . . . . . . . . . . . . .
Classless IP Addresses for Split DNS . . . . . . . . . . . . . . . . . . . . . . . . . . . . . . . .
Packet-Filtering Rules for Split DNS . . . . . . . . . . . . . . . . . . . . . . . . . . . . . . . .
How to Configure Split DNS on the Firewall . . . . . . . . . . . . . . . . . . . . . . . . . . . .
II-114
II-116
II-117
II-120
II-121
II-123
II-124
Split DNS - Underlying Constructs . . . . . . . . . . . . . . . . . . . . . . . . . . . . . . . . . . .
II-126
DNS Boot File (bootfile) . . . . . . . . . . . . . . . . . . . . . . . . . . . . . . . . . . . . . . . . . . . .
DNS Database Files (db.*) . . . . . . . . . . . . . . . . . . . . . . . . . . . . . . . . . . . . . . . . . .
Network Configuration Database File (netconfig) . . . . . . . . . . . . . . . . . . . . . . . .
DNS Resolver Configuration File (resolv.conf) . . . . . . . . . . . . . . . . . . . . . . . . . .
Classless IP Addresses Database File (zonemap) . . . . . . . . . . . . . . . . . . . . . . . . .
Domain Name Server Command (named) . . . . . . . . . . . . . . . . . . . . . . . . . . . . . .
Name Server Testing with nslookup . . . . . . . . . . . . . . . . . . . . . . . . . . . . . . . . . . .
How to Set Up the Split DNS Testing Environment . . . . . . . . . . . . . . . . . . . . .
How to Test Name Servers . . . . . . . . . . . . . . . . . . . . . . . . . . . . . . . . . . . . . . . .
DNS Maintenance . . . . . . . . . . . . . . . . . . . . . . . . . . . . . . . . . . . . . . . . . . . . . . . . .
How to Add a Host to an Existing Network . . . . . . . . . . . . . . . . . . . . . . . . . . .
How to Remove a Host from an Existing Network . . . . . . . . . . . . . . . . . . . . .
How to Add a Host with a New Network Number . . . . . . . . . . . . . . . . . . . . . .
How to Delegate a Sub-Domain . . . . . . . . . . . . . . . . . . . . . . . . . . . . . . . . . . . .
II-129
II-132
II-138
II-138
II-139
II-139
II-140
II-140
II-141
II-144
II-144
II-145
II-145
II-146
Troubleshooting DNS . . . . . . . . . . . . . . . . . . . . . . . . . . . . . . . . . . . . . . . . . . . . .
II-147
Chapter 8
Users
II-149
RADIUS . . . . . . . . . . . . . . . . . . . . . . . . . . . . . . . . . . . . . . . . . . . . . . . . . . . . . .
Central Authentication . . . . . . . . . . . . . . . . . . . . . . . . . . . . . . . . . . . . . . . . .
Remote Authentication . . . . . . . . . . . . . . . . . . . . . . . . . . . . . . . . . . . . . . . . .
SecurID . . . . . . . . . . . . . . . . . . . . . . . . . . . . . . . . . . . . . . . . . . . . . . . . . . . . . . .
SecureNet Key. . . . . . . . . . . . . . . . . . . . . . . . . . . . . . . . . . . . . . . . . . . . . . . . . .
II-150
II-150
II-151
II-152
II-152
Users Window. . . . . . . . . . . . . . . . . . . . . . . . . . . . . . . . . . . . . . . . . . . . . . . . . . . .
II-153
Users - User Information Page . . . . . . . . . . . . . . . . . . . . . . . . . . . . . . . . . . . . .
Users - Authentication Page . . . . . . . . . . . . . . . . . . . . . . . . . . . . . . . . . . . . . . .
Password Page. . . . . . . . . . . . . . . . . . . . . . . . . . . . . . . . . . . . . . . . . . . . . . . .
NT Password Page . . . . . . . . . . . . . . . . . . . . . . . . . . . . . . . . . . . . . . . . . . . .
RADIUS Page . . . . . . . . . . . . . . . . . . . . . . . . . . . . . . . . . . . . . . . . . . . . . . . .
SecurID Page. . . . . . . . . . . . . . . . . . . . . . . . . . . . . . . . . . . . . . . . . . . . . . . . .
SecureNetKey Page. . . . . . . . . . . . . . . . . . . . . . . . . . . . . . . . . . . . . . . . . . . .
Central Authentication Page . . . . . . . . . . . . . . . . . . . . . . . . . . . . . . . . . . . . .
Remote Authentication Page. . . . . . . . . . . . . . . . . . . . . . . . . . . . . . . . . . . . .
Users - FTP Operations Page . . . . . . . . . . . . . . . . . . . . . . . . . . . . . . . . . . . . . .
Users - Passport One Rules Page . . . . . . . . . . . . . . . . . . . . . . . . . . . . . . . . . . .
Default User Information Window . . . . . . . . . . . . . . . . . . . . . . . . . . . . . . . . . . . .
Default FTP Operations Window . . . . . . . . . . . . . . . . . . . . . . . . . . . . . . . . . . . . .
How to Add or Change a User. . . . . . . . . . . . . . . . . . . . . . . . . . . . . . . . . . . . . . . .
II-155
II-158
II-160
II-162
II-163
II-163
II-164
II-164
II-164
II-165
II-166
II-168
II-169
II-170
CyberGuard Firewall Manual
xix
Contents
How to Delete a User . . . . . . . . . . . . . . . . . . . . . . . . . . . . . . . . . . . . . . . . . . . . . . .
How to Set Defaults for New Users. . . . . . . . . . . . . . . . . . . . . . . . . . . . . . . . . . . .
How to Configure RADIUS. . . . . . . . . . . . . . . . . . . . . . . . . . . . . . . . . . . . . . . . . .
How to Configure Central Authentication . . . . . . . . . . . . . . . . . . . . . . . . . . . . . . .
How to Configure Remote Authentication . . . . . . . . . . . . . . . . . . . . . . . . . . . . . .
How to Configure SecurID . . . . . . . . . . . . . . . . . . . . . . . . . . . . . . . . . . . . . . . . . .
How to Configure SecureNet Key . . . . . . . . . . . . . . . . . . . . . . . . . . . . . . . . . . . . .
II-171
II-172
II-173
II-174
II-177
II-180
II-181
Users - Underlying Constructs . . . . . . . . . . . . . . . . . . . . . . . . . . . . . . . . . . . . . .
II-183
Chapter 9
Passport One
II-185
NT Authentication Detection. . . . . . . . . . . . . . . . . . . . . . . . . . . . . . . . . . . . . . .
NT Share Authentication Detection. . . . . . . . . . . . . . . . . . . . . . . . . . . . . . . . . .
SSL and X.509 Certificate Technology . . . . . . . . . . . . . . . . . . . . . . . . . . . . . . .
SSL and Passport One . . . . . . . . . . . . . . . . . . . . . . . . . . . . . . . . . . . . . . . . . . . .
II-186
II-187
II-188
II-188
Passport One Window . . . . . . . . . . . . . . . . . . . . . . . . . . . . . . . . . . . . . . . . . . . . .
II-190
Passport One Setup Page . . . . . . . . . . . . . . . . . . . . . . . . . . . . . . . . . . . . . . . . . .
Passport One Profiles Page . . . . . . . . . . . . . . . . . . . . . . . . . . . . . . . . . . . . . . . .
Passport One Rules Page . . . . . . . . . . . . . . . . . . . . . . . . . . . . . . . . . . . . . . . . . .
Passport One NT Share Detection Page . . . . . . . . . . . . . . . . . . . . . . . . . . . . . .
Passport One SSL Page . . . . . . . . . . . . . . . . . . . . . . . . . . . . . . . . . . . . . . . . . . .
Passport One Authentication Forms for HTTP Connections. . . . . . . . . . . . . . . . .
How to Configure Passport One Profiles. . . . . . . . . . . . . . . . . . . . . . . . . . . . . . . .
How to Configure Passport One Profile Rules . . . . . . . . . . . . . . . . . . . . . . . . . . .
How to Assign Passport One Profiles to Users . . . . . . . . . . . . . . . . . . . . . . . . . . .
How to Create Custom Banners for Telnet Authentication . . . . . . . . . . . . . . . . . .
II-190
II-192
II-193
II-194
II-195
II-196
II-197
II-198
II-199
II-200
Passport One - Underlying Constructs . . . . . . . . . . . . . . . . . . . . . . . . . . . . . . .
II-201
Passport One Configuration File (clasd.conf) . . . . . . . . . . . . . . . . . . . . . . . . . . . .
Passport One Profile Files . . . . . . . . . . . . . . . . . . . . . . . . . . . . . . . . . . . . . . . . . . .
Passport One Command (clasd) . . . . . . . . . . . . . . . . . . . . . . . . . . . . . . . . . . . . . . .
Monitor and Control Active Connections Command (daemon) . . . . . . . . . . . . . .
NT Authentication Detection Command (ntadd). . . . . . . . . . . . . . . . . . . . . . . . . .
NT Authentication Detection Command Status (ntaddstat). . . . . . . . . . . . . . . . . .
Certificate Signing Request Command (mkcsr) . . . . . . . . . . . . . . . . . . . . . . . . . .
II-202
II-205
II-206
II-207
II-208
II-209
II-210
Chapter 10
SOCKS
II-211
SOCKS Window . . . . . . . . . . . . . . . . . . . . . . . . . . . . . . . . . . . . . . . . . . . . . . . . . .
II-213
SOCKS Setup Page . . . . . . . . . . . . . . . . . . . . . . . . . . . . . . . . . . . . . . . . . . . . . .
SOCKS Rules Page . . . . . . . . . . . . . . . . . . . . . . . . . . . . . . . . . . . . . . . . . . . . . .
How to Configure SOCKS. . . . . . . . . . . . . . . . . . . . . . . . . . . . . . . . . . . . . . . . . . .
II-214
II-215
II-217
SOCKS - Underlying Constructs . . . . . . . . . . . . . . . . . . . . . . . . . . . . . . . . . . . . .
II-219
SOCKS Configuration File (sock5d.conf) . . . . . . . . . . . . . . . . . . . . . . . . . . . . . . .
SOCKS Command (sock5d) . . . . . . . . . . . . . . . . . . . . . . . . . . . . . . . . . . . . . . . . .
II-220
II-221
Chapter 11
Intrusion Detection
xx
II-223
Intrusion Detection Window . . . . . . . . . . . . . . . . . . . . . . . . . . . . . . . . . . . . . . . .
II-224
How to Configure Intrusion Detection. . . . . . . . . . . . . . . . . . . . . . . . . . . . . . . . . .
II-225
Contents
Contents
Intrusion Detection - Underlying Constructs. . . . . . . . . . . . . . . . . . . . . . . . . . .
II-226
Intrusion Detection File (prowler.conf) . . . . . . . . . . . . . . . . . . . . . . . . . . . . . . . . .
II-226
Chapter 12
Security Options
II-229
Security Options Window . . . . . . . . . . . . . . . . . . . . . . . . . . . . . . . . . . . . . . . . . .
II-229
Security Options - Dynamic Rules Page . . . . . . . . . . . . . . . . . . . . . . . . . . . . . .
Security Options - Password Options Page. . . . . . . . . . . . . . . . . . . . . . . . . . . .
Security Options - User Blacklisting Page . . . . . . . . . . . . . . . . . . . . . . . . . . . .
II-230
II-230
II-231
Chapter 13
Virtual Private Network (VPN)
IP Security (IPSec) . . . . . . . . . . . . . . . . . . . . . . . . . . . . . . . . . . . . . . . . . . . . . .
IKE and Manual Keying . . . . . . . . . . . . . . . . . . . . . . . . . . . . . . . . . . . . . . . . . .
Internet Key Exchange (IKE) . . . . . . . . . . . . . . . . . . . . . . . . . . . . . . . . . . . .
Manual Keying . . . . . . . . . . . . . . . . . . . . . . . . . . . . . . . . . . . . . . . . . . . . . . .
VPN Client Configuration. . . . . . . . . . . . . . . . . . . . . . . . . . . . . . . . . . . . . . . . .
Extended Authentication (XAUTH) . . . . . . . . . . . . . . . . . . . . . . . . . . . . . . . . .
Certificates and the CyberGuard Firewall. . . . . . . . . . . . . . . . . . . . . . . . . . . . .
Integration with Other Firewall Components . . . . . . . . . . . . . . . . . . . . . . . . . . . .
VPN and Packet Filtering . . . . . . . . . . . . . . . . . . . . . . . . . . . . . . . . . . . . . . . . .
VPN and Network Address Translation (NAT). . . . . . . . . . . . . . . . . . . . . . . . .
VPN and NAT-Traversal (NAT-T). . . . . . . . . . . . . . . . . . . . . . . . . . . . . . . . . . .
VPN and Passport One . . . . . . . . . . . . . . . . . . . . . . . . . . . . . . . . . . . . . . . . . . .
VPN and Alerts, Activities, and Reporting . . . . . . . . . . . . . . . . . . . . . . . . . . . .
VPN and SmartProxies . . . . . . . . . . . . . . . . . . . . . . . . . . . . . . . . . . . . . . . . . . .
VPN and High Availability . . . . . . . . . . . . . . . . . . . . . . . . . . . . . . . . . . . . . . . .
Special Connection Considerations . . . . . . . . . . . . . . . . . . . . . . . . . . . . . . . . . . . .
Host-to-Gateway Connections . . . . . . . . . . . . . . . . . . . . . . . . . . . . . . . . . . . . .
Client-Initiated Sessions . . . . . . . . . . . . . . . . . . . . . . . . . . . . . . . . . . . . . . . . . .
SmartProxy Connections. . . . . . . . . . . . . . . . . . . . . . . . . . . . . . . . . . . . . . . . . .
FTP Data Connections . . . . . . . . . . . . . . . . . . . . . . . . . . . . . . . . . . . . . . . . . . .
II-235
II-236
II-238
II-238
II-239
II-240
II-241
II-241
II-246
II-246
II-247
II-249
II-250
II-250
II-251
II-252
II-252
II-252
II-253
II-254
II-255
IKE Protection Strategies Window . . . . . . . . . . . . . . . . . . . . . . . . . . . . . . . . . . .
II-256
IKE Protection Strategies - Protection Strategies Page. . . . . . . . . . . . . . . . . . .
IKE Protection Strategies - Cryptographic Properties Page . . . . . . . . . . . . . . .
II-257
II-257
IPSec Protection Strategies Window . . . . . . . . . . . . . . . . . . . . . . . . . . . . . . . . .
II-259
IPSec Protection Strategies - Protection Strategies Page . . . . . . . . . . . . . . . . .
IPSec Protection Strategies - Cryptographic Properties Page . . . . . . . . . . . . . .
II-260
II-260
VPN Client Configurations Window . . . . . . . . . . . . . . . . . . . . . . . . . . . . . . . . . .
II-262
VPN Secure Channels Window . . . . . . . . . . . . . . . . . . . . . . . . . . . . . . . . . . . . . .
II-264
VPN Secure Channels - Channel Information Page . . . . . . . . . . . . . . . . . . . . .
VPN Secure Channels - IKE Advanced Settings Dialog Box . . . . . . . . . . .
VPN Secure Channels - Manual Key Configuration Dialog Box. . . . . . . . .
VPN Secure Channels - Peer Protected Networks Page . . . . . . . . . . . . . . . . . .
VPN Secure Channels - Remote Identities Page. . . . . . . . . . . . . . . . . . . . . . . .
VPN Secure Channels - Trusted CAs Page. . . . . . . . . . . . . . . . . . . . . . . . . . . .
II-265
II-267
II-271
II-272
II-275
II-276
IKE Certificate Services Window . . . . . . . . . . . . . . . . . . . . . . . . . . . . . . . . . . . .
II-277
IKE Certificate Services - LDAP Directories Page. . . . . . . . . . . . . . . . . . . . . .
IKE Certificate Services - OCSP Responders Page . . . . . . . . . . . . . . . . . . . . .
II-277
II-278
CyberGuard Firewall Manual
xxi
Contents
VPN Controls Window . . . . . . . . . . . . . . . . . . . . . . . . . . . . . . . . . . . . . . . . . . . . .
II-279
VPN Controls Window - Options Page . . . . . . . . . . . . . . . . . . . . . . . . . . . . . . .
VPN Controls Window - Security Associations Page . . . . . . . . . . . . . . . . . . . .
VPN Controls Window - IKE Exchange Logging Page . . . . . . . . . . . . . . . . . .
IKE Exchange Log . . . . . . . . . . . . . . . . . . . . . . . . . . . . . . . . . . . . . . . . . . . . . .
VPN Controls Window - IKE Exchange Logging Timers Page . . . . . . . . . . . .
II-280
II-281
II-282
II-283
II-288
Certificate Request Wizard . . . . . . . . . . . . . . . . . . . . . . . . . . . . . . . . . . . . . . . . .
II-290
Certificate Management Window . . . . . . . . . . . . . . . . . . . . . . . . . . . . . . . . . . . .
II-292
Certificate Management - Keypairs Page . . . . . . . . . . . . . . . . . . . . . . . . . . . . .
Firewall Keypair Import Wizard . . . . . . . . . . . . . . . . . . . . . . . . . . . . . . . . . .
Firewall Keypair Export Wizard . . . . . . . . . . . . . . . . . . . . . . . . . . . . . . . . . .
Certificate Management - CA Certificates Page . . . . . . . . . . . . . . . . . . . . . . . .
CA Certificate Import Wizard . . . . . . . . . . . . . . . . . . . . . . . . . . . . . . . . . . . .
II-293
II-293
II-296
II-296
II-298
Configuring a Virtual Private Network . . . . . . . . . . . . . . . . . . . . . . . . . . . . . . . .
II-299
How to Configure a Gateway-to-Gateway VPN Firewall . . . . . . . . . . . . . . . . . .
How to Configure a Gateway-to-Host VPN (Virtual Address) . . . . . . . . . . . . . . .
How to Configure a Gateway-to-Host VPN (Dynamic Address) . . . . . . . . . . . . .
II-299
II-301
II-303
VPN - Underlying Constructs . . . . . . . . . . . . . . . . . . . . . . . . . . . . . . . . . . . . . . .
II-306
IKE Protection Strategy Configuration File (*.conf). . . . . . . . . . . . . . . . . . . . . . .
IPSec Protection Strategy Configuration File (*.conf) . . . . . . . . . . . . . . . . . . . . .
VPN Secure Channel Configuration File (*.conf) . . . . . . . . . . . . . . . . . . . . . . . . .
VPN Client Configuration File (*.conf) . . . . . . . . . . . . . . . . . . . . . . . . . . . . . . . .
LDAP Directories Configuration File (ldap_dirs.conf) . . . . . . . . . . . . . . . . . . . . .
OCSP Responders Configuration File (ocsp.conf) . . . . . . . . . . . . . . . . . . . . . . . .
CA Certificate Configuration File (ca_certs.conf). . . . . . . . . . . . . . . . . . . . . . . . .
VPN Policy Manager Configuration File (policymgr.conf). . . . . . . . . . . . . . . . . .
CRL Files (*.crl) . . . . . . . . . . . . . . . . . . . . . . . . . . . . . . . . . . . . . . . . . . . . . . . . . .
CA Certificate Files (*.cer) . . . . . . . . . . . . . . . . . . . . . . . . . . . . . . . . . . . . . . . . . .
Firewall Keypair Files (*.cer and *.prv) . . . . . . . . . . . . . . . . . . . . . . . . . . . . . . . .
VPN Control Command (vpnctl) . . . . . . . . . . . . . . . . . . . . . . . . . . . . . . . . . . . . . .
VPN Report Command (vpnrpt) . . . . . . . . . . . . . . . . . . . . . . . . . . . . . . . . . . . . . .
II-307
II-308
II-309
II-311
II-312
II-313
II-314
II-315
II-316
II-317
II-317
II-317
II-319
Troubleshooting VPN . . . . . . . . . . . . . . . . . . . . . . . . . . . . . . . . . . . . . . . . . . . . . .
II-320
Chapter 14
Alerts, Activities, and Archives
xxii
II-325
Alerts, Activities, and Archives Window . . . . . . . . . . . . . . . . . . . . . . . . . . . . . .
II-326
Alerts Page. . . . . . . . . . . . . . . . . . . . . . . . . . . . . . . . . . . . . . . . . . . . . . . . . . . . .
Suspicious Event Types. . . . . . . . . . . . . . . . . . . . . . . . . . . . . . . . . . . . . . . . .
Default Log Files for Suspicious Event Types . . . . . . . . . . . . . . . . . . . . . . .
Files to Monitor for Suspicious Events . . . . . . . . . . . . . . . . . . . . . . . . . . . . .
Controlling the Size of Disk Partitions . . . . . . . . . . . . . . . . . . . . . . . . . . . . .
Pager Numbers . . . . . . . . . . . . . . . . . . . . . . . . . . . . . . . . . . . . . . . . . . . . . . .
Packet-Filtering Rules for Alerts. . . . . . . . . . . . . . . . . . . . . . . . . . . . . . . . . .
Activities Page . . . . . . . . . . . . . . . . . . . . . . . . . . . . . . . . . . . . . . . . . . . . . . . . . .
Activity Types . . . . . . . . . . . . . . . . . . . . . . . . . . . . . . . . . . . . . . . . . . . . . . . .
Default Log Files for Activity Types. . . . . . . . . . . . . . . . . . . . . . . . . . . . . . .
Archives Page . . . . . . . . . . . . . . . . . . . . . . . . . . . . . . . . . . . . . . . . . . . . . . . . . .
How to Enable and Disable Alerts. . . . . . . . . . . . . . . . . . . . . . . . . . . . . . . . . . . . .
How to Enable and Disable Activities . . . . . . . . . . . . . . . . . . . . . . . . . . . . . . . . . .
How to Log Alerts and Activities for WebTrends Reports . . . . . . . . . . . . . . . . . .
II-328
II-331
II-333
II-335
II-336
II-339
II-340
II-341
II-344
II-346
II-348
II-352
II-353
II-354
Contents
Contents
How to Log Alerts and Activities for Central Auditing . . . . . . . . . . . . . . . . . . . .
How to Archive Alert and Activity Logs . . . . . . . . . . . . . . . . . . . . . . . . . . . . . . .
How to Restore Archived Logs . . . . . . . . . . . . . . . . . . . . . . . . . . . . . . . . . . . . . . .
II-355
II-356
II-357
Activity Logs Window . . . . . . . . . . . . . . . . . . . . . . . . . . . . . . . . . . . . . . . . . . . . .
II-360
Alerts, Activities, and Archives - Underlying Constructs. . . . . . . . . . . . . . . . .
II-362
Alerts Configuration File (alert.conf) . . . . . . . . . . . . . . . . . . . . . . . . . . . . . . . . . .
Activities Configuration File (trace.conf) . . . . . . . . . . . . . . . . . . . . . . . . . . . . . . .
Audit Command (auditlogd) . . . . . . . . . . . . . . . . . . . . . . . . . . . . . . . . . . . . . . . . .
II-362
II-366
II-368
Volume 3
Configuring SmartProxies for the CyberGuard Firewall
Chapter 1
SmartProxies
III-1
SmartProxies Window . . . . . . . . . . . . . . . . . . . . . . . . . . . . . . . . . . . . . . . . . . . . .
III-5
How to Configure Any Proxy . . . . . . . . . . . . . . . . . . . . . . . . . . . . . . . . . . . . . . . .
III-8
SmartProxies - Underlying Constructs . . . . . . . . . . . . . . . . . . . . . . . . . . . . . . .
III-9
How to Use Proxy Configuration Files . . . . . . . . . . . . . . . . . . . . . . . . . . . . . . . . .
How to Enable a Standalone Proxy (startup.conf). . . . . . . . . . . . . . . . . . . . . . . . .
How to Enable a Proxy with the inetd Daemon (inetd.conf). . . . . . . . . . . . . . . . .
III-10
III-11
III-13
Packet-Filtering Rules for SmartProxies . . . . . . . . . . . . . . . . . . . . . . . . . . . . . .
III-14
Pass Address and Packet-Filtering Rules . . . . . . . . . . . . . . . . . . . . . . . . . . . . .
Firewall-Generated Packet-Filtering Rules . . . . . . . . . . . . . . . . . . . . . . . . . . . .
III-15
III-16
Content Scanning with CVP . . . . . . . . . . . . . . . . . . . . . . . . . . . . . . . . . . . . . . . .
III-18
Troubleshooting SmartProxies . . . . . . . . . . . . . . . . . . . . . . . . . . . . . . . . . . . . . .
III-19
Chapter 2
File Transfer Protocol Proxy
III-21
FTP Pages. . . . . . . . . . . . . . . . . . . . . . . . . . . . . . . . . . . . . . . . . . . . . . . . . . . . . . .
III-22
FTP Setup Page . . . . . . . . . . . . . . . . . . . . . . . . . . . . . . . . . . . . . . . . . . . . . . . . .
FTP Users Page . . . . . . . . . . . . . . . . . . . . . . . . . . . . . . . . . . . . . . . . . . . . . . . . .
FTP Sessions Page . . . . . . . . . . . . . . . . . . . . . . . . . . . . . . . . . . . . . . . . . . . . . .
FTP Messages Page. . . . . . . . . . . . . . . . . . . . . . . . . . . . . . . . . . . . . . . . . . . . . .
FTP CVP Page . . . . . . . . . . . . . . . . . . . . . . . . . . . . . . . . . . . . . . . . . . . . . . . . .
FTP Proxy - Packet-Filtering Rules . . . . . . . . . . . . . . . . . . . . . . . . . . . . . . . . .
How to Configure the FTP Proxy . . . . . . . . . . . . . . . . . . . . . . . . . . . . . . . . . . . . .
How to Configure CVP for the FTP Proxy . . . . . . . . . . . . . . . . . . . . . . . . . . . . . .
How to FTP . . . . . . . . . . . . . . . . . . . . . . . . . . . . . . . . . . . . . . . . . . . . . . . . . . . . . .
III-22
III-25
III-26
III-28
III-29
III-31
III-33
III-34
III-35
FTP Proxy - Underlying Constructs . . . . . . . . . . . . . . . . . . . . . . . . . . . . . . . . . .
III-37
FTP Proxy Configuration File (ftpd-proxy.conf) . . . . . . . . . . . . . . . . . . . . . . .
FTP Proxy Command (ftpd-proxy) . . . . . . . . . . . . . . . . . . . . . . . . . . . . . . . . . .
III-37
III-41
Chapter 3
Gopher Protocol Proxy
Gopher Pages . . . . . . . . . . . . . . . . . . . . . . . . . . . . . . . . . . . . . . . . . . . . . . . . . . . .
CyberGuard Firewall Manual
III-43
III-43
xxiii
Contents
Gopher Setup Page . . . . . . . . . . . . . . . . . . . . . . . . . . . . . . . . . . . . . . . . . . . . . .
Gopher Clients Page . . . . . . . . . . . . . . . . . . . . . . . . . . . . . . . . . . . . . . . . . . . . .
Gopher Filter Syntax . . . . . . . . . . . . . . . . . . . . . . . . . . . . . . . . . . . . . . . . . . . . .
Gopher Proxy - Packet-Filtering Rules . . . . . . . . . . . . . . . . . . . . . . . . . . . . . . .
How to Configure the Gopher Proxy . . . . . . . . . . . . . . . . . . . . . . . . . . . . . . . . . . .
How to Add or Change Gopher-Server Client Rules. . . . . . . . . . . . . . . . . . . . . . .
How to Prioritize Gopher-Server Client Rules . . . . . . . . . . . . . . . . . . . . . . . . . . .
III-44
III-45
III-47
III-48
III-49
III-50
III-51
Gopher Protocol Proxy - Underlying Constructs . . . . . . . . . . . . . . . . . . . . . . .
III-52
Gopher Proxy Configuration File (gopherd-proxy.conf). . . . . . . . . . . . . . . . . .
Gopher Proxy Command (gopherd-proxy) . . . . . . . . . . . . . . . . . . . . . . . . . . . .
III-53
III-54
Troubleshooting the Gopher Proxy . . . . . . . . . . . . . . . . . . . . . . . . . . . . . . . . . .
III-55
Chapter 4
H.323 Protocol Proxy
III-57
H.323 Page . . . . . . . . . . . . . . . . . . . . . . . . . . . . . . . . . . . . . . . . . . . . . . . . . . . . . .
III-58
H.323 Setup Page. . . . . . . . . . . . . . . . . . . . . . . . . . . . . . . . . . . . . . . . . . . . . . . .
H.323 Proxy - Packet-Filtering Rules . . . . . . . . . . . . . . . . . . . . . . . . . . . . . . . .
How to Configure the H.323 Proxy . . . . . . . . . . . . . . . . . . . . . . . . . . . . . . . . . . . .
III-58
III-60
III-62
H.323 Protocol Proxy - Underlying Constructs . . . . . . . . . . . . . . . . . . . . . . . . .
III-63
H.323 Proxy Configuration File (h323-proxy.conf) . . . . . . . . . . . . . . . . . . . . .
H.323 Proxy Command (h323-proxy) . . . . . . . . . . . . . . . . . . . . . . . . . . . . . . . .
III-64
III-65
Chapter 5
Hypertext Transfer Protocol Proxy
xxiv
III-67
HTTP Pages. . . . . . . . . . . . . . . . . . . . . . . . . . . . . . . . . . . . . . . . . . . . . . . . . . . . . .
III-68
HTTP Setup Page . . . . . . . . . . . . . . . . . . . . . . . . . . . . . . . . . . . . . . . . . . . . . . .
HTTP Servers Page . . . . . . . . . . . . . . . . . . . . . . . . . . . . . . . . . . . . . . . . . . . . . .
HTTP Clients Page . . . . . . . . . . . . . . . . . . . . . . . . . . . . . . . . . . . . . . . . . . . . . .
HTTP Chaining Page . . . . . . . . . . . . . . . . . . . . . . . . . . . . . . . . . . . . . . . . . . . . .
HTTP File Blocking Page . . . . . . . . . . . . . . . . . . . . . . . . . . . . . . . . . . . . . . . . .
HTTP Header Filtering Page . . . . . . . . . . . . . . . . . . . . . . . . . . . . . . . . . . . . . . .
HTTP SOAP Page . . . . . . . . . . . . . . . . . . . . . . . . . . . . . . . . . . . . . . . . . . . . . . .
HTTP URL Translation Page . . . . . . . . . . . . . . . . . . . . . . . . . . . . . . . . . . . . . .
HTTP Language Blocker Page . . . . . . . . . . . . . . . . . . . . . . . . . . . . . . . . . . . . .
HTTP CVP Page . . . . . . . . . . . . . . . . . . . . . . . . . . . . . . . . . . . . . . . . . . . . . . . .
Configurable HTML and XML Forms for the HTTP Proxy . . . . . . . . . . . . . . .
HTTP Proxy - Packet-Filtering Rules . . . . . . . . . . . . . . . . . . . . . . . . . . . . . . . .
How to Configure the HTTP Proxy . . . . . . . . . . . . . . . . . . . . . . . . . . . . . . . . . . . .
How to Add or Change HTTP-Server Client Rules. . . . . . . . . . . . . . . . . . . . . . . .
How to Prioritize HTTP-Server Client Rules . . . . . . . . . . . . . . . . . . . . . . . . . . . .
How to Configure Websense Enterprise for the HTTP Proxy . . . . . . . . . . . . . . . .
How to Configure Language Blocking and CVP for the HTTP Proxy . . . . . . . . .
How to Configure Authenticating Browsers for the HTTP Proxy. . . . . . . . . . . . .
How to Relay HTTPS to an HTTP-Based Web Server Using Apache . . . . . . . . .
III-69
III-72
III-74
III-76
III-78
III-79
III-80
III-82
III-84
III-85
III-87
III-88
III-91
III-92
III-93
III-94
III-95
III-96
III-98
HTTP Proxy - Underlying Constructs . . . . . . . . . . . . . . . . . . . . . . . . . . . . . . . . .
III-101
HTTP Proxy Configuration File (httpd-proxy.conf) . . . . . . . . . . . . . . . . . . . . .
HTTP Proxy Header Blocking File (httpd-header.conf) . . . . . . . . . . . . . . . . . .
HTTP Proxy Document Types File (encoding.types) . . . . . . . . . . . . . . . . . . . .
HTTP Proxy Command (httpd-proxy). . . . . . . . . . . . . . . . . . . . . . . . . . . . . . . .
How to Change HTTP Proxy Configuration Rules . . . . . . . . . . . . . . . . . . . . . . . .
III-102
III-108
III-110
III-111
III-111
Contents
Contents
Chapter 6
Lightweight Directory Access Protocol Proxy
LDAP Referrals. . . . . . . . . . . . . . . . . . . . . . . . . . . . . . . . . . . . . . . . . . . . . . . . .
LDAP Load Balancing . . . . . . . . . . . . . . . . . . . . . . . . . . . . . . . . . . . . . . . . . . .
III-113
III-113
III-115
LDAP Pages . . . . . . . . . . . . . . . . . . . . . . . . . . . . . . . . . . . . . . . . . . . . . . . . . . . . .
III-115
LDAP Setup Page . . . . . . . . . . . . . . . . . . . . . . . . . . . . . . . . . . . . . . . . . . . . . . .
LDAP Rules Page . . . . . . . . . . . . . . . . . . . . . . . . . . . . . . . . . . . . . . . . . . . . . . .
LDAP Proxy - Packet-Filtering Rules. . . . . . . . . . . . . . . . . . . . . . . . . . . . . . . .
How to Configure the LDAP Proxy . . . . . . . . . . . . . . . . . . . . . . . . . . . . . . . . . . .
How to Prioritize the LDAP Proxy Client Rules. . . . . . . . . . . . . . . . . . . . . . . . . .
III-116
III-117
III-118
III-120
III-121
LDAP Proxy - Underlying Constructs. . . . . . . . . . . . . . . . . . . . . . . . . . . . . . . . .
III-122
LDAP Proxy Configuration File (ldap-proxy.conf) . . . . . . . . . . . . . . . . . . . . .
LDAP Proxy Command (ldap-proxy) . . . . . . . . . . . . . . . . . . . . . . . . . . . . . . . .
III-122
III-124
Chapter 7
Load Equalizer Proxy
III-125
Load Equalizer Pages . . . . . . . . . . . . . . . . . . . . . . . . . . . . . . . . . . . . . . . . . . . . .
III-125
Load Equalizer Setup Page . . . . . . . . . . . . . . . . . . . . . . . . . . . . . . . . . . . . . . . .
Load Equalizer Servers Page. . . . . . . . . . . . . . . . . . . . . . . . . . . . . . . . . . . . . . .
Load Equalizer Proxy - Packet-Filtering Rules. . . . . . . . . . . . . . . . . . . . . . . . .
How to Configure the Load Equalizer Proxy . . . . . . . . . . . . . . . . . . . . . . . . . . . .
III-126
III-128
III-129
III-130
Load Equalizer Proxy - Underlying Constructs. . . . . . . . . . . . . . . . . . . . . . . . .
III-131
Load Equalizer Proxy Configuration File (ept-proxy.conf) . . . . . . . . . . . . . . .
Load Equalizer Proxy Command (ept-proxy) . . . . . . . . . . . . . . . . . . . . . . . . . .
Load Equalizer Proxy Status Command (eptstat) . . . . . . . . . . . . . . . . . . . . . . .
III-131
III-133
III-133
Chapter 8
Microsoft SQL Server 2000 Protocol Proxy
III-135
MS-SQL Pages . . . . . . . . . . . . . . . . . . . . . . . . . . . . . . . . . . . . . . . . . . . . . . . . . . .
III-135
MS-SQL Setup Page . . . . . . . . . . . . . . . . . . . . . . . . . . . . . . . . . . . . . . . . . . . . .
MS-SQL Servers Page . . . . . . . . . . . . . . . . . . . . . . . . . . . . . . . . . . . . . . . . . . .
MS-SQL Proxy - Packet-Filtering Rules . . . . . . . . . . . . . . . . . . . . . . . . . . . . .
How to Configure the MS-SQL Proxy . . . . . . . . . . . . . . . . . . . . . . . . . . . . . . . . .
III-136
III-137
III-138
III-140
MS-SQL - Underlying Constructs . . . . . . . . . . . . . . . . . . . . . . . . . . . . . . . . . . . .
III-141
MS-SQL Proxy Configuration File (mssql-proxy.conf) . . . . . . . . . . . . . . . . . .
MS-SQL Proxy Command (mssql-proxy) . . . . . . . . . . . . . . . . . . . . . . . . . . . .
III-141
III-142
Chapter 9
Network News Transfer Protocol Proxy
III-143
NNTP Pages . . . . . . . . . . . . . . . . . . . . . . . . . . . . . . . . . . . . . . . . . . . . . . . . . . . . .
III-143
NNTP Setup Page . . . . . . . . . . . . . . . . . . . . . . . . . . . . . . . . . . . . . . . . . . . . . . .
NNTP Peers Page . . . . . . . . . . . . . . . . . . . . . . . . . . . . . . . . . . . . . . . . . . . . . . .
NNTP Groups Page . . . . . . . . . . . . . . . . . . . . . . . . . . . . . . . . . . . . . . . . . . . . . .
NNTP Proxy - Packet-Filtering Rules. . . . . . . . . . . . . . . . . . . . . . . . . . . . . . . .
How to Configure the NNTP Proxy . . . . . . . . . . . . . . . . . . . . . . . . . . . . . . . . . . .
III-144
III-146
III-147
III-148
III-150
NNTP Proxy - Underlying Constructs. . . . . . . . . . . . . . . . . . . . . . . . . . . . . . . . .
III-151
NNTP Proxy Configuration File (nntpd-proxy.conf) . . . . . . . . . . . . . . . . . . . .
NNTP Proxy Command (nntpd-proxy). . . . . . . . . . . . . . . . . . . . . . . . . . . . . . .
III-152
III-153
CyberGuard Firewall Manual
xxv
Contents
Chapter 10
Notes Proxy
III-155
Notes Page . . . . . . . . . . . . . . . . . . . . . . . . . . . . . . . . . . . . . . . . . . . . . . . . . . . . . .
III-155
Notes Setup Page . . . . . . . . . . . . . . . . . . . . . . . . . . . . . . . . . . . . . . . . . . . . . . . .
Notes Proxy - Packet-Filtering Rules . . . . . . . . . . . . . . . . . . . . . . . . . . . . . . . .
How to Configure the Notes Proxy . . . . . . . . . . . . . . . . . . . . . . . . . . . . . . . . . . . .
III-156
III-157
III-158
Notes Proxy - Underlying Constructs. . . . . . . . . . . . . . . . . . . . . . . . . . . . . . . . .
III-159
Notes Proxy Configuration File (notes-proxy.conf) . . . . . . . . . . . . . . . . . . . . .
Notes Proxy Command (notes-proxy) . . . . . . . . . . . . . . . . . . . . . . . . . . . . . . . .
III-159
III-160
Chapter 11
Port Guard Proxy
III-161
Port Guard Pages . . . . . . . . . . . . . . . . . . . . . . . . . . . . . . . . . . . . . . . . . . . . . . . . .
III-161
Port Guard Setup Page. . . . . . . . . . . . . . . . . . . . . . . . . . . . . . . . . . . . . . . . . . . .
Port Guard Servers Page . . . . . . . . . . . . . . . . . . . . . . . . . . . . . . . . . . . . . . . . . .
Port Guard Proxy - Packet-Filtering Rules . . . . . . . . . . . . . . . . . . . . . . . . . . . .
How to Configure the Port Guard Proxy . . . . . . . . . . . . . . . . . . . . . . . . . . . . . . . .
III-162
III-163
III-164
III-166
Port Guard Proxy - Underlying Constructs . . . . . . . . . . . . . . . . . . . . . . . . . . . .
III-167
Port Guard Proxy Configuration File (pg-proxy-mgr.conf) . . . . . . . . . . . . . . .
Port Guard Proxy Command (pg-proxy-mgr) . . . . . . . . . . . . . . . . . . . . . . . . . .
III-167
III-169
Chapter 12
Proxy-Writer Proxy
III-171
Proxy-Writer Proxy Configuration File (generic-proxy.conf) . . . . . . . . . . . . . . . .
Proxy-Writer Proxy Command (generic-proxy) . . . . . . . . . . . . . . . . . . . . . . . . . .
Proxy-Writer Proxy Source Files . . . . . . . . . . . . . . . . . . . . . . . . . . . . . . . . . . . . . .
III-173
III-173
III-174
Chapter 13
RealAudio Protocol Proxy
III-175
RealAudio Page . . . . . . . . . . . . . . . . . . . . . . . . . . . . . . . . . . . . . . . . . . . . . . . . . . .
RealAudio Setup Page . . . . . . . . . . . . . . . . . . . . . . . . . . . . . . . . . . . . . . . . . . . .
RealAudio Proxy - Packet-Filtering Rules . . . . . . . . . . . . . . . . . . . . . . . . . . . .
III-175
III-176
III-177
RealAudio Proxy - Underlying Constructs . . . . . . . . . . . . . . . . . . . . . . . . . . . . .
III-178
RealAudio Proxy Command (ra-proxy) . . . . . . . . . . . . . . . . . . . . . . . . . . . . . .
III-178
Chapter 14
Remote Login Proxy
III-179
Remote Login Page . . . . . . . . . . . . . . . . . . . . . . . . . . . . . . . . . . . . . . . . . . . . . . .
III-179
Remote Login Setup Page . . . . . . . . . . . . . . . . . . . . . . . . . . . . . . . . . . . . . . . . .
Remote Login Proxy - Packet-Filtering Rules. . . . . . . . . . . . . . . . . . . . . . . . . .
How to Remote Login . . . . . . . . . . . . . . . . . . . . . . . . . . . . . . . . . . . . . . . . . . . . . .
III-180
III-181
III-183
Remote Login Proxy - Underlying Constructs. . . . . . . . . . . . . . . . . . . . . . . . . .
III-185
Remote Login Proxy Configuration File (rlogind-proxy.conf) . . . . . . . . . . . . .
Remote Login Proxy Command (rlogind-proxy) . . . . . . . . . . . . . . . . . . . . . . .
III-186
III-187
Chapter 15
Session Initiation Protocol Proxy
III-189
SIP Page . . . . . . . . . . . . . . . . . . . . . . . . . . . . . . . . . . . . . . . . . . . . . . . . . . . . . . . .
xxvi
Contents
III-189
Contents
SIP Setup Page . . . . . . . . . . . . . . . . . . . . . . . . . . . . . . . . . . . . . . . . . . . . . . . . .
SIP Proxy - Packet-Filtering Rules . . . . . . . . . . . . . . . . . . . . . . . . . . . . . . . . . .
How to Configure the SIP Proxy . . . . . . . . . . . . . . . . . . . . . . . . . . . . . . . . . . . . . .
III-190
III-191
III-192
SIP Proxy - Underlying Constructs. . . . . . . . . . . . . . . . . . . . . . . . . . . . . . . . . . .
III-193
SIP Proxy Configuration File (sip-proxy.conf) . . . . . . . . . . . . . . . . . . . . . . . . .
SIP Proxy Command (sip-proxy) . . . . . . . . . . . . . . . . . . . . . . . . . . . . . . . . . . .
III-194
III-195
Chapter 16
Simple Mail Transfer Protocol Proxy
III-197
SMTP Pages . . . . . . . . . . . . . . . . . . . . . . . . . . . . . . . . . . . . . . . . . . . . . . . . . . . . .
III-198
SMTP Setup Page . . . . . . . . . . . . . . . . . . . . . . . . . . . . . . . . . . . . . . . . . . . . . . .
SMTP Servers Page. . . . . . . . . . . . . . . . . . . . . . . . . . . . . . . . . . . . . . . . . . . . . .
SMTP Users Page . . . . . . . . . . . . . . . . . . . . . . . . . . . . . . . . . . . . . . . . . . . . . . .
SMTP Blocking Page . . . . . . . . . . . . . . . . . . . . . . . . . . . . . . . . . . . . . . . . . . . .
SMTP Headers Page . . . . . . . . . . . . . . . . . . . . . . . . . . . . . . . . . . . . . . . . . . . . .
SMTP CVP Page . . . . . . . . . . . . . . . . . . . . . . . . . . . . . . . . . . . . . . . . . . . . . . . .
SMTP Proxy - Packet-Filtering Rules. . . . . . . . . . . . . . . . . . . . . . . . . . . . . . . .
How to Configure the SMTP Proxy . . . . . . . . . . . . . . . . . . . . . . . . . . . . . . . . . . .
How to Configure CVP for the SMTP Proxy . . . . . . . . . . . . . . . . . . . . . . . . . . . .
How to Ensure that “spam” is not Relayed . . . . . . . . . . . . . . . . . . . . . . . . . . . . . .
III-198
III-201
III-202
III-204
III-206
III-207
III-209
III-211
III-212
III-212
SMTP Proxy - Underlying Constructs . . . . . . . . . . . . . . . . . . . . . . . . . . . . . . . .
III-213
SMTP Proxy Configuration File (smtpd-proxy.conf) . . . . . . . . . . . . . . . . . . . .
Mail Alias Database Files . . . . . . . . . . . . . . . . . . . . . . . . . . . . . . . . . . . . . . . . .
Alias Database Command (genaliases) . . . . . . . . . . . . . . . . . . . . . . . . . . . . . . .
Display Alias Database Command (dumpaliases) . . . . . . . . . . . . . . . . . . . . . .
SMTP Proxy Command (smtpd-proxy) . . . . . . . . . . . . . . . . . . . . . . . . . . . . . .
III-214
III-219
III-220
III-220
III-221
Troubleshooting the SMTP Proxy. . . . . . . . . . . . . . . . . . . . . . . . . . . . . . . . . . . .
III-221
Chapter 17
SQL*Net Proxy
III-225
SQL*Net Pages . . . . . . . . . . . . . . . . . . . . . . . . . . . . . . . . . . . . . . . . . . . . . . . . . . .
III-225
SQL*Net Setup Page. . . . . . . . . . . . . . . . . . . . . . . . . . . . . . . . . . . . . . . . . . . . .
SQL*Net Servers Page . . . . . . . . . . . . . . . . . . . . . . . . . . . . . . . . . . . . . . . . . . .
SQL*Net Rules Page. . . . . . . . . . . . . . . . . . . . . . . . . . . . . . . . . . . . . . . . . . . . .
SQL*Net Proxy - Packet-Filtering Rules . . . . . . . . . . . . . . . . . . . . . . . . . . . . .
How to Configure the SQL*Net Proxy . . . . . . . . . . . . . . . . . . . . . . . . . . . . . . . . .
III-226
III-227
III-228
III-230
III-232
SQL*Net Proxy - Underlying Constructs . . . . . . . . . . . . . . . . . . . . . . . . . . . . . .
III-233
SQL*Net Protocol Proxy Configuration File (sqlnet-proxy.conf) . . . . . . . . . .
SQL*Net Proxy Command (sqlnet-proxy) . . . . . . . . . . . . . . . . . . . . . . . . . . . .
III-233
III-235
Chapter 18
Secure Sockets Layer Protocol Proxy
III-237
SSL Pages. . . . . . . . . . . . . . . . . . . . . . . . . . . . . . . . . . . . . . . . . . . . . . . . . . . . . . .
III-237
SSL Setup Page . . . . . . . . . . . . . . . . . . . . . . . . . . . . . . . . . . . . . . . . . . . . . . . . .
SSL Clients Page . . . . . . . . . . . . . . . . . . . . . . . . . . . . . . . . . . . . . . . . . . . . . . . .
SSL Protocol Proxy - Packet-Filtering Rules . . . . . . . . . . . . . . . . . . . . . . . . . .
How to Configure the SSL Protocol Proxy . . . . . . . . . . . . . . . . . . . . . . . . . . . . . .
How to Add or Change SSL-Server Client Rules . . . . . . . . . . . . . . . . . . . . . . . . .
How to Prioritize SSL-Server Client Rules . . . . . . . . . . . . . . . . . . . . . . . . . . . . . .
How to Configure Web Browsers to Use SSL Tunneling . . . . . . . . . . . . . . . . . . .
III-238
III-240
III-241
III-243
III-244
III-245
III-245
CyberGuard Firewall Manual
xxvii
Contents
SSL Protocol Proxy - Underlying Constructs . . . . . . . . . . . . . . . . . . . . . . . . . .
III-248
SSL Protocol Proxy Configuration File (ssl-proxy.conf) . . . . . . . . . . . . . . . . .
SSL Protocol Proxy Command (ssl-proxy) . . . . . . . . . . . . . . . . . . . . . . . . . . . .
III-248
III-250
Chapter 19
Telnet Network Login Proxy
III-251
Telnet Page . . . . . . . . . . . . . . . . . . . . . . . . . . . . . . . . . . . . . . . . . . . . . . . . . . . . . .
III-251
Telnet Setup Page. . . . . . . . . . . . . . . . . . . . . . . . . . . . . . . . . . . . . . . . . . . . . . . .
Telnet Proxy - Packet-Filtering Rules . . . . . . . . . . . . . . . . . . . . . . . . . . . . . . . .
How to Telnet. . . . . . . . . . . . . . . . . . . . . . . . . . . . . . . . . . . . . . . . . . . . . . . . . . . . .
III-252
III-253
III-255
Telnet Proxy - Underlying Constructs . . . . . . . . . . . . . . . . . . . . . . . . . . . . . . . .
III-257
Telnet Proxy Configuration File (telnetd-proxy.conf) . . . . . . . . . . . . . . . . . . . .
Telnet Proxy Command (telnetd-proxy) . . . . . . . . . . . . . . . . . . . . . . . . . . . . . .
III-258
III-259
Chapter 20
User Datagram Protocol Proxy
III-261
UDP Pages . . . . . . . . . . . . . . . . . . . . . . . . . . . . . . . . . . . . . . . . . . . . . . . . . . . . . .
III-261
UDP Ports Page . . . . . . . . . . . . . . . . . . . . . . . . . . . . . . . . . . . . . . . . . . . . . . . . .
UDP Servers Page . . . . . . . . . . . . . . . . . . . . . . . . . . . . . . . . . . . . . . . . . . . . . . .
UDP Proxy - Packet-Filtering Rules . . . . . . . . . . . . . . . . . . . . . . . . . . . . . . . . .
How to Configure the UDP Proxy . . . . . . . . . . . . . . . . . . . . . . . . . . . . . . . . . . . . .
III-262
III-263
III-264
III-266
UDP Proxy - Underlying Constructs . . . . . . . . . . . . . . . . . . . . . . . . . . . . . . . . . .
III-267
UDP Proxy Configuration File (udp-proxy.conf) . . . . . . . . . . . . . . . . . . . . . . .
UDP Proxy Command (udp-proxy). . . . . . . . . . . . . . . . . . . . . . . . . . . . . . . . . .
III-267
III-268
Chapter 21
X Window System Proxy
III-269
X11 Pages . . . . . . . . . . . . . . . . . . . . . . . . . . . . . . . . . . . . . . . . . . . . . . . . . . . . . . .
III-270
X11 Setup Page . . . . . . . . . . . . . . . . . . . . . . . . . . . . . . . . . . . . . . . . . . . . . . . . .
X11 Connections Page. . . . . . . . . . . . . . . . . . . . . . . . . . . . . . . . . . . . . . . . . . . .
X11 Proxy - Packet-Filtering Rules. . . . . . . . . . . . . . . . . . . . . . . . . . . . . . . . . .
How to Configure the X11 Proxy . . . . . . . . . . . . . . . . . . . . . . . . . . . . . . . . . . . . .
How to Prioritize X11 Connections . . . . . . . . . . . . . . . . . . . . . . . . . . . . . . . . . . . .
III-270
III-271
III-273
III-275
III-276
X11 Proxy - Underlying Constructs. . . . . . . . . . . . . . . . . . . . . . . . . . . . . . . . . . .
III-277
X11 Proxy Configuration File (x11-proxy.conf) . . . . . . . . . . . . . . . . . . . . . . . .
X11 Proxy Command (x11-proxy) . . . . . . . . . . . . . . . . . . . . . . . . . . . . . . . . . .
X11 Hook Proxy Command (x11_hook-proxy) . . . . . . . . . . . . . . . . . . . . . . . .
III-278
III-280
III-280
Troubleshooting the X Window System (X11) Proxy. . . . . . . . . . . . . . . . . . . . .
III-281
Copyright and Trademark Attributions
Glossary
Index
xxviii
Contents
Illustrations
Illustrations
Volume 1
Administering the CyberGuard Firewall
Figure I-1. Typical Firewall Connection . . . . . . . . . . . . . . . . . . . . . . . . . . . . . . . . . . . . . . . .
Figure I-2. Packet-Filtering Gateway . . . . . . . . . . . . . . . . . . . . . . . . . . . . . . . . . . . . . . . . . . .
Figure I-3. Directly Connected Internet Configuration . . . . . . . . . . . . . . . . . . . . . . . . . . . . .
Figure I-4. Window Components . . . . . . . . . . . . . . . . . . . . . . . . . . . . . . . . . . . . . . . . . . . . . .
Figure I-5. File Selection Window . . . . . . . . . . . . . . . . . . . . . . . . . . . . . . . . . . . . . . . . . . . . .
Figure I-6. Find Window . . . . . . . . . . . . . . . . . . . . . . . . . . . . . . . . . . . . . . . . . . . . . . . . . . . .
Figure I-7. Control Panel - Left Side . . . . . . . . . . . . . . . . . . . . . . . . . . . . . . . . . . . . . . . . . . .
Figure I-8. Control Panel - Right Side . . . . . . . . . . . . . . . . . . . . . . . . . . . . . . . . . . . . . . . . . .
Figure I-9. System Menu . . . . . . . . . . . . . . . . . . . . . . . . . . . . . . . . . . . . . . . . . . . . . . . . . . . .
Figure I-10. Shutdown Window . . . . . . . . . . . . . . . . . . . . . . . . . . . . . . . . . . . . . . . . . . . . . . .
Figure I-11. Configuration Menu . . . . . . . . . . . . . . . . . . . . . . . . . . . . . . . . . . . . . . . . . . . . . .
Figure I-12. Virtual Private Networks Sub-Menu . . . . . . . . . . . . . . . . . . . . . . . . . . . . . . . . .
Figure I-13. Reports Menu . . . . . . . . . . . . . . . . . . . . . . . . . . . . . . . . . . . . . . . . . . . . . . . . . . .
Figure I-14. Tools Menu . . . . . . . . . . . . . . . . . . . . . . . . . . . . . . . . . . . . . . . . . . . . . . . . . . . . .
Figure I-15. Help Menu . . . . . . . . . . . . . . . . . . . . . . . . . . . . . . . . . . . . . . . . . . . . . . . . . . . . .
Figure I-16. xman Window . . . . . . . . . . . . . . . . . . . . . . . . . . . . . . . . . . . . . . . . . . . . . . . . . .
Figure I-17. System Manual Page Window . . . . . . . . . . . . . . . . . . . . . . . . . . . . . . . . . . . . . .
Figure I-18. Help Search Window . . . . . . . . . . . . . . . . . . . . . . . . . . . . . . . . . . . . . . . . . . . . .
Figure I-19. Example of a Help Window . . . . . . . . . . . . . . . . . . . . . . . . . . . . . . . . . . . . . . . .
Figure I-20. Help History Window . . . . . . . . . . . . . . . . . . . . . . . . . . . . . . . . . . . . . . . . . . . .
Figure I-21. CyberGuard Firewall Login Window . . . . . . . . . . . . . . . . . . . . . . . . . . . . . . . . .
Figure I-22. Date and Time Window - Time Setup Page . . . . . . . . . . . . . . . . . . . . . . . . . . . .
Figure I-23. Date and Time Window - NTP Setup Page (Expanded) . . . . . . . . . . . . . . . . . .
Figure I-24. License Keys Window . . . . . . . . . . . . . . . . . . . . . . . . . . . . . . . . . . . . . . . . . . . .
Figure I-25. Network Interfaces Window - Interfaces Page . . . . . . . . . . . . . . . . . . . . . . . . . .
Figure I-26. Network Interfaces Window - Aggregates Page . . . . . . . . . . . . . . . . . . . . . . . .
Figure I-27. Network Interfaces File Example . . . . . . . . . . . . . . . . . . . . . . . . . . . . . . . . . . . .
Figure I-28. ATM Interfaces File Example . . . . . . . . . . . . . . . . . . . . . . . . . . . . . . . . . . . . . .
Figure I-29. Link Aggregation Configuration File Example . . . . . . . . . . . . . . . . . . . . . . . . .
Figure I-30. High Availability Window . . . . . . . . . . . . . . . . . . . . . . . . . . . . . . . . . . . . . . . . .
Figure I-31. High Availability Monitor Window . . . . . . . . . . . . . . . . . . . . . . . . . . . . . . . . . .
Figure I-32. Firewall Manager, Target Groups, and Target Firewalls . . . . . . . . . . . . . . . . . .
Figure I-33. Information Flow Between Firewall Manager and Target Groups . . . . . . . . . .
Figure I-34. Central Management Failover Configuration . . . . . . . . . . . . . . . . . . . . . . . . . .
Figure I-35. Failover Configuration - Manager 2 Takes Over For Manager 1 . . . . . . . . . . . .
Figure I-36. Central Management Role Window . . . . . . . . . . . . . . . . . . . . . . . . . . . . . . . . . .
Figure I-37. Central Management Role Window - Primary Managers Page . . . . . . . . . . . . .
Figure I-38. Central Management Role Window - Secondary Managers Page . . . . . . . . . . .
Figure I-39. Central Management Role Window - Monitoring Managers Page . . . . . . . . . .
Figure I-40. Encryption Window . . . . . . . . . . . . . . . . . . . . . . . . . . . . . . . . . . . . . . . . . . . . . .
Figure I-41. Central Management Choices Window . . . . . . . . . . . . . . . . . . . . . . . . . . . . . . .
Figure I-42. Firewall Manager Displayed on the Control Panel . . . . . . . . . . . . . . . . . . . . . .
CyberGuard Firewall Manual
I-2
I-2
I-6
I-10
I-29
I-30
I-31
I-32
I-33
I-35
I-36
I-38
I-39
I-40
I-42
I-43
I-43
I-44
I-45
I-46
I-47
I-52
I-54
I-62
I-68
I-71
I-86
I-87
I-88
I-97
I-102
I-104
I-104
I-105
I-106
I-115
I-117
I-119
I-121
I-122
I-124
I-126
xxix
Illustrations
Figure I-43.
Figure I-44.
Figure I-45.
Figure I-46.
Figure I-47.
Figure I-48.
Figure I-49.
Figure I-50.
Figure I-51.
Figure I-52.
Figure I-53.
Figure I-54.
Figure I-55.
Figure I-56.
Figure I-57.
Figure I-58.
Figure I-59.
Figure I-60.
Figure I-61.
Figure I-62.
Figure I-63.
Figure I-64.
Figure I-65.
Figure I-66.
Figure I-67.
Figure I-68.
Figure I-69.
Figure I-70.
Figure I-71.
Figure I-72.
Figure I-73.
Figure I-74.
Figure I-75.
Figure I-76.
Figure I-77.
Figure I-78.
Figure I-79.
Figure I-80.
Figure I-81.
Figure I-82.
Figure I-83.
Figure I-84.
Figure I-85.
Figure I-86.
Figure I-87.
Figure I-88.
Figure I-89.
Figure I-90.
Figure I-91.
Figure I-92.
Figure I-93.
Figure I-94.
xxx
Target Group Displayed on the Control Panel . . . . . . . . . . . . . . . . . . . . . . . . . .
Configuration Menu Choices for Target Group Configuration . . . . . . . . . . . . .
New and Changed File Buttons for Target Group Configurations . . . . . . . . . . .
Target Firewall Source Window . . . . . . . . . . . . . . . . . . . . . . . . . . . . . . . . . . . . .
Target Firewall Status Window . . . . . . . . . . . . . . . . . . . . . . . . . . . . . . . . . . . . . .
Central Alert Display Window . . . . . . . . . . . . . . . . . . . . . . . . . . . . . . . . . . . . . .
Central Alert Display Window (Show Choices) . . . . . . . . . . . . . . . . . . . . . . . . .
Central Alert Display Window (Show Summary) . . . . . . . . . . . . . . . . . . . . . . .
Logfile Time Dialog Window . . . . . . . . . . . . . . . . . . . . . . . . . . . . . . . . . . . . . . .
Target Alert Logs Reports Time Dialog Window . . . . . . . . . . . . . . . . . . . . . . . .
Secure Remote Management Window . . . . . . . . . . . . . . . . . . . . . . . . . . . . . . . .
Remote CyberGuard Firewall Control Panel . . . . . . . . . . . . . . . . . . . . . . . . . . .
Web Administration Window . . . . . . . . . . . . . . . . . . . . . . . . . . . . . . . . . . . . . . .
Secure Shell Window - Setup Page . . . . . . . . . . . . . . . . . . . . . . . . . . . . . . . . . .
Secure Shell Window - Clients Page . . . . . . . . . . . . . . . . . . . . . . . . . . . . . . . . .
Authorization Management Window - Duties Page (Expanded) . . . . . . . . . . . .
Authorization Management Window - Windows Page (Expanded) . . . . . . . . . .
Duty Choice Window . . . . . . . . . . . . . . . . . . . . . . . . . . . . . . . . . . . . . . . . . . . . .
Authorization Management Configuration File Example . . . . . . . . . . . . . . . . .
Ticket Request Window . . . . . . . . . . . . . . . . . . . . . . . . . . . . . . . . . . . . . . . . . . .
Configuration Tracking Window . . . . . . . . . . . . . . . . . . . . . . . . . . . . . . . . . . . .
Configuration History Window - Sessions Page . . . . . . . . . . . . . . . . . . . . . . . .
Configuration History Window - Details Page . . . . . . . . . . . . . . . . . . . . . . . . . .
Configuration History Window - Save As Sub-Window . . . . . . . . . . . . . . . . . .
Save and Restore Window - Save Page . . . . . . . . . . . . . . . . . . . . . . . . . . . . . . .
Save and Restore Window - Scheduler Window . . . . . . . . . . . . . . . . . . . . . . . .
Save and Restore Window - Restore Page . . . . . . . . . . . . . . . . . . . . . . . . . . . . .
Save and Restore Window - Schedule Page . . . . . . . . . . . . . . . . . . . . . . . . . . . .
Save and Restore Window - Log Page . . . . . . . . . . . . . . . . . . . . . . . . . . . . . . . .
Software Update Window . . . . . . . . . . . . . . . . . . . . . . . . . . . . . . . . . . . . . . . . . .
Hardware Health Window - Temp. Sensors Page . . . . . . . . . . . . . . . . . . . . . . . .
Hardware Health Window - Voltages Page . . . . . . . . . . . . . . . . . . . . . . . . . . . .
UPS Power Fail Support Window . . . . . . . . . . . . . . . . . . . . . . . . . . . . . . . . . . .
Console Messages Window . . . . . . . . . . . . . . . . . . . . . . . . . . . . . . . . . . . . . . . .
System Information Window . . . . . . . . . . . . . . . . . . . . . . . . . . . . . . . . . . . . . . .
Alert Summary Window . . . . . . . . . . . . . . . . . . . . . . . . . . . . . . . . . . . . . . . . . . .
Activity Reports Window . . . . . . . . . . . . . . . . . . . . . . . . . . . . . . . . . . . . . . . . . .
Sort Activity Reports Window . . . . . . . . . . . . . . . . . . . . . . . . . . . . . . . . . . . . . .
Audit Logs Reports Window . . . . . . . . . . . . . . . . . . . . . . . . . . . . . . . . . . . . . . .
Audit Logs Criteria Window - (Expanded) . . . . . . . . . . . . . . . . . . . . . . . . . . . .
WebTrends Audit Reports Window . . . . . . . . . . . . . . . . . . . . . . . . . . . . . . . . . .
Network Ping Test Window . . . . . . . . . . . . . . . . . . . . . . . . . . . . . . . . . . . . . . . .
Packet Trap Window . . . . . . . . . . . . . . . . . . . . . . . . . . . . . . . . . . . . . . . . . . . . . .
System Statistics Window . . . . . . . . . . . . . . . . . . . . . . . . . . . . . . . . . . . . . . . . . .
Packet Filter Statistics Window . . . . . . . . . . . . . . . . . . . . . . . . . . . . . . . . . . . . .
System Monitor Window . . . . . . . . . . . . . . . . . . . . . . . . . . . . . . . . . . . . . . . . . .
System Monitor Options Sub-Window . . . . . . . . . . . . . . . . . . . . . . . . . . . . . . . .
System Monitor Alarm Setup Sub-Window . . . . . . . . . . . . . . . . . . . . . . . . . . . .
Performance Monitor Window . . . . . . . . . . . . . . . . . . . . . . . . . . . . . . . . . . . . . .
Shell Window . . . . . . . . . . . . . . . . . . . . . . . . . . . . . . . . . . . . . . . . . . . . . . . . . . .
Standard Twisted-Pair Cable . . . . . . . . . . . . . . . . . . . . . . . . . . . . . . . . . . . . . . .
Rolled Twisted-Pair Cable . . . . . . . . . . . . . . . . . . . . . . . . . . . . . . . . . . . . . . . . .
Illustrations
I-126
I-127
I-128
I-129
I-132
I-135
I-137
I-138
I-139
I-139
I-157
I-159
I-168
I-189
I-191
I-194
I-195
I-199
I-204
I-205
I-206
I-207
I-209
I-210
I-216
I-220
I-221
I-224
I-225
I-234
I-238
I-239
I-243
I-245
I-246
I-250
I-252
I-260
I-261
I-262
I-276
I-280
I-281
I-285
I-287
I-289
I-290
I-291
I-294
I-310
I-345
I-345
Illustrations
Volume 2
Configuring the CyberGuard Firewall
Figure II-1. Host Names Window (Expanded) . . . . . . . . . . . . . . . . . . . . . . . . . . . . . . . . . . . .
Figure II-2. Host Names Database File Example . . . . . . . . . . . . . . . . . . . . . . . . . . . . . . . . . .
Figure II-3. Network Names Window (Expanded) . . . . . . . . . . . . . . . . . . . . . . . . . . . . . . . .
Figure II-4. Network Names Database File Example . . . . . . . . . . . . . . . . . . . . . . . . . . . . . .
Figure II-5. Grouping Window - Groups Page (Expanded) . . . . . . . . . . . . . . . . . . . . . . . . . .
Figure II-6. Grouping Window - Members Page (Expanded) . . . . . . . . . . . . . . . . . . . . . . . .
Figure II-7. Grouping Configuration File Example . . . . . . . . . . . . . . . . . . . . . . . . . . . . . . . .
Figure II-8. Packet-Filtering Rules Window - Basic Page (Expanded) . . . . . . . . . . . . . . . . .
Figure II-9. Packet-Filtering Rules Window - IPSec Page . . . . . . . . . . . . . . . . . . . . . . . . . . .
Figure II-10. Packet-Filtering Rules Window - Times Page . . . . . . . . . . . . . . . . . . . . . . . . .
Figure II-11. Packet-Filtering Rules Window - RPC Page . . . . . . . . . . . . . . . . . . . . . . . . . . .
Figure II-12. Network Services File Example - Regular Services . . . . . . . . . . . . . . . . . . . . .
Figure II-13. Network Services File Example - Proxy Services . . . . . . . . . . . . . . . . . . . . . .
Figure II-14. Packet-Filtering Rules File Example . . . . . . . . . . . . . . . . . . . . . . . . . . . . . . . .
Figure II-15. Packet-Filtering Rules for the SNMP Agent . . . . . . . . . . . . . . . . . . . . . . . . . .
Figure II-16. Kernel Statistics Example (netguard -I) . . . . . . . . . . . . . . . . . . . . . . . . . . . . . .
Figure II-17. Kernel Rules Format (netguard -l) . . . . . . . . . . . . . . . . . . . . . . . . . . . . . . . . . .
Figure II-18. Active Kernel Rules Format (netguard -a) . . . . . . . . . . . . . . . . . . . . . . . . . . . .
Figure II-19. Using NAT on the Firewall . . . . . . . . . . . . . . . . . . . . . . . . . . . . . . . . . . . . . . . .
Figure II-20. Proxy Without Pass Address Option . . . . . . . . . . . . . . . . . . . . . . . . . . . . . . . . .
Figure II-21. Proxy With Pass Address Option . . . . . . . . . . . . . . . . . . . . . . . . . . . . . . . . . . .
Figure II-22. Network Address Translation Window - Rules Page (Expanded) . . . . . . . . . .
Figure II-23. Network Address Translation Window - Interfaces Page . . . . . . . . . . . . . . . . .
Figure II-24. NAT and PassClientAddr Configuration File Example . . . . . . . . . . . . . . . . . .
Figure II-25. Network Address Translation File Example . . . . . . . . . . . . . . . . . . . . . . . . . . .
Figure II-26. Routing Window - Static Routes Page (Expanded) . . . . . . . . . . . . . . . . . . . . .
Figure II-27. Routing Window - Dynamic Routes Page . . . . . . . . . . . . . . . . . . . . . . . . . . . .
Figure II-28. Routing Window - Multicast Routes Page . . . . . . . . . . . . . . . . . . . . . . . . . . . .
Figure II-29. Routing Window - Multicast Routes, Defaults Page . . . . . . . . . . . . . . . . . . . .
Figure II-30. Routing Window - Multicast Routes, Boundary Names Page . . . . . . . . . . . . .
Figure II-31. Routing Window - Multicast Routes, Interfaces Page . . . . . . . . . . . . . . . . . . .
Figure II-32. Routing Window - Multicast Routes, Interfaces, Interface Options Page . . . .
Figure II-33. Routing Window - Multicast Routes, Interfaces, VIF Options Page . . . . . . . .
Figure II-34. Routing Window - Multicast Routes, Interfaces, Boundaries Page . . . . . . . . .
Figure II-35. Routing Window - Multicast Routes, Interfaces, Filters Page . . . . . . . . . . . . .
Figure II-36. Routing Window - Multicast Routes, DVMRP Tunnels Page . . . . . . . . . . . . .
Figure II-37. Routing Window - Multicast Routes, DVMRP Tunnels, Tunnel Options Page
Figure II-38. Routing Window - Multicast Routes, DVMRP Tunnels, VIF Options Page . .
Figure II-39. Routing Window - Multicast Routes, DVMRP Tunnels, Boundaries Page . . .
Figure II-40. Routing Window - Multicast Routes, DVMRP Tunnels, Filters Page . . . . . . .
Figure II-41. Static Routing Configuration File Example . . . . . . . . . . . . . . . . . . . . . . . . . . .
Figure II-42. Split Domain Name System Window - Setup Page . . . . . . . . . . . . . . . . . . . . .
Figure II-43. Split Domain Name System Window - Servers Page . . . . . . . . . . . . . . . . . . . .
Figure II-44. Split Domain Name System Window - Zones Page (Expanded) . . . . . . . . . . .
Figure II-45. Split Domain Name System Window - Hosts Page (Expanded) . . . . . . . . . . .
Figure II-46. Name Tree of storm.com Domain . . . . . . . . . . . . . . . . . . . . . . . . . . . . . . . . . . .
Figure II-47. Two Name Servers Running on the Firewall . . . . . . . . . . . . . . . . . . . . . . . . . .
Figure II-48. Boot File Example for External Name Server . . . . . . . . . . . . . . . . . . . . . . . . .
Figure II-49. Boot File Example for Internal Name Server . . . . . . . . . . . . . . . . . . . . . . . . . .
Figure II-50. External Database File Example for the storm.com. Domain . . . . . . . . . . . . .
Figure II-51. Database File Example for 45.168.192.in-addr.arpa. Domain . . . . . . . . . . . . .
CyberGuard Firewall Manual
II-2
II-4
II-6
II-8
II-10
II-13
II-19
II-22
II-29
II-35
II-36
II-41
II-42
II-48
II-49
II-52
II-56
II-59
II-63
II-65
II-65
II-66
II-69
II-75
II-76
II-83
II-86
II-88
II-89
II-91
II-92
II-93
II-94
II-96
II-97
II-98
II-99
II-100
II-102
II-103
II-111
II-114
II-116
II-118
II-120
II-126
II-127
II-130
II-131
II-133
II-134
xxxi
Illustrations
Figure II-52. Database File Example for 0.0.127.in-addr.arpa. Domain . . . . . . . . . . . . . . . .
Figure II-53. Cache File Example for External Name Server . . . . . . . . . . . . . . . . . . . . . . . .
Figure II-54. Internal Database File Example for the storm.com. Domain . . . . . . . . . . . . . .
Figure II-55. Database File Example for 25.168.129.in-addr.arpa. Domain . . . . . . . . . . . . .
Figure II-56. Cache File Example for Internal Name Server . . . . . . . . . . . . . . . . . . . . . . . . .
Figure II-57. Database File Example for 0.0.127.in-addr.arpa. Domain . . . . . . . . . . . . . . . .
Figure II-58. DNS in the Network Configuration Database File . . . . . . . . . . . . . . . . . . . . . .
Figure II-59. Resolver Configuration File Example . . . . . . . . . . . . . . . . . . . . . . . . . . . . . . . .
Figure II-60. Users Window . . . . . . . . . . . . . . . . . . . . . . . . . . . . . . . . . . . . . . . . . . . . . . . . . .
Figure II-61. Users Window (Expanded) - User Information Page . . . . . . . . . . . . . . . . . . . .
Figure II-62. Users Window (Expanded) - Password Authentication Page . . . . . . . . . . . . . .
Figure II-63. Users Window (Expanded) - NT Password Authentication Page . . . . . . . . . . .
Figure II-64. Users Window (Expanded) - FTP Operations Page . . . . . . . . . . . . . . . . . . . . .
Figure II-65. Users Window (Expanded) - Passport One Rules Page . . . . . . . . . . . . . . . . . .
Figure II-66. Default User Information Window . . . . . . . . . . . . . . . . . . . . . . . . . . . . . . . . . .
Figure II-67. Default FTP Operations Window . . . . . . . . . . . . . . . . . . . . . . . . . . . . . . . . . . .
Figure II-68. Passport One Window - Setup Page . . . . . . . . . . . . . . . . . . . . . . . . . . . . . . . . .
Figure II-69. Passport One Window - Profiles Page (Expanded) . . . . . . . . . . . . . . . . . . . . . .
Figure II-70. Passport One Window - Rules Page (Expanded) . . . . . . . . . . . . . . . . . . . . . . .
Figure II-71. Passport One Window - NT Share Detection Page (Expanded) . . . . . . . . . . . .
Figure II-72. Passport One Window - SSL Page . . . . . . . . . . . . . . . . . . . . . . . . . . . . . . . . . .
Figure II-73. Passport One Configuration File Example . . . . . . . . . . . . . . . . . . . . . . . . . . . .
Figure II-74. Passport One Profile File Example . . . . . . . . . . . . . . . . . . . . . . . . . . . . . . . . . .
Figure II-75. SOCKS Window - Setup Page . . . . . . . . . . . . . . . . . . . . . . . . . . . . . . . . . . . . .
Figure II-76. SOCKS Window - Rules Page . . . . . . . . . . . . . . . . . . . . . . . . . . . . . . . . . . . . .
Figure II-77. Intrusion Detection Window . . . . . . . . . . . . . . . . . . . . . . . . . . . . . . . . . . . . . . .
Figure II-78. Intrusion Detection File Example . . . . . . . . . . . . . . . . . . . . . . . . . . . . . . . . . . .
Figure II-79. Security Options Window - Dynamic Rules Page . . . . . . . . . . . . . . . . . . . . . .
Figure II-80. Security Options Window - Password Options Page . . . . . . . . . . . . . . . . . . . .
Figure II-81. Security Options Window - User Blacklisting Page . . . . . . . . . . . . . . . . . . . . .
Figure II-82. VPN Connections . . . . . . . . . . . . . . . . . . . . . . . . . . . . . . . . . . . . . . . . . . . . . . .
Figure II-83. IPSec Implementation . . . . . . . . . . . . . . . . . . . . . . . . . . . . . . . . . . . . . . . . . . . .
Figure II-84. CyberGuard Firewall/VPN and CA Certificates . . . . . . . . . . . . . . . . . . . . . . . .
Figure II-85. NAT is Enabled but not Applied to VPN Tunnel . . . . . . . . . . . . . . . . . . . . . . .
Figure II-86. NAT is Enabled and Applied to VPN Tunnel . . . . . . . . . . . . . . . . . . . . . . . . . .
Figure II-87. VPN Client/Server Configuration . . . . . . . . . . . . . . . . . . . . . . . . . . . . . . . . . . .
Figure II-88. Two-Tunnel Proxy Connection . . . . . . . . . . . . . . . . . . . . . . . . . . . . . . . . . . . . .
Figure II-89. IKE Protection Strategies Window - Protection Strategies Page . . . . . . . . . . .
Figure II-90. IKE Protection Strategies Window - Cryptographic Properties Page . . . . . . . .
Figure II-91. IPSec Protection Strategies Window - Protection Strategies Page . . . . . . . . . .
Figure II-92. IPSec Protection Strategies Window - Cryptographic Properties Page . . . . . .
Figure II-93. VPN Client Configurations Window . . . . . . . . . . . . . . . . . . . . . . . . . . . . . . . . .
Figure II-94. VPN Secure Channels Window - Channel Information Page . . . . . . . . . . . . . .
Figure II-95. IKE Advanced Settings Dialog Box . . . . . . . . . . . . . . . . . . . . . . . . . . . . . . . . .
Figure II-96. Manual Key Configuration Dialog Box . . . . . . . . . . . . . . . . . . . . . . . . . . . . . .
Figure II-97. VPN Secure Channels Window - Peer Protected Networks Page . . . . . . . . . . .
Figure II-98. VPN Secure Channels Window - Remote Identities Page . . . . . . . . . . . . . . . .
Figure II-99. VPN Secure Channels Window - Trusted CAs Page . . . . . . . . . . . . . . . . . . . .
Figure II-100. IKE Certificate Services Window - LDAP Directories Page . . . . . . . . . . . . .
Figure II-101. IKE Certificate Services Window - OCSP Responders Page . . . . . . . . . . . . .
Figure II-102. VPN Controls Window - Options Page . . . . . . . . . . . . . . . . . . . . . . . . . . . . . .
Figure II-103. VPN Controls Window - Security Associations Page . . . . . . . . . . . . . . . . . . .
Figure II-104. VPN Controls Window - IKE Exchange Logging Page . . . . . . . . . . . . . . . . .
Figure II-105. VPN Controls Window - IKE Exchange Timers Page . . . . . . . . . . . . . . . . . .
xxxii
Illustrations
II-134
II-135
II-136
II-136
II-137
II-137
II-138
II-139
II-153
II-155
II-158
II-162
II-165
II-166
II-168
II-169
II-190
II-192
II-193
II-194
II-195
II-204
II-206
II-213
II-215
II-224
II-227
II-229
II-230
II-232
II-235
II-237
II-243
II-248
II-248
II-253
II-254
II-256
II-257
II-259
II-260
II-262
II-264
II-267
II-271
II-273
II-275
II-276
II-277
II-278
II-279
II-281
II-282
II-289
Illustrations
Figure II-106.
Figure II-107.
Figure II-108.
Figure II-109.
Figure II-110.
Figure II-111.
Figure II-112.
Figure II-113.
Figure II-114.
Figure II-115.
Figure II-116.
Figure II-117.
Figure II-118.
Figure II-119.
Figure II-120.
Figure II-121.
Figure II-122.
Certificate Management Window - Keypairs Page . . . . . . . . . . . . . . . . . . . . .
Certificate Management Window - CA Certificates Page . . . . . . . . . . . . . . .
IKE Protection Strategy Configuration File Example . . . . . . . . . . . . . . . . . .
IPSec Protection Strategy Configuration File Example . . . . . . . . . . . . . . . . .
VPN Secure Channels Configuration File Example . . . . . . . . . . . . . . . . . . . .
VPN Client Configuration File Example . . . . . . . . . . . . . . . . . . . . . . . . . . . .
LDAP Directories Configuration File Example . . . . . . . . . . . . . . . . . . . . . . .
OCSP Responders Configuration File Example . . . . . . . . . . . . . . . . . . . . . . .
CA Certificate Configuration File Example . . . . . . . . . . . . . . . . . . . . . . . . . .
VPN Policy Manager Configuration File Example . . . . . . . . . . . . . . . . . . . .
Alerts, Activities, and Archives Window - Alerts Page . . . . . . . . . . . . . . . . .
Script Example for Handling Disk Partitions Full Event . . . . . . . . . . . . . . . .
Alerts, Activities, and Archives Window - Activities Page . . . . . . . . . . . . . .
Alerts, Activities, and Archives Window - Archives Page . . . . . . . . . . . . . . .
Activity Logs Window . . . . . . . . . . . . . . . . . . . . . . . . . . . . . . . . . . . . . . . . . .
Alert Configuration File Example . . . . . . . . . . . . . . . . . . . . . . . . . . . . . . . . .
Activities Configuration Example . . . . . . . . . . . . . . . . . . . . . . . . . . . . . . . . .
II-292
II-297
II-307
II-308
II-311
II-312
II-313
II-314
II-315
II-316
II-327
II-338
II-341
II-348
II-360
II-366
II-367
Volume 3
Configuring SmartProxies for the CyberGuard Firewall
Figure III-1. Transparent Operation of a SmartProxy on the Firewall . . . . . . . . . . . . . . . . . .
Figure III-2. General SmartProxy Operation for Services . . . . . . . . . . . . . . . . . . . . . . . . . . .
Figure III-3. SmartProxies Window (Expanded) . . . . . . . . . . . . . . . . . . . . . . . . . . . . . . . . . .
Figure III-4. Proxies Subset of the startup.conf File . . . . . . . . . . . . . . . . . . . . . . . . . . . . . . .
Figure III-5. Proxies Subset of the startup.conf File (con’t) . . . . . . . . . . . . . . . . . . . . . . . . .
Figure III-6. Proxies Subset of the inetd.conf File . . . . . . . . . . . . . . . . . . . . . . . . . . . . . . . . .
Figure III-7. SmartProxies Window - FTP Setup Page . . . . . . . . . . . . . . . . . . . . . . . . . . . . .
Figure III-8. SmartProxies Window - FTP Users Page . . . . . . . . . . . . . . . . . . . . . . . . . . . . .
Figure III-9. SmartProxies Window - FTP Sessions Page (Expanded) . . . . . . . . . . . . . . . . .
Figure III-10. SmartProxies Window - FTP Messages Page . . . . . . . . . . . . . . . . . . . . . . . . .
Figure III-11. SmartProxies Window - FTP CVP Page . . . . . . . . . . . . . . . . . . . . . . . . . . . . .
Figure III-12. FTP Configuration File Example . . . . . . . . . . . . . . . . . . . . . . . . . . . . . . . . . .
Figure III-13. SmartProxies Window - Gopher Setup Page . . . . . . . . . . . . . . . . . . . . . . . . . .
Figure III-14. SmartProxies Window - Gopher Clients Page (Expanded) . . . . . . . . . . . . . . .
Figure III-15. Gopher Proxy Configuration File Example . . . . . . . . . . . . . . . . . . . . . . . . . . .
Figure III-16. SmartProxies Window - H.323 Setup Page . . . . . . . . . . . . . . . . . . . . . . . . . . .
Figure III-17. H323 Proxy Configuration File Example . . . . . . . . . . . . . . . . . . . . . . . . . . . .
Figure III-18. SmartProxies Window - HTTP Setup Page . . . . . . . . . . . . . . . . . . . . . . . . . . .
Figure III-19. SmartProxies Window - HTTP Servers Page (Expanded) . . . . . . . . . . . . . . .
Figure III-20. SmartProxies Window - HTTP Clients Page (Expanded) . . . . . . . . . . . . . . . .
Figure III-21. SmartProxies Window - HTTP Chaining Page . . . . . . . . . . . . . . . . . . . . . . . .
Figure III-22. SmartProxies Window - HTTP File Blocking Page (Expanded) . . . . . . . . . .
Figure III-23. SmartProxies Window - HTTP Header Filtering Page (Expanded) . . . . . . . .
Figure III-24. SmartProxies Window - HTTP SOAP Page (Expanded) . . . . . . . . . . . . . . . .
Figure III-25. SmartProxies Window - HTTP URL Translation Page (Expanded) . . . . . . . .
Figure III-26. SmartProxies Window - HTTP Language Blocker Page . . . . . . . . . . . . . . . .
Figure III-27. Smart Proxies Window - HTTP CVP Page . . . . . . . . . . . . . . . . . . . . . . . . . . .
Figure III-28. HTTP Proxy Configuration File Example . . . . . . . . . . . . . . . . . . . . . . . . . . . .
Figure III-29. HTTP Proxy Header Blocking File Example . . . . . . . . . . . . . . . . . . . . . . . . .
Figure III-30. HTTP Proxy encoding.types File Example . . . . . . . . . . . . . . . . . . . . . . . . . . .
Figure III-31. HTTP Proxy Script to Change Configuration Files . . . . . . . . . . . . . . . . . . . . .
Figure III-32. SmartProxies Window - LDAP Setup Page . . . . . . . . . . . . . . . . . . . . . . . . . .
CyberGuard Firewall Manual
III-1
III-2
III-5
III-11
III-12
III-14
III-23
III-25
III-26
III-28
III-29
III-40
III-44
III-46
III-53
III-59
III-65
III-69
III-72
III-74
III-76
III-78
III-79
III-80
III-82
III-84
III-85
III-107
III-109
III-110
III-112
III-116
xxxiii
Illustrations
Figure III-33.
Figure III-34.
Figure III-35.
Figure III-36.
Figure III-37.
Figure III-38.
Figure III-39.
Figure III-40.
Figure III-41.
Figure III-42.
Figure III-43.
Figure III-44.
Figure III-45.
Figure III-46.
Figure III-47.
Figure III-48.
Figure III-49.
Figure III-50.
Figure III-51.
Figure III-52.
Figure III-53.
Figure III-54.
Figure III-55.
Figure III-56.
Figure III-57.
Figure III-58.
Figure III-59.
Figure III-60.
Figure III-61.
Figure III-62.
Figure III-63.
Figure III-64.
Figure III-65.
Figure III-66.
Figure III-67.
Figure III-68.
Figure III-69.
Figure III-70.
Figure III-71.
Figure III-72.
Figure III-73.
Figure III-74.
Figure III-75.
Figure III-76.
Figure III-77.
Figure III-78.
Figure III-79.
Figure III-80.
xxxiv
SmartProxies Window - LDAP Rules Page (Expanded) . . . . . . . . . . . . . . . . .
LDAP Proxy Configuration File Example . . . . . . . . . . . . . . . . . . . . . . . . . . . .
SmartProxies Window - Load Equalizer Setup Page . . . . . . . . . . . . . . . . . . . .
SmartProxies Window - Load Equalizer Servers Page (Expanded) . . . . . . . .
Load Equalizer Proxy Configuration File Example . . . . . . . . . . . . . . . . . . . . .
SmartProxies Window - MS-SQL Setup Page . . . . . . . . . . . . . . . . . . . . . . . . .
SmartProxies Window - MS-SQL Servers Page (Expanded) . . . . . . . . . . . . .
MS-SQL Configuration File Example . . . . . . . . . . . . . . . . . . . . . . . . . . . . . . .
SmartProxies Window - NNTP Setup Page . . . . . . . . . . . . . . . . . . . . . . . . . . .
SmartProxies Window - NNTP Peers Page (Expanded) . . . . . . . . . . . . . . . . .
SmartProxies Window - NNTP Groups Page . . . . . . . . . . . . . . . . . . . . . . . . .
NNTP Proxy Configuration File Example . . . . . . . . . . . . . . . . . . . . . . . . . . . .
SmartProxies Window - Notes Setup Page . . . . . . . . . . . . . . . . . . . . . . . . . . .
Notes Proxy Configuration File Example . . . . . . . . . . . . . . . . . . . . . . . . . . . .
SmartProxies Window - Port Guard Setup Page . . . . . . . . . . . . . . . . . . . . . . .
SmartProxies Window - Port Guard Servers Page (Expanded) . . . . . . . . . . . .
Port Guard Proxy Master Configuration File Example . . . . . . . . . . . . . . . . . .
Proxy-Writer Proxy Configuration File Example . . . . . . . . . . . . . . . . . . . . . .
SmartProxies Window - RealAudio Setup Page . . . . . . . . . . . . . . . . . . . . . . .
SmartProxies Window - Remote Login Setup Page . . . . . . . . . . . . . . . . . . . .
Remote Login Proxy Configuration File Example . . . . . . . . . . . . . . . . . . . . .
SmartProxies Window - SIP Setup Page . . . . . . . . . . . . . . . . . . . . . . . . . . . . .
SIP Proxy Configuration File Example . . . . . . . . . . . . . . . . . . . . . . . . . . . . . .
SmartProxies Window - SMTP Setup Page . . . . . . . . . . . . . . . . . . . . . . . . . . .
SmartProxies Window - SMTP Servers Page (Expanded) . . . . . . . . . . . . . . .
SmartProxies Window - SMTP Users Page (Expanded) . . . . . . . . . . . . . . . . .
SmartProxies Window - SMTP Blocking Page (Expanded) . . . . . . . . . . . . . .
SmartProxies Window - SMTP Headers Page (Expanded) . . . . . . . . . . . . . . .
SmartProxies Window - SMTP CVP Page . . . . . . . . . . . . . . . . . . . . . . . . . . .
SMTP Proxy Configuration File Example . . . . . . . . . . . . . . . . . . . . . . . . . . . .
SMTP Proxy Alias Database File Example . . . . . . . . . . . . . . . . . . . . . . . . . . .
Mail Server Communication with Itself Example . . . . . . . . . . . . . . . . . . . . . .
SmartProxies Window - SQL*Net Setup Page . . . . . . . . . . . . . . . . . . . . . . . .
SmartProxies Window - SQL*Net Servers Page (Expanded) . . . . . . . . . . . . .
SmartProxies Window - SQL*Net Rules Page (Expanded) . . . . . . . . . . . . . .
SQL*Net Proxy Configuration File Example . . . . . . . . . . . . . . . . . . . . . . . . .
SmartProxies Window - SSL Setup Page . . . . . . . . . . . . . . . . . . . . . . . . . . . .
SmartProxies Window - SSL Clients Page (Expanded) . . . . . . . . . . . . . . . . .
SSL Protocol Proxy Configuration File Example . . . . . . . . . . . . . . . . . . . . . .
SmartProxies Window - Telnet Setup Page . . . . . . . . . . . . . . . . . . . . . . . . . . .
Telnet Proxy Configuration File Example . . . . . . . . . . . . . . . . . . . . . . . . . . . .
SmartProxies Window - UDP Ports Page . . . . . . . . . . . . . . . . . . . . . . . . . . . .
SmartProxies Window - UDP Servers Page (Expanded) . . . . . . . . . . . . . . . . .
UDP Protocol Proxy Configuration File Example . . . . . . . . . . . . . . . . . . . . . .
SmartProxies Window - X11 Setup Page . . . . . . . . . . . . . . . . . . . . . . . . . . . .
SmartProxies Window - X11 Connections Page (Expanded) . . . . . . . . . . . . .
Direct X11 Proxy Configuration File Example . . . . . . . . . . . . . . . . . . . . . . . .
X11 Hook (Virtual) Proxy Configuration File Example . . . . . . . . . . . . . . . . .
III-117
III-124
III-126
III-128
III-132
III-136
III-137
III-142
III-144
III-146
III-147
III-153
III-156
III-160
III-162
III-163
III-168
III-173
III-176
III-180
III-186
III-190
III-194
III-199
III-201
III-203
III-204
III-206
III-207
III-218
III-220
III-222
III-226
III-227
III-229
III-234
III-238
III-240
III-249
III-252
III-258
III-262
III-263
III-268
III-270
III-271
III-279
III-279
Illustrations
Tables
Tables
Volume 1
Administering the CyberGuard Firewall
Table I-1.
Table I-2.
Table I-3.
Table I-4.
Table I-5.
Table I-6.
Table I-7.
Table I-8.
Table I-9.
Central Management vs. Secure Remote Management . . . . . . . . . . .
Effect of Propagation on Local Configurations . . . . . . . . . . . . . . . . .
SSDH2 Configuration File - CyberGuard Values . . . . . . . . . . . . . . .
Window Identifiers for Authorization Management . . . . . . . . . . . . .
Suspicious Event Report Formats . . . . . . . . . . . . . . . . . . . . . . . . . . .
Activity Reports Formats . . . . . . . . . . . . . . . . . . . . . . . . . . . . . . . . . .
Firewall Values of Selected Networking Tunable Parameters
....
Firewall Values of Selected Networking Tunable Parameters . . . . . .
Network Settings Comparison . . . . . . . . . . . . . . . . . . . . . . . . . . . . . .
I-114
I-130
I-178
I-202
I-254
I-258
I-335
I-340
I-340
Volume 2
Configuring the CyberGuard Firewall
Table II-1.
Table II-2.
Table II-3.
Table II-4.
Table II-5.
Table II-6.
Packet-Filtering Warning Messages . . . . . . . . . . . . . . . . . . . . . . . . .
Static vs. Dynamic Network Address Translation . . . . . . . . . . . . . . .
Static vs. Dynamic Routing . . . . . . . . . . . . . . . . . . . . . . . . . . . . . . . .
LDAP DN Attributes Format . . . . . . . . . . . . . . . . . . . . . . . . . . . . . . .
Default Log Files for Suspicious Event Types . . . . . . . . . . . . . . . . .
Default Log Files for Activity Types . . . . . . . . . . . . . . . . . . . . . . . .
II-61
II-64
II-79
II-290
II-333
II-346
Volume 3
Configuring SmartProxies for the CyberGuard Firewall
Table III-1. Proxy Implementation Comparison . . . . . . . . . . . . . . . . . . . . . . . . .
Table III-2. Client Address Seen by Proxy Server . . . . . . . . . . . . . . . . . . . . . . .
Table III-3. Common Packet-Filtering Rules for Proxies . . . . . . . . . . . . . . . . . .
Table III-4. Packet-Filtering Rule Implementation Comparison . . . . . . . . . . . .
Table III-5. Packet-Filtering Rules for the FTP Proxy . . . . . . . . . . . . . . . . . . . .
Table III-6. Packet-Filtering Rules for the Gopher Proxy . . . . . . . . . . . . . . . . .
Table III-7. Packet-Filtering Rules for the H.323 Proxy . . . . . . . . . . . . . . . . . .
Table III-8. Packet-Filtering Rules for the HTTP Proxy . . . . . . . . . . . . . . . . . .
Table III-9. Packet-Filtering Rules for HTTP Proxy Chaining . . . . . . . . . . . . .
Table III-10. Packet-Filtering Rule for Websense Enterprise . . . . . . . . . . . . . . .
Table III-11. Packet-Filtering Rules for the LDAP Proxy . . . . . . . . . . . . . . . . .
Table III-12. Packet-Filtering Rules for the LDE Proxy . . . . . . . . . . . . . . . . . .
Table III-13. Packet-Filtering Rules for the MS-SQL Proxy . . . . . . . . . . . . . . .
Table III-14. Packet-Filtering Rules for the NNTP Proxy . . . . . . . . . . . . . . . . .
Table III-15. Packet-Filtering Rules for the Notes Proxy . . . . . . . . . . . . . . . . . .
Table III-16. Packet-Filtering Rules for the Port Guard Proxy . . . . . . . . . . . . .
Table III-17. Packet-Filtering Rules for the RealAudio Proxy . . . . . . . . . . . . . .
Table III-18. Packet-Filtering Rules for the Rlogin Proxy . . . . . . . . . . . . . . . . .
Table III-19. Packet-Filtering Rules for the SIP Proxy . . . . . . . . . . . . . . . . . . .
Table III-20. Packet-Filtering Rules for the SMTP Proxy . . . . . . . . . . . . . . . . .
Table III-21. Packet-Filtering Rules for the SQL*Net Proxy . . . . . . . . . . . . . . .
CyberGuard Firewall Manual
III-3
III-15
III-16
III-17
III-32
III-48
III-61
III-89
III-90
III-90
III-119
III-129
III-138
III-149
III-157
III-165
III-177
III-181
III-191
III-210
III-230
xxxv
Tables
Table III-22.
Table III-23.
Table III-24.
Table III-25.
Table III-26.
Table III-27.
Table III-28.
xxxvi
Packet-Filtering Rules for the SSL Proxy . . . . . . . . . . . . . . . . . . .
Packet-Filtering Rules for the Telnet Proxy . . . . . . . . . . . . . . . . . .
Packet-Filtering Rules for the UDP Proxy (Port Rules) . . . . . . . .
Packet-Filtering Rules for the UDP Proxy (Server Rules) . . . . . .
Packet-Filtering Rules for the Direct X11 proxy . . . . . . . . . . . . . .
Packet-Filtering Rules for the Direct X11 Proxy with Confirmation
Packet-Filtering Rules for the Virtual X11 Proxy . . . . . . . . . . . . .
III-241
III-254
III-264
III-265
III-273
III-274
III-274
Tables
Chapter 1
Chapter 1.
II
Host Names
1
2
2
1
Your system can always use Internet Protocol (IP) addresses to communicate with other
systems (hosts) in a network or other networks. However, people usually recall host and
network names better than addresses. This chapter shows how to associate IP addresses
with names.
Host Names Window
1
Your system communicates with other systems (hosts) in a network by using an Internet
Protocol (IP) address; however, host names are easier to remember than IP addresses. Use
this window to view, add, change, or delete hosts. Changes to host information take effect
as soon as they are saved.
Notes:
◆
◆
This window defines host names for use by only the firewall. To define host
names and make them available to other hosts on the network, use the Split
Domain Name System (DNS).
The Packet-Filtering Rules window and the Static Routes page of the Routes
window use hosts from this window; changes to the Network Interfaces window may add hosts to this window.
Tip:
Define host names for systems that the firewall will need to initiate connections
to, for example, mail, the World Wide Web, and DNS servers, or other systems
that have special permissions in packet-filtering or proxy client rules. You do not
need to add entries for systems that the firewall does not reference.
II-1
Host Names Window
Figure II-1. Host Names Window (Expanded)
The expanded version of this window contains the following fields and controls:
Type
Has the following settings:
Host - (Default) Treats this line as a host description
Comment - Treats this line as a comment
Host Name
Unique primary name of the host that is distinct from network and group
names. Portable host names must contain only alphanumeric characters.
IP Address
Address used by the Internet Protocol to communicate with the host.
Aliases
Secondary names for the host. (An alias can separate a functional name
from a host name. For example, you might use mail as an alias for a host
that processes mail. If you change the host that processes mail, you simply move the alias to the other host.) Portable aliases must contain only
alphanumeric characters. The names are separated by spaces. This field
may be blank.
Comment
Information about the host, such as its hardware address, or a commented-out host description. This field may be blank.
CAUTION!
Do not use underscores in host names or aliases. The Split
Domain Name System (DNS) will not work if underscores are
used. Furthermore, under current Internet standards, underscores
are not valid characters for host names.
II-2
Chapter 1, Host Names
Host Names Window
See also:
◆
◆
◆
◆
◆
◆
“Window Components” on page I-10
“Find Window” on page I-30
“Network Interfaces Window” on page I-68
“Packet-Filtering Rules Window” on page II-22
“Routing Window” on page II-83
“Split Domain Name System Window” on page II-114
How to Configure Host Names
1
You can use the expanded Host Names window to add a name to the host list when you
add a system to your local network, correct an error in a host name or Internet address, add
or change an alias, or add or change a comment.
To display the expanded Host Names window:
1. Select Configuration from the Control Panel.
2. Select Host Names. The Host Names window appears.
3. Click on Show Editor. The expanded Host Names window appears.
To add a host to your network:
1. (Optional) Select the host that you want the new host to follow. (Skip this step if you
want to add a new host at the top of the list.)
2. Click on Insert. A blank line appears in the list. The Type field is set to Host.
3. Type the primary host name in the Host Name field.
4. Type the Internet address in the IP Address field.
5. (Optional) Type a space-separated list of any aliases for the host in the Aliases field.
6. (Optional) Type any comments in the Comment field.
7. Click on Save.
To change a host:
1. Select the host that you want to change.
2. Edit the fields that you want to change.
3. Click on Save.
To delete a host:
1. Select the hosts that you want to delete.
2. Click on Delete. The selected lines are removed from the list.
3. Click on Save.
CyberGuard Firewall Manual
II-3
Host Names - Underlying Constructs
Host Names - Underlying Constructs
1
Advanced Users Only! The GUI automates the editing of files and invocation of commands described in this section. If you choose to manually edit any file, you must first
close every window displayed from the Configuration menu and complete all edits of
the file before continuing GUI configuration activities.
Host Names Database File (hosts)
1
The /etc/inet/hosts file is the host name database, which lists the hosts’ Internet Protocol
(IP) addresses along with names that can be used in place of this address. This file can be
used to define the local host, internal hosts, external hosts, and your Internet Service Provider. Each network interface should have an entry in the hosts file. One entry should
relate the system node name to one external interface.
Format guidelines:
◆
◆
◆
Each host must be listed on a separate line
Fields are separated by white space (tabs or spaces)
Comments begin with the # character and continue until the end of the line
Format:
address name [aliases]
Fields:
address
name
aliases
Internet Protocol (IP) address assigned to the host system.
Host name assigned to the host system. Use alphanumeric names only.
(Optional) One or more alternate host names assigned to the system.
The following example shows a typical hosts file.
# /etc/inet/hosts
127.0.0.1
localhost
loopback
192.168.34.2
cyber0
firewall
# Loopback interface
192.168.65.3
cyber1
cyberguard
192.168.34.12
mango
mango.lab.com
192.168.34.4
kiwi
# Internal interface of firewall
cyberguardcorp.com
# External interface of firewall
# Internal interface of firewall
# Internal interface of firewall
Figure II-2. Host Names Database File Example
II-4
Chapter 1, Host Names
Chapter 2
Chapter 2.
II
Network Names
Your system can always use Internet Protocol (IP) addresses to communicate with other
systems (hosts) in a network or other networks. However, people usually recall host and
network names better than addresses. This chapter shows how to associate IP addresses
with names.
Network Names Window
2
Your system communicates with other networks by using an Internet Protocol (IP)
address; however, network names are easier to remember than IP addresses. Use this window to view, add, change, or delete networks. Changes to network information take effect
as soon as they are saved.
Tip:
You may want to define network names for each network to which the firewall is
directly connected as an easy way to reference each interface in the packet-filtering rules. You may also want to name the other networks you reference in packetfiltering or routing rules. You do not need to name networks that the firewall does
not reference.
Note: The Packet-Filtering Rules window and the Static Routes page of the Routes window use networks from this window.
II-5
Network Names Window
Figure II-3. Network Names Window (Expanded)
The expanded version of this window contains the following fields and controls:
Type
Has the following settings:
Network - (Default) Treats this line as a network description
Comment - Treats this line as a comment
Network Name
Unique primary name of the network that is distinct from host and
group names. Portable network names must contain only alphanumeric characters.
IP Address
Internet Protocol network address. This address consists of 1, 2 or
3 octets, depending on whether the network is class A (1 octet), B
(2 octets), or C (3 octets). This must be a classful network IP
address; it cannot be a classless IP address. See the inet(3N)
UnixWare system manual page.
Aliases
Secondary names for the network. (For example, you might add
an old network name to a new network name during a network
upgrade so that traffic for the old network is routed to the new network.) Portable aliases must contain only alphanumeric characters. The names are separated by spaces. This field may be blank.
Comment
Information about the network, such as its hardware address, or a
commented-out network description. This field may be blank.
CAUTION!
Do not use underscores in host names or aliases. The Split
Domain Name System (DNS) will not work if underscores are
used. Furthermore, under current Internet standards, underscores
are not valid characters for host names.
II-6
Chapter 2, Network Names
Network Names Window
See also:
◆
◆
◆
◆
◆
“Window Components” on page I-10
“Find Window” on page I-30
“Packet-Filtering Rules Window” on page II-22
“Routing Window” on page II-83
“Split Domain Name System Window” on page II-114
How to Configure Network Names
2
You can use the expanded Network Names window to add a network to the list when you
connect your system to a new network, correct an error in the network name or Internet
address, add or change an alias, or add or change a comment.
To display the expanded Network Names window:
1. Select Configuration from the Control Panel.
2. Select Network Names. The Network Names window appears.
3. Click on Show Editor. The expanded Network Names window appears.
To add a network:
1. (Optional) Select the network that you want the new network to follow. (Skip this step
if you want to add a new network at the top of the list.)
2. Click on Insert. A blank line appears in the list. The Type field is set to Network.
3. Type the primary network name in the Network Name field.
4. Type the Internet address in the IP Address field.
5. (Optional) Type any aliases for the network in the Aliases field, separating them with
spaces.
6. (Optional) Type any comments in the Comment field.
7. Click on Save.
To change a network:
1. Select the network that you want to change.
2. Edit the fields that you want to change.
3. Click on Save.
To delete a network:
1. Select the networks that you want to delete.
2. Click on Delete. The selected lines are removed from the list.
3. Click on Save.
CyberGuard Firewall Manual
II-7
Network Names - Underlying Constructs
Network Names - Underlying Constructs
2
Advanced Users Only! The GUI automates the editing of files and invocation of commands described in this section. If you choose to manually edit any file, you must first
close every window displayed from the Configuration menu and complete all edits of
the file before continuing GUI configuration activities.
Network Names Database File (networks)
2
Add, delete, or change network names using the /etc/inet/networks file.
File guidelines include:
◆
◆
◆
Each network appears on a separate line
Fields are separated by white space (tabs or spaces)
Comments begin with the # character and continue until the end of the line
Format:
network_name network_number [aliases]
Fields:
network_name
network_number
aliases
Name assigned to the network. Use alphanumeric names only.
Network number assigned to the network.
(Optional) One or more alternate network names for the network.
The following example shows a typical networks file.
# /etc/inet/networks
HdwTest
192.168.23
DevFW
192.168.24
hwl
# Hardware Testing Lab
UseLab
192.168.25
usability
# Usability Testing Lab
GuiTest
192.168.26
gui
# Graphical User Interface Testing
# Firewall Development Network
Figure II-4. Network Names Database File Example
II-8
Chapter 2, Network Names
Chapter 3
Chapter 3.
II
Grouping
The CyberGuard Firewall recognizes three distinct types of groups: services groups, firewall groups, and Central Management Target Groups. A services group is a named set of
network services. A firewall group is a named set of IP addresses, host, network, and
other group names. Services and firewall groups are usually used as sources and destinations in the Packet-Filtering Rules window. They are treated as if each member were listed
separately. A Central Management Target Group is a named set of one or more CyberGuard Firewalls defined as Target Firewall in the Central Management Role window.
These firewalls can be listed by host name or IP address.
See also:
◆
◆
◆
◆
◆
◆
“Central Management” on page I-103
“Central Management Choices Window” on page I-124
“Central Management Role Window” on page I-115
“How to Add Central Management Target Groups” on page I-141
“How to Configure a Target Group” on page I-142
“How to Configure Security on a Target Firewall” on page I-145
II-9
Grouping Window
Grouping Window
3
Use this window to view, add, change, or delete groups or group members. If the optional
Central Management product is installed on the system, use this window to define Target
Groups and Target Firewall group members. If the optional Central Management encryption libraries are installed, use this window to configure encryption for groups of Target
Firewalls or individual Target Firewalls.
Figure II-5. Grouping Window - Groups Page (Expanded)
Information about grouping appears on two notebook pages: the Groups page and the
Members page.
See also:
◆
◆
II-10
“Window Components” on page I-10.
“Find Window” on page I-30
Chapter 3, Grouping
Grouping Window
Groups Page
3
Use this page of the Groups window to view, add, change, or delete groups.
If the optional Central Management product is installed, use this page to define Target
Group names. If the optional Central Management encryption libraries are installed, use
this page to configure a Central Management encryption policy which will apply to an
entire group of Target Firewalls so that all Target Firewalls in the group will share the
same encryption type and encryption keys. If you have a large number of Target Firewalls
in centrally managed groups, you may want to simplify your security management scheme
by selecting this configuration method. A drawback to this method is that if any of the
configured cryptographic keys are compromised, then all members of a centrally managed
group which share those same keys may be vulnerable.
The expanded version of this page contains the following fields and control:
Type
Has the following settings:
Services
Group name of services.
Hosts/Networks
(Default) Group name of firewall hosts. Also called firewall groups.
When configuring VPN, Hosts/Network groups are convenient way to
configure the peer-protected networks for secure channels. These groups
exist on the remote side of the IPSec tunnel. When writing the IPSec
packet-filtering rules, the underlying VPN connection blocks are built
more efficiently when network groups are used. All addresses in a group
that are to be tunneled through a secure channel are combined in a single
VPN connection block. See “Virtual Private Network (VPN)” on page
II-235.
Target Firewalls
Group name of remote Central Management target hosts.
Comment
Treats this line as a comment.
Group Name Unique name of the group that is distinct from service, host, and network
names.
Service group names cannot have % or / in the name; Host and Target
Firewall group names cannot have / in the name.
A group name can also be used to specify multiple networks and hosts
that can be used as a valid routing destination. Select the Host/Networks type with a routing group. See also “Routing Window” on page
II-83.
Comment
CyberGuard Firewall Manual
Information about the group, such as how its members are related. This
field may be blank.
II-11
Grouping Window
Encryption
From the Firewall Manager, opens the Encryption window so that a common encryption type and a common set of encryption keys can be applied
to all Target Firewalls in a single group. If no optional cryptographic
libraries are installed on your CyberGuard Firewall, you must choose
None and click on Save on the Encryption window. Note that encryption
that is defined from the Groups page overrides any prior encryption
defined from the Members page. For complete information, see “Central
Management Security” on page I-110.
Notes:
◆
◆
Deleting a group does not delete its members from the Host Names and Network Names windows.
The order in which groups are defined on the Groups page of the Grouping
window is significant. Because a group may contain another group as a member, you must ensure that a group is defined before it is referenced. For example, if GroupB is a member of GroupA, GroupB must be defined before
GroupA.
See also:
◆
◆
◆
◆
◆
◆
◆
◆
◆
“Host Names Window” on page II-1
“Network Names Window” on page II-5
“Central Management” on page I-103
“Central Management Choices Window” on page I-124
“Central Management Security” on page I-110
“How to Add Central Management Target Groups” on page I-141
“How to Configure a Target Group” on page I-142
“How to Configure Security on the Firewall Manager” on page I-144
“How to Configure Security on a Target Firewall” on page I-145
Members Page
3
Use this page of the Groups window to view, add, change, or delete group members.
If the optional Central Management product is installed, use this page to define Target
Firewall members for Target Groups. If the optional Central Management encryption
libraries are installed, use this page to configure encryption for individual Target Firewalls
(e.g., each Target Firewall may use the same encryption algorithm, but a different set of
encryption keys or each Target Firewall may use a different encryption algorithm with a
different set of encryption keys, etc.). This configuration method is recommended as it
provides the strongest element of security using encryption. By having different cryptographic keys associated with each Target Firewall, you are ensuring that if only one set of
keys or a single key is compromised, then only one system may become vulnerable rather
than all systems in a centrally managed group. The drawback to this configuration method
is that it requires some degree of management for each Target Firewall, especially if there
are a large number of such systems being managed.
II-12
Chapter 3, Grouping
Grouping Window
Figure II-6. Grouping Window - Members Page (Expanded)
The expanded version of this page contains the following fields:
Group
Group name. Selecting a group displays its members, options, and
comments in the Member list.
Member
For service groups, service group name or service name in the format of service/protocol or port_number/protocol (for example, smtp/tcp, 4000/udp, or type:code/icmp)). Services can be
copied from the Member Choices list or typed into the Member field.
For firewall groups, group name or primary name, alias, or IP
address of a host, network, or interface. Can also be a predefined
member of the Packet Origin or Packet Destination list from the
Basic page of the Packet-Filtering Rules window. Names can be
copied from the Member Choices list or typed into the Member field.
For Target Groups, Name of Target Firewall copied from the
Member Choices list. The Insert button, Member field, and
Comment field are disabled for Central Management groups.
You must choose Target Firewalls from the Member Choices
list.
Comment
CyberGuard Firewall Manual
Information about the member, such as its hardware address. This
field may be blank. This field is disabled when configuring Central Management groups.
II-13
Grouping Window
Member Choices
For services groups, names of services; For firewall groups, group
name or primary name of a host, network, or interface; names
come from the Groups page, Host Names window, Network
Names window, Interfaces window, and Packet Origins and
Packet Destination fields of the Basic page of the Packet-Filtering Rules window. For Firewall Managers, names of firewalls
designated as a Managed Firewall in the Central Management
Role window. The left arrow button copies selected members
from this field into the Member field.
Encryption
From the Firewall Manager, opens the Encryption window so that
cryptographic support for the selected Central Management
Target Firewall can be individually defined. If no optional cryptographic libraries are installed on your CyberGuard Firewall, you
must choose None and click on Save on the Encryption window.
Note that encryption that is defined from the Groups page overrides any prior encryption defined from the Members page. For
complete information, see “Central Management Security” on
page I-110.
Notes:
◆
◆
Deleting a group member does not delete the member from the Host Names
and Network Names windows.
The left arrow button copies the selected member choices after the last
selected line in the Member field; copies these choices to the top of the
Member field if no line is selected in the Member field. This button is
enabled after a member is selected in the Member Choices field.
See also:
◆
◆
◆
◆
◆
◆
◆
◆
◆
◆
◆
II-14
“Window Components” on page I-10
“Host Names Window” on page II-1
“Network Names Window” on page II-5
“Packet Origins and Destinations” on page II-26
“Central Management” on page I-103
“Central Management Choices Window” on page I-124
“Central Management Security” on page I-110
“How to Add Central Management Target Groups” on page I-141
“How to Configure a Target Group” on page I-142
“How to Configure Security on the Firewall Manager” on page I-144
“How to Configure Security on a Target Firewall” on page I-145
Chapter 3, Grouping
Grouping Window
How to Add or Change a Group
3
You can use the expanded Groups page of the Grouping window to add a name to the
group list or add or change a comment.
Note: The order in which groups are defined on the Groups page of the Grouping window is significant. Because a group may contain another group as a member, you
must ensure that a group is defined before it is referenced. For example, if GroupB
is a member of GroupA, GroupB must be defined before GroupA.
To display the expanded Groups page of the Grouping window:
1.
2.
3.
4.
Select Configuration from the Control Panel.
Select Grouping.
Click on the Groups tab. The Groups page of the Grouping window appears.
Click on Show Editor. The expanded Groups page appears.
To add a group:
1. (Optional) Select the group that you want the new group to follow. (Skip this step if
you want to add a new group at the top of the list.)
2. Click on Insert. A blank line appears in the list. The Type field is set to Hosts/Networks.
3. (Optional) To configure a Target Group for a Firewall Manager, select Target Firewalls in the Type field.
4. Type the group name in the Group Name field.
5. (Optional) Type any comments in the Comment field.
6. Click on Save.
To change a group:
1. Select the group that you want to change.
2. Edit the fields that you want to change.
3. Click on Save.
CyberGuard Firewall Manual
II-15
Grouping Window
To delete a group:
1. Select the groups that you want to delete.
2. Click on Delete. The selected lines are removed from the list.
3. Click on Save.
See also:
◆
◆
◆
◆
◆
◆
◆
“Central Management” on page I-103
“Central Management Choices Window” on page I-124
“Central Management Security” on page I-110
“How to Add Central Management Target Groups” on page I-141
“How to Configure a Target Group” on page I-142
“How to Configure Security on the Firewall Manager” on page I-144
“How to Configure Security on a Target Firewall” on page I-145
How to Add or Change a Group Member
3
You can use the expanded Members page of the Grouping window to add or change a
group member.
To display the expanded Members page of the Grouping window:
1.
2.
3.
4.
Select Configuration from the Control Panel.
Select Grouping.
Click on the Members tab. The Members page appears.
Click on Show Editor. The expanded Members page appears.
To add a group member:
1. Select a group in the Group list. The Member list displays its members.
2. (Optional) Select the group member that you want the new member to follow. (Skip
this step if you want to add a new member at the top of the list.)
3. Select members to add to the selected group from the Member Choices list.
4. Click on the left arrow button. The selected members appear in the Member list.
5. If your choice does not appear in the Member Choices list or you want to enter a
member manually, click on Insert. A blank line appears in the Member list.
6. Type the member name or IP address in the Member field.
7. (Optional) Type any comments in the Comment field.
8. Click on Save.
II-16
Chapter 3, Grouping
Grouping Window
To change a group member:
1.
2.
3.
4.
Select a group in the Group list. The Member list displays its members.
Select the group member that you want to change.
Edit the fields that you want to change.
Click on Save.
To delete a group member:
1.
1.
2.
3.
Select a group in the Group list. The Member list displays its members.
Select the group members that you want to delete from the group.
Click on Delete. The selected lines are removed from the list.
Click on Save.
See also:
◆
◆
◆
◆
◆
◆
◆
“Central Management” on page I-103
“Central Management Choices Window” on page I-124
“Central Management Security” on page I-110
“How to Add Central Management Target Groups” on page I-141
“How to Configure a Target Group” on page I-142
“How to Configure Security on the Firewall Manager” on page I-144
“How to Configure Security on a Target Firewall” on page I-145
CyberGuard Firewall Manual
II-17
Grouping - Underlying Constructs
Grouping - Underlying Constructs
3
Advanced Users Only! The GUI automates the editing of files and invocation of commands described in this section. If you choose to manually edit any file, you must first
close every window displayed from the Configuration menu and complete all edits of
the file before continuing GUI configuration activities.
To establish groups:
1. Define grouping in the /etc/security/firewall/netguard.group file.
2. Use the following command to read the netguard.group configuration file:
netguard -g netguard.group
To use a file other than the default configuration file, use the following command:
netguard -g group_config_file.
See also “Packet-Filtering Command (netguard)” on page II-50.
Grouping Database File (netguard.group)
3
Define group names and members in the grouping database file,
/etc/security/firewall/netguard.group.
Format guidelines:
◆
◆
◆
◆
Group definitions begin with service_group, host_group or target_group
Group members are separated by white space
Each group definition ends with end_group
Comments begin with the # character and continue until the end of the line
Format:
service_group group_name
member
member
end_group
host_group group_name
member
member
end_group
II-18
Chapter 3, Grouping
Grouping - Underlying Constructs
target_group group_name
member
member
end_group
Fields:
service_group
Identifies the beginning of a new service group.
host_group
Identifies the beginning of a new firewall group. A firewall group
may contain host or network names or IP addresses and other
group names.
target_group
Identifies the beginning of a new Central Management Target
Group. Target Groups can contain host names or IP addresses.
group_name
Unique name of the group that is distinct from host and network
names.
member
For service groups, previously defined service groups or a service
as allowed in the netguard.conf file (for example, smtp/tcp, or
4000/udp, or type:code/icmp). For host or target groups, group
name or primary name, alias, or IP address of a host or network.
end_group
Keyword identifying the end of a new group.
Note: The order in which groups are defined in the netguard.group file is significant.
Because a group may contain another group as a member, you must ensure that a
group is defined before it is referenced. For example, if GroupB is a member of
GroupA, GroupB must be defined before GroupA.
The following example shows the layout of the netguard.group file.
# /etc/security/firewall/netguard.group
host_group Finance
cash
bills
money
end_group
target_group Development
# Target CyberGuards
atlantapro
# production system
atlantadev
# development machine
atlantasrc
# source control
jim
# test machine
192.147.55.1
192.149.0.0/255.255.0.0
end_group
Figure II-7. Grouping Configuration File Example
See also “Packet Origins and Destinations” on page II-26.
CyberGuard Firewall Manual
II-19
Grouping - Underlying Constructs
II-20
Chapter 3, Grouping
Chapter 4
Chapter 4.
II
Packet-Filtering Rules
The system administrator determines which services to allow into or out of the internal
network. Packet-filtering rules define which packets can and cannot pass through the
firewall and the specific times during which the rule applies.
CAUTION!
Many known security flaws of the network services provided with
the system have been corrected. However, every network capability has a certain security risk that must be evaluated.
Notes:
◆
◆
The order of packet-filtering rules is significant. When a packet arrives, the
network packet-filtering software scans the rules list from top to bottom looking for a rule match, applies the first rule that matches the characteristics of
the packet received, and ignores subsequent rules. If no rule matches, the
packet is denied.
Several kernel tunable parameters affect TCP and ICMP. See “Networking
Tunable Parameters” on page I-335 for details.
II-21
Packet-Filtering Rules Window
Packet-Filtering Rules Window
4
Use this window to view, add, change, delete, or prioritize packet-filtering rules. The
Packet-Filtering Rules window has four notebook pages: Basic, IPSec, Times, and RPC.
Figure II-8. Packet-Filtering Rules Window - Basic Page (Expanded)
In addition to the buttons described in “Common File Buttons” on page I-14 and “ListManipulation Buttons” on page I-16, this window contains the View Expanded Rules
button. The functionality of the View Expanded Rules button depends on whether you
are managing the firewall or a Target CyberGuard.
If you are managing the firewall and click on this button, a window appears displaying all
the rules on the firewall, including the “included” rules such as Central Management rules
and Passport One rules. Additional comment lines showing where the included rules begin
and end are added to the rules.
If you are managing a Target CyberGuard and click on this button, you are prompted for a
host in the target group. Selecting a host causes the firewall to contact the host and download all packet-filtering rules, including known “included” rules. You can open multiple
instances of the Expanded Packet-Filtering Rules window (one for the firewall at which
II-22
Chapter 4, Packet-Filtering Rules
Packet-Filtering Rules Window
you are sitting and one for each accessible Target CyberGuard) allowing you to view and
compare the rules on multiple hosts.
See also:
◆
◆
◆
◆
◆
◆
◆
◆
“Find Window” on page I-30
“Groups Page” on page II-11
“Members Page” on page II-12
“Passport One Rules Page” on page II-193
“Central Management” on page I-103
“Central Management Role Window” on page I-115
“Central Management Choices Window” on page I-124
“Target Firewall Configuration Files” on page I-153
Packet-Filtering Rules Basic Page
4
Use this page of the Packet-Filtering Rules window to add, change, or delete rules.
The expanded version of this window contains the following fields and controls:
Type
Has the following settings:
Permit
Packets pass through without intervention. This setting offers the
best performance but compromises security. It is usually used
with trusted packet transmissions (for example, from the firewall
to an internal server).
Proxy
Packets are intercepted and then passed to a proxy that performs
specific actions. This setting offers the highest level of security
but performance may be reduced. It is usually used with potentially threatening or revealing packet transmissions (for example,
from all internal hosts to all external hosts).
Deny
Packets matching this rule are denied or blocked.
Comment
Line is treated as text or a disabled rule; allows typing a comment
in the Comment field.
CyberGuard Firewall Manual
II-23
Packet-Filtering Rules Window
Port or Service
Port service and optionally the associated protocol.
Syntax is service[/protocol], where:
service - Decimal or hexadecimal port number, port range, service name from the /etc/inet/services file, icmp services, or the
word ALL. The format for a port range is i-j, where i is the lower
port number in the range, j is the upper port number in the range,
and the range is inclusive. A mix of port ranges and individual
ports may be entered separated by a comma, for example:
20-25, 53, 103-110, 21000-21003
Port ranges cannot be used with icmp.
protocol - (Required when service is a port number or port range
or when multiple protocols are possible) Any of the 255 defined
decimal or hexadecimal IP protocol numbers or names, including
packets constructed using raw IP.
For ICMP type and code filtering, the syntax is type:code/icmp.
Packet Origin
Host or network that initiates the connection. For a list of packet
origins, see “Packet Origins and Destinations” on page II-26.
These predefined packet origins can be used as members of a host
group. See “Members Page” on page II-12.
Packet Destination Host or network that receives the connection. For a list of packet
destinations, see also “Packet Origins and Destinations” on page
II-26. These predefined packet destinations can be used as members of a host group. See “Members Page” on page II-12.
Timeout (seconds)
Number of seconds a connection is waiting for a response. When
the timeout occurs, the connection is reset and further traffic is not
permitted. Responses are expected for TCP connections, and the
default timeout is 86,400 seconds (24 hours). Responses are
optional for UDP and ICMP connections, and the default timeout
is 30 seconds. To use the default settings, set the timeout to 0 or
leave the field blank.
TCP SYN Flood Timeout (seconds)
(Optional with TCP SYN Flood Attack Defense) Number of
seconds to wait for a response to a SYN/ACK before dropping the
connection.
Audit these packets (Default) Allows auditing of matches to the rule. Note that this
rule state also has an icon (Do not audit these packets) for its disabled state.
Enable replies
Allows returning packets through the firewall. The default for
UDP is disabled; for connection-oriented TCP, replies are always
enabled. If Type is set to Deny, then a denial response goes to the
packet originator.
Force port matching
Forces source and destination ports to be the same.
II-24
Chapter 4, Packet-Filtering Rules
Packet-Filtering Rules Window
Validate source address
(Default) Checks source address in a packet against the interface
on which the packet arrived. CAUTION: If disabled, interface
(IP) spoofing can go undetected. Note: Any rule pertaining to
multicast traffic must have the Validate source address option
unchecked (NO_IF_CHECK option in the /etc/security/firewall/ng_inet/netguard.conf file).
Apply to established connections
(TCP-specific rules only) Re-establishes TCP connections that
time out.
Defend against TCP SYN Flood
Circumvents a TCP SYN flood by handshaking with the client on
behalf of the server and then establishing a different connection
with the server after the connection attempt has been verified. See
also “TCP SYN Flood Defense” on page II-28.
Protect using IPSec Assigns IPSec protection to the rule to establish VPN channels
and enables the IPSec page of the Packet-Filtering Rules window.
EVERYONE can be specified for the non-tunneled Packet Origin or Packet Destination of an IPSec packet-filtering rule.
Packet-filtering rules that are automatically added when a proxy is
enabled are not automatically protected using IPSec. To protect
proxy traffic, this option must be manually selected for each of
these proxy rules must be manually selected. See also “Virtual
Private Network (VPN)” on page II-235.
Synchronize state
In a High Availability configuration, when the served firewall
fails over to the standby firewall, in order for the session to continue, the packet-filtering session must be transferred to the new
served firewall (former standby). Checking this box allows the
sessions resulting from the rule to continue through a failover.
This check box appears only for rules that will result in sessions
that can safely continue through a failover. The rule must be a permit rule and the service protocol must be tcp or udp with the
Enable replies option checked. See also “High Availability” on
page I-95 and “High Availability Window” on page I-96.
Create Sessions
Causes the packet filter to create a session and audit packets that
match this rule. By default this box is checked for Permit and
Proxy rules and unchecked for Deny rules.
Comment
Text or a disabled rule. This field may be blank.
CAUTION!
In the Dynamic page of the Network Address Translation window,
changing the setting for Pass Address invalidates all existing
automatically generated packet-filtering rules for proxies.
CyberGuard Firewall Manual
II-25
Packet-Filtering Rules Window
Notes:
◆
◆
◆
◆
◆
◆
Anything that is not specifically allowed is prohibited.
For outbound packets, Pass Address is applied before packet-filtering rules
which are applied before Network Address Translation (NAT). For inbound
packets, the order is reversed.
Rules automatically created while configuring routing, SNMP trap alerts,
proxies, SOCKS, and Split Domain Name System (DNS) automatically
appear in this window. Once you have enabled one of these features, do not
edit the comments that immediately precede and follow its packet-filtering
rules, and do not insert anything between them.
Do not enter the same packet-filtering rule more than once. Edit packet-filtering rules that you copy and paste back into the window.
For additional packet-filtering options not available through the GUI, see
“Packet-Filtering Rules Configuration File (netguard.conf)” on page II-43.
The firewall can audit several types of packet-filtering rule functions. See
“Alerts, Activities, and Archives Window” on page II-326, “Alert Summary
Window” on page I-250, and “Activity Reports Window” on page I-252.
See also:
◆
◆
◆
◆
◆
◆
◆
◆
◆
◆
◆
“Window Components” on page I-10
“How to Prepare for Secure Remote Management” on page I-159
“Network Address Translation Window” on page II-66
“Packet-Filtering Rules for Dynamic Routing” on page II-104
“Packet-Filtering Rules for Split DNS” on page II-123
“How to Configure SecurID” on page II-180
“Virtual Private Network (VPN)” on page II-235
“Packet-Filtering Rules for Alerts” on page II-340
“SmartProxies Window” on page III-5
“Packet-Filtering Rules for SmartProxies” on page III-14
“Firewall-Generated Packet-Filtering Rules” on page III-16
Packet Origins and Destinations
4
Packets require a source and destination name or IP address in the Packet Origin and
Packet Destination fields in the expanded Packet-Filtering Rules window.
You can type in any of the following:
◆
◆
◆
IP address in dotted-quad address format
Network IP address, /, and sub-network mask in dotted quad or bit-count format (e.g., mynet/255.255.255.0 or mynet/24)
Host or network name (from Host Name or Network Name window)
Note: IP addresses are preferred over host names for packet-filtering information
because they do not depend on the Split Domain Name System (DNS).
II-26
Chapter 4, Packet-Filtering Rules
Packet-Filtering Rules Window
You also can select any of the following settings from the drop-down lists:
ALL_INTERNAL
Any host on a network connected to any internal network
interface.
ALL_EXTERNAL
Any host on a network connected to any external network
interface.
device_NETWORK
Any host on the network connected to the network interface with the name device.
FIREWALL
All traffic to and from the IP address of any interface of
the firewall. (This keyword was named LOCAL_HOST
and sometimes referred to as BASTION_HOST in previous releases of the firewall. These keywords are no longer
used.)
EVERYONE
Firewall and all hosts on either side. Can be used in an
IPSec rule, but cannot be configured to be protected by
IPSec (cannot represent the tunneled part of the network
packet flow from the firewall).
groups
Group name defined in the Grouping window.
The following values are not available in the drop-down list, but some automatically generated packet-filtering rules may use them:
INTERNAL_INTERFACESAny internal network interface.
EXTERNAL_INTERFACESAny external network interface.
Note: The predefined packet origins and destinations listed above can be used as members of a host group. See “Members Page” on page II-12.
See also:
◆
◆
◆
◆
◆
“Host Names Window” on page II-1
“Network Names Window” on page II-5
“Grouping Window” on page II-10
“How to Add or Change a Packet-Filtering Rule” on page II-37
“Packet-Filtering Rules Configuration File (netguard.conf)” on page II-43
CyberGuard Firewall Manual
II-27
Packet-Filtering Rules Window
TCP SYN Flood Defense
4
The TCP SYN-flood attack is a denial-of-service attack that exploits the TCP connection
establishment protocol.
The attacker makes connection requests to the victim host using a fake source address.
The requests are made on the TCP port that the victim host’s server process is listening on.
The connection requests cause TCP SYN segments with the fake source address to be sent
to the victim. For each SYN segment received, the victim sends a SYN/ACK segment, and
the connection attempt enters the SYN_RCVD state. The connection is put in the connection request queue (backlog) until the final ACK is received to complete the TCP handshake.
The timeout value used by TCP to wait for the final ACK is rather long (usually about 75
seconds) to allow connections to be established over slow links. Because the SYN/ACK
segment was sent to a fake host, the connection attempt stays in the backlog until it times
out. The backlog is usually quite small; therefore, the backlog for a port can be flooded by
a small number of SYNs, and TCP will refuse further connections on that port. Because
this attack does not flood a system with continuous connections or volumes of data, the
attack is not easy to recognize. The firewall as well as all internal hosts are vulnerable to
this attack.
If you enable the Defend against TCP SYN flood check box, the CyberGuard Firewall circumvents these attacks as follows:
1. A client sends a connection request (SYN segment) to a server (firewall or internal).
2. The firewall intercepts the SYN segment and responds to the client with a SYN/ACK
segment.
3. The firewall waits the specified timeout period for the return ACK from the client to
complete the TCP handshake. If the firewall does not receive a return ACK, it drops
the packet. If the firewall receives a return ACK, it establishes a connection with the
requested server and forwards the original connection request.
Notes:
◆
◆
II-28
Auditing is available for this type of attack. See “Alerts, Activities, and
Archives Window” on page II-326, “Alert Summary Window” on page I-250,
and “Activity Reports Window” on page I-252.
An alternate, manual method of defending against TCP SYN floods uses network tunable parameters. See “TCP Parameters for TCP SYN Flood Defense”
on page I-340.
Chapter 4, Packet-Filtering Rules
Packet-Filtering Rules Window
Packet-Filtering Rules IPSec Page
4
IPSec is enabled on the Basic page of the Packet-Filtering Rules window with the
Protect using IPSec option. Use this page of the Packet-Filtering Rules window to configure the protection strategy (IPSec proposal) for the packet data and establish a secure
channel to the remote party (i.e., connect to the IPSec peer). This page provide the additional IPSec parameters required to enforce the policy on the selected rule. All of the fields
and controls on this page have satisfactory defaults and do not require user intervention to
configure.
Figure II-9. Packet-Filtering Rules Window - IPSec Page
This window contains the following fields and controls:
IPSec Protection Strategy
User-defined list of names for sets of negotiable SA (Security Association) parameters for the selected rule. These strategies must be previously defined using the
IPSec Protection Strategies window. In the IPSec Protection Strategies window, the
Firewall Administrator defines a name for the IPSec Protection Strategy. Then,
using the Cryptographic Properties page, the Firewall Administrator defines a list
of parameter groupings. The list may contain one grouping or multiple groupings.
The list represents a priority-ordered set of IPSec parameters. The first grouping in
the list has highest priority. During the negotiation process, the IPSec Protection
Strategy is negotiated between the firewall VPN and its peer. For the negotiation to
be successful, one of the groupings listed in the IPSec Protection Strategy will be
agreed upon as the parameters to be used. The successful negotiation of an IPSec
Protection Strategy results in an IPSec SA between the firewall VPN and the peer.
CyberGuard Firewall Manual
II-29
Packet-Filtering Rules Window
The default value for this field is Default (case-sensitive). If manual keying is
selected for the IPSec peer, only one set of cryptographic properties are used.
SA Granularity
Provides control over how SAs are established with the IPSec peer. The IPSec SA
that is established can govern a range of network traffic. This range is called the
granularity of the SA, and can have one of the following values: Port, Protocol,
Host, or Network. More network traffic can be governed by a larger, more general, SA Granularity. For example, an SA with Network granularity can govern all
traffic between the peer and a network, whereas an SA with Host granularity can
govern only the traffic between the peer and a specific host. In general, the greater
the granularity of the SA, the fewer IPSec negotiations that are needed to establish
other SAs. So unless there are specific security considerations, the largest granularity should be selected.The default is Network, which means to create one SA per
network. All matching connections are packed into the same SA.
Port - Creates one SA per port.
Protocol - Creates one SA per protocol.
Host - Creates one SA per host.
Network - Creates one SA per network. Network is the default.
To enable protocol and port selector matching for IPSec rules, the user must select
the appropriate SA granularity.
Only the UPD and TCP protocols support service port selectors for IPSec rules. For
example, IPSec rules can not differentiate based on ICMP types, only the ICMP IP
protocol.
The packet filter dynamically establishes sessions for FTP data flow by watching
the associated FTP control flow. The IPSec policy manager is not capable of doing
this. Therefore, FTP rules are written as if the Protocol granularity were selected.
A warning message is displayed if Port granularity is configured for FTP.
Enable Manual Selection of VPN Secure Channel
The manual selection of VPN secure channels is disabled by default. This causes
the firewall VPN to automatically attempt to identify the secure channel that governs the traffic defined in the packet filtering rule. The firewall uses the information
in the Packet Origin and Packet Destination fields of the packet filtering rule
(on the Basic page of the Packet-Filtering Rules window), along with the peer-protected Remote Network information defined for the Secure Channels (on the Peer
Protected Networks Page of the VPN Secure Channels window), in attempting to
identify the secure channel that governs the traffic defined in the packet-filtering
rule.
If desired, the firewall administrator can manually select a previously defined
Secure Channel for the Packet Origin and/or for the Packet Destination. This control should be used if the packet origin and/or the packet destination specified in the
packet filtering rule are insufficient to identify an IPSec peer (for example, no peerprotected networks have been defined), or the peer that the firewall VPN would
choose automatically is not the one the administrator wants.
Another possibility when manually selecting the secure channel is the value none.
This can be used for specific situations where the firewall administrator wants to
override the default behavior. If both the source and destination addresses belong to
II-30
Chapter 4, Packet-Filtering Rules
Packet-Filtering Rules Window
IPSec peers, two tunnels exist. If a tunnel-to-tunnel type connection is the default
behavior, but the firewall administrator does not want a VPN tunnel to be used but
would rather force a connection to a specific host in one of the protected networks,
none should be used.
Note that IPSec source and destination addresses are not subject to normal routing.
Packets for a tunnel are sent to the VPN peer of the selected secure channel.
To Packet Origin - Refers to a secure Channel Name defined in the VPN
Secure Channels window. If the check box is not checked, the origin is auto. A
value of none can also be selected.
To Packet Destination - Refers to a secure Channel Name defined in the VPN
Secure Channels window. If the check box is not checked, the destination is auto.
A value of none can also be selected.
Allow NAT to Translate Addresses
Indicates that Network Address Translation (NAT) will translate addresses for this
rule. If this option is enabled, NAT will be applied to network traffic matching this
packet-filtering rule before it is sent through the tunnel (encapsulated) for outbound
traffic, and after it exits the tunnel for inbound traffic. This option is disabled by
default. When disabled, the IP addresses of packets are assumed to be private, and
no NAT is performed, even if NAT is enabled in the Network Address Translation
window.
Note that NAT translation will occur only if the packet crosses a firewall network
interface that has dynamic or static NAT enabled. If NAT is not configured, this
check box has no effect on the packets.
If any IPSec rules on the IPSec page of the Packet-Filtering Rules window have
Allow NAT to Translate Addresses checked, the network should be reinitialized. See “System Shutdown Window” on page I-35 and “Network Address Translation” on page II-63 for more information.
There are potential conflicts if the user selects Allow NAT to Tra nslate
Addresses and the firewall becomes the identity for all rules to which dynamic
NAT is applied. For example:
Assume A and B are behind the firewall, the interface X is NATed, and Allow NAT
is enabled (0x03), the following rules would create a conflict:
permit all/tcp A X ipsec=DesMd5:sa-per-proto:0x03:auto:auto
permit all/tcp B X ipsec=3DesSha1:sa-per-proto:0x03:auto:auto
The above rules are interpreted by IPSec as follows:
permit all/tcp FW X ipsec=DesMd5:sa-per-proto:0x03:auto:auto
permit all/tcp FW X ipsec=3DesSha1:sa-per-proto:0x03:auto:auto
The conflict occurs because the first IPSec strategy (DesMd5) takes precedence
over the second IPSec strategy (3desSha1).
Note that NAT pools cannot be used in conjunction with VPN NAT-Smart. NATSmart is the ability to choose between bypassing the firewall’s Network Address
CyberGuard Firewall Manual
II-31
Packet-Filtering Rules Window
Translation (NAT) or allowing NAT to Translate the internal (local) address of an
IPSec connection. If the IPSec packet-filtering rule is set to Allow NAT to
Translate Addresses, the VPN policy must be written using the would-be translated address. Because IKE peers negotiate the policy (addresses) well before an
actual connection is made, the translated address must be static (i.e., predictable).
With NAT pools, the translated address cannot be predicted in advance.
Enforce PMTU if Fragmenting IPSec Packets
PMTU, Path Maximum Transmission Unit, is a technique to determine the largest physical packet size (MTU), measured in bytes, for the entire path that the packets will traverse between the source and the destination. Any messages larger than
the MTU are divided into smaller packets (fragmented) before being sent, which
slows down transmission speeds. Checking this box prevents IPSec packets from
being fragmented. The default setting is checked.
Notes:
◆
In a VPN tunnel, when going outbound through the firewall using a SmartProxy, two packet-filtering rules must be configured instead of one:
proxy
permit
◆
proxy
proxy
external
firewall
internal
external
ipsec=options
ipsec=options
The firewall will attempt to assist the user by detecting and advising unenforceable policy, but it may not be able to do so in some cases. For instance,
the policy parse does not detect lower-precedence rules with a more specific
set of selectors:
permit ALL
10.1.1.0/24
10.2.2.0/24 \
ipsec=DesMd5:sa-per-net:0x2:auto:FooGW
permit smtp/tcp 10.1.1.1
10.2.2.2 \
ipsec=3desSha1:sa-per-port:0x2:auto:BarGW
◆
In general, the rules should be written such that the more specific rules have
the higher precedence, above the more general rules:
permit smtp/tcp
10.1.1.1
10.2.2.2 \
ipsec=3desSha1:sa-per-port:0x2:auto:BarGW
permit ALL
10.1.1.0/24
10.2.2.0/24 \
ipsec=DesMd5:sa-per-net:0x2:auto:FooGW
II-32
Chapter 4, Packet-Filtering Rules
Packet-Filtering Rules Window
IPSec-Protected Rules, Packet Origins and Destinations
◆
◆
◆
◆
◆
◆
For device_NETWORK to be a tunneled origin or destination, the origin or
destination IP address of the target packet must have been routed through the
device interface.
If ALL_INTERNAL or ALL_EXTERNAL are used and they represent more
than one device_NETWORK, the channel cannot be manually selected.
Therefore, a default channel for each device_NETWORK must be configured
by adding the device_NETWORK specification to the Peer Protected Networks of the appropriate VPN Secure Channel.
The following rules apply to using a device_NETWORK as a Peer Protected
Network:
-
The route to the remote gateway is through the device interface, or the
host-type channel interface matches the device interface
-
Only one channel may use a particular device_NETWORK
The automatic channel selection algorithm (virtual route) attempts to match an
IPSec packet-filtering rule origin or destination address with the most specific
Peer Protected Network definition. Configured device_NETWORK objects
are matched only if no match is found within all peer protected host addresses,
subnetwork addresses, and address ranges.
Use host granularity on device_NETWORK rules if peer gateway rules are
not as general (for example, rules that define specific subnetworks, hosts, etc.).
Without a host granularity, device_NETWORK rules cause IKE to negotiate
using a Phase 2 identity of 0.0.0.0/0 (any address), and this will only match
a similar definition on the other side.
EVERYONE may be used on a rule that uses IPSec, but only if the matching
packet address is not coming from or going to an IPSec tunnel.
To determine if a netguard session was tunneled:
◆
◆
For a snapshot view, use the netguard -ln command to see which static rules
and dynamic sessions have IPSEC information such as ipsec_src, ipsec_dst,
and/or ipsec_nat associated with them.
Run the following command to cause an audit record to be generated when a
new packet-filtering rule is created:
auditset -S+ng_add_rule
(The auditset command must be run prior to network traffic passing through
the firewall in order to generate the audit records for ng_add_rule. This
command can also be added to the /etc/rc2.d/S03auditlogd file.)
The audit record can be seen using the following command:
auditrpt -n ng_add_rule
The audit record for ng_add_rule will contain one or more of the following:
CyberGuard Firewall Manual
II-33
Packet-Filtering Rules Window
src ipsec - if IPSec is enabled to the source for this rule
dst ipsec - if IPSec is enabled to the destination for this rule
nat - if Allow NAT to Translate Addresses is checked for this rule
If the verbose option of the auditrpt command is used as follows:
auditrpt -V
the ng_add_rule audit information is as follows:
Enable IPSEC to src TRUE|FALSE
Enable IPSEC to dst TRUE|FALSE
NAT VPN traffic TRUE|FALSE
The audit record for the ng_add_rule events contains a rule ID that consists
of the date, time, and a sequence number. This same rule ID is part of the audit
record for the corresponding ng_end_session event. Knowing the rule ID,
the ng_add_rule and ng_end_session pair can be identified. This also
identifies the time range that this rule was active. Actual traffic passing
through the firewall because of this rule is not explicitly marked with the rule
ID.
To identify such traffic, look at corresponding traffic (n g _ p e r m i t ,
ng_deny), match type of traffic (telnet, ftp, etc.) by the corresponding port
number (as defined in the /etc/services file), match source and destination
addresses. If this traffic matches a ng_add_rule audit record that indicates
VPN was enabled, then this traffic was protected by VPN.
See also:
◆
◆
◆
◆
◆
II-34
“Network Address Translation” on page II-63
“Virtual Private Network (VPN)” on page II-235
“VPN Secure Channels Window” on page II-264
“VPN Secure Channels - Peer Protected Networks Page” on page II-272
“IPSec Protection Strategies Window” on page II-259
Chapter 4, Packet-Filtering Rules
Packet-Filtering Rules Window
Packet-Filtering Rules Times Page
4
Use the Times page of the Packet-Filtering Rules window to specify times for which a
packet-filtering rule applies. This page provides a graphical way to configure active rule
times in half-hour increments, as well as input fields to configure these times in oneminute increments.
Figure II-10. Packet-Filtering Rules Window - Times Page
This window contains the following fields and controls:
Matrix of Days and Times
The matrix of days and times displays the days of the week and the hours
of the day (in half-hour increments). Each selectable square in the matrix
represents a particular half hour time period of a particular day of the
week. Use your mouse to select times by clicking on one square or dragging over a group of squares. Selected times appear in blue. Times of less
than 30 minutes input through the Start Time and End Time fields
appear in blue-gray.
Set All
Activates all times in the matrix.
Clear All
Clears the matrix of all entries.
CyberGuard Firewall Manual
II-35
Packet-Filtering Rules Window
Reload
Reloads the last version of the matrix that was either saved or that was
displayed before the user selected another rule to edit.
Start time
Specifies the time the rule becomes active. This field accepts values in
one-minute increments. The appropriate square in the matrix will appear
in blue-gray for any time less than 30 minutes.
End time
Specifies the time the rule becomes inactive. This field accepts values in
one-minute increments. The appropriate square in the matrix will appear
in blue-gray for any time less than 30 minutes.
Packet-Filtering Rules RPC Page
4
Remote Procedure Call (RPC) protocol is a general way for programs to execute functions
found on a remote host. Remote services can be imbedded as function calls within an
application. The RPC protocol handles data exchange between various systems types and
operating systems and handles the data in a standard fashion. The CyberGuard Firewall
RPC support uses UDP transport protocol to pass function arguments and results between
the client and the server.
Use the RPC page of the Packet-Filtering Rules window to define the RPC strategy for
rules on the firewall.
Figure II-11. Packet-Filtering Rules Window - RPC Page
This window contains the following fields:
RPC program
II-36
Checks the RPC program number or range, buried within a UDP
packet. This field accepts the following formats: program name,
program number (32-bit number between 0 and 4,294,967,295),
Chapter 4, Packet-Filtering Rules
Packet-Filtering Rules Window
or program number range (two 32-bit numbers, separated with a
dash “-”).
RPC procedure
Checks the RPC procedure number or range, buried within a UDP
packet. This field accepts the following formats: procedure number (32-bit number between 0 and 4,294,967,295) or procedure
number range (two 32-bit numbers, separated with a dash “-”).
RPC user id
User ID on which to filter. This field accepts a single 16-bit number between 0 and 65535. If an entry exists in the RPC group id
field, a user ID is required.
RPC group id
This field accepts up to 16 space-separated group IDs. Each group
ID is in the form of a 16-bit number between 0 and 65535. If an
entry exists in the RPC user id field, a group ID is required.
How to Add or Change a Packet-Filtering Rule
4
You can use the expanded Packet-Filtering Rules window to create a new rule or modify
an existing rule.
The order of packet-filtering rules is significant. When a packet arrives, the network
packet-filtering software scans the rules list from top to bottom looking for a rule match,
applies the first rule that matches the characteristics of the packet received, and ignores
subsequent rules. If no rule matches, the packet is denied.
CAUTION!
Rules automatically created while configuring routing, SNMP
trap alerts, proxies, SOCKS, and Split Domain Name System
(DNS) automatically appear in this window. Once you have
enabled one of these features, do not edit the comments that
immediately precede and follow its packet-filtering rules, and do
not insert anything between them.
Existing automatically generated proxy rules are invalidated when
you change the setting for Pass Address in the Dynamic page of
the Network Address Translation window.
To display the expanded Packet-Filtering Rules window:
1.
2.
3.
4.
Select Configuration from the Control Panel.
Select Packet-Filtering Rules. The Packet-Filtering Rules window appears.
Click on the Basic tab. The Basic page appears.
Click on Show Editor. The expanded Basic page of the Packet-Filtering Rules window appears.
CyberGuard Firewall Manual
II-37
Packet-Filtering Rules Window
To add a packet-filtering rule:
1. (Optional) Select the rule that you want the new rule to follow. (Skip this step if you
want to add a new rule at the top of the list.)
2. Click on Insert. An incomplete new line appears in the list. The Type field is set to
Permit.
3. Select Permit, Proxy, or Deny in the Type field.
4. Select the service and protocol to apply the rule to. The selected entry appears in the
Service field. You also can type in an entry; however, it must be typed correctly. If
typed incorrectly, the rule does not find a match and does nothing.
5. Select or type an originating host in the Packet Origin field. If known, use the IP
address.
6. Select or type a destination host in the Packet Destination field. If known, use the
IP address.
7. (Optional) Select a value in the Timeout (seconds) field for your network connection.
8. Check the Options check boxes that apply to this network connection. (To protect
from interface spoofing, do not disable Validate source address. Use the Alerts
page of the Alerts and Activities window to respond to possible interface spoofing
attempts.)
9. (Optional) Click on the Times tab. The Times page appears.
10. (Optional) Select the desired times from the matrix and fine-tune them with the Start
time and End time fields.
11. Click on Save. Your changes take effect at the next system reboot.
12. (Optional) Click on Use. Your changes take effect immediately.
To change a packet-filtering rule:
1.
2.
3.
4.
5.
6.
Select the rule that you want to change.
Edit the fields that you want to change.
(Optional) Click on the Times tab. The Times page appears.
(Optional) Edit the times you want to change.
Click on Save. Your changes take effect at the next system reboot.
(Optional) Click on Use. Your changes take effect immediately.
To delete a packet-filtering rule:
1.
2.
3.
4.
Select the rule that you want to delete.
Click on Delete. The rule is deleted.
Click on Save. Your changes take effect at the next system reboot.
(Optional) Click on Use. Your changes take effect immediately.
See also:
◆
◆
◆
II-38
“NAT Interfaces Page” on page II-69
“Alerts Page” on page II-328.
“SmartProxies Window” on page III-5
Chapter 4, Packet-Filtering Rules
Packet-Filtering Rules Window
How to Prioritize Packet-Filtering Rules
4
The order of packet-filtering rules is significant. When a packet arrives, the network
packet-filtering software scans the rules list from top to bottom looking for a rule match,
applies the first rule that matches the characteristics of the packet received, and ignores
subsequent rules. If no rule matches, the packet is denied.
You can use the Packet-Filtering Rules window to change the order of these rules.
To display the Packet-Filtering Rules window:
1. Select Configuration from the Control Panel.
2. Select Packet-Filtering Rules. The Packet-Filtering Rules window appears.
To prioritize packet-filtering rules:
1.
2.
3.
4.
Select the rule that you want to re-prioritize.
Use the arrow buttons to move the rule.
Click on Save. Your changes take effect at the next system reboot.
(Optional) Click on Use. Your changes take effect immediately.
CyberGuard Firewall Manual
II-39
Packet-Filtering Rules - Underlying Constructs
Packet-Filtering Rules - Underlying Constructs
4
Advanced Users Only! The GUI automates the editing of files and invocation of commands described in this section. If you choose to manually edit any file, you must first
close every window displayed from the Configuration menu and complete all edits of
the file before continuing GUI configuration activities.
To configure packet-filtering rules:
1. (Optional) Use the /etc/security/cyber/trace.conf file to audit packet-filtering
activity.
2. Define services and ports in the /etc/inet/services file.
3. Define packet-filtering rules in the /etc/security/firewall/ng_inet/netguard.conf
file.
4. Run the /usr/sbin/firewall/netguard command to apply the rules in the netguard.conf file.
See also:
◆
◆
◆
◆
“Network Services File (services)” on page II-40
“Packet-Filtering Rules Configuration File (netguard.conf)” on page II-43
“Packet-Filtering Command (netguard)” on page II-50
“Activities Configuration File (trace.conf)” on page II-366
Network Services File (services)
4
Network services are applications, such as finger, telnet, FTP, proxies, and echo/icmp,
that are run over the network. You can use network services that are defined in the
/etc/inet/services file, as well as Internet Control Message Protocol (ICMP) services.
Format guidelines:
◆
◆
◆
Each service is on a separate line
Fields are separated by white space (spaces or tabs)
Comments begin with the # character and continue until the end of the line
Format:
name port/protocol [alias]
II-40
Chapter 4, Packet-Filtering Rules
Packet-Filtering Rules - Underlying Constructs
Fields:
name
port
protocol
alias
Service name (Internet name) assigned to the network.
Port number (decimal) on which the service is being provided.
Protocol name (Internet name) that is used for the service.
(Optional) One or more alternate names for the service.
The following examples shows the layout of an /etc/inet/services file. Note that this is a
subset of the services that are available; refer to the services file on your system for a
more complete list. These examples shows the important regular and proxy services for
the CyberGuard Firewall.
# /etc/inet/services
# Regular Services
ftp
21/tcp
# FTP
ssh
22/tcp
# Secure Shell (SSH)
telnet
23/tcp
# Telnet
smtp
25/tcp
# Mail
domain
53/tcp
# Domain Name System
domain
53/udp
# Domain Name System
gopher
70/tcp
# Gopher
gopher
70/udp
# Gopher
http
80/tcp
www-http www # World Wide Web HTTP
nntp
119/tcp
# News
ldap
389/tcp
# LDAP
https
443/tcp
# Secure HTTP (SSL)
ike
500/tcp
# IKE (Internet Key Exchange)
login
513/tcp
# Rlogin
route
520/udp
# network routing
socks
1080/tcp
# SOCKS
notes
1352/tcp
# Lotus Notes
sqlnet
1521/tcp
# SQL*Net can be 1521-1529
radius
1812/udp
# RADIUS Authentication Server
securnetkey
2626/tcp
# SecureNet Key default port
clas-telnet
3023/tcp
# Passport One using telnet
clas-http
3080/tcp
# Passport One using HTTP
clas-https
3443/tcp
# Passport One using HTTPS
securid
5500/udp
# ACE/Server Master (SecurID)
securidprop
5510/udp
# ACE/Server slave (SecurID)
x11-0
6000/tcp
# X Window System
real-audio
7070/tcp
# Real-Audio TCP port
Figure II-12. Network Services File Example - Regular Services
CyberGuard Firewall Manual
II-41
Packet-Filtering Rules - Underlying Constructs
# /etc/inet/services
# CyberGuard Firewall Proxy Services
pn-raproxy
1090/tcp
# Real-Audio proxy
ms-sql-s
1433/tcp
# MS-SQL server
ms-sql-s
1433/ucp
# MS-SQL server
ms-sql-m
1433/tcp
# MS-SQL monitor
ms-sql-m
1433/ucp
# MS-SQL monitor
x11_hook
5998/tcp
# Telnet with X11 authentication
displayd
5999/tcp
# Launches X11 proxy
ftp-proxy
32789/tcp
# FTP proxy
telnet-proxy
32791/tcp
# Telnet proxy
smtp-proxy
32793/tcp
# SMTP proxy
gopher-proxy
32838/tcp
# Gopher Protocol proxy
http-proxy
32848/tcp
# HTTP proxy
nntp-proxy
32887/tcp
# NNTP proxy
ldap-proxy
33157/tcp
# LDAP proxy
login-proxy
33281/tcp
# Rlogin proxy
notes-proxy
34120/tcp
# Notes proxy
x11_hook-proxy 38766/tcp
# Virtual X11 proxy (Telnet hook)
x11-0-proxy
# X11 proxy
38768/tcp
Figure II-13. Network Services File Example - Proxy Services
Internet Control Message Protocol (ICMP) Services
4
In addition to the services available in the /etc/inet/services file, the following Internet
Control Message Protocol (ICMP) services can be used:
echo/icmp
Tests if a destination is alive and reachable.
echoreply/icmp
Response that the destination is alive and reachable.
ireq/icmp
Sent from machines to obtain their IP addresses from the network.
ireqreply/icmp
Response to ireq/icmp message.
mask/icmp
Sent from machines to obtain their sub-network masks from the
network.
maskreply/icmp
Response to mask/icmp message.
redirect/icmp
Sent to a host to indicate a better route for the datagram. Using
this service is NOT recommended from a security standpoint.
sourcequench/icmp Sent to tell the transmitting host to decrease the rate of packet
transmission because datagrams are arriving too quickly for a
gateway or host to process.
II-42
Chapter 4, Packet-Filtering Rules
Packet-Filtering Rules - Underlying Constructs
timxceed/icmp
Sent to the transmitting host to indicate that the time-to-live
counter has reached zero and the packet has been discarded.
unreach/icmp
Indicates that an IP message could not be delivered. Reasons
include: the network, host, protocol, or port was unreachable; the
packet needed to be fragmented; the source route request failed.
Packet-Filtering Rules Configuration File (netguard.conf)
4
Packet-filtering rules determine which services are allowed through the firewall. Packetfiltering rules are either static or dynamic. A static rule is specified in a configuration file
such as the default file, /etc/security/firewall/ng_inet/netguard.conf. A dynamic
rule is created for each inbound or outbound packet by comparing the packet header
against the kernel rules. Whether a packet transmission is permitted or denied, the
dynamic rule remains until its time-to-live expires.
When a packet arrives, the rules in the configuration file are scanned top to bottom seeking a match. The first rule that matches the characteristics of the packet is applied, and
subsequent rules are ignored.
Notes:
◆
◆
For outbound packets, packet-filtering rules are applied before Network
Address Translation (NAT). For inbound packets, NAT is applied first.
Anything that is not specifically allowed is prohibited.
Format guidelines:
◆
◆
◆
◆
Each rule is on a separate line
Fields are separated by white space (spaces or tabs)
Fields are case-insensitive
Comments begin with the # character and continue until the end of the line
Format:
rule_type service source destination options
Fields:
rule_type
Type of packet-filtering rule. One of the following must be used:
permit
A permit rule allows packets to pass through the firewall. Permit rules offer the best
performance but could compromise security. A permit rule is usually used with trusted
packet transmissions, such as transmissions from the firewall to an internal server.
proxy
A proxy rule causes packets to be intercepted and passed to a proxy that will enforce
CyberGuard Firewall Manual
II-43
Packet-Filtering Rules - Underlying Constructs
additional rules. A proxy rule provides the highest level of security. Proxy rules are
usually used with potentially threatening or revealing packet transmissions, such as
transmissions from all internal hosts to all external hosts.
Proxy rules on outbound requests provide extra control and auditing capabilities.
Proxy rules on inbound requests allow the use of unregistered internal addresses in
addition to extra control and auditing capabilities.
deny
A deny rule denies or blocks packets that match the rule.
service
Network service to permit, deny, or proxy. One of the following must be used:
◆
Valid service from the /etc/inet/services file. If the service is duplicated between UDP and TCP, the protocol must be explicitly stated.
◆
Valid service/protocol to define a port/protocol pair.
◆
port/protocol pair.
◆
port_range/protocol pair. Port ranges can be used for TCP and UDP,
but not ICMP. Specify port ranges as low_integer-high_integer.
◆
icmp_type/icmp pair.
◆
ALL, to specify all services.
◆
ALL/protocol, to define a protocol.
Note: A leading = (equal sign) indicates that the source port’s range is restricted to
be the same as that of the destination port. Otherwise, the source port can be any
port. (This corresponds to the Force port matching option on the expanded
Packet-Filtering Rules window.)
source and destination
Source is the host or network that sends the packets; destination is the host or network that receives the packets. One of the following variable or keywords must be
used:
◆
Host name from the /etc/inet/hosts file.
◆
IP address specified in “dot” notation format.
◆
Network name listed in the /etc/inet/networks file.
◆
network/subnetmask from the /etc/inet/networks file.
◆
EVERYONE, to specify the firewall and all hosts on either side.
◆
◆
II-44
ALL_INTERNAL, to refer to all traffic to and from a network that is
connected to an interface that is defined as i n t e r n a l in the
/etc/confnet.d/inet/interface file.
INTERNAL_INTERFACES, to refer to all traffic to and from the IP
address of any interface that is defined as i n t e r n a l in the
/etc/confnet.d/inet/interface file.
Chapter 4, Packet-Filtering Rules
Packet-Filtering Rules - Underlying Constructs
◆
◆
◆
◆
◆
◆
ALL_EXTERNAL, to refer to all traffic to and from a network connected to an interface that is not defined as the loopback interface and
not defined as internal in the /etc/confnet.d/inet/interface file.
EXTERNAL_INTERFACES, to refer to all traffic to and from the IP
address of any interface that is not defined as the loopback interface
and not defined as internal in the /etc/confnet.d/inet/interface file.
interface_NETWORK, to refer to any host on the network connected
to interface.
interface_IPADDRESS, to refer to the actual IP address of interface.
FIREWALL, to refer to all traffic to and from the IP address of any
interface of the firewall. This keyword was named LOCAL_HOST in
prior releases of the firewall.
type:code/icmp, valid for destination only, implements packet-filtering on ICMP type and code.
Note: A leading = (equal sign) or using one of the interfaces on the firewall with
the interface_IPADDRESS keyword indicates that the kernel rule will not be
modified to reflect that all firewall interface addresses are valid.
options
One or more of the following keywords can be used:
CLONE_REAL_AUDIO
This session emulates the characteristics of a RealAudio session.
CLONE_TFTP
This session emulates the characteristics of a TFTP session.
DONT_AUDIT
Specifies that matches to this filtering rule should not be audited. The default is to
audit matches to a rule.
ENABLE_REPLY
Allows returning packets through the firewall. Replies to UDP packets are disabled by
default; Replies to connection-oriented TCP packets are always enabled. If the packet
matches a deny rule, a denial response is sent to the packet originator.
ESTABLISHED
Re-establishes TCP connections that time out.
ipsec=ipsec_protection_strategy:sa_granularity:nat_pmtu_flag:origin_chan
nel:destination_channel
User-defined list of negotiable SA parameters, defined as the IPSec Protection Strategy, for the rule. By default, the default list is used. If manual keying is selected for
the IPSec channel, the cryptographic algorithms specified in the first proposal in the
list are used.
ipsec_protection_strategy - User-defined name of the IPSec Protection Strategy.
sa_granularity - Provides control over how SAs are established with the IPSec
CyberGuard Firewall Manual
II-45
Packet-Filtering Rules - Underlying Constructs
channel. The options are sa-per-net (create one SA per network), sa-per-port (create one SA per port), s a - p e r- p ro t o c o l (create one SA per protocol), and
sa-per-host (create one SA per host). All matching connections are packed into the
same SA.
nat_pmtu_flag - If the Network Address Translation (NAT) flag is turned on, the
firewall will translate addresses for this rule. NAT is applied to the packet before it
enters the tunnel. By default, NAT is turned off. If the PMTU flag is turned on, IPSec
packets are prevented from being fragmented. By default, PMTU is turned on.
0x1 - Indicates that Allow NAT to Translate Addresses is checked on the IPSec
page of the Packet-Filtering Rules window, and Enforce PMTU if Fragmenting
Packets is not checked
0x2 - Indicates that Allow NAT to Translate Addresses is not checked, and
Enforce PMTU if Fragmenting Packets is checked
0x3 Indicates that both Allow NAT to Translate Addresses and Enforce
PMTU if Fragmenting Packets are checked.
The default is 0x2.
origin_channel - Name of the IPSec channel configuration used to tunnel to the
address specified in the packet origin in the packet-filtering rule. This is a manual
override of the automatic channel selection, AUTO, which is the default. This field
can also be NONE.
destination_channel - Name of the IPSec channel configuration used to tunnel to
the address specified in the packet destination in the packet-filtering rule. This is a
manual override of the automatic channel selection, AUTO, which is the default. This
field can also be NONE.
By default, IPSec channel determination is automatic. If not specified, the peer-protected networks configured in the Peer Protected Networks Page of the VPN Secure
Channels window are used to identify the channel. Manual selection of IPSec channels is enabled when the packet origin or destination is not enough to identify an
IPSec channel (for example, no peer-protected networks have been defined), or the
channel that would be chosen is not the one the administrator wants to use. There is
also a tunnel-to-tunnel scenario where the administrator might want to choose none
for one of the channels.
NO_IF_CHECK
Does not check if the source addresses of an inbound packet matches the interface it
came over. CAUTION: This option can cause interface spoofing to go undetected.
Note: Any rule pertaining to multicast traffic must have the NO_IF_CHECK option
associated with it.
TCPSYNFLD
Applies the TCP SYN-flood defense strategy.
TCPSYNFLD_TIMEOUT=seconds
II-46
Chapter 4, Packet-Filtering Rules
Packet-Filtering Rules - Underlying Constructs
Amount of time the SYN-flood defense strategy should wait for a response to a
SYN/ACK. The default is the value of the NG_TCPSYNFLD_TIMEOUT tunable. Valid only with the TCPSYNFLD keyword.
TIME_OUT=seconds
Number of seconds a connection waits for a response. If a timeout occurs, the connection is reset and further traffic is prohibited. Responses are expected for TCP connections (default timeout is 24 hours); responses are optional for UDP/ICMP connections
(default timeout is 30 seconds). To use the default settings, set the timeout to 0 or do
not use this option.
RPC_PROC=procedure_number
Checks the RPC procedure number or range, buried within a UDP packet.
RPC_PROGRAM=program_number
Checks the RPC program number or range, buried within a UDP packet.
RPC_USER=uid:gid,gid...
This uid (user ID) and primary gid (group ID) along with the secondary gids must be
a superset of the uid and gids within the RPC packet. If a gid in the RPC packet is not
within this definition, the packet will not match.
tbr=times
Colon, dash, and comma separated list specifying the times that the rule is active.
Colons separate days from time, dashes denote a time range, and commas separate
time ranges within the same day. Times are formatted using a 24-hour clock and days
are formatted as 0 for Sunday through +6 for Saturday. The following rule represents
Sunday from 10 a.m through 12:35 a.m., Sunday from 3:00 p.m. through 11:15 p.m.,
Wednesday from 7 a.m. through 8 p.m., and Saturday from 12:00 pm through 5:00
p.m.
tbr=0:1000-1235,1500-2315+3:0700-2000+6:1200-1700
FAILOVER
In a High Availability configuration, when the served firewall fails over to the standby
firewall, in order for the session to continue, the packet-filtering session must be
transferred to the new served firewall (former standby). This option allows the sessions resulting from the rule to continue through a failover. This option can be applied
only to permit rules with tcp protocol or udp protocol with ENABLE_REPLY set, and
no given protocol (like ALL for a service). See also “High Availability” on page I-95
and “High Availability Window” on page I-96.
no_session
Causes the packet filter not to create a session and not to audit packets that match this
rule. This option should always be used with Deny rules.
CyberGuard Firewall Manual
II-47
Packet-Filtering Rules - Underlying Constructs
The following example shows the format of the netguard.conf file.
# /etc/security/firewall/ng_inet/netguard.conf
# Inbound traffic
permit
nntp/tcp
world_news
local_internal_news
permit
who/udp
EVERYONE
FIREWALL
DONT_AUDIT
permit
route/udp
EVERYONE
FIREWALL
DONT_AUDIT
proxy
telnet/tcp
ALL_EXTERNAL
EVERYONE
# Outbound traffic
permit
nntp/tcp
local_internal_news
permit
finger/tcp
FIREWALL
EVERYONE
permit
echo/udp
FIREWALL
EVERYONE
world_news
ENABLE_REPLY
# All other traffic
permit
telnet/tcp
ALL_INTERNAL
EVERYONE
permit
login/tcp
ALL_INTERNAL
EVERYONE
permit
ftp/tcp
ALL_INTERNAL
ALL_EXTERNAL
deny
all
EVERYONE
EVERYONE
Figure II-14. Packet-Filtering Rules File Example
Examples of packet-filtering rules are provided in the following sections:
◆
◆
◆
◆
◆
◆
◆
◆
◆
◆
◆
◆
◆
◆
◆
◆
◆
◆
◆
◆
◆
II-48
“Routing - Underlying Constructs” on page II-109
“Packet-Filtering Rules for Split DNS” on page II-123
“How to Configure SecurID” on page II-180
“Alerts Configuration File (alert.conf)” on page II-362
“How to Prepare for Secure Remote Management” on page I-159
“Packet-Filtering Rules for SmartProxies” on page III-14
“FTP Proxy - Packet-Filtering Rules” on page III-31
“Gopher Proxy - Packet-Filtering Rules” on page III-48
“HTTP Proxy - Packet-Filtering Rules” on page III-88
“LDAP Proxy - Packet-Filtering Rules” on page III-118
“Load Equalizer Proxy - Packet-Filtering Rules” on page III-129
“NNTP Proxy - Packet-Filtering Rules” on page III-148
“Notes Proxy - Packet-Filtering Rules” on page III-157
“Port Guard Proxy - Packet-Filtering Rules” on page III-164
“RealAudio Proxy - Packet-Filtering Rules” on page III-177
“Remote Login Proxy - Packet-Filtering Rules” on page III-181
“SMTP Proxy - Packet-Filtering Rules” on page III-209
“SQL*Net Proxy - Packet-Filtering Rules” on page III-230
“SSL Protocol Proxy - Packet-Filtering Rules” on page III-241
“Telnet Proxy - Packet-Filtering Rules” on page III-253
“X11 Proxy - Packet-Filtering Rules” on page III-273
Chapter 4, Packet-Filtering Rules
Packet-Filtering Rules - Underlying Constructs
Packet-Filtering Rules for SNMP
4
CAUTION!
Running an SNMP agent on the firewall is not recommended
from a security standpoint; however, it is possible. If you run an
SNMP agent on the firewall, permit SNMP traffic only from an
SNMP management station on the internal network to the firewall
for SNMP queries, and permit SNMP traffic only from the firewall to the SNMP management station on the internal network for
SNMP responses. The same rules for SNMP traps apply. Never
allow SNMP traps, queries, or responses to go to the external network.
The Simple Network Management Protocol (SNMP) provides a means for system and network administrators to efficiently manage, monitor, and maintain local or remote TCP/IPbased computer networks. An administrator can collect performance statistics, trouble
shoot, or enable/disable network interfaces from a central location on any computer system running SNMP on the network. The SNMP manager (client) process sends requests to
an SNMP agent (server) which responds to these requests. The SNMP agent communicates with SNMP management stations (clients) over predefined ports.
Limit access to the SNMP agent by adding packet-filtering rules similar to the following
in the netguard.conf file. Access should be limited to internal hosts.
# /etc/security/firewall/ng_inet/netguard.conf
# SNMP rules
permit
snmp/udp
management_station
FIREWALL
ENABLE_REPLY
permit
snmp-trap/udp
management_station
FIREWALL
ENABLE_REPLY
deny
snmp/udp
ALL_EXTERNAL
FIREWALL
ENABLE_REPLY
deny
snmp-trap/udp
ALL_EXTERNAL
FIREWALL
ENABLE_REPLY
Figure II-15. Packet-Filtering Rules for the SNMP Agent
Note: Adding support for SNMP does not mean that it will be possible to remotely configure CyberGuard Firewall-specific features across the network.
See also:
◆
◆
SNMP in the Network Administration UnixWare online manual
“Alerts Configuration File (alert.conf)” on page II-362
CyberGuard Firewall Manual
II-49
Packet-Filtering Rules - Underlying Constructs
Packet-Filtering Command (netguard)
4
Invoke the /usr/sbin/firewall/netguard command without options to apply the packetfiltering rules that you defined in the netguard.conf file. The netguard command also
has options that allow you to view and modify the kernel rules and perform other firewall
administration tasks.
Syntax:
/usr/sbin/firewall/netguard
/usr/sbin/firewall/netguard -a[k keys] [n]
/usr/sbin/firewall/netguard -A[n]
/usr/sbin/firewall/netguard -c
/usr/sbin/firewall/netguard -d[nw]
/usr/sbin/firewall/netguard -f[w] config_file
/usr/sbin/firewall/netguard -h
/usr/sbin/firewall/netguard -H
/usr/sbin/firewall/netguard -I
/usr/sbin/firewall/netguard -l[k keys][nw]
/usr/sbin/firewall/netguard -L[nw]
/usr/sbin/firewall/netguard -p[wd]
/usr/sbin/firewall/netguard -p[wd] [-f config_file]
/usr/sbin/firewall/netguard -P
/usr/sbin/firewall/netguard -q[w]
/usr/sbin/firewall/netguard -r
/usr/sbin/firewall/netguard -s
/usr/sbin/firewall/netguard -S[n] all
/usr/sbin/firewall/netguard -S[n] interface
/usr/sbin/firewall/netguard -t[w] host_name
/usr/sbin/firewall/netguard -v vpn_config_dir
/usr/sbin/firewall/netguard -w
Options and arguments:
-a
Displays all currently active sessions (permitted, proxied, or denied). Active sessions are displayed in the format described on page II-59.
-A
Displays all currently active sessions (permitted, proxied, or denied) and displays
the reason for packet denial. Active sessions are displayed in the format described
on page II-59; reasons for packet denial are described on page II-60.
-c
Clears (resets) kernel statistical data counts displayed by the -I option.
-d
Displays each static rule as it is represented in the configuration file, followed by its
kernel rule. If the -d is used without the -p option, both the configuration file and
the current kernel rules are parsed. The format of static rules is described on page
II-56.
-f config_file
Uses config_file rather than /etc/security/firewall/ng_inet/netguard.conf,
the default configuration file.
II-50
Chapter 4, Packet-Filtering Rules
Packet-Filtering Rules - Underlying Constructs
-g group_config_file
Use netguard -g netguard.group to use the default group configuration file.
Use netguard -g group_config_file to use a file other than the default configuration file.
-h and -H
Displays a list of netguard options and a brief description of each.
-I
Displays internal kernel netguard statistics as described on page II-52.
-k keys
Sorts output from the -a and -l options based on the selected key values described
on page II-52.
-l
Displays each kernel rule to the screen in the format outlined on page II-56.
-L
Displays each kernel rule to the screen in the format outlined on page II-56. Additionally, all rules that have associations (for example, ftp control and data) are
shown as linked.
-n
Displays IP addresses rather than host names and displays services as port numbers
rather than service names.
-p
Parses the configuration file for an invalid format.
-q
Queries netguard status to determine if netguard kernel code has been activated.
-r
Removes all kernel rules, causing the firewall to become a bastion host. This option
must be used alone.
-s
Displays the required format of the configuration file.
-S all
Displays network statistics for all interfaces.
-S interface
Displays network statistics for interface.
-t host_name
Terminates all sessions for host_name until the netguard command is run again.
-v vpn_config_dir
Uses vpn_config_dir as the vpnguard configuration directory subtree instead of
the default /etc/security/firewall/vpn/.
-w
Suppresses all warning messages while another netguard option is being executed. Warning messages are described on page II-61.
CyberGuard Firewall Manual
II-51
Packet-Filtering Rules - Underlying Constructs
Key Values (netguard -k)
4
The following values are arguments to the netguard -k command and sort output from
the netguard -a and netguard -l commands as follows:
O
o
R
r
S
D
s
d
P
I
i
Original rule’s time stamp (not displayed by -a)
Original rule’s sequence number (last 4 digits displayed)
Rule time stamp (displayed as elapsed time)
Rule sequence number (not displayed)
IP source address
IP destination address
TCP/UDP source port
TCP/UDP destination port
Protocol
Source interface name (not displayed by -a)
Destination interface name (not displayed by -a)
For example, netguard -a -kPSD sorts by protocol, IP source address, and IP destination address. A dash before a sort key causes that key to be sorted in descending order. For
example, netguard -a -k-R displays sessions in newest to oldest order.
Kernel Statistics (netguard -I)
4
The -I option displays kernel statistical information relating to netguard sessions. This
option displays session data types and counts and the source and destination IP addresses
of the last session associated with that particular session data count. The kernel session
statistics can be cleared (reset) with netguard -c. Only non-zero statistical counts are
displayed.
The following example shows the format of the output of the netguard -I command.
$ /usr/sbin/firewall/netguard -I
NETGUARD Statistics
Count
Last Src Address
Last Dest Address
==========================================================================
Session: Permit
:
89
192.168.36.2
markz
tcp
: SYN
:
7
192.168.36.2
markz
udp
:
:
77
192.168.36.12
192.168.36.255
icmp : echo
:
5
192.168.36.2
markz
:
6
192.168.36.19
192.168.6.255
:
6
192.168.36.19
192.168.6.255
:
6
192.168.36.16
192.168.6.2
<FIN :
6
192.168.36.16
192.168.6.2
Dropped Packet:
:
350
192.168.36.47
192.168.6.255
invalid i/f
:
350
192.168.36.47
192.168.6.255
Session: No Match
udp
:
TCP Close:
tcp
: FIN>
Figure II-16. Kernel Statistics Example (netguard -I)
II-52
Chapter 4, Packet-Filtering Rules
Packet-Filtering Rules - Underlying Constructs
The following list describes the statistical information that is tracked for each session
type:
Proxy Sessions
Session: Proxy:
tcp: SYN:
tcp: DUP SYN:
udp:
Total of all proxy sessions.
TCP-based proxy sessions started.
Repeated SYNs to start TCP-based proxy sessions.
UDP-based proxy sessions started.
Proxy Relay Sessions
Session: PRelay:
tcp: SYN:
tcp: DUP SYN:
udp:
Total of all proxy relay sessions.
TCP-based proxy relay sessions started.
Repeated SYNs to start TCP-based proxy relay sessions.
UDP-based proxy relay sessions started.
Permitted Sessions
Session: Permit:
tcp: SYN:
tcp: DUP SYN:
tcp: Established:
udp:
rpc:
icmp: echoreply:
icmp: unreach:
icmp: sourcequench:
icmp: redirect:
icmp: echo:
icmp: timxceed:
icmp: paramprob:
icmp: tstamp:
icmp: tstampreply:
icmp: ireq:
icmp: ireqreply:
icmp: mask:
icmp: maskreply:
other:
Total of all permitted sessions.
TCP-based permits started.
Repeated SYNs to start TCP-based permits.
Permits started based on ESTABLISHED keyword.
UDP-based permits started.
RPC-based permits started.
ICMP ECHO REPLY (ping reply) permits started.
ICMP destination UNREACH(able) permits started.
ICMP SOURCE QUENCH (flow control) permits started.
ICMP REDIRECT (reroute info) permits started.
ICMP ECHO (ping request) permits started.
ICMP TIME (to live) EXCEEDED permits started.
ICMP PARAMETER PROBLEM (ex. bad IP hdr) permits started.
ICMP TIME STAMP request permits started.
ICMP TIME STAMP REPLY permits started.
ICMP INFORMATION REQUEST permits started.
ICMP INFORMATION REQUEST REPLY permits started.
ICMP ADDRESS MASK request permits started.
ICMP ADDRESS MASK REPLY permits started.
Permits started by other IP protocols.
Denied Sessions
Session: Deny:
tcp: SYN:
tcp: ACK:
tcp: FIN:
tcp: RST:
tcp: SYN/ACK:
tcp: Other:
udp:
icmp: echoreply:
icmp: unreach:
CyberGuard Firewall Manual
Total of all denied sessions.
Denies containing SYN flag header.
Denies containing ACK flag header.
Denies containing FIN flag header.
Denies containing RST flag header.
Denies containing SYN/ACK flag header.
Denies containing other header flags.
UDP-based denies.
ICMP ECHO REPLY (ping reply) denies.
ICMP destination UNREACH(able) denies.
II-53
Packet-Filtering Rules - Underlying Constructs
icmp: sourcequench:
icmp: redirect:
icmp: echo:
icmp: timxceed:
icmp: paramprob:
icmp: tstamp:
icmp: tstampreply:
icmp: ireq:
icmp: ireqreply:
icmp: mask:
icmp: maskreply:
ICMP SOURCE QUENCH (flow control) denies.
ICMP REDIRECT (reroute info) denies.
ICMP ECHO (ping request) denies.
ICMP TIME (to live) EXCEEDED denies.
ICMP PARAMETER PROBLEM (ex. bad IP hdr) denies.
ICMP TIME STAMP request denies.
ICMP TIME STAMP REPLY denies.
ICMP INFORMATION REQUEST denies.
ICMP INFORMATION REQUEST REPLY denies.
ICMP ADDRESS MASK request denies.
ICMP ADDRESS MASK REPLY denies.
No Match Sessions
Session: No Match:
tcp: SYN:
tcp: ACK:
tcp: FIN:
tcp: RST:
tcp: SYN/ACK:
tcp: Other:
udp:
icmp: echoreply:
icmp: unreach:
icmp: sourcequench:
icmp: redirect:
icmp: echo:
icmp: timxceed:
icmp: paramprob:
icmp: tstamp:
icmp: tstampreply:
icmp: ireq:
icmp: ireqreply:
icmp: mask:
icmp: maskreply:
other:
Total of sessions that do not match any rules.
No matches containing SYN flag header.
No matches containing ACK flag header.
No matches containing FIN flag header.
No matches containing RST flag header.
No matches containing SYN/ACK flag header.
No matches containing other flags in header.
UDP-based no matches.
ICMP ECHO REPLY (ping reply) no matches.
ICMP destination UNREACH(able) no matches.
ICMP SOURCE QUENCH (flow control) no matches.
ICMP REDIRECT (reroute info) no matches.
ICMP ECHO (ping request) no matches.
ICMP TIME (to live) EXCEEDED no matches.
ICMP PARAMETER PROBLEM (ex. bad IP hdr) no matches.
ICMP TIME STAMP request no matches.
ICMP TIME STAMP REPLY no matches.
ICMP INFORMATION REQUEST no matches.
ICMP INFORMATION REQUEST REPLY no matches.
ICMP ADDRESS MASK request no matches.
ICMP ADDRESS MASK REPLY no matches.
No matches attempted by other IP protocols.
Closed TCP-Based Sessions
TCP Close:
tcp: SYN>:
tcp: SYN> <SYN:
tcp: SYN> <FIN:
tcp: SYN> <RST:
tcp: ACK> <ACK:
tcp: ACK> <FIN:
tcp: ACK> <RST:
tcp: FIN> <ACK:
tcp: FIN> <FIN:
II-54
Total of closed TCP-based sessions.
Closes in which only a SYN was received.
Note: A high count value indicates routing problems/down host.
Closes when SYN sent and SYN received, but no data.
Note: A high count value indicates routing problems.
Abnormal closes - SYN sent and FIN received.
Abnormal closes - SYN sent and RST received.
Abnormal closes - ACK sent and ACK received.
Abnormal closes - ACK sent and FIN received.
Abnormal closes - ACK sent and RST received.
Abnormal closes - FIN sent and ACK received.
Normal closes - FIN sent and FIN received.
Chapter 4, Packet-Filtering Rules
Packet-Filtering Rules - Underlying Constructs
tcp: FIN> <RST:
tcp: RST> <ACK:
tcp: RST> <FIN:
tcp: RST> <RST:
Abnormal closes - FIN sent and RST received.
Abnormal closes - RST sent and ACK received.
Abnormal closes - RST sent and FIN received.
Abnormal closes - RST sent and RST received.
Sessions that Cause Special Replies
Response Generated:
tcp: RST:
tcp: RST KAlive:
tcp: RST LoopBk:
icmp: UNREACH:
icmp: REDIRECT:
icmp: TIMXCEED:
Total sessions causing special replies.
Remote sessions terminated with TCP RST because of deny/no
match.
Remote ‘keepalive’ sessions terminated with TCP RST because of
deny/no match.
Local sessions (loopback) which internally generated packets and
were terminated with TCP RST.
Sessions causing ICMP Port Unreachable generation.
Sessions causing ICMP ‘host redirect’ generation.
Sessions where a routing loop was detected causing ICMP TIME
EXCEEDED generation.
Sessions with Dropped Packets
Dropped Packet:
mget fail:
short fragment:
short packet:
invalid fragment:
invalid rpc xid:
invalid i/f:
no route:
route loop:
forward deny:
Total sessions involving packet loss.
Kernel message buffer resources unavailable.
Invalid fragment size.
Invalid packet size.
Fragment overlays protocol header flags.
RPC XID not recognized.
Packet came in over the wrong interface.
No route to IP address.
Routing error on network.
Packet involved in a forwarding attack.
Reflected Sessions
Reflected Sessions:
I/F in == I/F out:
rt in == rt out:
Total “reflected” sessions.
Packet “in” interface same as “out” interface.
Packet “in” route entry same as “out” route entry.
TCP Relay Packets
TCP Relay Packets:
Total of packets through TCP Relay.
TCP SYN Flood Defense Sessions
TCP SYNFlood Defense:
Total of sessions defended from TCP SYN floods.
defense skipped:
Defense not started.
conn established:
TCP connection handshake completed.
conn refused:
Server TCP refused connection.
rule expired:
Netguard rule expired during connection handshake.
timeout: <SYN|ACK: Source did not respond to SYN/ACK.
timeout: SYN>:
Destination did not respond to SYN.
timeout: <FIN:
Source did not respond to FIN.
CyberGuard Firewall Manual
II-55
Packet-Filtering Rules - Underlying Constructs
source: FIN:
source: RST:
source: bad TCP:
dest: bad TCP:
alloc failure:
Source sent FIN before handshake with destination complete.
Source sent RST before handshake with destination complete.
Aborted - source sent invalid or unexpected TCP segment.
Aborted - destination sent invalid or unexpected TCP segment.
Aborted - allocation failure.
Miscellaneous events during TCP SYN Flood Defense
TCP SYNFlood Misc:
source drop:
dest drop:
RST failure:
Total of miscellaneous events during TCP SYN flood defense.
Invalid or unexpected TCP segment from source dropped.
Invalid or unexpected TCP segment from destination dropped.
Failed to send RST segment.
Kernel Rules Format (netguard -d, netguard -l, netguard -L)
The -d, -l, and -L options display kernel rules as shown in the following example.
$ /usr/sbin/firewall/netguard -l
[tcp]
proxy
-ip
enable_reply
dst_frg_id=3613
[tcp]
permit
telnet/tcp
permit
[udp]
-ip
-ip
[udp]
-ip
-ip
172.16.2.0/0xffffff00
session
dec1
dec1
route/udp
enable_reply
dst_frg_id=0
qatest2
telnet/tcp
qatest3
src_frg_id=3596
qatest1
who/udp
who/udp
two_way
ttl=64secs
lo0
update_time
d_ttl=240secs
enable_reply
dst_frg_id=0
lo0
update_time
d_ttl=80secs
enable_reply
dst_frg_id=0
who/udp
src_frg_id=52981
1070/tcp
two_way session
192.168.6.57
who/udp
dec0
qatest3
ttl=85051secs
route/udp
src_frg_id=51625
permit
cyberext1
update_time
dec1
dec1
ttl=86364secs
d_ttl=86400secs
192.168.6.0/0xffffff00
session
lo0
src_frg_id=15535
permit
1452/tcp
two_way session src_frg_id=52982
d_ttl=86400secs
192.168.6.0/0xffffff00
session
qatest1
enable_reply
dst_frg_id=3287
[udp]
dec0
update_time
two_way
ttl=199secs
lo0
update_time
d_ttl=240secs
two_way
ttl=136secs
Figure II-17. Kernel Rules Format (netguard -l)
Kernel rules format for the -d and -l options (one line):
[bucket] action protocol source_interface source_address/source_mask \
source_port/protocol dest_interface dest_address/dest_mask \
dest_port/protocol rule_state
II-56
Chapter 4, Packet-Filtering Rules
4
Packet-Filtering Rules - Underlying Constructs
Components of the kernel rules are defined as:
[bucket] If displayed, will be one of the following:
[relay] - Relay rule bucket
[static] - Static rule bucket
[syn_st] - TH_SYN state rule bucket
[proto] - Specific protocol bucket
[spstat] - Special static rule bucket
action
Action that each rule can apply: permit, deny, proxy, prelay
protocol
Protocol suite being used
source_interface
Source interface name
source_address/source_mask
Source IP address and source network mask
source_port/protocol
Source port number and protocol
dest_interface
Destination interface name
dest_address/dest_mask
Destination IP address and destination network mask
dest_port/protocol
Destination port number
rule_state Zero or more flags (listed in the following section) indicating state information associated with a kernel rule
Rule State Flags:
clone_tftp
clone_real_audio
count=x
deny_rule
dont_audit
drop=x
dst_frg_id= x
dst_p= x
d_ttl= x secs
enable_reply
CyberGuard Firewall Manual
Rule will act as a tftp rule.
Rule will act as a RealAudio rule.
Only applies to static rules and is a count of the sessions that have
been created as a result of this rule since the last time the statistics
were cleared.
Cause of denial was DENY.
Do not audit matches made to this rule.
Only applies to static rules and is a count of the number of packets
dropped due to the session rate being exceeded.
Last DST IP fragment ID was x.
x packets have been send from the destination.
x seconds must pass before a rule can be terminated after receipt
of a return packet (default is 30 seconds for non-TCP traffic and
86400 seconds for TCP traffic).
Returning packets will be allowed through when a dynamic kernel
rule is built.
II-57
Packet-Filtering Rules - Underlying Constructs
established
forward_deny
ftpd_active
ftpd_pasv_active
interface_error
ipsec_src
ipsec_dst
ipsec_nat
no_if_check
no_match_rule
no_route
orid=x
route_loop
session
special_static
src_frg_id= x
src_p= x
static_rule
s_ttl= x secs
tcp_fin_src_rcv
tcp_fin_dst_rcv
tcp flags=flags
Established session are allowed.
Cause of denial was FORWARD ERROR.
ftp-data is still active.
ftp-data PASV is still active.
Cause of denial was INTERFACE ERROR.
Packets to or from the rule’s source address are protected by
IPSEC.
Packets to or from the rule’s destination address are protected by
IPSEC.
NAT, if configured, is applied to packet before IPSEC encapsulates it.
Do not check packet for interface spoofing.
Cause of denial was NO MATCH.
Cause of denial was NO ROUTE INFO.
For static rules this is the rule identifier. For sessions this is the
rule identifier of the rule that caused the creation of this session.
Cause of denial was ROUTING LOOP.
Dynamically built session is still active.
Rule is a static rule, but built at the head of the static list.
Last SRC IP fragment ID was x.
x packets have been sent from the source.
A static rule.
x seconds must pass before a rule can be terminated after transmission of packet. (default is 30 seconds for non-TCP traffic and
86400 seconds for TCP traffic).
Detected TCP_FIN from source.
Detected TCP_FIN from destination.
TCP packet flags at time of denial. flags can be one or more of
the following, separated by a comma:
URG - TH_URG set. Packet has urgent information.
ACK - TH_ACK set. Packet acknowledges previously sent data.
PUSH - TH_PUSH set. Data flushes through the system.
RST - TH_RST set. TCP connection abnormally terminates.
SYN - TH_SYN set. TCP connection is being set up.
FIN - TH_FIN set. TCP connection normally closes down.
tcp_synflood [timeout = x]
A SYN flood defense strategy is will be applied to sessions based
on this rule.
tcp_syn_only
TCP session has not detected any data yet.
tftp_active
tftp is still active.
ttl= x secs
Positive value of x represents the number of seconds a rule has left
to live; negative value of x represents a rule to be terminated.
two_way
Check source and destination addresses; if no match, swap them,
and then check again for a match.
update_ports
Port numbers are being updated.
update_time
Timeout time is being updated for every packet match.
II-58
Chapter 4, Packet-Filtering Rules
Packet-Filtering Rules - Underlying Constructs
Active Kernel Rules Format (netguard -a, netguard -A)
4
The -a and -A options display all currently active sessions (permitted, proxied, and
denied) as shown in the following example.
$ /usr/sbin/firewall/netguard -a
Ty
Host
pe
Source
Prot
Destination
ocol
Ports
Src
Dst
Packets
Src
Dst
Bytes
Src
Dst
== ============ ============== ==== ===== ===== ===== ===== ===== =====
X
qatest1
qatest3
tcp
1452 telne
112
100
4543
4854
P
cyberext1
qatest3
tcp
1070 telne
40
29
1648
1753
P
192.168.6.57
192.168.6.255
udp route route
169
0
15548
0
P
qatest2
192.168.6.255
udp
who
who
29
0
3248
0
P
qatest1
172.16.2.255
udp
who
who
11
0
1232
0
P
qatest3
192.168.6.255
udp
who
who
28
0
3664
0
Figure II-18. Active Kernel Rules Format (netguard -a)
Active kernel rules format (one line):
type source_address dest_address protocol source_port dest_port \
source_packet_count dest_packet_count source_byte_count dest_byte_count
Components of the active kernel rules are defined as:
type
Type of Active rule:
source_address
dest_address
protocol
source_port
dest_port
source_packet_count
dest_packet_count
source_byte_count
dest_byte_count
R - Relay rule
P - Permit rule
Pe - Permit on ‘Established’ rule
PT - Temporary permit static rule
Pt - Temporary permit non-static rule
X - Proxy rule
Xr - Proxy ‘Relay’ (ongoing) rule
XT - Temporary proxy static rule
Xt - Temporary proxy non-static rule
D - Deny rule
DT - Temporary deny static rule
Dt - Temporary deny non-static rule
Source IP address
Destination IP address
Protocol
Source port
Destination port
Source packet transmission count
Destination packet transmission count
Source byte transmission count
Destination byte transmission count
CyberGuard Firewall Manual
II-59
Packet-Filtering Rules - Underlying Constructs
If active sessions are displayed on xterm windows with greater than 100 columns, netguard will provide the following additional information:
◆
◆
◆
Elapsed time of the session
Slightly wider service name display
Rule sequence number so that a session displays the sequence number of the
rule from which it was generated
Packet Denial States (netguard -A)
4
The reason for packet denial, with one or more of the following states, is displayed if the
-A option is used.
deny rule
no match
forward attempt
invalid interface
route loop
tcp flags=flags
Packet matches a DENY rule.
Packet did not match any rule.
Packet is not allowed to be forwarded through the firewall.
Packet came in over the wrong interface.
Packet is bouncing between two routers that point to each other.
TCP packet flags at time of denial. flags can be one or more of
the following, separated by a comma:
URG - TH_URG set. Packet has urgent information.
ACK - TH_ACK set. Packet acknowledges previously sent data.
PUSH - TH_PUSH set. Data flushes through the system.
RST - TH_RST set. TCP connection abnormally terminates.
SYN - TH_SYN set. TCP connection is being set up.
FIN - TH_FIN set. TCP connection normally closes down.
II-60
Chapter 4, Packet-Filtering Rules
Packet-Filtering Rules - Underlying Constructs
Warning Messages
4
Warning messages can alert you to unique or problematic packet-filtering rules. You can
suppress warning messages with the netguard -w command. The following table
describes the netguard warning messages.
Table II-1. Packet-Filtering Warning Messages
Warning Message
Description
* BASTIONHOST set: Packet forwarding
disabled between interfaces
Packets cannot be forwarded from one interface to
another even though the rule permits it.
* ‘Internal’ to ‘Internal’ packet filters
not supported
A rule supporting packet transmissions internally within
the firewall exists.
* ‘xxx ’ to ‘yyy ’ packet filters unexpected
Packets coming in through one interface are not
expected to go out through the same interface.
* Host x unreachable
No routing information is available on how to reach
host x.
CyberGuard Firewall Manual
II-61
Packet-Filtering Rules - Underlying Constructs
II-62
Chapter 4, Packet-Filtering Rules
Chapter 5
Chapter 5.
II
Network Address Translation
Network Address Translation
5
Network Address Translation (NAT) hides internal network addresses from external hosts
and allows your company to use unregistered local Internet addresses. All traffic appears
to originate or terminate at the least-trusted, external-interface addresses of the firewall.
Each of these interfaces is assigned one of your company’s registered Internet addresses.
Figure II-19 shows how NAT protects your internal addresses.
Packet Filter
(netguard)
Hidden
Addresses
Internal
Hosts
Firewall
N
A
T
External
Hosts
Internet
Figure II-19. Using NAT on the Firewall
Static and Dynamic Address Translation
Address translation can occur statically or dynamically.
The primary purpose of static address translation is to expose public servers or public subnetworks on the internal network to the external network, while still hiding the rest of the
internal network. Static translation also allows an external host to initiate a connection to a
specified internal host or network. For outbound traffic, NAT translates the source (internal) IP address to an external IP address. For inbound traffic, NAT translates the external
IP address to the specified internal IP address. Static NAT does not translate port numbers,
only Internet addresses. Any packets sent directly to the internal network, except those
allowed by static rules, are dropped.
II-63
Network Address Translation
Dynamic address translation hides internal addresses from the external network. In
dynamic mode, all transmitted packets are translated such that the source address becomes
the interface's Internet address (the global address) or the global address as assigned in a
NAT pool. For outbound traffic, dynamic NAT translates the source address from an internal IP address to a registered, external IP address, dynamically associating a port number
with the hidden IP address. For inbound traffic, dynamic NAT translates the destination
address from the external IP address to the correct internal IP address. Because NAT allocates a global port number for each connection, the reply packets to the global
address/port can be translated correctly back to the originating internal address/port. Any
packets sent directly to the internal network are dropped.
A subset of dynamic NAT is a NAT pool. A NAT pool specifies a group of local addresses
to be translated to a group of global addresses. These addresses can be external addresses
other than the external address of the firewall. More than one local address may use the
same global address.
When static and dynamic NAT and NAT pools are active on an interface, the order of precedence for translation to the interface address is:
1. static translation
2. pool translation
3. dynamic translation
If a packet matches a static rule, it is translated according to that rule only. If a packet does
not match a static rule but matches a pool rule, it is translated according to that rule only.
Otherwise, if dynamic NAT is enabled on the interface, it is translated to the interface
address.
The two modes of NAT, Static and Dynamic, can coexist. The following table compares
Static and Dynamic NAT.
Table II-2. Static vs. Dynamic Network Address Translation
Attribute
II-64
Static NAT
Dynamic NAT
Makes selected internal
addresses accessible
Only if a static rule translates the
specified internal address for a public server or sub-network
No
External host can initiate
communication
Only if a static rule translates the
specified internal address
No
Drops packets sent directly to
internal addresses
Only if no static rule translates the
specified internal address
Yes
Uses dynamic port allocation
Only if no static rule translates the
specified internal address
Yes
Chapter 5, Network Address Translation
Network Address Translation
Pass Address
The Pass Address check box used with Dynamic NAT enables a proxy to connect to a
client’s IP address through to the server when opening an ongoing connection to the server
on the other side of the firewall. If this option is not specified, the ongoing connection will
use the firewall’s IP address as the source address as shown in the following figures:
FTP
Server
Firewall
Address
FTP
Proxy
Client
Address
FTP
Client
Firewall
Figure II-20. Proxy Without Pass Address Option
FTP
Server
Client
Address
FTP
Proxy
Client
Address
FTP
Client
Firewall
Figure II-21. Proxy With Pass Address Option
NAT and VPN
Network Address Translation can also be used in conjunction with the firewall Virtual Private Network (VPN). See “Virtual Private Network (VPN)” on page II-235, “VPN and
Network Address Translation (NAT)” on page II-247, and “Packet-Filtering Rules IPSec
Page” on page II-29 for more information.
CyberGuard Firewall Manual
II-65
Network Address Translation Window
Network Address Translation Window
5
Use this window to enable Network Address Translation (NAT) on a network interface;
retain the address of an external host as a packet originator; and view, add, change, or
delete externally accessible addresses for public servers and public sub-networks on the
internal network on a per-interface basis. Externally accessible addresses allows externally initiated connections to internal hosts or networks. The rest of the internal network
remains hidden while NAT is enabled.
Notes:
◆
◆
NAT can be used in conjunction with VPN. If any IPSec rules on the IPSec
page of the Packet-Filtering Rules window have Allow NAT to Translate
Addresses checked, the network should be reinitialized. See “System Shutdown Window” on page I-35, “Packet-Filtering Rules IPSec Page” on page
II-29, “Virtual Private Network (VPN)” on page II-235, and “VPN and Network Address Translation (NAT)” on page II-247 for more information.
After clicking on Use, it is strongly recommended that you reinitialize the network or reboot the system.
Figure II-22. Network Address Translation Window - Rules Page (Expanded)
II-66
Chapter 5, Network Address Translation
Network Address Translation Window
NAT Rules Page
5
Use this page of the Network Address Translation window to view, add, change, or delete
externally accessible addresses for public servers and public sub-networks on the internal
network on a per-interface basis. This allows externally initiated connections to internal
hosts or networks. (The rest of the internal network remains hidden while NAT is enabled
on the Dynamic NAT Page.)
This page contains the following fields and controls:
Type
Has the following settings:
Static - (Default) Creates a static address translation rule which
exposes public servers or public sub-networks on the internal network to the external network, while still hiding the rest of the
internal network.
Pool - Creates a NAT pool which specifies a group of local
addresses to be translated to a group of global addresses.
Comment - Treats this line as a comment; permits typing in the
Comment field.
Global Address
Externally accessible registered IP address. For outbound packets,
it is the source address after translation. For inbound packets, it is
the destination address before translation.
This field can contain any valid address as defined by the packetfiltering sources and destinations (“Packet Origins and Destinat i o n s ” o n p a g e I I -2 6 ) , e x c e p t f o r A L L _ I N T E R N A L ,
ALL_EXTERNAL, d e v i c e _NETWORK, FIREWALL, and
EVERYONE. This field cannot contain an interface address
unless it is part of an address range. The drop-down list contains a
list of available host groups from the Grouping window.
Internal Address
Hidden internal IP address. For outbound packets, it is the source
address before translation. For inbound packets, it is the destination address after translation.
This field can contain any valid address as defined by the packetfiltering sources and destinations (“Packet Origins and Destinat i o n s ” o n p a g e I I -2 6 ) , e x c e p t f o r A L L _ I N T E R N A L ,
ALL_EXTERNAL, d e v i c e _NETWORK, FIREWALL, and
EVERYONE. This field cannot contain an interface address
unless it is part of an address range. The drop-down list contains a
list of available host groups from the Grouping window.
Interface
Network interface name that applies this translation rule. All network interfaces are provided in this list. The default is All.
Comment
Comment text. This field may be blank.
CyberGuard Firewall Manual
II-67
Network Address Translation Window
Notes:
◆
◆
◆
◆
◆
If NAT is not enabled on the Interfaces page, you still can save the values.
These values become useful when NAT is enabled on any external firewall
interface.
Static NAT can be activated on an internal interface, although this is not the
standard configuration.
Static NAT must be used when the HTTP and SMTP proxies are configured
for multiple servers.
Lines in this window are automatically sorted on the Interface field (i.e., all
dec0 lines appear first, all dec1 lines appear second, etc.). You can use the up
and down arrow buttons to sort lines within Interface groups.
NAT pools cannot be used in conjunction with VPN NAT-Smart. NAT-Smart
is the ability to choose between bypassing the firewall’s Network Address
Translation (NAT) or allowing NAT to Translate the internal (local) address of
an IPSec connection. If the IPSec packet-filtering rule is set to Allow NAT to
Translate Addresses, the VPN policy must be written using the would-be
translated address. Because IKE peers negotiate the policy (addresses) well
before an actual connection is made, the translated address must be static (i.e.,
predictable). With NAT pools, the translated address cannot be predicted in
advance.
See also:
◆
◆
◆
◆
II-68
“How to Configure Network Interfaces” on page I-73
“VPN and Network Address Translation (NAT)” on page II-247
“VPN and NAT-Traversal (NAT-T)” on page II-249
“VPN Secure Channels - IKE Advanced Settings Dialog Box” on page II-267
Chapter 5, Network Address Translation
Network Address Translation Window
NAT Interfaces Page
5
Use this page of the Network Address Translation window to enable NAT on an external
network interface and retain the address of an external host as a packet originator.
Figure II-23. Network Address Translation Window - Interfaces Page
This page contains the following fields and controls:
Interface
Type
Host Name
IP Address
Sub-Network Mask
Port name used as the network interface name.
Side of the firewall where the interface is connected.
Primary name of the host.
Internet Protocol address of the network interface.
Network class described by an octet pattern.
(The preceding read-only fields reflect settings on the Network Interfaces window.)
NAT
Determines if network address translation is enabled for
this network interface.
Pass Address
(Used by proxies) Passes the IP address of the requesting
client to the real server. Otherwise, passes the firewall
interface address that transmits the packets.
CyberGuard Firewall Manual
II-69
Network Address Translation Window
CAUTION!
◆
◆
◆
An internal interface with Pass Address set exposes internal host IP
addresses to any host connected via any other interface, unless NAT also
is enabled on that other interface.
Changing the setting for Pass Address invalidates all existing automatically generated packet-filtering rules for proxies.
This chapter describes how NAT functions when it is enabled on an
external network interface. NAT can also be enabled on an internal network interface; however, this is an unusual configuration in which
extreme caution and planning should be used.
Note: For outbound packets, Pass Address is applied before packet-filtering rules
which are applied before Network Address Translation (NAT). For inbound packets, the order is reversed.
See also:
◆
◆
◆
“How to Configure Network Interfaces” on page I-73
“SmartProxies Window” on page III-5
“How to Enable a Standalone Proxy (startup.conf)” on page III-11
How to Configure Network Address Translation Rules
5
You can use the expanded Static page of the Network Address Translation window to add
or change externally accessible addresses for public servers and public sub-networks on
the internal network.
To display the expanded Static page:
1. Select Configuration from the Control Panel.
2. Select Network Address Translation. The Network Address Translation window
appears.
3. Click on the Rules tab. The Rules page appears.
4. Click on Show Editor. The expanded Rules page appears.
II-70
Chapter 5, Network Address Translation
Network Address Translation Window
To add a Static Network Address Translation rule:
1. (Optional) Select the rule that you want the new rule to follow. (Skip this step if you
want to add a new rule at the top of the list.)
2. Click on Insert. An incomplete new line appears in the list. The Type field is set to
Static.
3. Select Static or Pool in the Type field.
4. Type a registered IP address in the Global Address field.
5. Type a hidden internal address in the Internal Address field.
6. (Optional) Select a new network interface name in the Interface field.
7. Click on Save. Your changes take effect at the next system reboot.
8. (Optional) Click on Use. Your changes take effect immediately.
9. It is strongly recommended that you reinitialize the network or reboot the system.
To change a Network Address Translation rule:
1.
2.
3.
4.
5.
Select the rule that you want to change.
Edit the fields that you want to change.
Click on Save. Your changes take effect at the next system reboot.
(Optional) Click on Use. Your changes take effect immediately.
It is strongly recommended that you reinitialize the network or reboot the system.
To delete a Network Address Translation rule:
1.
2.
3.
4.
Select the rule that you want to delete.
Click on Delete. The rule is deleted.
Click on Save. Your changes take effect at the next system reboot.
(Optional) Click on Use. Your changes take effect immediately.
CyberGuard Firewall Manual
II-71
Network Address Translation Window
How to Enable NAT and Retain Originating Addresses
5
You can use the Interfaces page of the Network Address Translation window to enable
NAT on external interfaces and use the IP address of the requesting external host as the
originating packet address.
CAUTION!
An internal interface with Pass Address set exposes internal
host IP addresses to any host connected via any other interface,
unless NAT also is enabled on that other interface.
To display the Interfaces page:
1. Select Configuration from the Control Panel.
2. Select Network Address Translation. The Network Address Translation window
appears.
3. Click on the Interfaces tab. The Interfaces page appears.
To enable NAT and retain originating addresses:
1. For external interfaces, check the NAT check box to enable network address translation.
2. Check the Pass Address check box to use the IP address of the requesting external
host as the originating address for auditing purposes.
3. Click on Save. Your changes take effect at the next system reboot.
4. (Optional) Click on Use. Your changes take effect immediately.
5. It is strongly recommended that you reinitialize the network or reboot the system.
CAUTION!
Changing the setting for Pass Address invalidates all existing
automatically generated packet-filtering rules for proxies.
See also “SmartProxies Window” on page III-5.
II-72
Chapter 5, Network Address Translation
NAT - Underlying Constructs
NAT - Underlying Constructs
5
Advanced Users Only! The GUI automates the editing of files and invocation of commands described in this section. If you choose to manually edit any file, you must first
close every window displayed from the Configuration menu and complete all edits of
the file before continuing GUI configuration activities.
To configure NAT on an interface:
1. Define NAT interface options in the /etc/security/firewall/if.conf file. Include
each interface from the interface file whether or not it uses any options.
2. If Network Address Translation rules are used on an interface, create and configure
one configuration file for each interface on which NAT rules are used. The file must be
named for the interface: /etc/security/firewall/nat.*.conf.
3. NAT will be enabled at boot time on any interface that uses the Nat keyword in the
/etc/security/firewall/if.conf file. You also can use the /usr/sbin/firewall/nat
command on the command line.
Notes:
◆
◆
◆
If you use dynamic address translation, connections can be initiated only from
the internal side to external hosts; external hosts cannot initiate connections to
your internal hosts or networks.
The precedence of NAT types, from highest to lowest, is: static NAT, NAT
pools, dynamic NAT.
NAT should be used only for external interfaces on a firewall.
See also “Network Interface File (interface)” on page I-85.
CyberGuard Firewall Manual
II-73
NAT - Underlying Constructs
NAT and PassClientAddr Configuration File (if.conf)
5
The /etc/security/firewall/if.conf file supplements the interface file with firewallspecific interface information. You must include each interface from the interface file
even if it does not use any flags.
Notes:
◆
◆
An internal interface that uses the PassClientAddr option from the if.conf
file exposes internal host IP addresses to any host connected via any other
interface, unless NAT also is enabled on that other interface.
For outbound packets, PassClientAddr is applied before packet-filtering
rules, which are applied before NAT. For inbound packets, the order is
reversed.
Format guidelines:
◆
◆
◆
Each interface is on a separate line
Each field is separated by a colon (:)
Comments begin with the # character and continue until the end of the line
Format:
device:unit:[flags]
Fields:
device
Identifies the controller type used for the interface. Usually, this value corresponds to the common name used for a particular device. This field cannot be
null and has no default. Use the same device as in the interface file.
unit
Integer that identifies a particular interface on a controller. This field cannot
be null and has no default. Use the same unit as in the interface file.
flags
(Optional) Can be zero or more of the following options separated by white
space:
Nat
Indicates that Dynamic Network Address Translation will be initialized on
this interface at boot time.
PassClientAddr
Used by proxies. Indicates that proxy servers accepting client connections on
this interface should use the client’s IP address as the IP source address of
packets passed to the real server. By default, the firewall’s IP address is used
as the IP source address. This option allows servers to log valid client
addresses, which are useful in generating audit reports.
II-74
Chapter 5, Network Address Translation
NAT - Underlying Constructs
The following example shows the layout of the if.conf file.
# /etc/security/firewall/if.conf
# include all interfaces from the interface file
dec:0:
dec:1:Nat PassClientAddr
Figure II-24. NAT and PassClientAddr Configuration File Example
See also:
◆
◆
◆
“Network Interface File (interface)” on page I-85
“How to Enable a Standalone Proxy (startup.conf)” on page III-11
netstat(1M) system manual page
Network Address Translation File (nat.*.conf)
5
Use the /etc/security/firewall/nat.*.conf file to define network address translation
rules for an interface. The * represents the name of the interface. A simple “pass-through”
policy can be configured by adding static translation rules with the global address equal to
the internal address.
Format guidelines:
◆
◆
◆
Each rule is on a separate line
Fields are separated by white space (spaces or tabs)
Comments begin with the # character in the first column and continue until the
end of the line
Format:
STATIC|POOL
global_address[/mask] local_address[/mask]
Fields:
STATIC
Defines a static NAT rule. The number of individual IP
addresses in the local address group must be exactly the
same as the number of individual addresses in the global
address group regardless of whether the local and global
groups are described as a group, an address range, or subnetwork.
POOL
Defines a NAT pool rule. The number of individual IP
addresses in the local address group need not be the same
as the number of individual addresses in the global address
group. If the size of the global address group is larger than
the size of the local address group, some of the global
CyberGuard Firewall Manual
II-75
NAT - Underlying Constructs
addresses will not be used. If the size of the local address
group is larger than the size of the global address group,
some of the global addresses will be used by more than
one local address.
The order of POOL rules is significant; POOL rules are
searched from top to bottom.
global_address[/mask]
Externally accessible host or sub-network address. For
outbound packets, it is the source address after translation.
For inbound packets, it is the destination address before
translation.
Addresses can be:
- An IP address
- An IP address with a network mask such as 192.16/16 or
192.16/255.255.0.0
- A host range such as 192.16.142.3-192.16.142.6
- A host group as defined in the Grouping window
local_address[/mask]
Hidden internal host or sub-network address. For outbound packets, it is the source address before translation.
For inbound packets, it is the destination address after
translation.
Addresses can be:
- An IP address
- An IP address with a network mask such as 192.16/16 or
192.16/255.255.0.0
- A host range such as 192.16.142.3-192.16.142.6
- A host group as defined in the Grouping window
Note: If global_address and local_address are the same, all packets to and from the
host or sub-network are unmodified by NAT.
The following example shows a network address translation file.
#
global_address
local_address
STATIC
192.168.101.3/255.255.0.0
192.168.45.6/255.255.0.0
STATIC
192.168.120.34
192.168.45.3
POOL
dev_group
192.168.45.1
POOL
192.168.10.0/255.255.0.0
192.168.45.0/255.255.255.0
POOL
192.168.0.0/255.255.0.0
192.168.45.18
Figure II-25. Network Address Translation File Example
II-76
Chapter 5, Network Address Translation
NAT - Underlying Constructs
Network Address Translation Command (nat)
5
The nat command, used without options, displays current NAT activity. You must be a
privileged user to run this command.
Syntax:
◆
Affects all interfaces:
/usr/sbin/firewall/nat [-r | -p ] all
◆
◆
◆
Display – affects a single interface:
/usr/sbin/firewall/nat [ -d] [ -s] [ -S] [ -n] interface
Reset NAT – Affects a single interface:
/usr/sbin/firewall/nat -r interface
Enable translation – affects a single interface:
/usr/sbin/firewall/nat [-f file] [-g file] [-i] [-p] interface
Options and arguments:
-d
Displays dynamic address translations.
-f file
Installs static translations and pool translations from the configuration file
file.
-g file
Uses file as the group definition file. The -g option should be used in conjunction with the -f option to specify the group file to be used when parsing the
configuration file.
-i
Enables dynamic translations.
-n
Displays the addresses in “dot” notation instead of the default domain name
format. This option can be used alone or with the -s option.
-p
Parses only the configuration.
-r
Resets NAT and turns off all translations.
-s
Displays static translations.
-S
Displays NAT statistics.
CyberGuard Firewall Manual
II-77
NAT - Underlying Constructs
II-78
Chapter 5, Network Address Translation
Chapter 6
Chapter 6.
Routing
II
Routing
6
A routing mechanism defines how information is transferred within an internal network
or between internal and external hosts. The routing mechanisms supported by the firewall
are static, dynamic, and multicast routing. These three routing mechanisms can coexist.
Static and Dynamic Routing
6
Static routing is preferred over dynamic routing because it offers a more secure solution in
exchange for some extra configuration effort. Table II-3 compares static and dynamic
routing. Multicast routing is described in the following section.
Table II-3. Static vs. Dynamic Routing
Attribute
Static Routing
Dynamic Routing
Advantages
and uses
You define each route. This
makes it useful for ultrasecure systems.
Routers know primary and alternate
routes. This makes it useful for systems requiring successful packet
transmissions. Easy propagation of
routing information is useful in large
intranet configurations.
Disadvantages
Defining many routes is
tedious. More administration is needed if the internal
network grows.
There is little selectivity about routing
information sources and recipients.
Number of direct
connections to
other networks
One external,
many internal
Many
II-79
Routing
Table II-3. Static vs. Dynamic Routing
Attribute
Static Routing
Dynamic Routing
Supports Routing Information
Protocol (RIP)
No
Yes
Supports Open
Shortest Path
First (OSPF)
No
Yes
Routing daemon
routed
gated
Notes:
◆
◆
Several kernel tunable parameters affect the forwarding of IP packets. See
“Networking Tunable Parameters” on page I-335 for details.
IPSec source and destination addresses, configured for the firewall VPN, are
not subject to normal routing. Packets for a tunnel are sent to the VPN peer of
the selected secure channel.
Multicast Routing
6
Multicast is communication between a single sender and multiple receivers on a network.
Multicast is an efficient way to distribute information to many hosts across the Internet
because it conserves bandwidth and reduces traffic by simultaneously delivering a single
stream of information to many recipients. Applications that take advantage of multicast
technologies include video conferencing, corporate communications, distance learning,
and the distribution of software, stock quotes, and news.
Multicast communications require the following elements:
◆
◆
◆
Multicast addressing
Multicast group registration
Multicast routing
Multicast Addressing
A multicast address enables the delivery of datagrams to hosts that have been configured
as members of a multicast group. A multicast group is identified by a Class D address.
Class D addresses range from 224.0.0.0 to 239.255.255.255.
The address 224.0.0.0 is reserved and cannot be assigned to any group. The multicast
addresses ranging from 224.0.0.1 to 224.0.0.255 are reserved for routing protocols and
other low-level topology discovery or maintenance protocols. The addresses ranging from
224.0.1.0 to 239.255.255.255 are assigned to various multicast applications or are unassigned. From this range, the addresses 239.0.0.0 to 239.255.255.255 are to be reserved for
local applications, not Internet-wide applications.
II-80
Chapter 6, Routing
Routing
Multicast Group Management
Hosts can join or leave a multicast group at any time. No restrictions are enforced on the
physical location or the number of members in a multicast group. A host can be a member
of more than one multicast group and need not belong to a group to send messages to the
group.
A group membership protocol is employed by routers to learn about the presence of group
members on their directly attached subnetworks. The CyberGuard Firewall implements
Internet Group Membership Protocol (IGMP) version 2 (IGMPv2). RFC 1112 defines
IGMP, and draft-ietf-idmr-igmp-v2-01.txt describes IGMPv2.
Based on the group membership information learned from the IGMP, a router is able to
determine which multicast traffic should be forwarded to each of its “leaf” subnetworks.
IGMP is only concerned with the forwarding of multicast traffic from the local router to
group members on directly attached subnetworks; IGMP is not concerned with the delivery of multicast packets between neighboring routers or across an internetwork. To provide an Internet-wide delivery service, it is necessary to use a multicast routing protocol.
Multicast Routing
A multicast routing protocol defines a delivery path and forwards multicast datagrams
across an internetwork. The CyberGuard Firewall implements the Distance Vector Multicast Routing Protocol (DVMRP) for multicast routing. DVMRP is derived from RIP (see
RFC 1058) and defined in RFC 1075.
DVMRP, using the IP multicast routing daemon mrouted, implements the Reverse Path
Multicasting (RPM) algorithm. Using RPM, mrouted forwards a multicast datagram to
all “leaf” routers, which transmit “prune messages” back to the source if there are no
group members on their directly attached leaf subnetworks. These prune messages result
in the removal of “branches” that do not lead to group members, thus creating the shortest
path tree with all leaves having group members.
The ports of a DVMRP router may be either a physical interface to a directly attached subnetwork or a tunnel interface. DVMRP tunnels are virtual point-to-point links between
pairs of multicast routers located anywhere on the Internet. DVMRP tunnels are used to
support multicasting among subnets that are separated by routers that do not support IP
multicasting. Tunneling is accomplished using the IP-in-IP (IP encapsulation) protocol to
encapsulate a multicast packet into a unicast packet and transmit that packet. The encapsulation is added on entry to a tunnel, and stripped off on exit from a tunnel.
CyberGuard Firewall Manual
II-81
Routing
The mrouted Command and the mrouted.conf Configuration File
The mrouted command can be used with or without the mrouted.conf configuration
file. Because the mrouted defaults are usually adequate for basic routing, the most common multicast routing scenarios use an empty configuration file. Left in its default state,
m r o u t e d will query on all capable interfaces. Generally, the goal of editing
mrouted.conf (manually or by using the Multicast Routes page of the Graphical User
Interface) is to limit the scope of multicasting (by limiting the number of interfaces
mrouted queries or to limit the scope of group addresses that can be used), or to configure
DVMRP tunnels. Use the Defaults, Boundary Names, Interfaces, or DVMRP Tunnels
pages to make such changes.
In most configuration situations, the administrator should be able to click on Run multicast routing daemon (mrouted) on the Multicast Routes page and use the defaults.
To use mrouted, you must also add packet-filtering rules to allow multicast routing data
through the firewall. See “Packet-Filtering Rules for Multicast Routing” on page II-104
and “Packet-Filtering Rules Window” on page II-22.
To pass multicast traffic, use the Static Routes page to define either a default route or a
route that matches all multicast traffic. The mrouted daemon will route the packet
according to its multicast routing tables. A route that matches multicast addresses should
have a source of 224.0.0.0 and a mask of 240.0.0.0 or 224.0.0.0/4. See “Static Routes
Page” on page II-83.
CAUTION!
This manual provides a brief overview of multicast routing and
brief descriptions of each field in the GUI for multicast routing.
Before using this feature or configuring multicast routing with the
GUI, you must understand the concepts of multicast routing, and
you must know how to use the mro ut ed command and the
mrouted.conf.
See also the mrouted(8) system manual page.
II-82
Chapter 6, Routing
Routing Window
Routing Window
6
Use this window to configure static, dynamic, and multicast routing. The Routing window
has three notebook pages: Static Routes, Dynamic Routes, and Multicast Routes.
Figure II-26. Routing Window - Static Routes Page (Expanded)
Static Routes Page
6
Use this page of the Routing window to specify an IP address of an ISP or router or gateway to an internal network for default static routing and to view, add, change, or delete a
static routing entry.
Notes:
◆
Every unspecified part of a network IP address is interpreted as a 0.
◆
Host IP addresses must have four octets.
◆
◆
Host and network names must be defined on the Host Names and Network
Names windows, respectively.
Portable host names should begin with an alphanumeric character and must
contain only alphanumeric characters and hyphens.
CyberGuard Firewall Manual
II-83
Routing Window
◆
◆
IP addresses are translated into host and network names. If you type an IP
address, save and close the window, and then reopen it, all IP addresses will be
displayed as host or network names.
To pass multicast traffic, use the Static Routes page to define either a default
route or a route that matches all multicast traffic. The mrouted daemon will
route the packet according to its multicast routing tables. A route that matches
multicast addresses should have a source of 224.0.0.0 and a mask of 240.0.0.0
or 224.0.0.0/4.
This page contains the following fields and controls:
Gateway for Default Route
Specifies the host name or IP address to which packets are forwarded if
no explicit route already exists. The default route must name a directly
connected host using a host name or IP address. If the address is one of
the firewall’s network interfaces, it is considered an interface route
(rather than a gateway route) and is expected to have a metric value of 0.
Usually this field contains the address of your ISP.
Destination
The static route destination can be one of the following:
-
Name (from Host Names or Network Names window).
-
Network IP address with sub-network mask in either bitcount form (the preferred 172.16.0.0/16) or dotted-quad
mask form (the more traditional 172.16.0.0/255.255.0.0).
IP address of the destination host.
Group names that contains only valid routing destinations
(or nested groups that meet the same requirement). If a mask
is provided, it will be ignored.
Portable names must contain only alphanumeric characters.
Mask
Sub-network mask supplied by the GUI based on what is entered in the
Destination field. If a host is entered as the destination, the supplied
mask is 255.255.255.255. A host is assumed when a resolvable host
name is supplied or the IP address contains bits set in the host part of the
address as determined by the mask in the Mask field or the default mask.
If a sub-network mask prefix bit count is entered with the destination IP
address, the corresponding dotted-quad mask will replace the content of
the Mask field. In other cases, the Mask field will be supplied with the
default sub-network mask only if the Mask field was previously blank.
You may override the supplied mask as long as the resulting destination
and mask combine to form a valid host or network specification (e.g., a
mask other than 255.255.255.255 cannot be used if bits are set in the destination corresponding to the host part of the address).
IP addresses are resolved to host names when they are displayed in the
list in the top portion of the window or when selected and displayed in
the edit area at the bottom of the window. If the address cannot be
resolved to a name, the address is shown. If the address is that of a network, the sub-network prefix bit count is appended.
II-84
Chapter 6, Routing
Routing Window
Forward To
If the Metric value is greater than 0, this field represents the host name
(from Host Names window) or IP address of the gateway to which packets should be forwarded. If the Metric value is equal to 0, this field represents the interface name, host name, or IP address of one of the firewall’s network interfaces.
Metric
The Metric value is interpreted by the underlying routing system. When
dynamic routing is not running, this value is usually a hop-count (the
number of network nodes between this system and the destination) but
may be weighted to indicate a cost for traversing the route. When
dynamic routing is running, this number is the p r ef e re n c e value
represents the rank used to select a route when both static and dynamic
routes to the same destination exist. In this case values around 60 are recommended to compete reasonably with other dynamic routing protocols.
0 is the highest rank, and 255 is the lowest rank. A metric of 0 represents
an interface route. A metric of 1 or greater represents a gateway route.
Interface routes (metric of 0) are automatically established at boot time. It
is rare that it will be necessary to add additional interface routes. The
default value in this field is 1.
See also:
◆
◆
◆
◆
◆
◆
◆
“Network Interfaces Window” on page I-68
“Host Names Window” on page II-1
“Grouping Window” on page II-10
“Packet-Filtering Rules Window” on page II-22
“How to Configure Static Routing” on page II-106
“Routing - Underlying Constructs” on page II-109
“Alerts Page” on page II-328 for responding to packet forwarding attacks
CyberGuard Firewall Manual
II-85
Routing Window
Dynamic Routes Page
6
Use this page of the Routing window to start dynamic routing, enable automatic packetfiltering rules for RIP, and configure dynamic routes.
Figure II-27. Routing Window - Dynamic Routes Page
This page contains the following fields and controls:
Enable dynamic routing
Determines if any dynamic routing will occur; static routing occurs regardless of this check box.
Update packet-filtering rules
If Enable dynamic routing is checked, automatically installs or removes
RIP-specific packet-filtering rules for dynamic routing. If you are using a
dynamic routing protocol other than RIP (by editing the gated.conf file), you
must use the Packet-Filtering Rules window to add your own protocol-specific packet-filtering rules.
Configuration Editor
Displays /etc/security/firewall/gated.conf, the dynamic routing configuration file. Use this area to view or edit the configuration file.
Load
II-86
Opens the Configuration Templates window, which provides a list of templates that will assist in the creation of a gated.conf file. Note that these templates are intended as a reference. You must thoroughly understand the gated
Chapter 6, Routing
Routing Window
daemon and the gated.conf file to securely configure dynamic routing. See
“Dynamic Routing Templates” on page II-87 for additional information.
Save As
Saves the current dynamic routing configuration file under a new name. After
you have configured the file you want to use for dynamic routing, be certain
that it is named /etc/security/firewall/gated.conf.
The GateD Consortium’s manual, “GateD, A routing daemon for Unix, User Manual” is
available online.
See also:
◆
◆
◆
gated(1M) system manual page
GateD Consortium Web page: http://www.merit.edu
GateD Consortium e-mail: [email protected]
Dynamic Routing Templates
6
Clicking on the Load button on the Dynamic Routes page of the Routing window opens
the Configuration Templates selection window. The following dynamic routing templates
are provided to assist in the configuration of the gated daemon. These file examples are
located in the /etc/security/firewall/gated directory. To save your own template or
alternate configuration files, click on the Save As button.
◆
◆
◆
◆
◆
◆
Basic configuration
Advanced configuration
RIP configuration
OSPF configuration
OSPF for high availability, primary
OSPF for high availability, secondary
Additional templates from the GateD Consortium are also provided.
CyberGuard Firewall Manual
II-87
Routing Window
Multicast Routes Page
6
Use this page of the Routing window to enable multicast routing, to limit the scope of
multicasting, or to configure DVMRP tunnels.
Note: To pass multicast traffic, use the Static Routes page to define either a default route
or a route that matches all multicast traffic. The mrouted daemon will route the
packet according to its multicast routing tables. A route that matches multicast
addresses should have a source of 224.0.0.0 and a mask of 240.0.0.0 or
224.0.0.0/4. See “Static Routes Page” on page II-83.
Figure II-28. Routing Window - Multicast Routes Page
This page contains the following control:
Run multicast routing daemon (mrouted)
Enables multicast routing by starting the IP multicast routing daemon,
mrouted.
See also the mrouted(8) system manual page.
II-88
Chapter 6, Routing
Routing Window
Multicast Routes - Defaults Page
6
Use this page of the Routing window to configure the overall operation of multicast routing.
Figure II-29. Routing Window - Multicast Routes, Defaults Page
This page contains the following fields and controls:
Cache Lifetime
Specifies, in seconds, the lifetime of a multicast forwarding cache
entry in the kernel. Multicast forwarding cache entries are
checked at the specified interval and are refreshed if the source is
still active and deleted if they are not active. A low value will
keep the kernel cache small, but the cache will be checked often
for periodic senders; however, a high value can cause the kernel
cache to grow unacceptably large. The default is 300 seconds (5
minutes).
Prune Lifetime
Specifies, in seconds, the average lifetime of prune messages that
are sent back to the source. The default is 7200 (2 hours). Smaller
values cause less data to be kept both at the router and the parent,
at the cost of more frequent broadcasts.
Note that some routers (such as mrouted prior to version 3.3 and
all versions of Cisco’s IOS) do not use the DVMRP generation ID
to determine that a neighbor has rebooted. Prunes sent towards
these neighbors should be kept short in order to shorten the time
to recover from a reboot. In this situation, the Prune Lifetime can
be assigned to a specific interface, as described in “Multicast
Routes - Interfaces, VIF Options Page” on page II-94.
CyberGuard Firewall Manual
II-89
Routing Window
No Flood
The multicast routing daemon (mrouted) assumes that it is the
forwarder for each of its attached subnets on startup. This can
cause duplicate packets for a short period (approximately one full
route report interval), since both the router that just started up and
the correct forwarder will be forwarding traffic. Checking No
Flood turns off this behavior; mrouted will not assume that it is
the forwarder on startup. Note that checking No Flood can cause
black holes (a situation in which packets disappear because a
router does not forward packets but thinks it can) on restart, which
will last approximately one full route report interval. No Flood
can also be specified on individual interfaces as described in
“Multicast Routes - Interfaces, VIF Options Page” on page II-94
or on DVMRP tunnels as described in “Multicast Routes DVMRP Tunnels, VIF Options Page” on page II-100.
Retransmit Prunes The default behavior (Default) of multicast routing is to retransmit prune messages on all point-to-point interfaces (including tunnels) but not on multi-access interfaces. On causes the retransmission of prunes on all interfaces. O f f disables the
retransmission of prunes. Unspecified indicates that this option
is not defined in the configuration file and the default behavior
will be used.
Retransmit Prunes can also be specified on individual interfaces as described in “Multicast Routes - Interfaces, VIF Options
Page” on page II-94 or on tunnels as described in “Multicast
Routes - DVMRP Tunnels, VIF Options Page” on page II-100.
See also the mrouted(8) system manual page.
Multicast Routes - Boundary Names Page
6
Use this page of the Routing window to restrict the scope of a broadcast. Boundary statements are an effective way to manage multicast domains by preventing multicast traffic
from traversing external links.
II-90
Chapter 6, Routing
Routing Window
Figure II-30. Routing Window - Multicast Routes, Boundary Names Page
This page contains the following fields:
Boundary Name
Name of the boundary that beyond which the router should not forward packets.
Scoped Address/Mask Length
Restricts the router from forwarding packets beyond the specified address.
The Scoped Address must be in the range 239.0.0.0 to 239.255.255.255.
See also the mrouted(8) system manual page.
CyberGuard Firewall Manual
II-91
Routing Window
Multicast Routes - Interfaces Page
6
Use this page of the Routing window to view and select for configuration the names of
individual interfaces that have their own multicast routing configurations.
Figure II-31. Routing Window - Multicast Routes, Interfaces Page
See also the mrouted(8) system manual page.
Multicast Routes - Interfaces, Interface Options Page
6
Use this page of the Routing window to assign a multicast routing configuration to a specific interface.
II-92
Chapter 6, Routing
Routing Window
Figure II-32. Routing Window - Multicast Routes, Interfaces, Interface Options
Page
This page contains the following fields and controls:
Interface Name or Address
(Read only) Name or IP address of the interface associated with an individual multicast routing configuration.
Netmask
Subnetwork mask of the interface.
Alt Net
If the Interface Name or Address is attached to multiple IP subnetworks, describe each additional subnetwork in the format of
IP_address/mask_length. One or more subnetworks, separated by
spaces, can be specified (e.g., 192.168.3.0/24 192.168.4.0/24).
Disable
Disables multicast forwarding on this interface. By default, the multicast
routing daemon discovers all locally attached multicast-capable interfaces and forwards on all of them.
Force Leaf
Forces the multicast routing daemon to ignore other routers on this interface. mrouted will never send or accept neighbor probes or route reports
on this interface.
CyberGuard Firewall Manual
II-93
Routing Window
IGMP V1
Forces mrouted into IGMPv1 mode if there are any IGMPv1 routers on
the interface. All routers on the interface must use the same version of
IGMP.
See also the mrouted(8) system manual page.
Multicast Routes - Interfaces, VIF Options Page
6
Use this page of the Routing window to configure a Virtual Interface (VIF).
Figure II-33. Routing Window - Multicast Routes, Interfaces, VIF Options Page
This page contains the following fields and controls:
Prune Lifetime
Specifies, in seconds, the average lifetime of prune messages that
are sent back to the source. The default is 7200 (2 hours). Smaller
values cause less data to be kept both at the router and the parent,
at the cost of more frequent broadcasts.
Note that some routers (such as mrouted prior to version 3.3 and
all versions of Cisco’s IOS) do not use the DVMRP generation ID
to determine that a neighbor has rebooted. Prunes sent towards
II-94
Chapter 6, Routing
Routing Window
these neighbors should be kept short in order to shorten the time
to recover from a reboot. In this situation, the Prune Lifetime can
be assigned to a specific interface.
Metric
The “cost” associated with receiving a datagram on the given
interface, the metric may be used to influence the choice of routes.
When a datagram is received, it is associated with a time-to-live
(TTL) value. The metric is subtracted from the TTL, and if the
TTL is greater than zero, the packet is forwarded. The Metric
value should be kept as small as possible, because DVMRP cannot route along paths with a sum of metrics greater than 31. The
default is 1.
Advert Metric
The “cost” associated with receiving a datagram on the given
interface, the metric may be used to influence the choice of routes.
The effective metric of a link is one end’s Metric plus the other
end’s Advert Metric. The default is 0.
Rate Limit
Specifies the bandwidth in Kbits/second allocated to multicast
traffic. The default is 0 (unlimited).
Threshold
Used to control the scope of multicast datagrams, the threshold
specifies the minimum IP time-to-live required for a multicast datagram to be forwarded to the interface or tunnel. The default
threshold is 1.
No Flood
The multicast routing daemon (mrouted) assumes that it is the
forwarder for each of its attached subnets on startup. This can
cause duplicate packets for a short period (approximately one full
route report interval), since both the router that just started up and
the correct forwarder will be forwarding traffic. Checking No
Flood turns off this behavior; mrouted will not assume that it is
the forwarder on startup. Note that checking No Flood can cause
black holes (a situation in which packets disappear because a
router does not forward packets but thinks it can) on restart, which
will last approximately one full route report interval.
Used on the VIF options page, No Flood is applicable to this
interface only.
No Transit
Prohibits routes learned from an interface marked No Transit to
be advertised on another interface marked No Transit. Marking
a single interface No Transit has no meaning; two or more interfaces must be marked No Transit. This is a specialized case of
route filtering.
Passive
Indicates that no packets will be sent on this interface or tunnel
until the routing daemon hears from the other end.
Allow Non-Pruners By default, mrouted refuses to peer with DVMRP neighbors that
do not claim to support pruning. This option allows such peerings
on this interface.
Retransmit Prunes The default behavior (Default) of multicast routing is to retransmit prune messages on all point-to-point interfaces (including
CyberGuard Firewall Manual
II-95
Routing Window
tunnels) but not on multi-access interfaces. On causes the retransmission of prunes on all interfaces. O f f disables the
retransmission of prunes. Unspecified indicates that this option
is not defined in the configuration file and the default behavior
will be used.
Used on the VIF options page, Retransmit Prunes is applicable to this interface only.
See also the mrouted(8) system manual page.
Multicast Routes - Interfaces, Boundaries Page
6
Use this page of the Routing window to restrict the scope of a broadcast. Boundary statements are an effective way to manage multicast domains by preventing multicast traffic
from traversing external links.
Figure II-34. Routing Window - Multicast Routes, Interfaces, Boundaries Page
This page contains the following field:
Boundary Name or Scoped Address/Mask Length
Name of the boundary or the IP address/mask length beyond which the router
should not forward packets. The Scoped Address must be in the range
II-96
Chapter 6, Routing
Routing Window
239.0.0.0 to 239.255.255.255. Boundary names are defined on the “Multicast
Routes - Boundary Names Page” on page II-90.
See also the mrouted(8) system manual page.
Multicast Routes - Interfaces, Filters Page
6
Use this page of the Routing window to enforce route filtering on an interface.
Figure II-35. Routing Window - Multicast Routes, Interfaces, Filters Page
This page contains the following fields and controls:
Accept
Accepts only the listed routes on the configured interface.
Deny
Accepts all routes except the listed routes.
Route/Mask Length
Route to accept or deny.
CyberGuard Firewall Manual
II-97
Routing Window
Exact
Indicates that only that specified route is matched. If Exact is not
checked, the specified route and any more specific route is matched. For
example, deny 0/0 denies all routes, while deny 0/0 Exact denies only
the default route.
Bidirectional Enables bidirectional route filtering in which the filter (Accept or Deny)
is applied to routes on both output and input. If Bidirectional is not
checked, the filter is only applied on input. Poison reverse routes are
never filtered out. (Poison reverse is a technique that helps upstream
DVMRP routers determine if a downstream router is dependent upon
them for forwarding multicast traffic from certain source networks.)
See also the mrouted(8) system manual page.
Multicast Routes - DVMRP Tunnels Page
6
Use this page of the Routing window to view and select for configuration the local and
remote names of DVMRP tunnels that have their own multicast routing configurations.
Note: Source-based pruning is not part of the current IP Multicast specification; it is
included in the next version, IGMP-3, which is under review by the IETF.
This means that when static NAT is enabled, prunes returning through a DVMRP
tunnel are not handled properly by mrouted. When a source behind the NAT
sends the first packet, it is forwarded by the firewall to its neighboring router
through the tunnel. Since no hosts have subscribed to that group, mrouted at the
other end of the tunnel sends back a prune message. Subsequent packets sent to
the group should no longer be forwarded by mrouted on that interface. However,
these prune messages are not handled correctly by mrouted, and packets are still
forwarded.
Figure II-36. Routing Window - Multicast Routes, DVMRP Tunnels Page
II-98
Chapter 6, Routing
Routing Window
See also the mrouted(8) system manual page.
Multicast Routes - DVMRP Tunnels, Tunnel Options Page
6
Use this page of the Routing window to establish a tunnel between a local host and a
remote host.
Figure II-37. Routing Window - Multicast Routes, DVMRP Tunnels, Tunnel
Options Page
This page contains the following fields:
Local Address or Interface Name
IP address or interface name of the local host on the tunnel.
Remote Address or Host Name
IP address or host name of the remote host on the tunnel. The Host Name may
be used only if it maps to a single IP address. A tunnel must be configured on
both routers before it can be used. Be careful that the unicast route to the
remote address goes out the interface specified by the Local Address or
Interface Name. Note that some UNIX kernels rewrite the source address
of mrouted’s packets on their way out to contain the address of the transmission interface. This is best assured via a static host route.
See also the mrouted(8) system manual page.
CyberGuard Firewall Manual
II-99
Routing Window
Multicast Routes - DVMRP Tunnels, VIF Options Page
6
Use this page of the Routing window to configure a Virtual Interface (VIF) on a tunnel.
Figure II-38. Routing Window - Multicast Routes, DVMRP Tunnels, VIF Options
Page
This page contains the following fields and controls:
Prune Lifetime
Specifies, in seconds, the average lifetime of prune messages that
are sent back to the source. The default is 7200 (2 hours). Smaller
values cause less data to be kept both at the router and the parent,
at the cost of more frequent broadcasts.
Note that some routers (such as mrouted prior to version 3.3 and
all versions of Cisco’s IOS) do not use the DVMRP generation ID
to determine that a neighbor has rebooted. Prunes sent towards
these neighbors should be kept short in order to shorten the time
to recover from a reboot. In this situation, the Prune Lifetime can
be assigned to a specific interface.
II-100
Chapter 6, Routing
Routing Window
Metric
The “cost” associated with receiving a datagram on the given
interface, the metric may be used to influence the choice of routes.
When a datagram is received, it is associated with a time-to-live
(TTL) value. The metric is subtracted from the TTL, and if the
TTL is greater than zero, the packet is forwarded. The Metric
value should be kept as small as possible, because DVMRP cannot route along paths with a sum of metrics greater than 31. The
default is 1.
Advert Metric
The “cost” associated with receiving a datagram on the given
interface, the metric may be used to influence the choice of routes.
The effective metric of a link is one end’s Metric plus the other
end’s Advert Metric. The default is 0.
Rate Limit
Specifies the bandwidth in Kbits/second allocated to multicast
traffic. The default is 0 (unlimited).
Threshold
Used to control the scope of multicast datagrams, the threshold
specifies the minimum IP time-to-live required for a multicast datagram to be forwarded to the interface or tunnel. The default
threshold is 1.
No Flood
The multicast routing daemon (mrouted) assumes that it is the
forwarder for each of its attached subnets on startup. This can
cause duplicate packets for a short period (approximately one full
route report interval), since both the router that just started up and
the correct forwarder will be forwarding traffic. Checking No
Flood turns off this behavior; mrouted will not assume that it is
the forwarder on startup. Note that checking No Flood can cause
black holes (a situation in which packets disappear because a
router does not forward packets but thinks it can) on restart, which
will last approximately one full route report interval.
Used on the VIF options page, No Flood is applicable to this tunnel only.
No Transit
Prohibits routes learned from an interface marked No Transit to
be advertised on another interface marked No Transit. Marking
a single interface No Transit has no meaning; two or more interfaces must be marked No Transit This is a specialized case of
route filtering.
Passive
Indicates that no packets will be sent on this tunnel until the routing daemon hears from the other end. This is useful for the server
end of a tunnel that goes over a dial-on-demand link. If the server
end is configured as passive, it will not send its periodic probes
until it hears one from the other side, so it will not keep the link
up. If this option is specified on both ends of a tunnel, the tunnel
will never come up.
Allow Non-Pruners By default, mrouted refuses to peer with DVMRP neighbors that
do not claim to support pruning. This option allows such peerings
on this interface.
CyberGuard Firewall Manual
II-101
Routing Window
Retransmit Prunes The default behavior (Default) of multicast routing is to retransmit prune messages on all point-to-point interfaces (including tunnels) but not on multi-access interfaces. On causes the retransmission of prunes on all interfaces. O f f disables the
retransmission of prunes. Unspecified indicates that this option
is not defined in the configuration file and the default behavior
will be used.
Used on the VIF options page, Retransmit Prunes is applicable to this tunnel only.
See also the mrouted(8) system manual page.
Multicast Routes - DVMRP Tunnels, Boundaries Page
6
Use this page of the Routing window to restrict the scope of a broadcast. Boundary statements are an effective way to manage multicast domains by preventing multicast traffic
from traversing external links.
Figure II-39. Routing Window - Multicast Routes, DVMRP Tunnels, Boundaries
Page
II-102
Chapter 6, Routing
Routing Window
This page contains the following field:
Boundary Name or Scoped Address/Mask Length
Name of the boundary or the IP address/mask length beyond which the router
should not forward packets. The Scoped Address must be in the range
239.0.0.0 to 239.255.255.255. Boundary names are defined on the “Multicast
Routes - Boundary Names Page” on page II-90.
See also the mrouted(8) system manual page.
Multicast Routes - DVMRP Tunnels, Filters Page
6
Use this page of the Routing window to enforce route filtering on a tunnel.
Figure II-40. Routing Window - Multicast Routes, DVMRP Tunnels, Filters Page
This page contains the following fields and controls:
Accept
Accepts only the listed routes on the configured interface.
Deny
Accepts all routes except the listed routes.
CyberGuard Firewall Manual
II-103
Routing Window
Route/Mask Length
Route to accept or deny.
Exact
Indicates that only that specified route is matched. If Exact is not
checked, the specified route and any more specific route is matched. For
example, deny 0/0 denies all routes, while deny 0/0 exact denies only
the default route.
Bidirectional Enables bidirectional route filtering in which the filter (Accept or Deny)
is applied to routes on both output and input. If Bidirectional is not
checked, the filter is only applied on input. Poison reverse routes are
never filtered out. (Poison reverse is a technique that helps upstream
DVMRP routers determine if a downstream router is dependent upon
them for forwarding multicast traffic from certain source networks.)
See also the mrouted(8) system manual page.
Packet-Filtering Rules for Dynamic Routing
6
The following packet-filtering rules are added for each interface when dynamic routing is
enabled and Update packet-filtering rules is checked on the Dynamic Routes page of
the Routing window. Use the Packet-Filtering Rules window to review all automatic
packet-filtering rules. You should delete packet-filtering rules that have been added on
interfaces on which routing is not being used and possibly add additional, more specific
packet-filtering rules for interfaces on which routing is being used. The following packetfiltering rules are RIP-specific.
# Routing rules (added automatically)
permit route/udp
FIREWALL
permit route/udp
device _INTERFACE
# End of Routing rules
device _INTERFACE
FIREWALL
See also “Packet-Filtering Rules Window” on page II-22.
Packet-Filtering Rules for Multicast Routing
6
Packet-filtering rules must be added explicitly in the Packet-Filtering Rules window to
allow multicast routing. Any permit rule pertaining to multicast traffic must have the Validate source address option on the Basic page of the Packet-Filtering rules window
unchecked (NO_IF_CHECK option in the /etc/security/firewall/ng_inet/netguard.conf file).
In the following examples, end hosts are on the internal network. They can be sources or
receivers or both. External interfaces are connected to other multicast routers.
II-104
Chapter 6, Routing
Routing Window
Packet-filtering rules for IGMP control messages
IGMP Queries
The following rules permit IGMP QUERY messages sent out by the firewall to determine
group memberships. These rules can be more restrictive by replacing FIREWALL with the
internal interface(s) of the firewall (if end hosts exist only on the internal network).
# permits general queries
permit */igmp
FIREWALL
224.0.0.1
# permits group-specific queries
multicast-group
permit */igmp
FIREWALL
NO_IF_CHECK
NO_IF_CHECK
IGMP membership reports:
Subscribers send membership reports to the all-routers group address 224.0.0.2. The following rules permit this traffic. These rules can again be made more restrictive by replacing ALL_INTERNAL with the specific IP addresses of end-hosts.
# permits general reports
permit */igmp
ALL_INTERNAL
224.0.0.2
NO_IF_CHECK
# permits group-specific reports
multicast-group
permit */igmp
ALL_INTERNAL
NO_IF_CHECK
Packet-filtering rules for DVMRP control messages
DVMRP probes/reports
The following rule permits outbound DVMRP control packets (probes and reports) originating from the external interface of the firewall and inbound traffic from neighboring
routers:
permit
*/igmp
ALL_EXTERNAL
224.0.0.4
NO_IF_CHECK
If the IP address of the neighboring router(s) are known, the above rule can be replaced
with the following:
# outbound rule
permit */igmp firewall_external_interface
224.0.0.4
NO_IF_CHECK
# inbound rule
permit */igmp IP_address_neighboring_router 224.0.0.4
NO_IF_CHECK
CyberGuard Firewall Manual
II-105
Routing Window
DVMRP Prunes / Grafts
The following rules permit DVMRP prunes and grafts:
# outbound rule
permit
*/igmp
FIREWALL
ALL_EXTERNAL
NO_IF_CHECK
# inbound rule
permit
*/igmp
ALL_EXTERNAL
FIREWALL
NO_IF_CHECK
If the IP address(es) of neighboring router(s) are known, ALL_EXTERNAL can be
replaced with the specific IP addresses.
Packet-filtering rules for data traffic
The following packet-filtering rules permits the end-host as a source:
# outbound rule
port /UDP
permit
host-IP
multicast-group NO_IF_CHECK
The following packet-filtering rules permits the end-host as a receiver:
# inbound rule
port /UDP
permit
ALL_EXTERNAL
multicast-group
NO_IF_CHECK
Tunneling
The following packet-filtering rules permit DVMRP tunnels:
permit
permit
*/ipencap
*/ipencap
FW-endpoint-IP
peer-endpoint-IP
peer-endpoint-IP
FW-endpoint-IP
NO_IF_CHECK
NO_IF_CHECK
See also “Packet-Filtering Rules Window” on page II-22.
How to Configure Static Routing
6
You can use the expanded Static Routes page of the Routing window to specify the default
route, which typically is the address of your Internet Service Provider (ISP), and add or
change a static routing table entry.
To display the expanded Static Routes page:
1.
2.
3.
4.
II-106
Select Configuration from the Control Panel.
Select Routing. The Routing window appears.
Click on the Static Routes tab. The Static Routes page appears.
Click on Show Editor. The expanded Static Routes page appears.
Chapter 6, Routing
Routing Window
To add a static route:
1. (Optional) Select the route that you want the new route to follow. (Skip this step if you
want to add a new route at the top of the list.)
2. Click on Insert. An incomplete new line appears in the list.
3. Type a host name or IP address or a network IP address and sub-network mask in the
Destination field. It may be a host or network.
4. (Optional) Type a sub-network mask value Mask field. The firewall will complete this
field based on the Destination field, but you may override the supplied mask provided by the firewall as long as the resulting destination and mask combine to form a
valid host or network specification.
5. Type a host name or an IP address in the Forward To field to indicate the gateway to
which to forward packets.
6. (Optional) Type a new route rank in the Metric field.
7. Click on Save. Your changes take effect at the next system reboot.
Note: When routes have been saved, click on Use only if there are no active network
connections; your changes take effect immediately. Otherwise, select System
from the Control Panel, select System Shutdown, and click on either Reinitialize Network or Shutdown System and Reboot.
See also “Packet-Filtering Rules Window” on page II-22.
How to Configure Dynamic Routing
6
You can use the Dynamic Routes page of the Routing window to configure routing using
the gated daemon. You can create your own routing configuration file or use one of several
templates as a guide.
To display the Dynamic Routes page:
1. Select Configuration from the Control Panel.
2. Select Routing. The Routing window appears.
3. Click on the Dynamic Routes tab. The Dynamic Routes page appears.
To configure dynamic routes:
1. Edit the current configuration or click on Load and select another routing configuration file or template.
2. Use the editor portion of the screen to edit the configuration file.
3. Click on Save As and save your file under a new name if you wish to save an alternate
configuration for later use, or save what you have as a template.
4. Click on Save. Your changes take effect at the next system reboot.
CyberGuard Firewall Manual
II-107
Routing Window
Note: When routes have been saved, click on Use only if there are no active network
connections; your changes take effect immediately. Otherwise, Select System
from the Control Panel, select System Shutdown, and click on either Reinitialize Network or Shutdown System and Reboot.
See also “Packet-Filtering Rules Window” on page II-22.
How to Configure Multicast Routing
6
You can use the expanded Multicast Routes page of the Routing window to enable multicast routing, to limit the scope of multicasting, or to configure DVMRP tunnels.
To display the Multicast Routes page:
1. Select Configuration from the Control Panel.
2. Select Routing. The Routing window appears.
3. Click on the Multicast Routes tab. The Multicast Routes page appears.
To configure multicast routes:
1. Click on Run multicast routing daemon (mrouted).
2. Click on Use. Your changes take effect immediately.
This instruction explains the simplest configuration for multicast routing. The mrouted
defaults are usually adequate for basic routing. Left in its default state, mrouted will
query on all capable interfaces. Generally, the goal of editing mrouted.conf (manually
or by using the Multicast Routes page of the Graphical User Interface) is to limit the scope
of multicasting (by limiting the number of interfaces mrouted queries or to limit the scope
of group addresses that can be used), or to configure DVMRP tunnels. Use the Defaults,
Boundary Names, Interfaces, or DVMRP Tunnels pages to make such changes.
You must also add packet-filtering rules using the Packet-Filtering Rules window as
described in “Packet-Filtering Rules for Multicast Routing” on page II-104 and “PacketFiltering Rules Window” on page II-22.
II-108
Chapter 6, Routing
Routing - Underlying Constructs
Routing - Underlying Constructs
6
Advanced Users Only! The GUI automates the editing of files and invocation of commands described in this section. If you choose to manually edit any file, you must first
close every window displayed from the Configuration menu and complete all edits of
the file before continuing GUI configuration activities.
To configure network routing:
1. Define the network routing service in the /etc/inet/services file:
route
520/udp
2. Define static and default routes in the /etc/security/firewall/routes.conf file.
3. Define dynamic routes in the /etc/security/firewall/gated.conf file.
4. Allow dynamic routing through the firewall by adding packet-filtering rules to the
/etc/security/firewall/ng_inet/netguard.conf file. You will need the following
two rules for each interface (for example, dec0, dec1) with RIP enabled:
permit
permit
route/udp
route/udp
FIREWALL
interface _NETWORK
interface _NETWORK
FIREWALL
5. (Optional) To enable dynamic routing, enable the gated routing daemon by changing
the R O U T I N G =
keyword from f a l s e
to t r u e
in the
/etc/security/firewall/startup.conf file:
ROUTING=true
6. (Optional) To enable multicast routing, enable the mrouted routing daemon by
changing the M R O U T E D = keyword from f a l s e to t r u e in the
/etc/security/firewall/startup.conf file:
MROUTED=true
See also:
◆
◆
◆
◆
◆
“Network Services File (services)” on page II-40
“Packet-Filtering Rules Configuration File (netguard.conf)” on page II-43
gated(1M) system manual page
GateD Consortium Web page: http://www.merit.edu
GateD Consortium e-mail: [email protected]
CyberGuard Firewall Manual
II-109
Routing - Underlying Constructs
Static Routing Configuration File (routes.conf)
6
Use the /etc/security/firewall/routes.conf file to configure static routing, including
the default route.
Format guidelines:
◆
◆
◆
Each static route is on a separate line
Fields are separated by white space (spaces or tabs)
Comments begin with the # character in the first column and continue until the
end of the line
Format:
destination gateway metric group
Fields:
destination
Name or IP address of the unique destination host or network. Portable
names should begin with an alphanumeric character and must contain
only alphanumeric characters and hyphens.
gateway
Gateway through which routing occurs. Must be a host (host name or IP
address) on a directly connected network. If a host name is used, it must
resolve to an IP address.
metric
Any positive value indicates a gateway route. 0 indicates an interface
route, meaning that the gateway field must be the IP address of one of
the firewall’s network interfaces. Because interface routes are automatically established at boot time, you should not have to add any routes with
a metric of 0. The range for this field is 0 to 255. This field is required if
a group is specified.
group
(Optional) If a group name is used for a routing destination, one line is
written into this file for each group member. This field contains the group
name from which the line originated. Therefore, if a group name is used
as the destination in the GUI, this field will contain many lines with the
same group name, gateway, and metric, but each with a different destination. If the destination is not from a group, this field may be omitted or
contain a dash ( - ).
The following example shows the layout of the routes.conf file.
II-110
Chapter 6, Routing
Routing - Underlying Constructs
# /etc/security/firewall/routes.conf
#
# default route:
default
192.168.1.1
1
192.168.2.2
1
192.168.2.1
1
#
# host route:
192.168.58.1
#
# network route:
192.168.0.0/16
Figure II-41. Static Routing Configuration File Example
Note: Separate static routes can be configured to be used on the standby half of an HA
pair using the /etc/security/firewall/routes.standby.conf file. When the
firewall transitions to the standby state, the routes defined in the
routes.standby.conf file will be installed on the system. If the user does not
configure this file, the routes defined in /etc/security/firewall/routes.conf
will be installed.
The routes.standby.conf file enables the firewall to distinguish between the
active and standby systems and inject a different default route for each. In some
firewall setups, it may also be useful to configure different static routes for the
firewall when operating in standby mode.
See also:
◆
◆
“High Availability” on page I-95
“Grouping Window” on page II-10
CyberGuard Firewall Manual
II-111
Routing - Underlying Constructs
II-112
Chapter 6, Routing
Chapter 7
Chapter 7.
II
Split Domain Name System
The Domain Name System (DNS) is a distributed database that maps host names to IP
addresses. Services often use DNS because host names ( ftp.uu.net) are easier to
remember than IP addresses (192.48.96.9). The servers that map names to addresses are
called domain name servers.
For networks connected to the Internet, DNS provides a vital service. However, DNS can
be used to probe a network and gain useful information about it. To guard against this
security threat, the CyberGuard Firewall runs two name servers on the firewall, one name
server for the external interfaces and one name server for the internal interfaces. The name
server on the external interface contains the public information; the name server on the
internal interface contains the private information. The firewall prevents anyone on the
outside from talking to the inside name server; only the public information is seen outside
the firewall. Packet-filtering rules allow the inside network to talk only to the internal
name server and the outside network to talk only to the external name server. This implementation is called Split Domain Name System or Dual Domain Name System.
Notes:
◆
◆
If you are unfamiliar with concepts related to the DNS or need further explanation, refer to DNS and BIND by Albitz and Liu. This book contains valuable information and is generally consistent with the firewall implementation
of DNS.
A list of DNS-related Requests For Comments (RFCs) appears in the Preface.
II-113
Split Domain Name System Window
Split Domain Name System Window
7
Use this window to manage two separate name servers. One server works with external or
non-trusted interfaces; the other works with internal or trusted interfaces. Each server listens to all interfaces that are on its side of the firewall. This setup prevents external hosts
from viewing or breaking into the internal system.
Figure II-42. Split Domain Name System Window - Setup Page
Information about DNS appears on four notebook pages: Setup, Servers, Zones, and
Hosts.
See also “Troubleshooting DNS” on page II-147.
DNS Setup Page
7
Use this page of the Split DNS window to enable DNS and install packet-filtering rules.
This page contains the following field and controls:
Operating Mode
Defines Split DNS operation on the firewall. Provides the following choices:
Enable domain name system
Enables Split DNS. The default is disabled.
Enable as client of Domain Name System server
(Optional) Enables the firewall as a DNS client. Type the IP address (host names are
not accepted) of the systems that act as DNS servers for the firewall in the space next
to this choice. If this field is left blank, the firewall will direct DNS lookups to hosts as
II-114
Chapter 7, Split Domain Name System
Split Domain Name System Window
specified in the db.cache file (see “DNS Database Files (db.*)” on page II-132),
which identifies well-known DNS servers on the Internet. Note that this is not a typical firewall configuration.
Disable Domain Name System
Disables Split DNS and removes any DNS-specific packet-filtering rules.
Update packet-filtering rules
Automatically installs packet-filtering rules to prevent external hosts from connecting
to the internal name server, permit external hosts to connect to the external name
server, and permit internal hosts to connect to the internal name server while Enable
domain name system is checked. Automatically removes these rules while Disable domain name system is checked. Checking Enable domain name system
and not checking this field requires manual editing of rules in the Packet-Filtering
Rules window. The default is to automatically update these rules.
CAUTION!
Once you have enabled DNS and automatically installed its
packet-filtering rules, do not edit the comments that immediately
precede and follow these rules, and do not insert a nyt hi ng
between them.
See also:
◆
◆
“Window Components” on page I-10
“Packet-Filtering Rules Window” on page II-22
CyberGuard Firewall Manual
II-115
Split Domain Name System Window
DNS Servers Page
7
Use this page of the Split DNS window to define the interfaces on which the DNS servers
listen and any forwarders for recursive queries and privileged addresses for zone transfers.
Figure II-43. Split Domain Name System Window - Servers Page
This page is divided into two sections, the Public Name Server section and the Private
Name Server section, and contains the following fields and controls:
Restrict Recursive Queries
Restircts recursive queries to the external name server.
When this box is unchecked, any host can query the external name server with recursive queries. When this box is
checked, only the internal name servers can query the
external name server with recursive queries.
Public Name Server
II-116
External Interfaces
Lists the IP addresses of the external interfaces of the firewall. Check each interface on which the external DNS
server will listen.
Forwarder Addresses
IP addresses (separated with a space, new line, or carriage
return) for the name server to contact if it receives a
request for a name outside its authority. This type of
request is also known as a recursive query.
Privileged Addresses
IP addresses (separated with a space, new line, or carriage
return) of hosts and networks that are permitted to make
zone transfers.
Chapter 7, Split Domain Name System
Split Domain Name System Window
Any
Allows zone transfers with any host and network.
None
Does not allow zone transfers.
Private Name Server
Internal Interfaces
Lists the IP addresses of the internal interfaces of the firewall. Check each interface on which the internal DNS
server will listen.
Forwarder Addresses
IP addresses (separated with a space, new line, or carriage
return) for the name server to contact if it receives a
request for a name outside its authority. This read-only
field shows the external interface address(es) from the
Network Interfaces window.
Privileged Addresses
IP addresses (separated with a space, new line, or carriage
return) of hosts and networks that are permitted to make
zone transfers.
Any
Allows zone transfers with any host and network.
None
Does not allow zone transfers.
Note: You cannot use subnetted IP addresses on the internal side of the firewall if you
want to resolve names on the firewall. The /etc/resolv.conf file does not allow a
classless IP address as the address of the name server.
See also “DNS Resolver Configuration File (resolv.conf)” on page II-138.
DNS Zones Page
7
Use this page of the Split DNS window to provide the zone name, role, and information
sources for the internal and external name servers and to provide connectivity to the Internet for external name servers.
CAUTION!
Do not enter in-addr.arpa domains. The CyberGuard Firewall
automatically constructs these domains from the host data.
CyberGuard Firewall Manual
II-117
Split Domain Name System Window
Figure II-44. Split Domain Name System Window - Zones Page (Expanded)
This page contains the following fields:
Name Server Has the following settings:
(Internal) private - Displays zones managed by the internal name
server.
(External) public - Displays zones managed by the external name
server.
Zone Names Opens a window to allow you to review the network addresses, sub-network masks, and reverse (“in-addr.arpa” domain) zones for the firewall
interface you are configuring. If you have entered any classless sub-network masks (something other than 8, 16, or 24), you can use this window
to review and correct the constructed hexadecimal sub-network mask values. You can correct any network address and sub-network mask errors
on the Hosts page. See “Classless IP Addresses for Split DNS” on page
II-121 for more information.
Zone Name
II-118
For the internal name server, the zone name known to the internal server.
For the external name server, the first zone in the list is the registered
domain name from the Network Interfaces window; other zones could
include a sub-domain such as mail.company.com.
Chapter 7, Split Domain Name System
Split Domain Name System Window
Type
Has the following settings:
Primary - (Default) Name server reads information about the zone
directly from internal database files.
Secondary - Name server gets information about the zone over the network from a primary name server specified in one of the Remote
Name Server IP Address fields.
Delegated Only - Sub-domain managed by a primary remote name
server. For example, software.mycompany.com is a sub-domain of
mycompany.com. If the registered domain name of the system is Delegated Only, forwarders are required for the external name server. If
other domains are Delegated Only forwarders are optional, but if they
are not specified, the domain must be a child of a primary domain.
Mail Servers Mail servers for the primary zones. A mail server may be specified as a
simple host name, a fully qualified name, or a domain prefix separated
from a simple or fully qualified name with a colon (:). If a specified mail
domain name (to the left of a colon) is a simple name, the current domain
name is appended to it.
E-mail Address of Contact Person
E-mail address of the person to contact regarding DNS on each zone. The
default is postmaster@node_name.domain.
Remote Name Servers Host Name
(Optional for Secondary; required for Delegated) Host name for the primary name server for the sub-domain. Portable names should begin with
an alphanumeric character must contain only alphanumeric characters
and hyphens. The default domain name is the appended value of the
Domain Name field. If you type only the host name without a dot ( . ),
the firewall will automatically append the domain. Do not use underscores in this field.
Remote Name Servers IP Address
(Required for Secondary and Delegated) IP address for the primary name
server for the sub-domain.
Notes:
◆
◆
To specify more than two Remote Name Servers, see “DNS Database Files
(db.*)” on page II-132.
The GUI will always place the registered domain name from the Network
Interfaces window first in the external domains list. If the GUI cannot find the
registered domain, it will ask if the first domain in the list should be updated to
match the registered domain name. If you allow this, the entire system will be
updated with this information.
See also “Network Interfaces Window” on page I-68.
CyberGuard Firewall Manual
II-119
Split Domain Name System Window
DNS Hosts Page
7
Use this page of the Split DNS window to view and update the list of hosts for each primary domain.
Figure II-45. Split Domain Name System Window - Hosts Page (Expanded)
This page contains the following fields and controls:
Zone
(Read-only) Internal or external zones defined on the Zones page. Hosts
are grouped within a selected zone.
Type
Has the following settings:
Host - Treats this line as a host
Comment - Treats this line as a comment
Host Name
Primary name of the host. The first host with an IP address that matches
the IP address of one of the firewall interfaces selected on the Servers
page will be advertised as the name and address of the authoritative name
server. Portable names should begin with an alphanumeric character must
contain only alphanumeric characters and hyphens.
IP Address [ /Mask ]
Address used by the Internet Protocol to communicate with the host. The
optional sub-network mask is specified with a slash (/) followed by either
a bit count (e.g., /24) or a dotted-quad mask (e.g., 255.255.255.0). The
firewall will translate and display all dotted-quad masks in bit-count format. The sub-network mask portion of this field is required if the IP
address class is not correct; otherwise, specifying a mask is not required.
If you enter a classless sub-network mask (something other than 8, 16, or
24) and click on Save, a window opens to allow you to review the net-
II-120
Chapter 7, Split Domain Name System
Split Domain Name System Window
work addresses, sub-network masks, and reverse (“in-addr.arpa” domain)
zones for the firewall interface you are configuring. In this pop-up window, you must supply the names to use with each of your classless subnetwork addresses. Correct any zone name errors on the Zones page. See
“Classless IP Addresses for Split DNS” on page II-121 for more information.
Aliases
Secondary names for the host. (An alias can separate a functional name
from a host name. For example, you might use mail as an alias for a host
that processes mail. If you change the host that processes mail, you simply move the alias to the other host.) Portable aliases should begin with
an alphanumeric character must contain only alphanumeric characters
and hyphens. The aliases are separated by spaces. This field may be
blank.
Comment
Information about the host, such as its hardware address, or a commented-out host description. This field may be blank.
Notes:
◆
◆
The Hosts page of the Split DNS window defines host names and makes them
available to other hosts on the network. The Host Names window defines host
names for use only by the firewall.
Primary external name servers should specify the name and address of an ISP.
See also:
◆
◆
◆
“Window Components” on page I-10
“Network Interfaces Window” on page I-68
“Host Names Window” on page II-1
Classless IP Addresses for Split DNS
7
A sub-network mask must be associated with each IP address so that a reverse
(“in-addr.arpa” domain) zone can be constructed. The CyberGuard Firewall permits the
use of sub-network mask suffixes on IP addresses entered on the Hosts page of the Split
Domain Name System page.
Classful Sub-Network Masks
The user may specify 172.16.48.5/24 to indicate host address 5 on network
172.16.48. Without the explicit sub-network mask (/24), the Domain Name System
would interpret 172.16.48.5 as host address 48.5 on class B network 172.16.
The IP address 172.16.48.5/24 is called a classful network IP address. A classful
network IP address is one in which the sub-network stops on an eight-bit boundary; its
sub-network mask is one of 8, 16, or 24 (expressed in bit-count format) or 255.0.0.0,
255.255.0.0, or 255.255.255.0 (expressed in dotted-quad format).
The reverse in-addr.arpa domain for the IP address 172.16.48.5/24 is represented as
48.16.172.in-addr.arpa. The sub-network mask can be assumed by the number of
CyberGuard Firewall Manual
II-121
Split Domain Name System Window
octets in the domain name. For example, a reverse in-addr.arpa domain represented as
48.16.172.in-addr.arpa. implies a sub-network mask 255.255.255.0; a reverse inaddr.arpa domain represented as 16.172.in-addr.arpa. implies a sub-network mask
255.255.0.0 (it need not be the default for the address class).
Classless Sub-Network Masks
You can also use a sub-network mask with a non-octet boundary, for example
172.16.48.192/28. This is called a classless network IP address. A classless net-
work IP address is one in which the network mask does not stop on an eight-bit boundary;
its sub-network mask is not one of 8, 16, or 24 (expressed in bit-count format) or
255.0.0.0, 255.255.0.0, or 255.255.255.0 (expressed in dotted-quad format). The typical
dotted-quad form of a classless IP address includes one octet that represents part of the
network mask and all or part of the host bits.
If you enter a classless sub-network mask (something other than 8, 16, or 24) on the Hosts
page of the Split DNS window and click on Save, a window opens displaying the network
addresses, sub-network masks, and reverse (“in-addr.arpa” domain) zones for the firewall
you are configuring. More importantly, this window displays the current zone name for
your classless IP address. If you have not changed your zone name, the default zone constructed for your classless IP address is displayed.
The leading component of the default zone, constructed by the firewall, represents the
decimal value of the part of the right-most octet that has some network bits set, followed
by the hexadecimal mask for that octet. For example, consider host address
172.16.195.1/20. The network portion comprises the first 20 bits of the address.
Ex press ed as a do tt ed q ua d v al u e, u sin g he xa dec im a l, t h e first 2 0 bi ts is
0xff.0xff.0xf0.0x00. That means that the network address portion ends in the middle
of the third octet (195). If we ignore the low four bits of 195 (hexadecimal 0xc3), the portion that is part of the host address, we are left with 192 (hexadecimal 0xc0). That means
that the network address is 172.16.192.0/20, and the host address on that network is
3.1.
Non-octet sub-network boundaries are usually used only for delegated sub-domains.
When the firewall constructs a zone name, if the last meaningful octet of the network
address is split between network and host portions (i.e., classless) then that octet's value
and the mask are encoded by combining the decimal value with the hexadecimal mask. In
this case, the third octet is encoded as 192xf0 and the default reverse in-addr.arpa domain
is 192xf0.16.172.in-addr.arpa.
However, there is no standard for creating zone names for classless addresses. The zone
name you use with DNS on the firewall must agree with whatever name is used by your
parent domain in its db.domain file. Consequently, you may specify a translation
between the default name of a classless network and the name used by your parent
domain. Only the first component is variable, and only if the network is classless. The
only requirement is that the value may not be completely numeric. You must contact the
network administrator of your upstream DNS server for this information.
If the CyberGuard Firewall detects an unrecognized zone name representing a classless
network IP address, a window opens, requesting the octet that is split by the end of the network mask and the sub-network prefix count (total number of bits in the network mask).
Be sure the resulting network address that you create does not have any host bits set. For
example, if zone name kirk.2.198 has been used for the 192.2.96.0/20 network, you
need to enter 96 for the missing network address octet and 20 for the sub-network mask
II-122
Chapter 7, Split Domain Name System
Split Domain Name System Window
prefix bit count. (This information is saved in the zonemap file. See “Classless IP
Addresses Database File (zonemap)” on page II-139).
The network address octet value must be between 0 and 254, and the sub-network prefix
count must be between 2 and 31.
Note: You cannot use subnetted IP addresses on the internal side of the firewall if you
want to resolve names on the firewall. The /etc/resolv.conf file does not allow a
classless IP address as the address of the name server.
See also:
◆
◆
◆
“Network Interfaces” on page I-65
“Static Routes Page” on page II-83
“DNS Resolver Configuration File (resolv.conf)” on page II-138
Packet-Filtering Rules for Split DNS
7
The GUI automatically adds packet-filtering rules for Split DNS to the Packet-Filtering
Rules window.
When Split DNS is enabled, the following rules prohibit external hosts from communicating with the firewall’s internal name server, allow external hosts to talk to the external
name server, and allow internal hosts to talk to the internal name server:
# Split DNS rules (added automatically by the CyberGuard GUI)
permit domain/tcp ALL_EXTERNAL EXTERNAL_INTERFACES
permit domain/tcp EXTERNAL_INTERFACES ALL_EXTERNAL
permit domain/udp ALL_EXTERNAL EXTERNAL_INTERFACES ENABLE_REPLY
permit domain/udp EXTERNAL_INTERFACES ALL_EXTERNAL ENABLE_REPLY
permit domain/tcp ALL_INTERNAL INTERNAL_INTERFACES
permit domain/tcp INTERNAL_INTERFACES ALL_INTERNAL
permit domain/udp ALL_INTERNAL INTERNAL_INTERFACES ENABLE_REPLY
permit domain/udp INTERNAL_INTERFACES ALL_INTERNAL ENABLE_REPLY
deny
domain/tcp EVERYONE EVERYONE
deny
domain/udp EVERYONE EVERYONE
# End of Split DNS rules
When the firewall is configured as a client of another DNS, the following rules are added:
# Split DNS rules (added automatically by the CyberGuard GUI)
permit domain/tcp nameserver
FIREWALL
permit domain/tcp FIREWALL
nameserver
permit domain/udp nameserver
FIREWALL
ENABLE_REPLY
permit domain/udp FIREWALL
nameserver
ENABLE_REPLY
# End of Split DNS rules
See also “Packet-Filtering Rules Window” on page II-22.
CyberGuard Firewall Manual
II-123
Split Domain Name System Window
How to Configure Split DNS on the Firewall
7
Use the Split DNS window to protect internal names and IP addresses by configuring two
Domain Name System servers, one for the external interfaces and one for the internal
interfaces.
To enable Split DNS on the firewall:
1. Select Configuration from the Control Panel.
2. Select Split Domain Name System. The Split Domain Name System window
appears displaying the Setup page.
3. Select Enable split Domain Name System.
4. Select Update packet-filtering rules.
To configure the public and private name servers:
1. Click on the Servers tab. The Servers page appears.
2. Configure the public name server:
3. Check each external firewall interface on which the external DNS server will listen.
4. Type IP addresses for the name server to contact if it receives a request for a name outside its authority in the Forwarder Addresses field.
5. Configure the zone transfer policy using Privileged Addresses, Any, or None.
6. Configure the private name server:
7. Check each internal firewall interface on which the internal DNS server will listen.
8. Configure the zone transfer policy using Privileged Addresses, Any, or None.
To configure internal and external zones:
1. Click on the Zones tab. The Zones page appears.
2. Click on Show Editor. The expanded Zones page appears.
3. Select (Internal) private or (External) public in the Name Server field to display information for the proper name server.
4. (Optional) Select the zone that you want the new zone to follow. (Skip this step if you
want to add a new zone at the top of the list.)
5. Click on Insert. An incomplete new line appears in the list. The Type field is set to
Primary.
6. Type a zone name in the Zone Name field.
7. Select Primary, Secondary, or Delegated Only in the Type field.
8. (Optional) Type an e-mail address in the E-mail Address of Contact Person field
9. (Optional) Type the Mail Server name in the Mail Servers field.
II-124
Chapter 7, Split Domain Name System
Split Domain Name System Window
10. (For Secondary and Delegated Only) Type the host name of a name server in the
Remote Name Server Host Name field. Type the IP address in the Remote
Name Server IP Address field. One or two name servers are allowed. Enter at least
one name if Delegated Only. Enter at least one IP address for either Delegated Only or
secondary.
11. Repeat these steps for all the other zones.
To configure hosts:
1. Click on the Hosts tab. The Hosts page appears.
2. Select the zone that these hosts should belong to.
3. Click on Show Editor. The expanded Hosts page appears.
4. (Optional) Select the host that you want the new host to follow. (Skip this step if you
want to add a new host at the top of the list.)
5. Click on Insert. An incomplete new line appears in the list. The Type field is set to
Host.
6. Select Host in the Type field.
7. Type a host name in the Host Name field.
8. Type the IP address and sub-network mask in the IP Address [/Mask] field.
9. (Optional) Type a space-separated list of aliases in the Aliases field.
10. (Optional) Type a comment in the Comment field.
11. Repeat these steps for other hosts.
To complete DNS configuration:
1. Click on Save. Your changes take effect at the next system reboot.
2. (Optional) Click on Use. Your changes take effect immediately.
3. Ensure that appropriate DNS packet-filtering rules exist in the Packet-Filtering Rules
window.
See also “Packet-Filtering Rules Window” on page II-22.
CyberGuard Firewall Manual
II-125
Split DNS - Underlying Constructs
Split DNS - Underlying Constructs
7
Advanced Users Only! The GUI automates the editing of files and invocation of commands described in this section. If you choose to manually edit any file, you must first
close every window displayed from the Configuration menu and complete all edits of
the file before continuing GUI configuration activities.
The examples in this section use a fictitious domain called storm.com. The firewall is
typhoon.storm.com. The following figure shows the domain name space for
storm.com. The shaded portion shows the domain for which the name servers are
responsible. Figure II-47 shows the layout of storm.com.
.
com
edu
net
storm
brain
cyclone
hurricane
sand
thunder
typhoon
Figure II-46. Name Tree of storm.com Domain
II-126
Chapter 7, Split Domain Name System
Split DNS - Underlying Constructs
Basic setup for storm.com. network
hurricane
192.168.25.172
brain
192.168.25.175
192.168.25.170
sand
192.168.25.173
typhoon
DNS (firewall)
192.168.45.170
DNS
Internet
thunder
192.168.25.174
cyclone
192.168.25.171
Figure II-47. Two Name Servers Running on the Firewall
To configure Split DNS on the firewall:
1. Determine the IP addresses of the external and internal interfaces.
netstat -in
2. Define DNS in the /etc/inet/services file:
domain 53/tcp
domain 53/udp
CyberGuard Firewall Manual
II-127
Split DNS - Underlying Constructs
3. Define packet-filtering rules in the /etc/security/firewall/ng_inet/netguard.conf
file, similar to the following example. Deny external hosts the ability to talk to the firewall’s internal name server. Allow external hosts to talk to the external name server.
Allow internal hosts to talk to the internal name server.
#action service/proto from
to
options
#allow traffic outside to external interface name server
permit domain/tcp all_external
=192.168.45.170
permit domain/tcp =192.168.45.170 all_external
permit domain/udp all_external
=192.168.45.170 enable_reply
permit domain/udp =192.168.45.170 all_external
enable_reply
#
#allow traffic inside to internal interface name server
permit domain/tcp all_internal
=192.168.25.170
permit domain/tcp =192.168.25.170 all_internal
permit domain/udp all_internal
=192.168.25.170 enable_reply
permit domain/udp =192.168.25.170 all_internal
enable_reply
#
# Deny all other traffic
deny
domain/tcp EVERYONE
EVERYONE
deny
domain/udp EVERYONE
EVERYONE
4. Configure the DNS-specific files associated with the external interface:
◆
◆
External boot file:
/etc/security/firewall/DNS/EXTERNAL/public/bootfile
External database files:
/etc/security/firewall/DNS/EXTERNAL/public/db.*
5. Configure the DNS-specific files associated with the internal interface:
◆
◆
Internal boot file:
/etc/security/firewall/DNS/INTERNAL/private/bootfile
Internal database files:
/etc/security/firewall/DNS/INTERNAL/private/db.*
6. Configure resolvers in the /etc/resolv.conf to ensure that all internal hosts query the
correct name server.
7. Modify the /etc/netconfig file to specify when DNS is used for name-to-address
lookups.
8. Enable DNS in the /etc/security/firewall/startup.conf file by adding a valid
domain name after the DOMAIN= keyword:
DOMAIN=valid_domain_name
Note: Only a privileged user can configure split DNS on the firewall.
See also:
◆
◆
◆
◆
◆
◆
II-128
“Network Services File (services)” on page II-40
“Packet-Filtering Rules Configuration File (netguard.conf)” on page II-43
“DNS Boot File (bootfile)” on page II-129
“DNS Database Files (db.*)” on page II-132
“DNS Resolver Configuration File (resolv.conf)” on page II-138
“Network Configuration Database File (netconfig)” on page II-138
Chapter 7, Split Domain Name System
Split DNS - Underlying Constructs
DNS Boot File (bootfile)
7
Use the boot file to define where the name server is to get its initial data.
Format guidelines:
◆
◆
◆
◆
Lines can be blank, comments, or statements
Comments begin with a semi-colon (;) and continue until the end of the line
Each statement begins on a new line and cannot continue on subsequent lines
Domain names must not contain a trailing dot (.)
Format:
keyword value
Statements:
directory path_name
Directory where the files listed in the boot file reside.
cache file
Contains the initial records for the cache and tells where the root servers are. More
than one cache file can be specified.
nocache
Indicates that the name server should be non-caching. This restricts the name server
from caching the address of other name servers to query. Thus, the name server will
not make queries directly to the outside but will query the forwarders instead.
interface IP_addresses
Specify which interface the DNS server will listen to. To listen on multiple interfaces,
use this statement multiple times.
primary domain file
Indicates that this is the primary name server for domain. file contains the records
for the domain. One or more primary statements can be specified.
secondary domain IP_addresses file
Indicates that this is the secondary name server for domain. A secondary name
server is a name server that must occasionally poll a (usually primary) name server to
get up-to-date information about its domain. IP_addresses is one or more name servers to contact for more current records of domain. file contains the initial records for
the domain.
forwarders IP_addresses
Provides a list of one or more IP_addresses that the name server should contact
when a query is received for a name outside its authority.
slave
Forces the name server to make queries only to forwarders. This option is normally
used on machines that will run a server, cannot be given Internet access, and have
access to a host with Internet access.
CyberGuard Firewall Manual
II-129
Split DNS - Underlying Constructs
xfrnets IP_addresses
Provides a list of one or more IP_addresses from which zone transfer requests are
accepted.
recursives internal_address
This keyword is optional and appears only in the external name server boot file. This
keyword restricts recursive queries to the external name server. When this keyword is
present, only the internal name servers can query the external name server with recursive queries. One recursives internal_address statement must be present for each
internal name server. When this keyword is not present, any host can query the external name server with recursive queries.
Note: If the firewall is enabled as a DNS client, the forwarders directive is omitted
from the boot file. Instead, the cache directive is used (instead of nocache)
when in client mode and the forwarders list is empty.
External Name Server Boot File Example
The following example shows the boot file for the external name server for the
storm.com. domain.
; /etc/security/firewall/DNS/EXTERNAL/public/bootfile
; EXTERNAL Name Server Boot File
;
directory
/etc/security/firewall/DNS/EXTERNAL/public
cache
.
db.cache
primary
storm.com
db.storm
primary
45.168.192.in-addr.arpa
db.192.168.45
primary
0.0.127.in-addr.arpa
db.127.0.0
interface
192.168.45.170
Figure II-48. Boot File Example for External Name Server
The directory line shows that db.storm , db.192.168.45 , db.127.0.0 , and
d b . c a c h e , w h i c h a p p e a r i n t h e d i r e c t i v e s t h a t f o l l o w, a r e u n d e r t h e
/etc/security/firewall/DNS/EXTERNAL/public directory.
The first primary line shows that the external name server is a primary name server for
the domain storm.com. The file db.storm contains resource records that are the database records for the storm.com. domain.
The next primary line shows that the external name server is a primary name server for
the domain 45.168.192.in-addr.arpa. The 45.168.192.in-addr.arpa. domain
represents the network 192.168.45. The in-addr.arpa. domain is used to resolve IP
addresses to names. Since the external interface’s address belongs to the 192.168.45 network, it is a name server for the 45.168.192.in-addr.arpa. domain. Your Internet
Service Provider may be responsible for the IP address of the external interface and therefore, responsible for this domain. If this is the case, remove this line and ignore any references to the 45.168.192.in-addr.arpa. domain.
II-130
Chapter 7, Split Domain Name System
Split DNS - Underlying Constructs
The third primary line shows the 0.0.127.in-addr.arpa. domain information, which
may not be necessary but is here for completeness. Most UNIX machines have a loopback
interface called localhost with an IP address of 127.0.0.1. By having a resource
record in storm.com. for localhost and adding the 0.0.127.in-addr.arpa.
domain, queries for localhost will be answered by the external name server.
The cache line is responsible for the root domain (.), which contains records of all root
name servers.
Internal Name Server Boot File Example
The internal name server must be dependent on the external name server. Indicate this in
the boot file, as shown in the following example of the boot file for the internal name
server for the storm.com. domain.
; /etc/security/firewall/DNS/INTERNAL/private/bootfile
; INTERNAL Name Server Boot File
;
directory
/etc/security/firewall/DNS/INTERNAL/private
cache
.
interface
192.168.25.170
primary
storm.com
db.storm
primary
25.168.192.in-addr.arpa
db.192.168.25
primary
0.0.127.in-addr.arpa
db.127.0.0
forwarders
192.168.45.170
db.cache
192.168.45.170
192.168.45.170
slave
Figure II-49. Boot File Example for Internal Name Server
This file is similar to the external name server’s boot file. The name server must still be
responsible for the storm.com. and the 0.0.127.in-addr.arpa. domains. The
25.168.192.in-addr.arpa.
domain
is
different
from
the
45.168.192.in-addr.arpa. domain because the network numbers for the interfaces
are different.
The forwarders line tells the name server to forward outside queries first to the name
servers running on the 192.168.45.170 domain before attempting to resolve the query
itself. The slave line tells the name server to rely on its forwarders list and not attempt to
resolve the query itself. 192.168.45.170 is listed three times so the internal name server
will retransmit queries three times before giving up. The internal name server is configured to handle forwards in this way so it can resolve outside names without having to talk
to name servers on the Internet. If traffic were allowed to the internal name server, it
would reveal private information about the network.
CyberGuard Firewall Manual
II-131
Split DNS - Underlying Constructs
DNS Database Files (db.*)
7
Database files contain resource records for each domain listed on a primary line in the
boot file of a name server. The cache file contains resource records for all known root
servers.
Format guidelines:
◆
◆
◆
Lines can be blank, comments, or statements
Comments begin with a semi-colon (;) and continue until the end of the line
Each statement begins on a new line, and only the SOA record can span multiple lines
Format:
domain [ttl] class record_type resource_record_data
Fields:
domain
Standard domain name, . for root server, or @ for the current origin.
ttl
(Optional) Resource record’s time to live.
class
Object address type. Use IN (Internet).
record_type resource_record_data
This field consists of the record type and the associated information:
A address - Host address.
CNAME domain - Canonical name for an alias.
HINFO cpu_type OS_type - Host information.
MB domain - Mailbox domain name.
MG domain - Mail group member.
MINFO request_domain error_domain - Mailbox or mail list information.
MR domain - Mail rename domain name.
MX domain - Mail exchange. Indicates the host that can forward e-mail.
NS domain - Authoritative name server.
NULL - Null resource record. No format or data.
PTR domain - Domain name pointer. Maps IP addresses to names.
SOA SOA_data - Start of Authority record. Marks the start of a zone of
authority. Each master zone file should begin with an SOA record for the
zone. Indicates which name server has authoritative data for the domain and
who is the administrative contact person. The SOA record is one of the few
record types that is allowed to span more than one line; use parenthesis, as in
the examples that follow. SOA records include the following:
domain_orig_host - Domain of originating host.
domain_address_of_maintainer - Domain address of maintainer.
serial_number - Typically a date and a version. Increasing this number tells
II-132
Chapter 7, Split Domain Name System
Split DNS - Underlying Constructs
secondary servers to update their data. This number should be changed each
time the master file is changed.
refresh - Indicates in seconds how often a secondary name server should
refresh its database.
retry - Indicates how many seconds after a failed refresh a secondary name
server should wait until trying again.
expire - Indicates the maximum time in seconds the secondary name server
can claim its data authoritative. If it cannot refresh its data in this amount of
time, the name server must expire.
time_to_live - Indicates how many seconds the data received from this name
server can be cached by another name server.
External Name Server Database File Examples
The information for the storm.com. domain should include the firewall and the mail
relay (also can be the firewall). The mail relay is a host that can forward e-mail for users
on a system. Figure II-50 shows the resource records for the storm.com. domain.
;/etc/security/firewall/DNS/EXTERNAL/public/db.storm
;
; Information available to outside for names matching
; pattern *.storm.com or the storm.com zone.
;
storm.com. IN SOA typhoon.storm.com. sysadm.storm.com. (
1995101601
; serial number
10800
; refresh
3600
; retry
86400
; expire
86400
; time to live
)
;
storm.com.
IN NS
typhoon.storm.com.
IN A
192.168.45.170
;
typhoon.storm.com.
;
; Mail support
*.mail.storm.com.
IN MX
0
typhoon.storm.com.
*.storm.com.
IN MX
0
typhoon.storm.com.
Figure II-50. External Database File Example for the storm.com. Domain
The SOA record shows that typhoon.storm.com. has authoritative data for storm.com.
The administrative contact is [email protected]. Note the parenthesis, which allows
the SOA record to span more than one line. The serial number represents October 16th,
1995, version 1. The refresh number indicates that a secondary should refresh its database
every 10,800 seconds. The retry number indicates that after a failed refresh, a secondary
name server should 3,600 seconds before trying again. The expire number indicates that
the secondary name server has a maximum of 86,400 seconds to claim that its data is
CyberGuard Firewall Manual
II-133
Split DNS - Underlying Constructs
authoritative. The time-to-live number indicates that the data received from this name
server has 86,400 seconds to be cached by another name server.
The NS record shows that a name server for storm.com. is typhoon. The A records show
that typhoon ’s address is 192.168.45.170 and that localhost ’s address is
127.0.0.1 . The MX records show that names matching *.mail.storm.com. or
*.storm.com. should be sent to typhoon. All mail in this setup will be routed to the firewall; the SMTP server must be able to correctly route mail to the correct host.
Figure II-51 shows the resource records for the 45.168.192.in-addr.arpa.domain.
;/etc/security/firewall/DNS/EXTERNAL/public/db.192.168.45
;
45.168.192.in-addr.arpa. IN SOA
typhoon.storm.com.
1995101601
; serial number
10800
; refresh
3600
; retry
86400
; expire
86400
; time to live
sysadm.storm.com. (
)
;
45.168.192.in-addr.arpa.
IN NS
typhoon.storm.com.
IN PTR
typhoon.storm.com.
;
170.45.168.192.in-addr.arpa.
Figure II-51. Database File Example for 45.168.192.in-addr.arpa. Domain
The SOA record shows that typhoon has authoritative data. The NS record shows that
typhoon is the name server for the 45.168.192.in-addr.arpa. domain. The PTR
record shows that address 192.168.45.170 belongs to typhoon.
Figure II-52 shows the resource records for the 0.0.127.in-addr.arpa. domain in
/etc/security/firewall/DNS/EXTERNAL/public/db.127.0.0 file.
;/etc/security/firewall/DNS/EXTERNAL/public/db.127.0.0
;
0.0.127.in-addr.arpa.
IN SOA
typhoon.storm.com.
1995101601
; serial number
10800
; refresh
3600
; retry
86400
; expire
86400
; time to live
sysadm.storm.com. (
)
0.0.127.in-addr.arpa.
IN NS
1.0.0.127.in-addr.arpa. IN PTR
typhoon.storm.com
localhost.
Figure II-52. Database File Example for 0.0.127.in-addr.arpa. Domain
II-134
Chapter 7, Split Domain Name System
Split DNS - Underlying Constructs
As you can see, localhost is the only machine in this domain.
Figure II-53 shows the resource record for the cache file.
; /etc/security/firewall/DNS/EXTERNAL/public/db.cache
;
.
3600000
NS
A.ROOT-SERVERS.NET.
A.ROOT-SERVERS.NET.
3600000
IN
A
198.41.0.4
.
3600000
NS
B.ROOT-SERVERS.NET.
B.ROOT-SERVERS.NET.
3600000
A
128.9.0.107
.
3600000
NS
C.ROOT-SERVERS.NET.
C.ROOT-SERVERS.NET.
3600000
A
192.33.4.12
.
3600000
NS
D.ROOT-SERVERS.NET.
D.ROOT-SERVERS.NET.
3600000
A
128.8.10.90
.
3600000
NS
E.ROOT-SERVERS.NET.
E.ROOT-SERVERS.NET.
3600000
A
192.203.230.10
.
3600000
NS
F.ROOT-SERVERS.NET.
F.ROOT-SERVERS.NET.
3600000
A
192.5.5.241
.
3600000
NS
G.ROOT-SERVERS.NET.
G.ROOT-SERVERS.NET.
3600000
A
192.112.36.4
.
3600000
NS
H.ROOT-SERVERS.NET.
H.ROOT-SERVERS.NET.
3600000
A
128.63.2.53
.
3600000
NS
I.ROOT-SERVERS.NET.
I.ROOT-SERVERS.NET.
3600000
A
192.36.148.17
Figure II-53. Cache File Example for External Name Server
The cache file contains the list of all known root servers. The number 3600000 is the
time-to-live in seconds for the data. In this example, the root servers will not change for
1,000 hours.
Internal Name Server Database File Examples
For your internal domain, you must have address records and pointer records for each
inside host. If you want to use DNS to route mail, you also will need MX records. The files
db.cache and db.127.0.0 do not change from public to private.
CyberGuard Firewall Manual
II-135
Split DNS - Underlying Constructs
The following example shows the database file for the storm.com. domain.
; /etc/security/firewall/DNS/INTERNAL/private/db.storm
storm.com. IN SOA typhoon.storm.com. sysadm.storm.com. (
1995101601
; serial number
10800
; refresh
3600
; retry
86400
; expire
86400
; time to live
)
storm.com.
IN NS
typhoon.storm.com.
typhoon.storm.com.
IN A
192.168.25.170
cyclone.storm.com.
IN A
192.168.25.171
hurricane.storm.com.
IN A
192.168.25.172
sand.storm.com.
IN A
192.168.25.173
thunder.storm.com.
IN A
192.168.25.174
brain.storm.com.
IN A
192.168.25.175
Figure II-54. Internal Database File Example for the storm.com. Domain
The address records belong in this file. MX records also would be listed in this file as well
as other record types such as well-known services (WKS) or host information (HINFO).
These additional record types provide ways of telling more information about a domain or
host.
Figure II-55 shows the SOA and pointer records for the in-addr.arpa. domain.
; /etc/security/firewall/DNS/INTERNAL/private/db.192.168.25
;
25.168.192.in-addr.arpa. IN SOA
typhoon.storm.com.
1995101601
; serial number
10800
; refresh
3600
; retry
86400
; expire
86400
; time to live
sysadm.storm.com.
)
;
25.168.192.in-addr.arpa.
IN NS
typhoon.storm.com.
170.25.168.192.in-addr.arpa.
IN PTR
typhoon.storm.com.
171.25.168.192.in-addr.arpa.
IN PTR
cyclone.storm.com.
172.25.168.192.in-addr.arpa.
IN PTR
hurricane.storm.com.
173.25.168.192.in-addr.arpa.
IN PTR
sand.storm.com.
174.25.168.192.in-addr.arpa.
IN PTR
thunder.storm.com.
175.25.168.192.in-addr.arpa.
IN PTR
brain.storm.com.
;
Figure II-55. Database File Example for 25.168.129.in-addr.arpa. Domain
II-136
Chapter 7, Split Domain Name System
(
Split DNS - Underlying Constructs
The db.cache and db.127.0.0 files are the same for the internal name server as for the
external name server.
Figure II-56 shows the internal db.cache.
; /etc/security/firewall/DNS/INTERNAL/private/db.cache
;
.
3600000
NS
A.ROOT-SERVERS.NET.
A.ROOT-SERVERS.NET.
3600000
IN
A
198.41.0.4
.
3600000
NS
B.ROOT-SERVERS.NET.
B.ROOT-SERVERS.NET.
3600000
A
128.9.0.107
.
3600000
NS
C.ROOT-SERVERS.NET.
C.ROOT-SERVERS.NET.
3600000
A
192.33.4.12
.
3600000
NS
D.ROOT-SERVERS.NET.
D.ROOT-SERVERS.NET.
3600000
A
128.8.10.90
.
3600000
NS
E.ROOT-SERVERS.NET.
E.ROOT-SERVERS.NET.
3600000
A
192.203.230.10
.
3600000
NS
F.ROOT-SERVERS.NET.
F.ROOT-SERVERS.NET.
3600000
A
192.5.5.241
.
3600000
NS
G.ROOT-SERVERS.NET.
G.ROOT-SERVERS.NET.
3600000
A
192.112.36.4
.
3600000
NS
H.ROOT-SERVERS.NET.
H.ROOT-SERVERS.NET.
3600000
A
128.63.2.53
.
3600000
NS
I.ROOT-SERVERS.NET.
I.ROOT-SERVERS.NET.
3600000
A
192.36.148.17
Figure II-56. Cache File Example for Internal Name Server
Figure II-57 shows db.127.0.0.
;/etc/security/firewall/DNS/INTERNAL/public/db.127.0.0
;
0.0.127.in-addr.arpa. IN SOA typhoon.storm.com. sysadm.storm.com. (
1995101601
; serial number
10800
; refresh
3600
; retry
86400
; expire
86400
; time to live
)
;
0.0.127.in-addr.arpa.
IN NS
typhoon.storm.com.
;
1.0.0.127.in-addr.arpa. IN PTR
localhost.
Figure II-57. Database File Example for 0.0.127.in-addr.arpa. Domain
CyberGuard Firewall Manual
II-137
Split DNS - Underlying Constructs
Network Configuration Database File (netconfig)
7
Use the /etc/netconfig file to specify when DNS is used for name-to-address lookups by
including /usr/lib/resolv.so as a lookup library in field 7 for all inet family lines. The
following example shows the placement of /usr/lib/resolv.so in the /etc/netconfig
file. For further information about the network configuration database, refer to the
netconfig(4) system manual page.
# /etc/netconfig
tcp
tpi_cots_ord v inet tcp
/dev/tcp /usr/lib/tcpip.so,/usr/lib/resolv.so
udp
tpi_clts
v inet udp
/dev/udp /usr/lib/tcpip.so,/usr/lib/resolv.so
icmp
tpi_raw
- inet icmp /dev/icmp /usr/lib/tcpip.so,/usr/lib/resolv.so
rawip tpi_raw
- inet -
/dev/rawip /usr/lib/tcpip.so,/usr/lib/resolv.so
Figure II-58. DNS in the Network Configuration Database File
DNS Resolver Configuration File (resolv.conf)
7
A resolver is a routine, called by an application, that performs name and address translation. Resolvers eliminate the overhead of constructing a DNS packet to query a name
server. Another reason resolvers are used is because name address translation is not
always done through the DNS; resolution can be done by DNS, Network Information Services (NIS), or the /etc/inet/hosts file.
Configure resolvers so that all internal hosts query the correct name server by creating or
modifying the /etc/resolv.conf file. This file is read by the resolver routines the first
time they are invoked by a process.
Format guidelines:
◆
◆
Each statement is on a separate line
Keywords and values are separated with white space (spaces or tabs)
Format:
keyword value
Statements:
domain name
Default domain to append to names that do not have a dot in them.
nameserver IP_address
IP address of the name server that the resolver should query.
II-138
Chapter 7, Split Domain Name System
Split DNS - Underlying Constructs
The following example shows the /etc/resolv.conf file for the firewall.
domain storm.com.
nameserver 192.168.25.170
Figure II-59. Resolver Configuration File Example
For internal hosts, how you configure resolvers depends on what operating system you are
running. DNS and BIND by Albitz and Liu provides a list for different systems.
Note: You cannot use subnetted IP addresses on the internal side of the firewall if you
want to resolve names on the firewall. The /etc/resolv.conf file does not allow a
classless IP address as the address of the name server.
Classless IP Addresses Database File (zonemap)
7
The /etc/security/firewall/DNS/zonemap file is used to store important zone and
address information if classless addresses are used for split DNS. This file lists all usersupplied zone name information as well as information needed to reconstruct the original
network address and mask. For further information about classless addresses, see “Classless IP Addresses for Split DNS” on page II-121.
Domain Name Server Command (named)
7
You can use the domain name server daemon named to enable a name server without
rebooting the system.
Syntax:
/usr/sbin/firewall/named [-d level] [-p port] [-b bootfile]
Options and arguments:
-d level
Print debugging information. level is a number from 1 to 9 that indicates
the level of messages printed. Higher numbers give more detailed debugging information.
-p port
Use a different port number than the default from /etc/inet/services.
-b bootfile
Specify a boot file other than the default, /etc/inet/named.boot. bootfile can be a full path name or relative path name. If multiple boot files
are specified, only the last is used. Any additional arguments are taken as
the name of a boot file.
CyberGuard Firewall Manual
II-139
Split DNS - Underlying Constructs
Name Server Testing with nslookup
7
Use the nslookup tool to verify that you have set up your name servers correctly.
When used with other commands, nslookup can verify the basic setup of a name server:
◆
◆
◆
◆
◆
◆
◆
The external named can resolve outside names
The external named contains minimal information about its domain
The internal named can resolve outside names
The internal named can resolve names inside the domain
The /etc/resolv.conf file is correct on the firewall
Zone transfers occur
Recursive queries occur
To test your name servers:
1.
2.
3.
4.
Disable packet filtering.
Verify that both name servers are running.
Test basic setup and security features with nslookup.
Re-enable packet filtering.
Note: All tests with nslookup should be done from an inside host.
How to Set Up the Split DNS Testing Environment
7
Note: Automatically generated rules for DNS should permit testing. Otherwise, use the
following procedure on the firewall to open all domain traffic.
You must enable DNS packets through the firewall and make sure the name servers are
running.
To enable DNS packets through the firewall:
1. Edit the /etc/security/firewall/ng_inet/netguard.conf file:
a. (Optional) Comment out all rules pertaining to domain.
b. Add the following rules before the old domain rules. These rules allow
all DNS packets to pass through the firewall.
permit domain/udp EVERYONE EVERYONE ENABLE_REPLY
permit domain/tcp EVERYONE EVERYONE
2. Run the /usr/sbin/firewall/netguard command to update the firewall with the new
rules.
Note: Remember that running netguard changes the packet-filtering rules for subsequent connections made through the firewall. You may want to test your name
servers when network activity is minimal.
II-140
Chapter 7, Split Domain Name System
Split DNS - Underlying Constructs
To verify that both name servers are running:
1. Use the ps command to show all active processes and the grep command to filter
lines with “named” in them. The following example shows this command and its output.
ps -ef | grep named
root 809 1 1 0 11:06:39 ? 0:00 /usr/sbin/firewall/named -b
/etc/security/firewall/DNS/EXTERNAL/public/bootfile
root 812 801 1 2 11:07:12 L0.1/ttyA1 0:00 grep named
root 811 1 1 0 11:07:08 ? 0:00 /usr/sbin/firewall/named -b
/etc/security/firewall/DNS/INTERNAL/private/bootfile
2. Start the name servers if they are not running. The external name server should be
started first, as shown in the following example.
named -b /etc/security/firewall/DNS/EXTERNAL/public/bootfile
named -b /etc/security/firewall/DNS/INTERNAL/private/bootfile
How to Test Name Servers
7
The nslookup utility is normally run non-interactively but also can be run interactively.
To run nslookup non-interactively:
The most common way to use nslookup is to type the nslookup command followed by
a host name. This command returns the host’s IP address. If the /etc/resolv.conf file on
the host is correct, the server’s address should be the address of the internal interface. Use
the nslookup command followed by localhost as shown in the following example:
/usr/sbin/nslookup localhost
Server: typhoon.storm.com
Address: 192.168.25.170
Name: localhost.storm.com
Address: 127.0.0.1
In this example, the IP address of localhost is 127.0.0.1.
To run nslookup interactively:
1. Run nslookup without arguments to get into interactive mode.
/usr/sbin/nslookup
Default Server: typhoon.storm.com.
Address: 192.168.25.170
From the prompt, there are several commands you can issue. To get a complete listing
you can type ?. To exit nslookup, press Ctrl+d on your keyboard.
CyberGuard Firewall Manual
II-141
Split DNS - Underlying Constructs
2. Type server followed by the external interface’s address to have nslookup talk to the
external named.
server 192.168.45.170
Default Server: [typhoon.storm.com.]
Address: 192.168.45.170
3. Type ls followed by your domain. The ls command in nslookup issues a query of
type=T_AXFR (zone transfer).
◆
If zone transfers (privileged addresses) are configured, you will see the
following:
ls storm.com.
[[typhoon.storm.com.]]
Host or domain name
storm
localhost
typhoon
◆
Internet address
server = typhoon.storm.com
127.0.0.1
192.168.45.170
If zone transfers (privileged addresses) are not configured, you will see
the following:
ls storm.com.
[[typhoon.storm.com.]]
Host or domain name
Internet address
*** Error during listing of storm.com.: Query refused
4. Enter a host name that is outside your domain.
◆
If recursive queries (forwarders) are configured, you will see the following:
ftp.uu.net.
Server: [typhoon.storm.com.]
Address: 192.168.45.170
Name:
ftp.uu.net
Address: 192.48.96.9
◆
If recursive queries (forwarders) are not configured, you will see the following:
ftp.uu.net.
Server: [typhoon.storm.com.]
Address: 192.168.45.170
*** [192.168.45.170] can't find ftp.uu.net.: Query
refused
5. Type the firewall name. Recursive queries apply only to names outside the domains for
which the name server is authoritative, so the name server will resolve the firewall
name.
typhoon.storm.com.
Server: [typhoon.storm.com.]
Address: 192.168.45.170
II-142
Chapter 7, Split Domain Name System
Split DNS - Underlying Constructs
Non-authoritative answer:
Name:
typhoon.storm.com
Address: 192.168.45.170
6. Type the name of an internal host. Because you are talking to the external named, it
will have no information about the host.
hurricane.storm.com.
Server: [typhoon.storm.com.]
Address: 192.168.45.170
*** No address information available for hurricane.storm.com.
7. Type server, followed by the internal interface's address:
server 192.168.25.170
Default Server: [typhoon.storm.com.]
Address: 192.168.25.170
8. Type the name of an internal host. Since you are talking to the internal name server it
should have address information for an internal host.
hurricane.storm.com.
Server: [typhoon.storm.com.]
Address: 192.168.25.170
Name:
hurricane.storm.com
Address: 192.168.25.172
9. Type a host name that is outside your domain. This verifies that the internal named
can resolve outside names. The non-authoritative line will be present if a previous
search cached the resource record for ftp.uu.net.
ftp.uu.net.
Server: [typhoon.storm.com.]
Address: 192.168.45.170
Non-authoritative answer:
Name:
ftp.uu.net
Address: 192.48.96.9
After testing is complete, reinstate the correct packet-filtering rules:
1. Edit the /etc/security/firewall/ng_inet/netguard.conf file:
a. Remove the rules you added before testing:
permit domain/udp EVERYONE EVERYONE ENABLE_REPLY
permit domain/tcp EVERYONE EVERYONE
b. (Optional) Un-comment the domain rules that you commented out.
2. Run the /usr/sbin/firewall/netguard command to update the firewall with the new
rules.
CyberGuard Firewall Manual
II-143
Split DNS - Underlying Constructs
DNS Maintenance
7
Common maintenance issues you might encounter as your domain grows include:
◆
◆
◆
◆
Adding a host to an existing network
Removing a host
Adding a host to a new network
Delegating a sub-domain
The examples in this section imply the use of an internal interface (private side). All file
examples are located in the /etc/security/firewall/DNS/INTERNAL/private/ directory.
How to Add a Host to an Existing Network
7
The steps in this section explain how to add a host to an existing network. As an example,
a new host, tropical, with IP address 192.168.25.177 , has been added to the
storm.com. domain. Since tropical.storm.com. is in the storm.com. domain and
the 25.168.192.in-addr.arpa. domain, the files db.storm and db.192.168.25
need to be edited. This information will be known only inside the firewall, so the external
name server’s files will be unchanged.
To add a host to an existing network:
1. Add the new address record to the domain database file, db.storm (Figure II-54):
tropical.storm.com. IN A 192.168.25.177
2. Add the corresponding pointer record to the database file, db.192.168.25
(Figure II-55):
177.25.168.192.in-addr.arpa. IN PTR tropical.storm.com.
3. Increase the SOA records. You can either increment them or adjust the numbers in the
YYYYMMDDNN format. The advantage of this format is that you can tell the last time
you modified the database file. The NN field (version) can be left in or dropped.
4. Reload the name server’s database by sending a hangup signal to named as shown in
the following example:
kill -HUP ‘cat /etc/named.pid.192.168.25.170‘
The k i l l command is used to send signals to processes. The
/etc/named.pid.192.168.25.170 file contains the process ID (PID) of the inter-
nal name server.
II-144
Chapter 7, Split Domain Name System
Split DNS - Underlying Constructs
How to Remove a Host from an Existing Network
7
In this example, the host thunder has been removed from the storm.com. domain. The
resource records for thunder.storm.com. must be removed from the files db.storm
and db.192.168.25.
1. Remove the address record from the domain database file, db.storm (Figure II-54):
thunder.storm.com. IN A 192.168.25.174
2. Remove the corresponding pointer record, db.192.168.25 (Figure II-55):
174.25.168.192.in-addr.arpa. IN PTR thunder.storm.com.
3. Increase the SOA records. You can either increment them or adjust the numbers in the
YYYYMMDDNN format.
4. Send a HUP signal to named to update its information.
How to Add a Host with a New Network Number
7
The steps in this section explain how to add a host with a different network number. As an
example, the host winter has been added. This host will bridge the 192.168.25 network
and t he 192.168.15 network. Its IP addresses are 192.168.25.180 and
192.168.15.100.
1. Add the new domain to the boot file, bootfile (Figure II-49):
primary 15.168.192.in-addr.arpa db.192.168.15
2. Create a new database file to contain resource records for the domain,
db.192.168.15, for the 15.168.192.in-addr.arpa. domain:
15.168.192.in-addr.arpa. IN SOA typhoon.storm.com. sysadm.storm.com.
(
1995101601 ; serial number
10800
; refresh
3600
; retry
86400
; expire
86400
; time to live
)
15.168.192.in-addr.arpa.
IN NS
typhoon.storm.com.
100.15.168.192.in-addr.arpa.
IN PTR winter.storm.com.
3. Add the new address records to the domain database file, db.storm (Figure II-54):
winter.storm.com. IN A 192.168.25.180
winter.storm.com. IN A 192.168.15.100
CyberGuard Firewall Manual
II-145
Split DNS - Underlying Constructs
4. Add the corresponding pointer record, db.192.168.25 (Figure II-55):
180.25.168.192.in-addr.arpa. IN PTR winter.storm.com.
5. Increase the SOA records. You can either increment them or adjust the numbers in the
YYYYMMDDNN format.
6. Reload the name server’s database by sending a HUP signal to named.
How to Delegate a Sub-Domain
7
When you delegate a sub-domain, the domain name server needs to know the sub-domain
name server (by name and address) to which the sub-domain is delegated. You must add
records to the database files to define this information. The example in this section adds
several hosts to the new sub-domain of the new network. The new sub-domain is
winter.storm.com.; the name server for the sub-domain is ice (192.168.15.100);
o t h e r h o s t s i n t h e s u b - d o m a i n i n c l u d e h a i l ( 1 9 2 . 1 6 8 . 1 5 . 1 0 1 ) , s l e et
(192.168.15.102), and snow (192.168.15.103).
1. Add the new sub-domain to the boot file, bootfile (Figure II-49):
primary
168.192.in-addr.arpa
db.192.168
2. Add the new address records and new sub-domain record to the domain database file,
db.storm (Figure II-54):
winter.storm.com.
ice.winter.storm.com.
IN
IN
NS
A
ice.winter.storm.com
192.168.15.100
3. Create a new database file to contain resource records for the new domain:
; /etc/security/firewall/DNS/INTERNAL/private/db.192.168
168.192.in-addr.arpa. IN SOA typhoon.storm.com. sysadm.storm.com. (
1995101601 ; serial number
10800
; refresh
3600
; retry
86400
; expire
86400
; time to live
)
15.168.192.in-addr.arpa IN
NS
ice.winter.storm.com.
4. Make sure a properly configured name server is running on the host to which you are
delegating authority (ice, in the example). You must configure the following files to
do this:
a. Add the name server definition to a boot file (ex. named.boot):
primary
primary
II-146
winter.storm.com
15.168.192.in-addr.arpa
db.winter.storm.com
db.192.168.15
Chapter 7, Split Domain Name System
Troubleshooting DNS
b. Create a database file for the address records:
; db.winter.storm.com
ice.winter.storm.com
hail.winter.storm.com
sleet.winter.storm.com
snow.winter.storm.com
IN
IN
IN
IN
A
A
A
A
192.168.15.100
192.168.15.101
192.168.15.102
192.168.15.103
c. Create a database file for the pointer records:
; db.192.168.15
100.15.168.192.in-addr.arpa.
101.15.168.192.in-addr.arpa.
102.15.168.192.in-addr.arpa.
103.15.168.192.in-addr.arpa.
IN
IN
IN
IN
PTR
PTR
PTR
PTR
ice.winter.storm.com.
hail.winter.storm.com.
sleet.winter.storm.com.
snow.winter.storm.com.
5. Increase the SOA records. You can either increment them or adjust the numbers in the
YYYYMMDDNN format.
6. Reload the name server’s database by sending a HUP signal to named.
7. To allow the internal named to forward requests for the sub-domain to this name
server, you must edit the internal boot file and add the nocache keyword. This maintains the security offered by the internal named not forwarding requests outside the
firewall.
Troubleshooting DNS
7
You can examine files and use commands to detect and correct problems you may have
with DNS.
◆
In the Shell window, look for clues in the following configuration files:
◆
/etc/security/firewall/DNS/INTERNAL/*/bootfile
/etc/security/firewall/DNS/EXTERNAL/*/bootfile
/etc/security/firewall/DNS/INTERNAL/*/db.domain.com
/etc/security/firewall/DNS/EXTERNAL/*/db.domain.com
/etc/security/firewall/DNS/INTERNAL/*/*
/etc/security/firewall/DNS/EXTERNAL/*/*
/etc/rc2.d/S72firewall
/etc/security/firewall/startup.conf
/etc/netconfig
/etc/resolv.conf
/etc/security/firewall/ng_inet/netguard.conf
In the Shell Window, run the following commands:
-
Look for deny rules for DNS.
/usr/sbin/firewall/netguard -An | grep names
CyberGuard Firewall Manual
II-147
Troubleshooting DNS
-
Ensure that DNS can lookup a host.
/usr/sbin/nslookup host
-
ping a host.
/usr/sbin/ping -s host
-
Determine if you have a route to a host.
/usr/bin/netstat -rn
-
Determine if named is running.
ps -ef | grep named
-
Look for fatal errors from named.
tail /var/adm/syslog
-
Enable tracing and logging.
kill -USR1 PID
Repeat up to ten times for ten levels of debugging. Three times is usually
enough. (Note: On a busy system, this can take a lot of disk space.)
-
Write the name server’s internal database to /var/tmp/named.db.
kill -INT PID
-
Turn off debug mode.
kill -USR2 PID
◆
◆
Look for spelling errors and misplaced periods in the DNS configuration
files if these files were hand edited.
In the Packet-Filtering Rules window, look for missing packet-filtering rules.
These may be due to unchecking the Update Packet-Filter Rules field on
the DNS Setup page of the Split Domain Name System (DNS) window.
In the Static Routes page of the Routing window, look for a blank Address
for Default Route field.
Note: If DNS stops working after a reboot (or a Use on the Network Interfaces window), you may have redefined one or more of your interfaces and confused DNS.
See also:
◆
◆
◆
◆
◆
II-148
“Network Ping Test Window” on page I-279
“Shell Window” on page I-310
“Packet-Filtering Command (netguard)” on page II-50
“Static Routes Page” on page II-83
“Split Domain Name System Window” on page II-114
Chapter 7, Split Domain Name System
Chapter 8
Chapter 8.
Users
II
Users
8
Accurate and strong user identification and authentication (I&A) is a critical aspect of
firewall security. To access the CyberGuard Firewall, a user must have a login ID and a
method of authentication. The CyberGuard Firewall supports the following methods of
identification and authentication:
◆
◆
◆
◆
◆
◆
◆
UNIX passwords (for UnixWare firewalls)
NT passwords (for Windows NT® firewalls in target groups)
RADIUSTM
Central Authentication
Remote Authentication
SecurID®
SecureNet® Key
Users can be configured to use one authentication method for inbound connections and
another for outbound connections.
For the highest level of security, accounts on the firewall should be limited to administrative users such as Firewall Security Officers. To achieve this, the CyberGuard Firewall
supports the following types of users:
◆
◆
◆
◆
◆
◆
Proxy
Firewall Security Officer (FSO)
Firewall Security Monitor (FSM)
Unprivileged
Remote Group
Administrative
(For a complete description of user types, see “Default User Information Window” on
page II-168.) FSO, FSM, Unprivileged, and Administrative users have firewall accounts
and are authorized to login to the firewall. These users require security levels. A Proxy
user does not have an account on the firewall and is authorized to use only the authenticating proxy services of the firewall. Security levels are not required for Proxy users.
One special Proxy user is the DEFAULT user. A DEFAULT user record is used to select a
remote authentication server for the identification and authentication of users who are not
in the CyberGuard Firewall’s user database. Only the remote authentication server methods (RADIUS, SecurID, and SecureNet Key) are valid authentication choices; initially,
both internal and external authentication methods are disabled. The DEFAULT user entry
allows the configuration of default FTP operations and default Passport One rules.
II-149
Users
Note: All users are eligible to use configured proxy services. Proxy users can use only
proxy services.
RADIUS
8
Note: RADIUS requires the customer to install a third-party authentication service separate from the firewall.
The Remote Authentication Dial-In User Service (RADIUS) by Lucent Technologies
InterNetworking Systems (formerly Livingston Enterprises, Inc.), is an IP-based protocol
for a Network Access Server (NAS) to communicate with a database server of authorized
users. The RADIUS system consists of two parts: an authentication server and client protocols.
RADIUS authenticates users through a series of communications between the client and
the server. After a user is authenticated, the client provides the user with the appropriate
network services. In its generic form, RADIUS will authenticate users against a UNIX
password file, the Network Information Service (NIS), and a separately maintained
RADIUS database. The RADIUS server also can be adapted to work with third-party
security products or proprietary security systems.
RADIUS is also used for Central Authentication and Remote Authentication. For more
information, see “SecurID” on page II-152 and “Remote Authentication” on page II-151
For complete information about RADIUS, refer to Lucent Technologies InterNetworking
Systems’ documentation.
See also:
◆
◆
“RADIUS Page” on page II-163
“How to Configure RADIUS” on page II-173
Central Authentication
8
Central Authentication allows the firewall to be administered by users who are managed
on a central RADIUS- or LDAP-compliant authentication server. Central Authentication
does not require the manual configuration of the Administrative user on the firewall. After
successful authentication at a properly configured RADIUS or LDAP server, centrally
authenticated administrators are automatically added to the firewall user configuration
based on properties configured on the authentication server (see “How to Configure Central Authentication” on page II-174). This is a tremendous benefit when managing large
numbers of firewalls: the administrator does not need to be preconfigured on every firewall.
Central Authentication is designed to work in conjunction with Remote Web Administration. The Remote Web Administration server running on the firewall uses telnet to
authenticate with the firewall and then execute the CyberGuard GUI application. Authentication is performed by the telnet daemon (in.telnetd) running on the firewall. Because
the Remote Web Administration server is also running on the firewall, no packet filter
rules are required for the telnet connection.
II-150
Chapter 8, Users
Users
The Remote Web Administration server is typically configured to connect to the firewall’s
fully qualified domain name (FQDN). If the FQDN is associated with an external interface
address on the firewall, Central Authentication attempts to match authentication rules
defined for external (inbound) interfaces. If the FQDN is associated with an internal interface address on the firewall, Central Authentication attempts to match authentication rules
defined for internal (outbound) interfaces.
Configuring Central Authentication creates a RADIUS or LDAP authentication configuration, adds the CentralAuth method to the authentication module database, adds an application-service authentication rule for the firewall telnet server, creates packet-filtering rules
to access the RADIUS or LDAP servers, and inserts CentralAuth as a GUI authentication
method. If Central Authentication fails for any reason, the firewall configuration is
restored to its previous state.
Note: Central Authentication is intended for Administrative users, not for Proxy users.
See also:
◆
◆
◆
“Central Authentication Page” on page II-164
“How to Configure Central Authentication” on page II-174
“Remote Web Administration” on page I-163
Remote Authentication
8
The Remote Authentication method provides support for retrieving remote-client policy
attributes defined on a RADIUS or LDAP authentication service (after successful authentication with that service). Currently supported remote-client attributes are Passport One
group names and VPN client configuration.
Passport One Group Names
Passport One group names authorize use of Passport One access profiles. Users are
defined on the remote RADIUS or LDAP service with attributes that map into a group
name defined on the firewall. The group name is returned by the authentication service
after successful authentication of the user. The group name then translates into a Passport
One profile.
Note: To use the RADIUS or LDAP attributes that define remote group membership, the
remote group name is configured on the firewall. To add a Passport One remote
group name to the firewall configuration, add the name as a Remote Group type
on the User Information Page of the Users Window, and then configure the Passport One profile.
For more information on configuring Remote Authentication using a RADIUS server, see
“How to Configure Remote Authentication” on page II-177.
VPN Client Configuration
When a VPN client is tunneling to a CyberGuard Firewall VPN gateway, it is often desirable to make the host appear to be present on an internal network. To provide this capability, the VPN client configuration (the Virtual IP address, WINS server, and DNS server) is
passed to the client by the VPN Policy Manager (vpnguard). When the firewall is configured to use the ISAKMP Configuration Method (See VPN Client Configuration), the VPN
address configuration may be obtained from RADIUS or LDAP authentication services.
CyberGuard Firewall Manual
II-151
Users
The VPN address attributes are returned by the authentication service after successful
authentication of the user via IKE Extended Authentication (XAUTH).
For more information on configuring Remote Authentication using an LDAP server, see
“LDAP Authentication Window” on page I-297.
See also:
◆
◆
◆
“Remote Authentication Page” on page II-164
“Passport One” on page II-185
“Passport One Profiles Page” on page II-192
SecurID
8
Note: SecurID requires the customer to install a third-party authentication service separate from the firewall.
SecurID by RSA Security, Inc., is a token authentication method that requires a user to
supply a unique, single-use password for each access. A valid password is a combination
of a PIN and a code generated by an electronic password generator. All attempts to gain
access into a SecurID protected system are logged to a file, and user access can be
restricted or denied.
SecurID authentication at the firewall is accomplished within the supported system utilities such as login(1) by establishing a dialog with a system running the ACE/Server®
server software. The firewall is a client of the ACE/Server. Activity logging is done both
at the firewall and the SecurID authentication server system.
For complete information about SecurID, refer to RSA Security’s documentation.
See also:
◆
◆
“SecurID Page” on page II-163
“How to Configure SecurID” on page II-180
SecureNet Key
8
Note: SecureNetKey requires the customer to install a third-party authentication service
separate from the firewall.
SecureNet Key by AXENTTM Technologies, Inc. is a challenge-response, personal identification token that consists of the following components:
◆
◆
II-152
SecureNet Key (SNK). This challenge-response, personal identification
token resembles a pocket-sized calculator.
Defender Security Server (DSS). This software device contains a database of valid users and an AXENT agent interface. The agent interface performs the Challenge/Response Security Dialog with users requesting access to
Chapter 8, Users
Users Window
protected access devices. It works with the agent interface in the DSS to
authenticate valid remote access to protected networks.
◆
◆
Protected Access Device. The CyberGuard Firewall acts as an AXENT
agent and works with the agent interface in the DSS to authenticate valid
remote access users.
Defender Management Software (WinDMS). This AXENT software
manages Defender devices, user information, auditing, and reporting. It also
can be used to access the DSS Console application for configuring Defender
Security Servers, their agents, and security dialog prompts.
SecureNet Key authentication at the firewall is accomplished within the supported system
utilities (such as login(1)) by establishing a dialog with a system running DSS Defender
Security Monitor and WinDMS. The firewall is an agent of the DSS. Activity logging is
done both at the firewall and the DSS system.
For complete information about SecureNet Key, refer to AXENT’s documentation.
See also:
◆
◆
“SecureNetKey Page” on page II-164
“How to Configure SecureNet Key” on page II-181
Users Window
8
Use this window to view, add, change, or delete users. The expanded Users window has
five notebook pages: the User Information page, the Authentication page, the FTP Operations page, and the Passport One Rules page.
Note: You can create templates to assign default login IDs for FSO, FSM, and Unprivileged users and permitted FTP operations to new users through the Default User
Information and Default FTP Operations windows, respectively. These windows
provide a quick method of entering information for more than one user.
Figure II-60. Users Window
CyberGuard Firewall Manual
II-153
Users Window
This window displays the following information:
Include system administrative users
Displays Administrative users for viewing and editing.
Type
Displays the user type, which can be one of the following types (for
descriptions, see “Users - User Information Page” on page II-155, User
Type):
Proxy
Firewall Security Officer
Firewall Security Monitor
Unprivileged
Remote Group
Administrative
Internal Authentication
External Authentication
Current authentication method for internal and external interfaces. Users
can be assigned one of the following authentication methods for each
interface (for descriptions, see “Users - Authentication Page” on page
II-158):
Password
NT Password
RADIUS
SecurID
SecureNet Key
Disabled
Login ID
Name used to uniquely identify the user and the user’s data.
Full Name
Name or function of the user.
See also:
◆
◆
◆
◆
◆
◆
◆
◆
◆
◆
◆
◆
II-154
tfadmin(1M) system manual page
“Window Components” on page I-10
“Shell Window” on page I-310
“RADIUS” on page II-150
“SecurID” on page II-152
“SecureNet Key” on page II-152
“Users - User Information Page” on page II-155
“Users - Authentication Page” on page II-158
“How to Add or Change a User” on page II-170
“How to Delete a User” on page II-171
“How to Set Defaults for New Users” on page II-172
“File Transfer Protocol Proxy” on page III-21
Chapter 8, Users
Users Window
Users - User Information Page
8
Use this page of the expanded Users window to add or change user and security information.
Figure II-61. Users Window (Expanded) - User Information Page
This page contains the following fields and push buttons:
User Type
Has the following settings:
Proxy
Authorized to use only the proxy services of the firewall and cannot have an account on the firewall. Proxy is the default user
type. The DEFAULT user is a proxy user.
Firewall Security Officer
Privileged Firewall Security Officer. Encompasses all commands
associated with administrative roles (auditor, site security officer,
network administrator, security operator, and operator) and firewall-related commands installed on the system. This user type is
cleared to the SYS_PRIVATE and NETWORK levels and has
an ID number greater than or equal to 100.
CyberGuard Firewall Manual
II-155
Users Window
Firewall Security Monitor
Read-only, privileged user who can monitor but not change the
CyberGu ard Fi rewall . This u ser t ype is cleared to the
NETWORK level and has an ID number greater than or equal to
100.
Unprivileged
Authorized to login to the firewall, but has no administrative privileges. For best security, limit accounts on the firewall to the FSO
and FSM. This user type is cleared to the NETWORK level and
has an ID number greater than or equal to 100.
Remote Group
Used to select the Passport One profile after successful Remote
Authentication (RemoteAuth). The Remote Group name will
match authorization information returned by a RADIUS or LDAP
authentication server. When the Remote Group user type is chosen, only the User Information and Passport One Rules pages can
be edited.
Administrative
Special system user type, most likely a daemon. Except for the
password, do not change, delete, or add. This user type has an ID
number greater than 0 and less than 100.
Login ID
Name used to uniquely identify the user.
Full Name
User’s full name or job function.
The following fields are active for all users except Proxy users:
ID Number
Unique integer used to associate files with a user’s login ID. This
value is generated automatically if Use system-generated ID
numbers is checked in the Default User Information window.
Home Dir.
Directory that receives user data after logging in. Once edited, this
field no longer shows changes to the login ID. You can set the parent directory of this directory in the Default User Information
window.
Login Shell
Name of the user’s login shell.
Edit Defaults
Sets up a template for new firewall users by opening the Default
User Information window. This button is not selectable for Proxy
users.
General Notes:
◆
◆
◆
II-156
All users are eligible to use configured proxy services. Proxy users can use
only proxy services.
Administrative users cannot change to any other type of user, and non-administrative users cannot become Administrative users.
The DEFAULT user is a Proxy user and cannot change to any other user type.
Chapter 8, Users
Users Window
◆
◆
◆
◆
Delete non-Proxy users only when their files are no longer on backup media.
Instead, set the users’ internal and external authentication methods to Disabled to prevent them from logging in. When you delete a user, you also
delete the user’s home directory and its contents and mail files.
Changing a user from an FSO, FSM, or Unprivileged user to a Proxy user has
the same effect as deleting the user - all files and the home directory are
deleted.
For security purposes, the Multilevel Secure (MLS) protection on the firewall
prevents a user from using Telnet or Rlogin to login to the firewall and become
superuser.
During the installation of Release 4.x, when UnixWare user records are
imported into the firewall user database, all users are designated as Unprivileged users. The firewall administrator must change each user who should be a
Proxy user. Refer to the cg_dbadm(1M) online manual page for complete
information.
FSO Notes:
◆
In the Shell window, FSO users should prefix each administrative command
(and many common commands) with the /sbin/ tfadmin command. This will
provide access to the full functionality of these commands. For example:
/sbin/tfadmin newlvl SYS_PRIVATE
◆
To become the root user, execute the tfadmin command and su to root:
/sbin/tfadmin newlvl SYS_PRIVATE
su root
◆
◆
The FSO’s home directory is cleared to SYS_PUBLIC; as such, it is not
writable. Two subdirectories are created in the FSO’s home directory:
sys_private and network. Each is cleared to the implied level and is writable when the FSO logs in at that level.
An FSO cannot delete his own ID.
For syntax, values, and defaults, see the Glossary. For information about the firewall user
database, see “Users - Underlying Constructs” on page II-183.
CyberGuard Firewall Manual
II-157
Users Window
Users - Authentication Page
8
Use this page of the expanded Users window to define how the selected user will be
authenticated.
Figure II-62. Users Window (Expanded) - Password Authentication Page
This page contains the following fields:
Internal Authentication Method
External Authentication Method
Both fields have the following choices:
Password - UnixWare password.
II-158
Chapter 8, Users
Users Window
NT Password - Windows NT password. This choice is not active when
configuring a regular firewall or the CyberGuard Manager; this choice is
active only when configuring a Target Group. Choosing NT Password
activates the Domain field.
RADIUS - This third-party is a remote access authentication server that
must be installed and configured for this choice to be active.
SecurID - This third-party product is a token authentication method that
must be installed and configured for this choice to be active.
SecureNet Key - This third-party product is a token authentication
method that must be installed and configured for this choice to be active.
Disabled - User cannot login.
Domain
(Optional) Windows NT domain that will perform authentication. A
domain can consist of 15 alphanumeric characters and cannot contain
spaces. If no domain is specified, the firewall to which this information is
propagated will handle authentication using one of the other methods,
such as NT Password, provided by the firewall. If a domain is specified, be sure to enter a valid domain into this field as the CyberGuard
Manager cannot check that the domain exists.
Notes:
◆
◆
◆
◆
◆
When users are disabled, their IDs are not reused. Therefore, no one can accidentally become the owner of someone else’s files. Delete users only when
you are confident that their files are no longer needed.
Because the Central Manager does not know what software is installed on a
target firewall or what type of firewall (UnixWare or Windows NT) comprises
a target group, all Authentication pages are always active when configuring
target groups. It is the administrator’s responsibility to ensure the correct
choices for target groups. For further information about Central Management,
see “Central Management Choices Window” on page I-124.
CyberGuard Corporation discourages using Password as the External
Authentication method for external connections. The more secure methods,
RADIUS, SecurID and SecureNet Key are preferred. You can select Password as the Internal Authentication method if the user will be accessing
the firewall from the internal network.
RADIUS, SecurID, and SecureNet Key may require an extended interactive
login dialog. Some applications cannot provide this interactive login. Applications such as FTP, HTTP, Rlogin, and Telnet can provide an interactive login.
Regardless of the chosen authentication method, the FSO cannot login as
root. The only way to become root is to change levels with the tfadmin and
newlvl commands and then use the su command, as follows:
/sbin/tfadmin newlvl SYS_PRIVATE
su root
CyberGuard Firewall Manual
II-159
Users Window
See also:
◆
◆
◆
◆
“How to Configure RADIUS” on page II-173
“How to Configure SecurID” on page II-180
“How to Configure SecureNet Key” on page II-181
“Central Management Role Window” on page I-115
Password Page
8
Use this page of the Authentication Page to configure the password authentication
method.
CAUTION!
For security purposes, passwords cannot be retrieved. Memorize passwords and destroy all hard copies of passwords.
Password Changes Establishes conditions for changing the password. Has the following settings:
User can change own password
(Default for new users)
Only FSO can change user’s password
Force password change at next login
Not recommended for users who will login to the firewall.
Age password
Limits the life of a password. This check box is enabled only if
U s e r c a n c h a n g e o w n p a s s w o r d or F o rc e p a s s w o r d
change at next login is selected.
Minimum Age (days)
Shortest time (0-441 days) that this password can remain
unchanged. This setting is enabled only if Age password is
checked. It prevents users from immediately changing their passwords back to what they were before. The default is 0.
Maximum Age (days)
Longest time (1-441 days) that this password can remain
unchanged. Once this time has expired, the user must change the
password at the next login. This setting is enabled only if Age
password is checked. The default is 1.
Password
II-160
Allows a newly hand-entered password or displays a generated
password. A suitable value in this field changes the password status displayed to the right of the Generate button to Has valid
password.
Chapter 8, Users
Users Window
Generate
Assigns the user a valid password and displays the password in
the Password field. Do not click on this button if you have
entered your own password in the Password field.
Notes:
◆
Proxy users must use the -p option at the login prompt to change their passwords:
login: -p username
◆
An FSO can change a user’s password to anything he chooses. However, when
a user changes his own password through the command line, or when the password expires and the user is prompted to change it through the login manager,
the password must have the following attributes:
-
Passwords must contain the minimum number of characters as defined in
the Enter minimum password length on the “Security Options - Password Options Page” on page II-230. Only the first eight characters are significant.
-
If the Require passwords to be a combination of mixed case,
numbers, and punctuation field on the “Security Options - Password
Options Page” on page II-230 is checked, passwords must contain a combination of three (3) of four (4) of the following:
- An uppercase letter
- A lowercase letter
- A number
- Some form of punctuation
◆
-
Passwords must differ from the user’s login name and any reverse or circular shift of that login name. (Corresponding uppercase and lowercase letters
are considered equivalent.)
-
A new password must differ from the old one by at least three positions.
The password cannot have been used within the length of time specified by
the Enter length of password history field on the “Security Options Password Options Page” on page II-230.
Because the Central Manager does not know what software is installed on a
target firewall or what types of firewalls (UnixWare or Windows NT) comprise a target group, all Authentication pages are always active when configuring target groups. It is the administrator’s responsibility to ensure the correct
choices for target groups. For further information about Central Management,
see “Central Management Choices Window” on page I-124.
CyberGuard Firewall Manual
II-161
Users Window
NT Password Page
8
Use this page of the Authentication Page to configure the NT Password authentication
method.
Figure II-63. Users Window (Expanded) - NT Password Authentication Page
CAUTION!
For security purposes, passwords cannot be retrieved. Memorize passwords and destroy all hard copies of passwords.
II-162
Chapter 8, Users
Users Window
This page contains the following field:
Password
Allows a newly hand-entered password or displays a generated
password. A valid password can be up to 256 characters. A suitable value in this field changes the password status to the right of
the G e n e r a t e button to H a s v a l i d p a s s w o r d . It is not
necessary to enter a password in this field if an NT domain will be
performing authentication.
Generate
Assigns the user a valid password and displays the password in
the Password field.
Note: Because the Central Manager does not know what software is installed on a target
firewall or what type of firewall (UnixWare or Windows NT) comprises a target
group, all Authentication pages are always active when configuring target groups.
It is the administrator’s responsibility to ensure the correct choices for target
groups. For further information about Central Management, see “Central Management Choices Window” on page I-124.
RADIUS Page
8
If RADIUS is installed, this page displays the following configuration message, “Users
using this method must be configured on its server.” Otherwise, the tab is unselectable.
Note: Because the Central Manager does not know what software is installed on a target
firewall or what type of firewall (UnixWare or Windows NT) comprises a target
group, all Authentication pages are always active when configuring target groups.
It is the administrator’s responsibility to ensure the correct choices for target
groups. For further information about Central Management, see “Central Management Choices Window” on page I-124.
See also:
◆
◆
“RADIUS” on page II-150
“How to Configure RADIUS” on page II-173
SecurID Page
8
If SecurID is installed, this page displays the following configuration message, “Users
using this method must be configured on its server.” Otherwise, the tab is unselectable.
Note: Because the Central Manager does not know what software is installed on a target
firewall or what type of firewall (UnixWare or Windows NT) comprises a target
group, all Authentication pages are always active when configuring target groups.
It is the administrator’s responsibility to ensure the correct choices for target
groups. For further information about Central Management, see “Central Management Choices Window” on page I-124.
See also:
◆
◆
“SecurID” on page II-152
“How to Configure SecurID” on page II-180
CyberGuard Firewall Manual
II-163
Users Window
SecureNetKey Page
8
If SecureNet Key is installed, this page displays the following configuration message,
“Users using this method must be configured on its server.” Otherwise, the tab is unselectable.
Note: Because the Central Manager does not know what software is installed on a target
firewall or what type of firewall (UnixWare or Windows NT) comprises a target
group, all Authentication pages are always active when configuring target groups.
It is the administrator’s responsibility to ensure the correct choices for target
groups. For further information about Central Management, see “Central Management Choices Window” on page I-124.
See also:
◆
◆
“SecureNet Key” on page II-152
“How to Configure SecureNet Key” on page II-181
Central Authentication Page
8
This tab appears only if Central Authentication is configured; this page displays the following configuration message, “Users using this method must be configured on its
server.”
Note: Because the Central Manager does not know what software is installed on a target
firewall or what type of firewall (UnixWare or Windows NT) comprises a target
group, all Authentication pages are always active when configuring target groups.
It is the administrator’s responsibility to ensure the correct choices for target
groups. For further information about Central Management, see “Central Management Choices Window” on page I-124.
See also:
◆
◆
“Central Authentication” on page II-150
“How to Configure Central Authentication” on page II-174
Remote Authentication Page
8
If RADIUS is installed and the rmtauth(1M) utility is run, this page displays the following configuration message, “Users using this method must be configured on its server.”
Otherwise, the tab is unselectable.
Note: Because the Central Manager does not know what software is installed on a target
firewall or what type of firewall (UnixWare or Windows NT) comprises a target
group, all Authentication pages are always active when configuring target groups.
It is the administrator’s responsibility to ensure the correct choices for target
groups. For further information about Central Management, see “Central Management Choices Window” on page I-124.
II-164
Chapter 8, Users
Users Window
See also:
◆
◆
“Remote Authentication” on page II-151
“How to Configure Remote Authentication” on page II-177
Users - FTP Operations Page
8
Use this page of the expanded Users window to permit or deny individual FTP operations
for a user. If you select the DEFAULT user and then edit this page, your selections become
the default operations; therefore, the Use defaults check box and the Edit Defaults
button are unselectable.
Figure II-64. Users Window (Expanded) - FTP Operations Page
Abbreviations that begin with an X are experimental operations that might not be supported by your FTP client program.
This page contains the following fields, push buttons, and controls:
Use defaults
CyberGuard Firewall Manual
Sets the FTP operations to those on the Default FTP Operations
window. If you check this field and later change the default FTP
operations, the new defaults will apply to this user. This check
box is not selectable when editing FTP operations for the
DEFAULT user (when you select the DEFAULT user from the
user list and select the FTP Operations page, you are editing the
defaults).
II-165
Users Window
Edit Defaults
Sets up a template for new users via the Default FTP Operations
window. Editing the default FTP operations also changes the FTP
operations for the DEFAULT user. This button is not active when
editing FTP operations for the DEFAULT user (when you select
the DEFAULT user from the user list and select the FTP Operations page, you are editing the defaults).
Note: This page is not active when configuring target groups. For further information
about Central Management, see “Central Management Choices Window” on page
I-124.
See also:
◆
◆
◆
“Default FTP Operations Window” on page II-169
“How to Add or Change a User” on page II-170
“File Transfer Protocol Proxy” on page III-21
Users - Passport One Rules Page
8
Use this page of the expanded Users window to assign Passport One rules to users.
You can establish Passport One profiles and rules for the DEFAULT user. These rules will
then be used for both the DEFAULT user and for any known user who does not have Passport One rules defined.
Figure II-65. Users Window (Expanded) - Passport One Rules Page
II-166
Chapter 8, Users
Users Window
This page contains the following fields:
Profile
Name of the packet-filtering rules profile for the user.
Source Address
IP address or host name from which the user can make
connections to Passport One. The wild card characters *
and ? are accepted.
Duration (seconds)
Maximum duration for a Passport One session. A value of
0 indicates that no timeout is enforced.
This page is controlled with a unique set of accelerator keys:
Alt+\
Alt+a
Alt+d
Alt+e
Alt+n
Deselects all list items
Selects all list items
Duplicates the selected line after itself
Shows or hides editable fields
Inserts empty line after the first selected line; otherwise empty line is first
See also:
◆
◆
◆
◆
“Accelerators” on page I-17
“Passport One Window” on page II-190
“Passport One Profiles Page” on page II-192
“Passport One Rules Page” on page II-193
CyberGuard Firewall Manual
II-167
Users Window
Default User Information Window
8
Use this window to create a template of default login information for FSO, FSM, and
Unprivileged users. The template greatly simplifies adding these users to the system. This
window does not apply to Proxy users or to the DEFAULT user.
Figure II-66. Default User Information Window
This window contains the following fields, push buttons, and controls:
Use system-generated ID numbers
Assigns a user ID.
Default Home Directory Parent
Assigns the parent directory of the home directory.
Default Login Shell
Sets a default login shell.
OK
Saves changes and closes the window.
Reset
Discards unsaved changes and restores previous values.
Cancel/Close Resets and closes the window. If there are unsaved changes, this button is
labeled Cancel; otherwise, it is labeled Close.
Help
Displays online help for the window.
Note: Changes to these fields affect several fields in the User Information page.
See also:
◆
◆
II-168
“Users - User Information Page” on page II-155
“How to Set Defaults for New Users” on page II-172
Chapter 8, Users
Users Window
Default FTP Operations Window
8
Use this window to create a template for default FTP operations. The template greatly
simplifies setting FTP operations for all new users on the system. Changing options on
this window changes the settings for the DEFAULT user.
Figure II-67. Default FTP Operations Window
This window has most of the same fields as the FTP Operations page; it has the following
push buttons:
OK
Saves changes and closes the window.
Reset
Discards unsaved changes and restores previous values.
Cancel/Close
Resets and closes the window. If there are unsaved changes, this
button name is Cancel; otherwise, it is Close.
Help
Displays online help for the window.
See also:
◆
◆
“Users - FTP Operations Page” on page II-165
“How to Set Defaults for New Users” on page II-172
CyberGuard Firewall Manual
II-169
Users Window
How to Add or Change a User
8
You can use the expanded Users window to add new users to your system and change
existing users. For a secure system, you must be careful when adding new users to the system and granting privileges.
To display the expanded Users window:
1. Select Configuration from the Control Panel.
2. Select Users. The Users window appears.
3. Click on Show Editor. The expanded Users window appears.
To add a user:
1. Click on Insert. The list is scrolled to the end. An incomplete new line appears.
2. Type in the new user information on the User Information page.
3. Click on the Authentication tab.
4. Select authentication methods in the Internal Authentication Method and
External Authentication Method field.
5. Click on the FTP Operations tab.
6. Check the individual FTP operations that you want to enable; remove the check from
operations that you want to disable.
7. (Optional) To configure a user to use Passport One profiles, click on the Passport
One Rules tab. The Passport One Rules page appears.
8. (Optional) Select a profile from the Profile Name list and type an address in the
Source Address field and a time period in the Session Duration field.
9. Click on Save.
To change a user:
1. Select the user that you want to change.
2. Edit the fields that you want to change on each notebook page.
3. Click on Save. If the user changes from FSO to FSM or Unprivileged, the CyberGuard Firewall removes the user from all roles and removes the network and
sys_private subdirectories and their contents. If the user type changed from FSO,
FSM, or Unprivileged, to Proxy, the CyberGuard Firewall removes the user from all
roles and removes the user’s home directory and its contents.
II-170
Chapter 8, Users
Users Window
How to Delete a User
8
You can use the Users window to delete users, files in their home directories, their home
directories, and mail files.
Notes:
◆
◆
◆
After initial system configuration, ensure that an FSO user other than
cgadmin exists, and delete cgadmin, a likely target for attacks.
Delete FSO, FSM, and Unprivileged users only when their files are no longer
on backup media. Instead, set the authentication method to Disabled to prevent users from logging in. When you delete a user, you also delete the files in
the user’s home directory, the home directory, and mail files.
An FSO cannot delete his own ID.
To display the Users window:
1. Select Configuration from the Control Panel.
2. Select Users. The Users window appears.
To delete a user:
1. Select the user to delete. (You cannot delete yourself or users with ID numbers less
than 99.)
2. Click on Delete.
3. Click on Save. The user’s system definition and membership in administrative roles
(e.g., FSO) are removed, and appropriate file changes occur.
CyberGuard Firewall Manual
II-171
Users Window
How to Set Defaults for New Users
8
You can set defaults for new firewall and FSO users from the Default User Information
window and you can set defaults for all users from the Default FTP Operations windows.
These windows are accessed through the expanded Users window.
To display the expanded Users window:
1.
2.
3.
4.
Select Configuration from the Control Panel.
Select Users. The Users window appears.
Select a FSO, FSM, or Unprivileged user.
Click on Show Editor. The expanded Users window appears.
To set login defaults for new users:
1. Click on the User Information tab. The User Information page appears.
2. Click on Edit Defaults. The Default User Information window appears.
3. (Optional) Check Use system-generated user ID numbers to have your system
assign the user IDs.
4. (Optional) Type a path in the Default Login Shell field.
5. (Optional) Type a path in the Default Home Directory Parent field.
6. Click on OK.
To set FTP operation defaults for new users:
1. Click on the FTP Operations tab. The FTP Operations page appears.
2. Click on Edit Defaults. The Default FTP Operations window appears.
3. Check the individual FTP operations that you want to enable as defaults for new users
and old users who were configured using the default operations; remove the check
from operations that you want to disable.
4. Click on OK.
II-172
Chapter 8, Users
Users Window
How to Configure RADIUS
8
Before you can select RADIUS as an authentication method, you must install and configure several components.
To configure RADIUS authentication on the firewall:
1. Install and configure the primary RADIUS server. Optionally, configure the backup
(secondary) RADIUS server. Installation and administration of the server is dependent
on the vendor. During installation, make note of the following values to be used when
configuring the CyberGuard Firewall RADIUS agent:
◆
◆
◆
◆
The “shared secret” key string
The IP address of the primary RADIUS Server
The IP address of the backup RADIUS Server
The Internet service port number of the RADIUS Server
2. Copy the /etc/security/auth/radius.conf.template file to the new name
/etc/security/auth/radius.conf and change the file specifications as follows:
owner: root
group: sys
mode: 0400
security level: SYS_PUBLIC
a. Change the security level with the following command:
chlvl SYS_PUBLIC /etc/security/auth/radius.conf
b. View file information as follows:
ls -lz
-r-------- 2 root sys 512 May 8 11:14 \
/etc/security/auth/radius.conf SYS_PUBLIC
3. Edit /etc/security/auth/radius.conf to configure the values obtained in Step 1
(/etc/security/auth/radius.conf is self-documented).
4. Define the RADIUS service port (the default port specified in RFC 2138 is 1812) in
the /etc/inet/services file:
radius
CyberGuard Firewall Manual
1812/udp
# RADIUS server authentication port
II-173
Users Window
5. Add packet-filtering rules to the Packet-Filtering Rules window similar to the following to permit UDP connections to the RADIUS servers. Obtain the IP address and the
service port number from the /etc/security/auth/radius.conf file. For example, if
the primary RADIUS server IP address is 192.168.200.1, the backup RADIUS
server IP address is 192.168.200.2, and the RADIUS service port is 1812, add the
following packet-filtering rules:
# Primary RADIUS Authentication Server
permit 1812/udp
FIREWALL
192.168.200.1
ENABLE_REPLY
# Secondary RADIUS Authentication Server
permit 1812/udp
FIREWALL
192.168.200.2
ENABLE_REPLY
See also:
◆
◆
◆
“Network Services File (services)” on page II-40
“Packet-Filtering Rules Window” on page II-22
“RADIUS” on page II-150
How to Configure Central Authentication
8
Before you can select Central Authentication as an authentication method, you must
install and configure several components. The command-line utility centralauth is used
to configure Central Authentication. Refer to the centralauth(1M) online man page for
complete details about this utility.
Note: For information about configuring LDAP for Central Authentication, see “LDAP
Authentication Window” on page I-297 and the ldapauth(1M) man page.
To configure Central Authentication with RADIUS:
1. Install and configure the primary RADIUS server. Optionally, configure the backup
(secondary) RADIUS server. Installation and administration of the server is dependent
on the vendor. Use the following steps to configure the RADIUS Server(s) that are to
be used for Central Authentication:
a. Add the firewall as a RADIUS client, specifying the shared secret key that
is to be used by that firewall client and the RADIUS server. This is the
secret key that you will specify on the centralauth command line with
the -k option.
b. Add a Remote Access Policy that governs administrative users’ (i.e., Firewall Security Officers or Monitors) access to the firewall. Before accessing the firewall’s Remote Web Administration interface, a RADIUS
server must be configured to return a valid firewall Trusted Facility Management (TFM) role, an organizational unit (OU), and optionally, a UNIX
user ID (UID). These user properties are sent to the firewall by the
RADIUS server after successful user authentication.
II-174
Chapter 8, Users
Users Window
Use the following format to specify the TFM role:
role=TFM_role_name
Use the following format to specify the OU:
ou=organizational_unit_name
Use the following format to specify the UID:
uid=user_ID
Note: These properties are not case sensitive. The values assigned to the
role and ou properties must not contain spaces or tabs. The value
assigned to the optional uid property must be valid for a UNIX user
account (a number between 100-59999). If no user ID is configured, one
is selected automatically by Central Authentication.
When specifying these properties, you must separate them with a space,
for example:
role=FSO ou=TEST
The properties are specified in a RADIUS profile that is associated with a
par t icu la r use r or g ro up of users. Specifically, the R ADIUS
Reply-Message attribute is added to the profile. Upon successful authentication, the RADIUS server returns the Reply-Message attribute. The
user’s TFM role, OU, and UID properties are specified in the Reply-Message. For example, a Firewall Security Officer is a member of the FSO
role in the firewall’s TFM data base. To log in as a centrally authenticated
FSO, the RADIUS Reply-Message attribute for the authenticated user
must contain role=FSO. If the firewall is configured (by centralauth)
as a part of the TEST OU, the reply message must contain the matching
ou=TEST to be authorized access.
c. Add the users governed by the Remote Access Policy to the user data base
associated with the RADIUS server.
d. During installation, make note of the following values to be used when
configuring the Firewall RADIUS agent:
◆
◆
◆
◆
◆
IP address of the primary RADIUS server (ServerIP)
“shared secret” key string (Key)
IP address of the backup RADIUS server, if applicable (BackupIP)
Internet service port number of the RADIUS servers (Port)
Organizational Unit assigned to the centrally-authenticated administrators of the target firewall (OrgUnit).
2. Determine which authenticating application service is to be configured for Central
Authentication. The default application is telnetd, which is used by Remote Web
Administration. If an application other than the default is used, invoke the
centralauth command with the -a option.
3. Determine the type of authentication rule (internal or external) for the application service. For Remote Web Administration, this is determined by the type of the network
CyberGuard Firewall Manual
II-175
Users Window
interface associated with the fully qualified domain name (FQDN) of the firewall. The
default type is internal.
4. Log in to the GUI, start a Shell Window, and become the root user with the following
commands.
/sbin/tfadmin newlvl SYS_PRIVATE
su root
5. From the Shell Window, as the root user, run the centralauth utility using the data
collected from Steps 1 through 3. Assume the following example data for the examples
shown below:
Primary RADIUS Server: 192.168.200.1
Backup RADIUS Server: 192.168.200.2
RADIUS service port: default (1812)
Shared Secret Key: "SECRET KEY"
Organizational Unit: SYSADMIN
Example 1: The authenticating application service is Remote Web Administration. The
authenticating rule type is internal.
(one line)
centralauth -i 192.168.25.170 -b 192.168.200.2 -k "SECRET KEY"
-o SYSADMIN
Example 2: The authenticating application service is Remote Web Administration. The
authentication rule type is external. No backup RADIUS server is being used.
centralauth -i 192.168.200.1 -k "SECRET KEY" -o SYSADMIN -x
6. Exit (log out of) the GUI. After running the centralauth command as shown above,
CentralAuth appears as an authentication method in the Users Window.
Notes:
◆
◆
◆
The user must exit from the GUI after configuring or removing central authentication.
The Remote Web Administration server is typically configured to connect via
telnet to the firewall’s fully-qualified domain name (FQDN). If the FQDN is
associated with an external interface address on the firewall, authentication
attempts to match authentication rules defined for external (inbound) interfaces. If the FQDN is associated with an internal interface address on the firewall, authentication attempts to match authentication rules defined for internal
(outbound) interfaces.
On High-Availability (HA) configurations, run centralauth on the primary
(served) firewall in the HA pair. The centralauth configuration automatically propagates to the secondary (standby) firewall in the HA pair.
See also:
◆
◆
◆
II-176
“Network Services File (services)” on page II-40
“Packet-Filtering Rules Window” on page II-22
“RADIUS” on page II-150
Chapter 8, Users
Users Window
How to Configure Remote Authentication
8
The rmtauth(1M) utility provides a command-line interface that is used to configure
Passport One group and VPN client configuration support using a RADIUS server.
Note: For information about configuring LDAP for Remote Authentication, see “LDAP
Authentication Window” on page I-297 and the ldapauth(1M) man page.
To configure Passport One Remote Authentication with RADIUS:
RemoteAuth using RADIUS interprets type 191 of the CyberGuard (1457) vendor-specific attribute to be a Passport One Remote Group name. The user entry on the RADIUS
server is configured with the user’s remote group name placed in the Cyberguard-GroupID (type 191) field of the CyberGuard (vendor ID 1457) vendor-specific attribute. This
enables Passport One to select a profile with a matching name and apply that Passport One
access profile to client connections for the user.
Configuring rmtauth(1M) for RADIUS adds the RemoteAuth method to the authentication module database, adds an application-service authentication rule for the Passport One
(clasd) service, creates packet-filtering rules to access the RADIUS servers, and inserts
RemoteAuth as a GUI authentication method. If rmtauth fails for any reason, the firewall
configuration is restored to its previous state.
1. Modify the Radius Dictionary File on the RADIUS server by adding the RADIUS
group-return data for the CyberGuard Vendor-Specific attribute:
CyberGuard Vendor ID: 1457
Attribute Name: CyberGuard-Group-ID
Vendor Specific Attribute Type: 191
Format of field value: string
Restricted to be single-value attribute
2. Assign the RADIUS user to the Passport One group by selecting and configuring the
CyberGuard-Group-ID attribute in the user’s return list attributes. This is done from
the RADIUS server administrator program. Failure to provide a properly formatted
RADIUS attribute or providing a name that does not match a remote group name on
the firewall will cause a failure to assign the Passport One access profile.
Note: If a user entry is configured with multiple remote group memberships, Passport
One will select a profile based on the first group name that matches. Care must be
taken by both the firewall and RADIUS (or LDAP directory) administrators to resolve
any ambiguity between the group memberships of the user record and the Passport
One remote group names.
3. On the firewall, execute the following command to configure Passport One for the
RADIUS-type RemoteAuth module:
rmtauth -i Server_IP_Address -k Firewall_Password
CyberGuard Firewall Manual
II-177
Users Window
where:
-i Server_IP_Address - Host name or IP address of the primary RADIUS Authenti-
cation Server.
-k Firewall_Password - Identifies the password known to the RADIUS server and
the firewall RADIUS client.
This command configures the /etc/security/auth/RemoteAuth.conf file, and
installs RemoteAuth as the default method for the clasd authentication service. Note
that if users will be authenticating from an external interface, use the -I option to configure the interface to which the Passport One (clasd) application service authentication rule applies. (Internal is the default).
4. To add Passport One groups to the firewall configuration, add the groups names as a
Remote Group types in the Users Window and configure their Passport One rules.
To configure VPN Client Configuration Remote Authentication with RADIUS:
There are four (4) CyberGuard vendor specific attribute types that define the VPN client
internal network configuration. The following steps illustrate how to configure the
RADIUS Server(s) used for VPN client address configuration.
1. The Radius Dictionary File, on the RADIUS server, must be modified to add the
RADIUS definitions for the CyberGuard Vendor-Specific attributes:
CyberGuard Vendor ID: 1457
Format of field value: string
Each is restricted to be single-value attribute
Vendor-specific attribute type codes, RADIUS attribute names, and corresponding
IKECFG attribute names are as follows:
Type Code
RADIUS Attribute Name
IKECFG Attribute Name
161
CyberGuard-VPN-Address
INTERNAL_IP4_ADDRESS
162
CyberGuard-VPN-Netmask
INTERNAL_IP4_ADDRESS
163
CyberGuard-VPN-DNS
INTERNAL_IP4_DNS
164
CyberGuard-VPN-WINS
INTERNAL_IP4_NBNS
2. The IKECFG network attributes are assigned by selecting and configuring the CyberGuard vendor-types. This is done from the RADIUS server administration program.
3. On the firewall:
a. Use the rmtauth command to configure the VPN Policy Manager for the
RADIUS-type RemoteAuth module. For example:
rmtauth -i 192.168.1.100 -k secret
II-178
-a vpnguard
Chapter 8, Users
Users Window
This command configures the /etc/security/auth/RemoteAuth.conf
file and installs RemoteAuth as the default method for the vpnguard application. Note: If users will be authenticating from an external interface, use
the -I option to configure interface to which the RemoteAuth method
applies (internal is the default).
b. In the VPN Client Configuration window, create a VPN client configuration and check the Remotely Assigned During XAUTH Authentication check box.
c. In the IKE Advanced Settings dialog window, accessed from the VPN
Secure Channels window, check the Use Extended Authentication
(XAUTH) check box.
d. In the IKE Advanced Settings dialog window, accessed from the VPN
Secure Channels window, select the VPN Client Configuration that was
configured in Step 3b.
Notes:
◆
◆
◆
◆
◆
◆
The user must exit from the GUI after configuring or removing remote authentication.
If a user entry is configured with multiple remote group membership, Passport
One will select a profile based on the first group name that matches. Care must
be taken by both the firewall and RADIUS or LDAP directory administrators
to resolve any ambiguity between the group memberships of the user record
and the Passport One remote group names.
On High-Availability (HA) configurations, run rmtauth on the primary
(served) firewall in the HA pair. The rmtauth configuration automatically
propagates to the secondary (standby) firewall in the HA pair.
The cg_dbadm(1M) utility may be used to view the underlying authentication rule configuration. Use cg_dbadm -b svc to see that clasd service rule is
using RemoteAuth. Use cg_dbadm -b am to see how the RemoteAuth
authentication method is configured.
Use cgia to test authentication from the command line. You must be root to
run this command. You must be at NETWORK level to test authentication
connections to RADIUS or LDAP servers.
Adding Debug 9 on a line in the /etc/security/firewall/clas/clasd.conf
file writes debug output to /var/tmp/clasd.<pid>. You must be at NETWORK level (/var/tmp is an MLD). This shows the user/group lookup as it
occurs.
See also:
◆
◆
◆
◆
rmtauth(1M) manual page
“Packet-Filtering Rules Window” on page II-22
“Remote Authentication” on page II-151
“LDAP Authentication Window” on page I-297
CyberGuard Firewall Manual
II-179
Users Window
How to Configure SecurID
8
Before you can select SecurID as an authentication method, you must install and configure
several components.
To configure SecurID authentication on the firewall:
1. Install and configure the ACE/Server (and optional slave server) software on the
appropriate system(s) using the procedure in the ACE/Server release notes and the
ACE/Server Installation and Configuration Guide. Refer to the ACE/Server
Administration Manual for details on adding firewall users and the firewall client to
the authentication server database.
When configuring the firewall as a client, select communications server as the
client type.
2. Copy the sdconf.rec file from the authentication server’s VAR_ACE directory (e.g.,
VAR_ACE=/var/ace ) to /etc/security/auth/sdconf.rec on the firewall. The
sdconf.rec file can be loaded using a tape device or ftp. The file must be owned by
root and should have owner read-only privilege.
3. Issue the sdinfo(1) command on the ACE/Server master (e.g., /usr/ace/sdinfo) to
obtain the master IP address, slave IP address, and service port number. For example:
MASTER SERVER ADDRESS
SLAVE NET ADDRESS
AUTHENTICATION SERVICE
PORT NUMBER
192.168.200.1
192.168.200.2
securid
5500
4. Define the SecurID service ports in the /etc/inet/services file. The default ports
chosen by RSA Security, Inc. are as follows:
securid
securidprop
5500/udp
5510/udp
# ACE/Server Master (SecurID)
# ACE/Server Slave (SecurID)
5. Add packet-filtering rules to the Packet-Filtering Rules window similar to the following example to permit UDP connection to the ACE/Server master, and optionally to
the slave server systems:
# ACE/Server Master
permit 5500/udp FIREWALL
# ACE/Server Slave
permit 5510/udp FIREWALL
II-180
192.168.200.1
ENABLE_REPLY
192.168.200.2
ENABLE_REPLY
Chapter 8, Users
Users Window
Notes:
◆
◆
◆
The node name of the firewall (i.e., uname -n) must be an alias in the firewall’s /etc/inet/ ho sts file for the IP address that is configured at the
Ace/Server. Remember that host name aliases should be unique within the
/etc/inet/hosts file.
The Ace/Server should be configured with DCE enabled.
A “node secret” file, /etc/security/auth/securid, is sent to the firewall during the initial authentication session. The Sent Node Secret check box on
the Client Configuration/Edit window of the ACE/Server administration program indicates if the node secret file has been sent to the client (the firewall).
If this box is checked and the node secret file does not exist on the firewall,
authentication will fail. If this occurs, uncheck the Sent Node Secret check
box to allow a new node secret to be sent to the firewall.
See also:
◆
◆
◆
“Network Services File (services)” on page II-40
“Packet-Filtering Rules Window” on page II-22
“SecurID” on page II-152
How to Configure SecureNet Key
8
Before you can select SecureNet Key as an authentication method, you must install and
configure several components.
To configure SecureNet Key authentication on the firewall:
1. Install and configure the DSS and WinDMS software on the appropriate system.
Installation and administration of the server is explained in the documentation provided by AXENT Technologies. During installation, make note of the following values
to be used when configuring the CyberGuard Firewall DSS agent software:
◆
◆
◆
◆
The agent ID name created for the firewall
The 16 hexadecimal digit key value assigned to the firewall agent
The IP address of the AssureNet Pathways Defender Security Server
The Internet service port number of the AssureNet Pathways Defender
Security Server
2. Copy the /etc/security/auth/snk_agent.cf.template file to the new name
/etc/security/auth/snk_agent.cf and change the file specifications as follows:
owner: root
group: sys
mode: 0400
security level: SYS_PUBLIC
CyberGuard Firewall Manual
II-181
Users Window
a. Change the security level with the following command:
chlvl SYS_PUBLIC snk_agent.cf
b. View file information as follows:
ls -lz
-r-------- 2 root sys 512 May 8 11:14 \
/etc/security/auth/snk_agent.cf SYS_PUBLIC
3. Edit /etc/security/auth/snk_agent.cf to configure the values obtained in Step 1
(/etc/security/auth/snk_agent.cf is self-documented).
4. Define the SecureNet Key service port (default port chosen by DSS is 2626) in the
/etc/inet/services file:
securnetkey
2626/tcp
# SecureNetKey port
5. Add packet-filtering rules to the Packet-Filtering Rules window similar to the following to permit TCP connection to the DSS system. Obtain the IP address and the service
port number from the /etc/security/auth/snk_agent.cf file. For example, if the
DSS IP address is 192.168.200.1, and the DSS service port is 2626, add the following packet-filtering rule:
# Defender Security Server (SecureNet Key token authentication)
permit 2626/tcp
FIREWALL
192.168.200.1
See also:
◆
◆
◆
II-182
“Packet-Filtering Rules Window” on page II-22
“Network Services File (services)” on page II-40
“SecureNet Key” on page II-152
Chapter 8, Users
Users - Underlying Constructs
Users - Underlying Constructs
8
Advanced Users Only! The GUI automates the editing of files and invocation of commands described in this section. If you choose to manually edit any file, you must first
close every window displayed from the Configuration menu and complete all edits of
the file before continuing GUI configuration activities.
The CyberGuard Firewall supports two types of identification and authentication databases: the UnixWare Identification and Authentication Database (IADB) and the CyberGuard Database (CGDB). User records, password records, and Authentication Module
(AM) records are maintained in separate CyberGuard Databases.
Users who require accounts on the firewall (FSO, FSM, and Unprivileged) have records in
both the IADB and the CGDBs. Proxy users, who do not have accounts on the firewall,
have records only in CGDBs.
You can use the useradd(1M), usermod(1M), userdel(1M), passwd(1) commands
to modify FSO, FSM, and Unprivileged user records in the UnixWare IADB. Refer to the
online manual pages of these commands for complete implementation details.
The cg_dbadm(1M) utility is used to import users during firewall installation. This
command is intended as an installation and debug tool only. Modifying CyberGuard Database files with this command is strongly discouraged. Refer to the cg_dbadm(1M)
online manual page for more information about this utility.
Note: Users added with the useradd command must also be added to the CGDB user
database using the cg_dbadm command; otherwise, the Users Window will not
function properly.
In the absence of the User CGDB or an authentication module:
The Identification and Authentication system of the CyberGuard Firewall will operate in a
remedial mode in the absence of the User CGDB or an authentication module. Without a
valid database or a selected authentication module, the login scheme (used for console
modules) will use the standard UnixWare IADB interface. After CGIA authentication verification failure, an “Internal ERROR” message is displayed by the login scheme on the
console and the standard UnixWare IADB password dialog is used: the FSO is prompted
for a password and the password entered is matched with the redundant copy stored in the
shadow password file. This allows the firewall administrator to login to the system to perform recovery procedures. Note that this method works only for the console login. When
the GUI is running on the console, the FSO gains access to the console login by typing
Alt+Sys-Req+P.
CyberGuard Firewall Manual
II-183
Users - Underlying Constructs
II-184
Chapter 8, Users
Chapter 9
Chapter 9.
Passport One
II
Passport One
9
Passport One provides authorization of multiple service connections through the firewall
contingent on a single, successful authentication session. Access rules for the authenticated user are applied for the duration of the session.
Passport One requires an authenticating client (HTTP, SSL, or Telnet) to create a session
with the firewall. An HTTP or SSL (HTTPS) client must use an authenticating browser
such as Netscape Navigator or Microsoft Internet Explorer. After authenticating the user,
Passport One adds packet-filtering rules according to the user’s configured profile. These
rules are active only as long as the authenticating client session remains connected.
A typical session consists of the following steps:
1. The user connects to the firewall on the dedicated Passport One port.
2. Passport One accepts the connection and queries the user for identification and authentication.
3. If authentication is successful, Passport One generates administrator-defined packetfiltering rules, sends an acceptance reply, and maintains the connection. If authentication is unsuccessful, Passport One returns a denial message.
4. Leaving the Passport One connection open, the user opens one or more connections
within the parameters of the packet-filtering rules in place from Passport One.
5. When the user closes the connection, Passport One removes the packet-filtering rules.
Passport One can also be used to authenticate and give unique access profiles through the
firewall to different groups of users on a RADIUS server. See “Remote Authentication”
on page II-151.
Auditing for Passport One is enabled on the Activities page of the Alerts and Activities
window with the Passport One activity field and stored in the Passport One activity report.
Notes:
◆
◆
Passport One was previously known as Client Authentication or Client-Level
Authentication Service (CLAS). Some file and command names continue to
reflect this.
Only one authentication connection per IP address will be permitted at a time.
II-185
Passport One
CAUTION!
When a client connected to Passport One disconnects without
sending an EOF or FIN, the authentication connection will be left
in a half-open state for up to 2 hours and 12.5 minutes. During this
time, the user’s rules will remain active and further login attempts
will return an “Already Connected” message. Setting certain network tunable parameters to their minimum values can resolve this
issue. For complete details and instructions, see “TCP Parameters
Associated with Passport One” on page I-338.
NT Authentication Detection
9
The NT Authentication Detection (NTAD) feature monitors NT authentication traffic
between Microsoft Windows NT clients and NT Primary Domain Controllers (PDCs).
NTAD adds a layer of security on top of regular NT domain authentication and identification.
NT Domain Authentication provides authorization of multiple service connections though
the firewall, contingent upon a single, successful authentication session. NT Authentication Detection allows access from an NT client to the Primary Domain Controller (PDC)
only if the client has successfully authenticated with the PDC.
Access rules for the authenticated user are applied to the connecting system for the duration of the session and are removed upon termination of the session. Access is mediated
during the authenticated session so that no direct connections are permitted between the
PDCs and NT Clients at any time.
NTAD uses UDP ports 137 and 138 for monitoring NT authentication traffic. These ports
are used to register the Netbios name of the NT Client and the WINS server, which often
resides on the PDC. NTAD uses TCP port 139 to detect the authentication of NT Client
with the domain that is running on the PDC. Packet-filtering rules such as the following
can be added automatically by the firewall or manually by the administrator to allow
NTAD:
permit
proxy
permit
permit
137-138/udp
139/tcp
137-138/udp
139/tcp
Client
Client
PDC
PDC
PDC
PDC
Client
Client
enable_reply
enable_reply
enable_reply
Client can refer to a single IP address or host name identifying a client workstation or a
group of clients. PDC refers to the IP address or host name of a single PDC or group of
PDCs.
II-186
Chapter 9, Passport One
Passport One
For large domains, the clients and PDCs can be grouped together and specific members
assigned to them using the Grouping window. The group names of PDC and CLIENTS,
for example, can then be used in the Rules page of the Passport One window to assign
similar access to groups of clients.
Auditing for NTAD is enabled on the Activities page of the Alerts and Activities window
with the Passport One activity field and stored in the Passport One activity report.
NT Share Authentication Detection
9
NT Authentication Detection (NTAD) provides a mechanism for detecting file access
within the directory of the specified share name. If the contents of a file are successfully
accessed, the file name is treated as if an user has just authenticated. After successful
access has been detected, NTAD adds packet-filtering rules according to the configured
profile. Access rules for the “authenticated” user are applied to the connecting system for
the duration of the access to the specified share name.
NTAD monitors traffic over TCP port 139 to accomplish the access check.
Note that the DEFAULT user is not used for NT Share Authentication Detection.
NTAD requires the following a persistent connection for the authorized duration. To
ensure that the access to the share name is not timed out by NT, the use of net use
\\SERVER\sharename is recommended.
The following is an example set of packet-filtering rules that need to added before NTAD
will be able to detect NT Authentication requests correctly.
proxy
139/tcp
client server
# The following rules may not be needed
# for SERVER <--> PDC authentication
permit 137-138/udp
server PDC
enable_reply
permit 137-138/udp
PDC
server
enable_reply
permit 139/tcp
PDC
server
permit 139/tcp
server PDC
Note that the last four rules describe the authentication paths that the server and PDC may
need to use to confirm that the user is currently authenticated on the client and has access
to the file name in \\SERVER\sharename.
Auditing for NT Share Authentication Detection is enabled on the Activities page of the
Alerts and Activities window with the Passport One activity field and stored in the
Passport One activity report.
CAUTION!
NT Share Authentication Detection is a control share only. Users
should not have write permission into that directory.
CyberGuard Firewall Manual
II-187
Passport One
SSL and X.509 Certificate Technology
9
The Secure Sockets Layer (SSL) protocol (also called HTTPS) provides a method of
encapsulating data to allow privacy between two applications communicating over the
Internet. SSL fragments data into blocks, compresses and encrypts the data blocks, and
then transmits the data. SSL provides optional authentication between the client and the
server using X.509 certificate technology.
An X.509 certificate is a number of pieces of information, which have been digitally
signed by a trusted third-party called a Certification Authority (CA). Digitally signed
means that a digest or summary of the information is computed and then encrypted with
the CA’s private key. The signature can be verified by recomputing the digest and comparing it to the results of the decrypted signature using the CA’s (previously known) public
key.
SSL is an application-level protocol and requires special server and client software. The
Netscape and Microsoft Web browser clients include SSL functionality through SSLv3.
Note: The Passport One binary application uses a statically-linked SSL library that is not
shipped with the CyberGuard Firewall product. Therefore, this library is not available for inclusion with or access by other applications.
SSL and Passport One
9
The HTTPS port can be used for Passport One in one of the following ways:
◆
◆
Without SSL client authentication (encryption only)
With SSLv3 client authentication, using X.509 certificates
The first mode provides encrypted login capability without certificates. The second mode
requires clients to have a valid certificate, and allows users to specify a single Passport
One profile for all clients with certificates issued by trusted Certification Authorities.
When the encryption-only mode is used, the client user will see an “encrypted page”
notice when connecting. When the client certificate authentication mode is active, the client user is prompted for a certificate and is then shown the accept or deny page according
to the acceptance of the certificate.
Notes:
◆
◆
II-188
The encryption capabilities of SSL when used in Passport One apply only to
the encryption of the authentication web pages served by Passport One and
does not apply to the firewall sessions associated with an authenticated user’s
profile.
There is no longer a distinction between domestic and export encryption for
Passport One with SSL. Only the strong cryptography (formerly “domestic”)
version is now offered. This version is capable of symmetric encryption with
128-bit keys. The default length for keys in certificate requests is 1024 bits.
Chapter 9, Passport One
Passport One
CAUTION!
The Client Certificate Authentication feature of Passport One is
intended to be used only by sites that control their own Certification Authority.
When the certificate authentication mechanism in Passport One
checks a client certificate, it verifies only that 1) The client certificate was signed by one of the trusted CAs, and 2) The current
date/time falls within the validity period of the client certificate. It
is not able to distinguish a particular certificate user attempting to
authenticate using SSL.
A client certificate issued by a publicly accessible Certification
Authority (such as VeriSignTM, Thawte, etc.) is signed with the
same private key as all other such certificates. Thus, if the issuer
certificate of such a Certification Authority is trusted for authentication with Passport One, any holder of a certificate issued by that
Certification Authority could successfully authenticate with Passport One.
This issue will be addressed in a future release of Passport One.
The following steps explain how to set up SSL with the Client Certification Authentication feature to work with Passport One:
1. If the Client Certificate Authentication feature is to be used, obtain copies of the issuer
certificates and import them into the Certificate Management window.
2. Use the Certificate Request Wizard to create a key pair and a PKCS10 Certificate
Signing Request (CSR).
3. Send the CSR to the chosen CA.
4. Retrieve the resulting SSL server certificate from the CA.
5. Import the certificate using the Certificate Management window.
6. Enable and configure Passport One from the GUI. In the Passport One window, go to
the SSL page and select the SSL server certificate from the Firewall SSL Keypair
drop-down list.
See also:
◆
◆
“Certificate Request Wizard” on page II-290
“Certificate Management Window” on page II-292
CyberGuard Firewall Manual
II-189
Passport One Window
Passport One Window
9
Use this window to configure Passport One. The Passport One window has the following
notebook pages: Setup, Profiles, Rules, NT Share Detection, and SSL (if licensed).
Figure II-68. Passport One Window - Setup Page
Passport One Setup Page
9
Use this page of the Passport One window to enable Passport One, define its interfaces,
authentication ports, maximum number of sessions, and packet-filtering rule refresh
period.
This page contains the following fields and controls:
Enable
Enables Passport One. The default is disabled.
Enabled Interfaces
Enables Passport One on the specified interface. All available network
interfaces will be listed. At least one interface must be checked if
Enable is checked.
HTTP
II-190
Enables Passport One through HTTP. The default is enabled.
Chapter 9, Passport One
Passport One Window
Port
Port number on which the Passport One daemon listens for HTTP connection requests. The default is 3080.
HTTPS
Enables Passport One through HTTPS (HTTP over SSL). The default is
disabled.
Port
Port number on which the Passport One daemon listens for HTTPS connection requests. The default is 3443.
Telnet
Enables Passport One through Telnet. The default is enabled.
Port
Port number on which the Passport One daemon listens for Telnet connection requests. The default is 3023.
NT Domain
Monitors NT authentication traffic between NT clients and the Primary
Domain Controller (PDC). Adds an additional layer of security on top of
NT domain authentication and identification by allowing access from a
client to PDC only if the client has successfully authenticated with the
PDC.
PDC
IP address, host name, or group name of the Primary Domain Controller.
If a value is entered in this field and NT Domain is checked, packet-filtering rules allowing the authenticating connection are automatically added.
If this field is left empty, packet-filtering rules must be added manually.
NT Share Detection
Enables Passport One to detect file accesses within the directory of the
specified share name.
PDC
IP address, host name, or group name of the Primary Domain Controller.
If a value is entered in this field and NT Share Detection is checked,
packet-filtering rules allowing the authenticating connection are automatically added. If this field is left empty, packet-filtering rules must be
added manually.
Share Name
Name of the share that NTAD will monitor for file access.
Server Address
IP address of the server exporting the share name.
Defaults
Resets the values in the HTTP, HTTPS, and Telnet Port fields to their
defaults and enables Passport One through the ports.
Maximum Number of Sessions
Maximum number of simultaneous Passport One sessions. The default is
64.
Refresh Interval (seconds)
Frequency in seconds that the Passport One daemon will check if packetfiltering rules need to be refreshed to maintain the connection. The
default is 5.
Defaults
CyberGuard Firewall Manual
Resets the values in the Maximum Number of Sessions and
Refresh Interval (seconds) fields to their defaults.
II-191
Passport One Window
See also:
◆
◆
◆
◆
“Network Interfaces Window” on page I-68
“Hypertext Transfer Protocol Proxy” on page III-67
“Secure Sockets Layer Protocol Proxy” on page III-237
“Telnet Network Login Proxy” on page III-251
Passport One Profiles Page
9
Use this page of the Passport One window to view, add, change, or delete profiles.
Figure II-69. Passport One Window - Profiles Page (Expanded)
This page contains the following field:
Profile Name Name of the profile that contains the packet-filtering rules corresponding
to a user’s access attributes. These rules are added at the beginning of a
Passport One or NTAD session and removed at the end of a Passport One
or NTAD session. Many profiles can exist, and several users can share a
profile. Profiles appear in alphabetical order.
Note: When a user modifies the name of a Passport One profile, the name of the profile
is not updated in the Profile Name field on the NT Share Detection page. The
names are also not updated in the profiles used by users.
See also “How to Configure Network Interfaces” on page I-73.
II-192
Chapter 9, Passport One
Passport One Window
Passport One Rules Page
9
Use this page of the Passport One window to view, add, change, or delete packet-filtering
rules for profiles.
Figure II-70. Passport One Window - Rules Page (Expanded)
This page contains the following fields:
Profile Name
Name of the Passport One or NTAD profile from the Profiles
page.
The expanded version of this page is identical to the expanded “Packet-Filtering Rules
Window” on page II-22 except for one additional keyword in the Packet Origin and
Packet Destination lists:
%USER
CyberGuard Firewall Manual
The source IP address of the system from which the user made the
authenticating connection.
II-193
Passport One Window
See also:
◆
◆
“Packet-Filtering Rules Window” on page II-22
“Users - Passport One Rules Page” on page II-166
Passport One NT Share Detection Page
9
Use this page of the Passport One window to set up NT Authentication Detection (NTAD)
to detect file access within the directory of the specified share name.
Figure II-71. Passport One Window - NT Share Detection Page (Expanded)
This page contains the following fields and controls:
File Name
Name of the file in the share name to which this rule applies. This
name must be unique.
Profile Name
Profile file to use for this rule.
Client Address
Source IP address from which the user can make connections. The
wild card characters * and ? are recognized. Note that when NT
share detection client addresses contain wild card characters, the
user must add the correct packet-filtering rules for the clients on
the Packet-Filtering Rules window.
Duration (seconds) Session timeout in seconds. Zero indicates no time limit.
Note: When a user modifies the name of a Passport One profile, the name of the profile
is not updated in the Profile Name field on the NT Share Detection page.
II-194
Chapter 9, Passport One
Passport One Window
Passport One SSL Page
9
Use this page of the Passport One window to set up SSL to be used with or without certificates. (This page is deactivated if the optional SSL support for Passport One is not
licensed.)
Figure II-72. Passport One Window - SSL Page
This page contains the following fields and controls:
Firewall SSL Keypair
List of firewall keypairs that are imported through the Certificate Management window.
Require Client Certificate
Indicates whether certificates are required for SSL authentication. The default is disabled.
Profile for Certificate-Authenticated Client
Name of the profile used for clients authenticated by the CA. This profile is used to
generate packet-filtering rules for all sessions that authenticate with client certificates.
Trusted CA Certificates for Client Authentication
List of CA certificates that are imported through the Certificate Management window.
These certificates are used to send a Certificate Request message in the SSL handshakes. This list determines which client certificates will be accepted by Passport
One.
Trust
Indicates whether the corresponding issuer certificate is to be trusted for client authentication.
CyberGuard Firewall Manual
II-195
Passport One Window
Note: The Client Certificate Authentication feature of Passport One is intended to be
used only by sites that control their own Certification Authority. See the Caution
statement in “SSL and Passport One” on page II-188.
See also:
◆
◆
“How to Configure Network Interfaces” on page I-73
“Certificate Management Window” on page II-292
Passport One Authentication Forms for HTTP Connections
9
When the user connects with an HTTP authenticating client, the following HTML files
step through the authentication process. These files are located in the
/etc/security/firewall/clas/ directory. You may revise the files with your own messages.
login.html
Prompts for a user name.
challenge.html
Prompts for authentication based on the authentication
method in use.
accept.html
Displays a connection acceptance notice.
deny.html
Displays a connection refusal notice.
ClientCertAccept.html
Immediately displays if a client certificate has been
authenticated.
Variable keywords can be used in each of the HTML files listed above.
%LOGIN
%CHALLENGE
%ADDR
%SESNUM
User’s login name.
Challenge message.
Client IP address.
Number of active sessions.
Notes:
◆
II-196
Certain versions of Internet ExplorerTM and Netscape Navigator® will time out
while the Passport One connection is active. The HTTP browser disconnects
its connection to the firewall, and the user’s Passport One Session is terminated. The firewall can prevent this from happening by periodically renewing
the browser connection with Passport One to preserve the session. JavaScriptTM must be enabled on the browser for this feature to work properly. If
JavaScript is disabled, the browser time-out problem will still occur.
Chapter 9, Passport One
Passport One Window
◆
◆
Clicking the Stop icon on the browser icon does not guarantee that the Passport One session will be terminated. Instead, a button displayed on the Passport One Accept Page should be used to log out from the session. Additionally,
leaving the Accept Page or closing the browser will terminate the Passport
One session.
See “How to Configure Authenticating Browsers for the HTTP Proxy” on
page III-96 for information about configuring your browser.
How to Configure Passport One Profiles
9
You can use the Passport One Profiles page to add or change profile names for Passport
One users. Profiles appear in alphabetical order.
To display the expanded Profiles page:
1.
2.
3.
4.
Select Configuration from the Control Panel.
Select Passport One. The Passport One window appears.
Click on the Profiles tab.
Click on Show Editor. The expanded Passport One Profiles page appears.
To add a profile:
1. Click on Insert. An incomplete new line appears in the list.
2. Type a new profile name in the Profile Name field.
3. Click on Save.
To change a profile name:
1. Select the profile that you want to change.
2. Edit the Profile Name field.
3. Click on Save.
To delete a profile name:
1. Select the profile name that you want to delete.
2. Click on Delete. The selected lines are removed from the list.
3. Click on Save.
Note: When a user modifies the name of a Passport One profile, the name of the profile
is not updated in the Profile Name field on the NT Share Detection page. The
names are also not updated in the profiles used by users.
See also:
◆
◆
◆
“Packet-Filtering Rules Window” on page II-22
“Packet Origins and Destinations” on page II-26
“Users - Passport One Rules Page” on page II-166
CyberGuard Firewall Manual
II-197
Passport One Window
How to Configure Passport One Profile Rules
9
You can use the expanded Passport One Rules page to configure packet-filtering rules profiles for Passport One users.
To display the expanded Rules page:
1.
2.
3.
4.
Select Configuration from the Control Panel.
Select Passport One. The Passport One window appears.
Click on the Rules tab.
Click on Show Editor. The expanded Passport One Rules page appears.
To add a packet-filtering rule to a profile:
1. Select the profile you want to change from the Profile Name field.
2. (Optional) Select the rule that you want the new rule to follow. (Skip this step if you
want to add a new rule at the top of the list.)
3. Click on Insert. An incomplete new line appears in the list. The Type field is set to
Permit.
4. Select Permit, Proxy, or Deny in the Type field.
5. Select or type the port number or service name and the protocol to which to apply the
rule. The selected entry appears in the Port or Service field.
6. Select or type an originating host in the Packet Origin field. Select %USER to use
the Source Address from the Passport One Rules page of the Users window.
7. Select or type a destination host in the Packet Destination field. Select %USER to
use the Source Address from the Passport One Rules page of the Users window.
8. (Optional) Select a value in the Timeout (seconds) field for your network connection.
9. Check the Options check boxes that apply to this network connection.
10. Click on Save.
To change a packet-filtering rule:
1.
2.
3.
4.
Select the profile that you want to change from the Profile Name field.
Select the rule that you want to change.
Edit the fields that you want to change.
Click on Save.
To delete a packet-filtering rule:
1. Select the profile that you want to change from the Profile Name field.
2. Select the rule that you want to delete. The selected lines are removed from the list.
3. Click on Save.
II-198
Chapter 9, Passport One
Passport One Window
See also:
◆
◆
◆
“Packet-Filtering Rules Window” on page II-22
“Packet Origins and Destinations” on page II-26
“Users - Passport One Rules Page” on page II-166
How to Assign Passport One Profiles to Users
9
You can use the Users window to assign users to Passport One profiles and rules defined
on the Passport One window:
To display the Passport One Rules page
1. Select Configuration from the Control Panel.
2. Select Users. The Users window appears.
3. Click on the Passport One Rules tab. The Passport One Rules page appears.
To assign users to Passport One profiles:
1. Select a user from the display portion of the main window.
2. Choose a profile from the Profile drop-down list.
3. Type the source address and the Passport One session duration in the Source
Address and Duration (seconds) fields.
4. (Optional) You can assign additional profiles to the user by repeating steps 2 and 3.
5. Click on Save.
See also Users Window, “Users - Passport One Rules Page” on page II-166
CyberGuard Firewall Manual
II-199
Passport One Window
How to Create Custom Banners for Telnet Authentication
9
When a user connects to Passport One via Telnet, a custom usage message can be displayed prior to log in. After a successful log in, a custom “terms and conditions” message
can be displayed.
To create a custom banner before the login prompt
1. In the /etc/security/firewall/clas/ directory, create a file named custom-usemsg.
The file should have the following attributes: owner is root; group is sys; level is
SYS_PUBLIC; owner has read/write (rw) permission.
2. Edit this file and type in the ACSII text that will appear prior to the log in prompt for
Telnet authentication.
To create a custom banner after a successful connection
1. In the /etc/security/firewall/clas/ directory, create a file named custom-terms.
The file should have the following attributes: owner is root; group is sys; level is
SYS_PUBLIC; owner has read/write (rw) permission.
2. Edit this file and type in the ASCII text that will appear upon successful Telnet authentication. This text will be displayed instead of the normal “Connected ...” message.
II-200
Chapter 9, Passport One
Passport One - Underlying Constructs
Passport One - Underlying Constructs
9
Advanced Users Only! The GUI automates the editing of files and invocation of commands described in this section. If you choose to manually edit any file, you must first
close every window displayed from the Configuration menu and complete all edits of
the file before continuing GUI configuration activities.
To configure Passport One:
1. Ensure that the default ports for Passport One are defined in the /etc/inet/services
file.
2. Define user rules and general Passport
/etc/security/firewall/clasd/clasd.conf file.
One
configuration
in
the
3. Define packet-filtering rules templates in profile files.
4. Revise the HTML authentication forms
accept.html, and deny.html) as appropriate.
(login.html,
challenge.html,
5. Permit connection to the authenticating login ports by adding rules similar to the following to the /etc/security/firewall/ng_inet/netguard.conf file:
permit
permit
permit
clas-telnet/tcp
clas-http/tcp
clas-https/tcp
EVERYONE
EVERYONE
EVERYONE
FIREWALL
FIREWALL
FIREWALL
6. Enable Passport One in the /etc/security/firewall/startup.conf file by editing the
CLASD= and CLASD_OPTS= keywords:
CLASD=true
CLASD_OPTS=options
7. If using NT Domain Authentication, permit connections by adding rules similar to the
following to the /etc/security/firewall/ng_inet/netguard.conf file:
proxy
permit
permit
permit
139/tcp
139/tcp
137-138/udp
137-138/udp
Clients
PDCs
Clients
PDCs
PDCs
Clients
PDCs
Clients
Enable_Reply
Enable_Reply
Enable_Reply
8. If using NT Domain Authentication, enable the feature in the /etc/security/firewall/startup.conf file by editing the NTAD= and NTAD_OPTS= keywords:
NTAD=true
NTAD_OPTS=options
CyberGuard Firewall Manual
II-201
Passport One - Underlying Constructs
See also:
◆
◆
◆
“Network Services File (services)” on page II-40
“Packet-Filtering Rules Configuration File (netguard.conf)” on page II-43
“How to Enable a Standalone Proxy (startup.conf)” on page III-11
Passport One Configuration File (clasd.conf)
9
Use the /etc/security/firewall/clas/clasd.conf file to set up Passport One and the user
definition database.
Format guidelines:
◆
◆
◆
Each statement is on a separate line
Blank lines can be used
Comments begin with the # character and continue until the end of the line
Statements:
include configuration_files
(Optional, one or more) Parses other configuration files. Use brackets < > around a
file located in the default Passport One directory; otherwise, use a full path name. A
maximum of 20 files can be included. This statement is case sensitive.
Interface IP_address
(Required, one or more) Interface on which Passport One is enabled.
MaxSession number
(Optional, one) Maximum number of simultaneous user-authenticated sessions. The
default is 64.
RefreshPeriod seconds
(Optional, one) Frequency in seconds that the clasd daemon refreshes packet-filtering rules. The default is 5 seconds.
Client user profile IP_address max_duration
Defines user parameters for connections. Multiple records for each user are valid; the
server uses the first rule that matches the user name and IP address. In authentication
detection mode, the user doing the NT Authentication will be matched against the
appropriate client rule. If there is not a user match and the user DEFAULT is defined,
then the DEFAULT client rule will be matched. If there is no DEFAULT client rule,
then this user will not get any extra privileges from matching this rule.
user
User ID this rule applies to.
profile
Profile file name that contains packet-filtering rules for the user’s access attributes.
IP_address
II-202
Chapter 9, Passport One
Passport One - Underlying Constructs
Source IP address from which the user can make connections to Passport One. The
wild card characters * and ? are accepted.
max_duration
Session timeout in seconds. Zero indicates no time limit.
File file_name profile IP_address timeout
Used for resource authentication detection mode. The file name successfully accessed
within the share will be matched against file name in the appropriate client rule. If
there is not a file name match, then this NT Client will not get any extra privileges
from matching this rule.
file_name
Name of the file in the share name to which this rule applies. This name must be
unique.
profile
Profile file name that contains packet-filtering rules for the user’s access attributes.
IP_address
Source IP address from which the user can make connections to NTAD. This rule is
not matched if the packet source IP address does not match this field.
max_duration
Session timeout in seconds. Zero indicates no time limit.
HTTPS-Port port
Port on which to listen for SSL connection attempts. The default is 3443.
ClientCAs CA_tag(s)
Enables client certificate authentication. The keyword ClientCAs is followed by one
or more CA certificate tags, and each tag specifies the name of a file in the
/etc/security/firewall/vpn/ca_certs/directory with the .cer extension removed.
Each file in the /etc/security/firewall/vpn/ca_certs/directory must contain a
DER/PEM encoded CA certificate. This information is used to generate the CertificateRequest message to be sent to the client. Multiple CA certificate tags are permitted,
and at least one must be specified.
CertProfile profile_name
Profile used to generate packet-filtering rules for all sessions that authenticate with
client certificates. Only one certificate profile can be specified. This profile is located
in the /etc/security/firewall/profiles/local/ directory. This keyword is required
when the ClientCAs keyword is present.
SSLKeypair keypair_tag
Specifies the keypair to use for SSL/HTTPS. This keyword requires one keypair tag
which is the name of a file in the /etc/security/firewall/vpn/keypairs/ directory
with the .cer or .pvk extension removed.
Note: The Client Certificate Authentication feature of Passport One is intended to be
used only by sites that control their own Certification Authority. See the Caution
statement in “SSL and Passport One” on page II-188.
CyberGuard Firewall Manual
II-203
Passport One - Underlying Constructs
The following example shows the layout of the clasd.conf file.
# /etc/security/firewall/clas/clasd.conf
include
<clasd.common.conf>
Interface
192.168.2.30
Interface
192.168.2.31
MaxSession
240
RefreshPeriod
4
#
Client
ericp
normal
192.9.200.*
0
Client
susanj
normal
*
120
Figure II-73. Passport One Configuration File Example
If you change a Client or CertProfile rule or the RefreshPeriod after clasd is
running:
1. Determine the process ID (PID) of the Passport One daemon:
ps -ef | grep clasd
2. Send a hangup signal to clasd:
kill -HUP PID
Note: This procedure will not break current connections.
If you change an Interface or MaxSession value, or if the ClientCAs is
added, deleted, or changed after clasd is running:
1. Determine the process ID (PID) of the Passport One daemon:
ps -ef | grep clasd
2. Stop the Passport One daemon:
kill -SIGTERM PID
3. Restart the Passport One daemon:
/usr/sbin/firewall/clasd options
Note: This procedure will break current connections.
II-204
Chapter 9, Passport One
Passport One - Underlying Constructs
If you change a rule that affects the NT Authentication Detection daemon
after ntadd is running:
1. Determine the process ID (PID) of the NT Authentication Detection daemon:
ps -ef | grep ntadd
2. Send a hangup signal to the daemon:
kill -HUP PID
Note: This procedure will not break current connections.
Passport One Profile Files
9
A profile file is a template for packet-filtering rules that correspond to a user’s access
attributes. Many profile files can exist, and several users can share a profile file. The
clasd daemon constructs packet-filtering rules from the file and inserts the rules into its
local netguard.clas.conf file for Passport One and its local netguard.ntad.conf file
for NTAD.
Profile files do not have extensions and by default are located in one of the following two
directories:
◆
◆
/etc/security/firewall/clas/profiles/common/
/etc/security/firewall/clas/profiles/local/
The common directory is updated by the Central Management feature, and the local
directory is updated by the local system.
Profile files consist of packet-filtering rules and the following keywords:
%USER
Inserts the source IP address of the system from which the user made the
authenticating connection. To insert the source IP address and the source
port of the system from which the user made the authenticating connection, see the -S option in the “Passport One Command (clasd)” on page
II-206.
include
Includes other profile files.
CyberGuard Firewall Manual
II-205
Passport One - Underlying Constructs
The following example shows the layout of a profile file.
# /etc/security/firewall/profile/devprofile
include
jimd_profile
permit
80/tcp
%USER
ALL_EXTERNAL
permit
21/tcp
ALL_INTERNAL
ALL_EXTERNAL
proxy
23/tcp
ALL_INTERNAL
%USER
ENABLE_REPLY
Figure II-74. Passport One Profile File Example
Passport One Command (clasd)
9
Start the Passport One daemon by running the clasd command on the command line or
adding the options to the /etc/security/startup.conf file.
Syntax:
/usr/sbin/firewall/clasd [-h http_port] [-t telnet_port] [-s https_port] [-S ] [-d working_dir]
Options and arguments:
-h http_port
Alternate port on which to listen for HTTP connections. The
default is port 3080. A value of 0 disables the port.
-t telnet_port
Alternate port on which to listen for telnet connections. The
default is port 3023. A value of 0 disables the port.
-s https_port
Alternate port on which to listen for HTTPS connections. The
default is port 3443. A value of 0 disables the port.
-S
Changes the functionality of the %USER keyword in the profile
file. Without the -S option, %USER inserts the source IP address
of the system from which the user made the authenticating connection. With the -S option, %USER inserts the source IP address
and the source port of the system from which the user made the
authenticating connection.
-d working_dir
Alternate directory for Passport One files.
Note: To run the Passport One daemon standalone from the command line, you must
invoke the command at NETWORK level. If you are not running at NETWORK
level, precede the command with the newlvl(1M) command as follows:
/usr/sbin/newlvl NETWORK /usr/sbin/firewall/clasd options
II-206
Chapter 9, Passport One
Passport One - Underlying Constructs
Monitor and Control Active Connections Command (daemon)
9
The daemon command can be used to monitor and control the Passport One process.
This command must be run by root at NETWORK level on the firewall running the Passport One process.
Syntax:
daemon -p clasd list
daemon -p clasd count
daemon -p clasd kill n
Options and arguments:
list
Displays a list of all connections. Each connection in the list is displayed with
four fields:
- Socket connection
- IP address of the connection
- Login used for the connection
- Time until the connection will timeout, displayed as hh:mm:ss
count
Displays a count of the connections.
kill n
Kills the connection with socket connection n. This number is determined
from the output of the list command.
CyberGuard Firewall Manual
II-207
Passport One - Underlying Constructs
NT Authentication Detection Command (ntadd)
9
The ntadd command is used for NT Authentication Detection and NT Resource Authentication Detection. Start the standalone daemon by running the ntadd command on the
command line or adding the options to the /etc/security/startup.conf file.
Syntax:
/usr/sbin/firewall/ntadd [-A] [-S sharename]
Options and arguments:
-A
Authentication option. When invoked with only the -A option, the
daemon will perform only NT authentication detection.
-S sharename
Share option. When invoked with only the -S option, the daemon
will perform only NT resource usage detection. The sharename
argument specifies the name of a share that NTADD is to monitor
for file access.
-A and -S
When invoked with both the -A and -S options, the daemon will
perform both authentication detection and resource usage detection.
no option specified
When no options are specified, the daemon will perform only
authentication detection.
Note: To run the NT Authentication Detection daemon standalone from the command
line, you must invoke the command at NETWORK level. If you are not running at
NETWORK level, precede the command with the newlvl(1M) command as follows:
/usr/sbin/newlvl NETWORK /usr/sbin/firewall/ntadd options
II-208
Chapter 9, Passport One
Passport One - Underlying Constructs
NT Authentication Detection Command Status (ntaddstat)
9
This command displays the status of the current connections for the NT Authentication
Detection daemon. If a connection has been authenticated, the profile included in the
packet-filtering rules is displayed as well.
Syntax:
/usr/sbin/firewall/ntaddstat [-n ]
Options and arguments:
This option causes IP addresses and port numbers to be displayed. The default
for the command is to convert IP addresses and port numbers into host and
service names.
-n
Note: To run the NT Authentication Detection Command Status daemon standalone
from the command line, you must invoke the command at NETWORK level. If
you are not running at NETWORK level, precede the command with the
newlvl(1M) command as follows:
/usr/sbin/newlvl NETWORK /usr/sbin/firewall/ntaddstat options
CyberGuard Firewall Manual
II-209
Passport One - Underlying Constructs
Certificate Signing Request Command (mkcsr)
9
The mkcsr command is used to create a Privacy Enhanced Mail (PEM) encoded Certificate Signing Request (CSR). A CSR consists of a Distinguished Name (DN) and a public
cryptographic key. The public cryptographic key is signed with the corresponding private
cryptographic key. Only RSA key pairs are used by mkcsr.
The mkcsr program prompts for the elements of a DN. Your Certification Authority will
have recommendations and requirements for each of the following elements:
◆
◆
◆
◆
◆
◆
◆
Country name
State or province name
Locality name
Organization name
Organizational unit name
Common name
E-mail address
m k c s r reads the elements it will use for constructing the DN from
/etc/security/firewall/keys/cert.conf. This file can be edited to specify the prompts
and provide defaults for the elements. See the cert.conf(4) manual page for complete
information.
Each time mkcsr is run, it creates a new key pair (unless the -k option is used). Private
keys are stored in the / e t c / s e c u r i t y / f i re w a l l / k e y s / directory in files named
privkeynn.pem, where nn is a serial number. The most recently generated key is pointed
to by the symbolic link /etc/security/firewall/keys/privkey.pem.
The Certificate Signing Request is placed in the /etc/security/firewall/keys/csr.pem
file. The csr.pem file can be forwarded to a Certification Authority (CA) who converts
the information into a digital certificate and returns it to the user. The CA determines the
method by which the CSR is communicated to the CA, the methods by which the CA
determines the authenticity of the information in the CSR, and the means of communicating the digital certificate to the user.
Syntax:
/usr/sbin/firewall/mkcsr [-h ] [-k keyfile]
Options and arguments:
II-210
-h
Displays command syntax information.
-k keyfile
Uses the key pair located in the keyfile file instead of generating a
new key pair.
Chapter 9, Passport One
Chapter 10
Chapter 10.
SOCKS
II
SOCKS
10
SOCKS is a protocol that allows client programs that use the sockets API to send TCP and
UDP traffic across a firewall. SOCKS uses sockets to represent and track individual connections, and SOCKS hides the IP addresses of client applications. SOCKS clients are
specially modified programs that are able to connect to the SOCKS server. A SOCKS
server processes connection requests from clients and either permits or rejects these
requests based on the requesting user or the requested destination. SOCKS is most commonly used as a proxy server so that hosts in a LAN can pass traffic through a firewall and
go out to the Internet.
SOCKS has two components, the SOCKS server and the SOCKS client. The SOCKS
server is implemented at the application layer; the SOCKS client is implemented between
the application and transport layers. SOCKS enables hosts on one side of a SOCKS server
to access hosts on the other side of a SOCKS server without direct communication
between the two hosts.
When an application client needs to connect to an application server, the client connects to
a SOCKS proxy server. The SOCKS proxy server connects to the application server on
behalf of the client and relays data between the client and the server. The SOCKS proxy
server is the client of the application server.
II-211
SOCKS
The SOCKS Protocol Version 5 performs the following functions:
◆
◆
◆
◆
Makes connection requests
Authenticates users
Sets up proxy circuits
Relays application data
The SOCKS Protocol Version 5 is also known as authenticated firewall traversal (AFT)
and is discussed in RFC 1928. The CyberGuard Firewall implements Dante, a version of
the SOCKS client and server software developed by Inferno Nettverk A/S. Dante is distributed under the BSD license.
Note: The SOCKS server currently does not support GSSAPI. User names and passwords are passed between the client and the SOCKS server without encryption.
GSSAPI, Generic Security Service Application Program Interface, provides security services to calling applications. It allows a communicating application to
authenticate the user associated with another application, to delegate rights to
another application, and to apply security services such as confidentiality and
integrity on a per-message basis. GSSAPI is discussed in RFC 1508 and RFC
1509.
II-212
Chapter 10, SOCKS
SOCKS Window
SOCKS Window
10
Use this window to enable SOCKS, identify the internal and external interfaces of the
SOCKS daemon, and define the rules governing communications between SOCKS clients
and the SOCKS daemon. Information about SOCKS appears on two notebook pages:
Setup and Rules.
Figure II-75. SOCKS Window - Setup Page
The following windows also are related to SOCKS:
Packet-Filtering Rules
Alerts and Activities
Activity Reports
Configure packet-filtering rules for SOCKS
(Activities page) Enable logging of SOCKS activities
Monitor SOCKS activities
See also:
◆
◆
◆
◆
◆
“Window Components” on page I-10
“Activity Reports Window” on page I-252
“Packet-Filtering Rules Window” on page II-22
“Activities Page” on page II-341
“How to Configure SOCKS” on page II-217
CyberGuard Firewall Manual
II-213
SOCKS Window
SOCKS Setup Page
10
Use this page of the SOCKS window to enable SOCKS, define the internal and external
networks that use SOCKS, and to set timeout variables.
This page contains the following fields and controls:
Enable SOCKS
Starts the SOCKS daemon.
External Interfaces List of the firewall’s external interfaces through which the
SOCKS daemon sends outgoing traffic. At least one external
interface check box must be checked.
Internal Interfaces List of the firewall’s internal interfaces through which the SOCKS
daemon listens for incoming connections from SOCKS clients. At
least one internal interface check box must be checked.
Port Number(s)
(Optional) Port numbers on which the SOCKS daemon listens for
incoming connections from SOCKS clients. Each internal interface check box has a port number text field that affects a commaseparated list of port numbers. The default SOCKS port number
of 1080 is assumed if the port number text field is left blank.
Connection Timeout (seconds)
(Optional) Specifies the length of time in seconds that a SOCKS
client has to send a request after a successful connection. The
default value is 0, which indicates that no timeout is imposed.
I/O Timeout (seconds)
(Optional) Specifies the length of time in seconds that an established connection can remain idle. The default value is 0, which
indicates that no timeout is imposed.
See also:
◆
◆
II-214
“Console Messages Window” on page I-245
“Packet-Filtering Rules Window” on page II-22
Chapter 10, SOCKS
SOCKS Window
SOCKS Rules Page
10
Use this page of the SOCKS window to define the rules for permitting or denying a specified SOCKS service request based on the requesting and destination IP addresses, the type
of service or destination port number, and the requesting users.
Figure II-76. SOCKS Window - Rules Page
This page contains the following fields and controls:
Update Packet-Filter Rules
Automatically generates packet-filtering rules to allowed the
specified traffic. The rules permit both SOCKS and the requested
services. The following example shows the rules that permit
through the firewall only SOCKSified Telnet and FTP clients that
are internal to the firewall:
# SOCKS rules
# (added automatically by the CyberGuard GUI)
permit socks/tcp
ALL_INTERNAL FIREWALL
# Rules for the selected client services of SOCKS
permit telnet/tcp FIREWALL
EVERYONE
permit ftp/tcp
FIREWALL
EVERYONE
#End of SOCKS rules
Type
Has the following settings:
Permit
Allows service requests that match this rule.
Deny
CyberGuard Firewall Manual
II-215
SOCKS Window
Rejects service requests that match this rule; requests not matching any rule are denied.
Comment
Treats this line as a comment; permits typing a comment in the
Comment field.
Origin
Network IP address, including the lenth of the network prefix, of a
requesting host. 0.0.0.0/0 will match any IP address. Individual IP
addresses require a /32.
Destination
Network IP address, including the length of the network prefix, of
a destination host. 0.0.0.0/0 will match any IP address. Individual
IP addresses require a /32.
Port or Service
Relational operator and a destination port number (0-65535), port
number range, or service name from the /etc/inet/services file.
The relational operator specifies the condition of the port number
or port number range. Values include: < (less than), <= (less than
or equal to), = (equal to), != (not equal to), >= (greater than or
equal to), > (greater than), and the word Any (match any port
number). If the operator is Any, the text input field is not enabled,
and the rule applies to all destination port numbers or services. A
port number range can be entered in the form of: start_portend_port/tcp or start_port-end_port/udp.
Users
Login IDs of users requesting the SOCKS service. Each user
name should be separated by a comma. If this field is blank, the
line applies to any login ID. The maximum length of this field is
400 characters.
Comment
Text or a disabled rule. This field may be blank.
Note: The order of SOCKS rules is significant. When a service request arrives, the software scans the rule list from top to bottom looking for a rule match, applies the
first rule that matches the characteristics of the requesting client, and ignores subsequent rules. If no rule matches, the request is denied.
II-216
Chapter 10, SOCKS
SOCKS Window
How to Configure SOCKS
10
You can use the SOCKS window set up SOCKS services and define the rules for permitting or denying a specified SOCKS service request.
The order of SOCKS rules is significant. When a service request arrives, the software
scans the rule list from top to bottom looking for a rule match, applies the first rule that
matches the characteristics of the requesting client, and ignores subsequent rules. If no
rule matches, the request is denied.
To display the Setup page of the SOCKS window:
1. Select Configuration from the Control Panel.
2. Select SOCKS. The Setup page of the SOCKS window appears.
To setup the SOCKS configuration:
1. Check the Enable SOCKS box.
2. Check at least one External Interface through which the SOCKS daemon sends
outgoing traffic.
3. Check at least one Internal Interface through which the SOCKS daemon listens for
incomming connections from SOCKS clients.
4. (Optional) Add one or more port numbers in the Port Number(s) field.
5. (Optional) Type a timeout value in seconds in the Connection Timeout (seconds)
field.
6. (Optional) Type a timeout value in seconds in the I/O Timeout (seconds) field.
7. Click on Save. Your changes take effect at the next system reboot.
8. (Optional) Click on Use. Your changes take effect immediately.
To setup SOCKS rules:
1. Click on the Rules tab. The Rules page appears.
2. (Optional) Select the rule that you want the new rule to follow. (Skip this step if you
want to add a new rule at the top of the list.)
3. Click on Insert. An incomplete new line appears in the list. The Type field is set to
Permit.
4. Select Permit or Deny in the Type field.
5. Type an IP address (including the length of the network prefix) in the Origin field.
6. Type an IP address in the Destination field.
CyberGuard Firewall Manual
II-217
SOCKS Window
7. (Optional) Select a relational operator to indicate a range of ports.
8. (Optional) Select the service to apply the rule to. The selected entry appears in the
Port or Service field. You also can type in the service name with or without a protocol. A port number or a port number range (0-65535) is also accepted, but in this case,
the protocol (tcp or udp) is required. For example:
http
http/tcp
23/tcp
23-80/tcp
9. (Optional) Type a comma-separated list of login IDs in the Users field.
10. Click on Save. Your changes take effect at the next system reboot. If the Update
Packet-Filter Rules box is checked, updated packet-filtering rules automatically
appear in the Packet-Filtering Rules window.
11. (Optional) Click on Use. Your changes take effect immediately.
To change a SOCKS rule:
1. Select the rule that you want to change.
2. Edit the fields that you want to change.
3. Click on Save. Your changes take effect at the next system reboot. If the Update
Packet-Filter Rules box is checked, updated packet-filtering rules automatically
appear in the Packet-Filtering Rules window.
4. (Optional) Click on Use. Your changes take effect immediately.
To delete a SOCKS rule:
1. Select the rule that you want to delete.
2. Click on Delete. The rule is deleted. Packet-filtering rules are automatically removed
from the Packet-Filtering Rules window.
3. Click on Save. Your changes take effect at the next system reboot.
4. (Optional) Click on Use. Your changes take effect immediately.
See also “Packet-Filtering Rules Window” on page II-22.
II-218
Chapter 10, SOCKS
SOCKS - Underlying Constructs
SOCKS - Underlying Constructs
10
Advanced Users Only! The GUI automates the editing of files and invocation of commands described in this section. If you choose to manually edit any file, you must first
close every window displayed from the Configuration menu and complete all edits of
the file before continuing GUI configuration activities.
To configure the SOCKS server:
1. Use the /etc/security/cyber/trace.conf file if you want to log SOCKS activity in a
file for auditing purposes.
2. Define the SOCKS service in the /etc/inet/services file:
socks
1080/tcp
3. Define packet-filtering rules in the /etc/security/firewall/ng_inet/netguard.conf
file. You must permit both SOCKS and the requested service. The following example
shows how to permit through the firewall only SOCKSified Telnet and FTP clients that
are internal to the firewall:
permit
permit
permit
socks/tcp
telnet/tcp
ftp/tcp
ALL_INTERNAL FIREWALL
FIREWALL
EVERYONE
FIREWALL
EVERYONE
4. Define the SOCKS configuration and rules in the /etc/security/firewall/proxies/sock5d.conf file.
5. Enable SOCKS for standalone operation through the /etc/security/firewall/startup.conf file:
SOCKS5=true
SOCKS_OPTS5=options
See also:
◆
◆
◆
◆
“Network Services File (services)” on page II-40
“Packet-Filtering Rules Configuration File (netguard.conf)” on page II-43
“Activities Configuration File (trace.conf)” on page II-366
“How to Enable a Standalone Proxy (startup.conf)” on page III-11
CyberGuard Firewall Manual
II-219
SOCKS - Underlying Constructs
SOCKS Configuration File (sock5d.conf)
10
Use the /etc/security/firewall/proxies/sock5d.conf Dante server configuration file
to control access to the SOCKS proxy server and its services. You can define the rules
governing communications between SOCKS clients and the SOCKS proxy server based
on the requesting host, the destination host, the type of service, and the requesting user.
The configuration file for the Dante server controls both access and logging. It is divided
into two parts, server settings and rules. The server settings control the generic behavior of
the server, such as internal and external IP addresses and the connection timeout. Two sets
of rules work at different levels: client-rules and socks-rules.
Client-rules are checked first and are used to see if the client is allowed to connect to the
Dante server. These rules work at the TCP/IP level. Socks-rules are a level higher and are
checked after the client connection has been accepted by the client-rules. The socks-rules
are used to evaluate the socks request that the client sends. They thus work at the socks
protocol level.
The order of SOCKS rules is significant. When a service request arrives, the rules are
scanned from top to bottom looking for a match. The first rule that matches is applied and
subsequent rules are ignored. Requests that do not match any rule are denied.
For complete details about the sock5d.conf file, see the sock5d.conf(4) man page. For
information about the Dante server, see http://www.inet.no/dante.
II-220
Chapter 10, SOCKS
SOCKS - Underlying Constructs
SOCKS Command (sock5d)
10
Use the /usr/sbin/firewall/sock5d command to run the Dante network SOCKS server
daemon.
Syntax:
/usr/sbin/firewall/sock5d [-DLhVdnv] [-N copies] [-f config_file]
Options and arguments:
-D
The sock5d daemon will detach from the controlling terminal and run in
the background as a system daemon.
-L
Displays the sock5d license.
-N copies
The sock5d daemon will fork off copies of itself when starting. This
option can be used for very busy servers.
-V
Verifies the configuration file and exits.
-d
Enables debugging.
-f config_file The sock5d daemon will read its configuration from config_file.
-h
Shows the currently valid options.
-n
Disables TCP keep-alive messages. Normally sock5d enables TCP
keep-alive messages so that connections from machines that have crashed
or for other reasons no longer can be reached will time out.
-v
Displays the sock5d version.
CyberGuard Firewall Manual
II-221
SOCKS - Underlying Constructs
II-222
Chapter 10, SOCKS
Chapter 11
Chapter 11.
II
Intrusion Detection
NetProwler provides dynamic network intrusion detection that transparently examines
network traffic. It identifies, logs, and terminates unauthorized use, misuse and abuse of
computer systems by internal and external hackers. The NetProwler IDS consists of the
following components: the NetProwler Console, the NetProwler Manager, and one or
more NetProwler Agents. The NetProwler Console is used to configure and monitor the
NetProwler Agent(s) through the NetProwler Manager. Each of these components can run
on separate systems or they can all be on the same system. The NetProwler Agent monitors the network traffic looking for suspicious events.
The NetProwler Agent can be configured to send a packet containing the offending
source, destination, and protocol to the firewall when a suspicious event occurs. For security, the Agent computes an HMAC-MD5 message digest and appends this to the packet
for authenticity. The authentication string used for creating the message digest is configurable through the Console.
The CyberGuard Firewall can be configured to work with NetProwler to stop offending
connections. The NetProwler Agent can be configured to send a notification packet with
information about the offending session to the CyberGuard Firewall so that the firewall
can shutdown network paths as needed. As a security measure, the firewall can be configured to accept packets from a specific address. Upon receipt of a packet that authenticates
using the message digest, the firewall will audit the information and can deny traffic based
on the information in the packet if configured to do so. The alert subsystem can be configured to send an alert based on the audit event.
II-223
Intrusion Detection Window
Intrusion Detection Window
11
Use this window to enable and configure Intrusion Detection.
Figure II-77. Intrusion Detection Window
This window contains the following fields and controls:
Enable Intrusion Detection Monitor
Enables the Intrusion Detection system on the firewall to
monitor packets on the configured port.
Shutdown Offending Connections
Upon receipt of a valid packet (a packet from a valid
address that authenticates), the Intrusion Detection system
will always audit the packet. When this box is checked,
IDS will add a packet-filtering rule that will disallow further traffic from the source address to the destination
address given in the packet. This disallowed traffic will be
based on the ports and protocol specified in the packet.
II-224
Address
Host name or IP address of the NetProwler agent. If an
address is specified in this field, only packets from the
specified address are accepted. If any is specified, packets
from any address are accepted as long as they authenticate.
Port
The NetProwler port for accepting packets from the network. The default port is 426.
Rule Time Out
Time in minutes that the packet-filtering rule, added when
Shutdown Offending Connection is checked, is valid. The
default is 1440 minutes (24 hours).
Chapter 11, Intrusion Detection
Intrusion Detection Window
Authentication String
String used to compute the HMAC-MD5 digest used for
authenticating packets from the Agent. The packet and this
string are used to compute a digest that must match the
digest sent with the packet in order for the packet to be
valid. Thus, the Agent and the firewall must be configured
with the same authentication string.
Confirm Auth String
Authentication string retyped for confirmation.
How to Configure Intrusion Detection
11
You can use the Intrusion Detection window to configure the prowler to listen for packets
describing suspicious events from NetProwler IDS and to shut down offending connections.
To display the expanded Intrusion Detection window:
1. Select Configuration from the Control Panel.
2. Select Intrusion Detection. The Intrusion Detection window appears.
To add a host to your network:
1. Check Enable Intrusion Detection Monitor.
2. Check Shutdown Offending Connections to add a packet-filtering rule to disallow further traffic from the source address to the destination address described in the
packet.
3. Type the host name or IP address of the NetProwler Agent in the Address field.
4. Type the port number for accepting information from the NetProwler in the Port field.
5. If Shutdown Offending Connections is checked, type a time in minutes for the
packet-filtering rule to remain active in the Rule Time Out field.
6. Type the authentication string used to compute the HMAC-MD5 digest used for
authenticating packets in the Authentication String field, and then confirm this
string in the Confirm Auth String field.
7. Click on Save.
CyberGuard Firewall Manual
II-225
Intrusion Detection - Underlying Constructs
Intrusion Detection - Underlying Constructs
11
Advanced Users Only! The GUI automates the editing of files and invocation of commands described in this section. If you choose to manually edit any file, you must first
close every window displayed from the Configuration menu and complete all edits of
the file before continuing GUI configuration activities.
Intrusion Detection File (prowler.conf)
11
The /etc/security/firewall/prowler.conf file is
Format guidelines:
◆
◆
◆
Each host must be listed on a separate line
Fields are separated by white space (tabs or spaces)
Comments begin with the # character and continue until the end of the line
Statements:
Enable yes|no
(Required) Enables the Intrusion Detection system on the firewall to monitor packets
on the configured port.
Shutdown yes|no
(Optional) Upon receipt of a valid packet (a packet from a valid address that authenticates), the Intrusion Detection system will always audit the packet. When this box is
checked, IDS will add a packet-filtering rule that will disallow further traffic from the
source address to the destination address given in the packet. This disallowed traffic
will be based on the ports and protocol specified in the packet.
Addr host_name|IP_address|any
(Required) Host name or IP address of the NetProwler agent. If a host name or address
is specified, only packets from the specified address are accepted. If any is specified,
packets from any address are accepted as long as they authenticate.
Port port_number
(Optional) The NetProwler port for accepting packets from the network. The default
port is 426. If this keyword is not present, the default port number is used.
RuleTO minutes
(Optional) Time in minutes that the packet-filtering rule, added when Shutdown yes
is present, is valid. The default is 1440 minutes (24 hours). If this keyword is not
present, the default time is used.
II-226
Chapter 11, Intrusion Detection
Intrusion Detection - Underlying Constructs
AuthString authentication_string
(Required) String used to compute the HMAC-MD5 digest used for authenticating
packets from the Agent. The packet and this string are used to compute a digest that
must match the digest sent with the packet in order for the packet to be valid. Thus,
the Agent and the firewall must be configured with the same authentication string.
The following example shows a typical prowler.conf file.
# /etc/security/firewall/prowler.conf
Enable
yes
Shutdown
yes
Addr
1.23.456.7
AuthString
Figure II-78. Intrusion Detection File Example
CyberGuard Firewall Manual
II-227
Intrusion Detection - Underlying Constructs
II-228
Chapter 11, Intrusion Detection
Chapter 12
Chapter 12.
II
Security Options
A number of security options can be configured on the firewall. These security options
include the handling of dynamic packet-filtering rules, user password requirements, and
user blacklisting. These security options play an important role in customizing and securing your firewall.
Security Options Window
12
Use this window to configure various security options for the CyberGuard Firewall. The
Security Options window has three notebook pages: Dynamic Rules, Password Options,
and User Blacklisting.
Figure II-79. Security Options Window - Dynamic Rules Page
II-229
Security Options Window
Security Options - Dynamic Rules Page
12
Use this page of the Security Options window to prohibit dynamic packet-filtering rules
from being automatically inserted by the firewall.
This page contains the following fields and controls:
Do not allow dynamic packet-filtering rules to be inserted
During the course of firewall operation, dynamic packet filtering-rules are sometimes
added. Check this box to prohibit dynamic packet-filtering rules from being added.
automatically. If this option is checked, the user must add the appropriate rules for the
firewall to function.
See also “Packet-Filtering Rules” on page II-21.
Security Options - Password Options Page
12
Use this page of the Security Options window to specify requirements for user passwords.
Figure II-80. Security Options Window - Password Options Page
This page contains the following fields and controls.
Enter length of password history
Number of days the system will remember the previous password. This prevents users
from reusing passwords. This value can be set between 0 (off) and 50.
Enter minimum password length
Specifies the minimum number of characters that must be present in a valid password.
The default is 6. Valid values are 1 through 8.
II-230
Chapter 12, Security Options
Security Options Window
Require passwords to be a combination of mixed case, numbers, and punctuation
Requires passwords to contain a combination of three (3) of four (4) of the following:
- An uppercase letter
- A lowercase letter
- A number
- Some form of punctuation
Checking this setting ensures more secure passwords.
See also:
◆
◆
“CyberGuard Firewall Login Window” on page I-47
“Password Page” on page II-160
Security Options - User Blacklisting Page
12
Use this page of the Security Options window to enable user blacklisting, specify how
users are removed from the blacklist, and list users who are not to be blacklisted. This
page applies to firewall users, such as FSO and FSM users, and not to proxy users. For
example, a user attempting to login from the console as cgadmin would be subject to
blacklisting.
User blacklisting works in conjunction with the Failed Logins alert on the Alerts page of
the Alerts, Activities, and Archives window. (See “Alerts Page” on page II-328 and “Suspicious Event Types” on page II-331.) You must enable the Failed Logins alert to enable
user blacklisting on the firewall.
CyberGuard Firewall Manual
II-231
Security Options Window
Figure II-81. Security Options Window - User Blacklisting Page
This page contains the following fields and controls.
Enable user blacklisting
Enables the blacklisting feature.
Number of failed attempts before being blacklisted
Specifies the number of times a user can fail to authenticate in the time specified in
the Interval field before the user ID is disabled.
Interval (secs)
Specifies the time period during which a user can fail to authentication the number of
times specified in the Number of failed attempts before being blacklisted
field before the user ID is disabled.
For example, assume the Number of failed attempts before being blacklisted
field is 3 and the Interval (secs) field is 20. If a user fails to authentication three
time within 20 seconds, the user is blacklisted. However, if a user fails to authenticate
twice in 19 seconds, and fails to authenticate again 3 seconds later, the alert will not
triggered, and the user will not be blacklisted.
Enable automatic user unblacklisting
Specifies that blacklisted users will automatically unblacklisted after the number of
days specified in the Number of days to be blacklisted field.
II-232
Chapter 12, Security Options
Security Options Window
Number of days to be blacklisted
Specifies the number of days a blacklisted user will be unable to login to the firewall.
Times per day to unblacklist users
Specifies how often to remove users from the blacklist so they can login to the firewall. The options are Never, Hourly, and Daily
List of exempt users
Users, such as system administrators, who should not be blacklisted under any circumstances.
Blacklisted Users
List of users who have been blacklisted.
Remove blacklist status
When a user in the Blacklisted Users box is selected this button is enabled. When
the button is pressed, the user is removed from the list. However, the user is not reenabled until Use is clicked.
CyberGuard Firewall Manual
II-233
Security Options Window
II-234
Chapter 12, Security Options
Chapter 13
Chapter 13.
VPN
II
Virtual Private Network (VPN)
13
A Virtual Private Network (VPN) securely connects distant networks and nodes to form a
single, protected network. The data is protected as it tunnels through unsecured networks,
such as the Internet or intranets. The VPN ensures data origin authentication, data integrity, data confidentiality, and anti-replay protection.
The CyberGuard VPN is a gateway between trusted and non-trusted networks. It is a security gateway, protecting network access (netguard), network visibility (NAT), and network
data (VPN). The two types of VPN connections that are supported by the CyberGuard
VPN are gateway-to-gateway and VPN host-to-gateway.
In Figure II-82, the gateway-to-gateway tunnel connects networks A and B to form a Virtual Private Network (VPN). The gateway-to-gateway connection is how the distant and
disparate networks of enterprise branch offices are brought together to form the VPN. The
host-to-gateway tunnel allows the remote user to connect to the VPN from anywhere
Internet access is available. The VPN host type connection is useful for enterprise telecommuters, a company’s mobile sales force, and extranet partner access to protected business-related services provided by the enterprise.
Figure II-82. VPN Connections
II-235
VPN
IP Security (IPSec)
13
The CyberGuard VPN is based on IP Security (IPSec). IPSec secures the data at the network level. It defines a security protocol for both IPv4 and IPv6, which automatically protects upper layer protocols (TCP, UDP, etc.).
The endpoints of tunnels are referred to as the IPSec peers. The security attributes shared
between the CyberGuard VPN and the peer are referred to as the VPN secure channel.
Typically, it is the remote endpoint relative to the CyberGuard VPN being managed that is
referred to as the IPSec peer, or simply “the peer”.
The IPSec protocol suite consists of traffic security protocols and cryptographic key management procedures and protocols that are used together to provide security at the network
level. The IPSec protocol suite consists of the following:
◆
◆
◆
Authentication Header (AH) protocol
Encapsulating Security Payload (ESP) protocol
Internet Key Exchange (IKE)
The Authentication Header (AH) protocol is used when only integrity and origin protection are needed. It guarantees that the packet is not modified in transit, and that it was
actually sent by the party that is claimed to be the sender. However, it does not provide
confidentiality for the traffic.
The Encapsulating Security Payload (ESP) protocol, like AH, specifies that a header is
included in a data packet and provides packet data encryption. ESP does not protect the IP
header.
The communicating parties must agree on the protocol, the parameters to be used, and the
cryptographic keys to be used with the security protocols. This information is negotiated
using either the Internet Key Exchange (IKE) or manually to create a Security Association
(SA)
A security association is a set of security parameters that specifies the protocols, their
parameters, and the cryptographic keys used between two hosts. An SA is created when
hosts communicate for the first time, and remains active until it expires or the limit on the
amount of traffic is reached. It is the purpose of the key management protocol to negotiate
and create security associations between hosts.
A security association is identified by a Security Parameters Index (SPI) value, together
with the address of the destination host. An SPI is an arbitrary 32-bit number that is
assigned to a security association when the security association is created. The AH and
ESP protocol headers always include the SPI number. This value is used to obtain the
security association (e.g. encryption and authentication keys) that will be used to verify or
decrypt the packet.
The basic components of the CyberGuard VPN IPSec implementation are illustrated in
Figure II-83.
II-236
Chapter 13, Virtual Private Network (VPN)
VPN
Figure II-83. IPSec Implementation
The IPSec engine runs in the kernel. It interfaces with the Security Policy Database (SPD)
and the Security Association Database (SADB) through the Policy Manager (PM).
The SPD defines the security policy to be enforced for both inbound and outbound packets. The SADB contains all active Security Associations (SAs). The Security Association defines the security processing that is performed on IPSec traffic traveling in a particular direction, inbound or outbound.
The Internet Key Exchange (IKE) component negotiates the SAs for a connection. IKE is
activated for inbound requests from a VPN peer and by the IPSec Policy Manager for outbound traffic that needs an SA to communicate with its peer.
The Policy Manager runs at both the user and the kernel level and manages the data in the
SPD and SADB. The IPSec engine interfaces with the Policy Manager to retrieve the
appropriate SA. IKE interfaces with the Policy Manager to negotiate with peer IKE daemons, and to relay the outcome of IKE negotiations. A policy configuration component
interfaces with the Policy Manager to update configuration information.
CyberGuard Firewall Manual
II-237
VPN
IKE and Manual Keying
13
When defining a secure channel for a peer, the firewall administrator may choose to establish keys using IKE, which is the default mechanism, or Manual Keying.
Internet Key Exchange (IKE)
13
IKE is the default method used to establish authentication keys. IKE parameters can be
customized on a per-channel basis. Two types of parameters that can be customized:
authentication data and IKE data.
Authentication Data
Authentication data governs the mechanism used between the CyberGuard VPN and a
peer to authenticate the identity of each other. Two methods of authentication are available: preshared secret and certificates. These two methods are not mutually exclusive.
If both methods are configured, the CyberGuard VPN will first attempt to authenticate
using certificates, since this is considered the more sophisticated method. If authentication
via certificates is unsuccessful, the firewall will try to authenticate using the preshared
secret.
Preshared Secret
The Firewall Administrator must manually agree and securely communicate a secret
phrase with the administrator of the peer, because the same preshared secret must be configured on the peer system. Although using a preshared secret is easy to configure, the
burden of securely sharing this secret becomes prohibitive as the number of peers
increases. Using certificates for authentication is more manageable.
Certificates
A certificate is a publicly known, electronic document that binds a user’s identity with his
digital signature. A certificate is issued by a Certification Authority (CA). There are many
CAs that issue certificates.
For more information on certificates, see “Certificates and the CyberGuard Firewall” on
page II-241.
IKE Data
IKE Data consists of parameters used for IKE negotiations with the peer. These include
IKE Protection Strategy, IKE Mode, and a Diffie-Hellman group number used to provide
Perfect Forward Secrecy.
The IKE Protection Strategy consists of a name and a list of parameter groupings. Each
grouping defines all of the parameters needed for IKE. The list represents a priorityordered set of IKE parameters; the first grouping in the list has highest priority. The firewall is preloaded with three IKE sample protection strategies. During the IKE process, the
IKE Protection Strategy is negotiated between the CyberGuard VPN and its peer. For the
negotiation to be successful, one of the groupings listed in the IKE Protection Strategy
will be agreed upon as the IKE parameters to be used. The successful negotiation of an
IKE Protection Strategy results in an IKE SA (Security Association) between the CyberGuard VPN and the peer.
II-238
Chapter 13, Virtual Private Network (VPN)
VPN
For more information, refer to the following sections:
◆
◆
“VPN Secure Channels - IKE Advanced Settings Dialog Box” on page II-267
“IKE Protection Strategies Window” on page II-256
Packet-Filtering Rules for IKE
IKE is an application-layer protocol that connects and accepts connections on port
500/udp. The firewall automatically configures 500/udp traffic between the firewall and
its IPSec peers. Instead of hard-coding port 500 in these automatically configured packetfiltering rules, the service name is used.
Packet-filtering rules for IKE are automatically inserted as needed to permit IKE traffic to
the peer. The rules will not appear in any netguard configuration file. The netguard -ln
command may be used to verify the existence of the static IKE rules:
permit
permit
ike/udp
ike/udp
FIREWALL
IPSec_Peer
IPSec_Peer
FIREWALL
The IKE service port is found in the /etc/services file, and the service port name is to be
used to resolve the actual port number. Because the IKE service port is hard-coded in
many IPSec implementations, changing its value may result in interoperability problems.
For more information, see “Network Services File (services)” on page II-40.
Manual Keying
13
If the firewall administrator chooses to use manual keying, IPSec peer authentication is
not done because IKE is not performed.
Manual keys must be defined for network traffic inbound to the CyberGuard VPN and for
network traffic outbound from the CyberGuard VPN. The values for the inbound manual
keys defined on the CyberGuard VPN must be used as the outbound manual keys on the
peer, and the values for the Outbound Manual Keys defined on the CyberGuard VPN must
be used as the inbound manual keys on the peer.
The SAs established using Manual Keying never expire; they remain valid until they are
deleted. This may be a security risk because the longer a key is used, the more exposure it
has thereby increasing the possibility that the key could be compromised.
Manual keying requires the firewall administrator to manually agree on the set of keys to
be used with the peer. Manual keys are difficult to share securely, and manual keying does
not scale well when dealing with multiple peers. It is strongly recommended that manual
keying be used only to interact with vendors who lack proper IKE support.
See also:
◆
◆
“VPN Secure Channels - Channel Information Page” on page II-265
“VPN Secure Channels - Manual Key Configuration Dialog Box” on page
II-271
CyberGuard Firewall Manual
II-239
VPN
VPN Client Configuration
13
When a remote host connects to the firewall using a VPN client, it may be desirable for the
host appear to be present on an internal network. The VPN Client Configurations window
specifies the appropriate network configuration for the VPN client to operate on the private side of the firewall. These network attributes can include an IP address, netmask, the
DNS server, and the WINS server. The firewall/VPN gateway dynamically assigns these
private network attributes to the VPN client.
VPN Client Configuration is useful for host-type secure channels, used to accept IKE connections from anonymous peer IP addresses. Peer-protected networks defined for the
channel should match the address range specified in the VPN Client Configuration.
Packet-filtering rules are written to permit one or more of the addresses, supplied by the
VPN Client Configuration, to some point internal to the firewall/VPN gateway.
To enable this feature, the GUI is first used to create the VPN Client Configuration. The
VPN Client Configuration names are then referenced by the VPN Secure Channel via IKE
Advanced Settings. Finally, an IPSec packet-filtering rule references the secure channel
(via manual or auto-selection), and the packet filter (netguard) reads the configuration data
and uses it to configure the VPN policy manager (vpnguard).
To enable the SafeNet SoftRemote ® client, the Virtual Adapter should be set to
Required under My Identity of the Connection; and the SoftRemote client should
NOT be configured to Allow to Specify Internal Network Address (under Options/Global
Policy Settings); The IKE-mode-config exchange is initiated by vpnguard when the SoftRemote client starts its Phase-2 (IPSec) negotiation. The IKE Exchange Logging feature
in the VPN Controls window can be used to track the progress of the CFG mode
exchange.
Note: When the SoftRemote client initiates the FIRST phase-2 (Quick Mode) negotiation, it has not yet been given the IKECFG-assigned address to use; therefore, it
connects using its physical address as the phase-2 identity. The exchange should
fail (no proposal chosen) because no connection block contains the client’s physical address. This behavior is normal.
II-240
Chapter 13, Virtual Private Network (VPN)
VPN
Extended Authentication (XAUTH)
13
The VPN system can authenticate clients; Extended Authentication is a means by which
the user behind the client is authenticated. At the start of the connection sequence, the user
at the remote VPN client must authenticate (via an XAUTH IKE exchange) with the VPN
policy Manager (vpnguard) before the client is allowed to establish VPN tunnels. The user
name and password are validated via firewall authentication rules. Using XAUTH and
VPN Client Configuration, the same client is able to use the same IP address for each connection.
XAUTH is enabled in the VPN Secure Channel/IKE Advanced Settings window with the
Use Extended Authentication (XAUTH) setting. The XAUTH exchange is initiated
by vpnguard when the SoftRemote starts its phase-2 (IKE Quick Mode, or QM) negotiation. XAUTH occurs before IKECFG. The IKE Exchange Logging feature in the VPN
Controls window can be used to track the progress of the CFG mode exchange.
An authentication dialog box pops up on the client to allow the entry of a user name and
password. The user has about 30 seconds to respond. For XAUTH, there are no changes to
how the SoftRemote client is configured.
Note: The Authentication Method selection on SoftRemote offers Pre-Shared Key;
Extended Authentication as a method. This does not work with the CyberGuard VPN gateway. Select only Pre-Shared Key.
Another setting on the VPN Secure Channel/IKE Advanced Settings window, Enforce
XA UT H a nd C onfig ura t io n ex chang e , when disabled, allows the mixing of
XAUTH and IKECFG (ISAKMP Configuration Method: draft-dukes-ike-mode-cfg-02)
with non-XAUTH/IKECFG clients on the same Host-type Secure Channel. VPN clients
that are not recognized as supporting XAUTH and IKECFG are allowed to connect without participating in the ISAKMP (IKE) Configuration Method exchanges. Recognized
VPN clients are still required to participate in XAUTH or IKECFG, if configured in the
Secure Channel.
Certificates and the CyberGuard Firewall
13
A certificate is a publicly known, electronic document that binds a user’s identity with his
digital signature. A certificate is issued by a Certification Authority (CA). A Certification
Authority is an entity that performs the following functions:
◆
◆
◆
◆
Issues certificates for users and/or subordinate CAs (sub-CAs)
Revokes certificates and issues Certificate Revocation Lists (CRLs)
Publishes certificates to public servers so that users can retrieve them
Archives valid and revoked certificates
CyberGuard Firewall Manual
II-241
VPN
There are many CAs that issue certificates.
Definitions
PKCS12 Password-protected file format used for storing and transporting multiple private keys and certificates.
PKCS7
File format used for sending encrypted and/or digitally-signed messages. Files
ending in .p7c are commonly used to store CA certificate chains which are
comprised of one or more CA certificates including the root CA certificate.
Files ending in .p7m or .p7r are commonly used by CAs to store certification
request reply messages.
PKCS10 File format used for certificate requests. These are also known as certificate
signing requests or CSRs. These files are frequently encoded in PEM (Base
64) format so that they can be sent through email and displayed in HTML
forms. Note that the terms “PKCS 10 request”, “certificate signing request”,
“CSR” are used interchangeably with “certificate request” in the documentation.
X.509
Authentication framework or model that uses public key cryptography for
strong authentication. It is the foundation for public key infrastructure. Certificates conforming to the X.509 format are usually encoded according to Distinguished Encoding Rules (DER) or Privacy Enhanced Mail (PEM).
Importing a Certificate on the Firewall
If the firewall administrator chooses to authenticate the peer using certificates, the firewall
must offer its own certificate as part of the authentication process. The firewall administrator can import certificates that have been issued by various CAs to identify the firewall.
To import a certificate on the firewall, the firewall administrator must take the following
steps:
1. Obtain certificates that identify the firewall from various CAs. To create a certificate
request, see “Certificate Request Wizard” on page II-290.
2. Place the files containing the certificates on the file system of the firewall.
3. Import these certificates into the VPN configuration system. See “Firewall Keypair
Import Wizard” on page II-293 and “CA Certificate Import Wizard” on page II-298.
During the authentication process, the CyberGuard VPN and the peer will exchange certificates as a method of identifying themselves. After obtaining the peer’s certificate, the
firewall will scrutinize the certificate’s validity and examine if the CA that issued the
peer’s certificate is trusted by the firewall. The firewall administrator designates which
CAs are trusted.
The CyberGuard VPN will then accept a certificate from any user whose certificate was
issued by a Trusted CA unless the firewall administrator restricts the users.
Certificate Revocation List
A Certificate Revocation List (CRL) is a list of revoked certificates that is issued periodically by a CA. CRLs can be stored as disk files, or they can be accessed online through
various servers, most commonly through LDAP, HTTP, or FTP. CRLs contain time stamps
that indicate the start of their validity period and the expected date of the issuance of the
next CRL.
II-242
Chapter 13, Virtual Private Network (VPN)
VPN
A CRL Distribution Point (CDP) consists of information that tells users where and how to
retrieve CRLs issued by a specific CA. CDPs are embedded in X.509 version 3 certificates.
Certificates and CRLs are stored in repositories to make them accessible to users. LDAP
servers, Web servers, and FTP servers are examples of repositories.
Online Certificate Status Protocol (OCSP) is defined in RFC 2560. Agents called OCSP
responders collect CRLs from repositories and/or CAs and use the collected information
to answer users’ queries about the validity of certificates. This helps users by eliminating
the time needed to download large CRLs.
Certificate Revocation Checking by the CyberGuard Firewall/VPN
The CyberGuard Firewall can be configured to use CRLs and OCSP to check the validity
of VPN certificates.
The CyberGuard Firewall/VPN is able to:
◆
◆
◆
◆
Retrieve CRLs from CRL distribution points on LDAP, HTTP or FTP servers.
Read CRLs from disk files.
Retrieve CA certificates from LDAP servers.
Send OCSP requests using the HTTP protocol to OCSP responders.
The relationship of the firewall to these different entities is illustrated in Figure II-84.
Figure II-84. CyberGuard Firewall/VPN and CA Certificates
IKE Certificate Services
The following sections describe the requirements for setting up IKE Certificate Services
with the CyberGuard Firewall/VPN.
Several requirements must be considered for certificate revocation checking to be successful.
CyberGuard Firewall Manual
II-243
VPN
CA, LDAP, and OCSP Software Setup Considerations
Certificate revocation checking has been tested with the following certification authority
products:
◆
◆
Baltimore UniCERT version 3.5.3
Microsoft Server 2000 Certification Authority
OCSP has been tested with the following validation authority products:
◆
◆
Enterprise Validation Authority version 4.2.2
Enterprise Validation Authority version 4.6.1
The following LDAP directories have been tested for CRL storage and retrieval:
◆
◆
iPlanet Directory Server version 5.1
OpenLDAP version 2.0.23
CRL Distribution Points with Baltimore UniCERT
Consider the following issues when configuring CRL Distribution Points with the Baltimore UniCERT Certification Authority:
1. The CRL Distribution Points should be configured during the initial setup of the CA.
2. Inspect the IDP extension in CRLs/ARLs is critical check box in the CA’s Certificate, CRL, and Directory Options tab and make sure that it is Disabled. See “Configuring the Certificate, CRL, and Directory Options” in the UniCERT v3.5.3
Administrator's Guide--Certification Authority.
3. The Location Type of the CRL Distribution Point must be set to X.500 Directory
Name. This is the only supported location type. Refer to the section “Setting up and
using CDPs” in the UniCERT v3.5.3 Administrator's Guide-Certification
Authority.
4. The LDAP directory entry for the CRL Distribution Point must have a distinguished
name equal to the certification authority’s distinguished name. Refer to the documentation for the LDAP directory server for information on how to check the LDAP directory.
5. The LDAP server must give the firewall anonymous read access to the directory and it
must support LDAP version 2.
6. Follow the steps in “Appendix D: Publishing certificates using third-party products” of
the UniCERT v3.5.3 Administrator's Guide-Appendices.
ValiCert Enterprise Validation Authority
Consider the following issues when setting up the ValiCert Enterprise Validation Authority for the first time:
1. Follow the procedure in the section “Setting Up the ValiCert Enterprise VA” on page
48 of the ValiCert Enterprise VA Installation and Administration Guide to create an OCSP responder key pair using the EVA.
II-244
Chapter 13, Virtual Private Network (VPN)
VPN
2. Follow the procedure in the section “Issuing Delegated Certificates” on page 246 of
the ValiCert Enterprise VA Installation and Administration Guide to create a
Customer Registration Policy for the OCSP responder certificate.
3. Submit the certificate request to the UniCERT RAO. Contact the Registration Authority Operator user to find out how to do this at your installation.
4. When the OCSP responder certificate has been issued, follow the procedure in the section “Managing Certificate Stores” on page 112 of the ValiCert Enterprise VA
Installation and Administration Guide to submit the OCSP responder certificate
and the certificates of the CAs that publish CRLs to the EVA.
Microsoft 2000 Server Certification Authority
Consider the following issue when configuring CRL Distribution Points with the
Microsoft Windows 2000 Server Certification Authority:
1. Only the HTTP URI and FTP URI CRL Distribution Points have been tested with the
firewall.
2. Consult the Microsoft documentation and configure the Certification Authority on the
Microsoft Windows 2000 Server. Ensure that the HTTP and FTP servers are serving
the CRLs and CA certificates.
3. Remember to add packet-filtering rules to permit outgoing HTTP or FTP connections
from the firewall to the Microsoft CA Server so that the firewall can retrieve CRLs
and/or CA certificates.
See also:
◆
◆
◆
◆
◆
◆
◆
“IKE Certificate Services Window” on page II-277
“Certificate Request Wizard” on page II-290
“Certificate Management Window” on page II-292
UniCERT v3.5.3 Documentation Set
ValiCert Enterprise, VA Installation and Configuration Guide, Version 4.2.2
IETF Request for Comments: 2560, Internet X.509 Public Key Infrastructure,
OCSP
IETF Request for Comments: 3280, Internet X.509 Public Key Infrastructure,
Certificate and Certificate Revocation List (CRL) Profile
CyberGuard Firewall Manual
II-245
VPN
Integration with Other Firewall Components
13
Virtual Private Networking is fully integrated into the firewall and works with other firewall components to form a complete VPN solution.
VPN and Packet Filtering
13
The CyberGuard Firewall packet filter (netguard) works in conjunction with the CyberGuard VPN. It is responsible for reading the policy configuration and translating it into
rules for both the firewall and the IPSec policy manager. An IPSec policy option is available in the packet-filtering rules window to enable security for the given rule and to provide the additional IPSec parameters required to enforce the policy.
By enabling IPSec for a packet-filtering rule, the user chooses to protect the packet flows
between the IPSec peer and the CyberGuard VPN. The IPSec option describes the protection strategy for the packet data and explains how to establish a secure channel to the
remote party. All of the parameters have satisfactory defaults and do not require user intervention to configure. The firewall comes preloaded with four sample IPSec protection
strategies to assist users in creating the appropriate protections strategy.
To determine if a netguard session was tunneled:
◆
◆
For a snapshot view, use the netguard -ln command to see which static rules
and dynamic sessions have IPSEC information such as ipsec_src, ipsec_dst,
and/or ipsec_nat associated with them.
To track a session over a period of time, run the following command to cause
an audit record to be generated when a new packet-filtering rule is created:
auditset -S+ng_add_rule
(The auditset command must be run prior to network traffic passing through
the firewall in order to generate the audit records for ng_add_rule. This
command can also be added to the /etc/rc2.d/S03auditlogd file.)
The audit record can be seen using the following command:
auditrpt -n ng_add_rule
The audit record for ng_add_rule will contain one or more of the following:
src ipsec - if IPSec is enabled to the source for this rule
dst ipsec - if IPSec is enabled to the destination for this rule
nat - if Allow NAT to Translate Addresses is checked for this rule
If the verbose option of the auditrpt command is used as follows:
auditrpt -V
II-246
Chapter 13, Virtual Private Network (VPN)
VPN
the ng_add_rule audit information is as follows:
Enable IPSEC to src TRUE|FALSE
Enable IPSEC to dst TRUE|FALSE
NAT VPN traffic TRUE|FALSE
The audit record for the ng_add_rule events contains a rule ID that consists
of the date, time, and a sequence number. This same rule ID is part of the audit
record for the corresponding ng_end_session event. Knowing the rule ID,
the ng_add_rule and ng_end_session pair can be identified. This also
identifies the time range that this rule was active. Actual traffic passing
through the firewall because of this rule is not explicitly marked with the rule
ID.
To identify such traffic, look at corresponding traffic (n g _ p e r m i t ,
ng_deny), match type of traffic (telnet, ftp, etc.) by the corresponding port
number (as defined in the /etc/services file), match source and destination
addresses. If this traffic matches a ng_add_rule audit record that indicates
VPN was enabled, then this traffic was protected by VPN.
See also:
◆
◆
◆
“Packet-Filtering Rules Window” on page II-22
“Packet-Filtering Rules Basic Page” on page II-23
“Packet-Filtering Rules IPSec Page” on page II-29
VPN and Network Address Translation (NAT)
13
The CyberGuard VPN is designed to work with Network Address Translation (NAT).
When static or dynamic NAT is configured using the Network Address Translation window, the Allow NAT to Translate Addresses option on the IPSec page of the PacketFiltering Rules window can be used to cause Network Address Translation (NAT) to translate addresses for an IPSec tunnel.
If the Allow NAT to Translate Addresses option is enabled, NAT will be applied to
network traffic before it is sent through the tunnel (encapsulated) for outbound traffic, and
after it exits the tunnel for inbound traffic.
The Allow NAT to Translate Addresses option is disabled by default. When disabled, the IP addresses of packets are assumed to be private, and no NAT is performed,
even if NAT is enabled in the Network Address Translation window. When establishing a
VPN between trusted CyberGuard VPN peers that both have dynamic NAT activated, it is
necessary to tunnel through (circumvent) NAT and have the private addresses preserved.
The CyberGuard VPN gateways on either side of the tunnel are able to route the private
addresses emerging from the tunnel.
Figure II-85 illustrates the situation in which NAT is enabled and Allow NAT to Translate Addresses is not checked.
CyberGuard Firewall Manual
II-247
VPN
The goal is to establish a VPN consisting of Net1 and Net2, which are behind vgA, and
Net3 and Net4, which are behind vgB. The network addresses are private and are not publicly routable; however, vgA and vgB belong to the same enterprise, and it is desirable to
share the private network configuration.
Any host on any of these networks can initiate a connection with any other host on one of
theses networks. The private address must not be translated by NAT entering the tunnel, or
translated by NAT after exiting the tunnel. Based on its configuration, the firewall must
determine when not to translate.
Figure II-85. NAT is Enabled but not Applied to VPN Tunnel
Figure II-86 illustrates the situation in which NAT is enabled and Allow NAT to Translate Addresses is checked. The VPN is connecting a private network to a public network. The initiator of the connection to be tunneled is a private address behind the firewall
NAT, and the destination is a public server. The public server does not have knowledge of
the private network. The private address must be translated by NAT before entering the
tunnel at the firewall, and translated again by NAT after exiting the tunnel at the firewall.
Static NAT must be used if NAT is applied and the initiator of the tunnel is on the public
side.
Figure II-86. NAT is Enabled and Applied to VPN Tunnel
See also:
◆
◆
II-248
“Network Address Translation” on page II-63
“Packet-Filtering Rules IPSec Page” on page II-29
Chapter 13, Virtual Private Network (VPN)
VPN
VPN and NAT-Traversal (NAT-T)
13
Network Address Translation (NAT) typically involves changing addresses in the headers
of Internet Protocol (IP) packets. In doing this, NAT devices can break the basic IPSec
assumption that packet addressing should not change on the network route
between endpoints.
NAT-Traversal circumvents the changes made by NAT and allows the free use of AH,
ESP, and IPComp in tunnel and transport modes regardless of NAT use on the network
route between IPSec endpoints.
For NAT-T to work properly, it must be able detect one or more NATs between IPSec hosts
and then negotiate the use of UDP encapsulation of the IPSec packets through the NAT
devices.
During IKE phase one (e.g., Main Mode), IPSec devices first determine if they both support NAT-T. Next, the devices determine whether or not NAT occurs anywhere on the
communications path between them by sending NAT-D (NAT Discovery) packets. NAT-D
packets send information about source and destination IP addresses and ports. If the IP
address and ports are not the same, the VPN devices know that a NAT device exists somewhere in between.
During the IKE phase two (Quick Mode) exchange, if a NAT device was detected, the
VPN policy manager negotiates use of UPD-encapsulated tunnel mode for the IPSec security association (SA).
Usually, NAT assignments last for a short period of time and are then released. For IPsec
to work properly, the same NAT assignment needs to remain intact for the duration of the
VPN tunnel. NAT-T accomplishes this by requiring any end point communicating through
a NAT device to send a “keepalive” packet to prevent NAT end points from being
remapped during the session.
All NAT Traversal communications begin over UDP port 500, which is already open for
IKE (Internet Key Exchange) communications in IPsec VPNs. Once a NAT device is discovered, all subsequent IKE exchanges occur on UDP port 4500. Note that UDP port 4500
is also used for the NAT-T “keepalive” and UDP-encapsulated IPSec packets generated by
the firewall as VPN gateway.
The NAT-T implementation supports the following Internet Drafts:
◆
◆
draft-ietf-ipsec-nat-t-ike-03.txt
draft-ietf-ipsec-udp-encaps-03.txt
Notes:
◆
◆
NAT-Traversal should not be confused with NAT-Smart. These two features
are not related. NAT-Traversal is used to setup a UDP-encapsulated tunnel
between two IPSec peers when there is a NAT device between the peers.
NAT-Smart dictates how the firewall NAT will handle translation of packets
that will pass through an established IPSec tunnel.
As with ESP tunnel packets arriving at and departing from the firewall VPN,
the NAT-T udp-encapsulated and keepalive packets terminate at the IPSec
CyberGuard Firewall Manual
II-249
VPN
engine in the firewall network stack, and are not seen by the packet-filter
(ip_netguard).
◆
◆
The IKE Exchange Logging feature in the VPN Controls window can be used
to track the progress of NAT-Traversal exchanges between VPN peers.
NAT pools cannot be used in conjunction with VPN NAT-Smart. NAT-Smart
is the ability to choose between bypassing the firewall’s Network Address
Translation (NAT) or allowing NAT to Translate the internal (local) address of
an IPSec connection. If the IPSec packet-filtering rule is set to Allow NAT to
Translate Addresses, the VPN policy must be written using the would-be
translated address. Because IKE peers negotiate the policy (addresses) well
before an actual connection is made, the translated address must be static (i.e.,
predictable). With NAT pools, the translated address cannot be predicted in
advance. See “Network Address Translation” on page II-63 and “NAT Rules
Page” on page II-67.
NAT Traversal is enabled on the IKE Advanced Settings Dialog Box. See “VPN Secure
Channels - IKE Advanced Settings Dialog Box” on page II-267.
VPN and Passport One
13
Passport One provides the most secure way to give IPSec access to VPN hosts, especially
if the IP address cannot be predicted, as in the case of a traveling employee. The remote
user first authenticates with Passport One. The Passport One user profile contains packetfiltering rules for the user. The packet-filtering rules configured for the user have IPSec
enabled for required VPN connections. Passport One substitutes the VPN host’s IP
address for the %USER address specification in Passport One packet-filtering rules.
See also:
◆
◆
“Passport One Window” on page II-190
“Passport One Rules Page” on page II-193
VPN and Alerts, Activities, and Reporting
13
Alerts
Four alerts are provided for VPN on the Alerts page of the Alerts, Activities, and Archives
window:
◆
◆
◆
◆
◆
VPN IKE alert
VPN IPSec alert
VPN Interceptor alert
VPN X9.17 random number failure
VPN Certificate alert
Alert Summary reports are provided through the Alert Summary and Activity Reports
windows.
II-250
Chapter 13, Virtual Private Network (VPN)
VPN
Activities
Four activities are provided for VPN on the Activities page of the Alerts, Activities, and
Archives window:
◆
◆
◆
◆
VPN IKE activity
VPN IPSec activity
VPN Interceptor activity
VPN Certificate activity
Activity reports are provided through the Activity Reports window.
Reports
Seven reports are provided for VPN on the System Information window:
◆
◆
◆
◆
◆
◆
◆
◆
IKE Exchange Logging
General IPSec/IKE SA Information
Detailed IPSec SA Information
Detailed IKE SA Information
Global IPSec SA Information
Virtual Network Routing (Sorted by Channel Name)
Virtual Network Routing (Sorted by Peer GW Addr)
Virtual Network Routing (Sorted by Network Address)
See also:
◆
◆
◆
◆
◆
“Alerts Page” on page II-328
“Activities Page” on page II-341
“Alert Summary Window” on page I-250
“Activity Reports Window” on page I-252
“System Information Window” on page I-246
VPN and SmartProxies
13
SmartProxy connections can be configured to work with the CyberGuard VPN. After a
proxy requiring IPSec is enabled in the SmartProxies window, the firewall administrator
must add the IPSec option to the proxy rule in the Packet-Filtering Rules window.
See also:
◆
◆
◆
“Packet-Filtering Rules Window” on page II-22
“SmartProxy Connections” on page II-254
“SmartProxies Window” on page III-5
CyberGuard Firewall Manual
II-251
VPN
VPN and High Availability
13
The CyberGuard VPN feature can be used in conjunction with the High Availability feature. When the standby system in an HA pair enters the serving state, it will force the peers
to negotiate new IKE SAs when creating new sessions with the HA pair.
Special Connection Considerations
13
The following connection types require special treatment:
◆
◆
◆
◆
Host-to-Gateway Connections
Client-Initiated Sessions
SmartProxy Connections
FTP Data Connections
Host-to-Gateway Connections
13
VPN hosts are typically end-user (personal) computers equipped with IPSec-based VPN
client software. The client software is invoked to establish a secure connection with the
CyberGuard VPN. The CyberGuard VPN must be configured to allow secure connection
initiated by the VPN client software. These connections are different from gateway-togateway connections because the physical IP address of the host is not always known in
advance.
The IPSec peer configuration for VPN hosts defines the interface to which IKE negotiations by VPN clients are initiated. The IPSec peer definition for VPN hosts is a many-toone relationship - many VPN hosts establish connections using a single CyberGuard VPN
peer definition.
VPN hosts initiate the negotiation with the IKE service on the firewall. Once the host is
authenticated by IKE, the IPSec parameters are negotiated (Phase 2), and a secure tunnel
to the firewall is established.
Client software for VPN hosts often has the capability of configuring a virtual IP address
to use once the IKE SA is established. The virtual IP address is assigned to the VPN host
user. This enables remote users to appear as internal users on a private network. When a
virtual address is used, the source address of traffic originating from the VPN host is different from its physical address. The virtual IP address is analogous to the protected networks of a VPN gateway peer. Virtual address configuration on the VPN client provides
the capability of predicting the remote address to use when configuring the firewall. If the
virtual network of VPN hosts is known, it can be configured similar to a gateway and specific packet-filtering rules can be written.
Using Passport One is perhaps the most secure way to provide IPSec access to VPN hosts,
especially if the IP address cannot be predicted. The remote user first authenticates with
II-252
Chapter 13, Virtual Private Network (VPN)
VPN
Passport One. The Passport One user profile contains packet-filtering rules for the user.
The packet-filtering rules configured for the user have IPSec enabled for required VPN
connections. Passport One substitutes the VPN host’s IP address for the %USER address
specification in Passport One packet-filtering rules and writes the rule to n e t guard.clas.conf. Passport One then runs the netguard(1M) command.
Notes:
◆
◆
Virtual addresses (addresses located on the remote end of a VPN tunnel) do
not need to be routable; however, packet filter parsing generates warning messages for nonroutable addresses that it encounters. To avoid these warning
messages, it is strongly recommended that you configure a default route.
Only one host-type secure channel may be defined per network interface.
Because the initiating remote gateway’s address is assumed to be unknown
(for example, a remote or traveling employee or a VPN client), the host-type
channel connection will match any valid VPN peer during IKE Phase 1 negotiation. This match is made if no other channel configurations match and the
VPN peer is connecting on the configured interface. Because a host channel
matches any connection, only one secure channel is allowed.
Client-Initiated Sessions
13
Firewall packet-filtering rules are designed to control network traffic originating at a specified network location and destined for a service port of a destination network location. A
packet-filtering rule defines a client-to-server relationship. Permitted network connections
are only allowed if they originate at the client and are destined for the server. To allow
connections to be initiated in the opposite direction, a second rule is required. For example, the firewall security policy for the figure below states that host A1 is permitted connection to the Telnet service of host B1, and vise versa.
Figure II-87. VPN Client/Server Configuration
The following packet-filtering rules are written on both firewalls to allow Telnet clients on
B1 to connect to the A1 server and to allow Telnet clients on A1 to connect to the B1
server:
permit
permit
CyberGuard Firewall Manual
telnet/tcp
telnet/tcp
A1
B1
B1
A1
ipsec=default
ipsec=default
II-253
VPN
SmartProxy Connections
13
Configuring VPN connections for SmartProxies is not automatic. After a proxy requiring
IPSec is configured and enabled in the SmartProxies window, the firewall administrator
must add the IPSec option to the proxy rule in the Packet-Filtering Rules window.
Note: Support for tunnels on the server-side of proxy rules is automatic.
Inbound To Firewall
Tunneling proxy connections that are specified as Inbound To Firewall on the SmartProxies window is a common scenario. The following two examples refer to Figure II-88
in which vgA is the firewall being configured. The Telnet client, B1, arrives at vgA through
the tunnel with vgB. The proxy server-side connection is made with A1 through a direct
tunnel to A1.
Figure II-88. Two-Tunnel Proxy Connection
Packet-Filtering Rules when Pass Address is Enabled
When Pass Address is enabled on the Dynamic page of the Network Address Translation
window, a proxy rule and a permit rule are necessary. In this case, because we have to
write an extra rule to permit the server-side connection, it may be explicitly protected by
IPSec policy without producing any undesirable side effect.
Rules similar to the following should be added on the Packet-Filtering Rules window.
proxy
permit
telnet/tcp
telnet/tcp
192.168.2.1
vgA
vgA
10.2.3.1
ipsec=default
ipsec=default
Packet-Filtering Rules when Pass Address is Disabled
When Pass Address is disabled, two proxy rules are written. Both the client and serverside connections may be tunneled. Because the initial connection is with the firewall, the
second of the two rules only matches server-side traffic on the interface to the server.
Rules similar to the following should be added on the Packet-Filtering Rules window.
proxy
proxy
II-254
telnet/tcp
telnet/tcp
192.168.2.1
192.168.2.1
Firewall
10.2.3.1
ipsec=default
ipsec=default
Chapter 13, Virtual Private Network (VPN)
VPN
Outbound Through Firewall
When tunneling proxy connections that are specified as Outbound Through Firewall
on the SmartProxies window, two packet-filtering rules must be configured instead of one:
proxy
permit
proxy
proxy
external
firewall
internal
external
ipsec=options
ipsec=options
See also:
◆
◆
◆
◆
“NAT Interfaces Page” on page II-69
“Packet-Filtering Rules Window” on page II-22
“SmartProxies Window” on page III-5
“Pass Address and Packet-Filtering Rules” on page III-15
FTP Data Connections
13
The FTP application protocol presents special circumstances to the firewall and NAT
devices for the following reasons:
◆
◆
The FTP protocol uses one connection for the command/control session
between client and server (port 21/tcp, normally) and another connection for
data transfers.
The port and IP address used in the data connection is passed between the client and server inside the FTP control session payload. This exchange occurs
with the PORT command issued by the client or the server 227-reply to the client's PASV command.
The firewall packet filter and NAT know about FTP command payload. The firewall automatically sets up the appropriate data connection rule from the information it reads from
the FTP control payload.
To secure the FTP data connection, the port number must be omitted on the underlying
IPSec policy configuration. This implies that writing an FTP rule using the IPSec option
creates a VPN policy that performs the configured IPSec transform for all connections
from the specified addresses (i.e., for any TCP port number). Care must be taken in the
placement of these rules as they will match (during IKE negotiation) more than the FTP
traffic for which they are intended. The firewall packet filter still enforces the actual FTP
data connection.
CyberGuard Firewall Manual
II-255
IKE Protection Strategies Window
IKE Protection Strategies Window
13
An IKE Protection Strategy represents the settings that are negotiated by the CyberGuard
VPN with an IPSec peer during IKE Phase 1. Use the IKE Protection Strategies window to
define one or more groups of cryptographic properties as an IKE protection strategy. The
list represents a priority-ordered set of IKE parameters. The first grouping in the list has
highest priority. During the negotiation process, the IKE Protection Strategy is negotiated
between the CyberGuard VPN and its peer. For the negotiation to be successful, one of the
groupings will be agreed upon and its parameters will be used. The successful negotiation
of an IKE Protection Strategy results in an IKE SA (Security Association) between the
CyberGuard VPN and the peer. IKE Protection Strategies that are configured in this window can be selected on the IKE Advanced Setting dialog box.
Three sample IKE Protection Strategies are preloaded on the CyberGuard VPN so that
users will be able to create tunnels immediately:
Default
Propose all - stronger security first
HighSecurity
Limit choices to the more secure algorithms
Aggressive
IKE aggressive mode: only one DH group may be specified
Figure II-89. IKE Protection Strategies Window - Protection Strategies Page
II-256
Chapter 13, Virtual Private Network (VPN)
IKE Protection Strategies Window
IKE Protection Strategies - Protection Strategies Page
13
Use this page of the IKE Protection Strategies window to create protection strategy names
to which to add cryptographic properties.
This page has the following fields:
Protection Strategy
User-defined name for an IKE protection strategy. The list
represents a priority-ordered set of IKE parameters. The
first grouping in the list has highest priority.
Comment
Describes the purpose of the IKE protection strategy.
IKE Protection Strategies - Cryptographic Properties Page
13
Use this page of the IKE Protection Strategies window to add cryptographic properties to
an IKE protection strategy.
Figure II-90. IKE Protection Strategies Window - Cryptographic Properties Page
This page has the following fields and controls:
Protection Strategy
CyberGuard Firewall Manual
Displays a list of Protection Strategies defined on the Protection Strategies page. Select a Protection Strategy to
configure its cryptographic properties.
II-257
IKE Protection Strategies Window
Encryption Algorithm
Displays a list of encryption algorithms. Supported algorithms are: 3des-cbc, des-cbc, aes-cbc, twofish-cbc,
blowfish-cbc, cast128-cbc. The default value is 3descbc.
Hash Algorithm
Displays a list of hash algorithms. Supported algorithms
are: sha1, md5, tiger192, and ripemd160. The default
value is sha1.
Diffie-Hellman Group
Displays Diffie-Hellman group numbers 1, 2, and 5. The
default value is 2.
SA Lifetime Seconds
Duration of the SA in seconds. The minimum value is 60
(1 minute); the maximum value is 315360000 (10 years);
the default value is 10800 (3 hours). This field is required
for IKE.
SA Lifetime Kbytes
Duration of the SA in Kbytes. The minimum value is 100;
the maximum value is 2147483647; the default value is
51200 (50 MB).
Unspecified
Indicates the Security Association will not be expired
based on the SA Lifetime Kbytes type. Represents a
value of 0. If this box is checked, only SA Lifetime Seconds will be used.
Notes:
◆
◆
◆
II-258
IKE aggressive mode does not support negotiation of multiple Diffie-Hellman
groups; therefore, the Default IKE Strategy will not work with IKE aggressive
mode exchanges. Use the preloaded Aggressive strategy or create a new strategy to use with secure channels that specify aggressive mode.
IKE aggressive mode does not support negotiation of multiple authentication
methods; therefore, secure channels that use aggressive mode should configure either preshared secret or certificates, but not both.
IKE Aggressive Mode exchanges through a NAT device using pre-shared keys
are not supported. This is true even if NAT-Traversal is enabled. Use RSA or
DSA signature authentication (i.e. certificates) for IKE Aggressive Mode
exchanges through a NAT device. Use IKE Main Mode for exchanges through
a NAT device when using pre-shared keys.
Chapter 13, Virtual Private Network (VPN)
IPSec Protection Strategies Window
IPSec Protection Strategies Window
13
Use the IPSec Protection Strategies window to define one or more groups of cryptographic
properties as an IPSec protection strategy. The list represents a priority-ordered set of
IPSec parameters. The first grouping in the list has highest priority. During the negotiation
process, the IPSec Protection Strategy is negotiated between the CyberGuard VPN and its
peer. For the negotiation to be successful, one of the groupings will be agreed upon and its
parameters will be used. The successful negotiation of an IPSec Protection Strategy results
in an IPSec SA (Security Association) between the CyberGuard VPN and the peer.
IPSec Protection Strategies are displayed on the IPSec page of the Packet-Filtering Rules
window so that packet-filtering rules can be protected by the cryptographic properties
configured in this window.
Note: Manual keying requires that only one parameter grouping be defined in the IPSec
Protection strategy.
Four sample IPSec Protection Strategies are preloaded on the CyberGuard VPN so that
users will be able to create tunnels immediately:
Default
Propose all (stronger security first)
HighSecurity Limit choices to the more secure algorithms
EncryptOnly Encryption only (do not apply HMAC to packets)
AuthOnly
Authenticate only (do not encrypt packet data)
Figure II-91. IPSec Protection Strategies Window - Protection Strategies Page
CyberGuard Firewall Manual
II-259
IPSec Protection Strategies Window
IPSec Protection Strategies - Protection Strategies Page
13
Use this page of the IPSec Protection Strategies window to create protection strategy
names to which to add cryptographic properties.
This page has the following fields:
Protection Strategy
User-defined name for an IPSec protection strategy. A list
of Protection Strategies represents a priority-ordered set of
IPSec parameters. The first grouping in the list has highest
priority.
Comment
Describes the purpose of the IPSec protection strategy.
IPSec Protection Strategies - Cryptographic Properties Page
13
Use this page of the IPSec Protection Strategies window to configure cryptographic properties for an IPSec protection strategy.
Figure II-92. IPSec Protection Strategies Window - Cryptographic Properties
Page
II-260
Chapter 13, Virtual Private Network (VPN)
IPSec Protection Strategies Window
This page has the following fields and controls:
Protection Strategy
Displays a list of Protection Strategies defined on the Protection Strategies page. Select a Protection Strategy to
configure its cryptographic properties.
Encryption Algorithm
Displays a list of encryption algorithms. The supported
algorithms are: 3des-cbc, des-cbc, aes-cbc, twofishcbc, blowfish-cbc, cast128-cbc, and none. none may
be specified only if the Authentication Algorithm is
not equal to none. The default value is 3des-cbc.
Authentication Algorithm Displays a list of HMACs. The supported HMACs are:
hmac-sha1-96, md5, hmac-md5-96, and none. none
may be specified only if the Encryption Algorithm is
not equal to none. The default value is hmac-sha1-96.
SA Lifetime Seconds
Duration of the SA in seconds. The minimum value is 60
(1 minute); the maximum value is 315360000 (10 years);
the default value is 28800 (8 hours).
Unspecified
Indicates the Security Association will not be expired
based on the SA Lifetime Seconds type. Represents a
value of 0. If this box is checked, only SA Lifetime
Kbytes will be used. Unspecified cannot be checked for
both SA Lifetime Seconds and SA Lifetime Kbytes.
SA Lifetime Kbytes
Amount of traffic that can be protected by the SA in
Kbytes. The minimum value is 100; the maximum value
is 2147483647; the default value is 51200 (50 MB).
Unspecified
Indicates the Security Association will not be expired
based on the SA Lifetime Kbytes type. Represents a
value of 0. If this box is checked, only SA Lifetime Seconds will be used. Unspecified cannot be checked for
both SA Lifetime Seconds and SA Lifetime Kbytes.
IP Payload Compression
Using the IP Payload Compression algorithm (IPCOMP),
compresses IP payload to counteract the overhead introduced by the IPSec protocol.
CyberGuard Firewall Manual
II-261
VPN Client Configurations Window
VPN Client Configurations Window
13
When a remote host connects to the firewall using a VPN client, it may be desirable for the
host appear to be present on an internal network. The VPN Client Configurations window
specifies the appropriate network configuration for the VPN client to operate on the private side of the firewall. These network attributes can include an IP address, netmask, the
DNS server, and the WINS server. The firewall/VPN gateway dynamically assigns these
private network attributes to the VPN client.
A single contiguous address pool is configurable per secure channel definition. Note that
because there is only one host-type secure channel possible per network interface, only
one address pool is configurable per network interface. Addresses can not be reserved for
a particular VPN client; VPN clients are assigned the next available address from the pool.
After the IKE SA is deleted, the VPN client’s address must be returned to the address
pool. The IKE SA may be deleted through SA expiration, forced removal through the
Delete All SAs button on the VPN Controls window, or due to a delete notification message from the client.
The VPN client internal address assignment is audited and messages associated with the
client configuration are logged to the IKE log.
Figure II-93. VPN Client Configurations Window
This window contains the following fields and controls:
II-262
Configuration Name
Unique name used to identify a single virtual network configuration.
Start IP Address
(Optional) Specifies the lowest IP address available in the
virtual network. This field is required if the End IP
Address is given. The start-end address range must be
contained within the network defined by the Netmask.
Chapter 13, Virtual Private Network (VPN)
VPN Client Configurations Window
End IP Address
(Optional) Specifies the highest IP address available in the
virtual network. This field is required if the Start IP
Address is given. The start-end address range must be
contained within the network defined by the Netmask.
Netmask
(Optional) Specifies the virtual network mask. This field is
required if the Start IP Address and End IP Address
are given. The start-end address range must be contained
within the network defined by the Netmask.
DNS Server
(Optional) Specifies the IP address or host name of the
DNS server that is serving the client in the virtual network.
WINS Server
(Optional) Specifies the IP address or host name of the
WINS server (NetBios Name Server) that is serving the
client in the virtual network.
Remotely Assigned During XAUTH Authentication
Configuration can be defined by a remote system that is
running an extended authentication (XAUTH) server such
as RADIUS or LDAP.
Note that when Remote Authentication is configured to
provide client configuration attributes, those attributes
take precedence over address attributes configured in the
local VPN Client Configuration. If Remote Authentication
is configured but no client configuration attributes are supplied by the authentication service, VPN Client Configuration will attempt to find the attributes to use from the local
configuration. If any attributes are supplied by Remote
Authentication, only the attributes supplied are used.
For information on configuring the VPN Client Configuration remote authentication with
RADIUS, see “How to Configure Remote Authentication” on page II-177. For information on configuring the VPN Client Configuration remote authentication with LDAP, see
“How to Configure Remote Authentication with LDAP” on page I-304.
Notes:
◆
◆
To enable the SafeNet SoftRemote® client, the Virtual Adapter should be
set to Required under My Identity of the Connection; and the SoftRemote
client should NOT be configured to Allow to Specify Internal Network
Address (under Options/Global Policy Settings); The IKE-mode-config
exchange is initiated by vpnguard when the SoftRemote client starts its Phase2 (IPSec) negotiation. The IKE Exchange Logging feature in the VPN Controls window can be used to track the progress of the CFG mode exchange.
When the SoftRemote client initiates the FIRST phase-2 (Quick Mode) negotiation, it has not yet been given the IKECFG-assigned address to use; therefore, it connects using its physical address as the phase-2 identity. The
exchange should fail (no proposal chosen) because no connection block contains the client’s physical address. This behavior is normal.
CyberGuard Firewall Manual
II-263
VPN Secure Channels Window
See also:
◆
◆
◆
◆
◆
◆
◆
“VPN Client Configuration” on page II-240
“Extended Authentication (XAUTH)” on page II-241
“VPN Secure Channels - IKE Advanced Settings Dialog Box” on page II-267
“VPN Controls Window” on page II-279
“RADIUS” on page II-150
“How to Configure RADIUS” on page II-173
“LDAP Authentication Window” on page I-297
VPN Secure Channels Window
13
The VPN Secure Channels window allows the user to enter configuration information for
a VPN Secure Channel. The secure channels created with this window are used by the
packet filter to attempt to automatically identify the secure channel that governs the traffic
defined in the packet filtering rule.
The secure channels defined in this window can also be manually selected in the Packetfiltering Rules window in the fields associated with the Enable Manual Selection of
VPN Secure Channel option. This control should be exercised if the packet origin
and/or the packet destination specified in the packet-filtering rule are insufficient to identify an IPSec peer (for example, no peer-protected networks have been defined), or the
peer that the CyberGuard VPN would choose automatically is not the one the administrator wants.
Figure II-94. VPN Secure Channels Window - Channel Information Page
II-264
Chapter 13, Virtual Private Network (VPN)
VPN Secure Channels Window
See also:
◆
◆
◆
“Packet-Filtering Rules Window” on page II-22
“Packet-Filtering Rules Basic Page” on page II-23
“Packet-Filtering Rules IPSec Page” on page II-29
VPN Secure Channels - Channel Information Page
13
Use this page of the VPN Secure Channels window to define secure channels to IPSec
peers and determine the method to establish authentication keys. This is the first step the
user must take to configure VPN.
This page has the following fields and controls:
Channel Name
User-defined name of the secure channel between the VPN host
and peer. Numbers, letters, and underscores are permitted in this
field. Values from this field appear in the To Packet Origin and
the To Packet Destination fields on the IPSec page of the
Packet-Filtering Rules window.
Peer Type
Configures the secure channel between the firewall and a gateway
or the firewall and a host:
Gateway - The peer has a known IP address as in the case of a
security gateway. Selecting this Peer Type activates the Host
Name field.
Host - The peer does not have a static IP address as in the case of
a traveling employee running VPN client software. Selecting this
Peer Type activates the Interface Name field.
Host Name
Host name or IP address of the IPSec peer. The host name must be
defined in the Host Names window; the resolved IP address must
be routable.
Interface Name
Device through which VPN client connections are accepted. If
interfaces have been properly configured on the firewall, a list of
interfaces will be displayed.
Establish Keys Using
Establishes authentication using IKE or Manual Keys. See “IKE
and Manual Keying” on page II-238 for more information.
IKE - Indicates that IKE will be used to negotiate SA attributes
with the peer. If this option is selected, Preshared Secret and
Advanced are activated.
Manual Keying - Indicates that keys will be entered manually
to establish SA attributes with the peer. A secure channel that uses
manual keying can only be used by one packet-filtering rule. If
this option is selected, the Configure box is activated. Only the
Gateway peer type can use manual keying.
CyberGuard Firewall Manual
II-265
VPN Secure Channels Window
Preshared Secret
Authentication data to be used with IKE. The preshared secret can
be either a plain text string or a hexadecimal integer beginning
with the characters 0x. Hexadecimal integers must have an even
length. If text is entered in this field and the Advanced button is
clicked, its value is copied into the Preshared Secret field in
the IKE Advanced Settings dialog box. The value typed into
this field is masked. This field may contain up to 128 characters.
A confirmation icon appears to the right of this field. A red check
mark indicates that the key has not been confirmed. Click on the
button, and a popup window with a confirmation field appears. A
yellow icon indicates that the key is the process of being confirmed. If the value entered in the confirmation popup matches the
Preshared Secret value, the icon turns green, indicating that the
key has been confirmed.
Two methods of authentication are supported: preshared secret
and certificates. Certificates are activated by clicking the
Advanced button. If certificates and preshared secret are both
configured, the CyberGuard VPN will attempt to use certificates
before the preshared secret.
Advanced...
When Establish Keys Using IKE is selected, this button is
activated. Clicking this button opens the IKE Advanced Settings dialog box that can be used to change the IKE defaults. See
“VPN Secure Channels - IKE Advanced Settings Dialog Box” on
page II-267.
Configure...
Opens the Manual Key Configuration dialog box. This window
can be used to configure settings for inbound and outbound manual keying. Manual keying is used instead of IKE under special
circumstances. This button is displayed in yellow when manual
keys have not been entered and gray when manual keys have been
entered. See “VPN Secure Channels - Manual Key Configuration
Dialog Box” on page II-271.
See also:
◆
◆
◆
◆
◆
◆
II-266
“Packet-Filtering Rules Window” on page II-22
“Packet-Filtering Rules Basic Page” on page II-23
“Packet-Filtering Rules IPSec Page” on page II-29
“IKE and Manual Keying” on page II-238
“VPN Secure Channels - IKE Advanced Settings Dialog Box” on page II-267
“VPN Secure Channels - Manual Key Configuration Dialog Box” on page
II-271
Chapter 13, Virtual Private Network (VPN)
VPN Secure Channels Window
VPN Secure Channels - IKE Advanced Settings Dialog Box
13
This window appears when the Advanced… button on the Channel Information page of
the VPN Secure Channels window is selected. Use this window to configure parameters
that govern the IKE interaction between the CyberGuard VPN and any peer that uses this
specific channel.
See “Internet Key Exchange (IKE)” on page II-238 for information about authenticating
with preshared secrets and certificates and IKE data.
During the authentication process, the CyberGuard VPN and the peer will exchange certificates as a method of identifying themselves. After obtaining the peer’s certificate, the
firewall will scrutinize the certificate’s validity. Part of this process is to examine if the CA
that issued the peer’s certificate is trusted by the firewall. The firewall administrator will
designate which CAs are trusted using the Trusted CAs page in the VPN Secure Channels
window.
Figure II-95. IKE Advanced Settings Dialog Box
This page has the following fields and controls:
Preshared Secret
CyberGuard Firewall Manual
If the Preshared Secret field is completed on the VPN
Secure Channels window, that masked value appears in
this field. The preshared secret can be either a plain string
or a hexadecimal integer beginning with the characters 0x.
II-267
VPN Secure Channels Window
Hexadecimal integers must have an even length. This field
may contain up to 128 characters.
A confirmation icon appears to the right of this field. A red
check mark indicates that the key has not been confirmed.
Click on the button, and a popup window with a confirmation field appears. A yellow icon indicates that the key is
the process of being confirmed. If the value entered in the
confirmation popup matches the Preshared Secret
value, the icon turns green, indicating that the key has
been confirmed.
The firewall administrator must agree on and securely
communicate a secret phrase with the administrator of the
peer, because the same preshared secret must be configured on the peer system. Although using a preshared secret
is easy to configure, the burden of securely sharing this
secret becomes prohibitive as the number of peers
increases. Using certificates for authentication is more
manageable.
A B Keys (two user input) Accommodates the entry of a Preshared Secret by two
Firewall Security Officers (FSOs). If this box is checked,
the following fields are displayed: Preshared Secret A
and Preshared Secret B. The first FSO enters Preshared
Secret A and logs out. The second FSO then logs in and
enters Preshared Secret B. Until both parts of the preshard
secret (A and B) are supplied, the channel cannot be used.
Use identity
When Preshared Secret has been chosen as the authentication method, Use identity causes IKE Phase 1 to
send the local gateway address (the firewall’s network
interface to the tunnel) in the Identity payload. This is one
of the identity types (i.e., IP address) that can be verified
by the remote peer, if the remote peer is a CyberGuard
VPN and configures it in the Remote Identities page of the
VPN Secure Channels window. This box is checked by
default.
Use Extended Authentication (XAUTH)
Specifies that the user at the remote VPN client must
authenticate (via an XAUTH IKE exchange) with the VPN
policy Manager (vpnguard) before the client is allowed to
establish VPN tunnels. The user name and password are
validated via firewall authentication rules. Additional
challenges from the firewall authentication (e.g., password
expiration/enter new password) are not supported and are
treated as authentication failure. Authentication success/failure is audited to the proxy_ia (network) audit
event. See “Extended Authentication (XAUTH)” on page
II-241 and “VPN Client Configurations Window” on page
II-262.
II-268
Chapter 13, Virtual Private Network (VPN)
VPN Secure Channels Window
Enforce XAUTH and Configuration exchange
If enabled, all VPN clients must successfully participate in
the ISAKMP (IKE) Configuration Method exchanges
(e.g., XAUTH) to establish a VPN connection. If disabled,
VPN clients that are not recognized as supporting XAUTH
and IKECFG are allowed to connect without participating
in the ISAKMP (IKE) Configuration Method exchanges.
Enable NAT Traversal
By default, the firewall/VPN will participate in NAT discovery and perform NAT Traversal if NAT is discovered.
If disabled, the firewall does not participate in NAT discovery and will not attempt NAT Traversal. See “VPN and
NAT-Traversal (NAT-T)” on page II-249.
Support Certificates
Supports certificates for authentication. Checking this box
activates the Firewall Keypair and Subject Name
fields. A certificate is a publicly known, electronic document that binds a user’s identity with his digital signature.
A certificate is issued by a Certification Authority (CA).
CAs known by the Firewall have been defined using the
Trusted CA page of the IKE Certificate Management window. See “Internet Key Exchange (IKE)” on page II-238
for an explanation of CAs and “Certificate Management
Window” on page II-292.
Firewall Keypair
Specifies the firewall’s certificate that will be offered to
the peer for authentication. The keypairs listed in this field
are configured in the Keypairs page of the IKE Certificate
Management window. See “Certificate Management Keypairs Page” on page II-293.
Subject Name
Lists alternative subject names from the firewall keypair
X.509v3 public key certificate. Choices include the fully
qualified domain name (also referred to as the FQDN or
DNS name) or the subject’s email address (if they were
specified in the certificate). This will be the subject name
that is validated by the remote peer. The subject name
specified is matched by the remote CyberGuard VPN with
the list of authorized subjects defined by its remote identities in the Remote Identities page of the VPN Secure
Channels window. See “VPN Secure Channels - Remote
Identities Page” on page II-275.
IKE Protection Strategy
Lists IKE protection strategies previously defined in the
IKE Protection Strategies window. This strategy consists
of a user-defined name and a list of one or more priorityordered sets of IKE parameters. The first set of parameters
in the list has highest priority. During the IKE process, the
IKE Protection Strategy is negotiated between the CyberGuard VPN and its peer. For the negotiation to be successful, one of the groupings listed in the IKE Protection Strategy will be agreed upon as the IKE parameters to be used.
The successful negotiation of an IKE Protection Strategy
results in an IKE SA (Security Association) between the
CyberGuard Firewall Manual
II-269
VPN Secure Channels Window
CyberGuard VPN and the peer. See “IKE Protection Strategies Window” on page II-256.
IKE Mode
Method to use when the CyberGuard VPN is engaged in
IKE Phase 1 negotiations.
M ai n m od e - The more secure (and recommended)
mode, main mode hides the identity of the negotiating parties.
Aggressive mode - Faster than main mode, but does not
protect the identities of the negotiating nodes. See Notes
below.
Perfect Forward Secrecy Group
Specifies a Diffie-Hellman group number that provides
Perfect Forward Secrecy when negotiating new IPSec SAs
during Phase 2 negotiations. PFS values are none, 1, 2, or
5. The default is none, which indicates that PFS is not in
effect. PFS exists if new keys have no mathematical relationship with existing keys. PFS enhances security
because if a current key is compromised, it would be of no
value in determining new keys because they are mathematically independent. Perfect Forward Secrecy is important for some applications but there is overhead associated
with doing a Diffie-Hellman exchange at each re-key
interval.
VPN Client Configuration Specifies the VPN client configuration that is defined in
the VPN Client Configurations window. See “VPN Client
Configuration” on page II-240 and “VPN Client Configurations Window” on page II-262.
Notes:
◆
◆
◆
II-270
IKE aggressive mode does not support negotiation of multiple Diffie-Hellman
groups; therefore, the Default IKE Strategy will not work with IKE aggressive
mode exchanges. Use the preloaded Aggressive strategy or create a new strategy to use with secure channels that specify aggressive mode.
IKE aggressive mode does not support negotiation of multiple authentication
methods; therefore, secure channels that use aggressive mode should configure either preshared secret or certificates, but not both.
IKE Aggressive Mode exchanges through a NAT device using pre-shared keys
are not supported. This is true even if NAT-Traversal is enabled. Use RSA or
DSA signature authentication (i.e. certificates) for IKE Aggressive Mode
exchanges through a NAT device. Use IKE Main Mode for exchanges through
a NAT device when using pre-shared keys.
Chapter 13, Virtual Private Network (VPN)
VPN Secure Channels Window
VPN Secure Channels - Manual Key Configuration Dialog Box
13
When defining a secure channel for a peer, the Firewall Administrator may choose to
establish keys using Manual Keying rather than using IKE, which is the default mechanism. This is selected on the Channel Information page of the VPN Secure Channels window. The Configure button must be clicked in order to setup the manual keys. See “Manual Keying” on page II-239 for more information.
Notes:
◆
◆
◆
Manual keying requires that only one cryptographic property be defined in the
IPSec Protection strategy. See “IPSec Protection Strategies - Cryptographic
Properties Page” on page II-260.
A secure channel that uses manual keying can only be used by one packet-filtering rule.
IPSec SAs created by manual keying will be deleted by the Delete All SAs
button in the VPN Controls window. See “VPN Controls Window” on page
II-279.
Use this page of the VPN Secure Channels window to configure settings for inbound and
outbound manual keying.
Figure II-96. Manual Key Configuration Dialog Box
This window has the following fields. These parameters define each set of manual keys
for inbound and outbound traffic.
SPI
Security Parameter Index for inbound/outbound traffic from this
secure channel. The SPI is a number that a system uses to identify
a Security Association it is currently using to communicate with
an IPSec peer. The SPI must be a decimal number greater than
255. This field may contain up to 10 characters.
Cipher Key
Key used by the encryption algorithm to encrypt or decrypt packets. The key must follow the rules specified below. This field may
contain up to 128 characters.
CyberGuard Firewall Manual
II-271
VPN Secure Channels Window
Authentication Key Key used by the HMAC (Keyed-Hash Message Authentication
Code) algorithm that is used to authenticate the packet. The key
must follow the rules specified below. This field may contain up
to 128 characters.
A confirmation icon appears to the right of each field. A red check mark indicates that the
key has not been confirmed. Click on the button, and a popup window with a confirmation
field appears. A yellow icon indicates that the key is the process of being confirmed. If the
value entered in the confirmation popup matches the Preshared Secret value, the icon
turns green, indicating that the key has been confirmed.
Rules for manual keys:
◆
◆
◆
◆
Manual keys can be a hex or an ASCII string and must not exceed the maximum key length for the associated cryptographic properties.
A hex string is represented by 0x followed by a string of hex digits (0-9,a-f,AF). The hex string is converted directly to hex data; therefore, the actual key
length is 1/2 the number of characters in the configured string (not counting
the 0x).
ASCII strings are converted to hex data, one character per byte in the key.
ASCII key strings may be as long as the maximum key length for the cipher or
hmac algorithm. Neither the colon (:) nor the double-quotation mark (") can be
specified.
The maximum key lengths (bytes) for the supported algorithms are:
Cipher Keys
3des-cbc
aes-cbc
twofish-cbc
blowfish-cbc
cast128-cbc
des-cbc
Bytes
24
32
16
56
16
8
HMAC (auth) keys
hmac-sha1-96
hmac-md5-96
Bytes
20
16
VPN Secure Channels - Peer Protected Networks Page
13
Use this page of the VPN Secure Channels window to enter a list of networks that will be
protected by the peer. Configuring this page of the VPN Secure Channels window is
optional, although highly recommended. The information specified on this page allows
the packet filter to automatically determine the VPN Secure Channel to use for packet-filtering rules that are protected using IPSec.
If peer-protected networks are not defined, the firewall administrator must manually select
the Secure Channel in the IPSec tab of the Packet Filtering Rules window. In order to
identify networks protected by the peer, the firewall administrator is required to define a
certain amount of information about networks and hosts that are not protected behind this
II-272
Chapter 13, Virtual Private Network (VPN)
VPN Secure Channels Window
firewall. However, such “external” information is necessary for the firewall to participate
in a Virtual Private Network.
Figure II-97. VPN Secure Channels Window - Peer Protected Networks Page
This page has the following fields and controls:
VPN Secure Channels
Displays a list of the Channel Names configured on the Channel Information page of the VPN Secure Channels window. Select
an VPN Secure Channel to configure its parameters on this page.
Network Address
Displays information entered in the Network Address field and
choices selected from the Choices List on the right.
Choices List
Displays candidates for protection that can be selected and copied
into the Network Address field using the left arrow button. For
candidates to appear in this list, they must have been previously
defined in the Host Names, Network Names, or Grouping windows.
Network Address
IP address, IP address range, IP subnetwork, host name, or group
name to be protected by this VPN Secure Channel. Valid host
names must be configured on the Host Names window.
The network identifier device_NETWORK is valid for peer protected networks
The following firewall network identifiers are n o t allowed
because they specify objects associated with the local firewall and
are not applicable to the remote peer. These identifiers are:
- FIREWALL, LOCAL_HOST, or BASTION_HOST
- INTERNAL_NETWORK
CyberGuard Firewall Manual
II-273
VPN Secure Channels Window
- EXTERNAL_NETWORK
- device_IPADDRESS
- INTERNAL_INTERFACES
- EXTERNAL_INTERFACES
For a description of these network identifiers, see “Packet Origins
and Destinations” on page II-26.
Notes:
◆
◆
◆
◆
◆
For device_NETWORK to be a tunneled origin or destination, the origin or
destination IP address of the target packet must have been routed through the
device interface.
If ALL_INTERNAL or ALL_EXTERNAL are used and they represent more
than one device_NETWORK, the channel cannot be manually selected.
Therefore, a default channel for each device_NETWORK must be configured
by adding the device_NETWORK specification to the Peer Protected Networks of the appropriate VPN Secure Channel.
The following rules apply to using a device_NETWORK as a Peer Protected
Network:
-
The route to the remote gateway is through the device interface, or the
host-type channel interface matches the device interface
-
Only one channel may use a particular device_NETWORK
The automatic channel selection algorithm (virtual route) attempts to match an
IPSec packet-filtering rule origin or destination address with the most specific
Peer Protected Network definition. Configured device_NETWORK objects
are matched only if no match is found within all peer protected host addresses,
subnetwork addresses, and address ranges.
Use host granularity on device_NETWORK rules if peer gateway rules are
not as general (for example, rules that define specific subnetworks, hosts, etc.).
Without a host granularity, device_NETWORK rules cause IKE to negotiate
using a Phase 2 identity of 0.0.0.0/0 (any address), and this will only match
a similar definition on the other side.
See also:
◆
◆
◆
◆
◆
◆
II-274
“Host Names Window” on page II-1
“Network Names Window” on page II-5
“Grouping Window” on page II-10
“Packet-Filtering Rules Window” on page II-22
“Packet-Filtering Rules Basic Page” on page II-23
“Packet-Filtering Rules IPSec Page” on page II-29
Chapter 13, Virtual Private Network (VPN)
VPN Secure Channels Window
VPN Secure Channels - Remote Identities Page
13
The CAs known by the firewall are imported on the IKE Certificate Management window
and designated as “trusted” on the Trusted CAs page of the VPN Secure Channels window. After these steps are completed, the CyberGuard VPN will accept a certificate from
any user whose certificate was issued by a Trusted CA. On this page of the VPN Secure
Channels window, the firewall administrator can restrict the users from whom the firewall
will accept certificates.
Use this page of the VPN Secure Channels window to define remote identities that will be
allowed to present a certificate during the authentication process. Do not use this page if
all users presenting certificates are to be permitted.
Figure II-98. VPN Secure Channels Window - Remote Identities Page
This page has the following fields and controls:
VPN Secure Channels
Displays a list of the Channel Names configured on the
Channel Information page of the VPN Secure Channels
window. Select a VPN Secure Channel to configure its
parameters on this page.
Remote Identity
Remote identity to be used in the IKE authentication
phase. Remote identities can be IP addresses, e-mail
addresses, or host names.
Identity Type
The type of identity entered in the Remote Identity field.
The following choices can be selected: Host Name,
Email address or IP address.
CyberGuard Firewall Manual
II-275
VPN Secure Channels Window
VPN Secure Channels - Trusted CAs Page
13
During the authentication process, the CyberGuard VPN and the peer will exchange certificates as a method of identifying themselves. After obtaining the peer’s certificate, the
firewall will scrutinize the certificate’s validity. Part of this process is to examine if the CA
that issued the peer’s certificate is trusted by the Firewall.
CA certificates are imported in the IKE Certificate Management window and displayed on
the Trusted CAs page. Use this page of the VPN Secure Channels window to define the
CA certificates that will be trusted during IKE negotiation for the secure channel being
defined.
Figure II-99. VPN Secure Channels Window - Trusted CAs Page
This page has the following fields and controls:
VPN Secure Channels
Displays a list of the Channel Names configured on the
Channel Information page of the VPN Secure Channels
window. Select a VPN Secure Channel to configure its
parameters on this page.
CA Certificates
Displays the names of CA certificates shown in the CA
Certificates page of the IKE Certificate Management window.
Trust
Indicates that the CA certificates are trusted. By default,
all certificates are trusted. Limit the trusted certificates by
unchecking those certificates that should not be trusted.
Make sure that the trusted CAs of the peer VPN gateway
are also checked.
See also:
◆
◆
◆
◆
II-276
“VPN Secure Channels - Channel Information Page” on page II-265
“Certificate Management Window” on page II-292
“Packet-Filtering Rules Basic Page” on page II-23
“Packet-Filtering Rules IPSec Page” on page II-29
Chapter 13, Virtual Private Network (VPN)
IKE Certificate Services Window
IKE Certificate Services Window
13
CAs can place certificates and CRLs on Lightweight Directory Access Protocol (LDAP)
directories so that users can retrieve them. Applications can query Online Certificate Status Protocol (OCSP) responders to determine if a certificate is valid. Use this window to
configure LDAP directories and OCSP responders.
Figure II-100. IKE Certificate Services Window - LDAP Directories Page
IKE Certificate Services - LDAP Directories Page
13
Use this page of the IKE Certificate Services window to identify LDAP servers that can be
used to obtain certificates.
This page contains the following fields and controls.
Update Packet-Filter Rules
Inserts packet-filtering rules to allow access to the LDAP directories specified
on this page.
Server
Fully qualified domain name or IP address of the LDAP server.
Port
TCP port number of the LDAP server. A maximum of five characters (0-9) are
permitted. The default is 389.
CyberGuard Firewall Manual
II-277
IKE Certificate Services Window
IKE Certificate Services - OCSP Responders Page
13
Online Certificate Status Protocol (OCSP) is a protocol defined in RFC 2560 and used by
applications to query OCSP responders in order to find out if a certificate is valid. Use this
page to identify the OCSP responders that the firewall may contact.
Figure II-101. IKE Certificate Services Window - OCSP Responders Page
This page contains the following fields and controls.
Update Packet-Filter Rules
Updates the firewall’s packet-filtering rules to allow connections
from the firewall to OCSP responders through HTTP. The default
rules are:
If the default Responder’s Access URL is used:
permit http/tcp
FIREWALL EVERYONE
If one or more specific Responder’s Access URLs are used:
permit
permit
http/tcp
http/tcp
FIREWALL
FIREWALL
1st_responder_host/IP
2nd_responder_host/IP
...etc...
Enable OCSP
Enables access to the OCSP responders defined on this page.
Sign OCSP Requests
Enables the signing of OCSP requests using the selected keypair
from the Firewall Keypair drop-down list.
II-278
Chapter 13, Virtual Private Network (VPN)
VPN Controls Window
Firewall Keypair
List of firewall keypairs configured on the Keypairs page of the
IKE Certificate Management window. See “Certificate Management - Keypairs Page” on page II-293.
Responder’s Access URL
URL that points to an OCSP Responder. The wild card symbol *
is also accepted and indicates that the URL must be found in the
Authority Info Access X509v3 extension in the certificate being
checked.
Validate Certificates Issued by This CA
List of currently installed CA certificates. This list also contains
an asterisk (*) as the default list selection. If a CA certificate is
selected from this list, only those certificates that were issued by
this CA will be checked against the specified URL. If the asterisk
is selected, checking is not performed and all certificates are
checked against the specified URL if necessary.
Note: The order of OCSP responders is significant. OCSP responders will be queried in
the order in which they appear on this page.
VPN Controls Window
13
Use this window to control the operation of the VPN policy manager and to start IKE
Exchange Logging for troubleshooting VPN IKE negotiations.
Figure II-102. VPN Controls Window - Options Page
CyberGuard Firewall Manual
II-279
VPN Controls Window
VPN Controls Window - Options Page
13
Use this page of the VPN Controls window to control the operation of the VPN policy
manager.
This page contains the following fields and controls.
Do not send certificate chains
Supports an IKE backward-compatibility mode needed for some Alcatel
(TimeStep) VPN devices.
Disable crash recovery
Checking this box turns off the crash recovery feature.
Crash recovery provides the capability to react to situations where IKE/IPSec
Security Associations (SAs) are deleted or missing in the VPN policy manager, yet delete notifications were not sent, or were not received by the VPN
peer.
For gateway-to-gateway connections using preshared secrets, crash recovery
works best if the Use identity check box is checked in the IKE Advanced
settings window (selected from the VPN Secure Channels window).
Crash recovery works better if the IKE SA lifetime is kept relatively short (5
minutes/300 seconds).
Maximum Concurrent VPN Clients
Specifies the maximum number of VPN clients that are permitted at one time.
The default is 10,000.
CRL Validity Interval (hours)
Time period in hours during which a CRL (Certificate Revocation List) is
valid. The default is 25. 0 is not a valid value.
II-280
Chapter 13, Virtual Private Network (VPN)
VPN Controls Window
VPN Controls Window - Security Associations Page
13
Use this page of the VPN Controls window to delete Security Associations (SAs) and to
display the SA information on the System Information window.
Figure II-103. VPN Controls Window - Security Associations Page
This page contains the following fields and controls.
VPN Peer Name
Host name or IP address of the peer to be deleted.
Delete Peer SAs
Deletes peer-specified SAs based on the host name or IP
address. Type an IP address or host name in the blank
field, and then push the Delete Peer SAs button. The
result of the operation is displayed in a dialog box.
Delete All SAs
Deletes all active IPSec and IKE SAs. Delete notifications
are sent to VPN peers.
Note: Clicking this button deletes IPSec SAs created by
Manual Keys. See “VPN Secure Channels - Manual Key
Configuration Dialog Box” on page II-271. To reestablish
manually keyed SAs complete the following steps:
1. Select Tools from the Control Panel.
2. Select Shell Window.
3. Become root with the following command:
/sbin/tfadmin newlvl SYS_PRIVATE
su root
newlvl NETWORK
CyberGuard Firewall Manual
II-281
VPN Controls Window
4. Issue the following commands:
vpnctl stop
netguard
or
1. Select System from the Control Panel.
2. Select Reinitialize Network.
Display SA Information
Opens the System Information window and displays General IPSec/IKE SA Information.
See Also:
◆
◆
“System Information Window” on page I-246
“System Information Reports” on page I-247
VPN Controls Window - IKE Exchange Logging Page
13
Use this page of the VPN Controls window to start IKE Exchange Logging for troubleshooting VPN IKE negotiations.
Figure II-104. VPN Controls Window - IKE Exchange Logging Page
This page contains the following fields and controls.
II-282
Logging is Enabled
Indicates logging is being performed.
Logging is Disabled
Indicates logging is not being performed.
Max log size (KB)
Maximum size in kilobytes that the log file is allowed to
grow to. The maximum value for this field is determined
Chapter 13, Virtual Private Network (VPN)
VPN Controls Window
by dividing the system’s current maximum file size by
1024. The default is 4096 KB (4 MB).
Log file path
Absolute path of the location of the log file.
Produce verbose output
Produces a formatted log file that can be read and understood by an administrator. If this box is not checked, the
log file entries are written in a format that is intended for
parsing by awk/sed scripts. This box is checked by default.
Start/Stop
Starts and stops IKE exchange logging.
Clear Log
Clears the contents of the log file. Click on Refresh in the
System Information Window after clicking this button to.
View Log
Opens the System Information window and displays the
IKE Exchange Logging report. Click on Refresh in the
System Information window after clicking this button to
redisplay the current contents of the log file.
See Also:
◆
◆
“System Information Window” on page I-246
“System Information Reports” on page I-247
IKE Exchange Log
13
The IKE exchange log helps the system administrator to troubleshoot VPN IKE negotiations.
The content of the log assumes the user has some familiarity with the following RFCs:
RFC 2407
RFC 2408
RFC 2409
The Internet IP Security Domain of Interpretation for ISAKMP
Internet Security Association and Key Management Protocol (ISAKMP)
The Internet Key Exchange (IKE)
The log file contains the following fields:
Time (and date)
The time and date of the logged record. The time is formatted:
mm/dd/yy HH:MM:SS.FFF, where mm is the month (01-12), dd
is the day (01-31), yy is the last two digits of the year, HH is the
hour (00-23), MM is the minute (00-59), SS is the second (00-59),
and FFF is the fraction of seconds in milliseconds.
Cookies
The IKE Phase 1 SA identifier (16 octets). The format is:
initiator cookie-responder cookie
where the initiator and responder cookies are displayed in hexadecimal format, for example,
3f6e3c46.7d000003-2f86c3ce.ea000003
CyberGuard Firewall Manual
II-283
VPN Controls Window
Exchange
The exchange mode, IKE role, packet direction, packet payloads,
and IP address of the remote IKE peer.
The exchange mode is one of the following:
MM - Phase 1 Main Mode / Identity Protection
AM - Phase 1 Aggressive Mode
QM - Phase 2 Quick Mode
Info - Informational exchanges (for delete or notify payloads)
The role is initiator or responder, indicating the role played by the
IKE daemon for this exchange. The packet direction indicates
whether the IKE daemon is sending or receiving the exchange
packet. The abbreviated payload descriptions reveal the types of
IKE payloads sent or received, as specified in RFC 2408
(ISAKMP):
SA - Security Association
KE - Key Exchange
NONCE - Nonce
CR - Certificate Request
ID - Identity
CERT - Certificate
SIG - Signature
HASH - Hash digest
D - Delete
N - Notification
VID - Vendor ID
The order payload abbreviations are listed is arbitrary and does
not represent the order of the payload in the IKE packet.
Local/Remote ID
The local and remote identity payload data are logged if the ID
payload is present. The ID string is formatted as:
ID_type(protocol_ID:port,identification_data)
The identification_data will depend on the ID_type. The
ID_type is typically one of the following:
fqdn - Domain name (my.company.com)
usr@fqdn - Email address ([email protected])
ipv4 - IPv4 address (10.0.0.1)
ipv4_subnet - IPv4 subnetwork address (10.0.0.0/8)
ipv4_range - IPv4 address range (10.0.0.1-10.0.0.9)
Other
This field contains additional information related to the exchange
including SA attributes, error messages, and Phase 2 Security
Parameter Indices (SPI).
Proposed SA attributes are not shown. Only the final, negotiated
SA attributes are given. The negotiated SA attributes such as
cipher, hash, and lifetime are provided by the responder (received
by the initiator) on the second SA payload between IKE peers for
II-284
Chapter 13, Virtual Private Network (VPN)
VPN Controls Window
MM, AM, or QM exchanges.
Errors with certificate and certificate request payloads passed in
the exchange may not produce precise messages. The user should
consult the audit report for events related to errors detected by the
VPN Certificate Manager.
The following is an example IKE log output for a QM exchange:
Time:
Cookies:
Exchange:
Local ID:
Remote ID:
08/19/02 10:10:49.034
3f6e3c46.7d000003-2f86c3ce.ea000003
QM initiator sending SA ID HASH NONCE to 10.1.0.10
ipv4_subnet(any:0,192.168.7.0/24)
ipv4_subnet(any:0,192.168.1.0/24)
Time:
Cookies:
Exchange:
Local ID:
Remote ID:
Other:
08/19/02 10:10:49.037
3f6e3c46.7d000003-2f86c3ce.ea000003
QM initiator received SA ID HASH NONCE from 10.1.0.10
ipv4_subnet(any:0,192.168.7.0/24)
ipv4_subnet(any:0,192.168.1.0/24)
ESP tunnel, 3des, hmac-sha1-96, No PFS, 300 sec, 0 KB
Time:
Cookies:
Exchange:
08/19/02 10:10:49.038
3f6e3c46.7d000003-2f86c3ce.ea000003
QM initiator sending HASH to 10.1.0.10
Time:
Cookies:
Exchange:
Local ID:
Remote ID:
Other:
08/19/02 10:10:49.038
3f6e3c46.7d000003-2f86c3ce.ea000003
QM initiator completed exchange with 10.1.0.10
ipv4_subnet(any:0,192.168.7.0/24)
ipv4_subnet(any:0,192.168.1.0/24)
Phase 2 complete. SPI (in,out): 2185ca30,498ad18a
CyberGuard Firewall Manual
II-285
VPN Controls Window
VPN Certificate Events in the Log File
The log file contains the following log entries pertaining to VPN Certificate Events. These
log entries contain the same information as VPN Certificate alerts and activities.
Time (and date)
The time and date of the logged record. The time is formatted:
mm/dd/yy HH:MM:SS.FFF, where mm is the month (01-12), dd
is the day (01-31), yy is the last two digits of the year, HH is the
hour (00-23), MM is the minute (00-59), SS is the second (00-59),
and FFF is the fraction of seconds in milliseconds.
Cert Event
A description of the VPN certificate event that occurred. The certificate events are:
Certificate Added - A certificate was added/found.
Certificate Revoked - A certificate was determined to be in the
revoked/suspended state.
CRL Added - A CRL was added/found.
OCSP Status Check - The status of a certificate was checked
against an OCSP responder.
OCSP Status Failure - An OCSP request failed.
Cert path verification error - The verification of a certificate
revealed a problem (or problems).
The remainder of the Certificate Event log entry depends on the Cert Event field.
Certificate Added/Revoked Events:
Subject Name
Issuer Name
Serial Number
Distinguished name of the subject of the certificate.
Distinguished name of the issuer of the certificate.
Serial number of the certificate.
CRL Added Events:
CRL Issuer Distinguished name of the issuer of the CRL.
This Update Date/Time when the CRL was issued.
Next Update The Date/Time when the issuance of the next CRL is scheduled.
OCSP Status Check:
Result
The status of the certificate. There are three possible values for
this field:
Certificate is good
Certificate is revoked
Certificate status is unknown
Subject Name
Issuer Name
Serial Number
II-286
Distinguished name of the subject of the certificate.
Distinguished Name of the issuer of the certificate.
Serial number of the certificate.
Chapter 13, Virtual Private Network (VPN)
VPN Controls Window
OCSP Status Failure:
Error Message
The reason why the OCSP check failed. These are the possible
values for Error Message:
No responses were found
A nonce is required
The nonce did not match
The serial number did not match
The issuer key hash did not match
The timestamps that were indicated in the response were bad
The signature of the OCSP response was not verified
The responder is not authorized to sign responses
The responder search failed
Failure to receive an OCSP response
Subject Name
Issuer Name
Serial Number
Distinguished name of the subject of the certificate.
Distinguished Name of the issuer of the certificate.
Serial number of the certificate.
Cert path verification error:
Error Message
The reason why the certificate path verification failed.
Certificate algorithm mismatch
Certificate key usage mismatch
Certificate was not in the expected time interval
Certificate was invalid
Certificate had invalid signature
Certificate was revoked
Certificate was not added to the cache
Certificate decoding failed
Certificate was not found
Certificate chain did not reach trusted root CA
Certificate critical extension check failed
CA was invalid
CRL was too old
CRL was invalid
CRL had an invalid signature
CRL was not found
CRL was not added to the cache
CRL decoding failed
CRL thisUpdate time is in the future
CRL contained a duplicate serial number
Certificate validity interval was invalid
Time information was not available
Database search timeout
Database search failed
Path was not verified (chain validation failed)
Maximum path length reached
CyberGuard Firewall Manual
II-287
VPN Controls Window
Subject Name
Issuer Name
Serial Number
Distinguished name of the subject of the certificate.
Distinguished Name of the issuer of the certificate.
Serial number of the certificate.
The following is an example IKE log output for VPN Certificate Events:
Time:
Cert Event:
Subject Name:
Issuer Name:
Serial Number:
Time:
Cert Event:
Result:
Subject Name:
Issuer Name:
Serial Number:
10/11/02 11:00:01.083
Certificate Added
C=us, O=CyberGuard Corporation,
C=US, O=CyberGuard Corporation,
1034114040
10/11/02 11:00:01.085
OCSP Status Check
Certificate is good.
C=US, O=CyberGuard Corporation,
C=US, O=CyberGuard Corporation,
1034347741
OU=Development, CN=valicert.cybg.com
OU=Development, CN=Issuer 1 CA
OU=Development, CN=olyeller.cybg.com
OU=Development, CN=Issuer 1 CA
Non-Formatted Log
The non-formatted logging option produces one line of output per each log entry. The
fields are comma-separated values and represent the same data as described above for certificate events:
time:mode:role:dir:payloads:remoteIP:localID:remoteID:cookies:other
The time is formatted mmddyyHHMMSS.FFF, where mm is the month (01-12), dd is the
day (01-31), yy is the last to digits of the year, HH is the hour (00-23), MM is the minute
(00-59), SS is the second (00-59), and FFF is the fraction of seconds in milliseconds. The
mode is MM, AM, QM or Info, as described above. The role is I for initiator or R for
responder. The dir field species the packet direction (RX=received, TX=sending).
See Also:
◆
◆
vpnrpt (1M)
vpnctl (1M)
VPN Controls Window - IKE Exchange Logging Timers Page
13
Use this window to adjust IKE exchange retry parameters to that negotiations across networks with high latency are able to complete successfully.
II-288
Chapter 13, Virtual Private Network (VPN)
VPN Controls Window
Figure II-105. VPN Controls Window - IKE Exchange Timers Page
This page contains the following fields and controls.
Maximum number of retries
Specifies the maximum number of retransmission packets that will be sent.
The negotiation is aborted after this limit is reached.
Initial retry interval (seconds)
Specifies the the base interval for the retransmission packets. The first retransmission packet is sent after that time. The next packet is sent at 2^(retransmission packet number) * (Initial retry interval). For example, if the Maximum number of retries is 10, the Initial retry interval is 0.5, the first
retransmission packet is sent out after 0.5 seconds, the second packet after is
sent out after 1 second, and following packets after 2, 4, 8, 16, 32, 64, 128, and
256 seconds. After that, the negotiation times out.
Maximum retry interval (seconds)
Specifies the maximum time in seconds between retrasmission packets. For
example if the Maximum retry interval is set to 30 seconds, the Initial
retry interval is set to 0.5 seconds, and the Maximum number of
retries is set to 10, the retransmission packets are sent after 0.5, 1, 2, 4, 8, 16,
30, 30, 30, and 30 seconds.
Maximum negotiation duration (seconds)
Specifies maximum time for the whole negotiation. After this time expires,
the negotiation is immediately aborted.
Restore Defaults
Returns all controls on this page to their default values.
CyberGuard Firewall Manual
II-289
Certificate Request Wizard
Certificate Request Wizard
13
The Certificate Request Wizard collects input from the user for a PKCS10 Certificate
Request and then creates the request using the openssl command. The Certificate Request
Wizard is started when Certificate Request is selected from the Tools menu.
The following wizards are also available to assist with certificate importing and exporting:
◆
◆
◆
“Firewall Keypair Import Wizard” on page II-293
“Firewall Keypair Export Wizard” on page II-296
“CA Certificate Import Wizard” on page II-298
The wizard consists of a series of forms that require user input before moving to the next
form. The forms appear as follows:
Step 1. Enter the Subject Name
1. Enter a Subject Name either by entering familiar subject name attributes or by entering
the complete Subject Name in LDAP DN (distinguished name) format. When entering
the subject name in LDAP DN format, either the long form or the short form of the
attributes may be specified. Each line should contain one attribute name followed by
the equal sign and the value.
The following subject name attributes may be specified multiple times in LDAP DN
format: the domainComponent (dc) attribute and the organizationalUnit (OU)
attribute. The domainComponent attribute can be specified more than once up to
the number of times necessary to represent a complete domain name (e.g., dc=cyberguard, dc=com). The organizationalUnit attribute can be specified up to four
times.
The following table lists the allowed attributes along with their maximum lengths:
Table II-4. LDAP DN Attributes Format
II-290
Long Name
Short Name
Max Length
countryName
C
2
commonName
CN
64
organizationName
O
64
organizationalUnitName
OU
32
localityName
L
64
stateOrProvinceName
ST
64
givenName
G
16
surname
S
40
Chapter 13, Virtual Private Network (VPN)
Certificate Request Wizard
Table II-4. LDAP DN Attributes Format
Long Name
Short Name
Max Length
name
name
64
initials
I
5
title
T
64
dnQualifier
dnQualifier
64
generationQualifier
generationQualifier
3
domainComponent
DC
64
emailAddress
email
128
pseudonym
pseudonym
128
2. Click on Next.
Step 2. Enter one or more Alternative Subject Names (optional)
1. Optionally enter one name for each supported type: Email Address, DNS Name,
and IP Address. These names are optional and one or more text fields can be left
blank.
2. Click on Next.
Step 3. Select a Public Key Algorithm and Public Key Length
1. From the drop-down list box, select the Public Key Algorithm to be used. Valid
choices are RSA or DSA.
2. From the drop-down list box, select the Public Key Length.
3. Click on Next.
Step 4. Confirmation
The Confirmation form displays the user’s choices and input for verification. If the information is correct, click on Finish to generate the PKCS10 request. To modify any
choices, click on Previous.
Step 5. Summary
If the PKCS10 request was successfully created, the Summary form displays the file
names of the saved PKCS10 request and the private key as well as the Base 64 (PEM)
encoding of the PKCS10 Certificate Request. The Base 64 (PEM) encoding is selectable
so that the Certificate Request can be copied to another X program such as a Web browser.
The following buttons also appear on this form:
Copy to Clipboard Copies the certificate request to the clipboard. This text can be
pasted into other programs by pressing the middle mouse button
or by clicking the Paste button in the program’s tool bar.
CyberGuard Firewall Manual
II-291
Certificate Management Window
Save to File
Displays the File Selection window to allow the user to specify a
file name. The certificate request will be written to that file. See
“File Selection Window” on page I-29.
Save to Diskette
If a DOS-formatted diskette is in the floppy disk drive, the user is
prompted to specify the DOS filename to which the certificate
request will be saved.
Certificate Management Window
13
Use this window to import keypairs and certificates into the firewall for use in IKE
authentication. Certificates that identify the CyberGuard VPN firewall or CA certificates
can be imported with this window. A keypair is the pairing of a certificate with its corresponding private key. Keypairs are used to store the identity of the firewall. CA certificates are used to check the certificates that the firewall receives from its IPSec peer.
To create a certificate request, see “Certificate Request Wizard” on page II-290.
The following wizards are also available to assist with certificate importing and exporting:
◆
◆
◆
“Firewall Keypair Import Wizard” on page II-293
“Firewall Keypair Export Wizard” on page II-296
“CA Certificate Import Wizard” on page II-298
See “Internet Key Exchange (IKE)” on page II-238 for more information about CA certificates.
Figure II-106. Certificate Management Window - Keypairs Page
II-292
Chapter 13, Virtual Private Network (VPN)
Certificate Management Window
Certificate Management - Keypairs Page
13
Use this page of the IKE Certificate Management window to import or delete keypairs
from the firewall. Keypairs are stored within a secure directory to restrict access to them.
This page has the following fields and controls:
Keypair Tag User-defined name for a keypair. When a keypair is imported, this name
is used to rename certificate and private key files.
Import
Begins the Firewall Keypair Import Wizard to copy PKCS12, PKCS7,
and DER/PEM-encoded X.509 certificates and private keys into the correct directories in the format required by the firewall. See “Firewall Keypair Import Wizard” on page II-293.
View
After a certificate has been imported, opens the Certificate Viewer window.
Export
If a certificate has already been imported, begins the Firewall Keypair
Export Wizard to write keypairs out to PKCS12 files. See “Firewall Keypair Export Wizard” on page II-296.
Firewall Keypair Import Wizard
13
Use the Firewall Keypair Import Wizard to copy PKCS12, PKCS7, and DER/PEMencoded X.509 certificates and private keys into the correct directories in the format
required by the firewall. The Firewall Keypair Import Wizard is started when the Import
button is clicked on the Keypairs page of the Certificate Management window. To create a
certificate request, see “Certificate Request Wizard” on page II-290.
The wizard consists of a series of forms that require user input before moving to the next
form. The forms appear as follows:
For PKCS12:
Step 1. Select a certificate file format.
1. Select PKCS12.
2. Click on Next.
Step 2. Select a file
1. Type the absolute path name of the certificate in the Filename field or click on the
Browse button to search the file system for the file.
2. Click on Next.
Step 3. Enter the PKCS#12 password.
1. Type a password in the Password field.
2. Re-type the password in the Confirm Password field to ensure that it was typed correctly.
CyberGuard Firewall Manual
II-293
Certificate Management Window
3. Click on Next.
Step 4. Select the certificates to be imported.
1. If the PKCS12 file contains more than one certificate, a list of certificates is displayed.
Select a certificate.
2. Click on Next.
Step 5. Confirmation.
The Confirmation form displays the user’s choices and input for verification. If the Keypair Import settings are correct, click on Finish. To modify any choices, click on Previous.
Step 6. Summary
The Summary form displays the names of the firewall certificate and any CA certificates
that were imported.
For PKCS7 and PEM/DER-Encoded X.509 Certificates:
Step 1. Select a certificate file format
1. Select PKCS7 or X.509 Certificate.
2. Click on Next.
Step 2. Select a method for importing the certificate
1. Choose from Import from file or Copy and Paste.
2. Click on Next.
Step 3. Select a file or paste the certificate text
1. Complete the next form:
◆
◆
If Import from file was selected, the Certificate Filename form
appears. Type the absolute path name of the certificate or click on the
Browse button to search the file system for the file.
If Copy and Paste was selected, the Certificate Text form appears.
Copy the certificate text from the source and then click on Paste from
Clipboard to paste the text into the form.
2. Click on Next.
Step 4. Select a private key file
The Private Key Filename form allows the user to specify a private key filename and to
specify whether the private key is encrypted. If the private key is encrypted, this form
allows the user to specify the password required to decrypt the private key. When importing private keys that were generated by the firewall, leave the Decrypt private key
check box unchecked.
II-294
Chapter 13, Virtual Private Network (VPN)
Certificate Management Window
1. Type the absolute path name of the certificate or click on the Browse button to search
the file system for the file.
2. If the private key should be decrypted, check Decrypt private key. Checking this
box enables the Password and Confirm Password fields.
3. To unhide the password, clear Mask password which is checked by default.
4. Type the password in the Password field and again in the Confirm Password
field.
5. Click on Next.
Step 5. Select the certificates to be imported
1. If the PKCS7 file contains more than one certificate, a list of certificates is displayed.
Select a certificate.
2. Click on Next.
Step 6. Confirmation
The Confirmation form displays the user’s choices and input for verification. If the Firewall Keypairs Import is correct, click on Finish. To modify any choices, click on Previous.
Step 7. Summary
The Summary form displays the names of the firewall certificate and any CA certificates
that were imported.
CyberGuard Firewall Manual
II-295
Certificate Management Window
Firewall Keypair Export Wizard
13
Use the Firewall Keypair Export Wizard to write keypairs out to PKCS12 files. The Firewall Keypair Export Wizard is started when the Export button is clicked in the Keypairs
page of the Certificate Management window.
The wizard consists of a series of forms that require user input before moving to the next
form. The forms appear as follows:
Step 1. Enter the PKCS12 output filename
1. Type the absolute path name or click on the Browse button to specify the location of
the new PKCS12 file that will be created.
2. Click on Next.
Step 2. Enter the password
1. To hide the password, check Mask password.
2. Type the password in the Password field and again in the Confirm Password
field.
3. Click on Next.
Step 3. Confirmation
The Confirmation form displays the user’s choices and input for verification. If the Keypair Export is correct, click on Finish. To modify any choices, click on Previous.
Certificate Management - CA Certificates Page
13
Use this page of the IKE Certificate Management window to import, view, or delete CA
certificates. To create a certificate request, see “Certificate Request Wizard” on page
II-290.
II-296
Chapter 13, Virtual Private Network (VPN)
Certificate Management Window
Figure II-107. Certificate Management Window - CA Certificates Page
This page has the following fields and controls:
CA Tag
User-defined name for a CA public key certificate.
Import
Starts the CA Certificate Import Wizard to import a PKCS7 or DER/PEMencoded X.509 certificate in the format required by the firewall and copy it
into the correct directory.
View
Displays the Certificate Viewer window. This window displays information
about a certificate along with the Base 64 (PEM) encoding of the certificate.
Text within this window can be highlighted and copied in order to paste the
text into another window or program.
Certificate Revocation Checking
Disabled - Indicates that CRL checking will not be performed for certificates
that were signed by this CA.
CDP Extension in Certificate - Indicates that CRL checking will be performed and the CRL Distribution Point (CDP) X.509v3 extension will be
checked to find where CRLs can be retrieved.
CRL File - Indicates that the user will specify a path to the CRL file already
on the system.
Import CRL File
Displays a file selection box to allow the user to choose a CRL filename.
This button is activated when CRL file is selected from the Certificate
Revocation Checking drop-down list. After clicking this button, the user is
prompted for the file name of a CRL file. The file can be read from a floppy
diskette or from a disk file.
CyberGuard Firewall Manual
II-297
Certificate Management Window
CA Certificate Import Wizard
13
Use the CA Certificate Import Wizard to import a PKCS7 or DER/PEM-encoded X.509
certificate in the format required by the firewall and copy it into the correct directory. The
CA Certificate Import Wizard is started when the Import button is clicked on the CA
Certificates page of the Certificate Management window.
The wizard consists of a series of forms that require user input before moving to the next
form. The forms appear as follows:
Step 1. Select a certificate file format
1. Select PKCS7 or X.509 Certificate.
2. Click on Next.
Step 2. Select a method for importing the certificate
1. Choose from Import from file or Copy and Paste.
2. Click on Next.
Step 3. Select a certificate filename or copy/paste the certificate text
1. Complete the next form:
◆
◆
If Import from file was selected, the Certificate Filename form
appears. Type the absolute path name of the certificate or click on the
Browse button to search the file system for the file.
If Copy and Paste was selected, the Certificate Text form appears.
Copy the certificate text from the source and then click on Paste from
Clipboard to paste the text into the form.
2. Click on Next.
Step 4. Confirmation
The Confirmation form displays the user’s choices and input for verification. If the CA
Certificate Import is correct, click on Finish. To modify any choices, click on Previous.
Step 5. Summary
The Summary form displays the names of the CA certificates that were imported.
II-298
Chapter 13, Virtual Private Network (VPN)
Configuring a Virtual Private Network
Configuring a Virtual Private Network
13
The sections that follow explain how to set up the most common VPN configurations:
gateway-to-gateway, gateway to a VPN host with a known address, and gateway to a VPN
host with an unknown address.
How to Configure a Gateway-to-Gateway VPN Firewall
13
Using as many defaults as possible, this procedure explains how to configure a VPN with
an IPSec Gateway as its peer.
Step 1 - Define a Channel to the IPSec Peer
Begin by defining a channel to the IPSec peer that the CyberGuard VPN will communicate with.
1. Select Configuration from the Control Panel.
2. Select VPN Secure Channels. The VPN Secure Channels window appears.
3. Click on the Channel Information tab. The Channel Information page appears.
4. Click on Show Editor. The expanded Channel Information page appears.
5. Click on Insert to begin creating a new secure channel.
6. Type a name in the Channel Name field, for example, HQ_gateway.
7. Select Gateway as the Peer Type. An example of a gateway is another CyberGuard
VPN.
8. Type the IP address or the host name of the peer in the Host Name field. If a host
name is entered, it must be defined in the /etc/inet/hosts file.
9. Specify if the communication with the peer will use IKE (Internet Key Exchange, the
key management protocol of IPSec) or Manual Keying. IKE is the default, and this
procedure will use IKE.
10. Because IKE is selected, specify a mechanism for the firewall and the peer to authenticate one another. Typing a secret phrase in the Preshared Secret field requires the
minimum amount of configuration. The firewall administrator must agree to and
securely communicate this secret phrase with the administrator of the peer, because the
same preshared secret must be configured on the peer system.
CyberGuard Firewall Manual
II-299
Configuring a Virtual Private Network
Step 2 - Identify Networks Protected by the Peer
Because the peer is a gateway, the next step is to identify the networks of interest that are
protected by this peer. Although this step is optional, it is highly recommended because it
enables the CyberGuard VPN to automatically determine the secure channel for each
packet-filtering rule that is protected with IPSec.
1. Click on the Peer Protected Networks tab of the VPN Secure Channels window.
2. In the VPN Secure Channels list on the left side of the page, select a secure channel, such as HQ_gateway that was defined in Step 1.
3. Click on Show Editor.
4. Click on Insert.
5. In the Network Address field, type an IP address, IP address range, network name,
IP subnet, host name, or group name that defines the entities protected by the peer
gateway or use the Choices List to select the remote entities of interest. Note that for
the remote entities to appear in this Choices List, they must have been previously
defined in the Host Names, Network Names, or Grouping windows.
Step 3 - Define Packet-Filtering Rules
Define packet-filtering rules that will be protected using IPSec and the newly defined
VPN Secure Channel.
1. Select Configuration from the Control Panel.
2. Select Packet-Filtering Rules. The Packet-Filtering Rules window appears.
3. Click on Show Editor. The expanded window appears.
4. Click on the Basic tab. The Basic page appears.
5. Enter the rules similar to the following:
permit
permit
ALL
ALL
192.168.2.0/24
10.2.3.0/24
10.2.3.0/24
192.168.2.0/24
6. For both rules, select the rule and check the Protect using IPSec option. To configure device_NETWORK type VPN rules, see “Packet-Filtering Rules IPSec Page” on
page II-29.
7. Click on Save. Your changes take effect at the next system reboot.
8. (Optional) Click on Use. Your changes take effect immediately.
See also:
◆
◆
◆
◆
II-300
“Host Names Window” on page II-1
“Packet-Filtering Rules Window” on page II-22
“Packet-Filtering Rules Basic Page” on page II-23
“Packet-Filtering Rules IPSec Page” on page II-29
Chapter 13, Virtual Private Network (VPN)
Configuring a Virtual Private Network
How to Configure a Gateway-to-Host VPN (Virtual Address)
13
Using as many defaults as possible, this procedure explains how to configure a VPN with
a host (IPSec client) as its peer.
Step 1 - Define a Channel to the IPSec Peer
Begin by defining a channel to the IPSec peer that the CyberGuard VPN will communicate with.
1. Select Configuration from the Control Panel.
2. Select VPN Secure Channels. The VPN Secure Channels window appears.
3. Click on the Channel Information tab. The Channel Information page appears.
4. Click on Show Editor. The expanded Channel Information page appears.
5. Click on Insert.
6. Type a name in the Channel Name field, for example, mylaptop.
7. Select Host as the Peer Type. An example of a host is a single end-user machine,
known as a VPN client.
8. Because the Peer Type is a Host, select the network interface of the firewall to
which the peer (VPN client) will connect. For example, select dec2 in the Interface
Name list box.
9. Specify if the communication with the peer will use IKE (Internet Key Exchange, the
key management protocol of IPSec) or Manual Keying. IKE is the default, and this
procedure will use IKE.
10. Because IKE is selected, specify a mechanism for the firewall and the peer to authenticate one another. Typing a secret phrase in the Preshared Secret field requires the
minimum amount of configuration. The firewall administrator must agree and securely
communicate this secret phrase with the administrator of the peer, because the same
preshared secret must be configured on the peer system.
CyberGuard Firewall Manual
II-301
Configuring a Virtual Private Network
Step 2 - Identify Networks Protected by the Peer
If the VPN client software supports a mapping of a virtual IP address to a physical IP
address, the virtual IP address is analogous to the protected networks of a VPN gateway
peer. If the virtual network of VPN hosts is known, it can be specified on the Peer Protected Networks page of the VPN Secure Channels window. Although this step is
optional, it is highly recommended because it enables the CyberGuard VPN to automatically determine the secure channel for each packet-filtering rule that is protected with
IPSec.
1. Click on the Peer Protected Networks tab of the VPN Secure Channels window.
2. In the VPN Secure Channels list on the left side of the page, select a secure channel, such as mylaptop that was defined in Step 1.
3. Click on Show Editor.
4. Click on Insert.
5. In the Network Address field, type the virtual IP address, IP address range, IP subnet, or host name that defines the host or use the Choices List to select the remote
entities of interest. Note that for the remote entities to appear in this Choices List,
they must have been previously defined in the Host Names, Network Names, or
Grouping windows.
Step 3 - Define Packet-Filtering Rules
Define packet-filtering rules that will be protected using IPSec and the newly defined
VPN Secure Channel.
1. Select Configuration from the Control Panel.
2. Select Packet-Filtering Rules. The Packet-Filtering Rules window appears.
3. Click on Show Editor. The Expanded Basic page appears.
4. Click on the Basic tab. The Basic page appears.
5. Enter the rules similar to the following:
permit
permit
ALL
ALL
192.168.5.55/24
10.2.3.0/24
10.2.3.0/24
192.168.5.55/24
6. For both rules, select the rule and check the Protect using IPSec option. To configure device_NETWORK type VPN rules, see “Packet-Filtering Rules IPSec Page” on
page II-29.
7. Click on Save. Your changes take effect at the next system reboot.
8. (Optional) Click on Use. Your changes take effect immediately.
Note: Virtual addresses (addresses located on the remote end of a VPN tunnel) do not
need to be routable; however, packet filter parsing generates warning messages
for nonroutable addresses that it encounters. To avoid these warning messages, it
is strongly recommended that you configure a default route.
II-302
Chapter 13, Virtual Private Network (VPN)
Configuring a Virtual Private Network
See also:
◆
◆
◆
“Packet-Filtering Rules Window” on page II-22
“Packet-Filtering Rules Basic Page” on page II-23
“Packet-Filtering Rules IPSec Page” on page II-29
How to Configure a Gateway-to-Host VPN (Dynamic Address)
13
Using as many defaults as possible, this procedure explains how to configure a VPN with
a host (IPSec client) as its peer, where the IP address of the host is unknown prior to it
connecting to the firewall.
Step 1 - Define a Channel to the IPSec Peer
Begin by defining a channel to the IPSec peer that the CyberGuard VPN will communicate with.
1. Select Configuration from the Control Panel.
2. Select VPN Secure Channels. The VPN Secure Channels window appears.
3. Click on the Channel Information tab. The Channel Information page appears.
4. Click on Show Editor. The expanded Channel Information page appears.
5. Click on Insert.
6. Type a name in the Channel Name field, for example, mylaptop.
7. Select Host as the Peer Type. An example of a host is a single end-user machine,
known as a VPN client.
8. Because the Peer Type is a Host, select the network interface of the firewall to
which the peer (VPN client) will connect. For example, select dec2 in the Interface
Name list box.
9. Specify if the communication with the peer will use IKE (Internet Key Exchange, the
key management protocol of IPSec) or Manual Keying. IKE is the default, and this
procedure will use IKE.
10. Because IKE is selected, specify a mechanism for the firewall and the peer to authenticate one another. Typing a secret phrase in the Preshared Secret field requires the
minimum amount of configuration. The firewall administrator must agree and securely
communicate this secret phrase with the administrator of the peer, because the same
preshared secret must be configured on the peer system.
Note: When the IPSec peer type is a host with an unknown IP address, the host cannot
be specified on the Peer Protected Networks page. This limits the information the
firewall has in attempting to automatically select an VPN Secure Channel for a
particular packet-filter rule. Therefore, Enable Manual Selection of VPN
Secure Channel will need to be configured for each applicable packet-filtering
rule, on the IPSec page of the Packet-Filtering Rules window.
CyberGuard Firewall Manual
II-303
Configuring a Virtual Private Network
Step 2 - Define Packet-Filtering Rules
Create packet filtering rules that govern the interaction between the VPN firewall and the
VPN client. Because the IP address of the client is not known, the Passport One mechanism is used to set up the packet-filtering rules. This allows use of the %USER construct
so that the source IP address of the system from which the user made the authenticating
connection is substituted into the packet-filtering rules.
1. Select Configuration from the Control Panel.
2. Select Passport One. The Passport One window appears.
3. Click on the Setup tab. The Setup page appears.
4. Check Enable.
5. Under Enabled Interfaces, check the firewall interface that corresponds to the
interface selected in Step 1 (dec2 in this example).
6. Accept the defaults for HTTP and Telnet (enabled), Maximum Number of Sessions, and Refresh Interval.
7. Click on the Profiles tab. The Profiles page appears.
8. Click on Insert.
9. Type a name in the Profile Name field.
10. Click on the Rules tab. The Rules page appears.
11. Enter packet filtering rules for the Profile Name. Use the %USER construct to identify the IP address of the host (VPN client).
12. Check the option Protect using IPSec. To configure device_NETWORK type VPN
rules, see “Packet-Filtering Rules IPSec Page” on page II-29.
13. For each Option using %USER:
c. Click on the IPSec tab.
d. If %USER is in the Packet Origin field of the packet-filtering rule,
click on the To Packet Origin box in the Enable Manual Selection
of VPN Secure Channel section. Then select the Secure Channel for
this rule.
e. If %USER is in the Packet Destination field of the packet-filtering rule,
click on the To Packet Destination box in the Enable Manual
Selection of VPN Secure Channel section. Then select the Secure
Channel for this rule.
14. Click on Save. Your changes take effect at the next system reboot.
15. (Optional) Click on Use. Your changes take effect immediately.
II-304
Chapter 13, Virtual Private Network (VPN)
Configuring a Virtual Private Network
Step 3 - Associate the Remote Host User with the Passport One Profile
1. Select Configuration from the Control Panel.
2. Select Users. The Users window appears.
3. Click on Show Editor. The expanded Users window appears.
4. Click on Insert. The list is scrolled to the end. An incomplete new line appears.
5. Type in the new user information on the User Information page.
6. Click on the Authentication tab. The Authentication page appears.
7. Select authentication methods in the Internal Authentication Method and
External Authentication Method field.
8. To configure the user to use the Passport One profile configured in Step 2, click on the
Passport One Rules tab. The Passport One Rules page appears.
9. Select a profile from the Profile Name list and type a * in the Source Address
field because the address of the host is unknown and a time period in the Session
Duration field.
10. Click on Save.
See also:
◆
◆
◆
◆
◆
“Users - Passport One Rules Page” on page II-166
“Passport One Rules Page” on page II-193
“Packet-Filtering Rules Window” on page II-22
“Packet-Filtering Rules Basic Page” on page II-23
“Packet-Filtering Rules IPSec Page” on page II-29
CyberGuard Firewall Manual
II-305
VPN - Underlying Constructs
VPN - Underlying Constructs
13
Advanced Users Only! The GUI automates the editing of files and invocation of commands described in this section. If you choose to manually edit any file, you must first
close every window displayed from the Configuration menu and complete all edits of
the file before continuing GUI configuration activities.
Configuration files that capture the data entered into the Graphical User Interface are used
to produce SPD files for the IPSec Policy Manager. The following files configure IPSec
policy:
◆
◆
◆
◆
◆
◆
II-306
VPN Secure Channel Configurations are stored in the /etc/security/firewall/vpn/channels/ directory. Each channel is identified by a name given by
the firewall administrator. File names consist of this name plus a .conf file
extension.
IKE Protection Strategies are stored in the /etc/security/firewall/vpn/ike_strategies/ directory. Each strategy consists of a list of cryptographic properties to negotiate during IKE Phase 1 and is identified by a
name given by the firewall administrator. File names consist of this name plus
a .conf file extension.
IPSec Protection Strategies are stored in the /etc/security/firewall/vpn/ipsec_strategies/ directory. Each strategy consists of a list of
cryptographic properties to negotiate during IKE Phase 2 and is identified by a
name given by the firewall administrator. File names consist of this name plus
a .conf file extension.
Trusted CA Certificates are stored in the /etc/security/firewall/vpn/ca_certs/ directory. CA certificates are stored in individual files,
each identified by a name given by the firewall administrator plus a .cer
extension. The name is used as the key to a CA certificate metadata database
that describes the public key certificate.
Firewall Keypairs are stored under the /etc/security/firewall/vpn/keypairs/ directory. Each keypair consists of a certificate and private key that is
used by the firewall to authenticate itself to any VPN peer during the IKE
Phase 1 exchange. Certificates are stored in individual files, each identified by
a name given by the firewall administrator plus a .cer extension. The corresponding private keys are stored in separate files, each identified by a name
given by the firewall administrator plus a .prv extension.
Packet-Filtering Rules are stored in /etc/security/firewall/ng_inet/netguard.conf and provide the ipsec option to enable data security on the connection associated with each packet-filtering rule. See “Packet-Filtering Rules
Configuration File (netguard.conf)” on page II-43.
Chapter 13, Virtual Private Network (VPN)
VPN - Underlying Constructs
IKE Protection Strategy Configuration File (*.conf)
13
The IKE Protection Strategies window is used to configure and display information for
one or more IKE Protection Strategies. This information is stored in a set of text files in
the /etc/security/firewall/vpn/ike_strategies/ directory.
Format guidelines:
◆
◆
◆
Fields are separated by white space (tabs or spaces)
Comments begin with the # character and continue until the end of the line
The first line of the file is always a treated as a comment
Format:
encryption_algorithm authentication_algorithm Diffie-Hellman_group_number
SA_lifetime_secs SA_lifetime_kb IP_payload_compression
Fields:
encryption_algorithm
Name of the encryption algorithm. Can be one of the following: 3des-cbc, des-cbc, twofish-cbc, blowfishcbc, aes-cbc, cast128-cbc, or none. If none is specified, authentication_algorithm must not be equal to
none.
authentication_algorithm
Name of the hash algorithm. Can be one of the following:
sha1, md5, tiger192, or ripemd160.
Diffie-Hellman_group_number
Can be one of the following: 1, 2, or 5.
SA_lifetime_secs
Lifetime of the SA in seconds. The minimum value is 60;
the maximum value is 315360000 (10 years); the default
value is 10800 (3 hours).
SA_lifetime_kb
Lifetime of the SA in kilobytes. The minimum value is
100; the maximum value is 2147483647; the default
value is 51200 (50 MB). A value of 0 means unspecified,
which indicates that this life time type is ignored
The following example shows the layout of the IKE Protection Strategy configuration file.
#/etc/security/firewall/vpn/ike_strategies/Strategy1.conf
3des-cbc sha1 2 10800 51200
Figure II-108. IKE Protection Strategy Configuration File Example
CyberGuard Firewall Manual
II-307
VPN - Underlying Constructs
IPSec Protection Strategy Configuration File (*.conf)
13
The IPSec Protection Strategies window is used to configure and display information for
one or more IPSec Protection Strategies. This information is stored in a set of text files in
the /etc/security/firewall/vpn/ipsec_strategies/ directory.
Format guidelines:
◆
◆
◆
Fields are separated by white space (tabs or spaces)
Comments begin with the # character and continue until the end of the line
The first line of the file is always a treated as a comment
Format:
encryption_algorithm authentication_algorithm SA_lifetime_secs
SA_lifetime_kb IP_payload_compression
Fields:
encryption_algorithm
Name of the encryption algorithm. Can be one of the following: 3des-cbc, des-cbc, twofish-cbc, blowfishcbc, aes-cbc, cast128-cbc, or none. If none is specified, authentication_algorithm cannot equal none.
authentication_algorithm
Name of HMAC algorithm. Can be one of the following:
hmac-sha1-96, hmac-md5-96, or none. If none is
specified, encryption_algorithm cannot equal none.
SA_lifetime_secs
Lifetime of the SA in seconds. The minimum value is 60;
the maximum value is 315360000 (10 years); the default
value is 28800 (8 hours); a value of 0 means unspecified,
which indicates that this life time type is ignored.
SA_lifetime_secs and SA_lifetime_kb cannot both be 0.
SA_lifetime_kb
Lifetime of the SA in kilobytes. The minimum value is
100; the maximum value is 2147483647; the default
value is 51200 (50 MB); a value of 0 means unspecified,
which indicates that this life time type is ignored.
SA_lifetime_secs and SA_lifetime_kb cannot both be 0.
IP_payload_compression
Enables and disables IP Payload compression. Accepted
values are: true, false, yes, no.
The following example shows the layout of the IPSec Protection Strategy configuration
file.
#/etc/security/firewall/vpn/ipsec_strategies/Strategy1.conf
3des-cbc hmac-sha1-96 0 51200 NO
Figure II-109. IPSec Protection Strategy Configuration File Example
II-308
Chapter 13, Virtual Private Network (VPN)
VPN - Underlying Constructs
VPN Secure Channel Configuration File (*.conf)
13
The VPN Secure Channels window is used to configure and display information for one or
more VPN Secure Channels. This information is stored in a set of text files in the
/etc/security/firewall/vpn/channels/ directory.
Format guidelines:
◆
◆
◆
Each statement begins on a separate line, and some may span multiple lines
Blank lines are permitted
Comments begin with the # character and continue until the end of the line
Statements:
HOSTNAME=host_name|IP_address
IP address or host name that identifies the peer when the peer type is a gateway
(SGW=true). If a host name is used, it must be defined in the Hosts configuration
file.
INTERFACE=interface
Device through which VPN client connections are accepted.
SGW=true|false|yes|no
If the peer is a security gateway, this statement is set to true. If the peer is a host, this
statement is set to false.
MANUAL_KEYING=true|false|yes|no
If manual keying is used, this statement is set to true. If IKE is used, this statement is
set to false.
IKE_PROPOSAL_LIST=names
IKE Protection Strategy name.
AGGRESSIVE_MODE=true|false|yes|no
If Aggressive Mode is being used, this statement is set to true. This statement is applicable only to IKE. IKE aggressive mode does not support negotiation of multiple Diffie-Hellman groups; therefore, the Default IKE Strategy will not work with IKE
aggressive mode exchanges. Use the preloaded Aggressive strategy or create a new
strategy to use with secure channels that specify aggressive mode. IKE aggressive
mode does not support negotiation of multiple authentication methods; therefore,
secure channels that use aggressive mode should configure either preshared secret or
certificates, but not both. IKE Aggressive Mode exchanges through a NAT device
using pre-shared keys are not supported. This is true even if NAT-Traversal is enabled.
Use RSA or DSA signature authentication (i.e. certificates) for IKE Aggressive Mode
exchanges through a NAT device. Use IKE Main Mode for exchanges through a NAT
device when using pre-shared keys.
PFS_GROUP=1|2|5
Specifies the group number for perfect Forward Security. 1, 2 or 5. If this keyword is
present, PFS will be used. This keyword is applicable only to IKE.
CyberGuard Firewall Manual
II-309
VPN - Underlying Constructs
MANUAL_KEYS=variables
Variables used to configure manual keys are: inbound SPI, inbound cipher key,
inbound authentication key, outbound SPI, outbound cipher key, and outbound
authentication key. SPIs must be integers greater than 255. Cipher and authentication
keys can be text strings or hexadecimal integers. This keyword is only applicable if
manual keying is specified. This field can only be viewed or edited using the GUI.
PRESHARED_SECRET=secret_string
Preshared secret can be a text string or a hexadecimal integer. This keyword is applicable only to IKE. This field can only be viewed or edited using the GUI.
USE_SIGNATURES=true|false|yes|no
If certificates will be used for authentication, this statement is set to true and the KEYPAIR variable must have a value. This keyword is applicable only to IKE.
USE_IDENTITY=true|false|yes|no
If the value is set to true, the SPD key structure created for the preshared secret will
specify the firewall’s IP address as the subject identity to use during IKE Phase 1. The
default is true.
KEYPAIR=IKE_keypair_name
IKE Keypair name.
SUBJECT_NAME=name
Subject name presented to the peer during IKE Phase 1.
TRUSTED_CA_CERTS=IKE_certificate_names
List of IKE Certificate names separated by colons on the same line or by new lines.
REMOTE_AUTH_IDS=IDs
List of authorized identities separated by colons on the same line or by new lines.
NETWORKS=host_name|IP_addr|IP_addr_range|network_name|group_name|
device_NETWORK
List of host names, IP addresses or an IP address range similar to the IP address
ranges accepted by the Grouping window. Items in this list can be separated by colons
on the same line or by new lines.
CONNECTION_FLAGS=non-cfgmode-clients
VPN clients that are not recognized as supporting XAUTH and IKECFG are allowed
to connect without participating in the ISAKMP (IKE) Configuration Method
exchanges.
NAT_TRAVERSAL=true|false|yes|no
If yes, the firewall/VPN will participate in NAT discovery and perform NAT Traversal
if NAT is discovered. If no, the firewall does not participate in NAT discovery and
will not attempt NAT Traversal.
II-310
Chapter 13, Virtual Private Network (VPN)
VPN - Underlying Constructs
The following example shows the layout of the VPN Secure Channels configuration file.
# /etc/security/firewall/vpn/channels/Channel1.conf
SGW=yes
HOSTNAME=10.2.3.4
MANUAL_KEYING=no
AGGRESSIVE_MODE=no
IKE_PROPOSAL_LIST=Default
USE_SIGNATURES=no
USE_IDENTITY=yes
XAUTH=no
NAT_TRAVERSAL=yes
NETWORKS=grp1
grp2
PRESHARED_SECRET=Ntmt2XWOrUM=
Figure II-110. VPN Secure Channels Configuration File Example
VPN Client Configuration File (*.conf)
13
The /etc/security/firewall/vpn/ikecfg/vpn_client_configuration.conf file defines
the parameters for a VPN client configuration.
Format guidelines:
◆
◆
◆
Each statement is on a separate line
Blank lines are permitted
Comments begin with the # character and continue until the end of the line
Statements:
START_IP_ADDR=ip_address
(Optional) Specifies the lowest IP address available in the virtual network.
END_IP_ADDR=ip_address
(Optional) Specifies the highest IP address available in the virtual network.
NETMASK=network_mask
(Optional) Specifies the network mask of the virtual client network.
DNS=ip_address
(Optional) Specifies the IP address of the DNS server that is serving the client in the
virtual network.
WINS=ip_address
(Optional) Specifies the IP address of the WINS server (NetBios Name Server) that is
serving the client in the virtual network.
CyberGuard Firewall Manual
II-311
VPN - Underlying Constructs
SUBNETS=subnetworks/network_masks
List of networks that the client will need to be configured to use the VPN tunnel to get
to them (not supported by the GUI).
USE_SET=true|false
If true, the configuration should be sent by firewall when the firewall determines. If
false, the firewall accepts a REQUEST from the client (not supported by the GUI always true).
XAUTH_IKECFG=true|false
Specifies that the user at the remote VPN client must authenticate (via an XAUTH
IKE exchange) with the VPN policy Manager (vpnguard) before the client is allowed
to establish VPN tunnels. The user name and password are validated via firewall
authentication rules. Additional challenges from the firewall authentication (e.g.,
password expiration/enter new password) are not supported and are treated as authentication failure. Authentication success/failure is audited to the proxy_ia (network)
audit event.
The following example shows the layout of the VPN Client Configuration configuration
file.
# /etc/security/firewall/vpn/ikecfg/vpnclientconfig1.conf
start_ip_addr=192.168.45.1
end_ip_addr=192.168.241.82
dns_addr=192.168.1.1
set_client_config=true
Figure II-111. VPN Client Configuration File Example
LDAP Directories Configuration File (ldap_dirs.conf)
13
The /etc/security/firewall/vpn/ldap_dirs.conf file identifies LDAP servers that can
be used to obtain certificates. This file can store ten records.
Format guidelines:
◆
◆
◆
Comments begin with the # character and continue until the end of the line
Each LDAP record is listed on a separate line
Fields are separated by white space (tabs or spaces)
Format:
server [port]
II-312
Chapter 13, Virtual Private Network (VPN)
VPN - Underlying Constructs
Fields:
server
Fully qualified domain name or IP address of the LDAP server.
port
(Optional) TCP port number of the LDAP server. The default is 389.
The following example shows the layout of the LDAP Directories configuration file.
# /etc/security/firewall/vpn/ldap_dirs.conf
ldapserver.cybg.com 389
Figure II-112. LDAP Directories Configuration File Example
OCSP Responders Configuration File (ocsp.conf)
13
The /etc/security/firewall/vpn/ocsp.conf file identifies the OCSP responders that the
firewall may contact.
Format guidelines:
◆
◆
◆
Each statement is on a separate line
Blank lines are permitted
Comments begin with the # character and continue until the end of the line
Statements:
EnableOcsp = true|false
When set to True, OCSP is enabled; otherwise, OCSP is disabled.
SignOcspRequests = true|false With keypair_tag
When set to True, OCSP requests are signed using keypair keypair_tag. When set to
False, OCSP requests are not signed.
url CA_tag [Sign = true|false With keypair_tag] [RecheckTime = seconds]
[RequireNonce = true|false] [UseProducedAt = true|false]
The words enclosed in square brackets are optional. They cannot be entered using the
GUI.
url
Specifies the OCSP responder’s access URL. May be set to an asterisk (*) for the
default responder.
CA_tag
Specifies a CA certificate. May be set to an asterisk (*) if any CA is accepted.
CyberGuard Firewall Manual
II-313
VPN - Underlying Constructs
Sign
(Optional) If Sign is set to true, OCSP requests for this responder are signed using
the specified keypair_tag.
RecheckTime
(Optional) Specifies the number of seconds that the OCSP response is to be considered valid after the time the response was issued or produced. This is used to counteract the effect of a difference in the clocks of the firewall and of the OCSP responder.
RequireNonce
(Optional) If RequireNonce is true, an OCSP response must include a valid nonce
in order to be considered valid. This is intended to ensure compatibility with responders that do not include a nonce in their responses.
UseProducedAt
(Optional) If UseProducedAt is true, then the producedAt time in the OCSP
response should be used instead of the thisUpdate time as the time when the certificate should be considered valid. This is intended to ensure compatibility with
responders that do not set the thisUpdate time in the response to the current time.
The following example shows the layout of the VPN Secure Channels configuration file.
# /etc/security/firewall/vpn/ocsp.conf
EnableOcsp = true
SignOcspRequests = false With ""
"http://valicert.cybg.com:1024/ocsp" "SunONE" RecheckTime = 300 UseProducedAt = true
"http://valicert.cybg.com" "UNICERTIssuer1"
"http://valicert.cybg.com" "UNICERTRoot"
Figure II-113. OCSP Responders Configuration File Example
CA Certificate Configuration File (ca_certs.conf)
13
The /etc/security/firewall/vpn/ca_certs.conf file identifies CA tags and CRL files.
Format guidelines:
◆
◆
◆
Comments begin with the # character and continue until the end of the line
Each CA certificate record is listed on a separate line
Fields are separated by white space (tabs or spaces)
Format:
CA_tag CRL_file_name
II-314
Chapter 13, Virtual Private Network (VPN)
VPN - Underlying Constructs
Fields:
CA_tag
Valid CA tag.
CRL_file_name
Absolute path name of a file containing a CRL. CRL files normally reside in the /etc/security/firewall/vpn/ca_certs/
directory and have an extension of .crl.
The following example shows the layout of the CA Certificate configuration file.
# /etc/security/firewall/vpn/ca_certs.conf
UNICERTIssuer1 /etc/security/firewall/vpn/ca_certs/UNICERTIssuer1.crl
UNICERTRoot
/etc/security/firewall/vpn/ca_certs/UNICERTRoot.crl
Figure II-114. CA Certificate Configuration File Example
VPN Policy Manager Configuration File (policymgr.conf)
13
The /etc/security/firewall/vpn/policymgr.conf file configures the options associated
with VPN controls.
Format guidelines:
◆
◆
Keywords and variables are separated by white space (tabs or spaces)
Comments begin with the # character and continue until the end of the line
Statements:
DO_NOT_SEND_CERT_CHAINS=yes|no
Supports an IKE backward-compatibility mode needed for some Alcatel (TimeStep)
VPN devices.
NO_CRASH_RECOVERY=yes|no
Crash recovery provides the capability to react to situations where IKE/IPSec Security
Associations (SAs) are deleted or missing in the VPN policy manager, yet delete notifications were not sent, or were not received by the VPN peer. yes indicates that crash
recovery is turned off. no indicates that crash recovery is turned on.
CRL_VALIDITY_TIME=time
Time period during which a CRL is valid.
MAX_CLIENTS=number
Specifies the maximum number of VPN clients that are permitted at one time. The
default is 10,000.
RETRY_LIMIT=number
Specifies the maximum number of retransmission packets that will be sent. The negotiation is aborted after this limit is reached.
CyberGuard Firewall Manual
II-315
VPN - Underlying Constructs
RETRY_TIMER=seconds
Specifies the the base interval for the retransmission packets. The first retransmission
packet is sent after that time. The next packet is sent at 2^(retransmission packet number) * (R E T RY _ T I M E R ). For example, if the R E T RY _L I M I T is 10, the
R E T RY _ T I M E R is 0.5 (R E T RY _ T I M E R is 0 seconds, and
RETRY_TIMER_USEC is 500000 microseconds), the first retransmission packet
is sent out after 0.5 seconds, the second packet after is sent out after 1 second, and following packets after 2, 4, 8, 16, 32, 64, 128, and 256 seconds. After that, the negotiation times out.
RETRY_TIMER_USEC=microseconds
Specifies the the base interval for the retransmission packets.
RETRY_TIMER_MAX=seconds
Specifies the maximum time in seconds between retrasmission packets. For example
if the RETRY_TIMER_MAX is set to 30 seconds, the Initial retry interval is set
to 0.5 seconds, and the Maximum number of retries is set to 10, the retransmission packets are sent after 0.5, 1, 2, 4, 8, 16, 30, 30, 30, and 30 seconds.
EXPIRE_TIMER=seconds
Specifies maximum time for the whole negotiation. After this time expires, the negotiation is immediately aborted.
The following example shows the layout of the VPN policy manager configuration file.
#/etc/security/firewall/vpn/policymgr.conf
DO_NOT_SEND_CERT_CHAINS=no
NO_CRASH_RECOVERY=no
CRL_VALIDITY_TIME=86400
MAX_CLIENTS=10000
RETRY_LIMIT= 6
RETRY_TIMER=3
RETRY_TIMER_USEC=500000
RETRY_TIMER_MAX=10
EXPIRE_TIMER=40
Figure II-115. VPN Policy Manager Configuration File Example
CRL Files (*.crl)
13
Each CA Certificate in the IKE Certificate Management window can be assigned an
optional CRL file. This CRL is stored in the /etc/security/firewall/vpn/ca_certs/
directory. Each certificate file in this directory is named with a .crl extension.
II-316
Chapter 13, Virtual Private Network (VPN)
VPN - Underlying Constructs
CA Certificate Files (*.cer)
13
The CA Certificates page of the IKE Certificate Management window displays information for one or more CA Certificates. This information is stored in a set of certificate files
in the /etc/security/firewall/vpn/ca_certs/ directory. Each certificate file in this
directory is named with a .cer extension. For example, a certificate thawte-ca will have
a corresponding file named thawte-ca.cer.
Firewall Keypair Files (*.cer and *.prv)
13
The Keypairs page of the IKE Certificate Management window displays information for
one or more keypairs. A keypair is the pairing of a certificate with a private key. This
information is stored in certificate and private key files in the /etc/security/firewall/vpn/keypairs/ directory. Certificate files in this directory are named with a .cer
extension; while private key files are named with a .prv extension.
VPN Control Command (vpnctl)
13
The vpnguard(1M) daemon (/usr/sbin/firewall/vpnguard) is invoked by netguard(1M) and functions as the IPSec Policy Manager, IKE service, and IPSec Certificate manager. The /usr/sbin/firewall/vpnctl command can also be used to control
vpnguard(1M).
Syntax:
vpnctl
vpnctl
vpnctl
vpnctl
vpnctl
vpnctl
vpnctl
config [-v]
delete-sas [-v]
stop [-v]
ike-log [-l level ] [-f logfile ] [-x max_size ] [-Vcv]
events [-l level ] [-v]
trace [-l level ] [-f logfile ] [-x max_size ] [-vc]
ike-log|events|trace [-qv]
Options and arguments:
config
Signals vpnguard(1M) to re-read its SPD configuration.
delete-sas
Causes vpnguard(1M) to delete all active IPSec and IKE Security
Associations (SAs). Delete notifications are sent to VPN peers.
CyberGuard Firewall Manual
II-317
VPN - Underlying Constructs
stop
Signals vpnguard(1M) to terminate/exit.
ike-log
Starts and stops IKE exchange debug logging. The default log file is
/var/adm/log/ike.log.
events
Sets the lowest priority syslog priority level message to be sent by the
policy manager (vpnguard(1M)). The -l level specified along with all
higher (lower numbered) priorities are enabled and will be sent to
syslog. Note that the final syslog destination depends on the syslog configuration. See syslog.conf(4).
trace
If trace logging is enabled (-l level option is non-zero), all event (syslog)
messages are sent to the trace file. The default trace file is
/var/tmp/vpn.log.
-l level
Sets the debug level. Stops logging if the level is 0.
The following are the acceptable levels listed from highest to lowest priority.
EMERG
0
system is unusable
ALERT
1
action must be taken immediately
CRIT
2
critical conditions
ERR
3
error conditions
WARNING
4
warning conditions
NOTICE
5
normal but significant condition
INFO
6
informational messages
DEBUG
7
debug-level messages
-f logfile
Writes to the specified file.
-x max_size
Sets the maximum size in Kilobytes that the log file is allowed to grow
before logging is disabled. The default is 4096 KB (4 MB).
-c
Clears the log file.
-V
Produces a more formatted output to the IKE log. This format is easier to
read and output records span multiple lines.
-v
Verbose output. Displays vpnguard(1M) control connection status.
-q
Queries the current settings. The -v option can be used to produce an easily readable table of the current settings; otherwise a one-line output is
produced in the following format:
log:file:level:flags:max:size:lines[:msg] where:
log - Log name (IKE, EVENTS, or TRACE)
II-318
Chapter 13, Virtual Private Network (VPN)
VPN - Underlying Constructs
file - Log file name (NA for EVENTS)
level - Logging level (non-zero if logging is on)
flags - VERBOSE and/or FULL
max - Maximum log file size in Kilobytes
size - Current log file size in bytes
lines - Number of lines in the log file
msg - Optional message
VPN Report Command (vpnrpt)
13
Use /usr/sbin/firewall/vpnrpt command to generate system information related to
VPN activity, including statistics and routing. Virtual routing tables are the defined VPN
Secure Channel peer-protected networks. You can type the following commands on the
command line or use the System Information Window to view formatted reports. See
“System Information Window” on page I-246.
Syntax:
/sbin/tfadmin
/sbin/tfadmin
/sbin/tfadmin
/sbin/tfadmin
/sbin/tfadmin
vpnrpt stats -ipsec [-dv]
vpnrpt stats -ike [-dv]
vpnrpt stats -global [-v]
vroute [-pcv]
ike-log [-v]
Options and arguments:
stats
Displays VPN statistics.
-ipsec
Displays VPN IPSec SA statistics.
-ike
Displays VPN IKE SA statistics.
-global
Displays global IPSec statistics.
-d
Provides detailed SA statistics.
-g
Provides general statistics.
-v
Verbose output.
vroute
Displays VPN virtual network routing.
ike-log
Displays the IKE exchange debug log.
-p
By default, the network routing table is ordered by network address. This
option orders the table by peer GW address.
-c
By default, the network routing table is ordered by network address. This
option orders the table by channel name.
CyberGuard Firewall Manual
II-319
Troubleshooting VPN
Troubleshooting VPN
13
Tools for Troubleshooting VPN
Use the following tips to help troubleshoot your VPN configuration.
◆
To remove all old SAs and start fresh, delete all SAs via the VPN Controls
window. Or run the following command:
vpnctl delete-sas
If this does not achieve the desired effect, run the following commands:
vpnctl stop
netguard
◆
◆
◆
Look in /var/adm/syslog and /var/adm/log/osmlog for vpnguard messages. To view the vpnguard messages on the Console Messages window,
select Reports on the Control Panel, and then select Console Messages on
the Reports menu.
To view IKE and IPSEC SA statistics, see the System Information window
and the Activity Reports window. See also the vpnrpt(1M) system manual
page.
To view static rules and active netguard sessions, run the following command:
netguard -ln
Note the ipsec_src, ipsec_dst, and ipsec_nat flags designate IPSEC
options enabled on a rule.
◆
Review “Troubleshooting Network or Interface Problems” on page I-92.
Troubleshooting Aids
◆
◆
◆
II-320
Turn on IKE Exchange Logging in the VPN Controls window and make sure
that the Produce verbose output check box is checked.
When using Certificates, turn on VPN Certificate Alerts and Activities.
When using third-party products like OCSP responders, HTTP servers, FTP
servers and/or LDAP servers, be sure to review their accompanying documentation to find out what error-reporting facilities they provide. They may provide information that will assist in troubleshooting VPN connections.
Chapter 13, Virtual Private Network (VPN)
Troubleshooting VPN
IKE Exchange Log Error messages
This section lists some error messages and their interpretation:
Malformed payload
If preshared secrets are being used, this error message indicates that the preshared
secret was incorrectly typed.
Proposal not chosen
This error message occurs for a variety of reasons.
First, make sure that the following match for both VPN gateways:
- IKE Protection Strategy
- IPSec Protection Strategy
- VPN Secure Channel (IKE)
o IKE Mode
o Perfect Forward Secrecy Group
- VPN Secure Channel (Manual Keying)
o Inbound and Outbound SPIs
o Cipher Key and Authentication Keys
If certificates are being used, make sure that both VPN gateways are using the same
public key algorithm in the certificates.
Examine the packet filtering rules on both VPN gateways and ensure that the rules
contain the same source and destination addresses in order for the IKE Phase 2 Identities to match.
Check if the VPN Secure Channels window contains any Remote Identities. If certificates are being used, check whether the Subject Name in the local VPN gateway's certificate matches with the Remote Identity in the remote VPN gateway's VPN Secure
Channels window.
Some VPN clients require a simple VPN policy. When troubleshooting it is useful to
use a simple IKE Protection Strategy and IPSec Protection Strategy consisting only of
one cryptographic property each.
Some VPN clients require the firewall to send its IP address as its IKE Phase 1 Identity when using preshared secrets. When troubleshooting preshared secrets, ensure
that the Use Identity check box in the IKE Advanced Settings dialog box of the
VPN Secure Channels window is checked.
Authentication failed
This error message may indicate that there was a problem related to certificates. Turn
on VPN Certificate Alerts and Activities to get information on certificate-related
problems.
Some Alcatel/TimeStep VPN devices require the Do not send certificate chains
check box in the VPN Controls window to be checked.
CyberGuard Firewall Manual
II-321
Troubleshooting VPN
VPN with Certificates
This section lists some things that should be checked if VPN with Certificates is not working:
System date/time
Before proceeding, check the Date and Time window and set the correct date and time if
necessary.
Root and Intermediate CA Certificates
As much as possible, all CA certificates needed to trace the certification path of both the
firewall’s certificate and the peer VPN gateway’s certificate must be imported into the
Certificate Management window. At a bare minimum, the root CA certificate must be
present and one or more LDAP servers should be defined in the IKE Certificate Services
window so that the firewall can query them, if necessary, for the intermediate CA certificates.
Troubleshooting OCSP
This section lists some things that should be checked if OCSP is not working:
1. Make sure that the system dates/times of the firewall and the OCSP responder are in
sync.
2. The OCSP responder certificate must not be self-signed.
3. If the status of certificate x is to be checked, make sure that the issuer of x directly
issued the OCSP responder’s certificate.
4. While testing, turn off Certificate Revocation Checking by setting it to
Disabled to prevent any interactions with CRLs. Also delete all LDAP Servers.
5. Make sure that the CRLs in the LDAP server and the OCSP server are in sync (i.e.,
that the CRLs are not old).
II-322
Chapter 13, Virtual Private Network (VPN)
Troubleshooting VPN
PKI/Certificate-related IKE Exchange Log error messages
This section lists some error messages and their interpretation. These error messages occur
in both the IKE Exchange Log and in the VPN Certificate Alerts and Activities.
Certificate was revoked
The firewall encountered a revoked certificate in its certificate processing.
Certificate was not found
The firewall tried to retrieve a certificate from a LDAP, HTTP or FTP server but
failed.
Certificate chain did not reach trusted root CA
The firewall was unable to verify whether a certificate was trusted.
CRL was too old
Check system date/time.of the firewall and of the certification authority server.
Have the certification authority operator publish new CRLs to the LDAP server and
retry troubleshooting.
CRL was not found
The firewall tried to retrieve a certificate from a LDAP, HTTP or FTP server but
failed.
CRL update time is in the future
Check system date/time.of the firewall and of the certification authority server.
Have the certification authority operator publish new CRLs to the LDAP server and
retry troubleshooting.
Time information was not available
Check system date/time of the firewall.
The firewall may have attempted an operation that took too long and affected the timing of the certificate processing.
Check whether HTTP, FTP and LDAP connections are succeeding. The firewall starts
HTTP, FTP or LDAP connections to retrieve CRLs and it starts HTTP connections to
OCSP responders. Verify that these connections are not timing out. View the certificates by clicking on the View button in the Certificate Management window. Check
whether the certificates contain any unresolved host names and insert the host names
into the Host Names window.
Database search timeout or Database search failed
The firewall tried to retrieve a certificate from a LDAP, HTTP or FTP server but
failed.
Path was not verified
The firewall was unable to verify whether a certificate was trusted.
CyberGuard Firewall Manual
II-323
Troubleshooting VPN
PKI/Certificate-related IKE Exchange Log error messages for OCSP
This section lists some error messages and their interpretation. These error messages occur
in both the IKE Exchange Log and in the VPN Certificate Alerts and Activities.
No responses were found
The firewall was not able to validate any responses from the OCSP responder.
A nonce is required or
The nonce did not match or
The serial number did not match or
The issuer key hash did not match or
The timestamps that were indicated in the response were bad or
The signature of the OCSP response was not verified
The firewall detected a problem in the OCSP response.
The responder is not authorized to sign responses or
The responder search failed
The firewall detected a problem in the OCSP responder’s certificate.
Make sure that the OCSP responder certificate was issued by one of the CAs in the
Certificate Management window.
Failed to receive an OCSP response
The firewall was not able to validate any responses from the OCSP responder.
II-324
Chapter 13, Virtual Private Network (VPN)
Chapter 14
Chapter 14.
II
Alerts, Activities, and Archives
Monitoring firewall activity is important so that you can detect and respond to threats and
critical conditions. You can configure the firewall to recognize suspicious and critical
events and customize your response to these events. You can log regular firewall activities
to special files, which you can copy to another directory, or you can log firewall activities
to the syslog so the files can be sent to a remote host or used for Centralized Auditing. The
Centralized Auditing System reads syslogd messages and can print graphs and tables
about the data collected.
Firewall activity can also be archived to a tape device, file system on the firewall, or an
FTP server. These archives can be encrypted.
WebTrendsTM is a third-party product from WebTrends Corporation. Used in conjunction
with the CyberGuard Firewall, WebTrends offers a variety of configurable reports that
provide extensive information about firewall activity. Configurable reports that contain
information about firewall activity in real time can be configured on the Activities Page of
the Alerts, Activities, and Archives Window (see page II-341); audit reports containing
session information can be generated through the WebTrends Audit Reports Window (see
page I-276). For complete details about configuring WebTrends and its reports, see
WebTrends for Firewalls and VPNs, provided by WebTrends Corporation.
Activity logs can be moved from one directory to another to prevent the files from growing until the disk becomes full. These files can also be processed by CSMART (Centralized Solution for Monitoring, Auditing, Reporting, and Tracking) to generate easy-to-read
reports.
II-325
Alerts, Activities, and Archives Window
Alerts, Activities, and Archives Window
14
Use this window to view a list of suspicious event types (occurrences that may require
attention) and their alert settings, enable or disable alerts, change the alert parameters; and
enable or disable logging for activity types (non-threatening occurrences). Use the Alert
Summary window to monitor alerts and the Activity Reports window to view alerts and
activities log files.
CAUTION!
Logging activity information and logging and mailing alert information can fill your disk. You can enable an alert for the Disk
partitions full event to forewarn that a specified file system is
about to be filled.
For frequently occurring suspicious event types, some alerts can
make the situation worse. For example, enabling the Window alert
might tie up the Alert Summary window, and logging disk-full
messages to a file might consume even more disk space.
The Alerts, Activities, and Archives window consists of three notebook pages: Alerts,
Activities, and Archives.
II-326
Chapter 14, Alerts, Activities, and Archives
Alerts, Activities, and Archives Window
Figure II-116. Alerts, Activities, and Archives Window - Alerts Page
Note: Auditing is turned on at boot time. Use the auditoff(1M) command to turn auditing off and use the a u d i t o n ( 1 M ) command to restart auditing. Use the
auditlog(1M) command to view the current status of auditing.
See also:
◆
◆
◆
◆
◆
◆
◆
◆
◆
◆
auditon(1M) system manual page
auditoff(1M) system manual page
auditlog(1M) system manual page
System Administration UnixWare online manual
“Alert Summary Window” on page I-250
“Activity Reports Window” on page I-252
“How to Enable and Disable Alerts” on page II-352
“How to Log Alerts and Activities for WebTrends Reports” on page II-354
“Activity Logs Window” on page II-360
“Secure Remote Management Window” on page I-157
CyberGuard Firewall Manual
II-327
Alerts, Activities, and Archives Window
Alerts Page
14
Use this page of the Alerts, Activities, and Archives window to view a list of suspicious
event types (occurrences that may require attention) and their alert settings, enable or disable alerts for suspicious event types, and change the alert parameters; this permits anticipating potential system abuses and automating responses to them. Use the Alert Summary
and Activity Reports windows to monitor alerts.
This page contains the following fields and alarm controls:
Suspicious Event Type
Lists each suspicious event or attack type. See “Suspicious Event
Types” on page II-331.
File
Logs suspicious-event records to a trusted file. A default file in
the /var/audit_logs/ directory exists for each suspicious event
type. If Window is checked or the file exists, you can view this
file in the Activity Reports window. Use the Activity Logs window to back up these files.
Window
Writes the count of each suspicious event type to the Alert Summary window; the counter increments each time the corresponding suspicious event type occurs. Disabling this option removes
the suspicious event type from list in the report window. Check
this option only when you think that the frequency of suspicious
events will not overwhelm the X server.
Mail
Electronically mails the alert message. The user must already
exist on the internal mail host at NETWORK level or on the
firewall. Undeliverable mail goes to the root user.
SNMP Trap
Sends an enterprise-specific SNMP trap for each alert message to
an SNMP community that includes the destination SNMP host.
(See the estrap(1M) system manual pages, SNMP documentation for foreign host types, the /etc/netmgt/snmpd. comm file,
and the Network Administration UnixWare online manual.)
Pager
Sends a numeric message to a pager telephone number.
Syslog
Writes suspicious-event records to the system log file specified in
the /etc/syslog.conf file. The default file is /var/adm/syslog.
(See the syslog(3G), logger(1), and syslogd(1M) system manual pages.)
Shell Command
Runs a trusted program or script. The standard input to the command is the text of the audit-log entry associated with this alert.
The following fields affect alert behavior:
Log File
II-328
(Read-only) Name of the default audit-log file for this suspicious
event type. The file is in the trusted /var/audit_logs/ directory.
Chapter 14, Alerts, Activities, and Archives
Alerts, Activities, and Archives Window
Mail Recipient
(Required with Mail alert) Existing login ID either on the internal
mail host or on the firewall. The syntax is: user[@mailhost].
The default is root, the system administrator on the firewall. See
also “Packet-Filtering Rules for Alerts” on page II-340.
Mail Level
(Required with Mail alert) Transmission level for the mail. This
level is a level at which the recipient is cleared to read mail. The
default is NETWORK. Use NETWORK when sending mail to
a user on an internal mail host.
SNMP Host Address
(Required with SNMP Trap alert) Address of the host receiving
the SNMP trap. The default is 0.0.0.0, indicating that the trap is
broadcast to any SNMP host listening for traps sent to the specified community. See also “Packet-Filtering Rules for Alerts” on
page II-340.
SNMP Community (Required with SNMP Trap alert) Community to receive the
SNMP trap. The default is public.
SNMP Trap Number
(Required with SNMP Trap alert) Integer that identifies this
SNMP trap. The default is 0. (Avoid using 1, 2, or 3 because the
SNMP product uses them.)
SNMP Message
(Required with SNMP Trap alert) Prefix of text sent as part of the
SNMP trap. The text of the audit-log entry associated with this
alert is appended to this field.
Pager Number
(Required with Pager alert) Telephone number of the pager
including optional access code. Each comma (,) represents a twosecond delay. The # character is also permitted in this field. See
also “Pager Numbers” on page II-339.
Pager Message
(Required with Pager alert) Numeric message to display on the
pager. The default is 1*1 where the first 1 identifies a specific firewall, * is a separator that appears as a -, and the second 1 means
urgent. The # character is also permitted in this field.
Pager Comm Port
(Required with Pager alert) Serial communications port number of
the tty connected to the outgoing modem for the pager. Possible
values include 1, 2, 3, and 4.
Syslog Facility
(Required with Syslog alert) System component generating the
problem message. The default is local7. See syslogd(1M) and
syslog.conf(4) system manual pages.
Syslog Level
(Required with Syslog alert) Problem severity. The default is
notice message priority.
Shell Command
(Required with Shell Command alert) Program or script name,
commands, options, arguments, redirection, etc. for execution by
the Bourne shell. Single quotation marks replace double quotation
marks. The alert message is available on standard input.
CyberGuard Firewall Manual
II-329
Alerts, Activities, and Archives Window
Files
(Required with File access failures, File access granted,
and Disk partitions full suspicious event types) Trusted files
and directories to monitor. The characters * and ? are treated as
literals, not as wild cards.
Interval (secs)
(Required with Disk partitions full, Failed login attempts,
and Attempts to scan network ports suspicious event types)
Maximum number of seconds that is deemed significant between
occurrences.
Percent in Use
(Required with Disk partitions full suspicious event type)
Maximum percentage of file system in use that is deemed significant.
Number of Tries
(Required with Failed login attempts and Attempts to scan
network ports suspicious event types) Minimum number of
attempts that are deemed significant over an Interval.
Notes:
◆
By default, notification about suspicious events occurs at least every five minutes. To decrease this interval, do one of the following:
◆
◆
◆
Invoke auditlogd with the -i sec option in the Shell window
Keep the System Statistics window open (minimized or not)
Click on Refresh Now in the System Statistics window
Set the Refresh Interval field to something less than 300 seconds, and
click on Use New Interval in the System Statistics window
Three features allow you to write information to the syslog: the Syslog fields
on the Alerts page, the Syslog Setup frame on the Activities page, and the
WebTrends Setup frame on the Activities page. If you specify a facility and
level for one feature, all other features that use the same facility and level will
use the same log location. You can specify the log location on the Syslog
Setup frame and the WebTrends Setup frame, but not on the Alerts page.
SNMP trap, syslog, and mail to a host other than the firewall require that specific additional services run on the system. By default, the syslog service is
adequately configured, but the others are not.
Remember that pager transmissions over the airways and e-mail and SNMP
messages over the Internet can be intercepted.
See also:
◆
◆
◆
◆
◆
◆
◆
◆
II-330
“Alert Summary Window” on page I-250
“Activity Reports Window” on page I-252
“System Statistics Window” on page I-285
“Files to Monitor for Suspicious Events” on page II-335
“Pager Numbers” on page II-339
“Packet-Filtering Rules for Alerts” on page II-340
“How to Enable and Disable Alerts” on page II-352
“Activity Logs Window” on page II-360
Chapter 14, Alerts, Activities, and Archives
Alerts, Activities, and Archives Window
Suspicious Event Types
14
The following list contains a brief description of all suspicious event (attack) types and the
messages generated when their associated alerts are checked.
File access failures
Unsuccessful attempts to access specified trusted files or directories.
File access granted
Successful attempts to access specified trusted files or directories.
Disk partitions full
Disks are reaching capacity within a specified interval. Only partition names, such as
/, /var, and /usr, are useful with this suspicious event. See “Controlling the Size of
Disk Partitions” on page II-336.
Failed login attempts
Unsuccessful attempts to login to the firewall by the same user or through the same
terminal (tty) device within a specified interval. Users can be blacklisted and prohibited from logging on to the firewall after a specified number of attempts. See “Security Options - User Blacklisting Page” on page II-231.
Number of licensed hosts exceeded
Denied TCP connections because the number of internal hosts permitted to pass packets through the firewall reached the licensed limit. Be sure to enable this alert if your
company does not have unlimited user licenses. See “License Keys Window” on page
I-61.
Packet forwarding attacks
Attempts to forward inbound packets through a different route than usual.
Land attacks
Discarded packets in which the source address and port are the same as the destination
address and port. Land is a widely available attack tool that exploits the vulnerability
of many TCP/IP implementations to these particular packets.
Ping of death attacks
Discarded packets, often from a ping(1) command, that contain an illegal combination of IP fragment offset and IP length and might cause the destination host to crash
if allowed to pass through.
TCP SYN flood attacks
Within a specified time interval, a specified number of TCP connections failed due to
a timed out SYN/ACK segment sent from the same server IP address and port number.
IP interface spoofing attempts
Attempts to confuse the firewall with spurious packets. For example, a packet with a
source address of an internal interface that is received on an external interface.
Interface access check failures
Access to an interface was denied due to a MAC failure.
Network port scan attempts
Attempts to exploit the firewall through the ports it listens on.
CyberGuard Firewall Manual
II-331
Alerts, Activities, and Archives Window
File transmission blocked
The content scanning software has identified a dangerous or undesirable file or
document and blocked its transmission through the firewall. Note that alerts are not
generated for disinfected files.
High availability served transition
A transition has been made to or from the “served” (active) or “unknown” state.
High availability missing heartbeat
Heartbeat messages are absent from the served or standby firewall. Total or partial
failure are noted in the report.
Software update
Automatic updates to the firewall or operating system software through use of the
Software Updates window.
Platform sensor events
Provides information about sensor events, such as the status of temperature, fans, and
voltages in the system. Also provides alert notification when the UPS battery is low or
when the UPS transitions from line power to battery or from battery to line power.
Audit archiving activity
Identifies successful archiving as well as problems such as the capacity overriding
“keep days”, high utilization of local destinations, FTP failures, and tar failures.
Intrusion Detection shutdown message
Working with NetProwler, provides notification when a packet-filtering rule is added
by the Intrusion Detection System to deny traffic an offending connections.
VPN IKE alert
Indicates an issue has occurred with IKE.
VPN IPSec alert
Indicates an issue has occurred with IPSec.
VPN Interceptor alert
Indicates an issue has occurred with an ESP or AH session.
VPN X9.17 random number failure
Indicates the VPN pseudo random number generator has generated the same number
twice. The FIPS 140-1 standard requires that VPN operation be halted in this unlikely
event. Therefore, the operator must investigate and resolve the problem and then manually resume VPN operation.
VPN Certificate alert
Provides information about problems with certificates.
HA standby down
Indicates that the standby machine in a High Availability pair is down. This alert is
generated on the served machine.
CM/HA standby disk full
Indicates that the disk on the standby machine has reached capacity. This alert is generated on the served machine.
II-332
Chapter 14, Alerts, Activities, and Archives
Alerts, Activities, and Archives Window
Auditing disabled
Indicates that auditing has been disabled. The administrator may choose to shutdown the
firewall, receive a page, and receive e-mail when this alert occurs. To enable these actions,
type the following command in the Shell Command field:
/usr/sbin/auditoff_alert -s 10 -p phone_number -m 1*911
-c com_port -r cgadmin
where -s is the number of seconds before the firewall shuts down, -p is the phone number
of the pager, -m is the message displayed on the pager, -c is the com port of the pager, and
-r is the user ID to which e-mail is sent at NETWORK level.
Note that every night at midnight, the auditing subsystem switches to the audit file for the
next day and turns auditing off for a moment. This generates an auditoff event followed
immediately by an auditon event. Because this is a normal event, the auditoff_alert
command can be used to take action only when auditing is disabled unexpectedly.See
also:
◆
◆
◆
◆
◆
◆
◆
◆
“Packet-Filtering Rules Window” on page II-22
“Static Routes Page” on page II-83
“Packet-Filtering Rules for Alerts” on page II-340
“Content Scanning with CVP” on page III-18
“FTP CVP Page” on page III-29
“HTTP CVP Page” on page III-85
“SMTP CVP Page” on page III-207
Software Update Window
Default Log Files for Suspicious Event Types
14
The following table presents the default files from the /var/audit_logs/ directory for the
suspicious event types monitored by the firewall.
Table II-5. Default Log Files for Suspicious Event Types
CyberGuard Firewall Manual
Suspicious Event Type
Default Log File:
/var/audit_logs/
File access failures
AccessDenied
File access granted
AccessGranted
Disk partitions full
DiskFull
Failed login attempts
LoginFailed
Number of licensed hosts exceeded
HostsLimit
Packet forwarding attacks
ForwardD
Land attacks
LandAttack
Ping of death attacks
PingDeath
TCP SYN flood attacks
SynFlood
II-333
Alerts, Activities, and Archives Window
Table II-5. Default Log Files for Suspicious Event Types (Cont.)
Suspicious Event Type
Default Log File:
/var/audit_logs/
IP interface spoofing attempts
NetguardI
Interface access check failures
IFMACerror
Network port scan attempts
PortScan
File transmission blocked
BlockedFile
High availability served transition
HAtransition
High availability missing heartbeat
HAnohb
Software update
SWUpdate
Platform sensor events
PlatformSensor
Audit archiving activity
AuditArchive
Intrusion Detection shutdown message
IDSMsg
VPN IKE alert
VPNIkeAlert
VPN IPSec alert
VPNIPSecAlert
VPN Interceptor alert
VPNIntcpAlert
VPN X9.17 random number failure
VPNX917TEST
VPN Certificate alert
VPNCertAlert
HA standby down
HAStandbyDown
CM/HA standby disk full
HAStandbyAlert
Auditing disabled
AuditOff
See also “Alert Summary (Suspicious-Event) Reports” on page I-254.
II-334
Chapter 14, Alerts, Activities, and Archives
Alerts, Activities, and Archives Window
Files to Monitor for Suspicious Events
14
The following list contains all file and directory names that the GUI alters during firewall
configuration. After you check any alert for File access failures or File access
granted suspicious events, you may wish to type some of these names in the Files field.
◆
◆
◆
◆
◆
◆
◆
◆
◆
◆
◆
◆
◆
◆
◆
◆
◆
◆
◆
◆
◆
◆
◆
◆
◆
◆
◆
◆
◆
◆
◆
◆
◆
◆
/etc/TIMEZONE
/etc/confnet.d/inet/interface
/etc/inet/hosts
/etc/inet/inetd.conf
/etc/inet/networks
/etc/inet/services
/etc/netconfig
/etc/nodename
/etc/passwd
/etc/resolv.conf
/etc/security/cyber/alert.conf
/etc/security/cyber/trace.conf
/etc/security/firewall/gated.conf
/etc/security/firewall/if.conf
/etc/security/firewall/nat.*.conf
/etc/security/firewall/netguard.conf
/etc/security/firewall/proxies/*-proxy.conf
/etc/security/firewall/proxies/DNS/EXTERNAL/*
/etc/security/firewall/proxies/DNS/INTERNAL/*
/etc/security/firewall/proxies/aliases
/etc/security/firewall/proxies/builtin/*
/etc/security/firewall/proxies/encoding*
/etc/security/firewall/proxies/sockd.conf
/etc/security/firewall/proxies/sockd.route
/etc/security/firewall/routes.conf
/etc/security/firewall/startup.conf
/etc/security/ia/ageduid
/etc/security/ia/audit
/etc/security/ia/index
/etc/security/ia/level
/etc/security/ia/master
/etc/security/tfm/roles
/etc/security/tfm/users
/etc/shadow
CyberGuard Firewall Manual
II-335
Alerts, Activities, and Archives Window
Controlling the Size of Disk Partitions
14
When a disk partition, such as /var, reaches a specified percentage of its capacity, the firewall shuts down to protect itself and its internal hosts. As the default location for auditlogs files, the /var partition is particularly susceptible to becoming full. You can manually
monitor and control the size of a partition, or you can configure a controlled system
response to prevent a partition from reaching its capacity and unexpectedly shutting down
the firewall.
Note: The instructions and examples in this section refer to the /var partition, although
they can apply to any partition.
To manually monitor and control the size of the /var partition:
1. Use the df -v command to regularly monitor the /var partition.
2. Backup important files.
3. Remove old files from the /var/audit directory.
To automatically monitor and control the size of the /var partition:
1.
2.
3.
4.
5.
6.
Select Configuration from the Control Panel.
Select Alerts, Activities, and Archives.
Select Disk partitions full.
Type /var in the Files field.
Type a percentage value (85% to 90%) in the Percent in Use field.
Configure the firewall to notify the FSO or others:
a. Check desired alert options, such as Mail or Pager.
b. Complete the corresponding alert data fields.
7. Configure one of the following automatic responses. Configuration steps are described
below.
◆
◆
◆
Turn auditing off when the partition reaches its specified capacity.
Shut down the system when the partition reaches its specified capacity.
The FSO must reboot the firewall and then backup or delete files from
the affected partition.
Run a shell script when the partition reaches its specified capacity. Use a
script similar to the following example to backup and delete audit-logs
files automatically.
To turn auditing off when the partition reaches its specified capacity:
1.
2.
3.
4.
II-336
Check Shell Command.
Type /usr/sbin/auditoff in the Shell Command field.
Click on Save. Your changes take effect at the next system reboot.
Click on Use. Your changes take effect immediately.
Chapter 14, Alerts, Activities, and Archives
Alerts, Activities, and Archives Window
To turn auditing back on:
1. Open a shell window. See “Shell Window” on page I-310.
2. Type /usr/sbin/auditon.
3. Type /usr/sbin/audit_init_log.
To shut down the system when the partition reaches its specified capacity:
1.
2.
3.
4.
Check Shell Command.
Type /usr/sbin/init 0 in the Shell Command field.
Click on Save. Your changes take effect at the next system reboot.
Click on Use. Your changes take effect immediately.
To run a shell script when the partition reaches its specified capacity:
1.
2.
3.
4.
Check Shell Command.
Type the name of your script in the Shell Command field.
Click on Save. Your changes take effect at the next system reboot.
Click on Use. Your changes take effect immediately.
You can configure the script shown below to perform one of the following tasks:
◆
◆
◆
Backup the oldest audit-logs files and remove them
Copy the oldest audit-logs files to another partition and remove them
Remove the oldest audit-logs files
CyberGuard Firewall Manual
II-337
Alerts, Activities, and Archives Window
#!/usr/bin/sh
cmd='basename $0'
USAGE() {
cat <<END_OF_USAGE
$cmd [ count ]
Backup and delete the <count> oldest audit log files.
count - The number of audit log files to be backed up and deleted.
When count is not specified a default of 1 is used.
END_OF_USAGE
}
d=`date`
DIR=/var/audit
# Default backup device.
DEV=/dev/rmt/ntape1
# set number of files to backup/delete <cnt>.
if [ $# -eq 0 ]; then
cnt=1
else
cnt=$1
fi
list=""
oldest='/bin/ls -1t $DIR | egrep [0-9]{7}.Z | tail -$cnt'
for file in 'echo $oldest'; do
list="$list $DIR/$file"
done
# Select one of following actions by removing ###.
#
# 1. Backup the oldest audit trail file(s) and remove them.
#
NOTE: Verify that <DEV> is set to the correct device.
###/usr/bin/tar -cf $DEV $list && /bin/rm $list
###echo "$cmd:$d: File(s) $oldest backed up and removed." >> $DIR/BackupLog
#
# 2. Copy the oldest audit trail files to a different partition and
#
remove them. NOTE: <BACKUP_DIR> must be set.
###/usr/bin/find $list | cpio -pLuvdm $BACKUP_DIR && /usr/bin/rm $list
###echo "$cmd:$d: File(s) $oldest copied to $BACKUP_DIR and removed." >> $DIR/BackupLog
#
# 3. Remove the oldest audit trail files.
###/usr/bin/rm $list
###echo "$cmd:$d: File(s) $oldest removed." >> $DIR/BackupLog
Figure II-117. Script Example for Handling Disk Partitions Full Event
II-338
Chapter 14, Alerts, Activities, and Archives
Alerts, Activities, and Archives Window
If a full /var partition shuts down the firewall, restore the system with the following steps:
1. Boot to mUNIX, following the procedure in “Maintenance Kernel (mUNIX)” on page
I-321.
2. Backup any important files.
3. Remove as many old files from the /var/audit/ directory as possible.
4. Run the df -v command to view the remaining space in the /var partition. Continue
removing files until adequate space is available.
5. Reboot the firewall with the init 6 command.
6. Login to the CyberGuard Firewall.
See also:
◆
◆
◆
◆
auditon(1M) system manual page
auditoff(1M) system manual page
init(1M) system manual page
“Shell Window” on page I-310
Pager Numbers
14
Use the Pager Number field to specify the telephone number and dialing delays for a
paging service.
Syntax:
[access_code,[...]]telephone_number,,[...]
Arguments:
[]
...
access_code
,
telephone_number
(For illustration only) encloses optional parameters
(For illustration only) repeats the preceding parameter
Digits needed to access an outside line
Two-second delay
Telephone number of the pager
For example, type 9,,5551234,,,, to specify the access code for an outside line (9), a foursecond pause for a slow modem (,,), the pager number (5551234), and eight-second pause
to allow the service to pick up before data transmission (,,,,).
CyberGuard Firewall Manual
II-339
Alerts, Activities, and Archives Window
To test your pager number:
1. Enable the Pager alert for the File access granted suspicious event type.
2. Type /etc/passwd in the Files field.
3. Type in the Pager Number, erring on the side of too long pauses.
4. Type a message of up to 10 digits in the Pager Message field.
5. Type in the Pager Comm Port field.
6. Click on Use. Your changes take effect immediately.
7. Trigger a File access granted suspicious event by entering the following command:
wc -l /etc/passwd
8. Repeat steps 3 and 6 until the message is received successfully.
9. (Optional) Disable this Pager alert.
Packet-Filtering Rules for Alerts
14
The GUI automatically adds packet-filtering rules to the Packet-Filtering Rules window if
they are not already present and if SNMP trap alerts are enabled. Packet-filtering rules for
mail alerts require some manual intervention.
◆
If SNMP traps are enabled, the GUI adds packet-filtering rules.
-
If the default SNMP host address (0.0.0.0) is used, the following packetfiltering rules are added:
# SNMP Alarm Trap rules (added automatically by the CyberGuard GUI)
permit snmp-trap/udp FIREWALL EVERYONE
# End of SNMP Alarm Trap rules
-
If an SNMP host address other than the default is used, the following
packet-filtering rules are added:
# SNMP Alarm Trap rules (added automatically by the CyberGuard GUI)
permit snmp-trap/udp FIREWALL SNMP_host_address
# End of SNMP Alarm Trap rules
◆
For mail alerts to go to a user on an internal mail host, do the following:
-
In the Shell window, edit the /usr/ucblib/sendmail.cf file, and change
the mailhost string to the name of your mail host.
-
In the Packet-Filtering Rules window, ensure that the following rule exists:
permit
smtp/tcp
FIREWALL
mailhost
See also “Packet-Filtering Rules Window” on page II-22.
II-340
Chapter 14, Alerts, Activities, and Archives
Alerts, Activities, and Archives Window
Activities Page
14
Use this page of the Alerts, Activities, and Archives window to enable or disable logging
for activity types (non-threatening occurrences); this provides easy access to logically
related auditing information. Use the Activity Reports window to monitor activities.
Note: The following screen capture is an example of the Activities page of the Alerts,
Activities, and Archives window and not necessarily a proper or complete configuration or the configuration that is appropriate to your company’s needs. The Syslog Setup, the WebTrends Setup, and the Centralized Auditing Setup are enabled
so that all fields are clearly visible. This may not be desirable for your firewall
setup.
Figure II-118. Alerts, Activities, and Archives Window - Activities Page
This page contains the following fields and controls:
Activity Type
File
CyberGuard Firewall Manual
Lists each activity type.
Logs activity records to a trusted file.
II-341
Alerts, Activities, and Archives Window
Log File
(Read-only) Name of the default audit-log file for this activity
type. The file is in the trusted /var/audit_logs/ directory. Use
the Activity Logs window to back up these files.
Note: By default, logging of activities occurs at least every five minutes. To decrease
this interval, in the System Statistics window, either click on Refresh Now or set
the Refresh Interval field to something less than 300 seconds, or in the Shell
window, invoke auditlogd with the -i sec option.
Syslog Setup
This Syslog Setup frame allows you to write records to a remote host or a local file.
Syslog writes the facility, level, and destination in /etc/syslog.conf file and, if necessary, establishes a packet-filtering rule for access to the remote host.
Send activity reports to syslog (standard format)
Writes activity records to the system log file specified in the Log Location field. For
additional information about syslog, see the s y s l o g ( 3 G ) , l o g g e r ( 1 ) ,
syslog.conf(4), and syslogd(1M) system manual pages.
Facility
System component generating the problem message. The default is local0.
Level
Problem severity. The default is info message priority.
Log Location
Directory and file location in which to write the activity records. This location can be
on a local or remote host.
WebTrends Setup
The WebTrends Setup frame allows you to write records to the syslog or to a local log
file in WebTrends format. Syslog writes the facility, level, and destination in
/etc/syslog.conf file and, if necessary, establishes a packet-filtering rule for access
to the remote host. For further information about WebTrends, see the introduction to
this chapter on page II-325, “WebTrends Audit Reports Window” on page I-276, and
WebTrends for Firewalls and VPNs, provided by WebTrends Corporation.
Send activity reports to syslog (WebTrends format)
Writes activity records to the system log file in the WELF format used by the
WebTrends software.
Facility
System component generating the problem message. The default is local7.
Level
Problem severity. The default is notice message priority.
Log Location
Directory and file location in which to write the activity records. This location can be
on a local or remote host.
Log activities to file (WebTrends format)
Writes activity records to the file specified in the Log File field in the format used by
the WebTrends software.
II-342
Chapter 14, Alerts, Activities, and Archives
Alerts, Activities, and Archives Window
Log File
(Read-only) Name of the default audit-log file in which to write the activity records.
The file is in the trusted /var/audit_logs/ directory. Use the Activity Logs window
to back up these files.
Centralized Auditing Setup
The Centralized Auditing Setup frame allows you to write records to the syslog or to a
local log file in Centralized Auditing format. Syslog writes the facility, level, and destination in /etc/syslog.conf file and, if necessary, establishes a packet-filtering rule
for access to the remote host. For further information about Centralized Auditing see
the introduction to this chapter on page II-325 and “How to Log Alerts and Activities
for Central Auditing” on page II-355.
Send activity reports to syslog (Centralized Auditing format)
Writes activity records to the system log file in the Centralized Auditing format used
by the Centralized Auditing software.
Facility
System component generating the problem message. The default is local7.
Level
Problem severity. The default is notice message priority.
Log Location
Directory and file location in which to write the activity records. This location can be
on a local or remote host. A remote host must be a host name defined using the Hosts
window or an IP address. A local log file must be a fully qualified path name.
Log activities to file (Centralized Auditing format)
Writes activity records to the file specified in the Log File field.
Log File
(Read-only) Name of the default audit-log file (CentralAudit) in which to write the
activity records. The file is in the trusted /var/audit_logs/ directory. Use the Activity Logs window to back up these files.
Notes:
◆
◆
Do not to send WebTrends data to syslog at the same facility and level or to the
same local log file as non-WebTrends data.
Four features allow you to write information to the syslog: the Syslog fields on
the Alerts page, the Syslog Setup frame on the Activities page, the WebTrends
Setup frame on the Activities page, and the Centralized Auditing Setup frame
on the Activities page. If you specify a facility and level for one feature, all
other features that use the same facility and level will use the same log location. You can specify the log location on the Syslog Setup frame and the
WebTrends Setup frame, but not on the Alerts page.
CyberGuard Firewall Manual
II-343
Alerts, Activities, and Archives Window
See also:
◆
◆
◆
◆
“Activity Reports Window” on page I-252
“Activity Reports” on page I-258
“System Statistics Window” on page I-285
“Activity Logs Window” on page II-360
Activity Types
14
The following list contains a brief description of all activity types and the information that
is logged when their associated File check box is checked in the Activities page of the
Alerts, Activities, and Archives window.
All packets scanned by packet filter
Packets compared against packet-filtering rules.
Packets permitted
Packets permitted by the firewall. If File is checked and Use is clicked, Service
Connections on the System Statistics window get updated.
Packets denied
Packets denied by the firewall.
Packets denied because no rule matched
Packets does not match any rules and is, therefore, denied.
All login attempts
Attempts to login or logout.
Each completion of a session
Termination of a TCP connection.
Password changes
Changes to password or the passwd file.
Alerts reset by the Central Manager
Alerts on a Target Firewall that have been reset by the Firewall Manager.
System updated by the Central Manager
Configuration propagation sent from the Firewall Manager to a Target Firewall.
CM encryption msg authentication failures
The integrity of the encrypted configuration data transmitted from the Firewall Manager to a Target Firewall is in question because an authentication check failure was
detected on an encrypted packet sent from the Firewall Manager to a Target Firewall.
CM encryption DB authentication activity
Successful or unsuccessful login to the cryptographic keys database or successful or
unsuccessful changes to the password for the cryptographic keys database.
CM encryption DB record activity
Changes (additions, modifications, deletions) to the encryption keys database.
II-344
Chapter 14, Alerts, Activities, and Archives
Alerts, Activities, and Archives Window
Passport One activity
Attempts to use Passport One or NT Authentication Detection for inbound and outbound connections.
Content scanning activity
CVP virus scanning and ActiveX, Java, JavaScript, and VBScript language blocking.
Firewall Administrative activity
GUI actions including: starting the GUI, stopping the GUI, changing configuration
files, executing commands, signalling daemons, changing GUI roles, blacklisting
users, and unblacklisting users. This log also includes proxy user administration
records.
SSH activity
Connection attempts and activities using the Secure Shell.
proxy_name proxy activity
Connections, legal, and illegal use of proxy commands, where proxy_name is FTP,
Generic (Proxy-Writer), Gopher, HTTP, LDAP, Load Equalizer/Port Guard, NNTP,
Notes, RealAudio, Remote Login, SMTP, SQL*Net, SOCKS, SSL, Telnet Login,
X11, X11 Hook, X11 display daemon. Note that the Load Equalizer and the Port
Guard SmartProxies share the same audit-log file.
VPN IKE activity
Activities associated with IKE.
VPN IPSec activity
Activities associated with IPSec.
VPN Interceptor activity
Activities associated with ESP or AH sessions.
VPN Certificate activity
Provides information about VPN certificate activity.
See also:
◆
◆
◆
◆
◆
◆
“System Statistics Window” on page I-285
“Packet-Filtering Rules Window” on page II-22
“Users Window” on page II-153
“Central Management” on page I-103
“SmartProxies Window” on page III-5
“SOCKS Window” on page II-213
CyberGuard Firewall Manual
II-345
Alerts, Activities, and Archives Window
Default Log Files for Activity Types
14
The following table presents the default files from the /var/audit_logs/ directory for the
activity types monitored by the firewall.
Table II-6. Default Log Files for Activity Types
II-346
Activity Type
Default Log File: /var/audit_logs/
All packets scanned by packet filter
NetguardS
Packets permitted
NetguardP
Packets denied
NetguardD
Packets denied because no rule matched
NetguardM
All login attempts
Logins
Each completion of a session
NetguardT
Password changes
Passwd
Alerts reset by the Central Manager
CMReset
System updated by the Central Manager
CMPropagate
CM encryption msg authentication failures
CMAuthFail
CM encryption DB authentication activity
CMDbAuth
CM encryption DB record activity
CMDbRecords
Passport One activity
(also records NTAD activity)
PassportOne
Content scanning activity
ContentScan
Firewall Administrative activity
FWAdmin
FTP proxy activity
ProxyFTP
Generic proxy activity (Proxy-Writer)
ProxyGeneric
Gopher proxy activity
ProxyGopher
HTTP proxy activity
ProxyHTTP
LDAP proxy activity
ProxyLDAP
Load Equalizer/Port Guard proxy activity
ProxyLDE
NNTP proxy activity
ProxyNNTP
Notes proxy activity
ProxyNotes
Rlogin proxy activity
ProxyRlogin
SMTP proxy activity
ProxySMTP
SQL*Net proxy activity
ProxySQLNet
SOCKS proxy activity
SOCKS
SSH activity
SSH
Chapter 14, Alerts, Activities, and Archives
Alerts, Activities, and Archives Window
Table II-6. Default Log Files for Activity Types (Cont.)
Activity Type
Default Log File: /var/audit_logs/
SSL proxy activity
ProxySSL
Telnet login proxy activity
ProxyTelnet
X11 (direct) proxy activity
ProxyX11
X11 (virtual) proxy activity
ProxyX11Hook
X11 display daemon activity
ProxyX11Disp
VPN IKE activity
VPNIkeActivity
VPN IPSec activity
VPNIPSecActivity
VPN Interceptor activity
VPNIntcpActivity
VPN Certificate activity
VPNCertActivity
See also “Activity Reports” on page I-258.
CyberGuard Firewall Manual
II-347
Alerts, Activities, and Archives Window
Archives Page
14
Use this page of the Alerts, Activities, and Archives window to periodically archive log
files to a tape device, one or more file systems on the firewall, or one or more FTP destination addresses. Archiving to a file system can be configured to work in conjunction with
FTP archiving for the concurrent log processing/movement on a high performance system
such as STARLord. The log file archive can also be encrypted.
Figure II-119. Alerts, Activities, and Archives Window - Archives Page
This page contains the following fields and controls:
Location for Archived Audit Trail
Indicates the method to be used for storing the audit logs. Can be a
tape device, a file system on the firewall, or an FTP log server.
II-348
Device
Stores audit logs to tape. Note that this option is not supported in
KnightSTAR units; a tape device is not available with those units.
Device Path
(Required with Device) Full path name of the tape device on
which logs are to be archived.
File System
Stores audit logs to one or more file systems on the firewall. On
the local system, the audit archives will fill the first directory in
the Destination Path list until the file system on which it
resides reaches a disk capacity of 75%. At that point, the audit
Chapter 14, Alerts, Activities, and Archives
Alerts, Activities, and Archives Window
archive system determines if there is another destination directory
in the Destination Path on another file system for which the
utilization is less. File System archiving can be configured to
work with FTP archiving to provide the concurrent log processing/movement on a high performance system such as STARLord.
See Using File System Archiving with FTP Archiving
below.
Destination Path
(Required with File System) Full path name of the directory or
directories on the firewall to which logs are to be archived. Directories must be separated with a semicolon and should be on different file systems. The /archive file system is the recommended
storage location for appliance firewalls KnightSTAR, STARLord,
and FireSTAR, and was created for this purpose. A standard UnixWare firewall does not have the /archive file system; it is recommended to FTP the files to another machine.
FTP
Sends audit logs from the firewall to a log server using FTP. File
System archiving can be configured to work with FTP archiving
to provide the concurrent log processing/movement on a high performance system such as STARLord. See Using File System
Archiving with FTP Archiving below.
Use Secure FTP V2 Sends audit logs from the firewall to a log server using Secure
FTP (SFTP) Version 2. SFTP is similar to FTP but uses SSL to
encrypt and decrypt the packets. The Secure Shell Server version
2 must be used. Note that Secure FTP allows the user name to be
part of the command line, assumes all transfers are binary, and
does not prompt the user for multiple file transfers.
IP Address
(Required with FTP) Host name or IP address of FTP server on
which to archive logs.
Destination Path
Full path name of one or more directories on the FTP server to
which logs are to be archived. Directories must be separated with
a semicolon. The directories must exist, and the user specified by
User Name must be able to write to it. The default destination path
is the user’s home directory.
User Name
(Required with FTP) Login name on the FTP server.
Password
(Required with FTP) Password for user on the FTP server. Single
or double quotes, leading #, and backslash in the password are not
permitted. A confirmation icon appears to the right of this field.
A red check mark indicates that the password has not been confirmed. Click on the button, and a popup window with a confirmation field appears. A yellow icon indicates that the password is the
process of being confirmed. If the value entered in the confirmation popup matches the Password value, the icon turns green,
indicating that the password has been confirmed.
Archive File
Name under which the file will be archived. Directory and file
names are preprocessed by the date(1) command to replace date
and time specifiers (e.g., %M). In addition, %f is replaced by the
simple source file name or some predefined string (cf for the
CyberGuard Firewall Manual
II-349
Alerts, Activities, and Archives Window
active configuration, cgrv for the archive directory, arc for anything else) and %n is replaced by the node name. %t, which the
date command would replace with a tab, is replaced by an underscore. The default file name for items that need a file name is
%f.%n.%y%m%d%H%M, which expands to something like
cf.gonzales.0006191304 . Two symbols help distinguish
members of an HA pair: %a is replaced by the machine alias (cg1
vs. cg2) and %i is replaced by the machine hardware ID (as found
in the License Keys window).
Time for Archive Job
Indicates how often the audit logs are to be archived.
Never
Indicates that no archiving is scheduled.
Daily
Indicates that audit logs are to be archived once each day. If this
button is selected, you must specify values in the Time of Day
lists.
Weekly
Indicates that audit logs are to be archived once each week. If this
button is selected, you must choose a day of the week from the
associated drop-down list. You must also specify values in the
Time of Day lists.
Monthly
Indicates that audit logs are to be archived once each month. If
this button is selected, you must choose the desired day of the
month from the associated drop-down list. You must also specify
values in the Time of Day lists.
Time of Day
Specifies the time at which audit logs are to be archived. Set the
time by choosing a value ranging from 00 to 23 in the Hour dropdown list and a value ranging from 00 to 59 in the Minute dropdown list.
Keep Files
Specifies the number of days’ audit logs that are to be kept on the
firewall instead of being archived. Choose a value ranging from
01 to 31 in the associated drop-down list. The default is 01, which
specifies that audit logs older than one day will be archived.
Disk Capacity
Archives audit logs when the disk capacity reaches a specified
threshold. Disk capacity is checked every hour on the hour and
each day at midnight when the system checks if it should archive
on that day. If this box is checked, enter a number ranging from 1
to 100 in the Percent field. The default value is 70.
The Disk Capacity field overrides the Keep Files field. This is
to accommodate systems that generate a great number of audit
records each day. If the utilization of the /var file system goes
above the capacity setting, the audit archive system attempts to
archive enough of the audit records currently in /var, to reduce
the utilization of that file system to below the required capacity.
This archival starts with the oldest audit records, and leaves only
the most recent record in /var. This single file is the file that is
currently collecting audit records.
II-350
Chapter 14, Alerts, Activities, and Archives
Alerts, Activities, and Archives Window
Use caution when setting the Disk Capacity. If it is set too low,
audit archive will archive records every hour, and still may not be
able to satisfy the capacity requirement. If it is set too high, /var
could fill up completely, resulting in firewall shutdown. It is recommended that Disk Capacity be set between 50% and 80%,
depending upon how full /var is without any audit records.
Encryption Password
Indicates whether the log file archive is to be encrypted prior to
sending it to the specified device, file system, or FTP server. If
this box is checked, you must enter a password to encrypt the
archive. This value is a string of characters including any printable character (lower and upper case letters, punctuation marks,
and numbers). It is used to generate a cryptographic key for
encrypting the archive.
Archive Now
Indicates whether the audit logs are to be archived immediately. If
this box is checked, information entered on the window is applied,
and archiving is performed.
Notes:
◆
The name of a log file archive has the following format:
hostmmddhhmm.tar
where mm represents the month, dd the day, hh the hour, and mm the minute.
(e.g., cgfw03282330.tar)
The name of an encrypted log file archive has the following format:
hostmmddhhmm.tar.encr
(e.g., cgfw03282330.tar.encr)
◆
◆
◆
The archiving facility creates a log file on the firewall called
/tmp/auditarc.err. This file contains information about the last time audit
archive was called. It tells how many files are being archived, the spaced used
by those files, and whether or not there is space in a destination directory to
hold the archive. If there is sufficient space to archive it elsewhere, the file
also holds the name and location of the archive, whether or not the archive was
encrypted, was created successfully, etc. It tells whether or not a local destination has reached its specified disk capacity. If so, and an FTP server is configured, it holds information about which files were transferred or problems
encountered using FTP. This file is overwritten each time audit archiving is
run.
An archive alert, Audit archiving activity, can be configured to notify the
administrator about archival problems such as capacity overriding “keep
days”, high utilization of local destinations, FTP failures, and tar failures. You
can also establish an alert for disk space usage, Disk partitions full, for all
file systems used by the audit archive system.
To restore archived logs, see “How to Restore Archived Logs” on page II-357.
CyberGuard Firewall Manual
II-351
Alerts, Activities, and Archives Window
Using File System Archiving with FTP Archiving:
The FTP archiving feature can be configured to automatically archive and move audit data
when the system switches file systems to recommence audit log creation. To do this, complete the following steps:
1. Specify a file system use threshold in the Disk Capacity field. When this threshold is
met, audit logs will be placed in another file system.
2. Select FTP and fill in the IP Address, Destination Path, User Name, and Password fields.
3. Click on the Save button.
4. Select File System and fill in the Destination Path field.
5. Click on the Save button.
See also:
◆
◆
◆
◆
“Activity Reports Window” on page I-252
“Activity Reports” on page I-258
“System Statistics Window” on page I-285
“Activity Logs Window” on page II-360
How to Enable and Disable Alerts
14
You can use the Alerts page of the Alerts, Activities, and Archives window to specify
which events may require attention and to choose how to automatically detect and respond
to these occurrences.
CAUTION!
For frequently occurring suspicious event types, some alerts can
make the situation worse. For example, enabling the Window alert
might tie up the Alert Summary window, and logging disk-full
messages to a file might consume even more disk space.
To display the Alerts page of the Alerts, Activities, and Archives window:
1. Select Configuration from the Control Panel.
2. Select Alerts, Activities, and Archives. The Alerts page of the Alerts, Activities,
and Archives window appears.
II-352
Chapter 14, Alerts, Activities, and Archives
Alerts, Activities, and Archives Window
To enable or disable alerts:
1. To detect when a disk-full problem is about to occur, ensure that the File alert for
Disk partitions full is checked.
2. (Optional) Check other alert options. Some fields may become required for some
newly enabled alerts and some suspicious event types.
3. Click on Save. Your changes are saved in the alert configuration file
/etc/ security/cyber/alert.conf. The changes take effect at the next system reboot.
If you checked an SNMP Trap alert, Save adds packet-filtering rules for each unique
address in the Packet-Filtering Rules window; it also deletes rules for each obsolete
address.
4. (Optional) Click on Use. Your changes take effect immediately; the alerts that you
enabled will be triggered if and when they occur. If you checked a Window alert, Use
adds a line to the Alert Summary window.
To display an alert file:
1. Select Report from the Control Panel.
2. Select Alert Summary. The Alert Summary window appears.
3. Select a suspicious event type. Its alert file appears.
See also:
◆
◆
“Packet-Filtering Rules Window” on page II-22
“Alert Summary Window” on page I-250
How to Enable and Disable Activities
14
You may want to have easy access to logically related auditing information about nonthreatening events. You can use the Activities page of the Alerts, Activities, and Archives
window to specify which events to log.
To display the Activities page of the Alerts, Activities, and Archives window:
1. Select Configuration from the Control Panel.
2. Select Alerts, Activities, and Archives. The Alerts, Activities, and Archives window appears.
3. Click on the Activities tab. The Activities page appears.
To enable or disable activity logging:
1. Check the File check box for activity types that you want to log.
2. Click on Save. The changes take effect at the next system reboot.
3. (Optional) Click on Use. Your changes take effect immediately.
CyberGuard Firewall Manual
II-353
Alerts, Activities, and Archives Window
To display an activity file:
1. Select Report from the Control Panel.
2. Select Activity Reports. The Activity Reports window appears.
3. Select an activity report. Its activity file appears.
See also “Activity Reports Window” on page I-252.
How to Log Alerts and Activities for WebTrends Reports
14
You can write certain alert and activity records in WebTrends format to the syslog or to a
file. You can view these reports by transferring the files to a computer running the
WebTrends reporting tool.
To display the Activities page of the Alerts, Activities, and Archives window:
1. Select Configuration from the Control Panel.
2. Select Alerts, Activities, and Archives. The Alerts, Activities, and Archives window appears.
3. Click on the Activities tab. The Activities page appears.
To configure alerts and activities for WebTrends logging:
1. To write activity records to the system log file, click on Send activity reports to
syslog (WebTrends format), select a Facility, and select a Level.
2. To write activity records to a log file in WebTrends format, click on Log activities to
a f i l e ( W e b Tr e n d s f o r m a t ) . T h e d e f a u l t l o c a t i o n o f t h e l o g f i l e i s
/var/audit_logs/WebTrends.
3. Click on the Alerts page and enable the events you would like to log in WebTrends
format. The following alerts are available: Disk partitions full, Failed login attempts,
File access granted, Packet forwarding attacks, Number of licensed hosts exceeded,
Land attacks, Ping of death attacks, TCP SYN flood attacks, Interface access check
failures, Access to an interface was denied due to a MAC failure, and Network port
scan attempts.
To View a WebTrends log using WebTrends software:
1. Transfer the log files to a computer running Windows and WebTrends using ftp, tar,
or doscp, depending on your company’s security policy.
2. Use the WebTrends tool as specified in the WebTrends for Firewalls and VPNs
manual, provided by WebTrends Corporation.
See also:
◆
◆
◆
II-354
“Activity Reports Window” on page I-252
“Alerts Page” on page II-328
“Activities Page” on page II-341
Chapter 14, Alerts, Activities, and Archives
Alerts, Activities, and Archives Window
How to Log Alerts and Activities for Central Auditing
14
You can write alert and activity records to the syslog or to a file for use in centralized
auditing. You must determine which activities you want to include and where you want to
log them.
To display the Activities page of the Alerts, Activities, and Archives window:
1. Select Configuration from the Control Panel.
2. Select Alerts, Activities, and Archives. The Alerts, Activities, and Archives window appears.
3. Click on the Activities tab. The Activities page appears.
To configure alerts and activities for Central Auditing:
1. To log activity records to the system log file for local or remote logging, click on Send
activity reports to syslog (Centralized Auditing format), select a Facility
and Level, and type the name of a log file or a remote host in the Log Location
field.
2. To log activity records in the local /var/audit_logs/CentralAudit log file, click on
Log activities to a file (Centralized Auditing format).
3. Click on Save. The changes take effect at the next system reboot.
4. (Optional) Click on Use. Your changes take effect immediately.
See also:
◆
◆
◆
“Activity Reports Window” on page I-252
“Alerts Page” on page II-328
“Activities Page” on page II-341
CyberGuard Firewall Manual
II-355
Alerts, Activities, and Archives Window
How to Archive Alert and Activity Logs
14
The CyberGuard Firewall accommodates centralized log storage. You can periodically
archive log files to a variety of locations: a tape device, a file system on the firewall, or an
FTP system.
To display the Archives page of the Alerts, Activities, and Archives window:
1. Select Configuration from the Control Panel.
2. Select Alerts, Activities, and Archives. The Alerts, Activities, and Archives window appears.
3. Click on the Archives tab. The Archives page appears.
To configure archiving:
1. Select a method for storing data (Device, File System, or FTP) and complete the
required fields for that type.
2. Select None, Daily, Weekly, or Monthly to set the frequency of the archive procedure. For weekly and monthly archives, select the day of the week or number of
months from the associated drop-down lists
3. Select the Time of Day for the archive to take place.
4. Specify the number of days audit logs are to be kept on the firewall with the Keep
Files drop-down list.
5. To archive audit logs when disk capacity reaches a specified threshold, check the Disk
Capacity box and type a percentage into the corresponding field.
6. To encrypt the archive before sending it to the device, check the Encrypt Password
box. Type a password into the corresponding field.
7. To archive the audit logs immediately, check the Archive Now box.
See also:
◆
◆
◆
II-356
“Activity Reports Window” on page I-252
“Alerts Page” on page II-328
“Activities Page” on page II-341
Chapter 14, Alerts, Activities, and Archives
Alerts, Activities, and Archives Window
How to Restore Archived Logs
14
The sections that follow explain how to restore log files that have been archived to a log
server, tape, or file system.
Note: The cg_crypt(1M) utility uses a statically-linked SSL library that is not shipped
with the CyberGuard Firewall product. Therefore, this library is not available for
inclusion with or access by other applications.
Files Archived to Log Server
To be able to generate an audit logs report from a binary audit log file archive that has
been stored on an FTP server, you must transfer the archive to the firewall, decrypt it if
applicable, and extract the files from the archive.
Prior to transferring the archive to the firewall, you must add a packet-filtering rule on the
Packet-Filtering Rules window on the firewall. To display this window, select Configuration from the firewall Control Panel, and then select Packet-Filtering Rules. Specify the
following rule to permit an FTP transfer from the log server to the firewall:
permit
ftp/tcp
log_server
FIREWALL
(Click on the ? button or press <F1> to display help related to this window.)
To transfer an archive to the firewall, decrypt it, and extract the files, complete the following steps on the firewall:
1. Select Tools from the Control Panel.
2. Select Shell Window.
3. When the Shell Window is displayed, enter the following to become root (note that su
cannot be executed from any level other than SYS_PRIVATE):
/sbin/tfadmin newlvl SYS_PRIVATE
su
Enter the corresponding password, and press <Enter>
4. Enter the following to change level to network:
newlvl network
5. Enter the following commands to create and change to an appropriate directory on the
firewall and to use FTP to retrieve the archive from the log server.
cd /archive
mkdir audit_dir
cd audit_dir
ftp log_server
User: log_server_login_ID
Password: log_server_password
CyberGuard Firewall Manual
II-357
Alerts, Activities, and Archives Window
cd log_server_archive_directory
bin
get archive_name
(e.g., get cgfw03282330.tar or get cgfw03282330.tar.encr)
quit
6. If you encrypted the log file archive, enter the following command to decrypt it:
cg_crypt -d
-p encryption_password
-i archive_name
The name of the decrypted file is of the form host_namemmddhhmm.tar if a file of
that name does not already exist; otherwise, it is of the form
host_namemmddhhmm.tar.decr.
7. Enter the following command to extract all audit logs files from the retrieved archive.
Note that files will be restored to /archive/audit_dir.
tar xvf archive_name
(e.g., tar xvf cgfw03282330.tar or tar xvf cgfw03282330.tar.decr)
8. Enter exit to exit the root shell.
9. Enter exit to return to the previous level.
10. Enter exit to close the Shell Window.
Instructions for producing an audit logs report from the binary audit logs files are presented in “How to Generate an Audit-Logs Report” on page I-275. Note that in the Audit
log directory field, you must change the name to /archive/audit_dir.
Files Archived to Tape
Note: This option is not supported in KnightSTAR units. A tape device is not available
with a KnightSTAR unit.
To be able to generate an audit logs report from a binary audit log file archive that has
been stored to tape, you must restore the archive from tape, decrypt it if applicable, and
extract the files from the restored archive.
To obtain an archive from tape, decrypt it, and extract the files, complete the following
steps:
1. Enter the following commands to create and change to a directory for the archived
files:
cd /archive
mkdir audit_dir
cd audit_dir
2. Enter the following command to retrieve the archive file from the tape:
tar xvf device_name
3. If you encrypted the log file archive, enter the following command to decrypt it:
cg_crypt -d
II-358
-p encryption_password -i archive_name
Chapter 14, Alerts, Activities, and Archives
Alerts, Activities, and Archives Window
The name of the decrypted file is of the form host_namemmddhhmm.tar if a file of
that name does not already exist; otherwise, it is of the form
host_namemmddhhmm.tar.decr.
4. Enter the following command to extract all audit logs files from the archive:
tar xvf archive_name
(e.g., tar xvf cgfw03282330.tar or tar xvf cgfw03282330.tar.decr)
Instructions for producing an audit logs report from the binary audit logs files are presented in “How to Generate an Audit-Logs Report” on page I-275. Note that in the Audit
log directory field, you must change the name to /archive/audit_dir.
Files Archived to File System
To be able to generate an audit logs report from a binary audit log file archive that has
been stored on the /archive file system, you must decrypt it if applicable and extract the
files from the archive.
To decrypt the archive and extract the files, complete the following steps:
1. Enter the following commands to create and change to a directory for the archived
files:
cd /archive
mkdir audit_dir
cd audit_dir
2. If you encrypted the log file archive, enter the following command to decrypt it:
cg_crypt -d -p encryption_password -i archive_name
The name of the decrypted file is of the form host_namemmddhhmm.tar if a file of
that name does not already exist; otherwise, it is of the form
host_namemmddhhmm.tar.decr.
3. Enter the following command to extract all audit logs files from the archive:
tar xvf archive_name
(e.g., tar xvf cgfw03282330.tar or tar xvf cgfw03282330.tar.decr)
Instructions for producing an audit logs report from the binary audit logs files are presented in “How to Generate an Audit-Logs Report” on page I-275. Note that in the Audit
log directory field, you must change the name to /archive/audit_dir.
See also:
◆
◆
◆
“Activity Reports Window” on page I-252
“Alerts Page” on page II-328
“Activities Page” on page II-341
CyberGuard Firewall Manual
II-359
Activity Logs Window
Activity Logs Window
14
Use this window to transfer activity-log files daily from one directory to another and to
specify whether network names or IP addresses will be used in the reports. Moving and
resetting the activity-log files prevents the files from growing until the disk becomes full.
The default is to grow the files. Activity-log files in /var/audit_logs/ are archived in
/var/audit_logs/old/.
You can also use this window to send activity-log files to the CSMART (Centralized Solution for Monitoring, Auditing, Reporting, and Tracking) server to generate easy-to-read
reports.
Figure II-120. Activity Logs Window
This window contains the following controls:
Nights to reset activity-log files
Moves activity-log files at 12:15 a.m. on the days checked from one directory to
another, overwriting files in the destination directory.
Enable CSMART backup
Enables the backup of the activity reports to the server specified in the CSMART
Server Address field. This will occur just after midnight on weekdays if Reset
activity-log files weekday nights is specified or just after midnight on weekends
if Reset activity-log files weekend nights is specified or both if both are specified.
II-360
Chapter 14, Alerts, Activities, and Archives
Activity Logs Window
CSMART Server Address
The name or IP address of the CSMART server. The activity reports will be sent via
FTP to this address whenever they are backed up.
CSMART Server Login
The login ID on the CSMART server.
CSMART Server Password
The password for the specified login ID on the CSMART server. A confirmation icon
appears to the right of this field. A red check mark indicates that the password has not
been confirmed. Click on the button, and a popup window with a confirmation field
appears. A yellow icon indicates that the password is the process of being confirmed.
If the value entered in the confirmation popup matches the CSMART Server Password value, the icon turns green, indicating that the password has been confirmed.
Confirm Password
Confirmation of the password specified in the CSMART server password.
CSMART Server Path
The directory name on the CSMART server. Special characters are recognized:
%i - Hardware ID of the firewall
%n - Node name of the firewall
%a - Alias (in an HA pair) of the firewall (e.g., cg1 vs. cg2) all of the special characters recognized by the date command.
Resolve names of network addresses
Creates reports showing host and domain names rather than IP addresses, if the names
can be resolved using the local hosts and networks databases. Having name resolution
enabled can hinder logging if names cannot be resolved (for example, if there is a
DNS problem).
Use numeric ports, protocols, and ICMP types
Creates reports showing the numeric value for ports, protocols, and ICMP types.
Without this option, these fields are translated into the corresponding symbolic value
from the /etc/services and /etc/protocols files. For example, if this option is
selected, the report would display port 21 instead of ftp, protocol 6 instead of tcp,
and ICMP type 8:0 instead of ECHO.
CAUTION!
Overwriting causes activity records to be discarded, making auditing impossible for those records. You may want to archive
/var/audit_logs/old/ records before they are overwritten.
Notes:
◆
◆
Logging to these files occurs after you check File and click on Use on the
Alerts, Activities, and Archives window.
CSMART does not use its own configuration file. The CSMART configuration data is stored in the /etc/security/firewall/startup.conf file.
CyberGuard Firewall Manual
II-361
Alerts, Activities, and Archives - Underlying Constructs
See also:
◆
◆
◆
◆
◆
auditlogd(1M) system manual page
auditrpt(1M) system manual page
CSMART User’s Guide
“Activity Reports Window” on page I-252
“Alerts, Activities, and Archives Window” on page II-326
Alerts, Activities, and Archives - Underlying Constructs
14
Advanced Users Only! The GUI automates the editing of files and invocation of commands described in this section. If you choose to manually edit any file, you must first
close every window displayed from the Configuration menu and complete all edits of
the file before continuing GUI configuration activities.
To define the system’s response to suspicious events and regular activities:
1. Define suspicious events and the
/etc/security/cyber/alert.conf file.
associated
system
responses
in
the
2. Define activities to log to a file in the /etc/security/cyber/trace.conf file.
3. Invoke the /usr/sbin/cyber/auditlogd daemon to read the configuration files and
monitor alerts and activities.
Alerts Configuration File (alert.conf)
14
The alert subsystem of the CyberGuard Firewall can monitor network activity for
sequences of events that are characteristic of an attack or that require administrative attention. When such a sequence occurs, the alert subsystem constructs a message describing
the event and delivers the message using any of several different methods.
Use the /etc/security/cyber/alert.conf file to identify the events to monitor and the
notification method for each event. This file is read by the auditlogd daemon when the
-A option is used.
Format guidelines:
◆
◆
◆
◆
II-362
Alert definitions can span multiple lines.
Use quotation marks around parameter values that contain white space.
Comments begin with the # character and continue until the end of the line.
Follow each event keyword with at least one notification method. Some events
have additional parameters that refine the event definition.
Chapter 14, Alerts, Activities, and Archives
Alerts, Activities, and Archives - Underlying Constructs
Format:
event notification_method [additional_parameters]
Event Statements:
access_deny notification_method file=absolute_path_name
Access was denied to a file or directory specified with file=absolute_path_name.
Use one file= keyword for each file or directory that you want to track.
access_grant notification_method file=absolute_path_name
Access was granted to a file or directory named with file=absolute_path_name.
Use one file= keyword for each file or directory that you want to track.
audit_archive notification_method
Identifies archiving problems such as the capacity overriding “keep days”, high utilization of local destinations, FTP failures, and tar failures.
auditoff_alert notification_method
Indicates that auditing has been disabled. The administrator may choose to shutdown
the firewall, receive a page, and receive e-mail when this alert occurs. To enable these
actions, type the following in the configuration file:
auditoff_alert shell_cmd="/usr/sbin/auditoff_alert -s 10
-p phone_number -m 1*911 -c com_port -r cgadmin"
where -s is the number of seconds before the firewall shuts down, -p is the phone
number of the pager, -m is the message displayed on the pager, -c is the com port of
the pager, and -r is the user ID to which e-mail is sent at NETWORK level.
Note that every night at midnight, the auditing subsystem switches to the audit file for
the next day and turns auditing off for a moment. This generates an auditoff event
followed immediately by an auditon event. Because this is a normal event, the
auditoff_alert command can be used to take action only when auditing is disabled
unexpectedly.blocked_file notification_method
The content scanning software has identified a dangerous or undesirable file or document and blocked its transmission through the firewall.
disk_space notification_method check=interval,utilization,filesystem
Disk space is low. Use one or more check= keywords with the interval (in seconds)
specifying how often to check the disk capacity, the percentage of disk space utilization that will trigger an alert, and the file system to check.
failed_logins notification_method [attempts=number] [interval=seconds]
Unsuccessful attempts have been made to login to the firewall by the same device or
by the same user within an interval (in seconds) of time. The defaults are 3 attempts in
a 3600-second interval (three attempts in an hour).
forward_attack notification_method
A source-routed packet names a different route from the one the firewall would normally use.
CyberGuard Firewall Manual
II-363
Alerts, Activities, and Archives - Underlying Constructs
ha_nohb notification_method [interval=seconds] [attempts=number]
Heartbeat messages have been absent from the served or standby firewall for a specified number of seconds after a specified number of attempts. The default interval is
180 seconds; the default number of attempts is 1.
ha_standby_alt notification_method
Indicates that the disk on the standby machine has reached capacity. This alert is generated on the served machine.
ha_standby_dwn notification_method
Indicates that the standby machine in a High Availability pair is down. This alert is
generated on the served machine.
ha_transition notification_method
A transition has been made to or from the “served” (active) or “unknown” state.
host_limit notification_method [interval=seconds]
One or more TCP connections are denied because the number of internal hosts permitted to pass packets through the firewall reached the licensed limit. The default repeat
interval is 120 seconds.
interface_spoof notification_method
Occurs when the source address of an inbound packet (a packet from the external side
of the firewall) is the address of a host on the internal side of the firewall.
land_attack notification_method
Discarded packets in which the source address and port are the same as the destination. Land is a widely available attack tool that exploits the vulnerability of many
TCP/IP implementations to these particular packets.
mac_violation notification_method
Access through an interface was denied due to a MAC failure.
ping_of_death notification_method
Discarded packets, often from a ping(1) command, that contain an illegal combination of IP fragment offset and IP length and might cause the destination host to crash
if allowed to pass through.
prowler_msg notification_method
Working with NetProwler, provides notification when a packet-filtering rule is added
by the Intrusion Detection System to deny traffic an offending connections.
port_scan notification_method [denials=number] [interval=seconds]
The netguard packet filter denied a specified number of packets with the same
source IP address and different destination IP addresses or port numbers within a
specified time period. The default is 50 packets within a one-second time period.
sw_update notification_method
Automatic updates to the firewall or operating system software through use of the
Software Updates window.
tcp_synflood notification_method [timeouts=number] [interval=seconds]
The netguard packet filter encountered a specified number TCP connections that
failed due to a timed-out SYN/ACK segment sent from the same server IP address and
port number. The default is 10 TCP connection time-outs in a 75-second time period.
II-364
Chapter 14, Alerts, Activities, and Archives
Alerts, Activities, and Archives - Underlying Constructs
vpn_ike_alert notification_method
Indicates an issue has occurred with IKE.
vpn_ipsec_alert notification_method
Indicates an issue has occurred with IPSec.
vpn_intcpke_alert notification_method
Indicates an issue has occurred with an ESP or AH session.
vpn_x917_test notification_method
Indicates the VPN pseudo random number generator has generated the same number
twice. The FIPS 140-1 standard requires that VPN operation be halted in this unlikely
event. Therefore, the operator must investigate and resolve the problem and then manually resume VPN operation.
vpn_cert_alert notification_method
Provides information about VPN certificate problems.
Notification Method:
log_file=absolute_path_name
Write the message to the named file. You can use any path name and file name; however, the GUI uses default files in the /var/audit_logs/ directory. See “Default Log
Files for Suspicious Event Types” on page II-333 for a list of the default files.
mail_addr=recipient,level
Mail the message to the recipient with “Alert message from CyberGuard” as the
subject line. The level must be the MAC level of the recipient, such as NETWORK,
SYS_PRIVATE, or SYS_PUBLIC [see lvlname(1M)].
num_page='pager_number','pager_message',com_port
Send a numeric message to a pager telephone number.
pipe_cmd="command_line"
Use a pipe to write the message to the standard input of the named shell command.
The shell command line is executed by sh(1).
shell_cmd="command_line"
Append the message to the named shell command as a quoted string argument and
pass the resulting command line to sh(1) for execution.
snmp_trap=host_address,community,trap_number,message_prefix
Send the message in an SNMP trap. The alert message is appended to
message_prefix. See estrap(1M) for further information.
To use this alert, you must define packet-filtering rules for SNMP in the
/etc/security/firewall/netguard.conf file.
syslog=facility.level
Send the message to syslogd. See syslog.conf(4) for a description of facilities and
levels.
window
Write the name of the alert to a pipe read by the CyberGuard Firewall’s GUI.
CyberGuard Firewall Manual
II-365
Alerts, Activities, and Archives - Underlying Constructs
The following example shows the layout of the alert.conf file.
# /etc/security/cyber/alert.conf
#
access_deny log_file=/var/audit_logs/AccessDenied file=/etc/passwd
access_grant mail_addr=secadm file=/var/audit file=/etc/security
disk_space syslog=local0.alert check=30,90,/ check=30,90,/var
failed_logins window log_file=/var/audit_logs/LoginFailed attempts=5 interval=7200
forward_attack log_file=/var/audit_logs/ForwardD shell_cmd="/usr/local/myprog -x"
interface_spoof snmp_trap=1.2.3.4,public,34,Alert window mail_addr=secadm
mac_violation log_file=/var/audit_logs/IFMACerror
ping_of_death num_page='9,,5554273,,,','1*911',1
port_scan log_file=/var/audit_logs/PortScan pipe_cmd="/bin/write secadm"
Figure II-121. Alert Configuration File Example
See also:
◆
◆
◆
“Default Log Files for Suspicious Event Types” on page II-333
“Pager Numbers” on page II-339
“Packet-Filtering Rules for Alerts” on page II-340
Activities Configuration File (trace.conf)
14
Use the /etc/security/cyber/trace.conf file to log regular firewall activities. This file
is read by the auditlogd daemon when the -T option is used.
Format guidelines:
◆
◆
Comments begin with the # character and continue until the end of the line
Each line begins with an activity keyword
Format:
activity file
Fields:
activity
Type of firewall activity to record in the file.
all_packets - All packets encountered by the firewall
permit - Permitted packets
deny - Denied packets
no_match - Denied packets that did not match any rule
logins - Login attempts
session - Session measurements from the firewall
passwd - Password changes
cm_alerts_reset - Alerts reset by the Central Manager
II-366
Chapter 14, Alerts, Activities, and Archives
Alerts, Activities, and Archives - Underlying Constructs
cm_propagate - Configuration files propagated by the Central Manager
cm_mac_failures - Authentication check failure on an encrypted packet
cm_db_password - Changes to the cryptographic keys database password
cm_db_records - Changes to the cryptographic keys database.
cscan - Messages from the content scanning software
clasd - Messages from the Passport One and NTAD daemons
fw_admin - Administrative interface activities
ftp_proxy - Messages from the FTP proxy
generic_proxy - Messages from the Proxy-Writer (generic) proxy
gopher_proxy - Messages from the Gopher proxy
http_proxy - Messages from the HTTP proxy
ldap_proxy - Messages from the LDAP proxy
ept_proxy - Messages from the Load Equalizer and Port Guard proxies
notes_proxy - Messages from the Notes proxy
nntp_proxy - Messages from the NNTP proxy
ra_proxy - Messages from the RealAudio proxy
rlogin_proxy - Messages from the Rlogin proxy
smtp_proxy - Messages from the SMTP proxy
sqlnet_proxy - Messages from the SQL*Net proxy
ssl_proxy - Messages from the Secure Shell
ssl_proxy - Messages from the SSL proxy
telnet_proxy - Messages from the Telnet proxy
x11_proxy - Messages from the X11 proxy
x11_hook_proxy - Messages from the X11 Hook proxy
displayd - Messages from the displayd daemon
sockd - Messages from the SOCKS server
vpn_ike_activity - Activities associated with IKE
vpn_ipsec_activity - Activities associated with IPSec
vpn_intcp_activity - Activities associated with ESP or AH sessions
vpn_cert_activity - Activities associated with VPN certificates.
file
The absolute path name in which to record the data. You can use any path
n am e an d fil e na me; ho we ver, t he G UI uses d efaul t fi les i n t he
/var/audit_logs/ directory. See “Default Log Files for Activity Types” on
page II-346 for a list of these files.
The following example shows the layout of the trace.conf file.
# /etc/security/cyber/trace.conf
#
permit
/var/audit_logs/NetguardP
deny
/var/audit_logs/NetguardD
passwd
/var/audit_logs/Passwd
nntp_proxy
/var/audit_logs/ProxyNNTP
http_proxy
/var/audit_logs/ProxyHTTP
Figure II-122. Activities Configuration Example
CyberGuard Firewall Manual
II-367
Alerts, Activities, and Archives - Underlying Constructs
See also:
◆
◆
◆
◆
◆
◆
“Packet-Filtering Rules Configuration File (netguard.conf)” on page II-43
“Passport One - Underlying Constructs” on page II-201
“Default Log Files for Activity Types” on page II-346
“Central Management” on page I-103
“SmartProxies - Underlying Constructs” on page III-9
“SOCKS - Underlying Constructs” on page II-219
Audit Command (auditlogd)
14
Use this command to enable the a u d i t l o g d daemon to read the a l e rt . c o n f and
trace.conf configuration files and monitor firewall events and activities. A SIGHUP signal causes auditlogd to reread its configuration files.
If auditlogd finds an error in a configuration file, it will write an error message to
/etc/security/cyber/auditlogd.stderr and continue to use the old configuration. All
other error messages are written to the .stderror file.
Syntax:
/usr/sbin/cyber/auditlogd [-n] [-N] [-A] [-T] [-S facility .level] [-i seconds]
Options and arguments:
-n
Print Internet addresses numerically rather than symbolically, thus avoiding name
server lookups.
-N
Print ports, protocols, and ICMP types numerically rather than symbolically. For
example, the report would display port 21 instead of ftp, protocol 6 instead of tcp,
and icmp type 8:0 instead of ECHO.
-A
Invoke the alerts monitor to read the /etc/security/cyber/alert.conf file and
perform the specified actions.
-T
Invoke the activities monitor to read the /etc/security/cyber/trace.conf file and
write the specified records to a file.
-S facility .level
Invoke the activities monitor to read the /etc/security/cyber/trace.conf file and
write the specified records to syslogd(1M). See the syslog.conf(4) system manual page for a description of facilities and levels.
-i seconds
If no new audit records have been appended to the current audit file for a time
period of seconds, this option will cause auditlogd to force the kernel’s audit
buffers to be written to the audit file. The default is 5 minutes (300 seconds).
II-368
Chapter 14, Alerts, Activities, and Archives
Alerts, Activities, and Archives - Underlying Constructs
Notes:
◆
◆
When auditlogd is started with both the -T and -S options, activity records
are sent to the specified files and to and syslogd(1M).
After a reboot, auditlogd is automatically started in the
/etc/rc2.d/S03auditlogd script. Before a reboot, auditlogd is automatically stopped in the /etc/rc0.d/K01auditlogd script.
CyberGuard Firewall Manual
II-369
Alerts, Activities, and Archives - Underlying Constructs
II-370
Chapter 14, Alerts, Activities, and Archives
Copyright and Trademark Attributions
3
3
CyberGuard Corporation Copyright
14
Copyright 2003 by CyberGuard Corporation. All rights reserved. This publication or any
part thereof may not be reproduced for any reason in any form without the written permission of the publisher.
This publication or any part thereof is intended solely for use with CyberGuard Corporation products by CyberGuard Corporation personnel, customers, and end users.
The information contained in this document is believed to be correct at the time of publication. It is subject to change without notice. CyberGuard Corporation makes no warranties, express or implied, concerning the information contained in this document.
To report an error or comment on a specific portion of the manual, photocopy the page in
question and mark the correction or comment on the copy. Mail the photocopied page
(and any additional comments) to CyberGuard Corporation, 2000 West Commercial Boulevard, Suite 200, Fort Lauderdale, FL 33309. Mark the envelope "Attention: Publications Department."
Copyrights, Trademarks, and Registered Trademarks
14
This product includes software developed by the University of California, Lawrence Berkeley Laboratory and its contributors. The following products are copyrights, trademarks
or registered trademarks of their respective companies or organizations. All other copyrights, trademarks, or registered trademarks are the property of their respective owners.
◆
◆
ACE/Server and SecurID are registered trademarks of RSA Security, Inc.
Adaptec, ANA, Quartet, and Quartet64 are trademarks of Adaptec, Inc., which
may be registered in some jurisdictions.
Attributions-1
Copyrights, Trademarks, and Registered Trademarks
◆
◆
CellView is a trademark and Interphase Corporation is a registered trademark
of Interphase Corporation.
◆
CyberGuard is a registered trademark of CyberGuard Corporation.
◆
Ethernet is a registered trademark of Xerox Corporation.
◆
Gopher is a trademark of the University of Minnesota.
◆
◆
◆
◆
◆
Java, HotJava, JavaScript, the Java Coffee Cup Logo, JavaWorld, and all Javabased trademarks and logos, the Duke Logo, Solaris, Netra, Ultra, NFS, and
The Network Is The Computer are trademarks or registered trademarks of Sun
Microsystems, Inc. in the United States and other countries.
KnightStar is a trademark of CyberGuard Corporation.
Netscape, Netscape Navigator, Netscape ONE, and the Netscape N and Ship's
Wheel logos are registered trademarks of Netscape Communications Corporation in the United States and other countries.
Microsoft, Windows, Windows 95, Windows 98, Windows NT, ActiveX,
VBScript, and Internet Explorer are either trademarks or registered trademarks
of Microsoft Corporation.
Notes is a trademark and Lotus and Lotus Notes are registered trademarks of
Lotus Development Corporation.
◆
Olicom is a registered trademark of Olicom.
◆
OSF/Motif is a trademark of Open Software Foundation, Inc.
◆
Pentium is a registered trademark of Intel Corporation.
◆
RADIUS is a trademark of Lucent Technologies.
◆
RealAudio is a trademark of Progressive Networks, Inc.
◆
◆
◆
SCO, Tarantella, the Tarantella logo and The Santa Cruz Operation are trademarks or registered trademarks of The Santa Cruz Operation, Inc. in the USA
and other countries.
SecureNet Key and AXENT are trademarks of AXENT Technologies, Inc.
Secure Shell is a trademark and SSH is a registered trademark of SSH Communications Security. Copyright (C) 1997-2001.
◆
SmartFilter is a trademark of Secure Computing Corporation.
◆
SmartProxies is a trademark of CyberGuard Corporation.
◆
SSH is a registered trademark of SSH Communications Security Corp
◆
◆
Attributions-2
CAST was developed by Carlisle Adams and Steve Tavares and is owned by
Entrust Technologies of Canada.
Unisys is a registered trademark, and Aquanta is a trademark of Unisys Corporation.
UNIX is a registered trademark of The Open Group in the US and other countries.
Copyright and Trademark Attributions
CAST-128 Encryption Algorithm Copyright
◆
◆
◆
◆
◆
◆
UnixWare is a registered trademark of Caldera International, Inc.
VeriSign is a trademark of VeriSign, Inc. Digital ID and Digital ID Center are
service marks of VeriSign, Inc.
Websense Enterprise is a registered trademark of Websense, Inc.
WebTrends, WebTrends for Firewalls and VPNs, and FastTrends are trademarks of WebTrends Corporation.
X Window System and X are trademarks of The Open Group.
ZNYX, NetBlaster, and ZNYX products referenced herein are trademarks or
registered trademarks of ZNYX Corporation in the U.S. and/or other countries.
CAST-128 Encryption Algorithm Copyright
14
Implementation of the CAST-128 cipher as described in “Constructing Symmetric Ciphers
Using the CAST Design Procedure” by Carlisle Adams. Nortel, under whose aegis the
CAST-128 algorithm was developed, have allowed free use of the algorithm for any purpose. This implementation of CAST-128 is copyright 1996 Peter Gutmann, and may be
used freely for any purpose provided you don't claim you wrote it.
DES Encryption Algorithms Copyright
14
Copyright (C) 1995-1997 Eric Young ([email protected]) All rights reserved.
This package is an SSL implementation written by Eric Young ([email protected]). The
implementation was written so as to conform with Netscape’s SSL.
This library is free for commercial and non-commercial use as long as the following conditions are adhered to. The following conditions apply to all code found in this distribution, be it the RC4, RSA, lhash, DES, etc., code; not just the SSL code. The SSL documentation included with this distribution is covered by the same copyright terms except
that the holder is Tim Hudson ([email protected]).
Copyright remains Eric Young's, and as such any Copyright notices in the code are not to
be removed. If this package is used in a product, Eric Young should be given attribution as
the author of the parts of the library used. This can be in the form of a textual message at
program startup or in documentation (online or textual) provided with the package.
Redistribution and use in source and binary forms, with or without modification, are permitted provided that the following conditions are met:
CyberGuard Firewall Manual
Attributions-3
Expect Copyright Notice
1. Redistributions of source code must retain the copyright notice, this list of conditions
and the following disclaimer.
2. Redistributions in binary form must reproduce the above copyright notice, this list of
conditions and the following disclaimer in the documentation and/or other materials
provided with the distribution.
3. All advertising materials mentioning features or use of this software must display the
following acknowledgment:
“This product includes cryptographic software written by Eric Young ([email protected])”
The word 'cryptographic' can be left out if the routines from the library being used are
not cryptographic related :-).
4. If you include any Windows specific code (or a derivative thereof) from the apps
directory (application code) you must include an acknowledgment: “This product
includes software written by Tim Hudson ([email protected])”
THIS SOFTWARE IS PROVIDED BY ERIC YOUNG ``AS IS'' AND ANY EXPRESS
OR IMPLIED WARRANTIES, INCLUDING, BUT NOT LIMITED TO, THE IMPLIED
WARRANTIES OF MERCHANTABILITY AND FITNESS FOR A PARTICULAR
PURPOSE ARE DISCLAIMED. IN NO EVENT SHALL THE AUTHOR OR CONTRIBUTORS BE LIABLE FOR ANY DIRECT, INDIRECT, INCIDENTAL, SPECIAL,
EXEMPLARY, OR CONSEQUENTIAL DAMAGES (INCLUDING, BUT NOT LIMITED TO, PROCUREMENT OF SUBSTITUTE GOODS OR SERVICES; LOSS OF
USE, DATA, OR PROFITS; OR BUSINESS INTERRUPTION) HOWEVER CAUSED
AND ON ANY THEORY OF LIABILITY, WHETHER IN CONTRACT, STRICT LIABILITY, OR TORT (INCLUDING NEGLIGENCE OR OTHERWISE) ARISING IN
ANY WAY OUT OF THE USE OF THIS SOFTWARE, EVEN IF ADVISED OF THE
POSSIBILITY OF SUCH DAMAGE.
The licence and distribution terms for any publicly available version or derivative of this
code cannot be changed. i.e. this code cannot simply be copied and put under another distribution licence [including the GNU Public Licence.]
Expect Copyright Notice
14
Written by: Don Libes, [email protected], NIST, 12/3/90
Design and implementation of this program was paid for by U.S. tax dollars. Therefore it
is public domain. However, the author and NIST would appreciate credit if this program
or parts of it are used.
Attributions-4
Copyright and Trademark Attributions
Lightweight Directory Access Protocol (LDAP) Copyright
Lightweight Directory Access Protocol (LDAP) Copyright
14
Copyright (c) 1990 Regents of the University of Michigan. All rights reserved.
Redistribution and use in source and binary forms are permitted provided that this notice
is preserved and that due credit is given to the University of Michigan at Ann Arbor. The
name of the University may not be used to endorse or promote products derived from this
software without specific prior written permission. This software is provided ``as is'' without express or implied warranty.
OpenSSL Copyright
14
Copyright (c) 1998-1999 The OpenSSL Project. All rights reserved.
Redistribution and use in source and binary forms, with or without modification, are permitted provided that the following conditions are met:
1. Redistributions of source code must retain the above copyright notice, this list of conditions and the following disclaimer.
2. Redistributions in binary form must reproduce the above copyright notice, this list of
conditions and the following disclaimer in the documentation and/or other materials provided with the distribution.
3. All advertising materials mentioning features or use of this software must display the
following acknowledgment:
"This product includes software developed by the OpenSSL Project for use in the
OpenSSL Toolkit. (http://www.openssl.org/)"
4. The names "OpenSSL Toolkit" and "OpenSSL Project" must not be used to endorse or
promote products derived from this software without prior written permission. For written
permission, please contact [email protected].
5. Products derived from this software may not be called "OpenSSL" nor may "OpenSSL"
appear in their names without prior written permission of the OpenSSL Project.
6. Redistributions of any form whatsoever must retain the following acknowledgment:
"This product includes software developed by the OpenSSL Project for use in the
OpenSSL Toolkit (http://www.openssl.org/)"
THIS SOFTWARE IS PROVIDED BY THE OpenSSL PROJECT ``AS IS'' AND ANY
EXPRESSED OR IMPLIED WARRANTIES, INCLUDING, BUT NOT LIMITED TO,
THE IMPLIED WARRANTIES OF MERCHANTABILITY AND FITNESS FOR A
PARTICULAR PURPOSE ARE DISCLAIMED. IN NO EVENT SHALL THE OpenSSL
PROJECT OR ITS CONTRIBUTORS BE LIABLE FOR ANY DIRECT, INDIRECT,
INCIDENTAL, SPECIAL, EXEMPLARY, OR CONSEQUENTIAL DAMAGES
CyberGuard Firewall Manual
Attributions-5
OpenSSL Copyright
(INCLUDING, BUT NOT LIMITED TO, PROCUREMENT OF SUBSTITUTE GOODS
OR SERVICES; LOSS OF USE, DATA, OR PROFITS; OR BUSINESS INTERRUPTION) HOWEVER CAUSED AND ON ANY THEORY OF LIABILITY, WHETHER
IN
CONTRACT, STRICT LIABILITY, OR TORT (INCLUDING NEGLIGENCE OR OTHERWISE) ARISING IN ANY WAY OUT OF THE USE OF THIS SOFTWARE, EVEN
IF ADVISED OF THE POSSIBILITY OF SUCH DAMAGE.
This product includes cryptographic software written by Eric Young ([email protected]). This product includes software written by Tim Hudson ([email protected]).
Original SSLeay License
Copyright (C) 1995-1998 Eric Young ([email protected])
All rights reserved.
This package is an SSL implementation written by Eric Young ([email protected]). The
implementation was written so as to conform with Netscapes SSL.
This library is free for commercial and non-commercial use as long as the following conditions are aheared to. The following conditions apply to all code found in this distribution, be it the RC4, RSA, lhash, DES, etc., code; not just the SSL code. The SSL documentation included with this distribution is covered by the same copyright terms except
that the holder is Tim Hudson ([email protected]).
Copyright remains Eric Young's, and as such any Copyright notices in the code are not to
be removed.
If this package is used in a product, Eric Young should be given attribution as the author of
the parts of the library used. This can be in the form of a textual message at program startup or in documentation (online or textual) provided with the package.
Redistribution and use in source and binary forms, with or without modification, are permitted provided that the following conditions are met:
1. Redistributions of source code must retain the copyright notice, this list of conditions
and the following disclaimer.
2. Redistributions in binary form must reproduce the above copyright notice, this list of
conditions and the following disclaimer in the documentation and/or other materials provided with the distribution.
3. All advertising materials mentioning features or use of this software must display the
following acknowledgment:
"This product includes cryptographic software written by Eric Young ([email protected])"
The word 'cryptographic' can be left out if the routines from the library being used are not
cryptographic related :-).
4. If you include any Windows specific code (or a derivative thereof) from the apps directory (application code) you must include an acknowledgment:
"This product includes software written by Tim Hudson ([email protected])"
Attributions-6
Copyright and Trademark Attributions
SOCKS Copyright
THIS SOFTWARE IS PROVIDED BY ERIC YOUNG ``AS IS'' AND ANY EXPRESS
OR IMPLIED WARRANTIES, INCLUDING, BUT NOT LIMITED TO, THE IMPLIED
WARRANTIES OF MERCHANTABILITY AND FITNESS FOR A PARTICULAR
PURPOSE ARE DISCLAIMED. IN NO EVENT SHALL THE AUTHOR OR CONTRIBUTORS BE LIABLE FOR ANY DIRECT, INDIRECT, INCIDENTAL, SPECIAL,
EXEMPLARY, OR CONSEQUENTIAL DAMAGES (INCLUDING, BUT NOT LIMITED TO, PROCUREMENT OF SUBSTITUTE GOODS OR SERVICES; LOSS OF
USE, DATA, OR PROFITS; OR BUSINESS INTERRUPTION) HOWEVER CAUSED
AND ON ANY THEORY OF LIABILITY, WHETHER IN CONTRACT, STRICT LIABILITY, OR TORT (INCLUDING NEGLIGENCE OR OTHERWISE) ARISING IN
ANY WAY OUT OF THE USE OF THIS SOFTWARE, EVEN IF ADVISED OF THE
POSSIBILITY OF SUCH DAMAGE.
The licence and distribution terms for any publicly available version or derivative of this
code cannot be changed. i.e. this code cannot simply be copied and put under another distribution licence [including the GNU Public Licence.]
SOCKS Copyright
14
Copyright (c) 1989 Regents of the University of California. All rights reserved.
Redistribution and use in source and binary forms, with or without modification, are permitted provided that the following conditions are met:
1. Redistributions of source code must retain the above copyright notice, this list of conditions and the following disclaimer.
2. Redistributions in binary form must reproduce the above copyright notice, this list of
conditions and the following disclaimer in the documentation and/or other materials
provided with the distribution.
3. All advertising materials mentioning features or use of this software must display the
following acknowledgment:
This product includes software developed by the University of California, Berkeley
and its contributors.
4. Neither the name of the University nor the names of its contributors may be used to
endorse or promote products derived from this software without specific prior written
permission.”
THIS SOFTWARE IS PROVIDED BY THE REGENTS AND CONTRIBUTORS “AS
IS” AND ANY EXPRESS OR IMPLIED WARRANTIES, INCLUDING, BUT NOT
LIMITED TO, THE IMPLIED WARRANTIES OF MERCHANTABILITY AND FITNESS FOR A PARTICULAR PURPOSE ARE DISCLAIMED. IN NO EVENT SHALL
THE REGENTS OR CONTRIBUTORS BE LIABLE FOR ANY DIRECT, INDIRECT,
INCIDENTAL, SPECIAL, EXEMPLARY, OR CONSEQUENTIAL DAMAGES
(INCLUDING, BUT NOT LIMITED TO, PROCUREMENT OF SUBSTITUTE GOODS
OR SERVICES; LOSS OF USE, DATA, OR PROFITS; OR BUSINESS INTERRUPTION) HOWEVER CAUSED AND ON ANY THEORY OF LIABILITY, WHETHER
IN CONTRACT, STRICT LIABILITY, OR TORT (INCLUDING NEGLIGENCE OR
CyberGuard Firewall Manual
Attributions-7
SSH Copyright
OTHERWISE) ARISING IN ANY WAY OUT OF THE USE OF THIS SOFTWARE,
EVEN IF ADVISED OF THE POSSIBILITY OF SUCH DAMAGE.
Portions Copyright (c) 1993, 1994, 1995, 1996 by NEC Systems Laboratory.
Permission to use, copy, modify, and distribute this software for any purpose with or without fee is hereby granted, provided that the above copyright notice and this permission
notice appear in all copies, and that the name of NEC Systems Laboratory not be used in
advertising or publicity pertaining to distribution of the document or software without specific, written prior permission.
THE SOFTWARE IS PROVIDED “AS IS” AND NEC SYSTEMS LABORATORY DISCLAIMS ALL WARRANTIES WITH REGARD TO THIS SOFTWARE, INCLUDING
ALL IMPLIED WARRANTIES OF MERCHANTABILITY AND FITNESS. IN NO
EVENT SHALL NEC SYSTEMS LABORATORY BE LIABLE FOR ANY SPECIAL,
DIRECT, INDIRECT, OR CONSEQUENTIAL DAMAGES OR ANY DAMAGES
WHATSOEVER RESULTING FROM LOSS OF USE, DATA OR PROFITS,
WHETHER IN AN ACTION OF CONTRACT, NEGLIGENCE OR OTHER TORTIOUS
ACTION, ARISING OUT OF OR IN CONNECTION WITH THE USE OR PERFORMANCE OF THIS SOFTWARE.
SSH Copyright
14
© 2000 SSH Communications Security Corporation. All rights reserved. SSH® is a registered U.S. Trademark of SSH Communications Security Corporation. The SSH logo,
IPSEC Express and Making the Internet Secure are trademarks of SSH Communications
Security Corporation and may be registered in certain jurisdictions. All other names and
marks are property of their respective owners.
Table Widget Copyright
14
The Table widget is a 1990, 1991, and 1992 copyright of David E. Smyth with the following warning: “Permission to use, copy, modify, and distribute this software and its documentation for any purpose without fee is granted, provided that the above copyright notice
appear in all copies and that both copyright notice and this permission notice appear in
supporting documentation, and that the name of David E. Smyth not be used in advertising
or publicly pertaining to distribution of the software without specific written prior permission.”
Attributions-8
Copyright and Trademark Attributions
XFree86 Copyright
XFree86 Copyright
14
Copyright (C) 1998 The Open Group
Permission is hereby granted, free of charge, to any person obtaining a copy of this software and associated documentation files (the Software), to use the Software without
restriction, including, without limitation, the rights to copy, modify, merge, publish, distribute and sublicense the Software, to make, have made, license and distribute derivative
works thereof, and to permit persons to whom the Software is furnished to do so, subject
to the following conditions:
The above copyright notice and the following permission notice shall be included in all
copies of the Software:
THE SOFTWARE IS PROVIDED AS IS, WITHOUT WARRANTY OF ANY KIND,
EXPRESS OR IMPLIED, INCLUDING, BUT NOT LIMITED TO, THE WARRANTIES
OF MERCHANTABILITY, FITNESS FOR A PARTICULAR PURPOSE AND NONINFRINGEMENT. IN NO EVENT SHALL THE OPEN GROUP BE LIABLE FOR
ANY CLAIM, DAMAGES OR OTHER USEABILITIY, WHETHER IN AN ACTION
OF CONTRACT, TORT OR OTHERWISE, ARISING FROM, OUT OF, OR IN
CONNNECTION WITH THE SOFTWARE OR THE USE OF OTHER DEALINGS IN
THE SOFTWARE.
Except as contained in this notice, the name of The Open Group shall not be used in advertising or otherwise to promote the use or other dealings in this Software without prior written authorization from The Open Group.
X Window System is a trademark of The Open Group.
CyberGuard Firewall Manual
Attributions-9
XFree86 Copyright
Attributions-10
Copyright and Trademark Attributions
Glossary
This glossary defines the terms used in the CyberGuard Firewall system and this documentation.
activity
Non-threatening occurrence potentially logged to a file. For example:
◆
◆
◆
Packets permitted
All login attempts
Specific proxy’s activity
See also “Activity Types” on page II-344.
alert
Automatic system reaction that reports a suspicious event. Can do any of the following:
◆
Writes the event record to an X window and system log file specified in the
/etc/ syslog.conf file
◆
Logs the event record to a secure file
◆
Mails the event record to an existing user at a given mail level
◆
Sends a numeric message to a pager telephone number
◆
◆
Sends an enterprise-specific SNMP trap to a specified SNMP host address and
community
Executes a secure program or script
application-level proxy
(Also referred to as a “dedicated proxy server”) proxy that serves a single protocol. See
circuit-level proxy.
auditable event
Representation of a single action (system call or network request) that may affect the security of the system. See network event and system event.
Glossary-1
Glossary
Authentication Header (AH)
An upper level header located between the IP header and the payload within an IP packet.
Typically, an AH includes an integrity check value of the transfer-independent contents of
the IP packet. An AH is used to ensure the integrity of the IP packet, both the payload and
the IP header. It does not provide data confidentiality. The AH transformation is defined in
RFC 2402.
authoritative
bastion host
broadcast packet
Blowfish
CAST-128
certificate
Name server that contains the most correct information about a domain or data received
from an authoritative name server.
Computer system that is hardened against attacks from outsiders.
Packet that can be transmitted and read by all hosts on a system. It usually has a host
address of 0 or 255.
A symmetric block cipher. Blowfish uses a block size of 64 bits and a key length of 32 to
448 bits.
A symmetric block cipher with a block size of 64 bits and a key length of up to 128 bits.
CAST-128 is believed to be very strong. See RFC 2144 for more information.
A digital document which is used for verifying the identity of the other end of the transmission. Any type of address including domain name, IP, and e-mail addresses can be
authenticated using certificates.
Certification Authority (CA)
An entity that issues digital certificates (especially X.509 certificates) and vouches for the
binding between the data items in a certificate.
Certificate users (end entities) depend on the validity of information provided by a certificate. Thus, a CA should be someone that the end entities trust, and usually holds an official position created and granted power by a government, a corporation, or some other
organization. A CA is responsible for managing the life cycle of certificates and, depending on the type of certificate and the CPS that applies, may be responsible for the life cycle
of key pairs associated with the certificates.
certificate chain
Certificate Request
Glossary-2
Ordered list of certificates in which the first is self-signed and the succeeding certificates
were issued by their predecessors.
A PKCS10 message containing a subject’s name and public key that are submitted to an
RA or a CA for signing. Also called a Certificate Signing Request (CSR).
CyberGuard Firewall Manual
Glossary
Certificate Revocation List (CRL)
A time-stamped list, signed by a CA, identifying revoked certificates and made freely
available in a public repository.
Certificate Signing Request (CSR)
Collection of information that a CA can turn into a certificate.
circuit-level proxy
Class D address
(Also referred to as a “generic proxy server”) proxy that serves multiple protocols. See
application-level proxy.
A multicast group is identified by a Class D address. Class D addresses range from
224.0.0.0 to 239.255.255.255.
classless network IP address
A network IP address in which the network mask does not stop on an eight-bit boundary;
its sub-network mask is not one of 8, 16, or 24 (expressed in bit-count format) or
255.0.0.0, 255.255.0.0, or 255.255.255.0 (expressed in dotted-quad format). The typical
dotted-quad form of a classless IP address includes one octet that represents part of the
network mask and all or part of the host bits.
classification level
community
daylight savings time
Comma-separated string starting with the name or number of a hierarchical classification
level optionally followed by a list of non-hierarchical category names and/or numbers.
There can be no blank space (blanks, tabs, etc.) in this list. Only numbers, letters, underscore, and commas are permitted.
Group of one or more management stations associated with an SNMP agent.
Alternate time observed in many time zones that permits daytime activities during daylight
hours. See also standard time.
Data Encryption Standard (DES)
DES is a U.S. Federal Information Processing Standard (FIPS) that defines the Data
Encryption Algorithm (DEA). The term DES is also commonly used when referring to the
algorithm.
The algorithm itself is a symmetric block cipher with a block size of 64 bits and a key
length of 64 bits (of which 8 are parity bits). The controversy surrounding DES key length
and design issues has developed many variants of the original algorithm. 3DES (also
known as triple DES or TDEA) is the most accepted. DEA and TDEA are defined in FIPS
PUB 46-3.
Diffie-Hellman key exchange
A method for key exchange between two parties. This method can be used to generate an
unbiased secret key over an insecure medium.
CyberGuard Firewall Manual
Glossary-3
Glossary
digital signature
By encrypting a digest of a message with the private key, authentication can later be performed by applying the public key to an encrypted digest (digital signature) and comparing the result to the digest of the message.
Distinguished Encoding Rules (DER)
An ASN.1 “tag, length, value” encoding system used to encode certificates and private
keys. Files that are DER encoded cannot be read by a text editor.
DNS
Domain Name System
domain
See Domain Name System.
Distributed database system that establishes one or more name servers to maintain equivalency maps between IP addresses and names.
Subtree in the name space hierarchy. The edu domain, for example, is the set of all names
ending in edu or all names that match:
◆
◆
◆
*.edu
*.*.edu
*.*.*.edu
See also zone.
dotted-quad address
IP address that consists of four non-negative integers, called octets, separated by periods.
(Left octets make up the network address. Right octets make up the host address.) It is
normally in decimal format but can be in hexadecimal or octal format. You can even mix
formats within a given address. For example, the following addresses are all identical:
127.95.16.12
0x7f.0137.16.0xc
0177.0x5F.0x10.014
dynamic NAT
dynamic routing
Glossary-4
Form of Network Address Translation. For outbound traffic, the source address from the
internal IP address is translated to the registered, external IP address, dynamically allocating a port number. For replying inbound traffic, the destination address from the external
IP address is translated to the correct internal IP address. See static NAT.
Convenient but not very secure routing mechanism where routers know primary and alternate routes. It supports the Routing Information Protocol. See static routing.
CyberGuard Firewall Manual
Glossary
Encapsulating Security Payload (ESP)
An upper level IP header that denotes that the contents of the payload are encrypted and
possibly also otherwise protected. An ESP may appear after the IP header, after an ESP
header or theoretically also elsewhere within an IP packet. An ESP only protects the contents of the payload, not any associated header. Therefore it is possible, for example, to
change any field in the header of the IP packet carrying an ESP without causing a security
violation. The contents of the ESP header are unknown to anyone not possessing information about the transformation and SA needed to recover the protected data. An ESP may
also contain integrity protection. The ESP protocol is defined in RFC 2406.
enhanced pass-through
The Enhanced Pass-Through proxy is not a proxy for a particular service; instead, it listens
for connections from external clients on a specified port, connects the client with the leastbusy internal server associated with that port, and passes data between the client and
server.
event
event class
external interface
See auditable event and suspicious event.
Name (alias) for a collection of auditable events.
Name of the external network-interface port and its attributes: an external IP address, subnetwork mask, and host name.
See internal interface and bastion host.
firewall
forwarder
FSM
FSO
FTP
Computer system that is intended to provide security protection and selected isolation
between two networks.
Name server that handles all off-site queries generated at a site, saving time and money;
required if the site is not directly connected to the Internet.
Firewall Security Monitor role. Privileged user who can monitor but not change the
CyberGuard Firewall in read-only mode.
Firewall Security Officer role. Privileged user who can run all commands associated with
administrative roles (auditor, site security officer, network administrator, security operator,
and operator) and firewall-related commands installed on the system. This user is cleared
to the SYS_PRIVATE and NETWORK security levels.
File Transfer Protocol. An application that transfers files between systems.
CyberGuard Firewall Manual
Glossary-5
Glossary
full name
gateway
Gopher
group
H.225
H.245
H.323
In the context of user information for the firewall database, this is the user’s full name or
job function possibly followed by a comma and telephone number. Only letters, numbers,
spaces, and punctuation marks (except colon) are permitted.
Directly connected host.
Protocol that includes the gopher program that permits file searches and retrievals on
other systems.
Named set of IP addresses, host names, network names, network interfaces, and other
group names. It can be used as shorthand notation in packet-filtering rules sources and
destinations.
An International Telecommunication Union (ITU) that defines a layer that formats the
transmitted audio, video, data, and control streams from the network.
An International Telecommunication Union (ITU) that is used to exchange signaling
information between H.323 endpoints.
An International Telecommunication Union (ITU) standard that specifies how multimedia
terminals, equipment, and services communicate over networks that do not provide a
guaranteed quality of service (such as the Internet). H.323 allows users to participate in
the same video conference even if they are using different videoconferencing applications.
The H.323 session normally consists of the H.225 TCP connection, the H.245 TCP connection, the auxiliary connections such as T.120, and the RTP/RTCP UDP streams carrying audio/video data.
Hash Message Authentication Code (HMAC)
A secret-key authentication algorithm. Data integrity and data origin authentication as
provided by HMAC depend on the scope of the distribution of the secret key. If only the
source and destination know the HMAC key, this provides both data origin authentication
and data integrity for packets sent between the two parties. If the HMAC is correct, this
proves that it must have been added by the source.
home directory
Glossary-6
Directory where the user is positioned immediately after logging in. It must be on a writable file system and must not already exist when the user is added. It is strongly recommended that all home directories be under /home (the default) or /home2. Home directories will not be allowed in the root directory, e.g., /joe, /tmp, nor allowed to be under any
directories reserved for system files, i.e., /dev, /etc, /export, /instal/, /sbin, and
/system. Note that the cgadmin home directory is in /var, although this directory is normally reserved for system files.
CyberGuard Firewall Manual
Glossary
hops
host address
host name
HTTP
HTTPS
ID number
Number of nodes a router must pass through to reach a destination host or network. The
system uses this value to choose the most efficient route. This also is known as the path
length. Values include:
1
Direct communications link or both source and destination have connections on the
same local area network
2
Packets routed through one intermediary host before reading the destination
n
Packets routed through n-1 intermediary hosts before reading the destination
Right-most octet(s) of a dotted-quad address. Class D and Class E addresses, where the
first octet is between 224 and 254, inclusive, cannot be used for host addresses.
Name or alias for a system. A list appears in /etc/inet/hosts and in the Host Names window.
Hypertext Transfer Protocol. A protocol that enables communication between World Wide
Web browsers and servers.
Secure HTTP. Security is enforced through the use of SSL.
Unique integer between 100 and 50000, inclusive. The system uses it to associate files
with a user’s login ID. The default is the first available user ID greater than 100.
The following values categorize users:
interface spoofing
internal interface
1-99
admin. Usually reserved for daemons.
100-50000
user. Has no innate privileges.
Suspicious event that occurs each time one of the interfaces receives a packet that should
not have appeared on that interface. For example, if a packet received on an external interface has a source address of an internal-network machine, an IP spoofing attempt occurred
and is logged.
Name of the internal network-interface port and its attributes: an internal IP address, subnet mask, and host name. (See also external interface and bastion host.)
Internet Key Exchange (IKE)
The key-establishment protocol used with IPSec. IKE was formerly called the
ISAKMP/Oakley key exchange. The IKE protocol is defined in RFC 2409, RFC 2408,
and RFC 2407.
CyberGuard Firewall Manual
Glossary-7
Glossary
Internet Protocol Security (IPSec)
A protocol suite for protecting IP traffic at packet level defined by the Internet Engineering Task Force (IETF). IPSec can be used for protecting the data transmitted by any service or application that is based on IP. The IPSec protocols are defined in RFC 2401.
IP
IP address
IP payload
ISP
level
license key
Internet Protocol. Often called the “building block of the Internet,” IP serves as a base for
a number of different protocols, defines the basic unit of transmission across the Internet,
defines the Internet addressing scheme, and much more.
Internet Protocol address assigned to a computer according to its Internet network. The
address is a 32-bit number grouped into four sets of eight bits (octets); each octet is converted into a decimal number and separated by a dot. For example, 192.168.3.2. See dotted-quad address.
The part of the IP packet that carries upper level application data.
Internet Service Provider. External host that connects the firewall to the Internet.
See security level.
Software mechanism provided by CyberGuard Customer Assistance Center that permits
access to optional features and products related to the CyberGuard Firewall.
Lightweight Directory Access Protocol (LDAP)
A protocol developed by the University of Michigan that allows clients to retrieve information about people and objects in the network. CAs can place certificates and CRLs on
LDAP directories so that users can retrieve them.
login ID
login shell
MTU
Glossary-8
Name that the user enters to login to the system. The system uses it to uniquely identify
the user and the user’s files. Only lowercase letters and numbers are permitted. The login
ID must begin with a letter. The maximum length is eight characters.
Name of the user's login shell. Usually this is / u s r / b i n / s h , / u s r / b i n / c s h , or
/usr/bin/ksh. Only numbers, letters, underscore, slash, and comma are permitted. The
default is /usr/bin/sh.
Maximum Transmission Unit. The largest physical packet size, measured in bytes, that
a network can transmit. Any messages larger than the MTU are divided into smaller packets (fragmented) before being sent, which slows down transmission speeds.
CyberGuard Firewall Manual
Glossary
name server
NAT
See Domain Name System.
See Network Address Translation.
network address
Left-most octet(s) of a dotted-quad address. Class A network addresses consist of one
octet, Class B two octets, and Class C three octets. Normally in decimal format, each octet
can be in hexadecimal or octal format. You can even mix formats within a given address.
Omitted octets are interpreted as 0s. See also sub-network mask.
Network Address Translation
Feature that allows a firewall to hide a company's internal network from the outside while
allowing network services to be routed through the firewall. See dynamic NAT and static
NAT.
network event
Type of auditable event. Representation of a network request that may affect the security
of the system. See system event.
Network Information Center
Provider of registered external IP addresses.
Network Interface Card
A network interface card (NIC) is a computer circuit board or card that is installed in a
computer so that it can be connected to a network. Network interface cards provide a dedicated, full-time connection to a network.
network service
Operation that occurs between hosts. For example:
◆
◆
◆
NIC
Telnet
FTP
SNMP
See Network Information Center and Network Interface Card.
NNTP
node name
non-privileged host
Network News Transfer Protocol. A protocol that is used to transfer news across the Internet.
Name a communications network calls a system.
Hosts attached to an external interface.
CyberGuard Firewall Manual
Glossary-9
Glossary
notebook
Related tabbed displays called pages that are viewed individually.
Online Certificate Status Protocol (OCSP)
A protocol defined in RFC2560 and used by applications to query OCSP responders in
order to find out if a certificate is valid.
octet
Number that represents the unsigned value of an 8-bit byte. The decimal number 255 represents the maximum value of an unsigned 8-bit byte. See dotted-quad address.
packet-filtering gateway
Computer system with two network interfaces that allows specific network services to be
routed through and others to be blocked based on a set of administrator-defined rules.
packet-filtering rule
Site-defined criterion that determines whether particular packets can pass through the firewall. A rule is based on:
◆
◆
◆
◆
password
A network service and protocol
A proxy
One or more rule options
The IP addresses and the service port numbers for the connected originating
host and destination host
Next security hurdle after the login ID. Passwords can be system-generated; the proposed
password is made up of two syllables and two digits. Syllables can be two or three characters long; syllables and digits can appear in any order. The intent is to provide a sufficiently large password-space to discourage guessing while providing quasi-pronounceable
passwords as an aid to memory.
Perfect Forward Secrecy (PFS)
Refers to the notion that any single key being compromised will permit access to only data
protected by that single key. In order for PFS to exist, the key used to protect transmission
of data must not be used to derive any additional keys. If the key used to protect transmission of data was derived from some other keying material, that material must not be used
to derive any more keys.
PKCS7
PKCS10
PKCS12
Glossary-10
A message syntax for sending encrypted and/or digitally signed messages.
A message syntax for certificate requests.
A portable format for storing and transporting private keys and certificates.
CyberGuard Firewall Manual
Glossary
PMTU
primary name server
Packet Maximum Transmission Unit. See MTU.
Name server that reads information from files. See secondary name server.
Privacy Enhanced Mail (PEM)
A type of encoding for certificates, private keys, and digital signatures. Files that are PEM
encoded can be read by a text editor.
private key
proxy
In public-key cryptography the private key is only known to the holder, and it can be used
to sign and decrypt messages.
Network service that is executed on the firewall on behalf of the corresponding service on
a local machine. A proxy service is used so that a more secure network service can communicate with another host. For example, instead of using the service that resides on your
local machine to communicate with an external host, you can configure the firewall so that
internal machines use the service that resides on the firewall. Because the service is performed at the firewall, performance is reduced, but security is enhanced.
See also Telnet, Rlogin, SMTP, and FTP.
range
Pair of security levels where the upper bound must dominate the lower bound. For example:
◆
◆
read-only mode
RealAudio
recursive query
SYS_PUBLIC — NETWORK
SYS_PUBLIC — SYS_PRIVATE
Firewall state that permits an FSM user to monitor but not change the CyberGuard
Firewall.
The RealAudioTM client-server application allows for the delivery of streaming audio on
the Internet. It allows a user (client) with a RealAudio player to hear audio clips and realtime (including live) audio broadcasts from Internet sites that are running a RealAudio
server.
Requests to a name server to follow through with resolving referrals to other name servers
and reply with the final answer, rather than passing a referral back to the requester of a
recursive query. If the correct answer cannot be resolved, an error is returned.
CyberGuard Firewall Manual
Glossary-11
Glossary
registered domain name
Externally visible name for a firewall that is registered with the Network Information Center. It has the following types:
◆
◆
remote administration
RIP
Rlogin
root name server
Fully qualified domain has the firewall host name as the node name, and the
rest as the registered name
Multiple-network domain has at least the firewall host name registered if the
ISP handles Domain Name System
Central control and monitoring of multiple firewalls.
See Routing Information Protocol.
Remote login.
Well-known server that holds information about high-level, or root, Internet domain hierarchies.
Routing Information Protocol
Popular interior gateway protocol that classifies routers as active and passive. Active
routers transmit their routes to others; passive routers receive and update their routes
based on advertisements; they do not advertise. Usually, routers run RIP in active mode,
and hosts use passive mode.
rule action
rule option
Description of how the firewall handles packets. It may be permit, proxy, or deny.
State flag associated with a rule. For example:
◆
◆
◆
Enable reply
Audit these packets
Time-out in seconds
secondary name server
Name server that gets information over the network from another name server. It shares
the load with the primary name server or replaces it when the primary is down.
Security Association (SA)
A unidirectional connection created for security purposes. All traffic traversing an SA is
provided the same security processing. In the IPSec context, an SA is an internet layer
abstraction implemented through the use of an AH or ESP. It contains data controlling
how a transformation is applied to an IP packet. The data is determined using specially
defined SA management mechanisms. The data may be a result of an automated SA and
key negotiation or it may be defined manually. This term is defined in RFC 2401.
Glossary-12
CyberGuard Firewall Manual
Glossary
security level
Hierarchical classification level plus a set of non-hierarchical categories that represent the
sensitivity of information. For example:
◆
◆
◆
security policy
NETWORK
SYS_PRIVATE
SYS_PUBLIC
Description of addressed security issues, enforcement rules, review guidelines, people’s
roles, etc. when it comes to protecting your system. For example, it may include a list of
the network services that you wish to allow into and out of the firewall.
security parameters index (SPI)
An arbitrary value used in combination with a destination address and a security protocol
to uniquely identify an SA. The SPI is carried in AH and ESP protocols to enable the
receiving system to select the SA under which a received IP packet will be processed. An
SPI has only local significance as it is defined by the creator of the SA, which is usually
the receiver of the IP packet carrying the SPI.
service
SMTP
SNMP
spoofing
SSL
Port number with a meaningful name such as telnet, ftp, smtp, nntp, who, or echo.
Simple Mail Transfer Protocol. A protocol that is used to exchange messages between two
mail transport agents, such as sendmail programs.
Simple Network Management Protocol. Lets administrators efficiently manage, monitor,
and maintain local or remote TCP/IP-based computer networks. A host receiving an
SNMP trap must be configured so it can respond to the trap. See e s t r a p ( 1 M ) ,
/etc/netmgt/snmpd. comm, the Network Administration UnixWare online manual,
and the SNMP documentation for the foreign host type.
See interface spoofing.
Secure Sockets Layer protocol. Provides a method of encapsulating data to allow privacy
between two applications communicating over the Internet.
SSL tunneling
standard time
Protocol that adds assurance that the proper protocol is in use. It forces an extra handshake
between internal SSL clients and the proxy on the firewall.
Time established by law or custom as civil time. See also daylight savings time.
CyberGuard Firewall Manual
Glossary-13
Glossary
static NAT
static routing
subnet mask
sub-network mask
Form of Network Address Translation. It exposes public servers or public sub-networks on
the internal network to the external network, while still hiding the rest of the internal network. It also allows an external host to initiate a connection to a specified internal host or
network. For outbound traffic, it translates the internal IP address to an external IP
address. For inbound traffic, it translates the external IP address to the specified internal IP
address. See dynamic NAT.
Secure but tedious routing mechanism where you define each route. See dynamic routing.
See sub-network mask.
Means of modifying the structure of an IP address by using some of the host address bits
as extra network address bits. In a mask, 255 means an exact match, and 0 means any
number; use 0s in the rightmost bit positions.
If you are using sub-networks, the sub-network mask depends on the class (A, B, or C) of
Internet addresses and how far you want to extend the use of bits in the address for use as
a network address. A class B address normally provides 16 bits of network address and 16
bits of host address. However, through the use of the sub-network mask of
255.255.255.0, the upper 24 bits of the address are used as the network address, and the
lower 8 bits are used as the host address. For further information on the use of sub-network masks, consult a text on TCP/IP networking.
suspicious event
Occurrence that may require corrective action. For example:
◆
◆
◆
◆
File access failures
Disk partitions full
Failed login attempts
IP interface spoofing attempts
See also “Suspicious Event Types” on page II-331 and alert.
system event
system manual page
T.120
Glossary-14
Type of auditable event. Representation of a system call that may affect the security of the
system. See network event.
Terse technical description provided with the operating system. It describes a system command, service, library, or file.
Suite of communication and application protocols for real-time data connections and conferencing.
CyberGuard Firewall Manual
Glossary
TCP SYN flood
Telnet
time zone
A denial-of-service attack that exploits the standard TCP connection establishment protocol. A malicious client forges it’s source address to be that of a non-existent host. This
causes the responding server TCP to consume resources while waiting for the non-existent
host to respond to the server’s synchronization packet. This wait can cause the port’s backlog to be flooded. TCP will refuse further connections on the flooded port.
Telnet Network Login. Application that allows you to login to a remote machine.
Geographical region that uses the same standard time. It has the following parts:
◆
◆
◆
The time offset from Greenwich Mean Time (GMT)
The daylight savings time rules about its start and end dates and times
The time zone abbreviation for date and time displays, e.g., date(1)
See timezone(4) for the format.
token
trap
Hand-held device that produces user passwords for identification and authentication.
Exceptional condition notification sent by SNMP.
trusted gateway
Twofish
ISP or internal router acting as a routing-information source in dynamic routing.
A strong and fast block cipher. Twofish uses a block size of 128 bits and a key length of up
to 256 bits.
Virtual Private Network (VPN)
Virtual private networking is the use of encryption in the lower protocol layers to provide
a secure connection through an otherwise insecure network, typically the Internet.
WWW
X11
World Wide Web.
X Window System. Protocol that allows remote access to graphical resources.
zone
One level of a subtree in the name space hierarchy. The edu zone is the set of all names
that match *.edu. A zone is different from a domain in that it is one level in a domain.
uclink.berkeley.edu is not in edu’s zone but berkeley.edu is.
CyberGuard Firewall Manual
Glossary-15
Glossary
zone of authority
zone transfer
Glossary-16
Refers to the name space a name server contains authoritative information for. For example, the name server for berkeley.edu would not be authoritative *.com or *.mil but
would be authoritative for names matching *.berkeley.edu.
Copying of zone information that occurs when a secondary name server requests this
information from a primary name server.
CyberGuard Firewall Manual
Index
Symbols
%ADDR II-196
%CHALLENGE II-196
%LOGIN II-196
%SESNUM II-196
%USER II-193
.login file I-47
.mwmrc file I-11
.olsetup file I-47
.profile file I-47
.Xdefaults file I-11
.xsession file I-11, I-47
? button I-15
A
abandon, LDAP proxy operations III-118, III-123
accelerators
Control Panel I-17
file buttons I-17
list-manipulation buttons I-17, I-18
accept.html file II-196
AccessDenied alert report file II-333
AccessGranted alert report file II-333
ACE/Server II-152
active connections command II-207
active firewall I-95
ActiveX language blocking III-18, III-67, III-84
activities II-341
administration I-259
archiving II-356, II-357
central auditing II-343, II-355
Central Management I-258, II-344
content scanning II-345
enabling and disabling II-353, II-366
encryption I-258, II-344
files I-258
login I-258, II-344
packet-filtering I-258, II-344
packets permitted II-344
Passport One I-258, II-345
password changes II-344
proxy II-345
reports I-252, I-258
session completion II-344
SOCKS II-345
SSH II-345
types II-344
VPN I-259, II-250, II-345
WebTrends II-330, II-342, II-354
Activity Logs window II-360
Activity Reports window I-252
sort I-260
activity-log file II-360
add, LDAP proxy operations III-118, III-123
address resolution, Central Management failover I-109
address translation II-63
dynamic II-64, II-69, II-74
static II-63, II-67, II-75
window II-66
addresses
class D II-80
hiding III-197
hiding with NNTP III-143
hiding with SMTP III-197
hiding with X11 III-269
retaining II-69, II-74
administration
remote I-157
role-based I-193
administrative activities I-259, II-345
Administrative user II-149, II-154, II-156
AH, see Authentication Header
Alarm Off button I-135
Alarm On button I-135
Index-1
Index
Alert Summary window I-250
caution II-326, II-352
alert.conf file II-353, II-362
alerts II-328
archiving II-356, II-357
audit archiving II-332
auditing disabled II-333
bell I-250
count of I-251
customizing II-362
disk partitions full II-331
enabling and disabling II-352, II-362
failed login attempts II-331
file access II-331
file transmission II-332
hardware health II-332
high availablity II-332
IDS II-332
interface access check failure II-331
interface spoofing II-331
land attacks II-331
licensed hosts exceeded II-331
packet forwarding attacks II-331
ping of death attacks II-331
port scan II-331
reports I-254
software update II-332
summary I-250
TCP SYN flood attacks II-331
UPS I-242
VPN II-250, II-332
WebTrends II-354
Alerts, Activities, and Archives window II-326
aliases
file III-219
host II-2, II-121
network II-6
user III-203, III-219
anonymous FTP III-24, III-41
caution III-22, III-37
Apache I-163
application-level proxy III-4
Apply button I-263
archive
alerts II-332
how to II-356
archives II-348
FTP II-352
Arrange by Host button I-135
Arrange by IP button I-135
arrows
buttons I-16
icons I-25
Asynchronous Transfer Mode I-67
Index-2
ATM adaptor I-68, I-69
ATM, see Asynchronous Transfer Mode
attacks II-331
interface spoofing II-331
land I-256, II-331, II-354
packet forwarding I-256, II-331, II-354
ping of death I-256, II-331, II-354
port scan II-331, II-354
TCP SYN flood I-256, II-25, II-28, II-46, II-331,
II-333, II-354, II-364
audible bell I-250
audit directory I-261
audit logs I-253, I-261, I-277
criteria I-263, I-264, I-274
files, querying I-262
generating reports I-275
reports I-261, I-277
time range I-263
Audit Logs Criteria window I-261
Audit Logs Report window I-261
audit_logs directory I-251, I-252, II-328, II-342, II-343,
II-360
AuditArchive alert report file II-334
auditing
configuration II-341
disabled, alert II-333
packets II-24
auditlogd command II-368
AuditOff alert report file II-334
auth.html file III-87
authenticated FTP III-23
authentication II-149, II-152, II-158
central II-149, II-150, II-151, II-164, II-174
RADIUS II-150, II-154, II-163, II-164, II-173
remote II-149, II-177
SecureNet Key II-149, II-152, II-154, II-164, II-181
SecurID II-149, II-152, II-154, II-163, II-180
Authentication Header II-236
authorization management I-193
adding and changing I-197, I-198
choosing a duty I-200
deleting I-197, I-198
Authorization Management window I-194
AXENT Technologies II-152
B
Back button I-45
backup I-323
bastion host I-3, I-335
bell for alerts I-250
/bin/date command I-59
CyberGuard Firewall Manual
Index
binary, audit-log file I-261, I-277
bind, LDAP proxy operations III-118, III-123
bit-count sub-network mask II-84, II-120
block attachments III-205, III-215
BlockedFile alert report file II-334
blocking
e-mail III-204
language III-67
boot file I-35, I-344
bootfile file
external II-130
internal II-131
buttons
? I-15
Alarm Off I-135
Alarm On I-135
Apply I-263
Arrange by Host I-135
Arrange by IP I-135
arrows I-16
Back I-45
Cancel I-29, I-30, II-168, II-169
Close I-46
Close Window I-14
Copy I-16
Cut I-16
Delete I-16
Duplicate I-16
file I-14, I-17, I-128
Filter I-14, I-29
Find I-14, I-30
Find Again I-14
Forward I-46
Go Back I-14
Help I-29, I-30, II-168, II-169
Hide Choices I-136
Hide Editor I-16
Hide Summary I-136
History I-46
Insert I-16
list-manipulation I-16, I-17, I-18
OK I-29, II-168, II-169
Paste I-16
Procede I-15
Refresh I-15, I-135
Reset II-168, II-169
Reset All Alerts I-251
Reset Fields I-63
Revert I-15
Revise Selection Criteria I-263
Save I-15
Save As I-15
Show Choices I-136
Show Editor I-16
CyberGuard Firewall Manual
Show Summary I-136
Sort I-253
Stop I-263
Topics I-45
Use I-15
Use, caution I-15
View Expanded Rules II-22
C
CA Certificate Import wizard II-298
CA certificates II-296
CA certificates database files II-317
CA, see Certificate Authority
Cancel button I-29, I-30, II-168, II-169
CAST-128 I-112
cat command I-320
caution
anonymous FTP III-22, III-37
cannot retrieve passwords II-160, II-162
configuring service ports III-164
DNS rules editing II-115
exposing internal addresses II-70, II-72, II-74
filling the disk II-326
importance of Use button I-15
interface spoofing II-25, II-46
invalid packet-filtering rules II-25, II-37, II-70,
II-72, III-6
memory consumption I-337
monitor /var partition I-261
network interface changes I-68, I-73
network services II-21
online help I-41
outbound news III-143
overwriting log files II-361
packet-filtering rules III-6
PassClientAddr III-16
Passport One connections II-186
Passport One, Client Certificate Authentication
II-189
rules editing II-37
SNMP II-49
tying up Alert Summary window II-326, II-352
Update packet-filtering rules check box III-6
cd command I-320
CellView I-69
Central Alert Display window I-135
icons I-136
mouse controls I-136
central auditing II-343
logging alerts and activities II-355
Central Authentication II-149, II-164
Index-3
Index
central authentication II-150, II-151, II-174
Central Management I-103
activities I-258, II-344
alerts and activities II-355
auditing II-343
encryption, see encryption
failover I-105
file buttons I-128
icons I-28, I-134, I-136
Secure Remote Management I-114
security, see encryption
Central Management Choices window I-124
Central Management Role window I-115
CentralAudit activity report file II-343
Centralized Solution for Monitoring, Auditing,
Reporting, and Tracking II-325, II-360
configuration file II-361
cert.conf file II-210
Certificate Authority II-188, II-238, II-241
trusted CAs II-276
Certificate Management window II-292
Certificate Request wizard II-290
Certificate Signing Request II-210
file II-210
certificates I-164
CA II-296
command II-210
VPN II-238, II-269
cg_dbadm command II-157, II-183
chaining III-76
chaining, proxy III-76
challenge.html file II-196
channel information II-265
chgrp command I-320
chlvl command I-320
chmod command I-320
chown command I-320
circuit-level proxies III-4
CLAS, see Passport One
clasd command II-206
clasd.conf file II-202
class
A network I-65, I-70, II-6
B network I-65, I-70, II-6
C network I-65, I-70, II-6
D address II-80
classes file I-264, I-277
classless
network IP address II-122
sub-network mask II-120
client III-1
Client Authentication, see Passport One
ClientCertAccept.html file II-196
Client-Level Authentication Service, see Passport One
Index-4
Close button I-46
Close Window button I-14
CMAuthFail activity report file II-346
CMDbAuth activity report file II-346
CMDbRecords activity report file II-346
CMPropagate activity report file II-346
CMReset activity report file II-346
colors
field I-14
commands
/bin/date I-59
/etc/conf/bin/idmkinit I-343
/etc/conf/bin/idtune I-337
/sbin/tfadmin I-12, I-310, I-322, II-157, II-159
/usr/bin/pkginfo I-31
/usr/bin/putdev I-343
/usr/bin/X11/xlock I-13
/usr/sbin/cyber/auditlogd II-368
/usr/sbin/firewall/clasd II-206
/usr/sbin/firewall/config_dump I-330
/usr/sbin/firewall/cyberctrl I-11, I-31
/usr/sbin/firewall/daemon II-207
/usr/sbin/firewall/dumpaliases III-220
/usr/sbin/firewall/ept-proxy III-133
/usr/sbin/firewall/eptstat III-133
/usr/sbin/firewall/ftpd-proxy III-41
/usr/sbin/firewall/genaliases III-220
/usr/sbin/firewall/generic-proxy III-173
/usr/sbin/firewall/gopherd-proxy III-54
/usr/sbin/firewall/h323-proxy III-65
/usr/sbin/firewall/httpd-proxy III-111
/usr/sbin/firewall/ldap-proxy III-124
/usr/sbin/firewall/mkcsr II-210
/usr/sbin/firewall/mssql-proxy III-142
/usr/sbin/firewall/named II-139
/usr/sbin/firewall/nat II-77
/usr/sbin/firewall/netguard II-50
/usr/sbin/firewall/nntpd-proxy III-153
/usr/sbin/firewall/notes-proxy III-160
/usr/sbin/firewall/ntaddd II-208
/usr/sbin/firewall/ntadddstat II-209
/usr/sbin/firewall/pg-proxy-mgr III-169
/usr/sbin/firewall/ra-proxy III-178
/usr/sbin/firewall/rcyberctrl I-323
/usr/sbin/firewall/rlogind-proxy III-187
/usr/sbin/firewall/sip-proxy III-195
/usr/sbin/firewall/smtpd-proxy III-221
/usr/sbin/firewall/sock5d II-221
/usr/sbin/firewall/sqlnet-proxy III-235
/usr/sbin/firewall/ssl-proxy III-250
/usr/sbin/firewall/telnetd-proxy III-259
/usr/sbin/firewall/udp-proxy III-268
/usr/sbin/firewall/vpnctl II-317
/usr/sbin/firewall/vpnrpt II-319
CyberGuard Firewall Manual
Index
/usr/sbin/firewall/x11_hook-proxy III-280
/usr/sbin/firewall/x11-proxy III-280
/usr/sbin/init I-338, I-339
/usr/sbin/newlvl III-54, III-65, III-111, III-124,
III-133, III-142, III-153, III-160, III-169,
III-174, III-187, III-195, III-235, III-250,
III-259, III-268, III-280
/usr/sbin/nslookup II-140
/usr/X/bin/xhost I-160
UnixWare I-319
vi editor I-321
common configuration I-130
compare, LDAP proxy operations III-118, III-123
config_dump command I-330
configuratin tracking
ticket window I-205
configuration
common, Central Management I-130
CVP III-34, III-95, III-212
external DNS name server II-128
file copy utility I-330
firewall I-5
FTP proxy III-33, III-37
gateway-to-gateway VPN II-299
gateway-to-host VPN II-301, II-303
Gopher proxy III-49, III-52
HTTP proxy III-91, III-101, III-193
initial procedure I-6
internal DNS name server II-128
language blocking III-95
LDAP proxy III-120, III-121, III-122
Load Equalizer proxy III-130, III-131
local, Central Management I-130
NNTP proxy III-150, III-151, III-167
Notes proxy III-159
procedure I-7
propagation to Target Firewalls I-129
RealAudio proxy III-178
rlogin proxy III-185
save and restore I-226, I-227
serial-port I-343
SMTP proxy III-211, III-213
SSL proxy III-233, III-243, III-248, III-267
telnet proxy III-257
UDP proxy III-266
window changes for target groups I-131
X11 proxy III-275, III-277
Configuration menu I-36
Central Management I-126
shortcuts I-18
configuration tracking I-205
history I-207
window I-206
connections
CyberGuard Firewall Manual
RJ45 I-345
service I-286
console messages I-344
Console Messages window I-245
content scanning II-345, III-18
activities I-259, II-345
alert II-332
Content Vectoring Protocol III-18
FTP III-29, III-39
HTTP III-85, III-104
multiple servers III-30, III-39, III-40, III-86,
III-104, III-105, III-208, III-216, III-217
SMTP III-207, III-216
ContentScan activity report file II-346
control active connections command II-207
Control Panel I-31
accelerators I-17
configuring Firewall Manager I-126
configuring target group I-126
Copy button I-16
cp command I-320
critical interface I-99
CRL files II-316
cryptographic properties II-257, II-260
cryptography, see encryption
CSMART, see Centralized Solution for Monitoring,
Auditing, Reporting, and Tracking
CSR, see Certificate Signing Request
csr.pem file II-210
Cut button I-16
CVP, see Content Vectoring Protocol
cyberctrl command I-11, I-31
CyberCtrl file I-11, I-237
CyberCtrl-color file I-11
CyberCtrl-mono file I-11
CyberGuard
copyright 1
VPN II-235
CyberGuard Firewall Login window I-47
D
daemon command II-207
DATA III-197
Data Encryption Standard I-111
Date and Time window I-51
date command I-59
db.* file
external II-133
internal II-135
dedicated proxy server III-4
Default
Index-5
Index
FTP Operations window II-168
User Information window II-168
DEFAULT user II-149, II-155, II-166, II-168, II-169
defaults
for new users II-166, II-168, II-172
FTP II-165, II-169
time zone I-56, I-58
Defender Management Software II-153
Defender Security Server II-152
DELETE III-72
Delete button I-16
delete, LDAP proxy operations III-118, III-123
deny rule II-23
deny.html file II-196, III-87
deny.xml file III-88
DES 56 I-111
DES, see Data Encryption Standard
destination
packet filtering II-24, II-26
routing II-84
SOCKS II-216
df command I-320
diff command I-320
directories
/etc/security/firewall/clas/profiles/common/ II-205
/etc/security/firewall/vpn/
ca_certs/ II-306
channels/ II-306
ipsec_strategies/ II-306
keypairs/ II-306
/etc/security/firewall/vpn/ike_strategies II-306
/usr/lib/firewall/proxy-toolkit/ III-171
/usr/lib/locale/TZ/ I-53, I-59
/var/audit/ I-261
/var/audit_logs/ I-251, I-252, II-328, II-342, II-343,
II-360
/var/audit_logs/old/ I-252, II-360
home I-11, II-156
network II-157
parent of home II-168
sys_private II-157
disabled interface I-69
disk partitions
/var I-261, I-285
caution I-261, II-326
full II-326, II-331, II-354
DiskFull alert report file II-333
display
name I-157
virtual III-271, III-272
DNS, see Domain Name System
domain name
mail III-199
Index-6
NNTP III-144
registered I-5, I-69
startup.conf file I-84
Domain Name System II-113
adding a host II-144
adding a host with a new network number II-145
bootfile file II-129
database files II-132
delegating a subdomain II-146
editing rules caution II-115
external name server II-113
interface changes I-77
internal name server II-113
maintenance II-144
name server configuration II-127
named command II-139
netconfig file II-138
nslookup II-140
packet-filtering rules II-123, II-128
removing a host II-145
resolv.conf file II-117, II-123, II-128, II-138,
II-139, II-140, II-141
services file II-127
startup.conf file II-128
testing name servers II-140
troubleshooting II-147
window II-114
zones II-117
dotted-quad sub-network mask I-70, II-84, II-120
dual DNS II-113
dumb-terminal configuration I-343
dumpaliases command III-220
duplex, network interface I-70
Duplicate button I-16
duties I-193
adding and changing I-197, I-198
choosing I-200
deleting I-197, I-198
file I-201
Duty Choice window I-199
dynamic
address translation II-64, II-69, II-74
routing II-79, II-86, II-107
routing, packet-filtering rules II-104
routing, templates II-87
rules II-43
E
e-mail III-197
alert II-328, II-365
spam III-197, III-212
CyberGuard Firewall Manual
Index
Encapsulating Security Payload II-236
encoding.types file III-110
encryption I-110, I-116, I-117, I-119
activities I-258, II-344
CAST-128 I-112
cryptographic keys I-112
Data Encryption Standard I-111
DES 56 I-111
grouping II-11, II-12
Message Digest keys I-113
security keys I-113
symmetrical I-110
Triple DES I-111
Encryption window I-122
enhanced proxy performance III-131
Enter key I-18
ept-proxy command III-133
ept-proxy.conf file III-131
eptstat command III-133
ESP, see Encapsulating Security Payload
estrap command II-328, II-365
/etc/
netconfig file II-138
nodename file I-84
resolv.conf file II-117, II-123, II-128, II-138,
II-139, II-140, II-141
syslog.conf file II-328
TIMEZONE file I-59
/etc/atm/ifconfig_atm file I-86
/etc/conf/bin/
idmkinit command I-343
idtune command I-337
/etc/conf/dtune.d/tcp file I-336
/etc/conf/init.d/kernel file I-343
/etc/conf/mtune.d/tcp file I-336
/etc/confnet.d/inet/interface file I-85
/etc/default/
login file I-344
/etc/inet/
hosts file II-4
inetd.conf file III-13
networks file II-8
services file I-283, II-24, II-40
/etc/rc0.d/K01auditlogd file II-369
/etc/rc2.d/
S03auditlogd file II-369
/etc/netmgt/snmpd.comm file II-328
/etc/security/audit/classes file I-264, I-277
/etc/security/cyber/
alert.conf file II-353, II-362
trace.conf file II-366
/etc/security/firewall/
authmgmt.conf file I-201
gated.conf file II-86
CyberGuard Firewall Manual
if.conf file II-74
nat.*.conf file II-75
prowler.conf file II-226
routes.conf file II-110
startup.conf file II-361, III-11
/etc/security/firewall/clas/
accept.html file II-196
challenge.html file II-196
clasd.conf file II-202
ClientCertAccept.html file II-196
deny.html file II-196
login.html file II-196
/etc/security/firewall/clas/profiles/common/ directory
II-205
/etc/security/firewall/DNS/EXTERNAL/public/
bootfile file II-130
db.* file II-133
/etc/security/firewall/DNS/INTERNAL/private/
bootfile file II-131
db.* file II-135
/etc/security/firewall/keys/
cert.conf file II-210
csr.pem file II-210
privkey.pem file II-210
/etc/security/firewall/keys/ directory II-210
/etc/security/firewall/ng_inet/netguard.conf file II-43
/etc/security/firewall/proxies/
aliases file III-219
encoding.types file III-110
ept-proxy.conf file III-131
ftpd-proxy.conf file III-37
generic-proxy.conf file III-173
gopherd-proxy.conf file III-53
h323-proxy.conf file III-64
httpd-header.conf file file III-108
httpd-proxy.conf file III-102
ldap-proxy.conf file III-122
mssql-proxy.conf file III-141
nntpd-proxy.conf file III-152
notes-proxy.conf file III-159
pg-proxy-mgr.conf file III-167
rlogind-proxy.conf file III-186
sip-proxy.conf file III-194
smtpd-proxy.conf file III-214
sock5d.conf file II-220
sqlnet-proxy.conf file III-233
ssl-proxy.conf file III-248
telnetd-proxy.conf file III-258
udp-proxy.conf file III-267
x11-proxy.conf file III-278
/etc/security/firewall/proxies/builtin/
auth.html file III-87
deny.html file III-87
deny.xml file III-88
Index-7
Index
index.html file III-87
pwchg.html file III-87
pwchgfail.html file III-88
pwchgpass.html file III-88
soap_deny.xml file III-88
/etc/security/firewall/vpn/
policymgr.conf II-315
/etc/security/firewall/vpn/ca_certs/
CA certificates database files II-317
CRL files II-316
/etc/security/firewall/vpn/channels/
secure channel configuration file II-309, II-311,
II-312, II-313, II-314
/etc/security/firewall/vpn/ike_strategies/
IKE protection strategy configuration file II-307
/etc/security/firewall/vpn/ipsec_strategies/
IPSec protection strategy configuration file II-308
/etc/security/firewall/vpn/keypairs/
firewall keypairs database files II-317
event types
activity II-344
suspicious I-250, I-252, II-331, II-362
events
network I-262, I-264, I-265
system I-262, I-264, I-269
exempt
external interface I-70
internal interface I-69
exempt interface I-65
exit command I-320
exit, CyberGuard Firewall I-34
expanded packet-filtering rules II-22
extended, LDAP proxy operations III-118, III-123
external
interface I-69
name server II-113
F
F1 key I-41
failover, Central Management I-105
fan tachometers I-238
features
CyberGuard Firewall I-4
icons I-21
field colors I-14
file
copy utility I-330
transmission blocked II-332
File Selection window I-29
File Transfer Protocol proxy II-235, III-21
configuring III-33, III-37
Index-8
CVP III-34
default user operations II-169
ftpd-proxy command III-41
ftpd-proxy.conf file III-37
interface changes I-78
Messages page III-28
packet-filtering rules III-31
Sessions page III-26
Setup page III-22
user operations II-165
Users page III-25
using III-35
Filter button I-14, I-29
filter codes, Gopher Protocol proxy III-47
filtering, see packet-filtering
Find Again button I-14
Find button I-14, I-30
find command I-320
Find window I-30
Firewall
Manager, monitoring I-105, I-107, I-120
Manager, primary I-105, I-106, I-117
Manager, secondary I-105, I-106, I-118
Security Monitor I-193, II-149, II-154, II-156
Security Officer I-47, I-193, II-149, II-154, II-155
Target I-103, I-107
firewall
active I-95
Central Management I-103
configuration I-5
description of I-1
group II-9, II-11
secure remote management I-161
served I-95
standby I-95
target I-107
Firewall Keypair Export wizard II-296
Firewall Keypair Import wizard II-293
FIREWALL, sources and destinations II-27, II-45
Forward button I-46
forward to, routing I-335, II-85
ForwardD alert report file II-333
forwarding, packet I-335, II-85
attack I-256
attacks II-331, II-354
FSO, see Firewall Security Monitor
FSO, see Firewall Security Officer
FTP
and audit archiving II-352
and the Load Equalizer proxy III-125
and the Port Guard proxy III-137
anonymous III-24
authenticated III-23
defaults II-165, II-169
CyberGuard Firewall Manual
Index
proxy chaining III-76
see also File Transfer Protocol proxy
VPN II-255
ftpd-proxy command III-41
ftpd-proxy.conf file III-37
FWAdmin activity report file II-346
services II-9
Target CyberGuard II-9, II-11
Target Firewall I-103
GUI, see graphical user interface
H
G
gated.conf file II-86
gateways
packet-filtering I-2
proxy I-3
routing I-335
gateway-to-gateway VPN II-299
gateway-to-host VPN II-301, II-303
genaliases command III-220
generic proxy server III-4
Generic proxy, see Proxy-Writer proxy
generic_log.c file III-174
generic_request.c file III-174
generic_server.c file III-174
generic-proxy command III-173
generic-proxy.c file III-174
generic-proxy.conf file III-173
generic-proxy.h file III-174
generic-proxy.mk file III-174
Go Back button I-14
Gopher Protocol proxy III-43
chaining III-76
Clients page III-45
configuring III-49, III-52
filter codes III-47
gopherd-proxy command III-54
gopherd-proxy.conf file III-53
interface changes I-78
packet-filtering rules III-48, III-60
Setup page III-44
troubleshooting III-55
gopherd-proxy command III-54
gopherd-proxy.conf file III-53
Gopher-server client rules
adding and changing III-50
prioritizing III-51
graphical user interface I-9
customization I-11
locking and unlocking I-13
troubleshooting I-48, I-92
grep command I-320
Grouping window II-10
groups
firewall II-9, II-11
CyberGuard Firewall Manual
H.225 III-57, III-59
H.245 III-57
H.323 Protocol proxy III-57
configuring III-62, III-63
h323-proxy command III-65
h323-proxy.conf file III-64
packet-filtering rules III-60
Setup page III-58
h323-proxy command III-65
h323-proxy.conf file III-64
halt, system I-35
HAnohb alert report file II-334
hardware health
alerts II-332
Hardware Health window I-237
HAStandbyAlert alert report file II-334
HAStandbyDown alert report file II-334
HAtransition alert report file II-334
headers, SMTP III-206
heartbeat interface I-65, I-69
HELO III-197
Help
button I-29, I-30, II-168, II-169
menu I-18, I-42
menu, shortcuts I-18
Search window I-44
window I-45
Help History window I-46
help, online I-41
Hide Choices button I-136
Hide Editor button I-16
Hide Summary button I-136
hiding
addresses with NAT II-63
addresses with NNTP III-143
addresses with SMTP III-197
addresses with X11 III-269
users with SMTP III-197
High Availability
alerts II-332
Link Aggregation I-82
Monitor window I-102
state synchronization I-95, I-98, II-25
VPN II-252
window I-96
Index-9
Index
History
button I-46
window I-46
home directory II-156
$HOME/.login file I-47
$HOME/.mwmrc file I-11
$HOME/.olsetup file I-47
$HOME/.profile file I-47
$HOME/.Xdefaults file I-11
$HOME/.xsession file I-47, I-11
hop-count II-85
Host Names window II-1
hosts
adding and changing II-3
aliases II-2, II-121
bastion I-3, I-335
deleting II-3
file II-4
interface changes I-75
licenses exceeded I-62, II-331, II-354
names II-1, II-120
HostsLimit alert report file II-333
how to
activities II-353, II-355
alert summary I-252
alerts II-352
archive alerts and activities II-356, II-357
audit-logs report I-274, I-275
authorization management I-197, I-198, I-200
boot mUNIX I-322
cancel pending save jobs I-231
central authentication II-174
Central Management I-140
Central Management failover I-147
Central Management security I-144, I-145
certificate request II-290
compile the Proxy-Writer proxy III-171
configuration history reports I-212
configuration tracking I-212
configure SmartProxies III-9
Content Advisor III-94
create a new proxy III-172
CVP III-34, III-95, III-212
date and time I-55, I-59
determine if session tunneled II-246
determine tunneled session II-33
DNS II-127
DNS, add host II-144
DNS, add host with new network number II-145
DNS, delegate subdomain II-146
DNS, maintenance II-144
DNS, remove host II-145
domain name I-84
duties I-197, I-198, I-200
Index-10
encryption I-144, I-145
export firewall keypair II-296
ftp III-35
FTP proxy III-33, III-37
Gopher proxy III-49, III-50, III-51, III-52
H.323 proxy III-62, III-63
HA I-81
High Availability I-99
host II-3
HTTP proxy III-91, III-92, III-93, III-101, III-193
hypertext links I-46
import firewall keypair II-293
install certificates I-165
intrusion detection II-225
LAG I-81
LAG and HA I-82
language blocking III-95
LDAP proxy III-120, III-121, III-122
Load Equalizer proxy III-130, III-131
manage a remote CyberGuard Firewall I-161
MS-SQL proxy III-140, III-141
network II-7, II-8
network address translation II-70, II-71, II-73
network interfaces I-73, I-74, I-84
NNTP proxy III-150, III-151, III-167
node name I-84
Notes proxy III-159
nslookup II-140
packet-filtering rules II-37, II-38, II-39, II-40
packet-filtering rules and SmartProxies III-14
Pass Address and SmartProxies III-14
Passport One II-197, II-198, II-201
Passport One, SSL, CA II-189
performance monitor I-296
proxy configuration files III-10
Proxy-Writer proxy III-172
RADIUS II-173
read-only mode I-323
RealAudio proxy III-178
remote authentication II-177
Remote Web Administration I-169
Remote Web Administration login I-169
rlogin III-183
rlogin proxy III-185
routing II-106, II-107, II-108, II-109
save and restore active configuration I-226
save and restore archived configuration I-227
save and restore SCCS I-228
save configuration I-214
schedule save operation I-231
Secure Remote Management I-159, I-161
SecureNet Key II-181
SecurID II-180
shell window I-310
CyberGuard Firewall Manual
Index
SIP proxy III-192
SmartProxies, inetd daemon III-13
SmartProxies, standalone III-11
SMTP proxy III-211, III-213
SOCKS II-217, II-218, II-219
software updates I-235
spam prevention III-197, III-212
SSH I-192
SSL proxy III-233, III-243, III-244, III-245,
III-248, III-267
system monitor statistics I-292
system monitor statistics alarms I-293
system statistics I-286
telnet III-255
telnet proxy III-257
test name servers II-140
time zone I-56, I-57, I-58
UDP proxy III-266
UPS I-244
URL filtering III-94
users II-170, II-171, II-172, II-183
VPN gateway-to-gateway II-299
VPN gateway-to-host, dynamic II-303
VPN gateway-to-host, virtual II-301
Websense III-94
WebTrends reports II-354
X11 proxy III-275, III-276, III-277
HTTP
proxy chaining III-76
see also Hypertext Transfer Protocol proxy
httpd-header.conf file III-108
httpd-proxy command III-111
httpd-proxy.conf file III-102
HTTPS I-164, II-40, II-188, III-237, III-241
chaining III-76
HTTP-server client rules
adding and changing III-92
prioritizing III-93
hypertext links, using I-46
Hypertext Transfer Protocol
Content Advisor III-94
Hypertext Transfer Protocol Proxy
Websense III-67, III-70
Hypertext Transfer Protocol proxy III-67
auth.html file III-87
Chaining page III-76
Clients page III-74
configuring III-91, III-101, III-193
CVP III-95
CVP page III-85
deny.html file III-87
deny.xml file III-88
encoding.types file III-110
File Blocking page III-78
CyberGuard Firewall Manual
Header Filtering page III-79
httpd-header.conf file III-108
httpd-proxy command III-111
httpd-proxy.conf file III-102
index.html file III-87
interface changes I-78
Language Blocker page III-84
language blocking III-95
multiple ports III-70, III-111
multiple servers III-72, III-102
packet-filtering rules III-88
packet-filtering rules for proxy chaining III-89
proxy chaining III-67
pwchg.html file III-87
pwchgfail.html file III-88
pwchgpass.html file III-88
Servers page III-72
Setup page III-69
Soap page III-80
soap_deny.xml file III-88
URL filtering III-94
URL Translation page III-82
Websense III-70, III-94
I
ICMP
connections timeout II-47
see also, Internet Control Message Protocol
ICMP, see Internet Control Message Protocol
ICMPMASKREQ tunable parameter I-336
icons
bell I-250
central alert I-136
Central Management I-28
features I-21
meanings I-20
packet-filtering I-24
placement I-25
propagation I-134
proxy-rules I-25
removing alert I-250
routing I-26
user type I-27
identification and authentication, see authentication
idmkinit command I-343
IDS, see Intrusion Detection System
IDSMsg alert report file II-334
idtune command I-337
if.conf file II-74
ifconfig_atm file I-86
IFMACerror alert report file II-334
Index-11
Index
IKE
Advanced Settings dialog box II-267
Certificate Services window II-277
Protection Stategies window II-256
protection strategies, preloaded II-256
protection strategy configuration file II-307
IKE, see Internet Key Exchange
index.html file III-87
inetd daemon III-3
inetd.conf file III-13
init command I-338, I-339
initial
configuration procedure I-6
Insert button I-16
interface access check failures II-331
interface file I-85
interface spoofing II-38
attempts II-25, II-331
caution II-25, II-46
Interfaces window I-68
interfaces, see network interfaces
internal
address, caution II-70, II-72, II-74
interface I-69
name server II-113
users I-62
Internet Control Message Protocol I-336, II-42
Internet Key Exchange II-236, II-238
Internet Service Provider I-5, II-84
Intrusion Detection System II-223
configuring II-225
Intrusion Detection window II-224
Intrustion Detection System
alert II-332
IP Security II-236
IP_SRCROUTING tunable parameter I-336
IPFORWARDING tunable parameter I-335
IPSec
Protection Strategies window II-259
protection strategies, preloaded II-259
protection strategy configuration file II-308
see IP Security
IPSENDREDIRECTS tunable parameter I-336
ISP, see Internet Service Provider
J
Java language blocking III-18, III-67, III-84
JavaScript language blocking III-18, III-67, III-84
Index-12
K
K01auditlogd file II-369
kernel file I-343
kernel parameters
ICMPMASKREQ I-336
IP_SRCROUTING I-336
IPFORWARDING I-335
IPSENDREDIRECTS I-336
TCP_FOREIGN_HASHBKTS I-337
TCP_LOCAL_HASHBKTS I-337
TCP_SECURE_ISS_BITS I-335
TCP_SECURE_ISS_DELTA I-335
kernel rules format II-56
active II-59
kernel statistics II-52
Key
Enter I-18
F1 I-41
space bar I-18
keypairs II-293
keys
license I-65
optional product I-61
kill command I-320
L
LAG, see Link Aggregation
land attacks I-256, II-331, II-354
language blocking III-67, III-95
LDAP, see Lightweight Directory Access Protocol
proxy
ldap-proxy command III-124
ldap-proxy.conf file III-122
Legato Systems, Inc. I-96
levels
auditing I-264
NETWORK I-264, II-156, II-328, II-329, II-365
SYS_PRIVATE I-264, II-155, II-157, II-365
SYS_PUBLIC I-264, II-365
license keys I-65
License Keys window I-61
Lightweight Directory Access Protocol proxy III-113
configuring III-120, III-122
interface changes I-78
ldap-proxy command III-124
ldap-proxy.conf file III-122
load balancing III-115
operations III-118
packet-filtering rules III-118
CyberGuard Firewall Manual
Index
prioritizing III-121
referrals III-113
Rules page III-117
Setup page III-116
line-mode, Proxy-Writer proxy III-171
Link Aggregation I-66, I-81
HA I-82
load balancing
LDAP proxy III-115
Load Equalizer proxy III-125
Load Equalizer proxy III-125, III-131
configuring III-130, III-131
ept-proxy command III-133
ept-proxy.conf file III-131
eptstat command III-133
interface changes I-78
packet-filtering rules III-129
Servers page III-128
Setup page III-126
status command III-133
local configuration I-130
LOCAL_HOST, sources and destinations II-27, II-45
locking the GUI I-13
log
audit I-261
file II-360
out, CyberGuard Firewall I-34
Logfile Time Dialog window I-139
logger command II-328, II-342
login I-158, II-149, II-156
activities I-258, II-344
attempts II-344
failures II-331, II-354
remote III-179
shell II-156
telnet III-251
login file I-344
Login window I-47
login.html file II-196
LoginFailed alert report file II-333
Logins activity report file II-346
ls command I-320
lvlname command II-365
M
MAIL III-197
mail III-197
alert II-328, II-365
DNS II-119, II-132
maintenance kernel I-321
man command I-320
CyberGuard Firewall Manual
management
central I-103
remote I-157
Management Information Base I-248
manager
monitoring I-105, I-107, I-120
primary I-105, I-106, I-117
secondary I-105, I-106, I-118
manual (man) pages, viewing I-43
Manual Key Configuration dialog box II-271
manual keying II-238
memory consumption, caution I-337
menus
Configuration I-18, I-36
Help I-18, I-42
Reports I-19, I-39
System I-19, I-33
Tools I-19, I-40
Virtual Private Networks I-20, I-38
Message Digest keys, encryption I-113
messages, console I-245
metric, routing II-85
MIB, see Management Information Base
Microsoft II-188
Microsoft SQL Server 2000 Protocol proxy III-135
configuring III-140, III-141
mssql-proxy command III-142
mssql-proxy.conf file III-141
packet-filtering rules III-138
Servers page III-137
Setup page III-136
mkcsr command II-210
mnemonics, see shortcuts
modem configuration I-343
modify, LDAP proxy operations III-118, III-123
modifyDN, LDAP proxy operations III-118, III-123
monitor active connections command II-207
Monitoring Manager I-105, I-107, I-120
MS-SQL, see Microsoft SQL Server 2000 Protocol
proxy
mssql-proxy command III-142
mssql-proxy.conf file III-141
multicast routing II-108
packet-filtering rules II-104
Multilevel Secure I-322, II-157
multiple ports, HTTP proxy III-70, III-111
multiple servers
CVP III-30, III-39, III-40, III-86, III-104, III-105,
III-208, III-216, III-217
HTTP proxy III-72, III-73, III-102
SMTP proxy III-214
mUNIX I-321
mv command I-320
MX records II-119, II-132
Index-13
Index
N
name server II-113
external II-113
internal II-113
primary II-119
secondary II-119
see also Domain Name System
named command II-139
names
display I-157
domain I-5, I-69, III-144, III-199
grouping window II-10
hosts II-1, II-120
hosts window II-1
network window II-5
networks II-5
node I-69
users II-156
nat command II-77
NAT, see Network Address Translation
nat.*.conf file II-75
netconfig file II-138
netguard command II-50
active kernel rules format II-59
kernel rules format II-56
kernel statistics II-52
packet denial states II-60
warning messages II-61
netguard.conf file II-43
DNS II-123, II-128
FTP proxy III-31
Gopher proxy III-48, III-60
H.323 proxy III-60
HTTP proxy III-88
HTTP proxy chaining III-89
LDAP proxy III-118
Load Equalizer proxy III-129
MS-SQL proxy III-138
network routing II-104, II-109
NNTP proxy III-148
Notes proxy III-157
Port Guard proxy III-164
RealAudio proxy III-177
remote management I-160
rlogin proxy III-181
Simple Network Management Protocol, trap alert
II-365
SIP proxy III-191
SMTP proxy III-209
SNMP II-49
SNMP trap alert II-340
SOCKS II-219
Index-14
SQL*Net proxy III-230
SSL proxy III-241
telnet proxy III-253
UDP proxy III-264
X11 proxy III-273
NetguardD activity report file II-346
NetguardI alert report file II-334
NetguardM activity report file II-346
NetguardP activity report file II-346
NetguardS activity report file II-346
NetguardT activity report file II-346
NetProwler II-223
see also, Intrusion Detection System
Netscape II-188
netstat command I-320
network
directory II-157
event I-262, I-264, I-265
interface changes I-75
names II-5
services caution II-21
statistics I-285
Network Address Translation II-63
dynamic II-64, II-69, II-74
interface changes I-76
pool II-64, II-67, II-75
static II-63, II-67, II-75
VPN II-31, II-235, II-247
VPN and FTP II-255
VPN and NAT-T II-249, II-269
window II-66
network class I-65
Network Information Center I-5
network interfaces
adding I-73, I-74
ATM I-67
caution I-68, I-73
configuring I-73, I-84
critical I-99
disabled I-69
duplex I-70
exempt external I-70
exempt internal I-69
external I-65, I-69
external exempt I-65
heartbeat I-65, I-69
internal I-65, I-69
internal exempt I-65
LAG I-66
NAT II-69, II-74
speed I-70
Network Interfaces window I-68
NETWORK level I-264, II-156, II-328, II-329, II-365,
III-54, III-65, III-111, III-124, III-133, III-142,
CyberGuard Firewall Manual
Index
III-153, III-160, III-169, III-174, III-187,
III-195, III-235, III-250, III-259, III-268,
III-280
Network Names window II-5
Network News Transfer Protocol proxy III-143
caution III-143
configuring III-150, III-151, III-167
News Groups page III-147
nntpd-command III-153
nntpd-proxy.conf file III-152
packet-filtering rules III-148
Peers page III-146
Setup page III-144
Network Ping Test window I-279
network routing
packet-filtering rules II-104, II-109
services file II-109
startup.conf file II-109
network-address-translation rule
adding II-70
changing II-70
deleting II-71
networks
adding and changing II-7
aliases II-6
deleting II-7
file II-8
newlvl command III-54, III-65, III-111, III-124, III-133,
III-142, III-153, III-160, III-169, III-174,
III-187, III-195, III-235, III-250, III-259,
III-268, III-280
news III-143
NIC, see Network Information Center
NNTP
see Network News Transfer Protocol proxy
nntpd-proxy command III-153
nntpd-proxy.conf file III-152
NO UCE, see No Unsolicited Commercial E-mail
III-200, III-216
No Unsolicited Commercial E-mail III-200, III-216
node name I-69
nodename file I-84
nonline-mode, Proxy-Writer proxy III-171
Notes proxy III-155
configuring III-159
interface changes I-79
notes-proxy command III-160
notes-proxy.conf file III-159
packet-filtering rules III-157
Setup page III-156
notes-proxy command III-160
notes-proxy.conf file III-159
nslookup command I-320, II-140
NT Authentication Detection II-186
CyberGuard Firewall Manual
command II-208
command status II-209
NT Authentication Share Detection II-187
NT passwords II-149, II-154, II-159
NT(R)AD, see NT Authentication Share Detection
NTAD, see NT Authentication Detection
ntadd command II-208
ntaddstat command II-209
NTP setup page I-54
NTpasswords II-162
number of internal users I-62
O
OK button I-29, II-168, II-169
old directory I-252, II-360
online help I-41
caution I-41
optional products
ATM adaptor I-68, I-69
Central Management encryption I-110
High Availability I-95
keys I-61
RADIUS II-149
SecureNet Key II-152
SecurID II-152
Websense III-67
WebTrends I-276, II-325
origin
packet filtering II-24, II-26
SOCKS II-216
OSPF, routing configuration example II-87
overview, CyberGuard Firewall I-1
P
package, CyberGuard Corporation software I-31, I-337
packet denial states II-60
Packet Filter Statistics window I-287
packet forwarding I-335, II-85
attacks II-331, II-354
packet-filtering
activities I-258, II-344
gateway I-2
icons I-24
reports I-248
statistics I-287
VPN II-246
packet-filtering rules II-21, II-43
adding and changing II-37
Index-15
Index
caution II-25, II-37, II-70, II-72, III-6
deleting II-38
DNS II-123, II-128
dynamic routing II-104
editing caution II-37
expanded II-22
FTP proxy III-31
Gopher proxy III-48, III-60
H.323 proxy III-60
HTTP proxy III-88
HTTP proxy chaining III-89
interface changes I-76
LDAP proxy III-118
Load Equalizer proxy III-129
MS-SQL proxy III-138
multicast routing II-104
network routing II-109
NNTP proxy III-148
Notes proxy III-157
Port Guard proxy III-164
prioritizing II-39
raw IP II-24
RealAudio proxy III-177
remote management I-160
Remote Procedure Call II-36
rlogin proxy III-181
SIP proxy III-191
SMTP proxy III-209
SNMP II-49
SNMP trap alert II-340, II-365
SOCKS II-219
SQL*Net proxy III-230
SSH I-179
SSL proxy III-241
telnet proxy III-253
UDP proxy III-264
Websense III-90
X11 proxy III-273
Packet-Filtering Rules window II-22
packets
deny II-23
logging of denials II-344
logging of permits II-344
permit II-23
proxy II-23
sources and destinations II-26
pager alert notification II-365
partition
caution I-261
full II-331, II-354
/var disk I-261, I-285
Pass Address II-69
VPN II-254
PassClientAddr II-74
Index-16
Passport One II-185
activities I-258, II-345
activity report file II-346
adding and changing profile rules II-198
adding or changing profiles II-197
command II-206
configuration file II-202
NT Authentication Detection II-186
NT Authentication Share Detection II-187
Passport One Rules Page II-166
profile files II-205
Profiles page II-192
Rules page II-193
Setup page II-190
tunable parameters I-338
tuning I-338
VPN II-250
window II-190
passwd
command II-183
Passwd activity report file II-346
passwords II-158
aging II-160
caution II-160, II-162
changing II-160, II-344
NT II-149, II-154, II-159, II-162
UNIX II-149, II-154, II-158, II-160
Paste button I-16
PCB, see Protocol Control Block
peer protected networks II-272
performance
enhanced III-131
tuning I-336, I-337
Performance Monitor window I-294
permit rule II-23
pg command I-320
pg-proxy-mgr command III-169
pg-proxy-mgr.conf file III-167
ping
command I-320
of death attack I-256, II-331, II-354, II-364
test window I-279
PingDeath alert report file II-333
PKCS10 II-242
PKCS12 II-242
PKCS7 II-242
pkginfo command I-31
Platform Sensor alert report file II-334
platform sensor events II-332
pool, NAT II-64, II-67, II-75
port I-283, II-24
caution III-164
Enhanced Pass-Through III-126
Gopher III-44
CyberGuard Firewall Manual
Index
HTTP III-70
matching II-24
multiple III-70, III-111
NNTP III-145
scanning II-331, II-354
SOCKS II-216
SSL III-239
UDP III-262
Port Guard proxy III-161
packet-filtering rules III-164
pg-proxy-mgr command III-169
pg-proxy-mgr.conf file III-167
Servers page III-163
Setup page III-162
PortScan alert report file II-334
POST III-72
preference, routing II-85
preshared secret II-238
Primary Manager I-105, I-106, I-117
primary name server II-119
privadm command I-163
privilege I-264
privkey.pem file II-210
Procede button I-15
products, optional
ATM adaptor I-68, I-69
Central Management encryption I-110
RADIUS II-149
SecureNet Key II-152
SecurID II-152
Websense III-67
WebTrends I-276, II-325
profile files, Passport One II-205
propagation I-128
errors I-134
icons I-134
protection strategies II-256, II-257, II-260
IKE II-256
IPSec II-259
protocol I-283, II-24
Protocol Control Block I-337
prowler.conf file II-226
proxies, see SmartProxies
proxy
chaining III-67, III-76, III-89
gateway I-3
rule II-23
rule icons I-25
URL translation III-82
Proxy user II-149, II-154, II-155
ProxyFTP activity report file II-346
ProxyGopher activity report file II-346
ProxyHTTP activity report file II-346
ProxyLDAP activity report file II-346
CyberGuard Firewall Manual
ProxyLDE activity report file II-346
ProxyNNTP activity report file II-346
ProxyNotes activity report file II-346
ProxyRlogin activity report file II-346
ProxySMTP activity report file II-346
ProxySQLNet activity report file II-346
ProxySSL activity report file II-347
ProxyTelnet activity report file II-347
proxy-toolkit directory III-171
Proxy-Writer proxy III-171
compiling III-171
configuring III-172
enhancements III-171
generic-proxy command III-173
generic-proxy.conf file III-173
services file III-172
source files III-174
using as a template III-172
ProxyX11 activity report file II-347
ProxyX11Disp activity report file II-347
ProxyX11Hook activity report file II-347
ps command I-320
push buttons, see buttons
PUT III-72
putdev command I-343
pwchg.html file III-87
pwchgafail.html file III-88
pwchgpass.html file III-88
pwd command I-320
Q
QUALha I-96
QUIT III-197
R
RADIUS II-149, II-150, II-154, II-163, II-164, II-173
ra-proxy command III-178
raw IP II-24
RCPT III-197
rcyberctrl command I-323
read-only mode I-32, I-193, I-196, I-201, I-323
Real Time Performance Monitor, see Performance
Monitor
RealAudio Protocol proxy III-175
configuring III-178
interface changes I-79
packet-filtering rules III-177
ra-proxy command III-178
Index-17
Index
Setup page III-176
Real-Time Control Protocol III-57
Real-Time Transport Protocol III-57
refresh
interval I-286
suspicious-event report I-15
Refresh button I-15, I-135
register, optional products I-61
registered domain name I-5, I-69
Remote Authentication II-149
remote authentication II-177
Remote Group user II-149, II-154, II-156
remote identities II-275
Remote Login proxy III-179
configuring III-185
interface changes I-79
packet-filtering rules III-181
rlogind-proxy command III-187
rlogind-proxy.conf file III-186
Setup page III-180
using III-183
remote management, see Secure Remote Management
Remote Procedure Call II-36
Remote Web Administration I-163
troubleshooting I-170
Remote Web Administration window I-168
reports
activities I-258
activity I-252
alert summary I-250
audit logs I-261, I-277
console messages I-245
generating audit logs I-275
selecting criteria I-274
system information I-246
VPN II-250
WebTrends I-276
Reports menu I-39
shortcuts I-19
Reset
All Alerts button I-251
button II-168, II-169
Fields button I-63
reset statistics I-286
resolv.conf file II-117, II-123, II-128, II-138, II-139,
II-140, II-141
resolver II-138
restore I-323
retrieve, files with gopher III-43
Revert button I-15
Revise Selection Criteria button I-263
RFC
1058, RIP II-81
1075, DVMRP II-81
Index-18
1112, IGMP II-81
1213, Management Information Base I-248
2138, RADIUS II-173
2407, ISAKMP II-283
2408, ISAKMP II-283, II-284
2409, IKE II-283
2560, OCSP II-243, II-278
793, Transmission Control Protocol I-281
DNS II-113
recommended list vi
RIP, routing configuration example II-87
RJ45 connections I-345
rlogin
and the Load Equalizer proxy III-125
and the Port Guard proxy III-137
see Remote Login proxy
rlogind-proxy command III-187
rlogind-proxy.conf file III-186
role-based administration I-193
file I-201
window I-194, I-199
roles
Firewall Security Monitor II-149, II-154, II-156
Firewall Security Officer I-47, II-149, II-154,
II-155
rolled RJ45 connections I-345
root user I-322, II-157, II-328
routes.conf file II-110
routing
adding and changing a route II-106
configuration file, dynamic II-86
configuration file, static II-110
dynamic II-79, II-107
hop-count II-85
icons I-26
interface changes I-76
metric II-85
multicast II-108
packet-filtering rules II-104
preference II-85
static II-79, II-83
Routing window II-83
RPC, see Remote Procedure Call
RSA Security, Inc. II-152
rsh
and the Load Equalizer proxy III-125
and the Port Guard proxy III-137
RTCP, see Real-Time Control Protocol
RTP, see Real-Time Transport Protocol
RTPM, see Performance Monitor
rules
dynamic II-43
packet-filtering window II-22
see packet-filtering rules
CyberGuard Firewall Manual
Index
static II-43
time-zone, creating I-57
S
S03auditlogd file II-369
save and restore
how to I-226, I-227, I-228
Save and Restore window I-215
Save As button I-15
Save button I-15
save, system I-323
/sbin/tfadmin command I-12, I-310, I-322, II-157,
II-159
scanning
content II-345, III-18
languages III-67
SCCS
save and restore I-228
scheduling save and restore operation I-231
screen
locking I-13
search
for files with gopher III-43
LDAP proxy operations III-118, III-123
see Find window
Secondary Manager I-105, I-106, I-118
secondary name server II-119, II-129
secret keys, see security keys
secure channel configuration file II-309, II-311, II-312,
II-313, II-314
secure LAN, troubleshooting I-333
Secure Remote Management I-157
Central Management I-114
preparing for I-159
troubleshooting I-162
window I-157
Secure Shell
activities I-259, II-345
client I-181
packet-filtering rules I-179
troubleshooting I-181
Secure Shell window I-189
Secure Sockets Layer protocol
Passport One II-188
Remote Web Administration I-164
Secure Sockets Layer Protocol proxy III-237
Clients page III-240
configuring III-233, III-243, III-248, III-267
HTTPS II-40, II-188, III-237, III-241
interface changes I-79
packet-filtering rules III-241
CyberGuard Firewall Manual
Setup page III-238
ssl-proxy command III-250
ssl-proxy.conf file III-248
SecureNet Key II-149, II-152, II-154, II-164, II-181
SecurID II-149, II-152, II-154, II-163, II-180
security keys, encryption I-113
Security Options II-229
dynamic rules II-230
password options II-230
user blacklisting II-231
window II-229
Security Parameter Index II-271
security, see encryption
see Secure Sockets Layer Protocol proxy
sendmail III-201, III-214
sendmail.cf file II-340
serial-port configuration I-343
served firewall I-95
server III-1
mail III-198
name II-113
news III-143
service I-283, II-24
connections I-286
ports, caution III-164
services
group II-9
services file I-283, II-24, II-40
DNS II-127
network routing II-109
Proxy-Writer proxy III-172
SecureNet Key II-173, II-182
SecurID II-180
SOCKS II-216, II-219
session completion activity II-344
session count I-62, II-331, II-354
Session Initiation Protocol proxy III-189
configuring III-192
packet-filtering rules III-191
Setup page III-190
sip-proxy command III-195
sip-proxy.conf file III-194
sessions
active II-50, II-59
denied II-53
display II-52
dropped packets II-55
netguard II-52
no match II-54
Passport One I-95
permitted II-53
proxy I-95, II-53
proxy relay II-53
state synchronization I-95, I-98, II-25
Index-19
Index
TCP SYN Flood defense II-55
terminate II-51
shell
command in alerts II-328
default login II-168
login II-156
Shell window I-310
shortcuts
Configuration menu I-18
Help menu I-18
Reports menu I-19
System menu I-19
Tools menu I-19
Virtual Private Networks sub-menu I-20
Show
Choices button I-136
Editor button I-16
Summary button I-136
shutdown, system I-35
Simple Mail Transfer Protocol proxy III-197
aliases file III-219
banners III-200, III-216
block attachments III-205, III-215
Blocking page III-204
configuring III-211, III-213
CVP III-212
CVP page III-207
DATA III-197
dumpaliases command III-220
genaliases command III-220
Headers page III-206
HELO III-197
interface changes I-79
MAIL III-197
multiple servers III-214
packet-filtering rules III-209
preventing spam III-197, III-212
QUIT III-197
RCPT III-197
Servers page III-201
Setup page III-198
smtpd-proxy command III-221
smtpd-proxy.conf file III-214
troubleshooting III-221
Users page III-202
X-Proxy header III-200, III-214
X-Sender III-197
Simple Network Management Protocol
caution II-49
packet-filtering rules II-49
trap alert II-328, II-329, II-340, II-365
trap alert, packet-filtering rules II-340, II-365
SIP, see Session Initiation Protocol proxy
sip-proxy command III-195
Index-20
sip-proxy.conf file III-194
SmartProxies III-1
activities I-259, II-345
application-level III-4
auditing I-262, I-264
circuit-level III-4
comparison III-3
configuration files III-10
dedicated III-4
enhanced performance III-131
File Transfer Protocol II-235, III-21
generic proxy server III-4
Gopher Protocol III-43
H.323 Protocol III-57
Hypertext Transfer Protocol III-67
inetd daemon III-3
inetd.conf file III-13
interface changes I-78
Lightweight Directory Access Protocol III-113
Load Equalizer III-125, III-131
MS-SQL Protocol III-135
Network News Transfer Protocol III-143
Notes III-155
packet-filtering rules III-14
PassClientAddr III-14
performance I-337
Port Guard III-161
Proxy-Writer III-171
RealAudio III-175
Remote Login III-179
Secure Sockets Layer Protocol III-237
Simple Mail Transfer Protocol III-197
SIP Protocol III-189
SQL*Net III-225
standalone III-3, III-11
TCP Relay III-131
Telnet Network Login III-251
User Datagram Protocol III-261
VPN II-251, II-254
window III-5
X Window System I-160, III-269
SMTP proxy, see Simple Mail Transfer Protocol proxy
smtpd-proxy command III-221
smtpd-proxy.conf file III-214
SNMP, see Simple Network Management Protocol
snmpd.comm file II-328
soap_deny.xml file III-88
sock5d command II-221
sock5d.conf file II-220
SOCKS II-211
activities II-345
activity report file II-346
adding and changing a rule II-217
deleting a rule II-218
CyberGuard Firewall Manual
Index
interface changes I-80
packet-filtering rules II-219
services file II-216, II-219
sock5d command II-221
sock5d.conf file II-220
startup.conf file II-219
window II-213
software update alert II-332
Software Update window I-234
software updates
how to I-235
Sort Activity Reports window I-260
Sort button I-253
source
packet filtering II-24, II-26
SOCKS II-216
space bar key I-18
spam III-197, III-212
speed, network interface I-70
SPI, see Security Parameter Index
Split Domain Name System
see also Domain Name System
window II-114
spoofing, interface II-38
attempts II-25, II-331
SQL*Net proxy III-225
packet-filtering rules III-230
sqlnet-proxy command III-235
sqlnet-proxy.conf file III-233
sqlnet-proxy command III-235
sqlnet-proxy.conf file III-233
SSH activity report file II-346
SSL, see Secure Sockets Layer Protocol proxy
ssl-proxy command III-250
ssl-proxy.conf file III-248
SSL-server client rules
adding and changing III-244
prioritizing III-245
/stand/boot file I-35, I-344
standalone proxy III-3
standard RJ45 connections I-345
standby firewall I-95
startup.conf file II-361, III-11
CSMART II-361
DNS II-128
domain name I-84
network routing II-109
SmartProxies III-11
SOCKS II-219
state synchronization, High Availability I-95, I-98, II-25
static
routing II-79, II-83, II-106
rule II-43
static NAT II-63, II-67, II-75
CyberGuard Firewall Manual
SMTP proxy III-214
statistics
changing time between refreshes I-286
kernel II-52
network I-285
packet-filtering I-287
reset last I-286
system I-285
Stop button I-263
sub-network mask I-65, I-70
bit-count II-84, II-120
classless II-122
DNS II-120
dotted-quad II-84, II-120
routing II-84
summary, alert I-250
suspicious-event reports I-254
suspicious-event types II-331, II-362
how to count I-252
list of I-250
SWUpdate alert report file II-334
SYN flood attack, see TCP SYN flood attack
synchronization, High Availability I-95, I-98, II-25
SynFlood alert report file II-333
sys_private directory II-157
SYS_PRIVATE level I-264, II-155, II-157, II-365
SYS_PUBLIC level I-264, II-365
syslog
alert II-328, II-365
command II-328, II-342
file II-328
syslog.conf file II-328, II-329, II-342, II-365
syslogd command II-328, II-329, II-342, II-365
System
Information window I-246
Manual Pages window I-43
menu I-33
menu, shortcuts I-19
Monitor window I-289
Shutdown window I-35
Statistics window I-285
system
backup and restore I-323
boot time I-285
event I-262, I-264, I-269
failure, prevention I-33, I-95
information I-246
statistics I-285
system.mwmrc file I-11
Index-21
Index
T
T.120 III-57, III-59
tail command I-320
Tarantella application server I-163
Target Alert Logs Reports window I-139
Target CyberGuard group II-9, II-11
Target Firewall I-103, I-107, I-125
file buttons I-128
group I-103, I-125
Source window I-129
Status window I-132
Target Group Owners I-124, I-135, I-136
TCP connections
RealAudio III-176, III-178
re-establishing II-25, II-45
timeout II-24, II-47
tcp file I-336
TCP Relay III-131
TCP SYN flood attack I-256, II-25, II-28, II-46, II-331,
II-333, II-354, II-364
tunable parameter defense I-340
TCP, see Transmission Control Protocol
TCP_FOREIGN_HASHBKTS tunable parameter I-337
TCP_KEEPIDLE tunable parameter I-336, I-337, I-338
TCP_LOCAL_HASHBKTS tunable parameter I-337
TCP_SECURE_ISS_BITS tunable parameter I-335
TCP_SECURE_ISS_DELTA tunable parameter I-335
telnet
see also Telnet Network Login proxy
Telnet Network Login proxy III-251
configuring III-257
interface changes I-79
packet-filtering rules III-253
Setup page III-252
telentd-proxy command III-259
telnetd-proxy.conf file III-258
using III-255
telnetd-proxy command III-259
telnetd-proxy.conf file III-258
temperature sensors I-238
terminal configuration I-343
tfadmin command I-12, I-310, I-322, II-157, II-159
time
last reset I-286
last updated I-285
range for audit-log reports I-263
range for WebTrends audit reports I-276
system boot I-285
window I-51
time zone
creating a rule I-57
setting I-56, I-58
Index-22
TIMEZONE file I-59
token authentication II-152, II-158
tools
network ping test I-279
NTP Setup page I-54
packet filter statistics I-287
performance monitor I-294
shell window I-310
system monitor I-289
system statistics I-285
Tools menu I-40
shortcuts I-19
Topics button I-45
trace.conf file II-366
translation, address window II-66
Transmission Control Protocol I-337
transmission rates I-285
Triple DES I-111
troubleshooting
DNS II-147
Gopher proxy III-55
graphical user interface I-48, I-92
proxies III-19
Remote Web Administration I-170
secure LAN I-333
Secure Remote Management I-162
SMTP proxy III-221
SSH server I-181
VPN II-320
X11 proxy III-281
truss command I-320
trusted CAs II-276
tunable parameters
ICMPMASKREQ I-336
IP_SRCROUTING I-336
IPFORWARDING I-335
IPSENDREDIRECTS I-336
Passport One I-338
performance I-336
security I-335
TCP SYN flood defense I-340
TCP_FOREIGN_HASHBKTS I-337
TCP_KEEPIDLE I-336, I-337, I-338
TCP_LOCAL_HASHBKTS I-337
TCP_SECURE_ISS_BITS I-335
TCP_SECURE_ISS_DELTA I-335
tunnel, determine if session was tunneled II-246
twisted-pair cable I-345
type
activity II-344
suspicious-event I-250, II-331, II-362
TZ directory I-53, I-59
CyberGuard Firewall Manual
Index
U
UDP connections
RealAudio III-178
timeout II-24, II-47
UDP, see User Datagram Protocol proxy
udp-proxy command III-268
udp-proxy.conf file III-267
unbind, LDAP proxy operations III-118, III-123
UNIX passwords II-149, II-154, II-158, II-160
Unprivileged user II-149, II-154, II-156
update
interval I-286
software update alert II-332
UPS
alerts I-242
cables I-241
enabling I-244
Power Fail Support I-241
Power Fail Support window I-242
supported devices I-241
URL translation, proxy III-82
Use button I-15
caution I-15
User Datagram Protocol proxy III-261
configuring III-266
packet-filtering rules III-264
Ports page III-262
Servers page III-263
udp-proxy command III-268
udp-proxy.conf file III-267
useradd command II-183
userdel command II-183
usermod command II-183
users II-149
adding and changing II-170
Administrative II-149, II-154, II-156
auditing I-263, I-264
DEFAULT II-149, II-155, II-166, II-168, II-169
deleting II-171
Firewall Security Monitor II-149, II-154, II-156
Firewall Security Officer II-149, II-154, II-155
hiding with SMTP III-197
icons I-27
managing I-7
names II-156
Passport One II-166
Proxy II-149, II-154, II-155
Remote Group II-149, II-154, II-156
root I-322, II-157, II-328
setting defaults II-172
Unprivileged II-149, II-154, II-156
Users window II-153
CyberGuard Firewall Manual
/usr/bin/
pkginfo command I-31
putdev command I-343
/usr/bin/X11/
xlock command I-13
/usr/lib/firewall/proxy-toolkit/ directory III-171
/usr/lib/locale/TZ/ directory I-59, I-53
/usr/sbin/
init command I-338, I-339
newlvl command III-54, III-65, III-111, III-124,
III-133, III-142, III-153, III-160, III-169,
III-174, III-187, III-195, III-235, III-250,
III-259, III-268, III-280
nslookup command II-140
/usr/sbin/cyber/auditlogd command II-368
/usr/sbin/firewall/
clasd command II-206
config_dump command I-330
cyberctrl command I-11, I-31
daemon command II-207
dumpaliases command III-220
ept-proxy command III-133
eptstat command III-133
ftpd-proxy command III-41
genaliases command III-220
generic-proxy command III-173
gopherd-proxy command III-54
h323-proxy command III-65
httpd-proxy command III-111
ldap-proxy command III-124
mkcsr command II-210
mssql-proxy command III-142
named command II-139
nat command II-77
netguard command II-50
nntpd-proxy command III-153
notes-proxy command III-160
ntadd command II-208
ntaddstat command II-209
pg-proxy-mgr command III-169
ra-proxy command III-178
rcyberctrl command I-323
rlogind-proxy command III-187
sip-proxy command III-195
smtpd-proxy command III-221
sock5d command II-221
sqlnet-proxy command III-235
ssl-proxy command III-250
telnetd-proxy command III-259
udp-proxy command III-268
vpnctl II-317
vpnrpt command II-319
x11_hook-proxy command III-280
x11-proxy command III-280
Index-23
Index
/usr/ucblib/sendmail.cf file II-340
/usr/X/bin/xhost command I-160
/usr/X/lib/app-defaults/
CyberCtrl file I-11, I-237
CyberCtrl-color file I-11
CyberCtrl-mono file I-11
/usr/X/lib/system.mwmrc file I-11
/usr/X/lib/xdm/
Xdefaults-cyber file I-11
Xresources-cyber file I-11
Xsession-cyber file I-11
util.c file III-174
util.h file III-174
V
/var disk partition I-261, I-285
caution I-261
/var/adm/syslog file II-328
/var/audit/ directory I-261
/var/audit_logs/ directory II-328, II-342, II-343, I-251,
I-252, II-360
/var/audit_logs/old/ directory I-252, II-360
VBScript language blocking III-18, III-67, III-84
version, CyberGuard Firewall I-31, I-159
vi editor I-321
View Expanded Rules button II-22
virtual display III-271, III-272
Virtual Private Networks II-235
activities I-259, II-250, II-345
alerts II-250, II-332
CA certificates database file II-317
certificates II-269
CRL files II-316
firewall keypairs database files II-317
FTP II-255
FTP and NAT II-255
high availability II-252
IKE protection strategy configuration file II-307
IPSec protection strategy configuration file II-308
NAT II-31, II-235, II-247
NAT-T II-249, II-269
packet-filtering II-246
Pass Address II-254
Passport One II-250
reports II-250
secure channel configuration file II-309, II-311,
II-312, II-313, II-314
SmartProxies II-251, II-254
SPI II-271
sub-menu I-38
sub-menu shortcuts I-20
Index-24
troubleshooting II-320
VPN policy manager configuration file II-315
vpnctl command II-317
vpnrpt command II-319
virus scanning II-345, III-18
Voice-Over IP III-57
VoIP, see Voice-Over IP
voltage sensors I-239
VPN Client Configurations window II-262
VPN Controls
Options page II-280
Security Associations page II-281, II-282, II-288
VPN Secure Channels window II-264
VPN, see Virtual Private Networks
VPNCertAlert alert report file II-334
vpnctl command II-317
VPNIkeAlert alert report file II-334
VPNIntcpAlert alert report file II-334
VPNIPSecAlert alert report file II-334
vpnrpt command II-319
VPNX917TEST alert report file II-334
W
WAIS and proxy chaining III-76
warning messages, netguard II-61
Web III-67
Websense III-67, III-70
packet-filtering rules III-90
Websense, Inc. III-71, III-92, III-94
WebTrends I-276, II-325, II-330, II-342
WebTrends Audit Reports Window I-276
WebTrends Corporation I-276
window II-168
Activity Logs II-360
Activity Reports I-252
Alert Summary I-250
Alerts, Activities, and Archives II-326
anchoring I-12
Audit Logs Criteria I-261
Audit Logs Report I-261
Authorization Management I-194
Central Alert Display I-135
Central Management Choices I-124
Central Management Role I-115
Certificate Management II-292
Certificate Request II-290
Configuration History I-207
Configuration Tracking I-206
Configuration Tracking Ticket I-205
Console Messages I-245
Date and Time I-51
CyberGuard Firewall Manual
Index
Default FTP Operations II-168
Duty Choice I-199
Encryption I-122
File Selection I-29
Find I-30
Grouping II-10
Hardware Health I-237
Help I-45
Help History I-46
HelpSearch I-44
High Availability I-96
High Availability Monitor I-102
Host Names II-1
identifiers I-202
IKE Advanced Settings II-267
IKE Certificate Services II-277
IKE Protection Strategies II-256
Intrusion Detection II-224
IPSec Protection Strategies II-259
License Keys I-61
Logfile Time Dialog I-139
login I-47
Manual Key Configuration II-271
Network Address Translation II-66
Network Interfaces I-68
Network Names II-5
Network Ping Test I-279
Packet Filter Statistics I-287
Packet-Filtering Rules II-22
Passport One II-190
Performance Monitor I-294
Remote Web Administration I-168
Routing II-83
Save and Restore I-215
Secure Remote Management I-157
Secure Shell I-189
Security Options II-229
Shell I-310
SmartProxies III-5
SOCKS II-213
Software Update I-234
Split Domain Name System II-114
System Information I-246
System Manual Pages I-43
System Monitor I-289
System Shutdown I-35
System Statistics I-285
Target Alert Logs Reports I-139
Target Firewall Source I-129
Target Firewall Status I-132
UPS Power Fail Support I-242
Users II-153
VPN Client Configurations II-262
VPN Controls II-279
CyberGuard Firewall Manual
VPN Secure Channels II-264
wizard
CA Certificate Import II-298
Certificate Request II-290
Firewall Keypair Export II-296
Firewall Keypair Import II-293
World Wide Web III-67
WWW HTTP proxy, see Hypertext Transfer Protocol
proxy
WWW, see World Wide Web
X
X Window System proxy I-160, III-269
adding and changing connections III-275
configuring III-275, III-277
Connections page III-271
interface changes I-79
packet-filtering rules III-273
prioritizing connections III-276
Setup page III-270
troubleshooting III-281
x11_hook-proxy command III-280
x11-proxy command III-280
x11-proxy.conf file III-278
X.500 III-113
X.500 Directory III-113
X.509 II-242
X.509 certificate I-163, II-188
X11, see X Window System proxy
x11_hook-proxy command III-280
x11-proxy command III-280
x11-proxy.conf file III-278
Xdefaults-cyber file I-11
xhost command I-160
xlock command I-13
X-Proxy header for mail III-200, III-214
Xresources-cyber file I-11
X-Sender III-197
Xsession-cyber file I-11
Index-25
Index
Index-26
CyberGuard Firewall Manual