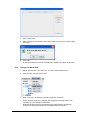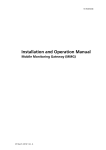
1
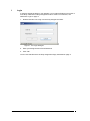
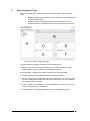
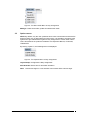
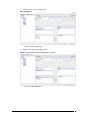
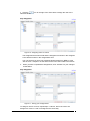
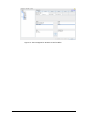
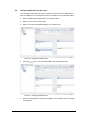
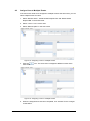
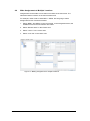
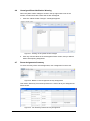
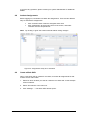
TD 92904EN
User Manual
Duty Assignment
Cardiomax
26 March 2012 / Ver. B
User Manual
Duty Assignment, Cardiomax
TD 92904EN
Content
Intended use of the product ............................................................................................. 1
1
Login ............................................................................................................................ 2
2
Duty Assignment Page............................................................................................... 4
3
Duty Assignment Menu .............................................................................................. 5
3.1 Assignment Menu.............................................................................................. 5
3.2 Work shifts Menu .............................................................................................. 5
3.3 Options menu .................................................................................................... 6
4
Duty Assignment Client ............................................................................................. 7
4.1 Assign Values to Rooms and Users .................................................................. 7
4.2 Assign multiple users to an event.................................................................... 11
4.3 Assign a User to Multiple Events ..................................................................... 12
4.4 Make Assignments to Multiple Locations ........................................................ 13
4.5 Assign Users from a Top Level Location ........................................................ 15
4.6 Unassigned Event Notification Warning .......................................................... 16
4.7 Room Assignments Summary......................................................................... 16
4.8 Activate Assignments ...................................................................................... 17
4.9 Create a Work Shift ......................................................................................... 17
4.10 Change the Work Shift .................................................................................... 18
4.11 Update the Work Shift ..................................................................................... 19
Ascom (Sweden) AB
Grimbodalen 2
SE-417 49 Göteborg
Sweden
26 March 2012 / Ver. B
Intended use of the product
The intended use of the Ascom Cardiomax is to provide an interface with clinical
systems to forward information associated to the particular event to the designated
display device(s).
For medical, near real time alarms, the Ascom Cardiomax is intended to serve as a
parallel, redundant, forwarding mechanism to inform healthcare professionals of
particular medical related events. Ascom Cardiomax does not alter the behavior of
the primary medical devices and associated alarm annunciations. The display
device provides a visual, and/or audio and/or vibrating mechanism upon receipt of
the alert.
26 March 2012 / Ver. B
1
1
Login
A shortcut shall be located on your desktop. It is an Internet Explorer icon which is
most likely called Ascom Duty Assignment Client. If there is no shortcut, see
Alternative Login on page 3.
1. Double-click this icon to log in to the Duty Assignment Client.
Figure 1. The Login dialogue.
2. Enter your assigned User ID and Password.
3. Click “OK”.
You are now transferred to the Duty Assignment Page, described on page 4.
26 March 2012 / Ver. B
2
Alternative Login
This section is only valid if the shortcut is not on your desktop.
1. Open a web browser (i.e. Internet Explorer) and do one of the following:
• in the menu, click “Favorites” and select “Duty Assignment Client”
• enter the IP address for the Cardiomax.
Note: Your system administrator should have this IP address.
Figure 2. The default start page of the Cardiomax
4. Click “Duty Assignment”. It will take you to the Login dialogue, see Figure 1.
Click the About button for information about software version and manufacturer
name and address.
26 March 2012 / Ver. B
3
2
Duty Assignment Page
After a successful login, the Duty Assignment page will open. This is the “Main
Page”.
•
•
Bold font implies that you have access to assign users to locations and
their associated events.
Regular text font implies that you have access to assign users to
locations and their associated events on a lower level in the structure.
Figure 3. The Duty Assignment page
The Duty Assignment page is divided into the following areas:
A. Layout – Describes the configured layout of your facility. This may include
building wings or floors as well as sub-categories of rooms.
B. Assignments – Displays the assigned users for the selected location.
C. Events – Displays the available events for the selected location.
D. Levels – Events have multiple levels that you must assign users. This is in case
the text message alert is not taken care of at the first level. It is then escalated
up to higher levels as needed.
E. Users – Displays the available users for the assignment. It is up to you to know
who is on duty and who is unavailable.
F. Assigned Users – Displays the selected users for the applicable events.
26 March 2012 / Ver. B
4
3
Duty Assignment Menu
3.1
Assignment Menu
By clicking “Assignment”, a drop-down list will be displayed. The items in the list are
briefly described below.
Figure 4. The Assignment Menu in the Duty Assignment window.
Activate: Activates your changes in the Duty Assignment page.
Clear: Removes the assignments belonging to the selected location only.
Clear All: Removes the assignments belonging to the selected location and all
locations below this one.
Unassigned Events: Displays all locations where events are not assigned. An
empty list is shown if all assignments are done.
Summary: Displays an overview of all assignments.
Log out: Ends your session.
3.2
Work shifts Menu
To facilitate changes in the duty assignment, it is possible to create work shifts for a
location.
When a new work shift has been created it is added to the Work shifts menu, see
below. From this menu the work shift can later be selected and loaded for the
location it was created for.
18 juni 2012 / Ver. PB
5
Figure 5. The Work shifts Menu in Duty Assignment
Manage: Create work shifts, update and delete work shifts.
3.3
Options menu
NOTE: By default, only the user sysadmin has access to these items and therefore
these functions are not described in this document. It is possible to change access
rights and to give administrator rights for Duty Assignment to certain User Teams.
This is described in the products Installation and Operation Manual, Cardiomax,
TD92901EN.
By clicking “Options”, the following items are displayed.
Figure 6. The Options Menu in Duty Assignment.
Layout Setup: Configures the Duty Assignment.
Auto Activate: Sets a time for automatic activation.
Note: Note that changes to “Auto Activate” will not take effect until next login.
26 March 2012 / Ver. B
6
4
Duty Assignment Client
In this chapter we will describe how to use the Duty Assignment Client.
4.1
Assign Values to Rooms and Users
In this example we have the possibility to assign values to ICU2, BED1, BED2 and
BED3.
You shall assign Users for a Monitor Alarm from BED1. Joan Jett, Mark Knopfler
and Tracy Chapman are working this shift.
•
•
•
Joan Jett will be the 1st level contact
Mark Knopfler will be the 2nd level contact
Tracy Chapman will be 3’rd level contact
Note: Currently, they are the only three users’ names listed in the Users area.
Please be aware that there may be more user names listed that are not
currently working. Always confirm current shift staff before completing shift
assignments.
1. Select “Monitor Alarm” in the Events area.
Note: Different levels will appear once you have selected an event. In this
example, Level 1, Level 2 and Level 3 appear when you have selected the
event.
Figure 7. Selecting Events
26 March 2012 / Ver. B
7
2. Select “Level 1” in the Levels area.
Figure 8. Selecting Levels
3. Select “Joan Jett” in the Users area.
Note: Values should now be highlighted in 3 areas.
Figure 9. Selecting Users
26 March 2012 / Ver. B
8
4 Click the
selected values.
icon to the right of the Users area to assign the user to the
Figure 10. Assigning users to events.
The assignment has been made and the assignment is shown in the Assigned
Users area as well as in the Assignments area.
You can see that you have now assigned “Monitor alarm from BED1 to Joan
Jett as Level 1 recipient”. Do the same for the rest of the locations and events.
4. When you have completed the assignments, click “Activate” for your changes
to take effect.
Figure 11. Saving your assignments
To assign a user for Level 2, repeat steps 1-5 above, but for the user to be
assigned for Level 2. Level 3 is assigned in the same way.
26 March 2012 / Ver. B
9
Figure 12. Users assigned for all three Levels for BED1.
26 March 2012 / Ver. B
10
4.2
Assign multiple users to an event
You can assign more than one user to an event so that the text message will be
sent to multiple users. Just select the users you would like for the specific values.
1. Select “Mobile Assist request CNA” in the Events area.
2. Select “Level 1” in the Levels area.
3. Select “Joan Jett” and “Mark Knopfler” in the Users area.
Figure 13. Assigning multiple users.
4. Click the
icon. The users are listed in the Assignments area.
Figure 14. Assigning multiple users
5. When the assignments have been completed, click “Activate” for the changes
to take effect.
26 March 2012 / Ver. B
11
4.3
Assign a User to Multiple Events
If the same user needs to be assigned to multiple events at the same level, you can
select multiple events at a time.
1. Select “Monitor Alarm”, “Mobile Assist Request CNA” and “Mobile Assist
Request RN” in the Events area.
2. Select “Level 1” in the Levels area.
3. Select “Mark Knopfler” in the Users area.
Figure 15. Assigning a user to multiple events
4. Click the
same level.
icon. The same user is assigned to different events of the
Figure 16. Assigning a user to multiple events
5. When the assignments have been completed, click “Activate” for the changes
to take effect.
26 March 2012 / Ver. B
12
4.4
Make Assignments to Multiple Locations
Assignments can be made to more than one location at the same time. The
selected locations must be on the same location level.
For example, under ICU2 we have BED1 – BED3. We are going to make
assignments to two of these three beds.
1. Select “BED1” and “BED2” in the Layout area. In the Assignments area, the
available events for these locations are visible.
2. Select “Monitor Alarm” in the Events area.
3. Select “Level 1” in the Levels area.
4. Select “Joan Jett” in the Users area
Figure 17. Making assignments to multiple locations
26 March 2012 / Ver. B
13
5. Click the
icon. The same user is assigned to different locations on the
same level. The same user you assign to the level will show up in multiple
locations, as shown below with “Joan Jett”.
Figure 18. Making assignments to multiple locations
6. When the assignments have been completed, click “Activate” for the changes
to take effect.
26 March 2012 / Ver. B
14
4.5
Assign Users from a Top Level Location
Assignments can also be done from a higher location level. As an example, by
selecting “ICU2”, assignments can be made to events that are common to all
locations under ICU, which in this case means BED1, BED2 and BED3.
1. Select “ICU2” in the Layout area.
2. Select “Monitor Alarm” in the Events area.
3. Select “Level 1” in the Levels area.
4. Select “Joan Jett” in the Users area.
icon. The same user is assigned to “Monitor Alarm” of Level 1
5. Click the
in ICU2 including BED1, BED2 and BED3.
6. When the assignments have been completed, click “Activate” for the changes
to take effect.
Figure 19. Assigning users from a top level location
Note: Assignments performed at a higher level cannot be changed at the lower
level. They will be in bold print. If you try to change the assignments from a
sub-level, you will get an alert message.
Figure 20. Alert message
In order to change them, return to the higher level and change it there.
26 March 2012 / Ver. B
15
4.6
Unassigned Event Notification Warning
When the yellow caution triangle is shown in the top right-hand corner of the
window, it means there are events that are left unassigned.
1. Click the “Yellow Caution Triangle”. A dialogue appears.
Figure 21. Clicking on the yellow caution triangle.
2. Click any of those values in the Unassigned Events column, and you will see
what is still requiring assignment.
4.7
Room Assignments Summary
To see a summary of the room assignments, click “Assignment” in the menu.
Figure 22. Where to click Assignment in Duty Assignment.
Then select “Summary” from the drop-down list. A view of all of your assignments
will be shown.
Figure 23. The Summary window in Duty Assignment.
26 March 2012 / Ver. B
16
If you have any questions, please contact your system administrator for additional
details.
4.8
Activate Assignments
Before logging out, remember to activate the assignments. There are two different
ways to activate the assignments:
•
•
Click “Activate” button under the Assigned Users area
Click “Assignment” at the top left corner of the screen, and select
“Activate” from the drop-down list.
Note: By clicking “Logout” the session will end without saving changes.
Figure 24. Assignments ready to be activated.
4.9
Create a Work Shift
When a new work shift is created for a location, it inherits all assignments for that
location and its sub location.
1. Select for which location you want to create the new work shift. In this example
ICU2 is selected.
2. Select “Work shifts” in the menu bar.
3. Click “Manage…”. The Work shifts window opens.
26 March 2012 / Ver. B
17
4. Click “Create new”.
5. Enter a name for the new work shift. In this example we want to create a Night
work shift.
6. Click “OK”.
A new work shift has now been created and is added to the Work shifts menu.
4.10
Change the Work Shift
1. Select “Work shifts” in the menu bar. The Work shifts window opens.
2. Click the work shift you want to edit.
3. Click “Yes” in the Confirmation window to load the work shift.
4. When you have made your changes and completed the assignments, click
“Activate” for your changes to take effect.
Note that the work shift is now activated and running with the assignment
changes, but the work shift itself is not updated with the changes.
26 March 2012 / Ver. B
18
4.11
Update the Work Shift
If you want your changes to be permanent, you need to update the work shift.
1. Select “Work shifts” in the menu bar.
2. Click “Manage…”. The Work shifts window opens.
3. Select work shift and click “Update”.
4. Click “Yes” in the Confirmation window to update the database. The work shift
is now updated with your changes.
26 March 2012 / Ver. B
19